supervisor embedded for konica minolta - monitorbm.comsupervisor embedded for konica minolta ...
TRANSCRIPT

Supervisor Embedded forKonica Minolta
www.monitorbm.com
Installation and User Guide

The software contains proprietary information of MonitorBusiness Machines Ltd. It is provided under a licenseagreement containing restrictions on use anddisclosure and is also protected by copyright law.Reverse engineering of the software is prohibited.
Information in this document is subject to changewithout notice. Companies, names, and data used inexamples herein are fictitious unless otherwise noted.No part of this document may be reproduced ortransmitted in any form or by any means, electronic ormechanical, for any purpose, without the express writtenpermission of Monitor Business Machines Ltd.
All rights reserved. No part of this work may bereproduced in any form or by any means - graphic,electronic, or mechanical, including photocopying,recording, taping, or information storage and retrievalsystems - without the written permission of thepublisher.
While every precaution has been taken in thepreparation of this document, the publisher and theauthor assume no responsibility for errors oromissions, or for damages resulting from the use ofinformation contained in this document or from the useof programs and source code that may accompany it. Inno event shall the publisher and the author be liable forany loss of profit or any other commercial damagecaused or alleged to have been caused directly orindirectly by this document.
Monitor Business Machines Ltd.31a Normanby Road,Mt Eden, Auckland 1024,NEW ZEALAND
Published: 3/04/2014
Supervisor Embedded for Konica Minolta
Copyright © 2014 Monitor Business Machines Ltd
The Monitor Logo and Supervisor™ are registeredtrademarks of Monitor Business Machines Ltd.
Any other products that are referred to in this documentmay be either trademarks and/or registered trademarksof the respective owners. The publisher and the authormake no claim to these trademarks.

iContents
Contents
Introduction 1
System Requirements 2
Licensing 3
Architecture Overview 4
Installation 5
................................................................................................................................... 5Installing
................................................................................................................................... 6After Installation
Configuration 7
................................................................................................................................... 7MFP Configuration
......................................................................................................................................................... 7Machine Menu
......................................................................................................................................................... 11Web Administration
................................................................................................................................... 15MFP Driver Settings
................................................................................................................................... 17System Settings
......................................................................................................................................................... 17Server IP Address
......................................................................................................................................................... 18Comms Timeout
......................................................................................................................................................... 18Listening Ports
.................................................................................................................................................. 18Authentication
.................................................................................................................................................. 18Pull Print
.................................................................................................................................................. 18MFP
.................................................................................................................................................. 18IDPort
......................................................................................................................................................... 18Locale
.................................................................................................................................................. 18Currency
.................................................................................................................................................. 18Paper Size Units
......................................................................................................................................................... 18Scan To Me
.................................................................................................................................................. 18FTP Server
.................................................................................................................................................. 19FTP Port
.................................................................................................................................................. 19FTP Username
.................................................................................................................................................. 19FTP Passw ord
.................................................................................................................................................. 19FTP Path
.................................................................................................................................................. 19Local Path
................................................................................................................................... 19Terminal Settings
................................................................................................................................... 21Terminal Setup Settings
......................................................................................................................................................... 21User Validation Method
......................................................................................................................................................... 22Auto Release Print Jobs
......................................................................................................................................................... 22Release Print Job Less Than
......................................................................................................................................................... 22Bypass PIN Entry On Card Sw ipe
......................................................................................................................................................... 22Disable Self-Registration
......................................................................................................................................................... 22Enable Function Selection
......................................................................................................................................................... 22Default Function
......................................................................................................................................................... 23Enable Default Primary
......................................................................................................................................................... 23Register, Unregister
......................................................................................................................................................... 23Disable Colour Copying
......................................................................................................................................................... 23Card Reader Type
......................................................................................................................................................... 23Pad To Number Length
......................................................................................................................................................... 23Admin Passw ord
......................................................................................................................................................... 23Application Button Caption
Contentsii
......................................................................................................................................................... 23Public User Functions
................................................................................................................................... 23Email Notifications of Server Restarts
......................................................................................................................................................... 24Host
......................................................................................................................................................... 24Port
......................................................................................................................................................... 24Username
......................................................................................................................................................... 24Passw ord
......................................................................................................................................................... 24From Address
......................................................................................................................................................... 24To Address
Using the Open API application 26
................................................................................................................................... 26User Validation
......................................................................................................................................................... 28Pin Entry
......................................................................................................................................................... 28Changing the PIN
................................................................................................................................... 29Secondary validation
................................................................................................................................... 30Session Screen
................................................................................................................................... 31Using Print Release
......................................................................................................................................................... 31Info or Job Details
......................................................................................................................................................... 32Deleting Jobs
......................................................................................................................................................... 32Printing Jobs
................................................................................................................................... 32Ending the session

1Introduction
Introduction
This manual describes Monitor's Konica Minolta OpenAPI embedded solution for SupervisorNet. This product allows you to restrict access to Konica Minolta multi-function printers(MFPs), using the MFP screen to prompt users for authentication information before allowingthem to use the device. It also provides optional prompting or search for secondaries,depending on the settings on the primary account. Once the device has been enabled the usercan carry out copying, scanning, or faxing. All activity is accounted for through Supervisor Net.

System Requirements2
System Requirements
· Windows XP or later.
· Supervisor Net version 5.6.1 or later
In order to use the print release functionality of the product one of the following print releasesystems must be installed for use with Supervisor Net:
· Monitor Print (For print release functionality)
The product requires version 3.5 of the .Net framework. An installer for this is included in theinstallation, and will be run if needed. The .Net framework in turn requires version 3.1 or later ofthe Microsoft Windows installer. Version 3.1 is included in the installation package, and will berun if necessary.
The installer installs a Windows service running under the local system account. Once it hasbeen installed, a set of new user interface components in Supervisor Administrator will beenabled to allow configuration of the software.

3Licensing
Licensing
The system uses the standard Supervisor Net registration system. A new terminal type,"KMO", has been created for this purpose. A new terminal model type called Konica Minolta Embedded has been implemented in the unitsetup record. All KM MFPs to be used with the system must be configured to have a unitsetup type with this model type. An example setup type called KMO SETUP has beensupplied to model any user defined setup types on, or can simply be used itself.

Architecture Overview4
Architecture Overview
The OpenAPI software comprises a number of components, some of which run on the server,and some on the individual MFPs.
The server software comprises one major component - Supervisor Net Open API Windowsservice.
The software installed on the MFPs consists of two applications:1. An authentication application.
This is responsible for validating user logon or card details against the server, and unlockingthe copier if the user has sufficient funds to do copies or release print jobs.
2. A "Pull Print" application. This allows an authenticated user to view a list of their print jobs held on the server, and torelease or delete some or all of them.
The functioning of the software involves the transmission of SOAP messages between theMFPs and the server. In most cases, the MFP will initiate the communication by sendingrequests (e.g. authenticate a user, get a list of print jobs, and so on) to the Supervisor NetOpen API Server. This server will then normally interact with Supervisor Net to to get therequired information, and will send a response back to the MFP.
In some cases, the MFP acts as the server, and processes a request from the Supervisor NetOpen API service. This will be the case, for example, if the Supervisor Net server receivescard swipe information from an IDPort network card reader.
It is assumed that, whoever initiates a request, communication will be encrypted using SSL.The server software will do this automatically. Individual MFPs will need to be configured touse SSL.
5Installation
Installation
Installing
1. Run the installation package called SupervisorNetOpenAPISetup.exe.
During the installation process, If you do not have Windows Installer 3.1 and/or Microsoft .Netframework 3.5, their installers will automatically run as part of the setup procedure. As bothare requirements, they will need to be installed on your system.
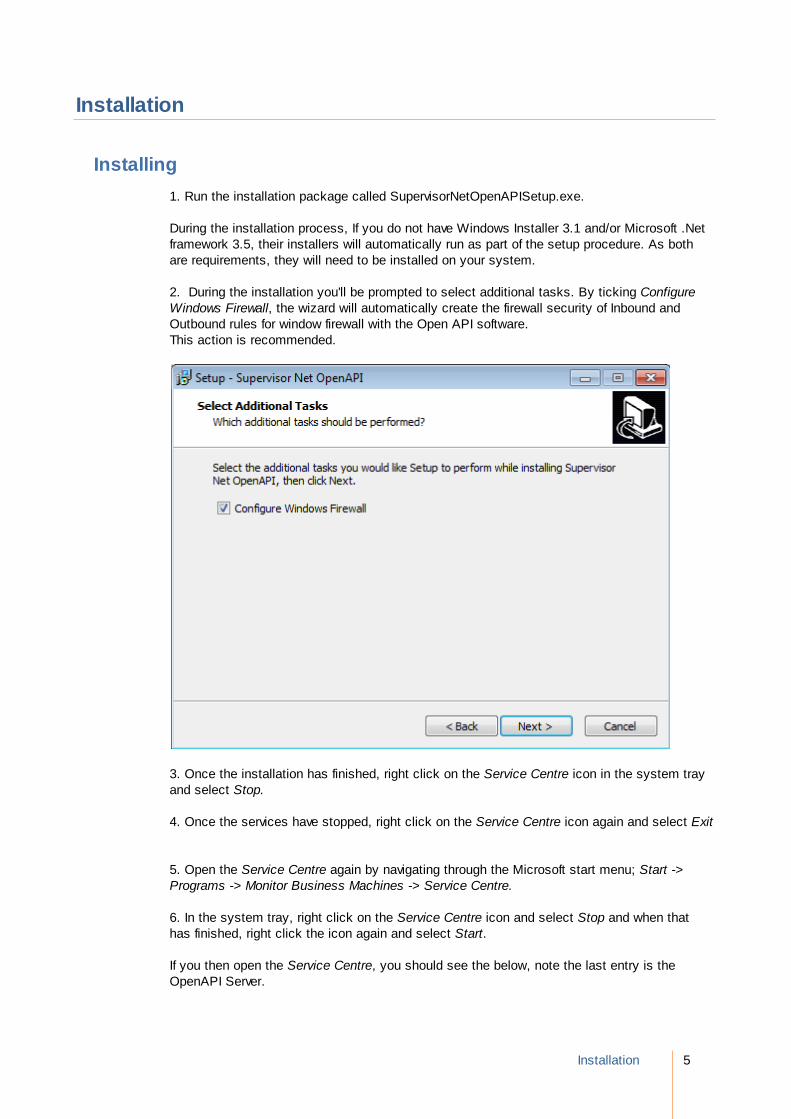
2. During the installation you'll be prompted to select additional tasks. By ticking ConfigureWindows Firewall, the wizard will automatically create the firewall security of Inbound andOutbound rules for window firewall with the Open API software. This action is recommended.
3. Once the installation has finished, right click on the Service Centre icon in the system trayand select Stop.
4. Once the services have stopped, right click on the Service Centre icon again and select Exit
5. Open the Service Centre again by navigating through the Microsoft start menu; Start ->Programs -> Monitor Business Machines -> Service Centre.
6. In the system tray, right click on the Service Centre icon and select Stop and when thathas finished, right click the icon again and select Start.
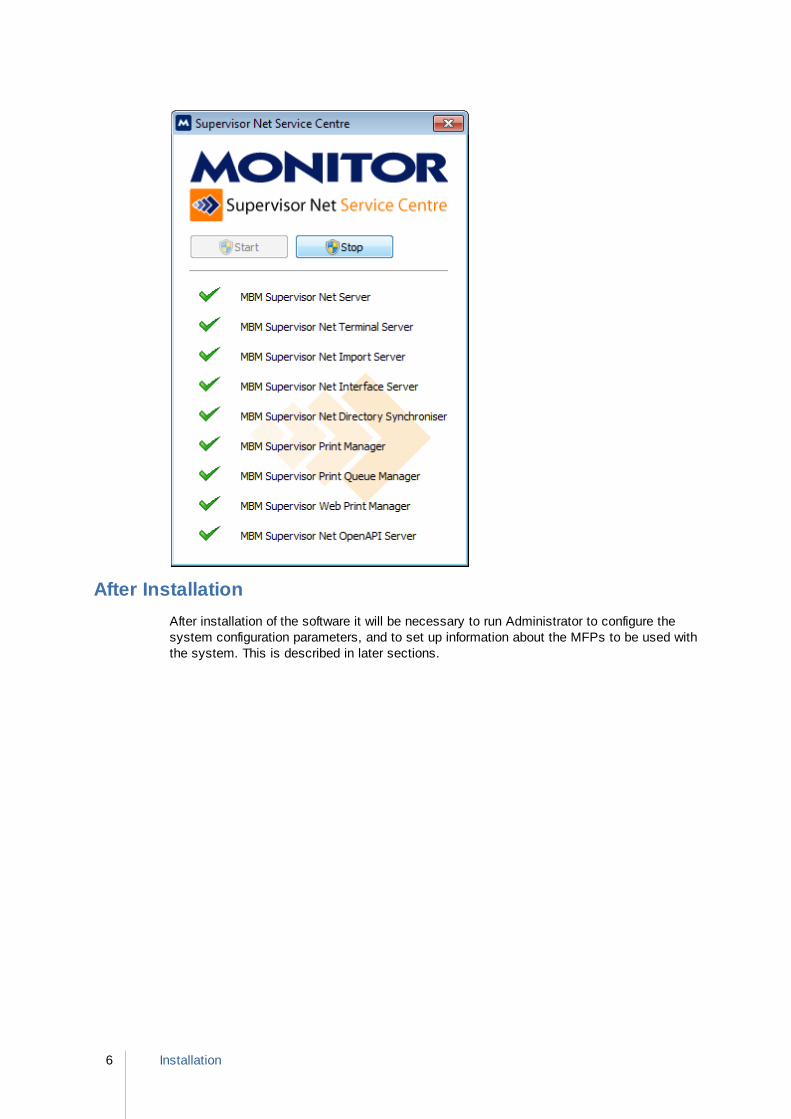
If you then open the Service Centre, you should see the below, note the last entry is theOpenAPI Server.
Installation6
After Installation
After installation of the software it will be necessary to run Administrator to configure thesystem configuration parameters, and to set up information about the MFPs to be used withthe system. This is described in later sections.

7Configuration
Configuration
MFP Configuration
This section describes how to configure the MFP in order to allow the OpenAPI to beconfigured and installed on the MFP.
Machine Menu
These are the steps required on the MFP itself.
1. When you press Utility/Counter on the right hand side, it will bring up the following menu.
2. Pressing 8 Device Information you will get the details below. The IP address is used forweb administration and terminal setup in Supervisor Net.

Configuration8
3. Click Close then 3 Administrator Settings
4. You will be asked for the administrator password, enter this and press OK
You will be presented with the below screen, this is the bottom level for the next few options. The navigation is on the left hand side.
9Configuration
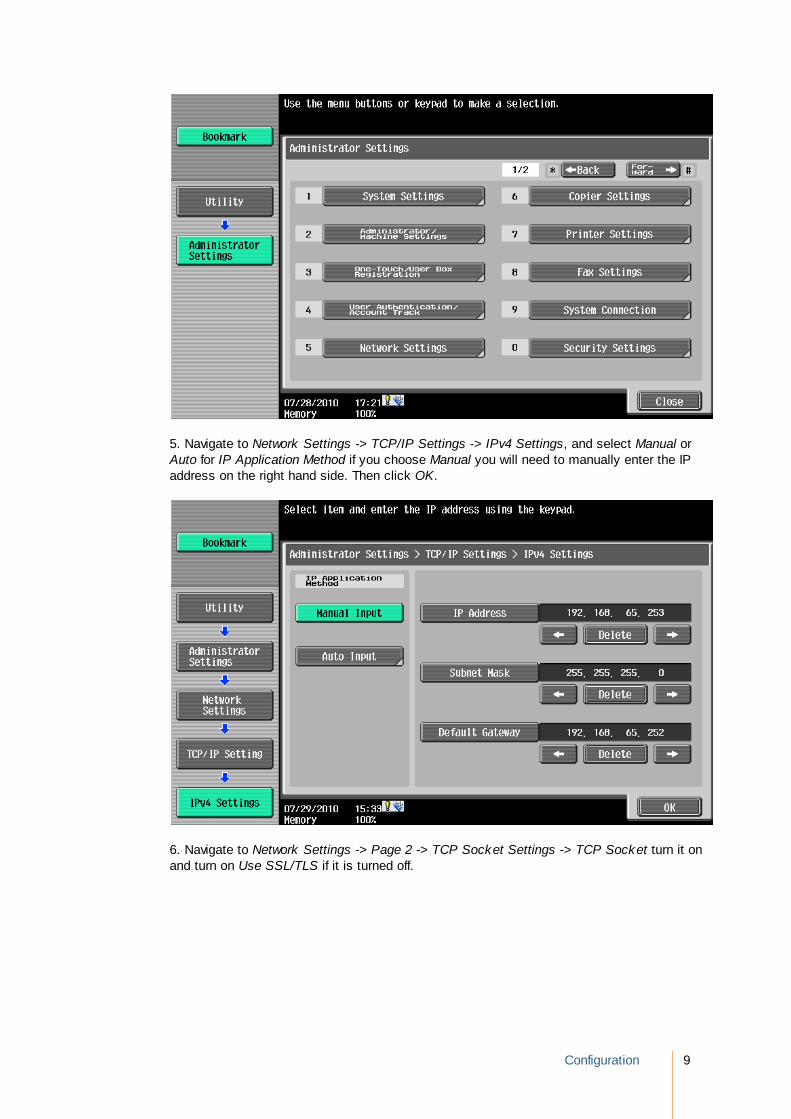
5. Navigate to Network Settings -> TCP/IP Settings -> IPv4 Settings, and select Manual orAuto for IP Application Method if you choose Manual you will need to manually enter the IPaddress on the right hand side. Then click OK.
6. Navigate to Network Settings -> Page 2 -> TCP Socket Settings -> TCP Socket turn it onand turn on Use SSL/TLS if it is turned off.
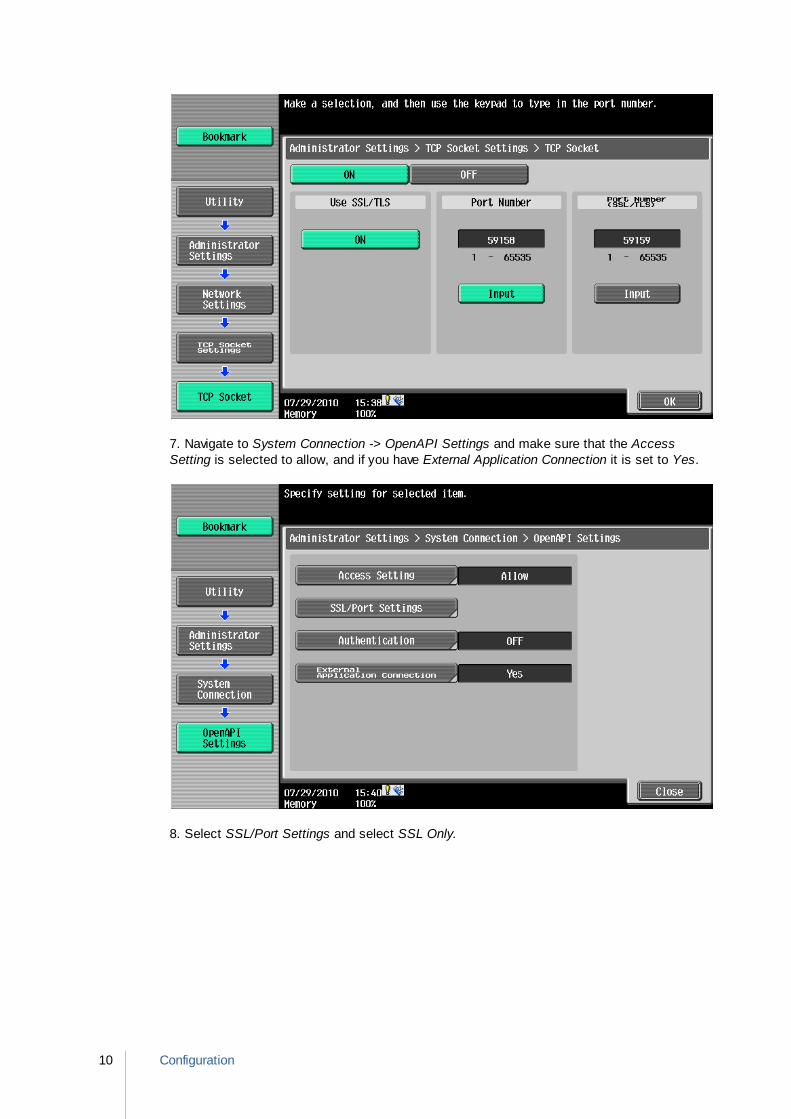
Configuration10
7. Navigate to System Connection -> OpenAPI Settings and make sure that the AccessSetting is selected to allow, and if you have External Application Connection it is set to Yes.
8. Select SSL/Port Settings and select SSL Only.

11Configuration
At some points you will be requested to restart the machine, and other to wait and not poweroff. Please follow all machine instructions explicitly.
Web Administration
To modify the MFP's configuration browse to the machines IP address. The following page willbe displayed in your web browser.
1. Enter in the Administrator Password, and click on OK.
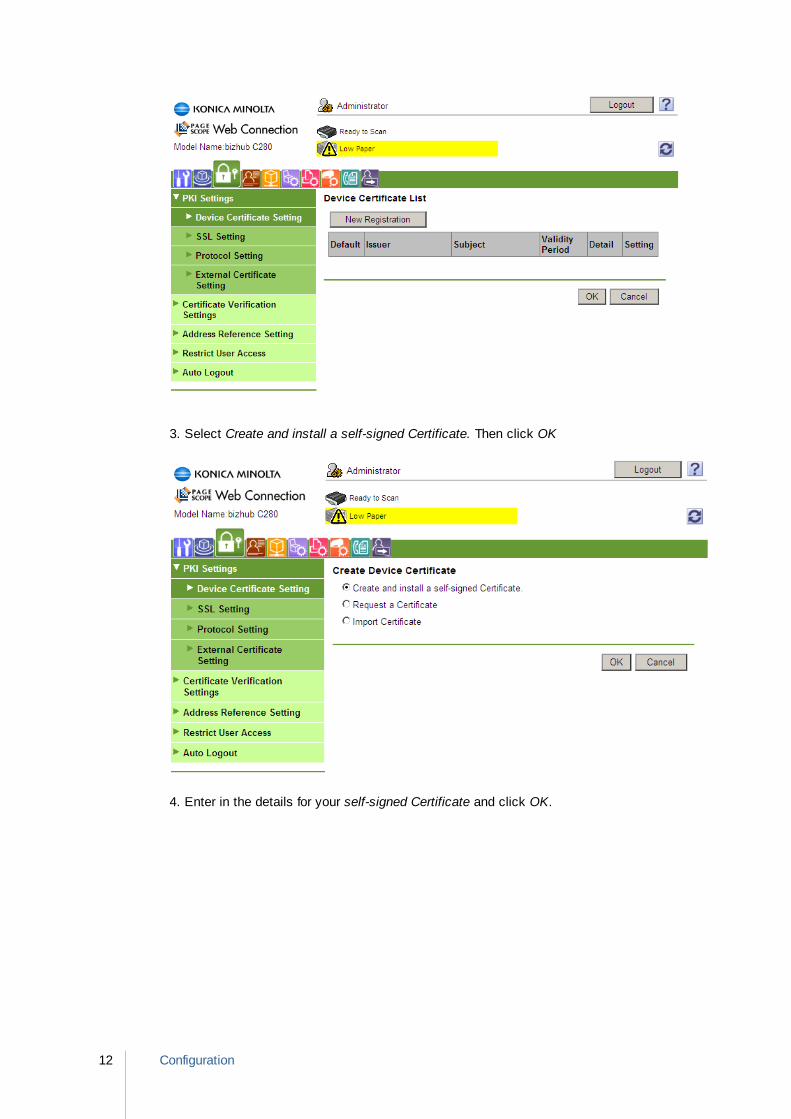
2. Click on the Security icon, then select New Registration.
Any existing certificates must be deleted in order for the new certificate to be recognizedas the default.
Configuration12
3. Select Create and install a self-signed Certificate. Then click OK
4. Enter in the details for your self-signed Certificate and click OK.

13Configuration
The following message will then show:
5. Once the certificate has been created, the below message will display, click OK.
You can now see your certificate that has been installed. To view information about it you canclick Detail. Clicking Setting will allow you to remove or export this certificate.

Configuration14
6. Add the TCP Socket and SSL Port to the new certificate in the Security tab then PKISettings then Protocol Settings.
7. Add the TCP and SSL Socket Settings to the certificate in the Network tab then TCPSocket Setting section. Tick the TCP Socket and SSL options.

15Configuration
8. Once that has been done, click OK then Logout.
MFP Driver Settings
It is necessary to alter certain settings in the driver on the print server to allow print jobs to besent to the device once the embedded application is being used. If this step is not followed,the blue light will flash momentarily on the MFP when a print job is sent to it, but the job willnot print out.
1. Open the driver properties, and go to the Configure tab.2. Click the button Obtain Settings...

Configuration16
3. Disable the option called Auto and click OK
4. Scroll down the Device Option list until you find User Authentication. Change this settingto Disable using the drop down list below.

17Configuration
5. Click OK to save this and exit.
System Settings
The global settings are accessed from the Tools -> Supervisor Net Settings in Administrator or
the icon:
When the software has been installed, a new tab labeled Open API is added to the settingswindow:
Server IP Address
This is the IP address which the MFPs will use to communicate to the server. It will initially beset to the first IP address of the server machine. If the server has more than one address, this

Configuration18
may not be the correct one, in which case the value will need to be changed manually.
Comms Timeout
This is the time in milliseconds after which the MFP will decide that communications with theserver have timed out, and will abondon the current request. If the value is changed, it will benecessary to re-register the application on the MFPs.
Listening Ports
Authentication
The port on which the server listens for authentication requests from MFPs.
Pull Print
The port on which the server listens for print job requests from the MFPs.
MFP
The port on which the MFPs will listen for instructions from the server. This must be configuredon the MFP when it is set up for OpenAPI. It is used when the MFP needs to be told torequest a registration screen for an unknown card number.
IDPort
The port on which the server listens for card swipe information from the IDPort server. Thismust be the same as the port in the external server URL configured in the IDPort UI.
Locale
Currency
The three digit currency code for the current location. This is used for display purposes on theMFP.
Paper Size Units
Choose your paper size unit from either Metric or Inches.
Scan To Me
The following configuration options are for the 'Scan to Me' functionality, which enables theuser to scan documents on the MFD to their network Home Folder.The user's home folder is defined in their primary record. The home folder location can besynchronised from LDAP and written to the user's record.After the MFD has scanned the document and written it to the FTP location, the server picksthe document up and copies it to the user's Home Folder location.
The server must therefore have access to both the FTP location (Local Path) and the user'sHome Folder location. Access to the home folder location is configured in Supervisor NetSettings -> Server Tab.
FTP Server
The FTP server address that the MFD will connect to after the user has scanned their job.
19Configuration
FTP Port
The FTP server's port number. This is 21 by default.
FTP Username
The credentials for the MFD to use when logging into the FTP server.
FTP Password
The password for the account.
FTP Path
The path on the FTP server that the MFD will transmit the documents to.
Local Path
The path relative to the Supervisor Net server where the documents are located.
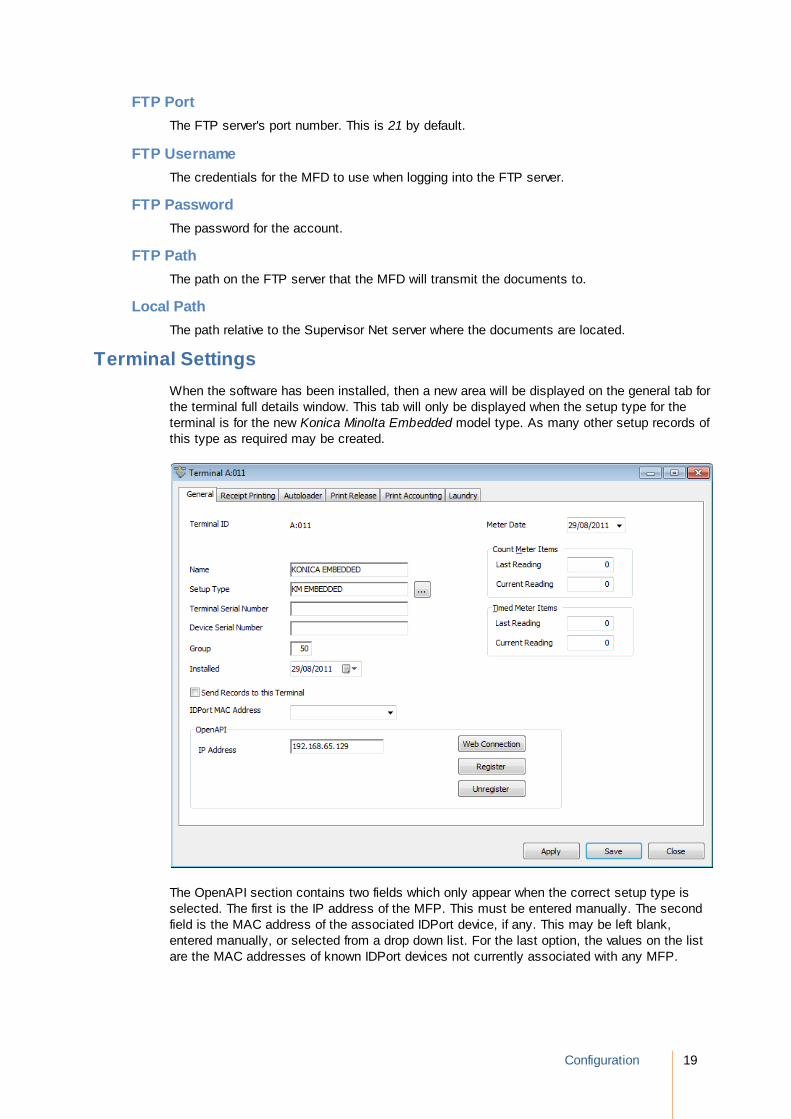
Terminal Settings
When the software has been installed, then a new area will be displayed on the general tab forthe terminal full details window. This tab will only be displayed when the setup type for theterminal is for the new Konica Minolta Embedded model type. As many other setup records ofthis type as required may be created.
The OpenAPI section contains two fields which only appear when the correct setup type isselected. The first is the IP address of the MFP. This must be entered manually. The secondfield is the MAC address of the associated IDPort device, if any. This may be left blank,entered manually, or selected from a drop down list. For the last option, the values on the listare the MAC addresses of known IDPort devices not currently associated with any MFP.

Configuration20
The Register button downloads the applications to the MFP and turns authentication on. TheUnregister button turns authentication off at the MFP, and removes the applications from it.
The Web Connection button will open a web browser window and automatically navigate to theIP address of the MFP.

21Configuration
Terminal Setup Settings
When the software has been installed, a new tab called Open API will be displayed. This tabwill only be displayed when the model type is Konica Minolta Embedded.
Inside the Open API tab are all the options specific to the Open API embedded application.
User Validation Method
· If Prompt for Number is checked, the initial login screen on the MFP will display a text boxfor entry of the user's primary number.
· If Prompt for ID is checked, the initial login screen on the MFP will display a text box forentry of the user's primary ID.
· If both boxes are checked, the user will have the option as to which method to use to log in -primary number or primary ID.
Configuration22
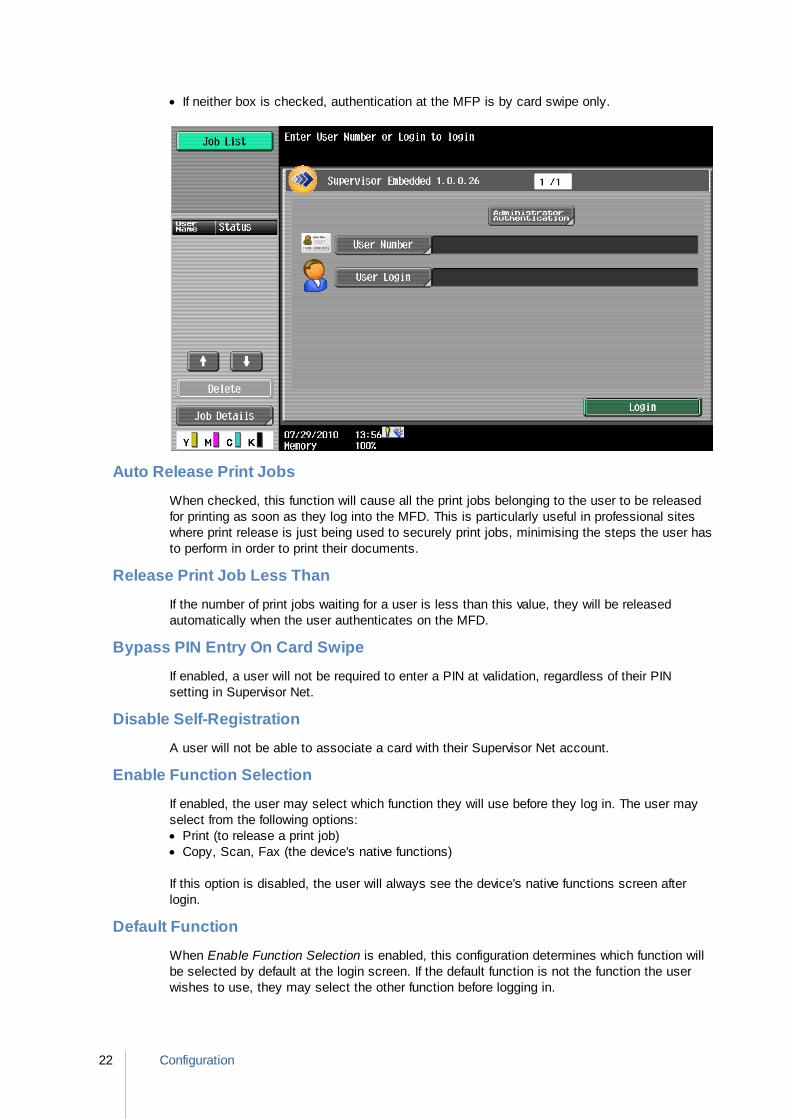
· If neither box is checked, authentication at the MFP is by card swipe only.
Auto Release Print Jobs
When checked, this function will cause all the print jobs belonging to the user to be releasedfor printing as soon as they log into the MFD. This is particularly useful in professional siteswhere print release is just being used to securely print jobs, minimising the steps the user hasto perform in order to print their documents.
Release Print Job Less Than
If the number of print jobs waiting for a user is less than this value, they will be releasedautomatically when the user authenticates on the MFD.
Bypass PIN Entry On Card Swipe
If enabled, a user will not be required to enter a PIN at validation, regardless of their PINsetting in Supervisor Net.
Disable Self-Registration
A user will not be able to associate a card with their Supervisor Net account.
Enable Function Selection
If enabled, the user may select which function they will use before they log in. The user mayselect from the following options:· Print (to release a print job)· Copy, Scan, Fax (the device's native functions)
If this option is disabled, the user will always see the device's native functions screen afterlogin.
Default Function
When Enable Function Selection is enabled, this configuration determines which function willbe selected by default at the login screen. If the default function is not the function the userwishes to use, they may select the other function before logging in.

23Configuration
Enable Default Primary
If enabled, the Primary record configured here will be the only Primary number that can bevalidated at the device. The user will not be able to validate against any other account, insteadthey simply press the Login button and will be prompted to enter a Secondary account. Thedefault Primary record must be configured to prompt for a Secondary account.This feature can be used when a site only charges transactions to Secondary accounts, andtherefore recording a transaction against a Primary account is not required.
Register, Unregister
The Register and Unregister buttons perform the same function as on the terminal screen, butfor all MFPs belonging to the setup type. Registering or un-registering the applications fromthe terminal setup screen gives the advantage of being able to update all the copiers on thesite from the one place.
Disable Colour Copying
When checked this disables the ability to copy documents in colour. Users are still able toScan and print in colour on this device.
Card Reader Type
Select the card reader that will be used for validation. Note that if an ID Port will be used, thisconfiguration is ignored.
Pad To Number Length
If enabled, the configured number length will determine how many leading zeros may be addedwhen validating a card. This configuration is necessary when a site uses cards with varyingnumber lengths and therefore must create Primary records with leading zeros to ensure allrecords have a consistent number length.If a user swipes a card 7 characters in length, and the value configured here is 10, the cardnumber that will be validated will be the 7 character card number with three leading zerosadded.
Admin Password
This is the built in administration password for a Konica Minolta MFDs. More informationregarding this password can be obtained from a Konica Minolta distributor.
Application Button Caption
The text of the button that will take the user from the device's native functions (copy/scan/fax)to the print release screen. This button is only visible if Enable Function Selection is disabled.
Public User Functions
Enables or disables any of the functions available to users without the need to log into theapplication.
Email Notifications of Server Restarts
The OpenAPI service has the ability to email out a notification when the service has beenrestarted.The notification is plain text and has the following content:Subject: OpenAPI server restartBody: The OpenAPI server has restarted.
The mail server settings are accessed from the Tools -> Supervisor Net Settings in
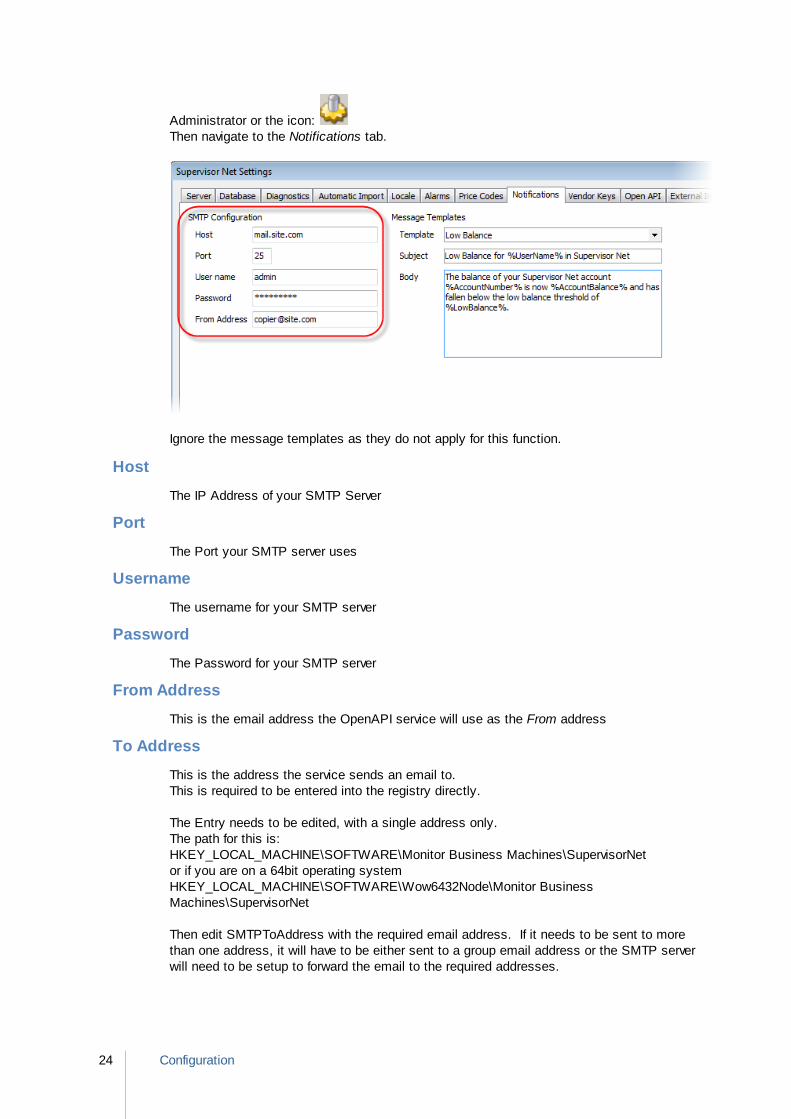
Configuration24
Administrator or the icon: Then navigate to the Notifications tab.
Ignore the message templates as they do not apply for this function.
Host
The IP Address of your SMTP Server
Port
The Port your SMTP server uses
Username
The username for your SMTP server
Password
The Password for your SMTP server
From Address
This is the email address the OpenAPI service will use as the From address
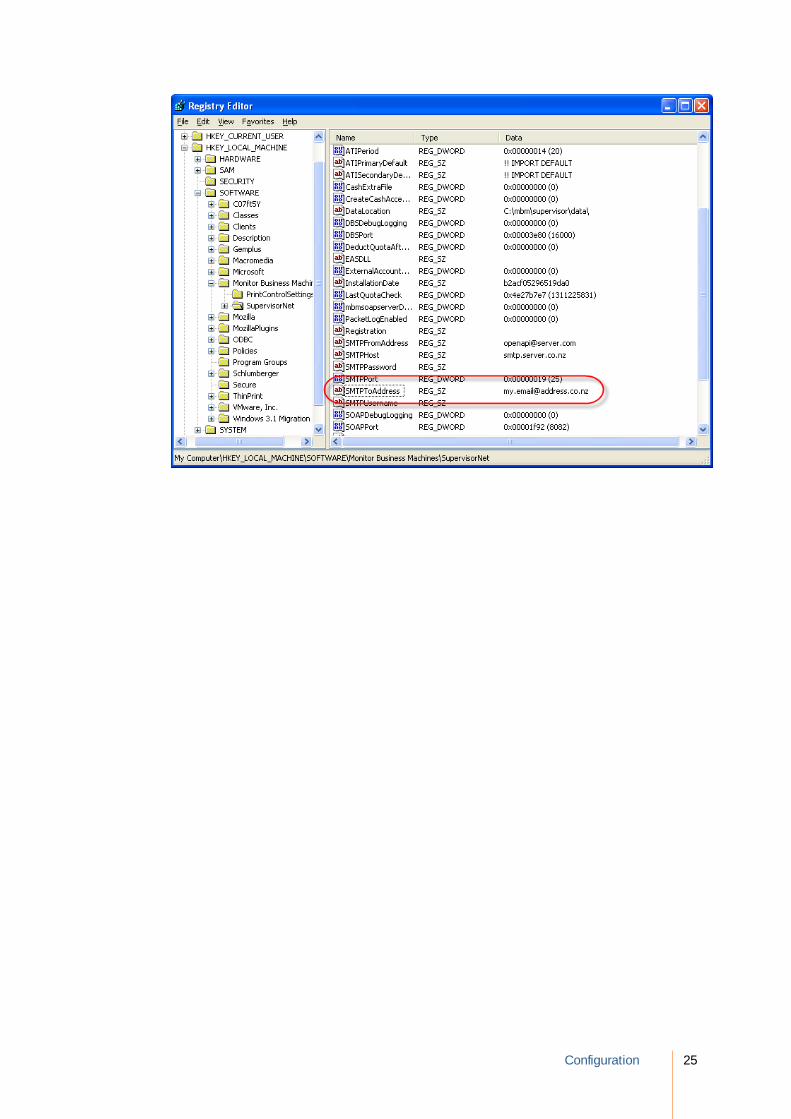
To Address
This is the address the service sends an email to.This is required to be entered into the registry directly.
The Entry needs to be edited, with a single address only.The path for this is:HKEY_LOCAL_MACHINE\SOFTWARE\Monitor Business Machines\SupervisorNetor if you are on a 64bit operating systemHKEY_LOCAL_MACHINE\SOFTWARE\Wow6432Node\Monitor BusinessMachines\SupervisorNet
Then edit SMTPToAddress with the required email address. If it needs to be sent to morethan one address, it will have to be either sent to a group email address or the SMTP serverwill need to be setup to forward the email to the required addresses.
25Configuration

Using the Open API application26
Using the Open API application
The initial screen that users will be presented with, will request their Primary Number or Login,or both. The labels on the buttons use Supervisor's name replacement function, so can bereplaced with text as required by the site by changing the Number Field and ID Field values inthe primary database configuration section in Administrator.
User Validation
The user selects one of the two possible options. These options appear as per the tick boxes Prompt for Number and Prompt for ID in the Terminal Setup options.
At any point where a user is required to enter information, they will see the screen below. Theprompt (Up the top of the screen) will change to reflect the particular screen that they arecurrently at.

27Using the Open API application
Once a user has entered their details and press OK, the login screen will show with theirdetails, they then press Login.
Using the Open API application28
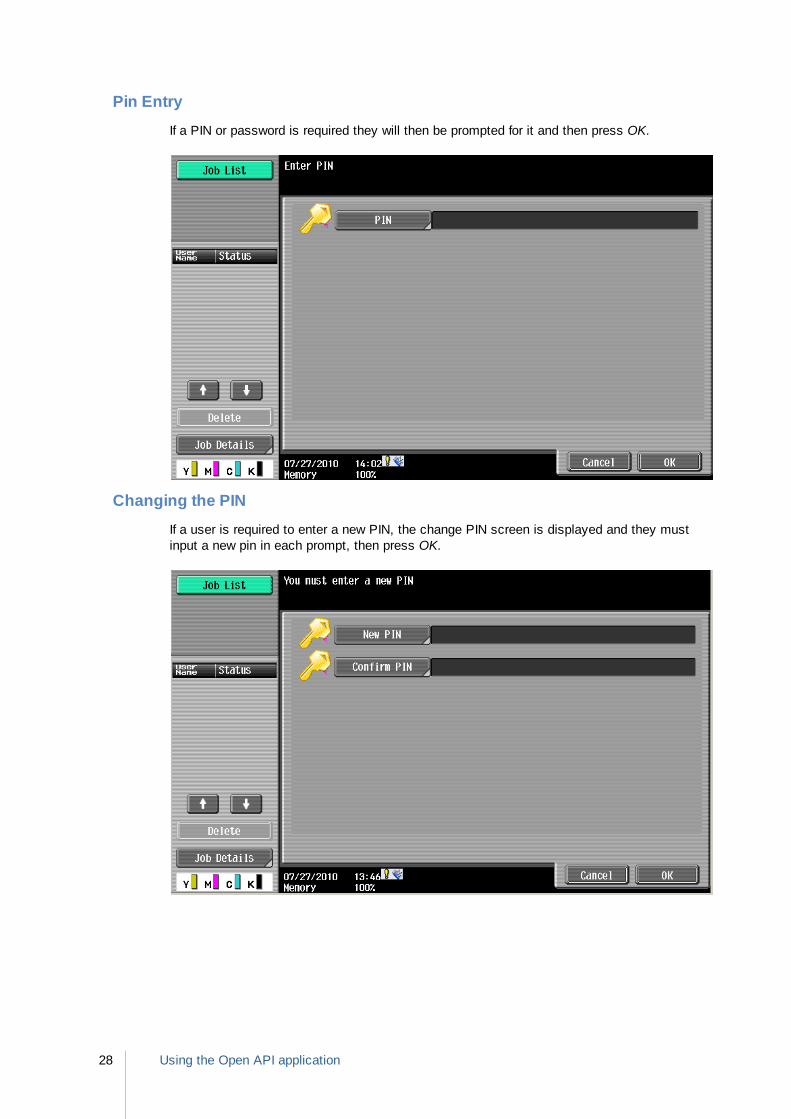
Pin Entry
If a PIN or password is required they will then be prompted for it and then press OK.
Changing the PIN
If a user is required to enter a new PIN, the change PIN screen is displayed and they mustinput a new pin in each prompt, then press OK.

29Using the Open API application
Secondary validation
If a secondary code (department, matter number, etc) is required, the user will be prompted forit next. They may also press Search if searching for codes is allowed.
A partial search will return all results containing that search string, a blank search will returnall secondaries that the user has access to (As determined by the Permit Table). Asecondary code can then be selected directly from the list on the screen.
Once you have entered or searched and selected the secondary code, press OK to select itfor the transaction.
Using the Open API application30
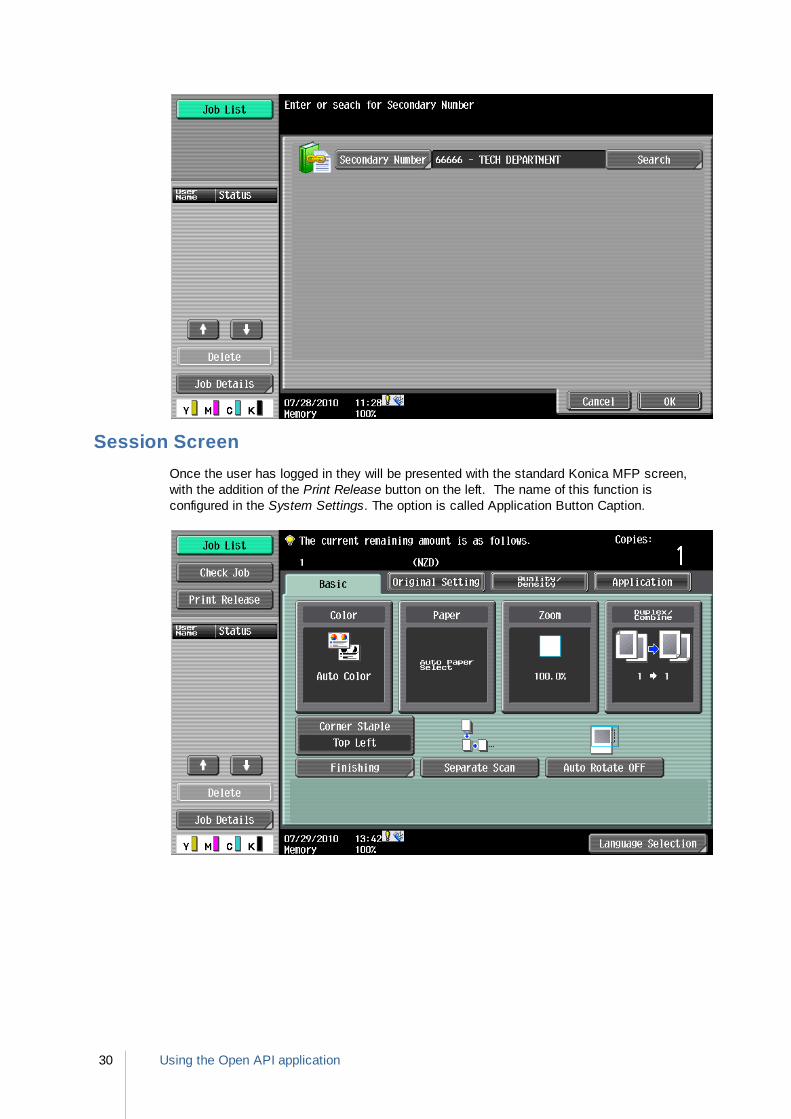
Session Screen
Once the user has logged in they will be presented with the standard Konica MFP screen,with the addition of the Print Release button on the left. The name of this function isconfigured in the System Settings. The option is called Application Button Caption.

31Using the Open API application
Using Print Release
Upon pressing the Print Release button on the front page, the user will then be presented witha list of their jobs. They can select one or more jobs from the list, or press Select All to selectall of them.
Info or Job Details
By pressing Info or Job Details a user can get more information about the job or selected jobsthey wish to print.
Using the Open API application32
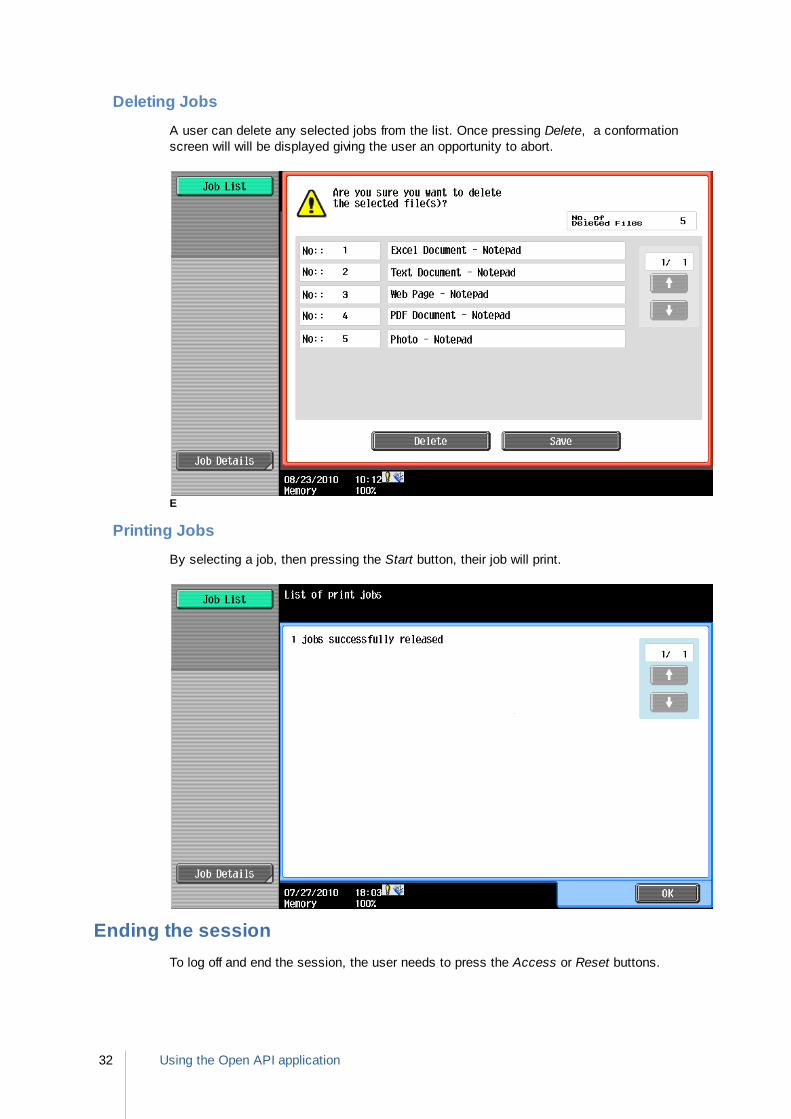
Deleting Jobs
A user can delete any selected jobs from the list. Once pressing Delete, a conformationscreen will will be displayed giving the user an opportunity to abort.
E
Printing Jobs
By selecting a job, then pressing the Start button, their job will print.
Ending the session
To log off and end the session, the user needs to press the Access or Reset buttons.

Monitor Business Machines Ltd31a Normanby Road,
Mt Eden, Auckland 1024,New Zealand.
Phone: +64 9 623 5000Web: www.monitorbm.com