suffolk county department of social services provid… · suffolk county department of social...
TRANSCRIPT

Suffolk County Department of Social Services
Shelter Online Attendance Reporting
Instruction Manual
Requirements needed to process attendance online:
Hardware: Computer, Internet Access capability
Software: Windows 7 OS w 2 gb RAM minimum, Internet Explorer browser version 9, 10 or 11
Internet Explorer link to application:
https://apps2.suffolkcountyny.gov/dss/soar/
Once the link opens in Internet Explorer, make a shortcut and place it on your desktop. The shortcut address may need
to be edited for forms authentication once it is on the computer desktop. To do this, follow the instructions in either the
“How to Create the SOAR Production Shortcut” or the “How to Create the SOAR Training Area Shortcut” document.
Log in screen will appear.
Enter User Name assigned to you by Suffolk County Department of Social Services. The first time signing into the
application, you will use the default password provided at training, enter the default password and you will then be asked
to create your own password. Follow directions on the screen.
1
Status: The two status options are now “Arrived” and “Absent.” The attendance status of each client should be entered accurately every day, as discharges will be made automatically by the housing software based on the attendance history.
Rm Num: User can add or edit the room number for a client. Discharge Reason: has been removed from the screen and will no longer be entered. Bedhold Date: If CHU has determined that a room should be held until a given date, a Bed Hold date will be
displayed on the client’s record. No action is required by the user
Functionality Changes For Providers As of May 12, 2018:
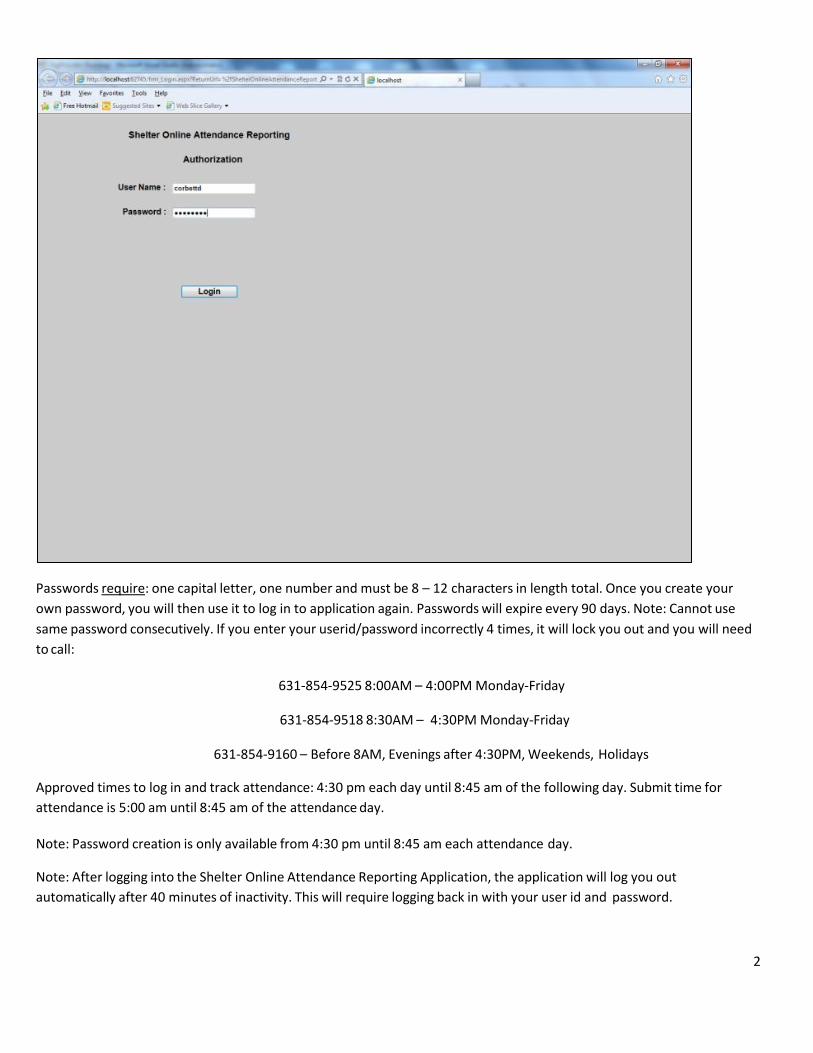
Passwords require: one capital letter, one number and must be 8 – 12 characters in length total. Once you create your
own password, you will then use it to log in to application again. Passwords will expire every 90 days. Note: Cannot use
same password consecutively. If you enter your userid/password incorrectly 4 times, it will lock you out and you will need
to call:
631-854-9525 8:00AM – 4:00PM Monday-Friday
631-854-9518 8:30AM – 4:30PM Monday-Friday
631-854-9160 – Before 8AM, Evenings after 4:30PM, Weekends, Holidays
Approved times to log in and track attendance: 4:30 pm each day until 8:45 am of the following day. Submit time for
attendance is 5:00 am until 8:45 am of the attendance day.
Note: Password creation is only available from 4:30 pm until 8:45 am each attendance day.
Note: After logging into the Shelter Online Attendance Reporting Application, the application will log you out
automatically after 40 minutes of inactivity. This will require logging back in with your user id and password.
2

Once logged into the application, the following screen appears with user name and facility name. Select your facility.
3
New
John Doe
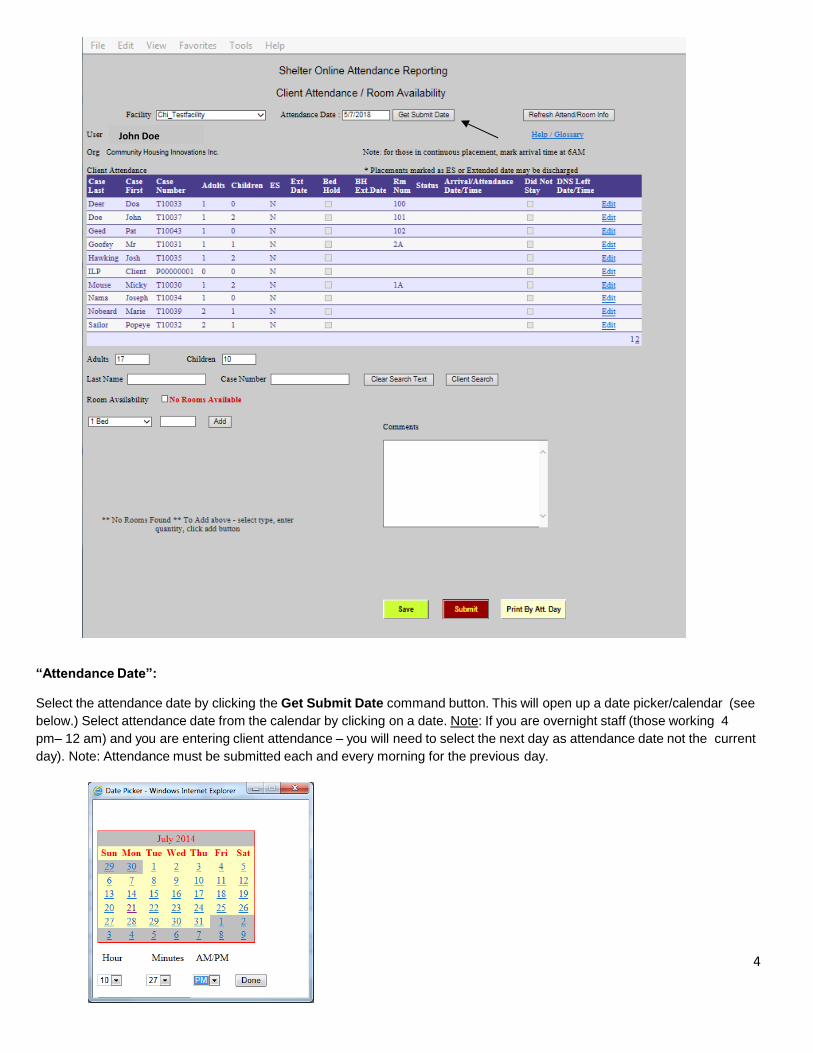
“Attendance Date”:
Select the attendance date by clicking the Get Submit Date command button. This will open up a date picker/calendar (see
below.) Select attendance date from the calendar by clicking on a date. Note: If you are overnight staff (those working 4
pm– 12 am) and you are entering client attendance – you will need to select the next day as attendance date not the current
day). Note: Attendance must be submitted each and every morning for the previous day.
4
John Doe

For example, if you are working 4 pm – 12 am on Monday, Jan 6th and you are tasked with updating attendance records,
you would select Tuesday, Jan 7th as the attendance date. If you are working 12 am – 8 am or 8 am – 4 pm and are tasked
with updating/submitting the attendance, you would always select the current date as the attendance date.
Once the attendance date has been selected, screen will then populate with current clients placed at the facility.
All of the attendance day’s current placements will appear in last name order. Note: if there are more than 10 clients at the
facility, a page indicator appears in the lower right corner of the Client Attendance grid. Click on the page number to
advance through the pages. Once the attendance records have populated on the screen, you are ready to do attendance.
Page Indicator
5

How To Report Attendance: To update Status for each client. Click on the Edit button to allow editing of the client
record. The following fields can be edited: Room Number, Status, Arrival Date/Time, Did Not Stay, DNS Left Date/Time.
6
Enter Status – select “Arrived” or “Absent” from the drop down list. If status is “Arrived”, enter Arrival Date/Time – click on
the Date Button in the Arrival Date/Time column and select the date/time client arrived*; after entering date and time
information, click the Done button in the calendar. Select Discharge Reason of “Not Discharged”.
*For example, if client “Arrived”: select “Arrived” from the Status dropdown list; next, enter the client arrival date/time
anywhere between 6:00 am Dec 9th until 5:59 am Dec 10th for the “attendance date” of: Dec 10th. If client did not arrive,
select the status of “Absent” and no additional information needs to be entered.
If client “Did Not Stay” – click the “Did Not Stay” checkbox and click the Date button under the Left Date/Time column to
indicate the date/time client departed from the facility. Select an appropriate discharge reason.
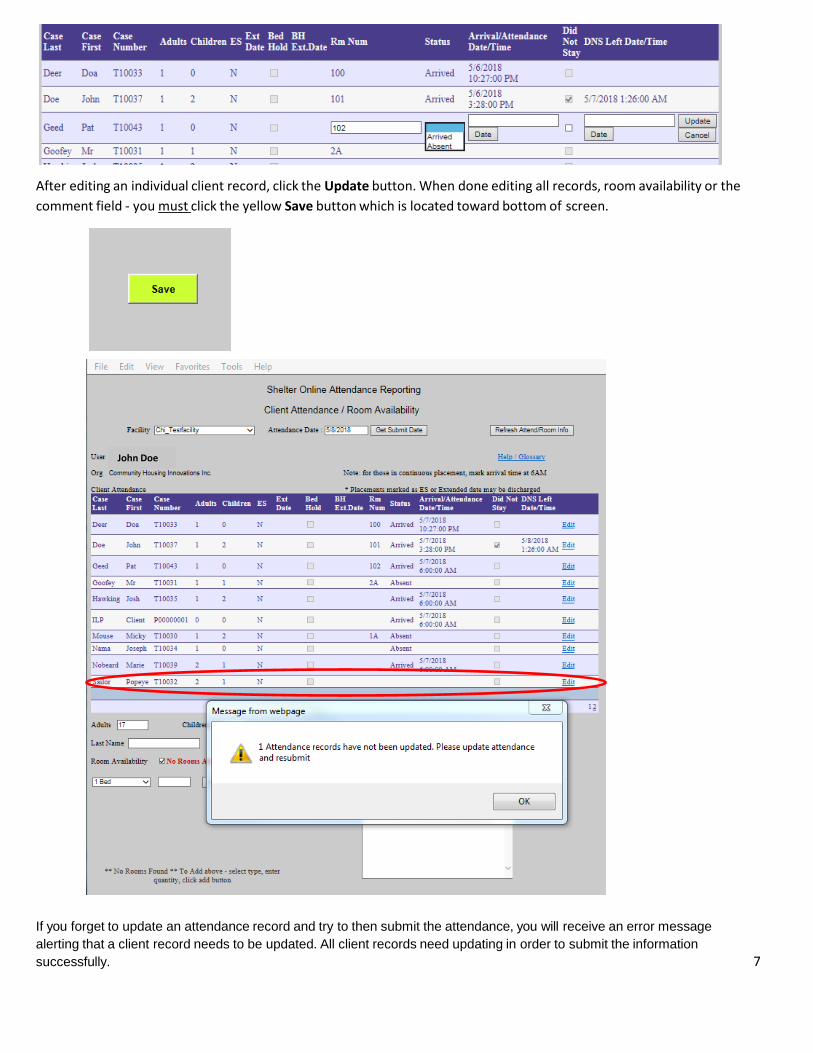
After editing an individual client record, click the Update button. When done editing all records, room availability or the
comment field - you must click the yellow Save button which is located toward bottom of screen.
7
If you forget to update an attendance record and try to then submit the attendance, you will receive an error message
alerting that a client record needs to be updated. All client records need updating in order to submit the information
successfully.
John Doe

Once all clients have had their attendance recorded and the room availability/unavailability noted, the information is ready
to be submitted. Click the red Submit button to submit attendance to the DSS Emergency Housing Placement Unit.*
8
John Doe

You will receive a message letting you know the attendance has been submitted successfully. *Note: Attendance can
only be submitted between the hours of 5:00 am and 8:45 am on Attendance Reporting Date.
9
Glossary – description of various fields and command buttons on the attendance form
Edit - must be clicked to allow entering information into fields for each record.
Update – must click after “editing” each record.
Save – click when done editing records on the screen. This transmits the attendance information to our database.
Status – client would either have “Arrived” or “Absent”
Did Not Stay - If client arrived but did not stay overnight, indicate this by clicking the Did Not Stay check box. This will automatically “discharge” the client. Enter the Date/Time client left facility. Note: There is no need to select a discharge reason if the client has the Did Not Stay checkbox filled in.
Arrival Date/Time – used when client arrived at facility.
DNS Left Date/Time – used when client did not stay at the facility to indicate date/time departed.
Discharge Reason - “Not Discharged” is selected if the client arrived and stayed the night. If you wish to alert the Housing Placement Unit to some problem that occurred during the placement (i.e., drugs/alcohol or police involved/arrested). Select a Discharge Reason – the Attendance will show the reason that you selected from the dropdown list. This information is then available to the Housing Placement Unit.
Available Rooms grid starts with a default of room type as “1 Bed” and the # of rooms field blank. The availability grid will enlarge as you add available room types located at your facility. Once a room type is selected, enter the # available in the text box next to the room type and click the Add button. This information can be edited or deleted as needed. If there are no rooms available at the facility, please check the box “No Rooms Available”. Note: Room availability is submitted once each morning along with the attendance information. Please call the DSS EH Placement Unit to alert them if room availability changes after submitting the day’s attendance information each morning.
Comment Field - is used to indicate any important information about the facility itself that you wish to communicate to the
Social Services Housing Placement Unit.
Client Search – useful if there are multiple pages of clients listed. Enter the client last name or case # and click Client Search. To clear the search field(s) and search for a different client/case #, click on Clear Search Text and then enter different search criteria and click Client Search. This will take you to the page where client record is located.
Submit - Attendance can only be submitted once each day (between the hours of 5:00 am – 8:45 am.) Please allow
enough time to enter the attendance before the 8:45 am cutoff.

Online Attendance Recording Matrix
For userid/password maintenance/client roster issues, please contact DSS:
8:00AM – 4:00PM 631-854-9525 Monday – Friday 8:30AM – 4:30PM 631-854-9518 Monday – Friday
Before 8AM, Evenings after 4:30PM, Weekends, Holidays 631-854-9160
Scenario Description Status Selection
Status Date
Did Not Stay Checkbox
Did Not Stay Left Time/Date
1 Client arrived and stayed the night
Arrived Enter the date/time arrived
Unchecked Leave Blank
3 Client Arrived Arrived Enter the Checked Enter the
but did not stay date/time date/time the entire night arrived client left the for some facility reason.
4 Client Did Not Absent Leave Leave Leave Blank Arrive Blank Blank
5 Client is at your facility but is Call DSS (see telephone
numbers below) not listed on the screen or client is listed on the screen but no longer at your facility
10

Reporting feature added to SOAR:
To retrieve the attendance from a given day (attendance has to have already been submitted previously) and save to file
or print:
1. Sign in to SOAR (After 4:30 pm and prior to 8:45 am the following day)
2. Select a facility and an attendance date
3. Click the ATTEND TXT button on the main screen.
4. You will receive following message which will be located at the bottom of your screen.
11
You have the option to open the file or save the file at this time.
To save the file with a meaningful file name, click the arrow to the right of the Save button and select “Save As”:

The following screen will appear and will contain a default name in the file name field. At this time, you can change this
default file name to a more meaningful file name, for example: 20150302 Attendance Roster.txt and save it as a .txt file
to any folder on your computer.
12
Once you have saved the file to your system, right click the file name and select “Open With” and select “Notepad from
the list.
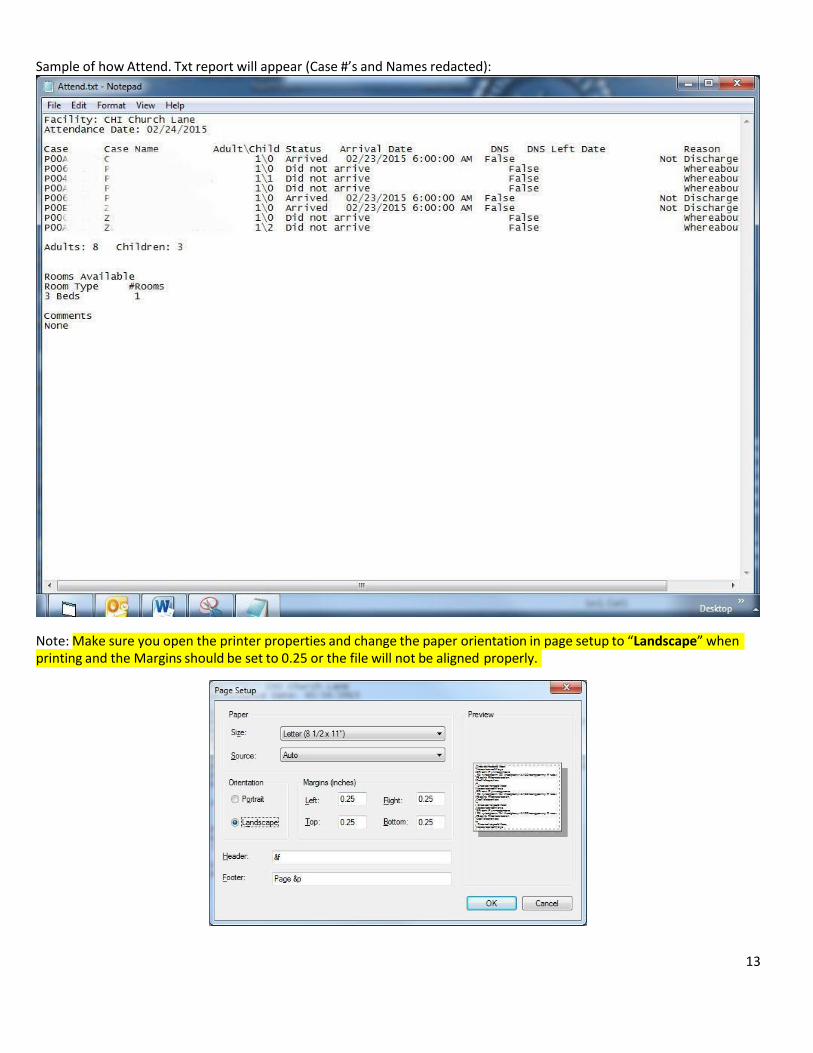
Sample of how Attend. Txt report will appear (Case #’s and Names redacted):
Note: Make sure you open the printer properties and change the paper orientation in page setup to “Landscape” when printing and the Margins should be set to 0.25 or the file will not be aligned properly.
13