students managing folders in office 365
TRANSCRIPT

7/26/2019 Students Managing Folders in Office 365
http://slidepdf.com/reader/full/students-managing-folders-in-office-365 1/5
Students Managing Folders in Office 365
Creating folders allows one to be able to easily sort and manage documents. It is for this reason that students should
learn how to do this task. The following steps are suggestions on how teachers could have students share folders so it’s
easier for students to organize their assignments, then share with the teacher. It also allows the teacher to monitor
student progress on assignments when they are shared with their teacher. By sharing documents, the students can be
working on document, while the teacher is able to monitor progress and insert comments. Teachers will no longer have
to wait for students to finish drafts.
1.
The first step is to go to Office 365, OneDrive and have the students create a folder in the following way:
Last name, First name Grade ___
This folder will become the main folder that will be shared with their teacher. Inside the folder will be the subjects
that their teacher teaches the student. The point of doing this is to provide the teacher with ONE MAIN FOLDER
alphabetized by last name, and easily found in the teacher’s SHARED WITH ME area of Office 365. All the
assignments that the student will create, will be saved in the main file folder and in the appropriate subject file
folder. By sharing the main folder, assignments will be organized and will hold the assignments for the student for
the year.
From the “new” area, the student
will create a new folder. This folder
will have the student’s last name,
first name and grade.
7/26/2019 Students Managing Folders in Office 365
http://slidepdf.com/reader/full/students-managing-folders-in-office-365 2/5
2.
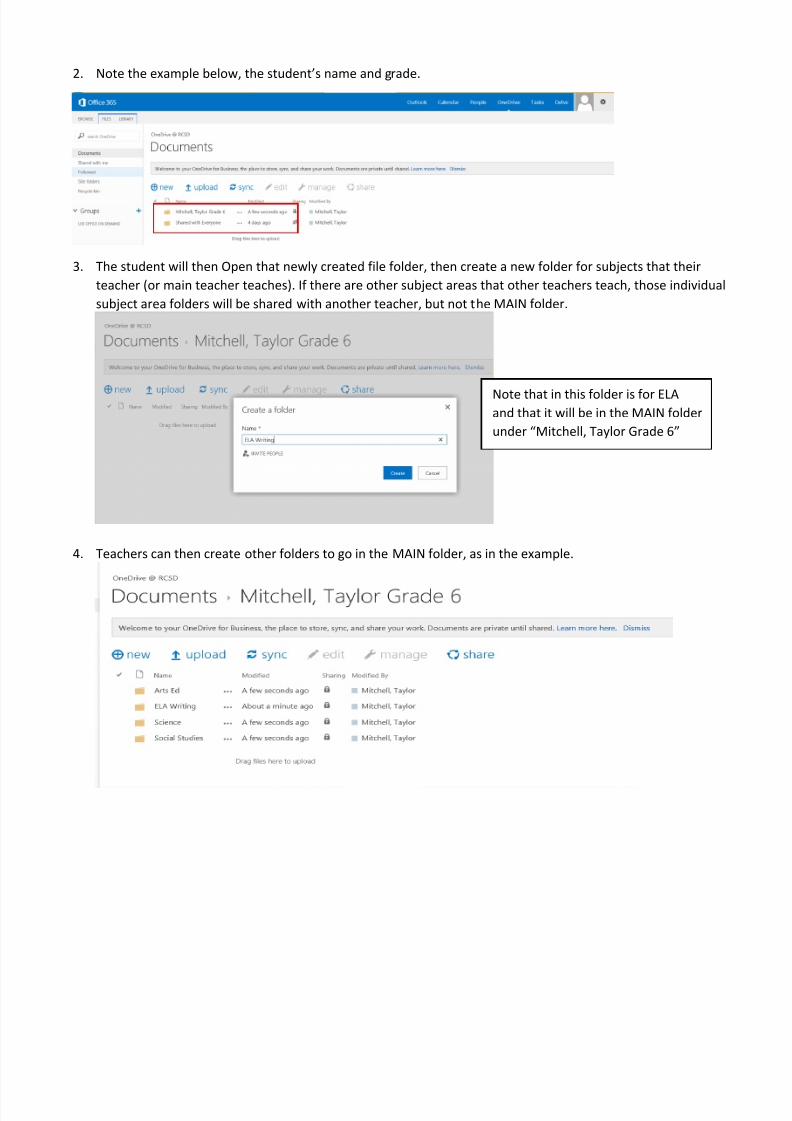
Note the example below, the student’s name and grade.
3.
The student will then Open that newly created file folder, then create a new folder for subjects that their
teacher (or main teacher teaches). If there are other subject areas that other teachers teach, those individual
subject area folders will be shared with another teacher, but not the MAIN folder.
4.
Teachers can then create other folders to go in the MAIN folder, as in the example.
Note that in this folder is for ELAand that it will be in the MAIN folder
under “Mitchell, Taylor Grade 6”

7/26/2019 Students Managing Folders in Office 365
http://slidepdf.com/reader/full/students-managing-folders-in-office-365 3/5
5.
After all the folders have been created, the student will then share that main folder with their teacher.
6.
In the “Invite” area, students will type their teacher’s last name (the Global Address list can be accessed in this
area, so full email addresses are not needed). Students may want to give their teachers editing rights, but it’s up
to the individual teacher.
7.
When a student creates a document for a particular subject area or folder (depending on how the teacher
wishes to set this up), they will go into the MAIN folder, select the subject folder, then create a new document
inside the appropriate folder. If a student forgets to do this, documents can be dragged into folders, but folders
can NOT be dragged into folders in Office 365. Therefore if a student does not create a folder inside that main
folder, they will have to delete the folder and create a new one inside the MAIN folder. To navigate back to the
OneDrive area from the folders, just click on the ONEDRIVE at the top of the screen in Office 365 or click on
Documents in the far left area.
Click on the ellipsis (…) to Share a
folder (or a document).

7/26/2019 Students Managing Folders in Office 365
http://slidepdf.com/reader/full/students-managing-folders-in-office-365 4/5
8.
To navigate back to the OneDrive area from the folders, just click on the ONEDRIVE at the top of the screen in
Office 365 or click on Documents in the far left area.
9.
If a folder or a document has to be deleted, students will need to go into OneDrive, and click on the ellipsis, and
click delete.
Note this new Word Document wi
be in the ELA Writing folder.

7/26/2019 Students Managing Folders in Office 365
http://slidepdf.com/reader/full/students-managing-folders-in-office-365 5/5
10.
To rename a file, click the ellipsis, then the ellipsis again, and choose Edit Properties. A new window will open, a
this point you can change the file name. Then click save.
To delete the file, click on the
ellipsis (…) next to the file name, the
ellipsis again, and choose Delete.