student year end - skywardsupport.skyward.com/deptdocs/corporate/documentation/public web… ·...
TRANSCRIPT

Student Year EndOverview
Pre-Year End Processing ChecklistMass Add Students to an EntityRetention and Promotion ReportRetain/Advance Students in the Student ProfileActual Scheduling RunMass Delete Student Categories from StudentsMass Delete Student Category CodesUpdate Attendance History YTD TotalsCheck State-Specific InstructionsCreating Backup of DatabaseLocking the SystemViewing the District Login History
Year End Processing ChecklistYear End ValidationNext Year Table CreationStudent Year End ProcessesYear Start Utilities
District Year End
Post-Year End Processing ChecklistUnlock the SystemPost-Year End Validation ReportYear Start Course Validation ReportYear Start Student Validation ReportStudent Processed in Year End ReportYear End Processing Reports
First Day of School Checklist

STUDENT YEAR END GUIDE
OverviewThe Student Year End is a series of processes run annually to close the current year and begin the upcoming school year. The modules of Fee Management, Food Service and SpecialEducation also have a Year End process.
Processing OrderThe following may be processed before or after Student Records Year End
Food Service Fee Management Special Education
Student Records Year End Processing Entities can be processed in any order The District Entity must be the last entity to complete year end
Functionality described here may vary in availability depending upon your district/entity configuration.** Denotes Required Field to save screen.

STUDENT YEAR END GUIDE
Pre-Year End Processing Checklist
Before running the year end process there are several steps you can complete. These steps include:
Run the Mass Add Students to an Entity Utility (only if not completed during Future Scheduling)
Retention and Promotion Report (used to assist with the retaining/advancing of students)
Retain/Advance Students Actual Scheduling Run (only if using Future Scheduling) Run the Mass Delete Student Categories from Students (optional) Run the Mass Delete Student Category Codes (optional) Update Attendance History YTD Totals Check State-Specific Instructions Creating Backups of Database Locking the System Viewing the District Login History
Functionality described here may vary in availability depending upon your district/entity configuration.** Denotes Required Field to save screen.

STUDENT YEAR END GUIDE
Mass Add Students to an EntityThe Mass Add Students to an Entity utility will move students to a new entity for the next school year. You only need to run this utility if it was not completed during Future Scheduling. You can find the Mass Add Students to an Entity utility by going to Student Management>Students>Setup>Utilities.
Retention and Promotion ReportThe Retention and Promotion Report can be used to assist you in determining the students that will be retained or promoted to the next grade level based upon the credit earned.
This report can be found by going to Student Management>Office>Year End>Utilities.
You will then select Retention and Promotion Report.
Functionality described here may vary in availability depending upon your district/entity configuration.** Denotes Required Field to save screen.

STUDENT YEAR END GUIDE
Report Ranges Report Type – Select to run the report as either Retention or Promotion. If you
select the option of “Promotion,” you will not have the option for “Student Test Scores.”
Current Year Courses – Select whether to include credits for courses student are currently enrolled in, or courses students have completed in this school or neither.
Re-count credits each time report is run – Do you want to have the credits re-counted each time the report is run?
Automatically set Retention Flag for Students on Report – Should the retentionflag be set for any students displaying on this report? Only the Retain field is flagged on the Student Profile when this option is selected. You will need to adjust the student’s NY Grad Year field in order to retain the student during the Year End process.
Include Special Ed – You may choose to include Special Ed students when running the report.
Functionality described here may vary in availability depending upon your district/entity configuration.** Denotes Required Field to save screen.

STUDENT YEAR END GUIDE
Student SelectionThe Student Selection allows you to determine if you want to run this report By Range of students or By Individual.
Grade Years to Report OnThe Grade Year to Report On allows you to select the minimum credits earned per graduation year. You can include additional graduation year by clicking on Add a Grad Year.
After clicking Add a Grad Year, you will be able to including additional graduation years with the minimum credits earned.
Student Test ScoresThe Student Test Scores allows you to select a Test to determine the retention of a student.If you select Use Test Score Retention Criteria, you will click Test Scores to determine the Test being used.
You will select the Test and Test Section(s). After selecting the Test Section, you will clickon the Edit Scores.
Functionality described here may vary in availability depending upon your district/entity configuration.** Denotes Required Field to save screen.

STUDENT YEAR END GUIDE
After clicking Edit Scores, it will allow you to enter a range of minimum scores that would be used to determine the retention of a student.
Once the ranges for scores have been entered you will click Save.
Test Date – The Test Date allows you to determine a range for when the test was given.
Student Test Scores to Compare – You can select to either use the most recent test or the test with the highest score.
After you have verified the ranges and options, you will click Save and Print. The report will display the credits earned per student for those it would consider retained based upon the ranges of the report.
Functionality described here may vary in availability depending upon your district/entity configuration.** Denotes Required Field to save screen.

STUDENT YEAR END GUIDE
Retain/Advance Students in the Student ProfileIf you know the students who are going to be retained (repeating a grade level) or advanced (skipping a grade level) for the next school year, you can flag the students in the Student Profile. The Year End process will create the necessary withdrawal and entry records for the retained and advanced students.
You will go to Students>Student Profile to retain or advance a student.
You will click on the General>Profile tab and then selectin Edit.
Functionality described here may vary in availability depending upon your district/entity configuration.** Denotes Required Field to save screen.

STUDENT YEAR END GUIDE
Sample of a Retained Student
Retain – You will select Yes. NY Grad Year – You will increase the NY Grad Year. Grad Req Base Year – The Grad Req Base Year is used in the Graduation
Requirement module to determine the graduation plan the student will follow. You can modify the Grad Req Base Year to reflect the graduation plan the student will complete, if it needs to be updated due to the retention.
Sample of an Advanced Student
Advance – You will select Yes. NY Grad Year – You will decrease the NY Grad Year. Grad Req Base Year – The Grad Req Base Year is used in the Graduation
Requirement module to determine the graduation plan the student will follow. You can also modify the Grad Req Base Year to reflect the graduation plan the student will complete, if it needs to be updated due to the advancement.
Actual Scheduling RunWe recommend that entities run an Actual Scheduling run in Future Scheduling. An actual scheduling run can be completed by going to Student Management>Office>Future Scheduling>Student Schedule Generation>Auto Scheduler>Generate Student Schedules. If you need the functionality of future scheduling after completing the year end process, there is an option that will allow you to use future scheduling during the current year. You can find this option by going to Student Management>Office>Current Scheduling>Setup> Configuration>Scheduling Entity Year Setup. You will click “Edit Scheduling Options” and select “Allow Current Year Scheduling.”You can find additional information on Actual Scheduling Runs in the Future Scheduling Guide.
Functionality described here may vary in availability depending upon your district/entity configuration.** Denotes Required Field to save screen.

STUDENT YEAR END GUIDE
Mass Delete Student Categories from StudentsThe Mass Delete Student Categories from Students utility is used to delete student categorycodes from the student’s record. Student Categories attached to a student can be found by going to Students>Student Profile and then selecting the Categories tab.
You can find the Mass Delete Student Categories from Students utility by going to Student Management>Office>Year End>Utilities.
After clicking Utilities, you will select Mass Delete Student Categories from Students.
Functionality described here may vary in availability depending upon your district/entity configuration.** Denotes Required Field to save screen.

STUDENT YEAR END GUIDE
Report RangesThe Report Ranges allow you to determine the categories that will be removed from the student.
Student SelectionThe Student Selection allows you to determine if you want to run this utility By Range of students or By Individual.
After verifying the ranges of the utility, you will click Save and Process.
Functionality described here may vary in availability depending upon your district/entity configuration.** Denotes Required Field to save screen.

STUDENT YEAR END GUIDE
Click Preview Data to Process to see a list of students with categories being deleted.
After verifying the students on the preview screen, you will click Back.
You will click Run the Update to have the utility complete in the Print Queue.
Functionality described here may vary in availability depending upon your district/entity configuration.** Denotes Required Field to save screen.

STUDENT YEAR END GUIDE
After clicking on Run the Update,you will click OK to delete the categories from the students.
After the utility completes in the Print Queue, you can click Display Report to generate a report displaying the number of records deleted.
Mass Delete Student Category CodesThe Mass Delete Student Category Codes utility is used to delete student category codes that you do not want to use in the upcoming school year.
You can find the utility by going to Student Management>Office>Year End>Utilities.
Functionality described here may vary in availability depending upon your district/entity configuration.** Denotes Required Field to save screen.

STUDENT YEAR END GUIDE
You will select Mass Delete Student Category Codes.
The only Category Codes not attached to students display in the “Select Categories to Delete” screen. You will select the category code(s) you want to delete and then click Delete Selected Categories.
After clicking Delete Selected Categories, you will click OK to the message.
You can click View Report to see a list of the deleted category codes.
Functionality described here may vary in availability depending upon your district/entity configuration.** Denotes Required Field to save screen.

STUDENT YEAR END GUIDE
Update Attendance History YTD TotalsThe Update Attendance History YTD Totals utility is used to retain yearly attendance to the student’s attendance history.
You can find the Update Attendance History YTD Totals utility in Student Management>Office>Year End>Utilities.
You will then select Update Attendance History YTD Totals.
Functionality described here may vary in availability depending upon your district/entity configuration.** Denotes Required Field to save screen.

STUDENT YEAR END GUIDE
Ranges to Use for UpdateEnter the desired student ranges. Most likely the student status will be set to “both” so as toretain attendance for all students enrolled during the specified timeframe.
You will choose either Update Totals Through a Specified Date or Stop Counting Before Current Date. If you select Update Totals Through a Specified Dates, you will enteran end date. The Stop Counting Before Current Date option will record attendance information from the beginning of the year to the current date minus the grace period days.
After verifying the range of the utility, you will click Save and Run.
Functionality described here may vary in availability depending upon your district/entity configuration.** Denotes Required Field to save screen.

STUDENT YEAR END GUIDE
After the utility completes in the Print Queue, you can click View Report to generate a report of the number records processed for each graduation year.
Check State-Specific InstructionsYou will want to check the specific Year End instructions for your state. Some states require that their state reports are completed prior to running the Year End processes. The State-Specific Instructions can be found in SkyDoc under Student Management>Office>Year End.
Database BackupsPrior to running the Student Year End Process, you will need to make sure there is a backupof your database. The backup would be used to restore your data if necessary.
Functionality described here may vary in availability depending upon your district/entity configuration.** Denotes Required Field to save screen.

STUDENT YEAR END GUIDE
Locking the SystemNo other users should be in Skyward when completing the year end process. You can prevent users from accessing the database by “Locking” the system.
You will need to change your system to Product Setup. Then select System Administration>Utilities.
You will select Lock and Unlock System.
Functionality described here may vary in availability depending upon your district/entity configuration.** Denotes Required Field to save screen.
STUDENT YEAR END GUIDE
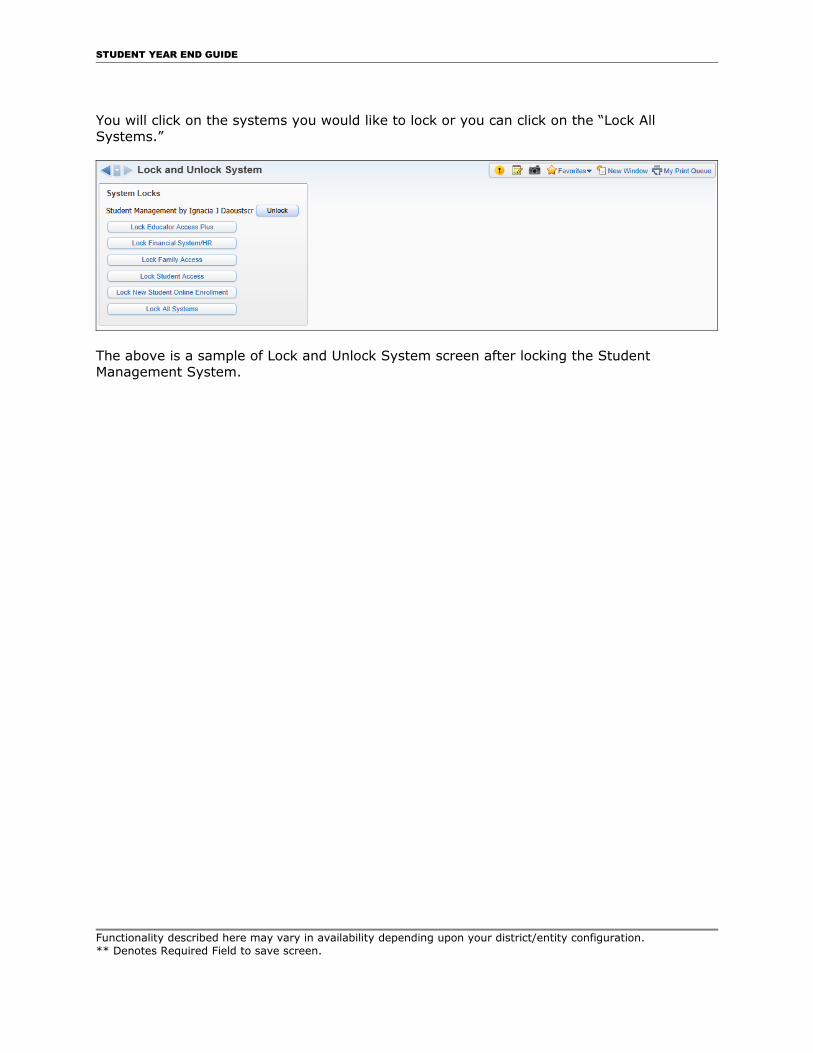
You will click on the systems you would like to lock or you can click on the “Lock All Systems.”
The above is a sample of Lock and Unlock System screen after locking the Student Management System.
Functionality described here may vary in availability depending upon your district/entity configuration.** Denotes Required Field to save screen.

STUDENT YEAR END GUIDE
Viewing District Login HistoryThere is no way to determine if users are currently logged into the database. The District Login History will show you the login history for the day and you can then contact the user(s) to determine if they are still logged in.
You will change your system to Product Setup and then select Skyward Contact Access> District Login History.
Functionality described here may vary in availability depending upon your district/entity configuration.** Denotes Required Field to save screen.

STUDENT YEAR END GUIDE
The District Login History will display any user that has logged in. You can change the filter to display “Today’s Logins” to see anyone that logged in today.
Please refer to the State-Specific Instructions in SkyDoc prior to proceeding with the Year End process. These documents can be found by going to Student Management>Office>YearEnd.
Functionality described here may vary in availability depending upon your district/entity configuration.** Denotes Required Field to save screen.

STUDENT YEAR END GUIDE
Year End Processing ChecklistOnce the Pre-Processing steps are completed, you will be able to run the actual Year End Processes. Below you will find the steps for the Student Records Year End Process:
Step 1 – Year End Validation Step 2 – Next Year Table Creation
Entity Year Scheduling Calendar
Step 3 – Student Year End Processes Grading Attendance Class History Mass Withdrawal – Check the state specific documents to determine if your state
mass withdraws students. Final Process
Step 4 – Year Start Utilities Clone Codes Mass Entry – Only if you mass withdrew your students Current Year Member Default Entity Calculate GPA
Functionality described here may vary in availability depending upon your district/entity configuration.** Denotes Required Field to save screen.

STUDENT YEAR END GUIDE
Year End ValidationThe Year End Validation process will verify that all students have a valid calendar and schoolassigned to them.
You will find the Year End Validation by going to Student Management>Office>Year End> Wizard Selection.
Functionality described here may vary in availability depending upon your district/entity configuration.** Denotes Required Field to save screen.

STUDENT YEAR END GUIDE
You can process multiple entities at the same time in the Year End Wizard. At the bottom of the screen you can select the entities to process. The entities that display are based upon security access, same current school year and same grade levels.
You will select Pre-Year End Validation and then click Next.
After the process completes in the Print Queue, you will click View Report.
Functionality described here may vary in availability depending upon your district/entity configuration.** Denotes Required Field to save screen.

STUDENT YEAR END GUIDE
Once you click View Report you will see a report displaying any students with an error regarding their calendar, school, retain flag, advance flag or NY Status.
How to fix the errors on the report:
Invalid Calendar – Go to the student’s Entry/Withdrawal tab in the Student Profile and edit the entry record to change the Calendar attached to the student.
Invalid School - Go to the student’s Entry/Withdrawal tab in the Student Profile andthe entry record to change the School attached to the student. If the school listed onthe Entry/Withdrawal tab is correct, you will go to Product Setup>Student Management>Entity>Configuration>Entity Year Setup and add the school to the Entity-School Cross Reference.
Invalid Retained or Advanced – No Open E/W – This error indicates that a student is active but is not enrolled for the current school year. You will add and entry record in the current entity by going to the Entry/Withdrawal tab in the Student Profile or mark the student as “inactive” in the Student Profile>Entity tab.Grad Year – This error indicates that the student’s Next Grad Year does not match his or her advanced or retained status. You will correct this error by going to the student’s General Profile tab in the Student Profile and modifying the Next Year Grad Year. For retained students, you will increase the NY Grad Year. For advanced students, you will decrease the NY Grad Year.
Invalid Next Year Status Code – Based on the grade level, the student is considered outgoing from the current entity, but has an active Next Year Status. If the student should be retained, set the retained status to “Yes” and modify the NY Grad Year in the Student Profile>General Profile tab. You can also use the Student Mass Change Utility (Student Management>Students>Setup>Utilities) to correct the Next Year Status.
It is recommended that you correct all error before proceeding with the year end process. After correcting the errors, you will run this validation report again.
Functionality described here may vary in availability depending upon your district/entity configuration.** Denotes Required Field to save screen.

STUDENT YEAR END GUIDE
Next Year Table CreationThe Next Year Table Creation consists of three processes:
1. Clone Entity Year and Term Definitions2. Clone Scheduling Master3. Clone Calendars
These steps are typically done during the Future Scheduling process. If the entity uses Future Scheduling, you will not need to complete this step. You will be able to tell the processes completed during Future Scheduling in the Next Year Table Creation section of the Year End Wizard; processes completed will display in red.
You can find the Next Year Table Creation in the Year End Wizard which is found by going toStudent Management>Office>Year End>Wizard Selection. You will select Next Year Table Creation and click Next.
Functionality described here may vary in availability depending upon your district/entity configuration.** Denotes Required Field to save screen.

STUDENT YEAR END GUIDE
You will click Next to take you to the Entity Year step of the Year End Wizard.
Functionality described here may vary in availability depending upon your district/entity configuration.** Denotes Required Field to save screen.
STUDENT YEAR END GUIDE
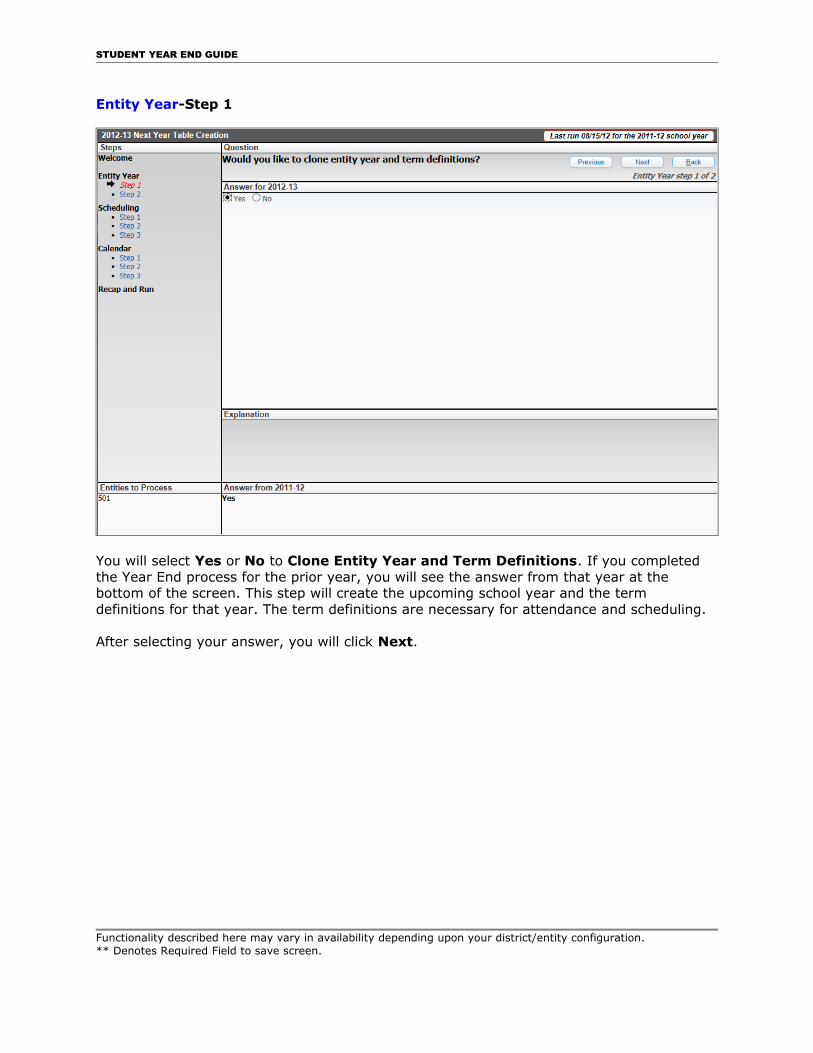
Entity Year-Step 1
You will select Yes or No to Clone Entity Year and Term Definitions. If you completed the Year End process for the prior year, you will see the answer from that year at the bottom of the screen. This step will create the upcoming school year and the term definitions for that year. The term definitions are necessary for attendance and scheduling.
After selecting your answer, you will click Next.
Functionality described here may vary in availability depending upon your district/entity configuration.** Denotes Required Field to save screen.

STUDENT YEAR END GUIDE
Entity Year-Step 2
If you selected Yes on the previous step, you will enter the new dates for the school year. The dates displaying are the dates from the prior year, but the year is incremented.
You will click Next after you have completed the term definition dates.
Functionality described here may vary in availability depending upon your district/entity configuration.** Denotes Required Field to save screen.

STUDENT YEAR END GUIDE
Scheduling–Step 1
You will select Yes or No to cloning the Course Master for the upcoming school year.
After selecting your answer, you will click Next.
Functionality described here may vary in availability depending upon your district/entity configuration.** Denotes Required Field to save screen.

STUDENT YEAR END GUIDE
Scheduling–Step 2
If you selected Yes, you have three options to determine the information that clones. You can clone only the courses, courses & sections, or courses & section & meets. The meets have the class period and teacher information.
After selecting the course information that will clone, you will click Next.
Functionality described here may vary in availability depending upon your district/entity configuration.** Denotes Required Field to save screen.

STUDENT YEAR END GUIDE
Scheduling–Step 3
If you selected Yes to step 1 of scheduling, you can choose if you want to clone the cross-entity enrollment link. Cross entity allows you to link two courses in two different entities together. This step will clone the home and away course information.
After you choose your answer to cloning cross-entity enrollment links, you will click Next.
Functionality described here may vary in availability depending upon your district/entity configuration.** Denotes Required Field to save screen.

STUDENT YEAR END GUIDE
Calendar-Step 1
You will select Yes or No to clone the calendar information for the upcoming school year. Selecting “Yes” allows you to keep the same calendar setup from one school year to the next. You must have a calendar for scheduling and attendance purposes. The calendar allows you to determine the start and stop dates of the school year.
After selecting your answer to cloning the calendar, you will click Next.
Functionality described here may vary in availability depending upon your district/entity configuration.** Denotes Required Field to save screen.

STUDENT YEAR END GUIDE
Calendar-Step 2
If you selected Yes, you will verify the calendar dates. The dates displaying have been copied from the dates you entered in Entity Year-Step 2 of the Wizard.
After verify the calendar dates, you will click Next.
Functionality described here may vary in availability depending upon your district/entity configuration.** Denotes Required Field to save screen.

STUDENT YEAR END GUIDE
Calendar-Step 3
If you selected Yes to Step 1 of the Calendar, you can choose to generate calendar days. You must have calendar days in order to take attendance for the next school year.
You will click Next after you select your answer concerning the option to generate calendar days.
Functionality described here may vary in availability depending upon your district/entity configuration.** Denotes Required Field to save screen.

STUDENT YEAR END GUIDE
Recap and Run
The Recap and Run allows you to see what information has been selected to be cloned or created. If you need to adjust any answers, you can click on the step found on the left side of the screen or click on the “Previous” button.
After verifying the responses for Entity Year, Scheduling and Calendar, you will click Start Next Year Table Creation.
You will click Start Processing to begin the Next Year Table Creation. While the Next Year Table Creation is running, you cannot process any other Year End Wizards for the selected Entities.
Functionality described here may vary in availability depending upon your district/entity configuration.** Denotes Required Field to save screen.

STUDENT YEAR END GUIDE
After the Next Year Table Creation completes in the Print Queue, you can click Display Report. The report will display your answers to the Next Year Table Creation questions and how long each process took to complete.
Functionality described here may vary in availability depending upon your district/entity configuration.** Denotes Required Field to save screen.

STUDENT YEAR END GUIDE
Student Year End ProcessesThe Student Year Processes will accomplish the following:
1. Grading – It is used to determine the GPA information that will save.2. Attendance – Allows you to save attendance records in order for the attendance to
print on transcripts or to view a summary of attendance for the year in the attendance history.
3. Class History – It is used to save the non-graded class history4. Mass Withdrawal – This option is used to mass withdraw graduating
students/outgoing class, enter information for students being advanced and retained,as well as close transportation record.
5. Final Process - At the conclusion of the Student Year End Process it will increment the school year.
You can find the Student Year End Processes in the Year End Wizard which is found by goingto Student Management>Office>Year End>Wizard Selection. You will select Student Year End Processes and click Next.
Functionality described here may vary in availability depending upon your district/entity configuration.** Denotes Required Field to save screen.

STUDENT YEAR END GUIDE
You will click Next to take you to the Grading step of the Year End Wizard.
Functionality described here may vary in availability depending upon your district/entity configuration.** Denotes Required Field to save screen.

STUDENT YEAR END GUIDE
Grading-Step 1
You will select Yes or No to save GPA Information. The information is normally only savedby high schools and some middle schools. If you completed the Year End process for the prior year, you will see the answer from that year at the bottom of the screen.
After selecting your answer regarding saving the GPA, you will click Next.
Functionality described here may vary in availability depending upon your district/entity configuration.** Denotes Required Field to save screen.

STUDENT YEAR END GUIDE
Grading-Step 2
If you selected Yes to save GPA information, you will need to enter the grade range for the students you want to save the information for.
After entering the grade ranges, you will click Next.
Functionality described here may vary in availability depending upon your district/entity configuration.** Denotes Required Field to save screen.
STUDENT YEAR END GUIDE
Grading-Step 3
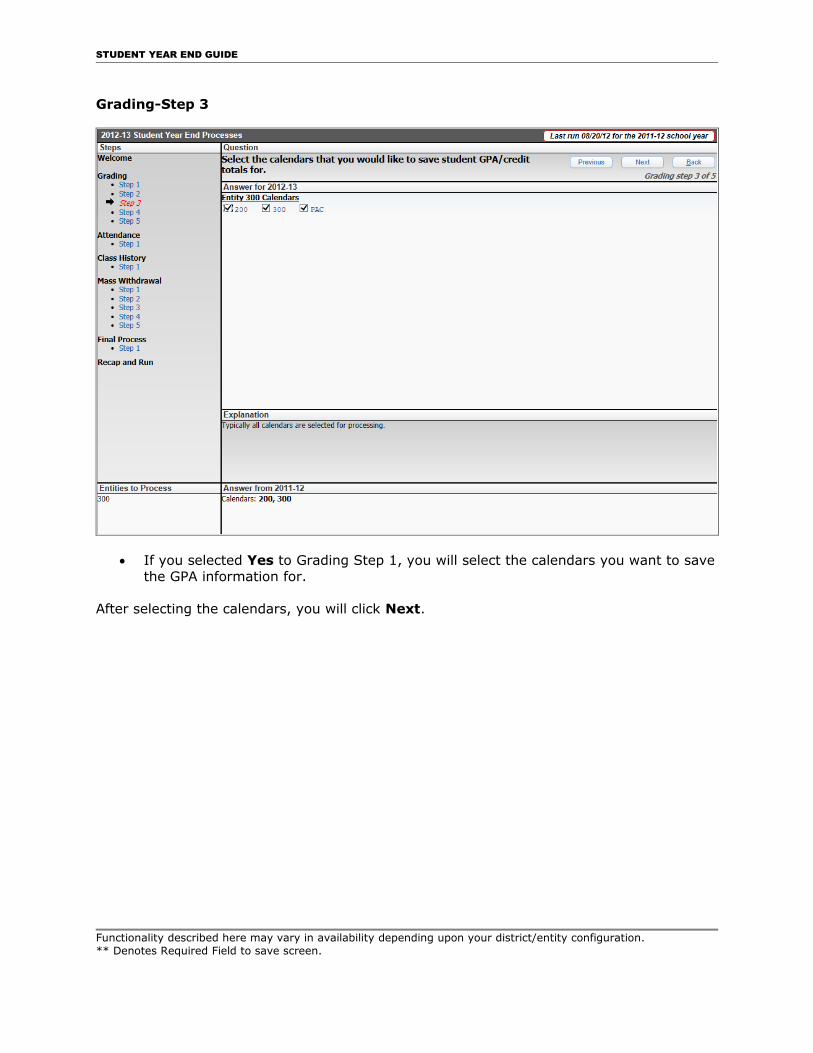
If you selected Yes to Grading Step 1, you will select the calendars you want to savethe GPA information for.
After selecting the calendars, you will click Next.
Functionality described here may vary in availability depending upon your district/entity configuration.** Denotes Required Field to save screen.

STUDENT YEAR END GUIDE
Grading-Step 4
If you selected Yes to Grading Step 1, you will need to select the schools you want to save the GPA information for.
Click Next after selecting the schools.
Functionality described here may vary in availability depending upon your district/entity configuration.** Denotes Required Field to save screen.

STUDENT YEAR END GUIDE
Grading-Step 5
If you selected Yes to Grading Step 1, you can choose whether you want to save theterm GPA points and credits. Saving the term GPA points and credits allow you to access the information and also compare term GPAs.
You will click Next after answering the question concerning saving term GPA points and credits.
Functionality described here may vary in availability depending upon your district/entity configuration.** Denotes Required Field to save screen.

STUDENT YEAR END GUIDE
Attendance-Step 1
Select Yes or No to save the Attendance Records. You will need to save this information if you want to print attendance on transcripts or see summary information in attendance history. If you do not choose to save the attendance records, you will not be able to access them after the Student Year End is complete.
After selecting your answer to save attendance records, you will click Next.
Functionality described here may vary in availability depending upon your district/entity configuration.** Denotes Required Field to save screen.

STUDENT YEAR END GUIDE
Class History-Step 1
Select Yes or No to whether you want to change non-graded classes into historical class records. You will need to save this information if you want to show records of study halls, lunch classes and other non-graded classes in course history. A non-graded class would be any course in the Course Master with the option of “Grade Course” not selected. You can find the Course Master by going to Student Management>Office>Current Scheduling>Build Course Master>Course Master.
You will click Next after selecting your answer regarding saving non-graded classes to course history for students.
Functionality described here may vary in availability depending upon your district/entity configuration.** Denotes Required Field to save screen.

STUDENT YEAR END GUIDE
Mass Withdrawal-Step 1
This step is only available if you flagged a student as being retained. Enter the values to be used for your Retained Students, including the withdrawal date, code and comment. You can also enter the re-entry date, code and comment or you can re-enter the student during the Year Start Processes.
After completing the values for the Retained Students, you will click Next.
Functionality described here may vary in availability depending upon your district/entity configuration.** Denotes Required Field to save screen.

STUDENT YEAR END GUIDE
Mass Withdrawal-Step 2
This step is only available if you flagged a student as being advanced. Enter the values to beused for your Advanced Students, including the withdrawal date, code and comment. You can also enter the re-entry date, code and comment or you can re-enter the student during the Year Start Processes.
Once the values have been entered for the Advanced Students, you will click Next.
Functionality described here may vary in availability depending upon your district/entity configuration.** Denotes Required Field to save screen.

STUDENT YEAR END GUIDE
Mass Withdrawal-Step 3
Select whether you want to withdraw the outgoing class. If you withdraw the outgoing class, enter the withdrawal date, code and comment. If you are withdrawing students in grade 12, you can choose to “Mark Students As Graduated.” You need to be careful when selecting the “Mark Students As Graduated” and/or entering information in the “Already Graduated Student Values” if you ran the “Student Graduation Date Mass Create/Change” utility. When you enter values in the graduation fields when withdrawing an outgoing class, it will overwrite the flag and dates already established on the student’s General>Profile tab. If student’s were flagged as graduated by running the “Student Graduation Date Mass Create/Change” utility, it will give every student the withdraw date and code in the “Already Graduated Student Values” area.
After selecting whether you are withdrawing the outgoing class, you will click Next.
Functionality described here may vary in availability depending upon your district/entity configuration.** Denotes Required Field to save screen.

STUDENT YEAR END GUIDE
Mass Withdrawal-Step 4
Choose whether you want to withdraw your remaining students. The answer to this question will depend upon your state reporting needs. Some states require that all students are withdrawn every year. You can find information regarding state specific instructions in this guide.
After selecting whether you want to withdraw your remaining students, click Next.
Functionality described here may vary in availability depending upon your district/entity configuration.** Denotes Required Field to save screen.

STUDENT YEAR END GUIDE
Mass Withdrawal-Step 5
Select whether you want to close this year’s transportation records. You would select “Yes” if you create new transportation records every year.
You will click Next after selecting your answer for closing transportation records.
Functionality described here may vary in availability depending upon your district/entity configuration.** Denotes Required Field to save screen.

STUDENT YEAR END GUIDE
Final Process-Step 1
If you are satisfied that all the previous steps have been setup correctly, click Yes and then select Next to run the final process. You can click on a prior step to make a change to a prior answer or you can click “Previous” until you get to that step.
Functionality described here may vary in availability depending upon your district/entity configuration.** Denotes Required Field to save screen.

STUDENT YEAR END GUIDE
Recap and Run
The last screen shows you what information will be processed. You will click Start Student Year End Processes.
You will click Start Processing to begin the Student Year End Processes. While the StudentYear End is running, you cannot process any other Year End Wizards for the selected Entities.
Functionality described here may vary in availability depending upon your district/entity configuration.** Denotes Required Field to save screen.

STUDENT YEAR END GUIDE
After the Student Year End completes in the Print Queue, you can click Display Report. The report will display your answers to the Student Year End questions and how long each process took to complete.
Once the Student Year End completes the school year will increment.
Functionality described here may vary in availability depending upon your district/entity configuration.** Denotes Required Field to save screen.

STUDENT YEAR END GUIDE
Year Start UtilitiesThe Year Start Utilities will accomplish the following:
1. Clone Codes2. Mass re-enter students withdrawn during the Student Year End Process3. Updates the Current Year Member Status4. Updates Default Entity5. Updates GPA and Earned Credits
You can find the Year Start in the Year End Wizard which is found by going to Student Management>Office>Year End>Wizard Selection. You will select Year Start Utilities and click Next.
Functionality described here may vary in availability depending upon your district/entity configuration.** Denotes Required Field to save screen.

STUDENT YEAR END GUIDE
You will click Next to take you to the Clone Codes step of the Year End Wizard.
Functionality described here may vary in availability depending upon your district/entity configuration.** Denotes Required Field to save screen.

STUDENT YEAR END GUIDE
Clone Codes-Step 1
Select whether you want to clone your codes (Absence Reasons, Absence Types, Activity Codes, Address Path Codes, Address Range Defaults, Attendance Period Times, Attendance Thresholds, Department Codes, Grading Codes, Homeroom Codes, Subject Codes) from the prior school year. Unless you anticipate a massive change in your codes between years, youshould click Yes.
Functionality described here may vary in availability depending upon your district/entity configuration.** Denotes Required Field to save screen.

STUDENT YEAR END GUIDE
Clone Codes-Step 2
If you selected Yes to Clone Codes Step 1, you will select the codes you want to clone.
After selecting the codes you want to clone, you will click Next.
Functionality described here may vary in availability depending upon your district/entity configuration.** Denotes Required Field to save screen.

STUDENT YEAR END GUIDE
Mass Entry-Step 1
Select whether you want to run the Mass Entry process. You would use this process if you “Mass Withdrew” your remaining students or didn’t create an re-entry record for retained or advanced students during the Year End Process.
After answering the question to the Mass Entry, you will click Next.
Functionality described here may vary in availability depending upon your district/entity configuration.** Denotes Required Field to save screen.

STUDENT YEAR END GUIDE
Mass Entry-Step 2
If you selected Yes to the Mass Entry Step 1, you will enter the grades to create a new entry record for.
After entering the grade ranges, you will click Next.
Functionality described here may vary in availability depending upon your district/entity configuration.** Denotes Required Field to save screen.

STUDENT YEAR END GUIDE
Mass Entry-Step 3
If you selected Yes to the Mass Entry Step 1, you will enter the entry record values for students being mass entered.
When you have finished, you will click Next.
Functionality described here may vary in availability depending upon your district/entity configuration.** Denotes Required Field to save screen.

STUDENT YEAR END GUIDE
Current Year Member-Step 1
Select whether you want to change the Current Year Member flag to “Yes” for active student in your entity.
Functionality described here may vary in availability depending upon your district/entity configuration.** Denotes Required Field to save screen.

STUDENT YEAR END GUIDE
Current Year Member-Step 2
If you selected Yes to Current Year Member-Step 1, you will need to enter the grades to be included in this process. It will change the Current Year Member flag forany active students that falls within the grade ranges.
After entering the grade ranges, you will click on Next.
Functionality described here may vary in availability depending upon your district/entity configuration.** Denotes Required Field to save screen.

STUDENT YEAR END GUIDE
Default Entity-Step 1
Select whether you want to change the default entity to this entity for incoming students.
You will click Next after answering the question regarding changing student’s default entity.
Functionality described here may vary in availability depending upon your district/entity configuration.** Denotes Required Field to save screen.

STUDENT YEAR END GUIDE
Default Entity-Step 2
If you selected Yes to the question for Default Entity-Step 1, you will enter the graderanges of the students that you want to change the default entity for. Just the incoming Grad Year needs to be selected.
After you have entered the Grad Year, you will click on Next.
Functionality described here may vary in availability depending upon your district/entity configuration.** Denotes Required Field to save screen.

STUDENT YEAR END GUIDE
Calculate GPA-Step 1
You will click Next on the GPA calculation process. This process will create a separate task in the Print Queue.
Functionality described here may vary in availability depending upon your district/entity configuration.** Denotes Required Field to save screen.

STUDENT YEAR END GUIDE
Recap and Run
The final screen shows you what information will be processed. If you need to adjust any answers, you can click on the step found on the left side of the screen or click on the “Previous” button. If you are satisfied that the information to process is correct, click Start Year Start Utilities.
You will click Start Processing to begin the Year Start Utilities. While the Year Start Utilities are running, you cannot process any other Year End Wizards for the selected Entities.
Functionality described here may vary in availability depending upon your district/entity configuration.** Denotes Required Field to save screen.

STUDENT YEAR END GUIDE
After the Year Start Utilities complete in the Print Queue, you can click Display Report. Thereport will display your answers to the Year Start questions and how long each process took to complete.
Functionality described here may vary in availability depending upon your district/entity configuration.** Denotes Required Field to save screen.

STUDENT YEAR END GUIDE
District Year EndThe District Year End is run after all entities have completed the year end process. It will accomplish the following:
1. Create an Entity Year record2. Increment the School Year
You will change to the District Entity and go to Student Management>Office>Year End>Wizard Selection.
After selecting Wizard Selection, you may see red warning messages. If you see the Food Service or Fee Management Year End warnings, you can continue with running the District Year End process. The Food Service and Fee Management Year End processes can be run after completing the District Year End process. You will want to make sure all entities have completed running the Student Year End prior to running the District Year End.
You will click Next to complete the District Year End.
Functionality described here may vary in availability depending upon your district/entity configuration.** Denotes Required Field to save screen.

STUDENT YEAR END GUIDE
You will click Next on the Welcome screen.
Functionality described here may vary in availability depending upon your district/entity configuration.** Denotes Required Field to save screen.

STUDENT YEAR END GUIDE
Entity Year-Step 1
Select whether you would like to clone the entity year and term definitions. You should select Yes, unless you’ve already manually created the school year records for the district entity. If you’ve created the entity year and terms definitions in the district and select Yes, the records will be overwritten.
After answering the question concerning the cloning of the entity year and term definitions, you will click Next.
Functionality described here may vary in availability depending upon your district/entity configuration.** Denotes Required Field to save screen.

STUDENT YEAR END GUIDE
Entity Year-Step 2
If you selected Yes to cloning the entity year and term definitions for the District Entity, you will enter the dates for the new school year.
After all of the dates have been verified, you will click Next.
Functionality described here may vary in availability depending upon your district/entity configuration.** Denotes Required Field to save screen.

STUDENT YEAR END GUIDE
Increment School Year-Step 1
Click Yes to increment the School Year for the District Entity and click Next.
Functionality described here may vary in availability depending upon your district/entity configuration.** Denotes Required Field to save screen.

STUDENT YEAR END GUIDE
Recap and Run
If any entities have not completed the Year End process, you will see them listed at the bottom of the screen. You will want to make sure all entities have completed running the Student Year End prior to running the District Year End.Once you are satisfied that the information in the previous steps is accurate, you will click Start District Year End. This will close the current school year and start the new school year in your district.
After clicking Start District Year End, you will select Start Processing to complete the District Year End.
Functionality described here may vary in availability depending upon your district/entity configuration.** Denotes Required Field to save screen.

STUDENT YEAR END GUIDE
After the District Year End process completes in the Print Queue, you will click Display Report. The report will display your answers to the Year Start questions and how long each process took to complete.
Functionality described here may vary in availability depending upon your district/entity configuration.** Denotes Required Field to save screen.

STUDENT YEAR END GUIDE
Post-Year End Processing Checklist
After the actual Year End processing has been completed, there are a few items you can runto validate data for the upcoming school year.
Unlock the System Run the Post-Year End Validation Report Year Start Course Validation Report Year Start Student Validation Report Students Processed in Year End Report Year End Processing Reports
Functionality described here may vary in availability depending upon your district/entity configuration.** Denotes Required Field to save screen.

STUDENT YEAR END GUIDE
Unlock SystemYou will need to unlock the system after you have completed the Year End processes.
You will change your system to Product Setup and then select System Administration> System Administration>Utilities.
Now you will select Lock and Unlock System.
You will click Unlock next to each system you locked. After you have unlocked eachsystem, you will see a message stating “All systems are currently unlocked.”
Functionality described here may vary in availability depending upon your district/entity configuration.** Denotes Required Field to save screen.

STUDENT YEAR END GUIDE
Run the Post-Year End Validation ReportThe Post-Year End Validation Report will give you a list of students with invalid information for graduated flags, graduation dates, entry/withdrawal records, graduation years, statuses,class statuses, and default entities.
You will find the Post-Year End Validation Report by going to Student Management>Office> Year End>Wizard Selection.
Functionality described here may vary in availability depending upon your district/entity configuration.** Denotes Required Field to save screen.

STUDENT YEAR END GUIDE
You will select Post-Year End Validation Report and then click Next. The report will then process in the Print Queue. The Post-Year End Validation Report is sorted two different ways1) sorted by student alphakey and 2) sorted by issue. Some of the issues you will see on the report might include:
1. Active without an open entry record – Verify the student’s Entry/Withdrawal and Entity tab in the Student Profile.
2. Inactive with an open entry record - Verify the student’s Entry/Withdrawal and Entity tab in the Student Profile.
3. Graduated but has an open entry record – Verify the student’s Entry/Withdrawal and General>Profile tab in the Student Profile.
4. Graduation date of _____ but not marked as graduated – Verify the student’s General>Profile in the Student Profile.
5. Enrolled in this entity but not in default entity of _____ - Verify the student’s Entry/Withdrawal tab in the Student Profile.
6. Class for previous year is not marked as historical – Verify the student’s Gradestab in the Student Profile.
Functionality described here may vary in availability depending upon your district/entity configuration.** Denotes Required Field to save screen.

STUDENT YEAR END GUIDE
Year Start Course Validation ReportThe Year Start Course Validation Report will verify the following information:
Section Calendar Course Length Sets Course Control Sets Start and Stop Terms Teacher Assignments Primary Teacher Status Gradebook Status Teacher’s access to EA+ Course Curriculum links GPA Sets Earned Credits GPA Credits
The report will list the error(s) and give suggestions how to fix them. You will need to determine if the error/warning needs to be fixed and perform the necessary changes.
You can find the Year Start Course Validation Report by going to Student Management> Office>Year End>Utilities.
You will select Year Start Course Validation Report.
Functionality described here may vary in availability depending upon your district/entity configuration.** Denotes Required Field to save screen.

STUDENT YEAR END GUIDE
Report Ranges School Year – Select the school year to run the validation for. Print Unaccessed Gradebook Errors – If this option is selected, it will display a
list of gradebook records that have not been created yet. A gradebook record can be created two ways: 1) Primary teacher needs to login and access their course or 2) Run the utility to “Mass Create Gradebook Records” found by going to Student Management>Educator Access Plus>Gradebook>Setup>Utilities.
Functionality described here may vary in availability depending upon your district/entity configuration.** Denotes Required Field to save screen.

STUDENT YEAR END GUIDE
Year Start Student Validation ReportThe Year Start Student Validation Report will verify the following information:
Student default entities and enrollment dates are correct. Students who are flagged as Graduated are inactive and do not have future
scheduling transactions. Scheduling Transaction Effective Dates Students have acceptable scheduling transaction drop and add records.
The report will display the error along with how to fix the given error. It will be up to you to determine if the error/warning needs to be fixed and perform the necessary changes.
You will find the Year Start Student Validation Report by going to Student Management> Office>Year End>Utilities.
You will select Year Start Student Validation Report.
Functionality described here may vary in availability depending upon your district/entity configuration.** Denotes Required Field to save screen.

STUDENT YEAR END GUIDE
Report By Options By Range/Individual – Allows you to determine the students that have their
student records verified.
Functionality described here may vary in availability depending upon your district/entity configuration.** Denotes Required Field to save screen.

STUDENT YEAR END GUIDE
Students Processed in Year End ReportThe Students Processed in Year End Report displays every student that was processed whilerunning the Year End processes. The report will display the Student’s Name, Graduation Year, Other ID, Birthday and Default Entity.
The Students Processed in Year End Report is found by going to Student Management> Office>Year End>Utilities.
You can then select Students Processed in Year End.
Functionality described here may vary in availability depending upon your district/entity configuration.** Denotes Required Field to save screen.

STUDENT YEAR END GUIDE
Report Ranges School Year – Select the School Year of Year End process. Grad Year – Choose the Grad Year ranges of students to be pulled on the report.
Functionality described here may vary in availability depending upon your district/entity configuration.** Denotes Required Field to save screen.

STUDENT YEAR END GUIDE
Year End Processing ReportsYou can view reports about the selections you made during the year end process.
You can view the Year End Processing Reports by going to Student Management>Office> Year End>Wizard Selection.
You will click on the Last Run/Status hyperlink for a Year End Process.
Functionality described here may vary in availability depending upon your district/entity configuration.** Denotes Required Field to save screen.

STUDENT YEAR END GUIDE
This is a sample of the Student Year End Processes hyperlink. The screen will display the processes select to run and if you expand by the process, you can see the number of students affected when running it. You also have an option to “Print Report” which will generate a report displaying the answers to each of the year end questions and amount of time each step took to process. This report is the same report that is generated after a yearend process completes in the Print Queue.
Functionality described here may vary in availability depending upon your district/entity configuration.** Denotes Required Field to save screen.

STUDENT YEAR END GUIDE
First Day of School ChecklistThe notes below are intended to assist you with your preparations for the first day of school.
Report Templates Verify and update any year-specific report templates to pull data for the new school
year.
Demographics Verify the Entry Code Defaults are set correctly for the start of school: Current
date, First day of Current School Year Calendar, Specific Date, etc.Go to: Student Management>Students>Student Profile (within Student Add Process)
Verify the Advisor field is correct set for the Current YearGo to: Student Management>Students>Student Profile>Entity>Entity InfoGo to: (Utility) Student Management>Students>Setup>Utilities>Mass Assign Student Advisor by Course or Class Period
Verify the Homeroom field is correctly set for the Current YearGo to: Student Management>Students>Student Profile>Entity>Entity InfoGo to: Student Management>Students>Setup>Utilities>Mass Assign Student Homeroom or Student Management>Office>Current Scheduling>Setup>Utilities> Student Homeroom Quick Entry
Scheduling Verify Scheduling Entity Year is correct for the current year. (Applicable only if
different from previous year)Go to: Student Management>Office>Current Scheduling>Setup>Configuration> Scheduling Entity Year Setup.
Verify Scheduling Configuration Options (Applicable only if different from previous year)Go to: Student Management>Office>Current Scheduling>Setup>Configuration> Scheduling Configuration Options
Verify Scheduling Related Codes are correct for the current year.Go to: Student Management>Office>Current Scheduling>Build Course Master> Setup>Codes
Verify Scheduling Period Times are correct. This will affect the Student Locator.Go to: Student Management>Office>Current Scheduling>Build Course Master> Setup>Codes>Scheduling Period Time Codes
Verify Scheduling Groups are created for current year.Go to: Student Management>Office>Current Scheduling>Build Course Master> Setup>Codes>Scheduling Group Codes
Functionality described here may vary in availability depending upon your district/entity configuration.** Denotes Required Field to save screen.

STUDENT YEAR END GUIDE
Attendance Verify Attendance Configuration is set for the current year.
Go to: Student Management>Office>Attendance>Setup>Configuration>Entity Year Configuration
Verify Attendance Type and Reason Codes were cloned from the previous year and that any additions or subtractions have been made.Go to: Student Management>Office>Attendance>Setup>Codes>Absence Type and Student Management>Office>Attendance>Setup>Codes>Absence Reason
Verify Calendars have been clone/created and all dates are correct for the current year.Go to: Student Management Office>Attendance>Setup>Codes>Calendar Codes
Verify Attendance Letter Setup is correct for the current year.Go to: Student Management>Office>Attendance>Setup>Configuration>Attendance Letter Setup
Verify Attendance Letter Thresholds and Letter Attendance Types are created for current year.Go to: Student Management>Office>Attendance>Attendance Letters>Setup> Codes>Threshold and Student Management>Office>Attendance>Attendance Letters>Setup>Codes>Letter Attendance Type
Grading Verify Grading Period Dates are correct for current year.
Go to: Student Management>Office>Grading>Setup>Configuration>Grading Setup>Grading>Grading Periods
Verify Grade Marks have been cloned and are correctGo to: Student Management>Office>Grading>Setup>Configuration>Grading Setup>Grade Marks
Verify Grade Comment codes are up to date.Go to: Student Management>Office>Grading>Setup>Codes>Grade Comment Codes
Secondary Gradebook Clone Category Codes and Groups.
Go to: Student Management>Educator Access Plus>Gradebook>Secondary>Setup> Utilities>Clone Category Groups for New Year
Add any Additional Categories and add them to the entity umbrella category group.Go to: Student Management>Educator Access Plus>Gradebook>Secondary>Setup> Codes>Category Codes and Student Management>Educator Access Plus> Gradebook>Secondary>Setup>Configuration>Category Groups.
Functionality described here may vary in availability depending upon your district/entity configuration.** Denotes Required Field to save screen.

STUDENT YEAR END GUIDE
Clone Grade Mark GroupsGo to: Student Management>Educator Access Plus>Gradebook>Secondary>Setup> Utilities>Clone Grade Mark Groups for New Year
Make any adjustment to the Grade Mark GroupGo to: Student Management>Educator Access Plus>Gradebook>Secondary>Setup> Configuration>Grade Mark Groups
Verify the Grade Level Grade Mark Group and/or Special Grade Mark Groups, ifyou are using these options.Go to: Student Management>Educator Access Plus>Gradebook>Secondary>Setup> Configuration>Grade Level Grade Mark Groups and/or Student Management> Educator Access Plus>Secondary>Setup>Configuration>Special Grade Mark Groups
If the district is using Special Codes, clone the Special Codes.Go to: Student Management>Educator Access Plus>Gradebook>Secondary>Setup> Utilities>Clone Special Codes for New Year
Make modifications to the Special Codes.Go to: Student Management>Educator Access Plus>Gradebook>Secondary>Setup> Codes>Special Codes
Clone the Semester/Final Default Formulas for the Secondary Gradebook.Go to: Student Management>Educator Access Plus>Gradebook>Secondary>Setup> Utilities>Clone Semester/Final Default Formulas for New Year
Verify the Semester/Final Default Formulas for the new year.Go to: Student Management>Educator Access Plus>Gradebook>Secondary>Setup> Configuration>Semester/Final Default Formula
Verify the Grade Mark Overrides.Go to: Student Management>Educator Access Plus>Gradebook>Secondary>Setup> Codes>Grade Mark Overrides
Standards Gradebook Clone the Academic Areas for Standards Gradebook.
Go to: Student Management>Educator Access Plus>Gradebook>Standards>Setup> Utilities>Clone Academic Areas for New Year
Make any Modifications to Academic Areas for the new school year.Go to: Student Management>Educator Access Plus>Gradebook>Standards> Academic Areas
Clone the Semester/Final Default Formulas for Standards Gradebook.Go to: Student Management>Educator Access Plus>Gradebook>Standards>Setup> Utilities>Clone Semester/Final Default Formula for New Year
Functionality described here may vary in availability depending upon your district/entity configuration.** Denotes Required Field to save screen.

STUDENT YEAR END GUIDE
Verify the Semester/Final Default Formulas for Standards Gradebook.Go to: Student Management>Educator Access Plus>Gradebook>Standards>Setup> Configuration>Semester/Final Default Formula
Secondary and Standards Gradebook If the district is using Comments Plus, clone Comments Plus.
Go to: Student Management>Educator Access Plus>Setup>Utilities>Clone Comments Plus for New Year
Make modification to Comment Plus.Go to: Student Management>Educator Access Plus>Configuration>Comments Plus
Scheduling needs to be Complete.
Verify the dates in the system. All dates can be verified using the Change Subsystem Control. You need to make sure the Grade Input Start and End Dates are correct.Go to: Student Management>Office>Attendance>Setup>Utilities>Change Subsystem Control Dates
Check to make sure the Grade Buckets are assigned to the correct grading periods.Go to: Student Management>Office>Grading>Setup>Configuration>Grading Setup
Assign security access to any teachers new to the district.
Health Records Modify the Age Effective Date for Vaccinations to reflect the first day of school.
Go to: Student Management>Office>Health Records>Vaccination>Setup> Configuration>Vaccination Configuration
Functionality described here may vary in availability depending upon your district/entity configuration.** Denotes Required Field to save screen.