startusb for avrâ„¢ - mikroelektronika
TRANSCRIPT

MikroElektronika
StartUSB for AVR™
Manual
All MikroElektronika´s development systems represent irreplaceable tools for programming and developing microcontroller-based devices. Carefully chosen components and the use of machines of the last generation for mounting and testing thereof are the best guarantee of high reliability of our devices. Due to simple design, a large number of add-on modules and ready to use examples, all our users, regardless of their experience, have the possibility to develop their projects in a fast and efficient way.
Deve
lopm
ent S
yste
m
MikroElektronika
2 StartUSB for AVR
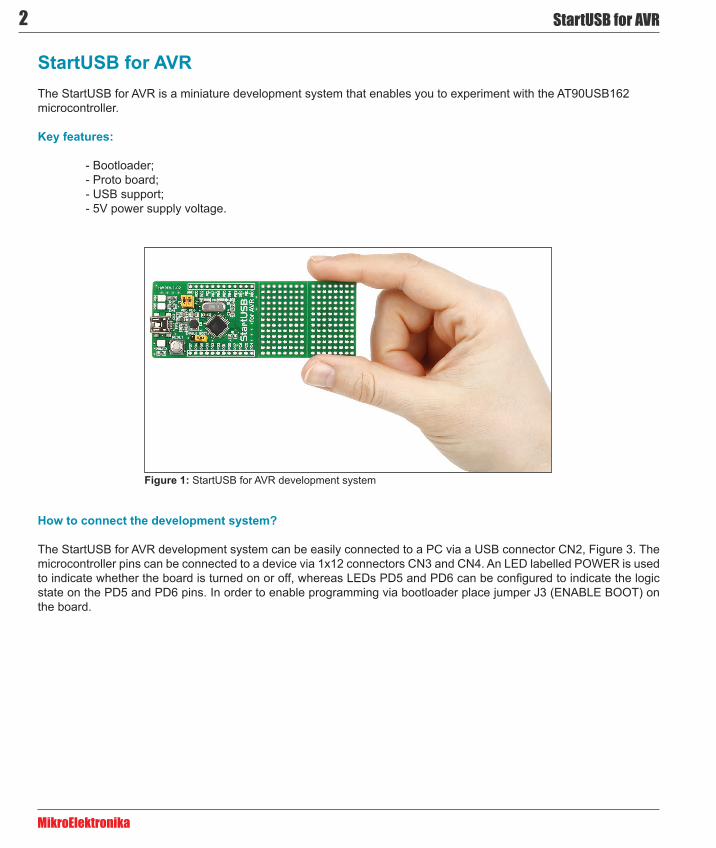
Figure 1: StartUSB for AVR development system
How to connect the development system?
The StartUSB for AVR development system can be easily connected to a PC via a USB connector CN2, Figure 3. The microcontroller pins can be connected to a device via 1x12 connectors CN3 and CN4. An LED labelled POWER is used to indicate whether the board is turned on or off, whereas LEDs PD5 and PD6 can be configured to indicate the logic state on the PD5 and PD6 pins. In order to enable programming via bootloader place jumper J3 (ENABLE BOOT) on the board.
StartUSB for AVR The StartUSB for AVR is a miniature development system that enables you to experiment with the AT90USB162 microcontroller.
Key features:
- Bootloader; - Proto board; - USB support; - 5V power supply voltage.

MikroElektronika
3StartUSB for AVR
How to program the microcontroller?
A .hex code is loaded into the microcontroller via the bootloader program stored in the microcontroller memory. The Atmel FLIP application is used to transfer the .hex code from the PC to the microcontroller.
Follow the steps below in order to program the microcontroller properly:
R27 27
FB1FERRITE
R26 27
C15
100nF
PB0
PD4
PB1
PD3
PD5
PD6
PD7
PB2
PD2
PB3
PD1
PD0
PB4
PB5
PC7
PB7
PC5
PC2
PB6
PC6
PC1
PC4
VCC
C24C13
100nF2.2uF
E5
10uF
R414K7
R152K2
LD2 LD3
J1J3 J2
PD5PD7
PD6
VCC
R34K7
LD1POWER
VCC
VCC
CN3
CN4
CN2
D-
RESET
D+
USB
MIN
I B
USBDNUSBDP
R1710K
R110K
RESET
VCC
VCC
14C100nF
T1X18MHz
C10
22pF
C 11
22pF
AT90USB162
AVC
CPD
3PD
4PD
5PD
6PD
7PB
0PB
1PB
2
UVC
CD
-/SD
ATA
D+/
SCK
UG
ND
UC
AP PC4
PC5
XTAL1 RESET/PC1PC6PC7PB7PB6PB5PB4PB3
PC0(XTAL2)GNDVCCPC2PD0PD1PD2
Figure 2: The StartUSB for AVR development system connection schematic
STEP 1: Install Atmel FLIP
Download the Atmel FLIP program from Atmel’s website at:http://www.atmel.com/dyn/products/tools_card.asp?tool_id=3886 (FLIP 3.4.2 for Windows (Java Runtime Environment included))
After download is completed double click on the FLIP installation icon
Follow on-screen instructions and install the program on your PC.

MikroElektronika
4 StartUSB for AVR
STEP 2: Connect StartUSB for AVR to your PC
STEP 3: Start Atmel FLIP program
Attach StartUSB for AVR to a PC via a USB cable, Figure 3. A PC will automatically start driver installation for a new hardware. If the driver installation fails go one step back and find driver manually in the Program files-Atmel-Flip folder.
To start this program double click on the Atmel FLIP icon . The Atmel FLIP window will appear on the screen.
Figure 3: Connecting the system to a PC

MikroElektronika
5StartUSB for AVR
STEP 4: Link the program with development system
After Atmel FLIP is started press RESET button on the StartUSB for AVR development board.
Click on the Select a Target Device button
Click on the Select a Communication Medium icon. A drop down menu will appear
The Device Selection window will open
Select AT90USB162 from the drop-down list
Click on the OK button
Select the USB option (You can also use keyboard shortcut Ctrl+U)
In the pop-up window click on the Open button

MikroElektronika
6 StartUSB for AVR
STEP 5: Browse for .hex code
After the link is established all options and buttons will become active
Click on the Load HEX File icon
In the pop-up window browse for a .hex file
Click on the OK button
MikroElektronika
7StartUSB for AVR
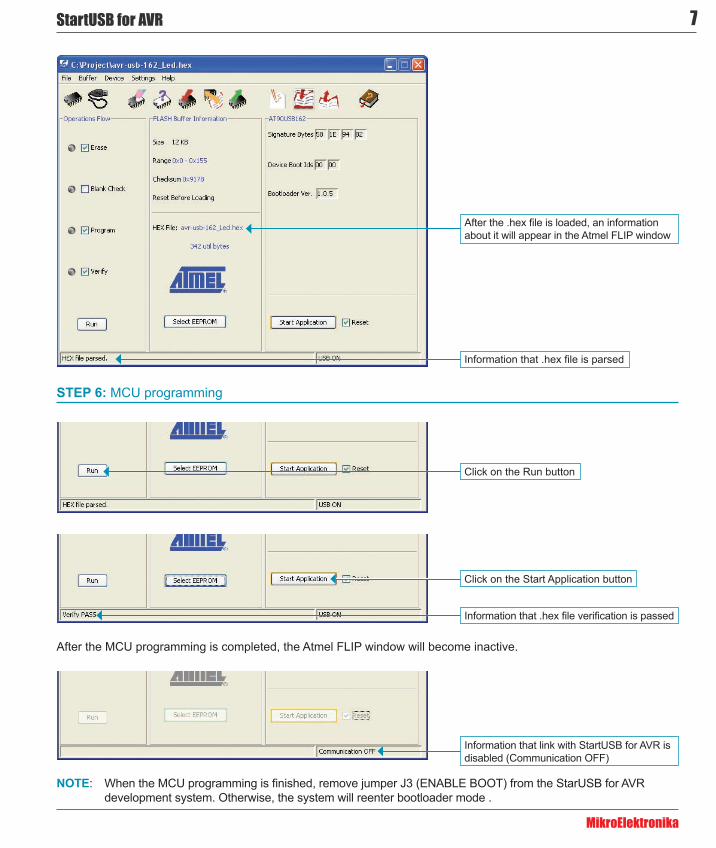
STEP 6: MCU programming
After the .hex file is loaded, an information about it will appear in the Atmel FLIP window
Information that .hex file is parsed
Click on the Run button
Click on the Start Application button
Information that .hex file verification is passed
Information that link with StartUSB for AVR is disabled (Communication OFF)
After the MCU programming is completed, the Atmel FLIP window will become inactive.
NOTE: When the MCU programming is finished, remove jumper J3 (ENABLE BOOT) from the StarUSB for AVR development system. Otherwise, the system will reenter bootloader mode .

MikroElektronika
8 StartUSB for AVR
93.11mm
2.54mm
35.03mm
Figure 4: Dimensions of the StartUSB for AVR development system
In the compiler window select Options from the Tools menu or press F12 on keyboard.
STEP 1: Open tools menu
Figure 5: Options window
Adding FLIP to mikroC PRO for AVR compiler
Follow the next few steps to add FLIP to mikroC PRO for AVR tools list. By doing so you can start programming of MCU on StartUSB for AVR directly from the compiler.
The process of adding FLIP tool to mikroBasic PRO for AVR and mikroPascal PRO for AVR is the same as for mikroC PRO for AVR.

MikroElektronika
9StartUSB for AVR
STEP 2: Add tool parameters
Rename Tool0 to StartUSB for AVR
Click on the open button
Find batchisp in the C:\Program Files\Atmel\Flip 3.4.2\bin folder
Click on the Open button
A path to batchisp.exe file will appear in the File Name box
NOTE: If you copy command line path retype every quotation mark
In parameters text box type in command line path: -device AT90USB162 -hard-ware USB -operation erase f loadbuffer “%HEX_FILE_NAME” program verify

MikroElektronika
10 StartUSB for AVR
Click OK
Select desired shortcut (in this case Ctrl+F2) from the drop down list
After the source code is written, select the Build option from the Build menu to compile it.
When the source code is compiled, the .hex file is generated and ready to be uploaded into the MCU.
STEP 3: Compile source code
Click on the Build option or press Ctrl+F9 on keyboard
To upload .hex file we will use StartUSB for AVR that was created in step 2. Just press Ctrl+F2 (or chosen shortcut) and .hex file will be automatically transferred into the MCU, Figure 6.
STEP 4: Uploade .hex file into MCU

MikroElektronika
11StartUSB for AVR
After uploading is over, a command line window (figure 6) will disappear which means that .hex file is uploaded.
Figure 6: Uploading .hex file

StartUSB for AVR
If yo
u w
ant t
o le
arn
mor
e ab
out o
ur p
rodu
cts,
ple
ase
visi
t our
web
site
at w
ww
.mik
roe.
com
If yo
u ar
e ex
perie
ncin
g so
me
prob
lem
s w
ith a
ny o
f our
pro
duct
s or
just
nee
d ad
ditio
nal i
nfor
mat
ion,
ple
ase
plac
e yo
ur ti
cket
at
ww
w.m
ikro
e.co
m/e
n/su
ppor
t
If yo
u ha
ve a
ny q
uest
ions
, com
men
ts o
r bus
ines
s pr
opos
als,
do
not h
esita
te to
con
tact
us
at o
ffice
@m
ikro
e.co
m