srm university department of computer applications lesson plan for lab · pdf...
TRANSCRIPT

SRM UNIVERSITY DEPARTMENT OF COMPUTER APPLICATIONS
LESSON PLAN FOR LAB
TITLE : MC0713 ‐ MULTIMEDIA SYSTEMS CLASS : III MCA – A, B ,C & D
Ex.No. Exercise Name Batch – I2 Hours (Day ‐ I)
Batch – II 2 Hours
(Day – IV) Outcome
PHOTOSHOP1. Selection Tools Copy, Cut, Paste,
Move 09.07.2011 05.07.2011
Understand and Apply Multimedia concepts using various tools in Adobe
Photoshop
2. Lasso‐ and Polygonal Lasso, Transform and Opacity
16.07.2011 12.07.2011 3. Quick Select Tool (or Magic Wand
Tool), Invert Selection4. Paint Bucket Tool, Color Picker, Brush
Tool 23.07.2011 19.07.2011
5. Layers, Eraser Tool
6. Text and Transform Tool
30.07.2011 26.07.2011 7.
Color Balance
8. Crop and Canvas
06.08.2011 02.08.2011 9.
Clone Stamp Tool, Smudge Tool
10. Filters 13.08.2011 09.08.2011
FLASH1.
Motion Tweening 20.08.2011 16.08.2011 Understand and Apply Multimedia concepts using various tools in
Macromedia Flash
2. Shape Tweening
27.08.2011 23.08.2011 3.
Working on Layers
4. Masking Effect
03.09.2011 30.08.2011 5.
Bouncing
6. Fade‐in, Fade‐out and Zoom‐in, Zoom‐out
10.09.2011 06.09.2011
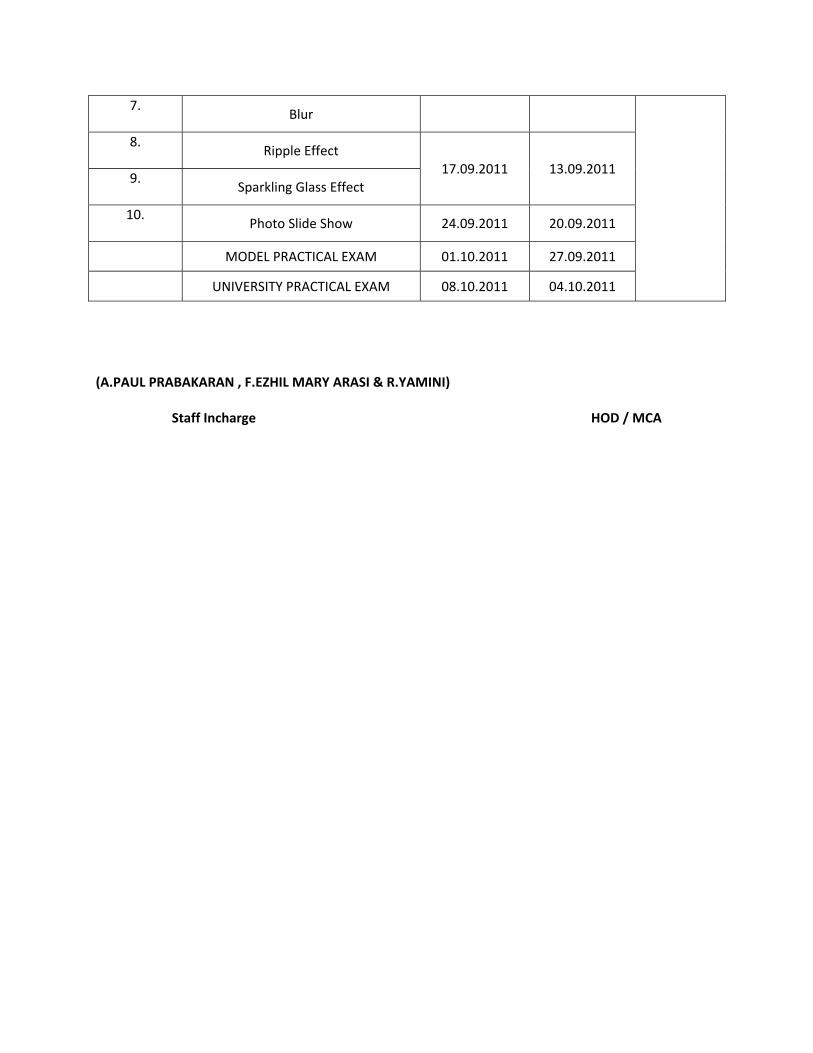
7. Blur
8. Ripple Effect
17.09.2011 13.09.2011 9.
Sparkling Glass Effect
10. Photo Slide Show 24.09.2011 20.09.2011
MODEL PRACTICAL EXAM 01.10.2011 27.09.2011
UNIVERSITY PRACTICAL EXAM 08.10.2011 04.10.2011
(A.PAUL PRABAKARAN , F.EZHIL MARY ARASI & R.YAMINI) Staff Incharge HOD / MCA

MC0713 ––MULTIMEDIA SYSTEMS
LAB MANUAL
DEPARTMENT OF COMPUTER APPLICATIONS
SRM UNIVERSITY
(Under Section 3 of UGC Act, 1956)
S.R.M. NAGAR, KATTANKULATHUR – 603 203
KANCHEEPURAM DISTRICT
Basic Exercises for Photoshop
Exercise 1
AIM:
This exercise can be solved using the following functions: Selection Tools, Copy, Cut, Paste, Move Tool, Paste Into
PROCEDURE FOR PASTE:
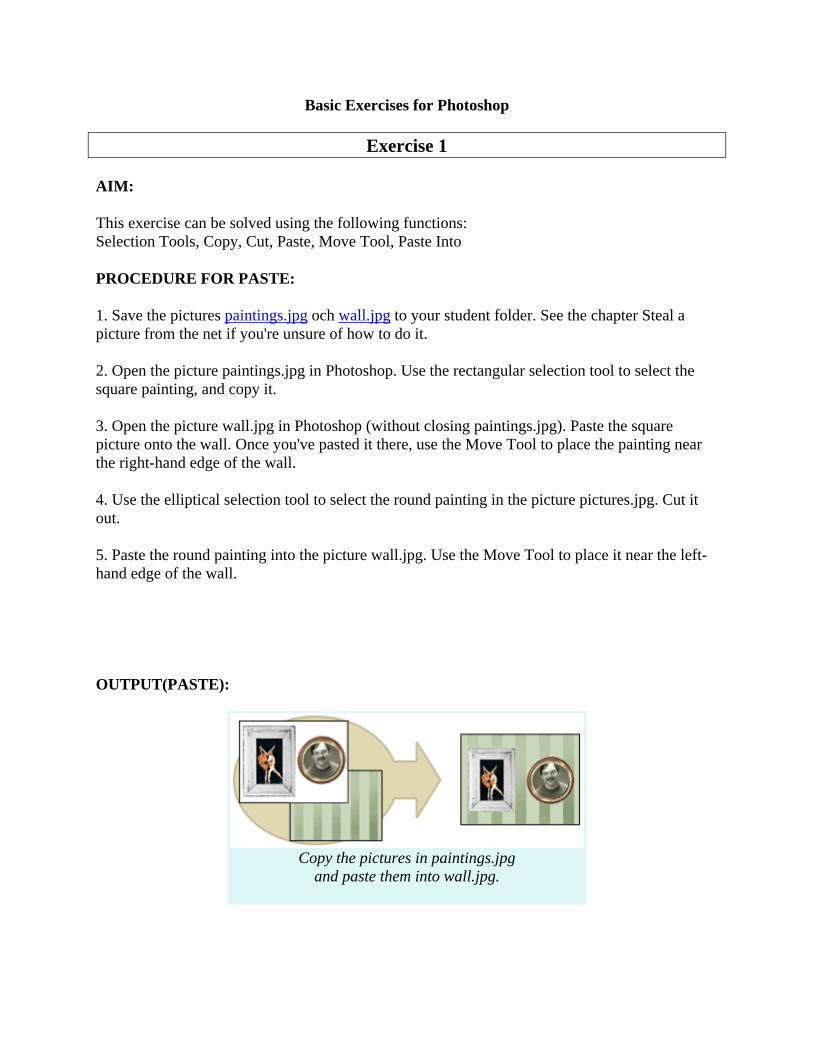
1. Save the pictures paintings.jpg och wall.jpg to your student folder. See the chapter Steal a picture from the net if you're unsure of how to do it.
2. Open the picture paintings.jpg in Photoshop. Use the rectangular selection tool to select the square painting, and copy it.
3. Open the picture wall.jpg in Photoshop (without closing paintings.jpg). Paste the square picture onto the wall. Once you've pasted it there, use the Move Tool to place the painting near the right-hand edge of the wall.
4. Use the elliptical selection tool to select the round painting in the picture pictures.jpg. Cut it out.
5. Paste the round painting into the picture wall.jpg. Use the Move Tool to place it near the left-hand edge of the wall.
OUTPUT(PASTE):
Copy the pictures in paintings.jpg
and paste them into wall.jpg.

PROCEDURE FOR PASTE INTO:
1. Save the pictures framethis1.jpg, framethis2.jpg, framethis3.jpg and emptyframes.jpg to your folder.
2. Open the pictures you just saved in Photoshop.
3. Use a fitting Selection Tool to copy a picture from one of the framethis-pictures. When you've copied it, Select the empty space inside one of the borders in the picture emptyframes.jpg. Use the function Paste Into to paste the picture you just copied into the frame.
4. Use the Move Tool to move the picture around inside the border until it fits.
5. Repeat until all the empty frames are filled.
OUTPUT (PASTE INTO)
Copy the pictures in framethis1, 2 and 3. Use the function
Paste Into to get them into the empty frames.

Exercise 2
AIM:
This exercise can be solved using the following functions: Lasso- and Polygonal Lasso Selection Tools, Copy, Paste Into, Move Tool, Zoom Tool, Transform,Opacity
PROCEDURE FOR Lasso- and Polygonal Lasso Selection Tools, Zoom Tool:
1. Save the pictures dog.jpg and doghouse.jpg to your folder.
2. Open the pictures in PhotoShop.
3. Use the Lasso- or Polygonal Lasso Selection Tools to select the dog. Be careful around the edges. You will probably have to use the Zoom Tool. Read more about how to effectively use these selection tools in the Tools chapter in the compendium.
4. When you've Selected the dog, copy it.
5. Use the Polygonal Lasso Tool to create a selection in the opening of the doghouse. Use Paste Into to put the dog in there. Move the dog around with the Move Tool. Use Transform Scale to shrink the dog a bit. Read more about how to do this in the chapter Transform in the compendium.
OUTPUT1:
Use the Lasso- or Polygonal Lasso Tool to Select and copy the dog. Paste the dog into the doghouse..
PROCEDURE FOR Transform, Opacity:
1. Save the pictures ghost.jpg and ghostcastle.jpg to your folder.
2. Open the pictures in Photoshop.

3. Use a Selection Tool to Select the ghost. Copy it. Paste at least ten copies of the ghost into the ghostcastle picture. Feel free to use Paste Into if you like. Use the Move Tool to place each ghost where you want it.
4. Use the Transform functions to change the way each ghost looks.
5. Give each ghost's layer an Opacity that's less than 100%.
OUTPUT2:
Copy the ghost and paste at least ten copies of it into the castle picture. Use the Transform function on each
ghost, and give the layer of each ghost a different Opacity.

Exercise 3
AIM: This exercise can be solved using the following functions: Quick Select Tool (or Magic Wand Tool), Invert Selection
PROCEDURE:
1. Save the picures guitar.jpg and flowerback.jpg to your folder.
2. Open the pictures in Photoshop.
3. We're going to select the guitar. The fastest way to do that is here is to select the black area around the guitar and then invert the selection -- to turn it inside out, so that the guitar ends up being selected while the black area becomes deselected.
If you're using Photoshop CS3, try using the Quick Select tool to Select the black area around the guitar. Read about how the Quick Select Tool works in the Tools chapter in the compendium.
If you're using Photoshop 7, use the Magic Wand Tool to Select the black area around the guitar. We weren't supposed to have to use Photoshop 7 when I started writing this course so I never mentioned Magic Wand Tool in the compendium, but it's fairly easy to use: click on the Magic Wand Tool in the Tool Box (it's in the same button as the Quick Select Tool, look it up in the chapter Tools in the compendium for a picture that shows you where it is). Once you've clicked on the Magic Wand Tool, make sure the value for Tolerance is more than 0 up in the Alternatives Bar -- somewhere around 20-30 would be good. Now click once on the black area around the guitar and you'll see that everything but the guitar becomes Selected (look at the edges of the picture and you'll see the selection bordering them; everything black has been selected, but not the guitar.)
4. Regardless of how you Selected the black area, now it's time to Invert the selection. Do that. Read about how in the Selection Tools Basics and Fancy Tricks section in the Tools chapter in the compendium.
5. Once you've inverted the selection everything that wasn't selected before (the guitar) should be selected, and everything that was (the black) should be deselected. Now you see how Invert works, it can be very handy! Now copy the guitar.
6. Paste the guitar into the flowerback picture.

Use the Selection Tool Quick Select to select the black area around the guitar. When you've selected all of it, Invert the selection. Now you can copy the guitar! Paste it onto the
flowery background.
OUTPUT:

Exercise 4
AIM:
This exercise can be solved using the following functions: Paint Bucket Tool, Color Picker, Brush Tool
PROCEDURE:
1. Save the picture colorize.psd to your folder.
2. Open the picture in Photoshop. It's in .psd-format because it consists of several layers.
3. Use the Paint Buchet Tool to color each part of the picture. Make sure to pick the right layer before you start coloring it! Read about how to pick a color under Color Picker and Eye Dropper Tool in the Tools chapter.
4. The layer "ansikte" (meaning "face") is empty. Use the Brush Tool to paint a face in it.
OUTPUT:
Use the Paint Bucket Tool to color the picture. Make sure to pick the right layer before you use the tool.

Exercise 5
AIM:
This exercise can be solved using the following functions: Layers AND Eraser Tool
PROCEDURE:
1. Save the pictures earth.jpg, mars.jpg and jupiter.jpg to your folder.
2. Create new picthre that is about 500 pixels wide, 400 pixels high, and has a resolution of 72 pixels/inch. We're going to create a fancy space background here. Use the Paint Bucket Tool to fill the Background layer with the color you want the space to have. Use the Brush Tool to paint the stars and stuff.
3. Open the pictures you just saved. Use the Elliptical Selection Tool to select a planet (be careful around the edges). Copy it, and paste it onto your space background. Do this for each of the three planets.
4. Imagine that the sun (out of picture) shines on the three planets from the right. The goal here is to create shadows on the planets. You do this by using the Eraser Tool, preferably with a big, soft brush set on a low Opacity. Read more about the Eraser Tool in the Tools chapter in the compendium.
Since this exercise can get a little tricky you'd be wise to make a couple of security copies of the layers you don't want to risk messing up. Read on how to quickly copy an entire layer under Layers in the compendium.
When you're done your picture should look something like this:

Exercise 6
AIM:
This exercise can be solved using the following functions: Text Tool, Transform Tool
PROCEDURE(TEXT):
1. Save the picture dialogue.jpg to your folder.
2. Open the picture in Photoshop. What are the men talking about? You decide! Use the Text Tool to type their dialogue into the speech bubbles. Use different fonts, sizes and colors where needed. Read how under Text Tool in the Tools chapter.
Add more bubbles if you want to by Selecting a bubble, copy it, and paste it. Use the Transform function and the Move Tool to make it look like you want it.
OUTPUT(TEXT):
Use the Text Tool to add text to the speech bubbles. Give the text different looks depending on what they're
saying. Feel free to add more bubbles if you need it.
PROCEDURE(TRANSFORM):
1. Save the picture transform.psd to your folder.
2. Open the picture in Photoshop.
3. The picture consists of eight layers: seven things and one background. Your task here is to move the things around and use the Transform function to put them where you think they should be, and make them look the way you want.
4. Put the diver out in the water. Use the Eraser Tool set on a medium Opacity to make him look like part of him is below the water's surface.

OUTPUT (TRANSFORM):
Use the function Transform to change sizes, places
and rotations of all the things in this picture.

Exercise 7
AIM:
This exercise can be solved using the following functions: Selection Tools, Selection Types, Color Balance
PROCEDURE:
1. Save the picture color.jpg to your folder and open it in Photoshop.
2. Use a Selection Tool to carefully select the iris and pupil of an eye on the girl to the left (that's the "inside" of the eye, the ring of color and the black dot).
3. Now set the Selection Type to Add To Selection and select the other eye as well. Read more on Selection Types under Selection Tools: Basics and Fancy Tricks in the Tools chapter.
4. Use the Color Balance function to change the color of the girl's eyes. When you're done, turn off the selection by Deselecting it.
5. Repeat this procedure with everything in the picture. Use different Selection Types on your selection where it fits. When you use Color Balance, try switching between Shadows, Midtones and Highlights. This will give you some very different results.
OUTPUT:
Use the Selection Tools to Select different parts of the picture. Colorize the parts using the Color Balance
function.

Exercise 8
AIM:
This exercise can be solved using the following functions: Crop and Canvas Size
PROCEDURE (CROP):
1. Save the pictures crop1.jpg, crop2.jpg and crop3.jpg to your folder. Open them in Photoshop.
2. Use the Crop Tool on the three pictures to cut them the way you think they'll look the best.
OUTPUT (CROP):
Use the Crop Tool to cut your pictures down to size.
PROCEDURE (CANVAZ):
1. Save the picture house.jpg to your folder and open it in Photoshop.
2. As you can see the picture is of a remarkably pretty house, but I couldn't fit everything I wanted in it! I wanted a flag pole, a cat, the sun and some clouds, but they just didn't fit.
Use the function Canvas Size to increase the picture's work area and paint the things I couldn't fit in. Read how in the chapter Change A Picture's Canvas Size. Feel free to add things of your own as well.
OUTPUT (CANVAZ):
Increase the picture's Canvas Size -- that's the area
you can use tools on -- and add some more things to it.

Exercise 9
AIM:
This exercise can be solved using the following functions: Clone Stamp Tool, Smudge Tool
PROCEDURE:
1. Save the picture scratches.jpg to your folder and open it in Photoshop.
2. As you can see the picture has a lot of scratches on it. That's not good. Try to remove them by using the Clone Stamp Tool on them. Read more about this odd but useful tool in the Tools chapter. Try to make the picture look as "undamaged" as possible. A few tips here:
• Use small brushes, not much larger than the scratch you're trying to repair.
• Switch source often (the area you Alt-click on).
• Feel free to use the Smudge Tool to smoothen out whatever sharp edges and lines that might pop up around your fixes. Remember to use small brushes here too, and keep it fairly weak, or things may come out looking a bit strange.
OUTPUT:
Use the Clone Stamp Tool to fix up scratchy photos and pictures with similar blemishes.

Exercise 10
Filters effect individual pixels
Filters
While filters are not really required for the lab, theycan be used to increase your artistic ability. Filtersgenerally are applied to pixel-based images that are already in Photoshop. First, select the region that youwant the filter to effect. Then choose the filter typefrom the Filter menu. Be careful. There are hundredsto pick from. Also, filters are performed directly on the image and not in a layer. Thus you cannot edit itlater like a layer. There is a history of action duringthe current editing session so you can "undo" actionsbut it is not a layer.
Finally, you will want to save the edited image as agif or jpg. This is best done with "Save for Web.." command in the File menu. This action will flattenthe layers if you have any and export it to the file typeyou pick. It does not destroy your layers in theoriginal psd file. Thus you get the output file and still have your source file for later editing (it alwayshappens, you will want to edit it again later when youweb site changes).
The Photo Filter command mimics the technique of putting a colored filter in front of the camera lens to adjust the color balance and color temperature of the light transmitted through the lens and exposing the film. The Photo Filter command also lets you choose a color preset to apply a hue adjustment to an image. If you want to apply a custom color adjustment, the Photo Filter command lets you specify a color using the Adobe Color Picker.
AIM: This exercise can be solved using the following functions: Filters
PROCEDURE:
1. Do one of the following: o Choose Filter > Adjustments > Photo Filter. o Choose Layer > New Adjustment Layer > Photo Filter. Click OK in the New
Layer dialog box. 2. To choose the filter color, do one of the following in the Photo Filter dialog box:
Warming Filter (85) and Cooling Filter (80)Color conversion filters that tune the white balance in an image. If an image was photographed at a lower color temperature of light (yellowish), the Cooling Filter (80) makes the image colors bluer to compensate for the

lower color temperature of the ambient light. Conversely, if the photo was taken at a higher color temperature of light (bluish), the Warming Filter (85) makes the image colors warmer to compensate for the higher color temperature of the ambient light. Warming Filter (81) and Cooling Filter (82)Light balancing filters for minor adjustments in the color quality of an image. The Warming Filter (81) makes the image warmer (yellower) and the Cooling Filter (82) makes the image cooler (bluer). Individual Colors Apply a hue adjustment to the image depending on the color preset you choose. Your choice of color depends on how you're using the Photo Filter command. If your photo has a color cast, you can choose a complement color to neutralize the color cast. You can also apply colors for special color effects or enhancements. For example, the Underwater color simulates the greenish-blue color cast caused when photographing underwater.
o Select the Filter option, and choose a preset from the Filter menu. o Select the Color option, click the color square, and use the Adobe Color Picker to
specify the color of a custom color filter.
Make sure Preview is selected to view the results of using a color filter.
If you don’t want the image darkened by adding the color filter, be sure that the Preserve Luminosity option is selected.
3. To adjust the amount of color applied to the image, use the Density slider or enter a percentage in the Density text box. A higher Density applies a stronger color adjustment.
4. Click OK.
OUTPUT:
Original image (left), and Warming Filter (81) with 60% Density applied (right)

Basic Exercises for Flash
Exercise No. 11 MOTION TWEENING ____________________________________________________________________________________ AIM: To perform motion tweening operation using flash. PROCEDURE: Step1: Draw a circle using oval tool in a new flash document. Step2: Click the 40th frame and press F6 key. Step3: Drag the circle using move tool a place wherever you want. Step4: Click on the time frame between 1 to 40 and Right‐Click and select create Motion tween. Step5: Press Ctrl+Enter to view the output.

EX. No: 12 SPOKES ON A WHEEL ____________________________________________________________________________ AIM: To create a 24 spokes on a wheel using flash. PROCEDURE: Step1: Draw a circle with the help of oval tool. Step2: Also draw 24 lines inside the circle with the help of line tool. Step3: Go to 40 th frame and click and press F6. Step4: Click on the timeline any place between frame1 and frame40 then right click and Choose motion tween. Step5: Select the selection tool from the tool box and click the circle ones or click the Frame one. Step6: Convert the circle to the symbol from the modified menu. Step7: Choose movie clip from the properties and select ok. Step8: Choose modify ‐>transform‐>rotate. Step9: Press Ctrl+Enter for see the playing

EX. No: 13 SHAPE TWEENING _____________________________________________________________________________ AIM: To change and object shape using a shape tweening concept. PROCEDURE: Step1: Draw any shapes using tools. Step2: Click 40 in the time frame and press F6. Step3: Change tween to shape in properties and press Delete key. Step4: Now delete the shape. Step5: Draw a new shape by using corresponding tool wherever you want.