sql server best practices on netapp solidfire · infrastructure by having several sql server...
TRANSCRIPT

Technical Report
SQL Server Best Practices on NetApp SolidFire Bobby Oommen, NetApp
November 2017 | TR-4609
Abstract
This document introduces NetApp® SolidFire® storage to the database administrator, and provides important design paradigms to consider when using SolidFire storage for SQL Server databases. We outline application profiles that are ideally suited for SolidFire storage and how to identify those types of application use cases. We also discuss architecture considerations for applications running in the context of SolidFire storage, and nuances regarding configuration and deployment are noted and explained. By following the guidelines in this document, you can learn how to effectively design, implement, and run SQL Server databases on SolidFire.

2 SQL Server Best Practices on NetApp SolidFire © 2017 NetApp, Inc. All Rights Reserved.
TABLE OF CONTENTS
1 Introduction ........................................................................................................................................... 4 1.1 Thin Provisioning ............................................................................................................................................4 1.2 Compression and Deduplication .....................................................................................................................4 1.3 Quality of Service (QoS) .................................................................................................................................5
2 Application Use Cases ......................................................................................................................... 5 2.1 Database Consolidation ..................................................................................................................................5 2.2 Data Protection and Disaster Recovery ..........................................................................................................5 2.3 Development and Testing ...............................................................................................................................5
3 Storage Configuration .......................................................................................................................... 6 3.1 Create an Account ..........................................................................................................................................6 3.2 Create a Volume .............................................................................................................................................7 3.3 Create Volume Access Groups .......................................................................................................................8
4 Operating System Configuration ........................................................................................................ 9 4.1 Enable Jumbo Frames ....................................................................................................................................9 4.2 Enable Microsoft iSCSI service ..................................................................................................................... 10 4.3 Enable multipath I/O (MPIO) ......................................................................................................................... 10 4.4 Configuring iSCSI ......................................................................................................................................... 13 4.5 Autoconfigure iSCSI ...................................................................................................................................... 14 4.6 Initializing Volumes ....................................................................................................................................... 14
5 SQL Server Clustering ....................................................................................................................... 16
6 SQL Tuning ......................................................................................................................................... 18
7 Backup & Recovery – Volume Shadow Copy Service (VSS) ......................................................... 18 7.1 Back Up the SQL Server Database .............................................................................................................. 19 7.2 Recover the Database .................................................................................................................................. 20
8 Virtualization ....................................................................................................................................... 20
9 Conclusion .......................................................................................................................................... 20

3 SQL Server Best Practices on NetApp SolidFire © 2017 NetApp, Inc. All Rights Reserved.
Appendix A - VSS Backup Output ........................................................................................................... 21
Appendix B - VSS Recovery Output ....................................................................................................... 22
Where to Find Additional Information .................................................................................................... 24
Version History ......................................................................................................................................... 24
4 SQL Server Best Practices on NetApp SolidFire © 2017 NetApp, Inc. All Rights Reserved.
1 Introduction NetApp SolidFire storage systems were born out of some of the largest cloud infrastructures in the world. They are designed to serve next-generation data center needs, including scaling with multitenancy, set-and-forget management, and guaranteed performance. Adopting the SolidFire architecture provides you with greater predictability for your shared storage infrastructure. SolidFire storage optimizes solid-state-drive (SSD) capacity to create high utilization and volume performance.
NetApp SolidFire storage systems have the following capabilities that support next-generation data center needs:
• Thin provisioning • Compression and deduplication • Quality of service (QoS)
These features reduce the amount of storage space that is required without affecting performance. You can use these features with various database use cases.
1.1 Thin Provisioning SolidFire uses 4K granular thin provisioning that does not require any reserve space, which increases effective capacity by consuming less space. This feature increases efficiency and reduces overhead by using the smallest allocation possible and by maintaining alignment with the native 4KB allocation format that modern operating systems use.
Because SolidFire volumes do not use any reserve space, you can deploy a volume capacity for the estimated maximum size of the database. You can therefore purchase just enough physical hardware to support the actual space that is consumed by the database. As database space consumption approaches the physical limits of the installed cluster, you can dynamically add nodes to the cluster to increase its physical capacity. This process is completely transparent to the database, and does not require downtime or reconfiguration of the operating system or the database.
Furthermore, SolidFire Helix® replication automatically redistributes existing data over the added nodes to create optimal load balancing of both existing and new data. With this deployment paradigm, you can configure logical storage capacity once for the lifetime of the supported databases rather than using incremental updates that depend on the needs of the database.
1.2 Compression and Deduplication Each SolidFire node includes a PCIe NVRAM card that serves as a write cache. When a host sends writes, they are divided into 4KB blocks that are immediately compressed, hashed and stored in the NVRAM of the two storage nodes before an acknowledgement is returned. The resulting value serves as a BlockID that determines the block placement and that is randomly distributed across all nodes to create an even load distribution.
The SolidFire Deduplication Block Service identifies blocks that have previously been written based on the BlockID. If a block already exists, metadata is updated accordingly and the duplicate is discarded. The whole is process is inline and global to the storage cluster.
The combination of inline compression and global deduplication has the following advantages:
• Reduced repetitive writes to media, prolonging drive life • Increased system performance by minimizing system resources • Evenly distributed capacity and performance loads across the system, eliminating hot spots

5 SQL Server Best Practices on NetApp SolidFire © 2017 NetApp, Inc. All Rights Reserved.
1.3 Quality of Service (QoS) NetApp SolidFire storage arrays present performance and capacity as dynamic, independent pools. This feature enables administrators to set the performance requirements for all the databases or tenants that are hosted on the same cluster. The minimum, maximum, and burst control settings in the QoS policy guarantee the required performance and can be dynamically changed anytime. If the SolidFire hardware resources are pushed to their physical limits, more nodes can be added to the existing cluster. SolidFire Helix data distribution automatically redistributes data for optimal load balancing over all hardware resources. This process is transparent to upstream applications.
2 Application Use Cases NetApp SolidFire can support a wide range of database application use cases. This section shows how to identify when applications use cases are a good fit for SolidFire. It also reviews the innovative benefits of SolidFire to these applications.
2.1 Database Consolidation NetApp SolidFire provides an optimal storage system for database consolidation. The per-volume QoS controls of SolidFire help individual databases get the I/O throughput that they need without being affected by other databases that run in parallel on the same storage system. With QoS and data reduction efficiencies, you can achieve higher database density can be achieved with the shared storage infrastructure by having several SQL server instances on a storage cluster.
Database administrators have full control of each storage volume on which the database resides and can perform all maintenance operations, including setting the QoS for each database copy. Administrators can use REST APIs to achieve full automation and make storage management simpler.
For architectures that contain multiple user database with varying resource needs, multiple SolidFire volumes can be used with differing QoS controls, and individual databases can be assigned to specific volumes, using default configuration methods, or SQL Server filegroups.
2.2 Data Protection and Disaster Recovery SolidFire Helix data protection is a distributed replication algorithm that spreads two redundant copies of data across all drives within the entire cluster. For high capacity and performance SQL server instances, you can group multiple storage volumes together using Windows dynamic disks in a striped configuration.
The shared-nothing architecture of SolidFire creates no single point of failure and can absorb multiple failures. The combined storage efficiency and QoS of SolidFire provides a compelling disaster recovery solution that enables the sharing of the same storage resources for disaster recovery and testing and development without performance penalties.
2.3 Development and Testing Storage snapshots provide a point-in-time view of the contents of an active file system or storage volume. You can use these snapshots for rapid recovery of corrupted data sets and to create space-efficient copies of data sets for development and testing use cases. The cloning process can be coupled with SolidFire QoS control so that database clones can coexist with the production copies without any performance effects on the upstream applications.
The CopyVolume feature of NetApp SolidFire allows you to refresh an existing cloned copy of a database without performing any filesystem remount operations. In this use case, you frequently refresh a copy of the database by only taking changes from the production copy.

6 SQL Server Best Practices on NetApp SolidFire © 2017 NetApp, Inc. All Rights Reserved.
3 Storage Configuration This section shows how to configure NetApp SolidFire volumes to support a SQL Server database. NetApp recommends that you have all the SQL Server database components on the SolidFire storage array. NetApp supports presenting the storage in a 4K sector size (native mode) and in a 512-byte sector size (512e). Testing conducted in a NetApp lab shows that there is no performance effect caused by emulation mode as long as there is no partition misalignment at the host level.
3.1 Create an Account To create an account, complete the following steps:
1. Log into the NetApp SolidFire Element® OS web UI. 2. Select Management Accounts. The Account List window opens.
3. Click Create Accounts. The Create a New Account window opens.
4. Enter a user name. 5. In the CHAP Settings section, enter following:
a. Initiator Secret for CHAP node session authentication b. Target Secret for CHAP node session authentication

7 SQL Server Best Practices on NetApp SolidFire © 2017 NetApp, Inc. All Rights Reserved.
Note: Leave the credentials field blank if you want the passwords to be generated automatically.
6. Click Create Account. Note: If an account with the same name exists, you get an error message.
3.2 Create a Volume To create a volume, complete the following steps:
1. Log in to the Element OS web UI. 2. Select Management Volumes. The Volumes List window opens. 3. Click Create Volume. The Create a New Volume window opens.
4. Enter the volume name (1 to 64 characters in length). For example, enter the name SQLDATA1. 5. Enter the size of the volume. 6. Click the Account drop-down list and select the account that should have access to the volume. In
this case, select SQL. 7. Set the Quality of Service values according to your requirements.
Note: The sliders can be used to adjust the IOPS values, or you can click the number field to enter the desired IOPS values. For SQLDATA1, use the following values: maximum = 100000, minimum = 15000, and burst = 100000.
8. Click Create Volume. 9. Repeat steps 1 through 7 for all volumes that are part of the SQL server instance.

8 SQL Server Best Practices on NetApp SolidFire © 2017 NetApp, Inc. All Rights Reserved.
3.3 Create Volume Access Groups Volume access groups limit connectivity from designated host servers based on a unique identifier, whereas CHAP authentication utilizes secret keys for unidirectional or bidirectional authentication. In this document, initiator iSCSI Qualified Names (IQNs) are used to access the volumes.
Volume access groups have the following system limits:
• They can have a maximum of 64 IQNs. • An IQN can belong to only one access group. • A single volume can belong to a maximum of four access groups.
To create volume access groups, complete the following steps:
1. Log in to the Element OS web UI. 2. Select Management Access Groups. The Access Group window opens. 3. Click Create Access Group. The Create a New Access Group window opens.
4. Enter a name for the volume access group. 5. Select the IQN from the initiator drop-down or click Create Initiator. 6. Select the newly added initiator, and click Add Initiator.
Note: Multiple IQNs are listed for a SQL cluster depending on the number of nodes. Complete the following steps to get the initiator name from the host server. Select Start iSCSI Initiator. The iSCSI Initiator Properties dialog box appears. Click the Configuration tab, select the initiator name, and copy the identification string.
7. Click Create Access Group. 8. Add the volumes to the access group by selecting Management Volumes. 9. Select the checkbox to the left of each volume. 10. Near the Create Volume button, click the Bulk Actions drop-down.
9 SQL Server Best Practices on NetApp SolidFire © 2017 NetApp, Inc. All Rights Reserved.
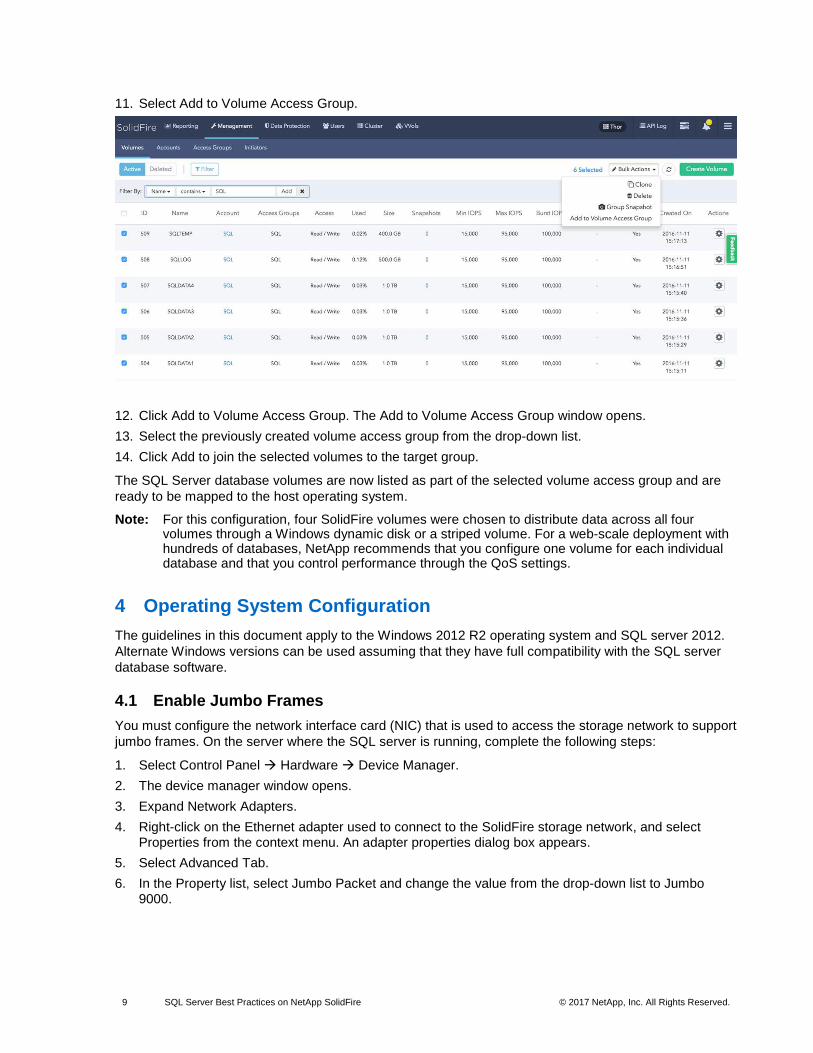
11. Select Add to Volume Access Group.
12. Click Add to Volume Access Group. The Add to Volume Access Group window opens. 13. Select the previously created volume access group from the drop-down list. 14. Click Add to join the selected volumes to the target group.
The SQL Server database volumes are now listed as part of the selected volume access group and are ready to be mapped to the host operating system.
Note: For this configuration, four SolidFire volumes were chosen to distribute data across all four volumes through a Windows dynamic disk or a striped volume. For a web-scale deployment with hundreds of databases, NetApp recommends that you configure one volume for each individual database and that you control performance through the QoS settings.
4 Operating System Configuration The guidelines in this document apply to the Windows 2012 R2 operating system and SQL server 2012. Alternate Windows versions can be used assuming that they have full compatibility with the SQL server database software.
4.1 Enable Jumbo Frames You must configure the network interface card (NIC) that is used to access the storage network to support jumbo frames. On the server where the SQL server is running, complete the following steps:
1. Select Control Panel Hardware Device Manager. 2. The device manager window opens. 3. Expand Network Adapters. 4. Right-click on the Ethernet adapter used to connect to the SolidFire storage network, and select
Properties from the context menu. An adapter properties dialog box appears. 5. Select Advanced Tab. 6. In the Property list, select Jumbo Packet and change the value from the drop-down list to Jumbo
9000.

10 SQL Server Best Practices on NetApp SolidFire © 2017 NetApp, Inc. All Rights Reserved.
4.2 Enable Microsoft iSCSI service If the Microsoft iSCSI service is not already running, complete the following steps:
1. Select Administration Services iSCSI Initiator Right-click Start. 2. The Microsoft iSCSI dialog opens.
3. Click Yes.
4.3 Enable multipath I/O (MPIO) To enable MPIO and configure the Microsoft device-specific module to recognize the NetApp SolidFire network, complete the following steps:
1. Open Server Manager. 2. On the Server Manager dashboard, select Manage Add Roles and Features.

11 SQL Server Best Practices on NetApp SolidFire © 2017 NetApp, Inc. All Rights Reserved.
3. In the Add Roles and Features wizard, complete the following steps: a. Before you begin, click Next. b. For Installation Type, select Role Based or Feature Based, and click Next. c. For Server Selection, select your server and click Next. d. For Server Roles, click Next. e. For Features, select MPIO and click Next.
4. Click Install when prompted. 5. After the installation is complete, open MPIO from Administrative Services.

12 SQL Server Best Practices on NetApp SolidFire © 2017 NetApp, Inc. All Rights Reserved.
6. Click the MPIO Devices tab, and then click Add to add a hardware device ID. 7. Enter SolidFirSSD SAN as the device hardware ID.
8. Click OK. 9. If you are prompted to restart, click No. 10. Select the Discover Multi-Paths tab, and then select the checkbox to add support for iSCSI devices.

13 SQL Server Best Practices on NetApp SolidFire © 2017 NetApp, Inc. All Rights Reserved.
11. Select the check box for Add Support for iSCSI Devices.
12. When prompted, restart the system.
4.4 Configuring iSCSI After you enable MPIO, you should configure multiple iSCSI sessions for each SolidFire volume. To do this from the iSCSI initiator utility, complete the following steps:
1. Open the iSCSI initiator utility. The iSCSI Initiator Properties dialog appears. Note: The iSCSI initiator performs a discovery of each SolidFire volume and returns the IQN strings for
the volumes added to the volume access group in the SolidFire system.
14 SQL Server Best Practices on NetApp SolidFire © 2017 NetApp, Inc. All Rights Reserved.
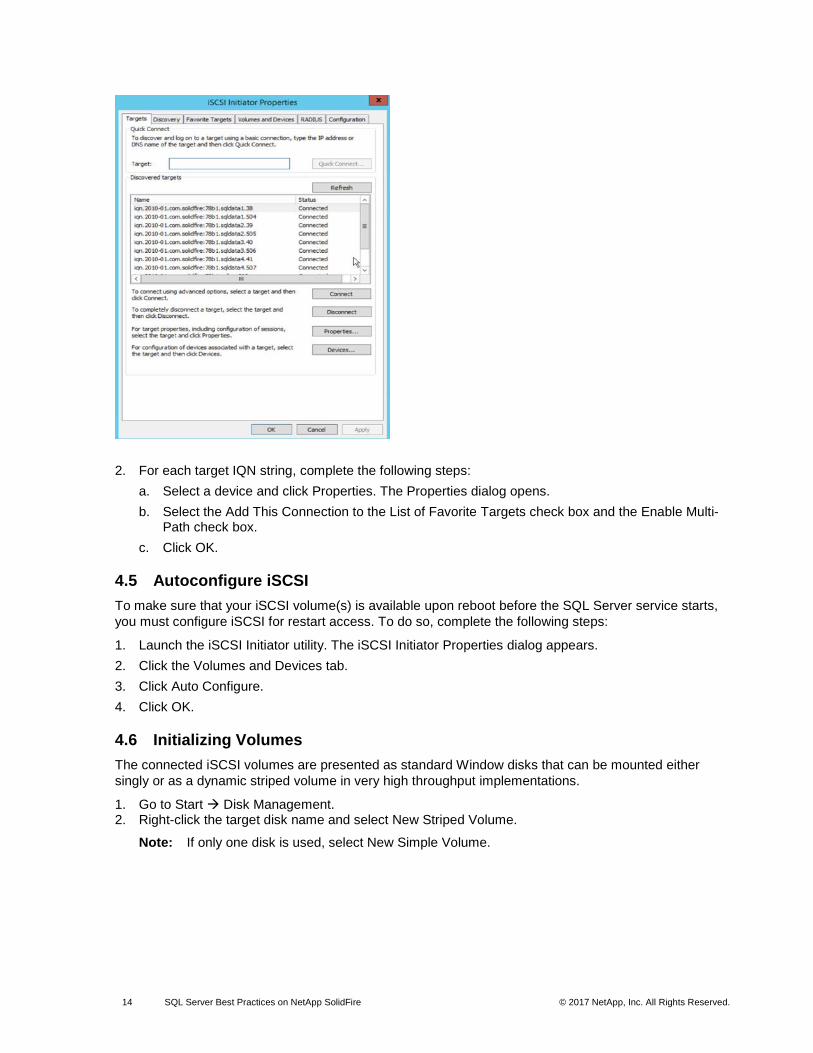
2. For each target IQN string, complete the following steps: a. Select a device and click Properties. The Properties dialog opens. b. Select the Add This Connection to the List of Favorite Targets check box and the Enable Multi-
Path check box. c. Click OK.
4.5 Autoconfigure iSCSI To make sure that your iSCSI volume(s) is available upon reboot before the SQL Server service starts, you must configure iSCSI for restart access. To do so, complete the following steps:
1. Launch the iSCSI Initiator utility. The iSCSI Initiator Properties dialog appears. 2. Click the Volumes and Devices tab. 3. Click Auto Configure. 4. Click OK.
4.6 Initializing Volumes The connected iSCSI volumes are presented as standard Window disks that can be mounted either singly or as a dynamic striped volume in very high throughput implementations.
1. Go to Start Disk Management. 2. Right-click the target disk name and select New Striped Volume.
Note: If only one disk is used, select New Simple Volume.

15 SQL Server Best Practices on NetApp SolidFire © 2017 NetApp, Inc. All Rights Reserved.
3. In the New Striped Volume window, add the required disks and click Next. In this case, four disks are added to create a SQLData striped volume.
Note: For SQL server clustering, striped volume is not supported because there is no native support for striped volume in Microsoft Windows Clustering. A large volume is recommended during storage provisioning.
4. On the Format Volume screen, set the following parameters and click Next: • File system: NTFS • Allocation unit size: 64K • Volume label: SQLData

16 SQL Server Best Practices on NetApp SolidFire © 2017 NetApp, Inc. All Rights Reserved.
Note: The recommended allocation size for the transaction log volume is 4K.
After you configure the iSCSI devices, you can install SQL Server 2012. See the Microsoft SQL Server installation guide for information about installing and configuring SQL Server 2012.
5 SQL Server Clustering SQL Server clustering is set up by adding one or more SQL Server instances to a Windows failover cluster. A Windows failover cluster uses shared storage. The SQL server user and system databases must be located on the shared storage. This arrangement allows the cluster to move the SQL instance to any node in the cluster at any time. There is only one copy of the data, but the network name and SQL Server service for the instance can be made active from any cluster node.
Before you set up SQL Server clustering, verify that the following conditions are met:
• Each node has Windows Server 2012 installed and is part of the Windows failover cluster. None of the nodes can be a domain controller.
• All the nodes have access to the shared SolidFire cluster.
• All the iSCSI initiator names have been added to the SolidFire volume access groups.
The following screenshot shows that two SQL Server nodes have been added to the Windows failover cluster.

17 SQL Server Best Practices on NetApp SolidFire © 2017 NetApp, Inc. All Rights Reserved.
Both nodes are connected to the SolidFire cluster, and shared volumes are set up to install the SQL Server databases. On the SolidFire cluster, four volumes are created for this setup, one each for Quorum, Data, Log, and Temp.

18 SQL Server Best Practices on NetApp SolidFire © 2017 NetApp, Inc. All Rights Reserved.
6 SQL Tuning We applied the following NetApp-recommended basic tuning when provisioning the SQL Server database on SolidFire. You should perform a base-line performance measurement for accurate sizing.
• Memory: Start with 4GB
• Number of data files: Start with four and increment by two
• Number of log files: One
• Number of temp files: Start with two
• Boost SQL priority: Do not configure
7 Backup & Recovery – Volume Shadow Copy Service (VSS) The SolidFire VSS Hardware Provider integrates VSS shadow copies with NetApp SolidFire snapshots and clones. The provider runs on Microsoft Windows 2008 R2 and 2012 R2 editions and supports shadow copies created using DiskShadow and other VSS requesters. Using VSS snapshot capabilities with the SolidFire VSS Hardware Provider makes sure that snapshots are application consistent with business applications that use SolidFire volumes on a system. SolidFire snapshots and clones minimize recovery time without affecting stability and performance and provide instant volume recovery.
The high-level architecture diagram depicted in Figure 1 shows the interaction between VSS components and the SolidFire system.

19 SQL Server Best Practices on NetApp SolidFire © 2017 NetApp, Inc. All Rights Reserved.
Figure 1) VSS and SolidFire high-level architecture.
The backup application DiskShadow is a VSS requester for creating shadow copies of volumes. When DiskShadow executes a backup, VSS orchestrates the interaction between the VSS requester, VSS writers, and VSS providers. VSS maintains application consistency when creating a volume shadow copy.
There are several VSS writers installed on this system, including the Microsoft SQL Server VSS writer. SolidFire VSS Hardware Provider manages the shadow copies created by a VSS requester at the hardware level using SolidFire snapshots and clones. The SolidFire provider uses snapshots and clones to make shadow copies available to the VSS requester. Shadow copy volumes allow for immediate read-only access to the data from the MS Windows host.
Verify the following for the VSS:
• The Microsoft Windows host has access to both the storage and the management network
• One or more SolidFire clusters have been added to the VSS Provider configuration
For more information, see the SolidFire VSS Hardware Provider User Guide.
7.1 Back Up the SQL Server Database After you install and configure SolidFire VSS Hardware Provider, you can create an application-consistent backup of the SQL Server database.
20 SQL Server Best Practices on NetApp SolidFire © 2017 NetApp, Inc. All Rights Reserved.
Note: For installation and configuration steps, see the SolidFire VSS Hardware Provider User Guide.
To create a backup, complete the following steps:
1. Log in to the Windows 2012 R2 server with the SQL Server database up and running. 2. Open a command prompt window or a PowerShell session. 3. Run the diskshadow command to create a backup of the SQL Server database as follows: DISKSHADOW> set verbose on DISKSHADOW> set context persistent DISKSHADOW> set option differential transportable DISKSHADOW> set metadata c:\sql.cab DISKSHADOW> add volume E: alias sqlData DISKSHADOW> add volume F: alias sqlLog DISKSHADOW> begin backup DISKSHADOW> create DISKSHADOW> end backup
For an example output of these backup commands, see Appendix A.
7.2 Recover the Database If you lose data or if your data is corrupted, you can perform a shadow copy resync and recover your database to make it consistent with the point-in-time shadow copy that was taken earlier.
To recover a database, complete the following steps:
1. Log in to the Windows 2012 R2 server with the SQL Server database up and running. 2. Take the database that needs to be recovered offline. 3. Open a command prompt window or a PowerShell session. 4. Run the diskshadow command to recover the database as follows: DISKSHADOW> set verbose on DISKSHADOW> load metadata c:\sql.cab DISKSHADOW> add shadow %sqlData% DISKSHADOW> add shadow %sqlLog% DISKSHADOW> begin restore DISKSHADOW> resync DISKSHADOW> end restore
For an example output of these restore commands, see the Appendix B.
8 Virtualization Depending on your business needs, you can run your SQL Server databases on virtual machines with VMware ESX Server or Hyper-V Server. The following provisioning formats are supported:
• VMware ESX Server, with iSCSI, raw device mapping (RDM), virtual machine file system (VMFS), and virtual machine's disk (VMDK)
• Hyper-V Server, with fixed, dynamic, and pass-through disks
9 Conclusion SolidFire provides an optimal storage platform for database applications on webscale deployments. All-flash performance, is coupled with capacity thin provisioning, per-volume quality-of-service, and in-line deduplication. These features yield significant efficiency and agility benefits to system planners and administrators when deploying and maintaining OLTP, DSS, database consolidation, data protection, disaster recovery, and test/dev/QA databases. By following the application considerations shown in this

21 SQL Server Best Practices on NetApp SolidFire © 2017 NetApp, Inc. All Rights Reserved.
document, IT administrators can quickly find the best fit for SolidFire in their business. For additional information contact SolidFire directly at [email protected].
Appendix A - VSS Backup Output DISKSHADOW> Windows PowerShell Copyright (C) 2013 Microsoft Corporation. All rights reserved. PS C:\Users\Administrator> diskshadow Microsoft DiskShadow version 1.0 Copyright (C) 2013 Microsoft Corporation On computer: SQLVM-01, 12/12/2016 6:11:45 AM DISKSHADOW> set verbose on DISKSHADOW> set context persistent DISKSHADOW> set option differential transportable DISKSHADOW> set metadata c:\sql.cab The existing file will be overwritten. DISKSHADOW> add volume E:\sqlData\tpcc DISKSHADOW> add volume F:\sqlLog\tpcc_log DISKSHADOW> begin backup DISKSHADOW> create Excluding writer "Shadow Copy Optimization Writer", because all of its components have been excluded. Excluding writer "BITS Writer", because all of its components have been excluded. Component "\TasksStore" from writer "Task Scheduler Writer" is excluded from backup, because it requires volume C:\ which is not in the shadow copy set. Component "\WriterMetadataStore" from writer "VSS Metadata Store Writer" is excluded from backup, because it requires volume C:\ which is not in the shadow copy set. Component "\PerformanceCounters" from writer "Performance Counters Writer" is excluded from backup, because it requires volume C:\ which is not in the shadow copy set. Component "\System Files" from writer "System Writer" is excluded from backup, because it requires volume C:\ which is not in the shadow copy set. Component "\Win32 Services Files" from writer "System Writer" is excluded from backup, because it requires volume C:\ which is not in the shadow copy set. Component "\BCD\BCD" from writer "ASR Writer" is excluded from backup, because it requires volume which is not in the shadow copy set. Component "\SQLVM-01\master" from writer "SqlServerWriter" is excluded from backup, because it requires volume C:\ which is not in the shadow copy set. Component "\SQLVM-01\model" from writer "SqlServerWriter" is excluded from backup, because it requires volume C:\ which is not in the shadow copy set. Component "\SQLVM-01\msdb" from writer "SqlServerWriter" is excluded from backup, because it requires volume C:\ which is not in the shadow copy set. Component "\SQLVM-01\ReportServer" from writer "SqlServerWriter" is excluded from backup, because it requires volume C:\ which is not in the shadow copy set. Component "\SQLVM-01\ReportServerTempDB" from writer "SqlServerWriter" is excluded from backup, because it requires volume C:\ which is not in the shadow copy set. Component "\Registry" from writer "Registry Writer" is excluded from backup, because it requires volume C:\ which is not in the shadow copy set. Component "\COM+ REGDB" from writer "COM+ REGDB Writer" is excluded from backup, because it requires volume C:\ which is not in the shadow copy set. Component "\WMI" from writer "WMI Writer" is excluded from backup, because it requires volume C:\ which is not in the shadow copy set. The writer "Task Scheduler Writer" is now entirely excluded from the backup, because it does not contain any components that can be included. The writer "VSS Metadata Store Writer" is now entirely excluded from the backup, because it does not contain any components that can be included. The writer "Performance Counters Writer" is now entirely excluded from the backup, because it does not contain any components that can be included. The writer "System Writer" is now entirely excluded from the backup,

22 SQL Server Best Practices on NetApp SolidFire © 2017 NetApp, Inc. All Rights Reserved.
because it does not contain any components that can be included. The writer "ASR Writer" is now entirely excluded from the backup because the top-level non selectable component "\BCD\BCD" is excluded. The writer "Registry Writer" is now entirely excluded from the backup, because it does not contain any components that can be included. The writer "COM+ REGDB Writer" is now entirely excluded from the backup, because it does not contain any components that can be included. The writer "WMI Writer" is now entirely excluded from the backup, because it does not contain any components that can be included. * Including writer "SqlServerWriter": + Adding component: \SQLVM-01\tpcc Alias VSS_SHADOW_1 for shadow ID {d4663ef2-2eec-4044-832b-b603e2d94527} set as environment variable. Alias VSS_SHADOW_2 for shadow ID {9c434b0d-1be4-4a06-88c0-b7d090168182} set as environment variable. Alias VSS_SHADOW_SET for shadow set ID {2c9254c5-736d-45cf-b37c-017d271fd260} set as environment variable. Inserted file Manifest.xml into .cab file sql.cab Inserted file BCDocument.xml into .cab file sql.cab Inserted file WM0.xml into .cab file sql.cab Inserted file WM1.xml into .cab file sql.cab Inserted file WM2.xml into .cab file sql.cab Inserted file WM3.xml into .cab file sql.cab Inserted file WM4.xml into .cab file sql.cab Inserted file WM5.xml into .cab file sql.cab Inserted file WM6.xml into .cab file sql.cab Inserted file WM7.xml into .cab file sql.cab Inserted file WM8.xml into .cab file sql.cab Inserted file WM9.xml into .cab file sql.cab Inserted file WM10.xml into .cab file sql.cab Inserted file Dis882A.tmp into .cab file sql.cab DISKSHADOW> end backup
Appendix B - VSS Recovery Output PS C:\Users\Administrator> diskshadow Microsoft DiskShadow version 1.0 Copyright (C) 2013 Microsoft Corporation On computer: SQLVM-01, 12/12/2016 6:20:12 AM DISKSHADOW> load metadata c:\sql.cab Alias sqlData for value {8b052ab6-a4cb-4fe4-9f24-3b0c57cd8bfe} set as an environment variable. Alias sqlLog for value {3f888160-cd13-4f8f-8104-5c0d3dd41abe} set as an environment variable. Alias VSS_SHADOW_SET for value {9ee35724-0040-4cfa-901d-4bbbbbac43bf} set as an environment variable. DISKSHADOW> add shadow %sqlData% -> %sqlData% = {8b052ab6-a4cb-4fe4-9f24-3b0c57cd8bfe} DISKSHADOW> add shadow %sqlLog% -> %sqlLog% = {3f888160-cd13-4f8f-8104-5c0d3dd41abe} DISKSHADOW> begin restore Listing writer status information ... * WRITER "Task Scheduler Writer" - Status: 1 (VSS_WS_STABLE) - Writer failure code: 0x00000000 (S_OK) - Writer ID: {d61d61c8-d73a-4eee-8cdd-f6f9786b7124} - Writer instance ID: {1bddd48e-5052-49db-9b07-b96f96727e6b} * WRITER "VSS Metadata Store Writer" - Status: 1 (VSS_WS_STABLE) - Writer failure code: 0x00000000 (S_OK)
23 SQL Server Best Practices on NetApp SolidFire © 2017 NetApp, Inc. All Rights Reserved.
- Writer ID: {75dfb225-e2e4-4d39-9ac9-ffaff65ddf06} - Writer instance ID: {088e7a7d-09a8-4cc6-a609-ad90e75ddc93} * WRITER "Performance Counters Writer" - Status: 1 (VSS_WS_STABLE) - Writer failure code: 0x00000000 (S_OK) - Writer ID: {0bada1de-01a9-4625-8278-69e735f39dd2} - Writer instance ID: {f0086dda-9efc-47c5-8eb6-a944c3d09381} * WRITER "System Writer" - Status: 1 (VSS_WS_STABLE) - Writer failure code: 0x00000000 (S_OK) - Writer ID: {e8132975-6f93-4464-a53e-1050253ae220} - Writer instance ID: {f9e33202-b5f4-4142-a493-040ba2d84c4b} * WRITER "SqlServerWriter" - Status: 1 (VSS_WS_STABLE) - Writer failure code: 0x00000000 (S_OK) - Writer ID: {a65faa63-5ea8-4ebc-9dbd-a0c4db26912a} - Writer instance ID: {4f8b8852-4730-4a88-bfa6-09fea5fe780e} * WRITER "ASR Writer" - Status: 1 (VSS_WS_STABLE) - Writer failure code: 0x00000000 (S_OK) - Writer ID: {be000cbe-11fe-4426-9c58-531aa6355fc4} - Writer instance ID: {96b018da-6b80-4d75-9f3f-0d5fb03e174f} * WRITER "WMI Writer" - Status: 1 (VSS_WS_STABLE) - Writer failure code: 0x00000000 (S_OK) - Writer ID: {a6ad56c2-b509-4e6c-bb19-49d8f43532f0} - Writer instance ID: {702f0af8-dc4a-4624-bcfd-28a7ea08d7bf} * WRITER "BITS Writer" - Status: 1 (VSS_WS_STABLE) - Writer failure code: 0x00000000 (S_OK) - Writer ID: {4969d978-be47-48b0-b100-f328f07ac1e0} - Writer instance ID: {90f0b160-a448-4a7e-a655-21d0410324a1} * WRITER "Registry Writer" - Status: 1 (VSS_WS_STABLE) - Writer failure code: 0x00000000 (S_OK) - Writer ID: {afbab4a2-367d-4d15-a586-71dbb18f8485} - Writer instance ID: {5631827b-a84b-4927-bf69-10225ab938d0} * WRITER "Shadow Copy Optimization Writer" - Status: 1 (VSS_WS_STABLE) - Writer failure code: 0x00000000 (S_OK) - Writer ID: {4dc3bdd4-ab48-4d07-adb0-3bee2926fd7f} - Writer instance ID: {20c27060-c5b5-4399-a46f-b47d0c40fc0f} * WRITER "COM+ REGDB Writer" - Status: 1 (VSS_WS_STABLE) - Writer failure code: 0x00000000 (S_OK) - Writer ID: {542da469-d3e1-473c-9f4f-7847f01fc64f} - Writer instance ID: {fe3f036b-7162-4c45-ae4f-4d7946aca543} Number of writers listed: 11 The PreRestore event was successfully sent to the writers. The restore operation has started. Please issue END RESTORE when it is complete. DISKSHADOW> resync The resynchronization operation successfully completed. DISKSHADOW> end restore

24 SQL Server Best Practices on NetApp SolidFire © 2017 NetApp, Inc. All Rights Reserved.
Where to Find Additional Information To learn more about the information described in this document, refer to the following documents and/or websites:
Configuring SolidFire on Windows for Element OS http://www.netapp.com/us/products/storage-systems/all-flash-array/solidfire-web-scale.aspx
Version History Version Date Document Version History
Version 1.0 June 2014 Initial document creation
Version 2.0 June 2017 Refresh for Element OS 9.x
Version 2.1 November 2017 Changed the "References" section to "Where to Find Additional Information." Minor edits.

25 SQL Server Best Practices on NetApp SolidFire © 2017 NetApp, Inc. All Rights Reserved.
Copyright Information Copyright © 1994–2017 NetApp, Inc. All rights reserved. Printed in the U.S. No part of this document covered by copyright may be reproduced in any form or by any means—graphic, electronic, or mechanical, including photocopying, recording, taping, or storage in an electronic retrieval system—without prior written permission of the copyright owner.
Software derived from copyrighted NetApp material is subject to the following license and disclaimer:
THIS SOFTWARE IS PROVIDED BY NETAPP “AS IS” AND WITHOUT ANY EXPRESS OR IMPLIED WARRANTIES, INCLUDING, BUT NOT LIMITED TO, THE IMPLIED WARRANTIES OF MERCHANTABILITY AND FITNESS FOR A PARTICULAR PURPOSE, WHICH ARE HEREBY DISCLAIMED. IN NO EVENT SHALL NETAPP BE LIABLE FOR ANY DIRECT, INDIRECT, INCIDENTAL, SPECIAL, EXEMPLARY, OR CONSEQUENTIAL DAMAGES (INCLUDING, BUT NOT LIMITED TO, PROCUREMENT OF SUBSTITUTE GOODS OR SERVICES; LOSS OF USE, DATA, OR PROFITS; OR BUSINESS INTERRUPTION) HOWEVER CAUSED AND ON ANY THEORY OF LIABILITY, WHETHER IN CONTRACT, STRICT LIABILITY, OR TORT (INCLUDING NEGLIGENCE OR OTHERWISE) ARISING IN ANY WAY OUT OF THE USE OF THIS SOFTWARE, EVEN IF ADVISED OF THE POSSIBILITY OF SUCH DAMAGE.
NetApp reserves the right to change any products described herein at any time, and without notice. NetApp assumes no responsibility or liability arising from the use of products described herein, except as expressly agreed to in writing by NetApp. The use or purchase of this product does not convey a license under any patent rights, trademark rights, or any other intellectual property rights of NetApp.
The product described in this manual may be protected by one or more U.S. patents, foreign patents, or pending applications.
RESTRICTED RIGHTS LEGEND: Use, duplication, or disclosure by the government is subject to restrictions as set forth in subparagraph (c)(1)(ii) of the Rights in Technical Data and Computer Software clause at DFARS 252.277-7103 (October 1988) and FAR 52-227-19 (June 1987).
Trademark Information NETAPP, the NETAPP logo, and the marks listed at http://www.netapp.com/TM are trademarks of NetApp, Inc. Other company and product names may be trademarks of their respective owners.