sport rules - internet archive
TRANSCRIPT


Sport rules for the army
from the 1st of October 1938
I approve the following sport rules for the army.It comes to effect on the 1st of October 1938. The inspector of the army school is allowed to arrange corrections in a non fundamental way.
v. Brauchitsch

Editor’s Preface
The translation of this book has been made possible by a large amount ofusers, all of them anonymous; this would make it very hard to correctly thank each and every single one of them. The threads on a certain Mongolian basket-weaving forum dedicated to this project were populated by an eerie wholesomeness and genuinely great people, whom I feel I cannot thank enough for the short company they have given me and the others.
This book is dedicated to Finnbro, Czech bro, Chilean bro, the myriad of Burgers and Krauts who made it possible, to the Italian mad lad who transcribed the text all by hand, to the various memeflags trying to shill against us and being converted into a resemblance of reason, to the guy who managed to rip the images and make them into SVGs, and to the Latex Kraut.
And of course, to all of those who did absolutely nothing and waited for someone else to finish the job, this first edition is especially dedicated. Now that you have the book, you better start using it.
There may be other editions (this one was hastily made in approximately 7 hours of ininterrupted work) but I wanted to get this out, and I did it.
-H, better known as “that Italian poster”
Resources are to be found at https://gitlab.com/sportvorschrift-fur-das-heer/

ContentsI. Guiding Principles............................................................................................6II. Management, Teachers, and Teaching Methods.............................................7III. Training Course...........................................................................................12IV. The Exercises...............................................................................................17
A. Korperschule............................................................................................17 B. Athletics...................................................................................................64 C. Swimming................................................................................................74 D. Boxing.....................................................................................................84
E. Team Sports..............................................................................................93V. Appendix.......................................................................................................96

I. Guiding Principles
1. These sportive activities raise and preserve the performance of the soldiers body, harden it like steel, and award him strength, endurance, speed, and agility.Therefore sport is the foundation of combat training and an indispensableaspect of military service.Sport awakens the offensive spirit, hardens the will, fosters self discipline and with it supports the education of the soldier into a fighter ready for action.Sport forces subordination and hardens the bond and spirit of the unit.In addition, it should provide the soldier with relaxation, recreation, and spark joy.

II. Management, Teachers, and Teaching Methods.
2. The company commander is responsible for the sports training of his subordinates.A successful physical education is not possible without good teaching staff.The company commander must therefore take special care that both officers and non-commissioned officers are exemplary in their performance.
3. A junior officer is the head of sports training.His personal performance should be significantly higher than the averageperformance of the unit.He must be able to demonstrate and explain the sporting exercises.His example determines the success of his training.His participation in competitions is recommended.
The leader wears the same uniform as the training unit.
4. The sports officer supports the commander.His powers are regulated by the company commander.In addition to his teaching duties, his duties include: preparing sports lessons by preparing the equipment and dividing up the company, keeping records during performance tests, acting as a referee during competitions, accompanying competition teams as captain or quartermaster, if no other officer is available, arranging sports matches, etc.The sports officer has to properly maintain and manage the sports equipment of the company.
5. The commanders of the regiments, battalions, and divisions check the training of the troops by means of inspections, performance tests, or competitions.They are certain that the necessary increase in performance of the individual is achieved through purposeful development and that sport is thus made usable for military training.They mandate sports courses for the uniform training of teaching staff.They ensure that it is primarily the junior officers who engage in sports themselves.
6. The battalion commander is assisted by the sports officer. He should have a special disposition for sport, have gained practical experience, and, if possible, participated in a course at an army sports school.

He must be trained as an arbitrator and judge proficient in safety regulations and the basic principles of health care.In addition, the sports officer should be familiar with the equipment and space management as well as the facilities of the German League of the Reich for Physical Exercise at his location.His actions are governed by his commander.
It covers:
a) Advising the commander and the company commander in organizational and technical questions of training and sports facilities (gymnasium, playing field, swimming pool).b) Provision and storage of equipment, installation and maintenance of sports facilities.c) Management of training courses for teaching staff.d) Organization and execution of sports competitions.e) Training management of competition teams.f) Management of the army sports clubs.g) Maintaining contact with the German League of the Reich for Physical Exercise and their affiliated associations.
7. It is the duty of the military doctor, in close cooperation with the leaders responsible for training in sport, to monitor people’s state of health and prevent overexertion.He teaches the troops about health and hygiene issues.
8. Teaching method. The training shall be based on the existing skills and abilities of the recruits; the sports training received by the soldier before taking up his service shall be linked to it. The simple, informal approach to the sporting practice, which avoids any unnecessary drill, awakens the spirit and love for sport and promotes training. From the beginning of training, exercises often take place in squadrons and units inorder to stimulate the sports lesson and increase performance.
The demands of the body, corresponding to its state of strength, must be adapted to the preceding performances, whereby a balancing of the type of exercise is necessary. The training of the limbs and core must go together.
It’s wrong to condense sports training into one or two days a week. Longer than 1-1.5 hours should not be practiced coherently in general.

The doctor can temporarily exempt people in need of care from sport completely or partially.
9. Sport should be practiced outdoors as much as possible. When the weather is cool, the sport training must begin with gymnastics in motion, short runs, or other exercises that warm the individual up in order to prevent colds and muscular injuries. The normal outfit is sports pants andfootwear.Depending on the weather, sports shirts and protective sports suits (tracksuits) can be added. When practicing intensely, the latter should be discarded, even in cold weather.Barefoot training strengthens the feet and is permissible in good weather and in proper ground conditions. During the game (handball, etc.) the footwear of the players must be uniform in order to prevent injuries.
Closed rooms must be well ventilated and thoroughly cleaned often. The air must be dust free. It is forbidden to practice sport in occupied spaces. The value of the training hours will increase if enough time is given to rest and clean the body afterwards. After cross-country races this is to be demanded in principle. Short warm showers reduce fatigue and eliminatemuscle stiffness.
10. Physical education lays the foundation for performance. This is a group exercise.Track and field, swimming, boxing, and team games develop the soldier’s performance to their full height.
In order to avoid military undesirable one-sided-ness, the soldier should demonstrate good average performance in all areas of official sport (all-around athletes). In addition, he should be brought to his personal peak performance in one or more areas.
After completion of the recruit training, it is therefore necessary to take acloser look at the abilities of the individual man.Training in top level divisions is often recommended so that soldiers witha good sporting disposition are not hampered in their further training by those with poor performance.People with particularly good performances, especially non-commissioned officers, can receive further training in voluntary exercisesin sports fields that are particularly suited to their inclination and disposition.

Soldiers who are preparing for competitions may also receive training opportunities in official sports.
11. Early morning exercise. Regular early morning exercise is only offered where - as with commanders - there is otherwise no possibility oforderly exercise operations.Its purpose is to stimulate blood flow and revitalize the body.A short run and a few minutes of movement exercises are particularly suitable for this purpose.Early morning exercise can never replace sports training aimed at performance.
III. Training Course
12. Sport must be implemented in the training course in a way that supports future training with weapons. The year is split into two training parts: Part I: Until the individual inspection of the trainee by an officer.Part II: Rest of the training year [or first year].
13. First year of service
Part I. (Recruit Training): The training areas are Körperschule1 and trail running, which must take place two times each month with increasing difficulty, as well as boxing. Swimming opportunities should be primarily used for the training of regular soldiers and non-swimmers.
Part II: a) At the end of April, the trail running training will find its end with standard competitions. The focus of the training should be boxing, whichmust be supported until free fighting. Körperschule and team sports may be practiced separately.It should be started with jumping, throwing, and running [or walking] training. Körperschule, team sports, and swimming may be practiced separately.
b) In the summer months, athletics (except trail running), swimming, andteam sports should be focused on. Körperschule should be repeated occasionally, gymnastics with equipment should be emphasized.
14. 2. Year of Service Part I: The main focus of the winter training is boxing and should be continued until free fighting with 3 rounds which last 2 minutes.Körperschule must be repeated and improved; games, especially team sports, are still practiced supporting the exercise material.Trail running must be continued like in the first service year.Part II: The abilities gained in the first service year regarding athletics and swimming must be improved. The technique of the training must be improved. The Reichssport-Medall and the certificate of the German LifeSaving Corporation2 must be achieved. Tournaments should bring the physical and mental capabilities of the man to its full potential.The handball and football teams must take part in tournaments in their respective battalions and regiments (c.f. 70.).
1 Literally school of the body, can be translated as “physical fitness”2 Still existing today as the DLRG
15. Review of the traininga) The personal inspection of the recruits extends to all branches of the Körperschule and the boxing school (first training stage)Certain strength and skill exercises (e.g. weight throwing, climbing, moving along a rope, tournament like obstacle relay races, etc.), usually paint a better picture of the capabilities of the recruits than a test of gymnastic training.
During the second year of service emphasis should be placed on boxing.The sparring match of up to 3 rounds lasting 2 minutes each is required.
Furthermore, improvements in the Körperschule should be noticeable.
The non-commissioned officers are to be proficient in all branches of winter training.
b) Until the end of April, standard tournaments must take place.
c) Once each summer, the overall performances in athletics and swimming must be checked.
Here, tournaments between companies of a battalion or regiment can be helpful.
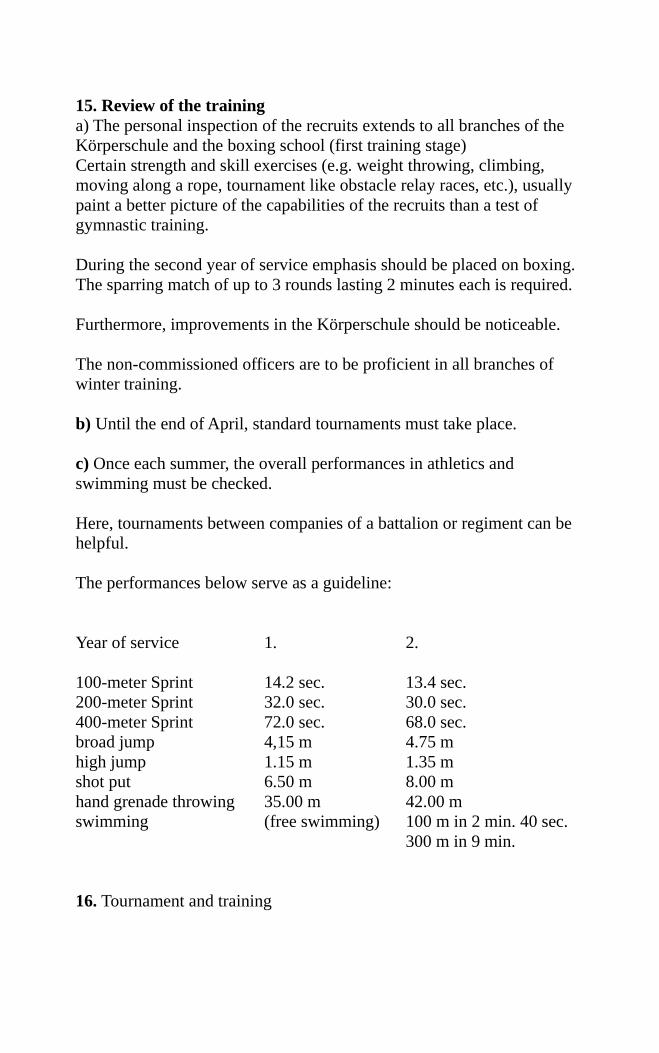
The performances below serve as a guideline: Year of service 1. 2.
100-meter Sprint 14.2 sec. 13.4 sec.200-meter Sprint 32.0 sec. 30.0 sec.400-meter Sprint 72.0 sec. 68.0 sec.broad jump 4,15 m 4.75 mhigh jump 1.15 m 1.35 mshot put 6.50 m 8.00 mhand grenade throwing 35.00 m 42.00 mswimming (free swimming) 100 m in 2 min. 40 sec.
300 m in 9 min.
16. Tournament and training

1. In a competition the soldier learns to push himself to the mental and physical limit.Competition is thus an exquisite school of will, toughness, and self-discipline.
The top performers in each competitive discipline encourage the remainder of the unit to strive for excellence.
The junior officers and all non-commissioned officers are to participate in official tournaments. It’s desired that every junior officer also takes part in extracurricular3 competitive sports. On occasion there may be tournaments in different age groups and years of service to give the less trained and less able a chance at success. Tournaments within companies and regiments are to occur annually. Division and corps championships are organized by the responsible command center. Championships of the army or Wehrmacht will be ordered by the high command of the army or Wehrmacht.
A command center may be tasked with the execution [of the championship]. Medical support should be provided and on site during championships. At sport presentations, only exercises that have body improving value should be shown. 2. Sport tournaments are held as single and team competitions. The tournament guidelines of the German League of the Reich for Physical Exercise are crucial for the sport tournaments.
a) One on one battles elicit top performance in competitive disciplines. Especially valuable here are combinations of different exercises, e.g. running, jumping, throwing, and swimming.
b) team tournaments promote fellowship and morale. They should play a big role in sports festivals. Suitable here are company relay races, competitions, tug of war, etc. To organize or participate in a large relay race is of great advertising value.
3. Weapon tournaments don’t belong in the area of physical education but in that of military training. They require a body that is trained thoroughly. The valuation [of the body] is carried out based on sport aspects.
3 non-mandatory

4. Training. Soldiers which take part in competitions must be well prepared because otherwise there would be a risk of injury. Every soldierwhich registers for a single competition is responsible for his own preparations. He must be supervised and guided by an experienced officer or a sport sergeant and doctor while training.
Preparations for the tournament only promise success if they buildupon a good trained body, full health, and an exemplary way of life. The main rules of this way of life are: Regular sleep of at least 8 hours, homemade food, and abstinence from drugs. Excessive behavior damages the condition and strength. Sexual abstinence is not bad for your health.
Massages are especially valuable in training. To avoid overexertion of the participants during preparations, an occasional dispensation of other duties must be accepted.
17. Off-duty sport, top athletes, army sports association. Voluntary off-duty sports activities should be encouraged through personal exampleat all ranks because through that the urge to participate in activity, which is in every youth, will be directed in the right direction. The soldier may practice any sport which he desires in his free time.
The off-duty sport is regarded as service in the sense of service injury if it was allowed in the interest of the trainers [or drillmasters]. Top athletes with national importance, who get made famous by the Oberkommando des Heeres, should find the support in the interest of the German Sport. They therefore, as far as their duty allows it, are enabled to train and take part in tournaments regarding their special fields after the recruitment training. The same support should be given to the hand and football team of the league.
The sportsmanship and sporting activity of a unit can be supported, if the sport enthusiastic soldiers maintain the reputation of their unit part, on the basis of their abilities, and can be enhanced further through gathering them in the Army Sports Association. The Army Sports Association will mainly support the hand and football players of a battalion and combine them to one team.
For the participation of those teams in tournaments and series games of the German League of the Reich for Physical Exercise, it's necessary that they are part of it. Only an active leader may lead the Army Sports Association to flourish. In each presentation in the public,

the Army Sports Association has to enhance its receptiveness and reputation through military and sporty behavior of its members. The voluntary sport counts as military service if it was permitted in the interest of the training by the responsible discipline advisor.If the soldier would come to harm, it would be regarded as service injury according to § 4 of the Army welfare and provision law.

IV. The Exercises.
Foreword
18. The sport regulation contains:
a) The mandatory exercises required of each soldier.
b) Exercises which are especially valuable for the further training of officers, non-commissioned officers, and exceptional soldiers.These exercises are added in small print to the individual practice areas without description.
c) The unit commander may in special cases (lack of equipment, swimming opportunity, etc.) omit certain parts of the mandatory exercises (except athletics). The unit commander may also decide to designate specific exercises as mandatory even though they are optional to the standard infantry, this depends on the nature of his unit (e.g. special forces).
A. Körperschule
19. The basic physical education takes place in the Körperschule. It includes movement games, gymnastics, and exercises on gym equipment.
20. Movement games. Easy games in the form of running-, pulling-, throwing-, ball-, and party games are the easiest way to make an untrained recruit versatile and flexible. In doing so, they awaken and encourage the enjoyment of physical activity. Playing games should therefore form the start of the training. Furthermore, the games serve as balance and relaxation after heavy exercise routines and should be continued throughout the year.
The listed games may be chosen by the instructor or supplemented by further ones.
Examples of games:
a) Obstacle course. Behind a drawn line, there are several rows ofup to 10 players, 4 in a distance of 25m with a 5-step distance as obstacles in a row, the first kneeling, the second in side-stance position,

the third as a vault, the fourth in a resting position. On "Go!", the first player in each row runs towards the obstacles; the first is to be jumped over, the second to crawl through, the third to be jumped over, the fourth to be ran around. Then the player runs back to his row, where the next one starts after a slap on the hand from the drawn line. The game is over when everyone in the row has finished running.
b) Fight against the row. About 12 players stand in a row, each clinging to the hips of his front man, the front man has his arms spread out; opposite of him is a lone player, the attacker, whose job it is to separate the clinging at some point in the row. The 1st row player may block the attacker with outstretched arms, but without holding him. The players in the back swing right when the attacker comes from the left andvice versa. If the attacker has successfully destroyed the row, he takes hisplace as the last person in the row and the player at the front becomes theattacker.
c) Tug of Ward) Medicine ball relay.
The squads (up to 20 participants each) stand in a line, with the player in the front (with his legs spread wide), about 3 meters away in a marked location. On the command "Go!", the ball is rolled through the straddled legs, beginning from the first player. Each player tries to accelerate the rolling ball by punching it with an open hand. The last in line receives the ball kneeling and runs past the right side of the squad to replace the first player. During this part each player moves one space back. If the ball exits the squad before reaching the last player the game continues from where the ball left the squad. The winner is the squad, who first returns every player to his starting position. Alternatively, in the same setup you can play the ball over the head and through the legs. The squadgains in speed when playing with 2 or 3 balls. The balls come into play in a distance of about 8m each on the command "Go!". However, each relay participant takes one ball to the front, only the last player has to collect and take back all the balls in the game. The squad whose balls return to their original position, win. Further exercises are optional.
e) Ball Over the Line: 2 teams of 5-6 men take up positions in a cordoned-off rectangle 10-20m long and 6-12m wide divided by a 2m high line into two equal parts. The players of each team divide themselves appropriately into front and back players. The ball is thrown over the line and must always be caught. The ball must be thrown from wherever it was caught. Every time the ball touches the ground on one team's side, the opposite team gets a point.Points are further scored:1. When the ball touches the line or goes under the line

2. When the ball touches the ground outside the playing field (the team whose side it lands on gets one point). Throws that are intercepted beforethey go out of bounds count as catches. The lines marking the field countas part of the playing field.3. If the hand of the thrower crosses the line. Whichever team reaches 20 points wins. The teams switch sides after 10 points.
f) Impact ball relay with the medicine ball. The games of 8-10 men are played in a series of relay races. No. 1 as a player faces the ball of his relay with about 2 m distance between him and player no. 2. On the command "Go!" the player throws the ball to No. 2, who then throws the ball back and sits down. Then No.3 gets the ball thrown to them by player no 1. and then throws it back as well and sits down, etc. Then the last player of the relay team, once he has received the ball, runs to the place of player no 1. who takes the lead in his turn. All participants must stand up during the run-up and take the place of the man behind them moving two meters towards the goal distance. The last player becomes first, the first becomes second and so on. The relay series starts anew for each team with each player. The winner is the relay team whom arrives first with the ball at the goal line.
g) Equestrian squadron.Behind a painted line, the players stand in line (each row up to 10 men strong). 20-25m away from the line, a target is marked, in front of each row. On the command "Go!", the second man (No.2) of each row jumps up on the back of the first (No.1) and is carried from the line to the target. Here, No.2 jumps off, runs back to the row and carries No. 3 to the target.Now No.3 runs back and picks up No.4 and so on until all the players areat the target.
h) Ball under the cord.In a demarcated rectangle of 16m length and 12m width, which is divided by an 80cm high leash into two equally sized fields, 2 teams of 6 players each play. The game is played with 3 Medicine balls, which are rolled under the leash. Running in your own field is allowed. Any ball that touches the rear of the playing field boundary of the opposite team isconsidered a point and can be achieved by all sorts of techniques. An out of bounds ball landing on the sides of the field is not evaluated. A point isalso scored: 1. if a ball or player touches the leash, 2. when a ball is thrown over the leash. The winner is the party that scores the highest in 10 minutes. 1 arbitrator is required for each game.
i) People's Ball. In a playing field of approximately 20m in lengthand 10m width, divided into two equally sized fields by a center line, twoequally strong teams, each up to 20 players, face each other. With a hand ball, both parties try to throw the ball at the other team.

At the start of the game, one player from the two parties is behind the opposing playing field.He participates in the throwing or tries to play the ball to his team in sucha way that it is possible to hit an opponent with a well placed throw. Every person hit must leave the field.All eliminated players surrounding the opponent's game limits can continue to participate in the game by passing the ball to their team or releasing the ball away from the opposing team's advantage. The winner is the party that first depletes the other team's ranks until no one is left onthe other team. At the start of the game, the ball is thrown up by the referee on the middle line. The party that catches the ball immediately starts the game.The game becomes more difficult when playing with 2 balls, or when it is allowed to catch the ball or to fend off the ball by smacking it away byhand.
j) A handball, rugby, or medicine ball can be used to play on a field of any size with any number of players. Gravel or hard frozen ground is not suitable as a playing surface.In order to avoid injury, it is recommended to play in a field of only 30m in length and 15m wide with 6 players on each side. The goals are represented by two medicine balls 4m apart.They are 3m in front of the lower boundary lines of the playing field.
Playing: The 6 players, divided into 3 strikers, 1 runner and 2 defenders, try to place the ball on the opponent's goal line. At the start of the game and after each goal, each team stands on their goal line. The ball is thrown into the middle of the field at the whistle. The ball may be thrown and pushed with the hands or carried any amount of steps. The ball can be taken out of the opponent's hand. The owner of the ball may be held below the arms by the opponent as long as he holds the ball. The opponent held in this way must play the ball within 5 seconds. It can be played behind the goal, but a goal can only be set from the front.The lines must not be passed through from behind.
A free-throw is imposed: a) in case of intentional pushing or kicking the ball with the foot, b) if the opponent is held incorrectly, c) if the player is not playing the ball within 5 seconds of being held, d) in rough and dangerous play.
If the ball exceeds the playing field boundaries, the ball is brought back into the field by throwing it in.If two players make an error at the same time, a referee's throw is given.

The duration of the game can be set as desired.It is recommended to playabout 2 by 10 minutes. l) Examples of other games: flying ball, hunter ball, neck ball, tug of war games over a line or from a circle as a competition, etc.
21. Gymnastics. The gymnastics practitioner should methodically loosen, stretch, and strengthen the muscles, which thereby prepares the body for athletic performance.Gymnastics consists of:1. gymnastics without equipment,2. gymnastics with equipment.
22. Gymnastics without equipment. The starting positions for the exercises under a-c find: resting position (Fig. 1), legs open or square position (Fig. 2), standing straight position (Fig. 3), step position (Fig. 4),sitting position (Fig. 5), kneeling position (Fig. 6), push up position,(Fig. 7), abdominal position (Fig. 8), laying position (Fig. 9).
Fig. 1 Fig. 2 Fig. 3 Fig. 4

Fig. 5 Fig. 6
Fig. 7
Fig. 8
Fig. 9

Directory.
On the command "To the gymnastics to the left (r.) open march (march, march)", the department opens so that the front line from the right (l.) wingspan from man to man is 3 steps between each one and in line to therear of each man is to have a 2 step distance. Step on the gap of the man in front as they step forward in unison.On the gymnasium floor, every man takes the resting position. On the command "Right (l.) completed - March! (March, March)" the first line-up is taken again and marched on the shortest way.
Practice of gymnastics.
The exercises are to be done in the alternation of arm, torso, and leg exercises. The exercise group begins with relaxation exercises, followed by stretching and strengthening exercises. After several strenuous exercises, a relaxation exercise follows appropriately. In time, gymnastics without equipment should not last longer than 15 minutes. The exercises are announced and presented. If the exercise is known, the presentation and lesson can be omitted. Each exercise starts and ends on the command "Start" or "Stop" in the rest position.During exercises in the sitting position, kneeling position, push-up to lift yourself, as well as in the abdominal and laying positions, the resting position is taken after the command "stand up". Occasionally, suitable exercises can also be carried out uniformly after counting or on the commander's command.
a) Easing exercises
1. Standing straight, jump (Fig. 10): When bouncing, arms and shoulders must be kept loose.2. While in the air, swing your arms upwards and spread your legs into a square position(Figure 11):


The arms are loosely swung into the air slanted high and then converged above the chest or head and then back through towards the sides of the body. The same exercise can be carried out with knee-swinging or jumping-jacks as well as with high and low swings of the arms.
Fig. 10
Fig. 11

3. Step position, leg swinging (Fig. 12):
The deferred leg is swung back and forward, where the knee and ankle ofthe swinging leg must be loose.
4. Square position, mill circles (Fig. 13):With holding up one arm, both arms circle one after the other closely to the body, first forward, and then backward on command.The torso must not be turned when the arms are circled.
Fig. 12 Fig. 13

5. Square position, hip circles (Fig. 14):
The circling of the torso takes place with pressed knees alternating left and right in alternating left and right.The arms swing through the upholds or hang loosely down.
6. Square position, circles of both arms (Figure 15): From the arms held high, both arms are then circled forward first and then backwards.Same exercise with knee-jerk or jumping-jacks.
7. Step position, arc swinging of a leg (Fig. 16): The deferred leg is swung forward and then sideways in the arc back to the starting position. The leg rises and then lowers back into the toe.
Fig. 14 Fig. 15

8. Square your hips and bend forwards (Abb. 17): From the upright position, both arms swing forwards through the invert position, backwards-upwards, with simultaneous forward bending, with squats andstretches.
9. Side straddle, rump turning (fig. 18):
Fig. 16
Fig. 17

With both arms held to the side, the torso is alternately swung to the left and right, with the respective rear arm remaining stretched, while the front arm is loosely swung to the chest.The legs are pushed through.
b.) Stretching.
1. Side straddle, Abdominal crunches forward (fig. 19): With straight legs, the torso is bent forward, far enough for both hands to touch the ground. The same exercise can be performed with one or two pushes or with folded hands swinging from the upright position through the legs.
2. Side straddle, Abdominal crunches backward (fig. 20):
Fig. 18 Fig. 19

By slightly sliding the knees forward and pushing up the hips, the torso is bent backwards.The feet have to stay on the ground with the whole sole, the arms hanging down casually.
3. Side straddle, Abdominal crunches sideways (fig. 21):
With both arms held up, the torso is alternately swung to the left and right.
Fig. 20 Fig. 21

4. Side straddle, falling into deep squat (fig. 22):
Both arms swinging, the knees bend quickly, with the body resting on thewhole sole.The torso is curved, the head retracted.
5. Running position, spread legs sideways (fig. 23):
Fig. 22
Fig. 23


One leg is swung sideways with the standing leg firmly planted to the ground.Alternate between both legs. It would be spread, with the standing leg going into the toes.
6. Step position, high pre-stretch (Fig. 24):
Fig. 24

The rear leg is swung as high forwards and upwards as possible, wherebythe standing leg lifts into the toe position.7. Running position, leg spread backwards (Fig. 25):
Fig. 25

After lifting the leg, the thigh is sharply swung back with loose knee and ankle joints.
The stand-leg lifts itself into the toe-stand, the arms swing into the side position.
8. Lateral straddle position and taking the extended lateral straddle position (Fig. 26):
The exercise should not be performed on smooth ground.
9. Running position, low squat position with knee extensions and bends (Fig. 27): In the low crouch-position, the torso is slightly bent, theheels are lifted, the hands support at the ground. After rocking once, the legs are stretched while the hands remain on the ground.
10. Kneeling position, core bends backwards (Fig. 28): The knees are a hand's width apart, the body is erect. The back bend takes place quicklywith raised hips without and with raising of the arms.
Fig. 26


11. Kneeling, core bends sideways (Fig. 29): One leg is placed stretched sideways. The bending is done with both arms held up and withone or two springs.
Fig. 27 Fig. 28
Fig. 29

12. Lateral position and take the extended step position (Fig. 30): The exercise should not be performed on smooth ground.
13. Seated stretch, bend core forward (Fig. 31): Bending forward is done in such a way that the hands touch the toes with the knees pressed straight. The head is retracted.
Fig. 30

14. Lateral straddle position, backward upward swinging of the arms (Fig. 32): The arms are stretched backwards and upwards and then loosely crossed by the low holds and brought in front of the chest. The heels are lifted when the arms swing back and lowered when the arms swing low.
Fig. 31

15. Abdominal position, fast lifting of the torso (Fig. 33): With sharp imprints of the hands from the ground, the chest opens to the limit of possibility. The arms support the lifting of the torso by strong side-stroking.
Fig. 32 Fig. 33

16. Deep creep position with spring deflection (Fig. 34): The hands arepushed into the floor in front so that the thighs stand vertically in the deep-creep-position.
Fig. 34

17. Sit straight, core torsion bends (Fig. 35): The torso is turned alternately from the straddle seat with side support and bent over the left and right leg, with the palm of the hand touching the opposite tip of the foot.
18. Abdominal position, back support, fast torso and leg lifting (Fig. 36):
19. Straddle seat, core bends forward as partner exercise (Fig. 37): From the straddle seat with feet placed against each other and mutual grasping by hand, the core is alternately bent forward and backward by pulling.
Fig. 35
Fig. 36

c. Strengthening Exercise
1. Pushups headfirst, squatting and stretching of the legs (fig. 38):
The legs are in turn stretched out and returned to a squatting position.This exercise can also be performed using one leg at a time, with a singular push to create more momentum.
Fig. 37
Fig. 38

2. Supine position, circling your legs (fig. 39):You lift your legs up from the supine position with lateral support (as seen in fig. 39) and continue circling them around without them touchingthe ground.
The circling can be executed with closed legs as well as with continually straddling, sinking, or scissoring your legs.
Fig. 39
Fig. 40

3. Supine position, quickly lifting torso and legs (fig. 40): Torso and legs are evenly lifted up so that the hands touch the feet.
4. Supine Position, quickly lifting and lowering the Torso (fig. 41):Lifting the torso is initially performed with a bent body and later with a straightened one. While lifting with a straightened torso, a helper holds down the practitioner's feet.
5. Pushups headfirst, elbow stretching and curling (fig. 42):[insert fig. 42]The curling of the elbows is performed slowly, the stretching quickly.
Fig. 41
Fig. 42

6. One-Legged squats as partner exercise (fig. 43): Two practitioners, grabbing each other's hands, simultaneously perform a deep squat - one with the left leg and one with the right. When bending the left leg, the right one is pushed forward.
7. Sit with the legs stretched out and alternate opening and closing ofthe legs while circling the legs of a partner (fig. 44)
Fig. 43


The two partners sit opposite to each other, one has his legs closed and the other has his opened.
The closed legs occupy a higher position. Successively, the practitioners perform various leg exercises: lifting, straddling, lowering, and closing of the legs. While closing the legs, the ground should not be touched. Both practitioners continue to perform leglifting, sliding, lowering and closing of the legs. Do not touch the floor when closing the legs. The same exercise can also be done with the legs closed.
Fig. 1:

8. Tuck jumps (fig. 45), star jumps (fig. 46) or jumps with a strong backwards thrust of the legs (fig. 47):
d) Exercises in Movement
Purpose and Method:
Walking, running, and jumping exercises should mobilize and warm up the musculature, especially at the beginning of the session.They are especially suited for early morning exercise, or for sessions in cool and wet weather.
Fig. 45 Fig. 46 Fig.47

Around 20-30 exercises are performed, each every three steps, while moving in a circle.
1. Walking and running in turns
2. Running in turns with double-time rebound intervals (fig. 48)
3. Running in turns with high jumps (fig. 49)After every 3 running steps, the left and right are alternately jumped up.

4. Fast walking (fig. 50)When speed walking the heel of the leg that is forward and almost fully extended should contact first and through the step roll towards the toes along the outer edge of the foot.
Fig. 48Fig. 49
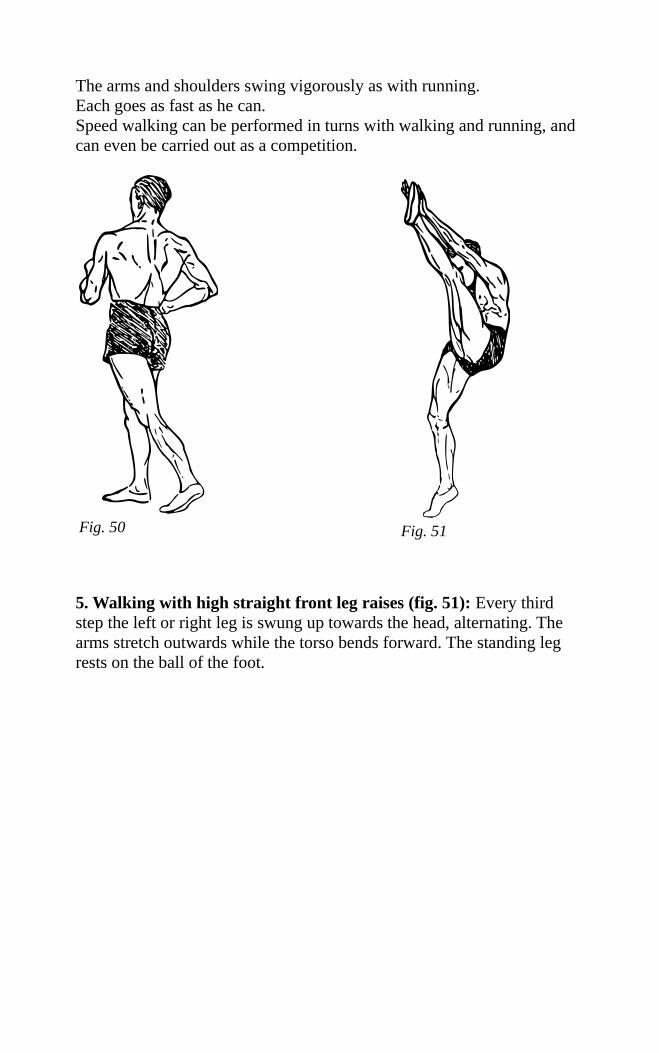
The arms and shoulders swing vigorously as with running.Each goes as fast as he can.Speed walking can be performed in turns with walking and running, and can even be carried out as a competition.
5. Walking with high straight front leg raises (fig. 51): Every third step the left or right leg is swung up towards the head, alternating. The arms stretch outwards while the torso bends forward. The standing leg rests on the ball of the foot.
Fig. 50 Fig. 51

6. Walking with deep lunges (fig. 52): During long, deep lunges, the heels are lifted, the torso held erect.
7. Running in turns with high knees and calf kick-ups: During high knees, the knees are lifted vigorously, during calf kick-ups the lower leg is loosely raised up rearwards.
23. Gymnastics with Equipment.Gymnastics with equipment is comprised mainly of strength building exercises, since the equipment provides the resistance necessary for muscle growth.The exercises with round weights and barbells or dumbbells are performed slowly.Medicine ball exercises and throwing exercises with throwing weights are especially valuable for building explosive strength.
Safety Measures: The leader must ensure sufficient distance between the exercisers.
Fig. 52

a) Exercises with the medicine ball: this requires two practitioners standing opposite of each other. The medicine ball is caught at chest level by reaching outwards towards the other practitioner who throws theball.
1. Step position, throw the ball as a high throw (Fig. 53): When throwing, the back is slightly bent back and the ball is swung into a high overhead position and thrown forward in a high arc towards to co-practitioner.
2. Step position, throw forward as deep throw (Fig. 54):From the high hold, the ball is thrown forward by swinging forward and applying resistance from the torso to hip height towards the co-practitioner.
3. Step length position, throwing the ball backwards over the head (Fig. 55):
Fig. 53

The ball is swung forward under the hips and then thrown backwards over the head by stretching and planting the bodies weight into the toes.
4. Side-digging position, throwing backwards under the hips (Fig. 56): From the high hold, the ball is thrown forward and downward through the spread legs under the hips as a fast underhand throw to behind the practitioner.
Fig. 54Fig. 55

Fig. 56
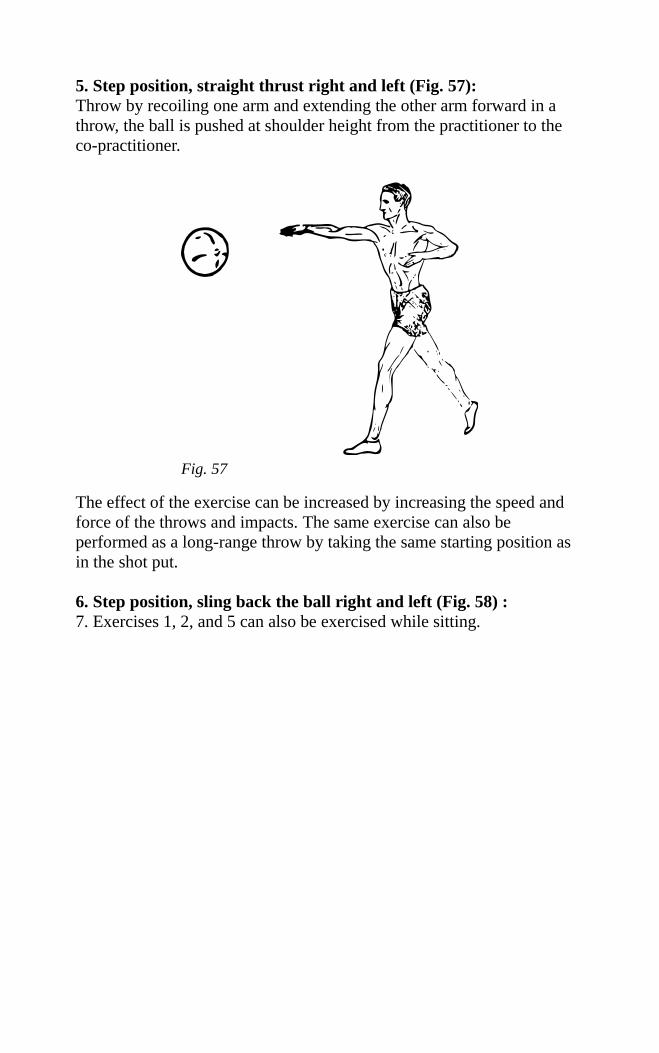
5. Step position, straight thrust right and left (Fig. 57): Throw by recoiling one arm and extending the other arm forward in a throw, the ball is pushed at shoulder height from the practitioner to the co-practitioner.
The effect of the exercise can be increased by increasing the speed and force of the throws and impacts. The same exercise can also be performed as a long-range throw by taking the same starting position as in the shot put.
6. Step position, sling back the ball right and left (Fig. 58) :7. Exercises 1, 2, and 5 can also be exercised while sitting.
Fig. 57


Fig. 58 Fig. 59Fig. 60

b) Exercises with the kettle bell: Employ as with gymnasitcs without equipment
1. Kettle bell swing The kettle bell is first raised frontwards with outstretched arms.It is then swung through the open legs under the torso with the body absorbing the swings inertia into a squatting position.The same exercise can be performed with only one arm holding the kettlebell, alternating left and right each swing.
2. Side swings (Fig. 61): The kettle bell is swung in front of the body with one arm alternately switched to the right and left in the swing from below the torso to the side.
3. Circles with one arm (Fig. 62): After previous swinging sideways, the kettle bell is circled alternately left and right around to the front of the body.
Fig. 61 Fig. 62

4. Circles with both arms (Fig. 63): After swinging sideways, the kettlebell will be swung alternately left and right around the head.Over the head the arms are bent slightly, in front of the body they are straight.
5. Kettle bell clean (Fig. 64):The Kettle bell is first swung through the practictioner's bent legs.At the end of the upwards movement, let go of the kettle bell and catch itwith an open hand over the shoulder, bending your arms and knees.
6. Kettle bell flipAfter swinging the kettle bell with one arm through bent legs, let go of the kettle bell during its upward motion and catch it after it does a full turn.
Fig. 63 Fig. 64
Fig. 65 Fig. 66

e) Exercises with the throwing hammer:These exercises are usually meant to be used in competitions.Here it is highly important to have a free throwing range and to leave enough space between practitioners.Starting position: The practitioner stands in a squat form with bent knees in front of the weight on the ground so that he can grab the weight with an overhand grip and straight arms.1. Swinging throw forward through squatted legs (Fig. 67)2. Swinging throw backward over the head (Fig. 68)3. Circling of the weight (Fig. 69)
Fig. 68Fig. 67
Fig.69

Out of the starting position the weight will be swung backwards through the opened legs, then forward again, swung from the right side and circled left over the head.
The weight will be swung deep behind the back on the right and high in the front left, in front of the body the arms are in a straight position, below the head they are bent.
4. Throw out of the standing position.
After circling the weight once or twice, the weight is to be thrown backwards with straight arms over the left shoulder (Fig. 70.)
Fig. 70

d) Exercises with the barbell (Fig. 71 and 72).While exercising there should be assistance to prevent the barbell falling backwards.1. Clean with one arm and both arms.2. Jerk with one arm and both arms.
e) Exercises with the kettle bell (5 and 7 ¼kg)Throw the kettle bell straight up left and right, catching with the same or the other hand. Throw from the right side over the left shoulder and catchit with the left hand, or vice versa.
24. Exercises on gymnastic equipmentGymnastic equipment is to be used to strengthen the body and for obstacle gymnastics. Explicit Gymnastic posture is not required.Safety precautions:To prevent accidents, help is strictly advised. Help is foremost necessary when doing jumps over the gymnastic equipment, as well as dismountingfrom the horizontal bar and parallel bar. In the beginning, help comes from the teacher, later from the other people instructed in it. Dismountingfrom the equipment is to be cushioned with a mat or deep raked sand pit.
Fig. 71 Fig. 72

a) Neck1. Pull ups with a bar at a reachable height. It is advised to train with underhand grip and reverse grip, the chin has to get above the pull up bar2. Swinging out of a standing position } the bar has to be at the3. Turn left and right (Fig. 73) } height of the head4. Squat5. Muscle up (Fig. 74)
b) Parallel bars:1. Dips (Fig. 75)
Fig. 73


Fig. 74 Fig. 75

2. Climb over (Fig. 76).3. Sideway jump over both parallel bars from a run-up (Fig. 77).
c) Parallel bars with different height:1. Jumping onto the lower bar with feet first, or sideways jump over the higher bar (Fig. 78).
Fig. 76
Fig. 77

2. Climbing over the low bar first, then the higher bar, then vice versa (Fig. 79a, b, c).
Fig. 78 Fig. 79a
Fig. 79b Fig. 79c

3. Jump into a supporting stance on the high bar and turn around over both bars (figure 80).4. Hanging on the higher bar, swing underneath it and over the lowerbar. (figure 81).
Fig. 80
Fig. 81

d) Horse, across without pommels.1. Flank vault left and right (Fig. 82).2. Squat vault up with both feet and leap forward (Fig. 83).
Fig. 82
Fig. 83

3. Squat vault (Fig. 84).4. Free jump up and leap forward (Fig. 85).
Fig. 84
Fig. 85

5. Free jump over the horse's height of 1.10m (Fig. 86).
e) Horse or long box:1. Squat vault with one foot and run over the back of the equipment, leaping forward, or jump over the presented obstacle. (Fig. 87).
Fig. 86
Fig. 87

2. Drop down off of horse in front from a squatting position.3. Giant straddle.
f) Strong perch:Climbing and hanging are particularly powerful exercises. When climbing, care must be taken to ensure that the climbing is correct.Hanging can also be practiced by those who are proficient enough.
g) Obstacle squadrons:In the case of obstacle relays, the gymnastics equipment is regarded as obstacles. By appropriate assembly of equipment, etc., obstacle courses are set up, which are overcome as quickly as possible in the competition.They are skipped, overtaken, undertaken and exceeded.In particularly difficult exercises, helpful-orders must be given.
Relay examples of the simplest type:1. Climbing and crossing a waist-high bar or horse.2. Jumping over the horse, squatting on or standing on the horse, runningover the back of the horse and jumping over a presented obstacle such as jumping a hurdle, a bar, or a higher horse.3. Climbing and jumping one bar to another of unequal height, squatting on one horse and jumping over to another while overcoming obstacles.4. Cross over a horse, turn around and back-flip.Turn away.5. Crawl under a bench or other obstacles, free jump over a perpendicularly crossed horse and climb or hang onto a rope.
25. Floor gymnastics.The ground exercises make the body supple and flexible.They should only be done on soft surfaces.Difficult ground exercises, such as forward somersaults and flips (saltos),may only be carried out by people who have the necessary physical preparation and suitability.
1. Forward Roll (Fig. 88): Exercise possibilities:
Fig. 88

a) Rolling forward from the approach and start-up,b) Forward roll several times in a row,c) Jumping and then rolling forward into a handstand,d) Handstand and then handstand with subsequent roll forward.
2. Protect your head.
3. Roll backwards (Fig. 89 a, b, c). Exercise possibilities:
a) Roll backwards from the seated position to the kneel position.b) Roll backwards from the squatted kneel position to a handstand.c) Roll backwards from the handstand to a standing position.d) Roll backwards with closed and squatted legs.e) Roll backwards into a handstand.
Fig. 89a
Fig. 89b
Fig. 89c

4. Pike roll (Fig. 90):An assistant kneeling next to the practitioner can facilitate a forward pikeroll by applying slight pressure on the back of the head of the practitionerduring "the tucked chin part of the pike roll" without exaggerating it so far that the practitioner falls on their back.
Exercise possibilities:a) Pike roll from exercise equipment (jumping with both feet).b) Pike roll from a running start (jump with both feet).c) Pike roll over 1 to 3 adjacent people (laying flat).d) Pike roll over 1 to 3 side by side people (benches).
5. Handstand.The assistant helps the practitioner.6. Roll forward,first learn a handstand with the bench, then finally without a bench.7. Roll sideways (cart-wheel).8. Roll forward freely (Salto).
27. Exercises on the Wall Bars.
The exercises on the wall bars are mainly stretching exercises.1. Stand forward on the fourth rung, handle at hip height, bend your torsowith one or two recoils.2. Stand forward on the fourth rung with open legs, handle at hip height, falling into a deep squat with recoils.
Fig. 90

3. Hang forward or backward at the second-highest rung, swinging the legs from the hip alternately left and right.4. Seated back with open legs close to the wall bars, handle at arm's length, lifting out of the seated squat into the final bend.Try the same exercise with closed legs while lifting to the toe stand position.5. Stand next to the fourth rung, handles at shoulder height, legs spread to the side, lift and lower yourself.6. Stand backwards on the fourth rung, handle at hip height, lower then raise yourself with spread legs.7. Hang backwards at the second-highest rung, lifting and lowering your legs.8. Stand forward with one leg spread horizontally, bend forward with recoils.9. Stand and flex your knees and torso to the side, stretching horizontallyand recoil back into place.10. Stand close to the wall bars, bend your hip forward and detect the second rung.Using your arm, bend and stretch your knee with pressure.11. Reclining up and down with your hands on the handle of the third rung, mutually bend and stretch your arm.12. Stretch exercises can be done with partners.

B. Athletics
28. Through the exercises of athletics, the soldier learns to perform the natural movements of running, jumping, and throwing in a practical and energy-saving manner, thereby increasing his performance in all areas of military service.The aim is to provide a wide range of training, if possible, with the addition of voluntary exercises.Through competitions and performance measurements in the practice hours, the ambition of the soldier is to be promoted in a healthy way and his voluntary commitment is achieved until the last forces are deployed.
29. The run.
a) General: The run is the most valuable exercise. Through it, stamina and speed are acquired and the internal organs (heart, lungs, circulatory system) are particularly stimulated and developed. When running, a loose and buoyant movement is to be sought and any unnecessary tension or cramping of the muscles must be avoided. Particular attention must be paid to a full swinging of the legs forward (Fig. 91). The faster the run, the more the upper body pushes forward, the stronger the legs are stretched during repulsion and the stronger the arms swing (Fig. 92). With slow running, the torso is upright, arms and legs swing lightly and loosely. The feet point in the direction of travel. In a sprint, the foot springs up, with medium-fast and slow running the foot is placed with the whole sole forward and rolled off. Breathing takes place through the mouth and nose. Thorough exhalation must be ensured.
b) Teaching: The correct running style is acquired through the following running exercises:
1. Unforced running at a slow pace on the track (each level course is suitable).2. Run with short, loose steps dribbling a ball with the feet (football/soccer run) to achieve the required looseness of the leg and arm work.3. Increase runs over 100 to 400 meters to train in each running style.The speed of the run is gradually increased during training.4. Runs with tempo change.The runner changes speed repeatedly, initially from medium speed, then to a slow speed, then to an all-out run at full speed, and then back into the initial pace.


c) Cross-country running is the best endurance training.The soldier learns to adapt to the difficulties of the terrain in his running style. The training of endurance depends on the length of the track and the pace. Shorter runs (2-3km) at a lively pace train endurance as well as longer runs (up to 10km) at a slow pace. The training begins with slow runs in light terrain (solid ground) over 2-3km, which are interrupted in the beginning with breaks between stages in training. The length of the track, the speed of the run, and the difficulties of the terrain are graduallyincreased.
d) The sprint. The sprint is carried out over distances of 100, 200, and 400m (short distance run). Starting practices, wind sprints, and tempo changes are necessary to achieve greater performance in the short distance run. Repeated short runs over 60 to 100m, occasionally over 200to 300m, and for the particularly rugged is the important 400m track run which can also be over 500 to 600m, given the necessary endurance to beable to pass this route at a fast pace. Every short-distance runner should also be trained in the start and relay change. The usual relays go over 4 by 100m and 4 by 400m
e) The Start. Set up to start running by placing the dominant leg behind the foot that is placed behind the starting line, bending the knee down on the other leg so that the knee of the dominant leg is located near the ankle of the forward foot, the tip of the foot is tightened into the starting holes and are carefully and deeply seated into back walls fixed in place ready to be propelled forward.
Fig. 91 Fig. 92

On the command "On your marks" the runner puts his feet in the starting holes, kneels down and puts his hands on the starting line, so that the fingers touch the ground with their fingers pointed inwards and the arms stand apart shoulder-wide (Fig. 93). On the command "Get set" the runner lifts the knee of the dominant posterior leg so far from the ground that the leg in the knee forms an angle of more than 90°, pushes the upper body forward, transfers the body weight to the stretched arms and breathes deeply. The view is slanted forward to the ground (Fig. 94). On the run-off command "Go" (shot) the runner pushes himself with both feet out of the starting holes. The first steps are short, fast, and loose, the arms swing sharply angled as the legs. The runner gradually straightens up to a natural running posture. After the start, 20 to 30m must always besprinted through.
Teaching:1. Practice the individual positions.
2. Easy starts, note that the arm work is correct from the first step.
3. Start over 20 to 30m at full speed.
4. Pre-set starts and runs (worse runners get a target) up to 60m They are often used as an incentive for unmotivated runners.
f) Passing the baton during the relay race. Passing the baton is the technical prerequisite for the team effort in short distance running. The runner receiving the baton stands at the beginning of the 20m transfer
Fig. 93
Fig. 94

spot and awaits the runner approaching at the fastest pace with the rod in his left hand. As soon as he has reached a mark designated 6-8m before the beginning of the transition location (the distance depends on the speed of both runners), the receiver goes off at full speed with full arm motion. Shortly before the next runner has given the baton, he stretches out the right arm to the back (hand spread out stretching from the body), the bringer simultaneously pushes the baton rod from under into the handof the receiver with the front extended left arm (Fig. 95). The reciever immediately takes the baton into his left hand.
Teaching:1. Practice the relay change while walking, then slow and fast running.2. Relay change in the 20m location with auxiliary stamp determination.In order to determine the auxiliary marks safely, it is necessary to pass through the full distance in the competition order of the stops.3. Practice competitions in different seasons.
30. Other running distances are: medium distances over 800m, 1000m, 1500m. Long-distance runs over 3000m, 5000m, 10,000m, 25km, 42.2km (Marathon). Hurdles over 100m, 200m, 400m Steeplechase (obstacle course run) over 3000m.
Fig. 95

31. The jump The jump in its execution is a stride leap, high jump, or long jump. a) The stride leap. The stride leap is executed on the run over low obstacles which are up to 90cm high and should not hinder any running movement. The runner lands on his swinging leg and continues running immediately. The takeoff leg is trailed just like when running.At obstacles which are over 70cm high, it is trailed laterally.
b) The high jump.The high jump is executed as a crouch jump or Scottish jump. The crouch jump is started by running forward, both legs tucked to the body while jumping, and ended by landing on both feet (Fig. 97).
Fig. 96
Fig. 97

The Scottish jump is performed by running from the side, so that the swinging leg is facing the bar.The legs are swung over one after another; the jumper lands on the swinging leg (Fig. 98).
The run-up to the high jump is a moderate run in which the last three to four steps are performed powerfully. c) The long jump. The long jump is a tuck jump, in which the lower legsare swung forward for landing. To avoid falling back, the jumper swings his arms forward and pushes his knees forward when he lands (Fig. 99, Fig. 100). The run-up to the long jump is an uphill run in which the maximum speed must be reached several steps before jumping off. The speed of the run-up and height of the jump determine the distance.
d) Teaching style of jumping:
1. Jumps from the standing position to strengthen the bounce and to learnthe necessary stretch when jumping.a) Long jump from the standing position.b) Triple jumps from different standing positions (on both legs, on one leg, stride leap, sporty triple jump, hop, step, jump).c) High jump from the standing position as tuck jump. 2. Jumps with a light run-up. a) Jump with both legs, high- and long jumps.b) Jump with the takeoff leg and relaxed but high long jumps.
Fig. 99

3. Long- and wide jumps with run-up.4. In cross-country runs, jumps over ditches, hedges, in sand pits, etc.are carried out. Predisposed jumpers maintain their jump style in the high- and long jump, if appropriate. 32. Other jumping exercises are: Long jump as running jump (including correct run-up technique). High jumps in various techniques (including roll-overs). Pole vault. Triple jump with run-up. 33. The throw.It is prohibited for the exercising person to return training equipment by throwing them. The throwing field is to be kept free at the front and on the sides by exercisers.
a) The hand grenade throw.The hand grenade throw is practiced as a long- and goal throw.Throw from the standing position: The hand grenade is held firmly but not too tightly in the throwing hand. The body weight rests on the right leg, the upper body is slightly bent forward. The throwing arm is stretched almost fully backward (Fig. 101). When throwing, the left leg is lifted first with the body leaning far back from the throwing direction.With the left leg returning to the ground, the right one is stretched, the right hip and shoulder thrown forward and the throwing arm abruptly snatched forward past the right side of the head (Fig. 102).
Fig. 101
Fig. 102

Throw with run-up: The run-up is about 15-20m. It is an accelerating run, in which the last 2 to 4 steps are carried out so that the right leg is placed over the left (cross step) and the thrower thus enters the throwing position. At the run-up, the hand grenade is carried in front of the body.In order to avoid shoulder and elbow injuries, only light throws are required in the beginning, and performance throws later. Teaching style of hand grenade throws: 1. Preparing, light throws from the standing position to learn how arm and body work in conjunction.2. Throw from slow run-up, practicing the cross step.3. Throw from moderate run-up, practicing the cross step.4. Throw from fast run-up, defining a mark at the beginning of the cross step.5. Hand grenades target throws. B) The shot put.The thrower stands with his left side to the throwing direction.The shot lies at the base of the fingers, the thumb is spread out.
The right leg is bent, the upper body slightly bent forward, the shot rests on the right shoulder (Fig.103).
Fig. 103

When thrown, the left leg raises and lowers a little to the left of the throwing direction on the front edge of the circled floor.The push is done by strongly extending the right leg by advancing the whole right throwing side over the stretched, stiff left leg (fig.104) and by straight pushing of the throwing arm at an angle of 45 ° over the edge of the circled floor (Fig. 105).The right leg must not lose contact with the ground until the ball has released the hand.
Teaching style: 1. Brief practice of the starting position and the process of movement without a shot. 2. Push from the standing position with a 5kg shot.Practicing of partial movements is to be avoided. 3. Push from the standing position with a 7.25kg shot.
Fig. 104Fig. 105

C) The stone toss.The stone toss requires the same technique as the shot put when standing upright (Fig. 106, Fig. 107). When throwing, the stone is carried one-handed in front of the chest (Fig. 108).
The stone is carried with one hand in front of the chest (Fig. 108). By moving the right leg over the left (cross-step), the thrower moves into thedischarge position.
Teaching Method:1. Push off the stall right and left.2. Running with the stone and learning the cross-step.3. Push with a full start of 15-20m length right and left.
34. Other throwing exercises are:Shot-put with pitch,Discus throw,Javelin,Hammer throw.
Fig. 106
Fig. 107Fig. 108

C. Swimming
35. Supervision and Classification. During swimming lessons, an officer or a non-commissioned officer trained as a swimming instructor is to be designated as the inspector. He is responsible for the practitionersand arranges the necessary security measures.
36. Safety Measures: The supervisor and teaching staff must observe thefollowing rules:a) Ear, eye, and skin patients should not go into the water without medical permission;b) People who have been ill must be specially watched;c) People should not go into the water with a full stomach or while overheated;d) After great efforts (marching) or little sleep (watch), efforts to swim must be avoided.e) Do not use outdoor baths when the water temperature is low for too long.
For continuous swimming, the skin must be greased to reduce the heat loss. The senior officers issue safety regulations according to legal conditions. In accordance with the general safety regulations, the inspector must arrange the division of troops, the distribution to the free-swimming and non-swimmer pool, the change of departments, the classification of the teaching staff and the emergency services (the latter, if necessary, in consultation with the lifeguard). The safety regulations are to be formulated accordingly for indoor swimming pools, if the civilian bath master does not lead the supervision.Special measures are to be taken when swimming outside the institution.Lifeguards who swim next to the students are to be marked by bright caps. A lifeboat (wide wooden barge) must be present.Canoes and folding boats are not suitable as lifeboats. For deep and opaque water, it is advisable to secure students who are already swimming without a line with a life vest or diver's respirator.Care should be taken when jumping into water of unknown depth.
In each institution are to be displayed:a) The safety requirements for the institution concerned;b) The panels of D.L.R.G. for resuscitation after drowning.
Non-swimming lessons.
37. The goal of this training is to learn the breaststroke and backstroke.

Teaching: Lessons are given in shallow water without a device.Equipment-free training has the advantage of being natural and many canbe trained concurrently. Training enhances the student's sense of security.First, the students are accustomed to water training with rest and patienceabout physical and mental inhibitions. Dry swimming exercises can be taught quickly. The individual exercises should be done first on land and then in the water.38. Exercises to get used to the water. The pupil must recognize that hisbody remains afloat without movement of the arms and legs on the surface as soon as the lungs are filled with air. Quiet and proper breathing is the first prerequisite. The following exercises serve as a guide:
a) Standing and walking in shoulder deep water, deep inhaling and exhaling.
b) Diving:1. Brief immersion of the head under water, immediate emergence.2. Inhale, submerge, stay underwater for a few seconds, exhale under water.3. When diving, keep your eyes open to look for underwater objects.
c) Testing the buoyancy of the water with deep breathing, first with help and then without help, by tightening the legs and forming a ball.Stretching of the body in breast and back position with assistance. Drifting in an extended breast and back position, first with another student pulling, then with another student pushing off the bottom or edgeof the pelvis.
39. Swimming movements in the chest position:
a) Leg movement: The legs are squatted with knees wide open, sideways and then closed. Practice: In shallow water, the hands support the body on the ground or hold it to the edge of the pool.
b) Arm movement: From the hold up, the arms are led sideways to forehead height, then the arms and hands are bent under the chest and loosely presented with the palm downwards. Practice: In shallow water, the student lies stretched out on the arms of the helper.

c) Breathing: When guiding the arms, the practitioner's breath is inhaled quickly through the mouth and exhaled slowly through the nose and mouth during the demonstration.
d) Coordination of movement (Figs. 109 to 113):
Count "1": Inhalation with lateral movement of the arms
Count "and": Bending the arms and hands under the chest while bending the legs with open knees.
Count "2": Exhalation with a side straddle and closing the legs while at the same time driving the hands forward.
Fig. 109
Fig. 110
Fig. 111

Practice: The student lies outstretched on a helper's arm.After each stroke the student must pause and let the body glide forward.If the student controls the coordination of the movements, he pushes himself off the side of the pool edge, into the swimming pool, and tries tocarry out the motion several times.The distance to be covered must be gradually increased.
40. Swimming movements in the inverted position. In backstroke, the hands are guided sideways in the water until the arms, elbow joints, and hands are stretched out. Then the arms are struck against the thighs with the arms stretched to hip level. At the same time, a leg kick should be performed, similar to the breaststroke technique. The body should be outstretched, and the head should be in the water, with water coming up to the ears.
Fig. 112
Fig. 113
Fig. 114

The swimmer should breath in as they drive their arms through the water,and should breath out slowly when their arms touch their hip.Breathing deeply through their nose and their mouth.
After the movements are performed, the swimmer should lay stretched out in the water in order to float in the water. It is easier to learn positioning, movements, and breathing in the backstroke than in the breaststroke. This way, the student will become more comfortable in the water.
41. Swimming in deep water: A life-jacket can be used when first transitioning to swimming in deep water.In order to increase safety, the student can swim next to a safety rope, which would be tied to a pier or boat.
Later, the student should swim without a rescuerope next to a boat, under the supervision of anexperienced swimmer (A lifeguard if possible).At the same time the student should practicejumping (Pencil jumping, or Cannon Ball)(nothead-first) on the rope, from the stairs, from theside of the pool and from a one meter high divingboard.Jumping from taller diving boards is forbiddenbefore passing the swimming proficiency test.42. Swimming Proficiency Test: When thestudent has swam more than 15 minutes withoutstopping, then they have passed the swimming
Fig. 115
Fig. 116

proficiency test. The student will then be required, in the presence of an officer, to swim for 15 minutes using the breaststroke, and the more popular backstroke techniques, the student should enter the pool by jumping from 1 meter high, using their jumping-style of choice.Swimming Proficiency Lessons:
43. Swimming styles.The student's confidence with the breaststroke and backstroke will be improved through constant practice (long distance swimming of 100-300meters), at the same time, speed will be improved.Students who master other forms of swimming will also improve their technique through long distance swimming.
44. Starting jump and turn: The start and turn are the prerequisites for every regulated swimming exercise. a) Starting jump from the side of the pool or a starting block: the feet should be a hands length apart, the toes facing inwards over the pool sideor starting block, with the knees, arms, and elbows slightly bent, the headsomewhat tilted back, the body should be leaned forwards (Fig. 117). The position should be taken after the commander says "On your marks!". The swimmers jump when they hear the word "Go", the arms should press forwards. The swimmer's body should glide stretched out flat in the water. The swimmer's head should be in a normal position between the arms. The swimmer should breath in when they first jump, and they should breath out when they emerge.
Fig. 117

b) Turning: The hands should grab the side of the pool or on the bar, the swimmer's body should be pulled up next to the wall,
but not completely out of the water, the swimmer should breath in. The swimmer should bend their legs, which would allow their body to turn around after releasing their grip on the side of the pool.
The arms should be stretched forward, and the head should be positionedin the water between the arms.The kick-off should be performed after both of the legs have made contact with the wall.After the kick off from the wall, the swimmer should glide through the water (Fig. 119-121).
Fig. 118
Fig. 119
Fig. 120

45. Diving: Diving raises the safety of the swimmer, and builds off of theprior swimming exercises. The eyes should be open under water. The swimmer's performance should slowly increase; overconfidence, or overzealous diving could lead to injury. The following milestones are required:
Deep-diving from 3 metersDiving for distance from kick-off 27 meters (No time limit)
(Certificate Awarded) In murky water the swimmer should be equipped with a life-vest with a rope attached (Be careful around piers, rafts, and barges). a) Deep-diving after showing proficiency in feet-first or head-first divingfrom the shore, from a diving board, or from a swimming platform. b) Distance diving. Swimming underwater should be performed with the breast-stroke. The arms should be stretched out passed the upper-body and then driven down to the hips. Buoyancy while in the water should be overcome by forcing the head down. The air that was inhaled during the kick-off should be slowly released during the duration of the dive. Swimming in a straight line under water can only be improved overtime by practice and slowly performing the swimming motions while opening the eyes under water. Before emerging all of the air should be already released. The most preferable diving-depth is 1.5-2 meters. (Do not swim close to bottom of the pool)
Fig. 121

46. Jumping. Precautions. The supervisor should be careful to correctly time the student's jumps. Falling, either forwards or backwards off of the platform, into a dive is forbidden due to how common injuries are. a) Standing jump with and without a walking or running start.It can be used from a 1-3 meter or 5 meter jumping platform where available.
b) Cannon ball jump with or without a running start.The legs should be tucked while in the air, the diver should fall feet-first while balled-up into the water.
This is best used in unknown or shallow water depths.This type of jump should only be performed from a one meter tall platform.
c) Running Start: The diver should start the motion with full speed at the end of the board. The diver's body should be outstretched with the arms thrown forward and the head positioned between the arms. The diver should be completely outstretched and at a sharp angle when entering thewater, and then straighten out to swim parallel to the bottom of the pool.
47. Other swimming techniques: Hand-over-hand swimming Doggy-paddle
Fig. 122
Fig. 123

Double arm backstroke Back stroke 48. Other jumps from 1-3 meters can be seen on the Swimming-department's chart of jumping techniques.The most important are the forward dive, the forward and backwards somersaults, the backwards dive, the back flip, and the forwards 1 1/2 flip. 49. Confident and safe swimmers should aspire to become lifeguards.A strict standard is to be set for the acceptance of test takers for the German-Life-Rescue society.The test taker must meet the conditions the first time taking the test.The lifeguards must learn how to swim with clothes on, how to handle someone thrashing in the water, how to rescue someone in the water, resuscitation, and how to behave in stressful situations.
Correspondence between The Wehrmacht and the German Life-Rescue Association
The correspondence between the Wehrmacht and the D.L.R.G. is directlyperformed by the regiments themselves. In abbeys, schools, etc. and the central office of the D.L.R.G. in Berlin.

D. Boxing
50. Boxing serves military training and education by developing the will and ability to fight the enemy.Boxing promotes mental and physical well-being, self-confidence, toughness, speed and agility.A soldier trained in boxing is equipped with a lot of mental and physical power to perform well in close combat with a weapon.
51. The 1st training level includes all exercises of the boxing school that can be carried out without gloves.In this training level, boxing is an important addition to physical exerciseand is to be performed alongside it.
52. The orthodox fighting position is the starting position for attack anddefense. The right leg stands about one step backwards to the right of theleft leg, with the left leg resting on the full sole, the right resting on the ball with the heel raised, the toes pointing forward, the knees are loose and slightly bent, the weight is evenly distributed on both legs (Fig.124), the upper body is almost upright, and the left shoulder is slightly ahead of the right. The left arm as an "attack arm" is set almost at a right angle. The hand is advanced at the level of the left nipple. The right arm covers the body, just below the chin. Both fists are clenched, the thumb is on theoutside of the index and middle fingers (Fig. 125).
53. Footwork: Quick footwork is the boxer's indispensable means of either attacking or evading the attacker.
Fig. 124Fig. 125

The legs are in continuous movement; the legs should not cross, and pulling your feet together is wrong.A distinction is made between the following movements:
1. Backwards step: the back foot retreats one step backwards, the front one follows.Step forward: vice versa.Step to the right, sideways: the right foot leads.Step to the left, sideways: the left foot leads.2. Jumping forward, backward, sideways: both legs perform a small flat jump at the same time.3. The step movements or advanced step movements (three-step), e.g. a left-right-left step or a right-left-right step is progressed from one leg to the other with a slight shift of weight.4. A good preliminary exercise for footwork is rope jumping. a) Jump on both legs with a hop in between skips. b) Jump alternately left and right with a hop in between. c) Jump on both legs without a hop in between. d) Jump alternately left and right without a hop in between.All jumps are performed flat with a slight bending of the knee joint.As the skill progresses, the last exercise should be carried out especially.At first, jump only one minute, later up to 3 minutes.
54. The straight punch: The arm, with power from the shoulder, connects to the target's head or body.The fist hits with full knuckle and is turned at the last moment with the back of the hand facing up (Fig. 126).
Fig. 126

In the right-hand thrust, the left hand returns to guard.If the straight punch can not be achieved because the opponent is out of reach, the boxer makes a small step with the left foot in order to obtain a favorable distance to the opponent.Practice: The straight punch is first practiced without footwork, then withsmall steps while counting, then with footwork.
55. Defense against the straight punch (partner posing): 1. A. (Attacker) attacks with a left straight - D.(Defender) takes a step back. 2. A. attacks with a right straight - D. takes a step back. 3. A. attacks with a left straight - D. takes a step to the right. 4. A. attacks with a right straight - D. takes a step to the right.(Fig. 127) 5. A. attacks with a left straight - D. defends by catching the punch with his right hand (Fig. 127),
Fig. 127

6. A. attacks with a right straight - D. defends by catching the punch withhis right hand.7. A. attacks with a left straight - D. defends by redirecting the punch with his right hand.(Fig. 128)8. A. attacks with a left straight to the body - D. defends with the back of his right hand.9. A. attacks with a right straight to the body - D. defends with the back of his left hand.
The defense is first practiced from a solid boxing position, then with footwork.
56. The hook: The hook hits the head or body from the side.When performing the hook, the fist is in the same position as when attempting a punch (thumbs up) (Fig. 129). The arm is more or less bent depending on the distance to the opponent. A wild swing is to be avoided. In the right-hook, the left hand shields the chin.
Fig. 128 Fig. 129

Practice: The left or right hook is executed like the straight punch, first without sidestep, then practiced with sidestep, then with footwork.
57. Defense against hooks (Partner Posing): These can be defended against by stepping backwards.
1. A. punches with left hook - D. ducks (Fig. 130). Ducking is a lowdodge. Head, torso, and legs are slightly bent. The blow goes overhead. When setting up, beware of hits.
2. A. punches with a right hook - D. ducks.3. A punches with a left hook - D. defends with the back of his right hand, close to his head (Fig. 131).4. A. punches with right hook - D. defends with the back of his left hand.5. A. attacks with a left punch to the body - D. defends with his right hand or forearm (Fig. 132).6. A. attacks with right punch to the body - D. defends with left hand or forearm.
58. The uppercut comes from below. At the moment of the hit (body, chin) the back of the hand points to the opponent. The arm is bent.The effect of the blow is reinforced through vigorous extension of the legs. In case of the right hook, the left hand shields.Practice: The uppercut is practiced like the hook and the straight punch.
Fig. 130

59. Defense against the uppercut (Partner Posing): These can be defended against with a backward step.
1. A. punches with left (right) uppercut to the chin - D. defends withopen hand (Fig. 133).
2. A. punches with left uppercut to the body - D. defends with the back ofhis right hand or forearm.3. A. punches with right uppercut to the body - D. defends with the back of his left hand or forearm.
Fig. 131 Fig. 132
Fig. 133

60. Double strikes: A boxing match will be more versatile if the punchesare not just applied individually. Therefore, it is often advisable to apply several punches in quick succession in the form of double strikes.They are practiced both from a standing position and with footwork:
1. Left straight to the body, left straight to the head. 2. Left hook to the body, left hook to the head. 3. Left straight to the head, right straight to the head. 4. Left straight to the body, right straight to the head. 5. Left hook to the body, right hook to the head. 6. Left hook to the head, right hook to the head. 7. Left hook to the head, right uppercut to the body.
61. Shadow boxing (mock battle): The student repeats everything he haslearned here, in a casual, self-chosen order, with the teacher paying attention to fluid footwork and clean punching technique.
62. Using boxing equipment: The most important boxing equipment arewall padding, punching balls, sandbags, platform balls, and speed balls.Wall padding, sandbags, and punching balls can easily be made at home.Using boxing devices, hits and punches are first to be practiced as instructed, followed by fighting the device in the way of shadow boxing.
63. The second level of training includes combat training. Boxing gloves,weighing 12-14 ounces (340-397 grams), are to always be worn during practice. Free fighting is only acceptable if attack and defense are mastered. The fight must not transform into a brawl. Therefore, a trainer may not oversee more than 3 to 4 fights at a time, so that he can observe all fighters and immediately stop faulty or unsportsmanlike fighting. In particular, the instructor must make sure that only equally strong opponents fight with each other. All safety measures initiated by the Boxing department must be observed according to competition regulations.
64. Left-hand training: First, the non-dominant left hand is trained in combat. Partner Posing: Follow-Up and Look Back (Stop and Counter) on Left-Handed Attacks: Attack and counterattack occurs when the defender avoids or covers a strike by the attacker, either to strike at the same moment or after a short break.
Left-handed stopping hit:

1. A. gives a straight left punch to the head - D. catches the punch with his right hand, his left arm moves forward at the same time. A. parries, also.2. A. gives a straight left punch to the head - D. ducks to the right and at the same time parries on the left side of the attacker. A. parries.
Countering:3. A. gives a straight left punch to the head - D. moves back and counterswith a straight punch while moving forward again.4. A. gives a straight left punch (left hook) to the head - D. parries and and counters with a left hook to the head or chest. A. parries. 5. A. gives a straight left punch (left hook) to the head - D. parries and counters with a left uppercut to the chest.
65. Fighting with the left hand (left-hand fight):When both contestants can use the punches learned in arbitrary order in attack or defense, the free fight evolves from this practice. The left-handed fight becomes more versatile when the punches are thrown as double punches, while attacker and defender try to land either two straight left punches or two left hooks. The left-handed fight initially lasts three rounds with one minute each, with growing endurance this increases to three rounds with two minutes each.
66. Training of the free fight. Defending double punches from left and right: The straight left and right punches are dodged by moving backwards, left and right hooks and uppercuts are accordingly parried.Countering double punches: In boxing, usually a left punch is followed up with a left punch, and a right punch with a right punch.
If now the attacker punches left-right, the defendant parries both punchesand tries to counter with the right hand, which can be followed by the left.
The following is to be practiced:1. A. gives a left and right straight punch to the head - D. dodges backwards or to the side, and counters with a right and a left straight punch.2. A. gives a left and right straight punch - D. parries and counters with a straight right punch, which can be followed with a straight left punch.3. A. gives a left and right hook - D. parries and counters both right and left.4. A. gives a left and right hook - D. parries and counters with a right uppercut, which may be followed up with a left hook.

Fighting with double punches: From this practice the fight with double jabs or punches evolves, while the attacker usually punches left-right andthe defender counters right or right-left. In the first practices, the right hand should be used with less force than usual. A fight lasts two rounds with one minute each.
67. Free fighting: Connecting the left-handed fight and double punches leads to fighting with high reach. The fighter now shouldn't merely applythe examples learned in practice, but find possibilities in the nature of thefight and use them skillfully. He should strive for a certain versatility in his punches. Sometimes it is necessary to disconnect from theory to a degree, since the fight may challenge the fighter in ways the school cannot prepare him for.
As experience in fighting with double punches increases, the fighters willtry to land more than two punches. For good fighting, the frequent and adept use of the left hand will be essential. The second level of educationis passed with a fight over three rounds, each lasting two minutes.
68. The next step of education is the close quarter combat. The goal of the training is the full fight in the ring, which is to be carried out in three rounds with three minutes each. It connects the described way of fighting and the close quarter combat.

E. Team Sports.
69. As the men grow more powerful, the training of the body is being replaced by such training that strengthens the team work and the spirit of fighting and competition. All sports carried out in competitions by the German League of the Reich for Physical Exercise, especially handball and soccer, but also hockey, rugby, basketball, etc., are well suited for enhancing the bodily fitness of the soldier. These sports teach battle spirit, subordination to the common goal, mental fitness, and quick individual action. Soldiers who already played in a team before joining the army should, if possible, be supported in their sports. The aim should also be to train all non-commissioned officers and most men in the second year of their service in team sports. The games are to be played by the rules of the German League of the Reich for Physical Exercise.
70. Handball is the main sport of the army. It is usually learned faster than soccer and doesn't require specialized gear. Each company is to assemble at least one handball or soccer team to play in a yearly regiment competition.Matches between soldiers and civilians are an important part of public relations between the Wehrmacht and the people.
71. Teaching handball.a) Technique. Ball training. Throwing and catching. Throwing techniques:
One-handed swinging throw below the hip, on shoulderlevel or above the head.Two-handed swinging throw below the hip or on shoulderlevel.One-handed core or power throw below the hip, onshoulder level or above the head.Two-handed core or power throw above the head.Two-handed catching of chest level, head level, and lowballs.Picking up rolling balls.Stopping high balls with one hand.Throwing and catching while moving, in a circle, or whilerunning next to other players.Left- and right-handed dribbling the ball while moving.
Sidestepping an enemy by:1. Turning past2. Tricking by lunging
3. Tricking by indicating a pass4. OutplayingThrowing goals while moving and after catching. Bouncingballs.Ball and movement training through a team ball game:
In a small area, two teams of three to five players pass the ball to each other. Each player in possession tries to pass as often as possible. In a competition, each successful pass of a team counts as one point. The first team with 25 points wins.
Position change practice with: 2 wingers and 2 backs, or with 2 teams without center and circle runner
b) Tactics.
Explanation of the tasks of each position.Covering.Explanation of the wing attack, holding and changing position.Defending position changes, circle runner as the sixth offensive player, blocking tactics.Lineup at first throw, goal throw-off, free throw near the goal, penalty corner throw, long corner throw.
72. Teaching soccer: I. Kicks. a) Technique. Ball training. Kick (pass) with the inner side of the foot, Kick (pass) with the outer side of the foot, Kick with the instep, Header shot. The exercises are to be done: 1. while standing still on a resting ball, 2. while moving on a rolling and bouncing ball (direct kicks). II. Stopping the ball. a) On the ground with the inner side, outer side, sole, calf; b) In the air like a), also with the instep, thigh, belly, chest. The exercises are to be done: 1. while standing still, the ball being thrown by a partner, 2. while playing.

III. Dribbling.With the inner side left and right, with the outer side left and right.
b) Tactics.Zig-Zag passes by two players.Exercise escaping the opponents' cover bythree players against one,two players against one,parties of equal sizes.Covering, passing, corner, free kick.
Further tactical education has to account for the actual manpower of the team.

V. Appendix.
Garrison competitions in trail running. To conclude winter training, in allgarrisons trail running competitions are to be held by the end of April. All companies, the battalion, division, regiment headquarters, cavalcades, intelligence corps, etc. of all parts of the troops (except the commanding staff) have to participate on the same day or under similar conditions. 1. Participation is mandatory for:
All senior lieutenants and lieutenants if not sick or commandeeredto another garrison,80% of all non-commissioned officers from the unit's effective strength,80% of the effective strength of all units.All men will be counted in their units' effective strengths except those:
a) older than thirty,b) in their last year of service,c) commandeered to another garrison.
All other non-commissioned officers and men - the sick, those on holiday, etc. - are to be seen as part of the 20% released from the trail run. Sick or commandeered officers are to be released and not to be counted. Officers on holiday have to do the run shortly before or after their holiday and are to be counted. Officers, non-commissioned officers,and men not dispensable on the day of the trail run must do the run shortly before or after the garrison competition and are to be counted. In addition to the 80% of draftable soldiers, all soldiers are allowed to compete. Their performances are to be counted as long as they improve the rating of their unit, meaning no matter the actual number of competing soldiers, only the best 80% of draftable soldiers will be counted. Officers, non-commissioned officers, and men can only replace soldiers of their own rank group.
2. The garrison competition in trail running demands appropriate training. This training should be comprised of 8 trial runs between November and the garrison competition. At least once in these trials, the soldier must run 5000m without pause. On the day of the competition each unit has to notify the commanding officer in writing about those soldiers who haven't participated in at least 8 trial runs. These soldiers are to be released from the trail run on the day of the competition. They are to make good for those trial runs (no more than two runs per week).

The garrison commander schedules the day on which they will do the actual run.
3. The running track length shall be 5000m on varied terrain with smallelevation differences. The start line needs to measure at least 30m across.Start and finish should be on the same level and in close proximity. The garrison commander determines the track by February 1st each year, announces it to the units and opens it up for trials. The garrison commander also determines the minimum time the soldiers have to complete the trail run. For a track of 5000m without remarkable obstacles, a time of 22m30s shall serve as reference. 4. Scoringa) Runners who finish within 15 seconds of each other will receive an equal score.b) Runners who finish in the minimum time required receive 0 points.(Example: assuming a minimum of 22 minutes 30 seconds, all runners who finish the run between 22 minutes 15.1 seconds and 22 minutes 30 seconds will receive 0 points)c) Runners finishing up to 5 minutes faster than the required minimum time will receive 1 bonus point for each 15 seconds under this limit.Assuming a minimum prescribed time of 22 minutes 30 seconds, those runners who finish between 17 minutes 15.1 seconds and 17 minutes 30 seconds will receive 20 bonus points.Those runners which exceed the minimum required time by more than 5 minutes earn 2 bonus points instead of 1 for every 15 seconds under the minimum time limit.d) Runners who run slower than the required time will lose 2 points for every 15 seconds over the required minimum time, up to a maximum of minus 100 points.
