soil · pdf file · 2010-02-10the soil safari pack ... soil ph ... that the...
TRANSCRIPT
1
Soil Safari Soil Science for Primary Schools
Teacher’s Notes

2
Contents INTRODUCTION ............................................................................................................................................. 3
THE SOIL SAFARI PACK .................................................................................................................................. 3
THE SOIL SAFARI ............................................................................................................................................ 3
PLANNING THE DAY ...................................................................................................................................... 4
INTRODUCING SOILS ..................................................................................................................................... 4
WHAT IS SOIL?............................................................................................................................................... 4
WHAT IS SOIL MADE OF? .............................................................................................................................. 4
HOW DOES SOIL FORM? ............................................................................................................................... 4
SOIL COLOUR ................................................................................................................................................. 5
SOIL AS PART OF OUR ENVIRONMENT ......................................................................................................... 5
SOIL AND VEGETATION ................................................................................................................................. 6
WORKSHEETS ................................................................................................................................................ 6
WS1 LEARNING ABOUT THE SITE .............................................................................................................. 6
Other Ideas:........................................................................................................................................... 6
WS2 A SOIL PIT: ......................................................................................................................................... 6
a) WHAT IS GROWING IN THE SOIL ....................................................................................................... 6
b) HOW TO DIG A SOIL PIT .................................................................................................................... 6
WS3 LOOKING AT A SOIL PROFILE ............................................................................................................ 7
WS4 LOOKING FOR MINIBEASTS ............................................................................................................... 7
WS5 SOIL COLOUR .................................................................................................................................... 7
WS6 SOIL TEXTURE.................................................................................................................................... 8
WS7 WATER IN THE SOIL .......................................................................................................................... 8
OTHER ACTIVITIES ......................................................................................................................................... 9
SOIL pH ...................................................................................................................................................... 9
SEDIMENTATION EXPERIMENT ................................................................................................................... 10
WATER IN SOIL ............................................................................................................................................ 11
WHICH SOILS GROW THE BEST PLANTS? .................................................................................................... 11
THE EFFECT OF WEATHER ON SOILS ........................................................................................................... 12
FOR MORE INFORMATION .......................................................................................................................... 12

3
INTRODUCTION Schools throughout Britain are taking part in the British Society of Soil Science Soil Safari. The main aim
of this national soil project is to emphasise that soil is a vital part of our environment. We want to
increase children’s awareness of soil because it is an essential natural resource for life on our planet,
and a major component of the world around us. We hope that children will gain a new respect for the
‘mud’ and ‘dirt’ that surrounds them, and that the Soil Safari will be an introduction to an exciting, new
environment.
Soil makes a fascinating subject for exploratory science in schools. A study of soil can integrate several
aspects of science, including physics, biology, chemistry, mathematics and geography. In addition, soil
provides an interesting context for archaeology, language work, and art and crafts. Soil is such a broad
subject and comes into so many aspects of our lives and surroundings that it could be explored by a
class for several weeks, or even provide the centre of interest for a whole term.
There is very little information available to help teachers and children study soil and learn about it
through practical work. As the professional body for soil scientists the British Society of Soil Science is in
a unique position to provide schools with soundly based, scientific information about soil. The Soil Safari
will help to focus attention on soil, and will give children the chance to learn more about this important
resource.
THE SOIL SAFARI PACK The Soil Safari pack has been produced for Primary Teachers, as a source of information and ideas for
using and learning about soils in the classroom and outside.
The pack consists of these teachers’ notes and a set of worksheets which can be used by the children.
The text refers to two useful background books: Down to Earth and Groundwork which can be accessed
at http://www.soil-net.com/downloads.
The worksheets are set out so that they can be used directly by children. Some teachers may prefer to
adapt the ideas to reflect the needs of their children and the focus of their project. Others may wish to
present the work in a different way. We encourage teachers to use the worksheets in a flexible way to
suit their own needs.
The British Society of Soil Science retains the copyright of all material contained in this pack, but parts of
the pack may be reproduced for use within school.
THE SOIL SAFARI The Soil Safari is a chance for children to explore the world of the soil, with their teacher and a Safari
Guide, the Soil Scientist. The British Society of Soil Science can usually arrange for a soil scientist to
spend a day with a class studying soil. The day should be organised jointly by the teacher and the soil
scientist to ensure that the time is of maximum benefit to the children. This pack can be used as a
source of ideas for the day, and any combination of the activities suggested on the worksheets could be

4
undertaken, as well as other activities which the teacher or soil scientist consider appropriate. The
worksheets are provided as an aid, rather than a rigid programme of work.
PLANNING THE DAY It is important that the soil scientist and teacher meet before the school visit, to discuss the amount of
time available, the activities to be undertaken, and the equipment needed. If you are planning field work
outside the school grounds, you will also need to consider transport arrangements, access to the site
and insurance.
Before visiting any site permission must be sought from the landowner. You will also need permission if
you want to dig soil pits and/or remove soil for experiments at school. Please check that your LEA will
provide the necessary insurance cover for staff, helpers and children before you go on your visit.
INTRODUCING SOILS The children can be introduced to soil in any number of ways. Some teachers may decide to present the
children with a bucket of soil and without any further discussion let the children find out as much as
they can about this ‘substance’. The work could then be followed by more structured experimental
work, and finally by a visit to a field site. Other teachers might start the project with a field visit which is
then followed up in the classroom by taking a bucket of soil from the site for further investigations.
Some classes might be studying a related topic, such as farming, and may start their soil topic by looking
at how things grow in soil. Bearing this in mind it is impossible to specify an order for doing things, so
teachers should structure the activities they chose to do with their class in their own way.
WHAT IS SOIL? Depending on the context, the word soil may have many different meanings. A widely used definition of
soil is: the material that plants grow in, and which provides them with physical support and nutrients.
More details can be found on p.4 of Down to Earth.
WHAT IS SOIL MADE OF? Soil is a mixture of weathered (ground up and chemically changed) rock and organic matter (living and
dead plant material, manure, etc.). This mixture is not solid, but contains many holes or pores. These
holes will contain air or water, depending upon the type of soil and the weather. In clay soils after rain
many of the holes are full of water, but in sandy soils the water drains away quickly leaving most holes
full of air. For more details see p.20-24 in Down to Earth.
HOW DOES SOIL FORM? Within your local area there are many different types of soil. These differences arise because of the
variety of landforms and climatic conditions. Soil interacts with its environment. For example, soils often
5
vary because of the way water flows over and through the soil. Water flowing over the soil surface
removes soil material from the top of the slope, transports it downslope and deposits it at the bottom of
the slope. Because of this movement soils at the bottom of the slope are usually deeper than soils at the
top of the slope. Water flows downhill, so soils at the bottom of the slope may also be wetter than
upslope soils. The differences between soils along a slope can be seen if you dig soil pits at the top,
middle and bottom of a slope. The wetter soils will have grey or yellowish colours, whereas soils further
upslope may have brown colours. Slope is just one of the many influences on soils and soil development;
more details are given on p.16-18 in Down to Earth.
SOIL COLOUR Soil colour provides useful information about soils. The colour is partly derived from the rock particles
which make up the soil, but it also reflects changes that have taken place in the soil since its formation.
The dominant red/brown colour of soil is due to the presence of minerals containing iron. When these
minerals are exposed to water and air the iron oxidises and forms a reddish colour, just as iron objects
go rusty if they are not protected from air and water. If there is too much water and too little air, the
dominant colours will not be brown but greys and yellowish greys. Soils which are waterlogged for part
of the year are called gleys.
Dark brown/black colours in soil usually indicate the presence of organic matter which is material
derived from plants or animals, e.g. dead leaves, stubble, manure, sewage, slurry, rotting vegetation.
When organic matter is added to the soil it is decomposed by microorganisms until eventually its
original form is lost, and all that remains is a soft, dark brown, crumbly material which is called humus.
In some soils the rock material from which they are derived has a dominant influence on the soil colour.
For example, shallow soils developed on chalky or limestone material are often greyish white in colour
below the surface layers. Other rocks may give distinctive colours; red soils on Old Red Sandstone; black
soils on coal measures.
SOIL AS PART OF OUR ENVIRONMENT We rarely think about soil because it is usually hidden by vegetation, buildings, roads etc. It is important
that the children appreciate that the soil is part of their everyday surroundings, and that it is not
restricted to the site they are visiting! It is equally important that they consider soil in its context,
whether they are looking at bare soil in a ploughed field, or digging their way through dense
undergrowth to find it. Encourage children to look at the field site to find out how it is used before they
start thinking about the soil itself. This information can provide useful clues about the kind of soil we
might expect to find.
Some sites will be managed by someone (a farmer, forester, gardener) who is responsible for growing
plants and keeping them healthy. Some sites will be unmanaged, e.g. self-perpetuating semi-natural or
natural vegetation and some sites could only be described as neglected with derelict buildings, litter,
rubbish, pollution etc. as evidence of man’s visit.

6
SOIL AND VEGETATION Vegetation is often a good indicator of soil conditions. Some plants will only be found in certain
locations because they have adapted to particular soil conditions, for example, rushes and reeds are
usually found in waterlogged sites; cowslips prefer chalky soils, heather grows best in acid soils, and
willowherb tends to grow on recently disturbed soil (see p.11 Groundwork). Although many children will
not be familiar with these plants, once they have been shown a ‘special plant’ which tells them
something about the soil, some will remember it for ever.
Where a site is managed to grow a particular type of plant, the soil may have been improved in some
way. Farmers add fertilisers and manures to provide essential nutrients for crops. In some cases the
farmer may not be able to grow all crops because the soil is not suitable (pp.34-42 Down to Earth).
WORKSHEETS
WS1 LEARNING ABOUT THE SITE Equipment: clipboard, pencil, spare paper, possibly colour pencils or crayons.
Soil exists as part of a complex environment. This worksheet encourages children to look around the site
before they consider the soil itself. This is an opportunity for the teacher to link land use and vegetation
types to soil. Soil influences what happens on the earth’s surface, it is not just something that is buried
or hidden underground. If this worksheet is used at the start of the field visit, it might be interesting to
ask similar questions towards the end of the visit, after the children have learnt a bit more about soil.
Other Ideas:
Stand up and look down at the ground just in front of your feet. What can you see? Now crouch or
kneel, look at your piece of ground – what can you see? Get your face close to the ground – what can
you see now? Poke around in the vegetation to find a bit of bare soil. What can you see if you use a
magnifying glass?
Shut your eyes – what can you hear? What can you smell? Do your answers tell you anything about the
site?
If the children have done some earlier work on soil properties they could be invited to make some
guesses about what kind of soil they are going to find (wet/dry, stony, sandy etc.).
WS2 A SOIL PIT:
a) WHAT IS GROWING IN THE SOIL
b) HOW TO DIG A SOIL PIT
Equipment: measuring tape/metre rule/bamboo cane cut to 1 metre and with 30cm mark, (corner
marker pegs e.g. large tent pegs or sticks about 1.5cm thick and 20cm long with point at one end,
string), spade, trowel, 2 large sheets of plastic, clipboard, pencil, paper.
7
In most cases it will be best to dig soil pits before children reach the field site, it’s surprising how long it
takes to dig a large hole! If the soil pits have been dug, the children could do a survey of vegetation in a
square metre close to the pit. WHEN YOU HAVE FINISHED WITH YOUR SOIL PITS PLEASE REMEMBER TO
FILL THEM IN AND TO REPLACE THE ‘TURF’ OF VEGETATION BACK ON TOP.
WS3 LOOKING AT A SOIL PROFILE Equipment: clipboard, pencil, paper, 30cm ruler, soil colour markers e.g. lolly or cocktail sticks.
This worksheet considers the soil in situ. Some useful information about soil profiles can be found in
Groundwork (pp.1-2). The photographs of soil profiles and accompanying notes in Down to Earth (pp.9,
12, 21, 22, 34, 46, 48) might also be of interest. The extent to which children ‘find out’ about the soil in
the different layers will depend on the time available. If the children are spending the day in the field
they may be able to tackle activities such as those suggested in worksheets, for each layer. Some
teachers might prefer to take soil from each layer back to the classroom for further work, others might
have a general discussion about the different layers: e.g. the children could be asked to discuss which
layers have most plant roots, minibeasts, stones, etc., and why.
WS4 LOOKING FOR MINIBEASTS Equipment: sheet of white or light coloured plastic (so that minibeasts show up easily), bucket full of
each soil to be studied, tray or shallow container with vertical sides for sorting minibeasts and set of 6-
10 yoghurt pots/jam jars to hold groups of minibeasts, squared paper for bar charts, minibeast
identification chart (e.g. p.10 Groundwork).
This activity develops sorting and observation skills. Teachers can adapt the activities to include work on
sets, using classification keys, summarising data using different types of graphs etc.
The work on minibeasts could also include a detailed study of the life cycle and behaviour of a particular
animal. A study of feeding, movement, growth and reproduction can incorporate observation,
measuring and recording skills. A simple wormery can be set up in a clean jam jar, which is filled with
alternate layers of moist soil and sand. The sand and soil become mixed as the worms move around in
the soil and give the children a visual demonstration of the way earthworms condition and mix soil. Fill
the jar to about 4cm below the rim and add a few earthworms. Fix a band or dark card or paper around
the outside of the jar to prevent light falling on the soil. A paper cap with pierced holes can be fitted to
the top of the jar with an elastic band. Several wormeries could be set up as an experiment e.g. one jar
with no worms, one jar with worms, jars with a few leaves added to the top with and without worms
etc.
WS5 SOIL COLOUR Equipment: sheet of plastic, paint colour charts, teaspoon, saucer, small amount of water.
This worksheet encourages the children to look closely at soil colours, which as explained above can
reveal certain properties of a soil. The worksheet is essentially an exercise in colour matching.
Professional soil scientists use a special set of colour charts to identify and name soil colours called
Munsell Charts. Each page of the chart is devoted to one shade of one of the soil colours, with several
8
different tones of the colour appearing in small squares, just like the coordinating ranges of colours
presented on cards by some card manufacturers. Each soil colour is identified by a code number, which
is recognised all over the world. Your local DIY store will probably let you have a few paint colour charts
if you explain why you want them. Some paint colour charts include a wide range of colours. The
children will probably find it easier to use the charts if the boxes of ‘soil colours’ (creams, yellows, greys,
browns, reds, and the grey or brown tones of colours such as pink, peach, blue, green and mauve) are
mounted on a card protected by plastic. An exercise older children might enjoy is to sort small cut out
boxes of paint colours into a grid in which a set of colour tones are graded vertically and horizontally,
e.g. top left box black with horizontal grading to pale grey in top right, and vertical grading to pale
brown in bottom left. A similar exercise could be tackled using paint mixtures e.g. children could be
asked to choose one primary colour, e.g. red and show the changes in colour tone that occur to move
through to another primary colour e.g. blue.
On the worksheet the children are invited to exercise their imagination by thinking of a name for their
soil colour.
WS6 SOIL TEXTURE Equipment: a half cup of clay, a half cup of sand, half a cup of soil, teaspoon, water and a container
which will produce drops e.g. plastic pipettes, old food colouring bottles, Jiffy plastic lemon, magnifying
glass.
Before the children tackle this worksheet they should understand that soil is partly made up of mineral
particles. The mineral particles are derived from weathered rock and vary in size from sand particles
(2mm-0.06mm diameter) to clay particles (< 0.002mm diameter). The proportions of clay, silt and sand
in different soils vary and the relative proportion of the different sized particles determines the soil
texture. The texture of soils determines how easy they are to dig and cultivate, the ability of the soil to
hold water, and how well the plants will grow. Soil texture and structure are described in detail on
pp.20-23 of Down to Earth.
Children could be given the opportunity to mix their own soil using different measured quantities of
sand, clay and peat or compost. A record could be made of the proportions e.g. 1 cup clay, 1 cup sand, 2
cups compost and the resulting texture and colour. The children could guess which mixture would
provide the best ‘soil’ for growing plants and then test the various mixtures (see plant growing
experiment below). Similarly the mixtures could be used in the experiments suggested on worksheet 7.
WS7 WATER IN THE SOIL Equipment:
Experiments 1 and 2: magnifying glass, three contrasting soils (or soil from field site, sand and clay),
water in clean washing-up-liquid bottle or other container which will allow small amounts of water to be
added to soil.

9
Experiment 3: clear plastic beer glass, tool for making hole in bottom of plastic glass (this is best done by
an adult), bluetack to plug the hole, pebbles (1-3cm diameter) to fill plastic glass, water in container
which pours easily, bowl or sink to catch water when bluetack plug is removed.
Experiment 4: three soils, 6 plastic cups (preferably clear), ruler, pen to mark cups, 3 jam jars, large nail
to make holes in bottom of cups (with supervision!), paper towels, water, stopwatch or timer.
This set of experiments is designed to help children think about water and air in the soil. The best results
will be obtained with contrasting soils such as clay, sand and a good, crumbly garden soil. However it
might be worth substituting soil from the field site for one of the three (or using the field soil as a fourth
sample. In Experiment 2 the water usually runs straight through sand, is held as a tiny puddle in the clay
and is absorbed by a good soil. The children should be encouraged to think about why this happens. This
is a good opportunity to discuss what they know about soil texture.
Experiment 3 should provoke a wide range of questions. How do we know that there is anything
between the pebbles? Is there a way to prove that there is air in the glass? What happens to the air
when you add water? Why does water sink? What is gravity? One way to demonstrate the presence of
air in the glass would be to fill the glass right to the top with pebbles, cover the top of the glass with
something which will provide a good seal and then totally immerse the glass and cover in a bucket full of
water. If the seal is good enough, air bubbles should be released when you remove the cover.
The understanding gained through observing water and pebbles can be applied to soil in Experiment 4.
Some soils retain most of the water that is added, but water runs freely through others. Often the water
will carry away soluble constituents of the soil, a process known as leaching (see p.20 Down to Earth). In
Experiment 4 the paper towels should act as filters, preventing soil particles from dripping into the jam
jars, but allowing soluble material through.
OTHER ACTIVITIES
SOIL pH pH is a term that scientists use to describe the degree of acidity or alkalinity of a solution or a soil. Some
plants grow well in acid soils such as peat, e.g. heathers, rhododendrons and azaleas. Other plants
prefer a slightly alkaline soil. Farmers create the right conditions for plants that are growing in an acid
soil by adding lime or chalk (an alkali) which neutralises the soil. Most crop plants prefer neutral soils. In
some ways it is a bit like the story of the three bears; different plants like their ‘porridge’ in different
ways, but most like it to be just right, about pH 6 which is slightly acid. Plants obviously do not taste the
pH of soils, but one way to demonstrate acidity and the neutralising effect of an alkali to children is to
use their sense of taste. If you suck a sharp tasting lemon sweet or an acid drop your mouth tingles
because the lemon has made your saliva acid. You can get rid of the acid taste by taking a small pinch of
baking powder. This fizzes as carbon dioxide is released, and then leaves your mouth free from the taste
of acid. The chalk or ‘calcium carbonate’ used by farmers and gardeners act just like the baking powder
or sodium bicarbonate in taking away the acidity.
10
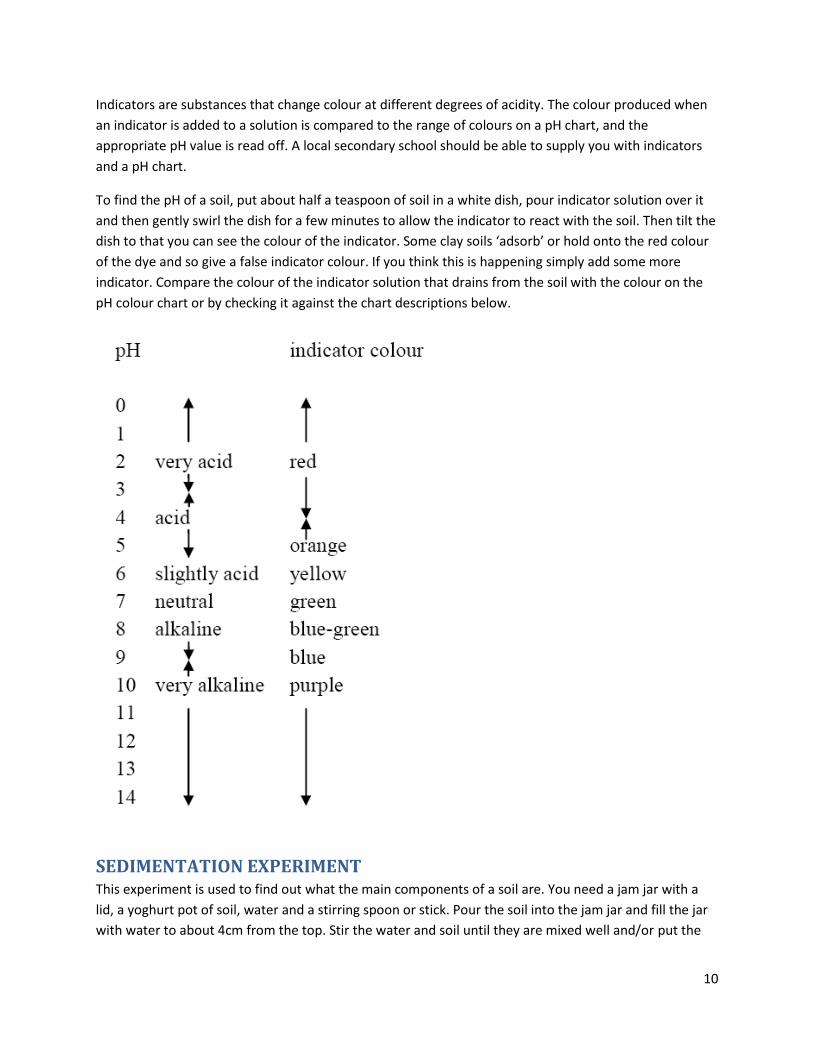
Indicators are substances that change colour at different degrees of acidity. The colour produced when
an indicator is added to a solution is compared to the range of colours on a pH chart, and the
appropriate pH value is read off. A local secondary school should be able to supply you with indicators
and a pH chart.
To find the pH of a soil, put about half a teaspoon of soil in a white dish, pour indicator solution over it
and then gently swirl the dish for a few minutes to allow the indicator to react with the soil. Then tilt the
dish to that you can see the colour of the indicator. Some clay soils ‘adsorb’ or hold onto the red colour
of the dye and so give a false indicator colour. If you think this is happening simply add some more
indicator. Compare the colour of the indicator solution that drains from the soil with the colour on the
pH colour chart or by checking it against the chart descriptions below.
SEDIMENTATION EXPERIMENT This experiment is used to find out what the main components of a soil are. You need a jam jar with a
lid, a yoghurt pot of soil, water and a stirring spoon or stick. Pour the soil into the jam jar and fill the jar
with water to about 4cm from the top. Stir the water and soil until they are mixed well and/or put the

11
lid on the jar and shake it well. Leave the jam jar for several hours or preferably overnight. If the soil was
well mixed it should settle into layers at the bottom of the jar (a sandy soil usually provides the quickest
and best results). At the bottom of the jar the soil forms layers with larger particles and small stones at
the bottom, then fine sand, then silt particles and finally some clay particles on the top. The water will
probably be slightly cloudy due to clay particles floating in suspension. Floating on top of the water will
be a layer of humus and organic matter.
WATER IN SOIL To find out how much water different soils contain, collect some soil samples from your field site, school
garden etc. (about a yoghurt pot full of each) and store each in an airtight bag until you are ready to
start the experiment. You will need scales, the soil samples, a foil plate (pie plates or even the little jam
tart or individual apple pie cases are ideal) for each sample, oven. It is best to start this experiment first
thing one morning as the soil takes a long time to dry out. Record the weight of each foil plate, then
weigh out an equal amount of soil into each dish. Make sure the plates are labelled in some way so you
know which soil is in which dish! Put the soil samples into an oven set at 105-110°C. The oven is used to
dry out the soil without burning it. To monitor the water loss take the samples out of the oven and
weigh them at regular intervals (e.g. once per hour), remembering to take the weight of the foil dishes
into account. When two successive weights for a particular soil are the same, the soil has stopped losing
water. The weight of water in the original soil sample would be the weight of the oven-dried sample
subtracted from the weight of the original sample. The percentage of soil moisture in the original soil
sample is determined by taking the soil water weight, dividing it by the weight of the original sample and
multiplying by 100. Soil moisture percent will vary considerably between soils, so you should get some
interesting results.
WHICH SOILS GROW THE BEST PLANTS? This experiment takes a couple of weeks. Seeds are sown in different soil samples to find out which soils
and conditions encourage plant growth.
You will need nine plastic cups/beakers (18 if you replicate the experiment), a sandy soil and a clay soil,
scales, and seeds which germinate easily e.g. radish, nasturtium, grass, leeks.
Weigh out three batches of 100g for each soil and place each batch in a beaker. Then weigh out 50g of
sand and 50g of clay and mix thoroughly before putting in a beaker. Weigh and mix two more batches of
50g sand and 50g clay, and put in two more beakers.
You now have three sets of beakers; 3 beakers containing 100g sand; 3 beakers containing 100g clay; 3
beakers containing a 100g mixture of sand and clay.
Depending on the size of the seeds, count out an equal number for each beaker (e.g. nasturtium seeds
are large so 5 would be the maximum for one beaker) or measure out equal amounts if the seeds are
12
tiny (e.g. a half teaspoon of grass seed). Scrape away a few millimetres of the soil at the surface, place or
sprinkle the seeds on the soil, then scrape back the soil to cover the seeds.
Place 1 clay soil, 1 sand soil and 1 mixture on the window ledge and add no water.
Place 1 clay soil, 1 sand soil and 1 mixture on the window ledge and add 20ml of water every 3 days.
Place 1 clay soil, 1 sand soil and 1 mixture on the window ledge and add 20ml of water every day.
The children can then monitor the growth of the plants. In which beaker did the plants appear first? Did
the plants grow in all the beakers? When plants have come up in most of the beakers the children could
rank the beakers in order of the most/largest plants to the fewest/smallest plants and to discuss why
differences in plant growth occurred. A follow-up to this experiment could be the investigation of other
conditions which affect plant growth: heat, light and food (e.g. fertiliser). This is a chance for children to
devise their own experiments.
Some schools may be able to continue their work on growing plants outside. How about growing some
vegetables for the school kitchen if you have a spare piece of school garden? What conditions produce
the best crop?
THE EFFECT OF WEATHER ON SOILS A simple experiment to show in a very artificial sense the effect of very different climates on soil
development is to dry a clay soil in two different ways. Take two large lumps (minimum 15cm x 15cm x
15cm) of wet clay; place one in a warm sunlit position and leave to dry; place a second lump in a deep
freeze for two days, remove and place at room temperature (out of direct sunlight) for one day, repeat
this sequence 10 times. Compare the two lumps of soils after 30 days. The ‘frozen’ soil should consist of
many small lumps of soil, which have been broken up by a process which scientists refer to as freeze-
thaw. As water in the soil freezes it expands and pushes soil particles apart. When the water thaws it
takes up less room so the soil lump contracts a bit. This continuous action gradually loosens the soil, so it
forms smaller lumps. Gardeners and farmers use this process when they dig or plough their land in the
autumn and then leave the soil to be broken down over the winter by the freeze-thaw cycles. It is much
easier to let the frost break down the soil than to try to do it using machinery.
There are many other experiments which will help you to learn about soil, but your study of soil does
not need to be restricted to observations and experiments. We hope you will enjoy finding ways of
bringing soil into creative writing, art and craft work, and other school activities!
FOR MORE INFORMATION Visit the free Soil-Net educational resource for more ideas http://www.soil-net.com