software change notice - balibago update file... · • addresses issues and provides improvements...
TRANSCRIPT

HPS/PMT
Experion PKS R500.2
Software Change Notice
EPDOC-X175-en-5002C
November 2017

www.honeywellprocess.com 2
Document Release Issue Date
EPDOC-X175-en-5002C 500.2 0 November 2017
Disclaimer
This document contains Honeywell proprietary information. Information contained herein is to be used solely for the purpose submitted, and no part of this document or its contents shall be reproduced, published, or disclosed to a third party without the express permission of Honeywell International Sàrl. While this information is presented in good faith and believed to be accurate, Honeywell disclaims the implied warranties of merchantability and fitness for a purpose and makes no express warranties except as may be stated in its written agreement with and for its customer. In no event is Honeywell liable to anyone for any direct, special, or consequential damages. The information and specifications in this document are subject to change without notice. Copyright 2017 - Honeywell International Sàrl

3 www.honeywellprocess.com
Symbol definitions
The following table lists the symbols used in this document to denote certain conditions.
Symbol Definition
NOTICE is used to address practices not related to physical injury.
CAUTION indicates a hazardous situation that, if not avoided, could result in minor or moderate injury.
CAUTION symbol on the equipment refers the user to the product manual for additional information.
The symbol appears next to required information in the manual.
WARNING indicates a hazardous situation that, if not avoided, could result in death or serious injury.
WARNING symbol on the equipment refers the user to the product manual for additional information.
The symbol appears next to required information in the manual.
DANGER indicates a hazardous situation that, if not avoided, will result in death or serious injury.
www.honeywellprocess.com 4
Contents
CHAPTER 1 BEFORE YOU BEGIN ............................................................................................................................................................. 8
CHAPTER 2 INTRODUCTION ................................................................................................................................................................... 9
2.1 ABOUT THIS POINT RELEASE ................................................................................................................................................................. 9 2.1.1 New features and enhancements ....................................................................................................................................... 10 2.1.2 Limitations ........................................................................................................................................................................ 11 Point release removal ...................................................................................................................................................................... 11 Point release distribution ................................................................................................................................................................. 11
2.2 RESOLVED PARS ............................................................................................................................................................................. 12 2.1.3 Common Components resolved PARs .................................................................................................................................. 12 2.1.4 Tools and Controller resolved PARs ..................................................................................................................................... 13 2.1.5 Servers and Stations resolved PARs..................................................................................................................................... 14 2.1.6 Quick Builder resolved PARs ............................................................................................................................................... 18 2.1.7 C200 to C300 Upgrade resolved PARs ................................................................................................................................. 18 2.1.8 Series C Universal IO Modules resolved PARs ...................................................................................................................... 18 2.1.9 Control Functions resolved PARs ......................................................................................................................................... 18 2.1.10 Control Builder resolved PARs ........................................................................................................................................ 18 2.1.11 Standard Series C IO Modules resolved PARs .................................................................................................................. 19 2.1.12 EIM - Platform resolved PARs ......................................................................................................................................... 20 2.1.13 Other functions resolved PARs ....................................................................................................................................... 20
2.3 CHANGE IMPACT ............................................................................................................................................................................. 21 2.3.1 Control change impact....................................................................................................................................................... 21 2.3.2 Operational change impact ............................................................................................................................................... 21 2.3.3 Infrastructural change impact............................................................................................................................................ 21
2.4 KNOWN ISSUES............................................................................................................................................................................... 22 2.4.1 Common components ........................................................................................................................................................ 22 2.4.2 Installation and Migration ................................................................................................................................................. 30 2.4.3 Servers and Stations .......................................................................................................................................................... 33 2.4.4 Controllers and Tools ......................................................................................................................................................... 35
2.5 WHAT TASK DO YOU WANT TO ACCOMPLISH? .......................................................................................................................................... 63 2.5.1 Clean installation of R500.2 ................................................................................................................................................ 63 2.5.2 Upgrade to R500.2 from R500.x ......................................................................................................................................... 63 2.5.3 Migrate to R500.2 from R4xx.x releases.............................................................................................................................. 64 To migrate to R500.2 from R4xx.x .................................................................................................................................................... 64 Sever client migration ...................................................................................................................................................................... 65 Controller migration ........................................................................................................................................................................ 65
CHAPTER 3 GETTING STARTED............................................................................................................................................................. 66
3.1 APPLICABLE NODES .......................................................................................................................................................................... 66 3.2 APPLICABLE MODULES ...................................................................................................................................................................... 67 3.3 SUPPORTED MIGRATION AND UPGRADE PATHS......................................................................................................................................... 68
3.3.1 Supported server migration paths ............................................................................................................................................ 68 3.4 SUPPORTED SERVER UPGRADE PATHS .................................................................................................................................................... 69 3.5 SUPPORTED CONTROLLER MIGRATION PATHS .......................................................................................................................................... 72 3.6 DOWNLOADING THE POINT RELEASE MEDIA ............................................................................................................................................ 73 3.7 DOWNLOADING THE EXPERION PKS PDF COLLECTION MEDIA ..................................................................................................................... 74 3.8 DOWNLOADING EXPERION PKS UPGRADE TOOL COMPONENTS MEDIA .......................................................................................................... 74
CHAPTER 4 UPGRADE TO EXPERION PKS R500.2 .................................................................................................................................. 75
4.1 UPGRADE SEQUENCE ........................................................................................................................................................................ 75

5 www.honeywellprocess.com
4.2 UPGRADE CHECKLIST ........................................................................................................................................................................ 76 Upgrading to Experion PKS R500.2.................................................................................................................................................... 76
4.3 PREPARING FOR UPGRADE .................................................................................................................................................................. 76 4.4 UPGRADING THE NON-REDUNDANT SERVER NODE BY INSTALLING THE POINT RELEASE ........................................................................................ 76
4.4.1 Pre-installation steps ......................................................................................................................................................... 76 4.4.2 Stopping the services ......................................................................................................................................................... 77 4.4.3 Installing the point release ................................................................................................................................................. 78 4.4.4 Validating the point release installation .............................................................................................................................. 79 4.4.5 Post-installation tasks ........................................................................................................................................................ 79
4.5 UPGRADING THE REDUNDANT SERVER BY INSTALLING THE POINT RELEASE........................................................................................................ 80 4.5.1 Installing the point release on Server B ............................................................................................................................... 80 4.5.2 Installing the point release on Server A ............................................................................................................................... 83
4.6 UPGRADING THE BCC SERVER BY INSTALLING THE POINT RELEASE ................................................................................................................. 88 4.6.1 Installing the point release on Server 0B ............................................................................................................................. 88 4.6.2 Installing the point release on Server 0A ............................................................................................................................. 90 4.6.3 Installing the point release on Server 1B ............................................................................................................................. 94 4.6.4 Installing the point release on Server 1A ............................................................................................................................. 97 4.6.5 Installing R500.2 Server documentation patch ................................................................................................................. 100
4.7 UPGRADING CLIENTS WITH THE POINT RELEASE ...................................................................................................................................... 101 4.7.1 Pre-installation steps ....................................................................................................................................................... 101 4.7.2 Stopping the services ....................................................................................................................................................... 102 4.7.3 Installing the point release ............................................................................................................................................... 102 4.7.4 Installing the point release on Premium Access clients ...................................................................................................... 103 4.7.5 Validating the point release installation ............................................................................................................................ 103 4.7.6 Post-installation tasks ...................................................................................................................................................... 104
4.8 UPGRADING THE ACE/ SCE/ EHG BY INSTALLING THE POINT RELEASE ......................................................................................................... 105 4.8.1 Pre-installation steps ....................................................................................................................................................... 105 4.8.2 Stopping the services ....................................................................................................................................................... 105 4.8.3 Installing the point release ............................................................................................................................................... 106 4.8.4 Validating the point release installation ............................................................................................................................ 107 4.8.5 Post-installation tasks ...................................................................................................................................................... 107
4.9 POST INSTALL ACTIVITIES AFTER ALL NODES HAVE BEEN UPGRADED ............................................................................................................. 107 4.10 UPDATING COMMON COMPONENTS ............................................................................................................................................... 108 4.11 INSTALLING PHD POINT SERVER PATCH .......................................................................................................................................... 109 4.12 MIGRATING CONTROLLERS .......................................................................................................................................................... 109
4.12.1 Updating the firmware ................................................................................................................................................ 109 4.12.2 Firmware revisions ...................................................................................................................................................... 110
CHAPTER 5 PROBLEMS RESOLVED IN R500.1 ..................................................................................................................................... 112
5.1 COMMON COMPONENTS RESOLVED PARS ........................................................................................................................................... 112 5.2 INSTALLATION AND MIGRATION ........................................................................................................................................................ 113 5.3 SERVERS AND STATIONS .................................................................................................................................................................. 114 5.4 CONTROLLERS AND TOOLS ............................................................................................................................................................... 114
CHAPTER 6 TROUBLESHOOTING INSTRUCTIONS ................................................................................................................................ 117
CHAPTER 7 SPECIAL CONSIDERATIONS IN R500.2 .............................................................................................................................. 118
7.1 INTERFACE METRIC ON FTE MUX CARD (PAR 1-6HGG7LG) .................................................................................................................. 118 7.2 INSTALLING R500.1 ESERVER PREMIUM ACCESS ON A WINDOWS 7 SYSTEM (PAR 1-6E8HD4J) ..................................................................... 118 7.3 MODIFICATION OF .STB FILES IN PRIMARY SERVER'S CLIENT/MENUS AND TOOLBARS DIRECTORY TO SUPPORT FILE REPLICATION RULE ...................... 118 7.4 CONFIGURING WINDOWS ACCOUNT RUNNING NETWORK API CLIENT APPLICATION AS AN EXPERION OPERATOR ................................................. 119 7.5 CONFIGURING WINDOWS ACCOUNT RUNNING MICROSOFT EXCEL DATA EXCHANGE (MEDE) APPLICATION AS AN EXPERION OPERATOR ................... 120 7.6 REPORT GENERATION IN EXPERION R500 ........................................................................................................................................... 120 7.7 TCP PORTS 22479 AND 22480 FOR MODIFIED NETWORK API ............................................................................................................... 121
www.honeywellprocess.com 6
7.8 TCP PORTS 22479 AND 22480 FOR MICROSOFT EXCEL DATA EXCHANGE (MEDE)...................................................................................... 121 7.9 NO ACCESS FOR UNAUTHENTICATED USERS TO DOWNLOAD CONFIGURATION CHANGES TO SERVER .................................................................. 121 7.10 OCCASIONAL DELAY IN REPORT GENERATION .................................................................................................................................. 122 7.11 C300 CONTROLLERS WITH EXPERION PROFIT CONTROLLER FUNCTION BLOCKS ........................................................................................ 122 7.12 EAS MIGRATION FAILURE AT APPLICATION FRAMEWORK STEP (PAR 1-6Q2D4JV) ................................................................................. 122 7.13 MIGRATING ORION TOUCH PANEL TO EXPERION PKS R500 ............................................................................................................... 123 7.14 PORTS FOR SERVER REDUNDANCY ................................................................................................................................................. 123 7.15 UNIFORMANCE PHD DOCUMENTATION CONNECTION TO THE EXPERION PKS PHD HISTORY TAG SYNCH SERVICE............................................ 124 7.16 INTEGRATION WITH OTHER PRODUCTS............................................................................................................................................ 124
7.16.1 Profit Blending and Movement (PBM) or Blending and Movement Automation (BMA) ................................................. 124 7.16.2 ACM ........................................................................................................................................................................... 125
7.17 PROMPT FOR USERNAME AND PASSWORD WHEN REQUESTING REPORTS ................................................................................................ 125 7.18 INSTALLING A FLEX SERVER.......................................................................................................................................................... 125 7.19 MIGRATION OF EXISTING DSA ADVANCED SECURITY CONNECTIONS ...................................................................................................... 125 7.20 NON REPLICATION OF MENUS AND TOOLBARS BETWEEN CONSOLE STATION EXTENSIONS AND FLEX STATIONS ................................................ 126 7.21 VERTICAL SCALING OF ROUTE PROFILE DISPLAY FOR LEAK ADJUSTED PRESSURES (PAR 1-6NVS8Z5) ............................................................ 126 7.22 THE PIPELINE PRESSURE PROFILE AND ROUTE PROFILE DISPLAYS (PAR 1-6NVUFHR)............................................................................... 127 7.23 PATCH CONSIDERATIONS IN R500.2 ............................................................................................................................................. 128
7.23.1 DSA – Alarm and Event Report .................................................................................................................................... 128 7.23.2 DSA Advanced Security................................................................................................................................................ 128 7.23.3 IEC60870 Interface ...................................................................................................................................................... 129 7.23.4 Uniformance PHD and history tag synching ................................................................................................................. 129 7.23.5 Integration with other products .................................................................................................................................. 130 7.23.6 ACM ........................................................................................................................................................................... 130
CHAPTER 8 SUPPORT AND OTHER CONTACTS ................................................................................................................................... 131
8.1 DOCUMENTATION FEEDBACK ............................................................................................................................................................ 131 8.2 HOW TO REPORT SECURITY VULNERABILITY? ......................................................................................................................................... 131 8.3 GTAC SUPPORT............................................................................................................................................................................ 131
8.3.1 Subscribe for Automated Email Alerts: .............................................................................................................................. 131 8.3.2 Further support required? ................................................................................................................................................ 132 8.3.3 Training classes ............................................................................................................................................................... 132
7 www.honeywellprocess.com
About this guide
This Software Change Notice describes the prerequisites, resolved PARs, applicable nodes, and steps to
install or uninstall the point release. Additionally, this SCN contains information about the change impact and
additional information for this point release. The latest version of this SCN is available on the Honeywell
Process Solutions website (www.honeywellprocess.com/support).
This point release affects multiple subsystems and some other products that integrate with Experion PKS.
Some subsystems will behave differently depending on whether an equivalent patch has been installed on
the other systems.
Please read Patch considerations for detailed information.
Revision history
Revision Date Description
A August 2017 First draft
B September 2017 Second draft
C November 2017 Third draft

www.honeywellprocess.com 8
Chapter 1 Before you begin
HPS Migration Center of Excellence (COE) handles Experion migration planning related activities. For all pre-
migration and site-specific queries, contact Migration COE at [email protected].
For any issues while performing migration, contact Global Technical Assistance Center (GTAC). For more
information, refer to “GTAC Support” section in this document.
The latest software, documentation, and antivirus updates are available in the
www.honeywellprocess.com. Ensure to use the latest updates before performing an
upgrade or migration procedure.

9 www.honeywellprocess.com
Chapter 2 Introduction
2.1 About this point release
This point release has the following major enhancements.
• Addresses issues and provides improvements requested since the release of Experion PKS R500.1.
• Enables upgrading of Experion PKS R500.1 to Experion PKS R500.2.
ATTENTION:
1. This point release is applicable only for R500.1 or with point releases on it.
2. This point release is qualified if individual server patches or TPN server patches are
installed on the point releases.
3. This point release is not qualified if individual Tools or Controller patches are installed on
PC nodes.
4. This point release is not qualified if there are Controlled Patch Controlled Release or
Hotfixes installed on the system. These patches or hotfixes have to be uninstalled from the
PC nodes (excluding the controllers/IOs), and the cluster (including controller/IOs) must be
upgraded to the qualified point release before using this feature. For more information,
contact HPS Migration Center of Excellence (COE).
5. New features in this point release does not impact the earlier rule of direct migrations of
controllers or IOs from any point release or patch to any target release as mentioned in the
site-specific migration guide and scenario-specific migration guide. For qualified controller
migration paths, refer to the Supported Controller Migration Paths section in this SCN.
ATTENTION:
• Controller firmware upgrade or migration is only required if the system is experiencing
one or more problems resolved given in the Tools and Controller resolved PARs
section.
• If you intend to upgrade or migrate controllers, be sure to contact HPS Migration Centre of
Excellence (COE) at least four weeks before installing this point release.
• This SCN includes a prioritized Product Anomaly Report (PAR) summary. Contact the
Honeywell Technical Assistance Center (TAC) for assistance if you observe issues not
addressed in this SCN.

www.honeywellprocess.com 10
2.1.1 New features and enhancements
The following are the new features and enhancements in Experion PKS R500.2
ControlEdge PLC integration with Experion R500.2: ControlEdge PLC integration with Experion provides significant savings in configuration and maintenance effort, significantly reduced likelihood of configuration errors, and a robust communications interface with:
• System provided hardware diagnostics displays and system alarms
• Automatic generation and maintenance of Experion points from the ControlEdge PLC control strategy
• Named tag addressing
• Secured network communications
• Guided workflow tasks in Configuration Studio
• Support FTE network installation with PLC as non-FTE node, and peer-to-peer communication with C300 using PCDI
Experion Profit Controller Function Block Profit Controller is an integrated component of Honeywell Profit Suite for Advanced Control and Optimization. It includes the tools necessary to design, implement and maintain multiple input/multiple-output (MIMO) advanced control applications. It has the unique ability to maintain superior process control even with significant model mismatches that result from underlying process changes. Profit Controller utilizes a dynamic process model to drive maximum value by predicting future process behavior. It ensures optimal control response by using the minimum manipulated variable movement necessary to bring all variables within limits or to set points. With the Experion R500 release, Profit controller functionality is introduced: On the embedded platform, C300V3, for faster execution rates with high availability; and the ACE platform. As part of the R500 point release, Experion Profit Controller FB is included on simulation platforms of ACE and C300.
Support DSA interop between R3xx and R500.x clusters Direct migration support to R500.x is from R400.x, R410.x and R43x.x. DSA interoperability is usually supported only between releases that support direct migrations. However, in R500.2, DSA interoperability is supported from R3xx apart from paths that support direct migration to R500.2. This feature is particularly useful in a multi-cluster environment where the clusters are on R3xx and required to be migrated to R500.2. To use this feature ensure that the R3xx systems are installed with the following patches before you start the migration: For R301: R301.3 Server Patch093 for PAR1-WKEFV9 For R310: R310 Server Patch680 for PAR1-K7N7TZ For R311: R311.2 Server Patch243 for PAR1-J43NXT Please refer the respective patch SCNs to know more including the pre-requisites.
FTEB Enhancements to support 64 Series A IOs for C300 controller As C200 is nearing its end of support, C300 controller was identified as the latest and most reliable replacement option. A few programs were rolled out to enable smooth migration of C200 controller to C300 without disturbing the IO wiring.

11 www.honeywellprocess.com
Users who have C200 controller with Series A (AI/AO/DI/DO), and Rockwell 1756 series IOs, can migrate their C200 controllers to C300 and connect the Series A (AI/AO/DI/DO) and Rockwell 1756 series IOs with the C300 controller through Honeywell’s Fault Tolerant Ethernet bridge Module (FTEB). However, the Series A (AI/AO/DI/DO) IO module handling efficiency of FTEB modules were not good enough to handle 64 Series A (AI/AO/DI/DO) IO modules that could be configured with C200 controller. The number of series A IOs that could be handled by C300 was limited to 40 due to this. In R500.2, the FTEB handling of Series A (AI/AO/DI/DO) IOs has been made more efficient to handle 64 Series A (AI/AO/DI/DO) and Rockwell 1756 series IO modules. This would let C200 users with Series A (AI/AO/DI/DO) IOs migrate to latest and more efficient C300 controller as part of their Control system evolution. For more information and activities related to C200 to C300 migration, please refer to C200 to C300 with Series A Upgrade Guide.
80 Series C modules supported for C300
80 Series C modules supported for C300 instead of Support for Series C MARK-II IOs. Specification change: Series C IO module specification is modified from 64 to 80 Series C modules for supporting C300.
Increased fast history capacity for CDA points
In this release the maximum number of CDA point parameters that can be assigned to one second fast history has been increased from 2000 to 5000 point parameters. The CPET (Cluster Performance Estimator Tool) should be used to confirm that the maximum parameters per second from each controller is not exceeded as well as the maximum parameters per second that can be collected via CDA Server on the Experion server is not exceeded. Load should be distributed as evenly across controllers as possible.
2.1.2 Limitations
Point release removal
You cannot uninstall/remove point releases. Take a backup of your system, for more
information contact your local Honeywell Process Solutions Customer Contact
Center (CCC) or visit www.honeywellprocess.com or contact Migration COE at
Point release distribution
[✓] Not limited
[] Limited.
www.honeywellprocess.com 12
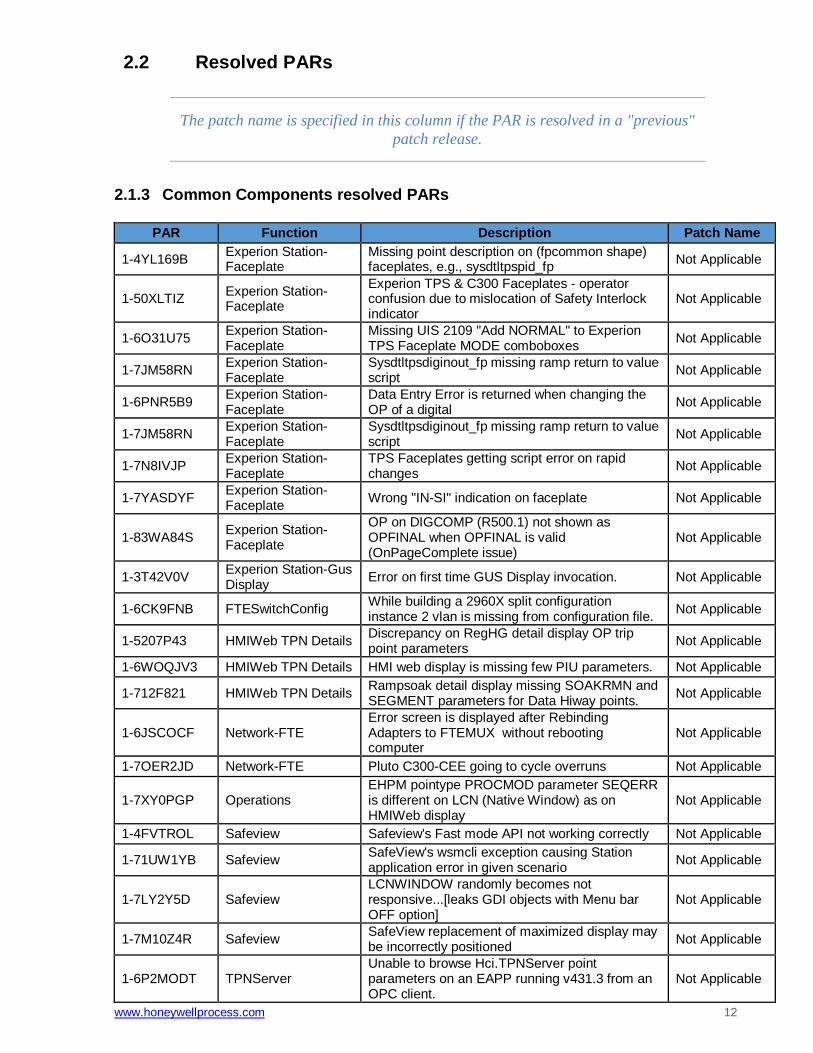
2.2 Resolved PARs
The patch name is specified in this column if the PAR is resolved in a "previous"
patch release.
2.1.3 Common Components resolved PARs
PAR Function Description Patch Name
1-4YL169B Experion Station-Faceplate
Missing point description on (fpcommon shape) faceplates, e.g., sysdtltpspid_fp
Not Applicable
1-50XLTIZ Experion Station-Faceplate
Experion TPS & C300 Faceplates - operator confusion due to mislocation of Safety Interlock indicator
Not Applicable
1-6O31U75 Experion Station-Faceplate
Missing UIS 2109 "Add NORMAL" to Experion TPS Faceplate MODE comboboxes
Not Applicable
1-7JM58RN Experion Station-Faceplate
Sysdtltpsdiginout_fp missing ramp return to value script
Not Applicable
1-6PNR5B9 Experion Station-Faceplate
Data Entry Error is returned when changing the OP of a digital
Not Applicable
1-7JM58RN Experion Station-Faceplate
Sysdtltpsdiginout_fp missing ramp return to value script
Not Applicable
1-7N8IVJP Experion Station-Faceplate
TPS Faceplates getting script error on rapid changes
Not Applicable
1-7YASDYF Experion Station-Faceplate
Wrong "IN-SI" indication on faceplate Not Applicable
1-83WA84S Experion Station-Faceplate
OP on DIGCOMP (R500.1) not shown as OPFINAL when OPFINAL is valid (OnPageComplete issue)
Not Applicable
1-3T42V0V Experion Station-Gus Display
Error on first time GUS Display invocation. Not Applicable
1-6CK9FNB FTESwitchConfig While building a 2960X split configuration instance 2 vlan is missing from configuration file.
Not Applicable
1-5207P43 HMIWeb TPN Details Discrepancy on RegHG detail display OP trip point parameters
Not Applicable
1-6WOQJV3 HMIWeb TPN Details HMI web display is missing few PIU parameters. Not Applicable
1-712F821 HMIWeb TPN Details Rampsoak detail display missing SOAKRMN and SEGMENT parameters for Data Hiway points.
Not Applicable
1-6JSCOCF Network-FTE Error screen is displayed after Rebinding Adapters to FTEMUX without rebooting computer
Not Applicable
1-7OER2JD Network-FTE Pluto C300-CEE going to cycle overruns Not Applicable
1-7XY0PGP Operations EHPM pointype PROCMOD parameter SEQERR is different on LCN (Native Window) as on HMIWeb display
Not Applicable
1-4FVTROL Safeview Safeview's Fast mode API not working correctly Not Applicable
1-71UW1YB Safeview SafeView's wsmcli exception causing Station application error in given scenario
Not Applicable
1-7LY2Y5D Safeview LCNWINDOW randomly becomes not responsive...[leaks GDI objects with Menu bar OFF option]
Not Applicable
1-7M10Z4R Safeview SafeView replacement of maximized display may be incorrectly positioned
Not Applicable
1-6P2MODT TPNServer Unable to browse Hci.TPNServer point parameters on an EAPP running v431.3 from an OPC client.
Not Applicable

13 www.honeywellprocess.com
2.1.4 Tools and Controller resolved PARs
PAR Function Description Patch Name
1-6UWQCHN
CK-Control Kernel Defect in recovery from CEE Overruns Not Applicable
1-43K9NV3 Control Builder Series C IO assignment lost during import and got the duplicate channels.
Not Applicable
1-5J5YYYF Control Builder-Change Parent/User Defined Template
Not passing the signal from one CM to another CM after doing Change parent Operation
Not Applicable
1-5N1DZGE Control Builder-Chart Control Builder application error on Moving function block from project side in a template instance
Not Applicable
1-4LVQYHX Control Builder-Chart Printjob name for autoprint is always "ChartPrinting"
Not Applicable
1-6FOQ17H Control Builder-Chart SCM Chart View alignment or the connection between the steps are not aligned properly after OPM
Not Applicable
1-6O1VOTB Control Builder-Configuration Form
DST Event every 15 minutes Not Applicable
1-66ORN4B Control Builder-Configuration Form
Unexpected error appears while enabling server point build in IO template. See details.
Not Applicable
1-6ZO4YSZ Control Builder-Fieldbus FIM2 Device Replacement Fails Not Applicable
1-6XIKSCL Control Builder-Load "Unable to delete a downloaded C300 Control Module with unassigned IO block"
Not Applicable
1-6ZN2KPZ Control Library Allowing to connect two connection to an input parameter
Not Applicable
1-75V3H2L EBM-Controller PHASE bock state is not set to complete when its execution completed in abnormal termination
Not Applicable
1-77N2ODP EIM - Platform EIM Production Image Firmware Built Incorrectly for R500.1
Not Applicable
1-6WNPGIB Embedded Controller/Gateway Platform
CPU Degradation of ~3% is observed when C300 is migrated from R400.8 to R500T1TP1.
Not Applicable
1-6MV9JY5 FF Interface Modules Process values from ST3000 and STT35Fs stop updating during FIM4 migration
Not Applicable
1-5VLJV2R Firmware EHPM Firmware does not update IP Address that $FTESTSx displays use during Experion migration.
Not Applicable
1-72OPZVN Firmware ENIM does not clear saved manufacturer certificate on node disjoin
Not Applicable
1-6P8PWKB IEC61850_Embedded EIM IEC61850 application Klocwork defect findings.
Not Applicable
1-5M28P8V Operations Need add ENB bridge traffic measurement parameters in UCN Statistics of ENB.
Not Applicable
1-7CSIU97 Operator ETN-FPGA version information required for any changes to firmware
Not Applicable
1-6N8GL61 OPM-Migration Tool OPM of EIM failed on R500 Build 98. Not Applicable
1-6NHGDDH OPM-Migration Tool The controller migration wizard should upgrade both the recovery and product images for EIM
Not Applicable
1-6TDZHAV OPM-Migration Tool While migration on EIM modules, the CMW doesn’t shows Experion Release as blank.
Not Applicable
1-6WY5OFZ OPM-On Process Migration
The Patchdb.exe fails in scenarios where EMDB is not opted as "Add-on Features".
Not Applicable
1-6FESTJ5 QVCS QVCS Checkout in R431.3 takes several hours (instead of a few minutes with prior release R311)
Not Applicable

www.honeywellprocess.com 14
PAR Function Description Patch Name
1-5Y1EVZL SCM-Sequential Control Module
SCM transition gate output is not as per expected
Not Applicable
2.1.5 Servers and Stations resolved PARs
Server
PAR Function Description Patch Name
1-6WO8QQJ Alarm Pager When trying to configure escalation targets for alarm pager, the escalations drop down list is empty
Experion PKS R500.1 Server Patch 3
1-61CGWYS CDA Integration Server may not failover automatically when CDA service stops on primary server
Experion PKS R500.1 Server Patch 3
1-3QFNDMJ Detail Displays Station number in Flex Station configuration page reverts to 1 when switching between tabs
Not Applicable
1-7K82G85 Diagnostic Infrastructure
Old Performance Monitor log files are not being removed from the disk which could lead to the server running out of disk space.
Experion PKS R500.1 Server Patch 3
1-77ZWPYB Displays - General
When editing an alphanumeric on the equipment display, the new value is appended to the end of the existing value, rather than over-writing the value that is there.
Experion PKS R500.1 Server Patch 3
1-6WBGYYX Displays - General Dragging the scrollbar on the equipment display may cause the display to scroll erratically
Experion PKS R500.1 Server Patch 3
1-72034AP Displays - SCADA Controllers
Callout "parameter is read only" is displayed on the SCADA controller detail display if entering a new controller number greater than 99
Experion PKS R500.1 Server Patch 3
1-6T5XIZF Displays - SCADA Controllers
Detail Display of R43X SCADA channel on a R500 subscriber are seen with status as "Simulation"
Not Applicable
1-6GMVAZ1 DSPLY Subsystem After silencing or acknowledging a selected display element, that element is deselected
Not Applicable
1-77EZP85 DSPLY Subsystem
When using raise/lower buttons on a DSP display and using "auto select of OP" option, unable to cycle through all of the output states of a SCADA status point when three or more states are configured.
Not Applicable
1-7LBRAH3 DSPLY Subsystem When accessing large amounts of variant string data, the Server Display process resource usage may increase
Not Applicable
1-83E5AX3 Electronic Flow Measurement
EFM meters may not export if there are too many records in a given log
Not Applicable
1-83DL4VV GDA - DSA Events In the filtered Event Summary, the alarm limit appears incorrectly as a very large number
Not Applicable
1-6QBYIC9 GDA - Notifications
The TPS synchronize status on the console alarm enable tab may show 'Unknown' if the TPS mapping option is 'Map all TPS units to assignable asset' or 'Map to assignable assets with the same name as TPS Units (direct mapping)'
Not Applicable
1-7XU724X GDA - Notifications
Occasionally the messages in the Native Window and Experion message summaries may not match. TPS confirmable messages may reappear in the Experion message summary a short time after being cleared and be required to be cleared again.
Not Applicable

15 www.honeywellprocess.com
PAR Function Description Patch Name
1-72MTLM3 GDA - Points Limit values configured as OPC DA in the LR are shown as BAD quality when viewed in Experion
Not Applicable
1-6JMLH7J GDA - Points Allow logging of OPC application writes to Experion log files
Not Applicable
1-6MX1YFZ GDA - Points Temporary inverse video may occur when running DCT capture
Experion PKS R500.1 Server Patch 3
1-72NR95X GDA - Points DSA may show incorrect value for parameter if written over DSA then immediately toggled back by controller
Not Applicable
1-7BMBXHA GDA - Points Experion exception history does not historize OPC DA limits from LR correctly
Not Applicable
1-7JQY9BP GDA - Points If a data acquire request timed out due to heavy server load, subsequent acquires will also time out unnecessarily
Not Applicable
1-6PPOASN IEC 61850 Interface
Adding a device to IEC61850 through icd file results in an incorrect configuration
Not Applicable
1-6WM2T7J IEC 61850 Interface
After adding 40 IED's, attempts to download will cause the IEC61850 driver to terminate unexpectedly
Not Applicable
1-6WM9PV1 IEC 61850 Interface
IEC61850 SCADA Russian lang - State descriptor show wrong symbols in alarm summary-MUST
Not Applicable
1-7KM6OFR Licence Management
Test license alarms get generated on Console station every hour
Experion PKS R500.1 Server Patch 3
1-7LERZAG Migration [M&I]On R432.2 setup Experion release Showing R432.1
Not Applicable
1-68YG9O9 Notification Management
When console stations are restarted, previously non suppressed CDA and TPS alarms on that console station can be automatically supressed if they are part of an active suppression group
Not Applicable
1-6P17ID1 Notification Management
Option to annunciate alarms even when operator is logged off does not work
Not Applicable
1-6S62Y4B Notification Management
Alarms will not get filtered on priority if the currently logged in operator is not configured as an operator in Experion (only configured in an Experion Group)
Experion PKS R500.1 Server Patch 3
1-6S4OJO1 Notification Management
In rare circumstances, the Server Notification Manager memory may increase while the alarm summary remains open, which could result in performance degradation of the server
Not Applicable
1-7KI2VE9 Notification Management
If a status point is rebuilt it is possible for an existing alarm to be regenerated
Not Applicable
1-6JX45EP ODBC Driver
ODBC query to flexible point table may cause many transactions to TPS which may cause delays to other clients reading and writing TPS point parameters
Experion PKS R500.1 Server Patch 3
1-7M2RJ31 ODBC Driver Snapshot history value can return INTERPOLATED even though raw history value is GOOD at same reported timestamp
Not Applicable
1-8HITPHH OPC Data Client (Scan Task)
If OPC point references for a controller are at more than 80% of the sysbld maximum, after migration some points belonging to the controller will lose the address fields of PV, SP and OP parameters
Not Applicable
1-71R0PU1 Operator Security Some CDA parameters cannot be controlled by Electronic Signature
Not Applicable

www.honeywellprocess.com 16
PAR Function Description Patch Name
1-7VE2X5M Operator Security Erroneous Advanced Parameter Security warning message outputted when migrating from a pre R410 system
Not Applicable
1-7JNTAM1 Presentation - Esig dialog
In rare cases, invoking the Electronic Signature Dialog from the message summary may cause Station to terminate
Not Applicable
1-7NGTXY9 Redundancy - Server
Unable to initiate an OPM from Experion R500 to a future release
Not Applicable
1-79A7T4F Redundancy - Server
Unable to synchronize servers when Alarm Pager is not licensed
Experion PKS R500.1 Server Patch 2
1-6P5CXP5 Reports Running a Point Attribute BadPV report on a system with lots of OMA Point Server points may cause the OMA Point Server to disconnect
Not Applicable
1-6Q8M0LX Reports The performance statistics report may show incorrect average data in graphs
Not Applicable
1-6S8G5S5 Reports On a large and heavily loaded system, a request for a performance statistics report with 12 hours or more data may fail to generate
Not Applicable
1-72QVU4B Reports If one of the points in the system returns a list of more than 32000 parameters, the point attribute report may fail and generate no output.
Not Applicable
1-7JHJF5T Reports
When requesting an Alarm and Event DSA report using Experion R43x from an earlier release over DSA, the report may state "Unable to connect to server" in the report output
Not Applicable
1-7A79NPP Scanning Subsystem
Manually setting the PV of a SCADA point from an alarmable value to a non-alarmable value does not return the alarm to normal
Not Applicable
1-6QSA66Q Server - Installation and Migration
Update migration plug-in to support migration of OTP favourites
Not Applicable
1-6UK7DCD Server - SCADA Interfaces
Points on Bristol Babcock can fail to scan and would cause application errors to occur
Not Applicable
1-6SJHA8U System Libraries Unexpected server failover occurring when referencing history parameters indirectly in trends or server scripts
Not Applicable
1-452JMJP TPS Interface
If multiple messages are generated on TPS with identical descriptions and timestamps, they may not all be correctly enunciated on the Experion message summary causing a mismatch between Experion and native window
Not Applicable
1-7BH2KYW TPS Interface The TPS System Status and TPS Console Status indicators in the Station status bar may show as blank boxes after the ES-T is rebooted
Not Applicable
1-7LWW66H TPS Interface
When an alarm is received on a combo point parameter, the parameter may revert back to reading through TPS instead of through CDA which may cause LCN congestion
Not Applicable
1-1H6L2NV TPS Interface hmiweb displays may all close after failed call to invoke native window display
Not Applicable
1-3EM3PGP TPS Interface Multiple invocations of tps.command object may fail to invoke NativeWindow display
Not Applicable
Station
PAR Function Description Patch Name

17 www.honeywellprocess.com
PAR Function Description Patch Name
1-2RZH3JD HDB Application HMIWeb Display Builder may not process certain keyboard inputs after selecting an open display using windows taskbar icons.
Not Applicable
1-7LRPRSB HMIWeb Station - Displays
Activity commands cannot be sent to activities from the context menu in activity/batch summaries if the activities have control confirmation enabled.
Not Applicable
1-6UY00HT HMIWeb Station - General
Application windows are not managed well on startup & during zoom.
Not Applicable
1-82XRX2Y HMIWeb Station - General
Collaboration station terminates with error on startup and exit.
Not Applicable
1-6S0UT5S Station DSP Displays
In DSP displays raise/lower operations do not work correctly on points that have control confirmation enabled.
Not Applicable
1-781SFW5 Station Equipment Display
Resource usage increases on repeated loading of the equipment display.
Not Applicable
1-72V3JIL Station eServer Standard Access
eServer Standard Access fails to connect after connecting a few times.
Not Applicable
1-7J6A8ZV Station eServer Standard Access
eServer Standard access does not process parameterised displays with more than one custom parameters.
Not Applicable
1-6WQ0K2P Station Limits Trend
Custom limit trend does not work correctly when viewed in Equipment Detail Display or pop up
Not Applicable
1-86UFFR5 Station Limits Trend
Last good target range is shown on limit trend when the target is actually bad value
Not Applicable
1-4Z41CQJ Station Navigation First mouse clicks are ignored by multi-window station with tabbed browsing enabled.
Not Applicable
1-6T09ORB Station Navigation In single window Station, faceplates that are "pushpinned" are closed after more than 50 other displays are opened.
Not Applicable
1-7JZS09D Station Operator Touch Panel
Station application error may occur when entering a prompt on the Operator Touch Panel when "Auto hide message zone" is set.
Not Applicable
1-6Q4SDOF Station Operator Touch Panel
Increase spacing between buttons on screen OEP layout to reduce likelihood of accidentally pressing the incorrect key.
Not Applicable
1-76YEAEL Station Pan and Zoom
Script error may occur on Pan and zoom display when alarm state changes on thumbnail.
Not Applicable
1-82HWERV Station Pan and Zoom
Shape on a Pan-and-zoom display may not reflect changes to its custom properties until the display is scrolled manually
Not Applicable
1-5DDFGSV Station Popups/Faceplates
Station may exit with an application error if TabletInputService is not running.
Not Applicable
1-4E00B1V Station Printing Option "page setup" for print not working Not Applicable
1-40HZQJ4 Station Printing Printing Trend on 100% zoom level does not print entire trend legend.
Not Applicable
1-5KNO20R Station Script Data Access
Blinking and navigation may not work if shape script data is bound to multiple custom properties that has its value set to <NULL> on the display.
Not Applicable
1-4OKHJGL Station Scripting Page position properties returned by script on page unload is inconsistent when tabs are enabled in multi-window station.
Not Applicable
1-82IYMLB Station Shapes Shapes on displays should have an option to continue to subscribe even if they are scrolled out of view.
Not Applicable
1-82ISC99 Station Shapes Performing a drag/drop operation on a shape in an equipment display may cause a script error to occur
Not Applicable

www.honeywellprocess.com 18
PAR Function Description Patch Name
1-71T6Y4P Station Web Browser
In eServer Premium Access Client, push button navigating to a non-existing display causes the Internet Explorer to go into a non-responsive state.
Not Applicable
2.1.6 Quick Builder resolved PARs
PAR Function Description Patch Name
1-5XAOC1L Configuration Studio
Quick Builder Non Scanned Parameter and OPC Parameter should support import {VAR, NUM, CDA, 0} and {VAR, CHAR, CDA, 0}.
Not Applicable
1-781U6SL Configuration Studio
Lost non scanned parameters in quick builder, during server upload.
Not Applicable
1-3MOBZOH Configuration Studio
OPC Browser takes an hour to expand a node with more than 5000 leaf nodes.
Not Applicable
1-3MMDBB9 Configuration Studio
When nothing selected in project and download window opened, "Selected items only" should be selected.
Not Applicable
2.1.7 C200 to C300 Upgrade resolved PARs
PAR Function Description Patch Name
1-5IYFDP1 C200 to C300 Upgrade
API support for handling Revert Operation after CNET to FTE and C200 to C300 upgrade.
Not Applicable
1-68KMFFN C200 to C300 Upgrade
Revert label not applied on vcs objects not upgraded for FTE network.
Not Applicable
1-6ET7WQH C200 to C300 Upgrade
Reverting to a label created prior to Up. was successful after Cnet to FTE with QVCS Up.
Not Applicable
1-70RAL7J C200 to C300 Upgrade
ServerB mig fails at “Restore Control Strategies” step after Cnet to FTE Up. on R410.9HF4.
Not Applicable
2.1.8 Series C Universal IO Modules resolved PARs
PAR Function Description Patch Name
1-6I3UGIZ Series C Universal IO Modules
After Secondary IOM powers up and sync's IOLINK errors are occurring.
Not Applicable
1-6W82OVN Series C Universal IO Modules
UIO alarms "Module Not Calibrated" on rapid temperature change
Not Applicable
2.1.9 Control Functions resolved PARs
PAR Function Description Patch Name
1-6SXAYYN CF-Control Function
FANOUT block BADCTL recovery causes initialization of outputs
Not Applicable
1-6WMNU2V CF-Control Function
Even though PID-PL is experiencing ARWOP being HI, the PID-PL OP is Increasing.
Not Applicable
1-6WNH15J Control Functions - Batch
EBM - Equipment not released when single step operation is done on phase block with report parameter
Not Applicable
1-722EAGZ Control Functions - Continuous
Redundant C300 loses synch after load of PC block with matrix density of greater than 60%
Not Applicable
2.1.10 Control Builder resolved PARs
PAR Function Description Patch Name

19 www.honeywellprocess.com
1-44YQCXN Control Builder-Batch
Import of MR/RCM/SCM with Datablock throws error
Not Applicable
1-70RHIMF Control Builder-Chart
Alignment options in Control builder chart are not working.
Not Applicable
1-6DPI6JJ Control Builder-Chart
Control builder crashes upon invoking Control module and IOM properties
Not Applicable
1-6IHPSKR Control Builder-Chart
Inverted inputs with Bubble is not working in R430. [BW-23642] - Part 2 of Fix
Not Applicable
1-75RXF77 Control Builder-Chart
Station point detail chart displays incorrect line / pin function block color
Not Applicable
1-6GFLLA7 Control Builder-Chart
Large SCMs load extremely slowly in Stations chart view
Not Applicable
1-7MGSKWB
Control Builder-Fieldbus
Methods Manager gets crashed - On running "Trim" Methods.
Not Applicable
1-6EJNKXL Control Builder-Print Printing of multiple charts (by selecting 2/3 CMs) results in control builder crash
Not Applicable
1-6GV1WO1 Control Builder-Profibus
AutoDSB fails to detect grouped module nettag name in particular scenario
Not Applicable
1-737H7OB Control Builder-Profibus
AutoDSB fails to update "ChnNumber" parameter value in DSB's
Not Applicable
1-735C6CX Control Builder-Tree Monitoring
Control Builder application error with no error number description
Not Applicable
2.1.11 Standard Series C IO Modules resolved PARs
PAR Function Description Patch Name
1-3KER42V Standard Series C IO Modules
Data corruption when Counters are latched during the Read
Not Applicable
1-7XJLBGT Standard Series C IO Modules
TVPROC is not getting turn on when FCO was enabled
Not Applicable

www.honeywellprocess.com 20
2.1.12 EIM - Platform resolved PARs
PAR Function Description Patch Name
1-72ZHSYN EIM - Platform Primary EIM441 failed during R500 T1TP1 final
stable run Not Applicable
1-7WKZUXJ EIM - Platform Certificates result in 0-size when stored to the module Not Applicable
1-7WPK039 EIM - Platform May accept non-Hon DHCP response and fail to boot
correctly Not Applicable
1-7X9V8G7 EIM - Platform Certificate overwrite is appended rather than
replaced Not Applicable
1-82I4GFF EIM - Platform Incorporate Wind River Linux 7 RCPL 25 into EIM
R500.2 Not Applicable
2.1.13 Other functions resolved PARs
PAR Function Description Patch Name
1-7FQQABP - Support for FIM4 HW version-3 module in Experion
Not Applicable
1-7XLS9QO C300 Controller C300 FAIL 00D1 when HART parameters fetched from LLAI-MUX chan 33-64
Not Applicable
1-71SLBYL CDA-Embedded Momentary loss of peer to peer data when SCM with Dynamic Fetch enabled is running
Not Applicable
1-78V0W38 EIP-CEE-EMBEDDED
Opfinal is not sending the same value as an output.
Not Applicable
1-6NGN50F EIP-Tools During PF525 device load getting error Invalid Load State.
Not Applicable
1-767KN7M EIP-Tools OP Final datatype and PV raw data type need to be exposed in the PDE.
Not Applicable
1-6CFTS15 ERDB, EMDB, DBAdmin
Unable to disable EMDB/ERDB replication after uninstalling R430.5 HF1
Not Applicable
1-747WKBP Fieldbus Interface Module-Series C
Firmware Flash Failed in New FIM8 HW Rev C Not Applicable
1-7K46OHD Firmware With L2 Switches not configured per HON Best FTE Practices, Double EHPM failure occurred.
Not Applicable
1-6WY79XP IEC61850_Embedded
During C300ME freeze and switchover DSIN blocks are losing data for 5 Seconds
Not Applicable
1-3PFVFQB Network-FTE Bridge FTEB is susceptible to latent fault that may prevent comm path recovery
Not Applicable
1-6DBIKXP NTools Ntools backup does not get restored. Not Applicable
1-6F7ATAL PGM Unable to clear NVS SF after PGM switchover where NVS SF LED 'Off' but System Alarm still has
Not Applicable
1-5FJC9LZ SCM-Sequential Control Module
R410.2 ACE Behaviour of SCM changed whenever Dynamic Fetch is enabled
Not Applicable
1-5WFGE3L SIM-C300 Experion R431.2 I/O reference block is not receiving output
Not Applicable
1-7136YEX SIM-FFD Simulation FIM download causes all other FIMS to go red
Not Applicable

21 www.honeywellprocess.com
2.3 Change impact
Change impact addresses the areas where control, operational, or infrastructural changes are delivered as
part of the PAR fix. This is observed when migration occurs from a prior release to the current patch. A
noticeable change in behavior is observed after installing the patch. This section describes such change in
behavior.
This point release affects multiple subsystems and some other products that integrate with Experion
PKS. Some subsystems will behave differently depending on whether an equivalent patch has been
installed on the other systems.
Please read Patch considerations for detailed information.
2.3.1 Control change
impact
Not applicable.
2.3.2 Operational change impact
PAR 1-PYDBC1
Description
The excel.exe process may continue to run in Task Manager under the Station login account even after navigating away from an opened Microsoft Excel Report in Station.
Impact
In Experion R500, when a Microsoft Excel report is displayed in Station, the associated excel.exe process does not terminate after navigating to a different Station display and the associated Microsoft Excel spreadsheet is not closed. This can prevent future instances of the report from generating correctly. Honeywell is working this issue with Microsoft. Note that this affects Microsoft Excel reports displayed in Station only. Periodic Microsoft Excel reports are not affected by this problem.
2.3.3 Infrastructural change impact Not applicable.

www.honeywellprocess.com 22
2.4 Known Issues
This chapter provides the information about the Experion issues and workarounds.
Attention
Experion PKS R500.2 Software Change Notice reflects only Product Anomaly Reports (PARs) with priority severity position 2.1 and above.
The PARs positioned at 2.2 and below are not included in this Software Change Notice.
2.4.1 Common components
Communication Manager
PAR Function Description
1-289JLQB
Communication Manager
Error Indication: Hardware replacement of the ESV node designated as Security Manager with no backup or unusable backup results in a loss of Secure Communications configuration data. Description: If the Security Manager node is replaced and a backup of the Secure Communications configuration (through EBR or other means) was not taken or cannot be restored, the configuration data is effectively lost and Secured nodes can no longer be managed through the Secure Communications tool. Recovery: Recovering the Secured nodes requires clearing their individual Secure Communications configuration and re-configuring the Secure Communications system. Please refer to the "Secure Communications User's Guide", Section "Node Maintenance" - Scenario "Restoring Security Manager without a valid backup". Workaround: Plan regular backups of the Security Manager node. Recommend taking a backup of the Security Manager node and its Secure Communications configuration whenever a new node has been Secured or an already Secured node has been Unassigned / removed.
Devices
PAR Function Description
1-3OMI99B
Devices
Description: FDM cannot be used for configuring and calibrating HART devices connected to Rockwell HART input and output modules which are configured in Experion PKS. Recovery: None. Workaround: HART field communicator must be used for any modifications to HART devices connected to Rockwell HART input and output modules.

23 www.honeywellprocess.com
Experion Station-Native Window
PAR Function Description
1-DLHZ3R
Experion Station- Native Window
Description:
On LCNP reset or PC restart, LCNP does not load to OK state. This issue has been reported in Experion PKS R400.x, R410.x, R430.x and R431.x.
Affected Customers: Customers using EST / ESVT / ACE-T or
EAPP nodes which are using LCNP4 cards for LCN connectivity.
Potential Customer Observable Symptoms:
On EST / ESVT / ACE-T or EAPP nodes using LCNP4e on LCNP reset or PC restart, LCNP does not load to OK state. LCNP status remains in POWER ON state, does not progress through states LOC_LOAD, READY and to OK despite doing LCNP reset multiple times.
Workaround:
A patch is being created for resolving this issue for the customers. The fix is planned to be released in R430.5, R431.3 and in R410.9.
Workaround 1 - (For EST / ESVT):
1. Ensure that LCNP Auto restart is enabled in the Configuration Utility.
2. Invoke Control Panel.
3. Select Administrative Tools.
Note
If not visible select System and Security to get Administrative Tools.
4. Right-click Services and Run as Administrator.
5. Locate the Name TDC Emulators Service.
6. Right-click and select Restart.
7. On a pop-up, select Yes to Restart the service.
8. Wait for it to complete and now check the LCNP Status.
9. Repeat this one more time, if LCNP does not load to OK.
Workaround 2 -(For ACE-T / EAPP):
When Workaround 1 is done to ACE-T or EAPP the LCNP does not
restart but the STATE goes to SEVERE due to reset ride through.
1. Ensure that LCNP Auto restart is Enabled in the Configuration Utility.
2. Shutdown the LCN node PC.
3. Remove the power connector from PC.
4. Connect the power connector to PC after 1 minute.
5. Boot the PC. Now check the LCNP Status, node should starts loading and go to OK state.
www.honeywellprocess.com 24
Experion TPS Engineering Tools
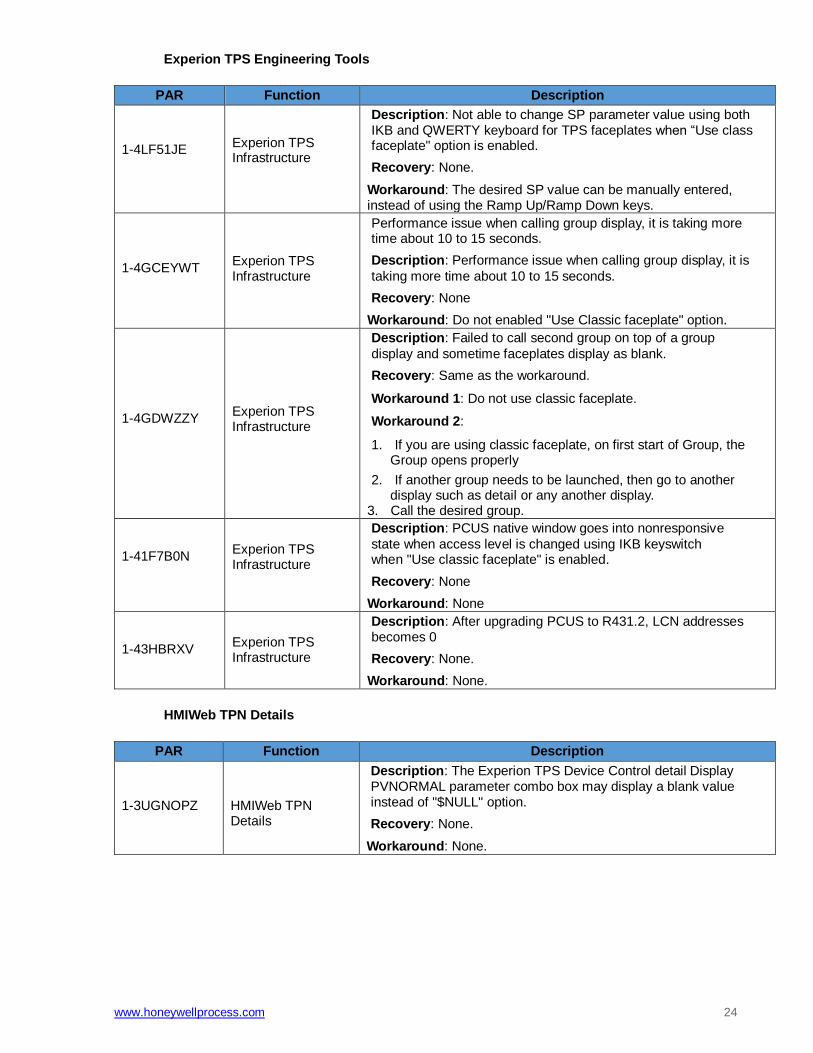
PAR Function Description 1-4LF51JE
Experion TPS Infrastructure
Description: Not able to change SP parameter value using both IKB and QWERTY keyboard for TPS faceplates when “Use class faceplate" option is enabled.
Recovery: None.
Workaround: The desired SP value can be manually entered, instead of using the Ramp Up/Ramp Down keys.
1-4GCEYWT
Experion TPS Infrastructure
Performance issue when calling group display, it is taking more time about 10 to 15 seconds.
Description: Performance issue when calling group display, it is
taking more time about 10 to 15 seconds. Recovery: None
Workaround: Do not enabled "Use Classic faceplate" option.
1-4GDWZZY
Experion TPS Infrastructure
Description: Failed to call second group on top of a group
display and sometime faceplates display as blank. Recovery: Same as the workaround.
Workaround 1: Do not use classic faceplate.
Workaround 2:
1. If you are using classic faceplate, on first start of Group, the Group opens properly
2. If another group needs to be launched, then go to another display such as detail or any another display.
3. Call the desired group. 1-41F7B0N
Experion TPS Infrastructure
Description: PCUS native window goes into nonresponsive
state when access level is changed using IKB keyswitch when "Use classic faceplate" is enabled.
Recovery: None
Workaround: None
1-43HBRXV
Experion TPS Infrastructure
Description: After upgrading PCUS to R431.2, LCN addresses becomes 0
Recovery: None.
Workaround: None.
HMIWeb TPN Details
PAR Function Description 1-3UGNOPZ
HMIWeb TPN Details
Description: The Experion TPS Device Control detail Display PVNORMAL parameter combo box may display a blank value instead of "$NULL" option.
Recovery: None.
Workaround: None.

25 www.honeywellprocess.com
Honeywell Communications Interface
PAR Function Description 1-3IMPGMP
Honeywell Communications Interface
Description: tpndss.exe leaks memory following repeated OPC client connection attempts when LCN connection is down.
Recovery: Enable LCN connection.
Workaround: Stop OPC client connection attempts to TPN Server when LCN connection is down. OPC client connections will fail when TPN Server has no LCN connection thus there is no purpose in attempting connection.
OPC Gateway
PAR Function Description
1-2GZIVP6
OPC Gateway
Error Indication: Data values coming from the OPC Gateway may freeze based on incorrect OPC Server function.
Description: Once the OPC Gateway subscribes to an OPC
Server for a data value, it is unable to detect if the OPC Server has stopped updating this point correctly. This can be visible where the data is seen to be "frozen" coming from the OPC Gateway but a new connection to the OPC Server by another client can get correct "live" data.
Recovery: The OPC Gateway is unable to recover only a single
data value. If an OPC Server stops updating one of the points to the OPC Gateway one of two actions can be taken. (1) (2)
1. Remove all requests for this point by clients of the OPC Gateway.
This requires unloading these points from Monitor.
2. Set the OPC Gateway to IDLE. This will result in the connection to the OPC Server being closed and ALL DATA from the OPC Gateway will go to Failsafe values. Commanding the OPC Gateway to RUN will restore all data from all points coming from the OPC Gateway.
Workaround: None.
Signon Manager
PAR Function Description 1-4T1DB5N
Signon Manager
Description: Sign-On issue when we connect EST node remotely
with user which is logged in locally (without logoff) Recovery: None.
Workaround: Log off and log-in the system and then connect the EST node remotely.
System Management
PAR Function Description 1-3IM128N
System Management
Description: Analysis of the FTEProvider process shows memory leak in Microsoft code, and Microsoft has been engaged to analyze and diagnose the memory leak. The leak is visible by observing the memory usage for the FTEProvider.exe process in Windows Task Manager.
Recovery: Reboot the node when the memory usage of
FTEProvider becomes high enough to impact other processes

www.honeywellprocess.com 26
PAR Function Description
running on the system. Workaround: Same as the recovery.
1-1EYHNCP
System Management
Error Indication: Missing Managed Component alarm in
alarm summary. Description: Sometimes the MANCOMP is not shown when a network failure occurs (such as disconnecting one of the FTE cables).
Recovery: Restart System Event Provider.
Workaround: Restart the System Event Provider service (sm-System Event Provider) using Computer Management -> Services.
1-3QHX3Q9
System Management
Error Indication: Flex node goes to non-responsive state
due to syncrep.exe errors. Description: In network and loading conditions, a Flex node
may become unresponsive. This issue is still being investigated and a more permanent solution will be created in a future update.
Recovery: Restart the node.
Workaround: Same as recovery.
1-MNAFT7
System Management
Error Indication: Server data connection is lost Description: Server lost data connection to System management by launching the L2.5 switch display from the station. Issue is caused by slow response from the switch.
Recovery: Switch to another display to continue working, and retry the switch display later.
Workaround: None
1-MZ6L8J
System Management
Error Indication: FTE nodes disjoin and reconnect. Description: FTE nodes gets disjoined and reconnected when time in NTP source is slightly modified.
Recovery: None. Required system automatically recovers.
Workaround: None.
1-86SR3EQ
System Management
Error Indication: System management display and FTE heart beat provider is not working as expected in R500.2 Rev3.
Description: In R500.2 Rev3 in System management display the R500.2 Rev3 nodes are displayed as failed (FTE status and OPC status). Also R500.2 machines are not listed in FTE heart beat provider.
Recovery: None.
Workaround: None.

27 www.honeywellprocess.com
Table View
PAR Function Description 1-F8BHKD
Table View
Error Indication: Trendparameter for SCM is not displayed in mini trend display in the station.
Description: Trendparameter for SCM is not displayed in mini trend display in the station.
Recovery: None.
Workaround: None.
1-HI1PMN
Table View
Error Indication: When Report and Formula parameter is printed for RCM, the report does not show the correct value.
Description: When Report and Formula parameter is printed for RCM, the report does not show the correct value. Printing the report and formula parameters, does not prints the current value.
Recovery: None.
Workaround: None.
1-ZESYD7
Table View
Error Indication: Reverse video observed in Child RCM and Child
SCM detail display during ICPP runtime. Description: It is observed that Parent navigation option does
not exist after navigating to Child detail display Recovery: Go back to parent detail display through back button in
Station tool bar. Workaround: None.
Network-CNI
PAR Function Description 1-WCZEO9
Network-CNI
Error Indication: Remote IO communication failed with a CNI
Line error 3416. Description: Remote IO communication failed with a CNI Line error 3416.
Recovery: None.
Workaround: None.
1-XG5K9X
Network-CNI
Error Indication: CNET cable removal system alarm RTN even though cable fault is live
Description: CNET cable removal system alarm RTN even though cable fault exists
Recovery: None.
Workaround: None.

www.honeywellprocess.com 28
Secure Communication Agent
PAR Function Description
1-1XVYCPZ
Secure Communication
Agent
Error Indication: C300 temporarily lose communication with console stations during policy deployment.
Description: When securing a large number of Windows and C300 nodes at once, C300 has been observed to temporarily lose communication with consoles stations in the same security zone.
Recovery: Not required, communication restores automatically.
Workaround: Refer to the Secure Communications User Guide for the recommended procedure to secure nodes. In addition, securing nodes in several parts (for example 10-15 nodes at a time) vs all at once will further increase the probability of avoiding interruptions in communication.
1-3JXC9T1
Secure Communication
Agent
Error Indication: Secured, redundant Experion Servers with ServerB as primary and ServerA as backup, ServerA is rebooted and ends up taking over as primary.
Description: This can occur when ServerA is started after reboot. Server A may timeout waiting for communications with Server B to be established before the IPSec negotiation succeeds, which can be up to 2minutes. ServerA will assume a primary role, resulting in dual primary Servers. Once the IPsec negotiation succeeds the Servers will start communicating and Server B will step down to the backup role knowing that ServerA is the preferred primary.
Recovery: None needed if ServerA in primary role and ServerB in backup role is ok. If ServerB needs to be in the primary role, then command a Server swap.
Workaround: Take secured Experion Server pairs out of Secure
Communications before staring critical operations that will cause a reboot, such as an Experion migration or Windows patch update. After the operation is completed, the Experion Sever pair can then be re- secured. From the Secure Communications user interface, nodes are taken out of Secure Communications by Unassigning them from the Secured Nodes list, and nodes are added to Secure Communications by Securing them from the Unassigned Nodes list. Furthermore, when it is known in advance that the system is expecting to be running Server B as primary and Server A is likely to have a period where it may not be able to communicate with Server B, additional action is recommended to ensure that when communications are re-established, ServerA will not elevate to a primary role. Follow the instructions documented (associated with PAR 1-2TXBDD5) to stop and disable the Experion System service on Server A before doing the critical operation, and subsequent restart and enable of the service after the operation is completed.

29 www.honeywellprocess.com
Series A IO Modules
PAR Function Description
1-2IAI1H5
Series A IO Modules
Error Indication: PID connected to Series-A AI or AO sheds Mode on switchover.
Description: If the following actions occur while using the topology of a C300 controlling Series-A I/O through an FTE Bridge module in the I/O chassis and if a Serial Interface Module resides in the same chassis as other Series-A I/O Modules: 1) Multiple Serial Interface I/O module blocks are configured to map to the same physical Serial Interface Module in the I/O chassis by using the same FTE Bridge Name and IOM Slot Number. 2) Both Serial Interface I/O module blocks are loaded to the C300 3) A switchover is performed Then on switchover there may be a momentarily loss of communication between the C300 and other Series-A I/O modules which reside in the same chassis as the FTE Bridge and Serial Interface Module. If a PID block is providing a process value to the Series-A I/O channel this loss of communication may be observed by the Mode of the PID block shedding to Manual. No warning or error is raised during the configuration or load operation of the Serial Interface Module blocks.
Recovery: Perform all of the following steps:
1. Delete all Control Modules containing Serial Array Channels
assigned to both of the Serial Interface Module blocks.
2. Delete both the Serial Interface module blocks.
3. Note: Only one Series A IO Module block may be configured to
map to any one physical Series-A IO Modules.
a. Identify the correctly configured Serial Interface Module block.
b. Load the correctly configured Serial Interface Module block.
c. Load all Control Modules containing Serial Array Channels assigned to the correctly configured Serial Interface Module block.
4. Switch off power to the I/O chassis containing the FTE Bridge and Serial Interface Module5).
5. Perform a Checkpoint Restore to the C3006).
6. Switch on power to the I/O chassis containing the FTE Bridge and Serial Interface Module. For verification of the recovery perform a switchover of the C300 and verify the connection is not lost to the other Series-A IO modules in the chassis.
Workaround: To avoid a momentarily loss of connection to Series-A
Chassis I/O and possibility of a Mode shed while using the C300 to Series-A Serial Interface Module through FTE Bridge topology take the following precautions:
1. Before loading Serial Interface Module blocks to a C300 verify the
path configuration details are not identical to any currently loaded Serial Interface Module blocks.
2. If all the actions have occurred except a switchover has not yet been performed follow the steps identified in the Recovery.

www.honeywellprocess.com 30
2.4.2 Installation and Migration
Rockwell Network
PAR Function Description 1-11H1RD1
Rockwell Network
Error Indication: RsLinx does not show the Series A IO/SIM Card with Module Icon.
Description: RsLinx application does not show the Series A IO/SIM Card with Module Icon.
Recovery: None.
Workaround: None.
1-13QB7PX
Rockwell Network
Error Indication: RsLinx automation tool fails when executed. Description: RsLinx Automation doesn't stop the required services and throws error
Recovery: None.
Workaround: Manually stop the Experion Server logger service from Services.msc application and then re-run this tool. After stopping this service RsLinx Automation works fine.
Third Party Components
PAR Function Description
1-11KCT39
Third Party
Components
Error Indication: Profibus IO module appears RED on Monitoring with the PFB Communication Status shown as ""PfbOffline and DEVSTATUS parameter of these blocks shows 'PfbNotInRun'.
Description: PBI_DEVICE blocks go offline and appear in red in monitoring side after load of many remote-chassis I/O including SST block at the same time. This was also seen when chassis IO modules are loaded in a particular order like Pulse input module, then Analog Output Modules and then SST module along with its I/O modules.
Recovery: Delete all the modules and load the Profibus modules first
and then load the other chassis I/O modules. Workaround: None.
1-17FPCH
Third Party
Components
Error Indication: Internal error occurs when you try to open the documents related to SST_PFB_CLX in SST Profibus installation CD part nr.705-0004, Rev. 03-02.
Description: Internal error occurs when you try to open the documents
related to SST_PFB_CLX in SST Profibus installation CD part nr. 705-0004, Rev. 03-02. Because of this the user documentation cannot be used which will assist in installation or up-gradation of firmware.
Recovery: None.
Workaround: Use next version of SST_PFB_CLX in SST Profibus installation CD part nr.705-0004, Rev. 07.10.0.0 where issue is resolved.

31 www.honeywellprocess.com
PAR Function Description 1-2BPGTNP
Third Party
Components
Error Indication: E3 plus relay is in "Blocked Start" state. Description: E3 plus relay may trip with `Blocked Start indication
during operation even when the motor or starter is not connected to the relay.
Recovery: The trip condition can be recovered from the Control
Builder by giving the "E3[0]: Fault Reset" command through the E3 plus output channel.
Workaround: Configure the Starts/Hour parameter and the Starts Interval parameters as follows:-Configure the Starts/Hour to allow more starts per hour-Shorten the interval between the starts in the Starts Interval parameter. For more information about troubleshooting related to E3 plus relay trip with a Blocked Start indication, see the E3 & E3 Plus Solid-State Overload Relay User manual from the Rockwell Literature Library.
1-G04A9M
Third Party
Components
Error Indication: BADPV Alarms are reported against CM's using
Siemens ET200 IO Module (AI 331-1KF01-0AB0) after PGM Switchover.
Description: Intermittent BADPV Alarms are logged against Control
Modules using Siemens ET200 331-1KF01-0AB0 AI module after a PGM Switchover. No loss of Communication to the device itself occurs or no such event is logged. Problem recovers within a few seconds. However if Control is configured to Shed on a Single BADPV, it will shed.
Recovery: Recovers automatically within few seconds.
Workaround: The workaround is not to use module type AI 331-1KF01-0AB0 in redundant systems. According to Siemens data sheet the basic execution time of this module is 488 ms. In case of fail over this time is too long.
1-PPG7GR
Third Party
Components
Error Indication: C200 5ms controller is losing Connection with Server Intermittently resulting in loss of View at Control Builder (everything turns RED at Monitoring side) and Loss of View at Station for C200 Detail Display.
Description: Loss of View / Server Connection fail on Control Builder
& Station for C200 5ms (Non-Redundant), when there is Peer-to-peer (P2P) Connection between C200 5ms & ACE on CNET and cable is disconnected as per below: Remove Control Net Cable A of Non- Redundant C200 5ms & Remove Control Net Cable B of ACE. Remove Control Net Cable B of Non-Redundant C200 5ms & Remove Control Net Cable A of ACE. In the above two Scenarios, Loss of Peer-to-peer data communication between C200 & ACE is observed which is expected. But in this scenario, the C200 5ms is losing Connection with Server Intermittently (disconnects and connects back) and hence resulting in Loss of View at Control Builder (everything turns RED at Monitoring side) and Loss of View at Station for C200 Detail Display.
Recovery: Reconnect the cables back.
Workaround: None.

www.honeywellprocess.com 32
PAR Function Description
1-TVWXHJ
Third Party
Components
Error Indication: After checkpoint restore, output modules configured through SST module remain in red color in monitoring side with DEVSTATUS set to PfbNotInRun.
Description: It is observed that after checkpoint restore, analog and
digital output modules remain in red color in monitoring side with DEVSTATUS set to PfbNotInRun.
Recovery: Take the C200E to NODB, reload the Master SST Profibus
Interface and IO modules. Workaround: None.
1-WBOGBR
Third Party Components
Error Indication: SST-PFB-CLX module LCD becomes blank with no
indications. The OK LED is OFF and one or both of the COMM LED and SYS LED is ON (RED).
Description: After upgrading the SST-PFB-CLX module to firmware 6.07 and loading a big configuration (exceeding what is mentioned in SST specification of 246 words output data, 248 words input data and 250 words status), two modules get bricked. LCD on the module becomes blank with no indications. The OK LED becomes OFF and one or both of the COMM LED and SYS LED becomes ON (RED). Restarting the modules does not help to bring them back.
Recovery: None.
Workaround: None.
INS-Experion Installer
PAR Function Description 1-6P6TWS5
INS-Experion Installer
Description: During Experion installation, if user cancels the installation, user may notice that Status display results in application error.
Recovery: None.
Workaround: Click Cancel to exit from the application error message. Launch Setup.exe to resume the installation.
Network-FTE
PAR Function Description 1-86TJ2TD
Network-FTE
Description: Server migration stuck on R500.2 if Honeywell
FTE Adapter name showing in command prompt as "Ethernet". Recovery: None.
Workaround:
1. If server migration stuck on 'Preinstall OSMig Step due to error "NIC topology change detected" acknowledge the error.
2. Edit "number of Nics=2" in OSMig registry in EMSN. 3. Restart migration. Migration will start from last stuck step.
Precaution: Before starting migration to R500.2, ensure that FTE adapter name in network connections window and command prompt are same (as per Honeywell standard).
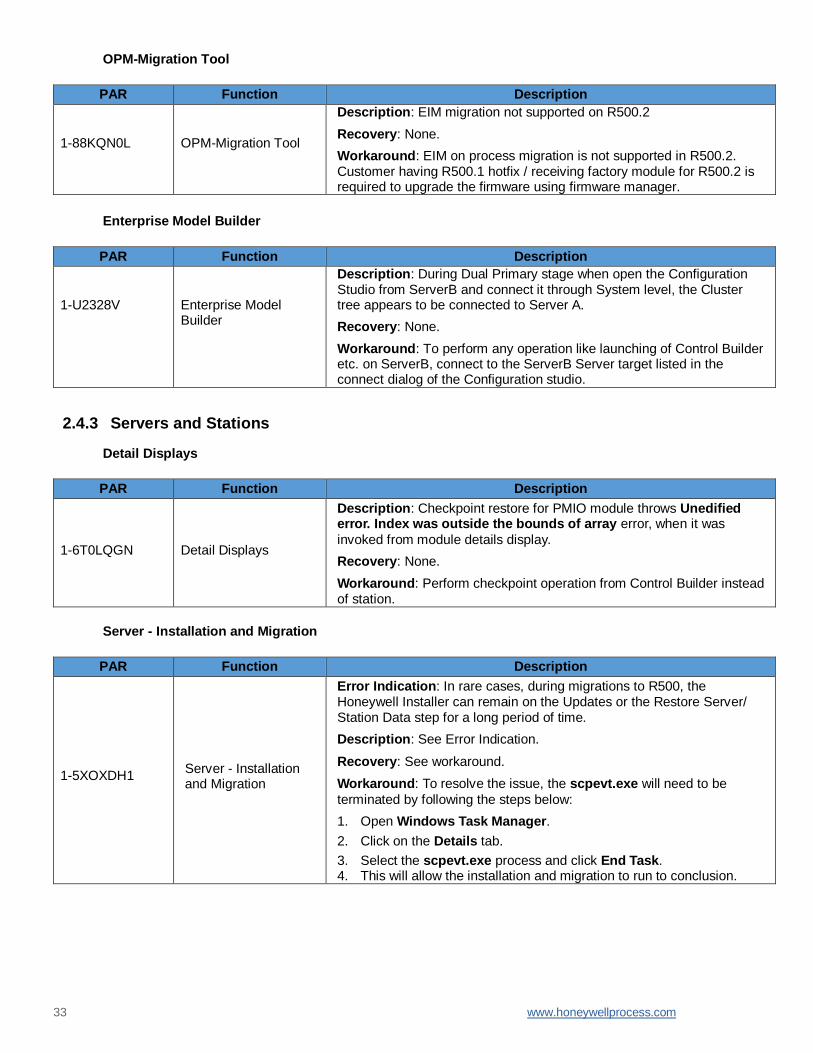
33 www.honeywellprocess.com
OPM-Migration Tool
PAR Function Description
1-88KQN0L
OPM-Migration Tool
Description: EIM migration not supported on R500.2 Recovery: None.
Workaround: EIM on process migration is not supported in R500.2. Customer having R500.1 hotfix / receiving factory module for R500.2 is required to upgrade the firmware using firmware manager.
Enterprise Model Builder
PAR Function Description
1-U2328V
Enterprise Model Builder
Description: During Dual Primary stage when open the Configuration Studio from ServerB and connect it through System level, the Cluster tree appears to be connected to Server A.
Recovery: None.
Workaround: To perform any operation like launching of Control Builder etc. on ServerB, connect to the ServerB Server target listed in the connect dialog of the Configuration studio.
2.4.3 Servers and Stations
Detail Displays
PAR Function Description
1-6T0LQGN
Detail Displays
Description: Checkpoint restore for PMIO module throws Unedified error. Index was outside the bounds of array error, when it was
invoked from module details display. Recovery: None.
Workaround: Perform checkpoint operation from Control Builder instead of station.
Server - Installation and Migration
PAR Function Description 1-5XOXDH1
Server - Installation and Migration
Error Indication: In rare cases, during migrations to R500, the Honeywell Installer can remain on the Updates or the Restore Server/ Station Data step for a long period of time.
Description: See Error Indication.
Recovery: See workaround.
Workaround: To resolve the issue, the scpevt.exe will need to be
terminated by following the steps below: 1. Open Windows Task Manager.
2. Click on the Details tab.
3. Select the scpevt.exe process and click End Task. 4. This will allow the installation and migration to run to conclusion.

www.honeywellprocess.com 34
Server – Redundancy
PAR Function Description
1-6RXJDL7
Server - Redundancy
Description: System Alarm Priority overrides are not being migrated correctly for the following Server Redundancy alarms:
Condition Description
COMMS Automatic failover requested
COMMS Backup Becoming Primary
COMMS Backup server
COMMS Backup: Not Synchronized
COMMS Backup: Unknown Status
COMMS Dual queue overflow
COMMS No links available
COMMS Peer version match
COMMS Synchronization
CHANGE Scheduled Replication Time Changed
FAILED Events database replication
OOS Forced OOS - run dual_bckup
QUEUE Nearly full
SYNCH Backup inconsistency detected
SYNCH Backup point database larger
SYNCH Backup server error starting
SYNCH Synchronization error occurred
SYNCH Synchronization finished
SYNCH Synchronization started
Recovery: None. Workaround: Manually note the existing overrides prior to migration and add them after migration has completed.
HMIWeb Display Builder
PAR Function Description
1-3HDCDNZ
HMIWeb Display
Builder
Description: Use of Convert scripts for Message zone prompts into Callouts option in Bulk Display Migrator may result in incorrect script on
the migrated Displays. This option has been disabled in R430.3. Recovery: Refer to the Priority Notification 2014-31, “https:// www.honeywellprocess.com/library/support/notifications/Customer/ pn2014-31_bulk_display_migrator_issue_callout_script.pdf ” for further details.
Workaround: None.
HMIWeb Station – General
PAR Function Description
1-3R1FRO9
HMIWeb Station - General
Description: Premium Access client will not work on ignoring IE
prompt to enable/disable HendrixBHO add-on Recovery: None
Workaround: None
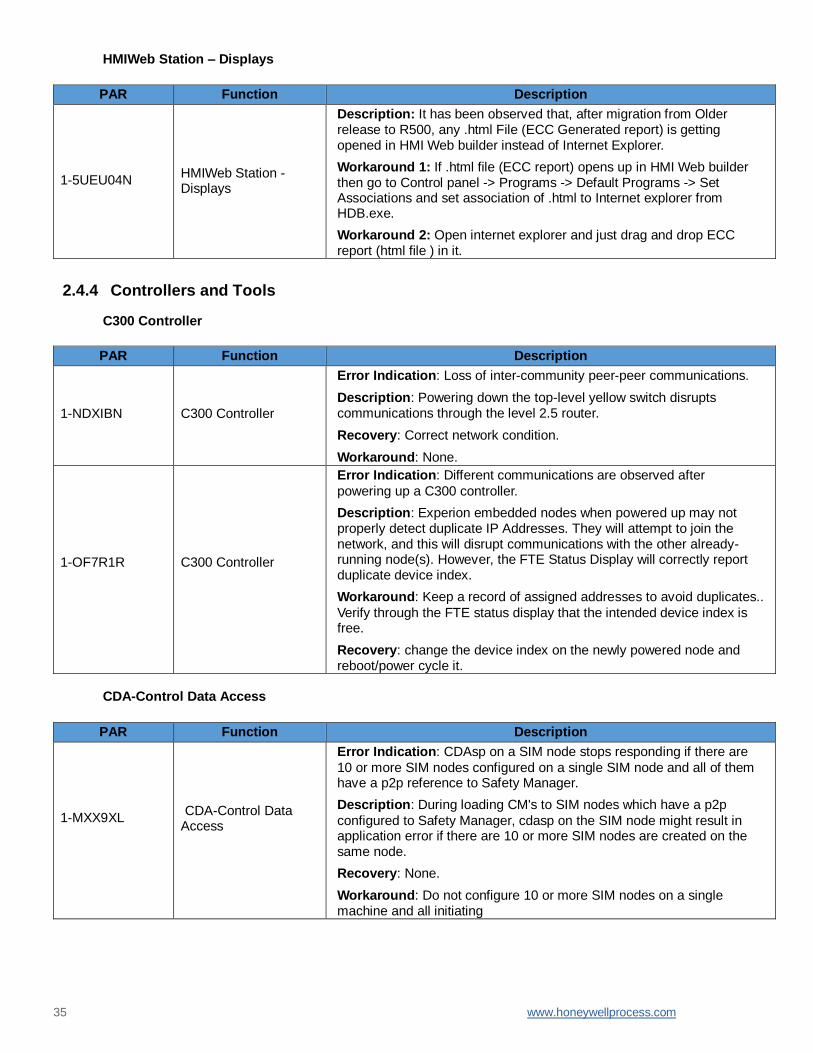
35 www.honeywellprocess.com
HMIWeb Station – Displays
PAR Function Description
1-5UEU04N
HMIWeb Station - Displays
Description: It has been observed that, after migration from Older release to R500, any .html File (ECC Generated report) is getting opened in HMI Web builder instead of Internet Explorer.
Workaround 1: If .html file (ECC report) opens up in HMI Web builder then go to Control panel -> Programs -> Default Programs -> Set Associations and set association of .html to Internet explorer from HDB.exe.
Workaround 2: Open internet explorer and just drag and drop ECC report (html file ) in it.
2.4.4 Controllers and Tools
C300 Controller
PAR Function Description
1-NDXIBN
C300 Controller
Error Indication: Loss of inter-community peer-peer communications. Description: Powering down the top-level yellow switch disrupts communications through the level 2.5 router.
Recovery: Correct network condition.
Workaround: None.
1-OF7R1R
C300 Controller
Error Indication: Different communications are observed after
powering up a C300 controller. Description: Experion embedded nodes when powered up may not properly detect duplicate IP Addresses. They will attempt to join the network, and this will disrupt communications with the other already- running node(s). However, the FTE Status Display will correctly report duplicate device index.
Workaround: Keep a record of assigned addresses to avoid duplicates..
Verify through the FTE status display that the intended device index is free.
Recovery: change the device index on the newly powered node and reboot/power cycle it.
CDA-Control Data Access
PAR Function Description
1-MXX9XL
CDA-Control Data
Access
Error Indication: CDAsp on a SIM node stops responding if there are
10 or more SIM nodes configured on a single SIM node and all of them have a p2p reference to Safety Manager.
Description: During loading CM's to SIM nodes which have a p2p
configured to Safety Manager, cdasp on the SIM node might result in application error if there are 10 or more SIM nodes are created on the same node.
Recovery: None.
Workaround: Do not configure 10 or more SIM nodes on a single machine and all initiating

www.honeywellprocess.com 36
PAR Function Description 1-N2IKQ7
CDA-Control Data
Access
Error Indication: You may see reverse videos on display and may observe loss of trend values.
Description: During normal operation, the servers may lose view from the controllers under very high communication load situation. This may result in a loss of view condition.
Recovery: Manual. Stop/Restart of EPKS Control Data Access service. Workaround: None.
1-NE4TG3
CDA-Control Data
Access
Error Indication: Loss of View observed or Server failover is observed.
Description: If for any reason, the primary CF9 loses power and
switches over to the partner CF9, you may notice Loss of View to the controllers in the cluster. In case of redundant Servers, you may notice that Server has failed over.
Recovery: For non-Redundant Servers, restart the Control Data Access
Server service manually if not already running. For Redundant Server setup, if Server has failed over, go over to the old Primary and restart the Control Data Access Server service manually if not already running.
Workaround: None.
1-P9OBD9
CDA-Control Data
Access
Error Indication: The Server may lose data connection to the
Controller and result in LOV. Description: If there are multiple controllers switching over
simultaneously, this will cause a burst of alarms to be regenerated which may affect the data connection to the controllers that are not switching over.
Recovery: Automatically recovers after few seconds
Workaround: None.
1-UNZ125
CDA-Control Data
Access
Error Indication: None. Description: Removal of cable from QCS node will not be detected in
Experion station. Recovery: Since this feature is not supported there is no specific
recovery mechanism. When you detect that the values do not get updated in QCS, one way to recover is manual verification of the cables, ensure that the cables are connected and working.
Workaround: None.
1-VK9U47
CDA-Control Data
Access
Error Indication: LOV observed and controller status shows red in
control builder. Description: You may see reverse video for display data access, and controller status shows red in Control Builder.
Recovery: Switchover the Server A where this issue is observed or you must start the CDA server manually in case of permanent LOV observed.
Workaround: None.

37 www.honeywellprocess.com
CDA-Embedded
PAR Function Description 1-15CPF6R
CDA-Embedded
Error Indication: You notice that connection to C200E is in RED state and all the IOs in the C200e do not give any value and display data access of these IOs shows reverse video.
Description: On removal of Enet module the C200e connection is lost.
Recovery: There is no specific recovery mechanism for this scenario, one way to ensure any connection loss for C200e, Enet module must be verified if it is connected properly or not.
Workaround: None.
1-1NJX441
CDA-Embedded
Error Indication: Noticed un-command shutdown ACE nodes during stable run.
Description: This error is observed on stable system run, when ace.exe process shuts down you try to restore the checkpoint and activate them to make them work properly.
Recovery: Restore checkpoint of ACE nodes and make the controller active.
Workaround: None.
1-3OO0E8N
CDA-Embedded
Error Indication: LOV and LOC observed on C300 while doing continuous switch over (Power switchover).
Description: C300 switchover by cutting down the primary controller
power, there was a LOV and LOC observed after it has switched over about 200 times (Primary restarted 200 and Secondary restarted 200 times). The C300 is configured with the max load as specified in the PCT spec.
Recovery: Stop the switchover and restart the Controllers.
Workaround: None.
1-NI0RKX
CDA-Embedded
Error Indication: Momentary failure in exchange block
communication with C300/C200E & PLC 5/PLC5550. Description: Momentary failure in exchange blocks communication with C300/C200E & PLC 5/PLC5550 observed while C300 connected through ENET, C200E to PLC5 while connected through Control net, C200E connected to PLC5550 through remote chassis.
Recovery: This error is a temporary condition and recovery happens automatically. This error does not have any major impact on the execution.
Workaround: None.
1-QL372H
CDA-Embedded
Error Indication: Parent phase block displays that child activity
already exists. Description: The phase block is out of sync with the child activity
Recovery: The child RCM will need to be executed then aborted and
reset. After this the parent Activity will take control of the child RCM. This has a greater chance of happening on an inter cluster peer to peer configuration.
Workaround: None.
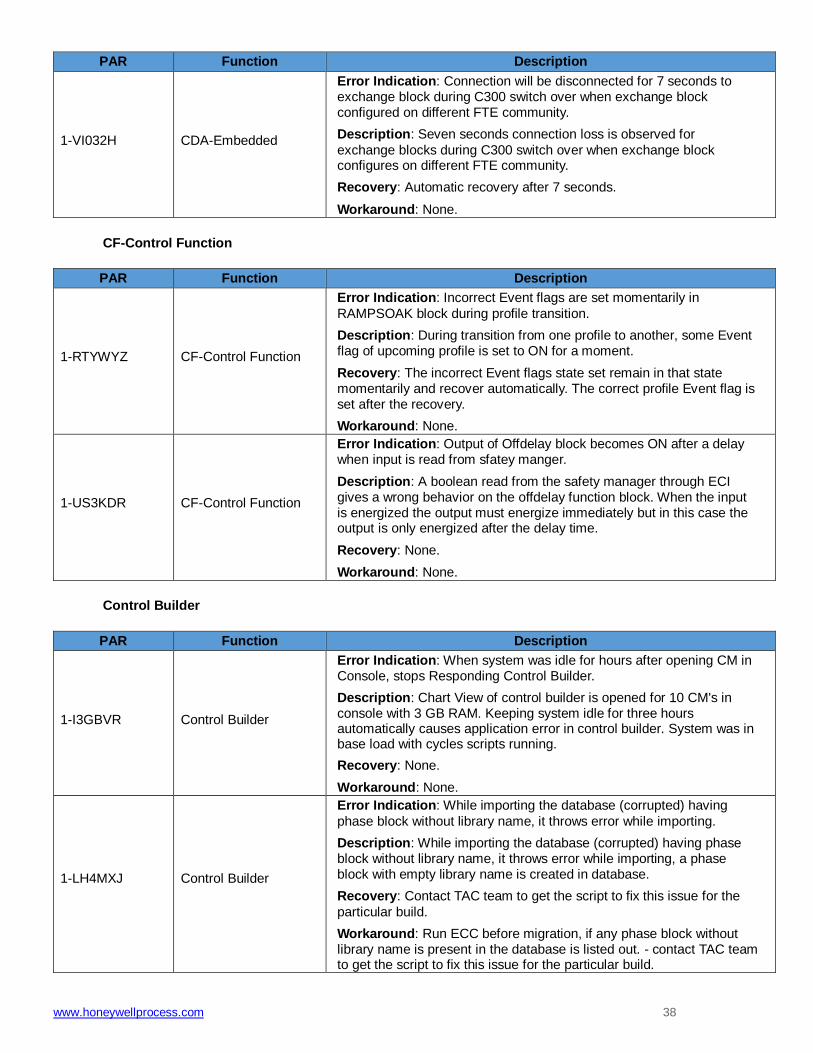
www.honeywellprocess.com 38
PAR Function Description
1-VI032H
CDA-Embedded
Error Indication: Connection will be disconnected for 7 seconds to exchange block during C300 switch over when exchange block configured on different FTE community.
Description: Seven seconds connection loss is observed for
exchange blocks during C300 switch over when exchange block configures on different FTE community.
Recovery: Automatic recovery after 7 seconds.
Workaround: None.
CF-Control Function
PAR Function Description 1-RTYWYZ
CF-Control Function
Error Indication: Incorrect Event flags are set momentarily in
RAMPSOAK block during profile transition. Description: During transition from one profile to another, some Event flag of upcoming profile is set to ON for a moment.
Recovery: The incorrect Event flags state set remain in that state momentarily and recover automatically. The correct profile Event flag is set after the recovery.
Workaround: None.
1-US3KDR
CF-Control Function
Error Indication: Output of Offdelay block becomes ON after a delay when input is read from sfatey manger.
Description: A boolean read from the safety manager through ECI gives a wrong behavior on the offdelay function block. When the input is energized the output must energize immediately but in this case the output is only energized after the delay time.
Recovery: None.
Workaround: None.
Control Builder
PAR Function Description 1-I3GBVR
Control Builder
Error Indication: When system was idle for hours after opening CM in Console, stops Responding Control Builder.
Description: Chart View of control builder is opened for 10 CM's in console with 3 GB RAM. Keeping system idle for three hours automatically causes application error in control builder. System was in base load with cycles scripts running.
Recovery: None.
Workaround: None.
1-LH4MXJ
Control Builder
Error Indication: While importing the database (corrupted) having
phase block without library name, it throws error while importing. Description: While importing the database (corrupted) having phase block without library name, it throws error while importing, a phase block with empty library name is created in database.
Recovery: Contact TAC team to get the script to fix this issue for the
particular build. Workaround: Run ECC before migration, if any phase block without library name is present in the database is listed out. - contact TAC team to get the script to fix this issue for the particular build.
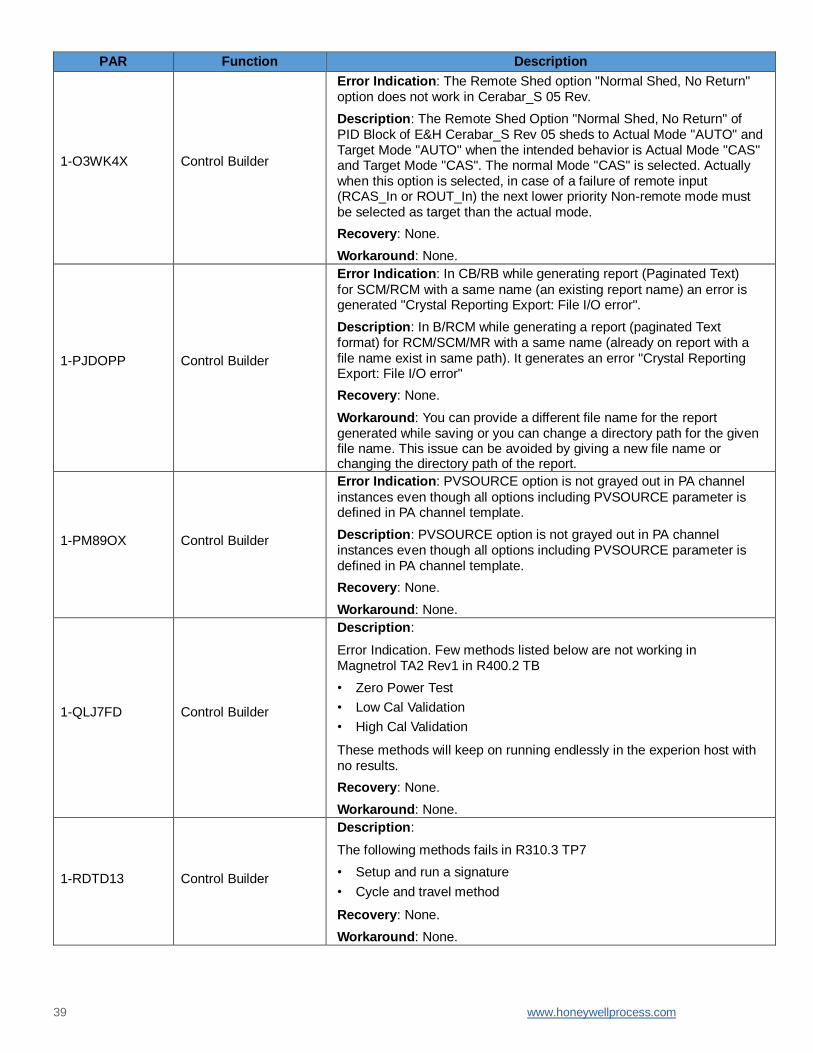
39 www.honeywellprocess.com
PAR Function Description
1-O3WK4X
Control Builder
Error Indication: The Remote Shed option "Normal Shed, No Return" option does not work in Cerabar_S 05 Rev.
Description: The Remote Shed Option "Normal Shed, No Return" of PID Block of E&H Cerabar_S Rev 05 sheds to Actual Mode "AUTO" and Target Mode "AUTO" when the intended behavior is Actual Mode "CAS" and Target Mode "CAS". The normal Mode "CAS" is selected. Actually when this option is selected, in case of a failure of remote input (RCAS_In or ROUT_In) the next lower priority Non-remote mode must be selected as target than the actual mode.
Recovery: None.
Workaround: None.
1-PJDOPP
Control Builder
Error Indication: In CB/RB while generating report (Paginated Text)
for SCM/RCM with a same name (an existing report name) an error is generated "Crystal Reporting Export: File I/O error".
Description: In B/RCM while generating a report (paginated Text format) for RCM/SCM/MR with a same name (already on report with a file name exist in same path). It generates an error "Crystal Reporting Export: File I/O error"
Recovery: None.
Workaround: You can provide a different file name for the report generated while saving or you can change a directory path for the given file name. This issue can be avoided by giving a new file name or changing the directory path of the report.
1-PM89OX
Control Builder
Error Indication: PVSOURCE option is not grayed out in PA channel
instances even though all options including PVSOURCE parameter is defined in PA channel template.
Description: PVSOURCE option is not grayed out in PA channel instances even though all options including PVSOURCE parameter is defined in PA channel template.
Recovery: None.
Workaround: None.
1-QLJ7FD
Control Builder
Description: Error Indication. Few methods listed below are not working in Magnetrol TA2 Rev1 in R400.2 TB
• Zero Power Test
• Low Cal Validation
• High Cal Validation These methods will keep on running endlessly in the experion host with no results.
Recovery: None.
Workaround: None.
1-RDTD13
Control Builder
Description: The following methods fails in R310.3 TP7
• Setup and run a signature
• Cycle and travel method Recovery: None.
Workaround: None.

www.honeywellprocess.com 40
PAR Function Description 1-1A58B5B
Control Builder
Error Indication: IOP details are missing for PMIO channels. Description: After assigning unassigned channels multiple times in CM
Loaded C200 with IOLIM and PMIO shows IOP details are missing on the assigned channels.
Recovery: None.
Workaround: None.
1-G3WCZ1
Control Builder
Description: FF FB block alarm enable/disable under station CM chart causes random bits to enable/disable.
Recovery: None.
Workaround: None.
Control Builder – Fieldbus
PAR Function Description 1-PAAF0B
Control Builder - Fieldbus
Error Indication: Trying to simultaneously load the same FIM from
different Control Builders may result in Load Failures. Description: Multiple, simultaneous loads to the same FIM from
different Control Builders impacts the devices on the FIM Links when you attempt to load.
Recovery: Multiple, simultaneous loads to the same FIM from different Control Builders can have several unexpected side effects, including inability to load, "device does not exist" error, "parameter not found in database error", and device not seen in Control Builder.
Workaround: The best course of action is to attempt an immediate reload of the failed block from a single Control Builder. There are several warnings in both the Experion Standard Operating Procedures Guide which states, "Maximum number of clients that can perform controller-related database operations on the same controller at the same time: 1". Multiple, simultaneous you must avoid loading to the same FIM at the same time.
Control Builder Help
PAR Function Description 1-288O73J
Control Builder Help
Error Indication: C300 remain "updating" in Secure Communications
UI; policies are not applied Description: After un-assigning a Security Manager proxy from the
Secure Communications UI, any nodes communicating with the Security Manager through that proxy will no longer receive policy updates.
Recovery: Secure the removed proxy node
Workaround: To prevent this situation do not un-assign proxy nodes or ensure all BOOTP servers point to one proxy node. See the Secure Communications User Guide for further information.

41 www.honeywellprocess.com
Control Builder-Batch
PAR Function Description
1-13BFFO7
Control Builder-Batch
Error Indication: Proxy CBR is not listed after the validation of Proxy CBR. You cannot configure it manually.
Description: If you create and validate new Proxy CBR in local cluster
(for Newly created CBR in remote cluster), the Proxy CBR does not list in Unit function reference point picker and it is not validated manually as well.
Recovery: Delete the proxy CBR from Control Builder and re-create the
proxy CBR. Workaround: Same as recovery.
1-XFDMT9
Control Builder-Batch
Error Indication: No error displayed, the default value of new
parameter added in the phase block is not displayed in datablock. Description: In Datablock default value is not populated for the newly added parameter for a phase block.
Recovery: Open the PDE of phase block and deselect the Use Value reference option and save the Phase block. Then open the Datablock of receipt. Observe that default value is displayed for newly added parameter. then open the phase block in PDE and select the "Use value reference" option and save the PDE
Workaround: None.
Control Builder-Bulk Build/Edit
PAR Function Description
1-11SICGP
Control Builder-Bulk
Build/Edit
Error Indication: Control Builder stops responding. Description: While performing bulk edit operation, Control Builder stops responding with Run time error.
Recovery: Close and re-open the Control Builder.
Workaround: None.
1-12Y56T9
Control Builder-Bulk
Build/Edit
Error Indication: Improper warning or failed error messages are observed during save to ERDB operation of various workflow of Bulk Configuration Tools.
Description: The error messages like Entry does not Exist,
configuration related errors are displayed with Failed status even though the save to ERDB is successful.
Recovery: Ignore the improper errors with status as failed.
Workaround: Same as recovery.
1-3ILPKOZ
Control Builder-Bulk
Build/Edit
Error Indication: HART channels are not displayed in the Bulk Edit list.
Description: Hart channels are not displayed in the bulk edit list. You cannot edit the HART channel parameters.
Recovery: None.
Workaround: Use Bulk Configuration Tools->Bulk Edit work flow.

www.honeywellprocess.com 42
PAR Function Description
1-3JZ83JT
Control Builder-Bulk
Build/Edit
Error Indication: Display of error message "Runtime Error R6025 - Pure Virtual Function Call" during Bulk Edit on update Monitor of CHANNUM.
Description: The error is displayed due to an internal error that is
causing the issue. This issue is not reproducible on demand. Recovery: Retry Bulk Edit.
Workaround: None.
1-3NHR0K1
Control Builder-Bulk
Build/Edit
Error Indication: "Save to ERDB failed error is displayed. Description: If you do not specify the new channel names for the
Replica IOM in the configuration sheet, the existing channels in Typical IOM is moved to the replica IOM.
Recovery: Reassign the channels to Typical IOM using Bulk Edit.
Workaround: Provide new channel names in the configuration sheet so that the new channels are created and assigned to new IOM.
1-3Q0K7WY
Control Builder-Change Parent/User Defined Template
Error Indication: On performing Change Parent(CP) of UDTCM1 to be the child of UDTCM2 both configured with old style channels AIChannel->PID->AOchannel blocks, CP fails with unexpected error in case there is an instance for the UDTCM1 and if there is no instance, then shows error "Existing background connection exists...".
Description: Doing a change parent operation between two UDTs
containing Channel blocks throws an error. Recovery: None.
Workaround: None.
Control Builder-Chart
PAR Function Description 1-Q2XSJX
Control Builder-Chart
Error Indication: Detail Displays (Charts) take 10 to 20 seconds to invoke from station during normal run.
Description: Chart Visualization Displays in Point Detail Displays sometime takes 10-20 seconds to come up. It is more often with charts containing large number of UDTs.
Recovery: None.
Workaround: Open the monitoring side charts from Control Builder for the same point to view the details.
1-ZA0E2F
Control Builder-Chart
Error Indication: HMIWeb Display Builder Crashes when ActiveX
Control-Textbox is placed on Display Recovery: None.
Workaround: None.
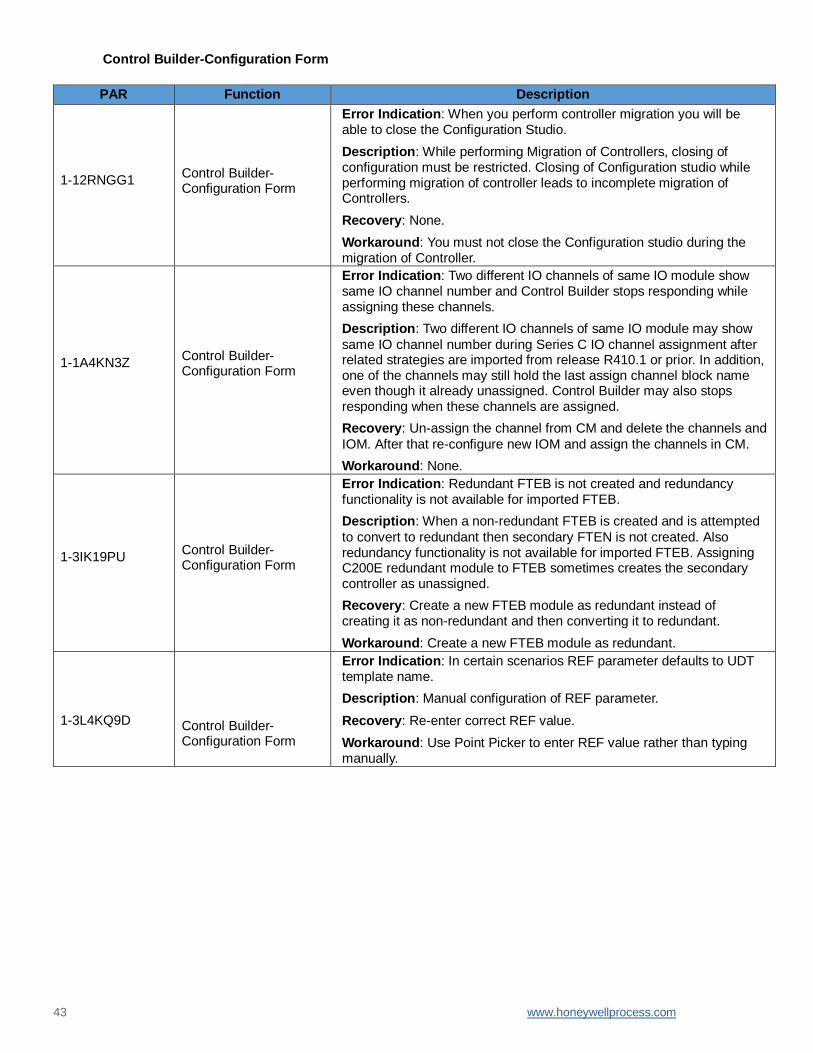
43 www.honeywellprocess.com
Control Builder-Configuration Form
PAR Function Description
1-12RNGG1
Control Builder- Configuration Form
Error Indication: When you perform controller migration you will be able to close the Configuration Studio.
Description: While performing Migration of Controllers, closing of configuration must be restricted. Closing of Configuration studio while performing migration of controller leads to incomplete migration of Controllers.
Recovery: None.
Workaround: You must not close the Configuration studio during the migration of Controller.
1-1A4KN3Z
Control Builder- Configuration Form
Error Indication: Two different IO channels of same IO module show same IO channel number and Control Builder stops responding while assigning these channels.
Description: Two different IO channels of same IO module may show
same IO channel number during Series C IO channel assignment after related strategies are imported from release R410.1 or prior. In addition, one of the channels may still hold the last assign channel block name even though it already unassigned. Control Builder may also stops responding when these channels are assigned.
Recovery: Un-assign the channel from CM and delete the channels and
IOM. After that re-configure new IOM and assign the channels in CM. Workaround: None.
1-3IK19PU
Control Builder- Configuration Form
Error Indication: Redundant FTEB is not created and redundancy functionality is not available for imported FTEB.
Description: When a non-redundant FTEB is created and is attempted
to convert to redundant then secondary FTEN is not created. Also redundancy functionality is not available for imported FTEB. Assigning C200E redundant module to FTEB sometimes creates the secondary controller as unassigned.
Recovery: Create a new FTEB module as redundant instead of creating it as non-redundant and then converting it to redundant.
Workaround: Create a new FTEB module as redundant.
1-3L4KQ9D
Control Builder- Configuration Form
Error Indication: In certain scenarios REF parameter defaults to UDT template name.
Description: Manual configuration of REF parameter.
Recovery: Re-enter correct REF value.
Workaround: Use Point Picker to enter REF value rather than typing manually.

www.honeywellprocess.com 44
PAR Function Description
1-RZZXUB
Control Builder- Configuration Form
Error Indication: Maintenance Mode change is not reflected back in ST800 DTM in FDM, when the change is done while the DTM configuration is open.
Description: From Control builder for ST800 device, if the channel's
parameter 'PVSOURCE' is changed from AUTO to MAN, the display shows 'Available for Maintenance'. Again change from MAN to AUTO, the display removes the 'Available for Maintenance'. This is not updated in DTM configuration form when you do the operation while DTM screen is in open state in FDM.
Recovery: None.
Workaround: Before performing the required PVSOURCE change in
Control Builder, close the corresponding ST800 DTM in FDM. Once the desired change is done, then re-launch the DTM in FDM to view the change in Maintenance Mode.
1-UPBZT1
Control Builder- Configuration Form
Error Indication: When entering base IP address with lowest octet other than multiple of 10, then the address is replaced with lowest octet as multiple of 10 and throws error message 12613.
Description: While entering the base IP address 10.66.51.128, CB is throwing error message 12613. and the address is directly replaced by 10.66.51.130.
Recovery: Change the base IP address with lowest octect of multiple of
10. Workaround: Configure the base IP address with lowest octect as multiple of 10.
1-W92HO6
Control Builder- Configuration Form
Error Indication: Local UDP Listeners have only 4 entries for C300 and other FTE nodes.
Description: For C300 and other FTE node types, on its form, navigate
to "UDP/TCP" tab. You will see that for "Local UDP Listeners", there are ONLY 4 entries. In C300, there are more than 4 that may be used. It is not possible to see all of them in Configuration form.
Recovery: None.
Workaround: None.

45 www.honeywellprocess.com
PAR Function Description
1-Z3FUD5
Control Builder- Configuration Form
Error Indication: Assigning control modules with particular CDB
blocks to ACE/C300 failing. Description: After importing specific CDB blocks and trying to assign the control module to C300/ACE it fails to assign and shows CDB not compatible with execution environment.
Recovery: Since this happens only for particular CDB blocks, the below compatible platforms must be added in CDB def xml file and then it can be imported.
<CompatiblePlatform>C200</
CompatiblePlatform><CompatiblePlatform>C300</
CompatiblePlatform><CompatiblePlatform>SCE</
CompatiblePlatform><CompatiblePlatform>C200E</
CompatiblePlatform>
Workaround: Add the below lines in exported CDB Block's def xml file
and then import it. It will then allow control module to be assigned to C300.
<CompatiblePlatform>C200</ CompatiblePlatform><CompatiblePlatform>C300</ CompatiblePlatform><CompatiblePlatform>SCE</ CompatiblePlatform><CompatiblePlatform>C200E</ CompatiblePlatform>
1-4V5Q9HJ
Control Builder- Configuration Form
Description: Control Builder crashes when CEERESTART is set in the
CMs. Recovery: Close CB and reopen again.
Workaround: None.
Control Builder-Delete
PAR Function Description
1-1A27Z5V
Control Builder-Delete
Error Indication: Cannot force delete the offline device from
monitoring tree Description: Unable to delete OW Adapter device from CB tree
monitoring when the device is in offline state. 'Force Delete' option does not appear for OW Adapter device which is in offline state.
Recovery: Check if device is powered off or run out of battery.
Workaround: None.
Control Builder-Fieldbus
PAR Function Description 1-1ZQHZDT
Control Builder- Fieldbus
Error Indication: "Unspecified FMS Initiate" error message is displayed while loading CM.
Description: When you try to make Azbil FF device as the Link
Master the error is displayed. Recovery: Acknowledge the message and try the workaround.
Workaround: Try keeping the FIM or other devices as Link Master.
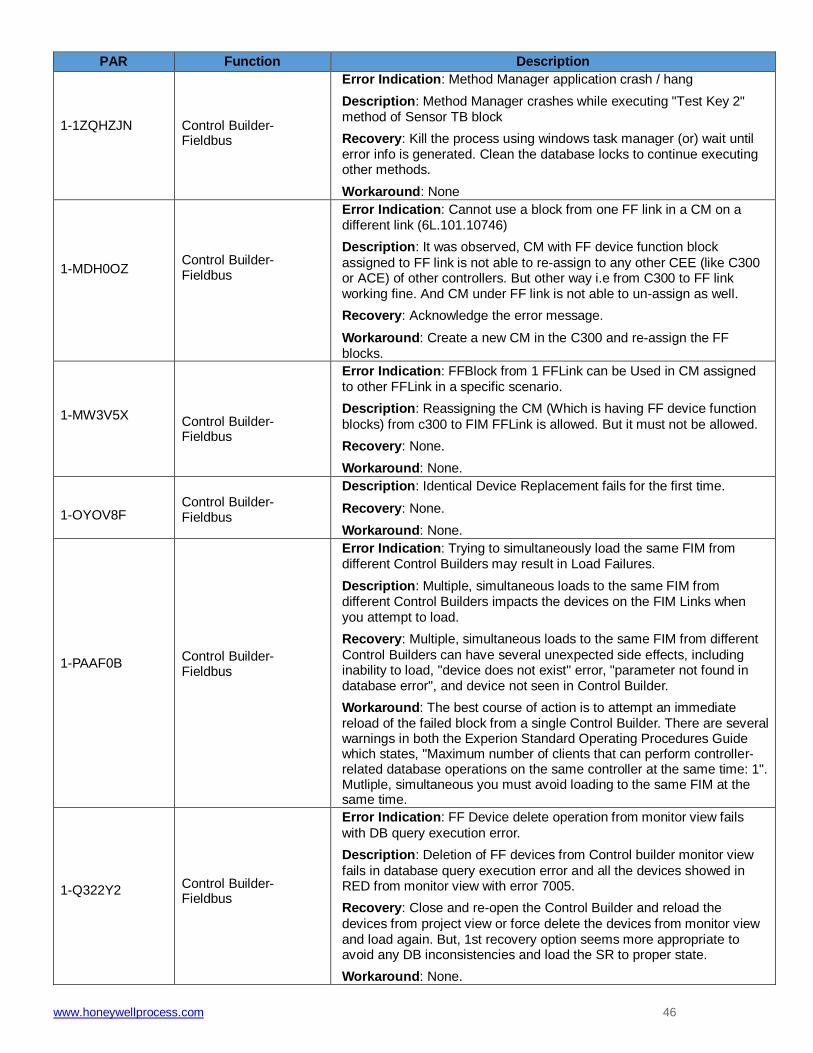
www.honeywellprocess.com 46
PAR Function Description
1-1ZQHZJN
Control Builder- Fieldbus
Error Indication: Method Manager application crash / hang Description: Method Manager crashes while executing "Test Key 2" method of Sensor TB block
Recovery: Kill the process using windows task manager (or) wait until error info is generated. Clean the database locks to continue executing other methods.
Workaround: None
1-MDH0OZ
Control Builder- Fieldbus
Error Indication: Cannot use a block from one FF link in a CM on a different link (6L.101.10746)
Description: It was observed, CM with FF device function block
assigned to FF link is not able to re-assign to any other CEE (like C300 or ACE) of other controllers. But other way i.e from C300 to FF link working fine. And CM under FF link is not able to un-assign as well.
Recovery: Acknowledge the error message.
Workaround: Create a new CM in the C300 and re-assign the FF blocks.
1-MW3V5X
Control Builder- Fieldbus
Error Indication: FFBlock from 1 FFLink can be Used in CM assigned to other FFLink in a specific scenario.
Description: Reassigning the CM (Which is having FF device function
blocks) from c300 to FIM FFLink is allowed. But it must not be allowed. Recovery: None.
Workaround: None.
1-OYOV8F
Control Builder- Fieldbus
Description: Identical Device Replacement fails for the first time. Recovery: None.
Workaround: None.
1-PAAF0B
Control Builder- Fieldbus
Error Indication: Trying to simultaneously load the same FIM from different Control Builders may result in Load Failures.
Description: Multiple, simultaneous loads to the same FIM from different Control Builders impacts the devices on the FIM Links when you attempt to load.
Recovery: Multiple, simultaneous loads to the same FIM from different
Control Builders can have several unexpected side effects, including inability to load, "device does not exist" error, "parameter not found in database error", and device not seen in Control Builder.
Workaround: The best course of action is to attempt an immediate reload of the failed block from a single Control Builder. There are several warnings in both the Experion Standard Operating Procedures Guide which states, "Maximum number of clients that can perform controller-related database operations on the same controller at the same time: 1". Mutliple, simultaneous you must avoid loading to the same FIM at the same time.
1-Q322Y2
Control Builder- Fieldbus
Error Indication: FF Device delete operation from monitor view fails
with DB query execution error. Description: Deletion of FF devices from Control builder monitor view
fails in database query execution error and all the devices showed in RED from monitor view with error 7005.
Recovery: Close and re-open the Control Builder and reload the
devices from project view or force delete the devices from monitor view and load again. But, 1st recovery option seems more appropriate to avoid any DB inconsistencies and load the SR to proper state.
Workaround: None.
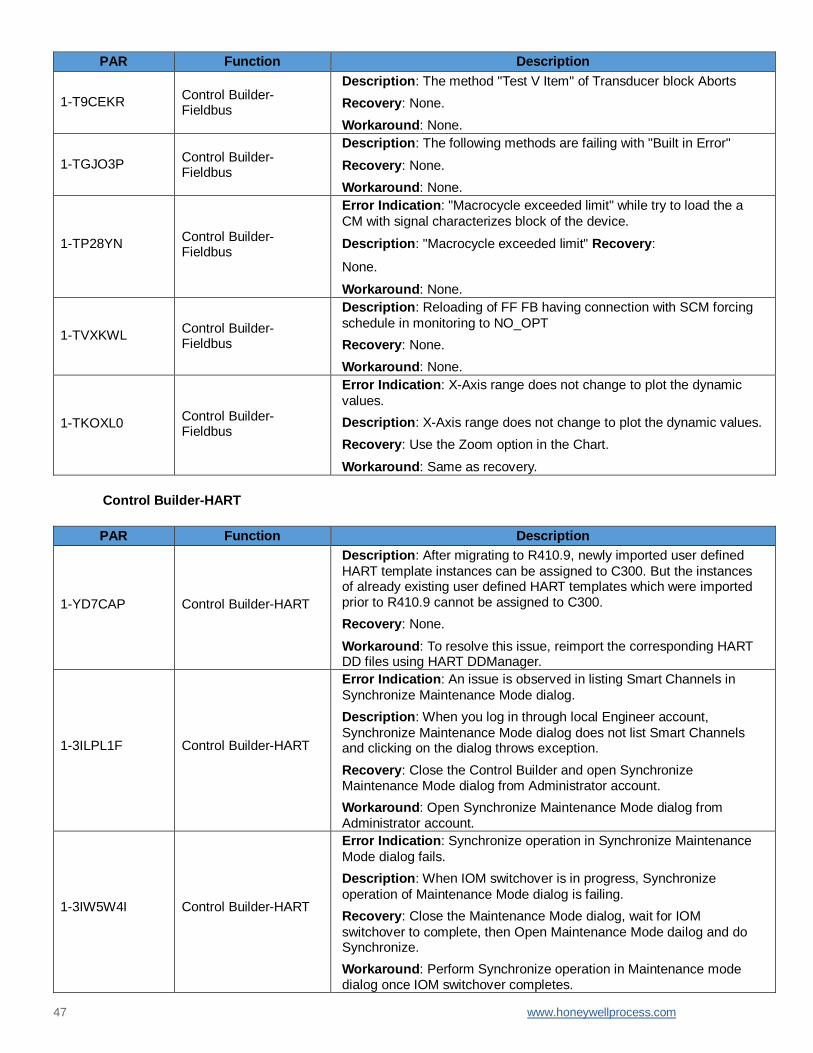
47 www.honeywellprocess.com
PAR Function Description 1-T9CEKR
Control Builder- Fieldbus
Description: The method "Test V Item" of Transducer block Aborts Recovery: None.
Workaround: None.
1-TGJO3P
Control Builder- Fieldbus
Description: The following methods are failing with "Built in Error" Recovery: None.
Workaround: None.
1-TP28YN
Control Builder- Fieldbus
Error Indication: "Macrocycle exceeded limit" while try to load the a
CM with signal characterizes block of the device.
Description: "Macrocycle exceeded limit" Recovery:
None.
Workaround: None. 1-TVXKWL
Control Builder- Fieldbus
Description: Reloading of FF FB having connection with SCM forcing
schedule in monitoring to NO_OPT Recovery: None.
Workaround: None.
1-TKOXL0
Control Builder- Fieldbus
Error Indication: X-Axis range does not change to plot the dynamic
values. Description: X-Axis range does not change to plot the dynamic values.
Recovery: Use the Zoom option in the Chart.
Workaround: Same as recovery.
Control Builder-HART
PAR Function Description 1-YD7CAP
Control Builder-HART
Description: After migrating to R410.9, newly imported user defined
HART template instances can be assigned to C300. But the instances of already existing user defined HART templates which were imported prior to R410.9 cannot be assigned to C300.
Recovery: None.
Workaround: To resolve this issue, reimport the corresponding HART DD files using HART DDManager.
1-3ILPL1F
Control Builder-HART
Error Indication: An issue is observed in listing Smart Channels in
Synchronize Maintenance Mode dialog. Description: When you log in through local Engineer account,
Synchronize Maintenance Mode dialog does not list Smart Channels and clicking on the dialog throws exception.
Recovery: Close the Control Builder and open Synchronize Maintenance Mode dialog from Administrator account.
Workaround: Open Synchronize Maintenance Mode dialog from Administrator account.
1-3IW5W4I
Control Builder-HART
Error Indication: Synchronize operation in Synchronize Maintenance
Mode dialog fails. Description: When IOM switchover is in progress, Synchronize
operation of Maintenance Mode dialog is failing. Recovery: Close the Maintenance Mode dialog, wait for IOM
switchover to complete, then Open Maintenance Mode dailog and do Synchronize.
Workaround: Perform Synchronize operation in Maintenance mode dialog once IOM switchover completes.
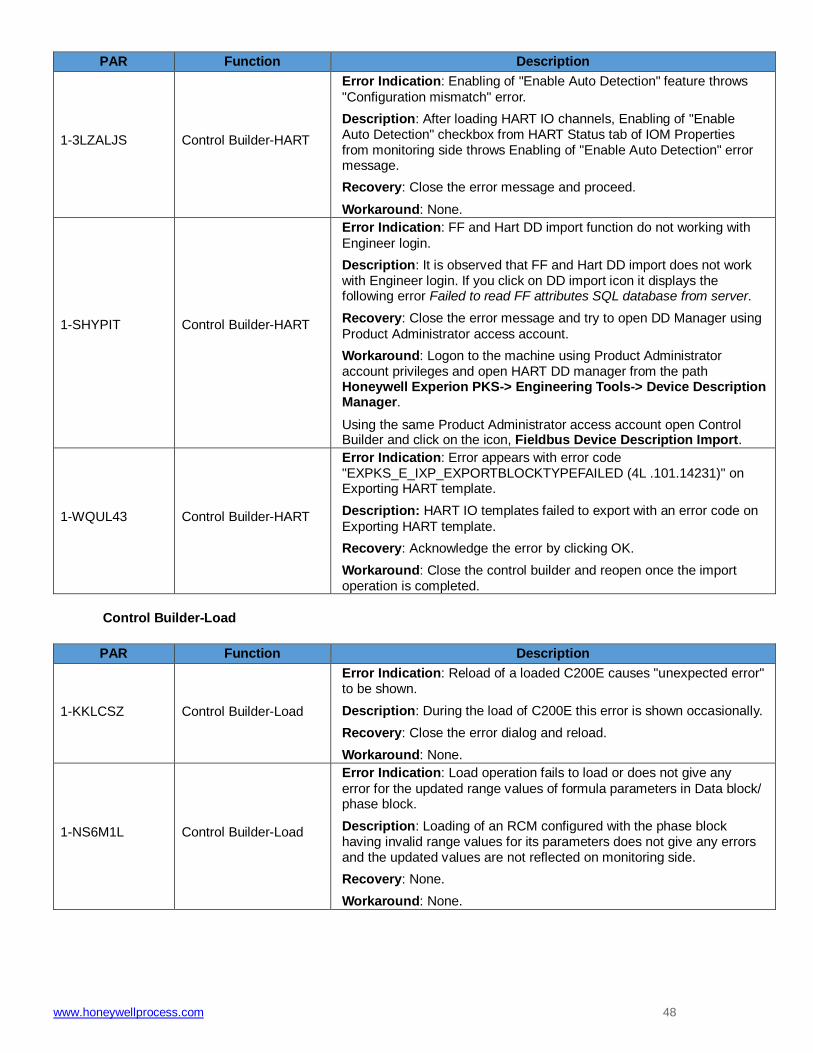
www.honeywellprocess.com 48
PAR Function Description 1-3LZALJS
Control Builder-HART
Error Indication: Enabling of "Enable Auto Detection" feature throws
"Configuration mismatch" error. Description: After loading HART IO channels, Enabling of "Enable Auto Detection" checkbox from HART Status tab of IOM Properties from monitoring side throws Enabling of "Enable Auto Detection" error message.
Recovery: Close the error message and proceed.
Workaround: None.
1-SHYPIT
Control Builder-HART
Error Indication: FF and Hart DD import function do not working with
Engineer login. Description: It is observed that FF and Hart DD import does not work with Engineer login. If you click on DD import icon it displays the following error Failed to read FF attributes SQL database from server.
Recovery: Close the error message and try to open DD Manager using
Product Administrator access account. Workaround: Logon to the machine using Product Administrator account privileges and open HART DD manager from the path Honeywell Experion PKS-> Engineering Tools-> Device Description Manager.
Using the same Product Administrator access account open Control Builder and click on the icon, Fieldbus Device Description Import.
1-WQUL43
Control Builder-HART
Error Indication: Error appears with error code "EXPKS_E_IXP_EXPORTBLOCKTYPEFAILED (4L .101.14231)" on Exporting HART template.
Description: HART IO templates failed to export with an error code on
Exporting HART template. Recovery: Acknowledge the error by clicking OK.
Workaround: Close the control builder and reopen once the import operation is completed.
Control Builder-Load
PAR Function Description
1-KKLCSZ
Control Builder-Load
Error Indication: Reload of a loaded C200E causes "unexpected error" to be shown.
Description: During the load of C200E this error is shown occasionally.
Recovery: Close the error dialog and reload.
Workaround: None.
1-NS6M1L
Control Builder-Load
Error Indication: Load operation fails to load or does not give any
error for the updated range values of formula parameters in Data block/ phase block.
Description: Loading of an RCM configured with the phase block having invalid range values for its parameters does not give any errors and the updated values are not reflected on monitoring side.
Recovery: None.
Workaround: None.

49 www.honeywellprocess.com
PAR Function Description 1-PADH2J
Control Builder-Load
Error Indication: Running SCM after CP Save/ Restore after LWA of
Alias may result in harmful effect. Description: When LWA is performed for SCM/RCM in active state and it has changes to selected instances in alias table, then selected instances are not loaded but the values in checkpoint are updated. CP save and restore after that may point to the new values.
Recovery: For such scenario, when LWA is performed for SCM/RCM
in active state and it has changes to selected instances in alias table, perform Checkpoint Rebuild after LWA.
Workaround: After CP rebuild, CP save and restore works properly.
Control Builder-Load/Upload/Update
PAR Function Description 1-13TQQLP
Control Builder-Load/ Upload/Update
Error Indication: "Out Of memory” pop up or “Last minute catch of
unexpected exception” in error logs is generated. Description: “Last minute catch of unexpected exception” is
displayed due to excessive memory usage when lot of bulk database operations have been done without closing Control Builder.
Recovery: Manually close Control Builder.exe via the Task Manager.
Workaround: Close and open Control Builder, then try to load the strategies.
1-1RT7EKD
Control Builder-Load/ Upload/Update
Error Indication: SQLServer.exe consumes lot of CPU time on
performing Load With contents. Description: If the number of strategies loaded exceeds the DFS
spec, the load dialog could become unresponsive for a prolonged time.
Recovery: Cancel the load and perform the load operation by
selecting the strategies in small numbers. Workaround: Perform the load operation by selecting the strategies in small numbers.
1-3E4HHLP
Control Builder-Load/ Upload/Update
Error Indication: Controller will inactivate and re-activate CMs. Description: During load of controllers having same device index
across clusters are loaded, it leads to the loaded controller inactivating and reactivating the CMs in the other cluster.
Recovery: The Controller recovers automatically.
Workaround: Ensure same device index is not used across clusters for the controllers.
1-3EG37WV
Control Builder-Load/ Upload/Update
Error Indication: Error "Comm Path is not set up for secondary C300
Controller " displayed during load. Description: This error occurs during the load of redundant C300 controller, but occurs occasionally.
Recovery: None.
Workaround: Uncheck and check the "Module is redundant" option in C300 main configuration form and try reloading.

www.honeywellprocess.com 50
PAR Function Description 1-3J99M63
Control Builder-Load/ Upload/Update
Error Indication: Mismatch between QVCS version number and mismatch in configurations on the IOModule between the project and monitoring side.
Description: Revert to version & load of IOM is updating the version
only. But content remains same on monitoring. Recovery: This can be recovered either by making the configuration changes of the IOM in project side to match with monitoring side and then reload the IOM. Or Delete the configuration changes which are different from project side IOM i.e. (by deleting the channel blocks from monitoring side) and then reload the IOM.
Workaround: Do Not revert QVCS version of IOM when there is configuration mismatch between project and monitoring .
1-SJ4W66
Control Builder-Load/ Upload/Update
Error Indication: C300 synchronization fails. Description: After loading a CM containing DO channels connected to
DEVCTL blocks, synchronization breaks between C300s when the IOM containing the loaded DO channels does not exist.
Recovery: The C300 Synchronization will restart automatically and complete successfully.
Workaround: To prevent this situation, do not load a CM containing DO channels connected to DEVCTL blocks unless the IOM is present.
1-TNX8CL
Control Builder-Load/ Upload/Update
Error Indication: Control Builder stops responding on trying to re-load a strategy with dangling connection.
Description: Control Builder stops responding if a Control Module with
dangling connection is loaded. Recovery: None.
Workaround: Open the Control Module containing dangling connection (indicated as '????') and delete the dangling connection in Control Module. Reload the Control Module.
1-3E4HHLP
Control Builder-Load/ Upload/Update
Error Indication: Controller will inactivate and re-activate CMs. Description: During load of controllers having same device index
across clusters are loaded, it leads to the loaded controller inactivating and reactivating the CMs in the other cluster.
Recovery: The Controller recovers automatically.
Workaround: Ensure same device index is not used across clusters for the controllers.
1-6L3M1PS
Control Builder-Load/ Upload/Update
Error Indication: When Upload Update operation is performed on SCM's which has JUMPZone Configured then error is thrown to user saying "Illegal Parameter Index JumpZOne (1, 11) and upload and update operation fails for that SCM.
Description: Upload and Update operations fails for SCM configured with JumpZOne when done in Interoperable scenarios i.e. When Server is in R500 and Controller is in Previous releases.
Recovery: None.
Workaround: Avoid doing Upload Update for such SCM's which has JumpZone configured.
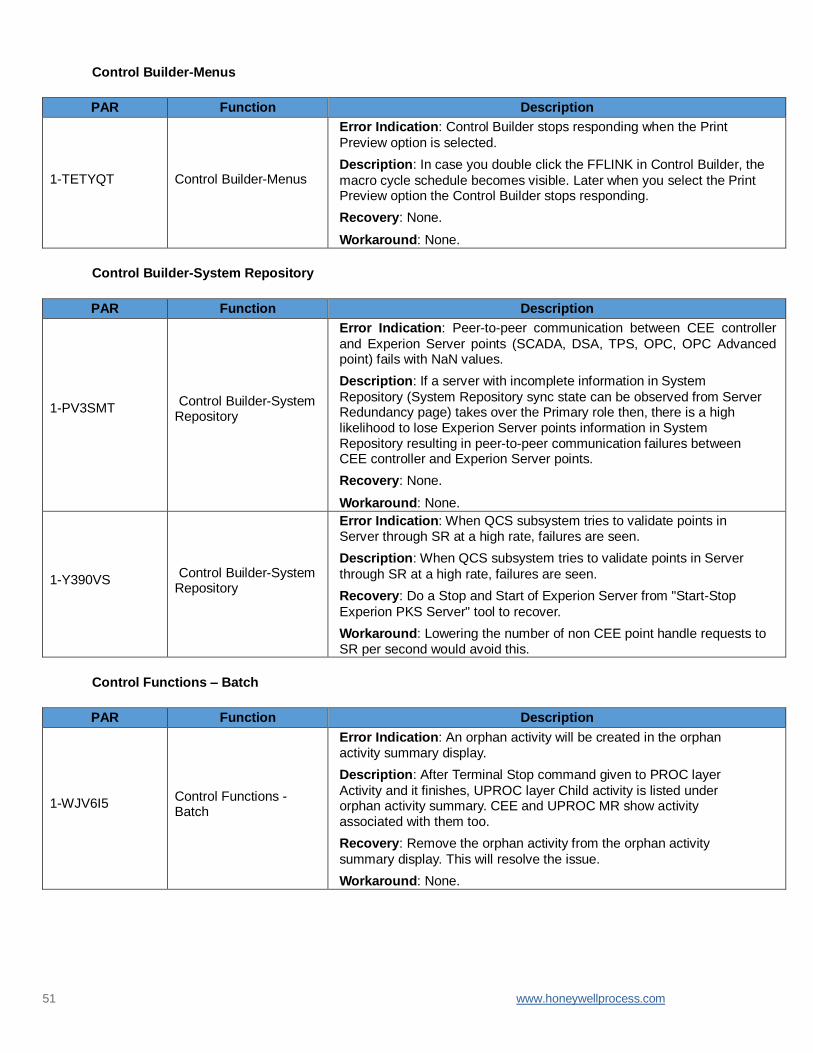
51 www.honeywellprocess.com
Control Builder-Menus
PAR Function Description
1-TETYQT
Control Builder-Menus
Error Indication: Control Builder stops responding when the Print
Preview option is selected. Description: In case you double click the FFLINK in Control Builder, the
macro cycle schedule becomes visible. Later when you select the Print Preview option the Control Builder stops responding.
Recovery: None.
Workaround: None.
Control Builder-System Repository
PAR Function Description
1-PV3SMT
Control Builder-System
Repository
Error Indication: Peer-to-peer communication between CEE controller
and Experion Server points (SCADA, DSA, TPS, OPC, OPC Advanced point) fails with NaN values.
Description: If a server with incomplete information in System
Repository (System Repository sync state can be observed from Server Redundancy page) takes over the Primary role then, there is a high likelihood to lose Experion Server points information in System Repository resulting in peer-to-peer communication failures between CEE controller and Experion Server points.
Recovery: None.
Workaround: None.
1-Y390VS
Control Builder-System
Repository
Error Indication: When QCS subsystem tries to validate points in Server through SR at a high rate, failures are seen.
Description: When QCS subsystem tries to validate points in Server
through SR at a high rate, failures are seen. Recovery: Do a Stop and Start of Experion Server from "Start-Stop
Experion PKS Server" tool to recover. Workaround: Lowering the number of non CEE point handle requests to SR per second would avoid this.
Control Functions – Batch
PAR Function Description
1-WJV6I5
Control Functions - Batch
Error Indication: An orphan activity will be created in the orphan activity summary display.
Description: After Terminal Stop command given to PROC layer
Activity and it finishes, UPROC layer Child activity is listed under orphan activity summary. CEE and UPROC MR show activity associated with them too.
Recovery: Remove the orphan activity from the orphan activity
summary display. This will resolve the issue. Workaround: None.
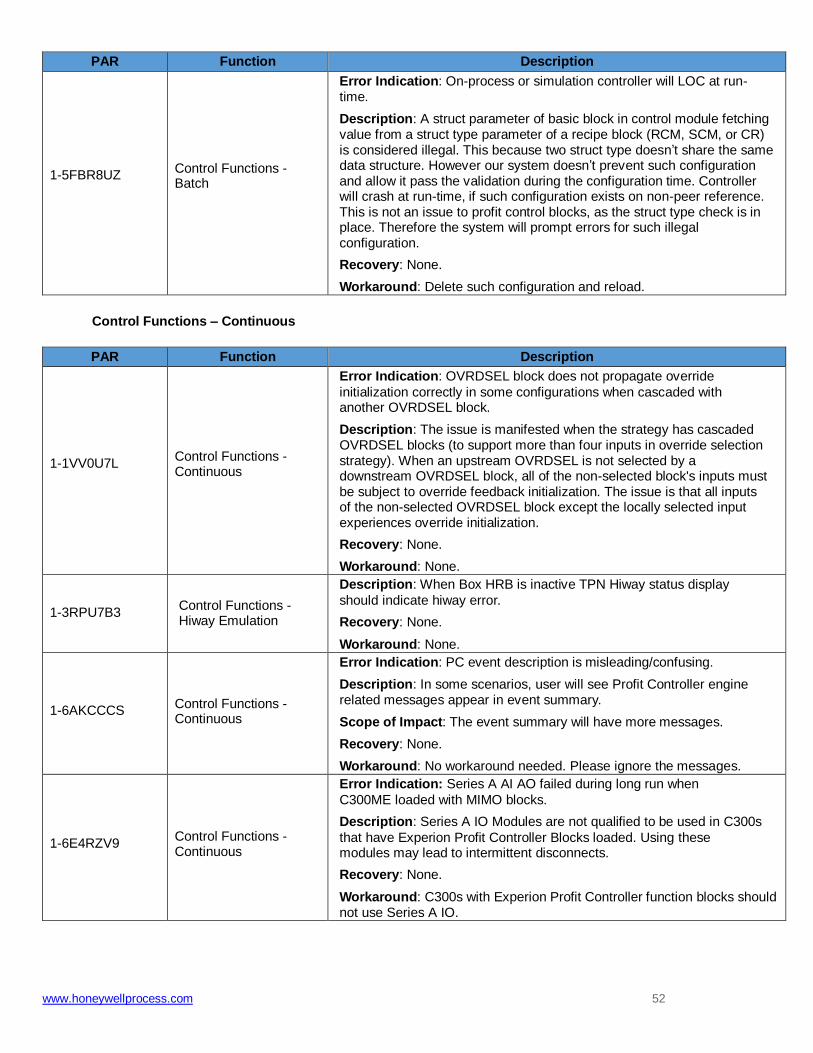
www.honeywellprocess.com 52
PAR Function Description
1-5FBR8UZ
Control Functions - Batch
Error Indication: On-process or simulation controller will LOC at run- time.
Description: A struct parameter of basic block in control module fetching value from a struct type parameter of a recipe block (RCM, SCM, or CR) is considered illegal. This because two struct type doesn’t share the same data structure. However our system doesn’t prevent such configuration and allow it pass the validation during the configuration time. Controller will crash at run-time, if such configuration exists on non-peer reference. This is not an issue to profit control blocks, as the struct type check is in place. Therefore the system will prompt errors for such illegal configuration.
Recovery: None.
Workaround: Delete such configuration and reload.
Control Functions – Continuous
PAR Function Description 1-1VV0U7L
Control Functions - Continuous
Error Indication: OVRDSEL block does not propagate override
initialization correctly in some configurations when cascaded with another OVRDSEL block.
Description: The issue is manifested when the strategy has cascaded OVRDSEL blocks (to support more than four inputs in override selection strategy). When an upstream OVRDSEL is not selected by a downstream OVRDSEL block, all of the non-selected block's inputs must be subject to override feedback initialization. The issue is that all inputs of the non-selected OVRDSEL block except the locally selected input experiences override initialization.
Recovery: None.
Workaround: None.
1-3RPU7B3
Control Functions - Hiway Emulation
Description: When Box HRB is inactive TPN Hiway status display
should indicate hiway error. Recovery: None.
Workaround: None.
1-6AKCCCS
Control Functions - Continuous
Error Indication: PC event description is misleading/confusing. Description: In some scenarios, user will see Profit Controller engine related messages appear in event summary.
Scope of Impact: The event summary will have more messages.
Recovery: None.
Workaround: No workaround needed. Please ignore the messages.
1-6E4RZV9
Control Functions - Continuous
Error Indication: Series A AI AO failed during long run when
C300ME loaded with MIMO blocks. Description: Series A IO Modules are not qualified to be used in C300s
that have Experion Profit Controller Blocks loaded. Using these modules may lead to intermittent disconnects.
Recovery: None.
Workaround: C300s with Experion Profit Controller function blocks should not use Series A IO.

53 www.honeywellprocess.com
Control Kernel
PAR Function Description
1-XGHDCZ
Control Kernel
Error Indication: An alarm generated from CAB function block may appear active in Station, though it is in normal condition. This can be cross verified by monitoring faceplate of the CAB function block.
Description: If an active alarm generated by CAB function block is
returned to normal condition while C300 switchover is in progress; there is possibility that this particular alarm still appears as active in station.
Recovery: Toggle ALMENBSTATE parameter of CM containing CAB
function block. This will trigger a re-notification of alarm state to station. Workaround: None.
Control Library
PAR Function Description 1-1PQWSTZ
Control Library
Error Indication: Duplicate Phase/Map block created due to change
parent operation when validate operation is used again. Description: Change Parent operation for phase block creates duplicate copy in the chart.
Recovery: Delete the duplicate phase block.
Workaround: If you want to use the validate operation again, close the existing change parent dialog and invoke again, validate and perform operation.
EBM-Controller
PAR Function Description
1-3QM82LT
EBM-Controller
Error Indication: A step block displays an error of 2447 when trying to
set a unit. Description: You are unable to select a unit.
Recovery: Abort the strategy.
Workaround: None.
1-NW1WPL
EBM-Controller
Error Indication: No error is displayed to the user. An RCM starts running like it has acquired equipment properly when in fact it hasn't.
Description: An RCM is configured to acquire a UCM. The RCM is started and acquires the UCM. The UCM is inactivated and deleted. The RCM is aborted, inactivated, activated, and started. The RCM does not try to acquire the UCM again before it starts. In this case it cannot acquire it because the UCM was deleted.
Recovery: None.
Workaround: Once the RCM is inactivated, reload it before you activate it again.

www.honeywellprocess.com 54
PAR Function Description 1-PK1QJ5
EBM-Controller
Error Indication: After performing freeze and switchover, when a new activity is created and started, it is struck in Acquiring Resource in Pre- Exec State.
Description: When an OPM is performed on a controller having an MR
with multiple CR's running, the old CR's get removed as expected but after OPM newly created Activities are not executing, they are struck in Pre-Exec state with Acquiring Resource as Info.
Recovery: None.
Workaround: Remove the CR. Inactivate and Activate the MR then Create a new CR.
EBM-Tools
PAR Function Description
1-1P915L9
EBM-Tools
Error Indication: After adding a phase block with function reference into a Master Recipe chart, saving the Master Recipe, closing and opening the Master Recipe again sometimes crashes Control Builder.
Description: After adding a phase block with function reference into a Master Recipe chart, saving the Master Recipe, closing and opening the Master Recipe again sometimes crashes Control Builder. Opening Control Builder again and opening the same Master Recipe chart will work.
Recovery: Open Control Builder again and open the Master Recipe
chart again. Workaround: None.
1-O0GF6A
EBM-Tools
Error Indication: Key parameters in Table view display. Description: When batch is executing across clusters such as parent
and child are in different clusters, the key parameter in table view of the parent recipe that display child recipe key information could display.
Recovery: None.
Workaround: You must click the blank area which is right above key parameters. This allows you to navigate to the child recipe detail Display which displays all the information of the child recipe including the key information.
1-VIAD8V
EBM-Tools
Error Indication: The number of activities shown in CEE statics Tab is different from the number of activities shown in Batch tab of CEE.
Description: The NUMACT value as seen in the Batch Tab of the CEE
shows a mismatch with the CEE-Activity Statistics -TOTALACTCAP. Recovery: Reload the ACE node in server.
Workaround: Same as Recovery.
1-ZX2IMV
EBM-Tools
Description: C300 controller and FTEB CPUFREE goes down by 7%-8% when UT is running.
Recovery: None.
Workaround: None.
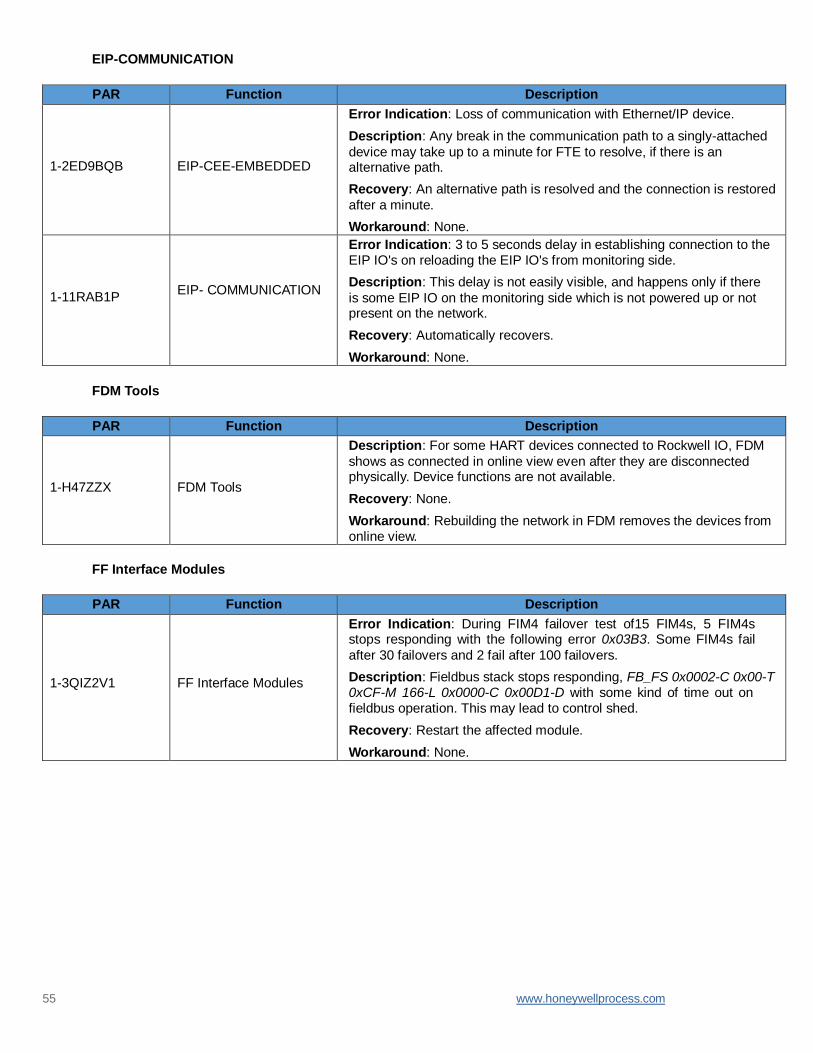
55 www.honeywellprocess.com
EIP-COMMUNICATION
PAR Function Description
1-2ED9BQB
EIP-CEE-EMBEDDED
Error Indication: Loss of communication with Ethernet/IP device. Description: Any break in the communication path to a singly-attached
device may take up to a minute for FTE to resolve, if there is an alternative path.
Recovery: An alternative path is resolved and the connection is restored
after a minute. Workaround: None.
1-11RAB1P
EIP- COMMUNICATION
Error Indication: 3 to 5 seconds delay in establishing connection to the EIP IO's on reloading the EIP IO's from monitoring side.
Description: This delay is not easily visible, and happens only if there
is some EIP IO on the monitoring side which is not powered up or not present on the network.
Recovery: Automatically recovers.
Workaround: None.
FDM Tools
PAR Function Description
1-H47ZZX
FDM Tools
Description: For some HART devices connected to Rockwell IO, FDM
shows as connected in online view even after they are disconnected physically. Device functions are not available.
Recovery: None.
Workaround: Rebuilding the network in FDM removes the devices from online view.
FF Interface Modules
PAR Function Description 1-3QIZ2V1
FF Interface Modules
Error Indication: During FIM4 failover test of15 FIM4s, 5 FIM4s stops responding with the following error 0x03B3. Some FIM4s fail
after 30 failovers and 2 fail after 100 failovers. Description: Fieldbus stack stops responding, FB_FS 0x0002-C 0x00-T 0xCF-M 166-L 0x0000-C 0x00D1-D with some kind of time out on fieldbus operation. This may lead to control shed.
Recovery: Restart the affected module.
Workaround: None.

www.honeywellprocess.com 56
FF-Configuration
PAR Function Description
1-123KRXP
FF-Configuration
Error Indication: "VCR Limit exceed" error is displayed while loading
Fieldbus device Description: VCR limit exceed error while loading.
Recovery: Acknowledge the error.
Workaround: Cross check if the connections are done within the limitation. If not, try to delete the block and recreate the required connections.
1-14E2RC8
FF-Configuration
Error Indication: None. Description: Control Builder allows to un-assign even if the device is
loaded. Recovery: None.
Workaround: Ensure the device is not loaded before making any changes in the Project side.
1-3PF1Q5L
FF-Configuration
Error Indication: When user executes Read Echo Curve method for Honeywell GWR level transmitter SLG700, graph does not get plotted.
Description: The data is not fetched from the Axillary transducer
block for this device while executing the method in Experion. Recovery: None.
Workaround: None.
Fieldbus Interface Module
PAR Function Description
1-PAPV2D
Fieldbus Interface
Module
Error Indication: Changing the address or TAG for Un commissioned device is resulting in inconsistent behavior.
Description: Changing the TAG name and address for two uncommissioned devices with same TAG name and temp address is showing inconsistent behavior as devices end up with same TAG name and address.
Recovery: Following steps were followed to recover the state:
1. Remove one of the problematic device.
2. Configure and reload the other device.
3. Then connect the first device and reload it. Workaround: This issue is observed following issues with other operation. After following steps to recovery, it is not observed.

57 www.honeywellprocess.com
PAR Function Description 1-Y3T5WR
Fieldbus Interface
Module-Series C
Error Indication: Some ST800 Resource block parameters not updating in FDM.
Description: Some Resource block parameters on the ST800, including Simulation Active and Write Lock, will not reflect updates in FDM if the value changes on the device. If the DTM on FDM is connected to the Device then these parameters will also not appear to update in the Control Builder block configuration pages.
Recovery: Values update correctly in Control Builder if the DTM is not connected to the Fieldbus device. Close the DTM on the FDM and monitor static parameters through Control Builder configuration forms only.
Workaround: When enabling Simulation or changing Write Lock of the ST800, close the DTM on the FDM and verify the changes to these parameters through the Control Builder block properties page.
Fieldbus Library Manager
PAR Function Description
1-OMCM9H
Fieldbus Library
Manager
Description: Methods Manager fails to launch after one of the method fails.
Recovery: None.
Workaround: None.
I/O-Hart Series A
PAR Function Description 1-3SHQL9H
I/O-Hart Series A
Description: HART devices stop getting detected on reloading of Rockwell IOs several times in Control Builder. The I/O modules continue to show status as green but the HART devices show the status as yellow.
Recovery: Delete and reload of Rockwell IOs brings the devices back.
Workaround: Controller switch over brings the AI devices back but not the AO devices.
I/O-Series C
PAR Function Description 1-3GAHYYS
I/O-Series C
Error Indication: Outputs that were POWERED when field power was
lost will return POWERED momentarily before initializing when power is again restored.
Description: Unexpected output behavior upon return of lost field power. For more details of anomaly see PN2014-30.
Recovery: None.
Workaround: For any output that was POWERED when field power was lost ensure that the output cannot return immediately to the POWERED state when the field power is restored. For more detail on how this can be accomplished see PN2014-30.

www.honeywellprocess.com 58
PAR Function Description 1-3I90BL7
I/O-Series C
Error Indication: HART communication errors continuously accumulate.
Description: AI-HART Analog Input module cannot communicate properly with a WIKA T32 transmitter.
Recovery: None.
Workaround: None.
1-RM2T8X
I/O-Series C
Description: Observed OPfail and Initreq ON for UIO AO channels after the (Power Cycle) switchover of UIO.
Recovery: None.
Workaround: None.
Controller Design
PAR Function Description 1-6L4TG91
Controller Design
(Non-linear)
Error Indication: Unable to run stepper from some of our console/flex and it is flooding EPKS OPC server
Description: In some systems Profit Stepper is not able to communicate properly because of DCOM issues. Stepper may be able to read data, but does not have the permission to write via OPC. At every interval, the stepper tried to re-connect to Experion OPC server and will try to subscribe to MIMO OPC data items and this will flood the EPKS OPC server.
Consequences: The EPKS OPC Server will get overloaded.
Scope of Impact: PSOS and EPKS OPC SERVER.
Recovery: Fix DCOM issues so that Stepper / PSOS can connect to EPKS OPC Server.
Workaround: Terminate Stepper URT platform.
1-6KQ2ECV
Controller Design
(Non-linear)
Error Indication: PC is showing status as SEE EVENT LOG & SS values of CV and MVs are showing as 0.
Description: In some rare cases, after exporting and importing tuning from PSES simulation to an EPKS PC CM, PC CM cannot be turned ON. The controller status in PSOS shows as SEE EVENT LOG.
Consequences: Profit Controller cannot be turned ON.
Scope of Impact: Profit Controller.
Recovery: None. Workaround: Export the controller model from PSES to the PC CM again and reload the CM or Set the READSPECFLAG parameter on ProfitCTL block to READ from project side and reload the PC block.

59 www.honeywellprocess.com
PAR Function Description 1-6P7GATX
Controller Design
(Non-linear)
Error Indication: Blockinitcounter parameter is not displayed in PSOS for EPKS PC.
Description: Load single PC and its associated strategies and invoke PSOS in EPKS station and observed that PSOS display is not showing BLOCKINITCOUNTER.
Consequences: Display only issue. Controller will still behave
normally. Scope of Impact: Only impact PSOS in EPKS station for EPKS PC.
Recovery: None.
Workaround: After the installation, user can manually update two PSOS config files using any text editor such as notepad:
C:\ProgramData\Honeywell\Profit Suite\ConfigFiles \ProfitControllerCEE.xml and C:\ProgramData\Honeywell\Profit Suite\ConfigFiles\ProfitControllerCEESim.xml.
Replace BLOCKINITCOUNER with BLOCKINITCOUNTER in them.
Note: There are two occurrences of this word in each file.
1-86T5QZ2
Controller Design (Non-linear)
Error Indication: Not able to create/load the stepper platform in EPKS R500.2 Rev3.
Description: In EPKS R500.2 Rev3 not able to load the stepper platform. It fails with "Exe Interval of stepper and the datawarehouse tag is not matching" error.
Recovery: None.
Workaround: None.
CDA-Server
PAR Function Description
1-3Y210HT
CDA-Server
Description: EXPERION PKS GCL name service and its
dependent services are not started automatically after patch installation.
Recovery: Same as workaround.
Workaround: Perform the following steps to start the services.
1. Browse to Start > All Programs > Honeywell Experion PKS and
launch Experion PKS Services Control Panel.
2. Select the Start All Services option. All Experion services will be started that are not started automatically.
1-1EE8TQT
CDA-Server
Error Indication: New devices added to the Experion network are not
detected in FDM, also any existing device removal do not dynamically get updated in FDM.
Description: This error occurs in a scenario where dynamic loading/ unloading of device and dynamic removal/connection of devices happen.
Recovery: If its redundant software mux, you have to stop the software mux service on primary which enables software mux to switch over to backup. On non-redundant system, you have to rebuild network after stopping the software mux service to recover from this issue.
Workaround: None.
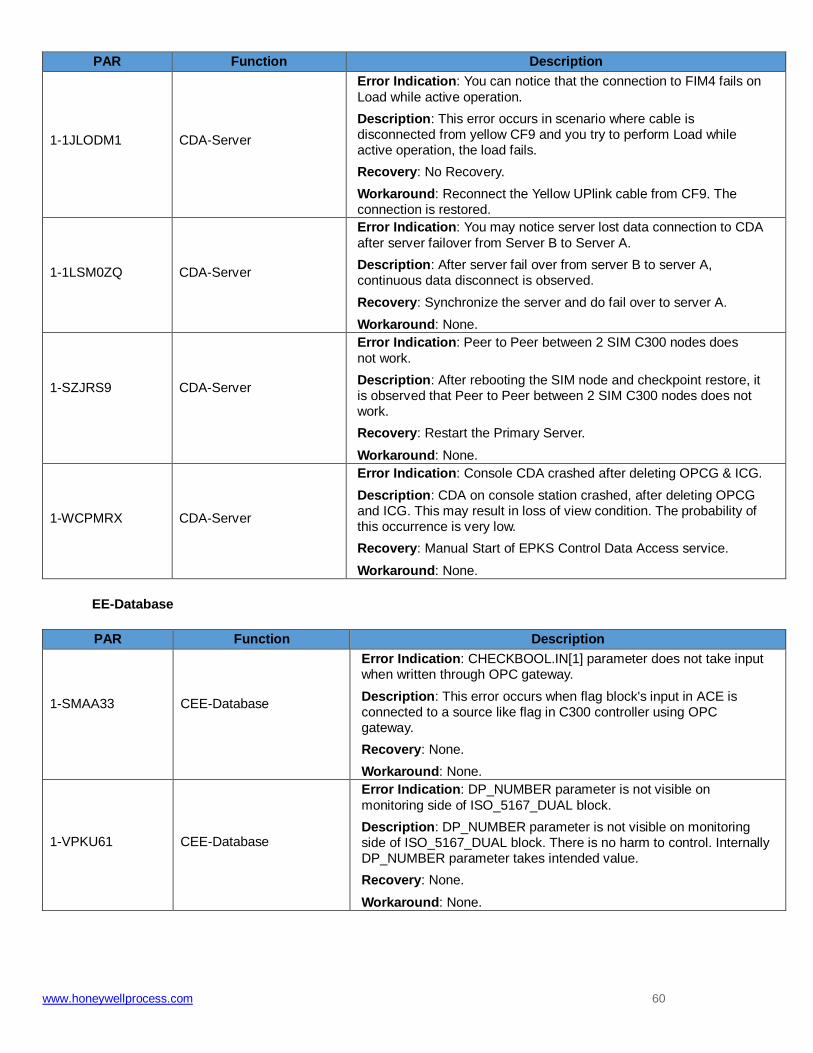
www.honeywellprocess.com 60
PAR Function Description 1-1JLODM1
CDA-Server
Error Indication: You can notice that the connection to FIM4 fails on
Load while active operation. Description: This error occurs in scenario where cable is disconnected from yellow CF9 and you try to perform Load while active operation, the load fails.
Recovery: No Recovery.
Workaround: Reconnect the Yellow UPlink cable from CF9. The connection is restored.
1-1LSM0ZQ
CDA-Server
Error Indication: You may notice server lost data connection to CDA
after server failover from Server B to Server A. Description: After server fail over from server B to server A, continuous data disconnect is observed.
Recovery: Synchronize the server and do fail over to server A.
Workaround: None.
1-SZJRS9
CDA-Server
Error Indication: Peer to Peer between 2 SIM C300 nodes does
not work. Description: After rebooting the SIM node and checkpoint restore, it is observed that Peer to Peer between 2 SIM C300 nodes does not work.
Recovery: Restart the Primary Server.
Workaround: None.
1-WCPMRX
CDA-Server
Error Indication: Console CDA crashed after deleting OPCG & ICG. Description: CDA on console station crashed, after deleting OPCG and ICG. This may result in loss of view condition. The probability of this occurrence is very low.
Recovery: Manual Start of EPKS Control Data Access service.
Workaround: None.
EE-Database
PAR Function Description 1-SMAA33
CEE-Database
Error Indication: CHECKBOOL.IN[1] parameter does not take input when written through OPC gateway.
Description: This error occurs when flag block's input in ACE is connected to a source like flag in C300 controller using OPC gateway.
Recovery: None.
Workaround: None.
1-VPKU61
CEE-Database
Error Indication: DP_NUMBER parameter is not visible on
monitoring side of ISO_5167_DUAL block. Description: DP_NUMBER parameter is not visible on monitoring side of ISO_5167_DUAL block. There is no harm to control. Internally DP_NUMBER parameter takes intended value.
Recovery: None.
Workaround: None.

61 www.honeywellprocess.com
Checkpoint
PAR Function Description
1-286ELKP
Checkpoint
Error Indication: Checkpoint Service stops responding. Description: When Checkpoint saves automatically (with Auto
checkpoint option enabled) at times Checkpoint service stops responding after long run.
Recovery: Automatically checkpoint service gets restarted after
the crash. Workaround: None.
1-3M63XJF
Checkpoint
Error Indication: Checkpoint restore operations failed entries in the
Control builder error log for specific IOM. Description: Dataflow stops if checkpoint restore for specific IOM
fails. The checkpoint restore for specific IOM fails occasionally. Recovery: This can be recovered by Reloading the corresponding
Output channels or Reload the CM's Containing or referring channels. Workaround: None.
1-TK8YFP
Checkpoint
Error Indication: Checkpoint file is in "Incomplete state". Description: After loading a controller with CMs configured, restore
window is showing checkpoint file is in incomplete state Recovery: Perform a manual checkpoint Save and try again the checkpoint restore operation.
Workaround: Perform a manual checkpoint Save and try again the checkpoint restore operation.
Enterprise Model Builder
PAR Function Description
1-BBESLV
Enterprise Model
Builder
Error Indication: Assets can be downloaded to Server by you without having engineer access.
Description: Same user name has been used to create user
accounts on two different servers. The privileges provided to you is different in both servers. In one Server (Server 1) you have Engineer privilege whereas in the other server (Server 2) you do not have Engineer privilege. Adding both Servers to the system of Server 1, the system model or assets model can be downloaded to both the servers.
Recovery: Ensure that the user accounts having the same user names in different servers have the same privileges.
Workaround: None.

www.honeywellprocess.com 62
PAR Function Description
1-J3B3SH
Enterprise Model
Builder
Error Indication: In a dual primary scenario while migrating from R430.1 to R500.1 release, the Assets or Alarm Groups configuration builder launched from Server A indicated that the connection is made to the primary server. The OPM status is indicated in the status bar. However instead of indicating secondary server the status bar shows that the connection has been made to the primary server.
Description: In a dual primary scenario while launching the Assets or Alarm Groups Builder, it is expected that the status bar on the right bottom corner must indicate OPM and Secondary Server connection status. In this scenario you see a primary server connection indicated on the status bar. In this scenario, the configuration change is not allowed at this time as the OPM status is enabled. This is a cosmetic anomaly and you can ignore the indication on the status bar.
Recovery: None.
Workaround: None.
OPM-Upgrade Tool
PAR Function Description 1-6SQ71FP
OPM-Upgrade Tool
Error Indication: Upgrade tool check for NTP config for controller fails when NTP is correctly configured.
Description: Even when NTP is correctly configured under System preferences Embedded FTE configuration Upgrade tool fails for this step.
Recovery: None.
Workaround:
1. Open Control builder System preferences.
2. Edit last octet in NTP configuration and save.
3. Database is updated with NTP configuration. 4. Run UT and Check will be PASS.
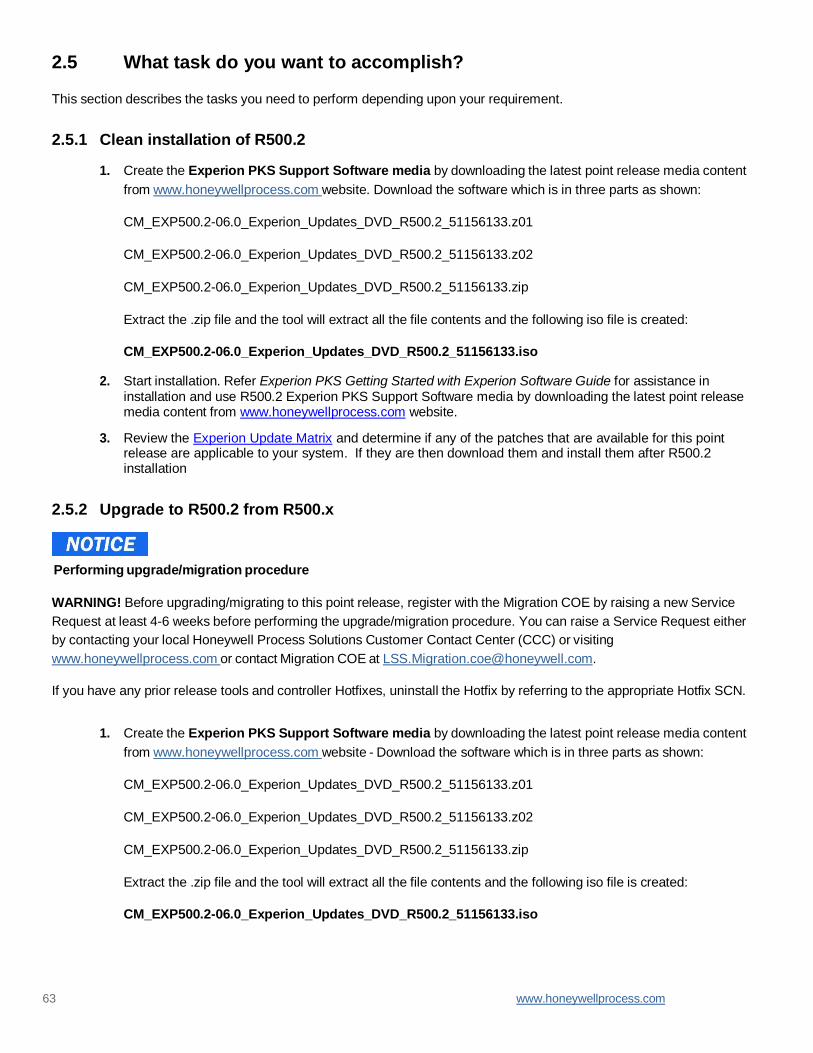
63 www.honeywellprocess.com
2.5 What task do you want to accomplish?
This section describes the tasks you need to perform depending upon your requirement.
2.5.1 Clean installation of R500.2
1. Create the Experion PKS Support Software media by downloading the latest point release media content
from www.honeywellprocess.com website. Download the software which is in three parts as shown:
CM_EXP500.2-06.0_Experion_Updates_DVD_R500.2_51156133.z01
CM_EXP500.2-06.0_Experion_Updates_DVD_R500.2_51156133.z02
CM_EXP500.2-06.0_Experion_Updates_DVD_R500.2_51156133.zip
Extract the .zip file and the tool will extract all the file contents and the following iso file is created:
CM_EXP500.2-06.0_Experion_Updates_DVD_R500.2_51156133.iso
2. Start installation. Refer Experion PKS Getting Started with Experion Software Guide for assistance in installation and use R500.2 Experion PKS Support Software media by downloading the latest point release media content from www.honeywellprocess.com website.
3. Review the Experion Update Matrix and determine if any of the patches that are available for this point release are applicable to your system. If they are then download them and install them after R500.2 installation
2.5.2 Upgrade to R500.2 from R500.x
Performing upgrade/migration procedure
WARNING! Before upgrading/migrating to this point release, register with the Migration COE by raising a new Service
Request at least 4-6 weeks before performing the upgrade/migration procedure. You can raise a Service Request either
by contacting your local Honeywell Process Solutions Customer Contact Center (CCC) or visiting
www.honeywellprocess.com or contact Migration COE at [email protected].
If you have any prior release tools and controller Hotfixes, uninstall the Hotfix by referring to the appropriate Hotfix SCN.
1. Create the Experion PKS Support Software media by downloading the latest point release media content
from www.honeywellprocess.com website - Download the software which is in three parts as shown:
CM_EXP500.2-06.0_Experion_Updates_DVD_R500.2_51156133.z01
CM_EXP500.2-06.0_Experion_Updates_DVD_R500.2_51156133.z02
CM_EXP500.2-06.0_Experion_Updates_DVD_R500.2_51156133.zip
Extract the .zip file and the tool will extract all the file contents and the following iso file is created:
CM_EXP500.2-06.0_Experion_Updates_DVD_R500.2_51156133.iso
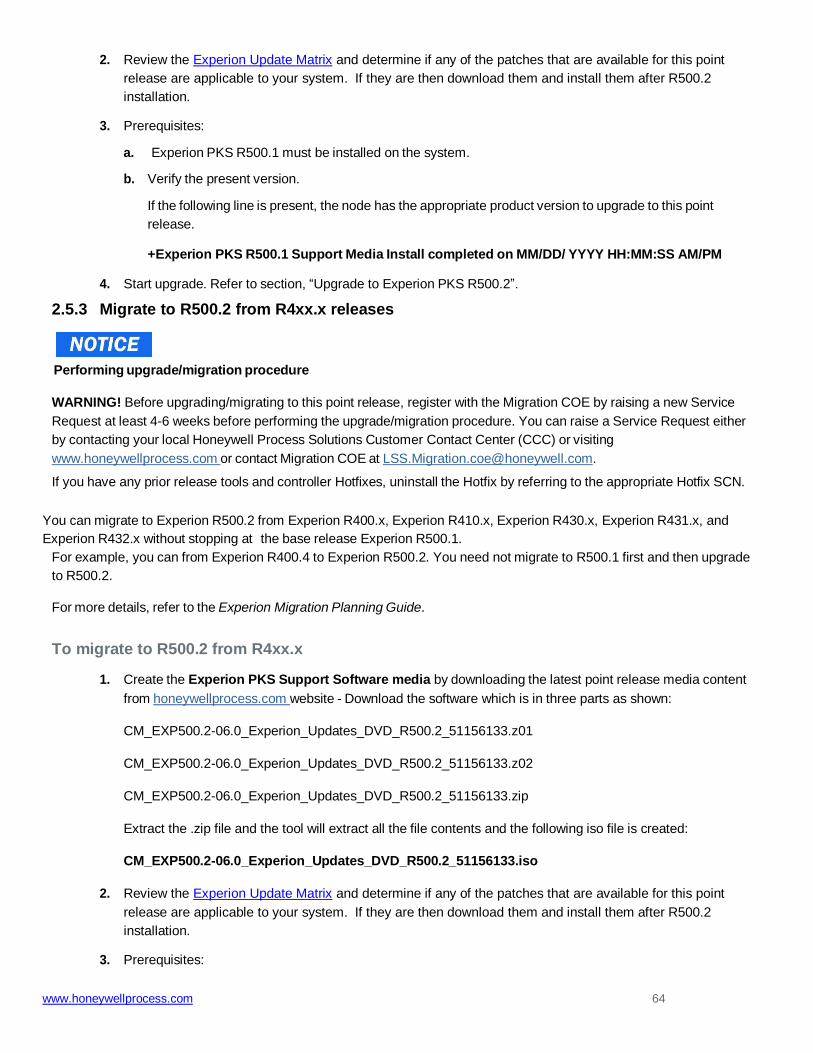
www.honeywellprocess.com 64
2. Review the Experion Update Matrix and determine if any of the patches that are available for this point
release are applicable to your system. If they are then download them and install them after R500.2
installation.
3. Prerequisites:
a. Experion PKS R500.1 must be installed on the system.
b. Verify the present version.
If the following line is present, the node has the appropriate product version to upgrade to this point
release.
+Experion PKS R500.1 Support Media Install completed on MM/DD/ YYYY HH:MM:SS AM/PM
4. Start upgrade. Refer to section, “Upgrade to Experion PKS R500.2”.
2.5.3 Migrate to R500.2 from R4xx.x releases
Performing upgrade/migration procedure
WARNING! Before upgrading/migrating to this point release, register with the Migration COE by raising a new Service
Request at least 4-6 weeks before performing the upgrade/migration procedure. You can raise a Service Request either
by contacting your local Honeywell Process Solutions Customer Contact Center (CCC) or visiting
www.honeywellprocess.com or contact Migration COE at [email protected].
If you have any prior release tools and controller Hotfixes, uninstall the Hotfix by referring to the appropriate Hotfix SCN.
You can migrate to Experion R500.2 from Experion R400.x, Experion R410.x, Experion R430.x, Experion R431.x, and
Experion R432.x without stopping at the base release Experion R500.1.
For example, you can from Experion R400.4 to Experion R500.2. You need not migrate to R500.1 first and then upgrade
to R500.2.
For more details, refer to the Experion Migration Planning Guide.
To migrate to R500.2 from R4xx.x
1. Create the Experion PKS Support Software media by downloading the latest point release media content
from honeywellprocess.com website - Download the software which is in three parts as shown:
CM_EXP500.2-06.0_Experion_Updates_DVD_R500.2_51156133.z01
CM_EXP500.2-06.0_Experion_Updates_DVD_R500.2_51156133.z02
CM_EXP500.2-06.0_Experion_Updates_DVD_R500.2_51156133.zip
Extract the .zip file and the tool will extract all the file contents and the following iso file is created:
CM_EXP500.2-06.0_Experion_Updates_DVD_R500.2_51156133.iso
2. Review the Experion Update Matrix and determine if any of the patches that are available for this point
release are applicable to your system. If they are then download them and install them after R500.2
installation.
3. Prerequisites:

65 www.honeywellprocess.com
a. Experion PKS R400.x, R410.x R430.x, Experion R431.x, or Experion R432.x must be installed on your system.
b. Take a backup of the system image using Experion Backup and Restore before installing this
point release on any node.
c. Enable Windows firewall.
d. On ES-T and ES-CE nodes (a Remote GUS Client) install the IKB Service package on the
node. (Installation of IKB Service is MANDATORY irrespective of whether physical IKB is
used)
The IKB Service can be installed from the Experion Application DVD, IKB OEP package.
4. Verify the present version.
a. Using Notepad, open the ProductVersion.txt file located in the following path.
<%User selected path%>\Honeywell\Experion PKS>
For example, C:\Program Files(X86) \Honeywell \Experion PKS
b. In the ProductVersion.txt, verify if one of the following lines is present. These lines indicate that the node
has the appropriate product version to migrate to this point release.
▪ +Experion PKS R400.x Install completed on MM/DD/ YYYY HH:MM:SS AM/PM
▪ +Experion PKS R410.x Install completed on MM/DD/ YYYY HH:MM:SS AM/PM
▪ +Experion PKS R430.x Install completed on MM/DD/ YYYY HH:MM:SS AM/PM
▪ +Experion PKS R431.x Install completed on MM/DD/ YYYY HH:MM:SS AM/PM
▪ +Experion PKS R432.x Install completed on MM/DD/ YYYY HH:MM:SS AM/PM
Here, “x” indicates the subsequent migration path as mentioned in the section “Supported server
migration paths”
5. Start migration. Refer to the Experion Migration Planning Guide for assistance in migration.
Sever client migration
The different server/client migration and installation scenarios supported for Experion R500.2 are described in the
Experion Migration Planning Guide. The document also describes ` the Microsoft Windows operating systems supported
for different Experion node types and the behavior of the Install Sequencer when it is run on the system. Some migration
scenarios may require a hardware upgrade.
Controller migration
ATTENTION: Controller migration is optional; it is only required when a controller-related error needs to be fixed. Refer
to the list of “Tools and Controller resolved PARs” in this SCN. Server/client-related fixes are decoupled from the
controller-related fixes.
The migration of controllers and control hardware can be performed in a number of ways, depending upon the system
topology and the compliment of the installed I/O. Typical scenarios are described in the Experion Migration Planning
Guide. Note that controller migration is performed, after server/client migration is completed.

www.honeywellprocess.com 66
Chapter 3 Getting started
3.1 Hardware Requirements Before you start, please ensure your hardware specifications meet the requirements as specified below:
• Physical Machines: Experion HMI Specification (EP03-200-500): https://www.honeywellprocess.com/library/support/Documents/Experion/EP03-200-500_HMI.pdf
• Virtual Machines: HPS Virtualization Specification (EP03-700-100): https://www.honeywellprocess.com/library/support/Documents/Trusted/Experion/EP03-700-100_V1_hps-virtualization-specification.pdf
3.2 Applicable nodes
This point release is applicable for the following nodes.
Sl. No. Node Is Experion PKS R500.2 applicable?
1 Application Server (EAS) Yes
2 Application Control Environment (ACE) Yes
3 Application Control Environment TPN Connected (ACET) Yes
4 Console Station (ES-C) Yes
5 Console Station TPN Connected (EST) Yes
6 Console Extension Station (ES-CE) Yes
7 Experion Server (ESV) Yes
8 eServer Yes
9 Experion Server TPN Connected (ESVT) Yes
10 Experion HiWay Gateway (EHG) Yes
11 Experion Application node. (E-APP) Yes
12 Flex Station (ES-F) Yes
13 Simulation Control Environment (SCE) Yes
14 Collaboration Station Yes
15 PCUS Yes
16 Remote Engineering Station Server (RESS) Yes
17 Optional Feature Yes
18 PHD point server Yes

67 www.honeywellprocess.com
3.3 Applicable modules
The following section is for upgrading from R500.1 to R500.2, for other migrations/upgrades, contact Migration COE.
The following applicable modules may change depending on the point release you have
installed. For more information about applicable modules, contact Migration COE at
Sl. No. Module Is Experion PKS R500.2 applicable?
1 CF9 No
2 C200CPM No
3 C200E controller Yes
4 C300 controller Yes
5 Fieldbus Interface Module Yes
6 Fieldbus Interface Module 4 Yes
7 Fieldbus Interface Module 8 Yes
8 Fault Tolerant Ethernet Bridge Module Yes
9 IO Link Interface Module Yes
10 I/O Module Yes
11 Legacy I/O Link Module No
12 PROFIBUS Gateway Module 2 Yes
13 Enhanced High-Performance Process Manager Yes
14 Experion HiWay Bridge Yes
15 Enhanced TPS Node Yes
16 Enhanced Network Interface Module Yes
17 Ethernet Interface Module Yes
This table contains only the firmware changes compared with 500.1.

www.honeywellprocess.com 68
3.4 Supported migration and upgrade paths
The following migration paths are supported.
3.3.1 Supported server migration paths
Direct Server migration to R500.2 from patches on top of the point releases mentioned above
are supported. Refer the controller migration paths list for the list of patches from where direct
server migrations are supported. If you have any Hotfixes installed on your system in addition
to those listed in this document, please contact Migration COE at
[email protected] to know about the feasibility of migrating your servers
directly to R500.2.
Sl. No. Direct migration of server and clients supported to R500.2 without hopping through R500.1
1 Experion R400.1
2 Experion R400.2
3 Experion R400.3
4 Experion R400.4
5 Experion R400.5
6 Experion R400.6
7 Experion R400.7
8 Experion R400.8
9 Experion R410.1
10 Experion R410.2
11 Experion R410.2 Rev2
12 Experion R410.3
13 Experion R410.4
14 Experion R410.5
15 Experion R410.6
16 Experion R410.7
17 Experion R410.8
18 Experion R410.9
19 Experion R430.1
20 Experion R430.2
21 Experion R430.3
22 Experion R430.4
23 Experion R430.5
24 Experion R430.6
25 Experion R431.1
26 Experion R431.2
27 Experion R431.3
28 Experion R431.4
29 Experion R432.1
30 Experion R500.1
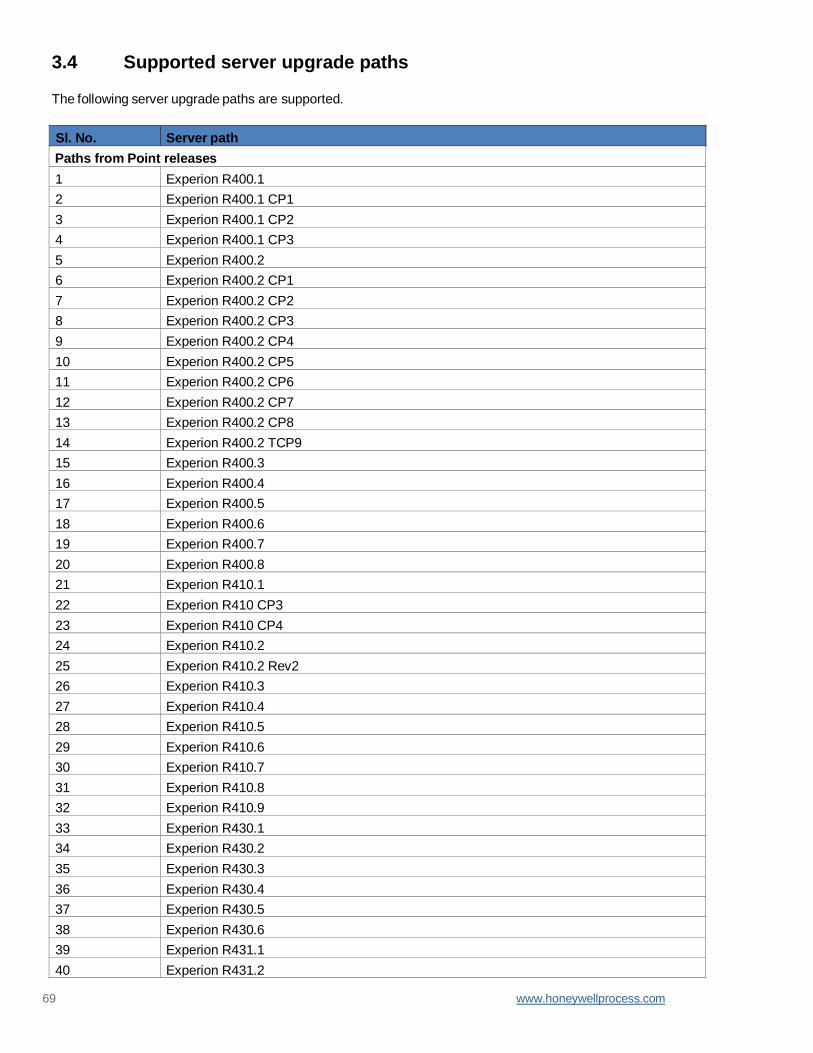
69 www.honeywellprocess.com
3.4 Supported server upgrade paths
The following server upgrade paths are supported.
Sl. No. Server path
Paths from Point releases
1 Experion R400.1
2 Experion R400.1 CP1
3 Experion R400.1 CP2
4 Experion R400.1 CP3
5 Experion R400.2
6 Experion R400.2 CP1
7 Experion R400.2 CP2
8 Experion R400.2 CP3
9 Experion R400.2 CP4
10 Experion R400.2 CP5
11 Experion R400.2 CP6
12 Experion R400.2 CP7
13 Experion R400.2 CP8
14 Experion R400.2 TCP9
15 Experion R400.3
16 Experion R400.4
17 Experion R400.5
18 Experion R400.6
19 Experion R400.7
20 Experion R400.8
21 Experion R410.1
22 Experion R410 CP3
23 Experion R410 CP4
24 Experion R410.2
25 Experion R410.2 Rev2
26 Experion R410.3
27 Experion R410.4
28 Experion R410.5
29 Experion R410.6
30 Experion R410.7
31 Experion R410.8
32 Experion R410.9
33 Experion R430.1
34 Experion R430.2
35 Experion R430.3
36 Experion R430.4
37 Experion R430.5
38 Experion R430.6
39 Experion R431.1
40 Experion R431.2

www.honeywellprocess.com 70
Sl. No. Server path
41 Experion R431.3
42 Experion R431.4
43 Experion R432.1
44 Experion R500.1
Paths from Hotfixes
1 Experion R400.2 TP4 HOTFIX1
2 Experion R400.2 TPP8
3 Experion R400.3 HOTFIX1
4 Experion R400.3 HOTFIX2
5 Experion R400.5 CPCR1
6 Experion R400.5 CPCR2
7 Experion R400.6 CPCR1
8 Experion R400.7 HOTFIX1
9 Experion R400.7 HOTFIX2
10 Experion R400.8 HOTFIX1
11 Experion R400.8 HOTFIX2
12 Experion R410.1 CPCR1
13 Experion R410.1 CPCR2
14 Experion R410.1 CPCR3
15 Experion R410.1 CPCR4
16 Experion R410.2 CPCR1
17 Experion R410.2 CPCR2
18 Experion R410.2 CPCR3
19 Experion R410.2 CPCR4
20 Experion R410.3 CPCR1
21 Experion R410.3 CPCR2
23 Experion R410.3 CPCR3
24 Experion R410.4 CPCR1
25 Experion R410.4 CPCR2
26 Experion R410.4 CPCR3
27 Experion R410.4 CPCR4
28 Experion R410.5 CPCR1
29 Experion R410.5 CPCR2
30 Experion R410.5 CPCR3
31 Experion R410.6 CPCR1
32 Experion R410.6 CPCR2
33 Experion R410.6 CPCR3
34 Experion R410.6 CPCR4
35 Experion R410.7 CPCR1
36 Experion R410.7 CPCR2
37 Experion R410.7 CPCR3
38 Experion R410.8 HOTFIX1
39 Experion R410.8 HOTFIX2
40 Experion R410.8 HOTFIX3
41 Experion R410.8 HOTFIX4

71 www.honeywellprocess.com
Sl. No. Server path
42 Experion R410.8 HOTFIX5
43 Experion R410.8 HOTFIX6
44 Experion R410.8 HOTFIX7
45 Experion R410.8 HOTFIX8
46 Experion R410.9 HOTFIX1
47 Experion R410.9 HOTFIX2
48 Experion R410.9 HOTFIX3
49 Experion R410.9 HOTFIX4
50 Experion R410.9 HOTFIX5
51 Experion R430.1 CPCR1
52 Experion R430.2 CPCR1
53 Experion R430.2 CPCR2
54 Experion R430.3 CPCR1
55 Experion R430.3 CPCR2
56 Experion R430.4 HOTFIX1
57 Experion R430.4 HOTFIX2
58 Experion R430.4 HOTFIX3
59 Experion R430.4 HOTFIX4
60 Experion R430.4 HOTFIX5
61 Experion R430.5 HOTFIX1
62 Experion R430.5 HOTFIX2
63 Experion R430.5 HOTFIX3
64 Experion R431.1 HOTFIX1
65 Experion R431.2 HOTFIX1
66 Experion R431.2 HOTFIX2
67 Experion R431.3 HOTFIX1
68 Experion R431.3 HOTFIX2
69 Experion R431.3 HOTFIX3
70 Experion R431.3 HOTFIX4
71 Experion R431.3 HOTFIX5
72 Experion R431.4 HOTFIX1
73 Experion R432.1 HOTFIX1
74 Experion R432.1 HOTFIX2
75 Experion R432.1 HOTFIX3
76 Experion R432.1 HOTFIX4
77 Experion R500.1 HOTFIX1
78 Experion R500.1 HOTFIX2
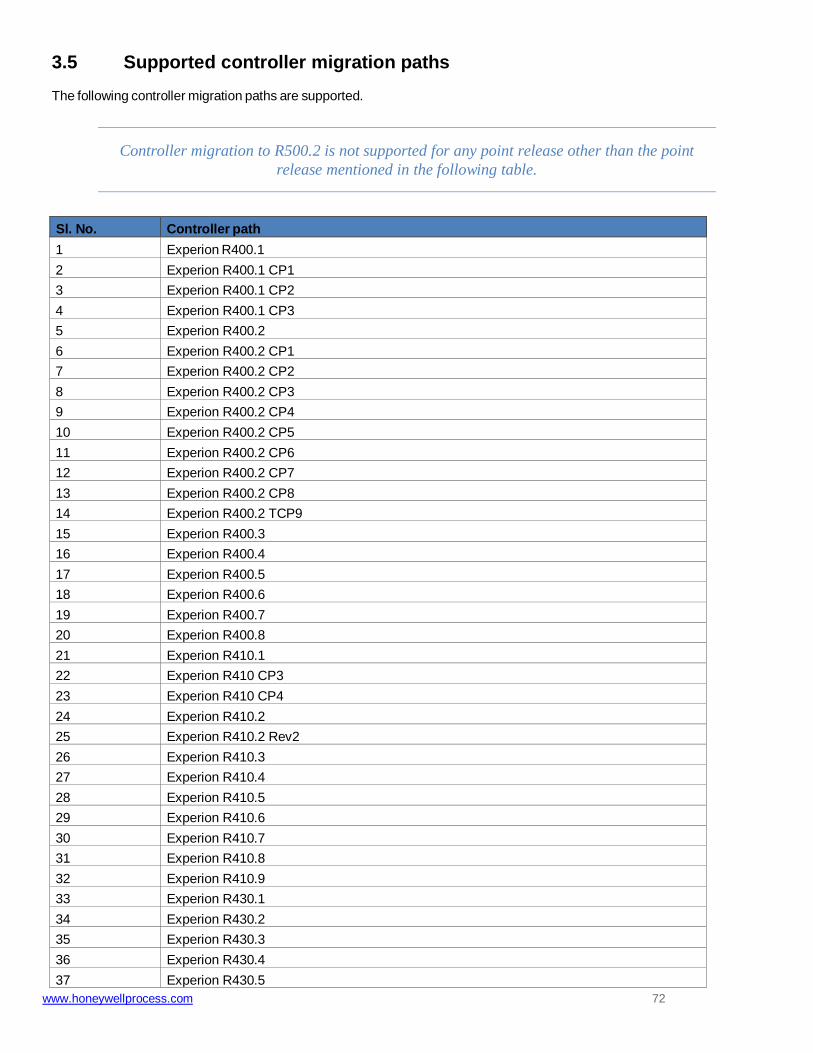
www.honeywellprocess.com 72
3.5 Supported controller migration paths The following controller migration paths are supported.
Controller migration to R500.2 is not supported for any point release other than the point
release mentioned in the following table.
Sl. No. Controller path
1 Experion R400.1
2 Experion R400.1 CP1
3 Experion R400.1 CP2
4 Experion R400.1 CP3
5 Experion R400.2
6 Experion R400.2 CP1
7 Experion R400.2 CP2
8 Experion R400.2 CP3
9 Experion R400.2 CP4
10 Experion R400.2 CP5
11 Experion R400.2 CP6
12 Experion R400.2 CP7
13 Experion R400.2 CP8
14 Experion R400.2 TCP9
15 Experion R400.3
16 Experion R400.4
17 Experion R400.5
18 Experion R400.6
19 Experion R400.7
20 Experion R400.8
21 Experion R410.1
22 Experion R410 CP3
23 Experion R410 CP4
24 Experion R410.2
25 Experion R410.2 Rev2
26 Experion R410.3
27 Experion R410.4
28 Experion R410.5
29 Experion R410.6
30 Experion R410.7
31 Experion R410.8
32 Experion R410.9
33 Experion R430.1
34 Experion R430.2
35 Experion R430.3
36 Experion R430.4
37 Experion R430.5

73 www.honeywellprocess.com
Sl. No. Controller path
38 Experion R430.6
39 Experion R431.1
40 Experion R431.2
41 Experion R431.3
42 Experion R431.4
43 Experion R432.1
44 Experion R500.1
Direct Controller migration to R500.2 from customer specific Hotfixes (on top of the point
releases and patches mentioned above) are supported. If you have any Hotfixes installed on
your system in addition to those listed in the above table, please contact Migration COE at
[email protected] to know about the feasibility of migrating your controllers and
IOs directly to R500.2.
3.6 Downloading the point release media
The latest point release media is available as multiple zip files (WinZip files) on the Honeywell Process Solutions website.
Download these zip files to create an ISO image before you begin installation.
To download the latest point release media, refer to the Experion Update Matrix using the following link:
https://www.honeywellprocess.com/library/support/software-downloads/Experion/experion-update-matrix.zip
Prerequisites
WinZip software must be installed on your system before you begin extraction.
To download the point release media
1. Locate the latest point release zip files on Honeywell Process Solutions website
(https://www.honeywellprocess.com/library/support/software-downloads/Experion/EXP-R500.2.pdf).
Download the software which is in three parts as shown:
CM_EXP500.2-06.0_Experion_Updates_DVD_R500.2_51156133.z01
CM_EXP500.2-06.0_Experion_Updates_DVD_R500.2_51156133.z02
CM_EXP500.2-06.0_Experion_Updates_DVD_R500.2_51156133.zip
Extract the .zip file and the tool will extract all the file contents and the following iso file is created:
CM_EXP500.2-06.0_Experion_Updates_DVD_R500.2_51156133.iso
2. Extract the CM_EXP500.2-06.0_Experion_Updates_DVD_R500.2_51156133.iso file.

www.honeywellprocess.com 74
Ensure that you have the ISO extraction software to extract the Experion PKS R500.2 ISO content.
For example, you can use the “Virtual CloneDrive” as ISO extraction software.
3. Copy the extracted files to a temporary folder on your hard disk.
4. Copy the extracted files to all nodes and also ensure that ISO content is copied without missing any file on
each node.
If you have installed the Whitelisting application, ensure to follow the procedure mentioned in
the Whitelisting Implementation Guide prior to the patch installation.
3.7 Downloading the Experion PKS PDF Collection media
For R500.2, there is no separate Experion PKS PDF Collection media. You can download the R500.1 Experion
PKS PDF Collection media from www.honeywellprocess.com. Note that a number of documents are updated for
R500.2 and can be downloaded from www.honeywellprocess.com.
3.8 Downloading Experion PKS Upgrade Tool Components media
For R500.2, there is no separate Experion PKS Upgrade Tool Components media. You can download the
R500.1 Experion PKS Upgrade Tool Components media from www.honeywellprocess.com.
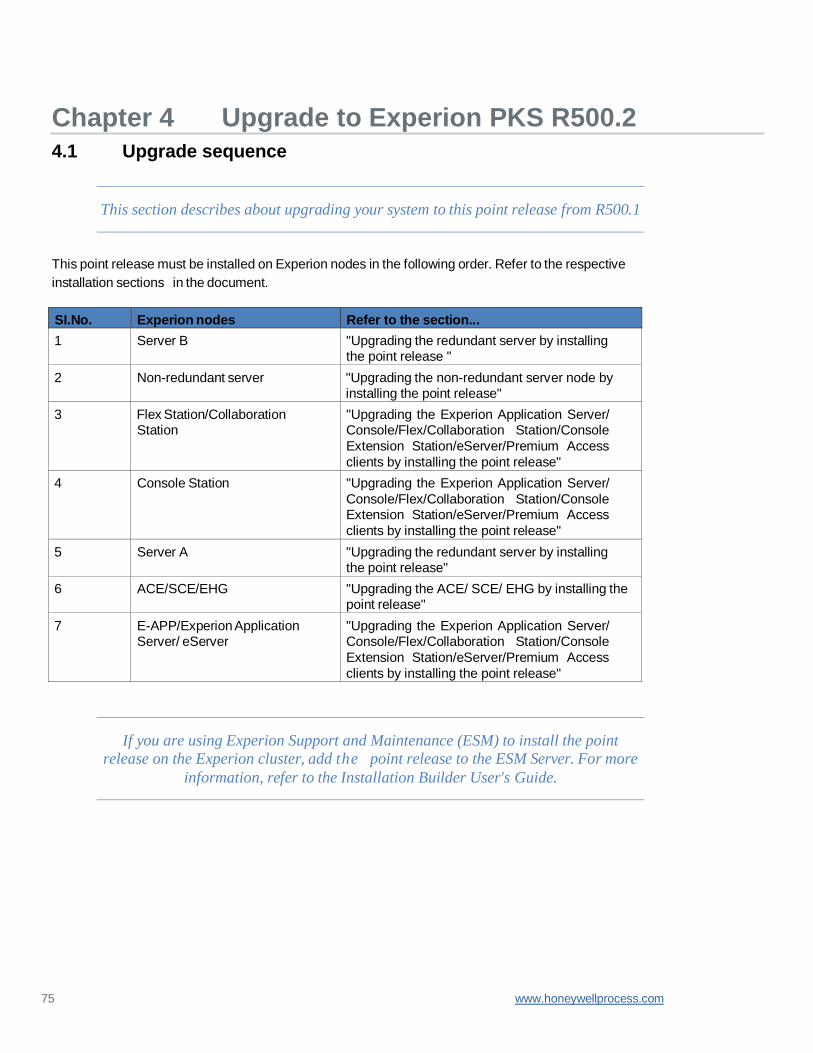
75 www.honeywellprocess.com
Chapter 4 Upgrade to Experion PKS R500.2
4.1 Upgrade sequence
This section describes about upgrading your system to this point release from R500.1
This point release must be installed on Experion nodes in the following order. Refer to the respective
installation sections in the document.
SI.No. Experion nodes Refer to the section...
1 Server B "Upgrading the redundant server by installing the point release "
2 Non-redundant server "Upgrading the non-redundant server node by installing the point release"
3 Flex Station/Collaboration Station
"Upgrading the Experion Application Server/ Console/Flex/Collaboration Station/Console
Extension Station/eServer/Premium Access
clients by installing the point release"
4 Console Station "Upgrading the Experion Application Server/
Console/Flex/Collaboration Station/Console Extension Station/eServer/Premium Access
clients by installing the point release"
5 Server A "Upgrading the redundant server by installing the point release"
6 ACE/SCE/EHG "Upgrading the ACE/ SCE/ EHG by installing the point release"
7 E-APP/Experion Application Server/ eServer
"Upgrading the Experion Application Server/ Console/Flex/Collaboration Station/Console
Extension Station/eServer/Premium Access
clients by installing the point release"
If you are using Experion Support and Maintenance (ESM) to install the point
release on the Experion cluster, add the point release to the ESM Server. For more
information, refer to the Installation Builder User's Guide.

www.honeywellprocess.com 76
4.2 Upgrade checklist
Upgrading to Experion PKS R500.2
Task Reference
Check for any PN, BW, and GTAC audit documents.
Refer to the “GTAC Support” section in this document.
Check the applicable nodes. Refer to “Applicable nodes” in this SCN.
Install Experion PKS R500.2 on the applicable nodes.
Refer to “Preparing for upgrade” in this SCN.
4.3 Preparing for upgrade
Ensure to take back up before any upgrade.
Performing upgrade/migration procedure
WARNING! Before upgrading/migrating to this point release, register with the Migration COE by raising a
new Service Request at least 4-6 weeks before performing the upgrade/migration procedure. You can raise
a Service Request either by contacting your local Honeywell Process Solutions Customer Contact Center
(CCC) or visiting www.honeywellprocess.com or contact Migration COE at
4.4 Upgrading the non-redundant server node by installing the point release
You must execute the ERDB Consistency Checker (ECC) tool before any upgrade
activity to identify any potential database related issue which may cause a migration
failure in future.
4.4.1 Pre-installation steps
1. Ensure that you are logged on to the server using an account that is part of both the Windows
Administrators and the Product Administrators group.
Ensure that you log on with the required privileges.
2. For systems with licensed QVCS only: Open the QVCS Manager application and complete
the required QVCS operations (for example: Check in, check out, revert, and so on). Close
the QVCS Manager application manually.
3. Perform the following Checkpoint tasks.

77 www.honeywellprocess.com
a. Disable all the Checkpoint tasks; click Stop for all the scheduled Checkpoint tasks.
Checkpoint tasks that are currently executing must be completed. Ensure that all the
automatic or manual. Checkpoint Save tasks are complete.
b. Ensure that the Checkpoint share has replicated correctly to all the Console stations.
c. To verify the replication of the Checkpoint shares, check the Event Summary Display
page on the Station after the manual/auto Checkpoint Saves are completed for all
controllers. If the Event Summary Display page does not display any replication
failure event, the replication is successful.
4. Disable all virus scan/protection/backup applications or services. If the DVM Logger service
is present, it must be disabled.
You must enable the services after completing the procedure.
5. Close all the running applications.
4.4.2 Stopping the services
Before installing the point release, you must stop the SNMP services. If PMD is installed, use PDS Server tool from Start > All Programs > PMD > Start or Stop PDS Server and stop the PMD services. Perform the following steps to stop all services manually.
1. Choose Start > Honeywell Experion PKS.
2. Right-click Experion PKS Services Control Panel tool, choose more and click Run as Administrator.
3. Click Stop all Services and click OK.
Installing the point release on an active non-redundant server leads to a loss of view.
a. If AEA Event Collection service is in the running state, perform following steps to stop the service.
b. Click Start > Run, type Services.msc and press Enter.
c. Right-click AEA Event Collection and click Stop to stop the service.

www.honeywellprocess.com 78
4.4.3 Installing the point release
1. If you are using Experion Support and Maintenance (ESM) to install the point release, install the
point release from the ESM client. For more information, refer to the Installation Builder User's
guide. If you are not using ESM to install the point release, go to step 2.
2. Browse to the folder containing the installer Experion PKS R500.2 > supportsoftware.exe. If
the installation is from the network, then map the location where the installer folder is located
to the network drive.
a. In the command prompt, as an Administrator, type the following command.
net use <drive>: \\computername\share\<folder> (for example, net use Z:
“\\199.63.5.151\temp\Experion PKS R500.2” )
b. Ensure that the path mapped (for example, \\199.63.5.151\temp\<point release>) has both
‘Read’ and ‘Write’ permissions.
c. Type the user name and password (must be in quotes if there is a blank).
d. In the same command prompt window, change to the above mapped drive and run supportsoftware.exe.
3. Right-click supportsoftware.exe and then click Run as Administrator. If the User Account
Control dialog box is displayed, click Yes to continue.
The Welcome to Experion PKS Update Manager dialog box appears.
4. Click Next and enter the Password in the Login Credentials panel to perform the auto logon
after restart. Confirm that you have resolved all ERDB inconsistencies by selecting the
ECC check box.
5. Click Next to start the installation.
If the installation is being performed from the network, acknowledge the User
Account Control prompt after each system restart.
You may see the following error message related to service which causes the
installation to abort. Stop the service manually after acknowledging the message
and restart the installation.
Failed to stop <service name>. Installation will be aborted now.
6. Follow the on-screen instructions and click Finish. The node restarts after the installation is complete.
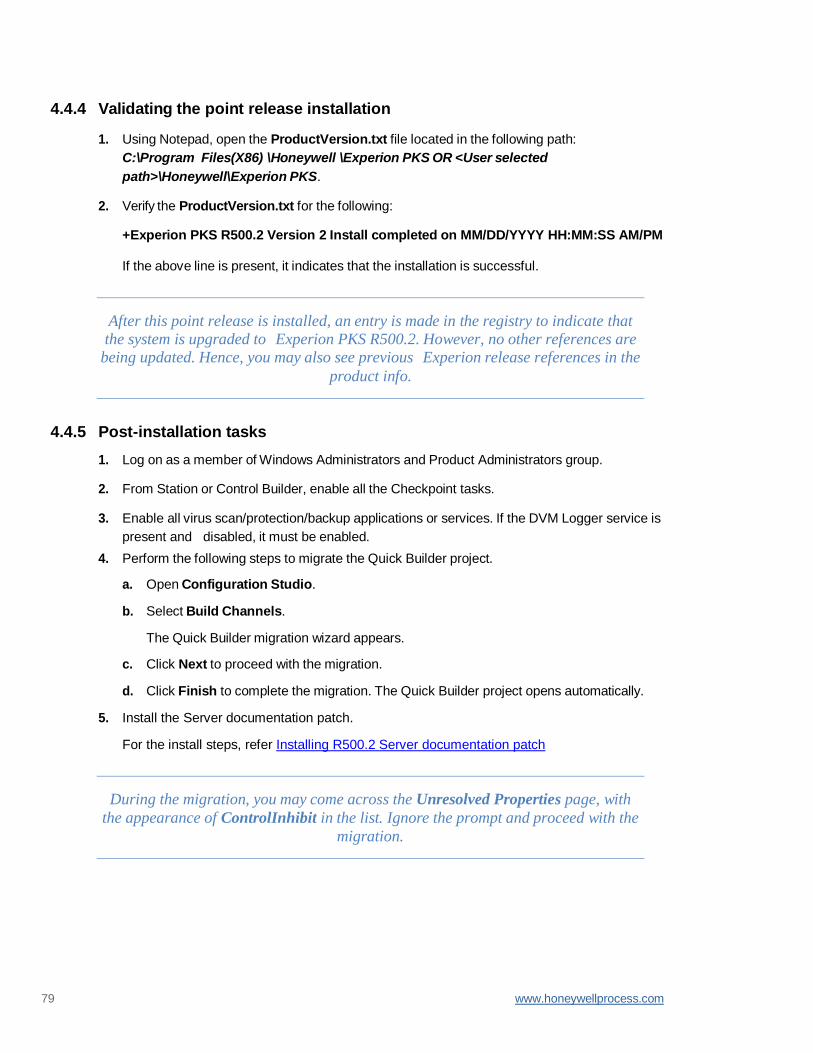
79 www.honeywellprocess.com
4.4.4 Validating the point release installation
1. Using Notepad, open the ProductVersion.txt file located in the following path:
C:\Program Files(X86) \Honeywell \Experion PKS OR <User selected
path>\Honeywell\Experion PKS.
2. Verify the ProductVersion.txt for the following:
+Experion PKS R500.2 Version 2 Install completed on MM/DD/YYYY HH:MM:SS AM/PM If the above line is present, it indicates that the installation is successful.
After this point release is installed, an entry is made in the registry to indicate that
the system is upgraded to Experion PKS R500.2. However, no other references are
being updated. Hence, you may also see previous Experion release references in the
product info.
4.4.5 Post-installation tasks
1. Log on as a member of Windows Administrators and Product Administrators group.
2. From Station or Control Builder, enable all the Checkpoint tasks.
3. Enable all virus scan/protection/backup applications or services. If the DVM Logger service is
present and disabled, it must be enabled.
4. Perform the following steps to migrate the Quick Builder project.
a. Open Configuration Studio.
b. Select Build Channels.
The Quick Builder migration wizard appears.
c. Click Next to proceed with the migration.
d. Click Finish to complete the migration. The Quick Builder project opens automatically.
5. Install the Server documentation patch.
For the install steps, refer Installing R500.2 Server documentation patch
During the migration, you may come across the Unresolved Properties page, with
the appearance of ControlInhibit in the list. Ignore the prompt and proceed with the
migration.

www.honeywellprocess.com 80
4.5 Upgrading the redundant server by installing the point release
Honeywell recommends that for redundant servers you first install the point release on Server
B, followed by one Client to perform system tests before promptly migrating Server A. Once
Server A is migrated, the remaining Clients and then Controllers can be migrated.
4.5.1 Installing the point release on Server B
You must execute the ERDB Consistency Checker (ECC) tool before any upgrade
activity to identify any potential database related issue which may cause a migration
failure in future.
Pre-installation steps
1. Ensure that you are logged on to the server using an account that is part of both the Windows
Administrators and the Product Administrators group.
Ensure that you log on with the required privileges.
2. Confirm that Server A is primary.
3. If the servers are not synchronized, click Synchronize.
4. Continue with the following steps on Server B.
5. Perform the following Checkpoint tasks.
a. Disable all the Checkpoint tasks; click Stop for all the scheduled Checkpoint tasks.
Checkpoint tasks that are currently executing must be completed. Ensure that all the
automatic or manual. Checkpoint Save tasks are complete.
b. Ensure that the CPBASE and Checkpoint shares have replicated correctly between Server B
and Server A.
c. Ensure that the Checkpoint share has replicated correctly to all the Console stations.
d. To verify the CPBASE and the replication of the Checkpoint shares, check the Event
Summary Display page on the Station after the manual/auto Checkpoint Saves are
completed for all controllers. If the Event Summary Display page does not display any
replication failure event, the replication is successful.
6. For systems with licensed QVCS only: Open the QVCS Manager application and complete
the required QVCS operations (for example: Check in, check out, revert, and so on). Close
the QVCS Manager application manually.

81 www.honeywellprocess.com
7. Disable all virus scan/protection/backup applications or services. If the DVM Logger service
is present, it must be disabled.
You must enable the services after completing the procedure.
8. Perform the following steps to disable ERDB replication.
a. Open Configuration Studio.
b. Select Administer Control Strategy Database. Perform the required steps to disable ERDB replication.
9. Perform the following steps to disable EMDB replication.
a. Open Configuration Studio.
b. Select Administer the System Database. Perform the required steps to disable EMDB replication.
10. Close all the running applications.
The installer automatically stops most of the required Experion services. However, certain
services that are not stopped by the installer must be stopped manually.
Stopping the services
Before installing the point release, you must stop the SNMP services. If PMD is installed, use PDS Server tool from Start > All Programs > PMD > Start or Stop PDS Server and stop the PMD services. Perform the following steps to stop all services manually.
1. Choose Start > Honeywell Experion PKS.
2. Right-click Experion PKS Services Control Panel tool, choose more and click Run as Administrator.
3. Click Stop all Services and click OK.
Installing the point release
1. If you are using Experion Support and Maintenance (ESM) to install the point release, install the
point release from the ESM client. For more information, refer to the Installation Builder User's
guide. If you are not using ESM to install the point release, go to step 2.
2. Browse to the folder containing the installer Experion PKS R500.2 > supportsoftware.exe. If
the installation is from the network, then map the location where the installer folder is located
to the network drive.
a. In the command prompt, as an Administrator, type the following command.
net use <drive>: \\computername\share\<folder> (for example, net use Z:
“\\199.63.5.151\temp\Experion PKS R500.2” )
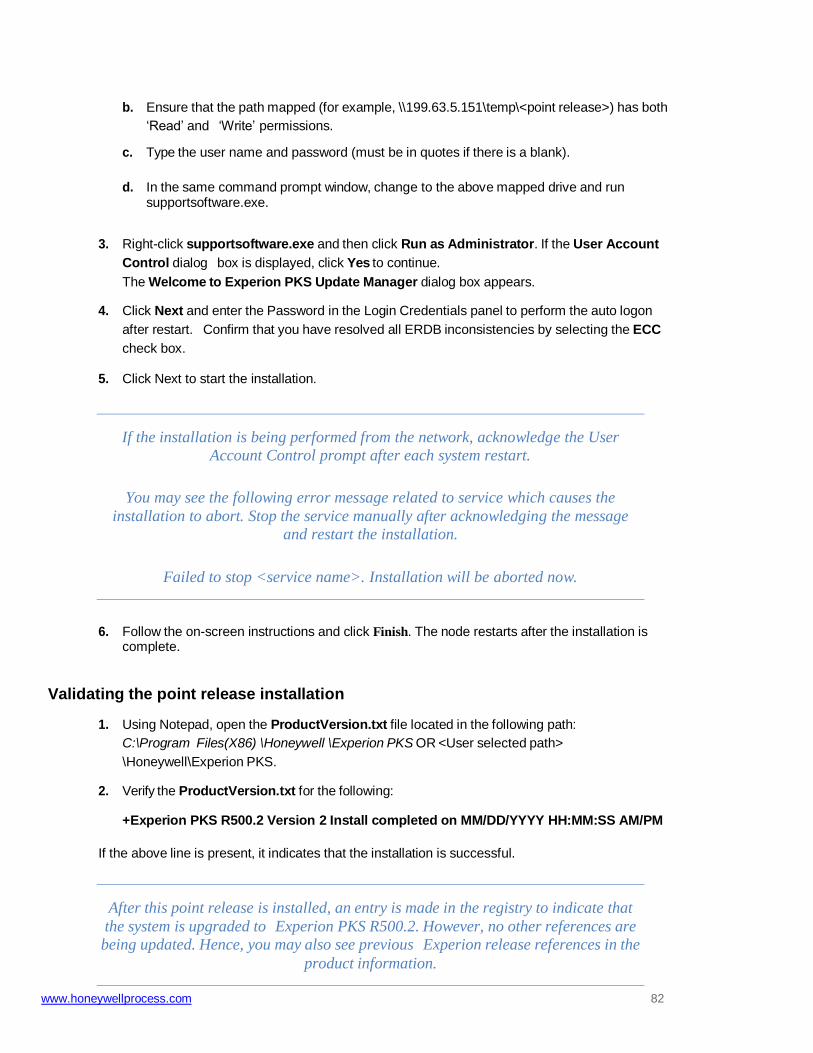
www.honeywellprocess.com 82
b. Ensure that the path mapped (for example, \\199.63.5.151\temp\<point release>) has both
‘Read’ and ‘Write’ permissions.
c. Type the user name and password (must be in quotes if there is a blank).
d. In the same command prompt window, change to the above mapped drive and run supportsoftware.exe.
3. Right-click supportsoftware.exe and then click Run as Administrator. If the User Account
Control dialog box is displayed, click Yes to continue.
The Welcome to Experion PKS Update Manager dialog box appears.
4. Click Next and enter the Password in the Login Credentials panel to perform the auto logon
after restart. Confirm that you have resolved all ERDB inconsistencies by selecting the ECC
check box.
5. Click Next to start the installation.
If the installation is being performed from the network, acknowledge the User
Account Control prompt after each system restart.
You may see the following error message related to service which causes the
installation to abort. Stop the service manually after acknowledging the message
and restart the installation.
Failed to stop <service name>. Installation will be aborted now.
6. Follow the on-screen instructions and click Finish. The node restarts after the installation is complete.
Validating the point release installation
1. Using Notepad, open the ProductVersion.txt file located in the following path:
C:\Program Files(X86) \Honeywell \Experion PKS OR <User selected path>
\Honeywell\Experion PKS.
2. Verify the ProductVersion.txt for the following:
+Experion PKS R500.2 Version 2 Install completed on MM/DD/YYYY HH:MM:SS AM/PM
If the above line is present, it indicates that the installation is successful.
After this point release is installed, an entry is made in the registry to indicate that
the system is upgraded to Experion PKS R500.2. However, no other references are
being updated. Hence, you may also see previous Experion release references in the
product information.
83 www.honeywellprocess.com
Post-installation tasks
1. Log on as a member of Windows Administrators and Product Administrators group.
2. Click Start > All Programs > Honeywell Experion PKS > Server > Station to start the station.
3. On the Redundancy tab, click Synchronize to synchronize the servers.
4. Click Manual Failover. Server Failover takes place and Server B becomes primary.
5. Install the point release on client nodes. Select the Redundancy tab, click Synchronize to
synchronize the serves. Confirm the connectivity to Server B from client nodes. Install the point
release on Server A after the point release is installed on all client nodes and their connectivity
to Server B is confirmed.
6. Enable all virus scan/protection/backup applications or services. If the DVM Logger service is
present and disabled, it must be enabled.
7. Perform the following steps to migrate the Quick Builder project.
a. Open Configuration Studio.
b. Select Build Channels.
The Quick Builder migration wizard appears.
c. Click Next to proceed with the migration.
d. Click Finish to complete the migration. The Quick Builder project opens automatically.
8. Install the Server documentation patch.
For the install steps, refer Installing R500.2 Server documentation patch
During the migration, you may come across the Unresolved Properties page, with
the appearance of ControlInhibit in the list. Ignore the prompt and proceed with the
migration.
4.5.2 Installing the point release on Server A
After installing this point release on Server B, continue with point release installation
on Flex Station/Collaboration Station and Console Station nodes before proceeding
with point release installation on Server A.
Pre-installation steps
1. Ensure that you are logged on to the server using an account that is part of both the Windows
Administrators and the Product Administrators group.
www.honeywellprocess.com 84
Ensure that you log on with the required privileges.
2. Confirm that Server B is primary.
3. Disable all virus scan/protection/backup applications or services. If the DVM Logger service
is present, it must be disabled.
You must enable the services after completing the procedure.
4. Turn off file replication of the mapping files.
a. In Station, click Configure > File Replication. Do not change the Send check box in this display.
b. Click mapping entry.
The configuration page for mapping file replication entry appears.
c. Clear the Replicate files from this path check box.
d. Click Save.
5. Close all the running applications.
The installer automatically stops most of the required Experion services. However, certain
services that are not stopped by the installer must be stopped manually.
6. Disable the Experion PKS Server System service. To disable the Experion PKS Server
System service, perform the following steps.
a. Choose Start > All Programs > Accessories > Command Prompt.
b. Right-click Command Prompt and click Run as Administrator. Click Yes in the prompt to continue.
c. In the Command Prompt, type the following command sc config HSCSERVER_System start= disabled and click Enter (the command must have a space after the equal sign).
d. Ensure that you see the following message once the Experion PKS Server System service
is disabled successfully [SC] ChangeServiceConfig SUCCESS.
Stopping the services
Before installing the point release, you must stop the SNMP services. If PMD is installed, use PDS Server tool from Start > All Programs > PMD > Start or Stop PDS Server and stop the PMD services. Perform the following steps to stop all services manually.
1. Choose Start > Honeywell Experion PKS.

85 www.honeywellprocess.com
2. Right-click Experion PKS Services Control Panel tool, choose more and click Run as Administrator.
3. Click the Stop all Services and click OK.
Installing the point release
1. If you are using Experion Support and Maintenance (ESM) to install the point release, install
the point release from the ESM client. For more information, refer to the Installation Builder
User's guide. If you are not using ESM to install the point release, go to step 2.
2. Browse to the folder containing the installer Experion PKS R500.2 >
supportsoftware.exe. If the installation is from the network, then map the location where
the installer folder is located to the network drive.
a. In the command prompt, as an Administrator, type the following command: net use <drive>:
\\computername\share\<folder> (for example, net use Z: “\\199.63.5.151\temp\Experion PKS R500.2”)
b. Ensure that the path mapped (for example, \\199.63.5.151\temp\<point release>) has both
‘Read’ and ‘Write’ permissions.
c. Type the user name and password (must be in quotes if there is a blank).
d. In the same command prompt window, change to the above mapped drive and run supportsoftware.exe.
3. Right-click supportsoftware.exe and then click Run as Administrator. If the User Account
Control dialog box is displayed, click Yes to continue.
The Welcome to Experion PKS Update Manager dialog box appears.
4. Click Next to start the installation.
If the installation is being performed from the network, after each system restart,
acknowledge the User Account Control prompt.
For redundant servers only: Before you restart the redundant server, review the
network configuration for redundant servers to ensure that the network settings are
correct for each node. If network settings are not configured or restored properly
after installation, both the servers may act as primary servers and you may
experience loss of view depending on server or station configuration.
You may see the following error message related to service which causes the
installation to abort. Stop the service manually after acknowledging the message
and restart the installation.
Failed to stop <service name>. Installation will be aborted now.

www.honeywellprocess.com 86
5. Follow the on-screen instructions and click Finish. The node restarts after the installation is complete.
6. Start the Experion PKS Server System service. To start the Experion PKS Server System
service, perform the following steps.
a. Choose Start > All Programs > Accessories > Command Prompt.
b. Right-click Command Prompt and click Run as Administrator. Click Yes in the prompt to continue.
c. In the Command Prompt, type the following command sc config HSCSERVER_System
start= auto and press Enter (the command must have a space after the equal sign).
d. Ensure that you see the following message [SC] ChangeServiceConfig SUCCESS.
e. In the Command Prompt, type the following command hscserver /start /y and press Enter.
f. Ensure that you see the following message once the Experion PKS Server System
service is started successfully Starting Server.hsc_Server_Control_s -stateRequired=4
...................hsc_Server_Control_s
- Exiting, at end with returnval 4 Completed successfully.
Validating the point release installation
1. Using Notepad, open the ProductVersion.txt file located in the following path:
C:\Program Files(X86) \Honeywell \Experion PKS OR <User selected
path>\Honeywell\Experion PKS.
2. Verify the ProductVersion.txt for the following: +Experion PKS R500.2 Version 2 Install completed on MM/DD/YYYY HH:MM:SS AM/PM If the above line is present, it indicates that the installation is successful.
After this point release is installed, an entry is made in the registry to indicate that
the system is upgraded to Experion PKS R500.2. However, no other references are
being updated. Hence, you may also see previous Experion release references in the
product info.
Post-installation tasks
1. Log on as a member of Windows Administrators and Product Administrators group.
2. Perform the following steps to enable ERDB replication.
This step must be performed on Server B.
a. Open Configuration Studio.
b. Select Administer Control Strategy Database. Perform the required steps to enable ERDB replication.

87 www.honeywellprocess.com
3. Perform the following steps to enable EMDB replication.
a. Click Start > All Programs > Honeywell Experion PKS > Server > Station to start the station.
b. On the Redundancy tab, click Synchronize to synchronize the servers.
c. If the servers are not synchronized, click Synchronize.
d. Click Manual Failover.
Server Failover takes place and Server A becomes primary.
4. Click Synchronize to synchronize the servers.
5. Turn on file replication of the mapping files.
a. In Station, click Configure > File Replication. Do not change Send check box in this display.
b. Click mapping entry.
c. The configuration page for mapping file replication entry appears.
d. Select Replicate files from this path check box.
e. Click Save.
6. Enable all virus scan/protection/backup applications or services. If the DVM Logger service is
present and disabled, it must be enabled.
7. From Station or Control Builder, enable all the Checkpoint tasks. 8. If the point release has been already installed on the Server B, then perform the following
steps to migrate the Quick Builder project.
a. Open Configuration Studio.
b. Select Build Channels.
The Quick Builder migration wizard appears.
c. Click Next to proceed with the migration.
d. Click Finish to complete the migration. The Quick Builder project opens automatically.
9. Install the Server documentation patch.
For the install steps, refer Installing R500.2 Server documentation patch
During the migration, you may come across the Unresolved Properties page, with
the appearance of ControlInhibit in the list. Ignore the prompt and proceed with the
migration.

www.honeywellprocess.com 88
4.6 Upgrading the BCC server by installing the point release
Honeywell recommends that for BCC Systems you first install the point release on Server 0B,
followed by one Client to perform system tests before promptly migrating Servers 0A, 1B and
1A. Once all servers are upgraded the remaining Clients can also be upgraded.
4.6.1 Installing the point release on Server 0B
Pre-installation steps
1. Ensure that you are logged on to the server using an account that is part of both the
Windows Administrators and the Product Administrators group.
Ensure that you log on with the required privileges.
2. Confirm that Server 0A is primary.
3. If the servers are not synchronized, click Synchronize.
4. Continue with the following steps on Server 0B.
5. For systems with licensed QVCS only: Open the QVCS Manager application and
complete the required QVCS operations (for example: Check in, check out, revert, and so
on). Close the QVCS Manager application manually.
6. Disable all virus scan/protection/backup applications or services. If the DVM Logger
service is present, it must be disabled.
You must enable the services after completing the procedure.
7. Close all the running applications.
The installer automatically stops most of the required Experion services. However, certain
services that are not stopped by the installer must be stopped manually.
Stopping the services
Before installing the point release, you must stop the SNMP services. Perform the following steps to stop all services manually.
1. Choose Start > Honeywell Experion PKS.
2. Right-click Experion PKS Services Control Panel tool, choose more and click Run as Administrator.
3. Click Stop all Services and click OK.

89 www.honeywellprocess.com
Installing the point release
1. If you are using Experion Support and Maintenance (ESM) to install the point release, install the
point release from the ESM client. For more information, refer to the Installation Builder User's
guide. If you are not using ESM to install the point release, go to step 2.
2. Browse to the folder containing the installer Experion PKS R500.2 > supportsoftware.exe. If
the installation is from the network, then map the location where the installer folder is located
to the network drive.
a. In the command prompt, as an Administrator, type the following command:
net use <drive>:\\computer name\share\<folder>
(for example, net use Z: “\\199.63.5.151\temp\Experion PKS R500.2”)
b. Ensure that the path mapped (for example, \\199.63.5.151\temp\<point release>) has both ‘Read’ and ‘Write’ permissions.
c. Type the user name and password (must be in quotes if there is a blank).
d. In the same command prompt window, change to the above mapped drive and run supportsoftware.exe.
3. Right-click supportsoftware.exe and then click Run as Administrator. If the User Account
Control dialog box is displayed, click Yes to continue.
The Welcome to Experion PKS Update Manager dialog box appears.
4. Click Next and enter the Password in the Login Credentials panel to perform the auto logon
after restart.
5. Click Next to start the installation.
If the installation is being performed from the network, acknowledge the User
Account Control prompt after each system restart.
You may see the following error message related to service which causes the
installation to abort. Stop the service manually after acknowledging the message
and restart the installation.
Failed to stop <service name>. Installation will be aborted now.
6. Follow the on-screen instructions and click Finish. The node restarts after the installation is complete.

www.honeywellprocess.com 90
Validating the point release installation
1. Using Notepad, open the ProductVersion.txt file located in the following path:
C:\Program Files(X86) \Honeywell \Experion PKS OR <User selected path>
\Honeywell\Experion PKS.
2. Verify the ProductVersion.txt for the following:
+Experion PKS R500.2 Version 2 Install completed on MM/DD/YYYY HH:MM:SS AM/PM
If the above line is present, it indicates that the installation is successful.
After this point release is installed, an entry is made in the registry to indicate that
the system is upgraded to Experion PKS R500.2. However, no other references are
being updated. Hence, you may also see previous Experion release references in the
product information.
Post-installation tasks
1. Log on as a member of Windows Administrators and Product Administrators group.
2. Click Start > All Programs > Honeywell Experion PKS > Server > Station to start the station.
3. On the Redundancy tab, click Synchronize to synchronize the servers.
4. Click Manual Failover. The server failover takes place, and Server 0B becomes primary.
5. If you plan to install the point release on client nodes before installing on the other BCC servers,
then on the Redundancy tab, click Synchronize to synchronize the servers. And also, confirm
the connectivity to Server 0B from client nodes before installing point release on servers 0A, 1B
and 1A.
6. Enable all virus scan/protection/backup applications or services. If the DVM Logger service is
present and disabled, it must be enabled.
7. Install the Server documentation patch.
For the install steps, refer Installing R500.2 Server documentation patch
4.6.2 Installing the point release on Server 0A
Pre-installation steps
1. Ensure that you are logged on to the server using an account that is part of both the Windows
Administrators and the Product Administrators group.
Ensure that you log on with the required privileges.

91 www.honeywellprocess.com
2. Confirm that Server 0B is primary.
3. Disable all virus scan/protection/backup applications or services. If the DVM Logger service
is present, it must be disabled.
You must enable the services after completing the procedure.
4. Turn off file replication of the mapping files.
a. In Station, click Configure > File Replication. Do not change the Send check box in this display.
b. Click mapping entry.
The configuration page for mapping file replication entry appears.
c. Clear the Replicate files from this path check box.
d. Click Save.
5. Close all the running applications.
The installer automatically stops most of the required Experion services. However, certain
services that are not stopped by the installer must be stopped manually.
6. Disable the Experion PKS Server System service. To disable the Experion PKS Server
System service, perform the following steps.
a. Choose Start > All Programs > Accessories > Command Prompt.
b. Right-click Command Prompt and click Run as Administrator. Click Yes in the prompt to continue.
c. In the Command Prompt, type the following command sc config HSCSERVER_System start= disabled and click Enter (the command must have a space after the equal sign).
d. Ensure that you see the following message once the Experion PKS Server System service
is disabled successfully [SC] ChangeServiceConfig SUCCESS.
Stopping the services
Before installing the point release, you must stop the SNMP services. Perform the following steps to stop all services manually.
1. Choose Start > Honeywell Experion PKS.
2. Right-click Experion PKS Services Control Panel tool, choose more and click Run as Administrator.
3. Click the Stop all Services and click OK.

www.honeywellprocess.com 92
Installing the point release
1. If you are using Experion Support and Maintenance (ESM) to install the point release, install
the point release from the ESM client. For more information, refer to the Installation Builder
User's guide. If you are not using ESM to install the point release, go to step 2.
2. Browse to the folder containing the installer Experion PKS R500.2 >
supportsoftware.exe. If the installation is from the network, then map the location where
the installer folder is located to the network drive.
a. In the command prompt, as an Administrator, type the following command:
net use <drive>:\\computer name\share\<folder>
(for example, net use Z: “\\199.63.5.151\temp\Experion PKS R500.2”)
b. Ensure that the path mapped (for example, \\199.63.5.151\temp\<point release>) has both
‘Read’ and ‘Write’ permissions.
c. Type the user name and password (must be in quotes if there is a blank).
d. In the same command prompt window, change to the above mapped drive and run supportsoftware.exe.
3. Right-click supportsoftware.exe and then click Run as Administrator. If the User Account
Control dialog box is displayed, click Yes to continue.
The Welcome to Experion PKS Update Manager dialog box appears.
4. Click Next to start the installation.
If the installation is being performed from the network, after each system restart,
acknowledge the User Account Control prompt.
Before you restart the redundant server, review the network configuration to ensure
that the network settings are correct for all server nodes. If network settings are not
configured or restored properly after installation, more than one server may act as a
primary server and you may experience loss of view depending on server or station
configuration.
You may see the following error message related to service which causes the
installation to abort. Stop the service manually after acknowledging the message
and restart the installation.
Failed to stop <service name>. Installation will be aborted now.
5. Follow the on-screen instructions and click Finish. The node restarts after the installation is complete.
6. Start the Experion PKS Server System service. To start the Experion PKS Server System
service, perform the following steps.

93 www.honeywellprocess.com
a. Choose Start > All Programs > Accessories > Command Prompt.
b. Right-click Command Prompt and click Run as Administrator. Click Yes in the prompt to continue.
c. In the Command Prompt, type the following command sc config HSCSERVER_System
start= auto and press Enter (the command must have a space after the equal sign).
d. Ensure that you see the following message [SC] ChangeServiceConfig SUCCESS.
e. In the Command Prompt, type the following command hscserver /start /y and press Enter.
f. Ensure that you see the following message once the Experion PKS Server System
service is started successfully Starting Server.hsc_Server_Control_s -stateRequired=4
...................hsc_Server_Control_s
- Exiting, at end with returnval 4 Completed successfully.
Validating the point release installation
1. Using Notepad, open the ProductVersion.txt file located in the following path:
C:\Program Files(X86) \Honeywell \Experion PKS OR <User selected
path>\Honeywell\Experion PKS.
2. Verify the ProductVersion.txt for the following:
+Experion PKS R500.2 Version 2 Install completed on MM/DD/YYYY HH:MM:SS AM/PM If the above line is present, it indicates that the installation is successful.
After this point release is installed, an entry is made in the registry to indicate that
the system is upgraded to Experion PKS R500.2. However, no other references are
being updated. Hence, you may also see previous Experion release references in the
product info.
Post-installation tasks
1. Log on as a member of Windows Administrators and Product Administrators group.
2. Click Synchronize to synchronize the servers.
3. Enable all virus scan/protection/backup applications or services. If the DVM Logger service is
present and disabled, it must be enabled.
4. Install the Server documentation patch.
For the install steps, refer Installing R500.2 Server documentation patch

www.honeywellprocess.com 94
4.6.3 Installing the point release on Server 1B
Pre-installation steps
1. Ensure that you are logged on to the server using an account that is part of both the Windows
Administrators and the Product Administrators group.
Ensure that you log on with the required privileges.
2. Confirm that Server 0B is primary.
3. Disable all virus scan/protection/backup applications or services. If the DVM Logger service
is present, it must be disabled.
You must enable the services after completing the procedure.
4. Close all the running applications.
The installer automatically stops most of the required Experion services. However, certain
services that are not stopped by the installer must be stopped manually.
5. Disable the Experion PKS Server System service. To disable the Experion PKS Server
System service, perform the following steps.
a. Choose Start > All Programs > Accessories > Command Prompt.
b. Right-click Command Prompt and click Run as Administrator. Click Yes in the prompt to continue.
c. In the Command Prompt, type the following command sc config HSCSERVER_System start= disabled and click Enter (the command must have a space after the equal sign).
d. Ensure that you see the following message once the Experion PKS Server System service
is disabled successfully [SC] ChangeServiceConfig SUCCESS.
Stopping the services
Before installing the point release, you must stop the SNMP services. Perform the following steps to stop all services manually.
1. Choose Start > Honeywell Experion PKS.
2. Right-click Experion PKS Services Control Panel tool, choose more and click Run as Administrator.
3. Click the Stop all Services and click OK.
95 www.honeywellprocess.com
Installing the point release
1. If you are using Experion Support and Maintenance (ESM) to install the point release, install
the point release from the ESM client. For more information, refer to the Installation Builder
User's guide. If you are not using ESM to install the point release, go to step 2.
2. Browse to the folder containing the installer Experion PKS R500.2 >
supportsoftware.exe. If the installation is from the network, then map the location where
the installer folder is located to the network drive.
a. In the command prompt, as an Administrator, type the following command:
net use <drive>:\\computer name\share\<folder>
(for example, net use Z: “\\199.63.5.151\temp\Experion PKS R500.2”)
b. Ensure that the path mapped (for example, \\199.63.5.151\temp\<point release>) has both
‘Read’ and ‘Write’ permissions.
c. Type the user name and password (must be in quotes if there is a blank).
d. In the same command prompt window, change to the above mapped drive and run supportsoftware.exe.
3. Right-click supportsoftware.exe and then click Run as Administrator. If the User Account
Control dialog box is displayed, click Yes to continue.
The Welcome to Experion PKS Update Manager dialog box appears.
4. Click Next to start the installation.
If the installation is being performed from the network, after each system restart,
acknowledge the User Account Control prompt.
Before you restart the redundant server, review the network configuration to ensure
that the network settings are correct for all server nodes. If network settings are not
configured or restored properly after installation, more than one server may act as a
primary server and you may experience loss of view depending on server or station
configuration.
You may see the following error message related to service which causes the
installation to abort. Stop the service manually after acknowledging the message
and restart the installation.
Failed to stop <service name>. Installation will be aborted now.
5. Follow the on-screen instructions and click Finish. The node restarts after the installation is complete.
6. Start the Experion PKS Server System service. To start the Experion PKS Server System
service, perform the following steps.

www.honeywellprocess.com 96
a. Choose Start > All Programs > Accessories > Command Prompt.
b. Right-click Command Prompt and click Run as Administrator. Click Yes in the prompt to continue.
c. In the Command Prompt, type the following command sc config HSCSERVER_System
start= auto and press Enter (the command must have a space after the equal sign).
d. Ensure that you see the following message [SC] ChangeServiceConfig SUCCESS.
e. In the Command Prompt, type the following command hscserver /start /y and press Enter.
f. Ensure that you see the following message once the Experion PKS Server System
service is started successfully Starting Server.hsc_Server_Control_s -stateRequired=4
...................hsc_Server_Control_s
- Exiting, at end with returnval 4 Completed successfully.
Validating the point release installation
1. Using Notepad, open the ProductVersion.txt file located in the following path:
C:\Program Files(X86) \Honeywell \Experion PKS OR <User selected
path>\Honeywell\Experion PKS.
2. Verify the ProductVersion.txt for the following: +Experion PKS R500.2 Version 2 Install completed on MM/DD/YYYY HH:MM:SS AM/PM If the above line is present, it indicates that the installation is successful.
After this point release is installed, an entry is made in the registry to indicate that
the system is upgraded to Experion PKS R500.2. However, no other references are
being updated. Hence, you may also see previous Experion release references in the
product info.
Post-installation tasks
1. Log on as a member of Windows Administrators and Product Administrators group.
2. Click Synchronize to synchronize the servers.
3. Enable all virus scan/protection/backup applications or services. If the DVM Logger service is
present and disabled, it must be enabled.
4. Install the Server documentation patch.
For the install steps, refer Installing R500.2 Server documentation patch

97 www.honeywellprocess.com
4.6.4 Installing the point release on Server 1A
Pre-installation steps
1. Ensure that you are logged on to the server using an account that is part of both the Windows
Administrators and the Product Administrators group.
Ensure that you log on with the required privileges.
2. Confirm that Server 0B is primary.
3. Disable all virus scan/protection/backup applications or services. If the DVM Logger service
is present, it must be disabled.
You must enable the services after completing the procedure.
4. Close all the running applications.
The installer automatically stops most of the required Experion services. However, certain
services that are not stopped by the installer must be stopped manually.
5. Disable the Experion PKS Server System service. To disable the Experion PKS Server
System service, perform the following steps.
a. Choose Start > All Programs > Accessories > Command Prompt.
b. Right-click Command Prompt and click Run as Administrator. Click Yes in the prompt to continue.
c. In the Command Prompt, type the following command sc config HSCSERVER_System start= disabled and click Enter (the command must have a space after the equal sign).
d. Ensure that you see the following message once the Experion PKS Server System service
is disabled successfully [SC] ChangeServiceConfig SUCCESS.
Stopping the services
Before installing the point release, you must stop the SNMP services. Perform the following steps to stop all services manually.
1. Choose Start > Honeywell Experion PKS.
2. Right-click Experion PKS Services Control Panel tool, choose more and click Run as Administrator.
3. Click the Stop all Services and click OK.

www.honeywellprocess.com 98
Installing the point release
1. If you are using Experion Support and Maintenance (ESM) to install the point release, install
the point release from the ESM client. For more information, refer to the Installation Builder
User's guide. If you are not using ESM to install the point release, go to step 2.
2. Browse to the folder containing the installer Experion PKS R500.2 >
supportsoftware.exe. If the installation is from the network, then map the location where
the installer folder is located to the network drive.
a. In the command prompt, as an Administrator, type the following command: net use <drive>:
\\computername\share\<folder> (for example, net use Z: “\\199.63.5.151\temp\Experion PKS R500.2”)
b. Ensure that the path mapped (for example, \\199.63.5.151\temp\<point release>) has both
‘Read’ and ‘Write’ permissions.
c. Type the user name and password (must be in quotes if there is a blank).
d. In the same command prompt window, change to the above mapped drive and run supportsoftware.exe.
3. Right-click supportsoftware.exe and then click Run as Administrator. If the User Account
Control dialog box is displayed, click Yes to continue.
The Welcome to Experion PKS Update Manager dialog box appears.
4. Click Next to start the installation.
If the installation is being performed from the network, after each system restart,
acknowledge the User Account Control prompt.
Before you restart the redundant server, review the network configuration to ensure
that the network settings are correct for all server nodes. If network settings are not
configured or restored properly after installation, more than one server may act as a
primary server and you may experience loss of view depending on server or station
configuration.
You may see the following error message related to service which causes the
installation to abort. Stop the service manually after acknowledging the message
and restart the installation.
Failed to stop <service name>. Installation will be aborted now.
5. Follow the on-screen instructions and click Finish. The node restarts after the installation is complete.
6. Start the Experion PKS Server System service. To start the Experion PKS Server System
service, perform the following steps.

99 www.honeywellprocess.com
a. Choose Start > All Programs > Accessories > Command Prompt.
b. Right-click Command Prompt and click Run as Administrator. Click Yes in the prompt to continue.
c. In the Command Prompt, type the following command sc config HSCSERVER_System
start= auto and press Enter (the command must have a space after the equal sign).
d. Ensure that you see the following message [SC] ChangeServiceConfig SUCCESS.
e. In the Command Prompt, type the following command hscserver /start /y and press Enter.
f. Ensure that you see the following message once the Experion PKS Server System
service is started successfully Starting Server.hsc_Server_Control_s -stateRequired=4
...................hsc_Server_Control_s
- Exiting, at end with returnval 4 Completed successfully.
Validating the point release installation
1. Using Notepad, open the ProductVersion.txt file located in the following path:
C:\Program Files(X86) \Honeywell \Experion PKS OR <User selected
path>\Honeywell\Experion PKS.
2. Verify the ProductVersion.txt for the following:
+Experion PKS R500.2 Version 2 Install completed on MM/DD/YYYY HH:MM:SS AM/PM If the above line is present, it indicates that the installation is successful.
After this point release is installed, an entry is made in the registry to indicate that
the system is upgraded to Experion PKS R500.2. However, no other references are
being updated. Hence, you may also see previous Experion release references in the
product info.
Post-installation tasks
1. Log on as a member of Windows Administrators and Product Administrators group.
2. Click Synchronize to synchronize the servers.
3. Turn on file replication of the mapping files.
a. In Station, click Configure > File Replication. Do not change Send check box in this display.
b. Click mapping entry.
c. The configuration page for mapping file replication entry appears.
d. Select Replicate files from this path check box.
e. Click Save.
4. Enable all virus scan/protection/backup applications or services. If the DVM Logger service is
present and disabled, it must be enabled.

www.honeywellprocess.com 100
5. If the point release has been already installed on the Server 0B, then perform the following
steps to migrate the Quick Builder project.
a. Open Configuration Studio.
b. Select Build Channels.
The Quick Builder migration wizard appears.
c. Click Next to proceed with the migration.
d. Click Finish to complete the migration. The Quick Builder project opens automatically.
6. Install the Server documentation patch.
For the install steps, refer Installing R500.2 Server documentation patch
During the migration, you may come across the Unresolved Properties page, with
the appearance of ControlInhibit in the list. Ignore the prompt and proceed with the
migration.
4.6.5 Installing R500.2 Server documentation patch
Pre-installation steps Ensure that you are logged on to the server using an account that is part of both the Windows Administrators and the Product Administrators group.
Installing the Server Documentation Patch
1. Browse to the folder containing the installer Experion PKS R500.2 > Packages\ServerClient\Server_Doc
2. Double click on “Experion PKS R500.2 Server Documentation.exe”.
3. Click Next to start the installation.
4. Follow the on-screen instructions and click Finish.
Validating the Server Documentation Patch
1. Using Notepad, open the ProductVersion.txt file located in the following path: C:\Program Files(X86) \Honeywell \Experion PKS OR <User selected path>\Honeywell\Experion PKS.
2. Verify the ProductVersion.txt for the following: ++ Experion PKS R500.2 Server Documentation Install Patch completed on MM/DD/YYYY HH:MM:SS AM/PM If the above line is present, it indicates that the installation is successful.

101 www.honeywellprocess.com
4.7 Upgrading clients with the point release
4.7.1 Pre-installation steps
1. Ensure that you are logged on to the server using an account that is part of both the
Windows Administrators and the Product Administrators group.
Ensure that you log on with the required privileges.
2. For systems with licensed QVCS only: Open the QVCS Manager application and
complete the required QVCS operations (for example: Check in, check out, revert, and
so on). Close the QVCS Manager application manually.
3. Perform the following Checkpoint tasks.
a. Disable all Checkpoint tasks; click Stop for all the scheduled Checkpoint tasks.
Any currently executing Checkpoint tasks must be complete before continuing.
Ensure that all the automatic or manual Checkpoint Save tasks are complete.
Checkpoint file replication fail alarm is generated if Checkpoint file replication is
enabled and Checkpoint schedule is ON during console patch up-gradation.
b. Ensure that the Checkpoint share has replicated correctly to all the Console stations.
c. To verify the replication of the Checkpoint shares, check the Event Summary
Display page on the Station after the manual/auto Checkpoint Saves are
completed for all controllers. If the Event Summary Display page does not
display any replication failure event, the replication is successful.
4. Disable all virus scan/protection/backup applications or services. If the DVM Logger
service is present, it must be disabled.
You must enable the services after completing the procedure.
5. Close all running applications.

www.honeywellprocess.com 102
4.7.2 Stopping the services
Before installing the point release, you must stop the SNMP services. If PMD is installed, use PDS Server tool from Start > All Programs > PMD > Start or Stop PDS Server and stop the PMD services. Perform the following steps to stop all services manually.
1. Choose Start > Honeywell Experion PKS.
2. Right-click Experion PKS Services Control Panel tool, choose more and click Run as Administrator.
3. Click the Stop all Services and click OK.
4.7.3 Installing the point release
1. If you are using Experion Support and Maintenance (ESM) to install the point release, install
the point release from the ESM client. For more information, refer to the Installation Builder
User's guide. If you are not using ESM to install the point release, go to step 2.
2. Browse to the folder containing the installer Experion PKS R500.2 >
supportsoftware.exe. If the installation is from the network, then map the location where
the installer folder is located to the network drive.
a. In the command prompt, as an Administrator, type the following command: net use <drive>:
\\computername\share\<folder> (for example, net use Z: “\\199.63.5.151\temp \Experion PKS R500.2”)
b. Ensure that the path mapped (for example, \\199.63.5.151\temp\<point release>) has both
‘Read’ and ‘Write’ permissions.
c. Type the user name and password (must be in quotes if there is a blank).
d. In the same command prompt window, change to the above mapped drive and run supportsoftware.exe.
3. Right-click supportsoftware.exe and then click Run as Administrator. If the User Account
Control dialog box is displayed, click Yes to continue.
The Welcome to Experion PKS Update Manager dialog box appears.
4. Click Next to start the installation.
If the installation is being performed from the network, after each system restart,
acknowledge the User Account Control prompt.
You may see the following error message related to service which causes the installation to abort. Stop the service manually after acknowledging the message and restart the
installation:
Failed to stop <service name>. Installation will be aborted now.

103 www.honeywellprocess.com
5. Follow the on-screen instructions and click Finish. The node restarts after the installation is complete.
4.7.4 Installing the point release on Premium Access clients
1. Ensure that the eServer associated with the Premium Access client is already updated.
2. Ensure that you are logged on to the server using an account that is part of both the Windows
Administrators and the Product Administrators group.
Ensure that you log on with the required privileges.
3. From the Start > Control Panel > Add or Remove Programs, select and remove the following programs.
• HMIWeb Browser Runtime
• Experion PKS Server Client Side Components
4. Open eServer home page and click on the link - Click here to install Premium Access components.
5. Click the appropriate link to install the Premium Access components.
6. Click the appropriate link to install the server client components.
4.7.5 Validating the point release installation
1. Using Notepad, open the ProductVersion.txt file located in the following path:
C:\Program Files(X86) \Honeywell \Experion PKS OR <User selected path>
\Honeywell\Experion PKS.
2. Verify the ProductVersion.txt for the following:
+Experion PKS R500.2 Version 2 Install completed on MM/DD/YYYY HH:MM:SS AM/PM
If the above line is present, it indicates that the installation is successful.
After this point release is installed, an entry is made in the registry to indicate that
the system is upgraded to Experion PKS R500.2. However, no other references are
being updated. Hence, you may also see previous Experion release references in the
product information.
www.honeywellprocess.com 104
4.7.6 Post-installation tasks
1. Log on as a member of Windows Administrators and Product Administrators group.
2. From Station or Control Builder, enable all the Checkpoint tasks.
3. Enable all virus scan/protection/backup applications or services. If the DVM Logger service is
present and disabled, it must be enabled.
4. Perform the following steps to migrate the Quick Builder project. This step can be an optional
step for Console Station node if you have not migrated the Quick Builder project on Server
nodes and opened the Quick builder for 1st time on Console Station node.
However, this step is not applicable for other nodes like eServer, Experion Application Server,
Flex, Collaboration Station, and Premium Access clients.
a. Open Configuration Studio.
b. Select Build Channels.
The Quick Builder migration wizard appears.
c. Click Next to proceed the migration.
d. Click Finish to complete the migration. The Quick Builder project opens automatically.
5. Install the Server documentation patch.
For the install steps, refer Installing R500.2 Server documentation patch
During the migration, you may come across the Unresolved Properties page, with
the appearance of ControlInhibit in the list. Ignore the prompt and proceed with the
migration.
ATTENTION: Perform the following steps when installing/upgrading on a Collaboration Station node:
1. Use any text editor and open the CollaborationStation.stn file from <INSTALLATION_RUNTIME_PATH>\Honeywell\Experion PKS\Client\Station.
2. Go to [Paths] section and update <INSTALLATION_SOFTWARE_PATH>\Honeywell\Experion PKS\Client\System\R430 To <INSTALLATION_SOFTWARE_PATH>\Honeywell\Experion PKS\Client\System\R500
3. Save the file.

105 www.honeywellprocess.com
4.8 Upgrading the ACE/ SCE/ EHG by installing the point release
4.8.1 Pre-installation steps
1. Ensure that you are logged on to the server using an account that is part of both the Windows
Administrators and the Product Administrators group.
Ensure that you log on with the required privileges.
2. Perform the following steps.
Perform step a through step d on Control Builder from Server B (redundant server)
or Experion server (non- redundant).
a. From Control Builder Monitoring view, right-click the node FB and select Upload/Update
to Project with Contents.
The Upload/Update to Project with Contents box is displayed.
b. Clear Server Configuration Information check box and click Continue.
The tuning constants are uploaded from the controller to the Monitoring view of ERDB.
c. Perform a manual Checkpoint Save of the controller.
d. Ensure that the Checkpoint shares have replicated correctly between the server and all
the Console stations.
e. To verify the replication of the Checkpoint shares, check the Event Summary Display
page on the Station once the manual Checkpoint Save is completed for this controller.
If the Event Summary Display page does not display any replication failure event, the
replication is successful.
3. Modify the node FB CEESTATE to IDLE.
4. Change the node FB ACE / SIM command to SHUTDOWN. For more information, refer to
the Control Building User’s Guide.
5. Shutdown the node FB from the Control Builder.
4.8.2 Stopping the services
Before installing the point release, you must stop the SNMP services. If PMD is installed, use PDS
Server tool from Start > All Programs > PMD > Start or Stop PDS Server and stop the PMD
services.
Perform the following steps to stop all services manually.
1. Choose Start > Honeywell Experion PKS.
www.honeywellprocess.com 106
2. Right-click Experion PKS Services Control Panel tool, choose more and click Run as Administrator.
3. Click the Stop all Services and click OK.
4.8.3 Installing the point release
1. If you are using Experion Support and Maintenance (ESM) to install the point release, install the
point release from the ESM client. For more information, refer to the Installation Builder User's
guide. If you are not using ESM to install the point release, go to step 2.
2. Browse to the folder containing the installer Experion PKS R500.2 > supportsoftware.exe. If the
installation is from the network, then map the location where the installer folder is located to
the network drive.
a. In the command prompt, as an Administrator, type the following command: net use <drive>:
\\computername\share\<folder> (for example, net use Z: “\\199.63.5.151\temp\Experion PKS R500.2”)
b. Ensure that the path mapped (for example, \\199.63.5.151\temp\<point release>) has both
‘Read’ and ‘Write’ permissions.
c. Type the user name and password (must be in quotes if there is a blank).
d. In the same command prompt window, change to the above mapped drive and run supportsoftware.exe.
3. Right-click supportsoftware.exe and then click Run as Administrator. If the User Account
Control dialog box is displayed, click Yes to continue.
The Welcome to Experion PKS Update Manager dialog box appears.
4. Click Next to start the installation.
If the installation is being performed from the network, after each system restart,
acknowledge the User Account Control prompt.
You may see the following error message related to service which causes the
installation to abort. Stop the service manually after acknowledging the message
and restart the installation:
Failed to stop<service name>. Installation will be aborted now.
5. Follow the on-screen instructions and click Finish. The node restarts after the installation is complete.

107 www.honeywellprocess.com
4.8.4 Validating the point release installation
1. Using Notepad, open the ProductVersion.txt file located in the following path:
C:\Program Files(X86) \Honeywell \Experion PKS OR <User selected
path>\Honeywell\Experion PKS.
2. Verify the ProductVersion.txt for the following:
+Experion PKS R500.2 Version 2 Install completed on MM/DD/YYYY HH:MM:SS AM/PM
If the above line is present, it indicates that the installation is successful.
After this point release is installed, an entry is made in the registry to indicate that
the system is upgraded to Experion PKS R500.2. However, no other references are
being updated. Hence, you may also see previous Experion release references in the
product info.
4.8.5 Post-installation tasks
1. Log on as a member of Windows Administrators and Product Administrators group.
2. Perform a Checkpoint Restore for the node and correct any errors that are observed during the
Checkpoint Restore.
3. From the Control Builder Monitoring view, perform a COLDSTART or WARMSTART of
ACE-CEE and SCE-CEE as follows:
a. Open the ACE-CEE Configuration form.
b. Click WARMSTART/COLDSTART (as applicable) from the CEE Command. For more
information about COLDSTART and WARMSTART, refer to the Control Building
User’s Guide.
4. Perform a Checkpoint Save after the node is successfully started. The CMs/SCMs are made
active (in case of a COLDSTART only). This ensures that the necessary runtime information
and the correct execution states of the CMs/SCMs is available in the latest .cp file of the ACE
node.
5. Install the Server documentation patch.
For the install steps, refer Installing R500.2 Server documentation patch
4.9 Post Install Activities after all nodes have been upgraded
For systems that meet the following prerequisites there is an additional command that should be executed:
• Cluster consists of ESVT and ES-Ts
• Experion PKS R500.2 has been installed on the ESVTs and ES-Ts
• Have an EHPM configured and loaded in Control Builder
• The EHPM has the "EHPM Data Access" setting set to "Peer to Peer and ExpServer"

www.honeywellprocess.com 108
If the above prerequisites are met, then on the primary ESVT and each ES-T open a command prompt and run: primecombopoints /validate /all
4.10 Updating common components
Note that these steps must be performed ONLY if you install an optional common
component package using Experion PKS Installation media after installing this
point release. To update the installed optional common component package version
to Experion PKS R500.2 versions, you must reinstall Experion PKS R500.2.
Follow the steps provided in the following respective sections to update the installed optional common
component package version to Experion PKS R500.2.
• Installing the point release on a non-redundant server
• Installing the point release on Server B
• Installing the point release on Server A
• Installing the point release on Experion Application Server/ Console/ Flex/Collaboration
Station/Console Extension Station/eServer/Premium Access clients
• Installing the point release on ACE or SCE

109 www.honeywellprocess.com
4.11 Installing PHD Point Server patch
1. Log in using an account that is a member of the Windows administrator’s group.
2. Start the Experion PKS Services Control Panel program (from Start > All Programs >
Honeywell
Experion PKS > Experion PKS Services Control Panel). Once started, select Stop All services and click OK to stop all Experion services.
3. Click Exit to exit the Experion PKS Services Control Panel program.
4. Navigate to the software patch package, Experion PKS R500.2 > Packages\ServerClient
\PHDPointServer\Experion PKS R500.2 PHD Point Server.exe, in Windows Explorer and right click Run as administrator.
5. Click Yes when prompt asked if you want to allow the patch to run. The patch will begin to
extract.
6. Click OK when asked if you want to install the following update. A Command Prompt window
with the
text “Installing patch…” and a few windows installer dialogs will appear.
7. Once the patch installation is finished, a message ‘Experion PKS R500.2 PHD Point
Server.exe’ is
installed successfully will appear.
8. Using the Server Experion PKS Services Control Panel program to restart all services.
If the software patch installer reports that some programs must be closed before
installing, click “OK” to accept this and let the installer to terminate these
programs. Otherwise, click “Cancel” to abort installation.
4.12 Migrating controllers
4.12.1 Updating the firmware
1. Perform the upgrade readiness checks using the Upgrade Tool (UT) or Migration
Readiness Tool (MRT).
For more information about UT, refer to the Experion Migration Planning Guide and
Upgrade Tool Users Guide.
2. Migrate the controllers and modules using the Controller Migration wizard (CMW).
CMW can be used for both on-process and off-process migration in an automated way.
NTools and CTools can be used for manual firmware upgrade.
For more information about CMW, refer to Controller Migration in the respective Scenario-
specific migration guide.

www.honeywellprocess.com 110
4.12.2 Firmware revisions
The following table provides details about the firmware versions.
Module Module number Firmware version File
C300 Cx-PCNT01 EXP500.1-98.102
c300.lcf c300app2.pcm c300app2_20.pcm c300app2_ehb.pcm c300app3.pcm c300app3_20.pcm c300boot2.pcm c300boot2_20.pcm c300boot2_ehb.pcm c300boot2x.pcm c300boot2x_20.pcm c300boot2x_ehb.pcm c300boot3.pcm c300boot3_20.pcm PCNT02.lcf
C200 TK-PRS022 EXP500.1-98.102 Cee50e.pcm Cpmboote.pcm
EHPM EC-THPM01 EXP500.1-98.102
ehpm.lcf ehpmapp1.pcm ehpmboot1.pcm
EHB EC-EHB01 EXP500.1-98.102
ehb.lcf ehbapp1.pcm ehbboot1.pcm enim2ehb.lcf
ELMM CC-ELMM01 EXP500.1-98.102
elmm.lcf elmmapp2.pcm elmmboot2.pcm
ENIM EC-TNIM01 EXP500.1-98.102
epni2.lcf epni2app1.pcm epni2boot1.pcm
ETN EC-ETB01 EXP500.1-98.102
etn.lcf ETNapp1.pcm ETNboot1.pcm
FIM TK-FFIF01 EXP500.1-98.102
fimboot.nvs fimboot.pcm fimrex.nvs fimrex.pcm
FIM4 Cx-PFB401 EXP500.1-98.102
fim4.lcf fim4app2.pcm fim4app3.pcm fim4boot2.pcm fim4boot3.pcm
FIM8 Cx-PFB801 EXP500.1-98.102
fim8.lcf fim8app2.pcm fim8boot2.pcm
FTEB TC-FTEB01 EXP500.1-98.102
ftebboot.nvs ftebboot.pcm ftebrex.nvs ftebrex.pcm

111 www.honeywellprocess.com
Module Module number Firmware version File
IOLIM TC-IOLI01 EXP500.1-98.102
iolimapp.nvs iolimapp.pcm iolimboot.nvs iolimboot.pcm
PGM2 Cx-IP0101 EXP500.1-98.102
pgm2.lcf pgm2app1.pcm pgm2boot1.pcm
UIO Cx-PUIO01 FW_5.00
uio_5_00_06.s28 uio_5_00_07.s28 uio_5_00_08.s28
UIO2 Cx-PUIO31 FW_5.00 uio2boot_5_00_08.srec uio2boot_5_00_09.srec

www.honeywellprocess.com 112
Chapter 5 Problems resolved in R500.1
5.1 Common components resolved PARs
HMIWeb TPN Details
PAR Function Description
1-3R3HXQR
HMIWeb Station - General
Alarm light option should be disabled by default in Station connection properties.
1-43HG8VH
HMIWeb TPN Details
Experion TPS displays need UTF-8 encoding to work with new IE11 default browser in Experion.
Experion Station-Native Window
PAR Function Description
1-43ZIGWX
Experion Station- Native Window
Failure to call Native Window graphics from Experion after upgrading from R430.3 to R430.4.
Experion TPS Infrastructure
PAR Function Description
1-4K8421R
Experion TPS Infrastructure
Messages are hidden while performing file transfer for some scenarios.
Redirection Manager
PAR Function Description
1-464IWUH Redirection Manager RDM fail after manual failover server.
System Management
PAR Function Description
1-3IOLFFF
System Management
Synchrep process is showing memory leak while testing McAfee VSE
8.8 Patch4 on R430.1.
1-3PYQWUV
System Management
System Management is not updating all of the Yellow adapter IPV4 properties correctly.
TPNServer
PAR Function Description
1-4FPAI68
TPNServer
History Import Tool does not work, When running the tool and selecting the EXPORT button.
Secure Communication Manager
PAR Function Description
1-1TRB5UD
Secure Communication
Manager
Experion nodes stop communicating and/or deployment of secure communications policies fail after a resynchronize command.
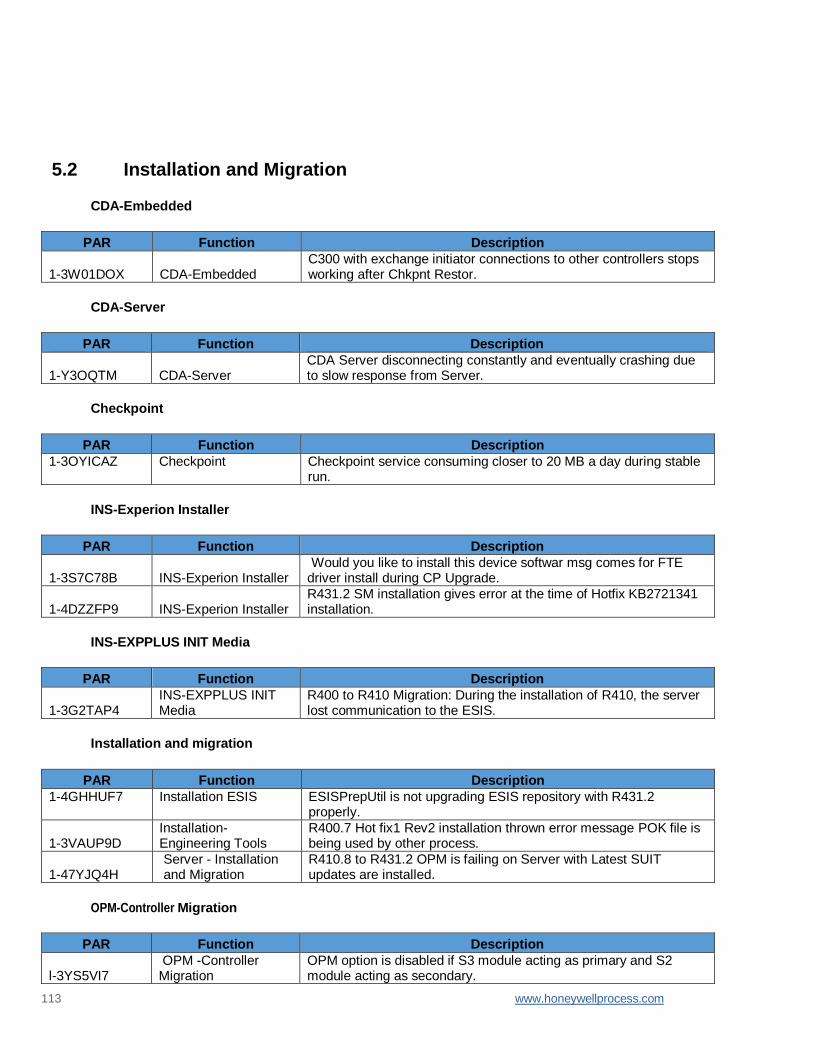
113 www.honeywellprocess.com
5.2 Installation and Migration
CDA-Embedded
PAR Function Description
1-3W01DOX
CDA-Embedded
C300 with exchange initiator connections to other controllers stops working after Chkpnt Restor.
CDA-Server
PAR Function Description
1-Y3OQTM
CDA-Server
CDA Server disconnecting constantly and eventually crashing due to slow response from Server.
Checkpoint
PAR Function Description
1-3OYICAZ Checkpoint Checkpoint service consuming closer to 20 MB a day during stable run.
INS-Experion Installer
PAR Function Description
1-3S7C78B
INS-Experion Installer
Would you like to install this device softwar msg comes for FTE driver install during CP Upgrade.
1-4DZZFP9
INS-Experion Installer
R431.2 SM installation gives error at the time of Hotfix KB2721341 installation.
INS-EXPPLUS INIT Media
PAR Function Description
1-3G2TAP4
INS-EXPPLUS INIT Media
R400 to R410 Migration: During the installation of R410, the server lost communication to the ESIS.
Installation and migration
PAR Function Description
1-4GHHUF7 Installation ESIS ESISPrepUtil is not upgrading ESIS repository with R431.2 properly.
1-3VAUP9D
Installation- Engineering Tools
R400.7 Hot fix1 Rev2 installation thrown error message POK file is being used by other process.
1-47YJQ4H
Server - Installation and Migration
R410.8 to R431.2 OPM is failing on Server with Latest SUIT updates are installed.
OPM-Controller Migration
PAR Function Description
l-3YS5VI7
OPM -Controller Migration
OPM option is disabled if S3 module acting as primary and S2 module acting as secondary.

www.honeywellprocess.com 114
5.3 Servers and Stations
Server - Display Subsystem
PAR Function Description
1-48YPYMT
Server - Display Subsystem
Auxiliary names show server name after migration for analog point display.
Servers and stations
PAR Function Description
1-3X9WE77
Server - Redundancy
Servers synchronization fail after a first sync on PKS R430.2 with Dell T320 + H310 RAID.
1-3QRGYB9
Server - other or unknown
The ODBC Query using MS access or odbcclient.exe application does not include the Point Type value.
1-3QRIISV
Server - other or unknown
Status point's PVState and OUTPUT State showing ??????text instead of state when query the status.
1-3ZKBL2T
Server - Alarm/event
If the Location Pane on an alarm summary is opened but not pinned, clicking on an asset will close t.
1-40I4ETR Server - Alarm/event Comments cannot be saved on the event summary.
1-3O9NPMP
Server - TPS Integration
Unable to change Mode from HMI faceplate in COD.
1-5QDGTEN
Server – Redundancy
Nuisance Alarm raised during Synchronization for Stopping Backup
Server(s).
5.4 Controllers and Tools
Control Builder-Chart
PAR Function Description
1-485382C
Control Builder-Chart
Function block jumps as soon as first input pin added or last one is removed.
1-45MIXBX
Control Builder-Chart
Control Builder is sluggish when we open Chart View and CB is going to Not Responding state.
1-4AS5HA7 Control Builder-Chart ControlBuilder crash when opening multiple CMs.
Control Builder-Profibus
PAR Function Description
1-16JFE8J
Control Builder- Profibus
You are able to delete the first item from any grouped modules when there is a DSB associated with that NETTAG.
Control Builder-Configuration Form
PAR Function Description
1-1T9HS0S
Control Builder- Configuration Form
No Units are showing for Bearing PV in the Control Builder.

115 www.honeywellprocess.com
Control Builder
PAR Function Description
1-UXS811
Control Builder-Search
Browser Services got crashed when both ODS and existing Browser Search starts in parallel.
Control Builder-Fieldbus
PAR Function Description
1-OYUXXR
Control Builder- Fieldbus
Device replacement is getting failed for the devices with instantiating function block.
1-T9A7RI
Control Builder- Fieldbus
METHOD: Density Factor Setup wizard of Arithmetic block Aborts.
Control Library
PAR Function Description
1-3E9JFPF
Control Library
Diagnostic Parameter values are not displayed for E&H Levelflex FMP5x FF - BW-21334.
Controllers and tools
PAR Function Description
1-1LSBQ9M
Embedded Controller/ Gateway Platform
Primary & secondary C300 took same IP address during C300 failover & resulted LOC/LOV.
1-3S5PF5Z
IEC61850 interface
IEC61850 SCADA HCI.Interface is terminating abruptly when logging level is set to FLOW.
1-3QY3645
IEC61850_Embedded
In extremely high network traffic (100% bandwidth) IEDs disconnect from the network and do not rejoin. The result is permanent loss of communication to the IED.
EBM-Tools
PAR Function Description
1-UMLIDH EBM-Tools ICP2P configuration not supported in two different release
Experion TPS Engineering Tools
PAR Function Description
1-4NB5BWP
Experion TPS Engineering Tools
Date and time stamp both are differs for newly created file copied from PC to HM.
FF-Configuration
PAR Function Description
1-107BU07
FF-Configuration
EPKS is unable to differentiate the case-sensitive units like mpa & Mpa, Mg & mg.

www.honeywellprocess.com 116
Fieldbus Library Manager
PAR Function Description
1-Q407YH
Fieldbus Library Manager
In Method manager, scroll bar is not available and Get string value built-in method is not supported.
1-R3X0ZN
Fieldbus Library Manager
Experion shows unit 1599 as Kbytes instead of mmSCFD.
IXP-Import Export
PAR Function Description
1-3OGPGX9 IXP-Import Export During Import of Control Modules looses the Child CM (BW-23195).
1-3IWH9K7 IXP-Import Export After import using IXPTOOL block connections are missing.
1-VM137H
IXP-Import Export
Error appears as "Entry does not exist [EXPKS_E_CL_ENTNOTEXIST (4L .101.10020)].
OPM-Upgrade Tool
PAR Function Description
1-4RHWXMB OPM-Upgrade Tool UT is unable to detect the Series C components.
PGM
PAR Function Description
1-I1C2F3 PGM CPULoLo Resource and CPU Lo Resource Alarm on PGM Switchover.
1-WDNURN
PGM
DRIVE DSB outputs are not initialized to init value if there is FTE cable break.
Redundancy-RM
PAR Function Description
1-3OHOIJB
Redundancy-RM
Synchronized Primary RM to force switchover to the secondary role when a major fault is detected.
Third Party Components
PAR Function Description
1-NMO0DJ
Third Party Components
Loss of control during PGM switchover when one of the TURCK redundant gateway module remove.

117 www.honeywellprocess.com
Chapter 6 Troubleshooting Instructions
When the Station or the Premium Access Client or the Collaboration Station applications fail to connect, he following message appears: Unable to Connect. Attempt to reconnect
Diagnostic check Ping the server to which the client attempts to connect and check with the system administrator to find out if ICMP traffic has been disabled.
Cause If ICMP is disabled, application will not be able to connect because it cannot ping the server.
Solution
• Make the following setting in the station.ini file for direct Station connection. [station]
DisablePingRequest=1
• Make the following setting in C:\Program Files (X86)\Honeywell\Experion PKS\Client\System\R400\default.stn or an equivalent CIP file path of eServer for Premium access client.
[station]
DisablePingRequest=1
• Make the following setting in C:\ProgramData\Honeywell\Experion PKS\Client\Station\CollabStation.stn for Collaboration Station.
[station]
DisablePingRequest=1
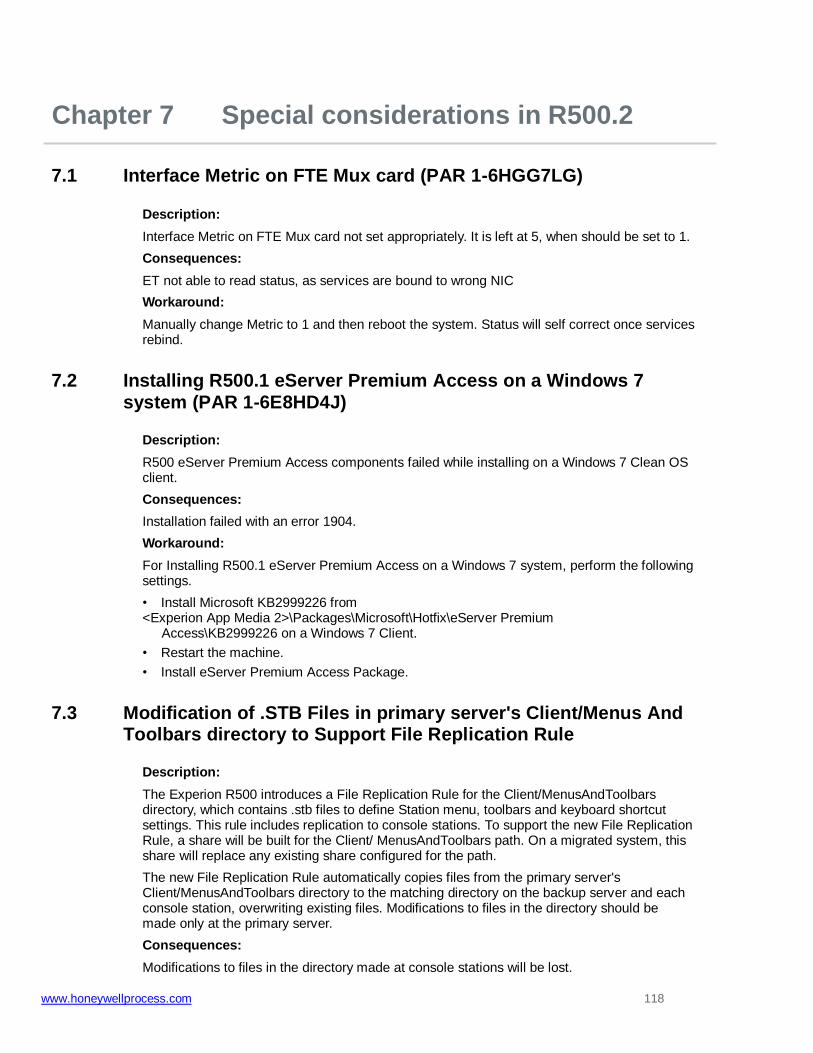
www.honeywellprocess.com 118
Chapter 7 Special considerations in R500.2
7.1 Interface Metric on FTE Mux card (PAR 1-6HGG7LG)
Description:
Interface Metric on FTE Mux card not set appropriately. It is left at 5, when should be set to 1.
Consequences:
ET not able to read status, as services are bound to wrong NIC
Workaround:
Manually change Metric to 1 and then reboot the system. Status will self correct once services rebind.
7.2 Installing R500.1 eServer Premium Access on a Windows 7 system (PAR 1-6E8HD4J)
Description:
R500 eServer Premium Access components failed while installing on a Windows 7 Clean OS client.
Consequences:
Installation failed with an error 1904.
Workaround:
For Installing R500.1 eServer Premium Access on a Windows 7 system, perform the following settings.
• Install Microsoft KB2999226 from <Experion App Media 2>\Packages\Microsoft\Hotfix\eServer Premium
Access\KB2999226 on a Windows 7 Client.
• Restart the machine.
• Install eServer Premium Access Package.
7.3 Modification of .STB Files in primary server's Client/Menus And Toolbars directory to Support File Replication Rule
Description:
The Experion R500 introduces a File Replication Rule for the Client/MenusAndToolbars directory, which contains .stb files to define Station menu, toolbars and keyboard shortcut settings. This rule includes replication to console stations. To support the new File Replication Rule, a share will be built for the Client/ MenusAndToolbars path. On a migrated system, this share will replace any existing share configured for the path.
The new File Replication Rule automatically copies files from the primary server's Client/MenusAndToolbars directory to the matching directory on the backup server and each console station, overwriting existing files. Modifications to files in the directory should be made only at the primary server.
Consequences:
Modifications to files in the directory made at console stations will be lost.

119 www.honeywellprocess.com
Example:
If, an engineer modifies default.stb file on the console station, these changes will be lost when File Replication Rule copies the primary server's default.stb file to the console station.
Workaround:
Modify .stb files only in the primary server's Client/MenusAndToolbars directory.
7.4 Configuring Windows Account Running Network API Client Application as an Experion Operator
Description:
When an application is using the Network API, it will now attempt to perform a single signon to the Experion Server using the Windows account under which the Network API client application is running.
This account needs to be configured as an Experion Operator either explicitly as a Windows account, or implicitly via this accounts membership of a Windows Group. By default, the Experion PKS Server install adds the following groups as Experion operators:
• Product Administrators
• Local Engineers
• Local Supervisors
• Local Operators
• Local Ack View Only Users
• Local View Only Users
By default all security levels can read from the server, however a security level of OPER is required for write operations. The first four groups above by default have write option.
Network API now requires client applications to authenticate.
Consequences:
If the Windows account running the client application does not meet these requirements, then the Network API connection will not succeed and Experion data will not be available to the client application.
Workaround:
Configure windows account running Network API client application as an Experion Operator with the options given below:
• Add the Windows account running Network API client application to the Experion operators table.
• Add the Windows account running Network API client application to the group that is exists in the Experion operators table.
Note
You will need to logout and login with this account to ensure Windows picks up this change for the account.
• Add a Windows group to the Experion operators table that has the Windows account with an application running as a member of Windows account running Network API client application.
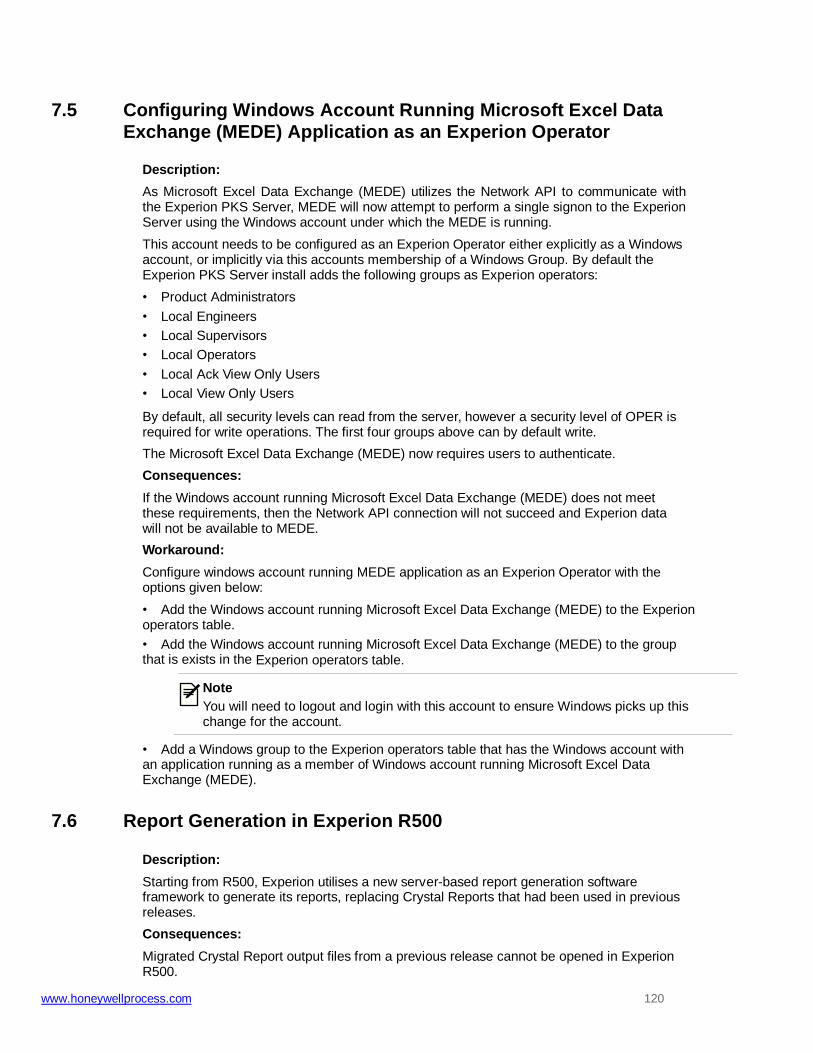
www.honeywellprocess.com 120
7.5 Configuring Windows Account Running Microsoft Excel Data Exchange (MEDE) Application as an Experion Operator
Description:
As Microsoft Excel Data Exchange (MEDE) utilizes the Network API to communicate with the Experion PKS Server, MEDE will now attempt to perform a single signon to the Experion Server using the Windows account under which the MEDE is running.
This account needs to be configured as an Experion Operator either explicitly as a Windows account, or implicitly via this accounts membership of a Windows Group. By default the Experion PKS Server install adds the following groups as Experion operators:
• Product Administrators
• Local Engineers
• Local Supervisors
• Local Operators
• Local Ack View Only Users
• Local View Only Users
By default, all security levels can read from the server, however a security level of OPER is required for write operations. The first four groups above can by default write.
The Microsoft Excel Data Exchange (MEDE) now requires users to authenticate.
Consequences:
If the Windows account running Microsoft Excel Data Exchange (MEDE) does not meet these requirements, then the Network API connection will not succeed and Experion data will not be available to MEDE.
Workaround:
Configure windows account running MEDE application as an Experion Operator with the options given below:
• Add the Windows account running Microsoft Excel Data Exchange (MEDE) to the Experion operators table.
• Add the Windows account running Microsoft Excel Data Exchange (MEDE) to the group that is exists in the Experion operators table.
Note
You will need to logout and login with this account to ensure Windows picks up this change for the account.
• Add a Windows group to the Experion operators table that has the Windows account with an application running as a member of Windows account running Microsoft Excel Data Exchange (MEDE).
7.6 Report Generation in Experion R500
Description:
Starting from R500, Experion utilises a new server-based report generation software framework to generate its reports, replacing Crystal Reports that had been used in previous releases.
Consequences:
Migrated Crystal Report output files from a previous release cannot be opened in Experion R500.

121 www.honeywellprocess.com
Workaround: There are free third party tools available to view Crystal Reports RPT files.
7.7 TCP ports 22479 and 22480 for Modified Network API
Description:
Starting from Experion R500 release, the Network API is modified to use TCP ports 22479 and 22480 for reads and writes respectively by replacing the use of UDP ports 50000 and 50001.
Consequences:
• Any firewall rules previously created by customers in network switching gear to allow Network API requests will now be incorrect.
• Applications written to use the Network API will not be able to connect to an R500 server if using the Network API DLL from a prior release.
Workaround:
• Update any Network API port rules in network switching gear to use the new TCP ports. • Update client applications to use the R500 version of the Network API DLL. This DLL will allow communication to R500 servers on the new ports as well as access older server versions on the old ports.
7.8 TCP ports 22479 and 22480 for Microsoft Excel Data Exchange
(MEDE)
Description:
Starting from Experion R500 release, the Network API is modified to use TCP ports 22479 and 22480 for communication. The Microsoft Excel Data Exchange (MEDE) now uses TCP ports rather than UDP ports.
Consequences:
Since, the Microsoft Excel Data Exchange (MEDE) relies on Network API for communication with the server, it will be impacted by changes made to the network ports Network API uses in R500.
Workaround:
Refer TCP ports 22479 and 22480 for Modified Network API section for more details.
7.9 No Access for Unauthenticated Users to Download Configuration Changes to Server
Description:
From Experion R500 Release, in station, disabling option to User name and password required for Quick Builder, Enterprise Model Builder and Control Builder downloads in Security Tab under Configure > Server-wide settings is not available for all the customers.
Consequences:
In older releases, this setting was enabled by default, but some customers would have this disabled, allowing unauthenticated users to download configuration changes to the server. This ability and setting is now removed.
Workaround:

www.honeywellprocess.com 122
To download engineering changes for the server, login to the Configuration Studio as a user who has the appropriate engineering permissions on the server or who belongs to either the Local Engineers or Product Administrators group on the servers.
Users will not be impacted by this change, as the affected engineering tools do not run unless the user is authorized.
Note
Ensure you use Windows account that exists on the server when performing engineering activities.
7.10 Occasional Delay in Report Generation
Description:
Experion uses Microsoft SQL Server Reporting Services (SSRS) to generate reports.
Occasionally you may experience a delay in report generation for the following reports due to the application domains in the SSRS recycling after the default period of 12 hours:
Consequences:
Specifically impacts:
• Alarm and Event DSA
• Fieldbus Diagnostics
• Asset Alarm Count
• Disabled Console Assets
• OPC DA Server Usage
• Performance Statistics
These scheduled recycling operations are aimed at promoting overall process health and to reduce the probability of a server wide issue from occurring.
7.11 C300 Controllers with Experion Profit Controller Function Blocks
Error Indication: Series A AI AO failed during long run when C300ME loaded with MIMO blocks
Description: Series A IO Modules are not qualified to be used in C300 controllers that have Experion Profit Controller Blocks loaded. Using these modules may lead to intermittent disconnects.
Recovery: None.
Workaround: C300s with Experion Profit Controller function blocks should not use Series A IO.
7.12 EAS Migration Failure at Application Framework Step (PAR 1-6Q2D4JV)
Error Indication: Step task returned non zero value (1603).
Description: EAS migration may fail at application framework step, if optional EAF package was installed.
Workaround:
• Acknowledge the error by click OK on sequencer display.
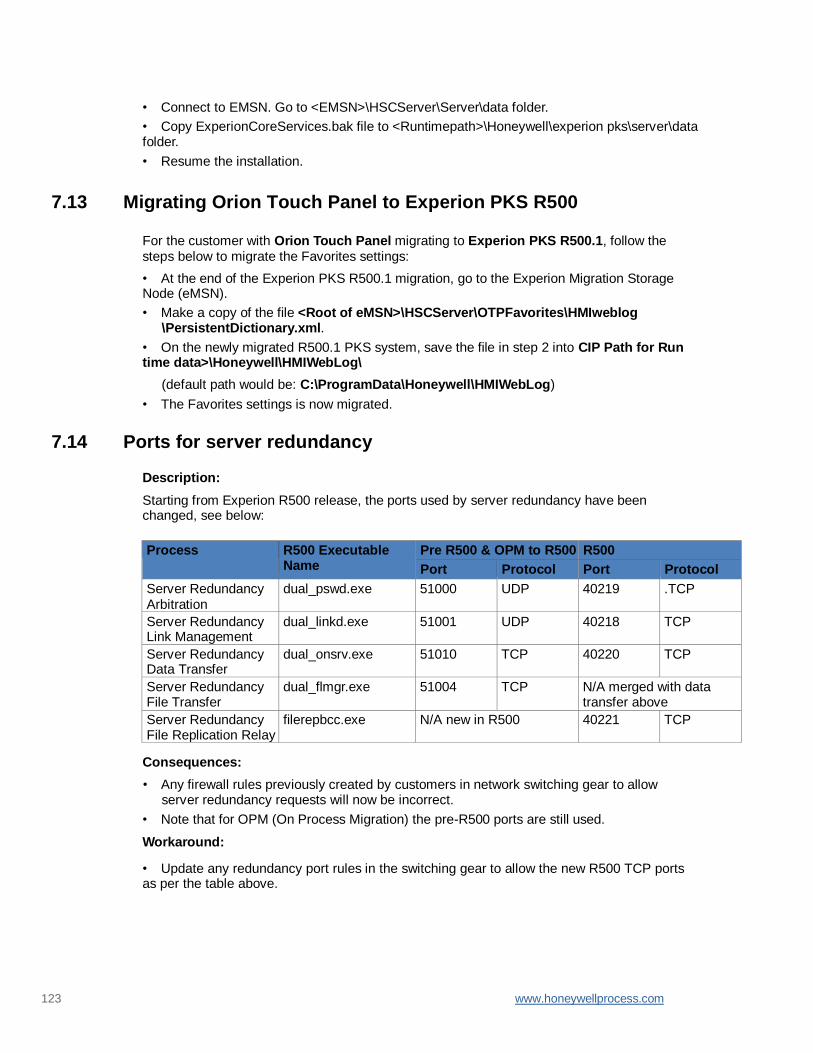
123 www.honeywellprocess.com
• Connect to EMSN. Go to <EMSN>\HSCServer\Server\data folder.
• Copy ExperionCoreServices.bak file to <Runtimepath>\Honeywell\experion pks\server\data folder.
• Resume the installation.
7.13 Migrating Orion Touch Panel to Experion PKS R500
For the customer with Orion Touch Panel migrating to Experion PKS R500.1, follow the steps below to migrate the Favorites settings:
• At the end of the Experion PKS R500.1 migration, go to the Experion Migration Storage Node (eMSN).
• Make a copy of the file <Root of eMSN>\HSCServer\OTPFavorites\HMIweblog \PersistentDictionary.xml.
• On the newly migrated R500.1 PKS system, save the file in step 2 into CIP Path for Run time data>\Honeywell\HMIWebLog\
(default path would be: C:\ProgramData\Honeywell\HMIWebLog)
• The Favorites settings is now migrated.
7.14 Ports for server redundancy
Description:
Starting from Experion R500 release, the ports used by server redundancy have been changed, see below:
Process R500 Executable Name
Pre R500 & OPM to R500 R500
Port Protocol Port Protocol
Server Redundancy Arbitration
dual_pswd.exe 51000 UDP 40219 .TCP
Server Redundancy Link Management
dual_linkd.exe 51001 UDP 40218 TCP
Server Redundancy Data Transfer
dual_onsrv.exe 51010 TCP 40220 TCP
Server Redundancy File Transfer
dual_flmgr.exe 51004 TCP N/A merged with data transfer above
Server Redundancy File Replication Relay
filerepbcc.exe N/A new in R500 40221 TCP
Consequences:
• Any firewall rules previously created by customers in network switching gear to allow server redundancy requests will now be incorrect.
• Note that for OPM (On Process Migration) the pre-R500 ports are still used.
Workaround:
• Update any redundancy port rules in the switching gear to allow the new R500 TCP ports as per the table above.

www.honeywellprocess.com 124
7.15 Uniformance PHD Documentation Connection to the Experion PKS PHD History Tag Synch Service
Description:
The Uniformance PHD documentation doesn't state the requirements clearly for connecting to the Experion PKS PHD history tag synch service.
Scope of Impact:
This consideration applies only to customers who are using thehistory tag synch feature of Uniformance PHD with Experion PKS.
Consequences:
If the Experion PKS Server is not configured correctly, Uniformance PHD will not be able to obtain tags from Experion PKS.
Recovery:
If you are using Uniformance PHD’s optional Experion PKS tag synching service, you need to ensure the Experion PKS Server is correctly configured.
When you first installed the tag synching service, you had an opportunity to set the account to be used to connect to the Experion PKS system. This setting is called Experion User Account and can be found in the Configure User Accounts tree on the Final Steps tab of the PHD installation.
To check what account you have used, or to change this account:
1. Launch the Uniformance System Console.
2. Connect to your Uniformance PHD server and log in.
3. Select the “Uniformance PHD Tag Synchronisation Server” item from the tree.
4. Right click on the item and select “Properties”.
5. Select the “Tag Synchronisation Users” tab.
6. Check or change the “Experion Client User Account”.
It’s important that the account you used in the above configuration:
1. If using a non-domain account, then an identical account (account name and password) must exist on the Experion PKS servers.
2. If using a domain account, then the PHD server and the Experion PKS servers are in the same domain.
3. The account has been added to the “Local Servers” group on the Experion PKS servers.
Workaround:
See the recovery section for how to avoid this issue.
7.16 Integration with other products
7.16.1 Profit Blending and Movement (PBM) or Blending and Movement Automation (BMA)
Customers who have implemented Profit Blending and Movement (PBM) or Blending and Movement Automation (BMA), must ensure that the BMA / PBM software is at the following point release level or higher:
• PBM R500.1

125 www.honeywellprocess.com
7.16.2 ACM
This release is not compatible with the ACM Point Server and it should not be installed if the ACM Point Server interface is being used. Please delay installation until an ACM patch is released where the ACM Point Server is compatible with Experion R500.1.
7.17 Prompt for Username and Password when Requesting Reports
Description:
User may be prompted for username and password when requesting reports.
Workaround:
1. Open Internet Explorer and select Internet options.
2. On the Security tab, select Local Intranet and click Custom Level.
3. Set the User Authentication > Logon setting to Automatic logon in Intranet zone.
Note
This setting may be managed by a domain group policy.
4. Ensure that the currently logged-on user on the computer is a member of one of the following Windows groups on the Experion Server:
a. Loal Ack View Only Users b. Local View Only Users c. Local Operators d. Local Engineers e. Local Supervisors f. Product Administrators
7.18 Installing a Flex Server
Description:
Flex Server is not listed as an installation option in the install media or the Software Installation Users Guide.
Workaround When installing a Flex Server to a Windows 10 machine, the node type you choose is ESV The Flex Server is not explicitly called out during the installation.
7.19 Migration of Existing DSA Advanced Security Connections
Description:
In previous Experion releases it was documented as a recommendation that Windows accounts being used for DSA Advanced Security were added to a Windows local group called Remote Servers. In Experion R500.1, it is now a compulsory requirement that all Windows accounts being used for DSA Advanced Security (for both publishing and subscribing connections) be added to a new local Windows group called Local DSA Connections. This group is added by the Experion R500.1 installation and replaces the functionality of the older Remote Servers group.
Scope of Impact:
Only migrating servers using DSA Advanced Security (as publisher or subscriber) are affected. DSA connections that use standard DSA security are not affected.

www.honeywellprocess.com 126
Consequences:
When the migrated server becomes primary, the DSA Advanced Security connections will fail to connect, if the accounts used are not members of the Local DSA Connections group.
Recovery:
Once the installation of Experion R500.1 is complete, add all Windows accounts used in DSA Advanced Security connections on the server (both for publishing and subscribing) to the local Local DSA Connections group. When the server first becomes primary, these DSA connections will connect successfully and there will be no disruption to DSA Data and Alarms.
Workaround:
See the Recovery section for how to avoid this issue.
7.20 Non Replication of Menus and Toolbars between Console Station Extensions and Flex Stations
Description:
Menus and Toolbars are not replicated between all Console Station Extensions and Flex Stations within the same clusters.
Scope of Impact:
For Console Station Extensions, if the operators swing to a different extension station, the same set of customized Menus and Toolbars may not be available.
Consequences:
See scope of impact.
Recovery:
See workaround.
Workaround:
1. On the Console Station Extension node, add a share for the %HwProgramData%\Experion PKS\Client\MenusAndToolbars folder, with the same permissions, as the share on the Console Station. An example command run in an Administrator command prompt on the node named ExtNode:
net share MenusAndToolbars="D:\Experion_PKS-ProgramData\Honeywell\Experion PKS\Client\MenusAndToolbars" /grant:"ExtNode\Local Servers",FULL
2. Add the Console Station Extension node to the Specific PCs destination in the MenusAndToolbars File Replication rule. 3. Click the Replicate now button for the MenusAndToolbars File Replication rule. Similarly, repeat the same for a Flex Station node and Servers.
7.21 Vertical Scaling of Route Profile display for Leak Adjusted Pressures (PAR 1-6NVS8Z5)
Description:
The Route Profile display does not correctly scale vertically for Leak Adjusted Pressures.
Scope of Impact:
The Route Profile display for liquid route equipment points provides a graphical representation of the pressure and temperature profile in a liquid transmission pipeline. If a leak is detected in the pipeline, the same display will provide an indication on where the leak

127 www.honeywellprocess.com
is located, the estimated size of the leak, and a calculated pressure profile across the pipeline that is due to the leak (the leak adjusted pressure).
The Route Profile display, which typically auto-scales for the pressure profiles on the pipeline, does not do so for the calculated leak adjusted pressure values.
Consequences:
In rare occurrences, the leak adjusted pressure may differ from the other pressure profiles on this display and may draw outside of the Route Profile display. However, the estimated leak size and leak location will always be visible to the user.
Recovery:
None. Note that the leak adjusted pressure profile is calculated for the purposes of determining the estimated leak location and would only be used for advanced troubleshooting purposes. It bears no consequence to the normal operation of the liquid transmission pipeline.
Workaround:
None.
7.22 The Pipeline Pressure Profile and Route Profile displays (PAR 1-6NVUFHR)
Description:
The Pipeline Pressure Profile and Route Profile displays report an error when viewed by a DSA Subscriber in runtime mode.
Scope of Impact:
The Pipeline Pressure Profile and Route Profile displays in the Operational Application Suite provide a graphical representation of the pressure and temperature profiles of the liquid pipeline and liquid route equipment points, respectively. However, when they are viewed by a DSA Subscriber that does not own these equipment points, then a script error is shown when they are viewed in the (default) runtime mode. Once the User acknowledges the script error, the pressure and temperature profiles are not displayed.
Consequences:
The pressure and temperature profiles are not displayed in the affected displays in the DSA Subscriber nodes. They are viewed correctly on the Experion Cluster that owns these equipment points. Recovery: None. Workaround: Use the time control on the affected displays and press the Pause button on the DSA Subscriber nodes. This will provide a view of the pressure and temperature profiles, but at a lower fidelity than in runtime mode.

www.honeywellprocess.com 128
7.23 Patch Considerations in R500.2
This point release affects some specific functionality of Experion PKS and other products that integrate with Experion PKS. If any of the items below are used on your system this section highlights additional preparation required before you install this patch. If you do not use any of these features, you will not be affected and you can disregard this section.
• DSA Alarm and Event Report
• Only when reporting from servers other than your local server
• DSA Advanced Security
• IEC60870 Interface
• Uniformance PHD and history tag synching
• Integration with other products
• Profit Blending and Movement (PBM) or Blending and Movement Automation (BMA)
• ACM
7.23.1 DSA – Alarm and Event Report
If you use the DSA Alarm and Event Report to query other systems, you will need to ensure you that that system is at the appropriate patch level. Use the following table to determine the minimum patch level. Installing patches to the subscribing servers first will minimize disruption of DSA Alarm Event Report queries whilst patching the servers in your system.
Release Patch Level
R400.8 Experion PKS R400.8 Server Patch 822
R410.9 Experion PKS R410.9 Server Patch 2
R430.6 Experion PKS R430.6 Server Patch 1
R431.3 Experion PKS R431.3 Server Patch 3
R431.4 Experion PKS R431.4
R432.1 Experion PKS R432.1
R500.1 Experion PKS R500.1 Server Patch 2
R500.1 Experion PKS R500.1
7.23.2 DSA Advanced Security If you are installing this point release on a server that uses DSA Advanced Security, either for publishing or subscribing, it was previously documented as a recommendation that Windows accounts being used were added to a Windows local group called ‘Remote Servers’. This is now a compulsory requirement and DSA Advanced Security connections will fail after installation of the point release if they are not in this group. Ensure that this procedure is followed for seamless DSA Advanced Security connectivity during patching:
1. Prior to patch installation, ensure all Windows accounts used for DSA Advanced
Security (both for publishing and subscribing to this server) are added to a local Windows group called ’Remote Servers’. Perform this step on both servers if they are

129 www.honeywellprocess.com
redundant. See ‘Creating a Remote Servers group’ in the Experion Server and Client Configuration Guide for more information.
2. If created after DSA setup system will need to be restarted. 3. If connecting via DSA to a R410 system, the R410 system must be at R410.2 or later. 4. Install this patch on the servers as per this SCN.
This does not affect users of standard DSA security.
7.23.3 IEC60870 Interface
This point release is not compatible with the standard R431 version of the IEC60870 point server and it should not be installed if an IEC60870 interface is being used. Please delay installation of this point release until application of an IEC60870 patch listed as being compatible with:
PAR 1-6N0F0UR Robustness improvements to DSA and console stations
7.23.4 Uniformance PHD and history tag synching
Ensure you follow Section Installing PHD point server patch on PHD server to update your PHD system. If you’re using Uniformance PHD’s optional Experion PKS tag synching service, you need to ensure the Experion PKS Server is correctly configured. When you first installed the tag synching service, you had the opportunity to set the account to be used to connect to the Experion PKS system. This setting is called “Experion User Account” and can be found in the “Configure User Accounts” tree on the “Final Steps” tab of the PHD installation. To check what account you’ve used, or to change this account:
- Launch the Uniformance System Console - Connect to your Uniformance PHD server and log in - Select the “Uniformance PHD Tag Synchronization Server” item from the tree - Right click on the item and select “Properties” - Select the “Tag Synchronization Users” tab - Check or change the “Experion Client User Account”
It’s important that the account you used in the above configuration:
- If using a non-domain account, then an identical account (account name and password)
must exist on the Experion PKS servers - If using a domain account, then the PHD server and the Experion PKS servers are in the
same domain - The account has been added to the “Local Servers” group on the Experion PKS servers
If a non-domain account is used, then the PHD tag sync service will also need to run under this account:
- Launch the Windows services applet (services.msc) - Navigate to the service “Uniformance PHD Tag Synchronization Server” - Change the “Log On” to the non-domain account (entering account name and password) - If prompted as to whether to grant the “run as a service” privilege to the account, grant this
privilege - The account should be added to the local “Product Administrators” group - Stop and restart the “Uniformance PHD Tag Synchronization Server” service

www.honeywellprocess.com 130
7.23.5 Integration with other products
Profit Blending and Movement (PBM) or Blending and Movement Automation (BMA)
Before applying this point release, customers who have implemented Profit Blending and Movement (PBM) or Blending and Movement Automation (BMA), must ensure that [a] the BMA / PBM point server dated 14-Jan-2016 or later (file version 4.3.2.14 or later) is running on their system or, alternatively, [b] the BMA / PBM software is at the following point release level or higher:
• PBM R500.1
• PBM R431.2 • BMA R430.3
7.23.6 ACM This point release is not compatible with the standard R431 version of the ACM point server and it should not be installed if an ACM point server interface is being used. Please delay installation of this point release until application of an ACM patch listed as being compatible with:
PAR 1-6N0F0UR Robustness improvements to DSA and console stations

131 www.honeywellprocess.com
Chapter 8 Support and other contacts
8.1 Documentation feedback
You can find the most up-to-date documents on the Honeywell Process Solutions support website at:
http://www.honeywellprocess.com/support
If you have comments about Honeywell Process Solutions documentation, send your feedback to:
Use this email address to provide feedback, or to report errors and omissions in the documentation. For
immediate help with a technical problem, contact your local Honeywell Process Solutions Customer Contact
Center (CCC) or Honeywell Technical Assistance Center (TAC) listed in the “Support and other contacts”
section of this document.
8.2 How to report security vulnerability?
For the purpose of submission, a security vulnerability is defined as a software defect or weakness that
can be exploited to reduce the operational or security capabilities of the software.
Honeywell investigates all reports of security vulnerabilities affecting Honeywell products and services.
To report a potential security vulnerability against any Honeywell product, please follow the instructions
at: https://honeywell.com/pages/vulnerabilityreporting.aspx
Submit the requested information to Honeywell using one of the following methods:
• Send an email to [email protected].
Or
• Contact your local Honeywell Process Solutions Customer Contact Center (CCC) or Honeywell
Technical Assistance Center (TAC).
8.3 GTAC Support
8.3.1 Subscribe for Automated Email Alerts:
Honeywell advises all users to subscribe for alerts on HoneywellProcess.com to receive an email alert every
time a new Notification or patch is posted. A tutorial is available (“Learn to Subscribe” link at the bottom right
hand side of any page of HoneywellProcess.com) to help guide you through the subscription process and to
tailor
subscriptions to be appropriate to your system and needs. In addition you may also Subscribe to the GTAC
Knowledge Sharing Mails which provide users on a regular basis with valuable tips & tricks, lessons learned and
recommendations.

www.honeywellprocess.com 132
8.3.2 Further support required?
If you have any questions concerning this notification, please contact your local Honeywell office or the Global
Technical Assistance Centre (GTAC). Visit HoneywellProcess.Com and select “Contact Us” for country-specific
Customer Contact Numbers. After you log on to HoneywellProcess.Com you may also Search our Knowledge
Base or Submit a Support Request to request help.
8.3.3 Training classes
Honeywell holds technical training classes on Experion PKS. These classes are taught by experts in the field of
process control systems. For more information about these classes, contact your Honeywell representative, or see
http://www.automationcollege.com.

Honeywell Process Solutions 1860 W. Rose Garden Lane Phoenix, AZ 85027 USA
www.honeywellprocess.com