sniper defense the sniper defense is a 4-3 base designed for flexibility in defending and attacking...
TRANSCRIPT
Sniper Defense
The Sniper Defense is a 4-3 base designed for flexibility in defending
and attacking the offense.(This is essentially a 4-3
Rover/Monster type defense)
Sniper Defense
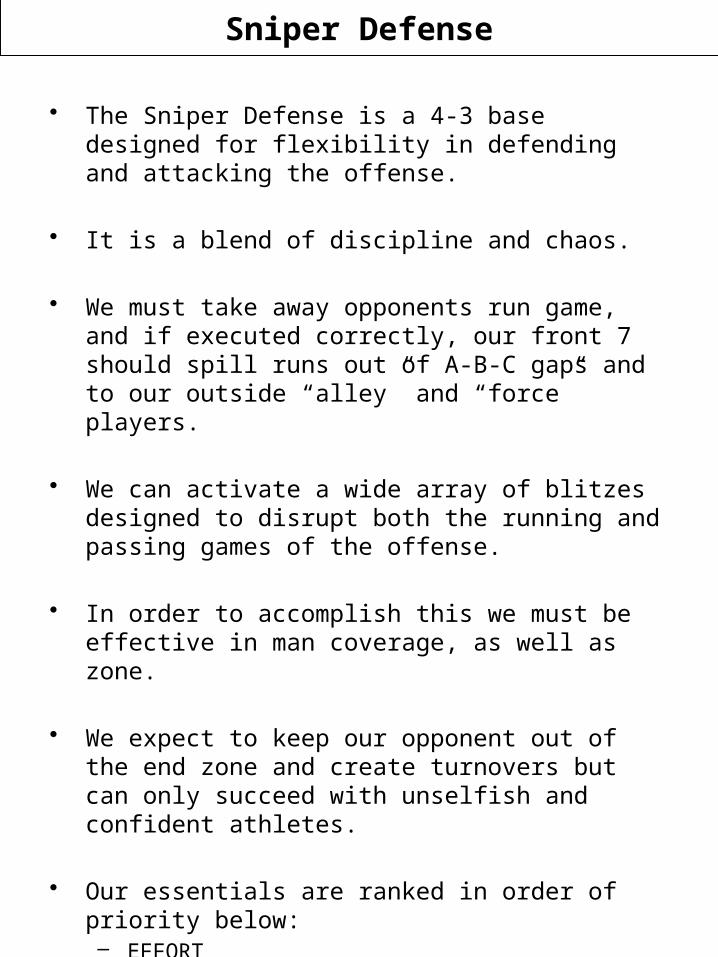
• The Sniper Defense is a 4-3 base designed for flexibility in defending and attacking the offense.
• It is a blend of discipline and chaos.
• We must take away opponents run game, and if executed correctly, our front 7 should spill runs out of A-B-C gaps and to our outside “alley” and “force” players.
• We can activate a wide array of blitzes designed to disrupt both the running and passing games of the offense.
• In order to accomplish this we must be effective in man coverage, as well as zone.
• We expect to keep our opponent out of the end zone and create turnovers but can only succeed with unselfish and confident athletes.
• Our essentials are ranked in order of priority below:– EFFORT– FUNDAMENTALS– SCHEME

Summary of Defensive CallsPositions Category Coaching Points Positions Category Coaching PointsAlignment LB's and Safeties
Base Alignment Wiper Blitz Sniper, Will
Strong Alignment Sluggo Blitz Sniper and Sam
Max Alignment Nitro Blitz Triple Strong Sniper/Sam/Mike
Defensive Line Safeties & Corners
Psycho Stunt Slant Strong 11 (Orange) Coverage
Tornado Stunt Whip 13 (Black) Coverage
Typhoon Stunt Tackle 14 (Husky) Coverage
Wacko Stunt Slant weak 22 (White) Coverage Default for LB blitzes
Bungy Blitz Deep FS/Sniper
Falcon Blitz Free
DL & LB's Slam Blitz Strong Corner
Devil Combo NT, Mike zone Sniper Blitz Sniper
Dogg Combo DE’s drop Wham Blitz Weak Corner
LB's Only
Fire Blitz Max All LB's Items in RED are to be ready for scrimmage
Maul Blitz Mike-Will
Mug Blitz Mike
Saw Blitz Sam-Will
Sike Blitz Sam-Mike
Smash Blitz Sam
Wax Blitz Will

Notes and Rules
• DT Technique– Align on the OL. Eyes of the DT are splitting the edge of the shoulder pads– 1-Technique: Over the shoulder of the C– 3-Technique: Over the outside edge of the OG– 2i-technique (Boomer): Over the inside edge of the OG– Strike through the OL, disrupt their block– If the OL pulls, in either direction, DL will follow to disrupt– Fight pressure – If PG tries to block down (he has the angle) then fight the pressure and do not give up the spot– Stay low and drive– 4-pt stance may be a consideration if the player will not stay low– If pass (watch the helmet of the OL), then do not play with the OL – Get off the OL and attack the QB– Remain in the rush lanes to ensure contain
• DE Technique– Align on the outside shoulder of the EMLOS– 2-pt stance, low, hands up for strike– If the EMLOS is the TE then attack, attack, attack! Do not let the TE get off the LOS free. Ever.– Attack outside the EMLOS to the QB in as direct a line as possible– If the EMLOS attempts to hook/reach for sweep then maintain outside contain– Ride the player to the sideline but do not give up outside contain– Block Down? Step Down! (BDSD)– If the EMLOS blocks down to the inside then the DE will step down– Silver Surfer – look for kick-out/pull from inside, create pile– Do not go upfield if the play seems to go away, no deeper than the deepest player– If pass then attack the QB, maintain outside contain, attack back-side shoulder
• Boomer – Alignment for no TE, single back, likely gun with Doubles or Trips– DT’s go to 2i (inside shade of OG)– Mike and Sam go to 30 techniques (B-gap, outside shade of OG)– They have the hook-seam area to their side– Will and Sniper take inside WR’s
• Problem: #2 WR goes vertical– Solution: Sniper or OLB goes with him– If Trips and the #2 goes vertical, the Sniper will take him and the ILB will take the flat– The ILB must be aware of #2 as well. #3 is not as dangerous to us as #2
• Motion– When WR motions he will be handed off from LB to LB as he crosses the formation– LB’s exchange location and responsibility when the motion crosses the LB-LB boundary, match motion across the formation– This will change the coverage– Jet motion will be quicker and may be handled differently
• Priority– Tackling – When in doubt, do a tackling drill– Pursuit – When in doubt after tackling, do a pursuit drill– Alignment and assignments– Depth Chart

Defensive Ends
• Responsibility– Control the ELOS/perimeter– Play football
• See ball, attack ball• Defeat your opponent each time
• General Concepts– Stance
• 2-pt stance• Inside leg splits the EMLOS in half • Keep head and back vertical• Arms in front, ready to attack and control
– First Move• Drive your inside leg and arm into the EMLOS
– Stop his momentum– Control your position– Retain outside control
• Use your arms to keep the EMLOS away from you and in control
• Blocking Schemes Coming After You:– Down Block – If the EMLOS is blocking down either the play is going away, or it is coming
right at you (lead, kick-out)• Push the EMLOS down into the pile
– Condense the LOS– Contact is closer to center than they want – Disrupt their TE passing game
• Look to the inside for a OL trapping you – Silver Surfer position• Look to the FB for a kick-out
– Drive Block – Play is going inside you so the EMLOS is trying to move you out of the hole• Hold your ground• Keep your outside arm and leg free
– Hook Block – The play is going outside of you (sweep)• Keep EMLOS to inside• Keep your outside arm and leg free• Drive up-field to alter BC path
– Pass Block• Attack the QB• A sack must be earned, all the way to the QB
– If you are getting through, they are letting you through. Look for the screen

DE – Wing-T Adjustments
• Offensive Summary– The wing-t will normally have a single wide receiver, two backs offset to the short
side, and wing. The wing will usually be outside the TE, but they will move him around and put him in motion. Some teams will also move the FB around just a bit. This is a deception offense – backs crossing, QB rolling - where you will not see the handoff and will not know who has the ball. Follow the G’s to the play. They will throw on the run, with little drop-back passing. Lots of fast hitting, pulling, trapping, deception type plays.
• Defensive Summary– Assign a Dog to the Wing. LB’s and DB’s turn and run to the QB rollout. DL slant to
the wing side. Not greatly concerned about vertical or combo route passing game.• Defensive Line – Slant to the wing side. DE’s split the EMLOS. If the wing goes in
motion the call will change so be prepared.• Linebackers – Won’t have lead/ISO type plays coming at you. Step up, read, and fill.• Corners – Wing side won’t have anyone wide so play closer to the box. We will
assign a Dog back to cover the wing 1-1. Outside C is 1-1 with the wide receiver. • Safety’s – Play over/just outside of the TE and outside the short side EMLOS. Look
to support run first.
• On TE Side – Continue to split the EMLOS– Step down 1 yard deep into the backfield through the EMLOS– Look to the inside for pulling guards– The Wing may try to block down on you– Control the TE to keep him from the LB’s and getting into the pass route clean -
Make him earn getting past you
• Away from TE– Continue to split the EMLOS– Look for the QB bootleg coming to your side– Look for the T and G fold blocking on you
• T will close down on our DT• The G will “pull” to drive you out• Objective is to clear a hole to your inside for the FB to run to

Defensive LinePosition Coaching Points
Your intent is to attack and disrupt the offensive linemen so our second level players can make tackles. You must play with an irritating energy that never stops. In order to achieve this you must quickly read and react and be physical at the point of attack. You must be disciplined in your protection of A-B gaps.
Whip – Weak-side defensive end
Same as the Sword, but will not normally be on the TE, will generally be on the OT which is a different body style and approach. May be down in a 3-point stance (may also angle, depending on the player) if not playing against a TE. Will not be concerned about disrupting the OT release except for the step-down. Do not spend time playing with the EMLOS, get to the QB while maintaining outside contain. Cannot get hooked. Will flip-flop with Sword depending on the strength call.
DT Normally a gap player, will be in the A- or B-gap depending on the strength call. Will be in a very low, weight on the hand, rear in the air stance. First thought is to get off the ball quick enough to get through the gap untouched. Will follow the OG, if he pulls then follow and disrupt. If no contact then turn to the inside and look for the trap block. Attack the QB and the football. Attack at full speed but under control to read the play, don’t want to run past a ball carrier.
Sword – Strong-side defensive end
Align outside shade of the strong-side EMLOS in a low 2-point stance, hands up, eyes on the target. Control and disrupt the TE release. Attack the QB through the shoulder-neck area. Watch for the reach-block by the EMLOS, must maintain outside leverage. If the EMLOS steps down to the inside, close down hard, shove the player into the inside, and as ‘Silver Surfer’, attack the pull- or kick-out block, create a pile. Will flip-flop with Whip depending on the strength call.

LinebackersPosition Coaching Points
Mike: You will quickly fill empty gaps with exceptional leverage and strength. You must play fast, downhill and punish ball carriers with sure tackling. You can effectively cover RB, TE and zones in the passing game. You are call makers both in the huddle and pre snap.
Sam, Will: You must be comfortable playing in space against skill players or rushing the passer. As a Force/Contain player you are willing to take on Offensive Linemen and hold your ground at the point of attack. You must be disciplined when the ball goes away watching for Counter/Reverse or Bootleg. You are an essential communicator both pre snap and during the play.
All LB’s First thought is to stop the inside run. Low, 2-point stance eyes up, ready to attack. First step is with the inside foot make the run/pass read, then attack the assignment.
Will – Weak-side outside linebacker
Will call the down and distance, before/in huddle and before play.Walk-off like Sniper if doubles formation. Control the weak-side B-gap and look for the off-tackle run play 1st. Maintain outside contain. May have flat away from Sniper, or hook-seam if to the Sniper.
Mike Will make the defensive call in the huddle.Step-up, read the OG-C-RB triangle and make the run/pass read. If pass then cover the hook-seam away from the Sniper call.
Sam – Strong-side outside linebacker
Will make the strength call.Control the strong-side B-gap. Look for the off-tackle play 1st, disrupt the TE release. Take flat if away from Sniper, or hook-seam if to the Sniper. If trips then align inside 1-2 yards inside the #3 receiver (unless TE) at normal LB depth.

Defensive BacksPosition Coaching Points
Sniper, Free Safety: The Sniper is the SNIPER, and I believe a pivotal player in the scheme. The SNIPER is tough and needs to have a dual personality. He must be a great tackler but also must be quick enough to stay with slot receivers. Our Free Safety is the quarterback of the defensive backfield. He will be called upon to prevent big plays by being instinctive and fast. He is also a guy who doesn’t mind getting his nose dirty making open field tackles.
Cornerbacks: You must play with fluid quickness and confidence. You must be comfortable playing “off” in zone or pressing. You should protect against the pass first, run second. If a ball carrier breaks contain then you are responsible for making the play. You must get off blocks and be sure tacklers.
Sniper If doubles then align with strengthAlign 2 yards inside the inside/#2 receiver, at a depth between the LB’s and the CB’s – deep enough to keep both the receiver and the QB in the line of sight. Look for the inside release first, make the receiver pay for coming inside. Take the flat. Make the run/pass read and attack the responsibility. Will have the QB on the option
Cornerback Normally 7-9 yards off the #1 receiver from the sideline. Will typically have the deep outside 1/3 of the field. Will not let the receiver get deeper than he is. Begin with backpedal and make the read. Initial view is on the QB. If run to him then maintain outside contain and funnel the runner back into the middle. Will have pitch on the option.
Free Safety 10-12 yards off the LOS, shaded to strength, generally between the C and OT. Nobody gets past him. Look for the run and punish the runner.

Calling the Offensive Strength
• In the Sniper defense we will flip-flop the Sword, Sam, Whip, and Will – it is critical that we properly identify which side of the offensive formation we consider the strong side
• Normally this will be to the tight end (TE) side of the offensive formation– This may change based on the formations, offensive scheme,
and the opponent
• If there is no TE, then strength is to the 2 receivers side
• If balanced (Doubles, Flexbone), then strength is to the wide side of the field– If in middle, to our sideline
• Call is ‘Strong Left’ or ‘Strong Right’, made by Sam– Repeat the call to both sides of the defense– Call is repeated by the other LB’s

Making the Sniper Call
• Sniper identifies the 2-receiver side
• Aligns as walk-off LB on the slot receiver
• Makes the Sniper call based on where he lines up– Left – Lima– Romeo – Right
• Must be a loud call so all of the LB’s and DB’s are aware of his location
FRONT-7ALIGNMENTS AND ASSIGNMENTS
Where the front-7 will align and what they will do

Base Defensive Alignments
S
SW T WH
M W
T
Area Defensive alignments
Call Base
Description Base defensive alignments for a Pro formation
Pos Align Assignment Pos Align Assignment
Sword - SH 7 Strong D, Contain CB Outside force, post, contain
T 3 Strong B-gap Sniper – $ Alley Alley
T 1 Weak A-gap Falcon – FS Alley Alley
Whip – WH 5 Weak C, Contain CB Outside force, post, contain
Sam – S 50 Strong C-gap
Mike – M 10 Strong A-gap
Will – W 30 Weak B-gap
$
FS
CC
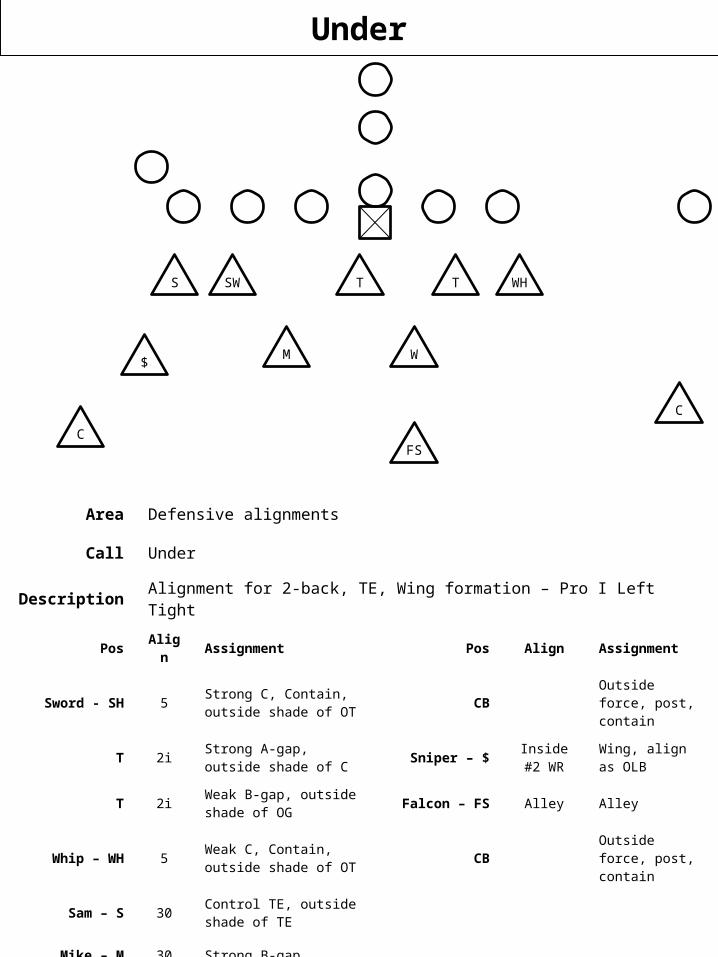
Under
S SW T WH
M W
T
Area Defensive alignments
Call Under
Description Alignment for 2-back, TE, Wing formation – Pro I Left Tight
Pos Align Assignment Pos Align Assignment
Sword - SH 5 Strong C, Contain, outside shade of OT CB Outside force, post,
contain
T 2i Strong A-gap, outside shade of C Sniper – $ Inside #2
WR Wing, align as OLB
T 2i Weak B-gap, outside shade of OG Falcon – FS Alley Alley
Whip – WH 5 Weak C, Contain, outside shade of OT CB Outside force, post,
contain
Sam – S 30 Control TE, outside shade of TE
Mike – M 30 Strong B-gap
Will – W Weak A-gap
$
FS
C
C

Under
S
SW T WH
M W
T
Area Defensive alignments
Call Under
Description Alignment for 2-back, TE, Wing formation – Pro I Left Tight
Pos Align Assignment Pos Align Assignment
Sword - SH 5 Strong C, Contain, outside shade of OT CB Outside force, post,
contain
T 2i Strong A-gap, outside shade of C Sniper – $ Inside #2
WR Wing, align as OLB
T 2i Weak B-gap, outside shade of OG Falcon – FS Alley Alley
Whip – WH 5 Weak C, Contain, outside shade of OT CB Outside force, post,
contain
Sam – S 30 Control TE, outside shade of TE
Mike – M 30 Strong B-gap
Will – W Weak A-gap
$
FS
C
C

Boomer
S
SW T WH
M W
T
Area Defensive alignments
Call Boomer
Description Alignment for interior DT and OLB vs. 1-back, no TE formations
Pos Align Assignment Pos Align Assignment
Sword - SH 5 Strong C, Contain CB Outside force, post, contain
T 2i Strong A-gap Sniper – $ Inside #2 WR Walk-off
T 2i Weak A-gap Falcon – FS Alley Alley
Whip – WH 5 Weak C, Contain CB Outside force, post, contain
Sam – S 30 Strong B-gap
Mike – M 30 Weak B-gap
Will – W Walk-off on #2 receiver
$
FS
CC

Ale (Max)
S SH T WH
M
WT
Area Defensive alignments
Call Max
Description Short yardage for a Pro formation
Pos Align Assignment Pos Align Assignment
Sword - SH 4 Pinch strong CB Outside force, post, contain, man-to-man
T 1 Strong A-gap Sniper – $ Stack SDE Strong C-gap, TE man-to-man
T 1 Weak A-gap Falcon – FS Stack WDE Weak C-gap, TE man-to-man
Whip – WH 5Wide Weak C, Contain CB Outside force, post,
contain, man-to-man
Sam – S 7 Strong D-gap, contain
Mike – M 00 Flow, fill, RB smash route
Will – W 7 Weak D-gap, contain, RB
$ FS CC

Strong
S SH T WH
M W
T
Area Defensive alignments
Call Strong
Description Strong alignments for a Pro formation
Pos Align Assignment Pos Align Assignment
Sword - SH 5 Strong C-gap CB Outside force, post, contain
T 1 Strong A-gap Sniper – $ Alley Alley
T 3 Weak B-gap Falcon – FS Alley Alley
Whip – WH 5Wide Weak C, Contain CB Outside force, post,
contain
Sam – S 7 Strong D-gap, contain
Mike – M 30 Strong B-gap
Will – W 10 Weak A-gap
CC
$
FS

SHORT YARDAGE

Combinations and Blitz SummaryCall Description Assignment
Psycho Slant Strong
Tornado Whip WDE lateral step into G outside shoulder, 1 tech engage C w/ inside arm then tight loop into C gap …NT contain on rush
Typhoon Tackle 1 tech attack opposite shoulder of C work into B gap, 3 tech tight loop into weak A
Wacko Slant weak

Psycho – Slant Strong
S
DE T WH
M W
T
Area Stunts and blitzes
Call Psycho
Description DL slant to strong-side gap
Pos Align Assignment
DE 7 Slant to strong gap
T 3 Slant to strong gap
T 1 Slant to strong gap
Whip – WH 5 Slant to strong gap
Sam – S 50 Strong C-gap
Mike – M 10 Strong A-gap
Will – W 30 Weak C-gap
CC
$
FS

DEFENSIVE LINE STUNTS

Combinations and Blitz SummaryCall Description Assignment
Psycho Slant Strong
Tornado Whip WDE lateral step into G outside shoulder, 1 tech engage C w/ inside arm then tight loop into C gap …NT contain on rush
Typhoon Tackle 1 tech attack opposite shoulder of C work into B gap, 3 tech tight loop into weak A
Wacko Slant weak

Psycho – Slant Strong
S
DE T WH
M W
T
Area Stunts and blitzes
Call Psycho
Description DL slant to strong-side gap
Pos Align Assignment
DE 7 Slant to strong gap
T 3 Slant to strong gap
T 1 Slant to strong gap
Whip – WH 5 Slant to strong gap
Sam – S 50 Strong C-gap
Mike – M 10 Strong A-gap
Will – W 30 Weak C-gap
CC
$
FS

Wacko – Slant Weak
S
DE T WH
M W
T
Area Stunts and blitzes
Call Wacko
Description DL slant to weak-side gap
Pos Align Assignment
DE 7 Slant to weak gap
T 3 Slant to weak gap
T 1 Slant to weak gap
Whip – WH 5 Slant to weak gap
Sam – S 50 Strong C-gap
Mike – M 10 Strong A-gap
Will – W 30 Weak C-gap
CC
$
FS

Tornado – DT Stunt
S
DE T WH
M W
T
Area Stunts and blitzes
Call Tornado
Description Whip lateral step into G outside shoulder, 1 tech engage C w/ inside arm then tight loop into C gap …T contain on rush
Pos Align Assignment
DE 7 Strong D, Contain
T 3 Strong B-gap
T 1 Engage outside shoulder of C then loop into C-gap
Whip – WH 5 Lateral step into outside shoulder of OG
Sam – S 50 Strong C-gap
Mike – M 10 Strong A-gap
Will – W 30 Weak C-gap
CC
$
FS
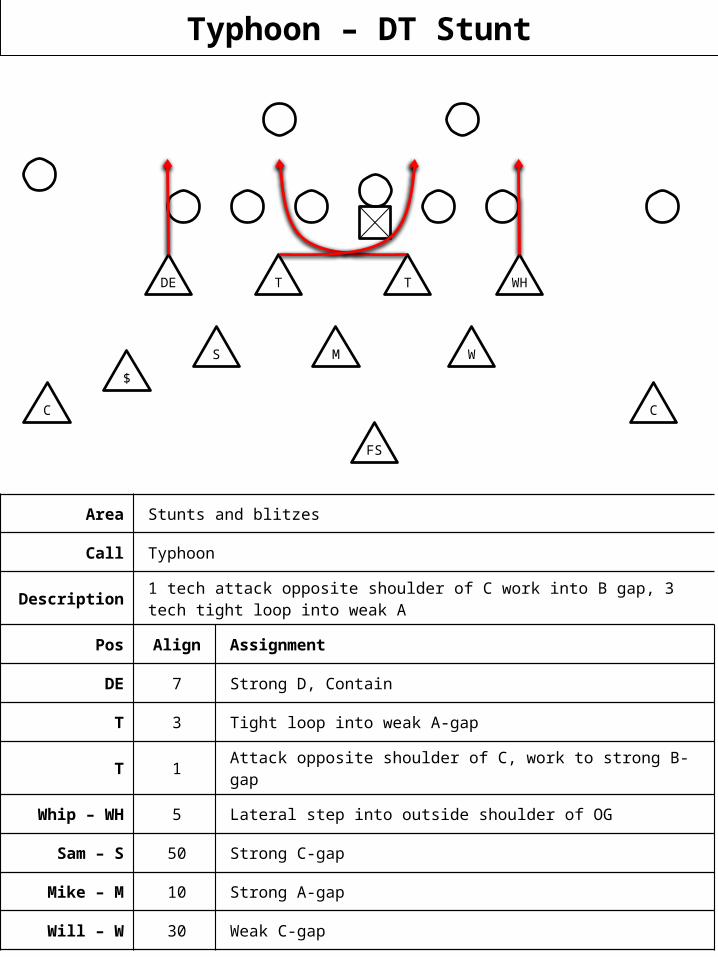
Typhoon – DT Stunt
S
DE T WH
M W
T
Area Stunts and blitzes
Call Typhoon
Description 1 tech attack opposite shoulder of C work into B gap, 3 tech tight loop into weak A
Pos Align Assignment
DE 7 Strong D, Contain
T 3 Tight loop into weak A-gap
T 1 Attack opposite shoulder of C, work to strong B-gap
Whip – WH 5 Lateral step into outside shoulder of OG
Sam – S 50 Strong C-gap
Mike – M 10 Strong A-gap
Will – W 30 Weak C-gap
CC
$
FS
DEFENSIVE LINE AND LINEBACKER COMBINATIONS

Defensive Line and Linebacker Combinations
Call Description Assignment
Devil DE’s drop DE’s drop to flat after hard outside rush step, Sam and Will blitz C-gap
Dogg NT, Mike zone

Devil – DE’s to flat
S
DE T WH
M W
T
Area Stunts and blitzes
Call Devil
Description DE’s drop to flat after hard 1st step, Sam, Will blitz C-gap
Pos Align Assignment
DE 7 Hard 1st step, then drop to flat coverage
T 3 Strong B-gap
T 1 Weak A-gap
Whip – WH 5 Hard 1st step, then drop to flat coverage
Sam – S 50 Blitz strong C-gap
Mike – M 10 Strong A-gap
Will – W 30 Blitz weak C-gap
CC
$
FS

Dogg – T Blitz, Mike zone
S
DE T WH
M W
T
Area Stunts and blitzes
Call Dogg
Description Mike blitzes, DT engages and then drops to zone
Pos Align Assignment
DE 7 Strong D, Contain
T 3 Strong B-gap
T 1 Engage the C and then drop into the Mike coverage area
Whip – WH 5 Weak C, Contain
Sam – S 50 Strong C-gap
Mike – M 10 Strong A-gap
Will – W 30 Weak B-gap
CC
$
FS

LINEBACKER BLITZES

Fire – All LB’s Blitz
S
DE T WH
M W
T
Area Stunts and blitzes
Call Fire
Description All LB’s blitz
Pos Align Assignment
DE 7 Strong D, Contain
T 3 Strong B-gap
T 1 Weak A-gap
Whip – WH 5 Weak C, Contain
Sam – S 50 Blitz strong C-gap
Mike – M 10 Blitz strong A-gap
Will – W 30 Blitz weak B-gap
CC
$
FS

Maul – Mike & Will Blitz
S
DE T WH
M W
T
Area Stunts and blitzes
Call Maul
Description Mike and Will blitz
Pos Align Assignment
DE 7 Strong D, Contain
T 3 Strong B-gap
T 1 Weak A-gap
Whip – WH 5 Weak C, Contain
Sam – S 50 Strong C-gap
Mike – M 10 Blitz strong A-gap
Will – W 30 Blitz weak B-gap
CC
$
FS

Mug – Mike Blitz
S
DE T WH
M W
T
Area Stunts and blitzes
Call Mug
Description Mike blitz
Pos Align Assignment
DE 7 Strong D, Contain
T 3 Strong B-gap
T 1 Weak A-gap
Whip – WH 5 Weak C, Contain
Sam – S 50 Strong C-gap
Mike – M 10 Blitz strong A-gap
Will – W 30 Weak B-gap
CC
$
FS

Saw – Sam & Will Blitz
S
DE T WH
M W
T
Area Stunts and blitzes
Call Saw
Description Sam and Will blitz
Pos Align Assignment
DE 7 Strong D, Contain
T 3 Strong B-gap
T 1 Weak A-gap
Whip – WH 5 Weak C, Contain
Sam – S 50 Blitz strong C-gap
Mike – M 10 Strong A-gap
Will – W 30 Blitz weak B-gap
CC
$
FS

Sike – Sam & Mike Blitz
S
DE T WH
M W
T
Area Stunts and blitzes
Call Sike
Description Sam and Mike blitz
Pos Align Assignment
DE 7 Strong D, Contain
T 3 Strong B-gap
T 1 Weak A-gap
Whip – WH 5 Weak C, Contain
Sam – S 50 Blitz strong C-gap
Mike – M 10 Blitz strong A-gap
Will – W 30 Weak B-gap
CC
$
FS

Smash – Sam Blitz
S
DE T WH
M W
T
Area Stunts and blitzes
Call Smash
Description Sam blitz
Pos Align Assignment
DE 7 Strong D, Contain
T 3 Strong B-gap
T 1 Weak A-gap
Whip – WH 5 Weak C, Contain
Sam – S 50 Blitz strong C-gap
Mike – M 10 Strong A-gap
Will – W 30 Weak B-gap
CC
$
FS
Wax – Will Blitz
S
DE T WH
M W
T
Area Stunts and blitzes
Call Wax
Description Will blitz
Pos Align Assignment
DE 7 Strong D, Contain
T 3 Strong B-gap
T 1 Weak A-gap
Whip – WH 5 Weak C, Contain
Sam – S 50 Strong C-gap
Mike – M 10 Strong A-gap
Will – W 30 Blitz weak B-gap
CC
$
FS

LINEBACKER AND DEFENSIVE BACK COMBINATIONS

Nitro – Sniper, Sam, Mike Blitz
S
DE T WH
M W
T
Area Stunts and blitzes
Call Nitro
Description Sniper, Sam, Mike blitz
Pos Align Assignment
DE 7 Strong D, Contain
T 3 Strong B-gap
T 1 Weak A-gap
Whip – WH 5 Weak C, Contain
Sam – S 50 Blitz strong C-gap
Mike – M 10 Blitz strong A-gap
Will – W 30 Weak B-gap
CC
$
FS
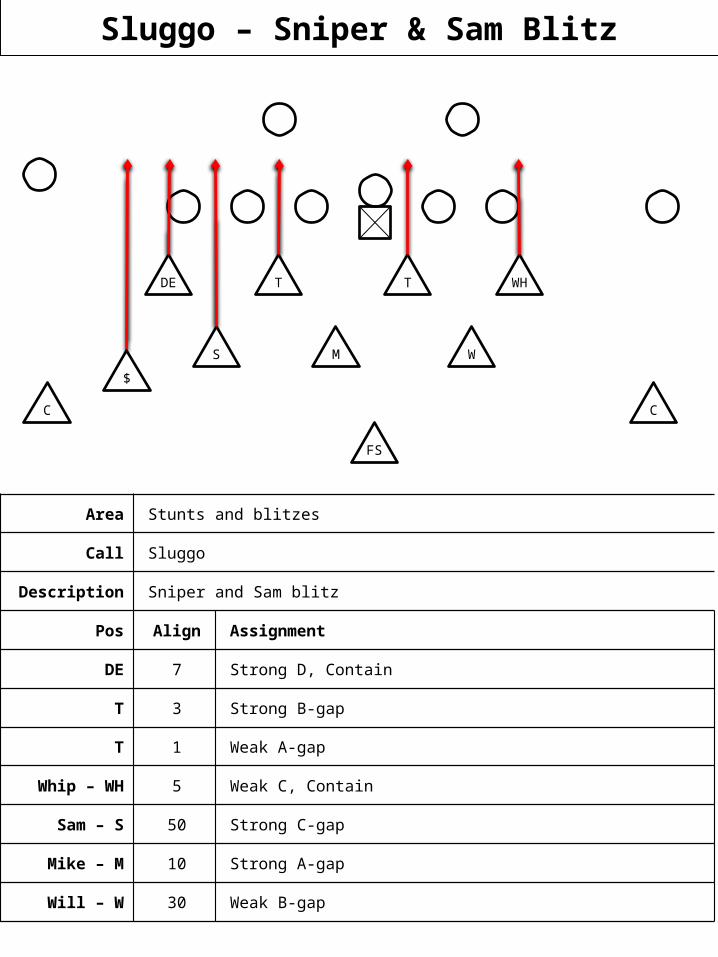
Sluggo – Sniper & Sam Blitz
S
DE T WH
M W
T
Area Stunts and blitzes
Call Sluggo
Description Sniper and Sam blitz
Pos Align Assignment
DE 7 Strong D, Contain
T 3 Strong B-gap
T 1 Weak A-gap
Whip – WH 5 Weak C, Contain
Sam – S 50 Strong C-gap
Mike – M 10 Strong A-gap
Will – W 30 Weak B-gap
CC
$
FS
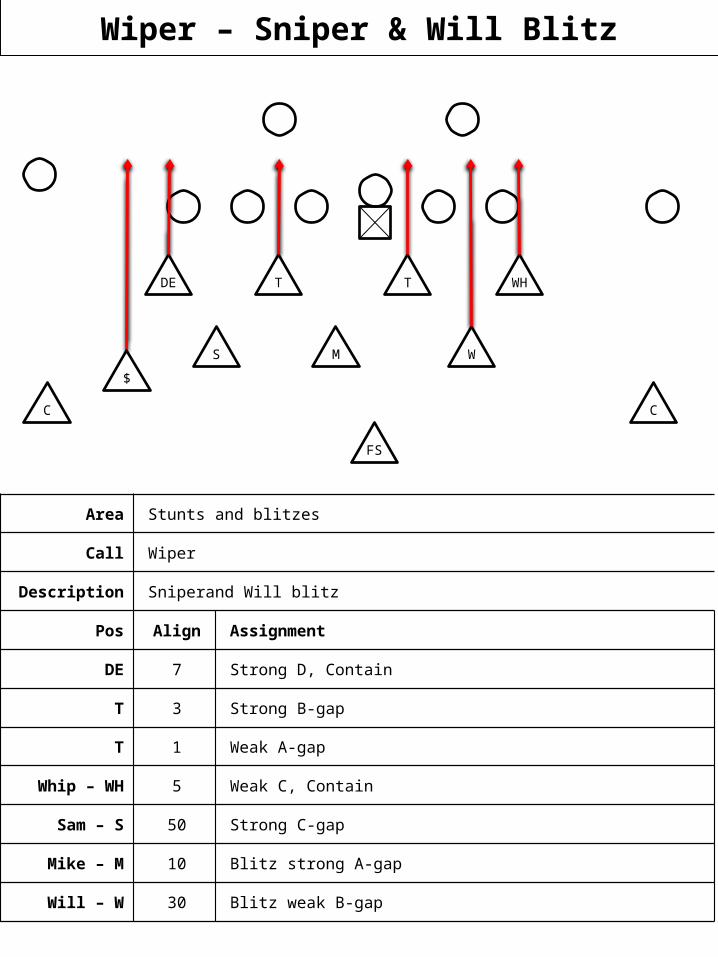
Wiper – Sniper & Will Blitz
S
DE T WH
M W
T
Area Stunts and blitzes
Call Wiper
Description Sniperand Will blitz
Pos Align Assignment
DE 7 Strong D, Contain
T 3 Strong B-gap
T 1 Weak A-gap
Whip – WH 5 Weak C, Contain
Sam – S 50 Strong C-gap
Mike – M 10 Blitz strong A-gap
Will – W 30 Blitz weak B-gap
CC
$
FS

DEFENSIVE BACK BLITZES

Bungy – Sniper & Falcon Blitz
S
DE T WH
M W
T
Area Stunts and blitzes
Call Bungy
Description Sniper and Falcon blitz
Pos Align Assignment
DE 7 Strong D, Contain
T 3 Strong B-gap
T 1 Weak A-gap
Whip – WH 5 Weak C, Contain
Sam – S 50 Strong C-gap
Mike – M 10 Blitz strong A-gap
Will – W 30 Blitz weak B-gap
CC
$
FS
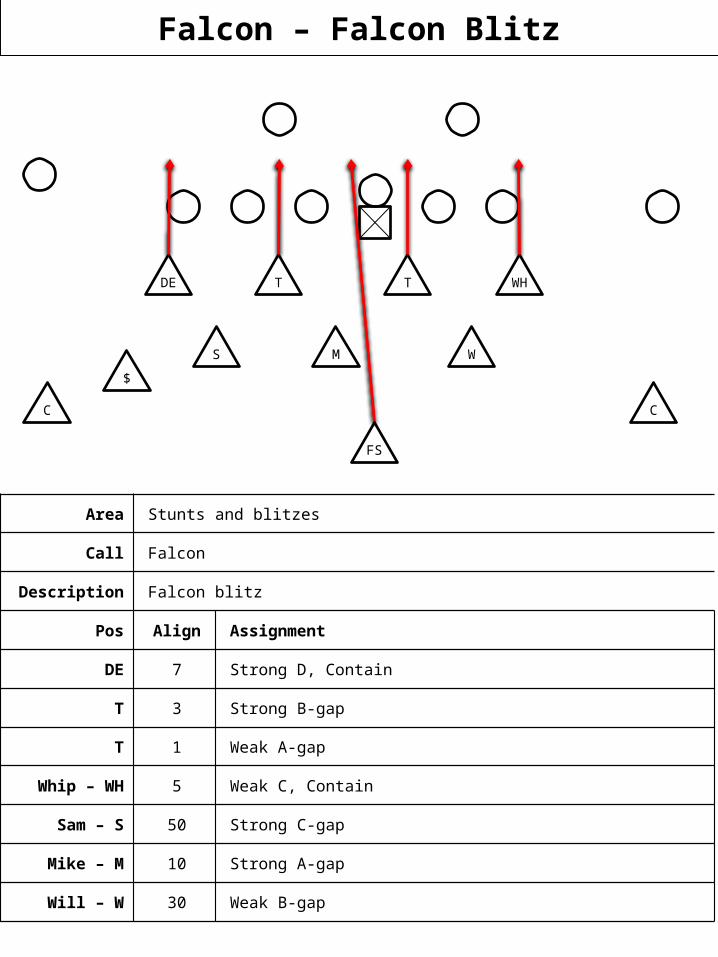
Falcon – Falcon Blitz
S
DE T WH
M W
T
Area Stunts and blitzes
Call Falcon
Description Falcon blitz
Pos Align Assignment
DE 7 Strong D, Contain
T 3 Strong B-gap
T 1 Weak A-gap
Whip – WH 5 Weak C, Contain
Sam – S 50 Strong C-gap
Mike – M 10 Strong A-gap
Will – W 30 Weak B-gap
CC
$
FS

Slam – Strong CB Blitz
S
DE T WH
M W
T
Area Stunts and blitzes
Call Slam
Description Strong cornerback blitz
Pos Align Assignment
DE 7 Strong D, Contain
T 3 Strong B-gap
T 1 Weak A-gap
Whip – WH 5 Weak C, Contain
Sam – S 50 Strong C-gap
Mike – M 10 Strong A-gap
Will – W 30 Weak B-gap
CC
$
FS

Sniper – Sniper Blitz
S
DE T WH
M W
T
Area Stunts and blitzes
Call Sniper
Description Sniper blitzes, Sam drops to zone
Pos Align Assignment
DE 7 Strong D, Contain
T 3 Strong B-gap
T 1 Weak A-gap
Whip – WH 5 Weak C, Contain
Sam – S 50 Drop to zone
Mike – M 10 Strong A-gap
Will – W 30 Weak B-gap
CC
$
FS

Wham – Weak CB Blitz
S
DE T WH
M W
T
Area Stunts and blitzes
Call Wham
Description Weak cornerback blitz
Pos Align Assignment
DE 7 Strong D, Contain
T 3 Strong B-gap
T 1 Weak A-gap
Whip – WH 5 Weak C, Contain
Sam – S 50 Strong C-gap
Mike – M 10 Strong A-gap
Will – W 30 Weak B-gap
CC
$
FS

PASS DEFENSE
Where the LB’s and DB’s will play to defend the passing game

Base Cover Rules
• Cover 3 is our base defensive coverage– FS has middle 1/3– Each CB has outside 1/3
• Sniper will align the to 2-receiver side and has the flats to his side
• OLB to the Sniper has the hook-seam to that side
• Mike has the hook-seam away from the Sniper
• OLB away from the Sniper has the flat

Coverage vs. ProCoverage Cover 3 (13, Black)
Formation Pro – 1 TE, 2-backs
Strength Right
Sniper Romeo
Coaching Points
C
F
C
M M
$ WMS
MM
M
M
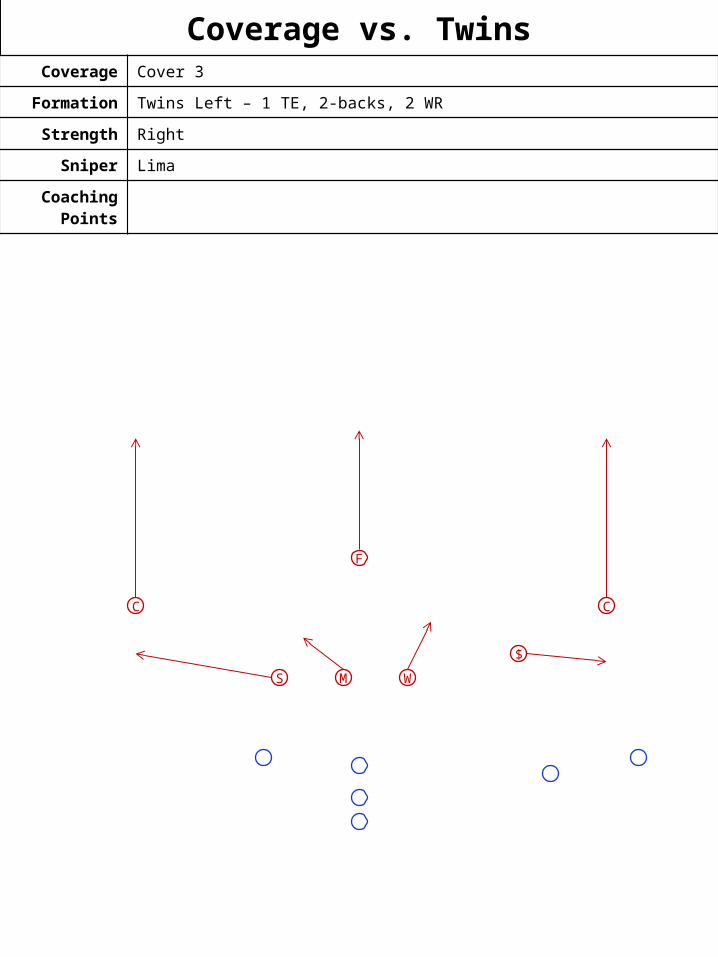
Coverage vs. TwinsCoverage Cover 3
Formation Twins Left – 1 TE, 2-backs, 2 WR
Strength Right
Sniper Lima
Coaching Points
C
F
C
M M
$
WMS
MM
M
M

Coverage vs. TroyCoverage Cover 3
Formation Troy Left 2-backs, 2 WR
Strength Left (no TE, 2-receiver side)
Sniper Lima
Coaching Points
C
F
C
M M
$
SMW
MM
M
M

Coverage vs. FlexboneCoverage Cover 3
Formation Flexbone/Spread Option
Strength Left
Sniper Romeo
Coaching Points Sniper aligns outside the wing at LB depth, becomes the 4 th LB
C
F
C
M M
$ SMW
MM
M
M
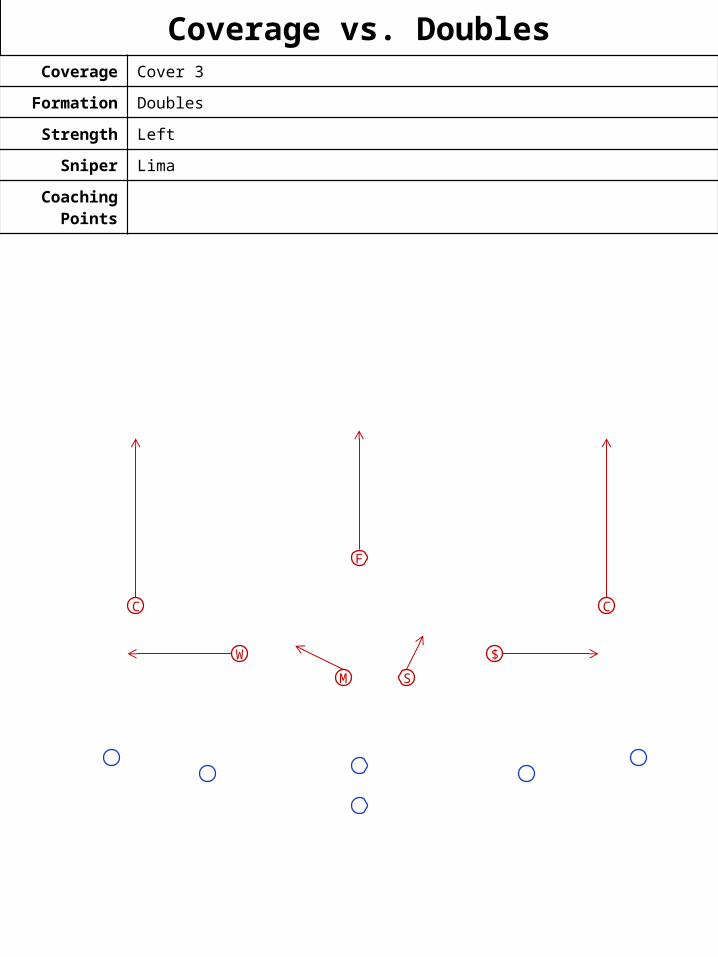
Coverage vs. DoublesCoverage Cover 3
Formation Doubles
Strength Left
Sniper Lima
Coaching Points
C
F
C
M M
W $
SM
MM
M
M
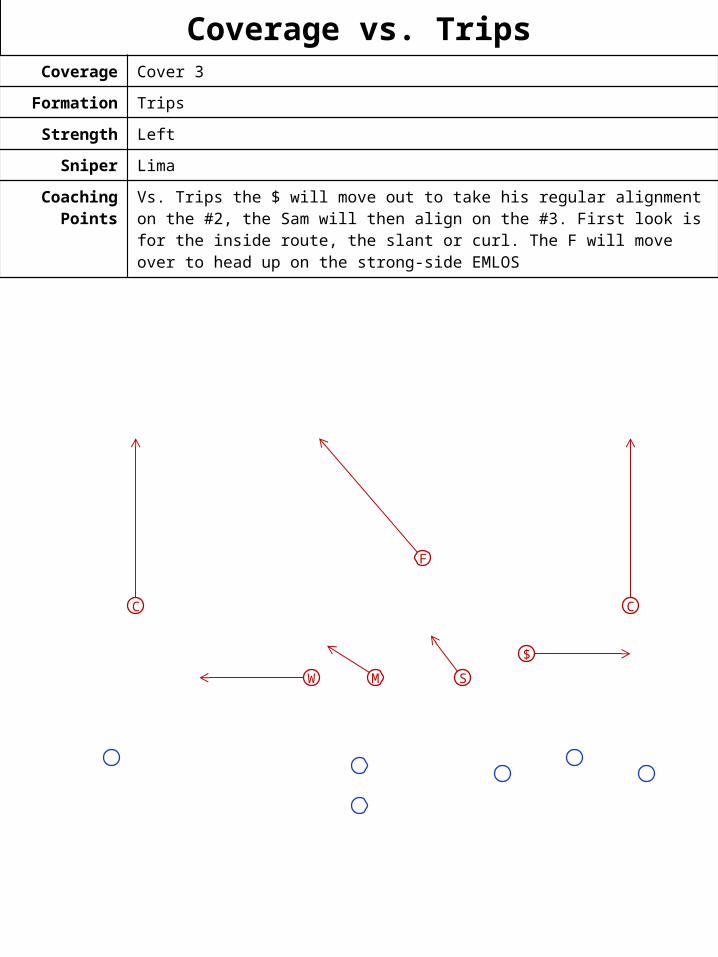
Coverage vs. TripsCoverage Cover 3
Formation Trips
Strength Left
Sniper Lima
Coaching Points Vs. Trips the $ will move out to take his regular alignment on the #2, the Sam will then align on the #3. First look is for the inside route, the slant or curl. The F will move over to head up on the strong-side EMLOS
C
F
C
M M
W
$
SM
MM
M
M

Coverage Rules for Base Blitzes
• If we call a base LB blitz then that will take us into an automatic cover 2 arrangement– The alignments are the same as in the base defense, no
substantive realignments to indicate cover 2 or blitzing– The concept is that we are rushing 5 and will pressure
the QB into throwing the ball early– The away CB and Sniper will take the flats, the to CB
and FS will split the field in half, and the non-blitzing LB’s will take the remaining hook-seam areas
• Smash, Mug, Wax– Sam takes the hook-seam to his side, except if he is
blitzing– Mike takes the hook-seam to the side of the blitzing LB
(Sam or Will)– Will takes the hook-seam to his side, except if he is
blitzing– Sniper takes the flat to his side– CB to Sniper takes the deep ½ to his side– FS takes the deep ½ away from Sniper– CB away from Sniper takes the flat to his side

Coverage: Smash vs. Pro
C
F
C
M M
$
WMS
MM
M
M
Coverage Smash
Formation Pro
Strength Right
Sniper Lima
Coaching Points

Coverage: Mug vs. Pro
C
F
C
M M
$
WMS
MM
M
M
Coverage Mike
Formation Pro
Strength Right
Sniper Lima
Coaching Points

Coverage: Wax vs. Pro
C
F
C
M M
$
WMS
MM
M
M
Coverage Wax
Formation Pro
Strength Right
Sniper Lima
Coaching Points

Coverage: Smash vs. TripsCoverage Smash
Formation Trips
Strength Left
Sniper Lima
Coaching Points
C
F
C
M M
W
$
SM
MM
M
M

Coverage: Mug vs. TripsCoverage Mike
Formation Trips
Strength Left
Sniper Lima
Coaching Points
C
F
C
M M
W
$
SM
MM
M
M

Coverage: Wax vs. TripsCoverage Wax
Formation Trips
Strength Left
Sniper Lima
Coaching Points
C
F
C
M M
W
$
SM
MM
M
M

It is time for you to leave.
Thus spake the master Coach:

PARKING LOT

Defensive Comments – What To Do:

Against an Option Team
• Hit the QB every play, force them to use both pitches.
• Make the d-line pinch inside for collapsing inside and protect the Mike if the play goes further because the d-linemen can't make the play. Shoot the outside linebackers on the edge to contain the play while the DE are the option guy.
• Make them get it to their least productive player
• Make them pitch.
• Mix the reads
• Take away FB & QB
• Take away the stud

Against a Balanced Team
• 30 Front. Mix up man under and Zone
• Make Them Pass – Play To Your Strength– Stick To Your System And Philosophy Against Any Team
Or Situation.
• Make Them Throw Anyhow, Every Pass Is A 50-50 In My Book #1.- Responsibility #2.- Attack! #3,#4, And #5- Disciplined Aggression #6.- Keep Them Inside #7.-Stretch Them Out #8.- Have Fun/No Pressure #9.- Thrash Them Quickly! #10.- Patience
• Stop The Best Plays
• Stop The Run, Make Them Pass
• Take Away Run
• Zero In On Tendencies

Against a Faster Team
• 30 Front, Cover 2 Or 4
• Attack Them... You Only Get One Shot... Remove The Space.
• Contain - Bottle Them Up
• Don’t Let Them Have The Ball
• Keep The Ball On Offense And Keep Them In Front Of You
• Make Them Nickel And Dime Us.
• Play Zone In Coverage And Try To Vary The Look To Make Them Think And This Will Take Away Their Athletic Advantage.
• Try To Keep Them Between The Tackles & Cov 2

Against an Inferior Team
• Base Offense, Base Defense, Sub A Lot.
• Beat‘em As Simply As You Can. Don‘t Put A Lot Of Stuff On Tape
• Close The Door In The First Half, JV'S Get The Second
• Don‘t Give Them Hope
• Get Serious... The Biggest Threat Is The Team With Nothing To Lose.
• Get Up On Them Early.
• Keep It Simple, Get A Lead And Play Nice
• Play Great Fundamentals And Work In Backups
• Sub After A 21 Point Lead.

Against a Passing Team
• 30 Front. Bring 1-2 Extra
• A) Confuse The QB By Disguising Coverage. B) Send Some Zone Blitz. C) Play Man Weakside, Zone Strongside. D) Show A Tuff Look With Backers And Drop Them Into Coverage.
• Cant Cover’em Rush’em, Cant Rush’em, Cover’em, Cant Cover Or Rush, Don’t Let Them Have The Ball
• Confuse The QB
• Keep Them In Front Of You And Pressure The Qb
• Make Them Drive The Ball
• Pressure The QB. Disrupt The WR'S Routes.
• Zone It.....Make Them Make Perfect Throws The Length Of The Field.

Against a Passing Team That Goes Deep
• 30 Front Cover 4, Blitz 1-2 Extra
• Bring Pressure Up The Middle
• Double The Receiver They Like To Go Deep With. If They Send A Lot Of 4 Verticals, Cover
• Man, Cover 2 Deep
• Man Under / Zone Over
• Press And Cover Deep.
• Same As #3 But A lot Of Cover 2
• Zone It.....Make Them Make Perfect Throws The Length Of The Field.

Against a Passing Team that Likes To Dink And Dunk
• C II Man Under 30 Front
• Cover 2 Read...
• M Press And Make Them Drive The Distance
• Press The Receivers And Bring Heat
• Take Away Dunk.
• Zone It.....Make Them Make Perfect Throws The Length Of The Field.
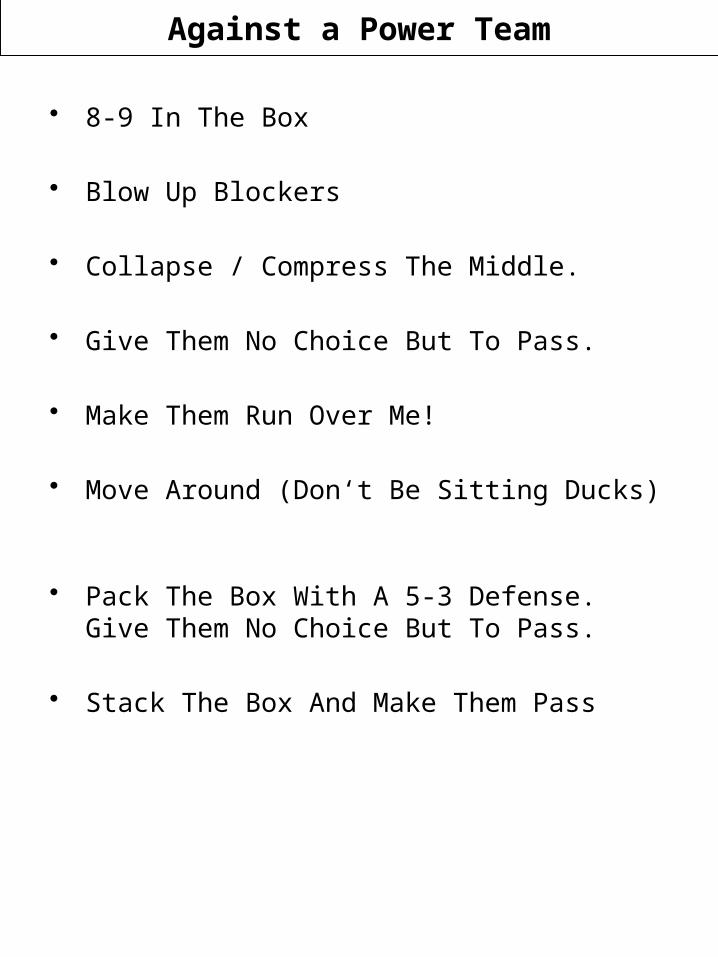
Against a Power Team
• 8-9 In The Box
• Blow Up Blockers
• Collapse / Compress The Middle.
• Give Them No Choice But To Pass.
• Make Them Run Over Me!
• Move Around (Don‘t Be Sitting Ducks)
• Pack The Box With A 5-3 Defense. Give Them No Choice But To Pass.
• Stack The Box And Make Them Pass

Against a Simply Superior Team
• Attack Them
• Beat Them At Their 3 Best Plays With Automatics...Force Them Out Of Their Comfort Zone
• Don’t Let Them Have The Ball
• Have Fun...
• Over Prepare And Keep It Simple.
• Over Prepare To Get The Job Done With A W!
• Run The Ball, Keep Clock Moving
• Sh*T And Go Blind.....Pray That You Can out Coach Them For A Game
• Stay Basic, "Do What You Do"
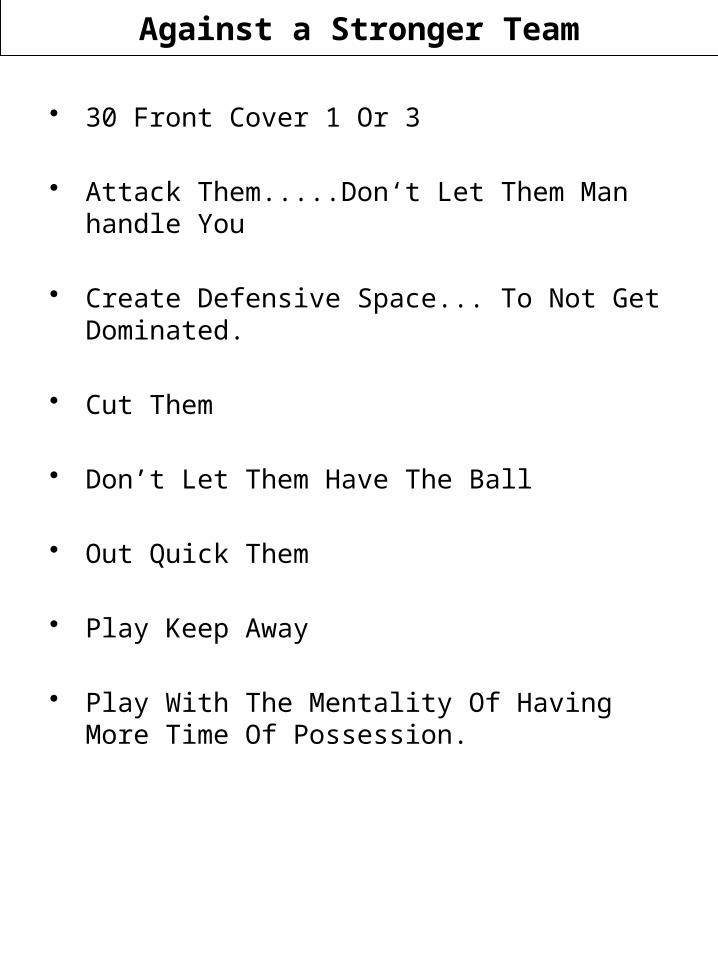
Against a Stronger Team
• 30 Front Cover 1 Or 3
• Attack Them.....Don‘t Let Them Man handle You
• Create Defensive Space... To Not Get Dominated.
• Cut Them
• Don’t Let Them Have The Ball
• Out Quick Them
• Play Keep Away
• Play With The Mentality Of Having More Time Of Possession.

Things to Think About
Various topics for defensive consideration. Some are good, some are ideas, mainly just some food for thought regarding how these items
might pertain to our defensive operations.
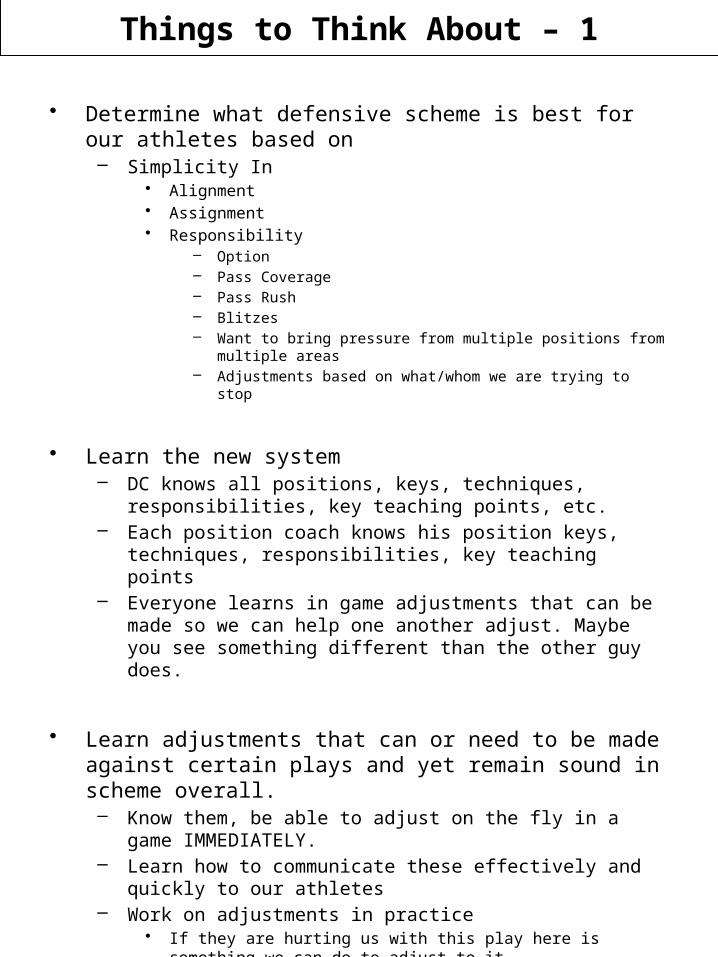
Things to Think About – 1
• Determine what defensive scheme is best for our athletes based on– Simplicity In
• Alignment• Assignment• Responsibility
– Option– Pass Coverage– Pass Rush– Blitzes– Want to bring pressure from multiple positions from multiple areas– Adjustments based on what/whom we are trying to stop
• Learn the new system– DC knows all positions, keys, techniques, responsibilities, key teaching
points, etc.– Each position coach knows his position keys, techniques,
responsibilities, key teaching points– Everyone learns in game adjustments that can be made so we can help
one another adjust. Maybe you see something different than the other guy does.
• Learn adjustments that can or need to be made against certain plays and yet remain sound in scheme overall. – Know them, be able to adjust on the fly in a game IMMEDIATELY.– Learn how to communicate these effectively and quickly to our athletes– Work on adjustments in practice
• If they are hurting us with this play here is something we can do to adjust to it.

Things to Think About – 2
• Pick the right leader in the huddle – “Coach on the field”– Not “liked” RESPECTED is the key– Stay positive at all times– Chew butt when appropriate– Knows the calls and signals– Knows the adjustments to various formations– Can communicate to DC what is happening on the field
so we can adjust– Must earn our trust that he knows what he is seeing on
the field
• Set 8-10 “Game Goals” that will determine the success of our defense. – Set expectations very high. No one has ever risen to
low expectations.– Board up in locker room with these goals so we can see
what we accomplish or fail to accomplish– Helmet stickers?

Things to Think About – 3
• Become more physical. Teams are intimidated by our speed already, but they are not intimidated of our physicality.– We need to become HITTERS– Stop “catching” blows and start handing out blows.– Drill physical play at least 1 time a week
• Will create competition between teammates• Will show us who can and who can’t be physical
• Determine some common down and distance/situational adjustments. Work on them every day.– 3rd and long– 4th and short– End of half– Need a turnover time– Protecting a lead
• Determine how we can disguise our intentions/coverages.– Too many times we show our hand and are easy to adjust to,
we need to become better at disguising our intentions on each play. Make the opponent question what we are going to do.
– Change it up in game situations, do not always have to blitz we want to keep the opponent’s offense guessing if we are coming, who is coming, and where is he coming from.
Things to Think About – 4
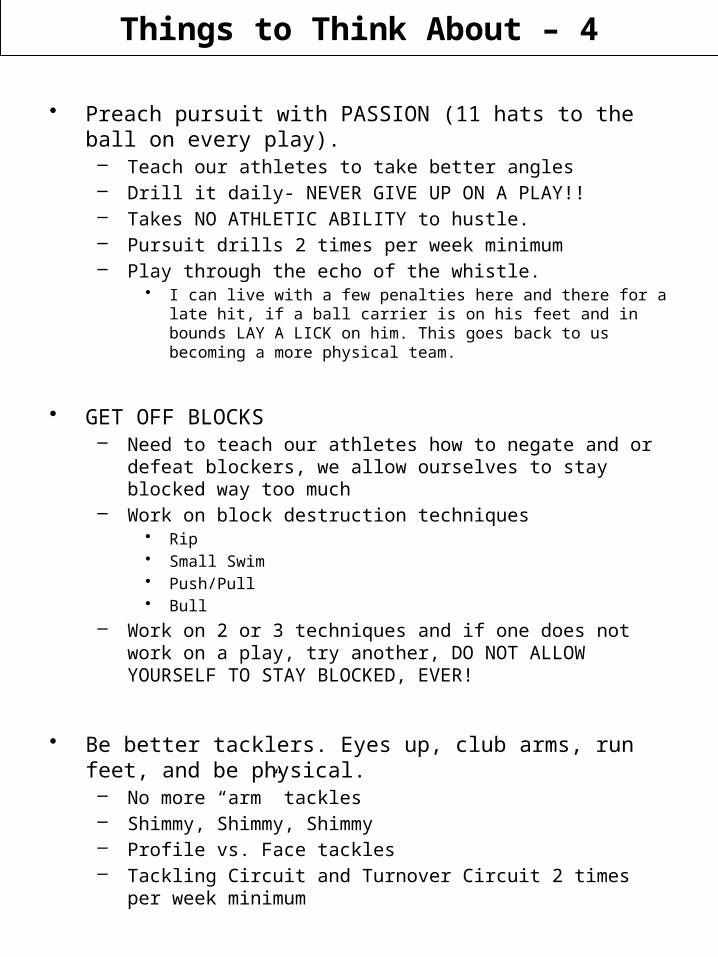
• Preach pursuit with PASSION (11 hats to the ball on every play).– Teach our athletes to take better angles– Drill it daily- NEVER GIVE UP ON A PLAY!!– Takes NO ATHLETIC ABILITY to hustle.– Pursuit drills 2 times per week minimum– Play through the echo of the whistle.
• I can live with a few penalties here and there for a late hit, if a ball carrier is on his feet and in bounds LAY A LICK on him. This goes back to us becoming a more physical team.
• GET OFF BLOCKS– Need to teach our athletes how to negate and or defeat blockers, we
allow ourselves to stay blocked way too much– Work on block destruction techniques
• Rip• Small Swim• Push/Pull• Bull
– Work on 2 or 3 techniques and if one does not work on a play, try another, DO NOT ALLOW YOURSELF TO STAY BLOCKED, EVER!
• Be better tacklers. Eyes up, club arms, run feet, and be physical.– No more “arm” tackles– Shimmy, Shimmy, Shimmy– Profile vs. Face tackles– Tackling Circuit and Turnover Circuit 2 times per week minimum
Things to Think About – 5
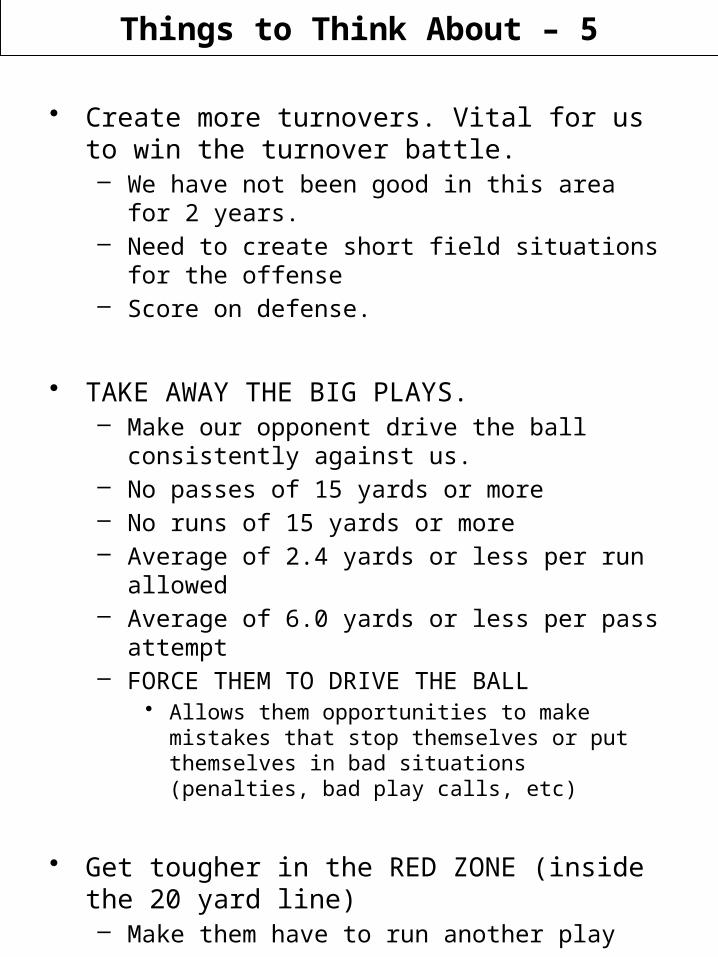
• Create more turnovers. Vital for us to win the turnover battle.– We have not been good in this area for 2 years. – Need to create short field situations for the offense – Score on defense.
• TAKE AWAY THE BIG PLAYS.– Make our opponent drive the ball consistently against
us.– No passes of 15 yards or more– No runs of 15 yards or more– Average of 2.4 yards or less per run allowed– Average of 6.0 yards or less per pass attempt– FORCE THEM TO DRIVE THE BALL
• Allows them opportunities to make mistakes that stop themselves or put themselves in bad situations (penalties, bad play calls, etc)
• Get tougher in the RED ZONE (inside the 20 yard line)– Make them have to run another play– Allows them opportunities to make mistakes– ATTITUDE, ATTITUDE, ATTITUDE– They have to earn every inch they gain– Make them pay a price to gain each inch

Things to Think About – 6
• Need more “3 and Outs” or 7 play or less drives that result in a turnover or punt.– Get the defense off the field/Get the offense on the field– Demoralizing to our athletes if they move the ball consistently– Demoralizing to the opponent if we do not allow them to
move the ball consistently• Changes their gameplan• Changes their playcalling• Changes the tempo of the game• Creates situations where we force them to make mistakes
(creates a sense of panic)
• Scout team needs to do a better job.– Keep score– Conditioning on the line (or some other type of
reward/reminder guidelines)– Focus on what opponent does best
• Main 3 or 4 formations• Main 4 or 5 running plays• Main 3 or 4 passing plays• Take an offense out of their comfort zone and what do they have?
– If they are a team that likes to run the ball, force them to throw.– If they are a team who likes to pass the ball, force them to run the
ball.– If they are a team who likes to run to the flank, force them to run in
the middle and be physical.– If they are a team who likes to pound the ball in the middle, invite
them to the flank where we gain a speed advantage.– If they are a balanced offense take away what they do best.

Teaching Team Defense
How we call what we call, and why.

Defensive Skills and Drills

4-Station Tackling - Overview
• Overview– The number one most important skill in football, no matter
what the level, from Pee Wee to Pro, is tackling. If you can't tackle, then you can't stop the offense.
– In just ten minutes of practice time per day, you can turn your players into a group of tackling machines. If you want to get really crazy, use three minutes at each station, with a thirty second rotation period. That's just fifteen minutes a day.
– You don't need to be using a specific tackling system to make this four-station drill work. Whether you prefer chest plate or waist tackling is irrelevant. All you need are some tackling dummies, five coaches, two gymnastics pads (or worn out mattresses), and ten minutes per practice.
• Key points:– Locate the four tackling stations about ten to fifteen yards
apart– One coach takes a group of players to a station. When the
players rotate to a new station, the coach remains– At each station players execute the specific tackling drill for
two minutes. The have thirty seconds to rotate to a new station
– Other drills can be substituted as necessary, or to give a change of pace. Attempt to keep with the drill's purpose, however. (Such as substituting the "Bull in the Ring" for the 2 X 2 square drill.)
– Position players (DBs, LBs, DEs, DL) together to ensure close physical match-ups
– The remedial tackling coach, located where he is in the center of all the drill stations, is the ideal person to control the timer

4-Station Tackling - Layout

Station #1: Head-on mat tackle
• Equipment: – 1 gymnastics mat, old mattress, or other padded landing surface– 1 tackling dummy– 1 "impact shield“
• Execution: – Place the tackling dummy lengthwise across one end of the landing
surface as shown in the diagram– The ball carrier holds the impact shield to protect himself– At a coach's signal, the tackler attacks the ball carrier with a form
tackle, lifting the ball carrier over the tackling dummy and onto the landing surface
– After the tackle, the ball carrier goes to the end of the line, and the tackler becomes the next ball carrier
• Execution: – Incorrect form results in the tackler being sent to the remedial tackling
coach for further reinforcement of the problem area (i.e. head down, no wrap, etc.)
– As the season progresses, have the ball carrier charge forward at the tackler
• Coaching Points: – Form tackle, good lift, drive hard– The tackle should be made at 1/2 speed, but while moving into and out
of the drill, keep players moving at high speed, and try for a minimum of five reps per player
– If a player has a problem with a certain area, such as forgetting to keep his head up, remind him with positive reinforcement before his rep
• For example, say "Johnny, remember to keep your head up," rather than, "Johnny, don't drop your head."
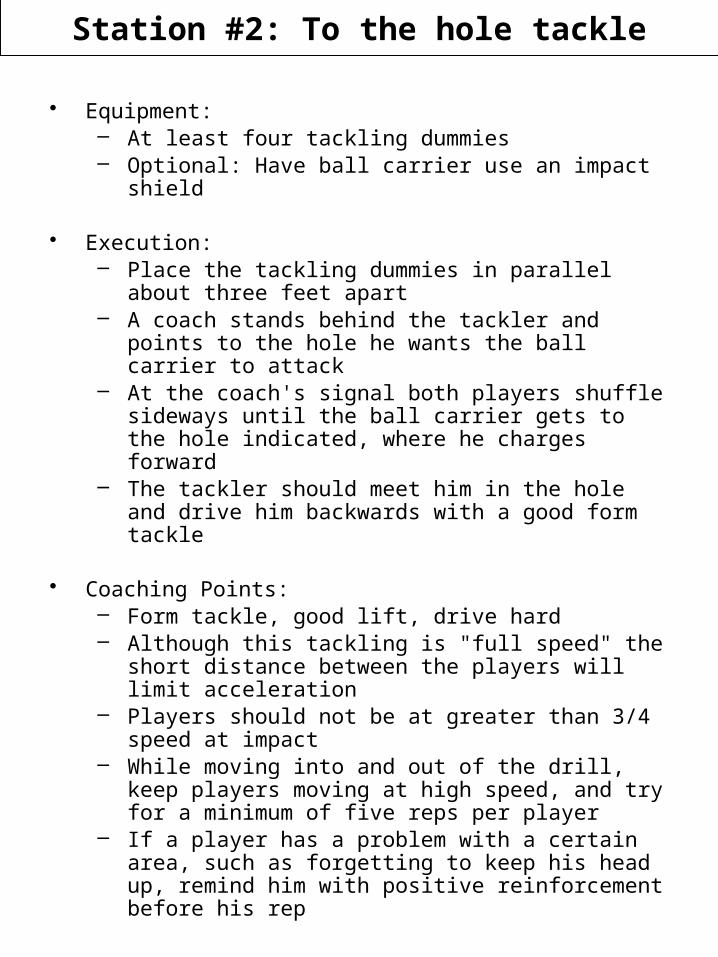
Station #2: To the hole tackle
• Equipment: – At least four tackling dummies– Optional: Have ball carrier use an impact shield
• Execution:– Place the tackling dummies in parallel about three feet apart– A coach stands behind the tackler and points to the hole he
wants the ball carrier to attack– At the coach's signal both players shuffle sideways until the
ball carrier gets to the hole indicated, where he charges forward
– The tackler should meet him in the hole and drive him backwards with a good form tackle
• Coaching Points: – Form tackle, good lift, drive hard– Although this tackling is "full speed" the short distance
between the players will limit acceleration– Players should not be at greater than 3/4 speed at impact– While moving into and out of the drill, keep players moving at
high speed, and try for a minimum of five reps per player– If a player has a problem with a certain area, such as forgetting
to keep his head up, remind him with positive reinforcement before his rep

Station #3: 2 X 2 box
• Equipment: – 4 cones or other items for marking a two yard by two yard square on
the practice field– Optional: 1 football
• Execution: – Arrange the players around the outside so that each player is facing
across from a player of roughly equal size– The coach will signal to a set of two players– At his gesture, the object is for one player to make it across the box,
while the other player must tackle him to prevent this – Optional: "Thud" tackle, without taking the ball carrier to the ground – Optional 2: Coach throws a football to his selected ball carrier. Player
directly across from the ball carrier is the tackler
• Coaching Points: – Concentrate on reinforcing secure tackles– This is an "open field" drill, so expect missed tackles– This drill will probably send more players to remedial tackling than any
other– Although this tackling is "full speed" the short distance between the
players will limit acceleration– Players should not be at greater than 3/4 speed at impact– While moving into and out of the drill, keep players moving at high
speed, and try for a minimum of five reps per player– If a player has a problem with a certain area, such as forgetting to keep
his head up, remind him with positive reinforcement before his rep
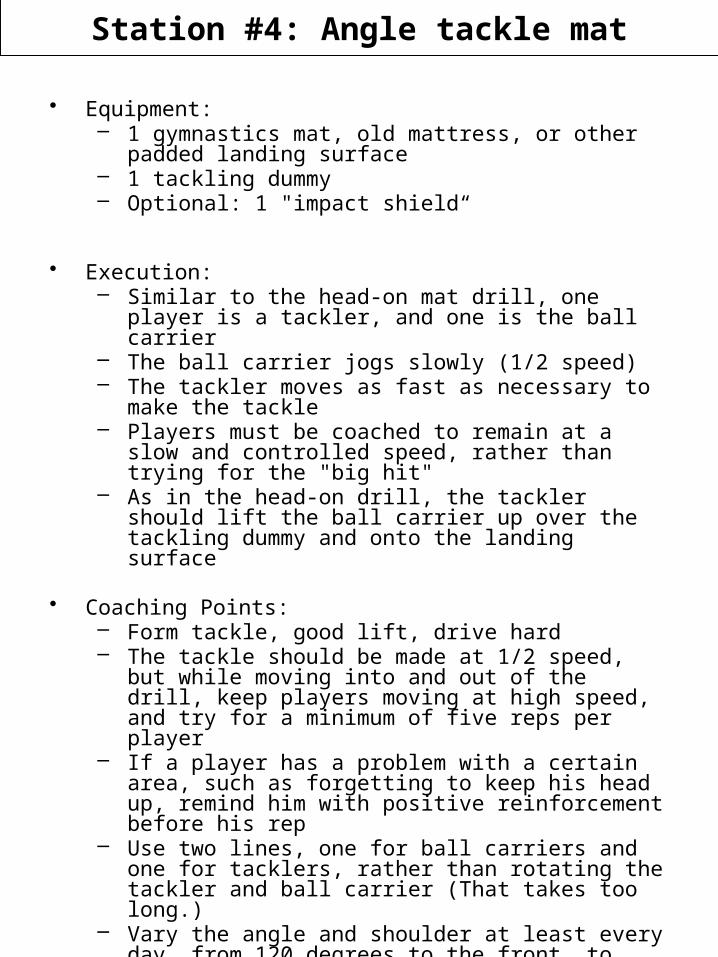
Station #4: Angle tackle mat
• Equipment: – 1 gymnastics mat, old mattress, or other padded landing
surface– 1 tackling dummy– Optional: 1 "impact shield“
• Execution: – Similar to the head-on mat drill, one player is a tackler, and
one is the ball carrier– The ball carrier jogs slowly (1/2 speed)– The tackler moves as fast as necessary to make the tackle– Players must be coached to remain at a slow and controlled
speed, rather than trying for the "big hit"– As in the head-on drill, the tackler should lift the ball carrier up
over the tackling dummy and onto the landing surface
• Coaching Points: – Form tackle, good lift, drive hard– The tackle should be made at 1/2 speed, but while moving
into and out of the drill, keep players moving at high speed, and try for a minimum of five reps per player
– If a player has a problem with a certain area, such as forgetting to keep his head up, remind him with positive reinforcement before his rep
– Use two lines, one for ball carriers and one for tacklers, rather than rotating the tackler and ball carrier (That takes too long.)
– Vary the angle and shoulder at least every day, from 120 degrees to the front, to around 30 degrees to the rear

Remedial Tackling
• Equipment: – 1 tackling dummy or "Popsicle stick" hitting sled
• Execution: – Upon incorrect execution of a tackle, the player will be sent to
the remedial tackling coach with the phrase, "Billy, go over to Coach Norm and work on keeping your head up while you tackle."
– The player then sprints to the remedial tackling coach and informs him what portion of the tackle he needs to work on (sometimes the remedial tackling coach will get too busy to hear the original mistake.)
– The player will then execute five correct tackles, (start to finish) using the tackling dummy/"Popsicle" stick before sprinting back to catch up with his drill mates, who may have moved on in the interim
• Coaching Points:– Players will feel that remedial tackling is a punishment. This is
not the case. Remedial tackling is a reinforcement of the correct tackling procedure
– Execute each of the points to a correct tackle as slowly as necessary to perform each step perfectly
– Incorrect iterations do not count

2-on-1 Tackling (Tee Time)
• Equipment: – 6 cones, football
• Execution: – Ball-Carrier is on his back. Tacklers stand behind their cone.
On the signal, ball-carrier gets up and runs straight downfield. Tacklers must round their cone and come back to make tackle. Variations to this drill may allow Ball-Carrier to juke, spin, cut or simply run straight ahead. Adjustments may include moving the ball-carrier’s cone forward or back, or moving the Tacklers’ cones forwards or back. Cones should be placed between 10-15 yards downfield.
• Coaching Points:– This is a drill that gets walked through until players are
comfortable with their responsibility. The Runners are not allowed to cut, juke or spin on their first few attempts. We want contact and cut/juke/spin negates some of that.
– After the players are comfortable with this drill, we allow the cut/juke/spin.
– Shorten the distances all around initially. Not sure how you teach tackling but any technique should work here.

2-on-1 Tackling (Tee Time)

3-on-3 Blocking/Tackling Drill (Snake Pit)
• Equipment:
• Execution: – Offensive and Defensive Linemen are in 3-point stance. – Ball-Carrier is deep set and Linebacker is in gap.– Variations include adjusting splits of Linemen, depth of Ball-
Carrier and/or Linebacker, or adding a Center.
• Coaching Points:

1-on-1 Tackling
• Equipment:
• Execution: Ball-Carrier and Tackler lie on their back with helmets almost touching each other. On the signal, Ball-Carrier rises and runs forward while Tackler rises and makes tackle. Variations include spacing between both players and/or allowing Ball-Carrier to juke, cut or run straight ahead.
• Coaching Points: