smoke detector - essence group€¦ · · 2017-09-13smoke detector . user guide . esugsc009 . ......
TRANSCRIPT

Care@Home™ Smoke Detector
User Guide
ESUGSC009
Version 1.2
September 2017

Table of Contents
2 Care@Home™ Smoke Detector User Guide
Table of Contents 1. Overview ................................................................................................................................................. 3 2. Installing the SK2 .................................................................................................................................... 4
2.1. Required Items ........................................................................................................................... 4 2.2. Determining the Best Location .................................................................................................. 4
2.2.1 Acceptable Structures for SK2 Usage ........................................................................... 4 2.2.2 Acceptable Installation Locations ................................................................................ 5 2.2.3 Unacceptable Installation Locations ............................................................................ 8
2.3. Setting Up the SK2 ...................................................................................................................... 9 2.4. Testing the SK2 .......................................................................................................................... 14
3. Operating the SK2 ................................................................................................................................. 15 3.1. Physical Attributes ..................................................................................................................... 15 3.2. Features .................................................................................................................................... 16 3.3. Indications................................................................................................................................. 16 3.4. Stopping the Alarm ................................................................................................................... 18
4. Maintaining the SK2 .............................................................................................................................. 19 4.1. Replacing the Battery ................................................................................................................ 19 4.2. Testing the SK2 ......................................................................................................................... 20 4.3. Cleaning the SK2 ....................................................................................................................... 21
5. Specifications ........................................................................................................................................ 23 Appendix A Fire Prevention and Safety ...................................................................................................... 25
Prevention and Planning ....................................................................................................................... 25 How to Escape if a Fire Occurs ............................................................................................................. 26 Limitations of Smoke Alarms ............................................................................................................... 26

Overview
Care@Home™ Smoke Detector User Guide 3
1. Overview
The Essence Smoke Detector (SK2) is a battery-powered, stand-alone, peripheral device for fire prevention. Designed for ceiling or wall installations, the SK2 is capable of bi-directional RF communications with the Care@Home™ Control Panel (CP) from a remote location.
Figure 1: Essence Smoke Detector
NOTE: The images of batteries included in this User Guide are for illustration purposes only.
Only batteries thoroughly tested and approved by Essence should be used to meet the device’s specifications. Refer to 5 Specifications on page 23.
Installing the SK2
4 Care@Home™ Smoke Detector User Guide
2. Installing the SK2
The following are the steps and processes to install the SK2
2.1. Required Items
Ensure you have the following:
A drill with a standard 3/16 in. (5 mm) bit
A standard Phillips screwdriver
Two DIN 7982 cross recessed countersunk head tapping screws (3.5 x 32 mm) and wall anchors - provided
Two 1.5 V AA alkaline batteries
NOTE: To comply with the UL certification standards, use GP International Ltd. batteries.
2.2. Determining the Best Location
To determine the best location for the SK2, you must take account of the following:
Acceptable structures
Acceptable locations
Unacceptable locations
2.2.1 Acceptable Structures for SK2 Usage
The SK2 is designed for residential units only. The SK2 can be used in a single family home or in an apartment building.
In multiple-family buildings, each residential unit should include smoke alarms. The smoke alarms should be installed in the appropriate rooms. Refer to 2.2.2 Acceptable Installation Locations on page 5.

Installing the SK2
Care@Home™ Smoke Detector User Guide 5
Smoke alarms installed in common areas, such as on porches or in hallways, may not provide sufficient early warnings for residents.
WARNING! Do not use this alarm in non-residential buildings. Warehouses, industrial buildings, commercial buildings, and other non-residential buildings require special fire detection and alarm systems.
The SK2 is not a substitute for a complete fire detection system for places where many people live or work, such as hotels, motels, dormitories, hospitals, nursing homes, and group homes of any kind, even if they once were single family homes.
See NFPA 101 (Life Safety Code), NFPA71, 72A, 72B, 72C, 72D and 72E for fire alarm requirements in buildings not defined as households.
2.2.2 Acceptable Installation Locations
For complete coverage, smoke alarms should be installed in all rooms in each residential unit including:
Halls and passage ways
Storage areas
Basements
Attics
Minimum coverage is one alarm on each floor, and another alarm in each sleeping area.
For optimal detection, consider the following recommendations when selecting an installation location for the SK2:
Install on the ceiling.
Install in the hallway outside every separate bedroom area, as shown in Figure 2.
Install two SK2 devices in homes with two bedroom areas, as shown in Figure 3.
Install on every floor of a multiple-floor residence, as shown in Figure 4.
The following figure shows an example of locations for installing smoke alarms in a single residence with one sleeping zone.

Installing the SK2
6 Care@Home™ Smoke Detector User Guide
Figure 2: Single Sleep Area in a Single-floor Residence
The following figure shows an example of locations for installing smoke alarms in a single-floor residence with more than one sleeping zone.
Figure 3: Multiple Sleep Areas in a Single-floor Residence
The following figure shows an example of locations for installing smoke alarms in a multiple-floor residence with a smoke alarm installed on each floor and in each bedroom
Figure 4: Multiple-floor Residence
Install on every floor of a multiple-floor residence, as shown in Figure 4.

Installing the SK2
Care@Home™ Smoke Detector User Guide 7
WARNING! Be sure doors or other obstructions do not block the path of smoke to the alarm.
Install a minimum of two SK2 devices in any household.
Install in every bedroom.
Install at both ends of a bedroom hallway, if the hallway is more than 12 m (40 ft.) long.
Install inside every room where one sleeps with the door partly or completely closed. The smoke could be blocked by the door. An SK2 installed in a hallway may not wake up the sleeper if the door is closed.
Install in the basement at the bottom of the basement stairwell.
For a two-floor residence, install at the top of the stairwell.
Install additional SK2 devices in the residence in the following areas
Living room
Dining room
Family room
Attic
Utility closet
Storage rooms
Install as close to the center of the ceiling as possible. If not possible, install on the ceiling no closer than 10 cm (4 in.) from any wall or corner.
If ceiling mounting is not possible and wall mounting is permitted by the local and state codes, mount on a wall 10 ~ 15 cm (4 to 6 in.) from the ceiling.
NOTE: Wall installations are not compatible with the EN 14604 standard and are not tested by this standard.
In rooms with sloped, peaked, or gabled ceilings, mount the SK2 0.9 m (3 ft.) measured horizontally from the highest point of the ceiling.
Installing the SK2
8 Care@Home™ Smoke Detector User Guide
WARNING! As required by the California State Fire Marshal:
"Early warning" fire detection is best achieved by the installation of fire detection equipment in all rooms and areas of the household as follows:
A smoke alarm installed in each separate sleeping area (in the vicinity, but outside of the bedrooms)
Heat or smoke alarms in the living rooms, dining rooms, bedrooms, kitchens, hallways, attics, furnace rooms, closets, utility and storage rooms, basements, and attached garages.
Smoke alarms should be installed in accordance with the NFPA Standard 72 (National Fire Protection Association, Battery March Park, Quincy, MA 02169).
The NFPA Standard 72, Section 2-4 reads as follows:
“2-4.1.1 Smoke alarms shall be installed outside of each separate sleeping area in the immediate vicinity of the bedrooms and on each additional story of the family living unit including basements and excluding crawl spaces and unfinished attics."
The provisions of section 2-4.1.1 indicate the minimum number of smoke alarms required by this standard.
Essence recommends using additional smoke alarms to obtain increased protection for areas separated by a door from the areas protected by the smoke alarms required under the NFPA Standard 72, Section 2-4.1.1.
2.2.3 Unacceptable Installation Locations
False alarms occur if smoke alarms are installed where they do not work properly. To avoid false alarms, consider the following guidelines for choosing an installation location.
Avoid air streams that have combustion particles.
Combustion particles are by-products of something that is burning. A smoke alarm can sense combustion particles in normal air-flow paths. They should be located where air streams bypass kitchens.
Avoid areas where combustion particles are present, such as:
Kitchens with few windows or poor ventilation
Garages where there may be vehicle exhaust
Near furnaces

Installing the SK2
Care@Home™ Smoke Detector User Guide 9
Near hot water heaters
Near space heaters
Do not install less than 6 m (20 ft.) from places where combustion particles are normally present. If a 6 m (20 ft.) distance is not possible, install the SK2 as far away from the combustion particles as possible. Provide good ventilation in such places.
Avoid damp or humid areas or near bathrooms with showers: Moisture in the air can enter the detection chamber. Upon cooling, water droplets can cause false alarms. Install the SK2 at least 3 m (10 ft.) from bathrooms.
Avoid very cold or very hot areas including unheated buildings and outdoor rooms: If the temperature goes above or below the operating range of the smoke alarm, the SK2 will not work properly. The temperature range for the SK2 is stated in section 5 on page 23.
Avoid very dusty or dirty areas: Dirt and dust can build up in the SK2’s detection chamber, making it overly sensitive. In addition, dust or dirt can block openings to the detection chamber and keep the alarm from detecting smoke.
Avoid drafty areas and areas near fresh air vents, air conditioners, heaters, or fans: Fresh air vents and drafts can drive smoke away from smoke alarms.
Avoid dead air spaces near the top of a peaked roof or in the corners formed by ceilings and walls: Dead air can prevent smoke from reaching an alarm.
Avoid insect-infested areas: If insects enter an alarm’s detection chamber, they may cause a false alarm.
Avoid installation near fluorescent lights: Electrical discharges from fluorescent lights can cause false alarms. Install SK2 devices at least 1.5 m (5 ft.) from fluorescent lights.
2.3. Setting Up the SK2
To set up the SK2:
Read sections 2.2.1, 2.2.2, and 2.2.3 before deciding where to install the SK2.

Installing the SK2
10 Care@Home™ Smoke Detector User Guide
Remove the mounting bracket from the SK2 by rotating the bracket counter-clockwise to release the bracket tabs.
Figure 5: Release the Mounting Bracket Attached to the SK2
Place the bracket in the location chosen for installation.
Bracket tabs

Installing the SK2
Care@Home™ Smoke Detector User Guide 11
Make a pencil mark, in each screw hole, to indicate the location of a wall anchor and screw. See the screw holes in the following figure.
Figure 6: The Mounting Bracket
Remove the bracket from the ceiling (or wall).
Drill a hole at each of the marks using a 5 mm (3/16-in.) drill bit and insert the wall anchors.
Caution: When you drill the holes, prevent dust from getting on the SK2.
Mount the bracket to the ceiling (or wall) using the screws.
WARNING! Do not connect the SK2 to any other alarm or auxiliary device. Connecting anything else to the SK2 prevents the proper operation of the alarm.
Bracket tabs
Mounting screw holes

Installing the SK2
12 Care@Home™ Smoke Detector User Guide
Press the PAIRING button, located on the right edge of the front of the CP, for five seconds. The CP beeps and the ring, around the EMERGENCY button, lights up in blue with a circular movement effect.
Insert the two batteries into the battery compartments, according to the polarity marks.
Figure 7: The Battery Compartments
NOTE: After you insert both batteries into the SK2, the tamper alarm sounds. This means the SK2 is working normally and indicates that the batteries are positioned properly.
Holding the SK2, move at least 2 m (~6 ft. 7 in.) from the CP.
Ensure that the pairing process is successful. The process can have the following results:
If the pairing process is successful, the CP beeps and the ring, around the CP EMERGENCY button, blinks blue three times.
If the pairing process is not successful, the CP beeps and the ring lights up red for two seconds.
If the peripheral device is already paired, the CP beeps and the ring lights up alternating between blue and red.
If no additional peripheral devices can be integrated, as when the CP memory is full, the CP beeps and the ring lights up red.

Installing the SK2
Care@Home™ Smoke Detector User Guide 13
Align the SK2 slots with the bracket tabs and insert the bracket tabs into the SK2 slots.
Figure 8: Align Slots
Turn the SK2 clockwise on the bracket until you hear a click.
Figure 9: Turn SK2 Clockwise to Install

Installing the SK2
14 Care@Home™ Smoke Detector User Guide
Caution: Do not use the SK2 with smoke detector guards unless the usage has been evaluated and found suitable for the SK2.
2.4. Testing the SK2
To test the SK2 and ensure the installation is successful:
Pull the smoke alarm downward to make sure it is securely attached to the mounting bracket.
WARNING! To prevent injury, the SK2 must be securely attached to the ceiling (or wall) in accordance with the installation instructions.
Press the TEST/MUTE button until the alarm sounds
Figure 10: SK2 TEST/MUTE Button
The SK2 emits an alarm if the unit is working properly.
TEST/MUTE Button

Operating the SK2
Care@Home™ Smoke Detector User Guide 15
3. Operating the SK2
The SK2 senses smoke when the smoke enters the smoke detection chamber. When the SK2 detects smoke:
An alarm is sounded.
The alarm LED lights up red.
A notification is sent to the CP.
If the alarm sounds and you are not testing the SK2, the SK2 may have detected smoke. Proceed as follows:
Determine if:
The alarm is real
There is smoke
A possible fire
The alarm is false.
If the alarm is triggered by smoke from a non-serious event such as smoke from cooking, open a window and fan the air to remove the smoke or dust. The alarm turns off as soon as the air is completely clear of smoke.
If the alarm is triggered by a real threat of fire, evacuate as rehearsed and call the fire department.
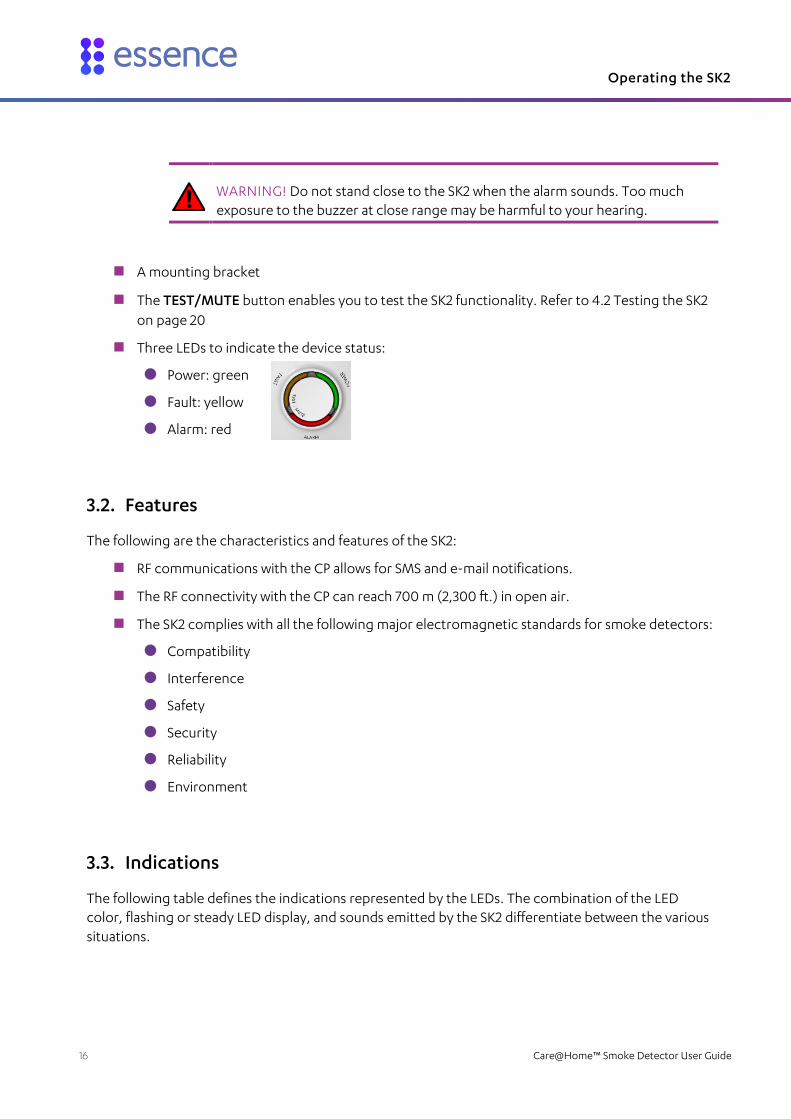
3.1. Physical Attributes
Figure 11: SK2 Physical Attributes
The SK2 includes:
A smoke-detection chamber
An alarm
Detection Chamber Mounting Bracket
LEDs and TEST/MUTE Button
Operating the SK2
16 Care@Home™ Smoke Detector User Guide
WARNING! Do not stand close to the SK2 when the alarm sounds. Too much exposure to the buzzer at close range may be harmful to your hearing.
A mounting bracket
The TEST/MUTE button enables you to test the SK2 functionality. Refer to 4.2 Testing the SK2 on page 20
Three LEDs to indicate the device status:
Power: green
Fault: yellow
Alarm: red
3.2. Features
The following are the characteristics and features of the SK2:
RF communications with the CP allows for SMS and e-mail notifications.
The RF connectivity with the CP can reach 700 m (2,300 ft.) in open air.
The SK2 complies with all the following major electromagnetic standards for smoke detectors:
Compatibility
Interference
Safety
Security
Reliability
Environment
3.3. Indications
The following table defines the indications represented by the LEDs. The combination of the LED color, flashing or steady LED display, and sounds emitted by the SK2 differentiate between the various situations.

Operating the SK2
Care@Home™ Smoke Detector User Guide 17
Table 1: LED Indications
Indications Flashing LED
Beep repeats every 25 - 35 seconds
Actions/Comments
Normal operation (default state) Power - green
No sound
The battery charge is low. The batteries need to be replaced.
The low battery indication can last for up to seven days.
Fault – yellow
One beep Press the TEST/MUTE button to temporarily stop the LED from flashing for the next 12 hours.
The SK2 is not being tested regularly No sound
Smoke detection sensitivity is at least 20% below the sensitivity factory setting.
One beep Replace the SK2 immediately.
A malfunction has occurred. One beep Call a technician.
Smoke detection indication Alarm - red
The SK2 sounds an audible alarm of 3 beeps, a pause, and then another 3 beeps.
Push the TEST/MUTE button to suspend the alarm for five minutes. When suspended, the SK2 re-assesses the smoke level. If the smoke has not dissipated, the SK2 sounds the alarm again.
When the SK2 is removed from its bracket, the tamper switch is triggered.
A loud continuous tone Returns to normal state when the SK2 returns to its bracket.
NOTE: Certification indications for Smoke Detection:
For UL: The SK2 produces three beeps of ½ second (ON) separated by ½ second breaks (OFF), and a 1½ seconds break (OFF).
For cUL: The SK2 produces a steady audible signal of continuous tone (ON).
Alarm event reports are retrieved via the CP.
The SK2 only indicates one alarm at a time. The SK2 sounds the alarm according to priority, such as:
First priority level: Smoke alarm
Second priority level: Tamper alarm
The SK2 reverts to the next priority level only when the status of the prior alarm is OFF.

Operating the SK2
18 Care@Home™ Smoke Detector User Guide
3.4. Stopping the Alarm
WARNING! Never disable the SK2 or remove the battery to stop the alarm.
The SK2 turns off the alarm automatically when it no longer senses smoke. To dissipate the smoke, do the following:
Open a window (s) in the room where the SK2 is installed.
Fan the air around the smoke alarm.
If the alarm persists, clean the SK2 as described in section 4.3 on page 21. If the alarm resumes after the SK2 is cleaned, check if the location of the SK2 is the source of the alarm problem.
If the location is acceptable, have the SK2 checked for any technical problems.

Maintaining the SK2
Care@Home™ Smoke Detector User Guide 19
4. Maintaining the SK2
Maintenance of the SK2 involves replacing the battery, testing, and cleaning the device.
4.1. Replacing the Battery
Replace the batteries when the SK2 indicates that the battery charge is low.
To replace the battery, perform the following procedure:
To remove the SK2 from the mounting-base, turn the SK2 counter-clockwise until you hear a click. The SK2 is freed from the bracket.
Figure 12: Open the Mounted SK2 for Maintenance
Remove the old batteries.
Insert the new batteries, according to the polarity marks in the battery compartment.
Align the SK2 slots with the bracket tabs, as illustrated in Figure 8 on page 13, and insert the bracket tabs into the SK2 slots.

Maintaining the SK2
20 Care@Home™ Smoke Detector User Guide
Turn the SK2 clockwise on the bracket until you hear a click.
Figure 13: Return SK2 to Base While Aligning Tabs
If the SK2 is not mounted onto the bracket correctly, a loud continuous tone is triggered.
Caution: Use only the specified type and make of battery. Refer to 5 Specifications on page 23.
4.2. Testing the SK2
To keep the SK2 in good working condition, test the SK2 once a month, and at any time the device appears not to be working.
To test the SK2, push firmly on the TEST/MUTE button until the buzzer sounds and all the LEDs flash. The TEST/MUTE button tests all the functions as required by Underwriters’ Laboratories.

Maintaining the SK2
Care@Home™ Smoke Detector User Guide 21
Caution: Never use an open flame of any kind to test the SK2.
If the SK2 is working properly, the three LEDs flash rapidly and continuously and the sound pattern is:
For UL: A single pattern of three consecutive pulses of ½ second (ON) separated by ½ second
breaks (OFF)
For cUL: A steady continuous tone (ON) of up to five seconds.
If the SK2 beeps and the yellow LED flashes once, the SK2 is not working properly and needs to be repaired or serviced immediately.
4.3. Cleaning the SK2
To keep the SK2 in good working condition, clean it at least once a year.
To clean the SK2, perform:
To remove the SK2 from the mounting-base, as illustrated in Figure 12 on page 19, turn the SK2 counter-clockwise until you hear a click. The SK2 is freed from the bracket.
Remove the batteries.
Remove dust from SK2 as follows:
Vacuum the dust from the detection chamber, located as shown in Figure 11 on page 15.
Use the soft brush attachment of the vacuum cleaner to remove dust and dirt from the detection chamber.
Caution: Never use water or cleaners to clean the SK2.

Maintaining the SK2
22 Care@Home™ Smoke Detector User Guide
Remove any dust on the SK2 components, especially in the battery compartments.
Figure 14 – Clean the SK2 Components
Replace the batteries.
Align the SK2 slots with the bracket tabs, as illustrated in Figure 8 on page 13, and insert the bracket tabs into the SK2 slots.
Turn the SK2 clockwise on the bracket until you hear a click.
Test the SK2, as per the instructions in section 4.2 above, to make sure that the SK2 is working properly.
Battery Compartments

Specifications
Care@Home™ Smoke Detector User Guide 23
5. Specifications
The following table lists the technical aspects and data about the SK2.
Table 2: Device Technical Specifications
Category Details
Essence Part Number ES700SK2.
Electrical Power Supply Two 1.5V AA Alkaline batteries, manufactured by Energizer (EN91/LR6/AM3)
Voltage and current ratings Nominal voltage: 2.4V
Standby time current consumption (@2.4V): 60µA
Maximum current consumption (@2.4V): 200mA
Nominal Battery Life Two years
NOTE: Nominal battery life is computed according to ESI's standard usage parameters.
System Compatibility Care@Home™
Wireless Bi-directional End-to-End bi-directional ESI protocol
Modulation and Frequency FSK modulation:
869.225 MHz, 868.3 MHz (Europe and China)
916.5 MHz (North America and Australia)
800 MHz (Israel)
Nominal Radio Coverage 700 m (2296 ft.) – Open Air Nominal
NOTE: Nominal RF coverage is tested over LOS free space in a low interference environment.
Encoding 32-bit ID, over 4 billion combinations
Environmental Humidity Up to 85% non-condensing
Operating Ambient Temp. range
-0° ~ 49° C (32° - 120° F) batteries dependent
Physical Dimensions Diameter 135 mm (0.44 ft.); Height: 48 mm (0.16 ft.) (including ceiling/wall mount)
Weight 214 g (0.47 lb.) (including batteries)
Color Glossy White
Mounting Standard ESI 2-screws ceiling/wall mount
Alarm A piezoelectric buzzer of 85 dB at 3 m

Specifications
24 Care@Home™ Smoke Detector User Guide
Category Details
Indications Normal operation Green LED flashes once every 25-35 seconds
Low battery warning Alarm sounds once every 25-35 seconds
Yellow LED flashes once every 25-35 seconds
Low sensitivity of detector Alarm sounds once every 25-35 seconds
Yellow LED flashes twice every 25-35 seconds
Improper installation Alarm produces a loud continuous tone
Yellow LED lit continuously
Test – pass Alarm generates 3 beeps, yellow LED flashes rapidly 8 times
Test – fail The combination of the alarm and the LED indicate the specific problem
Security and Safety
Tamper Feature Loud continuous sound is triggered and the red LED flashes continuously
Connectivity Failure Alarm functions even if gateway cannot be accessed
Device Identification Unique electronic serial number
Compliance with Standards
CE, FCC, IC, UL, cUL
The following table defines the technical data about the batteries tested and approved by Essence for the SK2.
Table 3: Battery Specifications
Device Quantity Voltage Type Chemistry Approved Manufacturer Battery Life
Smoke Detector 2 1.5 V AA Alkaline Energizer, Duracell, GP Two years

Fire Prevention and Safety
Care@Home™ Smoke Detector User Guide 25
Appendix A Fire Prevention and Safety
Prevention and Planning
Installing smoke detectors is only one step in protecting a residence from fire. Similarly, the smoke detector increases the probability that all residents can escape safely in the event of a fire.
To reduce the likelihood of fires, implement the following tips:
Install smoke alarms properly. Follow all the instructions in this manual. Keep the smoke detectors clean and test them every month.
Replace a smoke alarm immediately if it is not working properly.
Follow fire safety rules and prevent hazardous situations, as follows:
Use smoking materials properly. Never smoke in bed.
Keep matches and cigarette lighters away from children.
Store flammable materials in proper containers. Never use them near an open flame or sparks.
Keep electrical appliances in good condition. Do not overload electrical circuits.
Keep stoves, fireplaces, chimneys, and barbecue grills grease free. Make sure they are properly installed and away from combustible materials.
Keep portable heaters and open flames such as candles away from combustible materials.
Do not allow rubbish to accumulate.
Keep a supply of extra batteries available for the battery-powered smoke detectors.
Explain to the children what the smoke alarm signal means.
Develop a family escape plan and practice it with the family.
Draw a floor plan of the residence and find at least two ways to exit each room. There should be a way to exit each bedroom without opening the door.
Teach the children that they must be prepared to leave the home by themselves if necessary.
Show the children how to check to see if doors are hot before opening them.
Show the children how to stay close to the floor and crawl if necessary.
Show the children how to use the alternate exit if the door is hot and should not be opened.

Fire Prevention and Safety
26 Care@Home™ Smoke Detector User Guide
Decide on a meeting place that is a safe distance from the residence. Make sure that all the children understand that they should go to the meeting place and wait there, in the event of a fire.
Hold fire drills at least every six months to make sure that everyone knows what to do to escape safely, even small children.
Know where to go to call the fire department from outside the residence.
Obtain emergency equipment, such as fire extinguishers, and teach the children to use the equipment properly.
How to Escape if a Fire Occurs
Review the following rules with the children each time there is a fire drill.
Stay calm and try not to panic. Their safe escape may depend on thinking clearly and remembering what they have practiced.
Get out of the house as quickly as possible. Follow a planned escape route. Do not stop to collect anything or to get dressed.
Feel the doors to see if they are hot. If they are not hot, open them carefully. Do not open a door that is hot. Use an alternate escape route.
Stay close to the floor. Smoke and hot gas rise.
Cover your nose and mouth with a wet or damp cloth. Take short, shallow breaths.
Keep doors and windows closed. Open them only to escape.
Meet at the planned meeting place, after leaving the house.
Call the fire department as soon as possible from outside the residence. Give the emergency operator a name and address.
Never go back inside a burning building.
Contact the local fire department to get more information on how to prevent fires in the residence.
Limitations of Smoke Alarms
Although smoke detectors and alarms play a key role in reducing damage resulting from home fires, they can only work if they are properly located, installed, and maintained.
Smoke alarms may not be heard if residents are hearing impaired.
Special smoke alarms, such as those with both visual and audible alarms, should be installed for hearing impaired residents.

Fire Prevention and Safety
Care@Home™ Smoke Detector User Guide 27
Smoke alarms may not waken individuals who are sound sleepers.
If the sound of the smoke alarm does not easily wake up children or other family members, or if there are infants or family members with mobility limitations, make sure someone is assigned to assist them in the event of an emergency or a fire drill.

Legal Notice
28 Care@Home™ Smoke Detector User Guide
Legal Notice Usage of this document, and all information (including product information) provided within, are subject to the following terms and conditions, and all applicable laws. If you do not agree with these terms, please do not access or use the remainder of this document.
This document contains highly confidential information, which is proprietary to Essence SmartCare Ltd. and/or its affiliates (hereafter, "Essence"). No part of this document's contents may be used, copied, disclosed or conveyed to any third party in any manner whatsoever without prior written permission from Essence.
The information included in this document is intended for your knowledge and for negotiation purposes only. Essence makes no implicit representations or warranties with respect to such information.
The information included in this document is subject to change without notice. Any decision to rely on the information contained herein shall be at your sole responsibility, and Essence will not accept any liability for your decision to use any information or for any damages resulting therefrom.
Certain laws do not allow limitations on implied warranties or the exclusion or limitation of certain damages. If these laws apply to you, some or all of the above disclaimers, exclusions, or limitations may not apply to you.
By using the information contained herein, you agree that the laws of the State of Israel, without regard to principles of conflict of laws, will govern any dispute of any sort that might arise between you and Essence regarding the information contained herein, and any such dispute shall be settled exclusively in the competent courts of Tel Aviv-Jaffa, Israel.
All registered or unregistered trademarks, product names, logos and other service marks mentioned within this document are the property of Essence, or their respective owners. Nothing contained herein shall be construed as conferring by implication, estoppels, or otherwise any license or right, either express or implied, under any patent or trademark of Essence or any third party. No use of any trademark may be made without the prior written authorization of Essence.
This document and all of its contents are protected intellectual property of Essence. Any copying, reprinting, reuse, reproduction, adaptation, distribution or translation without the prior written permission of Essence is prohibited.
Please check your End User License Agreement (EULA) for terms and conditions.
© 2017 All rights reserved to Essence SmartCare Ltd.
For more information, please contact: Essence SmartCare Ltd.
12 Abba Eban Avenue,
Ackerstein Towers Bldg. D
Herzliya Pituach, 4612001 Israel
www.essence-grp.com
Tel: +972-73-2447777
Fax: +972-9-7729962