skype for business user guide - glasgow, scotland, … · 2 student csce pc clusters skype for...
TRANSCRIPT

IT Services | Sep 2016 | v1.4
Skype for Business User Guide
Contents
1 Introduction .................................................................................................................................... 1
2 Features........................................................................................................................................... 1
3 How to get Skype for Business (& Lync 2011 for Macs) .................................................................. 1
Standard Staff Desktop (SSD) Machine .................................................................................... 1
Student CSCE PC Clusters ........................................................................................................ 2
Other Windows PCs (your own devices).................................................................................. 2
Mac OS X ................................................................................................................................. 2
Mobile Devices ........................................................................................................................ 3
Web Application ...................................................................................................................... 3
4 Starting ............................................................................................................................................ 5
5 The main Skype for Business Window ............................................................................................. 7
6 Presence .......................................................................................................................................... 8
7 Contacts ........................................................................................................................................ 10
Adding a contact .................................................................................................................... 10
Privacy relationships .............................................................................................................. 10
8 Instant Messaging ......................................................................................................................... 11
9 Video and audio conferencing ....................................................................................................... 12
10 Starting a scheduled or ad-hoc Meeting ....................................................................................... 13
Ad-hoc Meeting ..................................................................................................................... 13
Schedule a Meeting ............................................................................................................... 14
Joining a Meeting .................................................................................................................. 16
11 Presentation Tools ......................................................................................................................... 17
Present Desktop .................................................................................................................... 17
Present Programs .................................................................................................................. 18
Present PowerPoint Files ....................................................................................................... 18
Co-Author Office Document .................................................................................................. 19
Add Attachments ................................................................................................................... 19
Shared Notes ......................................................................................................................... 19
My Notes ............................................................................................................................... 20
Whiteboard, Poll, Q&A .......................................................................................................... 21
12 Recording ...................................................................................................................................... 22
13 Skype for Business Web App ......................................................................................................... 23
14 Helpful Tips .................................................................................................................................... 24
Finding people ....................................................................................................................... 24
Contacting Skype users from Skype for Business & limitations ............................................. 24
When to use Skype for Business or the Videoconferencing Service ...................................... 24
Problems with Echo ............................................................................................................... 25
File transfer ........................................................................................................................... 25
Uploading a photo ................................................................................................................. 26

1
1 Introduction
Skype for Business has a similar look and feel to that of the free consumer version of Skype™, but
provides an enterprise level of security and encryption. The University controls user accounts. It
allows large meetings of up to 250 University contacts compared to 20 for Skype. Skype for
Business does not have advertising.
Skype for Business is an ideal choice for an individual at their desktop, laptop or mobile device. Once
you have a larger group of people in the same space, the UofG Videoconferencing service is
preferable.
Please note that Skype for Business is not linked to our VOIP Telephony system (this is sometimes
referred to in generic Microsoft guides and videos found on the internet).
2 Features
Communicate from anywhere with an Internet connection
Easily switch between instant message, audio and video capabilities or use all at once
Search for University staff and store contact in favorites and groups
Schedule meetings from Microsoft Outlook
Share PowerPoint presentations, whiteboard or your desktop
Create Q&A and polls for attendees
Integration with other Microsoft products
Drag and drop files to share with meeting attendees
Record your meeting to file
Meeting capabilities for contacting anyone using the Skype for Business Web App
3 How to get Skype for Business (& Lync 2011 for Macs)
Standard Staff Desktop (SSD) Machine All SSD PCs from September 2016 have Office 2016 installed.
If you have an earlier version, install Office 2016 from the Software Center desktop icon.
(http://www.gla.ac.uk/services/it/software/softwarecentre/) ” Microsoft Office 2016
Note IT Services do not support installing Office 2016 from Office 365 on SSD - it
would need to be removed and replaced with the above to work correctly.

2
Student CSCE PC Clusters Skype for Business is already installed.
Open from Start > Programmes> Microsoft Office 2016 > Skype for Business 2016
Please note that the nature of open-access PC Clusters means that they are suitable for
instant messaging, but not really for audio and video use.
Other Windows PCs (and your own devices) (Windows 10, Windows 7, Windows 8.1)
Before you install Skype for Business (previously called Lync) on your Windows computer, you
should check to see that it's not already installed. Go to the Start menu and select either
Microsoft Office 2013/2016 or Office 365 and look for the Skype for Business icon.
1. Sign in to https://office365.gla.ac.uk with your email address and password.
(http://www.gla.ac.uk/services/it/office365/)
2. Now click on Install Office 2016
3. Run the setup installation package and follow the instructions
This will install Office 2016 inclusive of Skype for Business. If you have previous versions of Office
installed or other Office 2013 products, including associated 2013 products such as Visio,
Project and Publisher which you wish to keep please contact your IT support for advice before
proceeding.
Mac OS X Currently there is no client for Skype for Business. It is due out before the end of 2016. This guide
will be updated when its released. For now, use Lync for most functionality (but not recording).
From your Mac, use your Office 365 subscription to download Lync 2011 for now.
1. Sign in to https://office365.gla.ac.uk with your email address and password.
(http://www.gla.ac.uk/services/it/office365/)
2. Under “Install Office 2016” click “Other Installs”
3. Under Software, select Skype for Business
4. It will know you are using a Mac, and offer you “Install Lync client for Mac 2011”
In the Lync for Mac sign-in window, type your user ID University of Glasgow email address
and GUID password.
Note: There is no need to follow the Advanced Set up instructions shown on the Office365
page. When logging in for the first time you need to enter your Email Address, User ID and
Password – Your UID is your UofG email address which you sign into Office365 with.

3
Mobile Devices
Windows Phone 8.1 or later
Download and install the Skype for Business App from the Windows store.
IOS device (iPhone or iPad) iOS or later
Download and install the Skype for Business App from the Apple App store.
Android device
Download and install the Skype for Business client from the Google Play store.
Web Application
The Skype for Business web app is an alternative way to invite people to join a Skype for Business meeting if they don't have Skype for Business installed on their PC. You can send a Skype for Business meeting invite to any email address.
When you invite someone outside the University who is not on Skype for Business, to a Skype for Business meeting, they will receive a link to the web application in their meeting invitation. They join the meeting by clicking on that link, which opens automatically to connect them to the meeting.
The guest experience they have depends on what they are using:
If a Windows user with Skype for Business installed clicks the "Join Skype Meeting" link in an email, Skype for Business launches.
If a Windows user without Skype for Business installed clicks the "Join Skype Meeting" link in
an email they see this
They can proceed to join the meeting without ticking the “install the Skype Meeting App plug-in” however the plug-in is required to participate in meeting audio and screen sharing.

4
Mac users, with or without Lync installed, clicking the “Join Skype Meeting” link see this: Selecting the “Join using Lync for Mac or Communicator for Mac” launches Lync if it is installed.
Follow the instructions for downloading and running the Web App plug-in installation. Note you may
be asked to allow the web-app to install and allow access through you machines firewall (this will vary
depending on your machines set-up and browser)
More information about using the Web App is provided - jump to section 13
5
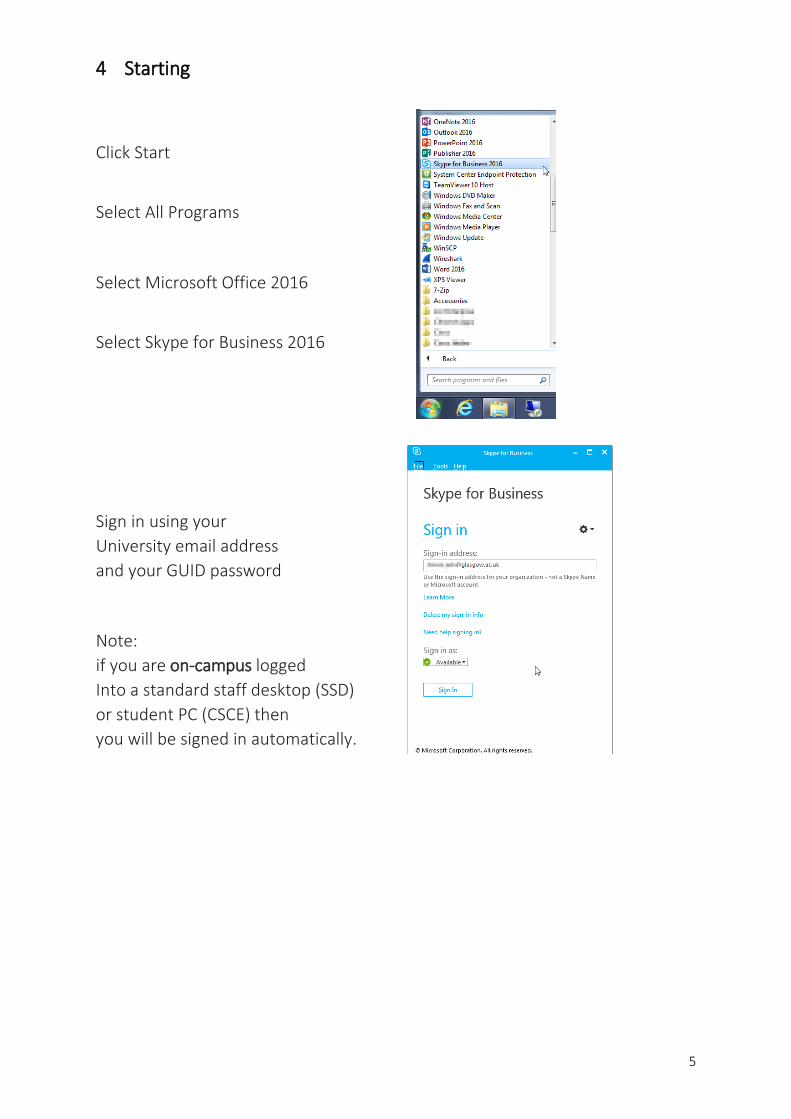
4 Starting
Click Start
Select All Programs
Select Microsoft Office 2016
Select Skype for Business 2016
Sign in using your
University email address
and your GUID password
Note:
if you are on-campus logged
Into a standard staff desktop (SSD)
or student PC (CSCE) then
you will be signed in automatically.

6
If you are using a non-domain joined machine, you may login to Skype for Business and then
also receive a request by Skype for Business asking to make a connection to Exchange Web
Services(EWS) :-
If Outlook isn’t running after a period of time you may also see this as it attempts to establish a connection

7
5 The main Skype for Business Window
Status
Use the drop down
box to indicate your
availability
busy, not available,
away, etc.
Add a custom
message or location
in the Set Location
field
Communications bar
Select
Contacts
Calls (All, Missed, placed)
Meetings
Option Menu
Allows access to a
range of settings
Menu Bar
Only available if
show menu bar is
selected in the
Options
Main viewing area
Showing list of
contacts in this
example

8
6 Presence
Skype for Business allows you to view the real time availability of colleagues via their status
which is reflected in a number of Microsoft applications, e.g. Outlook, SharePoint.
The "presence privacy mode" is "". I only want people in Contacts to see my presence”
To see a person’s presence, and for them to see your presence, you must add them as a
contact (see 7.1).
If someone is not a contact, they display to you as “Offline”.
Skype for Business client Outlook Email client
Your status is determined by your Outlook Calendar (in a meeting) or your computer activity (away).
Alternatively, you can set your status here manually (busy, do not
disturb, away, etc.)
Note: If your Outlook calendar is set to Out of Office, but your Skype status is available, a purple dot is
added indicating that although available you may be more difficult to contact.
Changing your presence privacy to “I want everyone to be able to see my presence”
From the Options cog select Status and pick the option
This is a collaboration service. Everyone means: University of Glasgow students and staff Any other organisation using Skype for
Business may be able to view your presence without requesting to add you as a contact first.

9
10
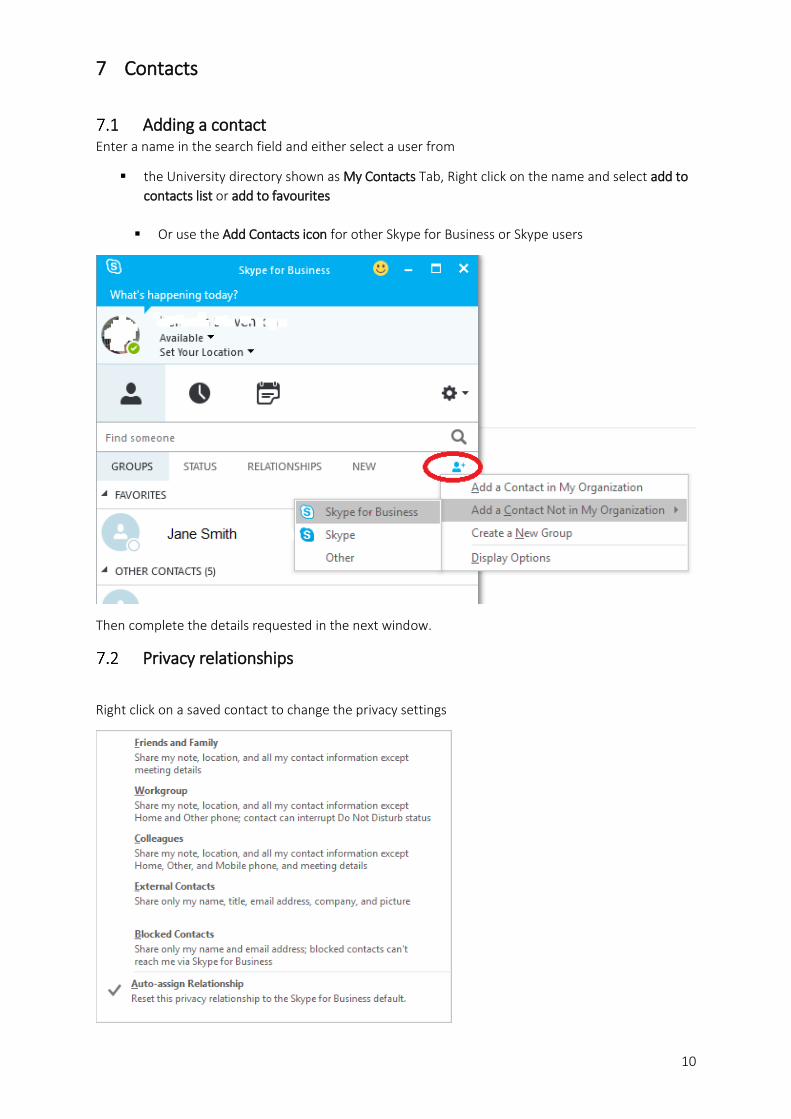
7 Contacts
Adding a contact Enter a name in the search field and either select a user from
the University directory shown as My Contacts Tab, Right click on the name and select add to
contacts list or add to favourites
Or use the Add Contacts icon for other Skype for Business or Skype users
Then complete the details requested in the next window.
Privacy relationships
Right click on a saved contact to change the privacy settings

11
8 Instant Messaging
To make contact using Instant Messaging, locate the person in your saved contacts or use the
search facility. Once located, hover over their presence icon then click the IM icon
Or double click the icon to start Or right click and select Send an IM
A window will appear on the contacts machine to indicate an incoming call;
This will change to Accept as your mouse pointer enters the window. Click on Accept to answer
the call and open the chat window or click on Ignore if you don’t want to be disturbed.
Chat Window
9
Please note by default IM conversations are saved into the Conversation History email folder for
Outlook version 2010 upwards. Like saved emails, they can be deleted, copied, etc.
If you do not wish copies to be saved , turn it off in Tools – Options – Personal, untick the checkbox
Conversation area – with scroll bar to
allow view of previous comments
New message area - type your message here
Change to video or audio
meeting, share desktop
Invite others
Share a file, flag as important, add emoticon,
send button (same as return key)
Additional Options
Saved conversion – your conversation will save to Conversation
History in Outlook version 2010 +, unless you change the default

12
9 Video and audio conferencing
Video Call
This will call or escalate a IM session into a full video call
Note: it is good practice to send an Instant message first and ask if the person would like to participate
in a video call. They may need a few minutes to set up their camera and audio devices.
To escalate your IM session to a video call, click on the camera icon
This will open a preview of your video click Start My Video to
proceed
If you need to set-up your camera click on the gear icon and select Tools – Video Device
Options You will be able to select the camera if you have more than one installed and adjust its settings.
The options will be dependent on the specific camera installed
Note: If there is a setting for anti-flicker this should be set to 50Hz if located in the UK
Stop or end a video call
Click on the camera icon to stop sending your video: Note you will still be receiving video. There
will now be a line through the camera icon indicating that your video is muted. Click on the icon
to restart your video.
To end the call completely press the hang-up icon
Video Meeting Window
13
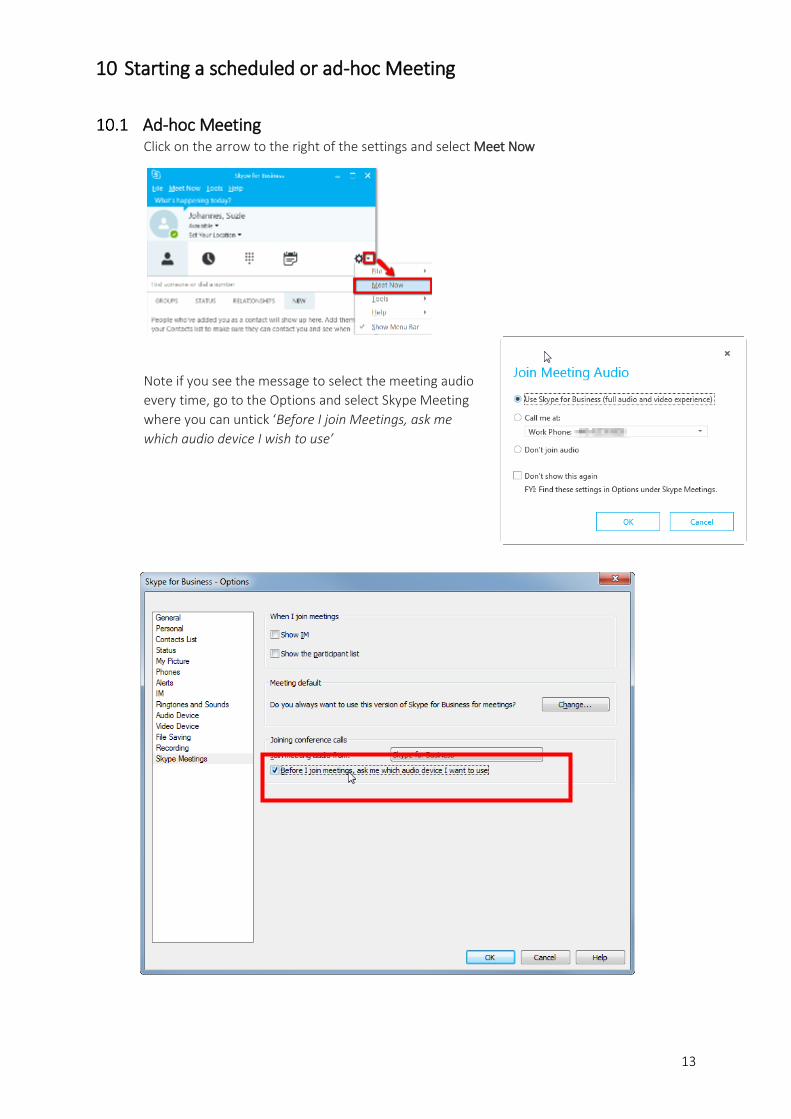
10 Starting a scheduled or ad-hoc Meeting
Ad-hoc Meeting Click on the arrow to the right of the settings and select Meet Now
Note if you see the message to select the meeting audio
every time, go to the Options and select Skype Meeting
where you can untick ‘Before I join Meetings, ask me
which audio device I wish to use’

14
Schedule a Meeting
Users of Outlook desktop 2016 or Exchange Online Email can schedule a meeting, either a single or
recurring Skype for Business meeting, from the Calendar function. You should see on the ribbon a
button marked ‘New Skype Meeting’
Pressing the New Skype Meeting button then opens the Meeting schedule window
Remember that you need to use HTML format for the link to appear. The best way to switch to HTML if you normally compose in plain text is using Format Text -> HTML in the compose window itself.

15
Meeting options allows you to select who can enter the meeting directly or who has to wait in ‘the
lobby’ and wait to be admitted.
Options
Who doesn’t have to wait in the lobby
Only me, (the meeting organiser). People I invite from my organisation. Anyone from my organisation. Anyone (no restriction).
Who can be a presenter
Only me, (the meeting organiser). People I choose. Anyone from my organisation. Anyone (no restriction).
There are also options to disable participants from using Instant Messaging during the meeting, to
mute all the attendee’s microphones or to block attendees from viewing the video that’s presented.
Alternative - Skype for Business Web Scheduler
If you are unable to access your Outlook calendar, or your mailbox is on an older version (e.g. Exchange
2007), you can schedule meetings or edit existing meeting schedules using the Web Scheduler.
1. Open a web browser, go to https://sched.lync.com and sign in
2. Fill in the relevant fields for start date and time, attendees email addresses, separate with
semi-colons.
3. Press save, you are shown the meeting details.
4. You must copy and paste into an email, or save as iCalendar attachment, and manually send
to the participants (this is only automatic if you use Outlook)
Note Scheduling a Skype meeting using the Web Scheduler does not result in an email being sent to
the meeting participants. You need to send the email manually. Not all meeting are displayed in the Web Scheduler: Skype for Business Web Scheduler lists
only the meetings you have scheduled, not all the meetings on your calendar

16
Joining a Meeting
There are 3 ways to join a scheduled meeting
In the Skype for Business client – click in the Meeting Tab for today’s meetings, any item shown in blue
can be double clicked to open the meeting window
In the meeting request click on ‘Join Skype Meeting’

17
In the meeting reminder click on ‘Join Online’
Note - The Meeting invite which you sent out to participants also has a clickable link to Join the
meeting, however this will only work if this was sent as an HTML enabled message, and your email
client displays the message as HTML
11 Presentation Tools
Once in a meeting and if you are the meeting organiser or you are enabled as a presenter you can
select the Presentation button, where you have a number of options.
Note – your Skype for Business status will change to Presenting and you will no longer receive instant
messages or calls
Present Desktop
Sharing your desktop displays the entire continents of your desktop.
18
Note if you have multiple monitors, or you are connected to a projector from a laptop, the client will
ask which screen you wish to share. Sharing the desktop is ideal if you are going to swap between
applications or show more than one application. Desktop sharing uses the least bandwidth and is
recommended if any participants are on a slower network connection.
Present Programs
Useful if you only want to show one an individual program and don’t want viewers to see anything
else you may be running. Note the program being shared will have a yellow frame surrounding it and
a Now Presenting tab will appear on the desktop. All open windows for that application will be shared.
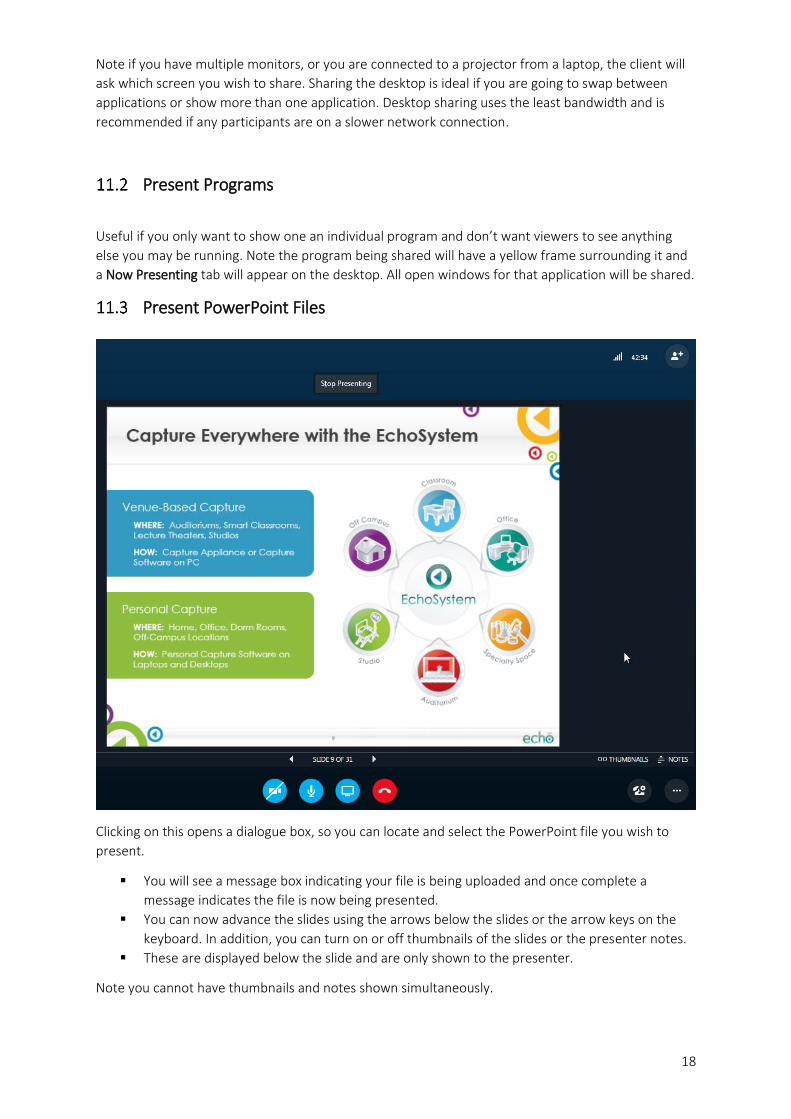
Present PowerPoint Files
Clicking on this opens a dialogue box, so you can locate and select the PowerPoint file you wish to
present.
You will see a message box indicating your file is being uploaded and once complete a
message indicates the file is now being presented.
You can now advance the slides using the arrows below the slides or the arrow keys on the
keyboard. In addition, you can turn on or off thumbnails of the slides or the presenter notes.
These are displayed below the slide and are only shown to the presenter.
Note you cannot have thumbnails and notes shown simultaneously.

19
Co-Author Office Document
Allows multiple participants to view and edit a shared document located on the presenters OneDrive
for Business (dependant on your OneDrive sharing permissions which you manage).
Add Attachments
This allows others to download the attached file – the padlock icon allows you to restrict this to
presenters only, the meeting organiser or everyone – Note this view is the same as selecting Manage
Content from the Presentation menu.
Shared Notes
This opens OneNote and allow you to select or create a Notebook. All participants are automatically
added to the OneNote attendee list.

20
My Notes
Allows you to create private notes for the meeting. You will be given a list of all of your open OneNote
notebooks. Select one and create your own notes.
This is not shared.

21
Whiteboard, Poll, Q&A
11.8.1 Whiteboard
The whiteboard is a standard white board with drawing, highlighting, upload, paste, etc. The
whiteboard can also be saved pasted into another application or copied to OneNote.
11.8.2 Polling
Polling allows you to create a set of questions that are shown to the audience. Options allow the
presenter to show or hide poll results from the audience and to edit or close the Poll. The poll results
can be saved to an image file (.png or a csv).

22
11.8.3 Questions & Answers
Q&A allows the presenter to type a series of questions. Only attendees can answer questions, so
make sure all the people that you want to answer are set as Attendees. Questions and answer can be
saved to a text file.
12 Recording
To record the meeting click on the options button on the bottom right of the meeting screen with the
three dots. The recording will capture all of the meeting materials including audio, video, instant
messages, screen sharing, PowerPoint, whiteboard and polling. Anyone who is a presenter is allowed
to record and save the recording to their machine.
An indicator on the top right hand side shows that the meeting is being recorded. Hover your mouse
over the icon to see who is recording the meeting.
The presenter now has additional controls to stop or pause the recording.
Once stopped the recording is processed into an mp4 format, note you can exit the meeting while the
recording is processing. The default location for the mp4 file is
My Documents\My Videos\Lync Recordings
this location and the resolution can be changed within Options.
Note: Recording is not available in Lync 2011 for Mac. This guide will be updated when the new Skype
for Business Mac client is released, due before the end of 2016.

23
13 Skype for Business Web App
Skype for Business Web App is a browser-based meeting client that you use to join Skype for Business
meetings. Details of how to sign in were earlier in section 3.5.
You can’t schedule a meeting from Skype for Business Web App, but you can join a meeting that was
scheduled using either Microsoft Outlook or the Skype for Business Web Scheduler.
After signing in, you will now join the meeting or if you joining early you may be placed in the virtual
lobby or the meeting room depending on the meeting room settings.
You will join the meeting room as a guest so options for presenting will need to be granted by the
meeting organiser.
Comparison with Skype for Business clients
Skype for Business Web App provides HD video conferencing, IM in meetings, high-fidelity desktop, application, and presentation viewing, desktop sharing, whiteboard, lobby, and presenter access controls. In addition, Skype for Business Web App now includes PC-based audio and video.
It doesn’t offer any other Skype for Business features, such as presence or contact information. For more information, see Skype for Business Online Service Description and Client comparison tables for Skype for Business Server 2015.

24
14 Helpful Tips
Finding people Click on the search bar for Find Users and type the person’s name as you start to type the
list of contacts should appear below under the headings My Contacts (University staff,
students and contacts in your address book) or from the Skype directory.
If you hover over any of these contacts with your mouse pointer you will have the option to
contact them by IM, an audio or a video call.
You can also check for additional details by clicking on the contact card.
If you wish to save the contact to any of you contact lists, click on More Options or
alternatively right click on the contact for the Add to Contacts List option
Contacting Skype users from Skype for Business & limitations To add your Skype contact, use the Add Contacts icon, select Skype, type in their Skype email address
(the Skype Directory is world-wide and so not ideal for simpler searching due to the number of
results). Once added to your contact list and your Skype contact has accepted your request, you can:
Make voice and video calls to them
Instant message with them.
See their online status.
Note: At present, Skype for Business users can only connect with Skype for Windows (desktop), Skype
modern client (included in Windows 8 / 8.1) and Lync 2011 for Mac OS X
Limitations on meetings involving Skype for Business & Skype contacts:
You cannot have an IM or audio conversation with three or more people, you are limited to
one to one conversations only
Desktop and application sharing is not available
File transfer is not available.
Note - remember that other people can use the Skype for Business Web App instead.
When to use Skype for Business or the Videoconferencing Service
There are a few things to consider before making your choice
Skype for business is an ideal choice for an individual at their desktop, laptop or mobile device.
? Once you have a group of people it becomes difficult for everyone to get a good view of the
screen, camera position will be more difficult and audio is more likely to suffer from echo
problems as you turn the volume up so everyone can hear
? If the meeting quality is critical. In this scenario where quality and reliability are crucial then
videoconferencing is a better solution, this is because the dedicated videoconferencing
hardware is more likely to cope with network errors and the audio/video setup in the room is
fixed and frequently checked for quality. The echo cancellation hardware built in is also much
more capable of dealing with difficult environments, (large rooms, conference halls etc.)

25
Problems with Echo
Echo is when a portion your audio is picked up and sent back to you after a short delay. This
can be for a number of reasons; however, it is easy to ascertain which site is causing the echo.
You will find when one of the parties mutes their microphone or speaker the echo stops. This is
the site with the problem though they may be oblivious to the fact that everyone else is hearing
their own voice come back to them
Likely causes are acoustic coupling, One or more of these issues may be to blame:
The microphone is close to the speakers
The speakers are turned up too loud,
The room is large and possibly noisy with many hard surfaces.
The microphone level is turned up high, often because it is positioned far away from the
person talking
The solution is to check your levels, if possible use a headset or if you are using this for a
small group, purchase a speakerphone that has its own hardware echo cancellation.
One other possibility is electronic coupling from the input to the output on your own machine.
Check the recording device properties and ensure that the ‘Listen to this Device’ box
is NOT checked on the listen Tab on the microphone properties
To check your levels, select Tools – ‘Audio Device Settings’ from the Options cog
From here you can view your microphone level on the audio meter and play a sound
which should be at a comfortable listening level.
File transfer
File transfer is not possible to Skype contacts.
By default, Skype for Business Online is configured to prevent users from sending files that have the
following file name extensions:
.ade, .adp, .app, .asp, .bas, .bat, .cer, .chm, .cmd, .com, .cpl, .crt, .csh, .exe, .fxp, .grp, .hlp, .hta, .inf,
.ins, .isp, .its, .js, .jse, .ksh, .lnk, .mad, .maf, .mag, .mam, .maq, .mar, .mas, .mat, .mau, .mav, .maw,
.mda, .mdb, .mde, .mdt, .mdw, .mdz, .msc, .msi, .msp, .mst, .ocx, .ops, .pcd, .pif, .pl, .pnp, .prf, .prg,
.pst, .reg, .scf, .scr, .sct, .shb, .shs, .tmp, .url, .vb, .vbe, .vbs, .vsd, .vsmacros, .vss, .vst, .vsw, .ws, .wsc,
.wsf, .wsh

26
Uploading a photo
Students
1. From a PC or Mac, open “remote desktop connection” 2. Type in “csceremote.gla.ac.uk” and login with your GUID and password. 3. Go to start, all programmes, Cjwdev > AD Photo Edit” 4. Type your GUID into the name box, it will display your details. 5. Click Edit Image then Select New Image, then Resize to recommended dimensions then OK
to upload your photo. Your photo will take around 24 hours to appear on Skype for Business.
Staff
1. From a PC or Mac, open “remote desktop connection” 2. Type in “ssdremote.gla.ac.uk” and login with your GUID and password 3. Click the “AD Photo Edit” icon 4. Type your GUID into the name box, it will display up your record. 5. Click Edit Image then Select New Image, then Resize to recommended dimensions then OK
to upload your photo.
Your photo will take around 24 hours to appear on Skype for Business. This image is also used by Outlook 2016.
27
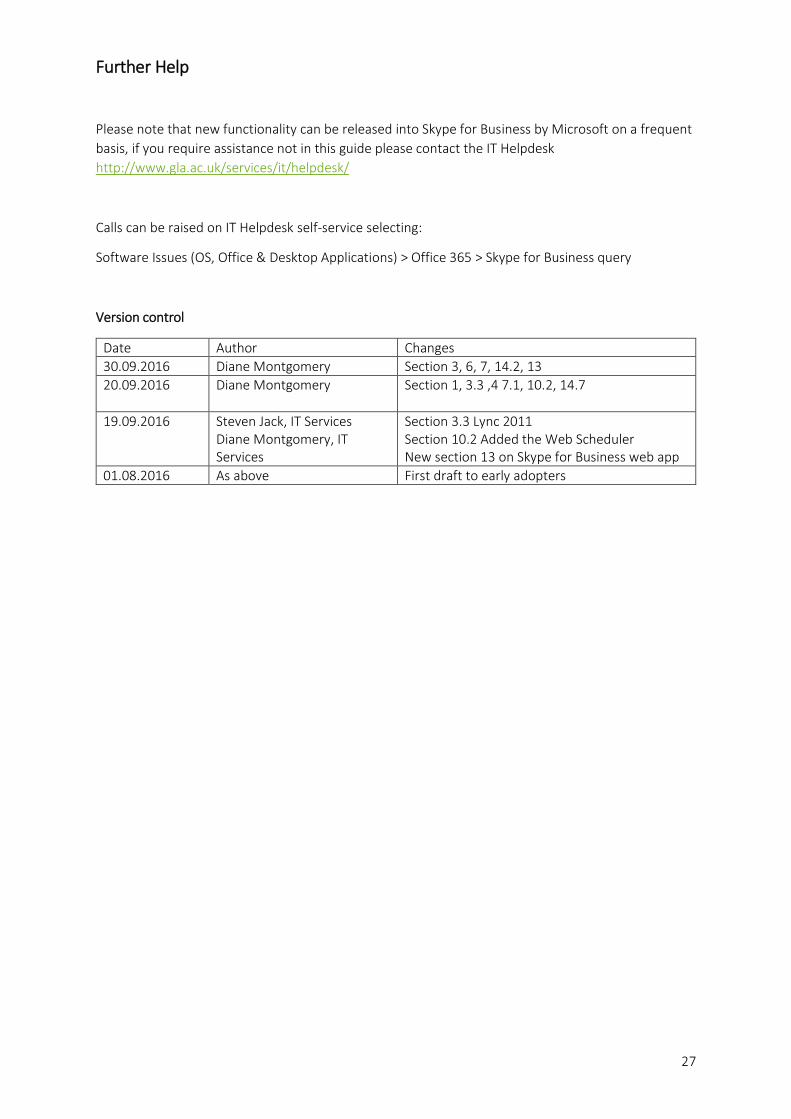
Further Help
Please note that new functionality can be released into Skype for Business by Microsoft on a frequent
basis, if you require assistance not in this guide please contact the IT Helpdesk
http://www.gla.ac.uk/services/it/helpdesk/
Calls can be raised on IT Helpdesk self-service selecting:
Software Issues (OS, Office & Desktop Applications) > Office 365 > Skype for Business query
Version control
Date Author Changes
30.09.2016 Diane Montgomery Section 3, 6, 7, 14.2, 13
20.09.2016 Diane Montgomery Section 1, 3.3 ,4 7.1, 10.2, 14.7
19.09.2016 Steven Jack, IT Services Diane Montgomery, IT Services
Section 3.3 Lync 2011 Section 10.2 Added the Web Scheduler New section 13 on Skype for Business web app
01.08.2016 As above First draft to early adopters