sknet manual 5 0 7589 - hoover fence
TRANSCRIPT


SK-NET™Operating & Installation Guide
Contents
1. INTRODUCTION ..................................................................... 11.1 WhatisSK-NET™?.................................................................. 11.2 SK-NET™Versions................................................................... 11.3 Computersystemrequirements............................................... 11.4 HowisSK-NET™organized?................................................... 2
2. GETTING STARTED ................................................................. 22.1SitePlan.................................................................................... 22.2 ConnectingSK-ACPpanelsand/or28SAPluscard readerstothecomputer.......................................................... 32.3 InstallingSK-NET™onyourcomputerornetwork.................... 4 SingleWorkstationInstallation(BasicVersion)......................... 4 MultipleLocations/ConnectionGroups.................................... 4 ActivatingSK-NET-MLDSoftware............................................. 4
Email............................................................................... 6 Phone.............................................................................. 6 FAX.................................................................................. 7 MultiWorkstationInstallation(Client/Server)..................... 8
3. QUICK START GUIDE.............................................................. 103.1 StartingSK-NET™................................................................. 103.2 Findingthereaders............................................................... 113.3 Namingthereaders.............................................................. 123.4 SettingalatchtimeforaConnectionGroup.......................... 133.5 Enrollingcardsintoyoursystem............................................ 143.6 Testingthesystem................................................................. 15
4. CUSTOMIZE YOUR SYSTEM .................................................. 164.1 CreatingAdditionalLocations.............................................. 16 (MLDorClient-Serverversionsonly)4.2 TimeZones........................................................................... 174.3 EditingaLocationTimeZone................................................ 174.4 Delayingthestartorendtimeforthehalfhourblocks........... 194.5 LimitingthedatesaTimeZoneisactive................................ 194.6 Antipassback........................................................................ 204.7 SelectingAntipassbackforaTimeZone................................. 204.8 TimedAntipassback.............................................................. 214.9 RealAntipassback(RAPB)...................................................... 224.10 RealAntipassbackForgive..................................................... 234.11 UnscheduledRAPBForgive................................................... 244.12 EditingaTimeZoneforasinglereader................................. 254.13 AccessGroups...................................................................... 264.14 CreatinganAccessGroup.................................................... 264.15 Changingareader’sTimeZoneinanAccessGroup............. 274.16 Changingthereadericons.................................................... 284.17 Doorschedules..................................................................... 284.18 ProgrammingaDoorSchedule............................................. 29 LocationDoorSchedule(Allreaders):.................................... 29 SingleDoorSchedule........................................................... 30

4.19 Holidays............................................................................... 314.20 ProgrammingaHoliday........................................................ 31 LocationHolidays:................................................................ 314.21 Changingthelatchtimerforasinglereader......................... 324.22 Dateandtime...................................................................... 324.23 Settingthetimeanddate4.24 ConfiguringorOverridingU.S.Daylight SavingTimefeature.................................................... 334.25 INandOUTreaders............................................................. 364.26 Programmingan“IN”oran“OUT”reader............................ 364.27 ReaderGroups..................................................................... 374.28 CreatingaReaderGroup...................................................... 374.29 DoorControls....................................................................... 384.30 UsingDoorControls............................................................. 384.31 Inputs................................................................................... 394.32 DefininganInput................................................................. 404.33 Outputs................................................................................ 414.34 DefininganOutput............................................................... 434.35 ProgrammingcustomWieganddataformats......................... 444.36 Addingnewreaderstothesystem......................................... 454.37 AddingaFacilityCode.......................................................... 46
5. MANAGING USERS .............................................................. 475.1 EnteringCardholderInformation........................................... 475.2 Addinganewcardnumber................................................... 485.3 Deletingauser..................................................................... 485.4 ChangingthenamesofUserdatafields................................ 495.5 SortingcardholdersintheUserList....................................... 495.6 FilteringUsers...................................................................... 505.7 UserReports......................................................................... 505.8 LimitedUseCards................................................................ 505.9 ProgrammingLimitedUseCards........................................... 515.10 IntegratedBadgePrinting..................................................... 53
6. MANAGING TRANSACTIONS ............................................... 586.1 ChangingTransactionView................................................... 586.2 FilteringTransactions............................................................ 596.3 Viewingcardholderphotos...................................................... 606.4 Archivingoldertransactions.................................................. 606.5 Viewingarchivedtransactions............................................... 616.6 ExcludingTransactionTypes.................................................. 616.7 ExcludingTransactionTypes.................................................. 626.8 ExcludingTransactionTypesforOneReader.......................... 63
7. REPORTS .............................................................................. 647.1 TransactionReports............................................................... 647.2 UserInformationReports...................................................... 657.3 PrintaSystemReport(Listofreadersinalocation)................ 667.4 PrintingalistofUsersinanAccessGroupreport................... 67
8. SECURITY .............................................................................. 698.1 ChanginganSK-NET™OperatorPassword........................... 698.2 AssigningOperatorLevels.................................................... 708.3 SystemActivityLog............................................................... 718.4 PasswordProtection.............................................................. 72
7589 3321876
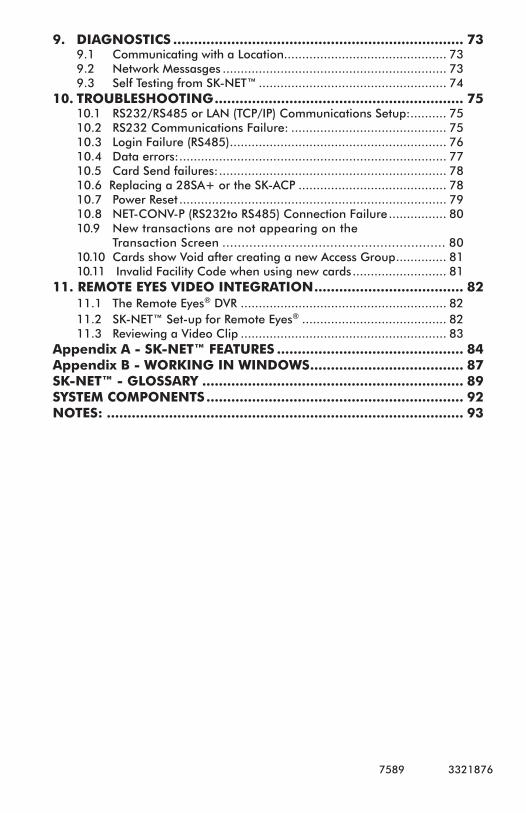
9. DIAGNOSTICS ...................................................................... 739.1 CommunicatingwithaLocation............................................. 739.2 NetworkMessasges.............................................................. 739.3 SelfTestingfromSK-NET™.................................................... 74
10. TROUBLESHOOTING ............................................................ 7510.1 RS232/RS485orLAN(TCP/IP)CommunicationsSetup:.......... 7510.2 RS232CommunicationsFailure:........................................... 7510.3 LoginFailure(RS485)............................................................ 7610.4 Dataerrors:.......................................................................... 7710.5 CardSendfailures:............................................................... 7810.6Replacinga28SA+ortheSK-ACP......................................... 7810.7 PowerReset.......................................................................... 7910.8 NET-CONV-P(RS232toRS485)ConnectionFailure................ 8010.9 Newtransactionsarenotappearingonthe TransactionScreen.......................................................... 8010.10CardsshowVoidaftercreatinganewAccessGroup.............. 8110.11 InvalidFacilityCodewhenusingnewcards.......................... 81
11. REMOTE EYES VIDEO INTEGRATION .................................... 8211.1 TheRemoteEyes®DVR......................................................... 8211.2 SK-NET™Set-upforRemoteEyes®........................................ 8211.3 ReviewingaVideoClip......................................................... 83
Appendix A - SK-NET™ FEATURES ............................................. 84Appendix B - WORKING IN WINDOWS ..................................... 87SK-NET™ - GLOSSARY ............................................................... 89SYSTEM COMPONENTS .............................................................. 92NOTES: ...................................................................................... 93

SK-NET™ Operating & Installation Guide
Secura Key • 1
1. INTRODUCTION
1.1 What is SK-NET™?
SK-NET™isaWindows®basedsoftwareprogramdesignedtomonitorandcontrolnetworksofSecuraKey28SA-PLUSaccesscontrolunitsorSecuraKeySK-ACP2-doorcontrolpanels.
1.2 SK-NET™ Versions
SK-NET™DownloadVersion& SK-NET-DM(CD-ROMw/Manual)
SK-NET-MLD(CD-ROMw/Manual)
SK-NET-MLD-CS_(CD-ROMwithManual)
1.3 Computer system requirements
Workstation (Client) Minimum Requirements:Windows®XP,32bit 1GHz,1GBRAM,1GBDiskSpace*Windows®Vista,32/64bit1GHz,1GBRAM,1GBDiskSpace*Windows®7,32/64bit 1GHz,1GBRAM,1GBDiskSpace*
Recommended System:Windows®7,64bit 2GHz,2GBRAM,10GBDiskSpace(Larger systems may not run properly at the minimum requirements.
Server Minimum Requirements (For Client/Server Versions):Windows®2003orgreater 2.0GHz,1GBRAM,1GBDiskSpace*(For SK-NET-MLD-C/S version a server is required to install ADS and the database).
* For larger systems more disk space may be required. SK-NET™ must be installed on a workstation only.
Required Peripherals: RS-232COMPortorTCP/IP,CDDrive (unlesssoftwareisdownloaded),amodemifyouusedial-upandaprinterforreports.
BasicSK-NET™foronelocationandasingleworkstation.A single LAN Connection is now supported.
Upgrade version supports multiple locations and multiple connection groups of readers. Also enablesconnection(s)viadial-upmodem and TCP/IP (LAN).This version is designedtorunonasingleworkstation.BadgePrintingcapabilitiesarealsoincluded.
All the features of SK-NET-MLD, plusmultiple workstations. Licensesareavailablefor2,5,10or15users.Client/Serversoftwarefeaturesfivepassword-protected levelsforprogramaccess.

SK-NET™ Operating & Installation Guide
Secura Key • 2
1.4 How is SK-NET™ organized?
Transactions show all events that have occurredat the readers and in the system.Users includesa list of all the cards in the system, along withcardholder name, access group, in/out status andotherinformation.Thisisalsotheplacewhereyouaddnewcardsorchangecardholderprivileges.Thetreeviewontheleftshowsthelayoutofthesystem,including readers, access groups, reader groups,holidayschedules,timezones,etc.Anychangestothesystemarestartedhere.
To read a comprehensive description of SK-NET™features, see Appendix A. SK-NET™ uses manycommonWindowsfunctions.FortipsonnavigatinginWindows®,seeAppendix B.
2. GETTING STARTED
2.1 Site Plan
1.Makea siteplan. List eachopeningwherea reader is tobeinstalled.NotetheserialnumberoftheSK-ACPpanelsand/or28SA-PLUSunitsforeachopening.(NOTE:AreaderconnectedtotherightsideofanSK-ACPpanel(J5)isserialnumber–1,theleftside(J6)isserialnumber–2).
2. Installallreadersand/orpanelsfollowingtheprovidedinstructions.Besuretousethetypeofwirespecified.DonotapplypowerorconnecttheRS-485busuntilallcomponentsareinstalled.
3.ConnecttheRS-485bustooneSK-ACPor28SA-PLUSatatime.Holdthewhiteresetbuttoninforthreesecondsafterapplyingpower,thenreleaseit.
4.Onceapanelor28SA-PLUSispowered,theLEDonthereaderwillbeginflashingalternatelyREDandGREEN(forSecuraKeyreaders).Presentasamplecardtothereaderwhileitisflashing.Thissetsthecorrectfacilitycodeinthememoryandtheflashingwillstopafter10seconds.
NOTE: A 28SA-PLUS can learn up to three facility codes. An SK-ACP can learn up to 16 facility codes. To add facility codes, push the reset button, then present a sample of each facility code to the reader while the LED is flashing RED/GREEN.

SK-NET™ Operating & Installation Guide
Secura Key • 3
2.2 Connecting SK-ACP panels and/or 28SA Plus card readers to the computer
There are four ways to connect a gateway to your location on thecomputer(s)whereSK-NET™willberunning:
1.RS-232.ConnecttheCOMportofaPCtotheRS-232connectionofonepanelor28SA-PLUS.ThiscanbeaterminalstriporanRJ-11jackconnection.(RJ11 jack recommended for laptop or temporary conection only!)RS-232connectionscanbeupto100feetandrequiresix-conductorshieldedcable(no twisted pairs).Thispanelor28SA-PLUSwillactasthe“Gateway”toanyotherlinkedpanelsor28SA-PLUSunits.
2.RS-485. Install theNET-CONV-P into theCOMport of yourcomputer.Runatwistedpair(orCAT5)cabletothenearestpanel(or28SA-PLUSwithanSK-NM485installed.(Newer28SAsincludeanRS-485cable).RS-485canberunupto4000totalfeet.
NOTE: When using the NET-CONV-P you must always connect the first panel to the next in line. You cannot use a stubbed, star fanout, or “T” configuration.
3.MODEM.Connectthepre-configuredSK-MDM56KmodemtotheRS-232portononeofthepanelsor28SA-PLUSunits.Connectthemodemtoadedicated phone line.ThemodemcurrentlybeingusedisaU.S.Roboticsmodel5686e.Ifyouwanttopurchaseandconfigureyourownmodem,theset-upinstructionsarelocatedonourwebsiteunder“TechSupport,ApplicationsBulletins”.
4. TCP/IP.ConnecttheSK-LANdevicetotheRS-232portononeof thepanelsor28SA-PLUSunits.Connect theSK-LANtoanEthernetjack.FollowtheinstructionsforsettinganIPaddressin theSK-LANdevice.NewerSK-ACPpanelswillaccepttheSK-LAN-MODplug-innetworkmodule.TheSK-NET™connectionwizardwillscanthesystemandautomaticallylocateeachmodule.BasicSK-NET™willallowasingleTCP/IPconnection.MultipleTCP/IPconnectionsrequireSK-NET-MLD.
NOTE: TCP/IP is the best connection method when using SK-NET™ Client/Server versions because it enables all clients to connect to any location, one at a time.NOTE: The MLD and Client/Server versions allow for multiple connections simultaneously to a single location. This allows for virtually unlimited number of doors (readers) within a location.

SK-NET™ Operating & Installation Guide
Secura Key • 4
2.3 Installing SK-NET™ on your computer or network
NOTE: If you are upgrading from a version of SK-NET™ before 2.42, you should run the “migration tool” when prompted. This will import databases from your older version to the new version.
NOTE: If you already have a Client Server installation (versions 3.05 or earlier) and you are upgrading to SK-NET™ version 5.00, you must also upgrade the ADS database. Contact technical support for details. SK-NET™ Version 5.00 requires ADS Version 10.1 or greater.
Single Workstation Installation (Basic Version)1. InstallSK-NET™onyourharddrivebyselecting“Install SK-NET” fromtheMainMenu.Followtheinstallationprompts.
2.Whenasked“Install SK-NET to:”werecommendthatyouacceptthedefaultlocation.
3.Whenasked“Install SK-NET database to:”werecommendthatyouacceptthedefaultlocation.
4. IfyouhavepurchasedSK-NET-MLDversion,clickonHelp.SelectUpgrade System.RefertoSection4.1forthecompleteregistrationprocedure.
Multiple Locations/Connection Groups
WithSK-NET-MLDversionyoucancreateasmanydifferentLocationsandConnectionGroupsasyouneed.ALocation isoneormoreConnectionGroupsconsistingofSK-ACPpanelsor28SA-PLUSreadersthatarelinkedtogetherviaRS-485tooperateasaunifiedsystem.
Activating SK-NET-MLD Software
WhenitisfirstinstalledSK-NET™Version5itrunsinlocalmode,evenifthedatabasethatisbeingusedhasbeenupgradedfromanearlierSK-NET-MLDversion.Localmodeallowsforasingle locationwithasingleconnectiongroup.
1.ToactivateSK-NET-MLDinVersion5clickonHelp,thenUpgradeSystemandenterthelicensenumberthatisincludedinsidethefrontcoveroftheSK-NET™5manual.

SK-NET™ Operating & Installation Guide
Secura Key • 5
2.AfterthelicensenumberhasbeenenteredyoucanclickOK.Thiswillstarta30daytrialperiodofSK-NET5MLD.Attheendofthe30daysiftheactivationkeyhasnotbeenenteredSK-NET™willreverttothelocalmodeofoperation.
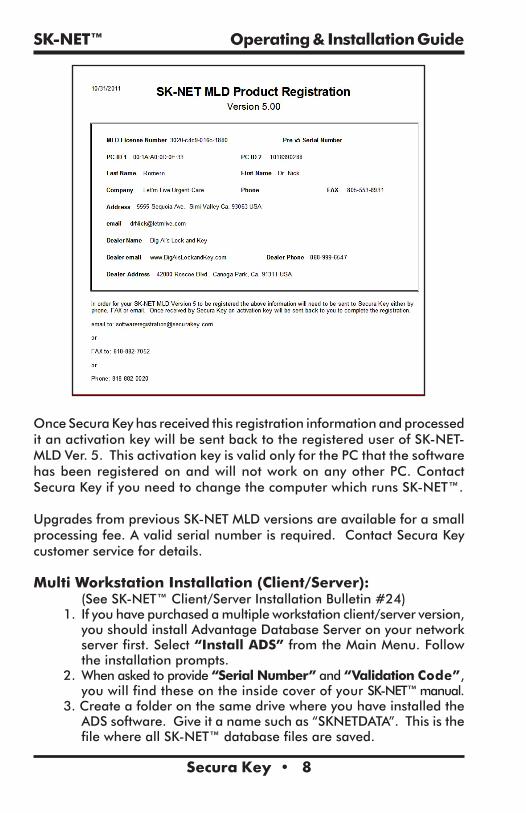
3.TofullyactivateSK-NET5MLDyoumustregisteritwithSecuraKey.ClickonHelp,thenupgradesystem,thenclickonregister,whichbringsupthefollowingscreen(seenextpage).Fillinallofthefields.Requiredfieldsaremarkedwithaasterisk(*).
4.Onceyouhavefilledinalltherequiredinformation,selectoneofthethreemethodstoregisterthesoftware.E-mail,PhoneorFaxandclickOK.
SK-NET™ Operating & Installation Guide
Secura Key • 6
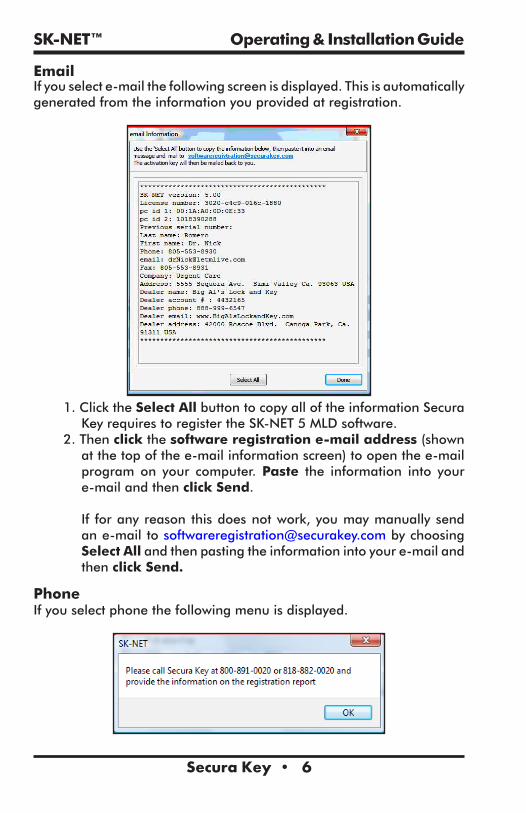
EmailIfyouselecte-mailthefollowingscreenisdisplayed.Thisisautomaticallygeneratedfromtheinformationyouprovidedatregistration.
1.ClicktheSelect AllbuttontocopyalloftheinformationSecuraKeyrequirestoregistertheSK-NET5MLDsoftware.
2.Thenclickthesoftware registration e-mail address (shownatthetopofthee-mailinformationscreen)toopenthee-mailprogramon your computer.Paste the information into youre-mailandthenclickSend.
If foranyreasonthisdoesnotwork,youmaymanuallysendane-mailtosoftwareregistration@securakey.combychoosingSelect Allandthenpastingtheinformationintoyoure-mailandthenclick Send.
PhoneIfyouselectphonethefollowingmenuisdisplayed.

SK-NET™ Operating & Installation Guide
Secura Key • 7
1.ClickOKtobringuptheregistrationreportasshownbelow.2.Call SecuraKeyCustomer to registerSK-NET-MLDand theywilltakeyourinformationoverthephone
FAXIfyouselectFAXthefollowingmenuisdisplayed.
1.ClickOKtobringupthefollowingregistrationreportasshownbelow.
2.Print outthereportandfaxtoSecuraKeyat818-882-7052.
SK-NET™ Operating & Installation Guide
Secura Key • 8
OnceSecuraKeyhasreceivedthisregistrationinformationandprocesseditanactivationkeywillbesentbacktotheregistereduserofSK-NET-MLDVer.5.ThisactivationkeyisvalidonlyforthePCthatthesoftwarehasbeenregisteredonandwillnotworkonanyotherPC.ContactSecuraKeyifyouneedtochangethecomputerwhichrunsSK-NET™.
UpgradesfrompreviousSK-NETMLDversionsareavailableforasmallprocessingfee.Avalidserialnumberisrequired.ContactSecuraKeycustomerservicefordetails.
Multi Workstation Installation (Client/Server): (SeeSK-NET™Client/ServerInstallationBulletin#24)1. Ifyouhavepurchasedamultipleworkstationclient/serverversion,youshouldinstallAdvantageDatabaseServeronyournetworkserverfirst.Select“Install ADS”fromtheMainMenu.Followtheinstallationprompts.
2.Whenaskedtoprovide“Serial Number”and“Validation Code”,youwillfindtheseontheinsidecoverofyourSK-NET™manual.
3.CreateafolderonthesamedrivewhereyouhaveinstalledtheADSsoftware.Giveitanamesuchas“SKNETDATA”.ThisisthefilewhereallSK-NET™databasefilesaresaved.
SK-NET™ Operating & Installation Guide
Secura Key • 9
4.Thedirectoryontheserverwherethedatabasesareinstalledmustbesharedbythenetwork.
5.AfteryouhaveinstalledADSonthenetworkserver,installSK-NET™ontheclientworkstations.Select“Install SK-NET”fromtheMainMenu.Followtheinstallationprompts.
6.When asked“Install SK-NET to:” we recommend that youacceptthedefaultlocation.
7.When asked“Install SK-NET database to:” browse to themapped drivewhere you have installedADS, and select thedatabasefolderyoucreated.
SK-NET™ Operating & Installation Guide
Secura Key • 10
3. QUICK START GUIDE
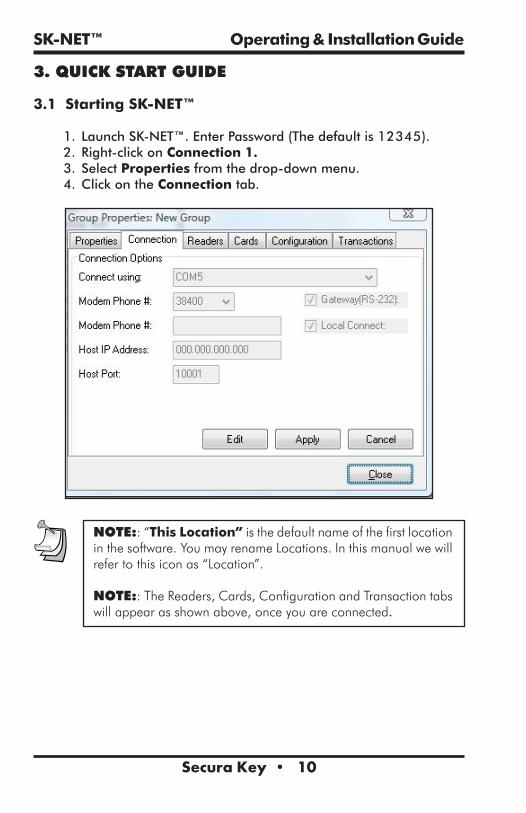
3.1 Starting SK-NET™
1. LaunchSK-NET™.EnterPassword(Thedefaultis12345).2. Right-clickonConnection 1.3. SelectPropertiesfromthedrop-downmenu.4.ClickontheConnectiontab.
NOTE:: “This Location” is the default name of the first location in the software. You may rename Locations. In this manual we will refer to this icon as “Location”.
NOTE:: The Readers, Cards, Configuration and Transaction tabs will appear as shown above, once you are connected.

SK-NET™ Operating & Installation Guide
Secura Key • 11
3.2 Finding the readers
1.ClicktheEditbutton.2. ForRS-232connections,usethe“Connection Wizard”.AcceptthebaudrateandCOMportthatConnectionWizardfinds.
3. ForRS-485connections,uncheckthe“Gateway (RS-232)”boxandusethe“Connection Wizard”.
4. ForModems, uncheckLocal Connect. Select theCOMPortwhereyourmodemis installed.Set theBaudrate to38,400.BesuretheGateway(RS-232)boxischecked.Enterthemodemphonenumberwhereindicated.(SK-NET-MLDversiononly.)
5. ForTCP/IP connections, selectTCP/IP from the drop downlist.Usethe“Connection Wizard”tofindallavailableTCP/IPconnections.IfyoufindmorethanoneTCP/IPconnection,selectone.(SK-NET-MLDorClient/Serverorversion4orhigher).
6.ClickApply,Close,andthenConnecttheLocation.7.Afterfollowingtheappropriateprocedurefrom1,2,3or4,closetheConnection Group Propertiesbox.Clickonthelocation.RightclickConnection Group andselect New, then Readers andthenQuick Find. (Note: If you have more than 10 SK-ACP panels (20 readers), use the same procedure, but click on Search instead of Quick Find.) Followtheprompts.SK-NET™willfindallofthereadersandbringthemintothesoftware.
8.AftertheLog-Iniscomplete,closetheLoginbox.
SK-NET™ Operating & Installation Guide
Secura Key • 12
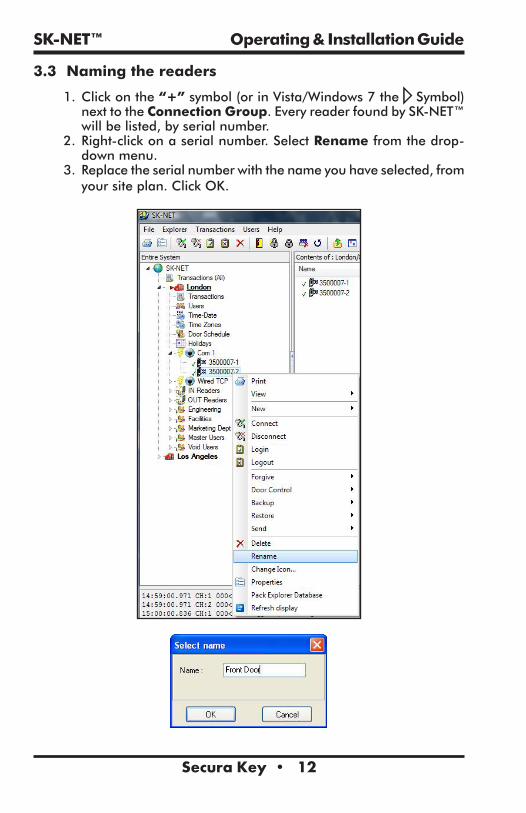
3.3 Naming the readers
1.Clickonthe“+”symbol(orinVista/Windows7theSymbol)nexttotheConnection Group.EveryreaderfoundbySK-NET™willbelisted,byserialnumber.
2. Right-clickonaserialnumber.SelectRenamefromthedrop-downmenu.
3. Replacetheserialnumberwiththenameyouhaveselected,fromyoursiteplan.ClickOK.

SK-NET™ Operating & Installation Guide
Secura Key • 13
3.4 Setting a latch time for a Connection Group
Out of the box, 28SA-PLUS and SK-ACP latch timers are set to onesecond.Whilethisisgoodforgateoperators,itisusuallytooshortforelectricallylockeddoors.
1. Rightclickona Connection Group.2. SelectPropertiesfromthedropdownmenu.3.ClickontheConfigurationtab.4.Changethelatchtimervaluetothenumberofsecondsyoudesire(orleavethedefaultdoorsettingofthreeseconds).
5.ClickonSend.ThenClickonClose.
NOTE: This will cause every reader in the connection group to activate the latch relay for the same time. To set a different latch timer for a single reader, See Section 5.21.

SK-NET™ Operating & Installation Guide
Secura Key • 14
3.5 Enrolling cards into your system
Thequickestwaytoenrollabatchofcardsisa“BlockLoad”.
1.ClickonUsersatthetoptoolbar.2. SelectAdd, thenselect Range.3. Enterthelowestcardnumberyouhave.4. Enterthehighestcardnumberyouhave.5. SelectanAccessGroupforallthecards.6.ClickOK.(Allofthesecardnumbersarenowlisted.)
NOTE: It is usually best to add a range of users/cards in the Void User group. The Access Group for each card can be changed when it is issued to a specific cardholder (See Section 5.1).
NOTE: If you anticipate adding additional Locations where cardholders from the first Location may need access, you should create those Locations in SK-NET™ before loading any cards in the first Location. For instructions in creating additional Locations See Section 4.1. (Multiple Locations require SK-NET-MLD version.)
SK-NET™ Operating & Installation Guide
Secura Key • 15
3.6 Testing the system
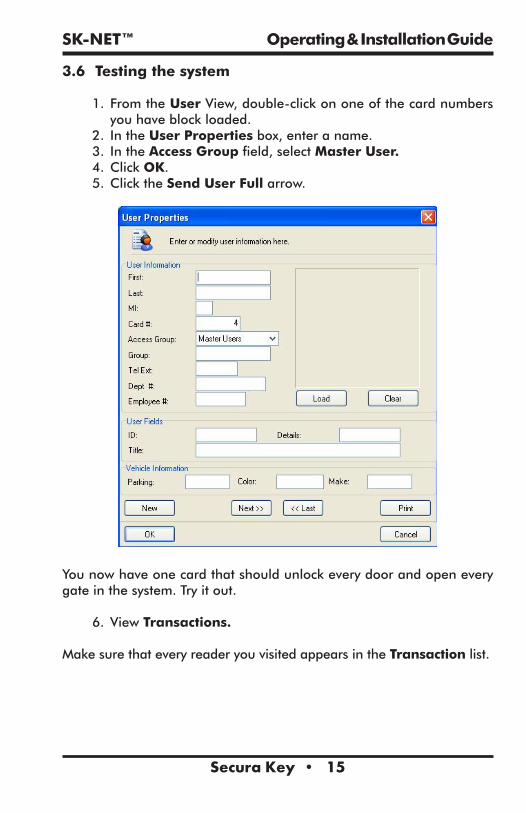
1. FromtheUserView,double-clickononeofthecardnumbersyouhaveblockloaded.
2. IntheUser Propertiesbox,enteraname.3. IntheAccess Groupfield,selectMaster User.4.ClickOK.5.ClicktheSend User Fullarrow.
Younowhaveonecardthatshouldunlockeverydoorandopeneverygateinthesystem.Tryitout.
6.ViewTransactions.
MakesurethateveryreaderyouvisitedappearsintheTransactionlist.

SK-NET™ Operating & Installation Guide
Secura Key • 16
4. CUSTOMIZE YOUR SYSTEM
4.1 Creating Additional Locations (MLD or Client-Server versions only)
Adding a new location:WithSK-NET-MLDorSK-NET-MLD-CSXXversionsyoucancreateasmanydifferentlocationsasyouneed.AlocationisoneormoreSK-ACPcontrolpanelsor28SA+readersconnectedtogetherviaRS-485communicationsandoperatingasaunifiedsystem.
Anewlocationisonlyrequiredwhenyouareconnectingtoagroupofreadersthatrequireadifferentlistofcardusersthanthosealreadybeingusedinanexistinglocation.
1.ClickontheExplorermenu.2. SelectNew.3. SelectLocation.4.NametheNewLocation.ClickOK.

SK-NET™ Operating & Installation Guide
Secura Key • 17
4.2 Time Zones
MostinstallationsrequirethatyoucustomizeoneormoreTimeZonesandthencreateoneormorenewAccessGroupsbeforeissuingcardstousers.Thisallowsyoutograntaccesstousersforspecificdoorsatspecifictimesanddays.
ATime Zoneisaschedulethatgovernswhenacardisvalid(allowedaccess)andwhenitisinvalid(deniedaccess).
EachTimeZonehasa24-hourscheduleforeachdayoftheweek,aswellasa24-hourschedulefor“holidays”.Anydatedesignatedasaholidaywillfollowtheholidayschedule,regardlessofwhatdayoftheweekitfallson.
SK-NET™hassixteenTimeZones.Time Zone 0is“AlwaysVoid”.(VoidUsersaccessgroup).Time Zone 1is“AlwaysValid”(MastersUsersaccessgroup).TimeZones0and1cannotbeedited.Time Zones 2through 15canbeeditedanywayyouchoose.
LocationTimeZonescanbeeditedforallreadersfromtheExplorer/Tree View.Youcanalsoeditatimezoneforaspecificreader(SeeSection4.12).
InanSK-NET™Systemwithmultiplelocations,youwillhavetosetupTime ZonesforeachnewLocationthatyoucreate.TheseTimeZonescanbecompletelydifferentfromtheTimeZonesinotherLocationsinthesystem.
4.3 Editing a Location Time Zone
1.StartingfromtheTree View.Double-ClickonTime Zones. 2. SelecttheTimeZoneyouwanttoeditfromthedropdownlist.3. EverysquarethatisREDisa½hourincrementwhenaccesswillbedenied.EverysquarethatisGREENisa½hourincrementwhenaccesswillbepermitted.ClickonsquarestochangethemfromREDtoGREEN(orGREENtoRED).
4.AftereditingaTimeZone,clickSave.5. Aftersaving,clickSendtosendthetimezonetoallofthereaders.

SK-NET™ Operating & Installation Guide
Secura Key • 18
NOTE: To change a block of squares from RED to GREEN, hold down the CONTROL key, click on the first square, then click on the last square. The square(s) in between will also change.
NOTE: To change an entire day from RED to GREEN, click on the big Green button to the left. To change an entire day from GREEN to RED, click on the big red button to the right.
NOTE: You can change the name of a Time Zone to something that reminds you of it’s function (i.e. “Day Shift” or “Cleaning Crew”.

SK-NET™ Operating & Installation Guide
Secura Key • 19
4.4 Delaying the start or end time for the half hour blocks
YoumaydelaythestartofaTimeZone,byenteringavalue(1-29)intheDelayStartfield.ThisvalueequalshowmanyminutesafterthefirstGREENincrementbeginswhenthecardwillbecomevalid.
YoumayextendtheendofaTimeZonebyenteringavalue(1-29)intheDelayEndfield.ThisvalueequalshowlongafterthelastGREENincrementthecardwillcontinuetobevalid.
4.5 Limiting the dates a Time Zone is active
UnchecktheStartUnrestrictedboxandusethecalendartoselectthefirstdatethecardsinthisTimeZoneshouldbecomeactive.
UnchecktheEndUnrestrictedboxandusethecalendartoselectthelastdatethatcardsinthisTimeZoneshouldbevalid.
NOTE: This feature is handy for clubs, gyms and other membership organizations.
NOTE: This feature does not apply to Time Zones 0 or 1.

SK-NET™ Operating & Installation Guide
Secura Key • 20
4.6 Antipassback
Antipassback isafeaturedesignedtopreventcardsharingand/ortoenforceuseofINandOUTreaders.
Timed AntipassbackdoesnotrequireINandOUTreaders.AfteracardisusedatareaderwithTimedAntipassback,thatcardwillnotbevalidatthatreaderforapredeterminedamountoftime(upto30minutes).
Real AntipassbackrequiresreadersforcomingINandgoingOUT.IfacardwaslastusedatanINreader,itmustbeusedatanOUTreaderbeforeitwillbevalidatanINreaderagain.
NOTE: These features do not apply to Time Zones 0 or 1.
4.7 Selecting Antipassback for a Time Zone
SelectthetypeofAntipassbackyouwantfromthelist.
HardAntipassbackmeansthecardwillnotbevalidandan“antipassbackviolation”messagewillappearinTransactions.
SoftAntipassbackmeansthatthecardwillbevalid,butan“antipassbackviolation”willappearinTransactions.
NOTE: Time Zones 0 and 1 cannot have antipassback.
SK-NET™ Operating & Installation Guide
Secura Key • 21
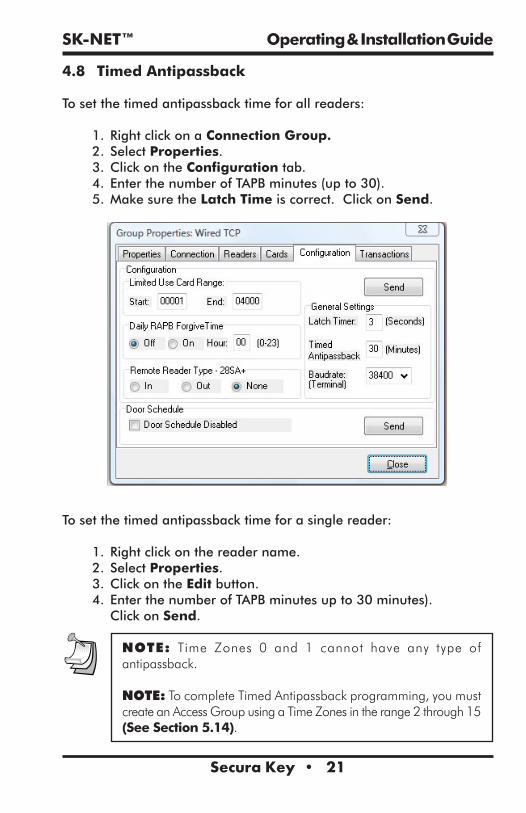
4.8 Timed Antipassback
Tosetthetimedantipassbacktimeforallreaders:
1. Rightclickona Connection Group.2. SelectProperties.3.ClickontheConfigurationtab.4. EnterthenumberofTAPBminutes(upto30).5.MakesuretheLatch Timeiscorrect.ClickonSend.
Tosetthetimedantipassbacktimeforasinglereader:
1. Rightclickonthereadername.2. SelectProperties.3.ClickontheEditbutton.4. EnterthenumberofTAPBminutesupto30minutes). ClickonSend.
NOTE: Time Zones 0 and 1 cannot have any type of antipassback.
NOTE: To complete Timed Antipassback programming, you must create an Access Group using a Time Zones in the range 2 through 15 (See Section 5.14).

SK-NET™ Operating & Installation Guide
Secura Key • 22
4.9 Real Antipassback (RAPB)
To program Real Antipassback into your system, you mustcompletethefollowingsteps:
1. SelecttheproperantipassbackconfigurationusingaTimeZoneintherange2through15(See Section 5.7).
2.Create anAccess Group using a TimeZone in the range2through15(See Section 5.14).
3.YoumustdefineyourreadersasINorOUTbydraggingalloftheIN readers intotheINReadergroupandalloftheOUTreadersintotheOUT Readergroup.
4.IfyoursystemhasmorethanoneConnectionGroup,inorderforRAPBtoworkproperly,allofyourConnectionGroupsmustbeconnectedtothesystem,andtheSK-NETsoftwaremustberunningonyourPC(itcanbeminimized).
NOTE: A Global RAPB Forgive All Command takes about ½ second per reader to process. On a 100-door system it will take approximately 50 seconds to reset Anti-Passback at all doors.

SK-NET™ Operating & Installation Guide
Secura Key • 23
4.10 Real Antipassback Forgive
RealAntipassbackForgiveresetsallcardsorasinglecardtoaneutralIN/OUTstatus,allowingaccessthenexttimethecardisusedateitheranINorOUTreader.ThedefaultsettingforallreadersisRAPBoff.YoucanchangethattoautomaticRAPBforgivewhichhappensonceaday.YoucanalsoinitiateRAPBforgiveatanytimeusingSK-NET™.
Toturnon/offRAPBForgive,ortochangethetimesetting,forallreadersinaConnection Group:
1. RightClickona Connection Group.2. SelectProperties.3.ClickontheConfigurationtab.4.Check“ON”or“OFF”forRAPBForgive.5. Enterthehour,inmilitarytime,whenRAPBForgiveshouldactivate.6.ClicktheupperSendbutton.
TochangeRAPBparametersforasinglereader:
1. Rightclickonthereadername.2. SelectProperties.3.ClickontheConfigurationtab.4.ClickontheEditbutton5.CheckRAPBForgive“ON”or“OFF”.6. Enterthehour,inmilitarytime,whenRAPBForgiveshouldactivate.7.ClickSend.
SK-NET™ Operating & Installation Guide
Secura Key • 24
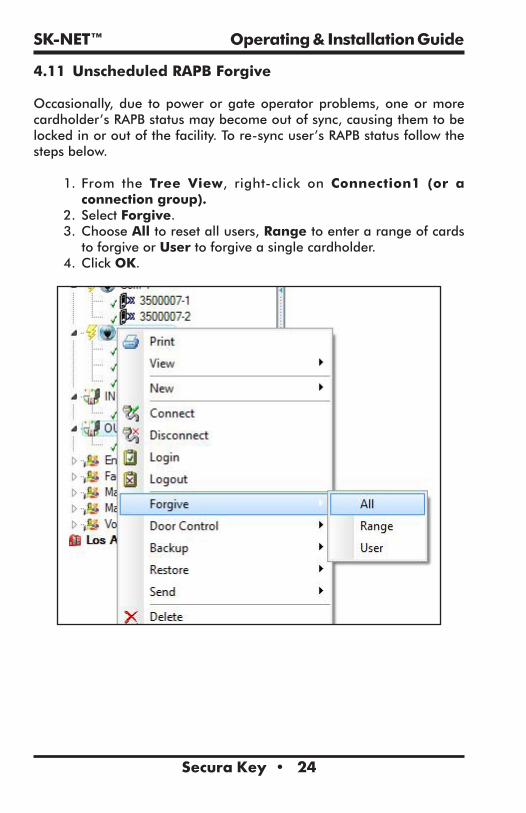
4.11 Unscheduled RAPB Forgive
Occasionally, due topowerorgateoperatorproblems,oneormorecardholder’sRAPBstatusmaybecomeoutofsync,causingthemtobelockedinoroutofthefacility.Tore-syncuser’sRAPBstatusfollowthestepsbelow.
1. From the Tree View, right-click on Connection1 (or a connection group).
2. SelectForgive.3.ChooseAlltoresetallusers,RangetoenterarangeofcardstoforgiveorUsertoforgiveasinglecardholder.
4.ClickOK.

SK-NET™ Operating & Installation Guide
Secura Key • 25
4.12 Editing a Time Zone for a single reader
1. FromtheTree View,right-clickontheselectedreader.2. SelectProperties.3.ClickontheZonesbutton.4. SelecttheTimeZonetobeedited.5. Followtheproceduresdescribedinsection5.3.6.ClickonSend.Closetheseboxes.7.Savesettingswhenprompted.
Warning: If you do a Global Send for the Time Zone you have just edited, it will be overwritten by the default Time Zone configuration for that Location.
SK-NET™ Operating & Installation Guide
Secura Key • 26
4.13 Access Groups
AnAccessGroupisassignedtoeachuserdefiningwhichreaderstheyhaveaccessto,andwhattimesthereaderscanbeused.
SK-NETautomaticallycreatestwodefaultAccessGroups:
TheMaster UsergroupalwaysincludesallthereadersinthelocationandisassignedTimeZone1(alwaysvalid).Master Userscanuseanyreaderatanytime.
TheVoid Usergroupalsoincludesallthereaders.ItistiedtoTime Zone 0(Nevervalid).Placingacardholder in theVoidUsergroupmeanshecannevergoanywhere,buthisattemptstousethecardwillappearinTransactions.
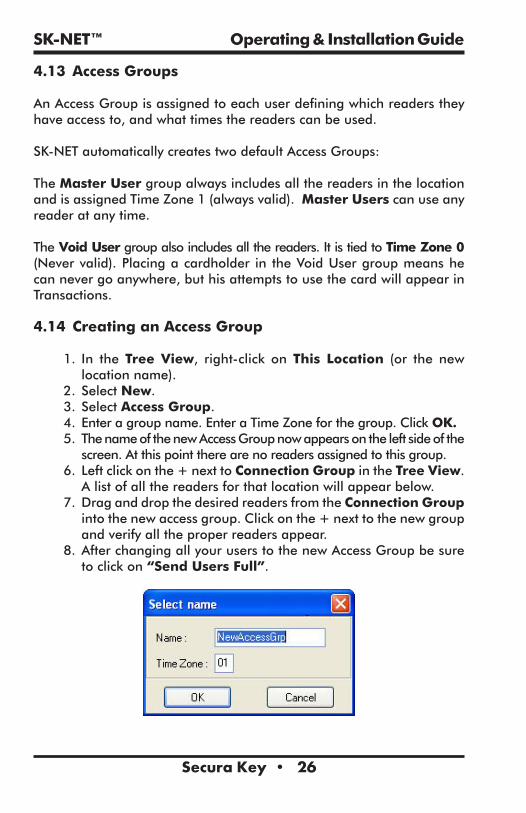
4.14 Creating an Access Group
1. In theTree View, right-click onThis Location (or the newlocationname).
2. SelectNew.3. SelectAccess Group.4. Enteragroupname.EnteraTimeZoneforthegroup.ClickOK.5. ThenameofthenewAccessGroupnowappearsontheleftsideofthescreen.Atthispointtherearenoreadersassignedtothisgroup.
6.Leftclickonthe+nexttoConnection GroupintheTree View.Alistofallthereadersforthatlocationwillappearbelow.
7.DraganddropthedesiredreadersfromtheConnection Group intothenewaccessgroup.Clickonthe+nexttothenewgroupandverifyalltheproperreadersappear.
8.AfterchangingallyouruserstothenewAccessGroupbesuretoclickon“Send Users Full”.

SK-NET™ Operating & Installation Guide
Secura Key • 27
4.15 Changing a reader’s Time Zone in an Access Group
EachreaderinanAccess GroupcouldbeassignedtoadifferentTime Zone.ToeditanAccessGroup:
1. RightClickontheAccessGroupname.2. SelectProperties.3.ClickontheReaderstab.4.Clickonthe“edit”icon(Itlookslikealittletriangle).5.ChangetheTimeZonesnexttoeachreadername.6.Clickonthe“Send”button.7.ClickonClose.

SK-NET™ Operating & Installation Guide
Secura Key • 28
4.16 Changing the reader icons
1. From theTree View, right click on the reader name. SelectChange Icon.
2. Selectasuitableiconfromthedisplayedmenu.ClickOK.
4.17 Door schedules
ADoor Schedule is used to automatically lock and unlock a dooraccordingtoaregularweeklytimeschedule.EachDoorSchedulehasa24-hourscheduleforeachdayoftheweek,aswellasa24-hourschedulefor“holidays”.Anydatedesignatedasaholidaywillfollowtheholidayschedule,regardlessofwhatdayoftheweekitfallson.
YoumaysetaLocationDoorScheduleforallthereadersinthelocation,oryoucansetaDoorScheduleforanindividualreader.
EachreaderinthesystemmayhaveitsownuniqueDoor Scheduleifrequired. DoorSchedulesarecompletelyseparate fromthesystem’sTimeZones.

SK-NET™ Operating & Installation Guide
Secura Key • 29
4.18 Programming a Door Schedule
Location Door Schedule (All readers):1. IntheTree View,double-clickonDoor Schedule.2. EveryGREENsquarerepresentsa½hourincrementwhenthedoorwillbeunlocked.EveryREDsquareisa½hourincrementwhen it will be locked. Change the color of any square byclickingonit.
3. SelectAutomaticorCard Activate.Automaticmeansthedoorwillunlockatthepredeterminedtime.CardActivatemeansthatthedoorwillremainlockedaftertheGREENperiodbeginsuntilthenextvalidcardispresented.Thisensuresthatsomeoneisinthebuildingbeforethedoorunlocks.
4. ForDoorSchedulesthatdonotconformtoexacthalf-hours,usetheDelay Start andDelay Endfeature.(See Section 5.4)
5.ClickSendwhenfinished.
NOTE: If you have a Door Schedule, you probably need to define Holidays.
NOTE: To temporarily override a door schedule, See Section 5.30d.
SK-NET™ Operating & Installation Guide
Secura Key • 30
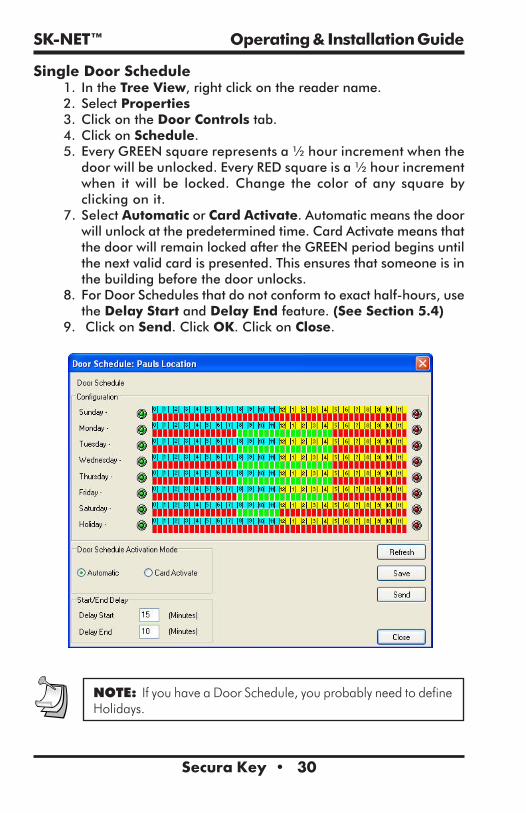
Single Door Schedule1. IntheTree View,rightclickonthereadername.2. SelectProperties3.ClickontheDoor Controlstab.4.ClickonSchedule.5.EveryGREENsquarerepresentsa½hourincrementwhenthedoorwillbeunlocked.EveryREDsquareisa½hourincrementwhen itwill be locked.Change the color of any squarebyclickingonit.
7.SelectAutomaticorCard Activate.Automaticmeansthedoorwillunlockatthepredeterminedtime.CardActivatemeansthatthedoorwillremainlockedaftertheGREENperiodbeginsuntilthenextvalidcardispresented.Thisensuresthatsomeoneisinthebuildingbeforethedoorunlocks.
8. ForDoorSchedulesthatdonotconformtoexacthalf-hours,usetheDelay StartandDelay Endfeature.(See Section 5.4)
9. ClickonSend.ClickOK.ClickonClose.
NOTE: If you have a Door Schedule, you probably need to define Holidays.
SK-NET™ Operating & Installation Guide
Secura Key • 31
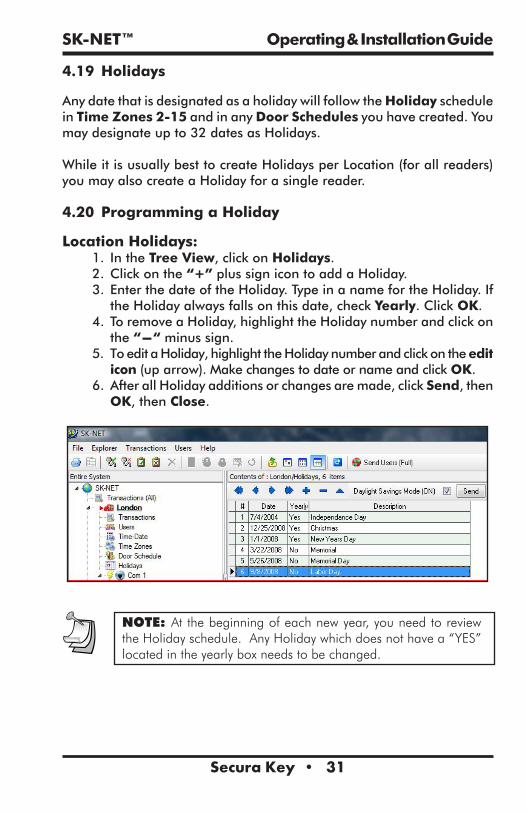
4.19 Holidays
AnydatethatisdesignatedasaholidaywillfollowtheHolidayscheduleinTime Zones 2-15andinanyDoor Schedulesyouhavecreated.Youmaydesignateupto32datesasHolidays.
WhileitisusuallybesttocreateHolidaysperLocation(forallreaders)youmayalsocreateaHolidayforasinglereader.
4.20 Programming a Holiday
Location Holidays:1. IntheTree View,clickonHolidays.2.Clickonthe“+”plussignicontoaddaHoliday.3. EnterthedateoftheHoliday.TypeinanamefortheHoliday.IftheHolidayalwaysfallsonthisdate,checkYearly.ClickOK.
4. ToremoveaHoliday,highlighttheHolidaynumberandclickonthe“-“minussign.
5. ToeditaHoliday,highlighttheHolidaynumberandclickontheedit icon(uparrow).MakechangestodateornameandclickOK.
6.AfterallHolidayadditionsorchangesaremade,clickSend,thenOK,thenClose.
NOTE: At the beginning of each new year, you need to review the Holiday schedule. Any Holiday which does not have a “YES” located in the yearly box needs to be changed.

SK-NET™ Operating & Installation Guide
Secura Key • 32
4.21 Changing the latch timer for a single reader
1. Right-clickonthenameofthereaderyouwanttochange.2. SelectProperties.3.ClickontheEditbutton.4. EnteranewLatch Timervalue(inseconds).5.ClickontheSendbutton.6.ClickonClose.
4.22 Date and time
Bydefault,everytimeyoulogintoalocationwithyourcomputer,thetime and date in that computer can be transmitted to the system. Ifyouprefer,youmaymanuallysetthesystemtimeusingSK-NET™.(Forexample,ifthecomputerisinadifferenttimezone,youwillwanttosetthetimemanually.)
AutomaticDaylightSavingsTimeadjustmentsarehandledbythesystem,unlessyouoverridethisfeature.
SK-NET™ Operating & Installation Guide
Secura Key • 33
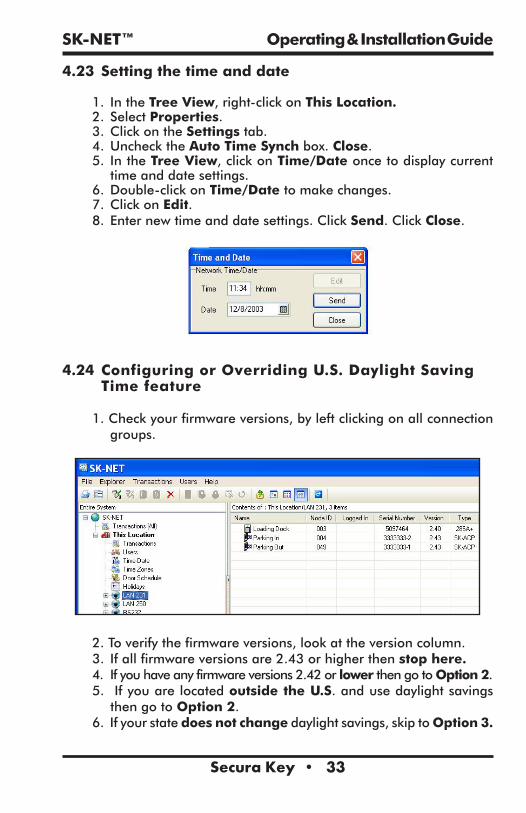
4.23 Setting the time and date
1. IntheTree View,right-clickonThis Location.2. SelectProperties.3.ClickontheSettingstab.4.UnchecktheAuto Time Synchbox.Close.5. IntheTree View,clickonTime/Dateoncetodisplaycurrenttimeanddatesettings.
6.Double-clickonTime/Datetomakechanges.7.ClickonEdit.8. Enternewtimeanddatesettings.ClickSend.ClickClose.
4.24 Configuring or Overriding U.S. Daylight Saving Time feature
1.Checkyourfirmwareversions,byleftclickingonallconnectiongroups.
2.Toverifythefirmwareversions,lookattheversioncolumn.3. Ifallfirmwareversionsare2.43orhigherthenstop here.4. Ifyouhaveanyfirmwareversions2.42orlowerthengotoOption 2.5.Ifyouarelocatedoutside the U.S.andusedaylightsavingsthengotoOption 2.
6. Ifyourstatedoes not changedaylightsavings,skiptoOption 3.

SK-NET™ Operating & Installation Guide
Secura Key • 34
Therearethreeoptionsforconfiguringdaylightsavingtimeoperation.
ToselecttheDaylightSavingMenu:1.RightclickontheLocation Name.2.SelectProperties
Option 1: Use the current U.S. daylight saving dates1.SelecttheSettingstab2.SelectAuto (US)forthecurrentUnitedStatesDaylightSavingdates3.ClickSend
ThiswillupdateallthereadersinyoursystemwiththecurrentUSDaylightSavingdates.
SK-NET™ Operating & Installation Guide
Secura Key • 35
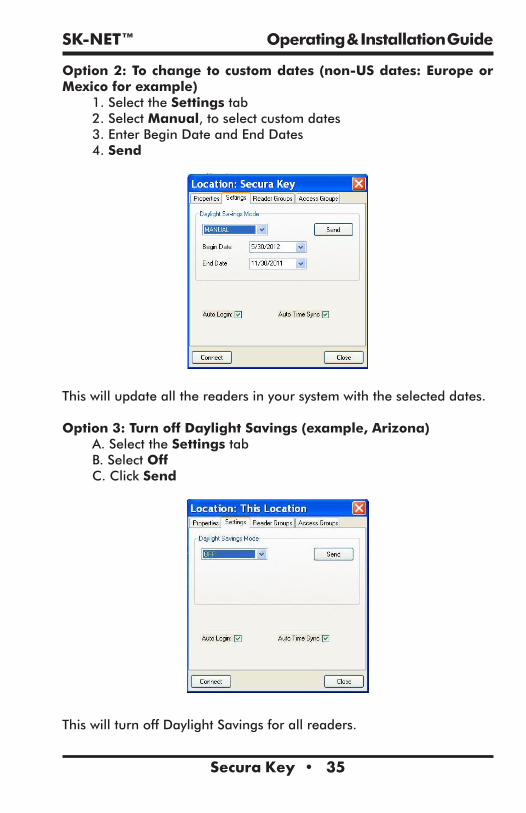
Option 2: To change to custom dates (non-US dates: Europe or Mexico for example)
1.SelecttheSettingstab2.SelectManual,toselectcustomdates3.EnterBeginDateandEndDates4.Send
Thiswillupdateallthereadersinyoursystemwiththeselecteddates.
Option 3: Turn off Daylight Savings (example, Arizona)A.SelecttheSettingstabB.SelectOffC.ClickSend
ThiswillturnoffDaylightSavingsforallreaders.

SK-NET™ Operating & Installation Guide
Secura Key • 36
4.25 IN and OUT readers
SK-NET™automaticallycreatesareadergroupfor“IN”readersandagroupfor“OUT”readers.Ifyoursystemhasreadersonbothsidesofanopeningtocontrolbothaccess(entry)andegress(exit),youshouldplacethesereadersintheINandOUTgroups.
WhenareaderisneitheranINoranOUTreader,validcardusesappearas“ValidAccess”inTransactions.WhenareaderhasbeendesignatedasanINreader,themessagewillsay“ValidEntry”.WhenareaderisdesignatedasanOUTreader,themessagewillsay“ValidExit”:
DesignatingreadersasINandOUTisrequiredinordertohaveReal Antipassback. (See Section 5.9, #3)
4.26 Programming an “IN” or an “OUT” reader
1. IntheTree View,clickonceonConnection Group.Thiswillcauseallofthereadericonstoappearontherightsideofthescreen.
2.Drag-and-DroptheappropriatereadersontotheIN Reader groupandtheOUT Readergroupontheleftsideofthescreen.
3.Clickonthe“+”plussignnexttoINReadersandOUTReaderstoverifythereadersforeachgroup.
4. RepeatstepsforeachConnectionGroup.
SK-NET™ Operating & Installation Guide
Secura Key • 37
4.27 Reader Groups
AReaderGroupisusedtosetcommonpropertiesfortwoormorereaders.SK-NET™automaticallycreatestwoReaderGroups:IN ReadersandOUT Readers.Youmaycreateupto25additionalReaderGroupsasyouwish.
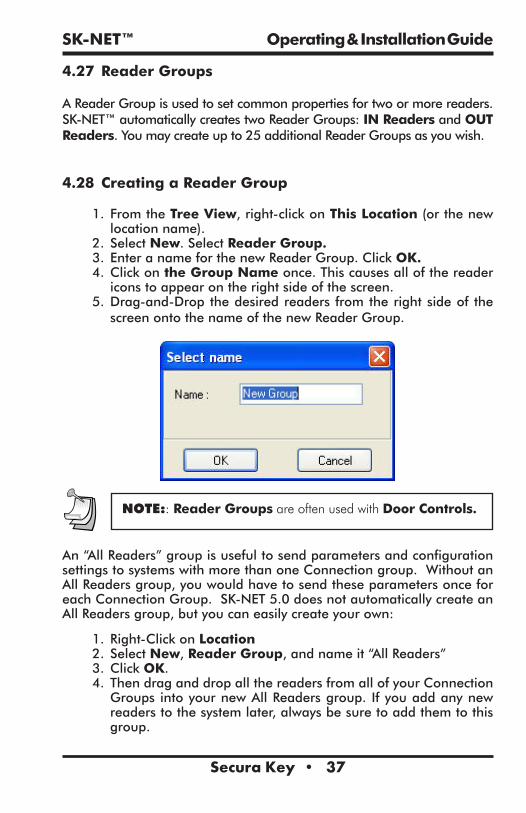
4.28 Creating a Reader Group
1. FromtheTree View,right-clickonThis Location(orthenewlocationname).
2. SelectNew.SelectReader Group.3. EnteranameforthenewReaderGroup.ClickOK.4.Clickonthe GroupNameonce.Thiscausesallofthereadericonstoappearontherightsideofthescreen.
5.Drag-and-Dropthedesiredreaders fromtherightsideof thescreenontothenameofthenewReaderGroup.
NOTE:: Reader Groups are often used with Door Controls.
An“AllReaders”groupisusefultosendparametersandconfigurationsettingstosystemswithmorethanoneConnectiongroup.WithoutanAllReadersgroup,youwouldhavetosendtheseparametersonceforeachConnectionGroup.SK-NET5.0doesnotautomaticallycreateanAllReadersgroup,butyoucaneasilycreateyourown:
1.Right-ClickonLocation2.SelectNew,Reader Group,andnameit“AllReaders”3.ClickOK.4.ThendraganddropallthereadersfromallofyourConnectionGroups intoyournewAllReadersgroup. Ifyouaddanynewreaderstothesystemlater,alwaysbesuretoaddthemtothisgroup.

SK-NET™ Operating & Installation Guide
Secura Key • 38
4.29 Door Controls
Door ControlsarefunctionsthatyoucaninitiatefromSK-NET™thataffectthedoororgateataconnectedlocation.DoorControliconsappearatthetopoftheTreeViewscreen.YoucansendaDoorControlcommandtoasinglereader,ortoaReaderGroup.
4.30 Using Door Controls
1. FromtheTree View,clickonceonthenameofasinglereaderoraReader Group (oraConnectionGroup).
2. ClickontheDoor Controliconforthefunctionyouwanttoinitiate:a. Open The Door Nowwillactivatethelatchrelay(s)forthe
sametimeaspresentingavalidcardb. Unlock The Dooractivatestherelayandkeepsitactivated
untilyourestoreit.DuringthistimetheGREENLEDonthereaderwillflashslowly.
c. Make Inactive (Locked) prevents even valid cards fromgainingaccessthroughthedooruntilyourestoreit.DuringthistimetheREDLEDwillflashslowly.
d. Disable Door Scheduleisanoverridethatrelocksadoor,or group of doors, that have been unlocked by aDoorSchedule.
e. Make Active (Normal)restoresareadertonormaloperationafterithasbeenplacedintheUnlockorInactivestatebyaDoorControlcommand.
NOTE: Disable Door Schedule is useful when conditions require that a normally unlocked door be locked early. An example would be a school that has early dismissal due to bad weather.NOTE: A Global Door-Open Command takes about ½ second per reader to process. On a 100-door system it will take approximately 50 seconds to open all doors.NOTE: A Global Reader Inactive (lock-down) Command takes about ½ second per reader to process. On a 100-door system it will take approximately 50 seconds to inactivate all doors.

SK-NET™ Operating & Installation Guide
Secura Key • 39
4.31 Inputs
InputsarecircuitsthatconnectexternalsensorsorswitchestoanSK-ACPor28SA-PLUS.ThisrequiresamomentaryNormallyOpencontactswitch.TheyareusedtoinitiatespecialfunctionsortogeneratemessagesinTransactions.ThereareeightdifferentInputdefinitionsyoucanchooseinSK-NET™.
NOTE: Inputfunctionsareassociatedwiththereaderordoorconnectedtothesame“side”oftheSK-ACPpanel.
a. Disabled–TheInputisnotused.b. Tamper –A switch or sensor that has been installed
todetect interferencewithacomponentof theaccesscontrol system. If this circuit is closed, the readerwillbe disabled and a Tampermessage will appear inTransactions.
c. Arming Circuit–Thereaderisdisableduntilthisinputisclosed.CardspresentedwhiletheArmingCircuitisopenwillbeloggedinTransactionsbutaccesswillbedenied.Thisinputisoftenusedforgateswherealoopdetectormustsensethatavehicleispresentbeforeacardcanbevalid.
d. Door Monitor–Connectedtoadoorpositionswitch,thisinputactivatesanti-tailgatefeature.Itisalsousedtodetectadoorforcedopenorheldopentoolong.
e. Door Bell–SendsanASCIIBellCharactertoaPCorprinter,causinganaudibletone.
f. Remote Inactive–Closingthisinputmakesthereaderinactive(lockout).
g. Remote Open–Thisinputactivatesthelatchrelayforthesameamountoftimeasavalidcarduse.A“DoorOpenedViaSensor”messageappearsinTransactions.AlsocalledRequest-To-ExitorREX.
h. User Defined–ThisinputallowsyoutowriteacustommessagethatwillappearinTransactions.TheInputcanbeavariationofRemoteOpenoritcansimulateDoorBell. Itcanalsobeusedasanalarmreset forcertainauxiliaryrelayoutputfunctions.
SK-NET™ Operating & Installation Guide
Secura Key • 40
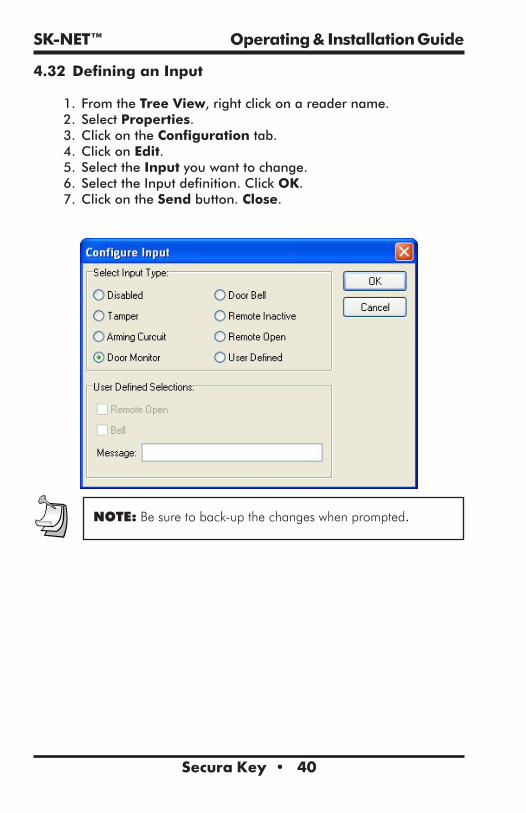
4.32 Defining an Input
1. FromtheTree View,rightclickonareadername.2. SelectProperties.3.ClickontheConfigurationtab.4.ClickonEdit.5. SelecttheInputyouwanttochange.6. SelecttheInputdefinition.ClickOK.7.ClickontheSendbutton.Close.
NOTE: Be sure to back-up the changes when prompted.
SK-NET™ Operating & Installation Guide
Secura Key • 41
4.33 Outputs
TheSK-ACPhasamain(latch)relayandanauxiliaryrelayforeachreader.(28SA-PLUS does not have an auxiliary output.)Thisextrarelaycanbeactivatedbyavarietyofmeanstoaccomplishvariousfunctions.
a. Disabled–Theoutputisnotused.b. Input 1 Follow / Latch–WheneverInput1isclosedthe
aux.relaywillactivateuntileither1)avalidcardispresentedtothereader,2)aUserDefinedInput2isactivated,3)apre-selectedamountoftimeelapsesor4)Input1isopened.
c. Input 2 Follow / Latch–WheneverInput2isclosedtheaux.relaywillactivateuntileither1)avalidcardispresentedtothereader,2)aUserDefinedInput1isactivated,3)apre-selectedamountoftimeelapsesor4)Input2isopened.
d. Door Monitor Alarm–IfoneoftheInputsisconfiguredasDoorMonitor,thisoutputwillactivateifthedoorisforcedopenorifitisleftopentoolong.Thisoutputistypicallyconnectedtoalocalalarmsignalortoaremotemonitoringstation.Oncetheauxiliaryrelayisactivateditwillremainactivateduntil1)avalidcardispresentedtothereader,2)aUserDefinedInputisactivated,3)apre-selectedamountoftimeelapses.
e. Door Forced Alarm -IfoneoftheInputsisconfiguredasDoorMonitor,thisoutputwillactivateifthedoorisforcedopen.Thisoutputistypicallyconnectedtoalocalalarmsignalortoaremotemonitoringstation.Oncetheauxiliaryrelay isactivated itwill remainactivateduntil1)avalidcardispresentedtothereader,2)aUserDefinedInputisactivated,3)apre-selectedamountoftimeelapses.
f. Door Held Open-IfoneoftheInputsisconfiguredasDoorMonitor, thisoutputwillactivate if thedoor is leftopentoolong.Thisoutputistypicallyconnectedtoalocalalarmsignalortoaremotemonitoringstation.Oncetheauxiliaryrelayisactivateditwillremainactivateduntil1)avalidcardispresentedtothereader,2)aUserDefinedInputisactivated,3)apre-selectedamountoftimeelapses.
g. Emergency Exit Alarm – UsedwhenoneoftheInputsis designatedasRemoteOpen, theauxiliary relaywillactivatewhenever themain relay is triggered via theRemoteOpenInput.Thisistypicallyusedtosoundalocalalarmwhenthedoorhasbeenusedforegress.
h. Card Range–Cardsinaselectedrangewillactivate

SK-NET™ Operating & Installation Guide
Secura Key • 42
theauxiliaryrelayonlyorboththeauxiliaryandmainrelays.Typicallythisisusedsospecificcardscancausesomethingspecialorextratohappen.TherelaycanbesettoToggle,(activateuntilanothercardintheselectedrangeispresented)ortoactivateforapresetamountoftime.
i. Error Alarm –When any one of selected “Error”conditionsoccur,theauxiliaryrelaywillactivateandstayactivateduntilavalidcardispresentedtothereader.ErrorConditionsyoumayselectfromare“DoorForced”,DoorHeld”,TamperInput”,“VoidUser”,“InvalidFacilityCode”, “Antipassback Violation”, “Arming”, “TamperCard”,“Inactive”,“InvalidID”,“TimeZoneError”,“TimeZoneDate”,“LimitedUseViolation”.
j. Serious Alarm–Whenanyoneofthefollowing“Error”conditions occur, theauxiliary relaywill beactivatedand remainactivateduntilavalid card ispresented:“VoidCard”,“InvalidFacilityCode”,”Tamper”,“DoorForced”,“DoorHeld”.
k. Time Zone–TheauxiliaryrelaywillbeactivatedduringtheGREENincrementsoftheselectedTimeZone.
l. Tamper Alarm–IfaTamperInputisclosed,theauxiliaryrelaywill beactivatedandwill remainactivateduntiluntil1)avalidcardispresentedtothereader,2)aUserDefinedInputisactivated,3)apre-selectedamountoftimeelapses.
m.Door Bell–IfaDoorBellInputisclosedtheauxiliaryrelaywillbeactivatedandremainactivateduntil1)The input isopenedor2)apre-selectedamountoftimeelapses.
n. Alarm Shunt–WheneverthemainrelayisactivatedbyavalidcardoraRemoteOpeninput,theauxiliaryrelaywillbeactivatedandwillremainactivateduntil1)themainrelayreturnstonormalor2)apre-selectedamountoftimeelapses.
SK-NET™ Operating & Installation Guide
Secura Key • 43
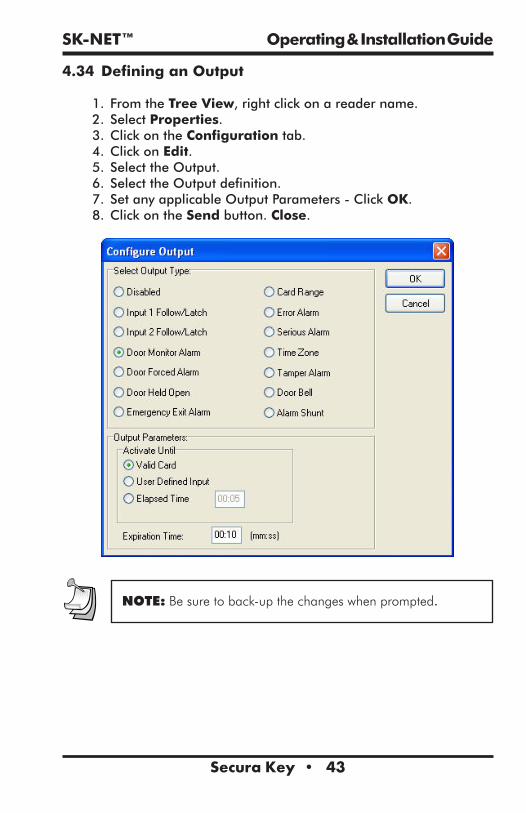
4.34 Defining an Output
1. FromtheTree View,rightclickonareadername.2. SelectProperties.3.ClickontheConfigurationtab.4.ClickonEdit.5. SelecttheOutput.6. SelecttheOutputdefinition.7. SetanyapplicableOutputParameters-ClickOK.8.ClickontheSendbutton.Close.
NOTE: Be sure to back-up the changes when prompted.
SK-NET™ Operating & Installation Guide
Secura Key • 44
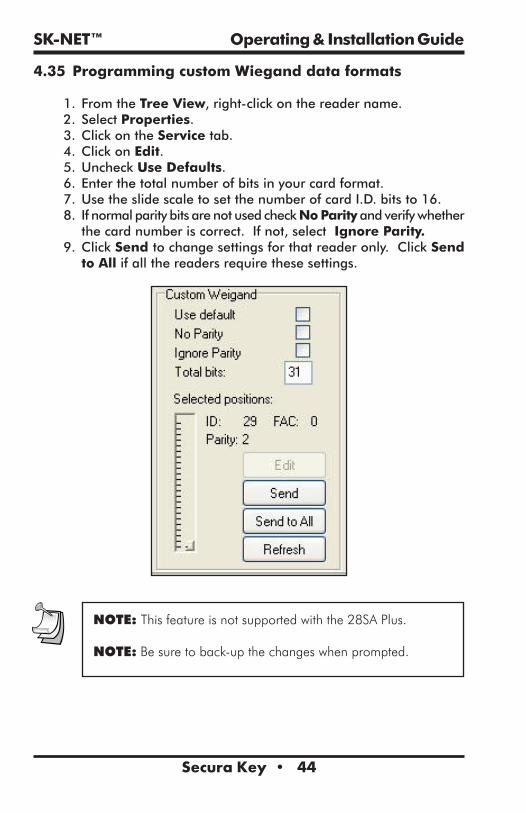
4.35 Programming custom Wiegand data formats
1. FromtheTree View,right-clickonthereadername.2. SelectProperties.3.ClickontheServicetab.4.ClickonEdit.5.UncheckUse Defaults.6. Enterthetotalnumberofbitsinyourcardformat.7.UsetheslidescaletosetthenumberofcardI.D.bitsto16.8. IfnormalparitybitsarenotusedcheckNo Parityandverifywhetherthecardnumberiscorrect.Ifnot,selectIgnore Parity.
9.ClickSend tochangesettingsforthatreaderonly.ClickSendto Allifallthereadersrequirethesesettings.
NOTE: This feature is not supported with the 28SA Plus.
NOTE: Be sure to back-up the changes when prompted.
SK-NET™ Operating & Installation Guide
Secura Key • 45
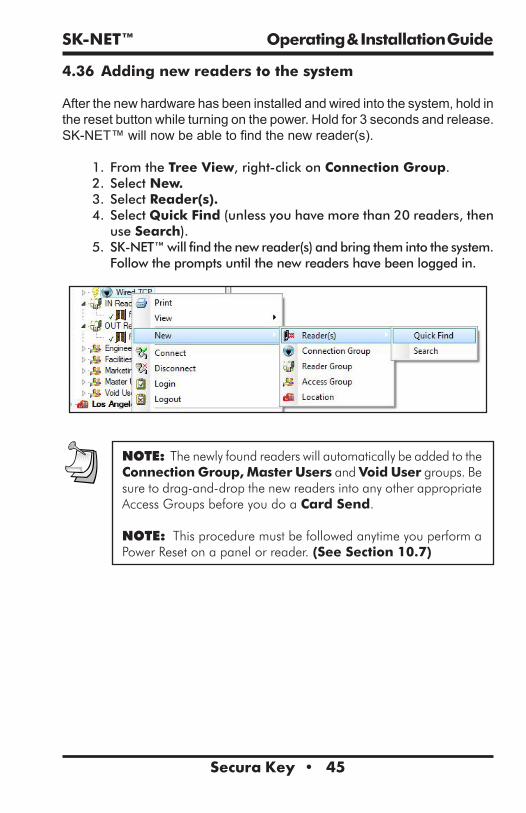
4.36 Adding new readers to the system
After the new hardware has been installed and wired into the system, hold in the reset button while turning on the power. Hold for 3 seconds and release. SK-NET™ will now be able to find the new reader(s).
1. FromtheTree View,right-clickonConnection Group.2. SelectNew.3. SelectReader(s).4. SelectQuick Find (unlessyouhavemorethan20readers,thenuseSearch).
5. SK-NET™willfindthenewreader(s)andbringthemintothesystem.Followthepromptsuntilthenewreadershavebeenloggedin.
NOTE: The newly found readers will automatically be added to the Connection Group, Master Users and Void User groups. Be sure to drag-and-drop the new readers into any other appropriate Access Groups before you do a Card Send.
NOTE: This procedure must be followed anytime you perform a Power Reset on a panel or reader. (See Section 10.7)
SK-NET™ Operating & Installation Guide
Secura Key • 46
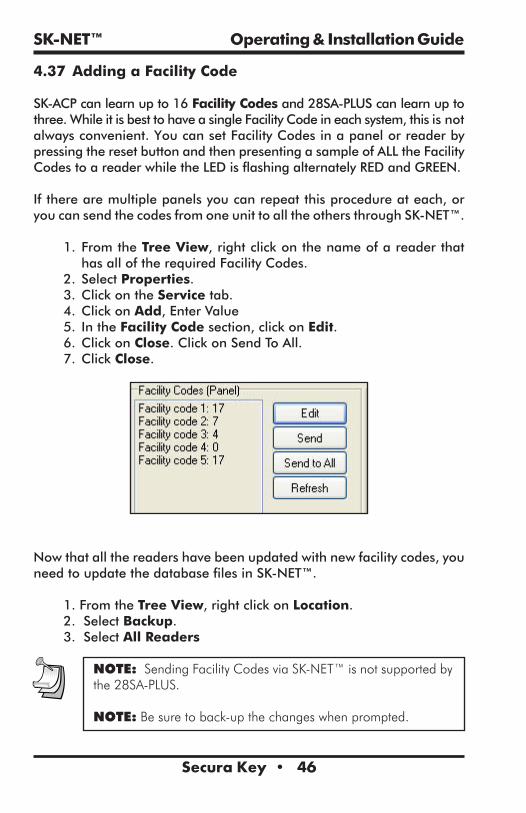
4.37 Adding a Facility Code
SK-ACPcanlearnupto16Facility Codesand28SA-PLUScanlearnuptothree.WhileitisbesttohaveasingleFacilityCodeineachsystem,thisisnotalwaysconvenient.YoucansetFacilityCodesinapanelorreaderbypressingtheresetbuttonandthenpresentingasampleofALLtheFacilityCodestoareaderwhiletheLEDisflashingalternatelyREDandGREEN.
Iftherearemultiplepanelsyoucanrepeatthisprocedureateach,oryoucansendthecodesfromoneunittoalltheothersthroughSK-NET™.
1. FromtheTree View,rightclickonthenameofareaderthathasalloftherequiredFacilityCodes.
2. SelectProperties.3.ClickontheServicetab.4.ClickonAdd,EnterValue5. IntheFacility Codesection,clickonEdit.6.ClickonClose.ClickonSendToAll.7.ClickClose.
Nowthatallthereadershavebeenupdatedwithnewfacilitycodes,youneedtoupdatethedatabasefilesinSK-NET™.
1.FromtheTree View,rightclickonLocation.2.SelectBackup.3.SelectAll Readers
NOTE: Sending Facility Codes via SK-NET™ is not supported by the 28SA-PLUS.
NOTE: Be sure to back-up the changes when prompted.

SK-NET™ Operating & Installation Guide
Secura Key • 47
5. MANAGING USERS
TheUserscreendisplaysallcardsandassociatedcardholders.This iswhereyoucanaddacard,editcarddetails,monitorinandoutstatusandgenerateuserreports.
5.1 Entering Cardholder Information
1. IntheUserView,doubleclickonthecardnumberyouwanttoissue.AUser Detailboxwillappear.
2. Enterthecardholdername.SelectanAccess Groupfromthedropdownlist.
3.Otherfieldsareoptional.Theyareprovidedforyourconvenience.4.Toattachaphotographtoauserrecord,clickonLoad.Usethebrowsertolocatethejpeg(.jpg)filewiththedesiredpicture.
5.ClickOK.6.Afterallcardadditionsorchanges,clicktheSend Usersarrow.
NOTE: Follow the same procedure to edit cardholder information or change Access Group.
NOTE: Attached photos should be small files (480x640). High resolution pictures may slow the program and they will not look any better on a computer screen. Attached photos can be viewed in Transaction Detail (See Section 6.3) and are available for use by SK-NET-MLD for badge printing.

SK-NET™ Operating & Installation Guide
Secura Key • 48
5.2 Adding a new card number
1. IntheUser View,clickonthe“+”sign(Add).2. IntheUser Detailbox,enterthecardholdername.3. EntertheCard Number.4. SelectanAccess Groupfromthedropdownlist.5. Enteradditionaldataand/orattachphotosifdesired.6.ClickOK.7.Afterallcardadditionsorchanges,clicktheSend Usersarrow.
5.3 Deleting a user
NOTE: You can remove a card completely from the system. It is usually better, though, to edit the card and make it a Void User. This ensures that the card will not open anything, but each attempted use will be recorded in Transactions.
Toremoveasinglecard:
1. IntheUserView,clickonthecardnumbertoberemoved.Thiswillpositionthepointernexttothatnumber.
2.Clickonthe“X“(Delete).Therecordwillberemoved.3.Afteranycardadditionsorchanges,clicktheSend Usersarrow.
NOTE: Be sure to backup your system when you exit SK-NET™.
SK-NET™ Operating & Installation Guide
Secura Key • 49
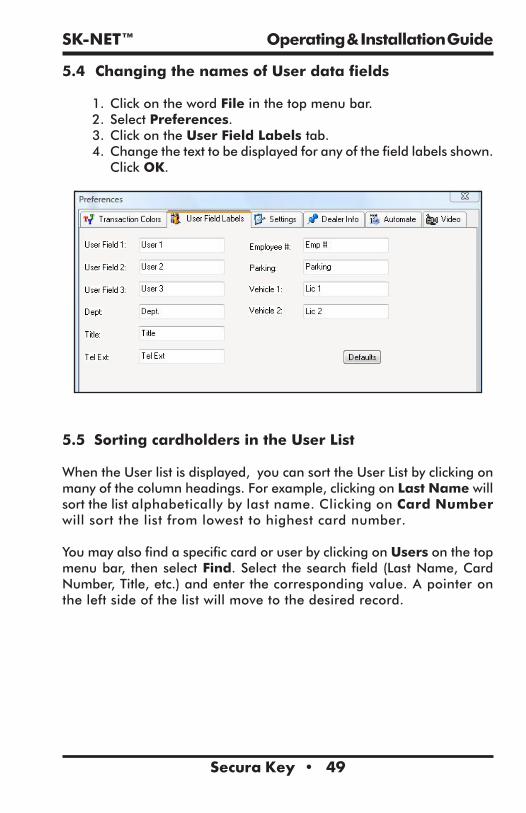
5.4 Changing the names of User data fields
1.ClickonthewordFileinthetopmenubar.2. SelectPreferences.3.ClickontheUser Field Labels tab.4.Changethetexttobedisplayedforanyofthefieldlabelsshown.ClickOK.
5.5 Sorting cardholders in the User List
WhentheUserlistisdisplayed,youcansorttheUserListbyclickingonmanyofthecolumnheadings.Forexample,clickingonLast Namewillsortthelistalphabeticallybylastname.ClickingonCard Numberwillsortthelistfromlowesttohighestcardnumber.
YoumayalsofindaspecificcardoruserbyclickingonUsersonthetopmenubar, thenselectFind.Select thesearchfield (LastName,CardNumber,Title,etc.)andenterthecorrespondingvalue.Apointerontheleftsideofthelistwillmovetothedesiredrecord.
SK-NET™ Operating & Installation Guide
Secura Key • 50
5.6 Filtering Users
Filters allow you to temporarily remove unwanted records from the list. This allows a limited user report to be generated, for example, users in a single department or users who are out of the building.
5.7 User Reports
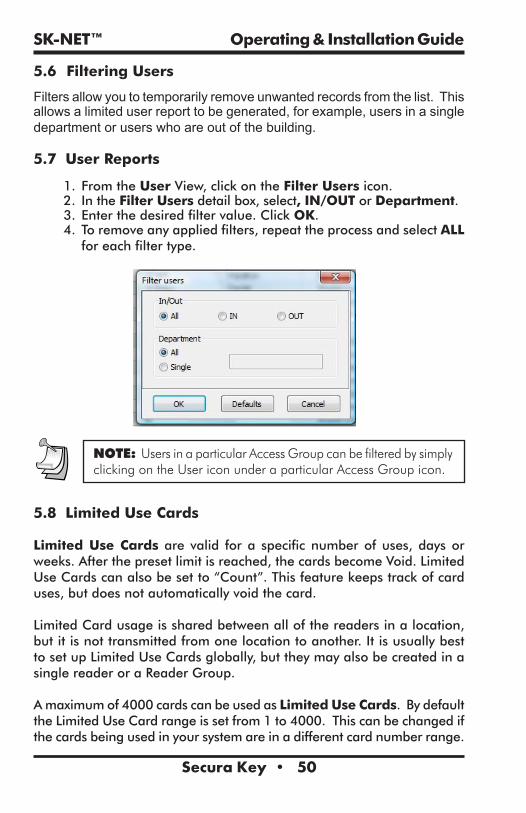
1. FromtheUserView,clickontheFilter Usersicon.2. IntheFilter Usersdetailbox,select, IN/OUTorDepartment.3. Enterthedesiredfiltervalue.ClickOK.4. Toremoveanyappliedfilters,repeattheprocessandselectALLforeachfiltertype.
NOTE: Users in a particular Access Group can be filtered by simply clicking on the User icon under a particular Access Group icon.
5.8 Limited Use Cards
Limited Use Cards are valid fora specific numberofuses, daysorweeks.Afterthepresetlimitisreached,thecardsbecomeVoid.LimitedUseCardscanalsobesetto“Count”.Thisfeaturekeepstrackofcarduses,butdoesnotautomaticallyvoidthecard.
LimitedCardusageissharedbetweenallofthereadersinalocation,butitisnottransmittedfromonelocationtoanother.ItisusuallybesttosetupLimitedUseCardsglobally,buttheymayalsobecreatedinasinglereaderoraReaderGroup.
Amaximumof4000cardscanbeusedasLimited Use Cards.BydefaulttheLimitedUseCardrangeissetfrom1to4000.Thiscanbechangedifthecardsbeingusedinyoursystemareinadifferentcardnumberrange.
SK-NET™ Operating & Installation Guide
Secura Key • 51
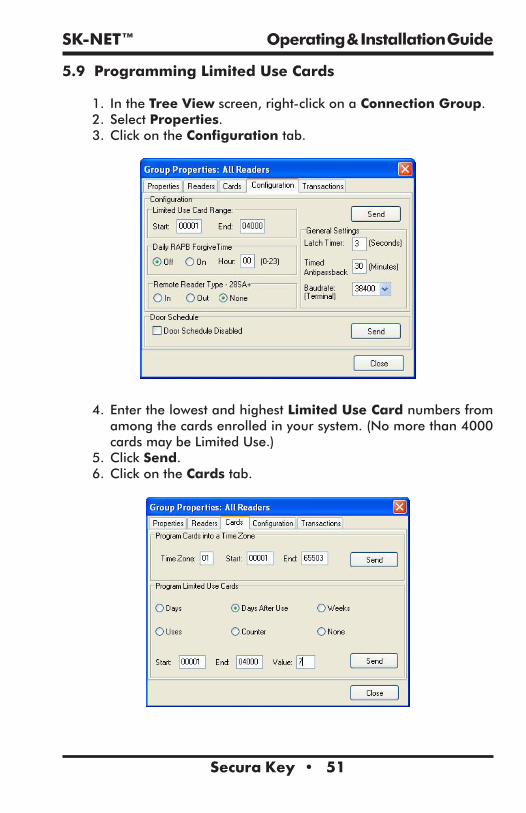
5.9 Programming Limited Use Cards
1. IntheTree Viewscreen,right-clickona Connection Group.2. SelectProperties.3.ClickontheConfigurationtab.
4. EnterthelowestandhighestLimited Use Cardnumbersfromamongthecardsenrolledinyoursystem.(Nomorethan4000cardsmaybeLimitedUse.)
5.ClickSend.6.ClickontheCardstab.

SK-NET™ Operating & Installation Guide
Secura Key • 52
7. Select the appropriate LimitedUse parameter. Enter a countvalue,whererequired.
8. Enterthelowestandhighestcardswithinthepreviouslydefinedlimitedusecardrange,thatappliestothisparameter.(YoucandefinemultiplegroupsofLimitedCardswithvariouslimitationparameters.)
9.ClickSend.ClickClose.
NOTE: A similar process can be used in the properties of a Reader Group or of a single reader. It is usually better to make Limited Use Cards Location-wide.
NOTE: Limited Use cards cannot be programmed into Time Zone 1 or Master Users.
NOTE: When the Uses parameter is selected, the system does not count uses involving an OUT reader.
NOTE: To reprogram a void Limited Use card, follow the programming steps above for the desired card or card range.
NOTE: If your system has more than one Connection Group, in order for the Limited Use “Uses” or “Counter” function (number of uses) to work properly, all of your Connection Groups must be connected to the system, and the SK-NET™ software must be running on your PC (it can be minimized). Once programmed, the Limited Use “Days”, “Days after Use”, and “Weeks” functions will continue to work, even if the SK-NET™ software is not continuously connected or running.
SK-NET™ Operating & Installation Guide
Secura Key • 53
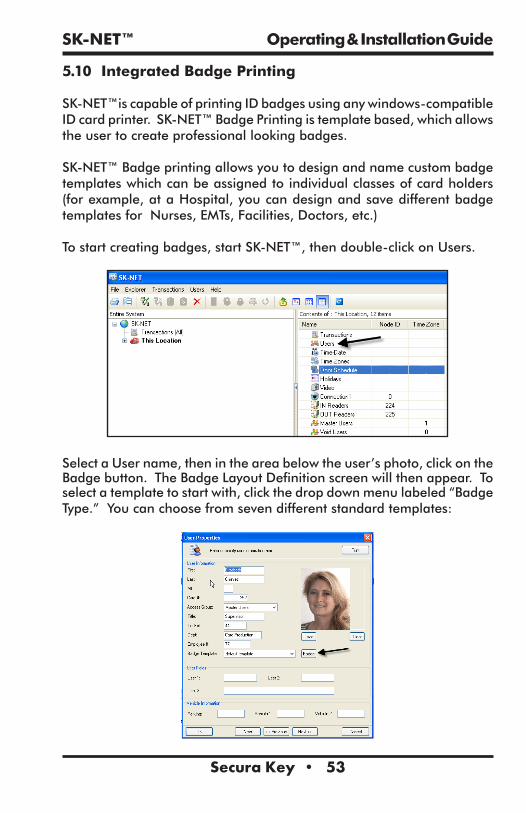
5.10 Integrated Badge Printing
SK-NET™iscapableofprintingIDbadgesusinganywindows-compatibleIDcardprinter.SK-NET™BadgePrintingistemplatebased,whichallowstheusertocreateprofessionallookingbadges.
SK-NET™Badgeprintingallowsyoutodesignandnamecustombadgetemplateswhichcanbeassignedtoindividualclassesofcardholders(forexample,ataHospital,youcandesignandsavedifferentbadgetemplatesforNurses,EMTs,Facilities,Doctors,etc.)
Tostartcreatingbadges,startSK-NET™,thendouble-clickonUsers.
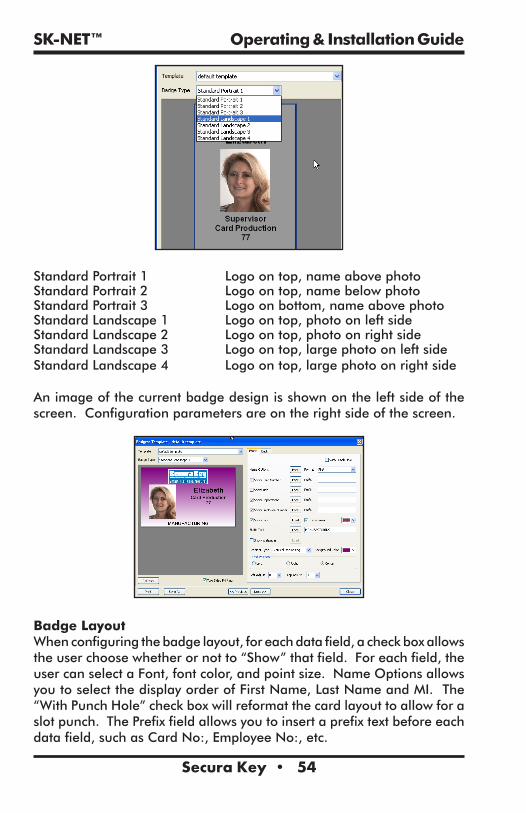
SelectaUsername,thenintheareabelowtheuser’sphoto,clickontheBadgebutton.TheBadgeLayoutDefinitionscreenwillthenappear.Toselectatemplatetostartwith,clickthedropdownmenulabeled“BadgeType.”Youcanchoosefromsevendifferentstandardtemplates:
SK-NET™ Operating & Installation Guide
Secura Key • 54
StandardPortrait1 Logoontop,nameabovephotoStandardPortrait2 Logoontop,namebelowphotoStandardPortrait3 Logoonbottom,nameabovephotoStandardLandscape1 Logoontop,photoonleftsideStandardLandscape2 Logoontop,photoonrightsideStandardLandscape3 Logoontop,largephotoonleftsideStandardLandscape4 Logoontop,largephotoonrightside
Animageofthecurrentbadgedesignisshownontheleftsideofthescreen.Configurationparametersareontherightsideofthescreen.
Badge LayoutWhenconfiguringthebadgelayout,foreachdatafield,acheckboxallowstheuserchoosewhetherornotto“Show”thatfield.Foreachfield,theusercanselectaFont,fontcolor,andpointsize.NameOptionsallowsyoutoselectthedisplayorderofFirstName,LastNameandMI.The“WithPunchHole”checkboxwillreformatthecardlayouttoallowforaslotpunch.ThePrefixfieldallowsyoutoinsertaprefixtextbeforeeachdatafield,suchasCardNo:,EmployeeNo:,etc.

SK-NET™ Operating & Installation Guide
Secura Key • 55
Inserting LogoToinsertacompanyororganizationlogo,firstsaveaJPEGofthelogoontoyourcomputer’sharddrive,thenchecktheShowLogocheckbox,thenclickonLoad,andyoucanbrowseyourdiskdrivetofindthelogofile.Thelogoshouldbecorrectlysizedtofitonthecard,butSK-NET™willcenterandsize the logoto fit into thecard layout. Tomakethelogoappearcorrectly,clickonthetransparentcheckbox,andselecttheappropriatecolortobetransparent.
Creating TemplatesTheStaticTextfieldallowsyoutoentertextthatisnotadatabasefield.This is useful when setting up templates for various cardholder jobclassifications,forexample,atahospital,youcandefineadifferentBadgeTemplateforNURSES,DOCTORS,EMTs,MAINTENANCE,etc.Onceyouhavesetuptheartworkthewayyouwantit,clickonSaveAs,andthenoverwritethetext“defaulttemplate”whichappearsinthepopupbox,bytypingthenewtemplatename.
Card BackgroundsTheShowWallpapercheckboxallowsyoutouseaJPEGimagefileasabackgroundforthecard.Thiscanbeaninterestingtexture,oryoucandesignandcreateacustomcardbackgroundinPhotoshopandsaveitasaJPEGontoyourcomputer’sharddrive.ThenchecktheShowWallpapercheckbox,thenclickonLoad,andyoucanbrowseyourdiskdrivetofindtheWallpaperfile.Thelogoshouldbecorrectlysizedtofitonthecard,butSK-NET™willcenterandsizetheWallpapertofitintothecardlayout.
Ifyoudon’thaveawallpaperorpre-designedbackgroundforthecard,SK-NET™willallowyoutoselectacolorforthebackground,andchoosefromseveraldifferenttypesofgradiatedwashes.IfyouaredesigninganumberofdifferentBadgeTemplatesforyourorganization,youmaywanttogivethemdifferentcoloredbackgrounds,sothattheycanbevisuallyrecognizedatadistance.
NOTE: If you choose a dark background, you may need to select a light color for text fields, to make them easier to read against the dark background.
Text AlignmentTheTextPositionradiobuttonsallowyoutoaligntextfieldsforthebestappearance.TheLeftAdjustandTopAdjustfieldsallowyoutoenteravaluetochangethealignmentoftheartworkonthecard.Youcanenteranumberfrom1-10inthefield.Normally,youshouldnothavetousethesefields.

SK-NET™ Operating & Installation Guide
Secura Key • 56
Two-Sided PrintingTheTwo-SidedPrintingcheckboxshouldbeusedifyouhaveadual-sidedcardprinter,andifyouintendtoprinttextorabarcodeonthebackofthecard.Ifyouwanttoprintbothsidesofthecard,besuretosettwo-sidedprintinginyourPrinterPropertiesdefinition,orthecardwillnotflipoverandyouwillprintthefrontandbackimagesontwodifferentcards.
Todesignthebackofthecard,clickontheBacktabontheBadgeLayoutscreen.Youcantypeinanytextthatyouwanttoappearonthebackofeachcard,suchasa“ReturnCardto”address,ora“NotResponsibleforDamages”disclaimerforaparkinglot.
Youcanalsoselectwhichdatafieldisusedtocreatethebarcode,andthenyoucanselectthetypeofBarCodetobeused.
Mosttwo-sidedprinterswillprintthefrontofthecardinfour-colors,andthebackofthecardinresinblack,andmanyprintershaveaspecialribbonwhichhasanextraresinpanelforprintingthebackofthecard.
Slot Punching Cards with ArtworkDonotslotpunchyourcardspriortoprinting,andbecarefultoslotpunchthecardsattheslotpunchtargetsmarked“+”toavoiddamagingtheantennainthecard.Ifyouhavealreadyslotpunchedyourcards,adjustyourlayoutsothatyouwillnotbeprintinganythingintheareaoftheslot,asthesharpedgeoftheslottendstoteardyesublimationprinterribbons.
Avoiding Printing ProblemsAccesscontrolcardsmaycontainembeddedintegratedcircuitsor“chips,”antennas, inlays, Wiegand code strips, or magnetic material. Theseembeddedmaterialsmaybemademoreobviousifyouprintthecard

SK-NET™ Operating & Installation Guide
Secura Key • 57
witha‘full-bleed”solidcolorbackground.Iftheembeddedcomponentscause thecardsurface tobeuneven, thedyesublimationprintheadmaylosecontactwiththecardatthepointwhereitpassesoverahighspot,causingawhitespotor“printingvoid”inthecardbackground.Toavoidprintingproblems,awhitebackgroundwillprovidebetterresultsthanusingasolidcolor.Also,doprintsometestcardsbeforeyoubegintoprint largequantitiesof cards. If younotice that thecardholder’sportraitappearsoveraprintingvoidcausedbyembeddedcomponents,youcanchooseanotherstandardtemplate,whichchangesthelocationofthephoto.
Whenhandlingcardspriortoprinting,usepowder-freegloves,andholdthecardsbytheedges–donotgetfingerprintsoroil fromyourskinonthecards.PVCcardshaveastaticcharge,andtheyattractdirtanddebris,whichcauseprintingproblems,souseyourprinter’scleaningcardandheadcleaningpen,andkeepyourworkareaascleanaspossible.Ifyourcardsshouldgetdirty,useasoftclothand99%IsopropylAlcoholtocleaneachcardpriortoprinting.

SK-NET™ Operating & Installation Guide
Secura Key • 58
6. MANAGING TRANSACTIONS
TheTransactionviewdisplayssystemactivity.Cardeventsthatarevalidand invalid are displayed, along with system events such as a doorunlockedbyaDoorScheduleorautomaticRAPBForgive.
Transactionscanbedisplayedinalist,withthemostrecenteventatthebottomofthescreen.Youcanalsodisplayasingletransactionindetail,includinganyattachedphotographforthecardholder.
6.1 Changing Transaction View1. FromtheTransactionscreen,clickontheChange Colorsicon.2.ClicktheChangeboxnexttotheeventtypeyouwanttoalter.3. Selectacolorfromthechart.ClickApplytopreviewhowthecolorwilllook.(Somecolorsareveryhardtoread.)ClickOKtousetheselectedcolor.
4.TochangewhetheratransactionclassappearsBoldorItalic,clicktheappropriatecheckbox.

SK-NET™ Operating & Installation Guide
Secura Key • 59
6.2 Filtering Transactions
1. FromtheTransactionsscreen,clickontheFiltericon.2. IntheTransaction Filterbox,selectoneormorefiltercriteriatypes.Eachfiltercriteriarequiresavaluetobeentered.
3.ClickOK.4. Toremoveanyfilters,repeattheprocessandselectALLforeachfiltercriteria(orclickonDefaultstoresetallfilters.)
NOTE: To View Transactions of Users from a particular Access Group or location, simply click on the Transactions icon under a particular Access Group or location.

SK-NET™ Operating & Installation Guide
Secura Key • 60Secura Key • 60
6.3 Viewing cardholder photos
1. From the Transaction View, click on theZoom In icon(magnifyingglassicon).
2. The selected transactionwill be displayedwith user detailsand photo (if loaded), To viewprevious transactions, use thenavigationbuttons.
6.4 Archiving older transactions
1. FromtheTransactionView,clickontheword“Transactions” inthemenubar.
2. SelectArchive, then New/Append.3. Enteranameforthearchivefiledestination.4. Ifyoudonotwanttoarchiveallthetransactionrecords,enterastartingand/orendingdate.
5.ClickOK.
NOTE: In the same menu you may choose to delete an archive file that you no longer wish to retain.

SK-NET™ Operating & Installation Guide
Secura Key • 61
6.5 Viewing archived transactions
1. FromtheTransactionView,clickontheselectorarrowforSelect Transactions to View.
2. Selectthearchivefileyouwanttosee.3. Youmaynavigatethrougharchivedtransactionsthesamewayyounavigatethroughcurrenttransactions.
6.6 Excluding Transaction Types
Youmayexcludespecifictransactiontypesfromthesystemaudittrail.Transactiontypestoexcludecanbeselectedfromtheconnectiongroup orforindividualreaders.ExcludingsometransactiontypesreducesthenumberofeventrecordsinTransactionsandalsoconservesspaceintheeventbufferoftheSK-ACPand/or28SA-PLUS.
NOTE: If you have more than one connection group and you want to exclude one or more transactions from all of the readers, we recommend that you create an “All Readers Group”. This will allow you to send this command one time and apply the change to all readers in the system. See Section 5.28.
SK-NET™ Operating & Installation Guide
Secura Key • 62
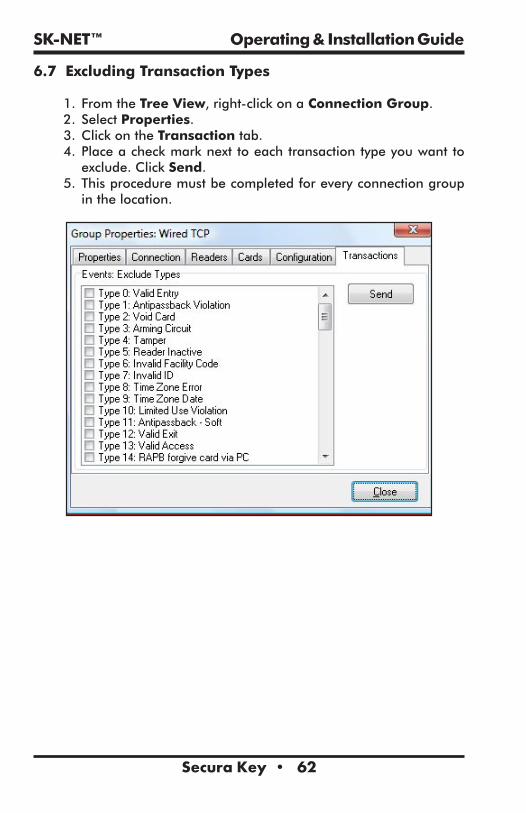
6.7 Excluding Transaction Types
1. FromtheTree View,right-clickona Connection Group.2. SelectProperties.3.ClickontheTransactiontab.4. Placeacheckmarknexttoeachtransactiontypeyouwanttoexclude.ClickSend.
5.Thisproceduremustbecompletedforeveryconnectiongroupinthelocation.

SK-NET™ Operating & Installation Guide
Secura Key • 63
6.8 Excluding Transaction Types for One Reader
1. FromtheTree View,right-clickonthenameofareader.2. SelectProperties.3.ClickontheTransactionstab.4.ClickontheEditbutton.5. Placeacheckmarknexttoeachtransactiontypeyouwanttoexclude.ClickSend.
SK-NET™ Operating & Installation Guide
Secura Key • 64
7. REPORTS
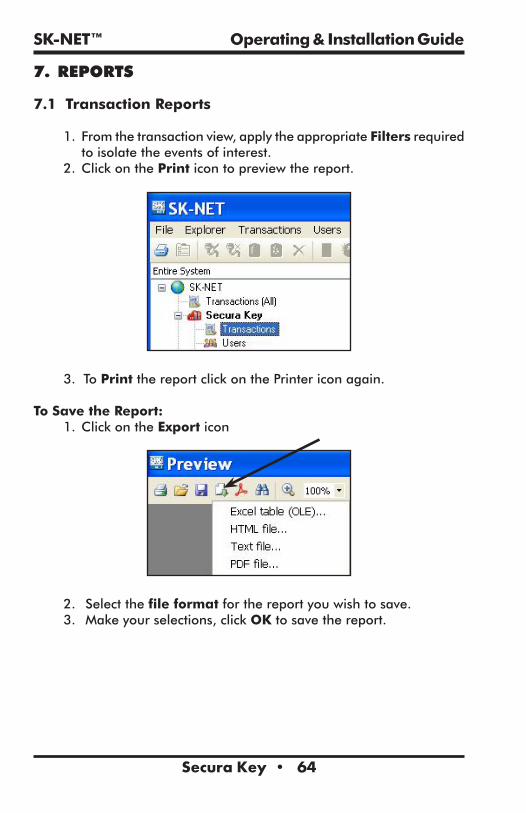
7.1 Transaction Reports
1. Fromthetransactionview,applytheappropriateFiltersrequiredtoisolatetheeventsofinterest.
2.ClickonthePrinticontopreviewthereport.
3.ToPrintthereportclickonthePrintericonagain.
To Save the Report:1.ClickontheExporticon
2. Selectthefile formatforthereportyouwishtosave.3. Makeyourselections,clickOKtosavethereport.

SK-NET™ Operating & Installation Guide
Secura Key • 65
7.2 User Information Reports
1. FromtheUser View,sortandFilterthelistthewayyouwantittoappearonthereport.
2.Clickon theselectorarrownext to theprint iconandchooseeithertheUserReportorUserDetailReport.
3.ToPrintthereportclickonthePrintericon4.MakeyourselectionsandclickOKtoprint.
To Save the Report:1.ClickontheExporticon
2. Selectthefile formatforthereportyouwishtosave.3.Makeyourselections,clickOKtoSavethereport.

SK-NET™ Operating & Installation Guide
Secura Key • 66
7.3 Print a System Report (List of readers in a location)
1.HighlighttheLocationname.2.ClickonthePrintbuttontoviewthereport.
3.ToPrintthereportclickonthePrintericonagain4.MakeyourselectionsandclickOKtoprint.
To Save the Report:
1.ClickontheExporticon2. Selectthefile formatforthereportyouwishtosave.3.Makeyourselections,clickOKtosavethereport.

SK-NET™ Operating & Installation Guide
Secura Key • 67
7.4 Printing a list of Users in an Access Group report
1. SelecttheAccess GroupandhighlightUsers.
2. SelecttheUser Report Type.
3.ToPrintthereportclickonthePrintericon4.MakeyourselectionsandclickOKtoprint.

SK-NET™ Operating & Installation Guide
Secura Key • 68
To Save the Report:
1.ClickontheExporticon
2. Selectthefileformatforthereportyouwishtosave.3.Makeyourselections,clickOKtosavethereport.

SK-NET™ Operating & Installation Guide
Secura Key • 69
8. SECURITY
8.1 Changing an SK-NET™ Operator Password
1.ClickonFileinthetopmenubar.2. SelectOperator.3. SelectChange Password.4. Enterthenewpasswordtwice.ClickOK.

SK-NET™ Operating & Installation Guide
Secura Key • 70
8.2 Assigning Operator Levels
Client/Server versions of SK-NET-MLD allow you to enroll numerousoperators,eachwithauniquepassword.Operatorscanbeassignedtooneoffivedifferentprivilegelevels:
a. Guards –AbletoviewTransactions.b. Receptionists –AbletoviewUserIN/OUTstatus.c. Card Issuer –Able to perform functions in theUser
screen.d. Supervisors –Abletoperformfunctionsinallscreens,
butnotabletochangesystemparametersorLocationproperties.
e. Administrators –Fullsoftwareprivileges.
1.ClickonFileinthetopmenubar.2. SelectOperator.3. SelectAdd (+).4. Entertheoperatorname,passwordtwiceandselecttheprivilegelevel.ClickOK.

SK-NET™ Operating & Installation Guide
Secura Key • 71
8.3 System Activity Log
TheSystem Activity Log recordswhattheoperatorsofSK-NET™havebeendoinginthesoftware.ItrecordstheOperator,Date,Time,andwhatactionwasperformed.
1.ClickonFileinthetopmenubar.2. SelectOperator.3. SelectView Activity Log.4. Scrollupordowntoseeoperatoractivity.
SK-NET™ Operating & Installation Guide
Secura Key • 72
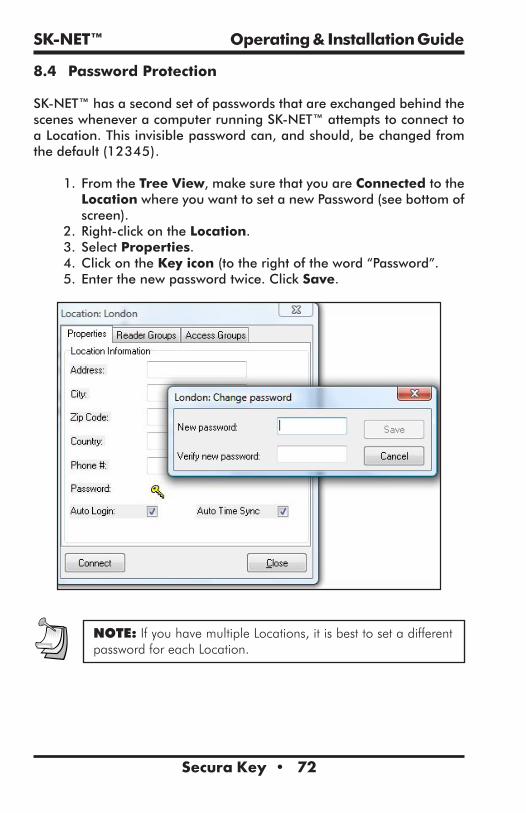
8.4 Password Protection
SK-NET™hasasecondsetofpasswordsthatareexchangedbehindthesceneswheneveracomputerrunningSK-NET™attemptstoconnecttoaLocation.Thisinvisiblepasswordcan,andshould,bechangedfromthedefault(12345).
1. FromtheTree View,makesurethatyouareConnected totheLocationwhereyouwanttosetanewPassword(seebottomofscreen).
2. Right-clickontheLocation.3. SelectProperties.4.ClickontheKey icon (totherightoftheword“Password”.5. Enterthenewpasswordtwice.ClickSave.
NOTE: If you have multiple Locations, it is best to set a different password for each Location.
SK-NET™ Operating & Installation Guide
Secura Key • 73
9. DIAGNOSTICS
9.1 Communicating with a Location
IntheTree View,aredtrianglenexttotheLocationicon(thelittleredbuilding)indicatesthatyouareconnectedtothatLocation.AlightningboltnexttoaConnection Groupmeansthattheconnectionisactive.
Agreencheckmarknexttoareadericonindicatesthatyouareloggedin to the reader. Being “logged in” means that complete, real-timecommunicationisoccurring,andthatall thestoredtransactionshavebeendownloadedtoSK-NET™.
Readericonswithred“X’s”throughthemarereadersthathavefailedtologin.
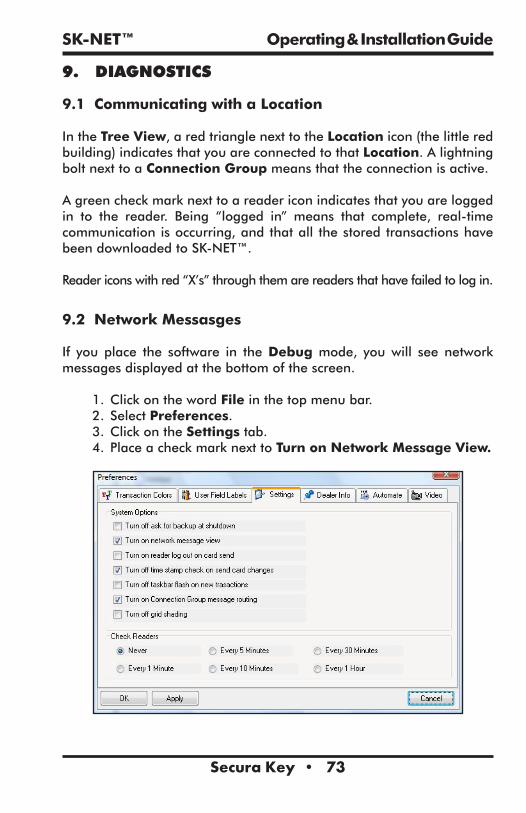
9.2 Network Messasges
If you place the software in theDebugmode, youwill see networkmessagesdisplayedatthebottomofthescreen.
1.ClickonthewordFileinthetopmenubar.2. SelectPreferences.3.ClickontheSettingstab.4. PlaceacheckmarknexttoTurn on Network Message View.
SK-NET™ Operating & Installation Guide
Secura Key • 74
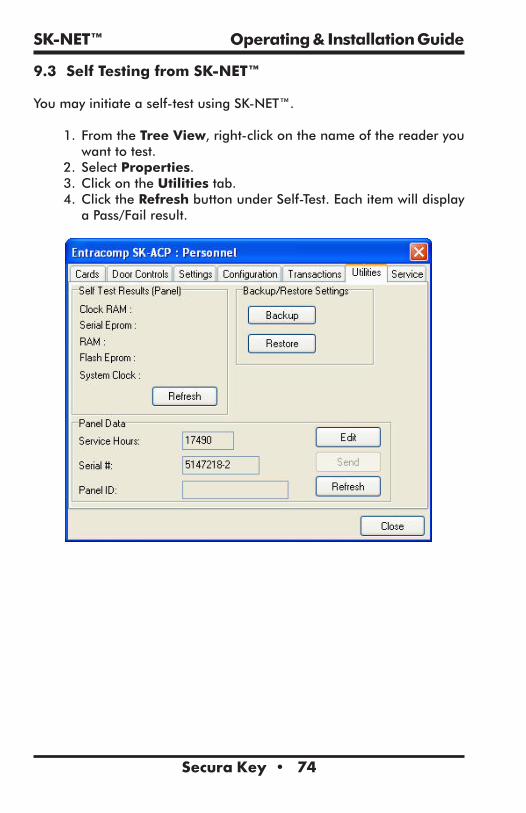
9.3 Self Testing from SK-NET™
Youmayinitiateaself-testusingSK-NET™.
1. FromtheTree View,right-clickonthenameofthereaderyouwanttotest.
2. SelectProperties.3.ClickontheUtilitiestab.4.ClicktheRefreshbuttonunderSelf-Test.EachitemwilldisplayaPass/Failresult.

SK-NET™ Operating & Installation Guide
Secura Key • 75
10. TROUBLESHOOTING
10.1 RS232/RS485 or LAN (TCP/IP) Communications Setup:
1.Fromthe Tree View,rightclickonAllReadersortheConnection Group(version4orhigher).
2.SelectProperties.3.ClickontheConnection Tab.4.Verifythereisacomportshowinginthe‘Connectusing’boxandthenrunthe Connection Wizard.
5.IftheWizardfindstheconnection,click OK, Apply.Youwillnowbeablecommunicatetoyourreaders.
LAN connection (version 4 only):1.FromtheTree View,rightclickonAll ReadersortheConnection
Group(version4orhigher).2.SelectProperties.3.ClickontheConnection Tab.4.SelectLAN-internet (TCP/IP)inthe‘Connectusing’boxandthenruntheConnection Wizard.
5.IftheWizardfindstheproperIPaddress,click OK, Apply. Youwillnowbeablecommunicatetoyourreaders.
10.2 RS232 Communications Failure:
Using RS-232 Voltage Measurements to Check for CommunicationProblems. If you cannot connect, itwill benecessary to take voltagemeasurementstoidentifywhethertheproblemiswiththeSK-ACP/28SA+orwiththecomputer.
Set-up for voltage measurements:1.From the Tree View, right-click onAll Readers or the
Connection Group (version4orhigher).2.SelectProperties.3.ClickontheConnection tab.4.Unchecktheboxnextto“Gateway (RS-232)”5.ClickontheConnectbutton.
Measure voltagesThesystemwillfailtoconnect,butintheprocessitwillopenthecomputer’sCOMport,makingthevoltagetestpossible.Measurevoltagesforthegatewayatthe28SA+terminalblockorJ7(ACP),communicationspins1to5.Connectthegroundleadtopin1(logicground)forallmeasurements.

SK-NET™ Operating & Installation Guide
Secura Key • 76
1.Pin2(ReceiveData,RXD).Thevoltageshouldreadbetween-5VDCto-12VDC.ThisvoltagecomesfromthePC.Ifthevoltageiswrongormissing, disconnect the reader from the PC, andmeasurethevoltagesatthereader(shouldbe0.0VDC)andatthePC(shouldbebetween-5VDCto-12VDC).
2. Pin3(CleartoSend,CTS).Thevoltageshouldreadbetween+5VDCto+12VDC.ThisvoltagecomesfromthePC.Ifthevoltageiswrongormissing, disconnect the reader from the PC, andmeasurethevoltagesatthereader(shouldbe0.0VDC)andatthePC(shouldbebetween+5VDCto+12VDC).
3. Pin4(RequesttoSend,RTS).Thevoltageshouldreadbetween-5VDCto-12VDC.ThisvoltagecomesfromtheCardReader.Ifthevoltageiswrongormissing,disconnectthereaderfromthePC,andmeasurethevoltagesatthereader(shouldbe-9.5VDC)andatthePC(shouldbe0.0VDC).
4. Pin5(TransmitData,TXD).Thevoltageshouldreadbetween-5VDCto-12VDC.ThisvoltagecomesfromtheCardReader.Ifthevoltageiswrongormissing,disconnectthereaderfromthePC,andmeasurethevoltagesatthereader(shouldbe-9.5VDC)andatthePC(shouldbe0.0VDC).
Check com ports using a different PC.1. AnotherquicktestyoucanruntoverifyifthefailureisthePCorthecardreadersystem,tryconnectinganotherPC,installSK-NETandjustruntheconnectionwizard(step1)toseeifitfindstheconnection.
Check com ports using a different 28SA+ or SK-ACP board1.Anotherquicktestyoucanruntoverifyifthefailureisthe28SA+/ACPboardorthecardreadersystem,tryconnectingadifferent28SA+/ACPboardandjustruntheconnectionwizard(step1)toseeifitfindstheconnection.
10.3 Login Failure (RS485)
1.IntheTree View,lookforaredarrownexttotheLocationicon.ThisindicatesyouareconnectedtotheLocation.
2.Clickonthe“+”nexttoAll ReadersortheConnection Group (version4orhigher).Ifthereadershowsagreencheckmark,thisindicatesthereaderisloggedin.Aniconwithared“X”indicateslostcommunicationswiththatreader.Ifthisoccurs,performaPowerResetforthereader.
SK-NET™ Operating & Installation Guide
Secura Key • 77
Power reset:Apowerresetdoesthreethings.1)itchangesthenodeIDtoeachreader,2)itdefaultsthereaderspasswordbackto12345,and3)itresetsthebaudratebackto38400.
1. Disconnectpowerfromthereaderorpanel(includinganybackupbattery)
2.Holddowntheresetbutton.3.Whileholdingtheresetbutton,restorepower.Continueholdingthebuttonforafewseconds.ThisprocedurewillchangethenodeIDforthereader(s).Youmustnowfindthereader(s)asnewtothesystemandthenclonethem.
To clone the readers after a power reset:1.FromtheTree View,rightclickonAll readersortheConnection
Group (version4orhigher).2.SelectNew.3.SelectReaders.4.SelectQuick Find (withlessthan20readers),orSearch(withmorethan20readers).
5.SK-NETwillfindtheoriginalreader(s)asnewones.6.ClickOK tobringthemintothesystem.Donotloginatthistime.7.LookunderAll ReadersortheConnection Group (version4orhigher) andyouwillnoticethatyounowhaveduplicatereader(s)names.TheoldonewillstillhavetheredXthroughtheicon,andthenewonewillnot.
8.DraganddroptheNew reader(s)ontotheoldreader(s)withthesamenamethathavetheredcheckmark.YouwillbeaskedtoReplace the reader,clickYes.Thiswillclonetheoriginalreadersettingsintothe‘new’ reader.RightclickontheLocationNameandselectLogin.Nowallthereadersshouldlog-inandshowagreenchecknexttoeachreader.
10.4 Data errors:
WhenreceivinganykindofdataerrorsafterstartingSK-Netorduringanyoperationsyouwillneedtorunthedatabaseutilitywhichwillre-indexallyourdatabasefiles.
1.ExitSK-NET2.LeftclickontheWindowsstartbutton.3.Select‘AllPrograms’4.LocateSK-Net5.Selecttorunthe‘DatabaseUtility’andclose.6.RestartSK-NET

SK-NET™ Operating & Installation Guide
Secura Key • 78
10.5 Card Send failures:
IftheSendUsersFullorSendUsersChangesfail,youwillneedtorunSK-NET’sdatabaseutilitywhichwillre-indexallyourdatabasefiles.
1.ExitSK-Net2.LeftclickontheWindowsstartbutton.3.Select‘AllPrograms’4.LocateSK-Net5.Selecttorunthe‘DatabaseUtility’andclose.6.RestartSK-Net
10.6 Replacing a 28SA+ or the SK-ACP
NOTE: Do not delete the original readers from SK-NET. Only replace one reader or ACP board at a time.
Afterreplacingthe28SA+orSK-ACPconnecttothelocationlikeyounormallywould.Youwillnoticethatthereader(s)willfailthelogin,thisistobeexpected.
1.Clickonthe“+”nexttoAll ReadersortheConnection Group (version4orhigher).Eachreadericonwillshowared“X”whichindicateslostcommunicationswiththereader(s).
Cloning the reader(s):1. From the Tree View, right click onALL Readers or the
Connection Group (version4orhigher).2.SelectNew.3.SelectReaders.4.SelectQuick Find(withlessthan20readers),orSearch(ifmorethan20readers).
5.SK-NETwillfindyournewreader(s).6 ClickOKtobringthemintothesystem.Donotloginatthistime.7. Look underAll Readers or theConnection Group (version4orhigher)andyouwillnoticethatyounowhaveaddedthenewreader(s)tothesystem.TheoldonewillstillhavetheredXthroughtheicon,andthenewone(s)willnot.
8.ClickonAll Readersor theConnection Group (version4orhigher)fromthetree.Ontherightsideofthescreen,youwillnoticeallofthereaderslistedwithname,nodeID,serialnumberetc.
SK-NET™ Operating & Installation Guide
Secura Key • 79
9.DraganddroptheNewreaderontotheoldreaderforthe28SA+,orthenew-1serialnumbertotheold-1serialnumberfortheACPboard.YouwillbeaskedtoReplace the reader,clickYes.Thiswillclonetheoriginalreadersettingsintothe‘new’reader.Repeatforthe-2serialnumberwhenusingtheACPboard.RightclickontheLocationNameandselectLogin.Nowallthereadersshouldlog-inandshowagreenchecknexttoeachreader.BesuretoSendUsersFull,andafterthejobhasbeencompletedthereadersarenowreadytobeused.
10.7 Power Reset
Apowerresetdoesthreethings:1)itchangesthenodeIDtoeachreader,2)itdefaultsthereaderspasswordbackto12345,and3itresetsthebaudratebackto38400.
1.Disconnectpowerfromthereaderorpanel(includinganybackupbattery)
2.Holddowntheresetbutton.3.Whileholdingtheresetbutton,restorepower.Continueholdingthebuttonforafewseconds.ThisprocedurewillchangethenodeIDforthereader(s).Youmustnowfindthereader(s)asnewtothesystemandthenclonethem.
To clone the readers after a power reset:1.FromtheTree View,rightclickonAll readersoraConnection
Group (version4orhigher).2.SelectNew.3.SelectReaders.4.SelectQuickFind(with less than20readers),orSearch(withmorethan20readers).
5.SK-NETwillfindtheoriginalreader(s)asnewones.6.ClickOK tobringthemintothesystem.Donotloginatthistime.7.LookunderAll ReadersortheConnection Group (version4orhigher)andyouwillnoticethatyounowhaveduplicatereader(s)names.TheoldonewillstillhavetheredXthroughtheicon,andthenewonewillnot.
8.DraganddroptheNew reader(s)ontotheoldreader(s)withthesamename.YouwillbeaskedtoReplace the reader,clickYes.Thiswillclonetheoriginalreadersettingsintothe‘new’ reader.RightclickontheLocationNameandselectLogin.Nowall thereadersshouldlog-inandshowagreenchecknext toeachreader.

SK-NET™ Operating & Installation Guide
Secura Key • 80
10.8 NET-CONV-P (RS232to RS485) Connection Failure
If you cannot connect and you are using the NET-CONV converter,measurethefollowingvoltages:
1.Measureinputvoltagefromtheconverterpowersupply,itshouldreadbetween9vdcto16vdc.
2.Measure voltage between ground (minus side of the powersupply)andTD(A),itshouldread0vdc.
3.Measure voltage between ground (minus side of the powersupply)andTD(B),itshouldread2.5vdcto5vdc.
If these voltages are not correct, disconnect J8 from all the ACP boards or disconnect the network connection from the 28SA+ readers and re-measure.
1.If thevoltageiscorrect, thenconnectonereaderatatimeandremoveany readerwhich causes the voltage to change. Thereader(s)whichcauseabigchangeinthevoltagemustbereplaced.
2.Ifthevoltageisstillbad,thenreplacetheconverter.
10.9 New transactions are not appearing on the Transaction Screen
Ifyouarenotseeingyournewest(oruptodate)transactionsthentrythefollowingprocedures:
Are your transactions being filtered?1.Fromthetransactionview,selectthefiltericon.2.Selectthedefaultbutton,clickOK.
Are you logged into your Location?1.Fromthetreeview,openAll ReadersortheConnection Group(version4orabove)toviewyourreadericon(s)andverifyeachreaderhasagreencheckmarknexttoeachone.
2.Ifreader(s)donothaveagreencheckmark(orhaveredlinesthroughthem)besurethatyouareconnectedtothatLocationorConnectionGroup(version4orabove).
3.If youare connected to the Location or Connection Group (version4orabove)thenclickontheloginiconlocatedonthetoolbartologin.
4.IfyouarenotconnectedtotheLocation or Connection Group (version4orhigher)thenhighlightitandselectconnect.

SK-NET™ Operating & Installation Guide
Secura Key • 81
Have you excluded any transactions?1.RightclickonAll ReadersortheConnection Group.2.ClickontheTransactiontab.3.ReviewalltheTransaction Types,toseeifthereareanywhichhaveacheckmarkontheboxbesideeachone.Ifyouwantthetransactiontoappear,uncheckthebox(s)andclose.
10.10 Cards show Void after creating a new Access Group
IfyouhaveaddedanewAccess GroupandtheusersforthatgroupareshowingvoidintheTransactionscreenreviewthefollowing:
Did you add the proper reader(s) in to the new group?1.fromthetreeview,clickontheAccess Group.2.Youwillneedtodraganddropthereader(s)intothenewgroupfromAll ReadersortheConnection GroupintothenewAccessGroup.Clickonthe(+ortriangle)nexttotheAccessGrouptoverifythatallthereader(s)arenowpartofthegroup.
3.ClickonSend Users Fulltoupdateyourusers.
Did you perform a card send?1.ClickonSend Users Fulltoupdateyouruser
10.11 Invalid Facility Code when using new cards
If you receive an Invalid FacilityCodemessage from the transactionscreen,performthefollowingsteps:
1.Gototothe28SA+orSK-ACPboardandtakeasamplecardwitheachfacilitycodebeingusedinthesystem.Presstheresetbuttonandwithin 8 secondspresenteachcardtothereaderwhilethereader (SecureKey) is flashing red/green.
2.GobacktothecomputerandselectthereaderwhereyoujustpresentedsamplecardswithalloftheFacility CodesandrightclickandselectProperties.
3.SelecttheService tab,andontherightsideyouwillseeallthecodesyouhaveentered.
Ifyouhavemorethanonereaderinthesystemperformthefollowing:1.ClickontheEdit button.2.Selectthe Send Allbutton,thiswillsendalltheFacilityCodestoallthereadersinthesystem.
3.Exit thereaderproperties,andbesuretosave the changes when prompted.

SK-NET™ Operating & Installation Guide
Secura Key • 82
11. REMOTE EYES VIDEO INTEGRATION
11.1 The Remote Eyes® DVR
The Remote Eyes®DVR,manufactured byOdyssey Technologies Inc.,integratesdirectlywithSK-NET™version3.05orhigher.SK-NET™capturesall real time transactions and downloads them into the transactiondatabase.InRemoteEyes®,thesametransactiondataisactuallyburnedintotheVideoClipallowingtheusertomatchthecardinformationwithavideoclipshowingthepersonusingthecard.ThisVideoClipandlivevideocanbevieweddirectlyfromSK-NET™alongwithgeneralsearchesofthevideoarchiveforeventssuchasparkinglotactivity.
11.2 SK-NET™ Set-up for Remote Eyes®
1. LeftclickonFileonthemenubar.2. SelectPreferences,selecttheVideotab,clickonthe+.
3. EnterHostIPAddress.ThisistheIPaddressoftheDVR.Portisalwaysequalto5025.
4.UserIDenter‘admin’.Passwordenter‘admin’(default).5. ConnectonLocationConnect,placeacheckmarkintheboxifyouwanttoconnecttoRemoteEyeswheneveryouconnecttoalocation.
6. TocreateCamera/ReaderAssignments,clickonthe+toaddacameraandnameittodescribethereaderitisviewing.

SK-NET™ Operating & Installation Guide
Secura Key • 83
11.3 Reviewing a Video Clip
TherearethreeiconsontheTransactionscreenthatcontroltheRemoteEyes® system. To launch a view of the video clip for the transactionselected,clickonthefirsticon.ThesecondiconlaunchestheRemoteEyes® application, and the third iconwill display live video from theRemoteEyes®system.
Warning: SK-NET™ software must be open and connected to the panels for the text insertion to take place in the video system.
Technical Support staff at Odyssey will assist new dealers in setting up the integration, including the SK-NET™ portion.
OdysseyTechnologies,Inc. TechnicalSupport 888-291-6379 Monday–Friday 9:00to5:00ET

SK-NET™ Operating & Installation Guide
Secura Key • 84
Appendix A - SK-NET™ FEATURES
SK-NET™isaWindows®(XPorgreater)compatiblesoftwareapplicationprogramdesignedtomonitorandcontrolanetworkofupto220SecuraKeyENTRACOMP®28SA-PlusSmartAccessControlUnits,or110SK-ACPTwoDoorAdvancedAccessControlPanels.
ThethreemainviewsthatSK-NET™usesare: SK-NET™Explorer/TreeView Transactions Users
SK-NET™ Explorerallowstheusertoconfigurethereadernetworkandcreateormodifyaccessgroupsandreadergroups.
TransactionsshowsreaderandsystemactivityfortheallLocations.
Usersshowswherecarduserdataisdisplayedandaccessprivilegescanbeenteredintothesystem.
SK-NET™ Explorer/Tree View shows the current configuration of allLocations,ConnectionGroups,ReaderGroupsandAccessGroups inthesystem.Itallowsyoutoadd,delete,configure,orchangeLocations,groupsorreaders.WhentheExplorer/TreeViewscreenisdisplayed,youmayusevarioustoolbarbuttonstoprintareaderreport,showpropertiesofselecteditems,deleteitems,connecttoordisconnectfromLocations,logintoorlogoutfromreaders,controldoorsforaselectedreadergrouporareader,orchangetheconfigurationdisplayformat.
TheSK-NET™Explorer screenisdividedintotwo sections:Theleftsideshowsthesystemconfigurationinanindentedmulti-levelformat(similartoWindows®Explorer).Eachlocation,group,orreaderisrepresentedbyanicononscreen.Therightsideofthescreenshowsindividualiconsforthecurrentlyhighlightedlocationorgroup.
SK-NET™ Operating & Installation Guide
Secura Key • 85
Thehighest level in theExplorer TreeView configurationwindow isSK-NET™(theentiresystem)whichincludesalllocations,groups,andreaderscontrolledfromthePCbeingused.
ThesecondhighestlevelisLocation.Alocationincludesallreadersonasinglenetworkconnected to thePCviaasingleCOMport,TCP/IPaddressorasinglemodemlocation.EachLocationcancontainupto12828SA-PLUSunitsor100SK-ACPtwo-doorpanels.A red triangle adjacent to the Location icon indicates that you areconnectedtothatLocation.Greencheckmarksnexttoindividualreadericonsindicatethatyouare“loggedin”tothosereaders.Beingloggedinmeansthattransactionsstoredinthereaderhavebeencopiedintothesoftwareandthatyoumayviewtransactionsastheyoccur intheTransactionscreen.
The third level in the system is Groups.EachLocationcontainsfourdefaultGroups:INandOUTReaders,MasterUsersandVoidUsers.
ConnectionGroupsdefineameanstoaccessareadergateway.TheycontainallreadersthatarevisiblethroughthereadergatewayviaRS-232,LANconnectionorbymodem.IntheMultipleLocationandClient/Serversystems,morethanoneConnectionGroupcanbecreatedandconnectedsimultaneouslybyconnectingtheLocations.
Becausereaderscanbelongtomultiplegroups,youwillseethesameiconappearingseveraltimesinthesystemconfigurationdisplay.
ToexpandSK-NET™,aLocation,oraGrouptothedetaillevel,clickonthe“+”iconjusttotheleftoftheitemyouwanttoexpand.The“+”iconchangesto“-“whenitisexpanded.Ifthereisno“+”or“-“iconnexttoaLocationorGroupthatindicatesthatnothinghasbeenassignedtothatLocationorGroup.
TheTransaction Viewshowsthelatestsystemeventsastheyoccur,fortheLocationwhichiscurrentlyconnectedtoSK-NET™.
Systemevents includecardusage, inputpointstatuschanges,readerstatuschanges,andsystemmessages.
Eacheventisdisplayedonasingleline,andincludesthetimeanddateof theevent, cardnumber (for card transactions),UserName (if the

SK-NET™ Operating & Installation Guide
Secura Key • 86
nameisstoredinthedatabase),TransactionType(whathappened),andReaderID/Location(nameofthereaderandtheLocationtowhichthereaderisconnected).
The Transaction Window allows you to view the entire TransactionDatabase,byusingthenavigationbuttonsorthescrollbartobrowsethroughthetransactionrecords.
TransactionDatabaseoptionsincludePrintTransactionReports,Erase,ChangeColors,andZoomIn.
TheTransactionWindownormallyshowsdataforallLocations(whenfiltering isnotapplied). WheneverSK-NET™connects toa Location,allnewtransactionsstoredatthereadersareautomaticallyuploaded.
The User ViewallowsyoutodisplayorchangetheCardUserDatabase.Youcanaddnewcardusersoreditcurrentuserrecords.YoumayusethescrollbarornavigationbuttonstoviewtheentireCardUserDatabase.Youcanalsoprintuserreports,searchforanindividualuser,oroptionally,selectuserdatabasesformultiplelocations.
TheUserViewdefaultstoaListformat,onelineperrecord.IfyouclickonZoom,theUserDetailScreenisdisplayedforthecurrentlyselecteduser.Youcanalsoselectauserfromthelistanddouble-clicktodisplaytherecord inUserDetail format. Editingoraddingcards isdonebydisplayingtheUserDetailscreen.TheNavigationbuttonsworkineitherListorUserDetailformat.

SK-NET™ Operating & Installation Guide
Secura Key • 87
Appendix B - WORKING IN WINDOWS
SK-NET™usesmanycommonfunctionsavailableinWindows®.ForuserswhoarenewtoWindows®softwarethesearethefunctionsyouwillneedtoknowtouseSK-NET™.
ICONS and TOOL BARS:Iconsarelittlepicturesthatrepresentfunctionsorfilesinthesoftware.MostoftheoperationsyouwillperforminSK-NET™beginbypointingatandclickingonanicon.MosticonsinSK-NET™willdisplaya“prompt”,aworddescriptionoftheicon,whenyoupointthecursoratit.
ToolbarsappearatthetopandontheleftsideofeachscreeninSK-NET™.Toolbarscontainiconsthatallowyoutoperformfunctionsoropenfilesintheprogram.Thetopmosttoolbarwillbecomprisedofwords.Clickingonthesewordsbrings“drop-downmenus”listingfunctionsthatyoumayselect.
MOUSE BUTTONS:Whenwedirectyouto“CLICK”onsomething,wemeanthatyoumoveyourcursorwiththemousetopointatthatitemandthenyoutaptheleftbuttononthemouseonce.Thisisusuallydonetoselectorhighlightanitem.Whenwetellyouto“DOUBLE CLICK”,theonlydifferenceisthatyoutapontheleftbuttontwiceinrapidsuccession.Thisisusuallydonetolaunchaprogramortostartafunction.
Whenwe tell you to“RIGHT CLICK”, tapon the rightmousebuttononce.Thisisusedtobringupamenuboxthatpertainstotheitemyouarepointingat.
Whenwetellyouto“DRAG-AND-DROP”youfirstpointthecursorattheitem,thenholddowntheleftmousebuttonand,whileholdingthatbuttondown,movethecursortothelocationwhereyouwantto“drop”theitemyouare“dragging”.Whentheitemisinthenewlocation,releasetheleftmousebuttonto“drop”it.Weusedrag-and-dropintheExplorerscreentomake iteasy foryou toadd individual readers toaccessgroupsandhardwaregroups.
EXPLORER:OneoftheprincipalscreensinSK-NET™isSK-NETEXPLORER.Thisviewismodeledafterthewell-knownWindows®Explorer.Ontheleft-handsideofthescreenyouwillseealloftheelementsofyoursystemina

SK-NET™ Operating & Installation Guide
Secura Key • 88
“tree”format.Ifaniteminthetreehasaplus(+)orminus(-)symbolnexttoit,itrepresentsafolder.Clickingonthe+symbol“opens”thatfolderanddisplayswhatisinside.Forexample,thefoldercalled“New Connection1”maycontainaniconforeveryreaderinthesystem.Clickingonthe+symbolnexttotheNew Connection1iconwilldisplayiconsforeachreader,underneaththeNew Connection1heading.
On the right-hand sideof the screenyouwill see icons representingwhicheverpartoftheExplorertreeyouhavehighlighted.For,example,ifyouCLICKonNew Connection1,theright-handsideofthescreenwilldisplayoneiconforeveryreaderinthatConnection Group.
HELP:SK-NET™hasextensivehelp,whichyoucanaccessbyclickingonHelponthetopmenubar,orbypressingF1.Muchoftheinformationinthismanualisalsoincludedintheon-lineHelpSystem.
Tolearnmoreaboutthefunctionsofvariousiconsor“buttons”,clickonHelporpressF1,selectContents,GettingStarted,thenSK-NETTMDesktop.PressingF1inthemainwindows(Explorer,TransactionsorUserManager)alsoofferscontext-specifichelpforthosescreens.

SK-NET™ Operating & Installation Guide
Secura Key • 89
SK-NET™ - GLOSSARYAccess Group–Asetofcardholderswhoarevalidatthesamereadersandhavethesametimezonerestrictions.Groupsareidealformulti-departmentalfacilitieswithdifferenttimeschedules.Section 5.14
Block Of Cards–Acontiguousgroupofcardsinsequentialcard-numberorder.Section 3.5
Connection Group –ConnectionGroupsdefineameanstoaccessareadergateway.ItcontainsallreadersthatarevisiblethroughthereadergatewayviaRS-232,LANconnectionorbymodem.SeeAppendixA.
Connection Wizard – A special function where SK-NET softwareautomaticallygoesthroughthevariousCOMportsandbaudratesonyoursystemtomakeaconnection.Thisfunctioncanbefoundbyright-clickingaLocation,selectingProperties,choosingtheConnectiontab,then clicking on theConnectionWizard icon.NOTE: The conncetionwizardcannowsearchforLANconnections.Section 3.2
Door Controls –Agroupofcommandsthataffectthedoororgateataconnectedlocation.Doorcontrolscanbeinitiatedinrealtime,usingtheSK-NETsoftware.Thesystemoperatorhasthecapabilityofcontrollingwhetherisadoorisunlockedorlocked,andwhetherthereaderisinactiveoractive.Section 5.30
Door Schedule–A timezonethat isspecificallyassignedtoadoor,whichcausesthedoortoautomaticallylockandunlockaccordingtoaregularweeklytimeschedule.Section 5.18
Hardware Password–ThedefaultpasswordforyourSK-ACPor28SAPlusreaderis“12345”.Section 8.4
Holidays –Thesystemoperatorcanenterupto32holidaysthatwillusetheHolidayScheduleinthesystemtimezones,insteadofthenormalscheduleforthedayoftheweek.ThisallowsaccesstoberestrictedordifferentthannormalonHolidays.Section 5.20
“IN” / “OUT” Readers–Whenaroomorareahasreadersonbothsidesofeachdoortocontrolbothentryandexit,thereaderscontrollingentrycanbeassignedtoanINgroup,andreaderscontrollingexitcanbeassignedtoanOUTgroup.ThisallowstheaccesscontrolsystemtotrackthestatusofeachcardholdertodetermineifthecardholderisINorOUTofthearea.Italsoallowsthesystemtocontrolthecardholder’sdirectionofmovementandtopreventcardpassbackbyinvokingtheAnti-Passbackfeature,whichpreventsanINorOUTreaderfrombeingusedtwiceinsuccessionbythesamecardholder.Section 5.25

SK-NET™ Operating & Installation Guide
Secura Key • 90
Inputs–ThesearecircuitsthatconnectexternalsensorsorswitchestoanSK-ACPor28SA-Plus.Statuschangesonthesecircuitscaninitiatespecialfunctionsorgeneratemessagesinthetransactionsscreen.Variousinputtypescanbedefined, includingTamper,Arming (loopdetector),doormonitor, request-to-exit (remoteopen),Bell, Remote Inactive (disablereader),andUserDefined. Section 5.31
Limited Use Cards–Acontiguousrangeof4000cardscanbedefinedtohavethisfeature.Thesecardsarevalidforaspecificnumberofuses,daysorweeks.Afterthepresetlimitisreached,thecardsbecomevoid.Limitedusecardscanbedefinedforasinglelocationorasinglereader.Section 5.8
Location –AlocationisagroupSK-ACPpanels(andconnectedreaders)or28SA-PlusreadersnetworkedtogetherviaRS-485andoperatingasaunifiedsystem.Section 4
Output (relay) – Relays are electromagnetically controlled switcheslocatedontheSK-ACPcontrolpanel.Whenactuated,theycompletepowercircuitsconnectingexternaldevicesandtheirexternalpowersupplies,operatingdoorstrikes,gateactuators,andannunciators(horns,bells,orflashers).TheSK-ACPhasalatchrelayandanauxiliaryrelay.Thelatchoraccessrelayisactuatedwhenacardaccessrequestisgranted.Theauxiliaryrelaycanbeconfiguredtoactivateforvariousconditionssuchasemulatingthestatusofaninput,orforanalarmconditionsuchasdoor-held,door-forced,emergencyexit,erroralarm,tamperalarm,oracardtransactioninaspecifiedrange,etc.Section 5.33
Reader Group-Asetofreaderscreatedforthepurposeofdefiningcommonpropertiesforthosereaders.Section 5.28
Real Antipassback (RAPB)–ThisfeaturecanbeassignedtoaTimeZone,anditcontrolscardholdermovementusingdesignatedINorOUTreaders.IfacardwaslastusedatanINreader,itmustbeusedatanOUTreaderbeforeitwillbevalidatanINreaderagain.Thisfeaturewasoriginallydevelopedforparkinggaragestopreventanauthorizedcardholder frompassinghis cardback toanunauthorizeduserafterenteringthelot.Section 5.9
Real Antipassback Forgive–Thiscommandresetsallcardstoaneutralin/outstatus,allowingthenextcarduseateitheranINorOUTreader.Itcanbeinvokedforallreadersorforaspecificreader.Itcanbescheduledtooccurdailyataspecifiedtime(usuallyearlyinthemorning)oritcanbemanuallyinvokedforallcardholders,aspecificcardholdernumberrange,orforasinglecardholder.Section 5.10

SK-NET™ Operating & Installation Guide
Secura Key • 91
Renaming Readers–AfterSK-NET™initiallylocatesreaders,itassignsthedefaultnameforthereaders,whichisusuallytheserialnumberwithadashoneordashtwoindicatingconnectiontotherightorlefthandreaderinput.Itisrecommendedthatthesystemoperator“rename”theirreaderswithameaningfulname(suchastheirphysicallocation)tobetteridentifythemwhendoingmaintenance.Section 3.3
SK-NET-DM–ThisversionofSK-NET™isprimarilyusedfora“directconnect”fromtheaccesscontrolsystemtotheCOMportonasinglecomputer.AsingleTCP/IPconnectionisalsoallowed.Section 1.2
SK-NET-MLD–ThisversionofSK-NET™isneededwhentherearemultiplelocations,andsomelocationsareconnectedtothecomputerusingamodemoraLANadapter.ItisrequiredformultipleTCP/IPconnections.Italsoincludesbadgeprintingcapabilities.Section 1.2
SK-NET-MLD- CSXX – This is theClient/Server versionofSK-NET™,whichisusedwhentherearemultiplelocations,andmorethanoneuserneedstoaccessthedatabasesimultaneously.TheSK-NET™databaseisloadedonaServercomputer,andmultipleClientWorkstationscanaccesstheServeronthesamenetwork.Client/Serverlicensescanbepurchasedfor2,5,10,or15workstations.Section 1.2
Software Password–UponopeningtheSK-NET™software,youwillbepromptedtoenterausernameandpassword.Thedefaultusernamewhenfirstopeningthesoftwareis“admin”,andthepasswordis“12345”.Section 3.1
Timed Antipassback (TAPB)–ThisfeaturemustbeassignedtoaTimeZone2to15.AfteracardisusedatareaderwithTimedAntipassback,thatcardwillnotbevalidatthatreaderforapredeterminedamountoftime.Section 5.8
Time Zone–Aschedulethatdetermineswhichdaysoftheweekandhoursofthedaythatacardholdercanobtainaccessatanassociateddoor.Eachweekdayisdividedinto48half-hoursegmentsthatcanbedefinedasVoidorValidforaccessbythesystemoperator.AHolidaytimeschedulecanalsobedefinedforeachTimeZone(seeHoliday).Section 5.2
Transactions–Thesearevarioussystemevents,suchascardholderaccessgranted/denied,alarmstatuschanges,powerfailures,doorlock/unlockcommands,etc.,whicharestoredintransactionhistorywiththetimeanddatethattheyoccurred.Reportscanbeprintedandsavedineither.pdfor.xlsformat.Section 7

SK-NET™ Operating & Installation Guide
Secura Key • 92
SYSTEM COMPONENTS
PANELSSK-ACP-LE LargeenclosureSK-ACP-NE Noenclosure(boardonly)
SOFTWARESK-NET-DM BasicSK-NET™withDisk&ManualSK-NET-MLD SK-NET™w/Multi-Location,Dial-UpandmultipleTCP/
IPCommunications,For1User,includesIDBadgePrintingCapability
SK-NET-MLD-C/SMultipleUserWorkstations,MultipleLocationsviaDial-UpModemandMultipleTCP/IPCommunications
(2,5,10,15userlicensesavailable)
ACCESSORIESNET-CONV-P: RS232toRS485converterwithpowersupplySK-MDM: External56KmodemSK-LAN-MOD: NetworkAdapter,plug-inSK-WLS-MOD: WirelessLANAdapter,plug-inCBLSA: CablekitforusewithlaptopcomputersSK-QUICKCONN:DB9toRJ116’cable-LaptoptoSK-ACPSK-PLUG9: DB9femalecomputerconnectorSK-USB: USBtoRS-232converterforcomputerswithoutCOMportsSK-LOCK: OptionallockandkeysforSK-ACPenclosureSK-ACP-PS: PowersupplykitincludingtransformerandbatterySK-24VDC: 24VDC,500mAplug-inpowersupplySK-XFRMR: 16.5VAC,40VAplug-intransformerw/ground (MustbeusedwithSK-DCPWR)SK-DCPWR: FilteredDCpowersupplyboard (MustbeusedwithSK-XFRMR)DTK-XR: Surgeprotectionforpower,dataandphonelinesDTK-CR: SurgeprotectionforcardreadersandkeypadsSK-BAT: 2.0AH–12VDCbatteryonly
