skilled trades 1201 - newfoundland and · pdf filetopic 2 carpentry - floor ... program to...
TRANSCRIPT

Skilled
Trades
1201
Curriculum Guide (interim)September 2008
Government of Newfoundland and Labrador
Department of Education


ContentsSection I: ......................................................................................................1
Program Overview and Rationale ..............................................................................................1
Background ............................................................................................................................1
Rationale ................................................................................................................................1
Purpose of the Curriculum Guide ..........................................................................................2
Technological Literacy, Capability, and Responsibility through the Skilled Trades ..................2
Context for Learning and Teaching .........................................................................................4
Meeting the Needs of all Learners ........................................................................................6
Effective Assessment and Evaluation Practices ....................................................................6
Professional Development .....................................................................................................8
Section II: .....................................................................................................9Curriculum Design and Components .........................................................................................9
Outcomes Structure ..........................................................................................................9
Essential Graduation Learnings (EGLs) ................................................................................10
General Curriculum Outcomes (GCOs) ................................................................................ 11
Key Stage Curriculum Outcomes (KSCO’s) ......................................................................... 11
Section 3: ....................................................................................................15Specifi c Curriculum Outcomes ................................................................................................15
Program Components ..........................................................................................................15
Timeline for Skilled Trades 1201 .......................................................................................16
Specifi c Curriculum Outcomes ........................................................................................16
Using the Four Column Layout ............................................................................................16
Specifi c Curriculum Outcomes ........................................................................................17
Suggested Teaching-Learning Strategies .........................................................................17
Suggested Assessment Strategies ..................................................................................17
Resources ........................................................................................................................17
Unit 1 Apprenticeship and the Skilled Trades ...........................................................................19
Unit 1 Overview ...................................................................................................................19
Organization .....................................................................................................................19
Assessment .....................................................................................................................19

Topic 1 Apprenticeship Program ......................................................................................20
Topic 2 The Skilled Trades .................................................................................................24
Topic 3 Courses Common to all Skilled Trades .................................................................26
Topic 4: Focus on 6 Specifi c Skilled Trades ......................................................................42
Unit 2 Skills Common to all Trades ..........................................................................................47
Unit 2 Overview ...................................................................................................................47
Organization .....................................................................................................................47
Assessment .....................................................................................................................47
Topic 1 Technology and the Workplace .............................................................................48
Topic 2 Reading Blueprints and Drawings ........................................................................62
Topic 3 Working in the Technology Lab ............................................................................91
Unit III: Skill-building in Selected Trades ................................................................................105
Unit 3 Overview .................................................................................................................105
Organization ...................................................................................................................105
Assessment ...................................................................................................................105
Topic 1 Experiencing the Trades Modularly ....................................................................106
Topic 2 Carpentry - Floor Construction ...........................................................................108
Topic 3 Carpentry - Wall Framing ...................................................................................126
Topic 4 Carpentry - Roof Framing...................................................................................144
Topic 5 Construction Electrician - Circuits ......................................................................164
Topic 6 Construction Electrician - Residential Wiring .....................................................182
Topic 7 Plumber - Toilet Installation ................................................................................206
Topic 8 Plumber - Sink Installation .................................................................................222
Topic 9 Lather ................................................................................................................236
Topic 10 Painter-Decorator .............................................................................................246
Topic 11 Masonry - Ceramic Wall Tile Installation ...........................................................268
Topic 12 Masonry - Ceramic Floor Tile Installation .........................................................286

Section 1: Program Overview and Rationale
Skilled Trades 1201 1
Section I:
Program Overview and Rationale
Background Skilled Trades 1201 is grounded in the Foundation for the Atlantic Canada Technology Education Curriculum. The teacher is directed to the Foundation document for specifi c information that forms the basis for this course. The Foundation is referenced at appropriate points in this document. As well, the Specifi c Curriculum Out-comes that form the basis of the course are each refer-enced to the Key Stage Curriculum Outcomes in the Foundation.
Skilled Trades 1201 has been developed to give students a sense of the prescribed skilled trades and the Red Seal skilled trades. It provides a more detailed depth of treat-ment for six of the trades by referencing them to stan-dard practices in residential construction.
Skilled Trades 1201 is grounded in the Foundation for the Atlantic Canada Technology Education Program. The foundation articulates technology as the human constructed world which consists of knowledge, pro-cesses and products, and Technology Education as a program to enable K-12 students to make sense of their technological environment.
Knowledge of needs and wants drives humans to modify their environment to meet those needs and wants. Knowledge of the resources needed to meet the needs and wants enables them to succeed. Use of resources requires knowledge of a wide range of technological pro-cesses ranging from the broadest technological problem
Rationale

Section 1: Program Overview and Rationale
2 Skilled Trades 1201
solving and design to the most minute detail of how to use a tool.
Technological processes include processing of materials by separating, shaping, combining and fi nishing them; management of projects; encoding information with as-sorted text, image and video tools, and following safety protocols.
Technological products are ‘visible’ aspects of technol-ogy. They range from clothes and food to microbes and spaceships. The most visible part of the built world includes buildings, roadways, vehicles, and all those ap-pliances, large and small, that we take for granted.
Much of this highly visible built environment is built and maintained by people working in the skilled trades. This course introduces students to the world of the skilled trades and lets them experience how skilled tradespersons interact with, and employ a wide variety of technological knowledge, processes and products in their daily work.
This curriculum guide serves three broad purposes
It provides a set of outcomes which articulate a level of expected achievement for students It provides teachers with student activities, back-ground information, resources, and references which help them plan and implement the course. In addition it provides recommendations for stu-dent assessment which helps to determine how well a student has meet the outcomes
Most defi nitions of literacy describe it as being able to read, write and communicate. The standard is not usu-ally defi ned. However, one may infer that for literacy to be of use, it has to endow the literate person with the skills to read and write with technology and be at least conversant about the issues that vex that society. In a technologically sophisticated society that means being
•
•
Purpose of the Curriculum Guide
Technological Literacy, Capability, and Responsibility through the Skilled Trades

Section 1: Program Overview and Rationale
Skilled Trades 1201 3
able to use and understand a wide array of technological systems and resources.
Technology education (Foundation) posits that basic reading and writing is only the beginning of the broader context of literacy. Technological literacy gives people a broader understanding of the issues and impact of technological systems and change and the skill to com-municate using various technologies. Technologically literate people
understand the role and nature of technology understand how technological systems are designed, used, and controlled critically examine technologies respond rationally to ethical dilemmas caused by technology
Technology education further defi nes technologically capable people as those who
respond in innovative and inventive ways by em-ploying iterative technological problem solving strategies exhibit attitudes and behaviours that are conducive to solving problems when the solutions are not obvious or there are multiple solutions rationalize decisions and predict the effects of tech-nological action
A quick look at programmes of studies and workplace activities for any of the skilled trades reveals that the skilled trades person embodies these descriptors for a specifi c area of technology. They communicate in and about their area of speciality using the lingua franca of that trade (spoken, written and technical drawings). They make decisions and create solutions, sometimes innovatively, and they are held accountable for their actions by their employers and clients and by codes and regulations.
By giving students both a high level understanding all trades, and a look at the details of selected trades, Skilled Trades 1201 lays a foundation for students to develop introductory technological literacy, capability and responsibility in the trades.
••
••
•
•
•

Section 1: Program Overview and Rationale
4 Skilled Trades 1201
Technology education curriculum in Atlantic Canada adheres to certain principles that guide decisions shap-ing the continuous improvement of learning and teach-ing. These principles guide the design and implementa-tion of the curriculum and include:
Authenticity. The skilled trades person acquires a particular body of knowledge, skills, and values which, taken together, provide a particular techno-logical literacy and capability essential to work in that trade. This course attempts to replicate selected elements which give the student a feel for the world of work unique to that trade and the relationship of that world of work to formal study leading towards improving chances for success. Unity. Just as the apprenticeship programs for the skilled trades make connections across different bodies of knowledge and practice, ranging from the academic to the practical, and from personal quali-ties to interpersonal relationships, so do courses in technology education. Skilled Trades 1201 ac-complishes this by setting up individual and group activities which require development of technical knowledge and skills in concert with more refl ective and contemplative personal activities. Constructivism. Learning experiences in this course refl ect the reality of the trades. Students engage actively in translating the abstract world of design, descriptions, drawings and discussions into the physical world of structures, circuits, fi nishes, and plumbing water supplies. By responding to under-standings of need and want and translating that into technological structures and systems, they build a deep and rich understanding of technology as intel-lectual and physical processes Collaboration. Technology is a collaborative endea-vour. It is created, assessed, used, bought, sold, and discarded by individuals and groups. It is a collab-orative process that defi nes our society. The skilled trades are an integral part of that societal process. Skilled workers function in teams on jobs large and small, in shifts and in scheduled and cascaded processes where the work of one trade must be done before another can begin, and when several trades work simultaneously, each co-dependant on the
•
•
•
•
Context for Learning and Teaching

Section 1: Program Overview and Rationale
Skilled Trades 1201 5
other. The diversity and complexity of collaborative processes is replicated in controlled ways in Skilled Trades 1201 Autonomy. Learners in Skilled Trades 1201 are engaged in managed and independent learning ac-tivities. Students are expected to exercise autonomy commencing with initial simpler activities and con-cluding with more complex projects that they plan and execute in individual and team settings. Continuous Inquiry. Technology is in constant fl ux and is growing logarithmically. New materials, new tools and techniques, new policies and codes are an expected part of the life of the skilled trades-person, as is the need for constant recertifi cation. Skilled Trades 1201, like all technology education courses embeds continuous inquiry a standard tech-nique in technological problem solving. Continuous Improvement. Continuous improve-ment is a learned process. It is fostered in technol-ogy education by embedding self-review and any-time revision/updating of a project or activity. At all key phases of a project, mechanisms are embed-ded to enable and encourage students to understand the consequences of decisions and to revise thinking and practice based on that understanding. Assess-ment and rubrics refl ect this approach Continuous Learning. As technology changes, our world changes. Our means, and our methods, of communication, travel, play, work, relating to one another, and even living change as well. The need to constantly learn is not just for some, but for all.
•
•
•
•

Section 1: Program Overview and Rationale
6 Skilled Trades 1201
The Foundation document clearly elaborates a vision for Technology Education in the province of Newfoundland and Labrador, which fosters the development of techno-logically literate and technologically capable members of society. This vision does not discriminate with respect to ability, race, gender, ethnicity, values, lifestyle, or language. Technology education meets diverse needs of children of all levels of ability by
providing an environment that refl ects those needs through curriculum development, fosters attitudes of acceptance and tolerance, and provides an expectation of success.
Skilled Trades 1201 blends the development of knowl-edge, skills and capabilities through a hands-on ap-proach. A signifi cant portion of the students time is spent in a technology lab, engaged in activities that employ a wide variety of tools, equipment and materi-als. Some of those tools have safety requirements which are managed by requiring 100% responses on written, verbal and performance test for those tools prior to use. This makes for a safe, demanding, but highly rewarding environment, where attention to one’s surroundings is of primary importance. Student safety is of paramount importance. The safety regime for the lab requires that proper procedures are understood and implemented by all students.
The outcomes identifi ed in this curriculum guide pro-vide the basis for achievement of key stage and general curriculum outcomes identifi ed in the foundation docu-ment. Skilled Trades 1201 meets the needs of a broad cross-section of abilities and may include students that are identifi ed with exceptionalities.
Assessment is the systematic process of gathering information on student learning.
Evaluation is the process of analysing, refl ecting upon, and summarizing assessment information, and making judg-ments or decisions based upon the information gathered.
The assessment process provides the data, and the evalu-ation process brings meaning to the data. Together, these processes improve teaching and learning. If we are
•
••
Effective Assessment and Evaluation Practices
Meeting the Needs of all Learners

Section 1: Program Overview and Rationale
Skilled Trades 1201 7
to encourage enjoyment in learning for students, now and throughout their lives, we must develop strategies to involve students in assessment and evaluation at all levels. When students are aware of the outcomes for which they are responsible, and the criteria by which their work will be assessed or evaluated, they can make informed decisions about the most effective ways to demonstrate their learning.
Assessment and evaluation are essential components of learning and teaching in technology education. Without effective assessment and evaluation it is impossible to know whether students have learned, whether teach-ing has been effective, or how best to address students’ learning needs. The quality of assessment and evaluation in the educational process has a profound and well-es-tablished link to student performance. Research consis-tently shows that regular monitoring and feedback are essential to improved student learning. What is assessed and evaluated, how it is assessed and evaluated, and how results are communicated send clear messages to students and others about what is really valued—what is worth learning, how it should be learned, what elements of quality are considered most important, and how well students are expected to perform.
Teacher-developed assessments and evaluations have a wide variety of uses, such as
providing feedback to improve student learning determining whether curriculum outcomes have been achieved certifying that students have achieved certain levels of performance setting goals for future student learning communicating with parents about their children’s learning meeting the needs of guidance and administrative personnel
[Excerpted from the Foundation for the Atlantic Canada Technology Education Curriculum document (page 32).]
••
•
••
•

Section 1: Program Overview and Rationale
8 Skilled Trades 1201
Professional development is a continuous process. Time, experience, and willingness to continuously im-prove are important elements.
Technology Education teachers need to have multiple profi ciencies, ranging from theory to pedagogical prac-tice, from knowledge of course content to capability with the tools and techniques that students are expected to use. Skilled Trades 1201 teachers need to manage shop equipment and the students using that equip-ment. They need to guide students through open-ended design, planning and fabrication, and be able to dem-onstrate safe practices for all applications of the tools, equipment and procedures of a trade. They need to manage parallel streams of course content while mul-tiple groups of students engage in different activities.
The technology education lab, is a busy place with many things happening simultaneously. What may seem at fi rst like chaos, is actually quite structured and organized.
Professional Development

Skilled Trades 1201 9
Section 2: Curriculum Design and Components
Section II:
Curriculum Design and Components
Curriculum content and student activities are defi ned with respect to a structure of curriculum outcomes (Figure 1). The essential components of the outcomes structure are:
EGLs. Essential Graduation Learnings are state-ments describing the knowledge, skills, and at-titudes expected of all students who graduate from high school.GCOs. General Curriculum Outcomes are state-ments that identify what students are expected to know and be able to do upon completion of study in a curriculum area.KSCO’s. Key Stage Curriculum Outcomes provide additional detail for each of the GCOs. There are four Key Stages - Key Stage 1 (K-Grade 3), Key Stage 2 (Grades 4-6), Key Stage 3 (Grades 7-9), and Key Stage 4 (Grades 10-12). Key Stage Curriculum Outcomes provide a means to quickly assess prog-ress in a subject area at the end of a level of school-ing.SCO’s. Specifi c Curriculum Outcomes are state-ments which describe knowledge, skills, and at-titudes, in measurable terms, that students should possess upon completion of a grade level or course.
•
•
•
•
Outcomes Structure

10 Skilled Trades 1201
Section 2: Curriculum Design and Components
C lusterEGL
GC O
KSC O
SC O
Subject Area
Key Stage
C ourse
Organizer
T/L StrategiesSet of SC Os A/E Strategies R esourcesN otes
VignettesActivities
Figure 1 Curriculum Outcome Structure
Essential Graduation Learnings are documented in the Outcomes section of the Foundation for the Atlantic Canada Technology Education Curriculum (2001) docu-ment. The Essential Graduation Learnings (EGL’s) are:
Aesthetic Expression. Graduates will be able to respond with critical awareness to various forms of the arts and be able to express themselves through the arts Citizenship. Graduates will be able to assess social, cultural, economic, and environmental interdepen-dence in a local and global context. Communication. Graduates will be able to use the listening, viewing, speaking, reading, and writing modes of language(s), and mathematical and sci-entifi c concepts and symbols, to think, learn, and communicate effectively. Personal Development. Graduates will be able to continue to learn and to pursue an active, healthy lifestyle. Problem Solving. Graduates will be able to use the strategies and processes needed to solve a wide vari-ety of problems, including those requiring language, and mathematical and scientifi c concepts. Technological Competence. Graduates will be able to use a variety of technologies, demonstrate an un-derstanding of technological applications, and apply appropriate technologies for solving problems.
•
•
•
•
•
•
Essential Graduation Learnings (EGLs)

Skilled Trades 1201 11
Section 2: Curriculum Design and Components
Spiritual and Moral Development. Graduates will be able to demonstrate understanding and apprecia-tion for the place of belief systems in shaping the development of moral values and ethical conduct.
Reference to the Foundation for the Atlantic Canada Technology Education Curriculum (2001) document is encouraged
Technology Education curriculum in the Atlantic Provinces is defi ned in terms of fi ve General Curriculum Outcomes (GCO’s). These defi ne the intent and focus of the Technology Education Program and apply from Kindergarten to Grade 12.
They are:
GCO 1: Technological Problem Solving. Students will be expected to design, develop, evaluate, and articulate technological solutions. GCO 2: Technological Systems. Students will be expected to evaluate and manage technological systems. GCO 3: History and Evolution of Technology. Students will be expected to demonstrate an under-standing of the history and evolution of technology, and of its social and cultural implications. GCO 4: Technology and Careers. Students will be expected to demonstrate an understanding of cur-rent and evolving careers and of the infl uence of technology on the nature of work. GCO 5: Technological Responsibility. Students will be expected to demonstrate an understanding of the consequences of their technological choices.
The Key Stage Curriculum Outcomes for Technol-ogy Education are listed in the Outcomes section of the Foundation for the Atlantic Canada Technology Education Curriculum (2001) document. Key Stage Curriculum Outcomes (KSCO’s) expand the intent of the GCO’s and summarize what is expected of students during each of the four Key Stages. The Skilled Trades 1201 document adheres to the KSCO’s at the Key Stage 4 level (Grades 10-12).
•
•
•
•
•
•
General Curriculum Outcomes (GCOs)
Key Stage Curriculum Outcomes (KSCO’s)
12 Skilled Trades 1201
Section 2: Curriculum Design and Components
The Key Stage 4 Curriculum Outcomes listed are orga-nized according to each of the fi ve General Curriculum Outcomes (GCO’s) for the Atlantic Canada Technology Education Curriculum.
By the end of grade 12, students will have achieved the outcomes for entry to grade 9 and will also be expected to
[1.401] articulate problems that may be solved through technological means
assess diverse needs and opportunities construct detailed design briefs that include de-sign criteria and a work schedule
[1.402] conduct design studies to identify a techno-logical solution to a problem
investigate related solutions document a range of options to solve this prob-lem determine and justify the best option determine resource requirements and availability develop detailed action plans, including technical drawings and sequences of action
[1.403] develop (prototype, fabricate, make) techno-logical solutions to problems
match resources and technical processes for spe-cifi c tasks construct and test models and prototypes as needed construct the solution with adherence to the design criteria document activities, decisions, and milestones
[1.404] critically evaluate technological solutions and report their fi ndings
develop detailed evaluations of both their own and others’ technological solutions, with reference to independently developed criteria employ a continuous assessment methodology with the purpose of continuous improvement of the design document and report their changes, the rationale for change, and conclusions
•
••
•
••
•••
•
•
•
•
••
•
•
•
GCO 1:
Technological Problem Solving. Stu-dents will be expected to design, devel-op, evaluate, and articulate technological solutions.

Skilled Trades 1201 13
Section 2: Curriculum Design and Components
[1.405] communicate ideas and information about technological solutions through appropriate techni-cal means
accurately present technical information by us-ing a representative sample of analog and digital tools, including, for example, two- and three-di-mensional, computer-assisted drafting and mod-elling tools create accurately scaled models and prototypes
By the end of grade 12, students will have achieved the outcomes for entry-grade 9 and will also be expected to
[2.401] operate, monitor, and adjust technological systems of increasing complexity [2.402] manage technological systems of increasing complexity [2.403] modify programming logic and control systems to optimize the behaviour of systems [2.404] deconstruct complex technological systems into their simpler systems and components [2.405] troubleshoot and maintain systems
By the end of grade 12, students will have achieved the outcomes for entry-grade 9 and will also be expected to
[3.401] evaluate technological systems in the con-text of convergence where one system has multiple functions, or divergence where multiple systems have the same function [3.402] evaluate the symbiotic roles of technology and science in modern society [3.403] analyse the symbiotic relationship between technology and education, including factors that infl uence standards for technological literacy and capability, and ways that the community responds [3.404] critically evaluate the effects of accelerating rates of technological change on self and society [3.405] account for effects of cultural diversity on technological solutions
critically examine the effects of cultural diversity on market forces and technological products, and vice versa incorporate knowledge of cultural diversity into development of technological solutions
•
•
•
•
•
•
•
•
•
•
•
•
•
•
•
GCO 2:
Technological Systems. Students will be expected to operate and manage techno-logical systems.
GCO 3:
History and Evolution of Technology. Students will be expected to demonstrate an understanding of the history and evo-lution of technology, and of its social and cultural implications.

14 Skilled Trades 1201
Section 2: Curriculum Design and Components
By the end of grade 12, students will have achieved the outcomes for entry-grade 9 and will also be expected to
[4.401] assess and evaluate employability profi les for a variety of workplaces and careers and determine the level of technological literacy and capability they would need to achieve for job entry [4.402] employ design and invention as tools to cre-ate entrepreneurial activity [4.403] envision their short- and longer-term future and develop a plan for acquiring the technological literacy/capability required to achieve their vision
By the end of grade 12, students will have achieved the outcomes for entry-grade 9 and will also be expected to
[5.401] demonstrate responsible leadership in em-ploying legal and ethical rules and principles [5.402] demonstrate responsible leadership in em-ploying health and safety rules and standards [5.403] demonstrate responsible leadership in tak-ing proper measures to manage current and future technological risk
•
•
•
•
•
•
GCO4:
Technology and Careers. Students will be expected to demonstrate an under-standing of current and evolving careers and of the infl uence of technology on the nature of work.
GCO 5:
Technological Responsibility. Students will be expected to demonstrate an un-derstanding of the consequences of their technological choices.

Skilled Trades 1201 15
Section 3: Specifi c Curriculum Outcomes
Section 3:
Specifi c Curriculum Outcomes
The Skilled Trades 1201 is an introduction to the des-ignated trades in this province and the inter-provincial Red Seal trades. It looks briefl y at the structure of the trades, including the formal schooling aspect of cross-trade courses, and trade specifi c courses. Some time is spent with technical drawings, one of the key cross-trade capabilities. A signifi cant part of the course focuses on 6 construction related trades
Carpentry Residential Electrician Plumber Lather Painter-Decorator Mason
Students examine each trade and develop rudimen-tary knowledge and skill. A construction project that spans all 6 trades serves to emulate some aspects of on-the-job experiences.The course has 3 units
Unit 1 Apprenticeship and the Skilled TradesUnit 2 Skills Common to all TradesUnit 3 Skill-building in Selected Trades
••••••
•••
Program Components

16 Skilled Trades 1201
Section 3: Specifi c Curriculum Outcomes
Skilled Trades 1201 is a 110 hour two credit course. A suggested breakdown of time for the course follows:
Unit 1 Apprenticeship and the Skilled Trades (6 hours)
Topic 1 Apprenticeship Program (1 hour) Topic 2 The Skilled Trades (1 hour) Topic 3 Courses Common to all Skilled Trades
(2 hours) Topic 4 Focus on 6 Skilled Trades (2 hours)
Unit 2 Skills Common to all Trades (24 hours)Topic 1 Technology and the Workplace (3 hours) Topic 2 Reading Blueprints and Drawings
(18 hours) Topic 3 Working in the Technology Lab (3 hours)
Unit 3 Skill-building in Selected Trades (77 hours)Experiencing the trades modularlyTopic 1 Carpentry - Floor Construction (7 hours) Topic 2 Carpentry - Wall Framing (7 hours) Topic 3 Carpentry - Roof Trusses (7 hours)Topic 4 Construction Electrician - Circuits
(7 hours) Topic 5 Construction Electrician - Residential
Wiring (7 hours) Topic 6 Plumber - Toilet Installation (7 hours) Topic 7 Plumber - Sink Installation (7 hours)Topic 8 Lather (7 hours) Topic 9 Painter-Decorator (7 hours) Topic 10 Masonry: Ceramic Wall Tile Installation
(7 hours) Topic 11 Masonry: Ceramic Floor Tile Installation
(7 hours)
Skilled Trades 1201 consists of three units of study, each of which is organized into several topics. Each topic is presented in a four column layout that spans 2 pages in the guide. The columns are
Specifi c Curriculum Outcomes (SCOs)Suggested Teaching-Learning StrategiesSuggested Assessment Strategies
•••
Timeline for Skilled Trades 1201
Using the Four Column Layout

Skilled Trades 1201 17
Section 3: Specifi c Curriculum Outcomes
Resources
Specifi c curriculum outcomes are statements that specify what the student should know or be able to do on completion of the activities associated with the outcome.
Teaching-Learning strategies offers suggestions for ensuring that students meet the requirements of the outcome. This column has two distinct parts—For the Teacher, and For the Student
For the Teacher focuses on what the teacher needs to do in order to address the outcome. This in-cludes advanced preparation and in-class strategies. For the Student focuses on what the student needs to do in order to achieve the outcome. Typically it takes the form of activities which may be unique to this outcome, or may be part of a larger activity that spans multiple outcomes. Activities can range from research to project-planning to fabrication of physi-cal components.
Assessment strategies indicate how to determine if the student has achieved an outcome. Since the outcome is addressed through activities and projects, assessment will indicate how to determine that the activity achieved the outcome. It is intended that this be used as an indi-cator of how to approach the outcome and assessment of the outcome
Assessment identifi es which of the rubrics in Ap-pendix B Rubrics is most relevant for assessment of this outcome
Resources are of four primary types—References, Draw-ings, Tools, and Consumables.
References: identify information in texts and on websites. Occasionally, drawings and other material are referenced if they have already appeared in previ-ous outcomes. These items may include student produced work if they are considered a reference for the current outcome.
•
•
•
•
•
Suggested Teaching-Learning Strategies
Specifi c Curriculum Outcomes
Suggested Assessment Strategies
Resources

18 Skilled Trades 1201
Section 3: Specifi c Curriculum Outcomes
Drawings: list drawings in Appendix A Support Materials that have been created specifi cally to meet the outcome requirements Tools: is a general reference to the kinds of tools needed for the activity. It will not be a complete list, since different options are available. Rather it should be treated as a reminder of the types of tools required. Tools of the trade will appear in separate lists in Appendix A Support Materials. These tool lists are provided as reference, to indicate the range of standard tools employed in the trade, and not as a required list for this course. Note that many of these tools require safety training. Any use requires testing with 100% accuracy on written/verbal and performance.Consumables: are considered to be things that are used up in the performance of the activity. Quanti-ties will not be indicated since making that determi-nation is usually part of the activity.
•
•
•
Resources (cont’d)

Skilled Trades 1201 19
Section 3: Unit 1 Apprenticeship and the Skilled Trades
Unit 1 Overview The purpose of this unit is to develop understanding of the scope of the skilled trades, how to enter a trade through the apprenticeship program, and develop a sense of what it is like to work in selected trades
The unit is organized into four topics.
Topic 1 Apprenticeship Program examines the ap-prenticeship program and the Red Seal certifi cation.Topic 2 The Skilled Trades examines the New-foundland and Labrador designated skilled trades and the Red Seal skilled tradesTopic 3 Courses Common to all Skilled Trades examines the common core courses for the skilled trades in Atlantic CanadaTopic 4 Focus on 6 Specifi c Trades examines the apprenticeship programs for 6 construction related trades in more detail. Specifi cally it looks at the technical courses unique to each, the work experi-ences unique to each and prospects for employment in each. The 6 trades are
Carpentry Residential ElectricianPlumberLatherPainter-DecoratorMason (Ceramic Tile)
Specifi c assessment strategies are recommended for each outcome.
•
•
•
•
••••••
Unit 1 Apprenticeship and the Skilled Trades
Organization
Assessment

20
Section 3: Unit 1 Apprenticeship and the Skilled Trades
Specifi c Curriculum Outcomes Suggested Learning and Teaching Strategies
Students will be expected to
Skilled Trades 1201
Topic 1 Apprenticeship Program
1.1.1 describe the apprenticeship pro-gram
[4.401]
For the Teacher
The purpose of this outcome is to develop understand-ing of the apprenticeship program, and how to become an apprentice. It also distinguishes between certifi ca-tion for provincially designated trades and Red Seal, or inter-provincial, trades.
As preparation you will need to become familiar with the apprenticeship program. Apprenticeship policy is the jurisdiction of provincial Department of Educa-tion, Industrial Training Section. Their Apprenticeship and Certifi cation Website is the primary reference in the resources. The specifi cs of apprenticeship programs are the mandate of the Provincial Apprenticeship and Certifi cation Board. See the webpage at http://www.ed.gov.nl.ca/app/pacb.htm for details of the mandate and specifi c duties of the board. The full policy manual is available in PDF format at http://www.ed.gov.nl.ca/app/doc_pub/pdf/ policymanual.pdf.
The Interprovincial Standards Red Seal programs web-site (http://www.red-seal.ca/Site/trades/analist_e.htm) will give you the full list of trades. The site will also be useful for the next topic.
Points to emphasize
Describe what constitutes an apprenticeshipReview of some of the programs available in Canada and this provinceRelationship between apprentice and journeypersonDesignated trades versus red seal tradesCertifi cation process
For the Student
Using the specifi c links as reference, describe each of the following
ApprenticeshipThe apprenticeHow to become an apprentice
••
•••
•••

21
Section 3: Unit 1 Apprenticeship and the Skilled Trades
Suggested Assessment Strategies Resources
Skilled Trades 1201
Topic 1 Apprenticeship Program
Assessment
Paper and pencil
Students could be assessed on this outcome with Appendix B Knowledge Rubric.
Research
Students could defi ne the following:ApprenticeshipThe apprenticeHow to become an apprenticeThe journeypersonProvincial designated occupations/ tradesCertifi cation (examination) in a designated tradeRed Seal tradeCertifi cation (examination) in Red Seal trade
Presentation and Research
Students could fi nd the answers to the following questions:
What is the duration of apprenticeship?Who administers the apprenticeship program?Who are the partners to the apprenticeship agree-ment?What are the roles of each partner?What is the course component?What is the workplace component?What is the purpose of Logbook (Record of Oc-cupational Progress)How do the pay rates for apprentices compare to that of journeypersons?
This research could be presented to the class as a whole, for different trades researched.
•
•••••••••
•
•••
••••
•
•
References
Government of Newfoundland and Labrador website Apprenticeship and Certifi cation (http://www.ed.gov.nl.ca/app/index.htm).
Specifi c links on the site
General Frequently Asked Questions at http://www.ed.gov.nl.ca/app/faq_gen.htmInformation for pre-apprentices http://www.ed.gov.nl.ca/app/doc_pub/pdf/ app_brochure.pdfApprenticeship benefi ts at http://www.ed.gov.nl.ca/app/doc_pub/pdf/app-benefi ts-info-sheet.pdfThree paths to certifi cation at http://www.ed.gov.nl.ca/app/doc_pub/pdf/app-paths-info-sheet.pdfGeneral conditions governing apprenticeship at http://www.ed.gov.nl.ca/app/doc_pub/pdf/gen_ conditions.pdfProvincial Apprenticeship and Training (http://www.ed.gov.nl.ca/edu/post/app.htm)
•
•
•
•
•
•

22
Section 3: Unit 1 Apprenticeship and the Skilled Trades
Specifi c Curriculum Outcomes Suggested Learning and Teaching Strategies
Students will be expected to
Skilled Trades 1201
The journeypersonProvincial designated occupations/ tradesCertifi cation (examination) in a designated tradeRed Seal tradeCertifi cation (examination) in Red Seal trades
Answer the following questions
What is the duration of apprenticeship?Who administers the apprenticeship program?Who are the partners to the apprenticeship agree-ment?What are the roles of each partner?What is the course component?What is the workplace component?What is the purpose of Logbook (Record of Occu-pational Progress)How do the pay rates for apprentices compare to that of journeypersons?
•••••
•••
••••
•
Topic 1 Apprenticeship Program
1.1.1 describe the apprenticeship pro-gram
[4.401]

23
Section 3: Unit 1 Apprenticeship and the Skilled Trades
Suggested Assessment Strategies Resources
Skilled Trades 1201
Topic 1 Apprenticeship Program
Students could also share these answers with the rest of the class in a presentation style. A group project could be started at this point, with each group of students given a single question or a single trade in which to answer the questions and then present the answers to the class.
•

24
Section 3: Unit 1 Apprenticeship and the Skilled Trades
Specifi c Curriculum Outcomes Suggested Learning and Teaching Strategies
Students will be expected to
Skilled Trades 1201
Topic 2 The Skilled Trades
1.2.1 identify the Newfoundland and Labrador designated trades and the Red Seal trades
[4.401]
For the Teacher
The purpose of this outcome is for students to be aware of the full scope of the skilled and Red Seal trades in the province of Newfoundland and Labrador and in Canada.
Points to emphasize
The scope of the skilled and Red Seal trades The difference between the two in terms of training and certifi cationHow each applies to inter-provincial employabilityInstitutions capable of providing training
For the Student
Using the links provided by your teacher, perform the following tasks:
Examine and list the types of trades that might be present on a construction site.Make a list of the Newfoundland and Labrador designated trades, complete with a one sentence description of each trade.Identify each of the designated trades as either a 7200, 5400, or a 4400 hour program.Make a list of the Red Seal trades, complete with a one sentence description of each tradeIdentify each of the designated trades as a 7200, 5400, or a 4400 hour program.
••
••
•
•
•
•
•

25
Section 3: Unit 1 Apprenticeship and the Skilled Trades
Suggested Assessment Strategies Resources
Skilled Trades 1201
Topic 2 The Skilled Trades
Assessment
Paper and pencil
Students could be assessed on this outcome with Appendix B Knowledge Rubric.
Research
Students could do a research project encompassing one or more of the following tasks:
Examine and list the types of trades that might be present on a construction site.Make a list of the Newfoundland and Labrador designated trades, complete with a one sentence description of each trade.Identify each of the designated trades as either a 7200, 5400, or a 4400 hour program.Make a list of the Red Seal trades, complete with a one sentence description of each tradeIdentify each of the designated trades as a 7200, 5400, or a 4400 hour program.
•
•
•
•
•
•
•
References
Interprovincial Standards Web Site, spe-cifi cally:
List of Red Seal Trades (http://www.red-seal.ca/Site/trades/analist_e.htm)Designated Trades Information for NL (http://www.ed.gov.nl.ca/app/occupations/designatedtrades.htm)Interprovincial Red Seal standards (http://www.red-seal.ca/Site/about/redseal_fall_2005.pdf )
Ellis Chart listing of provincial trades (http://tableauellis.ca/Welcome.html)
Skilled trades at http://www.apprenticetrades.ca.
Select Newfoundland and Labrador to get a 30 page listing of analyses of the skilled trades in this province.
•
•
•
•

26
Section 3: Unit 1 Apprenticeship and the Skilled Trades
Specifi c Curriculum Outcomes Suggested Learning and Teaching Strategies
Students will be expected to
Skilled Trades 1201
Topic 3 Courses Common to all Skilled Trades
1.3.1 identify the common core courses in the skilled trades programs in Atlantic Canada
[4.401] [4.403]
For the Teacher
Apprenticeship programs in Atlantic Canada make use of a set of common core courses. These courses are not part of the technical requirement of the trade, but address peripheral knowledge and skills that are related to the trade. As an example, writing skills are assessed because of their ubiquitous use in the communication of information.
Points to emphasize:
Course work dealing with writing and mathematical skills.Quality service as a part of doing business.Unions and their function in the skilled trade work-place.Methods of searching for and obtaining employ-ment in the skilled trades.Entrepreneurship as an alternative to being em-ployed by others.
For the StudentReview several of the provincially designated trades identifi ed in the last topic. Identify the common core courses that are taught concurrently with the trade.Create a table that details the types of knowledge gained in the common core courses. Using the information generated in the table, re-late the type of knowledge to its use in each of the skilled trades.
•
••
•
•
•
•
•

27
Section 3: Unit 1 Apprenticeship and the Skilled Trades
Suggested Assessment Strategies Resources
Skilled Trades 1201
Topic 3 Courses Common to all Skilled Trades
Assessment
Paper and pencil
Students could be assessed on this outcome with Appendix B Knowledge Rubric.
Research
Students could review several of the provincially designated trades identifi ed in the last topic and identify the common core courses that are taught concurrently with the trade.
Paper and pencil
Students could create a table that details the types of knowledge gained in the common core courses. Students could then use the information generated in the table, to relate the type of knowledge to its use in each of the skilled trades.
•
•
•
•
References
“Plans of Training” for provincial Apprenticeship and Certifi cation and at http://www.ed.gov.nl.ca/app/plansoftraining/list.htm
Plans of Training for the 7 courses
http://www.ed.gov.nl.ca/app/ plansoftraining/pdf/carpenter.pdfhttp://www.ed.gov.nl.ca/app/ plansoftraining/pdf/reselectrical.pdfhttp://www.ed.gov.nl.ca/app/ plansoftraining/pdf/reselectrical.pdfhttp://www.ed.gov.nl.ca/app/ plansoftraining/pdf/lather04.pdfhttp://www.ed.gov.nl.ca/app/ plansoftraining/pdf/paintdecorator.pdfhttp://www.ed.gov.nl.ca/app/plansoftraining/pdf/sheetmetalworker.pdfhttp://www.ed.gov.nl.ca/app/ plansoftraining/pdf/sm_equip_ service_tech_jul04.pdf
Workplace Learning and Skills for Life -Human Resources and Skills Development Canada at http://srv600.hrdc-drhc.gc.ca/esrp/awm/main/c_ap_observations_e.shtml
•
•
•
•
•
•
•

28
Section 3: Unit 1 Apprenticeship and the Skilled Trades
Specifi c Curriculum Outcomes Suggested Learning and Teaching Strategies
Students will be expected to
Skilled Trades 1201
Topic 3 Courses Common to all Skilled Trades
1.3.2 understand the necessity of effec-tive and well written workplace correspondence.
[4.403]
For the Teacher
This outcome addresses the Common Course Work-place Correspondence
Points to Emphasize:
Writing skills can affect the success of a business/the success of a person working in that business. Highlight the importance of being able to convey ideas, thoughts, and to communicate with others.Being able to direct writing to a specifi c audience.Being able to emphasize specifi c points in writing.Importance of syntax and spelling mistakes.Proofreading and proper revision of documents.A business letter and a memo have differing pur-poses: memos inform, letters are used to convince/infl uence.Applications of workplace correspondence in each of the skilled trades
For the StudentReview the skilled trades and identify examples of workplace correspondence that the tradesperson needs to respond toReview the skilled trades and identify examples of workplace correspondence that the tradesperson needs to create
•
•
•••••
•
•
•

29
Section 3: Unit 1 Apprenticeship and the Skilled Trades
Suggested Assessment Strategies Resources
Skilled Trades 1201
Topic 3 Courses Common to all Skilled Trades
Assessment
Research
Students could review the skilled trades and iden-tify examples of workplace correspondence that the tradesperson needs to respond toStudents could review the skilled trades and iden-tify examples of workplace correspondence that the tradesperson needs to create.
Paper and pencil
Students could be asked to write a report on their experiences in the classroom to this point, highlight-ing how things could be improved as well as those things which have gone well. This report should be written in a methodology that properly refl ects what would be a real piece of workplace correspondence.
•
•
•
References
Writing Professional Business Letters and Memos (http://owl.english.purdue.edu/handouts/pw/#sub7)
English text book from high school writing course.
Samples of Good and Bad Business Letters (http://www.careersonline.com.au/easyway/apply/gbex.html)
What makes a bad business letter (http://www.jobbankusa.com/business_cover_letter_sample.html)
Sample Letters (http://www2.jobtrak.com/help_manuals/jobmanual/cover.html)
Importance of Writing in the Workplace (http://www.writingcommission.org/prod_downloads/writingcom/writing-ticket-to-work.pdf )
Samples of Poorly Written Memos (http://planet.tvi.cc.nm.us/ba122/Letters%20and%20Memos/Persuasive.htm)

30
Section 3: Unit 1 Apprenticeship and the Skilled Trades
Specifi c Curriculum Outcomes Suggested Learning and Teaching Strategies
Students will be expected to
Skilled Trades 1201
Topic 3 Courses Common to all Skilled Trades
1.3.3 demonstrate an understanding of the benefi ts of high quality of service
[4.403] [5.401]
For the Teacher
This outcome addresses the Common Course Customer Service
Points to emphasize:
Quality service is the keystone to repeat customer business.Quality service is key to a successful business.Quality service is related to positive employee at-titude.Quality service is about the type of treatment given to the customer.Good listening skills are imperativeEmphasize the importance of empathyClarify the difference between a want and a needUnderstand the customers wants and needs.Positive and negative channels of anger
You will need to provide copies of Appendix A U1T3 Quality Customer Service Checklist to students.
For the Student
Using the links provided, explore what is meant by “quality service” and write a paragraph that defi nes and described this construct in their own words.
Research and defi ne the terms caveat emptor and caveat venditor. What signifi cance do these terms have in the skilled trades world?Create a table that lists fi ve poor and fi ve acceptable personal behaviours that infl uence quality service.Complete the checklist of attitudes and behaviours provided by the teacher. Review and assess their own personal service level.
•
••
•
•••••
•
•
•

31
Section 3: Unit 1 Apprenticeship and the Skilled Trades
Suggested Assessment Strategies Resources
Skilled Trades 1201
Topic 3 Courses Common to all Skilled Trades
Assessment
Paper and pencil
Students could be assessed on this outcome with Appendix B Knowledge Rubric. Students could use the links provided, to explore what is meant by “quality service” and write a para-graph that defi nes and described this construct in their own words.Students could create a table that lists fi ve poor and fi ve acceptable personal behaviours that infl uence quality service.
Research
Students could research and defi ne the terms caveat emptor and caveat venditor. What signifi cance do these terms have in the skilled trades world?Students could complete the checklist of attitudes and behaviours provided by the teacher. Review and assess their own personal service level.
•
•
•
•
•
References
Business Today: An Introduction, John D. Kwekkeboom, Mcgraw Hill Ryerson, 1987. page 354.
United States Small Business Administration—quality of service at http://www.sba.gov/managing/marketing/customer.html
Government Standards for Quality Service—Gov’t of Ireland (http://www.taoiseach.gov.ie/index.asp?docID=800)
Microsoft Customer Service Education Modules —Microsoft standards (http://www.microsoft.com/smallbusiness/resources/toolkit/module.aspx?mid=93)
Appendix A U1T3 Quality Customer Service Checklist

32
Section 3: Unit 1 Apprenticeship and the Skilled Trades
Specifi c Curriculum Outcomes Suggested Learning and Teaching Strategies
Students will be expected to
Skilled Trades 1201
Topic 3 Courses Common to all Skilled Trades
1.3.4 relate the role of organized unions to the skilled tradesperson.
[4.403] [5.402]
For the Teacher
This outcome addresses the Common Course Work-place Skills
Points to emphasize:
Rationale for the existence of labour unions in the workplace.Historical impact that unions had on labour wages, rights, and benefi ts.Relate the role of unions to ensuring a safe and haz-ard free work site for the skilled tradesperson.Emphasize the need for participation in, and knowl-edge of, the respective trade unions.The various worker protection associations such as:
Workers compensationEmployment insuranceOccupational health and safety
For the StudentExamine some of the industry and construction organizations that might be represented on a con-struction/trades site.Research the historical role of unions in Atlantic Canada. Using a time line itemize major events in the progress of unionism.Find a union handbook that cites the regulations, codes, and other information pertaining to the pro-tection of the worker. Have a class discussion about the types of union regulations governing the behav-iour of workers.
•
•
•
•
••••
•
•
•

33
Section 3: Unit 1 Apprenticeship and the Skilled Trades
Suggested Assessment Strategies Resources
Skilled Trades 1201
Topic 3 Courses Common to all Skilled Trades
Assessment
Paper and pencil
Students could be assessed on this outcome with Appendix B Knowledge Rubric.
Research
Students could examine some of the industry and construction organizations that might be represent-ed on a construction/trades site.Students could research the historical role of unions in Atlantic Canada. Using a time line itemize major events in the progress of unionism.
Discussion/Group work
Students could access a union handbook that cites the regulations, codes, and other information pertaining to the protection of the worker. Have a class discussion about the types of union regulations governing the behaviour of workers.
•
•
•
•
References
The Birth of Canadian Organized Labour at http://canadianeconomy.gc.ca/english/economy/1873Canadian_Labour_Union.html
Newfoundland Ministry of Labour—role of unions and labour at http://www.hrle.gov.nl.ca/lra/
Ontario Ministry of Labour at http://www.worksmartontario.gov.on.ca/scripts/default.asp?contentID=1-4-1
Work Safe, role of unions and safety in the workplace at http://www.worksafesask.ca/startup/contributors.html
Canada’s Unique Social History—history of unionism at http://www.socialpolicy.ca/cush/
Canadian Labour History—history of unionism at http://www.civilization.ca/hist/labour/lab01e.html
Business Today: An Introduction, John D. Kwekkeboom, Mcgraw Hill Ryerson, 1987. page 217.
Trades Associations: Koel, unit 2 page 10-15.
UK Health and Safety HandBook for Union Reps at http://www.usdaw.org.uk/getactive/resource_library/fi les/RLFHandSRepsHbook/HSRepsHBook.pdf
34
Section 3: Unit 1 Apprenticeship and the Skilled Trades
Specifi c Curriculum Outcomes Suggested Learning and Teaching Strategies
Students will be expected to
Skilled Trades 1201
Topic 3 Courses Common to all Skilled Trades
1.3.5 explore the process by which a person can search for prospective employment.
[4.401] [4.403]
For the Teacher
This outcome addresses the Common Course Job Search Techniques
Points to emphasize:
The need for skilled tradespersons in NL and other parts of Canada.Agencies responsible for helping locate prospective employment.The role of the resume in the application processInterview skills and techniques.Standards of dress for interviews.Appropriate language and used for interview re-sponses.Assessment of skills versus requirements.
For the StudentSearch the local papers for advertisements for skilled trades positions. Create a collage that highlights the variety of positions available.Prepare a cover letter and a resume in standard for-mat as application for one of the jobs located in the previous activity.Perform a mock interview, with the instructor grad-ing the interview based upon accepted interview criteria. Test your knowledge, Blankenbaker, page 559.
•
•
••••
•
•
•
•
•

35
Section 3: Unit 1 Apprenticeship and the Skilled Trades
Suggested Assessment Strategies Resources
Skilled Trades 1201
Topic 3 Courses Common to all Skilled Trades
Assessment
Paper and pencil
Students could be assessed on this outcome with Appendix B Knowledge Rubric. Prepare a cover letter and a resume in standard format as application for one of the jobs located in the previous activity.
Research
Students could search the local papers for adver-tisements for skilled trades positions and create a collage that highlights the variety of positions available.
Interview
Students could perform a mock interview, with the instructor grading the interview based upon accepted interview criteria.
•
•
•
•
References
Blankenbaker, page 535-558
Wagner & Smith, page 729-735.
Careers for Life (Interview section)
Career Development 2201 Curriculum materials
Business Today: An Introduction, John D. Kwekkeboom, Mcgraw Hill Ryerson, 1987. page 168-175.
Searching for a job. Services Canada. (http://www.jobsetc.ca/) In particular, career exploration, training options, Workers rights and benefi ts.
Seneca Career Resources. (http://ilearn.senecac.on.ca/careers/research/searching_for_employment.html) In particular, how to search for a job, types of employment, how to apply for a job.

36
Section 3: Unit 1 Apprenticeship and the Skilled Trades
Specifi c Curriculum Outcomes Suggested Learning and Teaching Strategies
Students will be expected to
Skilled Trades 1201
1.3.6 evaluate the need for quality assurance in the workplace with respect to codes and standards, quality of materials, and quality of workmanship.
[5.401]
Topic 3 Courses Common to all Skilled Trades
For the Teacher
This outcome addresses the Common Course Work Quality Assurance
Points to emphasize:
Construction codes of NL and Canada.Quality and standards of raw materials used on the jobsite.Occupational health and safety considerations for health risk to worker.Health risk to person assuming ownership of prod-uct that was constructed using sub-standard materi-als.Workmanship as a function of adhering to codes and regulations.Requirement of quality drawings and documents as a starting point for any job.
For the StudentWrite a paragraph and propose what it might mean to use substandard or cut rate materials in a project. Identify:
Structural implicationsImpact on business and reputationQuality of the jobSafety considerations on the work site
Identify the code and standard setting bodies for Canada and the provinces.Review and suggest the potential cost of poor qual-ity workmanship in terms of future costs, i.e.: insur-ance claims, legal liabilities.
••
•
•
•
•
•
••••
•
•

37
Section 3: Unit 1 Apprenticeship and the Skilled Trades
Suggested Assessment Strategies Resources
Skilled Trades 1201
Topic 3 Courses Common to all Skilled Trades
Assessment
Paper and pencil
Students could be assessed on this outcome with Appendix B Knowledge Rubric. Students could write a paragraph and propose what it might mean to use substandard or cut rate ma-terials in a project. In this paragraph they should identify:
Structural implicationsImpact on business and reputationQuality of the jobSafety considerations on the work site
Research
Students could identify the code and standard set-ting bodies for Canada and the provinces.Students could review and suggest the potential cost of poor quality workmanship in terms of future costs, i.e.: insurance claims, legal liabilities.
•
•
••••
•
•
References
Blankenbaker, chapter 8
Feirer, section 2.1
Miller, Miller, & Baker, chapter 5
Wagner & Smith, unit 6
ISO 9001 standardization. Discusses the ISO 9001 protocols for quality assurance, standards of quality, product conformity, product quality - http://praxiom.com/iso-9001.htm

38
Section 3: Unit 1 Apprenticeship and the Skilled Trades
Specifi c Curriculum Outcomes Suggested Learning and Teaching Strategies
Students will be expected to
Skilled Trades 1201
Topic 3 Courses Common to all Skilled Trades
1.3.7 understand the potential of entre-preneurial ventures versus regular employment.
[4.401] [4.402] [4.403]
For the Teacher
This outcome addresses the Common Course Entrepre-neurial Awareness
Points to emphasize:
Self-employment is a viable option to employment by companiesEntrepreneurs have these identifi able characteristics:
Self-confi denceEnergeticResourcefulAble to make decisionsLeadersDeterminationAmbition
A good business plan is a must (business plan can be located at the RED board site)Agencies available to assist in planning and funding include
Regional Economic Development BoardAtlantic Canada Opportunities AgencyBusiness Development Bank of Canada
You will need to supply a sample business plan for one of the activities
For the StudentExamine a sample business plan provided by the teacher.Contact your local RED board and discuss the entrepreneurship process, including:
Qualities of an entrepreneurStarting a businessThe business planFunding agencies
Research, or fi nd and interview a famous/successful local entrepreneur. Determine:
How they established their businessFailures and successesTheir mentors
•
••••••••
•
•
•••
•
•
••••
•
•••

39
Section 3: Unit 1 Apprenticeship and the Skilled Trades
Suggested Assessment Strategies Resources
Skilled Trades 1201
Topic 3 Courses Common to all Skilled Trades
Assessment
Paper and pencil
Students could be assessed on this outcome with Appendix B Knowledge Rubric. Students could examine a sample business plan pro-vided by the teacher. this could be from a Business Enterprise class.
Research
Students could contact their local RED board and discuss the entrepreneurship process, including:
Qualities of an entrepreneurStarting a businessThe business planFunding agencies
Students could research, or fi nd and interview a famous/successful local entrepreneur. Determine:
How they established their businessFailures and successesTheir mentors
•
•
•
••••
•
•••
References
Seneca College - Entrepreneurship test, info on starting your own business, qualities needed to become an entrepreneur (http://ilearn.senecac.on.ca/careers/entrepreneur/entrepreneurism.html)
Regional Economic Development Boards—economic initiatives, funding potentials—(http://www.intrd.gov.nl.ca/intrd/economicboards.htm)
Atlantic Canada Opportunities Agency (ACOA) funding, business info (http://www.acoa.ca/)
ACOA - Sample Business Plan at http://www.acoa.ca/e/business/tools.shtml
Sample Business Plan at http://www.zone-9.com/IWP.asp
Entrepreneurship (characteristics of en-trepreneurs): Wagner & Smith, page 735 –736.

40
Section 3: Unit 1 Apprenticeship and the Skilled Trades
Specifi c Curriculum Outcomes Suggested Learning and Teaching Strategies
Students will be expected to
Skilled Trades 1201
Topic 4: Focus on 6 Specifi c Skilled Trades
1.4.1 identify the technical courses for each of the selected trades, and identify the purpose of each course
[4.401] [4.403]
For the Teacher
The purpose of this outcome is to develop a “big pic-ture” view of 6 selected trades.
Carpentry, Residential Electrician,Plumber, Lather, Painter-Decorator, Sheet Metal Worker,
Each trade has a Plan of Training which shows the full list of courses. Each plan of training has a section that lists the courses and another that gives the contents of each course. For each course, the purpose is usually written as course aims, usually not more that four state-ments.
Points to emphasize
Each trade has a specifi c training planTraining plans involve technical, academic, and practical knowledge and skillsEach course offered has a specifi c focus
For the Student
For the apprenticeship programs
Carpentry, Residential Electrician,Plumber, Lather, Painter-Decorator, Mason,
Complete the following
Make a list of the technical courses for each trade, organized by yearWrite the purpose of each course, usually included in the course as course aims
••••••
••
•
••••••
•
•

41
Section 3: Unit 1 Apprenticeship and the Skilled Trades
Suggested Assessment Strategies Resources
Skilled Trades 1201
Topic 4: Focus on 6 Specifi c Skilled Trades
Assessment
Paper and pencil
Students could be assessed on this outcome with Appendix B Knowledge Rubric. Students could make a list of the technical courses for each trade, organized by year for the following apprenticeship programs:
Carpentry, Residential Electrician,Plumber, Lather, Painter-Decorator, andMason.
For the previous list, students could also write the purpose of each course, usually included as course aims.
•
•
••••••
•
References
Alphabetical listing of the plans of training http://www.ed.gov.nl.ca/ app/plansoftraining/list.htm
Plans of Training for the 7 courses
http://www.ed.gov.nl.ca/app/ plansoftraining/pdf/carpenter.pdfhttp://www.ed.gov.nl.ca/app/ plansoftraining/pdf/reselectrical.pdfhttp://www.ed.gov.nl.ca/app/ plansoftraining/pdf/reselectrical.pdfhttp://www.ed.gov.nl.ca/app/ plansoftraining/pdf/lather04.pdfhttp://www.ed.gov.nl.ca/app/ plansoftraining/pdf/paintdecorator.pdfhttp://www.ed.gov.nl.ca/app/ plansoftraining/pdf/mason.pdf
•
•
•
•
•
•

42
Section 3: Unit 1 Apprenticeship and the Skilled Trades
Specifi c Curriculum Outcomes Suggested Learning and Teaching Strategies
Students will be expected to
Skilled Trades 1201
Topic 4: Focus on 6 Specifi c Skilled Trades
1.4.2 identify and list the work experi-ences required for apprenticeship in the selected trades
[4.401] [4.403]
For the Teacher
The apprenticeship program has signifi cant work experi-ence requirements, and this outcome focuses on that. Information in the Plans of Training identifi es these requirements for most, but not all, of the trades. A bit of creative investigation may be in order. Inviting a tradesperson to class to discuss the apprenticeship pro-gram may be an option. Most programs have a block of in-school time followed by a block of work experience, followed by an in-school block. Depending on the apprenticeship program, the pattern is repeated over a period of 2 to 5 years.
Points to emphasize
Each skilled trade has selected skills that an appren-tice should experienceThese are elaborated as part of a training planExamine a selection of the training plans for the ap-prenticeships for selected trades
For the Student
For the apprenticeship programs
Carpentry, Residential Electrician,Plumber, Lather, Painter-Decorator, Mason,
Complete the following
Draw a block diagram of each program showing the in-school and work experience blocks.Where information exists, make a list of the work experiences in each work experience block for each apprenticeship program.
•
••
••••••
•
•

43
Section 3: Unit 1 Apprenticeship and the Skilled Trades
Suggested Assessment Strategies Resources
Skilled Trades 1201
Topic 4: Focus on 6 Specifi c Skilled Trades
Assessment
Paper and pencil
Students could be assessed on this outcome with Appendix B Knowledge Rubric. Students could draw a block diagram of each pro-gram showing the in-school and work experience blocks for the following apprenticeship programs:
Carpentry, Residential Electrician,Plumber, Lather, Painter-Decorator, andMason.
For the previous list, students could, where informa-tion exists, make a list of the work experiences in each work experience block for each apprenticeship program.
•
•
••••••
•
References
Alphabetical listing of the plans of training http://www.ed.gov.nl.ca/ app/plansoftraining/list.htm
Plans of Training for the 7 courses
http://www.ed.gov.nl.ca/app/ plansoftraining/pdf/carpenter.pdfhttp://www.ed.gov.nl.ca/app/ plansoftraining/pdf/reselectrical.pdfhttp://www.ed.gov.nl.ca/app/ plansoftraining/pdf/reselectrical.pdfhttp://www.ed.gov.nl.ca/app/ plansoftraining/pdf/lather04.pdfhttp://www.ed.gov.nl.ca/app/ plansoftraining/pdf/paintdecorator.pdfhttp://www.ed.gov.nl.ca/app/ plansoftraining/pdf/mason.pdf
•
•
•
•
•
•

44
Section 3: Unit 1 Apprenticeship and the Skilled Trades
Specifi c Curriculum Outcomes Suggested Learning and Teaching Strategies
Students will be expected to
Skilled Trades 1201
1.4.3 research and report job condi-tions and employment prospects for the selected trades
[4.401] [4.403]
For the Teacher
The purpose of this outcome is to enable students to develop a sense of what it is like to work in a particu-lar trade. As in the previous outcome, inviting trades people to class may be an option. You may wish to invite a person in the latter stages of apprenticeship as well as a journey person.
Points to emphasize
Provide references to begin the researchProvide criteria for the research and report. The rubric would be a starting point for criteriaYou may wish to present an overview of one trade, or work through the process of conducting the exer-cise for one trade.
For the Student
For the skilled trades
Carpentry, Residential Electrician,Plumber, Lather, Painter-Decorator, Mason,
Complete the following
Research and describe working conditions for each tradeResearch and describe employment prospects for each trade
••
•
••••••
•
•
Topic 4: Focus on 6 Specifi c Skilled Trades

45
Section 3: Unit 1 Apprenticeship and the Skilled Trades
Suggested Assessment Strategies Resources
Skilled Trades 1201
Assessment
Paper and pencil
Students could be assessed on this outcome with Appendix B Knowledge Rubric.
ResearchStudents could research and describe working con-ditions for the following apprenticeship programs:
Carpentry, Residential Electrician,Plumber, Lather, Painter-Decorator, andMason.
For the previous list, students could research and describe employment prospects for each trade.
•
•
••••••
•
References
Labour Market Occupational profi les at http://www.ed.gov.nl.ca/app/ occupations/designatedtrades.htm
Analysis of Red Seal Trades at http://www.red-seal.ca/Site/trades/analist_e.htm
Topic 4: Focus on 6 Specifi c Skilled Trades

46
Section 3: Unit 1 Apprenticeship and the Skilled Trades
Skilled Trades 1201
Skilled Trades 1201 47
Section 3: Unit 2 Skills Common to all Trades
Unit 2 Overview The purpose of this unit is to develop understanding of the scope of the skilled trades, how one enters a trade through the apprenticeship program, and develop a sense of what it is like to work in selected trades
The unit is organized into three topics.
Topic 1 Technology and the Workplace looks at the nature of technology, technological literacy and ca-pability, and technological processes. It relates these to the skilled trades and uses troubleshooting as an example of a technological capability.Topic 2 Reading Blueprints and Drawings examines technical drawings as the primary communications tool for technical information in the skilled trades. It covers basic principles and applications in each of the 6 trades.Topic 3 Working in the Technology Lab examines safety and personal rules of conduct from several perspectives.
Personal rules based on shop rules and practicesStrategies for team and individual activitiesMaterials processingTool and equipment usage
This unit has a value of 20% of the course. Specifi c as-sessment strategies are recommended for each outcome.
•
•
•
••••
Unit 2 Skills Common to all Trades
Organization
Assessment

48
Section 3: Unit 2 Skills Common to All Trades
Specifi c Curriculum Outcomes Suggested Learning and Teaching Strategies
Students will be expected to
Skilled Trades 1201
Topic 1 Technology and the Workplace
2.1.1 defi ne and describe technology as a function of knowledge, pro-cesses, and products
[3.403]
For the Teacher
The purpose of this SCO is to introduce the concept of technology as the human constructed world.
Points to emphasize:
Technology is how people modify the world around them. Technology is a process (how we do things), the hu-man constructed world (things that we make), and the knowledge and skills required to do those things.Technological action has consequences, some good, some bad, some known, some unknownTechnology is inherently engaging in that it involves “doing”“Technology is human innovation in action that involves the generation of knowledge and process to develop systems that solve problems and extend human capabilities.” (Foundation for the Atlantic Canada Technology Education Curriculum)
For the StudentUsing the notes and examples given by the instruc-tor, along with the reference materials provided to the student, write a one sentence defi nition of the term technology.Give examples of each and describe technology in terms of:
Technology as knowledgeTechnology as processTechnology as product
•
•
•
•
•
•
•
•••
49
Section 3: Unit 2 Skills Common to All Trades
Suggested Assessment Strategies Resources
Skilled Trades 1201
Topic 1 Technology and the Workplace
Assessment
Paper and pencil
Students could be assessed for this activity with Ap-pendix B Knowledge Rubric
Research
Using the notes and examples given by the instruc-tor, along with the reference materials provided to the student, students could write a one sentence defi nition of the term technology.Students could give examples of each and describe technology in terms of:
Technology as knowledgeTechnology as processTechnology as product
•
•
•
•••
References
Unit 1, Section 1, Lesson 1 of Communications Technology 2-3104 - (http://www.cdli.ca/courses/ctecx104/)
Unit 1, Section 1, Lesson 1 of Integrated Systems 1205 (http://www.cdli.ca/courses/isys1205/)

50
Section 3: Unit 2 Skills Common to All Trades
Specifi c Curriculum Outcomes Suggested Learning and Teaching Strategies
Students will be expected to
Skilled Trades 1201
Topic 1 Technology and the Workplace
2.1.2 describe technological literacy and capability
[3.403]
For the Teacher:
The purpose of this sco is to introduce the concepts of technological literacy, technological capability, how technological literacy may lead to technological capabil-ity, and the difference between the two constructs.
Point to emphasize:
Technological literacy is the ability to use techno-logical systems, manage technological activities, and make informed decisions about technological issues.Technological literacy can be described as:
Knowing about, Understanding, Being able to discuss with understanding, Being able to make informed decisions about technological issues, even complex ones like bio-engineering.
Technological literacy does not mean that you can engage in those sorts of processes, only that you have knowledge of, even though your input may impact the decision to engage or not engage in such technologies.Technological capability is expressed as an action that results in new and innovative solutions through the application of one or more technological prob-lem-solving strategies and the use of technological resourcesTechnological capability requires literacy but goes further. It means you have specialized knowledge and skills and a willingness to engage in technologi-cal problem solving in the technology in question. Technological capability implicitly means engage-ment.
•
•••••
•
•
•
•

51
Section 3: Unit 2 Skills Common to All Trades
Suggested Assessment Strategies Resources
Skilled Trades 1201
Topic 1 Technology and the Workplace
Assessment
Paper and pencil
Students could be assessed for this activity with Ap-pendix B Knowledge Rubric
Research
Students could defi ne technological literacy and capability.Students could identify areas of technology in which they feel they have technological literacy. Students could identify areas of technology in which they feel they have technological capability.
•
•
•
•
References
Unit 1, Section 1, Lesson 1 of Communications Technology 2-3104 (http://www.cdli.ca/courses/ctecx104/)
Foundation for the Atlantic Canada Technology Education Curriculum, The Nature of Technology Section, (http://www.ed.gov.nl.ca/edu/sp/foundations/tech_edu/te_found_nf-lab_full.pdf )

52
Section 3: Unit 2 Skills Common to All Trades
Specifi c Curriculum Outcomes Suggested Learning and Teaching Strategies
Students will be expected to
Skilled Trades 1201
For the Student:Defi ne technological literacy and capability.Identify areas of technology in which you feel you have technological literacy. Identify areas of technology in which you feel you have technological capability.
••
•
Topic 1 Technology and the Workplace
2.1.2 describe technological literacy and capability
[3.403]

53
Section 3: Unit 2 Skills Common to All Trades
Suggested Assessment Strategies Resources
Skilled Trades 1201
Topic 1 Technology and the Workplace

54
Section 3: Unit 2 Skills Common to All Trades
Specifi c Curriculum Outcomes Suggested Learning and Teaching Strategies
Students will be expected to
Skilled Trades 1201
2.1.3 identify technological processes in the skilled trades
[3.402][3.403]
Topic 1 Technology and the Workplace
For the Teacher
The purpose of this outcome is for students to identify and gain an understanding of the types of technological processes that exist, that are embedded in and are the foundation of the skilled trades.
Points to emphasize:
Communication processes areEncoding/decoding, Storing/retrieving,Sending/receiving
Managing processes are Planning, Decision making,Organizing,Staffi ng, Motivating,Leading,Controlling
Control processes areSensing,Switching, Regulating
Energy-power processes areConserving, Converting, Transmitting
Production processes areSeparating, Combining, Shaping,Finishing
Biotechnology processes arePropagating, Growing, Adapting,Treating, Maintaining,
••••
••••••••
••••
••••
•••••
••••••

55
Section 3: Unit 2 Skills Common to All Trades
Suggested Assessment Strategies Resources
Skilled Trades 1201
Topic 1 Technology and the Workplace
Assessment
Paper and pencil
Students could be assessed for this activity with Ap-pendix B Knowledge Rubric
Research
Students could identify and describe the technologi-cal processes by giving examples of each one in the skilled trades.
Communication processes of encoding/decoding, storing/retrieving, and sending/receivingManaging processes of planning, decision mak-ing, organizing, staffi ng, motivating, leading, and controllingControl processes of sensing, switching, and regulating Energy-power processes of conserving, convert-ing, and transmittingProduction processes of separating, combining, shaping, and fi nishingBiotechnology processes of propagating, growing, adapting, treating, maintaining, harvesting, and converting
•
•
•
•
•
•
•
•
References
Blankenbaker,
page 530, page 523chapter 2, 9
Mullin, Miller & Stephenson,
unit 1 page 1unit 4, page 64- 66unit 6, page 115unit 26, page 381unit 31, page 459
Wagner & Smith,
unit 4, 15, 13, 15, 16, 20
Unit 1, Section 1, Lesson 1 of Communications Technology 2-3104 (http://www.cdli.ca/courses/ctecx104/)
Unit 1, Section 1, Lesson 1 of Communications Technology 2-3104 (http://www.cdli.ca/courses/ctecx104) (communication model)
Managing the Construction Site. Planning the Job. (http://www.bangor.ac.uk/ohs/safety_pages/infl ink/managing_in_construction.htm)
Managing Risk, Disputes, & Other Site Related Info - (http://www.pwc.com/extweb/industry.nsf/docid/707e1d1bdd3b2e0785256df800185c8c)
••
•••••
•

56
Section 3: Unit 2 Skills Common to All Trades
Specifi c Curriculum Outcomes Suggested Learning and Teaching Strategies
Students will be expected to
Skilled Trades 1201
Topic 1 Technology and the Workplace
Harvesting, and convertingThere are three primary processes in the construc-tion skilled trades
Communication, Managing, Production
Control and energy-power and bio-technology do play a role in the trades
Some trades are explicitly about energy-power and/or control systems, for example electrician and plumber
For the Student
Identify and describe the technological processes by giv-ing examples of each one in the skilled trades.
Communication processes of encoding/decoding, storing/retrieving, and sending/receivingManaging processes of planning, decision making, organizing, staffi ng, motivating, leading, and con-trollingControl processes of sensing, switching, and regulat-ing Energy-power processes of conserving, converting, and transmittingProduction processes of separating, combining, shaping, and fi nishingBiotechnology processes of propagating, growing, adapting, treating, maintaining, harvesting, and converting
••
•••
•
•
•
•
•
•
•
•
2.1.3 identify technological processes in the skilled trades
[3.402][3.403]

57
Section 3: Unit 2 Skills Common to All Trades
Suggested Assessment Strategies Resources
Skilled Trades 1201
Topic 1 Technology and the Workplace

58
Section 3: Unit 2 Skills Common to All Trades
Specifi c Curriculum Outcomes Suggested Learning and Teaching Strategies
Students will be expected to
Skilled Trades 1201
Topic 1 Technology and the Workplace
2.1.4 identify troubleshooting as a criti-cal technological capability for a skilled tradesperson
[2.405]
For the Teacher
The purpose of this outcome is to help students exam-ine the concept of troubleshooting and relate its impor-tance to the skilled trades workplace.
Points to emphasize:
Equipment failures occur on a job site.Human resource issues may require troubleshooting skills, ie: labour unrest, wage issues, etc.Unexpected events can and will happen, and it is the responsibility of the tradesperson to be able to “think on their feet” and solve problems.Unexpected problems can crop up at any time.
Troubleshooting is also called problem solving which is an integral part of technology in that so-lutions arise out of the identifi cation of problems, or opportunities. The key elements to trouble-shooting are Being able to identify opportunities, problems in scenariosPosing appropriate solutions to those problems.Suggesting appropriate means of evaluating the suitability of the solutions.
For many systems, troubleshooting strategies are well documented. Typically the documentation will say something like “if this symptom occurs, check these items”.
For the StudentUsing a situation provided by the teacher, develop a solution to problem stating how the solution for the problem was created.Discuss the idea of how problem solving/trouble-shooting can be considered to be a technological capability.Give some examples of typical troubleshooting situ-ations that might arise in the home on a day to day basis.
••
•
••
•
••
•
•
•
•

59
Section 3: Unit 2 Skills Common to All Trades
Suggested Assessment Strategies Resources
Skilled Trades 1201
Topic 1 Technology and the Workplace
Assessment
Paper and pencil
Students could be assessed for this activity with Ap-pendix B Knowledge Rubric
Problem solving
Using a situation provided by the teacher, students could develop a solution to problem stating how the solution for the problem was created.
Discussion
Students could discuss the idea of how problem solving/troubleshooting can be considered to be a technological capability.Students could give some examples of typical trou-bleshooting situations that might arise in the home on a day to day basis.
•
•
•
•
References
Wagner & Smith, unit 26, page 677-681
Integrated Systems IS1205, Unit 1, Section 1, Lesson 1. (http://www.cdli.ca/courses/isys1205/)
Integrating technology into problem solving (http://www.uwsa.edu/ttt/morin.htm)
Problem Solving Model (http://literacy.kent.edu/salt_fork/prob_solv/index.html)
Good Problem Solving Model with Example (http://www.mediafrontier.com/Article/PS/PS.htm)
Simple Problem Solving Situations. Use graphics and little text. (http://www.dushkin.com/online/study/problemsolving.mhtml)
Problem Solving Unit based upon deductive/inductive reasoning (http://gouchercenter.edu/jcampf/searching_for_solutions.htm)

60
Section 3: Unit 2 Skills Common to All Trades
Specifi c Curriculum Outcomes Suggested Learning and Teaching Strategies
Students will be expected to
Skilled Trades 1201
Topic 1 Technology and the Workplace
2.1.5 assess the uses of information technology in the skilled trades
[4.401]
For the Teacher
The purpose of this outcome is to understand that levels of communication exist in the workplace, that an or-ganized structure for managing those communications is necessary, and that a variety of tools exist to transfer those communications from person to person.
Points to emphasize:
Information is often immediate and requires rapid distribution.Skilled trades work sites may have hundreds of workers in dozens of trades, each providing and ask-ing for specialized information.Organization and distribution of information in some organized manner is directly related to the ef-fi ciency of the job site.Information may be graphical in nature, verbal, or written.Technological products and processes can play a role in managing the information of the job site.Information technology incorporates tools that disseminate information in a methodical and suc-cinct manner using contracts, blueprints and plans, memos, fact sheets, e-mail, blackberries, cell phonesThere is a need to manage large volumes of informa-tion, for example chain of command: site supervisor to specifi c trade supervisor to foreman to worker.
For the StudentAfter reviewing the materials presented by the teacher, discuss and formalize a defi nition of “infor-mation technology”. Pick 3 of the 6 trades and discuss how to have effec-tive management of information between the trades on a job site.
•
•
•
•
•
•
•
•
•

61
Section 3: Unit 2 Skills Common to All Trades
Suggested Assessment Strategies Resources
Skilled Trades 1201
Topic 1 Technology and the Workplace
Assessment
Paper and pencil
Students could be assessed for this activity with Ap-pendix B Knowledge Rubric
Discussion
After reviewing the materials presented by the teach-er, students could discuss and formalize a defi nition of “information technology”.
Research
Students could pick 3 of the 6 trades and discuss how to have effective management of information between the trades on a job site.
•
•
•
References
Managing IT in an organization (http://en.wikipedia.org/wiki/Information_technology)
Paper on Construction Information Technology (http://www.itcon.org/cgi-bin/special/Show?_id=2006emerge)
Database of papers on Information Technology in Construction (http://itc.fgg.uni-lj.si/)

62
Section 3: Unit 2 Skills Common to All Trades
Specifi c Curriculum Outcomes Suggested Learning and Teaching Strategies
Students will be expected to
Skilled Trades 1201
Topic 2 Reading Blueprints and Drawings
2.2.1 correctly use the alphabet of lines
[1.401][2.401]
For the Teacher
The purpose of this outcome is for students to under-stand the basic building block of communication in the trades. Sketching is a basic communications skill es-sential for all the construction trades. Workers use the skill to develop drawings of parts of a project to ensure construction accuracy and to communicate ideas to oth-ers. As in all forms of communications, there is a core alphabet. For technical drawings, that begins with the standard forms of lines.
Sketching is a quick form of drawing. Except for the lack of drawing tools (mechanical or CAD), it is the same process as any other form of technical drawing. That is, the same types of drawings are created, both pictorial and orthographic.
It is absolutely critical that sketching take place with-out the use of mechanical drawing aids. This means no rulers, and no measuring devices. Only one aid is permissible—the use of grid paper to help keep lines straight and as an aid in aligning parts of the drawing. Appendix A U2T2 Orthographic Grid is provided for the purpose
Points to emphasize
The alphabet of lines and the function of each type of lineProper sketching techniques for creating each line using a pencil and grid paper (grid needs to be very light)While learning to sketch properly can be time consuming initially, it is one of the most signifi cant skills that crosses all tradesTechnical sketching is a critical communications tool for all the trades, and for all technical industries and professions.
•
•
•
•

63
Section 3: Unit 2 Skills Common to All Trades
Suggested Assessment Strategies Resources
Skilled Trades 1201
Topic 2 Reading Blueprints and Drawings
Assessment
Paper and pencil
Students could be assessed for this activity with Ap-pendix B Skills Rubric
Using a horizontal/vertical grid paper (for example Appendix A U2T2 Orthographic Grid) to help align the sketch lines, and unlined plain paper with a grid placed beneath, students could sketch a few dozen of each line type, with the purpose of creating straight lines of the correct weight and stroke length
Construction lineVisible object linesHidden object linesCentre linesExtension linesDimension lines
Students could also sketch a series of shapes using both grid and unlined paper:
BoxTriangleCircle
•
•
••••••
•
•••
References
CDLI Course Communications Technology 2-3104, Unit 2, Section 3, Lesson 2b (http://www.cdli.ca/courses/ctecx104/)
DrawingsAppendix A U2T2 Orthographic Grid
ToolsSketching pencils
ConsumablesCopies of Appendix A U2T2 Ortho-graphic GridOther sketching paper
•
•
•
•

64
Section 3: Unit 2 Skills Common to All Trades
Specifi c Curriculum Outcomes Suggested Learning and Teaching Strategies
Students will be expected to
Skilled Trades 1201
Topic 2 Reading Blueprints and Drawings
2.2.1 correctly use the alphabet of lines
[1.401][2.401]
For the Student
Using
For the fi rst set, a horizontal/vertical grid paper (for example Appendix A U2T2 Orthographic Grid) to help align the sketch linesFor the second set, unlined plain paper, with the grid placed beneath to help align the lines
Complete two sets by sketching a few dozen of each line type, with the purpose of creating straight lines of the correct weight and stroke length
Construction lineVisible object linesHidden object linesCentre linesExtension linesDimension lines
Compete two sets by sketching a series of shapes
BoxTriangleCircle
•
•
••••••
•••

65
Section 3: Unit 2 Skills Common to All Trades
Suggested Assessment Strategies Resources
Skilled Trades 1201
Topic 2 Reading Blueprints and Drawings

66
Section 3: Unit 2 Skills Common to All Trades
Specifi c Curriculum Outcomes Suggested Learning and Teaching Strategies
Students will be expected to
Skilled Trades 1201
Topic 2 Reading Blueprints and Drawings
2.2.2 read and interpret pictorial draw-ings
[1.401][1.402][1.403][2.401][2.402]
For the Teacher
The purpose of this outcome is to develop understand-ing of the standard method of representing three di-mensional objects as drawings where more than one face of the object is visible in the same drawing. While there are a number of types of pictorial drawings, the two most commonly used are cabinet which is an older style, and isometric which is a more modern and more frequently used style.
Many students have diffi culty visualizing in 3 dimen-sions. A common approach is to use 3-D physical models to illustrate the relationships between the actual object and the drawing. A series of 3 drawings are pro-vided in Appendix A U2T2 Drawings. Each drawing is based on a single 3-D shape. The sheet contains ortho-graphic, isometric, cabinet projection, and a pattern for constructing the object from paper. For this outcome, you will need to use the isometric, cabinet, and pos-sible the pattern drawings. The references to the Com-munications technology course include short video clip demonstrations of how to create each type of drawing.
For this outcome you will need to:
Create physical models of 3-D shapes, Name all of the faces on each model (1, 2, 3, etc). These can be made from wood, polyfoam, or folded paper. For folded paper use the patterns, and be sure to add tabs for gluing.Print the cabinet projection and isometric drawing for each object. Demonstrate the relationship between the named faces of the objects and the corresponding parts of the isometric drawings and cabinet projections.
You may wish to create a larger set of different, but simple, additional objects and drawings for use with students. The simpler shapes used here help students understand the relationships between the parts of the
•
•
•

67
Section 3: Unit 2 Skills Common to All Trades
Suggested Assessment Strategies Resources
Skilled Trades 1201
Topic 2 Reading Blueprints and Drawings
Assessment
Paper and pencil
Students could be assessed for this activity with Ap-pendix B Skills Rubric
Using models and drawings supplied by the teacher, students could:
Match parts of a cabinet projection to named faces on physical modelsMatch parts of isometric drawings to named faces on physical models
•
•
•
•
References
CDLI Course Communications Technology 2-3104, Unit 2, Section 3, Lesson 2c, 2d, 2e and the video clips in Lesson 2 activities (http://www.cdli.ca/courses/ctecx104/)
DrawingsAppendix A U2T2 Drawing 1 Iso-metric and PatternAppendix A U2T2 Drawing 2 Iso-metric and PatternAppendix A U2T2 Drawing 3 Iso-metric and Pattern
•
•
•

68
Section 3: Unit 2 Skills Common to All Trades
Specifi c Curriculum Outcomes Suggested Learning and Teaching Strategies
Students will be expected to
Skilled Trades 1201
Topic 2 Reading Blueprints and Drawings
2.2.2 read and interpret pictorial draw-ings
[1.401][1.402][1.403][2.401][2.402]
object and how they are shown in different types of drawings. These forms appear in all mechanical draw-ings including building plans.
Points to emphasize
Pictorial drawings are the primary method of repre-senting technical information in a 3-D format.Cabinet projections combine a fl at, front-on view of an object with an extruded depth at an angle of 30, 45, or 60 degrees. The depth is drawn at half the actual size.Isometric drawings are approximations of perspec-tive drawings, but simplifi ed so that the three major axes of a box are drawn vertical, and at 30 degrees from horizontal to the left and right. This makes them easy to do with mechanical drafting tools. All faces of an isometric are drawn using actual mea-surements (or using the same scale) Starting with the basic box shape, all objects can be drawn in an isometric layout. Special techniques exist for drawing circular and irregular shapes.The basic box has 6 faces. It is a convention (stan-dard practice) to draw it with the longest face to the left.
For the Student
Using models and drawings supplied by the teacher
Match parts of a cabinet projection to named faces on physical modelsMatch parts of isometric drawings to named faces on physical models
•
•
•
•
•
•
•

69
Section 3: Unit 2 Skills Common to All Trades
Suggested Assessment Strategies Resources
Skilled Trades 1201
Topic 2 Reading Blueprints and Drawings

70
Section 3: Unit 2 Skills Common to All Trades
Specifi c Curriculum Outcomes Suggested Learning and Teaching Strategies
Students will be expected to
Skilled Trades 1201
Topic 2 Reading Blueprints and Drawings
2.2.3 read and interpret orthographic projections
[1.401][1.402][1.403][2.401][2.402]
For the Teacher
The purpose of this outcome is to develop understand-ing of the method of drawing that represents one face of the object at a time in a drawing. You will need to use the orthographic views from the drawings for this outcome.
Six possible faces, or views, are available to represent a cube. In practice only three—labelled front view, right side view, and top view—are typically used. Check with the communications course info for details. Only three are used in the drawings from Appendix A. You will need to properly label the views before using the draw-ings, or do so with the students. One approach is to
Show the 3-D models and review the isometric drawings for them. Present the orthographic projections for each model and name the three standard views in the drawings.Identify each named face from the model and related it to the corresponding view in the ortho-graphic drawingRelate the orthographic projections to the corre-sponding isometrics by identifying which face of the isometric corresponds to which view of the ortho-graphic
Points to emphasize
Each view of an orthographic is simply what the object looks like from that side. While there are six views (six faces), it is normal to only show three views.The location of views is a convention. It is an agreed on way to do things that makes it easy for others to interpret a drawing based on the location of the views.The labels for the views are also a convention, and it applies to the location, not to the actual object. Front, right side, and top views are the normal.
•
•
•
•
•
•
•

71
Section 3: Unit 2 Skills Common to All Trades
Suggested Assessment Strategies Resources
Skilled Trades 1201
Topic 2 Reading Blueprints and Drawings
Assessment
Paper and pencil
Students could be assessed for this activity with Ap-pendix B Skills Rubric
Given a set of 3-D models and/or isometric draw-ings, and a set of orthographic projections students could match orthogonal views to the corresponding faces on the 3-D objects and / or isometric drawings
•
•
References
Wagner & Smith,
unit 6, page 114-142
CDLI Course Communications Technol-ogy 2-3104, Unit 2, Section 3, Lesson 2f and the video clips in Lesson 2 activities (http://www.cdli.ca/courses/ctecx104/)
DrawingsAppendix A U2T2 Drawing 1 Iso-metric and PatternAppendix A U2T2 Drawing 2 Iso-metric and PatternAppendix A U2T2 Drawing 3 Iso-metric and Pattern
••
•
•
•
72
Section 3: Unit 2 Skills Common to All Trades
Specifi c Curriculum Outcomes Suggested Learning and Teaching Strategies
Students will be expected to
Skilled Trades 1201
Topic 2 Reading Blueprints and Drawings
2.2.3 read and interpret orthographic projections
[1.401][1.402][1.403][2.401][2.402]
The front view may in fact show the side of the object.The location of the views corresponds to the faces of the object in the isometric drawing. Measurements on the isometric correspond to measurements on the orthographic viewsOrthographic views are used in all technical draw-ings, including building plans
For the Student
Given a set of 3-D models and/or isometric drawings, and a set of orthographic projections
Match orthogonal views to the corresponding faces on the 3-D objects and / or isometric drawings
•
•
•

73
Section 3: Unit 2 Skills Common to All Trades
Suggested Assessment Strategies Resources
Skilled Trades 1201
Topic 2 Reading Blueprints and Drawings

74
Section 3: Unit 2 Skills Common to All Trades
Specifi c Curriculum Outcomes Suggested Learning and Teaching Strategies
Students will be expected to
Skilled Trades 1201
Topic 2 Reading Blueprints and Drawings
2.2.4 sketch pictorial drawings
[1.405][2.402]
For the Teacher
The purpose of this outcome is enhance understanding of the relationship of the pictorial drawing to the real object and the orthographic views. Activities for this outcome can be accomplished with the drawings and models from the previous outcome. You will need to supply the isometric grid paper from Appendix A U2T2 ISO Grid. You may also wish to demonstrate use of the grid paper to create isometric sketches.
Points to emphasize
The isometric grid paper has lines that are at the correct anglesTo use the grid, count spaces.Draw directly on the linesAlternately the grid can be placed below plain paper, or preferably tracing paper, which will result in cleaner drawings
For the Student
Given a set of 3-D models and corresponding ortho-graphic projections, and using the isometric grid
Sketch isometric drawings of the models on the isometric grid paper
•
•••
•

75
Section 3: Unit 2 Skills Common to All Trades
Suggested Assessment Strategies Resources
Skilled Trades 1201
Topic 2 Reading Blueprints and Drawings
Assessment
Paper and pencil
Students could be assessed for this activity with Ap-pendix B Skills Rubric
Given a set of 3-D models and corresponding orthographic projections, and using the isometric grid students could sketch isometric drawings of the models on the isometric grid paper
•
•
References
Wagner & Smith,
unit 6, page 114-142
CDLI Course Communications Technology 2-3104, Unit 2, Section 3, (http://www.cdli.ca/courses/ctecx104/)
Lesson 2 Activities and the video clips in Lesson 2 activities Lesson 3
DrawingsAppendix A U2T2 Drawing 1 Iso-metric and PatternAppendix A U2T2 Drawing 2 Iso-metric and PatternAppendix A U2T2 Drawing 3 Iso-metric and PatternAppendix A U2T2 ISO Grid
ConsumablesCopies of Appendix A U2T2 ISO Grid
•
•
•
•
•
•
•
•

76
Section 3: Unit 2 Skills Common to All Trades
Specifi c Curriculum Outcomes Suggested Learning and Teaching Strategies
Students will be expected to
Skilled Trades 1201
Topic 2 Reading Blueprints and Drawings
2.2.5 sketch orthographic projections
[1.405][2.402]
For the Teacher
The purpose of this outcome is enhance understanding of the relationship of the orthographic views to the real object and the pictorial.
Activities for this outcome can be accomplished with the drawings and models from the previous outcome. You will need to supply the orthographic grid paper from Appendix A U2T2 Orthographic Grid. You may also wish to demonstrate use of the grid paper to create orthographic sketches.
Points to emphasize
The views are aligned vertically and horizontally. The top and front views have the same width. The front and right side views have the same height. The right side view and the top view have the same length or depthThe view labels apply to the view location on the drawing, regardless of what is being drawnSketch the outlines fi rst with construction lines and then block in the details with object linesViews need to be in correct location and properly labelled. All lines need to be of the correct type, and drawn properly. All lines need to be of the proper weight and in perfect alignment with the grid.
For the Student
Given a set of 3-D models and the corresponding iso-metric drawings, and using the orthographic grid
Sketch the front, side and top orthographic projec-tions in the proper locations, and label the views
•
•
•
•
•
•
•

77
Section 3: Unit 2 Skills Common to All Trades
Suggested Assessment Strategies Resources
Skilled Trades 1201
Topic 2 Reading Blueprints and Drawings
Assessment
Paper and pencil
Students could be assessed for this activity with Ap-pendix B Skills Rubric
Given a set of 3-D models and the corresponding isometric drawings, and using the orthographic grid students could sketch the front, side and top or-thographic projections in the proper locations, and label the views.
•
•
References
Wagner & Smith, unit 6, page 114-142
CDLI Course Communications Technology 2-3104, Unit 2, Section 3, (http://www.cdli.ca/courses/ctecx104/)
Lesson 2 Activities and the video clips in Lesson 2 activitiesLesson 3
DrawingsAppendix A U2T2 Drawing 1 Iso-metric and PatternAppendix A U2T2 Drawing 2 Iso-metric and PatternAppendix A U2T2 Drawing 3 Iso-metric and PatternAppendix A U2T2 Orthographic Grid
ConsumablesCopies of Appendix A U2T2 Ortho-graphic Grid
•
•
•
•
•
•
•

78
Section 3: Unit 2 Skills Common to All Trades
Specifi c Curriculum Outcomes Suggested Learning and Teaching Strategies
Students will be expected to
Skilled Trades 1201
Topic 2 Reading Blueprints and Drawings
2.2.6 correctly interpret drawing units and scale
[1.401][1.402][1.403][2.401][2.402]
For the Teacher
The purpose of this outcome is to help students under-stand the use of measurement and scale in drawings.
Drawings may larger than, equal to, or smaller than the actual objects they represent. Very few objects are of a size that is convenient to represent actual size in a draw-ing. Most are smaller than or larger than the drawing. Buildings fall into the latter category.
To accurately represent larger objects in a drawing, a scale must be used. One unit of measure in the draw-ing represents a larger unit of measure in the real object. In the imperial system, a typical scale for a house plan is 1/4 inch on the drawing represents 1 foot in the real world. For a metric drawing a scale can be 10:1, 20:1 or 50:1. Drawings also use dimensions to indicate actual size.
For this outcome, you will need to use Appendix A U2T2 Scale Drawing
Points to emphasize
Most drawings use a scaleWhile the scale can have any ratio, there are stan-dard ratios used for most drawings, especially for buildings. 1/4 “ to the foot, 20:1. 50:1 and so on.Scale ensures that drawings are an accurate repre-sentation of the object.While dimensions are placed on most drawings, sometimes it is easier to just measure the drawing and convert to the actual size using the scale.
For the Student
Given a partially dimensioned drawing, with a back-ground grid, answer the following questions
What is the total length and width of the building?What is the size of each of the smaller offi ces?What is the size of each window, and what is the distance from the center of each window to the outside edge of the left side of the building.
••
•
•
•••

79
Section 3: Unit 2 Skills Common to All Trades
Suggested Assessment Strategies Resources
Skilled Trades 1201
Topic 2 Reading Blueprints and Drawings
Assessment
Paper and pencil
Students could be assessed for this activity with Ap-pendix B Skills Rubric
Given a partially dimensioned drawing, with a background grid, students could answer the follow-ing questions,
What is the total length and width of the build-ing?What is the size of each of the smaller offi ces?What is the size of each window, and what is the distance from the center of each window to the outside edge of the left side of the building.
•
•
•
••
References
Wagner & Smith, unit 6, page 114-42
Mullin Miller Stephenson Drawing 5 from the set of drawings with the text.
DrawingsAppendix A U2T2 Scale Drawing•

80
Section 3: Unit 2 Skills Common to All Trades
Specifi c Curriculum Outcomes Suggested Learning and Teaching Strategies
Students will be expected to
Skilled Trades 1201
2.2.7 read and interpret fl oor plans
[1.401][1.402][1.403][2.401][2.402]
For the Teacher
The purpose of this outcome is to provide introductory experiences for students with the range of plans and structural drawings used in the construction trades.
Points to emphasize
Using a complete set of house plansDemonstrate the relationship between the drawings of a house plan and orthographic projections. A fl oor plan is a top view of a building that has been cut horizontally about midway up the wall.Demonstrate a foundation drawing and how it rep-resents the actual foundationDemonstrate a fl oor plan drawing and how it repre-sents the actual house structure and layoutDemonstrate elevation drawings and how they rep-resent the facade of the houseDemonstrate a section drawing and how it repre-sents the structure of the buildingDemonstrate a detail drawing and how it represents the construction details of a small component of the building
For the Student
Given a set of house plans
Read a foundation plan and determine building size and the location of doors, windows and support columnsRead a fl oor plan and determine size of each room and location and size of windows and doors and other featuresRead an elevation drawing and identify the rela-tionship of grade to the foundation and the type of siding and roofi ng. Read a section drawing and determine the actual components that make up the foundation, walls, fl oors and roof and the heights of structural compo-nents
••
•
•
•
•
•
•
•
•
•
Topic 2 Reading Blueprints and Drawings

81
Section 3: Unit 2 Skills Common to All Trades
Suggested Assessment Strategies Resources
Skilled Trades 1201
Assessment
Paper and pencil
Students could be assessed for this activity with Ap-pendix B Skills Rubric
Given a set of house plans, students couldRead a foundation plan and determine building size and the location of doors, windows and sup-port columnsRead a fl oor plan and determine size of each room and location and size of windows and doors and other featuresRead an elevation drawing and identify the rela-tionship of grade to the foundation and the type of siding and roofi ng. Read a section drawing and determine the actual components that make up the foundation, walls, fl oors and roof and the heights of structural com-ponents
•
••
•
•
•
References
Wagner & Smith, unit 6, page 114-142
Mullin Miller Stephenson, Drawings 1 to 10 from the set of drawings with the text.
DrawingsAppendix A U2T2 Foundation PlanAppendix A U2T2 Floor PlanAppendix A U2T2 ElevationsAppendix A U2T2 Section DrawingAppendix A U2T2 Detail Drawing
•••••
Topic 2 Reading Blueprints and Drawings

82
Section 3: Unit 2 Skills Common to All Trades
Specifi c Curriculum Outcomes Suggested Learning and Teaching Strategies
Students will be expected to
Skilled Trades 1201
2.2.8 sketch fl oor plans
[1.405][2.402]
For the Teacher
The purpose of this outcome is to further develop sketching technique while developing understanding of drawing used in construction. This exercise does not attempt to replicate the complexity of a set of building plans. Using the Appendix A drawings from the previ-ous outcome, give students copies of
A foundation planA fl oor planAn elevation drawingCopies of the Appendix A Orthographic Grid paper.
Points to emphasize
Proper use of lines is importantUse of scale, or counting the grid to determine loca-tion of linesEnsuring that all the key elements of each drawing needs to be presentFollow a technique of major outlines fi rst with con-struction lines, followed by blocking in details with object linesAll elements of the drawings should be included in the sketchSketches should be accurate within the precision of the grid linesAll lines should be of the correct type and weightDimensions should be included The method of drawing should show that the student understands the components of the object being sketched.
For the Student
Working from provided drawings and with the aid of grid paper, sketch
A foundation planA fl oor planAn elevation drawing
••••
••
•
•
•
•
•••
•••
Topic 2 Reading Blueprints and Drawings

83
Section 3: Unit 2 Skills Common to All Trades
Suggested Assessment Strategies Resources
Skilled Trades 1201
Assessment
Paper and pencil
Students could be assessed for this activity with Ap-pendix B Skills Rubric
Working from provided drawings and with the aid of grid paper, students could sketch
A foundation planA fl oor planAn elevation drawing
•
•
•••
References
Wagner & Smith, unit 6, page 114-142
Mullin Miller Stephenson Drawings, 1 to 10 from the set of drawings with the text.
DrawingsAppendix A U2T2 Foundation PlanAppendix A U2T2 Floor PlanAppendix A U2T2 ElevationsAppendix A U2T2 Orthographic Grid
••••
Topic 2 Reading Blueprints and Drawings

84
Section 3: Unit 2 Skills Common to All Trades
Specifi c Curriculum Outcomes Suggested Learning and Teaching Strategies
Students will be expected to
Skilled Trades 1201
2.2.9 read and interpret electrical draw-ings
[1.401][1.402][1.403][2.401][2.402]
For the Teacher
The purpose of this outcome is to provide an introduc-tion to the basic electrical symbols used on fl oor plans. Using the Appendix A U2T2 Electrical Drawing, and Drawings 8 and 10 from Mullin Miller Stephenson
Show examples of the electrical device (wire, switch, receptacle, ...) and sketch the symbol for that deviceDemonstrate the electrical drawing and how the symbols represent locations of devices.Demonstrate the method for showing circuits and the devices on the circuit, and the location of electri-cal appliancesDemonstrate the method for showing the location of the service entrance and distribution panel
Points to emphasize
The drawing has a reduced symbol setReview the complete symbol set in the text refer-ences and identify those used most frequentlyThe use of dashed lines on drawing to indicate wire runs. The Appendix A drawing does not show cir-cuit or home runs, only connections from switches to devices. Refer to the Mullen et al drawings for those itemsElectrical drawings are used by carpenters to build the structures needed to hold the electrical devices. They are used by electricians to plan circuits and wiring runs, and to place electrical boxes and wires for the electrical rough-ins
For the Student
Given the Appendix A U2T2 Electrical Drawing , ex-amine it and make a list of the
Locations and number of 120 volt receptaclesLocations and number of lightsLocations and number of switches and the devices they control, distinguishing single, and three-way switches
•
•
•
•
••
•
•
•••
Topic 2 Reading Blueprints and Drawings

85
Section 3: Unit 2 Skills Common to All Trades
Suggested Assessment Strategies Resources
Skilled Trades 1201
Assessment
Paper and pencil
Students could be assessed for this activity with Ap-pendix B Skills Rubric
Given the Appendix A U2T2 Electrical Drawing , students could examine it and make a list of the:
Locations and number of 120 volt receptaclesLocations and number of lightsLocations and number of switches and the devic-es they control, distinguishing single, and three-way switches
•
•
•••
References
Wagner & Smith, unit 6, page 114-142
Mullin Miller Stephenson, Unit 1-2, Drawings 8 and 10 from the set of draw-ings with the text.
DrawingsAppendix A U2T2 Electrical Draw-ing
•
Topic 2 Reading Blueprints and Drawings

86
Section 3: Unit 2 Skills Common to All Trades
Specifi c Curriculum Outcomes Suggested Learning and Teaching Strategies
Students will be expected to
Skilled Trades 1201
2.2.10 read and interpret plumbing drawings
[1.401][1.402][1.403][2.401][2.402]
For the Teacher
The purpose of this outcome is to provide an introduc-tion to the symbols and methods of representing plumb-ing systems on building plans.
Points to emphasize
Use the Plumbing references to demonstrate how pipe runs, control valves and the like are shown on drawings. Demonstrate the drawing symbols for plumbing components and devices, using samples of actual objects as references where possible. Show
Pipe runs on a drawingControls (valves, shut-offs, pressure regulators, ...)Hot and cold supply systemsDrainage systems and ventingOutside drainage systemsWater appliances
Use Appendix A U2T2 Floor Plan to show the location of water appliances, and the Appendix A Plumbing drawings to show details of pipe runs. From these, demonstrate how fi ttings, pipe sizes and lengths, and valves can be determined.
For the Student
Given a set of Plumbing Drawings
Identify all water appliancesIdentify the location and number of valves and other water control devicesAssuming that the water main enters the house directly below the hot water tank, calculate the ap-proximate number of feet required of each type of pipe (hot, cold, waste including for vents and water hammer)Count the number of fi ttings (90s, 45s, couplings, etc) needed to install the pipe runs, assuming a pipe length of 10 feet.Record the results in a table
•
••••••
•
••
•
•
•
Topic 2 Reading Blueprints and Drawings

87
Section 3: Unit 2 Skills Common to All Trades
Suggested Assessment Strategies Resources
Skilled Trades 1201
Assessment
Paper and pencil
Students could be assessed for this activity with Ap-pendix B Skills Rubric
Given a set of plumbing drawings, students could:Identify all water appliancesIdentify the location and number of valves and other water control devicesAssuming that the water main enters the house directly below the hot water tank, calculate the approximate number of feet required of each type of pipe (hot, cold, waste including for vents and water hammer)Count the number of fi ttings (90s, 45s, cou-plings, etc) needed to install the pipe runs, as-suming a pipe length of 10 feet.Record the results in a table
•
•••
•
•
•
References
Blankenbaker, chapter 4-6
Wagner & Smith, unit 6, page 114-142
DrawingsAppendix A U2T2 Floor PlanAppendix A U2T2 Plumbing Waste Water PlanAppendix A U2T2 Plumbing Supply PlanAppendix A U2T2 Plumbing Waste IsometricAppendix A U2T2 Plumbing Supply Isometric
••
•
•
•
Topic 2 Reading Blueprints and Drawings

88
Section 3: Unit 2 Skills Common to All Trades
Specifi c Curriculum Outcomes Suggested Learning and Teaching Strategies
Students will be expected to
Skilled Trades 1201
Topic 2 Reading Blueprints and Drawings
2.2.11 sketch electrical and plumbing systems on fl oor plans
[1.405][2.402]
For the Teacher
The purpose of this outcome is to have students develop a better understanding of the electrical and plumbing devices and their symbols and how they represent the systems on a plan
Provide each student with 2 copies of Appendix A U2T2 Floorplan, one for electrical and one for plumb-ing
Create and provide a specifi cation (list) of the electri-cal devices and where they need to be located. Write different requirements than that which are shown on the Appendix A U2T2 electrical drawing.
In the case of plumbing, use the results of the previous outcome for specifi cations
Points to emphasize
Receptacles need to be spaced about every 12 feetAll lights need to be controlled by a switch. It is customary to connect each switch to the device it controls on the plan using a dashed lineIn rooms where there is no overhead light it is customary to control one or more receptacles with a switch. In each case, half of the receptacle is live and the other half is switched220 receptacles are all on independent circuitsA maximum of 12 devices may be on a branch circuit
For the Student
Given 2 fl oorplans
Plan the electrical layout by sketching the devices in the correct location on the plan. Show which switches control which devicesPlan the plumbing layout by sketching the devices in the correct location on the plan
••
•
••
•
•

89
Section 3: Unit 2 Skills Common to All Trades
Suggested Assessment Strategies Resources
Skilled Trades 1201
Topic 2 Reading Blueprints and Drawings
Assessment
Paper and pencil
Students could be assessed for this activity with Ap-pendix B Skills Rubric
Given fl oorplans (2)
Students could plan the electrical layout by sketch-ing the devices in the correct location on the plan. Show which switches control which devices
Students could plan the plumbing layout by sketch-ing the devices in the correct location on the plan
•
•
•
References
Blankenbaker, chapter 4-6
Wagner & Smith, unit 6, page 114-142
DrawingsAppendix A U2T2 Floor Plan
ConsumablesCopies of Appendix A U2T2 Floor Plan
•
•
90
Section 3: Unit 2 Skills Common to All Trades
Specifi c Curriculum Outcomes Suggested Learning and Teaching Strategies
Students will be expected to
Skilled Trades 1201
Topic 3 Working in the Technology Lab
2.3.1 develop personal rules of conduct based on standard practise
[5.401][5.402][5.403]
For the Teacher
This topic forms the basis for the safe and orderly opera-tion of the technology education lab for the remainder of the year. Rules and regulations that govern individual and group behaviour are emphasized.
Points to emphasize:
Material on personal safety in Appendix A U2T3 Personal SafetyMaterial on machinery safety in Appendix B Tool Safety SheetsAppendix A U2T3 Student Safety Pledge Sheet is an integral part of the processSafety is an issue for every classSafety requires 100% on tests and performance
For the StudentComplete a safety checklist (resource) of the lab and insert into the portfolio.
Your exit route in case of a fi reThe location of the eye wash stationThe location of the fi re extinguishersType of extinguisher (rating) should be noted on the checklistThe location of the fi re hose
Identify potentially dangerous situations that can exist in a shop.Sign Student Safety Pledge Form agreeing to list of acceptable behaviours, and get your parent/guardian to sign. Give a copy to the teacher and place one in your worklog
•
•
•
••
•
••••
••
•
91
Section 3: Unit 2 Skills Common to All Trades
Suggested Assessment Strategies Resources
Skilled Trades 1201
Topic 3 Working in the Technology Lab
Assessment
Paper and pencil
Students could be assessed for this activity with Ap-pendix B Skills Rubric
Students could complete a safety checklist of the lab. These should include but are not limited to:
Your exit route in case of a fi reThe location of the eye wash stationThe location of the fi re extinguishersType of extinguisher (rating) should be noted on the checklistThe location of the fi re hose
Students must sign a Student Safety Pledge Form agreeing to list of acceptable behaviours, and get your parent/guardian to sign. A copy must go to the teacher and one retained by the student.
•
•
••••
•
•
References
Blankenbaker, page. 17.
Wagner & Smith, page. 51.
Workshop Safety (http://www.inthewoodshop.org/safety/wwd01.shtml)
Appendix A U2T3 Personal Safety
Appendix B Tool Safety Sheets
Appendix A U2T3 Student Safety Pledge Sheet

92
Section 3: Unit 2 Skills Common to All Trades
Specifi c Curriculum Outcomes Suggested Learning and Teaching Strategies
Students will be expected to
Skilled Trades 1201
Topic 3 Working in the Technology Lab
2.3.2 develop strategies for managing individual and team activities
[4.401][5.401][5.402][5.403]
For the Teacher
Teamwork is a critical factor in a well run technology education lab. Resources will be fi nite and consider-able overlap of projects (individual and team) will place demands on the distribution and use of tools. A policy that establishes individual and team activities is an es-sential component of the teaching strategy.
Points to emphasize:
Individual needs must be balanced with the needs of the groupUse of time management Need to share resourcesPlace materials and tools in the proper storage loca-tionsCooperation within and between groupsUse of good mannersTools and resources may need to be scheduled.Different roles of team membersWhy it is necessary to switch roles from time to timeTeam building methods
For the Student
Go through the teambuilding activity supplied by your teacher.
Write a brief paragraph that states how the needs of the team might differs from the needs of the indi-vidual in the skilled trades shop. This answer should refer to:
Sharing of resourcesTime managementBeing conscious of time when using tools and us-ing them effi cientlyProper storage of tools Scheduling the use of tools (sign in/sign out)Planning and communication between groupsThe different roles that team members can take on
•
•••
••••••
•
•••
••••

93
Section 3: Unit 2 Skills Common to All Trades
Suggested Assessment Strategies Resources
Skilled Trades 1201
Topic 3 Working in the Technology Lab
Assessment
Paper and pencil
Students could be assessed for this activity with Ap-pendix B Knowledge Rubric.
Students could write a brief paragraph that states how the needs of the team might differ from the needs of the individual in the skilled trades shop. This answer should refer to:
Sharing of resourcesTime managementBeing conscious of time when using tools and us-ing them effi cientlyProper storage of tools Scheduling the use of tools (sign in/sign out)Planning and communication between groupsThe different roles that team members can take on
•
•
•••
••••
References
Building Blocks for Teams (http://cac.psu.edu/ets/presentations/teams/student/index.html)
Team Roles (http://www.betterproductdesign.net/tools/organisation/belbin.htm)
Shop Management Summary (http://www.safety-council.org/info/OSH/shop.html#Anchor-Sho-18612)
Integrated Systems 1205 (http://www.cdli.ca/courses/isys1205/)
Unit 1, Section 1, Lesson 1 of Unit 3, section 1, lesson 3 of IS1205 Teambuilding activity
ICT Modules at the Virtual Teacher Centre (http://www.virtualteachercentre.ca)
Leadership SkillsTeambuildingFacilitation SkillsCollaboration
••
••••
94
Section 3: Unit 2 Skills Common to All Trades
Specifi c Curriculum Outcomes Suggested Learning and Teaching Strategies
Students will be expected to
Skilled Trades 1201
Topic 3 Working in the Technology Lab
2.3.3 maintain a work log (portfolio) for personal and professional as-sessment
[1.405]
For the Teacher
This SCO sets up one of the critical tools used in ap-prenticeship programs—the work log. Technology education course normally employ portfolios that stu-dents use to document their work. The worklog has a similar function. It is used by apprentices to document their activities and certifi cations. It is reviewed by their supervisor, typically a journeyperson, and is used to certify the apprentice for each stage of the process and for journeyperson status.
As an emulation of that practice, students will maintain a worklog for activities in the remainder of the course
Points to emphasize:
Worklog is a means of assessing the preparedness of an individual to complete tasks.Standard method of documenting and signing off when skills are acquired.A worklog is the standard tool in the apprenticeship programUsed to document jobs done, time on task, and has to be signed off by a journeyperson in the respective skilled trade.The worklog will be a standard tool that the student will use in an ongoing fashion to document their work
For the Student
Using the work log template provided by the instructor, and your work from the previous outcome, complete your fi rst work log entry
•
•
•
•
•

95
Section 3: Unit 2 Skills Common to All Trades
Suggested Assessment Strategies Resources
Skilled Trades 1201
Topic 3 Working in the Technology Lab
Assessment
Paper and pencil
Students could be assessed for this activity with Ap-pendix B Skills Rubric.
Work log
Students could, as this is their inaugural entry in their work log outline all of the skills and informa-tion they have been presented in the prevous out-comes.
•
•
References
Sample Log Book Template (http://www.cnc.bc.ca/apprenticetoolkit/pdf/recordbook.pdf )
Appendix A U2T2 Worklog

96
Section 3: Unit 2 Skills Common to All Trades
Specifi c Curriculum Outcomes Suggested Learning and Teaching Strategies
Students will be expected to
Skilled Trades 1201
Topic 3 Working in the Technology Lab
2.3.4 use accuracy and precision when processing materials
[1.404][1.405]
For the Teacher
This outcome will be primarily addressed through the remainder of the course. Activities below are mainly to acquaint students with the concept. When it is being employed in the rest of the course it is mainly skill-building. In the activities below it is knowledge-build-ing
Points to emphasize:
Resources are scarce and sharedWasteful cutting/usage limits the access of others.Good resource usage is a keystone to an effective and cost effi cient skilled trades site.Tools used to obtain accuracy when laying out on material:Ruler, scribe, protractor, templates, etc.“Measure twice, cut once” policy
You will need to provide project plans and materials lists for the activity.
For the Student
Given a drawing and a list of available materials, develop a plan for the most economical use of the materials.
•••
•
••

97
Section 3: Unit 2 Skills Common to All Trades
Suggested Assessment Strategies Resources
Skilled Trades 1201
Topic 3 Working in the Technology Lab
Assessment
Paper and pencil
Students could be assessed for this activity with Ap-pendix B Skills Rubric.The skill-building aspect of this outcome will be implemented throughout the fabrication activities during the remainder of the course.
Research
Given a drawing and a list of available materials, students could develop a plan for the most econom-ical use of the materials.
•
•
•
References
Blankenbaker, page 101, suggested activity 2.
Comm Tech 2-3104 - Course Portfolio, Unit 1, Unit Project, Part 3 (http://www.cdli.ca/courses/ctecx104/unit01/project/indexproj.html)
DrawingsDrawings as needed for the activities
ToolsTools as needed for the activities
ConsumablesMaterials as needed for the activities
•
•
•

98
Section 3: Unit 2 Skills Common to All Trades
Specifi c Curriculum Outcomes Suggested Learning and Teaching Strategies
Students will be expected to
Skilled Trades 1201
Topic 3 Working in the Technology Lab
2.3.5 qualify for use of tools and ma-chinery
[5.401][5.402][5.403]
For the Teacher
This is one of the critical training requirements for the ST1201 course. Students must have an excellent under-standing of the safety requirements and proper operat-ing parameters of all tools, in particular power tools. Injury is an issue with any type of tool.
Performance tests (Appendix B Tool Safety Sheets) assess the students overall competence and capability in the use of all tools.
Students will not necessarily be tested for all pieces of equipment. It is conceivable that in some cases, testing for equipment use may be limited to specifi c members of a project team.
Testing for capability is a long term issue that will take place over the course of the year. Just in time training will be required at specifi c points in the life of the activi-ties and major project. Certifi cation and training then needs to be provided by the instructor as needed.
Points to emphasize:
Skill acquisition for a tool is assessed by the teacher by written and observed assessments.A 100% pass score is the only acceptable grade.Skill acquisition is documented in the work log, dated and signed off by the teacher.
It may be useful to do a complete demonstration of all tools at this time. This will acquaint students with available tools and give them an overview of their use.
For the StudentComplete the written and performance test with 100% accuracy for any piece of equipment that you wish to use.
•
••
•

99
Section 3: Unit 2 Skills Common to All Trades
Suggested Assessment Strategies Resources
Skilled Trades 1201
Topic 3 Working in the Technology Lab
Assessment
Only 100% on the written and performance compo-nents of the test for each tool is acceptable. Assessment swill normally take place on an as-needed basis, prior to initial fi rst independent use of the tool by the student.
Pencil and Paper
Assess tool safety and use with Tool Safety Quizzes from Skilled Trades Safety Guide. This is assessment for learning, and students must repeat the quizzes until 100% is attained. No tool use is permitted before successful completion of the quizzes.
Practical Activity
Students must demonstrate the safe and proper operation of the tools and devices used in a ceramic tile project.
Work log
Students could create an appropriate entry in the worklog itemizing the tools they have qualifi ed for.
•
•
•
References
Blankenbaker, chapter 2, page 51.
Wagner & Smith,
unit 3, page 55, unit 4, page 75, unit 5, page 101.
CDLI Course Integrated System 1205, Unit 3, Section 3, Lesson 1 Materials Processing (Covers forming, separating, combining , conditioning, and fi nishing. Includes a number of video clips)
Appendix B Tool Safety Sheets
ToolsSee Appendix B Tool and Equipment Lists
•••
•

100
Section 3: Unit 2 Skills Common to All Trades
Specifi c Curriculum Outcomes Suggested Learning and Teaching Strategies
Students will be expected to
Skilled Trades 1201
Topic 3 Working in the Technology Lab
2.3.6 observe demonstrations for each of the construction activities in Unit 3 [5.401][5.402][5.403]
For the Teacher
Within the modular approach to instruction is an as-sumption that there will be time to do demonstrations of each of the activities students are expected to under-take. Some of this will occur as the individual modules start, but a quick overview of the activities should be undertaken before any of the modules begin. Th e pur-pose of this outcome is to create an opportunity to go over these activities as a whole before the module rota-tion begins. Th e module activities are listed below and in more detail in Unit 3.Topic 1 - Carpentry - Floor ConstructionTopic 2 - Carpentry - Wall FramingTopic 3 - Carpentry - Roof TrussesTopic 4 - Construction Electrician - CircuitsTopic 5 - Construction Electrician - Residential Wiring Topic 6 - Plumber - Toilet Installation Topic 7 - Plumber - Sink InstallationTopic 8 - Lather Topic 9 - Painter-DecoratorTopic 10 - Masonry: Ceramic Wall Tile InstallationTopic 11 - Masonry: Ceramic Floor Tile Installation
Th is could be presented a second time as the modules reach their half-way rotation as a refresher for students.
For the studentStudents could be expected to make a report on the demonstrations and should be encouraged to make copious notes. In small groups they could pres-ent their own demonstrations of how each module should be completed, or as part of their own module learning make a short presentation to the next group that is to rotate into their place.
•

101
Section 3: Unit 2 Skills Common to All Trades
Suggested Assessment Strategies Resources
Skilled Trades 1201
Topic 3 Working in the Technology Lab
Assessment
PresentationStudents could be expected to make a report on the demonstrations and should be encouraged to make copious notes. In small groups they could pres-ent their own demonstrations of how each module should be completed, or as part of their own mod-ule learning make a short presentation to the next group that is to rotate into their place.
•
ToolsSee Appendix B Tool and Equipment Lists All tools and equipment used in the modules should be demonstrated here.
ConsumablesConsumables as required for proper demonstration.
•
•
•

102
Section 3: Unit 2 Skills Common to All Trades
Specifi c Curriculum Outcomes Suggested Learning and Teaching Strategies
Students will be expected to
Skilled Trades 1201
Topic 3 Working in the Technology Lab
2.3.7 identify the trades required for each component of the construc-tion sequence [4.401]
For the Teacher
The purpose of this outcome is to get a ‘big picture’ un-derstanding of how a construction site is managed and sequenced. The role of the trades should be identifi ed as key factors in scheduling their appearance on the job.
Points to emphasize
Although obvious, all buildings are constructed from the ground up. Site prep, layout, and excavation are prerequisites. Footing installation especially the de-gree to which it is dead level makes subsequent work easier or more diffi cult.Each component has a logical and critical function. Regulations and codes control specify material type, sizing, and spacing to ensure a safe structure. Chang-es in codes and regs occur from time to time as new materials and techniques are employed.Because the drawings are meant to simplify, they il-lustrate traditional materials, ie., solid wood. Many buildings, including houses are built with engineered wood, especially for girders, fl oor joists, and sheath-ing. Demonstrate samples of those as well.The order of construction dictates when each of the trades is required on site. Also the inspection process affects scheduling of the trades. For example, elec-trical and plumbing rough-in needs to be inspected before the wall cavities are closed in.Some trades have to come to the site multiple times. For example, electricians and plumbers have to show up to do the rough-ins and then come back after the inside painting is complete to install the receptacles, switches, lights, and water appliances.
For the Student
Given the construction sequence
Identify the trade that is responsible for each taskConstruct a schedule of trades that shows the se-quence as they are required on the construction site.Create an appropriate entry in the Worklog
•
•
•
•
•
••
•

103
Section 3: Unit 2 Skills Common to All Trades
Suggested Assessment Strategies Resources
Skilled Trades 1201
Topic 3 Working in the Technology Lab
Assessment
Research
Students could identify the trade that is responsible for each task and construct a schedule of trades that shows the sequence as they are required on the construction site.
Work log
Students could create an appropriate entry in the Worklog.
•
•
References
Appendix A U3T2 Construction Se-quence
Plans of Training for the 7 courses
http://www.ed.gov.nl.ca/app/ plansoftraining/pdf/carpenter.pdf http://www.ed.gov.nl.ca/app/ plansoftraining/pdf/reselectrical.pdf http://www.ed.gov.nl.ca/app/ plansoftraining/pdf/reselectrical.pdf http://www.ed.gov.nl.ca/app/ plansoftraining/pdf/lather04.pdf http://www.ed.gov.nl.ca/app/ plansoftraining/pdf/paintdecorator.pdf http://www.ed.gov.nl.ca/app/ plansoftraining/pdf/mason.pdf
Student produced design brief
DrawingsAppendix A U3T2 Section DrawingAppendix A U3T2 Detail DrawingStudent produced drawings and sketches
•
•
•
•
•
•
•••

104 Skilled Trades 1201
Section 3: Unit 2 Skills Common to all Trades

Section 3: Unit 3 Skill-building in Selected Trades
Skilled Trades 1201 105
Unit 3 Overview The purpose of this unit is to develop understanding of the six designated trades in the context of a single construction project. The unit has two parallel strate-gies. After an initial research and prepatory task, the unit alternates between developing knowledge and skill related to a specifi c trade, followed by refl ection and job site clean-up. This pattern is repeated for the remain-ing 5 trades.
This approach is intended to emulate a job site experi-ence to the extent possible in the school technology lab.
The unit is organized into eleven topics. Each topic represents a specifi c module of instruction for the student. They are all based on seven hours, 2 hours of background, research and preparation, 4 hours of fabri-cation activities and 1 hour of refl ection.
Topic 1 Carpentry - Floor ConstructionTopic 2 Carpentry - Wall FramingTopic 3 Carpentry - Roof TrussesTopic 4 Construction Electrician - Circuits Topic 5 Construction Electrician - Residential WiringTopic 6 Plumber - Toilet InstallationTopic 7 Plumber - Sink InstallationTopic 8 LatherTopic 9 Painter-Decorator. Topic 10 Masonry - Ceramic Wall Tile InstallationTopic 11 Masonry - Ceramic Floor Tile Installation
This unit has a value of 70% of the course. Specifi c as-sessment strategies are recommended for each outcome.
•••••
••••••
Unit III: Skill-building in Selected Trades
Organization
Assessment

Section 3: Unit 3 Skill-building in Selected Trades
Specifi c Curriculum Outcomes Suggested Learning and Teaching Strategies
106 Skilled Trades 1201
Students will be expected to
3.1.1 review positions of all learning modules within the Fabrication Lab environment[2.401][2.402][2.405][3.401] [5.402]
For the Teacher
This is an opportunity for students to become familiar with all the modules for the Skilled Trades 1201 course. In the previous two outcomes, 2.3.6 and 2.3.7 students were introduced to the six trades they will become familiar with during this course. They were also shown demonstrations of what was needed to be done to suc-cessfully complete each of the modules. In this outcome, students must familiarize themselves with the fabrica-tion lab, position of modules, possible hazards, and loca-tion of tools and materials they may need to accomplish their tasks.
Points to emphasizeThis is a facilitated environment, where students will accomplish tasks with assistance from their teacher rather than specifi cally directed by themThere could be as many as eleven modules in opera-tion at any one time and students must be cognizant of what else is going on around them.Safety in the fabrication lab should take on new meaning at this point, as it is no longer about them personally, but also about what is going on around them.Being able to fi nd tools and materials in a timely fashion will decrease wasted time and allow students to complete their assigned modular tasks in plenty of time.
For the studentStudents could draw a quick diagram of the fabrica-tion lab as a whole. In this diagram each module position should be laid out, tool and materials stor-age should be indicated and potential access routers identifi ed.
•
•
•
•
•
Topic 1 Experiencing the Trades Modularly

Section 3: Unit 3 Skill-building in Selected Trades
Suggestions for Assessment Resources
Skilled Trades 1201 107
Assessment
Pencil and Paper
Students could draw a diagram of the fabrication lab. This diagram should include the position of all materials, tools and individual module stations.
Work log
Students could list all the module stations and their general positions in their work log.
•
•
Topic 1 Experiencing the Trades Modularly
References
Modular Layout Document
Skilled Trades 1201 Teacher Guide
ToolsSee Appendix A U3T2 Tool and Equipment List. Some of these tools require safety tests.
ConsumablesAs appropriate to the task at hand
•
•

Section 3: Unit 3 Skill-building in Selected Trades
Specifi c Curriculum Outcomes Suggested Learning and Teaching Strategies
108 Skilled Trades 1201
Students will be expected to
3.2.1 review and demonstrate safe prac-tices for use of standard hand, portable power, and stationary power tools for fl oor construction
[2.401][2.402][2.405][3.401] [5.402]
For the Teacher
This outcome will be interwoven with the rest of the carpentry outcomes, over the life of the trade related topics. Working with a wide variety of tools is at the heart of carpentry skills. The ones in this sample may be considered the basics.
For power tools in particular, a means of ensuring students are properly certifi ed to use them is essential. Normal practices is to use a combination of written and performance testing for each student for each tool. It is a good idea to maintain a chart of who is qualifi ed for what tools. You may wish to provide class wide instruc-tion on tools, followed by individual testing.
Points to emphasize
Safety is not just a set of rules. Safety is a way of life. It is a set of ideas, attitudes, behaviours and practices that are essential to the workplace. Safe practice does not eliminate risk, but it reduces risk. Safe practice is risk management.Safe use of tools is primarily using them in the prescribed manner, with the proper adjustments and usage procedures. It is also avoidance of clearly understood unsafe practices. In particular shortcuts and quick work-a rounds often increase the riskOnly students who are qualifi ed will be allowed to use a particular tool. Tool qualifi cation can occur on an as-needed basis.Tool qualifi cation has no margin of error. Only 100% on written/verbal/performance tests are ac-ceptable for qualifi cation.Each tool is different, but all tools have commonali-ties. Point out the commonalities with other tools when demonstrating a tool’s function, adjustments and operating procedures.
•
•
•
•
•
Topic 2 Carpentry - Floor Construction

Section 3: Unit 3 Skill-building in Selected Trades
Suggestions for Assessment Resources
Skilled Trades 1201 109
Assessment
Only 100% on the written and performance components of the test for each tool is acceptable.
Pencil and Paper
Assess tool safety and use with Tool Safety Quizzes from Skilled Trades Safety Guide. This is assessment for learning, and students must repeat the quizzes until 100% is attained. No tool use is permitted before successful completion of the quizzes.
•
References
Feirer, chapter 5-11
Wagner & Smith, unit 2-5, page 51-113.
Appendix B Tool Safety Sheets
DrawingsAs appropriate to the task at hand
ToolsSee Appendix A U3T2 Tool and Equipment List. Some of these tools require safety tests.
ConsumablesAs appropriate to the task at hand
•
•
•
Topic 2 Carpentry - Floor Construction
Section 3: Unit 3 Skill-building in Selected Trades
Specifi c Curriculum Outcomes Suggested Learning and Teaching Strategies
110 Skilled Trades 1201
Students will be expected to
Topic 2 Carpentry - Floor Construction
3.2.1 review and demonstrate safe prac-tices for use of standard hand, portable power, and stationary power tools for fl oor construction
[2.401][2.402][2.405][3.401] [5.402]
It may be useful to take one class and do an over-view demonstration of all tools. Include
Function of the toolParts of the toolAdjustments that can be made and the correct procedure for completing themSafe usage of the tool for performing the common tasksProcedures to follow in instances where the tool is not functioning or functioning outside the specs
For the StudentComplete the safety program for each tool that requires it, and that you intend to use
State and describe the safe operating procedure for using a tool at 100% accuracyDemonstrate safe use of a tool with 100% accu-racyRecord certifi cation for tool in the work log and have the teacher initial it
Use tools as needed, in accordance with accepted safe practices,Create an appropriate entry in the Worklog
•
•••
•
•
•
•
•
•
•
•

Section 3: Unit 3 Skill-building in Selected Trades
Suggestions for Assessment Resources
Skilled Trades 1201 111
Topic 2 Carpentry - Floor Construction

Section 3: Unit 3 Skill-building in Selected Trades
Specifi c Curriculum Outcomes Suggested Learning and Teaching Strategies
112 Skilled Trades 1201
Students will be expected to
Topic 2 Carpentry - Floor Construction
3.2.2 identify various types of fl oor framing systems and describe the advantages & disadvantages of various materials[1.401][1.402] [2.401][3.401]
For the TeacherPoints to emphasize
The two main types of fl oor framing involve plat-form and post and beam construction. Post and beam construction involve continuous posts from the basement to the roof. The stud-ding material for the walls run the full height of the house, and the fl oor materials are tied into the beam structures, rather than forming a part of the wall structure itself. This is not a common practice today, due to the costs of timbers and long run studs of this type.Platform framing makes the fl oor an integral part of the construction of the walls. Walls sit on the fl oor platform for each storey of the house. The fl oor platform forms the basis of the structure of the house. Flooring platforms are created by using long run horizontal beams (commonly called stringers) and then creating the platform at right angles to the beam. In the past the platform would rest on the stringer, but with the advent of joist hangers, the platform would but the stringer on either side. The lumber used to create the platform at right angles (called joists) will then form the basis for the fl oor and be sheathed.
Most often the fl oor joists are 300 mm (12 inches) or 400 mm (16 inches) apart. This is commonly ref-ered to as 12 or 16 inch centers. As well cross-bridg-ing, nailed between joists from the top of one to the bottom of the other, is used to stiffen the fl oor to transfer loads.
For the StudentStudents can differentiate between the house-fram-ing types and how this impacts the fl oor framing. This could involve a discussion of when they see the post and beam construction being most appropriate.
•
•
•
•
•
•

Section 3: Unit 3 Skill-building in Selected Trades
Suggestions for Assessment Resources
Skilled Trades 1201 113
Topic 2 Carpentry - Floor Construction
Feirer, chapter 20
Wagner & Smith, chapter 8
Hometime - Flooring DVD
www.hometime.com
Assessment
Research
Students could prepare a report comparing the various types of fl oor framing systems, listing the advantages and disadvantages of each. This should be done by researching the different fl oor frames in online and text sources.
Presentation
Students could do research into one fl ooring system and then present to the group as a whole.
Paper and Pencil
Students could label a diagram of common fl oor types, indicating the various parts of each fl oor framing system.
•
•
•

Section 3: Unit 3 Skill-building in Selected Trades
Specifi c Curriculum Outcomes Suggested Learning and Teaching Strategies
114 Skilled Trades 1201
Students will be expected to students could differentiate between the beam (stringer), and the joist and what materials they are usually constructed of.a discussion around the use of manufactured joists could be undertaken at this point.students could also note why cross-bridging is nec-essary and why it is more preferable than blocking, as well they could understand where holes should be cut in a joist, how large they should be and how important the spacing of these holes are for the strength of the joists
•
•
•
3.2.2 identify various types of fl oor framing systems and describe the advantages & disadvantages of various materials[1.401][1.402] [2.401][3.401]
Topic 2 Carpentry - Floor Construction

Section 3: Unit 3 Skill-building in Selected Trades
Suggestions for Assessment Resources
Skilled Trades 1201 115
Topic 2 Carpentry - Floor Construction

Section 3: Unit 3 Skill-building in Selected Trades
Specifi c Curriculum Outcomes Suggested Learning and Teaching Strategies
116 Skilled Trades 1201
Students will be expected to
Topic 2 Carpentry - Floor Construction
3.2.3 defi ne live and dead loads and state the important load consider-ations for fl oor framing
[1.401][1.402] [2.401][3.401]
For the Teacher
Live and dead loads differentiate between the weights a fl oor will take on a daily basis and the weights it has to take just for the structure of the building itself. They are designated in different areas within the residential construction.
Points to emphasize:
Dead loads are based on the mass of the structure being supported itself. A dead load in fl oor con-struction would be the weight of the fl oor sheathing, walls, partitions, and roof for example.Live loads are based on the designed use of the structure. A live load in fl oor construction would include the weight of appliances, furniture, inhabit-ants, fi xtures, wall hangings, and even snow on the roof.For fl oor framing, the use of the room in question will determine how structurally stiff the fl oor has to be. It may be a consideration in whether fl oor joists will be placed at 300 mm or 400 mm (12 or 16 inch) centers. It may also mean a larger nominal size of joist will be used.
For the StudentStudents could layout a fl oor framing project. While doing the layout, consideration of what the dead load and live load will be for the particular fl oor should be taken into account. The fl oor underneath a wall partition would have a dead load consider-ation, while the fl oor in the center of a room with have a number of live load considerations.
•
•
•
•

Section 3: Unit 3 Skill-building in Selected Trades
Suggestions for Assessment Resources
Skilled Trades 1201 117
Topic 2 Carpentry - Floor Construction
Assessment
Pencil and paperStudents could layout a fl oor framing project. This should be done on a work plan diagram involving a fl oor plan or plan for this module.Students could indicate, on the layout, consider-ation of what the dead load and live load will be for the particular fl oor. The fl oor underneath a wall partition would have a dead load consideration, while the fl oor in the center of a room with have a number of live load considerations.
Research
Students could research the different fl oor framing systems and examine how they handle live and dead loads. A comparison of the framing method should show the fundamental differences in the two con-structions.
Work LogStudents could make an entry in their work log discussing the nuances of live and dead loads, and why it is crucial to incorporate them into any house framing project.
•
•
•
•
•

Section 3: Unit 3 Skill-building in Selected Trades
Specifi c Curriculum Outcomes Suggested Learning and Teaching Strategies
118 Skilled Trades 1201
Students will be expected to
3.2.4 identify the various types of fl oor sheathing and the advan-tages and disadvantages of each [1.401][1.402] [2.401][3.401]
For the Teacher
When the term sheathing is used, we are usually con-sidering the sub-fl oor covering for a fl oor. In residential construction this is what is found under the hardwood, carpet, or vinyl fl oor.
For the purposes of this outcome, the three main fl oor sheathing types are:
Match lumber (tongue and grove lumber, ship lap)Tongue and grove plywoodOriented strand board (OSB)
The differences between each will identify their advan-tages and disadvantages.
Points to emphasize
Match lumber is primarily 19 mm x 166 mm (1 inch x 7 inch nominally) board with a tongue on one side and a groove on the other. This will permit tight placement of boards and reduce separation on the fl oor. It is thicker than most other sheathing types.Disadvantages include the number of boards re-quired to cover a fl oor space, that separation does occur although not gaps, and the amount of time for installation.Tongue and grove (t&g) plywood comes in a variety of thicknesses in 1200 mm x 2400 mm (4 ft x 8 ft) sheets, with a tongue on one of the long ends and a groove on the other. Once again it permits tight placement of the plywood and reduces separation on the fl oor. The major disadvantage of plywood is its cost. T&g plywood is the among the most expensive wood sheathing material on the market. Due to this fac-tor a thinner grade is usually selected for fl ooring, although plywood comes in a variety of widths.
•••
•
•
•
•
Topic 2 Carpentry - Floor Construction

Section 3: Unit 3 Skill-building in Selected Trades
Suggestions for Assessment Resources
Skilled Trades 1201 119
Assessment
Pencil and PaperStudents could do a comparison chart of each of the sheathing materials. This chart would include the advantages and disadvantages and how each of the sheathings address each others failings.
ResearchStudents could research a variety of alternative sheathing methods, those not presented in this out-come, and indicate their applicability to residential construction in Newfoundland and Labrador.
•
•
Feirer, pgs 382
Wagner & Smith, pgs 197-199
Hometime - Flooring DVD
www.hometime.com
Topic 2 Carpentry - Floor Construction

Section 3: Unit 3 Skill-building in Selected Trades
Specifi c Curriculum Outcomes Suggested Learning and Teaching Strategies
120 Skilled Trades 1201
Students will be expected to
3.2.4 identify the various types of fl oor sheathing and the advan-tages and disadvantages of each [1.401][1.402] [2.401][3.401]
OSB comes in a variety of lengths and widths, which is one of its main advantages. Sheets as large as 1200 mm x 4800 mm are available (larger sizes are manufactured but are impractical for most fab-rications). OSB is rigid throughout its area, and has positive environmental considerations.The major disadvantage of OSB is its vulnerability to moisture. Non-sealed edges within the sheet can absorb moisture and expand.
For the studentStudents could do a comparison chart of each of the sheathing materials. This chart would include the advantages and disadvantages and how each of the sheathings address each others failings.Students could research a variety of alternative sheathing methods, those not presented in this out-come, and indicate their applicability to residential construction in Newfoundland and Labrador.
•
•
•
•
Topic 2 Carpentry - Floor Construction

Section 3: Unit 3 Skill-building in Selected Trades
Suggestions for Assessment Resources
Skilled Trades 1201 121
Topic 2 Carpentry - Floor Construction

Section 3: Unit 3 Skill-building in Selected Trades
Specifi c Curriculum Outcomes Suggested Learning and Teaching Strategies
122 Skilled Trades 1201
Students will be expected to
3.2.5 create a work plan for the struc-tural component of the fl oor construction project
[1.402][1.405][4.402][4.403]
For the Teacher
To meet this outcome, students are expected to develop a work plan dealing with fl oor construction
The work plan is an essential fi rst step in any construc-tion activity. It ensures that workers understand what they have to do, and how to do it. To complete the plan, students will need to reference the previous top-ics. Use Appendix A Planning Guide: Information for Fabrication Planning as a guideline for this outcome.
Points to emphasize
Review the drawings for the fl oor construction, and make any additional sketches as needed during the remainder of the planning processMake a list of all the structural components that make up the structure of the fl oor construction, including their dimensions. Include sub-fl oor and sheathing.Determine how the materials will need to be mea-sured and marked for cutting, how they will be cut, and how they will be assembled. Identify tools and equipment needed, including for fastening parts togetherIdentify the construction sequence, listing what needs to be done in the order it needs to be done.Identify tools and equipment needed to perform the tasks. Identify items that they are not qualifi ed to use and plan to get certifi cation.
For the student
Students could identify the tools and equipment they will use. At this time it is important to ensure that any qualifi cations needed for those tools are obtained.
•
•
•
•
•
Topic 2 Carpentry - Floor Construction

Section 3: Unit 3 Skill-building in Selected Trades
Suggestions for Assessment Resources
Skilled Trades 1201 123
Topic 2 Carpentry - Floor Construction
Assessment
Achieving this sco requires the application of knowledge and skills acquired from work in previous topics and outcomes.
Pencil and paper
Assess this outcome with Appendix B Design Part 2 Planning Rubric
Workplan/layout
Students could draw a diagram to scale of the proj-ect to be undertaken in this module. This drawing should be mated with a description of the tools and techniques utilized in this section.
Work log
Students could include their workplan in their log books.
•
•
•
References
Appendix A Planning Guide: Informa-tion for Fabrication Planning
Student made materials
Drawings completed as part of the planning
Drawings
Appendix A U2T2 Section Drawing
Appendix A U2T2 Detail Drawing
One of these 2 sets
Appendix A U3T1 Design Plan Op-tion 1 and Appendix A U3T1 Design Option 1 Isometric
OrAppendix A U3T1 Design Plan Op-tion 2 andAppendix A U3T1 Design Option 2 Isometric
Appendix A U3T3 Flashing Drawing
Appendix A U2T2 Orthographic Grid
•
•
•
•
•
•

Section 3: Unit 3 Skill-building in Selected Trades
Specifi c Curriculum Outcomes Suggested Learning and Teaching Strategies
124 Skilled Trades 1201
Students will be expected to
Topic 2 Carpentry - Floor Construction
For the Teacher
Construction and sheathing of a fl oor frame is the fi rst of the modules presented in this guide. It is not in-tended that all students in your class will be doing this project simultaneously, but rather that each group will be doing their own module while this one is going on. Spacing for this project will be needed, it is expected that they will create a fl oor frame and sheath it.
For the purposes of this outcome, a 1200 mm (4 foot) square fl oor section would be suffi cient. Once a class is over, the fl oor frame can be stood on one end and placed away from the work area for storage.
Points to emphasize:
Materials for the construction exercise should be laid out and fi tted as fabrication progresses. Layouts are necessary to insure that cuts are made properly. The adage measure twice and cut once is an impor-tant part of the carpentry trade.All tools utilized must be qualifi ed for before useAll tools utilized must be returned to their proper place once class is completeClean-up of materials and work spaces should be complete before the end of classWorkspace should be kept free of clutter during the fabrication exerciseOnce completed assessment of the project should be made on the basis of how closely it resembles the plan, and whether or not it has been fabricated us-ing proper techniques and methodology.The fl oor section created in this exercise will have to be broken down during the refl ection class
For the StudentUsing the technical drawing and work plan as guid-ance, build the fl oor section complete with sub-fl oor (sheath).Create appropriate entry in the WorkLog and have teacher sign off.
•
••
•
•
•
•
•
•
3.2.6 construct and sheath a fl oor frame based on the technical drawings supplied by the instructor
[1.403][1.404][1.405][2.401] [2.402][2.405][4.402][5.401] [5.402][5.403]

Section 3: Unit 3 Skill-building in Selected Trades
Suggestions for Assessment Resources
Skilled Trades 1201 125
Assessment
Work log
Students could make an entry in their work log, outlining the skills and techniques they used to complete this task
Practical activity
Students could build the fl oor section complete with sub-fl oor (sheath), using the technical drawing and work plan as guidance.Assess this outcome with Appendix B Skills Rubric
•
•
•
References
Appendix A U3T2 Carpentry Tools
Appendix B Tool Safety Sheets
DrawingsAppendix A U3T2 Cutting Plan Drawing
ToolsLayout tools (rules, squares)Separating tools (saws, planes, drills)Combining tools (hammers, screw-drivers, pneumatic nailers)
Consumables2 by 4 lumberNailsScrewsConstruction Adhesive
•
•••
••••
Topic 2 Carpentry - Floor Construction

Section 3: Unit 3 Skill-building in Selected Trades
Specifi c Curriculum Outcomes Suggested Learning and Teaching Strategies
126 Skilled Trades 1201
Students will be expected to
Topic 3 Carpentry - Wall Framing
3.3.1 review safe practices for use of standard hand, portable power, and stationary power tools for wall framing
[2.401][2.402][2.405][3.401] [5.402]
For the Teacher
This outcome will be interwoven with the rest of the carpentry outcomes, over the life of the trade related topics. Working with a wide variety of tools is at the heart of carpentry skills. The ones in this sample may be considered the basics.
For power tools in particular, a means of ensuring students are properly certifi ed to use them is essential. Normal practices is to use a combination of written and performance testing for each student for each tool. It is a good idea to maintain a chart of who is qualifi ed for what tools. You may wish to provide class wide instruc-tion on tools, followed by individual testing.
Points to emphasize
Safety is not just a set of rules. Safety is a way of life. It is a set of ideas, attitudes, behaviours and practices that are essential to the workplace. Safe practice does not eliminate risk, but it reduces risk. Safe practice is risk management.Safe use of tools is primarily using them in the prescribed manner, with the proper adjustments and usage procedures. It is also avoidance of clearly understood unsafe practices. In particular shortcuts and quick work-a rounds often increase the risk.Only students who are qualifi ed will be allowed to use a particular tool. Tool qualifi cation can occur on an as-needed basis.Tool qualifi cation has no margin of error. Only 100% on written/verbal/performance tests are ac-ceptable for qualifi cation.Each tool is different, but all tools have commonali-ties. Point out the commonalities with other tools when demonstrating a tool’s function, adjustments and operating procedures.
•
•
•
•
•

Section 3: Unit 3 Skill-building in Selected Trades
Suggestions for Assessment Resources
Skilled Trades 1201 127
Assessment
Only 100% on the written and performance components of the test for each tool is acceptable.
Pencil and Paper
Assess tool safety and use with Tool Safety Quizzes from Skilled Trades Safety Guide. This is assessment for learning, and students must repeat the quizzes until 100% is attained. No tool use is permitted before successful completion of the quizzes.
•
References
Appendix A U3T2 Carpentry Tools
Appendix B Tool Safety Sheets
Topic 3 Carpentry - Wall Framing

Section 3: Unit 3 Skill-building in Selected Trades
Specifi c Curriculum Outcomes Suggested Learning and Teaching Strategies
128 Skilled Trades 1201
Students will be expected to It may be useful to take one class and do an over-view demonstration of all tools. Include
Function of the toolParts of the toolAdjustments that can be made and the correct procedure for completing themSafe usage of the tool for performing the common tasksProcedures to follow in instances where the tool is not functioning or functioning outside the specs
For the StudentComplete the safety program for each tool that requires it, and that you intend to use
State and describe the safe operating procedure for using a tool at 100% accuracyDemonstrate safe use of a tool with 100% accu-racyRecord certifi cation for tool in the work log and have the teacher initial it
Use tools as needed, in accordance with accepted safe practices,Create an appropriate entry in the Worklog
•
•••
•
•
•
•
•
•
•
•
3.3.1 review safe practices for use of standard hand, portable power, and stationary power tools for wall framing
[2.401][2.402][2.405][3.401] [5.402]
Topic 3 Carpentry - Wall Framing

Section 3: Unit 3 Skill-building in Selected Trades
Suggestions for Assessment Resources
Skilled Trades 1201 129
Topic 3 Carpentry - Wall Framing

Section 3: Unit 3 Skill-building in Selected Trades
Specifi c Curriculum Outcomes Suggested Learning and Teaching Strategies
130 Skilled Trades 1201
Students will be expected to
3.3.2 list and describe types of wall framing
[1.401][1.402] [2.401][3.401]
For the teacher
This outcome will address the difference between plat-form framing and post and beam construction. Stu-dents will be expected to know the differences in the two types of construction.
Points to emphasizePost and beam construction involve continuous posts from the basement to the roof. The studding material for the walls run the full height of the house. This type of construction call for fewer but larger pieces of wood spaced further apart than those used in conventional platform framing. This is not a common practice today, due to the costs of timbers and long run studs of this type.Platform framing is the most common method of framing currently used. Each level of the house is constructed separately. The fl oor is a platform built separately from the walls. Each wall is assembled fl at on the subfl oor and then tilted into place.Spacing varies based on whether the wall frame is in-tended for interior/exterior, bearing or non-bearing partitions. Common stud spacings are 400 mm (16 inch) for interior and 600 mm (24 inch) for exterior.Stud sizes vary between 38 mm x 89 mm (2 inch x 4 inch nominally) for interior walls and 38 mm x 140 mm (2 inch x 6 inch nominally) for exterior walls.These spacings allow for easy application of 1200 mm x 2400 mm (4 ft. x 8 ft.) sheets of sheathing material.
For the studentStudents can differentiate between the house-fram-ing types and how this impacts the wall framing. This could involve a discussion of when they see the post and beam construction being most appropriate.Students could research a variety of stud materials, indicating those which would be most suitable for the Newfoundland and Labrador climate.
•
•
•
•
•
•
•
Topic 3 Carpentry - Wall Framing

Section 3: Unit 3 Skill-building in Selected Trades
Suggestions for Assessment Resources
Skilled Trades 1201 131
References
Feirer, pgs 349-353
Wagner & Smith, pgs 205-214
Assessment
Research
Students could prepare a report comparing the various types of wall framing solutions, listing the advantages and disadvantages of each. This should be done by researching the different wall frames in online and text sources.
Presentation
Students could do research into one wall framing system and then present to the group as a whole.
Paper and Pencil
Students could label a diagram of common wall framing solutions, indicating the various parts of each system.
•
•
•
Topic 3 Carpentry - Wall Framing

Section 3: Unit 3 Skill-building in Selected Trades
Specifi c Curriculum Outcomes Suggested Learning and Teaching Strategies
132 Skilled Trades 1201
Students will be expected to
3.3.3 identify the important loading conditions to be considered when framing walls
[1.401][1.402][2.401][3.401]
For the teacher
The primary consideration for loading conditions is whether a wall frame will be load-bearing or non-bear-ing. Load bearing means that the wall is supporting the weight of a the structure above it and is in turn sup-ported by the sub-structure below it. Loading condi-tions cover the following wall framing components: sole plates, top plates, studs, headers (lintel), and sheathing. Different loading conditions will dictate that the nomi-nal sizes of these various materials may change.
Points to emphasize
Wall framing can be done using 38 mm x 89 mm (2 inch x 6 inch nominally) or 38 mm x 140 mm (2 inch x 6 inch nominally) lumber depending on the structure being built. There are strict limitations on where these materials can be used such as in load bearing and non-load bearing walls.Headers support structural loads above openings and transfers the load to the framing on either side of the openings. Headers can be made of solid lum-ber with spacers or engineered materials.
For the studentStudents could identify what a header is and when it is appropriate to use.Students could identify various types of alternative stud material and their applicability for load bearing partitions.
•
•
•
•
Topic 3 Carpentry - Wall Framing

Section 3: Unit 3 Skill-building in Selected Trades
Suggestions for Assessment Resources
Skilled Trades 1201 133
Assessment
Pencil and paperStudents could layout a wall framing project. This should be done on a work plan diagram involving a fl oor plan or plan for this module.Students could indicate, on the layout, consider-ation of what the loads for that particular wall.
Research
Students could research the different wall fram-ing systems and examine how they handle loads. A comparison of the framing method should show the fundamental differences in the two constructions.
•
•
•
References
Feirer, pgs 396
Wagner & Smith, pgs 205-214
Topic 3 Carpentry - Wall Framing

Section 3: Unit 3 Skill-building in Selected Trades
Specifi c Curriculum Outcomes Suggested Learning and Teaching Strategies
134 Skilled Trades 1201
Students will be expected to For the teacher
There are several products available to be used for wall sheathing depending on the wall construction being used. For the purposes of this outcome, we will concen-trate on exterior sheathing, as interior sheathing will be covered in the lathing section.
To answer the question why sheathe?
Sheathing strengthens the wall frame and adds rigid-ity to the house structure.Sheathing provides a solid nailing base for wall coverings.It seals the house and reduces air fl ow through the walls.It ties wall framing to fl oor framing again increasing the rigidity of the structure.
The most common sheathing products are:
Match lumber (tongue and grove lumber, ship lap)PlywoodOriented strand board (OSB)
The differences between each will identify their advan-tages and disadvantages.
Points to emphasize
Match lumber is primarily 19 mm x 166 mm (1 inch x 7 inch nominally) board with a tongue on one side and a groove on the other. This will permit tight placement of boards and reduce separation on the wall. It is thicker than most other sheathing types, increasing structure rigidity.Disadvantages include the number of boards re-quired to cover a wall space, that separation does occur although not gaps, and the amount of time for installation.Plywood comes in a variety of thicknesses in 1200 mm x 2400 mm (4 ft x 8 ft) sheets. Once again it permits tight placement and reduces separation on the wall.
•
•
•
•
•••
•
•
•
3.3.4 identify the various types of wall sheathing and the advan-tages and disadvantages of each [1.401][1.402] [2.401][3.401]
Topic 3 Carpentry - Wall Framing

Section 3: Unit 3 Skill-building in Selected Trades
Suggestions for Assessment Resources
Skilled Trades 1201 135
Topic 3 Carpentry - Wall Framing
Assessment
Pencil and PaperStudents could do a comparison chart of each of the sheathing materials. This chart would include the advantages and disadvantages and how each of the sheathings address each others failings.
ResearchStudents could research a variety of alternative sheathing methods, those not presented in this out-come, and indicate their applicability to residential construction in Newfoundland and Labrador.
•
•
References
Feirer, Chapter 21
Wagner & Smith, Unit 9
Hometime - Construction Basics DVD
www.hometime.com

Section 3: Unit 3 Skill-building in Selected Trades
Specifi c Curriculum Outcomes Suggested Learning and Teaching Strategies
136 Skilled Trades 1201
Students will be expected to The major disadvantage of plywood is its cost. Ply-wood is among the most expensive wood sheathing material on the market. Due to this factor a thinner grade is usually selected for walls, although plywood comes in a variety of widths. OSB comes in a variety of lengths and widths, which is one of its main advantages. Sheets as large as 1200 mm x 4800 mm are available (larger sizes are manufactured but are impractical for most fab-rications). OSB is rigid throughout its area, and has positive environmental considerations.The major disadvantage of OSB is its vulnerability to moisture. Non-sealed edges within the sheet can absorb moisture and expand.
For the studentStudents could do a comparison chart of each of the sheathing materials. This chart would include the advantages and disadvantages and how each of the sheathings address each others failings.Students could research a variety of alternative sheathing methods, those not presented in this out-come, and indicate their applicability to residential construction in Newfoundland and Labrador.
•
•
•
•
•
3.3.4 identify the various types of wall sheathing and the advan-tages and disadvantages of each [1.401][1.402] [2.401][3.401]
Topic 3 Carpentry - Wall Framing

Section 3: Unit 3 Skill-building in Selected Trades
Suggestions for Assessment Resources
Skilled Trades 1201 137
Topic 3 Carpentry - Wall Framing

Section 3: Unit 3 Skill-building in Selected Trades
Specifi c Curriculum Outcomes Suggested Learning and Teaching Strategies
138 Skilled Trades 1201
Students will be expected to
3.3.5 create a work plan for the struc-tural component of the wall fram-ing project
[1.402][1.405][4.402][4.403]
For the Teacher
To meet this outcome, students are expected to develop a work plan dealing with wall framing project.
The work plan is an essential fi rst step in any construc-tion activity. It ensures that workers understand what they have to do, and how to do it. To complete the plan, students will need to reference the previous top-ics. Use Appendix A Planning Guide: Information for Fabrication Planning as a guideline for this outcome.
Points to emphasize
Review the drawings for the wall framing, and make any additional sketches as needed during the re-mainder of the planning processMake a list of all the structural components that make up the structure of the wall framing, includ-ing their dimensions. Determine how the materials will need to be mea-sured and marked for cutting, how they will be cut, and how they will be assembled. Identify tools and equipment needed, including for fastening parts togetherIdentify the construction sequence, listing what needs to be done in the order it needs to be done.Identify tools and equipment needed to perform the tasks. Identify items that they are not qualifi ed to use and plan to get certifi cation.
For the student
Students should identify the tools and equipment they will use. At this time it is important to ensure that any qualifi cations needed for those tools are obtained.
•
•
•
•
•
Topic 3 Carpentry - Wall Framing

Section 3: Unit 3 Skill-building in Selected Trades
Suggestions for Assessment Resources
Skilled Trades 1201 139
Topic 3 Carpentry - Wall Framing
Assessment
Achieving this sco requires the application of knowledge and skills acquired from work in previous topics and outcomes.
Pencil and paper
Assess this outcome with Appendix B Design Part 2 Planning Rubric
Workplan/layout
Students could draw a diagram to scale of the proj-ect to be undertaken in this module. This drawing should be mated with a description of the tools and techniques utilized in this section.
Work log
Students could include their workplan in their log books.
•
•
•
References
Appendix A Planning Guide: Informa-tion for Fabrication Planning
Student made materials
Drawings completed as part of the planning
Drawings
Appendix A U2T2 Section Drawing
Appendix A U2T2 Detail Drawing
One of these 2 sets
Appendix A U3T1 Design Plan Op-tion 1 and Appendix A U3T1 Design Option 1 Isometric
OrAppendix A U3T1 Design Plan Op-tion 2 andAppendix A U3T1 Design Option 2 Isometric
Appendix A U3T3 Flashing Drawing
Appendix A U2T2 Orthographic Grid
•
•
•
•
•
•

Section 3: Unit 3 Skill-building in Selected Trades
Specifi c Curriculum Outcomes Suggested Learning and Teaching Strategies
140 Skilled Trades 1201
Students will be expected to For the teacher
Construction and sheathing of a wall frame is one of the modules presented in this guide. It is not intended that all students in your class will be doing this project simultaneously, but rather that each group will be doing their own module while this one is going on. Spacing for this project will be needed, it is expected that they will create a wall frame and sheathe it.
For the purposes of this outcome, a 1200 mm (4 foot) square wall section would be suffi cient. Once a class is over, the wall frame can be stood on one end and placed away from the work area for storage.
To meet this outcome students are expected to build a wall of a specifi ed size based on a supplied technical drawing. In a group of 2 students will be expected to select the proper materials based on proper nominal lumber size and based on lumber quality. They will measure and cut the selected material to proper sizes us-ing their technical drawing. Once they have assembled their wall section, with proper blocking, they will then choose their wall sheathing of choice. There are many different materials to choose from but our selection is lumber, plywood, or OSB. They will choose their wall sheathing, measure and cut the wall sheathing to the ap-propriate size, and then attach the wall sheathing to the studded wall.
Points to emphasize:
Materials for the construction exercise should be laid out and fi tted as fabrication progresses. Layouts are necessary to insure that cuts are made properly. The adage measure twice and cut once is an important part of the carpentry trade.All tools utilized must be qualifi ed for before useAll tools utilized must be returned to their proper place once class is complete
•
••
3.3.6 construct and sheathe a wall frame based on the technical drawings supplied by the instruc-tor
[1.403][1.404] [1.405][2.401] [2.402][2.405] [4.402][5.401] [5.402][5.403]
Topic 3 Carpentry - Wall Framing

Section 3: Unit 3 Skill-building in Selected Trades
Suggestions for Assessment Resources
Skilled Trades 1201 141
Topic 3 Carpentry - Wall Framing
Assessment
Work log
Students could make an entry in their work log, outlining the skills and techniques they used to complete this task
Practical activity
Students could build the wall section complete with sheath, using the technical drawing and work plan as guidance.Assess this outcome with Appendix B Skills Rubric
•
•
•
References
Feirer, Chapter 21
Wagner & Smith, Unit 9
Appendix A U3T2 Carpentry Tools
Appendix B Tool Safety Sheets
DrawingsAppendix A U3T2 Cutting Plan Drawing
ToolsLayout tools (rules, squares)Separating tools (saws, planes, drills)Combining tools (hammers, screw-drivers, pneumatic nailers)
Consumables2 by 4 lumberNailsScrewsConstruction Adhesive
•
•••
••••

Section 3: Unit 3 Skill-building in Selected Trades
Specifi c Curriculum Outcomes Suggested Learning and Teaching Strategies
142 Skilled Trades 1201
Students will be expected to Clean-up of materials and work spaces should be complete before the end of classWorkspace should be kept free of clutter during the fabrication exerciseOnce completed assessment of the project should be made on the basis of how closely it resembles the plan, and whether or not it has been fabricated us-ing proper techniques and methodology.The wall section created in this exercise will have to be broken down during the refl ection class
For the StudentUsing the technical drawing and work plan as guid-ance, build the wall section complete with sheath.Create appropriate entry in the worklog and have teacher sign off.
•
•
•
•
•
•
3.3.6 construct and sheathe a wall frame based on the technical drawings supplied by the instruc-tor
[1.403][1.404] [1.405][2.401] [2.402][2.405] [4.402][5.401] [5.402][5.403]
Topic 3 Carpentry - Wall Framing

Section 3: Unit 3 Skill-building in Selected Trades
Suggestions for Assessment Resources
Skilled Trades 1201 143
Topic 3 Carpentry - Wall Framing

Section 3: Unit 3 Skill-building in Selected Trades
Specifi c Curriculum Outcomes Suggested Learning and Teaching Strategies
144 Skilled Trades 1201
Students will be expected to
3.4.1 review safe practices for use of standard hand, portable power, and stationary power tools for roof truss fabrication[2.401][2.402][2.405][3.401] [5.402]
For the Teacher
This outcome will be interwoven with the rest of the carpentry outcomes, over the life of the trade related topics. Working with a wide variety of tools is at the heart of carpentry skills. The ones in this sample may be considered the basics.
For power tools in particular, a means of ensuring students are properly certifi ed to use them is essential. Normal practices is to use a combination of written and performance testing for each student for each tool. It is a good idea to maintain a chart of who is qualifi ed for what tools. You may wish to provide class wide instruc-tion on tools, followed by individual testing.
Points to emphasize
Safety is not just a set of rules. Safety is a way of life. It is a set of ideas, attitudes, behaviours and practices that are essential to the workplace. Safe practice does not eliminate risk, but it reduces risk. Safe practice is risk management.Safe use of tools is primarily using them in the prescribed manner, with the proper adjustments and usage procedures. It is also avoidance of clearly understood unsafe practices. In particular shortcuts and quick work-a rounds often increase the risk.Only students who are qualifi ed will be allowed to use a particular tool. Tool qualifi cation can occur on an as-needed basis.Tool qualifi cation has no margin of error. Only 100% on written/verbal/performance tests are ac-ceptable for qualifi cation.Each tool is different, but all tools have commonali-ties. Point out the commonalities with other tools when demonstrating a tool’s function, adjustments and operating procedures.
•
•
•
•
•
Topic 4 Carpentry - Roof Framing

Section 3: Unit 3 Skill-building in Selected Trades
Suggestions for Assessment Resources
Skilled Trades 1201 145
Topic 4 Carpentry - Roof Framing
Assessment
Only 100% on the written and performance components of the test for each tool is acceptable.
Pencil and Paper
Assess tool safety and use with Tool Safety Quizzes from Skilled Trades Safety Guide. This is assessment for learning, and students must repeat the quizzes until 100% is attained. No tool use is permitted before successful completion of the quizzes.
•
References
Feirer, chapter 5-11
Wagner & Smith, unit 2-5, page 51-113
Smart Guide Roofi ng
Appendix B Tool Safety Sheets
DrawingsAs appropriate to the task at hand
ToolsSee Appendix A U3T2 Tool and Equipment List. Some of these tools require safety tests.
ConsumablesAs appropriate to the task at hand
•
•
•

Section 3: Unit 3 Skill-building in Selected Trades
Specifi c Curriculum Outcomes Suggested Learning and Teaching Strategies
146 Skilled Trades 1201
Students will be expected to It may be useful to take one class and do an over-view demonstration of all tools. Include
Function of the toolParts of the toolAdjustments that can be made and the correct procedure for completing themSafe usage of the tool for performing the common tasksProcedures to follow in instances where the tool is not functioning or functioning outside the specs
For the StudentComplete the safety program for each tool that requires it, and that you intend to use
State and describe the safe operating procedure for using a tool at 100% accuracyDemonstrate safe use of a tool with 100% accu-racyRecord certifi cation for tool in the work log and have the teacher initial it
Use tools as needed, in accordance with accepted safe practices,Create an appropriate entry in the worklog
•
•••
•
•
•
•
•
•
•
•
3.4.1 review safe practices for use of standard hand, portable power, and stationary power tools for roof truss fabrication[2.401][2.402][2.405][3.401] [5.402]
Topic 4 Carpentry - Roof Framing

Section 3: Unit 3 Skill-building in Selected Trades
Suggestions for Assessment Resources
Skilled Trades 1201 147
Topic 4 Carpentry - Roof Framing

Section 3: Unit 3 Skill-building in Selected Trades
Specifi c Curriculum Outcomes Suggested Learning and Teaching Strategies
148 Skilled Trades 1201
Students will be expected to
3.4.2 list and describe different roof styles
[1.401][1.402][2.401][3.401]
For the teacher
To meet this outcome students are expected to demon-strate knowledge of the various roof styles that are used in construction. Even though there are many styles the various roof styles to be explored are fl at, gable, hip, and gambrel.
Points to emphasize
Flat roof: Supported on joists that also carry ceiling material on the underside. It may have a slight pitch to provide drainage.Gable roof: Two surfaces slope from the centerline of the structure. This forms two triangular shaped ends called gables.Hip: All four sides slope from a central point or ridge. The angles created when two sides meet are called hips.Gambrel: In this type of the gable roof, each slope is broken, usually near the center or ridge.
For the studentStudents could do a comparison of roof types in an visual assignment, indicating the differences between the roofs through diagrams.Students could discuss the differences between the roof types and which ones are most applicable given the climate in Newfoundland and Labrador.
•
•
•
•
•
•
Topic 4 Carpentry - Roof Framing
Section 3: Unit 3 Skill-building in Selected Trades
Suggestions for Assessment Resources
Skilled Trades 1201 149
Topic 4 Carpentry - Roof Framing
References
Feirer, Chapter 24
Wagner & Smith, unit 10
Smart Guide Roofi ng
Assessment
Research
Students could prepare a report comparing the vari-ous types of roofi ng styles, listing the advantages and disadvantages of each. This should be done by researching the different roof styles in online and text sources.
Presentation
Students could do research into one roofi ng system and then present to the group as a whole.
Paper and Pencil
Students could label a diagram of common roof so-lutions, indicating the various parts of each system.
•
•
•
Section 3: Unit 3 Skill-building in Selected Trades
Specifi c Curriculum Outcomes Suggested Learning and Teaching Strategies
150 Skilled Trades 1201
Students will be expected to
3.4.3 explain construction and installa-tion techniques for different types of roof frames
[1.401][1.402][2.401][3.401]
For the teacher
This outcome deals specifi cally with two types of roof frames; conventional “stick-built” rafters and the truss rafter. “Stick-built” rafters are built on site. The ceiling joists and rafters are laid out, cut, and installed one at a time. Trusses are engineered and prefabricated assem-blies that are usually factory built and delivered to the work site.
Points to emphasize
“Stick-built” rafters, as the name might suggest, are built one piece at a time using a ridge board and rafters. The ridge board is installed fi rst as a center piece and the common rafters are then tied into the ridge board and the top plate of the wall frame.Trusses are one piece constructs, whose design is based on the rigidity of the triangle. Triangular shapes are built into the truss such that the strain is parallel to the members making up the truss. This gives added strength and stability, making the trusses self-supporting.Trusses can also be made up on site.
For the studentStudents could explore the different methods of constructing roof frames. Students could discuss the differences between the two methods of roof framing, and how trusses elimi-nate the need for load bearing partitions in some instances
•
•
•
•
•
Topic 4 Carpentry - Roof Framing

Section 3: Unit 3 Skill-building in Selected Trades
Suggestions for Assessment Resources
Skilled Trades 1201 151
Assessment
Research
Students could explore the different methods of constructing roof frames.
Discussion
Students could discuss the differences between the two methods of roof framing, and how trusses elimi-nate the need for load bearing partitions in some instances
•
•
References
Feirer, Chapter 24
Wagner & Smith, unit 10
Smart Guide Roofi ng
Topic 4 Carpentry - Roof Framing

Section 3: Unit 3 Skill-building in Selected Trades
Specifi c Curriculum Outcomes Suggested Learning and Teaching Strategies
152 Skilled Trades 1201
Students will be expected to
3.4.4 identify the various types of roof sheathing and the advan-tages and disadvantages of each [1.401][1.402] [2.401][3.401]
For the teacher
There are several products available to be used for roof sheathing depending on the roof construction being used.
The most common sheathing products are:
Match lumber (tongue and grove lumber, ship lap)PlywoodOriented strand board (OSB)
The differences between each will identify their advan-tages and disadvantages.
Points to emphasize
Match lumber is primarily 19 mm x 166 mm (1 inch x 7 inch nominally) board with a tongue on one side and a groove on the other. This will permit tight placement of boards and reduce separation on the roof. It is thicker than most other sheathing types, increasing structure rigidity.Match lumber must be nailed securely to minimize movement in the boards so as to reduce distortion in roof shingles.Disadvantages include the number of boards re-quired to cover a wall space, that separation does occur although not gaps, and the amount of time for installation.Plywood comes in a variety of thicknesses in 1200 mm x 2400 mm (4 ft x 8 ft) sheets. Once again it permits tight placement and reduces separation on the roof. Plywood should be laid with the face grain perpen-dicular to the rafters.The major disadvantage of plywood is its cost. Ply-wood is among the most expensive wood sheathing materials on the market.OSB comes in a variety of lengths and widths, which is one of its main advantages. Sheets as large as 1200 mm x 4800 mm are available (larger sizes
•••
•
•
•
•
•
•
•
Topic 4 Carpentry - Roof Framing

Section 3: Unit 3 Skill-building in Selected Trades
Suggestions for Assessment Resources
Skilled Trades 1201 153
Assessment
Pencil and PaperStudents could do a comparison chart of each of the sheathing materials. This chart would include the advantages and disadvantages and how each of the sheathings address each others failings.
ResearchStudents could research which of the roof sheathing types are most commonly used in Newfoundland and Labrador and why.
Students could research a variety of alternative sheathing methods, those not presented in this out-come, and indicate their applicability to residential construction in Newfoundland and Labrador.
•
•
•
Topic 4 Carpentry - Roof Framing
References
Feirer, Chapter 24
Wagner & Smith, unit 10
Smart Guide Roofi ng
Section 3: Unit 3 Skill-building in Selected Trades
Specifi c Curriculum Outcomes Suggested Learning and Teaching Strategies
154 Skilled Trades 1201
Students will be expected to are manufactured but are impractical for most fab-rications). OSB is rigid throughout its area, and has positive environmental considerations.The major disadvantage of OSB is its vulnerability to moisture. Non-sealed edges within the sheet can absorb moisture and expand. On roofs the expan-sion can lead to bunching of shingles and leak issues.
For the studentStudents could research the different types of roof sheathing, identifying the advantages and disadvan-tages of each.
Match lumber (tongue and grove lumber, ship lap)PlywoodOriented strand board (OSB)
Students could also research which of the roof sheathing types are most commonly used in New-foundland and Labrador and why.
•
•
•
••
•
3.4.4 identify the various types of roof sheathing and the advan-tages and disadvantages of each [1.401][1.402] [2.401][3.401]
Topic 4 Carpentry - Roof Framing

Section 3: Unit 3 Skill-building in Selected Trades
Suggestions for Assessment Resources
Skilled Trades 1201 155
Topic 4 Carpentry - Roof Framing

Section 3: Unit 3 Skill-building in Selected Trades
Specifi c Curriculum Outcomes Suggested Learning and Teaching Strategies
156 Skilled Trades 1201
Students will be expected to
Topic 4 Carpentry - Roof Framing
3.4.5 given the span, develop a layout for a standard “w” roof truss
[1.401][1.402][1.403][1.404] [1.405][2.401][2.402][5.402]
For the Teacher
There are many different ways to construct a roof. Raf-ters and truss are the most common. While trusses are mostly purchased ready made, there are times when it is more economical to make them on site. Since they are a primary system in a house, this outcome is an exercise in understanding how they are constructed.
Trusses come in many shapes and styles, with the stan-dard “w” or Fink truss being the most common.
Points to emphasize
A truss owes its strength to the triangular structure of the components. It is very rigid in the vertical plane, but if it is twisted, it loses its strength. The chords and webs are joined with a plate on each side of the join. Factory made trusses use gang nails which must be pressed on. Driving with a hammer bends them and they are useless. Site made trusses use plywood gussets on each side of the joint. They are nailed in place.Demonstrate the span measurement from outside to outside of the walls. Demonstrate roof slope (pitch) in terms of rise and run, and point out the standard slopes in use.
For the Student
Given a 9.75 m (32 foot) span for a roof truss, and as-suming a 1:4 pitch, perform the following
Calculate the length of the major chords, allowing for a 3 foot (1m) eave overhangCalculate the location of the web-chord intersec-tionsUsing a grid paper, create a properly scaled sketch of the trussCreate an appropriate entry in the worklog
•
•
•
•
•
•
•
•

Section 3: Unit 3 Skill-building in Selected Trades
Suggestions for Assessment Resources
Skilled Trades 1201 157
AssessmentAssess this outcome with Appendix B Knowledge Rubric
Pencil and paper
Students could draw a diagram of a w-truss, indicat-ing span, chords and pitch.
Work log
Students could make an entry in their work log, containing a diagram of the truss and the nominal sizes.
•
•
•
References
Feirer
Wagner & Smith, unit 10, page 259-263
Smart Guide Roofi ng
DrawingsAppendix A U3T2 Standard (Fink) TrussAppendix A U2T2 Orthographic Grid
ToolsIf the model is constructed, layout tools and utility knives
ConsumablesCopies of Appendix A U2T2 Ortho-graphic GridScale lumber for truss
•
•
•
•
•
Topic 4 Carpentry - Roof Framing

Section 3: Unit 3 Skill-building in Selected Trades
Specifi c Curriculum Outcomes Suggested Learning and Teaching Strategies
158 Skilled Trades 1201
Students will be expected to
Topic 4 Carpentry - Roof Framing
3.4.6 create a work plan for the roof truss project [1.402][1.405][4.402] [4.403]
For the Teacher
To meet this outcome, students are expected to develop a work plan dealing with roof framing project.
The work plan is an essential fi rst step in any construc-tion activity. It ensures that workers understand what they have to do, and how to do it. To complete the plan, students will need to reference the previous top-ics. Use Appendix A Planning Guide: Information for Fabrication Planning as a guideline for this outcome.
Points to emphasize
Review the drawings for the roof framing, and make any additional sketches as needed during the re-mainder of the planning processMake a list of all the structural components that make up the structure of the roof framing, including their dimensions. Determine how the materials will need to be mea-sured and marked for cutting, how they will be cut, and how they will be assembled. Identify tools and equipment needed, including for fastening parts togetherIdentify the construction sequence, listing what needs to be done in the order it needs to be done.Identify tools and equipment needed to perform the tasks. Identify items that they are not qualifi ed to use and plan to get certifi cation.
For the student
Students should identify the tools and equipment they will use. At this time it is important to ensure that any qualifi cations needed for those tools are obtained.
•
•
•
•
•

Section 3: Unit 3 Skill-building in Selected Trades
Suggestions for Assessment Resources
Skilled Trades 1201 159
Topic 4 Carpentry - Roof Framing
Assessment
Achieving this sco requires the application of knowledge and skills acquired from work in previous topics and outcomes.
Pencil and paper
Assess this outcome with Appendix B Design Part 2 Planning Rubric
Workplan/layout
Students could draw a diagram to scale of the proj-ect to be undertaken in this module. This drawing should be mated with a description of the tools and techniques utilized in this section.
Work log
Students could include their workplan in their log books.
•
•
•
References
Appendix A Planning Guide: Informa-tion for Fabrication Planning
Student made materials
Drawings completed as part of the planning
Drawings
Appendix A U2T2 Section Drawing
Appendix A U2T2 Detail Drawing
One of these 2 sets
Appendix A U3T1 Design Plan Op-tion 1 and Appendix A U3T1 Design Option 1 Isometric
OrAppendix A U3T1 Design Plan Op-tion 2 andAppendix A U3T1 Design Option 2 Isometric
Appendix A U3T3 Flashing Drawing
Appendix A U2T2 Orthographic Grid
•
•
•
•
•

Section 3: Unit 3 Skill-building in Selected Trades
Specifi c Curriculum Outcomes Suggested Learning and Teaching Strategies
160 Skilled Trades 1201
Students will be expected to For the teacher
To meet this outcome students will be expected to construct a “w” truss using their design created in 3.3.5. In groups of 2, students will be expected to select the proper materials based on proper nominal lumber size and based on lumber quality. They will measure and cut the selected material to proper sizes using their technical drawing. Once they have assembled their roof truss they will attach them to the existing shed structure. There are many different materials to choose from but our selection is either lumber or plywood. The students will then choose their roof sheathing, measure and cut the roof sheathing to the appropriate size, and then attach the roof sheathing to the roof trusses. For the purposes of this outcome, a 600 mm x 2400 mm roof section would be suffi cient (2 foot x 8 foot). Once a class is over, the roof frame can be stood on one end and placed away from the work area for storage.
Points to emphasize:
Materials for the construction exercise should be laid out and fi tted as fabrication progresses. Layouts are necessary to insure that cuts are made properly. The adage measure twice and cut once is an important part of the carpentry trade.All tools utilized must be qualifi ed for before useAll tools utilized must be returned to their proper place once class is completeClean-up of materials and work spaces should be complete before the end of class Workspace should be kept free of clutter during the fabrication exerciseOnce completed assessment of the project should be made on the basis of how closely it resembles the plan, and whether or not it has been fabricated us-ing proper techniques and methodology.The roof section created in this exercise will have to be broken down during the refl ection class
•
••
•
•
•
•
3.4.7 construct and sheath a roof sec-tion based on the technical draw-ings supplied by the instructor
[1.403][1.404][1.405][2.401] [2.402][2.405][4.402][5.401] [5.402][5.403]
Topic 4 Carpentry - Roof Framing

Section 3: Unit 3 Skill-building in Selected Trades
Suggestions for Assessment Resources
Skilled Trades 1201 161
Topic 4 Carpentry - Roof Framing
Assessment
Work log
Students could make an entry in their work log, outlining the skills and techniques they used to complete this task
Practical activity
Students could build the roof section complete with sheath, using the technical drawing and work plan as guidance.Assess this outcome with Appendix B Skills Rubric
•
•
•
References
Feirer, Chapter 24, 25
Wagner & Smith, Unit 11
Appendix A U3T2 Carpentry Tools
Appendix B Tool Safety Sheets
DrawingsAppendix A U3T2 Cutting Plan Drawing
ToolsLayout tools (rules, squares)Separating tools (saws, planes, drills)Combining tools (hammers, screw-drivers, pneumatic nailers)
Consumables2 by 4 lumberNailsScrewsConstruction Adhesive
•
•••
••••

Section 3: Unit 3 Skill-building in Selected Trades
Specifi c Curriculum Outcomes Suggested Learning and Teaching Strategies
162 Skilled Trades 1201
Students will be expected to
3.4.7 construct and sheath a roof sec-tion based on the technical draw-ings supplied by the instructor
[1.403][1.404][1.405][2.401] [2.402][2.405][4.402][5.401] [5.402][5.403]
For the StudentUsing the technical drawing and work plan as guid-ance, build the roof frame section complete with sheath.Create appropriate entry in the worklog and have teacher sign off.
•
•
Topic 4 Carpentry - Roof Framing

Section 3: Unit 3 Skill-building in Selected Trades
Suggestions for Assessment Resources
Skilled Trades 1201 163
Topic 4 Carpentry - Roof Framing

Section 3: Unit 3 Skill-building in Selected Trades
Specifi c Curriculum Outcomes Suggested Learning and Teaching Strategies
164 Skilled Trades 1201
Students will be expected to
Topic 5 Construction Electrician - Circuits
3.5.1 discuss safe practices when work-ing with electricity.
[2.401][2.402][2.405][3.401] [5.402]
For the Teacher
This outcome addresses safety in the workplace when working with electricity. The teacher is expected to demonstrate the safe practices in the work environment, as well as test the student in those practices.
Safe practices start with ensuring that the electrical cir-cuit being worked on or tested is not energized. For this reason, the operation of metering devices and /or circuit tester such as a multi-meter should be emphasized.
Points to emphasize
Check to make sure the circuit is not energized before working on itFollow proper protocols for handling conductors, stripping insulation, and attaching them to devicesEnsure all devices are attached to ground as specifi ed
For the StudentDemonstrate the safe and proper operation of the following tools and devices, integral to safe practice with electricity:
MultimeterCircuit tester
Create an appropriate entry in the worklog.
•
•
•
•
••
•

Section 3: Unit 3 Skill-building in Selected Trades
Suggestions for Assessment Resources
Skilled Trades 1201 165
Assessment
Paper and pencil
Students could do up a list of general safety rules that deal with working with electricity. These are overriding concerns for any electrical work and not specifi c to a task.
Work log
Students could create an appropriate entry in their work logs, discussing what has been learned in this instance.
Practical activity
Students could demonstrate the proper use of a multimeter and circuit tester as a means of working with electricity safely.
•
•
•
References
Smart Guide Wiring pg. 4
Wagner & Smith, Chapter 26
Feirer, Unit 8, Chapter 39
Topic 5 Construction Electrician - Circuits

Section 3: Unit 3 Skill-building in Selected Trades
Specifi c Curriculum Outcomes Suggested Learning and Teaching Strategies
166 Skilled Trades 1201
Students will be expected to
3.5.2 demonstrate safe practices for use of hand tools common in the creation of electrical circuits
[2.401][2.402][2.405][3.401] [5.402]
For the Teacher
This outcome addresses the safe use of tools in electrical circuit creation. The teacher is expected to demonstrate the safe use of any tool operated in the work environ-ment, as well as test the student in that use.
Even though the last outcome dealt specifi cally with safe practices, this is still important when dealing with safe use of electrical tools. Safe tool use starts with ensuring that the electrical circuit being worked on or tested is not energized. For this reason, the operation of metering devices such as a multi-meter should be emphasized.
Points to emphasize
Check to make sure the circuit is not energized before working on itUse tools only for the task intended, and in the manner intendedFollow proper protocols for handling conductors, stripping insulation, and attaching them to devicesEnsure all devices are attached to ground as specifi ed It will be necessary to demonstrate usage of all tools and electrical devices to be used in the course. Demonstrations may occur during this topic, or some may be deferred until the electrical fabrication topic.
For the StudentDemonstrate the safe and proper operation of the following tools and devices:
Wire cuttersWire strippersMultimeterCircuit testerScrewdrivers
Create an appropriate entry in the worklog.
•
•
•
••
•
•••••
•
Topic 5 Construction Electrician - Circuits

Section 3: Unit 3 Skill-building in Selected Trades
Suggestions for Assessment Resources
Skilled Trades 1201 167
Assessment
Only 100% on the written and performance components of the test for each tool is acceptable.
Pencil and Paper
Assess tool safety and use with Tool Safety Quizzes from Skilled Trades Safety Guide. This is assessment for learning, and students must repeat the quizzes until 100% is attained. No tool use is permitted before successful completion of the quizzes.
Practical Activity
Students must demonstrate the safe and proper operation of the following tools and devices:
Wire cuttersWire strippersMultimeterCircuit testerScrewdrivers
Work log
Students could create an appropriate entry in the worklog itemizing the tools they have qualifi ed for.
•
•
•••••
•
Topic 5 Construction Electrician - Circuits
References
Smart Guide Wiring pg. 4
Wagner & Smith, Chapter 26
Feirer, Unit 8, Chapter 39

Section 3: Unit 3 Skill-building in Selected Trades
Specifi c Curriculum Outcomes Suggested Learning and Teaching Strategies
168 Skilled Trades 1201
Students will be expected to
3.5.3 defi ne electricity and electrical terms
[1.405]
For the Teacher
The electrician’s job, indeed safety on the job, is de-pendant on understanding the nature of electricity and how electrical systems work. It is important to under-stand the terminology of electricity in order to commu-nicate about electricity. Understanding begins with the atomic structure that underlies electricity
Points to emphasize:
Terminology of electricity:Resistance, abbreviated RCurrent, abbreviated IPower, abbreviated P Electrical componentsConductors,Resistors, Alternating and direct current.
Units of electrical measure Volt, symbol VOhms, symbol Ampere, symbol AWatt, symbol WJoules, symbol J
Electrical current as the net movement of electronsA circuit requires:
A load which uses the electricity to do somethingA source of electrical energyA pathway or conductorA control device, for example a switch
The circuit has to have one complete path through which electrons can fl ow (control device included)Drawings using a simple set of schematic symbols are typically used to describe a circuit.
The activity on sketching circuits will result in nearly identical schematics. That is deliberate, with the intent of having students realize that circuit schematics may be similar regardless of the power consumed by the load.
••••••••
••••••
••
••••
•
•
Topic 5 Construction Electrician - Circuits

Section 3: Unit 3 Skill-building in Selected Trades
Suggestions for Assessment Resources
Skilled Trades 1201 169
AssessmentAssess this outcome with Appendix B Knowledge Rubric
Paper and pencil
Students could create a table and match the follow-ing terms to their corresponding unit:
TermsResistance, Current, PowerUnitsVolts, Ohms, Ampere (amp), Watt.
Research
Students could do an assignment describing func-tion of each of the following basic components of a circuit, and give examples of each:
A source, A conductor, A control, and A load
Layout
Students could sketch a diagram that illustrates electricity in terms of electron fl ow through a group of atoms.
Students could sketch a schematic of each of the following circuits
A fl ashlight bulb powered by a single cell and a controlled with a switchA ceiling light in a room controlled by a wall switch
•
•
••••
•
••••
•
•
•
•
References
CDLI course Communications Technol-ogy, Unit 4, Section 1, lessons 1 to 9.
Comm Tech 2-3104, Unit 4, section 1, Electronics: Schematic Symbols found here. (http://www.cdli.ca/courses/ctecx104/unit04/section01/indexsect01.html)
Topic 5 Construction Electrician - Circuits

Section 3: Unit 3 Skill-building in Selected Trades
Specifi c Curriculum Outcomes Suggested Learning and Teaching Strategies
170 Skilled Trades 1201
Students will be expected to
3.5.3 defi ne electricity and electrical terms
[1.405]
For the Student
Complete the following series of activities
Create a table and match the following terms to their corresponding unit:
TermsResistance, Current, PowerUnitsVolts, Ohms, Ampere (amp), Watt.
Sketch a diagram that illustrates electricity in terms of electron fl ow through a group of atoms.Describe function of each of the following basic components of a circuit, and give examples of each:
A source, A conductor, A control, and A load
Sketch a schematic of each of the following circuitsA fl ashlight bulb powered by a single cell and a controlled with a switchA ceiling light in a room controlled by a wall switch
Create a suitable entry in the worklog
•
••••
•
•
••••
••
•
•
Topic 5 Construction Electrician - Circuits

Section 3: Unit 3 Skill-building in Selected Trades
Suggestions for Assessment Resources
Skilled Trades 1201 171
Work log
Students could create a suitable entry in the work-log dealing with the terms they have learned in this section.
•
Topic 5 Construction Electrician - Circuits

Section 3: Unit 3 Skill-building in Selected Trades
Specifi c Curriculum Outcomes Suggested Learning and Teaching Strategies
172 Skilled Trades 1201
Students will be expected to
3.5.4 describe the components of a standard residential electrical system
[1.405]
For the Teacher
This outcome addresses the structural subsystems in a residential electrical system.
Points to consider
Demonstrate the purpose and function of each component
The service entrance The electrical meter The distribution panel The branch circuits Speciality electrical systems (multimedia distribu-tion, networks, security)
Showing the physical objects, especially if they are as-sembled as a demo unit would be useful.
For the Student State the purpose and function of each of the fol-lowing components of the service entrance.
The service entrance The electrical meter The distribution panel The branch circuits Speciality electrical systems (multimedia distribu-tion, networks, security)
Complete the following questions from the Mullin, Miller, & Stephenson textbook: page 432, # 1 to 3. Create a suitable entry in the worklog
•
•••••
•
•••••
•
•
Topic 5 Construction Electrician - Circuits

Section 3: Unit 3 Skill-building in Selected Trades
Suggestions for Assessment Resources
Skilled Trades 1201 173
AssessmentAssess this outcome with Appendix B Knowledge Rubric
Research
Students could research the purpose and function of each of the following components of the service.
The service entrance The electrical meter The distribution panel The branch circuits Speciality electrical systems (multimedia distribu-tion, networks, security)
Work log Students could create a suitable entry in the work log dealing with the components of the electrical service.
•
•
•••••
•
References
Mullin, Miller, & Stephenson, unit 28, page 400-446
Wagner & Smith
unit 8-19, page 179-556unit 15, page 429-462unit 20, page 557-580unit 26, page 673-676
••••
Topic 5 Construction Electrician - Circuits

Section 3: Unit 3 Skill-building in Selected Trades
Specifi c Curriculum Outcomes Suggested Learning and Teaching Strategies
174 Skilled Trades 1201
Students will be expected to
3.5.5 list the electrical code require-ments for residential lighting and receptacle circuits.
[1.405]
For the Teacher
This sco deals with the regulatory bodies that govern the installation of electrical components in any type of construction venue in Canada and in the Provinces.
Regulation of building and electrical codes is a provin-cial jurisdiction. Each province regulates by passing laws which mandate a standard set of codes and regu-lations. Some provinces write their own codes, some do not. The Standards Council of Canada is a federal crown corporation, which has advisors from all the provinces, that creates a set of standards and the codes for many areas of construction, including electrical. Where provinces write their own, they are based on this standard and modifi ed to suit local conditions. Other provinces use the Standards Council codes.
Newfoundland and Labrador uses the Canadian Build-ing Codes as the authority.
Regulations that govern the electrical trades are:
Canadian Electrical CodeProvincial Electrical Code (for some)Municipal Electrical CodeCSA and ULInsurance regulations
Points to emphasize
Electrical equipment manufacture and installation of electrical equipment has signifi cant public safety issues, and is tightly regulated by standards and codesThe Canadian Electrical Code has multiple parts. One deals with equipment, one deals with residen-tial installation, and others deal with industrial and commercial applicationsThe Canadian Electrical Code sets a national stan-dard to which provincial and local codes and regula-tions adhere
•••••
•
•
•
Topic 5 Construction Electrician - Circuits

Section 3: Unit 3 Skill-building in Selected Trades
Suggestions for Assessment Resources
Skilled Trades 1201 175
Assessment Research
Students could identify each of the provincial and Canadian electrical regulating bodies and how they interact with the electrical code.Students could briefl y describe the function of each regulating body.
Paper and pencil
Students could identify the basic codes that regulate branch circuits in a residence and wiring to electrical appliance receptacles in a residence.
•
•
•
Topic 5 Construction Electrician - Circuits
References
Mullin, Miller, & Stephenson, unit 1, pg. 12

Section 3: Unit 3 Skill-building in Selected Trades
Specifi c Curriculum Outcomes Suggested Learning and Teaching Strategies
176 Skilled Trades 1201
Students will be expected to
3.5.5 list the electrical code require-ments for residential lighting and receptacle circuits.
[1.405]
Provinces set out which codes and regulations will be employed by passing laws.Codes specify which devices can go where in a building, how they have to be installed, how they have to be wired, how they have to protected with fuses and breakers, how many and what type of devices can be on a circuit.Provincial and municipal regulations specify who can perform electrical installations and the training and certifi cation they need
For the StudentIdentify each of the provincial and Canadian electri-cal regulating bodiesBriefl y describe the function of each regulating bodyLook in Mullin et al., starting on page 52, and identify the basic codes that regulate branch circuits in a residenceLook in Mullin et al., starting on page 52, and iden-tify the basic codes that regulate wiring to electrical appliance receptacles in a residence
•
•
•
•
••
•
Topic 5 Construction Electrician - Circuits

Section 3: Unit 3 Skill-building in Selected Trades
Suggestions for Assessment Resources
Skilled Trades 1201 177
Topic 5 Construction Electrician - Circuits

Section 3: Unit 3 Skill-building in Selected Trades
Specifi c Curriculum Outcomes Suggested Learning and Teaching Strategies
178 Skilled Trades 1201
Students will be expected to
3.5.6 confi gure and test low voltage cir-cuits in common residential use
[1.401][1.402][1.403][1.404] [1.405][2.401][2.402][5.402]
For the Teacher
This topic deals with common low voltage applications that may or may not be installed during a residential construction project.
Each of these circuits may be installed by the electrician, usually at the time of construction. It is expected that only one or two of these systems will be used as skill building activities.
Points to emphasize
Each of the systems in this section has unique requirements with respect to the way the cabling is installed, the kinds of equipment attached to the cabling, and the way that is used by the homeownerThe cost of installation when a house is under con-struction is minimal compared to installing after the house is completed. Labour is the major cost for most installations after the building is completeThere is a trend towards “smart” or “wired” houses where a communications infrastructure is installed in the house. This lets sensors in the house com-municate with central control systems, and with the homeowner. Regulation of HVAC (heating, ventila-tion and air conditioning), lighting and security can be as automated as the homeowner wants. As well, whole house entertainment with video, music and TV piped to any room in the house from a central computer is becoming more mainstream. Because the system is low voltage does not mean it has no hazards or diffi culties for installation. Knowledge of the equipment specifi cations, how it inter-operates and how to install it correctly can mean the difference between a clean fully functional installation and one that doesn’t work well. At some point it also connects to line voltage for its power.
•
•
•
•
Topic 5 Construction Electrician - Circuits

Section 3: Unit 3 Skill-building in Selected Trades
Suggestions for Assessment Resources
Skilled Trades 1201 179
Topic 5 Construction Electrician - Circuits
AssessmentAssess this outcome with Appendix B Skills Rubric
Practical Activity
Students could select, confi gure, install and test the following electrical circuits:
single pole switch to a lighttwo receptacles in seriestwo x three way switches to a lightswitch controlled receptacle
Work log
Students could create an appropriate entry in the work log, outlining the skills they have used.
•
•
••••
•
References
Smart Guide Wiring
Mullin, Miller, & Stephenson
Unit 25, page 356-380Unit 27, page 390-399
Appendix B Tool Safety Sheets
DrawingsTeacher produced Electrical Schemat-ics and Pictorials
ToolsElectrical tools as per Appendix A Electrical Tools
ConsumablesElectrical supplies for the low-voltage circuit specifi ed
••
•
•
•

Section 3: Unit 3 Skill-building in Selected Trades
Specifi c Curriculum Outcomes Suggested Learning and Teaching Strategies
180 Skilled Trades 1201
Students will be expected to
3.5.6 confi gure and test low voltage cir-cuits in common residential use
[1.401][1.402][1.403][1.404] [1.405][2.401][2.402][5.402]
It is suggested that a sample of these systems be mount-ed and installed on some sort of frame for demonstra-tion purposes.
You may wish to create schematics and pictorials for each circuit you want students to set up.
For the StudentSelect, confi gure, and install one of the following electrical circuits:
single pole switch to a lighttwo receptacles in seriestwo x three way switches to a lightswitch controlled receptacle
Test the system.Create an appropriate entry in the worklog.
•
••••
••
Topic 5 Construction Electrician - Circuits

Section 3: Unit 3 Skill-building in Selected Trades
Suggestions for Assessment Resources
Skilled Trades 1201 181
Topic 5 Construction Electrician - Circuits

Section 3: Unit 3 Skill-building in Selected Trades
Specifi c Curriculum Outcomes Suggested Learning and Teaching Strategies
182 Skilled Trades 1201
Students will be expected to
3.6.1 review safe practices when work-ing with electricity.
[2.401][2.402][2.405][3.401] [5.402]
For the Teacher
This outcome is intended to be a refresher for SCO 3.5.1, as it addresses safety in the workplace when work-ing with electricity. The teacher is expected to demon-strate the safe practices in the work environment, as well as test the student in those practices.
Safe practices start with ensuring that the electrical cir-cuit being worked on or tested is not energized. For this reason, the operation of metering devices and /or circuit tester such as a multi-meter should be emphasized.
Points to emphasize
Check to make sure the circuit is not energized before working on itFollow proper protocols for handling conductors, stripping insulation, and attaching them to devicesEnsure all devices are attached to ground as specifi ed
For the StudentDemonstrate the safe and proper operation of the following tools and devices, integral to safe practice with electricity:
MultimeterCircuit tester
Create an appropriate entry in the worklog.
•
•
•
•
••
•
Topic 6 Construction Electrician - Residential Wiring

Section 3: Unit 3 Skill-building in Selected Trades
Suggestions for Assessment Resources
Skilled Trades 1201 183
Topic 6 Construction Electrician - Residential Wiring
Assessment
Paper and pencil
Students could do up a list of general safety rules that deal with working with electricity. These are overriding concerns for any electrical work and not specifi c to a task.
Work log
Students could create an appropriate entry in their work logs, discussing what has been learned in this instance.
Practical activity
Students could demonstrate the proper use of a multimeter and circuit tester as a means of working with electricity safely.
•
•
•
References
Smart Guide Wiring pg. 4
Wagner & Smith, Chapter 26
Feirer, Unit 8, Chapter 39

Section 3: Unit 3 Skill-building in Selected Trades
Specifi c Curriculum Outcomes Suggested Learning and Teaching Strategies
184 Skilled Trades 1201
Students will be expected to
3.6.2 demonstrate safe practices for use of hand and power tools common in the installation of residential electrical circuits
[2.401][2.402][2.405][3.401] [5.402]
For the Teacher
This outcome addresses the safe use of tools in residen-tial wiring. The teacher is expected to demonstrate the safe use of any tool operated in the work environment, as well as test the student in that use. This outcome dif-fers from SCO 3.5.2 in that power tools are a common tool used in residential wiring.
Safe tool use starts with ensuring that the electrical circuit being worked on or tested is not energized. For this reason, the operation of metering devices such as a multi-meter should be emphasized.
Points to emphasize
Check to make sure the circuit is not energized before working on itUse tools only for the task intended, and in the manner intendedFollow proper protocols for handling conductors, stripping insulation, and attaching them to devicesEnsure all devices are attached to ground as specifi ed It will be necessary to demonstrate usage of all tools and electrical devices to be used in the course. Demonstrations may occur during this topic, or some may be deferred until the electrical fabrication topic.
For the StudentDemonstrate the safe and proper operation of the following tools and devices:
Wire cuttersWire strippersMultimeterCircuit testerScrewdriversDrillsSaws
Create an appropriate entry in the worklog.
•
•
•
••
•
•••••••
•
Topic 6 Construction Electrician - Residential Wiring

Section 3: Unit 3 Skill-building in Selected Trades
Suggestions for Assessment Resources
Skilled Trades 1201 185
Topic 6 Construction Electrician - Residential Wiring
Assessment
Only 100% on the written and performance components of the test for each tool is acceptable.
Pencil and Paper
Assess tool safety and use with Tool Safety Quizzes from Skilled Trades Safety Guide. This is assessment for learning, and students must repeat the quizzes until 100% is attained. No tool use is permitted before successful completion of the quizzes.
Practical Activity
Students must demonstrate the safe and proper operation of the following tools and devices:
Wire cuttersWire strippersMultimeterCircuit testerScrewdrivers
Work log
Students could create an appropriate entry in the worklog itemizing the tools they have qualifi ed for.
•
•
•••••
•
References
Smart Guide Wiring pg. 4
Wagner & Smith, Chapter 26
Feirer, Unit 8, Chapter 39

Section 3: Unit 3 Skill-building in Selected Trades
Specifi c Curriculum Outcomes Suggested Learning and Teaching Strategies
186 Skilled Trades 1201
Students will be expected to
3.6.3 review electricity and electrical terms
[1.405]
For the Teacher
These terms have been introduced in SCO 3.5.3. This outcome is present as a review, to insure that students are familiar with all the important terms. It is important to understand the terminology of electricity in order to communicate about electricity.
Points to emphasize:
Terminology of electricity:Resistance, abbreviated RCurrent, abbreviated IPower, abbreviated P Electrical componentsConductors,Resistors, Alternating and direct current.
Units of electrical measure Volt, symbol VOhms, symbol Ampere, symbol AWatt, symbol WJoules, symbol J
Electrical current as the net movement of electronsA circuit requires:
A load which uses the electricity to do somethingA source of electrical energyA pathway or conductorA control device, for example a switch
The circuit has to have one complete path through which electrons can fl ow (control device included)Drawings using a simple set of schematic symbols are typically used to describe a circuit.
The activity on sketching circuits will result in nearly identical schematics. That is deliberate, with the intent of having students realize that circuit schematics may be similar regardless of the power consumed by the load.
••••••••
••••••
••
••••
•
•
Topic 6 Construction Electrician - Residential Wiring
Section 3: Unit 3 Skill-building in Selected Trades
Suggestions for Assessment Resources
Skilled Trades 1201 187
Topic 6 Construction Electrician - Residential Wiring
AssessmentAssess this outcome with Appendix B Knowledge Rubric
Paper and pencil
Students could create a table and match the follow-ing terms to their corresponding unit:
TermsResistance, Current, PowerUnitsVolts, Ohms, Ampere (amp), Watt.
Research
Students could do an assignment describing func-tion of each of the following basic components of a circuit, and give examples of each:
A source, A conductor, A control, and A load
Layout
Students could sketch a diagram that illustrates electricity in terms of electron fl ow through a group of atoms.
Students could sketch a schematic of each of the following circuits
A fl ashlight bulb powered by a single cell and a controlled with a switchA ceiling light in a room controlled by a wall switch
•
•
••••
•
••••
•
•
•
•
References
CDLI course Communications Technol-ogy, Unit 4, Section 1, lessons 1 to 9.
Comm Tech 2-3104, Unit 4, section 1, Electronics: Schematic Symbols found here. (http://www.cdli.ca/courses/ctecx104/unit04/section01/indexsect01.html)

Section 3: Unit 3 Skill-building in Selected Trades
Specifi c Curriculum Outcomes Suggested Learning and Teaching Strategies
188 Skilled Trades 1201
Students will be expected to These activities are based on students being introduced to this topic for the fi rst time. It is assumed that students will be involved in a different set of activities for each of the outcomes in this section.
For the Student
Complete the following series of activities
Create a table and match the following terms to their corresponding unit:
TermsResistance, Current, PowerUnitsVolts, Ohms, Ampere (amp), Watt.
Sketch a diagram that illustrates electricity in terms of electron fl ow through a group of atoms.Describe function of each of the following basic components of a circuit, and give examples of each:
A source, A conductor, A control, and A load
Sketch a schematic of each of the following circuitsA fl ashlight bulb powered by a single cell and a controlled with a switchA ceiling light in a room controlled by a wall switch
Create a suitable entry in the worklog
•
••••
•
•
••••
••
•
•
3.6.3 review electricity and electrical terms
[1.405]
Topic 6 Construction Electrician - Residential Wiring

Section 3: Unit 3 Skill-building in Selected Trades
Suggestions for Assessment Resources
Skilled Trades 1201 189
Work log
Students could create a suitable entry in the work-log dealing with the terms they have learned in this section.
•
Topic 6 Construction Electrician - Residential Wiring

Section 3: Unit 3 Skill-building in Selected Trades
Specifi c Curriculum Outcomes Suggested Learning and Teaching Strategies
190 Skilled Trades 1201
Students will be expected to
Topic 6 Construction Electrician - Residential Circuits
3.6.4 identify and describe the devices used in a residential electrical system
[1.405]
For the Teacher
The purpose of this outcome is to ensure the student can visually identify and describe the purpose of each of the devices in use in residential electrical systems.
Points to consider
Using the list from the student activity, demonstrate each item to the students and describe the function of each and how each is deployed
As with the previous outcome, a demo setup containing all the devices would facilitate this outcome.
For the Student Create a table with two columns. List the items in column 1, describe the purpose/function of each of the items in column 2.
Breakers and fusesWires, (types and sizes) Octagon and outlet boxes Receptacles Switches Lighting fi xtures AppliancesConnectorsGFCIBallastsThermostatsTransformersSmoke detectorsLow voltage relayTelephone/data wiringChime and doorbell transformers
For each of the items, examine the device and deter-mine how wire is connected Create a suitable entry in the work log.Provinces set out which codes and regulations will be employed by passing laws.
•
•
••••••••••••••••
•
••

Section 3: Unit 3 Skill-building in Selected Trades
Suggestions for Assessment Resources
Skilled Trades 1201 191
Assessment Assess this outcome with Appendix B Knowledge Rubric
Research
Students could create a table with two columns, list-ing the following items in column 1, describing the purpose/function of each of the items in column 2.
Breakers and fusesWires, (types and sizes) Octagon and outlet boxes Receptacles Switches Lighting fi xtures AppliancesConnectorsGFCIBallastsThermostatsTransformersSmoke detectorsLow voltage relayTelephone/data wiringChime and doorbell transformers
For each of the items, examine the device and deter-mine how wire is connected.
Work log
Students could create a suitable entry in the work log.
•
•
••••••••••••••••
•
•
References
Miller, chapter 8
Herman, unit 10, page 305-331
Mullin, Miller, & Stephenson, unit 2-8, page 20-165
Topic 6 Construction Electrician - Residential Wiring

Section 3: Unit 3 Skill-building in Selected Trades
Specifi c Curriculum Outcomes Suggested Learning and Teaching Strategies
192 Skilled Trades 1201
Students will be expected to
3.6.4 identify and describe the devices used in a residential electrical system
[1.405]
Codes specify which devices can go where in a building, how they have to be installed, how they have to be wired, how they have to protected with fuses and breakers, how many and what type of devices can be on a circuit.Provincial and municipal regulations specify who can perform electrical installations and the training and certifi cation they need
•
•
Topic 6 Construction Electrician - Residential Circuits

Section 3: Unit 3 Skill-building in Selected Trades
Suggestions for Assessment Resources
Skilled Trades 1201 193
Topic 6 Construction Electrician - Residential Wiring
Section 3: Unit 3 Skill-building in Selected Trades
Specifi c Curriculum Outcomes Suggested Learning and Teaching Strategies
194 Skilled Trades 1201
Students will be expected to
3.6.5 list the electrical code require-ments in the installation of cables and wiring.
[1.405]
For the Teacher
This SCO deals with the regulatory bodies that govern the installation of electrical components in any type of construction venue in Canada and in the Provinces.
Regulation of building and electrical codes is a provin-cial jurisdiction. Each province regulates by passing laws which mandate a standard set of codes and regu-lations. Some provinces write their own codes, some do not. The Standards Council of Canada is a federal crown corporation, which has advisors from all the provinces, that creates a set of standards and the codes for many areas of construction, including electrical. Where provinces write their own, they are based on this standard and modifi ed to suit local conditions. Other provinces use the Standards Council codes.
Newfoundland and Labrador uses the Canadian Build-ing Codes as the authority.
Regulations that govern the electrical trades are:
Canadian Electrical CodeProvincial Electrical Code (for some)Municipal Electrical CodeCSA and ULInsurance regulations
Points to emphasize
Installation of electrical equipment has signifi cant public safety issues, and is tightly regulated by stan-dards and codesThe Canadian Electrical Code has multiple parts. One deals with equipment, one deals with residen-tial installation, and others deal with industrial and commercial applicationsThe Canadian Electrical Code sets a national stan-dard to which provincial and local codes and regula-tions adhere
•••••
•
•
•
Topic 6 Construction Electrician - Residential Circuits

Section 3: Unit 3 Skill-building in Selected Trades
Suggestions for Assessment Resources
Skilled Trades 1201 195
Assessment
Research
Students could identify each of the provincial and Canadian electrical regulating bodies and how they interact with the electrical code.Students could briefl y describe the function of each regulating body.
Paper and pencil
Students could identify the basic codes that regulate branch circuits in a residence and wiring to electrical appliance receptacles in a residence.
•
•
•
References
Mullin, Miller, & Stephenson, unit 1, pg. 12
Smart Guide Wiring pg. 4
Topic 6 Construction Electrician - Residential Wiring

Section 3: Unit 3 Skill-building in Selected Trades
Specifi c Curriculum Outcomes Suggested Learning and Teaching Strategies
196 Skilled Trades 1201
Students will be expected to
3.6.6 list the electrical code require-ments in the installation of cables and wiring.
[1.405]
Provinces set out which codes and regulations will be employed by passing laws.Codes specify which devices can go where in a building, how they have to be installed, how they have to be wired, how they have to protected with fuses and breakers, how many and what type of devices can be on a circuit.Provincial and municipal regulations specify who can perform electrical installations and the training and certifi cation they need
For the StudentIdentify each of the provincial and Canadian electri-cal regulating bodiesBriefl y describe the function of each regulating bodyLook in Mullin et al., starting on page 52, and identify the basic codes that regulate branch circuits in a residenceLook in Mullin et al., starting on page 52, and iden-tify the basic codes that regulate wiring to electrical appliance receptacles in a residence
•
•
•
•
••
•
Topic 6 Construction Electrician - Residential Circuits

Section 3: Unit 3 Skill-building in Selected Trades
Suggestions for Assessment Resources
Skilled Trades 1201 197
Topic 6 Construction Electrician - Residential Wiring

Section 3: Unit 3 Skill-building in Selected Trades
Specifi c Curriculum Outcomes Suggested Learning and Teaching Strategies
198 Skilled Trades 1201
Students will be expected to
3.6.7 create a work plan for the instal-lation of a residential electrical circuit
[1.402][1.405][4.402][4.403] [1.405]
For the Teacher
The work plan is an essential fi rst step. It ensures that students understand what they have to do, and how to do it. Planning and fabrication should be undertaken as a team effort.
In the previous topic on electricity, one outcome ad-dressed the two general sets of components (service and electrical devices) that might be installed in a residential construction in the production process. A work plan should be developed for the installation sequence of the identifi ed components. These are listed below. Students need to review the original drawings for the project that they chose from the two options, and plan the sequence of activities related to installing the electrical aspect of the project, commencing with the common compo-nents. The residential service will not be completed, but will have been demonstrated by the teacher. Each suc-cessive trade will construct its own work plan.
Students should also identify the tools and equipment they will use. A materials list will be a natural com-ponent in addition to the work plan. At this time it is important to ensure that any qualifi cations needed for those tools are obtained. Use Appendix A Planning Guide: Information for Fabrication Planning as a guide-line for this outcome.
Points to emphasize
Review the drawings for the project, and the struc-ture that has been built and sketch electrical draw-ings and schematics for the project to include
One lighting branch, switched using two three way switchesTwo receptacles, One receptacle should be split with the top half controlled using a SPST switch, and bottom half non-switchedOne exterior GFI receptacle
•
•
••
•
Topic 6 Construction Electrician - Residential Circuits

Section 3: Unit 3 Skill-building in Selected Trades
Suggestions for Assessment Resources
Skilled Trades 1201 199
Topic 6 Construction Electrician - Residential Wiring
Assessment
Achieving this sco requires the application of knowledge and skills acquired from work in previous topics and outcomes.
Pencil and paper
Assess this outcome with Appendix B Design Part 2 Planning Rubric
Workplan/layout
Students could draw a diagram to scale of the proj-ect to be undertaken in this module. This drawing should be mated with a description of the tools and techniques utilized in this section.
Work log
Students could include their workplan in their log books.
•
•
•
References
Appendix A Planning Guide: Informa-tion for Fabrication Planning
Student made materials
Drawings completed as part of the planning
Drawings
Appendix A U2T2 Section Drawing
Appendix A U2T2 Detail Drawing
One of these 2 sets
Appendix A U3T1 Design Plan Op-tion 1 and Appendix A U3T1 Design Option 1 Isometric
OrAppendix A U3T1 Design Plan Op-tion 2 andAppendix A U3T1 Design Option 2 Isometric
Appendix A U3T3 Flashing Drawing
Appendix A U2T2 Orthographic Grid
•
•
•
•
•

Section 3: Unit 3 Skill-building in Selected Trades
Specifi c Curriculum Outcomes Suggested Learning and Teaching Strategies
200 Skilled Trades 1201
Students will be expected to Make a list of all the electrical circuitsMake a list of the components for each circuit, including wiringIdentify tools and equipment needed, including for fastening parts together Identify the installation sequence, listing what needs to be done in the order it needs to be done. Identify items that they are not qualifi ed to use and plan to get certifi cation. At this time it is important to ensure that any quali-fi cations needed for those tools are obtained.
For the StudentBased on the drawings provided, and keeping the design brief in mind
Identify the individual circuitsMake a list of the electrical components for each circuitMake a sketch of the installation sequence indi-cating wire runs, where holes need to be bored, and the location of outlet boxesIdentify tools and equipment required and note any additional knowledge/skills needed to com-plete the work and make provisions with the teacher to obtain that qualifi cation
Create appropriate entry in the WorkLog and have teacher sign off.
••
•
•
•
•
•
••
•
•
•
3.6.7 create a work plan for the instal-lation of a residential electrical circuit
[1.402][1.405][4.402][4.403] [1.405]
Topic 6 Construction Electrician - Residential Circuits

Section 3: Unit 3 Skill-building in Selected Trades
Suggestions for Assessment Resources
Skilled Trades 1201 201
Topic 6 Construction Electrician - Residential Wiring

Section 3: Unit 3 Skill-building in Selected Trades
Specifi c Curriculum Outcomes Suggested Learning and Teaching Strategies
202 Skilled Trades 1201
Students will be expected to
3.6.8 install a residential electrical cir-cuit based on the technical draw-ings supplied by the instructor
[1.403][1.404][1.405][2.401] [2.402][2.405][4.402][5.401] [5.402][5.403]
For the Teacher
Points to emphasize
Electrical safety and the need to ensure a circuit is not energized when working on it. This constitutes the major safety issue for using electrical toolsThe wiring plans should be reviewed while examin-ing the structure to ensure no changes are required. If changes are needed, the plan needs to be modifi ed accordinglyCircuits and devices need to be marked out on the framing as per the wiring planElectrical boxes are installed nextWiring runs are laid out next and holes drilled for wireWires are pulled for all the circuits and outer casing stripped before wires are put into boxesThe electrical work will need to be done in several phases
Phase 1 is rough-in and it can be completed at this timePhase 2 is installation of receptacles, switches and electrical device/appliances and it gets completed after the interior work by the carpenters, lathers, and painters.
For the Student
Using the electrical plans you created in the previous activity, and Appendix A U2T2 Electrical Drawing as a reference, complete the following task for the electrical systems installation of the major project:
Mark out branch circuits on the structureOne lighting branch,Two receptacles, One exterior GFI receptacle
Install outlet and octagon boxesBore holes for wire runsPull wires for each circuitInstall receptacles and lights
•
•
•
••
•
•
•
•
•••
••••
Topic 6 Construction Electrician - Residential Circuits

Section 3: Unit 3 Skill-building in Selected Trades
Suggestions for Assessment Resources
Skilled Trades 1201 203
AssessmentAssess this outcome with Appendix B Skills Rubric
Practical Activity
Students could use the electrical plans created in the previous activity, and Appendix A U2T2 Electrical Drawing as a reference, tp complete the following task for the electrical systems installation of the major project:
Mark out branch circuits on the structureOne lighting branch,Two receptacles, One exterior GFI recep-tacle
Install outlet and octagon boxesBore holes for wire runsPull wires for each circuitInstall receptacles and lights
Work log
Students could create an appropriate entry in the work log, outlining the skills they have used.
•
•
•••
••••
•
References
Miller 130-133
Mullin, Miller, & Stephenson
Unit 25, page 356-380Unit 27, page 390-399
Appendix B Tool Safety Sheets
DrawingsTeacher produced Electrical Schemat-ics and Pictorials
ToolsElectrical tools as per Appendix A Electrical Tools
ConsumablesElectrical supplies for the low-voltage circuit specifi ed
••
•
•
•
Topic 6 Construction Electrician - Residential Wiring

Section 3: Unit 3 Skill-building in Selected Trades
Specifi c Curriculum Outcomes Suggested Learning and Teaching Strategies
204 Skilled Trades 1201
Students will be expected to Light should be switched using two three way switchOne receptacle should be split with the top half controlled using a SPST switch, and bottom half non-switched.Install other devices including low voltage sys-temsHave inspection performed by teacherTest electrical systemFinalize fi nish for next stage of construction.Complete appropriate cleanup and restoration of site for next trade sequence.
Create appropriate entry in the WorkLog and have teacher sign off.
•
•
•
••••
•
3.6.8 install a residential electrical cir-cuit based on the technical draw-ings supplied by the instructor
[1.403][1.404][1.405][2.401] [2.402][2.405][4.402][5.401] [5.402][5.403]
Topic 6 Construction Electrician - Residential Circuits

Section 3: Unit 3 Skill-building in Selected Trades
Suggestions for Assessment Resources
Skilled Trades 1201 205
Topic 6 Construction Electrician - Residential Wiring

Section 3: Unit 3 Skill-building in Selected Trades
Specifi c Curriculum Outcomes Suggested Learning and Teaching Strategies
206 Skilled Trades 1201
Students will be expected to
Topic 7 Plumber - Toilet Installation
3.7.1 demonstrate safe practices for use of hand and power tools common in toilet installation procedures.
[2.401][2.402][2.405][3.401] [5.402]
For the Teacher
Plumbing, like most specialized trades, employs special-ized tools that are used to cut, shape, and fi t pipe and fi ttings in the plumbing phase of a residential construc-tion project. The activity for this section will be carried out during the activities in remaining plumbing topics and SCOs.
Most of the plumbing tools are basic in terms of their operating requirements, and can be demonstrated quickly. One should not assume, however, that because they are simple, students automatically know how to use them, and that there are no safety requirements. Points to emphasize
Plumbing tools are designed for specifi c tasks. Us-ing the wrong tool can often damage the plumbing part, which can be an expensive mistakeSome tools are intended to be used in a specifi c way (adjustable wrenches for example are intended to be torqued in one direction), and will eventually be damaged if used incorrectlySafe practices must be observed at all timesDemonstrate the operation of the tools in the stu-dent activity
Modify the Appendix A Tool List for the student activi-ties as needed. The activity is restricted to knowledge about the tools, and assessment is as well. If you wish to modify the activity to skill building, plumbing com-ponents will need to be supplied so that students ma-nipulate them with the tools.
For the StudentUsing the plumbing tool list in Appendix A Tool List, identify each item and become familiar with the use and operation of the tool. A suitable entry should be made in the student work log
•
•
••
•
•

Section 3: Unit 3 Skill-building in Selected Trades
Suggestions for Assessment Resources
Skilled Trades 1201 207
References
Blankenbaker,
chapter 2, page 51chapter 7, page 132-136chapter 9, page 145-153
Appendix A Tool List
Appendix B Tool Safety Sheets
ToolsAs needed. See Appendix A U3T6 Plumbing Tools.
ConsumablesAs required by the activity in which tools are being used
•••
•
•
Topic 7 Plumber - Toilet Installation
Assessment
Only 100% on the written and performance components of the test for each tool is acceptable.
Pencil and Paper
Assess tool safety and use with Tool Safety Quizzes from Skilled Trades Safety Guide. This is assessment for learning, and students must repeat the quizzes until 100% is attained. No tool use is permitted before successful completion of the quizzes.
Practical Activity
Students must demonstrate the safe and proper operation of the tools and devices used in a toilet installation.
Work log
Students could create an appropriate entry in the worklog itemizing the tools they have qualifi ed for.
•
•
•

Section 3: Unit 3 Skill-building in Selected Trades
Specifi c Curriculum Outcomes Suggested Learning and Teaching Strategies
208 Skilled Trades 1201
Students will be expected to
3.7.2 identify, describe, and give the function of the components of a residential water supply system for a toilet
[1.401][1.402] [2.401][3.401]
For the Teacher
The supply side of the plumbing system begins with the cold water source from a well or a municipal water sup-ply. The supply line is usually pressurized, and can be from 3/4 inch (1.9cm) to 1 1/2 inch (3.8cm) diameter. The size of the pipe is reduced for the distribution lines in the house. The fi rst branch is to the hot water heater. Two parallel branches of hot and cold supply are run to the appliances in the house.
The toilet supply is a single pipe, and is only cold water. This is one of the few instances in residential plumbing that a single supply pipe is used.
Supply systems may be installed with branch circuits in series or in parallel, or a combination of both. The man-ner of distribution affects pressure, rate of fl ow, and how long it takes for hot water to reach a particular appli-ance. The ideal for water fl ow is to have shorter paths. See Appendix A U3T6 Series Distribution and Appen-dix A U3T6 Parallel Distribution for a basic layout of each
Points to emphasize
The water supply in a house is a managed pressure systemPipe sizing is used to control pressure in the distri-bution throughout the houseValves are used to control supply at critical points, for example a valve is installed at the point of con-nection to all water appliances so that they may be serviced without shutting off the water supply to the house.Compression chambers are used to control pressure fl uctuations at critical points, for example at faucets to prevent water hammerTwo basic branch distribution methods are em-ployed for water supply—parallel and series. Either
•
•
•
•
•
Topic 7 Plumber - Toilet Installation

Section 3: Unit 3 Skill-building in Selected Trades
Suggestions for Assessment Resources
Skilled Trades 1201 209
References
Blankenbaker,
chapter 11, page 169chapter 20, page 345
Wagner & Smith, unit 27, page 685
http://www.lowes.com/lowes/lkn?action=howTo&p= Improve/HousePlumb.html#1
http://www.bobvila.com/HowTo_Library/ Plumbing_Basics-Miscellaneous-A1895.html
http://www.popularmechanics.com/ home_improvement/ smart_consumer/1274641.html?page=1&c=y
DrawingsAppendix A U3T6 Series Distribu-tionAppendix A U3T6 Parallel Distribu-tionAppendix A U2T2 Plumbing Supply PlanAppendix A U2T2 Plumbing Supply Isometric
ToolsFor demonstration purposes,
Shop made parallel and series plumbing distribution mockups on small plywood panelsShop made display panels showing components
ConsumablesNot applicable
••
•
•
•
•
••
•
•
Topic 7 Plumber - Toilet Installation
Assessment Assess this outcome with Appendix B Knowledge Rubric
Research
Students could identify and describe the function of each of the following:
Rural water supplyWater main (or well)Types of wells that can supply waterPossible pumping sources to deliver the waterTypes of storage tanks for well systemsMunicipal water supplyMain water line and control valveCold water supplyHot water supply, including heating systemPipe runs and rises Stops, valves and faucets
Students could describe what happens when “water hammer” occurs. Students could also explain how an air chamber dampens this phenomenon.
Paper and pencilStudents could identify all the plumbing installa-tions that have only a single pipe source, either hot or cold, and how this adds to the complexity of a plumbing plan.
Work log
Students could make a suitable entry in their work log.
•
•
•••••••••••
•
•
•

Section 3: Unit 3 Skill-building in Selected Trades
Specifi c Curriculum Outcomes Suggested Learning and Teaching Strategies
210 Skilled Trades 1201
Students will be expected to one may be used, and in some instances both are used simultaneously in the same branch
For the StudentIdentify and describe the function of
Rural water supplyWater main (or well)Types of wells that can supply waterPossible pumping sources to deliver the waterTypes of storage tanks for well systemsMunicipal water supplyMain water line and control valveCold water supplyHot water supply, including heating systemPipe runs and rises Stops, valves and faucets
Describe what happens when “water hammer” occurs. Explain how an air chamber dampens this phenomenon.Students could identify all the plumbing installa-tions that have only a single pipe source, either hot or cold, and how this adds to the complexity of a plumbing plan.A suitable entry should be made in the student work log
••••••••••••
•
•
•
3.7.2 identify, describe, and give the function of the components of a residential water supply system for a toilet
[1.401][1.402] [2.401][3.401]
Topic 7 Plumber - Toilet Installation

Section 3: Unit 3 Skill-building in Selected Trades
Suggestions for Assessment Resources
Skilled Trades 1201 211
Topic 7 Plumber - Toilet Installation

Section 3: Unit 3 Skill-building in Selected Trades
Specifi c Curriculum Outcomes Suggested Learning and Teaching Strategies
212 Skilled Trades 1201
Students will be expected to
3.7.3 identify, describe, and give the function of the components of a waste water drainage system for a toilet
[1.401][1.402] [2.401][3.401]
For the Teacher
The waste water drainage system is separate from the supply side. Where the supply side had to be concerned with pressure reduction and water hammer, the drain-age system has to prevent sewer gasses from entering the house. Apart from being unpleasant, if there is suffi -cient methane gas build up, it can be explosive. Gasses are vented through the roof with carefully placed vent pipes. Gases are prevented from entering the house through the use of traps with standing water in them.
Points to emphasize
Drainage of waste water depends on gravity for fl ow, so all waste pipes have a slope towards the exterior sewer systemEvery waste system has build-up of sewer gases, so two controls are usedVenting through the roof of the building at each point of waste origin, for example sink, toilet or washer.Traps at each water appliance that hold standing water to prevent gases back into the buildingThe distinctness of toilets with regards to waste wa-ter (built in traps, large waste water pipe, no trap on the pipe) should also be emphasized here.
For the StudentCreate a table with two headings. Label the head-ings: Drainage System Component, Description / Function. Complete the table by describing each of the following and
Municipal sewer disposalSeptic fi eld systemsSand trapsGrease pitsDrain pipeCleanoutsBack fl ow valves
•
•
•
•
•
•
•••••••
Topic 7 Plumber - Toilet Installation

Section 3: Unit 3 Skill-building in Selected Trades
Suggestions for Assessment Resources
Skilled Trades 1201 213
References
Blankenbaker,
chapter 17, page 281chapter 18, page 299chapter 19, page 317chapter 23, page 405chapter 24, page 419
Smith,
unit 11-37, page 109-276unit 53, page 391unit 55, page 401
DrawingsAppendix A U2T2 Plumbing Waste Water Plan Appendix A U2T2 Plumbing Waste Isometric
ToolsFor demonstration purposes
Shop made waste and vent mock-up on small plywood panelShop made display panels showing components
•••••
•••
•
•
••
•
Topic 7 Plumber - Toilet Installation
Assessment Assess this outcome with Appendix B Knowledge Rubric
Research
Students could create a table with two columns, list-ing the following items in column 1, describing the purpose/function of each of the items in column 2.
Municipal sewer disposalSeptic fi eld systemsSand trapsGrease pitsDrain pipeCleanoutsBack fl ow valvesFloor fl angeTraps (p-trap systems/fl oor traps)Sewer branchesWaste and vent stacksSump pumps
Students could then itemize which of the specifi c waste water components are at work with a toilet system.
Work Log
Students could create an entry in their work log, discussing the terms introduced in this section.
•
•
••••••••••••
•
•

Section 3: Unit 3 Skill-building in Selected Trades
Specifi c Curriculum Outcomes Suggested Learning and Teaching Strategies
214 Skilled Trades 1201
Students will be expected to Floor fl angeTraps (p-trap systems/fl oor traps)Sewer branchesWaste and vent stacksSump pumps
Students could then itemize which of the specifi c waste water components are at work with a toilet system.A suitable entry should be made in the student work log
•••••
•
•
3.7.3 identify, describe, and give the function of the components of a waste water drainage system for a toilet
[1.401][1.402] [2.401][3.401]
Topic 7 Plumber - Toilet Installation

Section 3: Unit 3 Skill-building in Selected Trades
Suggestions for Assessment Resources
Skilled Trades 1201 215
Topic 7 Plumber - Toilet Installation

Section 3: Unit 3 Skill-building in Selected Trades
Specifi c Curriculum Outcomes Suggested Learning and Teaching Strategies
216 Skilled Trades 1201
Students will be expected to
3.7.4 identify the different types of fi x-tures, tubing, pipes, connectors, and fi ttings used in toilet installa-tion
[1.401][1.402] [2.401][3.401]
For the Teacher
This outcome enables students to get a glimpse of the variety of plumbing options that are available for supply and waste systems
Points to emphasize
The drainage system was traditionally constructed from cast iron. Most houses are now plumbed with ABS drainage pipe. Likewise copper pipe is the traditional choice for hot and cold water supply. Many houses are now being plumbed with PEX (cross linked high-density poly ethylene) pipe. Copper is joined using adhesion (soldering). ABS and PVC are joined using cohesion (solvents). PEX is joined using mechanical fi ttings. The system uses a copper manifold at the point of entry of the water main, and a separate pipe to each water appli-ance. PEX pipe slips on over a nipple on the mani-fold and a compression fi tting secures it.
For the StudentCreate a table with two columns. Label the head-ings: Item, and Description. Identify and examine each of the following components. In the table, describe, and cite the function of
Compression fi ttingsPEX plastic hot and cold supply: pipe, fi ttings, adapters to connect to copper manifold, copper manifoldPlastic drainage: elbows (ell - 90°, 60°, 45°, 22.5°), tees, caps, couplings
Students could itemize which of these components is used specifi cally in a toilet installation.
•
•
•••
•
••
•
•
Topic 7 Plumber - Toilet Installation

Section 3: Unit 3 Skill-building in Selected Trades
Suggestions for Assessment Resources
Skilled Trades 1201 217
Assessment Assess this outcome with Appendix B Knowledge Rubric
Research
Students could create a table with two columns. They should label the headings: Item, and Descrip-tion. Each of the following components should be identifi ed and described. The list should include
Compression fi ttingsPEX plastic hot and cold supply: pipe, fi ttings, adapters to connect to copper manifold, copper manifoldPlastic drainage: elbows (ell - 90°, 60°, 45°, 22.5°), tees, caps, couplings
Students could itemize which of these components is used specifi cally in a toilet installation.
•
•
••
•
•
References
Blankenbaker,
chapter 13, page 199chapter 14, page 213chapter 15, page 245chapter 16, page 257
Residential Plumbing and Piping systems http://www.chilipepperapp.com/ps.htm
PEX pipe confi guration http://www.lowes.com/lowes/lkn?action=howTo&p=Improve/PEX.html
Cross-linked Polyethylene (PEX) Water supply piping http://www.toolbase.org/techinv/techDetails.aspx?technologyID=296
PEX Faq http://www.ppfahome.org/pex/faqpex.html
DrawingsAppendix A U2T2 Plumbing Supply PlanAppendix A U2T2 Plumbing Supply IsometricAppendix A U2T2 Plumbing Waste Water Plan Appendix A U2T2 Plumbing Waste Isometric
••••
•
•
•
•
Topic 7 Plumber - Toilet Installation

Section 3: Unit 3 Skill-building in Selected Trades
Specifi c Curriculum Outcomes Suggested Learning and Teaching Strategies
218 Skilled Trades 1201
Students will be expected to
3.7.5 install components in a toilet tank
[1.401][1.402][1.403][1.404] [1.405][2.401][2.402][5.402]
For the teacher
This SCO covers the installation of the internal com-ponents of a toilet tank. Installation and replacement of the internal components of a toilet tank is one of the common tasks a plumber would undertake.
The teacher will demonstrate the proper installation technique of each part:
ballcock, fl ush valve, andlever arm.
During this demonstration the teacher should also discuss the function of each of these parts. A working demonstration would be best, such that if it is possible students should be shown how the toilet parts work together.
Points to emphasize
Rubber gaskets and washers that provide a water tight seal for the tank are important.The fl ush lever has a reverse thread.When choosing a toilet assembly, it is important to consider the availability of replacement parts over time.
For the studentStudents will be expected to reassemble the compo-nents of a toilet tank. They will be assessed on their ability to label and properly reinstall the components of the tank. The teacher will visually inspect the completed tank assembly and orally quiz the students to assess their knowledge base.
•••
•
••
•
•
•
Topic 7 Plumber - Toilet Installation

Section 3: Unit 3 Skill-building in Selected Trades
Suggestions for Assessment Resources
Skilled Trades 1201 219
AssessmentAssess this outcome with Appendix B Skills Rubric
Practical Activity
Students will be expected to reassemble the compo-nents of a toilet tank. They will be assessed on their ability to label and properly reinstall the components of the tank. The teacher will visually inspect the completed tank assembly and orally quiz the students to assess their knowledge base.
Work log
Students could create an appropriate entry in the work log, outlining the skills they have used.
•
•
•
•
•
Topic 7 Plumber - Toilet Installation
References
Blankenbaker, chapter 28, page 465-499
ToolsPlumbing tools as required for the mechanisms being repaired, includ-ing wrenches for removing valve seats
ConsumablesA repair kit for each mechanism (nor-mally reusable for this activity)
•
•

Section 3: Unit 3 Skill-building in Selected Trades
Specifi c Curriculum Outcomes Suggested Learning and Teaching Strategies
220 Skilled Trades 1201
Students will be expected to
3.7.6 install a toilet, including supply and waste lines, using manufac-turers instructions
[1.401][1.402][1.403][1.404] [1.405][2.401][2.402][5.402]
For the Teacher
Plumbing is one of the major jobs in the construction of the residential structure. Often, this trade operates concurrently with the carpentry, electrical, and lathing trades. There are three phases of plumbing that need be emphasized because of their relationship to the total construction sequence. These are: rough above and below ground work, rough in within the structure, and fi nished plumbing. Each phase coincides and overlaps with the tasks of other trades, and is often reliant upon the completion of those trade specifi c tasks. The Plumb-er provides the waste, drainage, and supply systems (interior and exterior).
Points to emphasize
Work from the drawings and planLayout the drainage rough-in fi rstInstall drainage systemLayout cold supplyInstall cold supplyUse proper techniques and precautions as covered in the previous topic
For the Student
Using the brief and the work plan you completed in the previous outcome as guidance, and following this procedure
Mark out the locations for the DWV and supply systemsPrepare the rough in for the interior/exterior systems by boring appropriate holes and creating mounting points.Measure, cut, and dry install rough-in components.Get teacher to inspect
••••••
•
•
••
Topic 7 Plumber - Toilet Installation

Section 3: Unit 3 Skill-building in Selected Trades
Suggestions for Assessment Resources
Skilled Trades 1201 221
Topic 7 Plumber - Toilet Installation
ReferencesDesign brief completed in U3T1Student material list from activity in previous outcome
Appendix B Tool Safety Sheets
DrawingsAppendix A U2T2 Floor PlanAppendix A U2T2 Plumbing Waste Water PlanAppendix A U2T2 Plumbing Supply PlanAppendix A U2T2 Plumbing Waste IsometricAppendix A U2T2 Plumbing Supply IsometricOne of
Appendix A U3T1 Design Plan Option 1, and Appendix A U3T1 Design Option 1 Isometric
OrAppendix A U3T1 Design Plan Option 2 andAppendix A U3T1 Design Option 2 Isometric
Appendix A U2T2 Orthographic GridStudent drawings from planning activity in previous outcome
••
••
•
•
•
••
•
•
•
•
•
AssessmentAssess this outcome with Appendix B Skills Rubric
Practical Activity
Students could use the brief and the work plan completed in the previous outcome as guidance, and following this procedure
Mark out the locations for the DWV and supply systemsPrepare the rough in for the interior/exterior systems by boring appropriate holes and creating mounting points.Measure, cut, and dry install rough-in compo-nents.Get teacher to inspect
Work log
Students could create an appropriate entry in the work log, outlining the skills they have used.
•
•
•
•
•
•
•

Section 3: Unit 3 Skill-building in Selected Trades
Specifi c Curriculum Outcomes Suggested Learning and Teaching Strategies
222 Skilled Trades 1201
Students will be expected to
Topic 8 Plumber - Sink Installation
3.8.1 demonstrate safe practices for use of hand and power tools common in sink installation procedures.
[2.401][2.402][2.405][3.401] [5.402]
For the Teacher
Plumbing, like most specialized trades, employs special-ized tools that are used to cut, shape, and fi t pipe and fi ttings in the plumbing phase of a residential construc-tion project. The activity for this section will be carried out during the activities in remaining plumbing topics and SCOs.
Most of the plumbing tools are basic in terms of their operating requirements, and can be demonstrated quickly. One should not assume, however, that because they are simple, students automatically know how to use them, and that there are no safety requirements. Points to emphasize
Plumbing tools are designed for specifi c tasks. Us-ing the wrong tool can often damage the plumbing part, which can be an expensive mistakeSome tools are intended to be used in a specifi c way (adjustable wrenches for example are intended to be torqued in one direction), and will eventually be damaged if used incorrectlySafe practices must be observed at all timesDemonstrate the operation of the tools in the stu-dent activity
Modify the Appendix A Tool List for the student activi-ties as needed. The activity is restricted to knowledge about the tools, and assessment is as well. If you wish to modify the activity to skill building, plumbing com-ponents will need to be supplied so that students ma-nipulate them with the tools.
For the StudentUsing the plumbing tool list in Appendix A Tool List, identify each item and become familiar with the use and operation of the tool. A suitable entry should be made in the student work log
•
•
••
•
•

Section 3: Unit 3 Skill-building in Selected Trades
Suggestions for Assessment Resources
Skilled Trades 1201 223
Topic 8 Plumber - Sink Installation
References
Blankenbaker,
chapter 2, page 51chapter 7, page 132-136chapter 9, page 145-153
Appendix A Tool List
Appendix B Tool Safety Sheets
ToolsAs needed. See Appendix A U3T6 Plumbing Tools.
ConsumablesAs required by the activity in which tools are being used
•••
•
•
Assessment
Only 100% on the written and performance components of the test for each tool is acceptable.
Pencil and Paper
Assess tool safety and use with Tool Safety Quizzes from Skilled Trades Safety Guide. This is assessment for learning, and students must repeat the quizzes until 100% is attained. No tool use is permitted before successful completion of the quizzes.
Practical Activity
Students must demonstrate the safe and proper operation of the tools and devices used in a sink installation.
Work log
Students could create an appropriate entry in the worklog itemizing the tools they have qualifi ed for.
•
•
•

Section 3: Unit 3 Skill-building in Selected Trades
Specifi c Curriculum Outcomes Suggested Learning and Teaching Strategies
224 Skilled Trades 1201
Students will be expected to
3.8.2 identify, describe, and give the function of the components of a residential water supply system for a sink
[1.401][1.402] [2.401][3.401]
For the Teacher
The supply side of the plumbing system begins with the cold water source from a well or a municipal water sup-ply. The supply line is usually pressurized, and can be from 3/4 inch (1.9cm) to 1 1/2 inch (3.8cm) diameter. The size of the pipe is reduced for the distribution lines in the house. The fi rst branch is to the hot water heater. Two parallel branches of hot and cold supply are run to the appliances in the house.
This is the main place that a sink installation and water supply differ from that of the toilet. A sink water sup-ply system has to have both hot and cold water sources. This the parallel branching system is in use here.
Supply systems may be installed with branch circuits in series or in parallel, or a combination of both. The man-ner of distribution affects pressure, rate of fl ow, and how long it takes for hot water to reach a particular appli-ance. The ideal for water fl ow is to have shorter paths. See Appendix A U3T6 Series Distribution and Appen-dix A U3T6 Parallel Distribution for a basic layout of each
Points to emphasize
The water supply in a house is a managed pressure systemPipe sizing is used to control pressure in the distri-bution throughout the houseValves are used to control supply at critical points, for example a valve is installed at the point of con-nection to all water appliances so that they may be serviced without shutting off the water supply to the house.Compression chambers are used to control pressure fl uctuations at critical points, for example at faucets to prevent water hammerTwo basic branch distribution methods are em-ployed for water supply—parallel and series. Either
•
•
•
•
•
Topic 8 Plumber - Sink Installation

Section 3: Unit 3 Skill-building in Selected Trades
Suggestions for Assessment Resources
Skilled Trades 1201 225
Topic 8 Plumber - Sink Installation
References
Blankenbaker,
chapter 11, page 169chapter 20, page 345
Wagner & Smith, unit 27, page 685
http://www.lowes.com/lowes/lkn?action=howTo&p= Improve/HousePlumb.html#1
http://www.bobvila.com/HowTo_Library/ Plumbing_Basics-Miscellaneous-A1895.html
http://www.popularmechanics.com/ home_improvement/ smart_consumer/1274641.html?page=1&c=y
DrawingsAppendix A U3T6 Series Distribu-tionAppendix A U3T6 Parallel Distribu-tionAppendix A U2T2 Plumbing Supply PlanAppendix A U2T2 Plumbing Supply Isometric
ToolsFor demonstration purposes,
Shop made parallel and series plumbing distribution mockups on small plywood panelsShop made display panels showing components
••
•
•
•
•
••
•
Assessment Assess this outcome with Appendix B Knowledge Rubric
Research
Identify and describe the function ofRural water supplyWater main (or well)Types of wells that can supply waterPossible pumping sources to deliver the waterTypes of storage tanks for well systemsMunicipal water supplyMain water line and control valveCold water supplyHot water supply, including heating systemPipe runs and rises Stops, valves and faucets
Describe what happens when “water hammer” occurs. Explain how an air chamber dampens this phenomenon.
Students could identify all of the plumbing instal-lations that require parallel pipe supply, and the complexity this introduces into residential plumbing planning.
Work log
Students could make an appropriate entry in their work log.
•
••••••••••••
•
•
•

Section 3: Unit 3 Skill-building in Selected Trades
Specifi c Curriculum Outcomes Suggested Learning and Teaching Strategies
226 Skilled Trades 1201
Students will be expected to
3.8.2 identify, describe, and give the function of the components of a residential water supply system for a sink
[1.401][1.402] [2.401][3.401]
one may be used, and in some instances both are used simultaneously in the same branch
For the StudentIdentify and describe the function of
Rural water supplyWater main (or well)Types of wells that can supply waterPossible pumping sources to deliver the waterTypes of storage tanks for well systemsMunicipal water supplyMain water line and control valveCold water supplyHot water supply, including heating systemPipe runs and rises Stops, valves and faucets
Describe what happens when “water hammer” occurs. Explain how an air chamber dampens this phenomenon.Students could identify all of the plumbing instal-lations that require parallel pipe supply, and the complexity this introduces into residential plumbing planning.A suitable entry should be made in the student work log
••••••••••••
•
•
•
Topic 8 Plumber - Sink Installation

Section 3: Unit 3 Skill-building in Selected Trades
Suggestions for Assessment Resources
Skilled Trades 1201 227
Topic 8 Plumber - Sink Installation

Section 3: Unit 3 Skill-building in Selected Trades
Specifi c Curriculum Outcomes Suggested Learning and Teaching Strategies
228 Skilled Trades 1201
Students will be expected to
3.8.3 identify, describe, and give the function of the components of a waste water drainage system for a sink
[1.401][1.402] [2.401][3.401]
For the Teacher
The waste water drainage system is separate from the supply side. Where the supply side had to be concerned with pressure reduction and water hammer, the drain-age system has to prevent sewer gasses from entering the house. Apart from being unpleasant, if there is suffi -cient methane gas build up, it can be explosive. Gasses are vented through the roof with carefully placed vent pipes. Gases are prevented from entering the house through the use of traps with standing water in them.
Points to emphasize
Drainage of waste water depends on gravity for fl ow, so all waste pipes have a slope towards the exterior sewer systemEvery waste system has build-up of sewer gases, so two controls are usedVenting through the roof of the building at each point of waste origin, for example sink, toilet or washer.Traps at each water appliance that hold standing water to prevent gases back into the buildingA sink installation involves the most common aspects of waste water in the system. It is the most frequent style of installation in the residential plumbing system.
For the StudentCreate a table with two headings. Label the head-ings: Drainage System Component, Description / Function. Complete the table by describing each of the following and
Municipal sewer disposalSeptic fi eld systemsSand trapsGrease pitsDrain pipeCleanouts
•
•
•
•
•
•
••••••
Topic 8 Plumber - Sink Installation

Section 3: Unit 3 Skill-building in Selected Trades
Suggestions for Assessment Resources
Skilled Trades 1201 229
Topic 8 Plumber - Sink Installation
References
Blankenbaker,
chapter 17, page 281chapter 18, page 299chapter 19, page 317chapter 23, page 405chapter 24, page 419
Smith,
unit 11-37, page 109-276unit 53, page 391unit 55, page 401
DrawingsAppendix A U2T2 Plumbing Waste Water Plan Appendix A U2T2 Plumbing Waste Isometric
ToolsFor demonstration purposes
Shop made waste and vent mock-up on small plywood panelShop made display panels showing components
•••••
•••
•
•
••
•
Assessment Assess this outcome with Appendix B Knowledge Rubric
Research
Students could create a table with two columns, list-ing the following items in column 1, describing the purpose/function of each of the items in column 2.
Municipal sewer disposalSeptic fi eld systemsSand trapsGrease pitsDrain pipeCleanoutsBack fl ow valvesFloor fl angeTraps (p-trap systems/fl oor traps)Sewer branchesWaste and vent stacksSump pumps
Students could then itemize which of the specifi c waste water components are at work with a sink system.
Work log
Students could make a suitable entry in their work log
•
•
••••••••••••
•
•

Section 3: Unit 3 Skill-building in Selected Trades
Specifi c Curriculum Outcomes Suggested Learning and Teaching Strategies
230 Skilled Trades 1201
Students will be expected to Back fl ow valvesFloor fl angeTraps (p-trap systems/fl oor traps)Sewer branchesWaste and vent stacksSump pumps
Students could then itemize which of the specifi c waste water components are at work with a sink system.A suitable entry should be made in the student work log
••••••
•
•
3.8.3 identify, describe, and give the function of the components of a waste water drainage system for a sink
[1.401][1.402] [2.401][3.401]
Topic 8 Plumber - Sink Installation

Section 3: Unit 3 Skill-building in Selected Trades
Suggestions for Assessment Resources
Skilled Trades 1201 231
Topic 8 Plumber - Sink Installation

Section 3: Unit 3 Skill-building in Selected Trades
Specifi c Curriculum Outcomes Suggested Learning and Teaching Strategies
232 Skilled Trades 1201
Students will be expected to
Topic 8 Plumber - Sink Installation
3.8.4 identify the different types of fi x-tures, tubing, pipes, connectors, and fi ttings used in sink installa-tion
[1.401][1.402][2.401][3.401]
For the Teacher
This outcome enables students to get a glimpse of the variety of plumbing options that are available for supply and waste systems
Points to emphasize
The drainage system was traditionally constructed from cast iron. Most houses are now plumbed with ABS drainage pipe. Likewise copper pipe is the traditional choice for hot and cold water supply. Many houses are now being plumbed with PEX (cross linked high-density poly ethylene) pipe. Copper is joined using adhesion (soldering). ABS and PVC are joined using cohesion (solvents). PEX is joined using mechanical fi ttings. The system uses a copper manifold at the point of entry of the water main, and a separate pipe to each water appli-ance. PEX pipe slips on over a nipple on the mani-fold and a compression fi tting secures it.
For the StudentCreate a table with two columns. Label the head-ings: Item, and Description. Identify and examine each of the following components. In the table, describe, and cite the function of
Compression fi ttingsPEX plastic hot and cold supply: pipe, fi ttings, adapters to connect to copper manifold, copper manifoldPlastic drainage: elbows (ell - 90°, 60°, 45°, 22.5°), tees, caps, couplings
Students could itemize which of these components is used specifi cally in a sink installation.
•
•
•••
•
••
•
•

Section 3: Unit 3 Skill-building in Selected Trades
Suggestions for Assessment Resources
Skilled Trades 1201 233
Topic 8 Plumber - Sink Installation
Assessment Assess this outcome with Appendix B Knowledge Rubric
Research
Students could create a table with two columns. They should label the headings: Item, and Descrip-tion. Each of the following components should be identifi ed and described. The list should include
Compression fi ttingsPEX plastic hot and cold supply: pipe, fi ttings, adapters to connect to copper manifold, copper manifoldPlastic drainage: elbows (ell - 90°, 60°, 45°, 22.5°), tees, caps, couplings
Students could itemize which of these components is used specifi cally in a sink installation.
•
•
••
•
•
References
Blankenbaker,
chapter 13, page 199chapter 14, page 213chapter 15, page 245chapter 16, page 257
Residential Plumbing and Piping systems http://www.chilipepperapp.com/ps.htm
PEX pipe confi guration http://www.lowes.com/lowes/lkn?action=howTo&p=Improve/PEX.html
Cross-linked Polyethylene (PEX) Water supply piping http://www.toolbase.org/techinv/techDetails.aspx?technologyID=296
PEX Faq http://www.ppfahome.org/pex/faqpex.html
DrawingsAppendix A U2T2 Plumbing Supply PlanAppendix A U2T2 Plumbing Supply IsometricAppendix A U2T2 Plumbing Waste Water Plan Appendix A U2T2 Plumbing Waste Isometric
••••
•
•
•
•

Section 3: Unit 3 Skill-building in Selected Trades
Specifi c Curriculum Outcomes Suggested Learning and Teaching Strategies
234 Skilled Trades 1201
Students will be expected to
Topic 8 Plumber - Sink Installation
3.8.5 install a sink and faucets, includ-ing supply and waste lines, using manufacturers instructions
[1.401][1.402][1.403][1.404] [1.405][2.401][2.402][5.402]
For the Teacher
Plumbing is one of the major jobs in the construction of the residential structure. Often, this trade operates concurrently with the carpentry, electrical, and lathing trades. There are three phases of plumbing that need be emphasized because of their relationship to the total construction sequence. These are: rough above and below ground work, rough in within the structure, and fi nished plumbing. Each phase coincides and overlaps with the tasks of other trades, and is often reliant upon the completion of those trade specifi c tasks. The Plumb-er provides the waste, drainage, and supply systems (interior and exterior).
Points to emphasize
Work from the drawings and planLayout the drainage rough-in fi rstInstall drainage systemLayout hot and cold supplyInstall hot and cold supplyUse proper techniques and precautions as covered in the previous topic
For the Student
Using the brief and the work plan you completed in the previous outcome as guidance, and following this procedure
Mark out the locations for the DWV and supply systemsPrepare the rough in for the interior/exterior systems by boring appropriate holes and creating mounting points.Measure, cut, and dry install rough-in components.Get teacher to inspect
••••••
•
•
••

Section 3: Unit 3 Skill-building in Selected Trades
Suggestions for Assessment Resources
Skilled Trades 1201 235
Topic 8 Plumber - Sink Installation
ReferencesDesign brief completed in U3T1Student material list from activity in previous outcome
Appendix B Tool Safety Sheets
DrawingsAppendix A U2T2 Floor PlanAppendix A U2T2 Plumbing Waste Water PlanAppendix A U2T2 Plumbing Supply PlanAppendix A U2T2 Plumbing Waste IsometricAppendix A U2T2 Plumbing Supply IsometricOne of
Appendix A U3T1 Design Plan Option 1, and Appendix A U3T1 Design Option 1 Isometric
OrAppendix A U3T1 Design Plan Option 2 andAppendix A U3T1 Design Option 2 Isometric
Appendix A U2T2 Orthographic GridStudent drawings from planning activity in previous outcome
••
••
•
•
•
••
•
•
•
•
•
AssessmentAssess this outcome with Appendix B Skills Rubric
Practical Activity
Students could use the brief and the work plan completed in the previous outcome as guidance, and following this procedure
Mark out the locations for the DWV and supply systemsPrepare the rough in for the interior/exterior systems by boring appropriate holes and creating mounting points.Measure, cut, and dry install rough-in compo-nents.Get teacher to inspect
Work log
Students could create an appropriate entry in the work log, outlining the skills they have used.
•
•
•
•
•
•
•

Section 3: Unit 3 Skill-building in Selected Trades
Specifi c Curriculum Outcomes Suggested Learning and Teaching Strategies
236 Skilled Trades 1201
Students will be expected to
Topic 9 Lather
3.9.1 research and demonstrate safe practices for the use of Lather tools
[2.401][2.402][2.405][3.401] [5.402]
For the Teacher
This outcome is addressed in two separate ways. The fi rst part is to develop knowledge about the tools. That is accomplished in the student activities below. The second part is to use the tools properly and safely. That part is addressed in subsequent activities in this topic and in the fabrication topic that follows.
Students will be tested on the use of the tools as the need arises, typically as they are performing the related tasks. Lather tools are listed in Appendix A Tool Lists.
Points to emphasize:
Safety and safe handling of tools.Safety and health issues that might arise from the use of the tools (dust/respiratory irritants generated)Proper technique makes the work easier, faster, and more effi cientDemonstrations should be given for each of the tools/techniques.
For the StudentWorking from the list of tools supplied by the teacher, identify each and describe the proper tech-niques for usage.A suitable entry should be made in the student worklog
••
•
•
•
•
Section 3: Unit 3 Skill-building in Selected Trades
Suggestions for Assessment Resources
Skilled Trades 1201 237
Topic 9 Lather
References
Wagner & Smith, unit 15, page 429-462
Hometime Construction Basics DVD
Appendix A Lather Tools
Appendix B Tool Safety Sheets
ToolsAs required for activity
ConsumablesAs required for the activity
•
•
Assessment
Only 100% on the written and performance components of the test for each tool is acceptable.
Pencil and Paper
Assess tool safety and use with Tool Safety Quizzes from Skilled Trades Safety Guide. This is assessment for learning, and students must repeat the quizzes until 100% is attained. No tool use is permitted before successful completion of the quizzes.
Practical Activity
Students must demonstrate the safe and proper operation of the tools and devices used in a lather project.
Work log
Students could create an appropriate entry in the worklog itemizing the tools they have qualifi ed for.
•
•
•

Section 3: Unit 3 Skill-building in Selected Trades
Specifi c Curriculum Outcomes Suggested Learning and Teaching Strategies
238 Skilled Trades 1201
Students will be expected to
3.9.2 describe the properties, advantag-es and disadvantages, of various wall sheathing
[1.405]
Topic 9 Lather
For the teacher
For the purposes of this outcome three interior wall sheathes will be considered:
concrete backer boardgreen boardgypsum drywall
The most common of these is gypsum drywall, but the other two sheathes have application in humid environ-ments such as bathrooms or around hot tubs.
Points to emphasize
Green board is just gypsum drywall with a wax coat-ing on the outside to prevent moisture form leach-ing in. Although still in use in some areas, it has become less popular over the past few years.Concrete backer board has a solid concrete hub and is armored with fi berglass mesh. Due to this armor-ing it is ideal for humid areas. It is also costly and diffi cult to cut and shape.Gypsum board or sheet rock or drywall as it is known, is the most versatile of all these choices. It is easiest to cut, cheaper and lighter. Its disadvantages are that it is more susceptible to humidity or water damage.Material thickness of drywall/fi re ratings.
For the studentStudents could do a comparison chart of each of the sheathing materials. This chart would include the advantages and disadvantages and how each of the sheathings address each others failings.Students could research a variety of alternative sheathing methods, those not presented in this out-come, and indicate their applicability to residential construction in Newfoundland and Labrador.
•••
•
•
•
•
•
•

Section 3: Unit 3 Skill-building in Selected Trades
Suggestions for Assessment Resources
Skilled Trades 1201 239
Topic 9 Lather
Assessment
Pencil and PaperStudents could do a comparison chart of each of the sheathing materials. This chart would include the advantages and disadvantages and how each of the sheathings address each others failings.
ResearchStudents could research a variety of alternative sheathing methods, those not presented in this out-come, and indicate their applicability to residential construction in Newfoundland and Labrador.
•
•
References
Feirer, Chapter 21
Wagner & Smith, unit 15, page 429-462
Hometime Construction Basics DVD

Section 3: Unit 3 Skill-building in Selected Trades
Specifi c Curriculum Outcomes Suggested Learning and Teaching Strategies
240 Skilled Trades 1201
Students will be expected to
Topic 9 Lather
3.9.3 create a workplan for installing drywall sheathing, green board, or concrete backerboard [1.405]
For the Teacher
This outcome should be addressed in conjunction with the next topic on Lather. Use Appendix A Planning Guide: Information for Fabrication Planning as a guide-line for this outcome.
Points to emphasize
Interior sheathing is installed after electrical and plumbing rough-ins.Planning has to identify materials, installation se-quence, plastering sequence and cut-outs for electri-cal and plumbing.Part of the planning sequence is to ensure that there is something to nail the sheathing to. Non-bearing partitions frequently present problems for ceiling installations.
For the Student
Working from the previous drawings, and measurements taken from the structure, develop a plan that
Applies sheathing to the interior wall and ceiling structuresAccommodates electrical and plumbing rough-insAccommodates odd shaped sections
The plan must include
Materials list with items, and quantity of each, Tools and equipmentTraining/certifi cation required to use a material or toolA list of the construction sequence indicating layout, cutting and installation, and plastering sequences
As well
Create appropriate entry in the WorkLog and have teacher sign off.
•
•
•
•
••
•••
•
•

Section 3: Unit 3 Skill-building in Selected Trades
Suggestions for Assessment Resources
Skilled Trades 1201 241
Topic 9 Lather
Assessment
Pencil and paper
Assess this outcome with Appendix B Design Part 2 Planning Rubric
Workplan/layout
Students could draw a diagram to scale of the proj-ect to be undertaken in this module. This drawing should be mated with a description of the tools and techniques utilized in this section.
Work log
Students could include their workplan in their log books.
•
•
•
References
CDLI course Integrated Systems 1205 Unit 3, Section 3, Lesson 2
Appendix A Planning Guide: Informa-tion for Fabrication Planning
The Design Brief completed in U3T1
Appendix A U3T9 Lather Planning Guide
Student plans from previous fabrication topics
DrawingsAppendix A U2T2 Design Section “A-A”Appendix A U2T2 Design Detail BOne of
Appendix A U3T1 Design Plan Option 1, and Appendix A U3T1 Design Option 1 Isometric
OrAppendix A U3T1 Design Plan Option 2 andAppendix A U3T1 Design Option 2 Isometric
Appendix A U3T13 Flashing Draw-ingAppendix A U2T2 Orthographic Grid
•
••
•
•
•
•
•
•
Section 3: Unit 3 Skill-building in Selected Trades
Specifi c Curriculum Outcomes Suggested Learning and Teaching Strategies
242 Skilled Trades 1201
Students will be expected to
Topic 9 Lather
3.9.4 install drywall to framed walls [1.401][1.402][1.403][1.404]
[1.405][2.401][2.402][5.402]
For the Teacher
Drywall is a sheet material made of a sandwich of gypsum and two layers of paper. Typically the two long edges are tapered to allow for a plastered seam.
Points to emphasize:
Types of fasteners and adhesives available to install-ers Proper distancing for fasteners (drywall screws or nails should be placed every six inches).Methods of cutting or scoring drywall Issues related to strapping versus installation on rough stud surfaces.Locations of studs should be marked in such a way as to allow them to be easily found once the wall or ceiling board is in place.Drywall is hung starting on the ceiling, and is hung perpendicular to the joists or trusses.In a wall installation, drywall must be propped up tight to the ceiling, so that any space is left at the bottom.
For the StudentStudents could install drywall on a partition. It is suggested that the partition should be at least 1800 mm in height (6 ft), not be 1200 mm x 2400 mm (4 ft x 8 ft) and should contain an interior or exte-rior corner.A suitable entry should be made in the student worklog
•
•
••
•
•
•
•
•

Section 3: Unit 3 Skill-building in Selected Trades
Suggestions for Assessment Resources
Skilled Trades 1201 243
Topic 9 Lather
Assessment
Paper and pencil
Students could be assessed for this outcome using the Appendix B Skills Rubric
Work log
Students could make an entry in their work log, outlining the skills and techniques they used to complete this task
Practical activity
Students could install drywall on a partition. It is suggested that the partition should be at least 1800 mm in height (6 ft), not be 1200 mm x 2400 mm (4 ft x 8 ft) and should contain an interior or exte-rior corner.
•
•
•
References
Feirer, Chapter 21
Hometime Construction Basics DVD
Wagner & Smith, unit 15, page 429-462
Installing Drywall (http://www.mygreathome.com/ fi x-it_guide/drywall.htm)
Ace (http://www.acehardware.com/ sm-installing-drywall--bg-1299080.html)
Installing Drywall Mudding and Taping (http://ezinearticles.com/? Installing-Drywall:-Mudding-and-Taping&id=51266)
ToolsAs required to install drywall,
ConsumablesDrywall
•
•
Section 3: Unit 3 Skill-building in Selected Trades
Specifi c Curriculum Outcomes Suggested Learning and Teaching Strategies
244 Skilled Trades 1201
Students will be expected to
Topic 9 Lather
3.9.5 install corner beading [1.401][1.402][1.403][1.404]
[1.405][2.401][2.402][5.402]
For the Teacher
Corner beading is installed on outside corners to pro-vide extra strength against bumps and knocks and to create a smooth, even edge to shape the plaster.
Points to emphasize:
Corner bead can be paper with metal, metal or plas-tic.Corner bead has a rounded edge, ranging from about 3mm radius to 20mm radiusMeans of fastening each type of beading.Advantages and disadvantages in adhering to wall-board.
This activity may be deferred. The fabrication activity in the next topic may be substituted.
For the StudentSet up two pieces of drywall, 1’ width x 2’ length, to an outside corner construction. Using the same dimensions, prepare an inside corner as well. Attach appropriate beading to the cornersA suitable entry should be made in the student worklog
•
•
••
•
•
••

Section 3: Unit 3 Skill-building in Selected Trades
Suggestions for Assessment Resources
Skilled Trades 1201 245
Topic 9 Lather
Assessment
Paper and pencil
Students could be assessed for this outcome using the Appendix B Skills Rubric
Work log
Students could make an entry in their work log, outlining the skills and techniques they used to complete this task
Practical activity
Students could set up two pieces of drywall, 1’ width x 2’ length, to an outside corner construction and attach appropriate beading to the corners. Students could also, using the same dimensions, prepare an inside corner as well and attach appropri-ate beading to the corners.
•
•
•
•
References
Feirer, Chapter 21
Hometime Construction Basics DVD
Wagner & Smith, unit 15, page 429-462
How to Install a Corner Bead - eHow.com (http://www.ehow.com/ how_4144_install-corner-bead.html)
ToolsLayout (measuring tape, level)Separating (snips, utility knife)Combining (hammer, electric screw-driver)
ConsumablesAssorted corner bead
•••
•

Section 3: Unit 3 Skill-building in Selected Trades
Specifi c Curriculum Outcomes Suggested Learning and Teaching Strategies
246 Skilled Trades 1201
Students will be expected to
Topic 10 Painter-Decorator
3.10.1 research and demonstrate safe practices for the handling of painting materials and various hand tools used in the preparation and painting of a surface
[2.401][2.402][2.405][3.401] [5.402]
For the Teacher
This outcome is addressed in two separate ways. The fi rst part is to develop knowledge about the tools. That is accomplished in the student activities below. The second part is to use the tools properly and safely. That part is addressed in subsequent activities in this topic and in the fabrication topic that follows.
Students will be tested on the use of the tools as the need arises, typically as they are performing the related tasks. Painting tools are listed in Appendix A Tool Lists.
Points to emphasize:
Safety and safe handling of tools.Safety and health issues that might arise from the use of the tools (dust/respiratory irritants generated)Proper technique makes the work easier, faster, and more effi cientDemonstrations should be given for each of the tools/techniques.
For the StudentWorking from the list of tools supplied by the teacher, identify each and describe the proper tech-niques for usage.A suitable entry should be made in the student worklog
••
•
•
•
•

Section 3: Unit 3 Skill-building in Selected Trades
Suggestions for Assessment Resources
Skilled Trades 1201 247
Assessment
Paper and pencil
Students could be assessed for this outcome using the Appendix B Knowledge Rubric.
Research
Students could, working from the list of tools sup-plied by the teacher, identify each and describe the proper techniques for usage.
Work log
Students should make a suitable entry should be in their worklog describing the tools used in this sec-tion.
•
•
•
Topic 10 Painter-Decorator
References
Feirer, Chapter 41
Wagner & Smith, Chapter 20, page 557-577
Hometime Construction Basics DVD
ToolsLayout (measuring tape, level)
ConsumablesAssorted paints and coverings
•
•

Section 3: Unit 3 Skill-building in Selected Trades
Specifi c Curriculum Outcomes Suggested Learning and Teaching Strategies
248 Skilled Trades 1201
Students will be expected to
3.10.2 demonstrate safe practices in the use of hand and power tools commonly used in the application and fi nishing of a plaster surface [1.405]
For the Teacher
Hand and power tool use require a means of ensuring students are properly certifi ed. Normal practices is to use a combination of written and performance testing for each student for each tool. It is a good idea to main-tain a chart of who is qualifi ed for what tools. You may wish to provide class wide instruction on tools, followed by individual testing.
Points to emphasize
Safety is not just a set of rules. Safety is a way of life. It is a set of ideas, attitudes, behaviours and practices that are essential to the workplace. Safe practice does not eliminate risk, but it reduces risk. Safe practice is risk management.Safe use of tools is primarily using them in the prescribed manner, with the proper adjustments and usage procedures. It is also avoidance of clearly understood unsafe practices. In particular shortcuts and quick work-a rounds often increase the risk.Only students who are qualifi ed will be allowed to use a particular tool. Tool qualifi cation can occur on an as-needed basis.Tool qualifi cation has no margin of error. Only 100% on written/verbal/performance tests are ac-ceptable for qualifi cation.Each tool is different, but all tools have commonali-ties. Point out the commonalities with other tools when demonstrating a tool’s function, adjustments and operating procedures. It may be useful to take one class and do an over-view demonstration of all tools. Include
Function of the toolParts of the toolAdjustments that can be made and the correct procedure for completing themSafe usage of the tool for performing the common tasks
•
•
•
•
•
•
•••
•
Topic 10 Painter-Decorator

Section 3: Unit 3 Skill-building in Selected Trades
Suggestions for Assessment Resources
Skilled Trades 1201 249
Topic 10 Painter-Decorator
References
Feirer, Chapter 41
Wagner & Smith, Chapter 20, page 557-577
Hometime Construction Basics DVD
ToolsLayout (measuring tape, level)
ConsumablesAssorted paints and coverings
•
•
Assessment
Only 100% on the written and performance components of the test for each tool is acceptable.
Pencil and Paper
Assess tool safety and use with Tool Safety Quizzes from Skilled Trades Safety Guide. This is assessment for learning, and students must repeat the quizzes until 100% is attained. No tool use is permitted before successful completion of the quizzes.
Practical Activity
Students must demonstrate the safe and proper operation of the tools and devices used in a painter-decorator project.
Work log
Students could create an appropriate entry in the worklog itemizing the tools they have qualifi ed for.
•
•
•
Section 3: Unit 3 Skill-building in Selected Trades
Specifi c Curriculum Outcomes Suggested Learning and Teaching Strategies
250 Skilled Trades 1201
Students will be expected to
3.10.2 demonstrate safe practices in the use of hand and power tools commonly used in the application and fi nishing of a plaster surface [1.405]
Procedures to follow in instances where the tool is not functioning or functioning outside the specs
For the StudentComplete the safety program for each tool that requires it, and that you intend to use
State and describe the safe operating procedure for using a tool at 100% accuracyDemonstrate safe use of a tool with 100% accu-racyRecord certifi cation for tool in the work log and have the teacher initial it
Use tools as needed, in accordance with accepted safe practices,Create an appropriate entry in the worklog
•
•
•
•
•
•
•
Topic 10 Painter-Decorator

Section 3: Unit 3 Skill-building in Selected Trades
Suggestions for Assessment Resources
Skilled Trades 1201 251
Topic 10 Painter-Decorator

Section 3: Unit 3 Skill-building in Selected Trades
Specifi c Curriculum Outcomes Suggested Learning and Teaching Strategies
252 Skilled Trades 1201
Students will be expected to
3.10.3 describe methods for cleaning and preparing surfaces to receive paint or other coverings
[1.405]
For the Teacher
The purpose of this SCO is to provide a series of pro-cesses and procedures that accomplish the task of clean-ing and preparing a variety of surfaces for the applica-tion of a fi nish.
Points to emphasize:
Walls—drywall:Preparation process is based on whether a new or existing structure.Remove wall coverings, ornamental objects, from wall/door/window structures.Clean wall with detergent (bleach & Water/TSP).Fill or repair wall defects (nail holes, etc)Remove loose materials such as paint, dust.Roughen surface lightly to provide a good surface to adhere primer (lightly sanded with fi ne grit sand paper)Remove dust from fi nished wall (tack cloth used to remove dust from sanding/preparing)Prime wall with a suitable base coat (with primer/base suitable for paint type - alkyd or latex, better adhesion of paint).
Wood:If necessary, strip wood surface with chemical/mechanical means.Repair defects, blemishes, fl aws Clean the surface using chemical/mechanical means.Sand surface to improve adhesion of new fi nishMatch fi nish material to old fi nish (alkyd to alkyd, latex to latex)
Metal:Strip old fi nish using chemical/mechanical/air-blown abrasives.Repair defects, blemishes, fl aws by reshaping or fi lling
••
•
••••
•
•
••
••
••
••
•
Topic 10 Painter-Decorator

Section 3: Unit 3 Skill-building in Selected Trades
Suggestions for Assessment Resources
Skilled Trades 1201 253
AssessmentStudents could be assessed for this outcome with Appendix B Knowledge Rubric.
Paper and pencil
Students could list the methods of preparing a wall for paint and other coverings. This could be done in a chart listing the possible covering and the steps of preparation necessary.
Work log
Students could record the information in their worklog.
•
•
•
References
Wagner & Smith, unit 20, page 564-565
Types of Paint Strippers http://www.hsia.org/paint_stripping/epa_cpsc/types.htm
Consumer Product Safety Commission What You Should Know About Using Paint Strippers http://www.cpsc.gov/cpscpub/pubs/423.html
Topic 10 Painter-Decorator

Section 3: Unit 3 Skill-building in Selected Trades
Specifi c Curriculum Outcomes Suggested Learning and Teaching Strategies
254 Skilled Trades 1201
Students will be expected to
3.10.4 describe the variety of fi nishes available for application to pre-pared surfaces.
[1.405]
For the Teacher
The purpose of this SCO is to highlight and discuss the range of fi nishes available to a painter, and to distinguish the relationship between type of surface and specifi c fi nish.
Sample web resources are listed for many of the fi nish materials. Many of them are commercial sites, but they are informative with respect to products and their prop-erties and application of the product.
Points to emphasize:
A fi nish material protects against moisture and sometimes ultraviolet lightWood fi nishes come in two basic types
Film forming fi nishes, which sit on the surface and form a protective layer. These are generally paints and clear fi nishesPenetrating fi nishes, which penetrate into the pores and cells of the wood. These are generally stains, but also include some clear fi nishes
Finishes for other materials tend to be of the fi lm typePaints contain
Pigments for colourBinders to hold pigments together. The binder evaporates during curing leaving a fi lm of pig-mentCarrier liquid to keep everything in suspension and spread out during application. It usually evaporates
Oil paints use oil binder in a mineral spirit carrier as the carrier liquid.
Oil binder can be natural such as linseed oil or synthetic such as alkydBrushes made from natural hair bristles work best
Latex paints use latex binder suspended in waterAcrylic latex is a common form
•
••
•
•
•••
•
•
•
••
•
Topic 10 Painter-Decorator

Section 3: Unit 3 Skill-building in Selected Trades
Suggestions for Assessment Resources
Skilled Trades 1201 255
Assessment
Paper and pencil
Students could be assessed for this outcome with Appendix B Knowledge Rubric
Paper and pencilStudents could create a table and describe the types of each fi nish that is commercially available, as well as where each application might be applied in a residential building.
Paint, stains, varnishPlaster, stuccoWallpaper (plain, embossed, vinyl, pre-pasted, self-adheringAsphaltPreservativesWaterproofi ngWax
Work log
Students could make a suitable entry in their work-log
•
•
•••
••••
•
References
Wagner & Smith, unit 20, page 557-577
Feirer, chapter 41
Exterior fi nishes for wood http://web1.msue.msu.edu/imp/mod02/01500571.html
Types of Paint http://www.hytechsales.com/howtopaint/paint_types.html
Facts about paint http://www.cdnpaint.org/facts_e.html#whatispaint
Environmental information on paints http://www.wasteonline.org.uk/resources/Wasteguide/mn_wastetypes_paint.html
Different types of household paints http://www.energymanagertraining.com/paints/Differenttypesofhouseholdpaints.htm
Interior Design and Decorating Finishes for the Home All You Need to Know About Paint (lot of advertising, but multiple pages of info) http://www.interiordezine.com/index.cfm/Interior_Design_Finishes/Paint_12
Types of Preservative http://www.cwc.ca/products/treated_wood/preservatives/types.php
Thompson’s® Water Seal® Advanced Clear Multi-Surface Waterproofer (application notes) http://www.thompsonswaterseal.com/products/productFocus.asp?products.data=002
SoyGuard® Wood Protection Premium Water Repellent and Sealer Product
Topic 10 Painter-Decorator

Section 3: Unit 3 Skill-building in Selected Trades
Specifi c Curriculum Outcomes Suggested Learning and Teaching Strategies
256 Skilled Trades 1201
Students will be expected to Brushes made from synthetic bristles work best. Natural hair bristles absorb the water, swell, and soften
Penetrating fi nishes penetrate into wood pores and fi bres
They may be clear or contain pigmentsThey may be Latex, oil, or alcohol based
Wood preservatives work by killing the organisms that destroy wood fi bres, including fungi and in-sects.Wood preservatives available for products used as decks and the like around homes, since 2004, are one of two types, both using copper as the main active ingredient. Each is water based and uses ad-ditional ingredients to combat organisms that are resistant to copper. They are
Alkaline Copper Quaternary (ACQ)Copper Azole (CA)
Waterproofi ng wood treatments are generally pen-etrating solutions that encapsulate wood cells and fi bres, preventing water penetration. They tend to have a limited lifespan of 2 -3 years and must be reapplied. If water beads on the surface, recoating is not necessary. If water is absorbed into the surface, it is time to recoat.Waterproofi ng membranes are made from a variety of compounds with elastic properties. They are used in a variety of interior and exterior applications, for example, on exterior concrete walls, on shower fl oors below the fi nish tiles, below roof shingles as ice shields, over existing roofi ng materials as a roof refi nish. A common low elasticity membrane is the vapor barrier used exterior insulated walls and ceil-ings. Membranes are engineered to be used alone and in tandem with other coatings.Asphalt is made from crude oil. In the raw form it is solid or semi-solid. It application form it contains solvents like naphtha or toluene, binders, hardening
•
•
••
•
•
••
•
•
•
3.10.4 describe the variety of fi nishes available for application to pre-pared surfaces.
[1.405]
Topic 10 Painter-Decorator

Section 3: Unit 3 Skill-building in Selected Trades
Suggestions for Assessment Resources
Skilled Trades 1201 257
Information and Application Instructions http://72.14.209.104/search?q=cache:sMQeFyHaa6QJ: www.biopreserve.com/products/SoyGuardPremSealerAppInst.pdf+%22 waterproofi ng+wood%22&hl=en&gl=ca&ct=clnk&cd=21&lr=lang_en&client=fi refox-a
Waterproofi ng membranes http://www.allwaterproofi ng.com/membrane.html
Waterproofi ng membrane http://www.epoxysystems.com/419.htm
Special Purpose Coatings (US Army) http://www.usace.army.mil/publications/armytm/tm5-618/chap10.pdf
Gardner Innovative Asphalt Coatings http://www.apoc.com/Gardner-5-02/index_ga.htm
What is Stucco http://architecture.about.com/library/blgloss-stucco.htm
Plasterers and stucco masons http://www.bls.gov/oco/ocos210.htm
Stucco http://www.cement.org/stucco/
Ingredients - waxes http://sci-toys.com/ingredients/wax.html
Topic 10 Painter-Decorator

Section 3: Unit 3 Skill-building in Selected Trades
Specifi c Curriculum Outcomes Suggested Learning and Teaching Strategies
258 Skilled Trades 1201
Students will be expected to
3.10.4 describe the variety of fi nishes available for application to pre-pared surfaces.
[1.405]
agents, and bonding agents. Asphalt coatings are made in a variety of forms
Liquid coatingsSemi-liquid patchesAdhesivesLiquid sealersReinforcing fabricsPaints
Stucco is a combination of cement (binder), sand and fi ne aggregate, and water. Pigments, coloured cement, and aggregate size can be controlled to modify the fi nal result. Method of application also affects appearance.Wax are natural substances containing alcohols and fatty acids. Beeswax is well known. Shellac is mainly made from wax exuded by the lac beetle. Synthetic waxes made from heavy hydrocarbons are not really waxes , but exhibit many of the properties of wax and add additional ones. Wax is applied to a surface to provide a protective coating and enhance the visual properties.
For the StudentCreate a table and describe the types of each fi nish that is commercially available, as well as where each application might be applied in a residential build-ing.
Paint, stains, varnishPlaster, stuccoWallpaper (plain, embossed, vinyl, pre-pasted, self-adheringAsphaltPreservativesWaterproofi ngWax
A suitable entry should be made in the student worklog
•
••••••
•
•
•
•••
••••
•
Topic 10 Painter-Decorator

Section 3: Unit 3 Skill-building in Selected Trades
Suggestions for Assessment Resources
Skilled Trades 1201 259
Topic 10 Painter-Decorator

Section 3: Unit 3 Skill-building in Selected Trades
Specifi c Curriculum Outcomes Suggested Learning and Teaching Strategies
260 Skilled Trades 1201
Students will be expected to
3.10.5 create a work plan for the prepa-ration and fi nishing of the interi-or/exterior surfaces of the project.
[1.402][1.405][4.402][4.403]
For the Teacher
This outcome should be addressed in conjunction with the previous topic on Painter-Decorator. The Painter-Decorator fabrication work plan is a continuation of the design brief and follows the plan for previous trades. Use Appendix A Planning Guide: Information for Fabri-cation Planning as a guideline for this outcome.
Points to emphasize
Finishes will be restricted to latex based.Sketches are common method of planning a interior colour scheme. Coloured markers or pencils can be used. Reference should be made to colour chips for the paint.Planning the sequence from preparation to cleanup is important to ensure that no steps are missedIdentify fi nish materials that will the desired fi nishIdentify the application sequence for fi nish materials
For the StudentBased on the drawings provided, and keeping the design brief in mind:
Make a list of the fi nishing materials needed ap-propriate to the dimensions of the structure.Make a list of the areas requiring fi nishing and provide quick sketches of each.Identify possible problem areas in the installation of the fi nish, ie: specialized materials, areas dif-fi cult to access.Make a list of the fi nishing sequence indicating preparation and order of fi nish.Identify tools and equipment required and note any additional knowledge/skills needed to com-plete the work and make provisions with the teacher to obtain that qualifi cation
Create appropriate entry in the WorkLog and have teacher sign off.
••
•
•
••
•
•
•
•
•
•
•
Topic 10 Painter-Decorator

Section 3: Unit 3 Skill-building in Selected Trades
Suggestions for Assessment Resources
Skilled Trades 1201 261
Assessment
Pencil and paper
Assess this outcome with Appendix B Design Part 2 Planning Rubric
Workplan/layout
Students could:make a list of the fi nishing materials needed ap-propriate to the dimensions of the structure.make a list of the areas requiring fi nishing and provide quick sketches of each.identify possible problem areas in the installation of the fi nish, ie: specialized materials, areas dif-fi cult to access.make a list of the fi nishing sequence indicating preparation and order of fi nish.identify tools and equipment required and note any additional knowledge/skills needed to com-plete the work and make provisions with the teacher to obtain that qualifi cation
Work log
Students could include their workplan in their log books.
•
••
•
•
•
•
•
Topic 10 Painter-Decorator
References
Appendix A Planning Guide: Informa-tion for Fabrication Planning
Student made materials
Drawings completed as part of the planning
Drawings
Appendix A U2T2 Section Drawing
Appendix A U2T2 Detail Drawing
One of these 2 sets
Appendix A U3T1 Design Plan Op-tion 1 and Appendix A U3T1 Design Option 1 Isometric
OrAppendix A U3T1 Design Plan Op-tion 2 andAppendix A U3T1 Design Option 2 Isometric
Appendix A U3T3 Flashing Drawing
Appendix A U2T2 Orthographic Grid
•
•
•
•
•

Section 3: Unit 3 Skill-building in Selected Trades
Specifi c Curriculum Outcomes Suggested Learning and Teaching Strategies
262 Skilled Trades 1201
Students will be expected to
Topic 10 Painter Decorator
3.10.6 prepare, tape and plaster drywall joints and corners
[1.401][1.402][1.403][1.404][1.405][2.401][2.402][5.402]
For the Teacher
Drywall compound is usually applied in three coats, al-lowing suffi cient drying time between coats. For many of the compounds, the material shrinks as it dries. The amount of sanding between coats is dependant on the skill of the plasterer
Points to emphasize:
Drywall tape can be paper, or mesh fabric. The paper tape is usually applied into wet plaster. The mesh is usually self adhesiveDrywall joints and corners need to be free of loose debris and not project beyond the plane of the surfaceDrywall compound needs to be applied quickly and evenly. Repeated trowelling beyond the “plastic” stage will result in a poor surface texture.
This activity may be deferred. The fabrication activity in the next topic may be substituted.
For the StudentUsing the corner section constructed in the corner beading step, prepare, plaster and fi nish the corner sections.Assemble two 1’ x 16” sections, butted on studding. Prepare, plaster, and fi nish this jointA suitable entry should be made in the student worklog
•
•
•
•
•
•

Section 3: Unit 3 Skill-building in Selected Trades
Suggestions for Assessment Resources
Skilled Trades 1201 263
Topic10 Painter Decorator
References
Wagner & Smith, unit 15, page 429-462
Hometime Construction Basics DVD
Taping Drywall Tutorial (http://www.easy2diy.com/cm/ easy/diy_ht_index.asp?page_id=35720195)
Taping Drywall Joints information at DoItYourself.com the Largest Online Home Improvement and Repair Center (http://www.doityourself.com/ stry/tapingdrywalljoints)
Video Tip Taping Drywall Seams (http://www.taunton.com/ fi nehomebuilding/pages/hvt050.asp)
ToolsCombining (Taping knife, Plastering trowel)
ConsumablesDrywall compound
•
•
Assessment
Paper and pencil
Students could be assessed for this outcome using the Appendix B Skills Rubric
Work log
Students could make an entry in their work log, outlining the skills and techniques they used to complete this task
Practical activity
Students could use the corner section constructed in the corner beading step, to prepare, plaster and fi nish the corner sections.Students could assemble two 1’ x 16” sections, butted on studding and then prepare, plaster, and fi nish this joint.
•
•
•
•

Section 3: Unit 3 Skill-building in Selected Trades
Specifi c Curriculum Outcomes Suggested Learning and Teaching Strategies
264 Skilled Trades 1201
Students will be expected to
3.10.7 prepare surfaces for paint or cov-erings
[1.401][1.402][1.403][1.404] [1.405][2.401][2.402][5.402]
For the Teacher
The purpose of this outcome is to gain practical experi-ence in preparing different surfaces for application of a fi nish.
Samples of each material will need to be available for student use. As well fi nish materials, brushes, rollers and clean up materials will be needed.
Points to emphasize
Start with surface examination and determine prepa-ration requirementsPrep surfaces and clean thoroughly
For the StudentPrepare the following surfaces for fi nishing. When completed, surfaces should be of a suitable condi-tion to apply a wall covering.
Plaster wallsPainted surfacesWoodMetalMasonry / concrete
A suitable entry should be made in the student worklog
•
•
•
•••••
•
Topic 10 Painter-Decorator

Section 3: Unit 3 Skill-building in Selected Trades
Suggestions for Assessment Resources
Skilled Trades 1201 265
Assessment
Paper and pencil
Students could be assessed for this outcome using the Appendix B Skills Rubric
Work log
Students could make an entry in their work log, outlining the skills and techniques they used to complete this task
Practical activity
Students could prepare the following surfaces for fi nishing. When completed, surfaces should be of a suitable condition to apply a wall covering.
Plaster wallsPainted surfacesWoodMetalMasonry / concrete
•
•
•
•••••
References
Wagner & Smith, unit 20, page 557-577
Hometime Construction Basics DVD
Appendix B Tool Safety Sheets
Topic 10 Painter-Decorator

Section 3: Unit 3 Skill-building in Selected Trades
Specifi c Curriculum Outcomes Suggested Learning and Teaching Strategies
266 Skilled Trades 1201
Students will be expected to
Topic 10 Painter-Decorator
For the Teacher
The purpose of this SCO is to experience the range of methods that are available for the application of fi nishes.
Points to emphasize:
The specifi c mechanical process of applying a fi nish is directly related to the type of fi nish used.Each fi nish will require a specifi c tool for application (ie: paint–brush/roller, plaster–trowel)Use drop cloths and safety precautionsEmploy proper techniquesClean applicators and put all materials away when fi nished
If desired, this activity may be postponed in favour of the painter fabrication in the next topic
For the StudentResearch and provide the type of fi nish that is asso-ciated with each of the following techniques. Creat-ing a table will help to organize the work. Each tech-nique may be used to apply more than one fi nish. Create a column that contains a brief description of the steps used in the technique.
Wiped/rubbedBrushedRolledSprayedSpongedTrowelledWallpapered
Using materials supplied by the teacher, and a suit-able surface prepared in previous activities, prepare and fi nish the surface using the appropriate materi-als and tools.A suitable entry should be made in the student worklog
•
•
•••
•
•••••••
•
•
3.10.8 apply fi nishes using proper tech-niques
[1.401][1.402][1.403][1.404] [1.405][2.401][2.402][5.402]

Section 3: Unit 3 Skill-building in Selected Trades
Suggestions for Assessment Resources
Skilled Trades 1201 267
Topic 10 Painter-Decorator
Assessment
Paper and pencil
Students could be assessed for this outcome using the Appendix B Skills Rubric
Work log
Students could make an entry in their work log, outlining the skills and techniques they used to complete this task
ResearchStudents could create a table to provide the type of fi nish that is associated with each of the following techniques. A column could be created that contains a brief description of the steps used in the tech-nique.
Wiped/rubbedBrushedRolledSprayedSpongedTrowelledWallpapered
Practical activityUsing materials supplied by the teacher, and a suit-able surface prepared in previous activities, students could prepare and fi nish the surface using the ap-propriate materials and tools.
•
•
•
•••••••
•
References
Wagner & Smith, unit 20, page 557-577
Appendix B Tool Safety Sheet
ToolsFinish (paint brushes, rollers, stir sticks, roller pans, drop cloths, trowel
ConsumablesPaintPlaster
•
••

Section 3: Unit 3 Skill-building in Selected Trades
Specifi c Curriculum Outcomes Suggested Learning and Teaching Strategies
268 Skilled Trades 1201
Students will be expected to
3.11.1 demonstrate safe practices for use of standard hand, portable power, and stationary power tools for ceramic tile installation
[2.401][2.402][2.405][3.401] [5.402]
For the Teacher
Hand and power tool use require a means of ensuring students are properly certifi ed. Normal practices is to use a combination of written and performance testing for each student for each tool. It is a good idea to main-tain a chart of who is qualifi ed for what tools. You may wish to provide class wide instruction on tools, followed by individual testing.
Points to emphasize
Safety is not just a set of rules. Safety is a way of life. It is a set of ideas, attitudes, behaviours and practices that are essential to the workplace. Safe practice does not eliminate risk, but it reduces risk. Safe practice is risk management.Safe use of tools is primarily using them in the prescribed manner, with the proper adjustments and usage procedures. It is also avoidance of clearly understood unsafe practices. In particular shortcuts and quick work-a rounds often increase the risk.Only students who are qualifi ed will be allowed to use a particular tool. Tool qualifi cation can occur on an as-needed basis.Tool qualifi cation has no margin of error. Only 100% on written/verbal/performance tests are ac-ceptable for qualifi cation.Each tool is different, but all tools have commonali-ties. Point out the commonalities with other tools when demonstrating a tool’s function, adjustments and operating procedures. It may be useful to take one class and do an over-view demonstration of all tools. Include
Function of the toolParts of the toolAdjustments that can be made and the correct procedure for completing themSafe usage of the tool for performing the common tasks
•
•
•
•
•
•
•••
•
Topic 11 Masonry - Ceramic Wall Tile Installation

Section 3: Unit 3 Skill-building in Selected Trades
Suggestions for Assessment Resources
Skilled Trades 1201 269
Topic 11 Masonry -Ceramic Wall Tile Installation
Assessment
Only 100% on the written and performance components of the test for each tool is acceptable.
Pencil and Paper
Assess tool safety and use with Tool Safety Quizzes from Skilled Trades Safety Guide. This is assessment for learning, and students must repeat the quizzes until 100% is attained. No tool use is permitted before successful completion of the quizzes.
Practical Activity
Students must demonstrate the safe and proper operation of the tools and devices used in a ceramic tile project.
Work log
Students could create an appropriate entry in the worklog itemizing the tools they have qualifi ed for.
•
•
•
References
Hometime Ceramic Tile DVD
Smart Guide: Ceramic Tile
Appendix B Tool Safety Sheets
Section 3: Unit 3 Skill-building in Selected Trades
Specifi c Curriculum Outcomes Suggested Learning and Teaching Strategies
270 Skilled Trades 1201
Students will be expected to
3.11.1 demonstrate safe practices for use of standard hand, portable power, and stationary power tools for ceramic tile installation
[2.401][2.402][2.405][3.401] [5.402]
Procedures to follow in instances where the tool is not functioning or functioning outside the specs
For the StudentComplete the safety program for each tool that requires it, and that you intend to use
State and describe the safe operating procedure for using a tool at 100% accuracyDemonstrate safe use of a tool with 100% accu-racyRecord certifi cation for tool in the work log and have the teacher initial it
Use tools as needed, in accordance with accepted safe practices,Create an appropriate entry in the worklog
•
•
•
•
•
•
•
Topic 11 Masonry - Ceramic Wall Tile Installation

Section 3: Unit 3 Skill-building in Selected Trades
Suggestions for Assessment Resources
Skilled Trades 1201 271
Topic 11 Masonry -Ceramic Wall Tile Installation

Section 3: Unit 3 Skill-building in Selected Trades
Specifi c Curriculum Outcomes Suggested Learning and Teaching Strategies
272 Skilled Trades 1201
Students will be expected to
3.11.2 describe methods for preparing walls for installation of ceramic tile
[1.402]
For the teacherTo complete this SCO students will explore the meth-ods of preparing walls for tile installation. There are generally three types of material used as backing mate-rial for the installation of wall tile. They are:
drywall,greenboard (moisture resistant drywall), or concrete backerboard.
All three are acceptable assuming they meet the follow-ing conditions: the wall is a fl at surface, it is solid, and it is well secured. If any of these conditions are not pres-ent then the wall material should be replaced or repaired to meet those standards. Points to emphasize:
Loose paint must be removed and smooth paint should be roughed up with sandpaper to allow for better adhesion.Wall paper should be scraped off and any glue re-moved before installing tile.Always ensure the surface is clean and free of dust or debris before installing tile over it.
For the student:Students can differentiate between the three types of backerboard and how the proper wall prepara-tion affects the fi nish product. This could involve a discussion of a variety of wall defects and how they affect the tiling project.
•••
•
•
•
•
Topic 11 Masonry - Ceramic Wall Tile Installation

Section 3: Unit 3 Skill-building in Selected Trades
Suggestions for Assessment Resources
Skilled Trades 1201 273
Topic 11 Masonry -Ceramic Wall Tile Installation
AssessmentStudents could be assessed for this outcome with Appendix B Knowledge Rubric.
Paper and pencil
Students could differentiate between the three types of backerboard and how the proper wall prepara-tion affects the fi nish product. This could involve a discussion of a variety of wall defects and how they affect the tiling project.
Work log
Students could record the information in their worklog.
•
•
•
References
Hometime Ceramic Tile DVD
Smart Guide: Ceramic Tile

Section 3: Unit 3 Skill-building in Selected Trades
Specifi c Curriculum Outcomes Suggested Learning and Teaching Strategies
274 Skilled Trades 1201
Students will be expected to
3.11.3 describe various materials used for installation of ceramic tile on a wall
[1.401][1.402][2.401][3.401]
For the teacher
There are several materials necessary for the installation of tile on a wall. These include the tile itself and tile adhesive.
As far as size goes, the most popular tile sold is still the 4-1/4” square wall tile. However tiles also come in 6 x 6 and 6 x 8 and these are quite popular as well. Wall tile will typically be of the smaller variety. Small one inch tiles are also common. These are called mosaic tile because you can mix different colors to create borders, patterns, and even pictures. These are usually joined together in 12”x12” or 12”x24” sheets to make them easier and quicker to set.
Adhesives generally come in two types; thinset mortars and pre-mixed adhesives. Pre-mixed adhesives are gen-erally used for wall tile because they start gripping the wall tile before they are fully cured.
For the studentStudents can research and compile a comparison chart showing the proper usage and the advantages and disadvantages of each type of tile adhesive. This could give examples of where and where not to use each adhesive type.
•
Topic 11 Masonry - Ceramic Wall Tile Installation

Section 3: Unit 3 Skill-building in Selected Trades
Suggestions for Assessment Resources
Skilled Trades 1201 275
Topic 11 Masonry -Ceramic Wall Tile Installation
Assessment
Paper and pencil
Students could be assessed for this outcome with Appendix B Knowledge Rubric
Research
Students could research and compile a comparison chart showing the proper usage and the advantages and disadvantages of each type of tile adhesive. This could give examples of where and where not to use each adhesive type.
Work log
Students could make a suitable entry in their work-log
•
•
•
References
Hometime Ceramic Tile DVD
Smart Guide: Ceramic Tile

Section 3: Unit 3 Skill-building in Selected Trades
Specifi c Curriculum Outcomes Suggested Learning and Teaching Strategies
276 Skilled Trades 1201
Students will be expected to
3.11.4 describe proper ways of installing backing material
[1.402][1.405]
Topic 11 Masonry - Ceramic Wall Tile Installation
For the Teacher
This outcome is a partial review of section 9, Lather
Points to emphasize
Interior sheathing is installed after electrical and plumbing rough-ins.Planning has to identify materials, installation se-quence, plastering sequence and cut-outs for electri-cal and plumbing.Part of the planning sequence is to ensure that there is something to nail the sheathing to. Non-bearing partitions frequently present problems for ceiling installations.
For the Student
Working from the previous drawings, and measurements taken from the structure, describe the installation methods to:
Apply sheathing to the interior wall and ceiling structuresAccommodate electrical and plumbing rough-insAccommodate odd shaped sectionsPrepare surface for ceramic tileConsideration for ceramic tile installation
The methodology must include
Materials list with items, and quantity of each, Tools and equipmentTraining/certifi cation required to use a material or toolA list of the construction sequence indicating layout, cutting and installation, and plastering sequences
As well
Create appropriate entry in the WorkLog and have teacher sign off.
•
•
•
•
••••
•••
•
•

Section 3: Unit 3 Skill-building in Selected Trades
Suggestions for Assessment Resources
Skilled Trades 1201 277
Topic 11 Masonry -Ceramic Wall Tile Installation
References
Hometime Ceramic Tile DVD
Smart Guide: Ceramic Tile
Assessment
Pencil and paper
Assess this outcome with Appendix B Design Part 2 Planning Rubric
Research
Students could outline the various ways that interior sheathing could be installed. When doing so they could include such things as:
ease of useease of preparing and shaping for structural needsmethods for creating holes for receptacles and switcheshow each of the different types of sheathing deals with the above.
Work log
Students could include their workplan in their log books.
•
•
•••
•
•

Section 3: Unit 3 Skill-building in Selected Trades
Specifi c Curriculum Outcomes Suggested Learning and Teaching Strategies
278 Skilled Trades 1201
Students will be expected to
3.11.5 given the nominal size, develop a work plan for the installation of ceramic tile simulating a bathtub installation
[1.402][1.405][4.402] [4.403]
For the teacher
To complete this outcome students will be expected to create a plan for the proper layout of tile in an area simulating a bath tub installation. Students will be instructed on proper methods of laying out a wall area to ensure a symmetrical layout is achieved. Students should be aware of terminology such as symmetrical layout, jury stick, or tile stick. This activity can be done using grid paper to allow students to try several different layout options. When they have chosen their preferred layout they can the proceed to layout their walls using the tile size and grout line size specifi ed by the instruc-tor.
Points to emphasize:
A symmetrical layout generally starts in the middle of a wall so that any cut tiles will be the same size on either end of the wall. The most basic principle is that you want full tiles in the most visible areas and cut tiles in the less visible areas.You never want the last tile to be less than 1/2 the width of a full tile. If it is, adjust the center line 1/2 the width of a tile in either direction. This means instead of having the grout line at the center, you will have a full tile centered on your center line. Then draw a new vertical reference line where the grout joint of the center tile falls.
For the StudentStudents will use the knowledge attained thus far to complete a set of scale drawings to demonstrate the proper layout for their wall tile. These drawing could also include a description of how to layout their reference lines to obtain the best results.Create appropriate entry in the worklog and have teacher sign off.
•
•
•
•
Topic 11 Masonry - Ceramic Wall Tile Installation

Section 3: Unit 3 Skill-building in Selected Trades
Suggestions for Assessment Resources
Skilled Trades 1201 279
Topic 11 Masonry -Ceramic Wall Tile Installation
Assessment
Pencil and paper
Assess this outcome with Appendix B Design Part 2 Planning Rubric
Workplan/layout
Students could use the knowledge attained thus far to complete a set of scale drawings to demonstrate the proper layout for their wall tile. These drawing could also include a description of how to layout their reference lines to obtain the best results.
Work log
Students could include their workplan in their log books.
•
•
•
References
Appendix A Planning Guide: Informa-tion for Fabrication Planning
Student made materials
Drawings completed as part of the planning
Drawings
Appendix A U2T2 Section Drawing
Appendix A U2T2 Detail Drawing
One of these 2 sets
Appendix A U3T1 Design Plan Op-tion 1 and Appendix A U3T1 Design Option 1 Isometric
OrAppendix A U3T1 Design Plan Op-tion 2 andAppendix A U3T1 Design Option 2 Isometric
Appendix A U3T3 Flashing Drawing
Appendix A U2T2 Orthographic Grid
•
•
•
•
•

Section 3: Unit 3 Skill-building in Selected Trades
Specifi c Curriculum Outcomes Suggested Learning and Teaching Strategies
280 Skilled Trades 1201
Students will be expected to
3.11.6 Layout the proper tile spacing for tile installation on a bathroom wall
[1.402][1.405] [4.402][4.403]
For the teacherIt is diffi cult to lay out tiles on a wall so a jury stick or tile stick is the preferred choice. This is simply a stick that has the proper tile spacing marked on it which can then be used to transfer the tile spacing to the wall. It is essential that all vertical tile spacing are straight and true and that all horizontal spacing is consistent from wall to wall. Uneven tile spacing will become very evident and it detracts for the fi nished product.
Points to emphasize
A symmetrical layout generally starts in the middle of a wall so that any cut tiles will be the same size on either end of the wall. The most basic principle is that you want full tiles in the most visible areas and cut tiles in the less visible areas.For this type of layout, fi rst fi nd the center of that wall section and draw a vertical plumb line using a level. Use the jury stick to mark the spacing of the tiles horizontally. Start with a grout joint on the center line and mark tile spacing to the end of the tile section. Do not fi t the tiles tightly into the corners. Leave about a ¼” gap, which will be fi lled later with caulk. You never want the last tile to be less than 1/2 the width of a full tile. If it is, adjust the center line 1/2 the width of a tile in either direction. This means instead of having the grout line at the center, you will have a full tile centered on your center line. Then draw a new vertical reference line where the grout joint of the center tile falls.
For the studentUsing the technical drawing and work plan as guid-ance, layout the wall section with proper reference lines to aid in the installation of the ceramic tile. Students should make use of a jury stick or tile stick to aid in the creation of these reference lines.Create appropriate entry in the worklog and have teacher sign off.
•
•
•
•
•
Topic 11 Masonry - Ceramic Wall Tile Installation

Section 3: Unit 3 Skill-building in Selected Trades
Suggestions for Assessment Resources
Skilled Trades 1201 281
Topic 11 Masonry -Ceramic Wall Tile Installation
Assessment
Pencil and paper
Assess this outcome with Appendix B Design Part 2 Planning Rubric
Workplan/layout
Students could, using the technical drawing and work plan as guidance, layout the wall section with proper reference lines to aid in the installation of the ceramic tile. Students should make use of a jury stick or tile stick to aid in the creation of these refer-ence lines.
Work log
Students could include their workplan in their log books.
•
•
•
References
Appendix A Planning Guide: Informa-tion for Fabrication Planning
Student made materials
Drawings completed as part of the planning
Drawings
Appendix A U2T2 Section Drawing
Appendix A U2T2 Detail Drawing
One of these 2 sets
Appendix A U3T1 Design Plan Op-tion 1 and Appendix A U3T1 Design Option 1 Isometric
OrAppendix A U3T1 Design Plan Op-tion 2 andAppendix A U3T1 Design Option 2 Isometric
Appendix A U3T3 Flashing Drawing
Appendix A U2T2 Orthographic Grid
•
•
•
•
•

Section 3: Unit 3 Skill-building in Selected Trades
Specifi c Curriculum Outcomes Suggested Learning and Teaching Strategies
282 Skilled Trades 1201
Students will be expected to
3.11.7 Install ceramic tile on a wall using industry standards and practices [1.401][1.402][1.403][1.404] [1.405][2.401][2.402][5.402]
For the teacher
To achieve this outcome students will be expected to install ceramic tile on their wall sections using proper techniques. They will need to select the proper tile and adhesive, trowel the adhesive onto the wall, set their tile and then ensure that the tiles surfaces and grout lines are free of adhesive.
Points to emphasize
Ensure that the wall area is clean and free of dirt or debrisCheck to ensure that the tile adhesive chosen is cor-rect for the intended application.Trowel the adhesive onto the wall is sections that you feel confi dent that you can complete in the giv-en time frame. Ensure that the adhesive is combed onto the surface with a consistent height which will ensure that the tiles are level. Hold the trowel at a 45 degree angle to get the best results. Install tiles from the bottom and the center work-ing outward and upward. Check often to ensure that your tile spacing stays consistent. Check the fi rst tile to ensure good adhesion. 80% coverage of adhesive to tile is a good benchmark.
For the studentUsing the reference lines and the work plan as guidance, tile the wall section. Once tiled, students should properly clean up their completed tile to pre-pare for the grouting. Students should take special care to safely use all tools and to ensure tools are properly cleaned at the end of the tiling process.Create appropriate entry in the worklog and have teacher sign off.
•
•
•
•
•
•
Topic 11 Masonry - Ceramic Wall Tile Installation

Section 3: Unit 3 Skill-building in Selected Trades
Suggestions for Assessment Resources
Skilled Trades 1201 283
Topic 11 Masonry -Ceramic Wall Tile Installation
Assessment
Paper and pencil
Students could be assessed for this outcome using the Appendix B Skills Rubric
Work log
Students could make an entry in their work log, outlining the skills and techniques they used to complete this task
Practical activity
Students could, using the reference lines and the work plan as guidance, tile the wall section. Once tiled, students should properly clean up their com-pleted tile to prepare for the grouting. Students should take special care to safely use all tools and to ensure tools are properly cleaned at the end of the tiling process.
•
•
•
References
Hometime Ceramic Tile DVD
Smart Guide: Ceramic Tile
Appendix B Tool Safety Sheets
DrawingsStudent/teacher technical drawingsStudent layout
Toolsnotched trowelgrout fl oatdrillmortar mixing paddletile spacerstile cutter
ConsumablesThinset mortarCeramic wall tile
••
••••••
••

Section 3: Unit 3 Skill-building in Selected Trades
Specifi c Curriculum Outcomes Suggested Learning and Teaching Strategies
284 Skilled Trades 1201
Students will be expected to
3.11.8 Grout ceramic tile using industry standards and practices
[1.401][1.402][1.403][1.404] [1.405][2.401][2.402][5.402]
For the teacher
To achieve this outcome students will be expected to select the proper grouting material for the tile installed in the previous SCO. Students will select their proper color grout, based on their tile color, and then mix the grout to the proper consistency. There are two types of grout used in industry: sanded and un-sanded. For the grouting of wall tile students will be using un-sanded grout. The color of the grout can go a long way in emphasizing the overall look of your tile. Contrasting colors will help accent the geometric layout of your tile. Choosing a light colored grout for high traffi c areas wouldn’t be a good idea because it will probably discolor over time.
Points to emphasize
Grout should be mixed to the suggested manufac-turers recommendations. Always follow the instruc-tions to achieve best results.Use a padded grout fl oat to force the grout into the spaces between the tiles. Grout should be pushed diagonally across the joints to force it into the gaps.Clean off the excess grout with a damp sponge and clean water. This will take several cleanings to get the tile totally clean.Sealing the grout is also an option. You can get sealer additives to be mixed with the grout or you can seal the grout after it is dried.
For the studentFollowing the manufacturers recommended specifi -cation students should mix and grout their complet-ed wall tile section cleaning up the tile to complete the project. Students should also take special care to properly use any tools needed for the grouting process and to clean any tools used during the grouting process.Create appropriate entry in the worklog and have teacher sign off.
•
•
•
•
•
•
•
Topic 11 Masonry - Ceramic Wall Tile Installation

Section 3: Unit 3 Skill-building in Selected Trades
Suggestions for Assessment Resources
Skilled Trades 1201 285
Topic 11 Masonry -Ceramic Wall Tile Installation
Assessment
Paper and pencil
Students could be assessed for this outcome using the Appendix B Skills Rubric
Work log
Students could make an entry in their work log, outlining the skills and techniques they used to complete this task
Practical activity
Following the manufacturers recommended speci-fi cation students could mix and grout their com-pleted tiled wall cleaning up the tile to complete the project. Students should also take special care to properly use any tools needed for the grouting pro-cess and to clean any tools used during the grouting process.
•
•
•
References
Hometime Ceramic Tile DVD
Smart Guide: Ceramic Tile
Appendix B Tool Safety Sheets
DrawingsStudent/teacher technical drawingsStudent layout
Toolsnotched trowelgrout fl oatdrillmortar mixing paddletile spacerstile cutter
ConsumablesThinset mortarCeramic wall tileGrout
••
••••••
•••

Section 3: Unit 3 Skill-building in Selected Trades
Specifi c Curriculum Outcomes Suggested Learning and Teaching Strategies
286 Skilled Trades 1201
Students will be expected to
3.12.1 review safe practices for use of standard hand, portable power, and stationary power tools for ceramic tile installation
[2.401][2.402][2.405][3.401] [5.402]
For the Teacher
Hand and power tool use require a means of ensuring students are properly certifi ed. Normal practices is to use a combination of written and performance testing for each student for each tool. It is a good idea to main-tain a chart of who is qualifi ed for what tools. You may wish to provide class wide instruction on tools, followed by individual testing.
Points to emphasize
Safety is not just a set of rules. Safety is a way of life. It is a set of ideas, attitudes, behaviours and practices that are essential to the workplace. Safe practice does not eliminate risk, but it reduces risk. Safe practice is risk management.Safe use of tools is primarily using them in the prescribed manner, with the proper adjustments and usage procedures. It is also avoidance of clearly understood unsafe practices. In particular shortcuts and quick work-a rounds often increase the risk.Only students who are qualifi ed will be allowed to use a particular tool. Tool qualifi cation can occur on an as-needed basis.Tool qualifi cation has no margin of error. Only 100% on written/verbal/performance tests are ac-ceptable for qualifi cation.Each tool is different, but all tools have commonali-ties. Point out the commonalities with other tools when demonstrating a tool’s function, adjustments and operating procedures. It may be useful to take one class and do an over-view demonstration of all tools. Include
Function of the toolParts of the toolAdjustments that can be made and the correct procedure for completing themSafe usage of the tool for performing the com-mon tasks
•
•
•
•
•
•
•••
•
Topic 12 Masonry - Ceramic Floor Tile Installation
Section 3: Unit 3 Skill-building in Selected Trades
Suggestions for Assessment Resources
Skilled Trades 1201 287
Topic 12 Masonry -Ceramic Floor Tile Installation
Assessment
Only 100% on the written and performance components of the test for each tool is acceptable.
Pencil and Paper
Assess tool safety and use with Tool Safety Quizzes from Skilled Trades Safety Guide. This is assessment for learning, and students must repeat the quizzes until 100% is attained. No tool use is permitted before successful completion of the quizzes.
Practical Activity
Students must demonstrate the safe and proper operation of the tools and devices used in a ceramic tile project.
Work log
Students could create an appropriate entry in the worklog itemizing the tools they have qualifi ed for.
•
•
•
References
Hometime Ceramic Tile DVD
Smart Guide: Ceramic Tile
Appendix B Tool Safety Sheets

Section 3: Unit 3 Skill-building in Selected Trades
Specifi c Curriculum Outcomes Suggested Learning and Teaching Strategies
288 Skilled Trades 1201
Students will be expected to
3.12.1 review safe practices for use of standard hand, portable power, and stationary power tools for ceramic tile installation
[2.401][2.402][2.405][3.401] [5.402]
Procedures to follow in instances where the tool is not functioning or functioning outside the specs
For the StudentComplete the safety program for each tool that requires it, and that you intend to use
State and describe the safe operating procedure for using a tool at 100% accuracyDemonstrate safe use of a tool with 100% accu-racyRecord certifi cation for tool in the work log and have the teacher initial it
Use tools as needed, in accordance with accepted safe practices,Create an appropriate entry in the worklog
•
•
•
•
•
•
•
Topic 12 Masonry - Ceramic Floor Tile Installation

Section 3: Unit 3 Skill-building in Selected Trades
Suggestions for Assessment Resources
Skilled Trades 1201 289
Topic 12 Masonry -Ceramic Floor Tile Installation

Section 3: Unit 3 Skill-building in Selected Trades
Specifi c Curriculum Outcomes Suggested Learning and Teaching Strategies
290 Skilled Trades 1201
Students will be expected to
3.12.2 describe methods for preparing walls for installation of ceramic tile [1.402]
For the teacher
To complete this SCO students will explore the meth-ods of preparing fl oors for tile installation. A strong base is the most important part of any tile installation. The fl oor must be fl at, free of defects, and well bonded to the sub structure. A fl oor thickness of 1 1/8 would be a recommended thickness.
The most common materials used as fl oor underlay-ment are plywood and concrete backerboard. Both of these materials are acceptable but concrete backerboard would be the ideal choice, especially in areas where moisture is a concern. Both of these products would require similar installation principles. Those are
Ensure the underlayment is fl at and free of defects. The underlayment should be attached to the subfl oor us-ing galvanized nails or screws which should extend into the fl oor joist below. They should be spaced every 4-6 inches around the perimeter and every 6-8 inches in the fi eld. Space your sheets approximately 1/8 inch apart and avoid joining two sheets in the same spot.
Points to emphasize:
Always ensure the surface is clean and free of dust or debris before installing tile over it.Any damaged fl ooring should be replaced before installing tile.
For the studentStudents can differentiate between the three types of backerboard and how the proper fl oor preparation and material affects the fi nish product. This could involve a discussion of the various fl oor underlay-ment materials and a comparison chart listing the advantages and disadvantages of each and how they affect the tiling project.
•
•
•
Topic 12 Masonry - Ceramic Floor Tile Installation

Section 3: Unit 3 Skill-building in Selected Trades
Suggestions for Assessment Resources
Skilled Trades 1201 291
Topic 12 Masonry -Ceramic Floor Tile Installation
AssessmentStudents could be assessed for this outcome with Appendix B Knowledge Rubric.
Paper and pencil
Students could differentiate between the three types of backerboard and how the proper fl oor prepara-tion and material affects the fi nish product. This could involve a discussion of the various fl oor un-derlayment materials and a comparison chart listing the advantages and disadvantages of each and how they affect the tiling project.
Work log
Students could record the information in their worklog.
•
•
•
•
References
Hometime Ceramic Tile DVD
Smart Guide: Ceramic Tile

Section 3: Unit 3 Skill-building in Selected Trades
Specifi c Curriculum Outcomes Suggested Learning and Teaching Strategies
292 Skilled Trades 1201
Students will be expected to
3.12.3 describe various materials used for installation of ceramic tile on a fl oor [1.401][1.402][2.401] [3.401]
For the teacher
There are several materials necessary for the installation of tile on a fl oor. These include the tile itself and tile adhesive. As far as size goes, the most popular tile used on fl oors would be 12x12s and even as large as 18 x18s. It’s tough for a do-it-yourselfer to install anything bigger than this because the underlayment has to be absolutely even and level. Floor tiles are classifi ed using the follow-ing rating;
The Porcelain Enamel Institute hardness ratings are:
Group I - Light Traffi c: residential bathroom fl oors where bare or stocking feet are the norm. Group II - Medium Traffi c: home interiors where little abrasion occurs. Don’t use in kitchens or en-tries. Group III - Medium-Heavy Traffi c: any home inte-rior.Group IV - Heavy Traffi c: homes or light to me-dium commercial areas. Group V- Extra Heavy Traffi c: use it anywhere.
Points to emphasize:
Adhesives generally come in two types; thinset mor-tars and pre-mixed adhesives. Thinset mortars are generally used for fl oor tile in-stallation. They come in powder form and have to be mixed to manufacturers specifi cations. Thinsets have a stronger bond and are more fl exible than pre-mixed adhesives. They can also support a lot of weight, so they’re often used for fl oor instal-lations. Thinsets can be used in wet areas as well as those exposed to heat.
For the studentStudents could identify the various types of tiling used in fl oor tile installation. This could involve a visual identifi cation as well as a discussion of the properties of each that may it a good choice. Stu-
•
•
•
•
•
•
•
•
•
Topic 12 Masonry - Ceramic Floor Tile Installation

Section 3: Unit 3 Skill-building in Selected Trades
Suggestions for Assessment Resources
Skilled Trades 1201 293
Topic 12 Masonry -Ceramic Floor Tile Installation
Assessment
Paper and pencil
Students could be assessed for this outcome with Appendix B Knowledge Rubric
Research
Students could identify the various types of tiling used in fl oor tile installation. This could involve a visual identifi cation as well as a discussion of the properties of each that may it a good choice.
Discussion
Students could discuss the differences between wall tile adhesive and fl oor tile thinset. This discussion could cover the various properties of each that make it most suitable for the specifi c application
Work log
Students could make a suitable entry in their work-log
•
•
•
•
References
Hometime Ceramic Tile DVD
Smart Guide: Ceramic Tile

Section 3: Unit 3 Skill-building in Selected Trades
Specifi c Curriculum Outcomes Suggested Learning and Teaching Strategies
294 Skilled Trades 1201
Students will be expected to dents could also discuss the differences between wall tile adhesive and fl oor tile thinset. This discussion could cover the various properties of each that make it most suitable for the specifi c application
•3.12.3 describe various materials used for installation of ceramic tile on a fl oor [1.401][1.402][2.401] [3.401]
Topic 12 Masonry - Ceramic Floor Tile Installation

Section 3: Unit 3 Skill-building in Selected Trades
Suggestions for Assessment Resources
Skilled Trades 1201 295
Topic 12 Masonry -Ceramic Floor Tile Installation

Section 3: Unit 3 Skill-building in Selected Trades
Specifi c Curriculum Outcomes Suggested Learning and Teaching Strategies
296 Skilled Trades 1201
Students will be expected to
3.12.4 given the nominal size, develop a work plan for the installation of ceramic tile simulating a fl oor installation [1.402][1.405][4.402] [4.403]
For the teacher
To complete this outcome the student will be expected to create a plan for the proper layout of tile in an area simulating a fl oor installation. Students will be instruct-ed on proper methods of laying out a fl oor to ensure the best layout is achieved. Tiles look best when they are laid out in straight lines and square to the walls. This activity can be done using grid paper to allow students to try several different layout options. When they have chosen their preferred layout they can then proceed to layout their fl oor using the tile size and grout line size specifi ed by the instructor.
Points to emphasize:
Have students draw a scaled drawing of the fl oor area to be tiled on grid paper. Students should then sketch out a grid simulating the tile size and spac-ing. They can then do overlays to line up their tile spacing to get the most effective spacing for their given area.Tiles should be laid square to the most visible wall. Also full tiles should be laid in the most visible areas with but tiles being laid in less visible areas. Cut tiles should be more than half the width of the full tiles if at all possible.
For the StudentStudents will use the knowledge attained thus far to complete a set of scale drawings to demonstrate the proper layout for their fl oor tile. These drawing could also include a description of how to layout their reference lines to obtain the best results.Students should identify the tools and equipment they will use. At this time it is important to ensure that any qualifi cations needed for those tools are obtained.
•
•
•
•
Topic 12 Masonry - Ceramic Floor Tile Installation

Section 3: Unit 3 Skill-building in Selected Trades
Suggestions for Assessment Resources
Skilled Trades 1201 297
Topic 12 Masonry -Ceramic Floor Tile Installation
Assessment
Pencil and paper
Assess this outcome with Appendix B Design Part 2 Planning Rubric
Workplan/layout
Students could use the knowledge attained thus far to complete a set of scale drawings to demonstrate the proper layout for their fl oor tile. These drawing could also include a description of how to layout their reference lines to obtain the best results.
Research
Students could identify the tools and equipment they will use. At this time it is important to ensure that any qualifi cations needed for those tools are obtained.
Work log
Students could include their workplan in their log books.
•
•
•
•
References
Appendix A Planning Guide: Informa-tion for Fabrication Planning
Student made materials
Drawings completed as part of the planning
Drawings
Appendix A U2T2 Section Drawing
Appendix A U2T2 Detail Drawing
One of these 2 sets
Appendix A U3T1 Design Plan Op-tion 1 and Appendix A U3T1 Design Option 1 Isometric
OrAppendix A U3T1 Design Plan Op-tion 2 andAppendix A U3T1 Design Option 2 Isometric
Appendix A U3T3 Flashing Drawing
Appendix A U2T2 Orthographic Grid
•
•
•
•
•
Section 3: Unit 3 Skill-building in Selected Trades
Specifi c Curriculum Outcomes Suggested Learning and Teaching Strategies
298 Skilled Trades 1201
Students will be expected to
3.12.5 Layout the proper tile spacing for tile installation on a fl oor area [1.402][1.405] [4.402][4.403]
For the teacher
To complete this outcome students will be expected to create reference lines that will aid them in the installa-tion of their fl oor tile. These reference lines will be cre-ated using the knowledge of proper layout gained in the previous SCO. Students should try a variety of fl oor tile layouts before deciding on the best layout option for their particular fl oor. This would involve physically placing the tiles on the fl oor with the proper spacing to get a visual representation of what the fi nished prod-uct would look like. Once a layout is selected students will take care to snap their chalk lines to allow for the installation of their tile with the appropriate tile spacing given to them by the instructor.
For the studentStudents will be expected to safely use all tools need-ed for the creating of their fl oor layout. Care must be taken to ensure that these tools are left in proper working order. Students will create their reference lines which will be vital to the successful completion of the fl oor tile installation.Create appropriate entry in the worklog and have teacher sign off.
•
•
Topic 12 Masonry - Ceramic Floor Tile Installation

Section 3: Unit 3 Skill-building in Selected Trades
Suggestions for Assessment Resources
Skilled Trades 1201 299
Topic 12 Masonry -Ceramic Floor Tile Installation
Assessment
Pencil and paper
Assess this outcome with Appendix B Design Part 2 Planning Rubric
Workplan/layout
Students could, using the technical drawing and work plan as guidance, layout the fl oor section with proper reference lines to aid in the installation of the ceramic tile. Students will have to create their reference lines which will be vital to the successful completion of the fl oor tile installation.
Work log
Students could include their workplan in their log books.
•
•
•
References
Appendix A Planning Guide: Informa-tion for Fabrication Planning
Student made materials
Drawings completed as part of the planning
Drawings
Appendix A U2T2 Section Drawing
Appendix A U2T2 Detail Drawing
One of these 2 sets
Appendix A U3T1 Design Plan Op-tion 1 and Appendix A U3T1 Design Option 1 Isometric
OrAppendix A U3T1 Design Plan Op-tion 2 andAppendix A U3T1 Design Option 2 Isometric
Appendix A U3T3 Flashing Drawing
Appendix A U2T2 Orthographic Grid
•
•
•
•
•

Section 3: Unit 3 Skill-building in Selected Trades
Specifi c Curriculum Outcomes Suggested Learning and Teaching Strategies
300 Skilled Trades 1201
Students will be expected to
3.12.6 Install ceramic tile using industry standards and practices on a fl oor area
[1.401][1.402][1.403][1.404] [1.405][2.401][2.402][5.402]
For the teacher
To achieve this outcome students will be expected to install ceramic tile on their fl oor sections using proper techniques. They will need to select the proper tile and thinset, trowel the thinset onto the fl oor, set their tile and then ensure that the tiles surfaces are level and the grout lines are free of adhesive.
Points to emphasize
Ensure that the fl oor area is clean and free of dirt or debrisCheck to ensure that the thinset chosen is correct for the intended application.Trowel the thinset onto the fl oor in sections that you feel confi dent that you can complete in the giv-en time frame. Ensure that the adhesive is combed onto the surface with a consistent height which will ensure that the tiles are level. Hold the trowel at a 45 degree angle to get the best results. Install tiles in sections to ensure best results and to gage the use of your thinset. Check often to ensure that your tile spacing stays consistent. Check the fi rst tile to ensure good adhesion. 80% coverage of thinset to tile is a good benchmark.
For the studentUsing the reference lines and the work plan as guidance, tile the fl oor section. Once tiled, stu-dents should grout the fl oor tile and properly clean up their completed tile to fi nish the job. Students should take special care to safely use all tools and to ensure tools are properly cleaned at the end of the tiling process.Create appropriate entry in the worklog and have teacher sign off.
•
•
•
•
•
•
Topic 12 Masonry - Ceramic Floor Tile Installation

Section 3: Unit 3 Skill-building in Selected Trades
Suggestions for Assessment Resources
Skilled Trades 1201 301
Topic 12 Masonry -Ceramic Floor Tile Installation
Assessment
Paper and pencil
Students could be assessed for this outcome using the Appendix B Skills Rubric
Work log
Students could make an entry in their work log, outlining the skills and techniques they used to complete this task
Practical activity
Students could, using the reference lines and the work plan as guidance, tile the fl oor section. Once tiled, students should properly clean up their com-pleted tile to prepare for the grouting. Students should take special care to safely use all tools and to ensure tools are properly cleaned at the end of the tiling process.
•
•
•
References
Hometime Ceramic Tile DVD
Smart Guide: Ceramic Tile
Appendix B Tool Safety Sheets
DrawingsStudent/teacher technical drawingsStudent layout
Toolsnotched trowelgrout fl oatdrillmortar mixing paddletile spacerstile cutter
ConsumablesThinset mortarCeramic fl oor tile
••
••••••
••

Section 3: Unit 3 Skill-building in Selected Trades
Specifi c Curriculum Outcomes Suggested Learning and Teaching Strategies
302 Skilled Trades 1201
Students will be expected to
3.12.7 Grout ceramic tile using industry standards and practices
[1.401][1.402][1.403][1.404] [1.405][2.401][2.402][5.402]
For the teacher
To achieve this outcome students will be expected to se-lect the proper grouting material for the proper grouting of the tile installed in the previous SCO. Students will select their proper color grout, based on their tile color, and then mix the grout to the proper consistency.
There are two types of grout used in industry: sanded and un-sanded. For the grouting of the fl oor tile stu-dents will be using sanded grout. Sanded grout has sand added to it to give the grout added strength to hold up to the wear and tear that is associated with the foot traffi c involved.
The color of the grout can go a long way in emphasiz-ing the overall look of your tile. Contrasting colors will help accent the geometric layout of your tile. Choosing a light colored grout for high traffi c areas wouldn’t be a good idea because it will probably discolor over time.
Points to emphasize
Grout should be mixed to the suggested manufac-turers recommendations. Always follow the instruc-tions to achieve best results.Use a padded grout fl oat to force the grout into the spaces between the tiles. Grout should be pushed diagonally across the joints to force it into the gaps.Clean off the excess grout with a damp sponge and clean water. This will take several cleanings to get the tile totally clean.Sealing the grout is also an option. You can get sealer additives to be mixed with the grout or you can seal the grout after it is dried.
•
•
•
•
Topic 12 Masonry - Ceramic Floor Tile Installation

Section 3: Unit 3 Skill-building in Selected Trades
Suggestions for Assessment Resources
Skilled Trades 1201 303
Topic 12 Masonry -Ceramic Floor Tile Installation
Assessment
Paper and pencil
Students could be assessed for this outcome using the Appendix B Skills Rubric
Work log
Students could make an entry in their work log, outlining the skills and techniques they used to complete this task
Practical activity
Following the manufacturers recommended speci-fi cation students could mix and grout their com-pleted tiled fl oor cleaning up the tile to complete the project. Students should also take special care to properly use any tools needed for the grouting pro-cess and to clean any tools used during the grouting process.
•
•
•
References
Hometime Ceramic Tile DVD
Smart Guide: Ceramic Tile
Appendix B Tool Safety Sheets
DrawingsStudent/teacher technical drawingsStudent layout
Toolsnotched trowelgrout fl oatdrillmortar mixing paddletile spacerstile cutter
ConsumablesThinset mortarCeramic fl oor tileGrout
••
••••••
•••

Section 3: Unit 3 Skill-building in Selected Trades
Specifi c Curriculum Outcomes Suggested Learning and Teaching Strategies
304 Skilled Trades 1201
Students will be expected to
3.12.7 Grout ceramic tile using industry standards and practices
[1.401][1.402][1.403][1.404] [1.405][2.401][2.402][5.402]
For the studentFollowing the manufacturers recommended speci-fi cation students should mix and grout their com-pleted tile fl oor. After the fl oor is grouted students should clean up the tile to complete the project. Students should also take special care to properly clean any tools used during the grouting process. Create appropriate entry in the worklog and have teacher sign off.
•
•
Topic 12 Masonry - Ceramic Floor Tile Installation

Section 3: Unit 3 Skill-building in Selected Trades
Suggestions for Assessment Resources
Skilled Trades 1201 305
Topic 12 Masonry -Ceramic Floor Tile Installation

306 Skilled Trades 1201
Section 3: Unit 3 Skill-building in Selected Trades

Appendices Appendix A Support Materials............................................................1
Print References.......................................................................................................5
Drawings...........................................................................................................7
Design Brief and Project Planning Guide.....................................................................55
Student Safety........................................................................................61
Sample Tools, Listed by Trade...................................................................................65
Appendix B Rubrics and Safety Tests.................................................71
Rubrics...................................................................................................................71
Tool Safety Sheets ................................................................................................79

Skilled Trades 1211 Appendices Page 1Skilled Trades 1211
AppendicesAppendix A Support Materials 3
Appendix B Rubrics and Safety Tests 54

Skilled Trades 1211Appendices Page 2 Skilled Trades 1211

Appendix A Page 3Skilled Trades 1211
Appendix A
Support Materials
Print References 5
Drawings 7
Design Brief and Project Planning Guide 40
Student Safety 46
Sample Tools, Listed by Trade 50

Appendix A Page 4 Skilled Trades 1211

Appendix A Page 5Skilled Trades 1211
Print Resources
Blankenbaker, E. Keith, Modern Plumbing, The Goodheart-Willcox Company, Inc.,2005
Feirer, Mark, D. & Feirer, John, L., Carpentry & Building Construction, Glencoe/McGraw-Hill, 2004
Mullin, Ray C., Miller, Gary & Stephenson, Paul, Electrical Wiring Residential, Thomson Nelson, 2003
Wagner, Willis H. & Smith, Howard Bud, Modern Carpentry, The Goodheart-Willcox Company, Inc.,2003
Creative Homeowner - Smart Guide Series
Roofi ng
Plumbing
Wiring
Ceramic Tile
Stairs and Railings

Skilled Trades 1211Appendix A Page 6

Skilled Trades 1211 Appendix A Page 7
Drawings
These drawings are produced for use with the activities in the course. The fi rst two, Orthographic and Isometric grids, are for duplication for use by students in a number of different activities. The others are specifi c to activities.

Skilled Trades 1211Appendix A Page 8
Title
:

Skilled Trades 1211 Appendix A Page 9
Title
:

Skilled Trades 1211Appendix A Page 10
U2T2 Drawing 1 Isometric and Pattern

Skilled Trades 1211 Appendix A Page 11
U2T2 Drawing 2 Isometric and Pattern

Skilled Trades 1211Appendix A Page 12
U2T2 Drawing 3 Isometric and Pattern

Skilled Trades 1211 Appendix A Page 13
U2T2 Scale Scale: 1 square = 1 Foot

Skilled Trades 1211Appendix A Page 14
Unf
inis
hed
Cra
wl S
pace
Sup
port
Post
s
U2T2 Foundation

Skilled Trades 1211 Appendix A Page 15
U2T2 Floor Plan
Sto
ve
Frid
ge
30”
14’ 8
”5’
8’ 4’20
’
Hot
Wat
er T
ank
AA

Skilled Trades 1211Appendix A Page 16
Sto
ve
Frid
ge
Hot
Wat
er T
ank
SS
3
GFC
I
S3
S
S3
S 3S
S
S S
GF
CI
WP
240V
200A
Serv
ice
Pane
l
U2T2 Electrical Plan

Skilled Trades 1211 Appendix A Page 17
14
Fron
t Ele
vatio
nR
ight
Sid
e el
evat
ion
U2T2 Elevations

Skilled Trades 1211Appendix A Page 18
Roof sheating
Shingles Roof Truss
Strapping
Drywall
R20 Insulation
R 40 Insulation
Wall Sheathing
Siding
Tyvek Vapor Barrier
Bottom Wall Plate
Subfloor
Joist
Sill
Sill Gasket
Foundation WallFooting
SoffitFascia
Detail B
Rim Joist
U2T2 Section Drawing (Section “A–A”)

Skilled Trades 1211 Appendix A Page 19
Shingles
Roof Sheathing
Ice Shield
AluminumFascia
Aluminumor vinylSoffit
Truss Tail
Toe Board
Frieze Trim
Siding
Tyvek
Wall Sheathing
U2T2 Detail Drawing (Detail B)

Skilled Trades 1211Appendix A Page 20
Frid
ge
Hot
Wat
er T
ank
P-T
rap
P-T
r ap
WC
Vent
Soi
lS
tack
U2T2 Plumbing Waste Water Plan (DWV)

Skilled Trades 1211 Appendix A Page 21
Frid
ge
Hot
Wat
er T
ank
Col
dW
ater
Sup
ply
Hot
Wat
er
U2T2 Plumbing Supply Plan (Hot and Cold)

Skilled Trades 1211Appendix A Page 22
P-Tr
ap
Vent
WC
Sew
er S
tac k
U2T2 Plumbing Waste Isometric

Skilled Trades 1211 Appendix A Page 23
Hot
Wat
er T
ank
Col
d W
ater
Sup
p ly
Hot
Wat
er S
upp l
y
Bat
htub
Sto
p Va
lves
Toile
t Sto
p Va
lve
Sin
k S
top
Valv
es
Sin
k St
op V
alv e
s
Wat
er H
amm
er A
rres
ter
U2T2 Plumbing Supply Isometric

Skilled Trades 1211Appendix A Page 24
Tabs
Para
llel L
ine
Layo
ut 1
Pat
tern
Vie
w
Para
llel L
ine
Layo
ut 1
Isom
etric
Fold
ing
(Ben
ding
) Lin
es
U2T2 Parallel Line 1

Skilled Trades 1211 Appendix A Page 25
Top
View
Fron
t Vie
wPa
ralle
l Lin
e Pa
ttern
Isom
etric
5
43
21
12
3
45
4
32
1
12
3
12
3
4
5
Circ
umfe
renc
e of
Cyl
inde
r
U2T2 Parallel Line 2

Skilled Trades 1211Appendix A Page 26
12
34
5
1
2
3
45
4
3
2
1
Top
View
Fron
t Vie
w
Rad
ial L
ine
Patte
rn
1
23
4
5
Circ
umfe
renc
e of
the
base
of th
e co
ne is
the
dist
ance
1 to
1 o
n th
e pa
ttern
Equa
l dis
tanc
e
Equa
l dis
tanc
e
U2T2 Radial Line
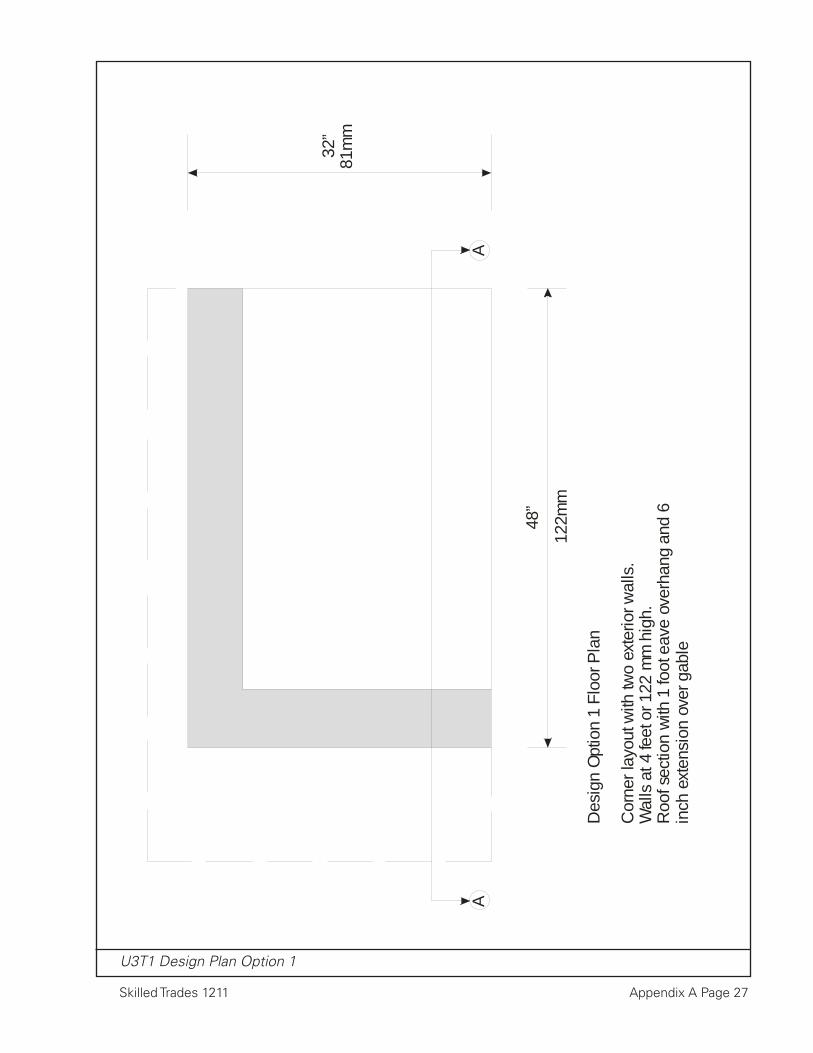
Skilled Trades 1211 Appendix A Page 27
32”
81m
m
48”
122m
m
Des
ign
Opt
ion
1 Fl
oor P
lan
Cor
ner l
ayou
t with
two
exte
rior w
alls
.W
alls
at 4
feet
or 1
22 m
m h
igh.
R
oof s
ectio
n w
ith 1
foot
eav
e ov
erha
ng a
nd 6
in
ch e
xten
sion
ove
r gab
le
AA
U3T1 Design Plan Option 1

Skilled Trades 1211Appendix A Page 28
U3T1 Design Option 1 Isometric

Skilled Trades 1211 Appendix A Page 29
32”
81m
m
48”
122m
m
Des
ign
Opt
ion
2 Fl
oor P
lan
Layo
ut w
ith o
ne e
xter
ior a
nd o
ne in
terio
r wal
l.W
alls
at 4
feet
or 1
22 m
m h
igh.
R
oof s
ectio
n w
ith 1
foot
eav
e ov
erha
ng
AA
U3T1 Design Plan Option 2

Skilled Trades 1211Appendix A Page 30
U3T1 Design Option 2 Iso

Skilled Trades 1211 Appendix A Page 31
2 by
8 jo
ist
subf
loor
2 by
6 w
all p
late
2 by
6 s
tuds
Dou
ble
top
wal
l pla
te
Trus
s se
ctio
n
2 by
4 s
ill
Cle
at fo
r whe
el
Whe
els
for m
obilit
y
Jois
tX-
brac
ing
U3T1 Design Section “A–A” (Options 1 and 2)

Skilled Trades 1211Appendix A Page 32
Detail B
U3T2 Section Drawing for Component List Activity

Skilled Trades 1211 Appendix A Page 33
U3T2 Detail Drawing for Component List Activity

Skilled Trades 1211Appendix A Page 34
U3T2 Cutting Plan Drawing

Skilled Trades 1211 Appendix A Page 35
1/4
Span
1/4
Span
Span
1/3
Span
1/3
Span
1/3
Span
Top
Cho
rds W
ebs
Botto
m C
hord
2
3Sl
ope
U3T2 Standard (Fink) Truss

Skilled Trades 1211Appendix A Page 36
Run
Ris
e
Tota
l Ru n
Tota
lR
ise
Not
e th
e di
ffere
nces
in th
e bo
ttom
rise
r boa
rdan
d th
e on
e in
the
next
ste
p. I
t sto
ps a
t the
floo
r,w
hile
all
the
othe
rs e
xten
d be
hind
the
tread
. Th
e to
tal r
ise,
or h
eigh
t, is
unc
hang
ed.
Trea
d
Ris
er
Nos
ing
Car
riage
Boa
r dTh
e op
timal
ris
er is
7.5
inch
esTh
e op
timal
thre
ad is
10
inch
esno
t inc
ludi
ng th
e no
sing
U3T2 Stair Drawing

Skilled Trades 1211 Appendix A Page 37
U3T6 Series Distribution
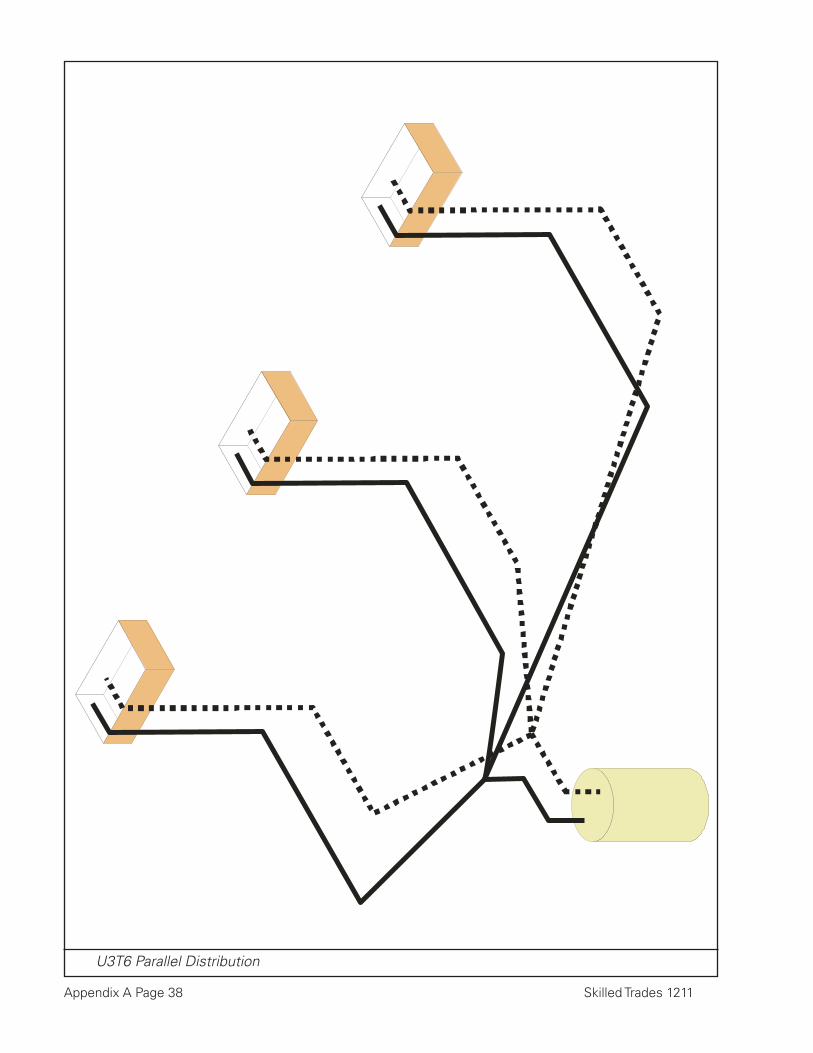
Skilled Trades 1211Appendix A Page 38
U3T6 Parallel Distribution

Skilled Trades 1211 Appendix A Page 39

Skilled Trades 1211Appendix A Page 40
Design and Planning
Design is a problem solving strategy that is employed in all technology education courses. It is based on standard practice in industry and commerce. It provides a standardized methodology for developing tech-nological solutions to problems. Design, as used in this course has these components
Project identifi cation/selectionDevelopment of a design briefPlanning each of the major components of the project Fabricating each of the major components of the project
The following are included in this section
Design Brief: Information for developing a briefDesign Brief TemplatePlanning Guide
••••
•••

Skilled Trades 1211 Appendix A Page 41
Design Brief
Information for Developing a Brief
Project Description
The workplace for the construction trades can be emulated by fabricating a model structure in the school shop, complete with electrical, plumbing and other components.
Task Statement
Design and fabricate a construction simulation that includes elements of these trades
CarpenterElectricianPlumberLatherPainter-decoratorSheet metal worker
Project Includes
The project needs to include these components from each of the trades
CarpenterRough framing (fl oor, walls, roof, ceiling strapping)Exterior (siding, roof covering)Interior (trim)
ElectricianElectrical rough-in (1 receptacle, 1 split receptacle with 1 half switched, 1 3-way switched overhead light, one outdoor GFI receptacle, and wiring)Installation of receptacles, switches, and lights
PlumberPlumbing waste water rough-in (drainage system with toilet fl ange, sink trap, and vents for bothPlumbing hot and cold supply rough-in (toilet supply, tap supply, with appropriate stops)
••••••
••
••
••
•
••
•
Insulation and vapour barrierLather
Drywall installationDrywall plaster
Painter-DecoratorPainting prepPainting
Sheet Metal WorkerForming of soffi t, fascia, rain gutterInstallation of soffi t, fascia, rain gutter
Conditions Affecting the Project
Conditions affecting the project are availability of resources, including time, space, materials, tools, and information. Other conditions are codes and regulations from the various trades that are ad-dressed in the project.
What the Solution must Do
The solution needs to emulate, as much as possible a job site setting. It needs to illustrate practices and techniques, and complete work according to accepted standards in each of the trades. It is not expected that students will attain the level of knowledge, skill and precision of a trades person. Accepted standards will be a sliding scale that the teacher has to judge.
••
••
•••
•••

Skilled Trades 1211Appendix A Page 42
Design Brief Template
Date ______________________
Name ______________________ Group _______________________
Project Description
Task Statement
Project Includes
Conditions Affecting the Project
What the Solution must Do

Skilled Trades 1211 Appendix A Page 43
Planning Guide
Information for Fabrication Planning
The major project for the course is based on de-velopment of a solution to a design problem. The solution is developed using a six stage process, with one stage for each of the six trades
CarpenterResidential ElectricianPlumberLatherPainter-DecoratorSheet Metal Worker
Each stage has two separate components
PlanningFabrication
Planning
Planning is a method of identifying the tasks that need to be done, the resources and tools required to do them, and putting it all into a logical sequence of actions.
Planning allows you to, for example
Identify potential problems and develop ways to deal with themDetermine best use of resources and timeBe more productive and get better resultsShare work equitably among team membersIdentify skills you need to acquire
Planning, in this course, begins with the design brief. The brief sets the overall conditions, and identifi es what needs to be done. The brief says nothing about how to actually develop the solu-tion, only what the solution must accomplish. The brief in this course is a bit more specifi c than in many cases in that it identifi es the general param-eters of the solution.
Since the solution will be implemented in six stages, one for each trade, planning will need to be
••••••
••
•
••••
done six times, once for each trade. The trades are sequenced in the order that they fi rst need to be implemented. Carpentry will not be completed until the initial work from electrical, plumbing, and lather is done. Electrical will not be com-pleted until initial work from plumbing, lather and painter-decorator is done.
Planning Sequence
For all 6 of the trades, the following planning sequence is recommended. It is recommended that you chance with the teacher as work progresses to determine if things are missing and to keep the teacher informed of your plans.
Review the design brief to identify what is requiredIdentify all the systems, subsystems and com-ponents required to construct themCreate sketches to ensure that you understand the systems, how they are built and how they work and interconnect with one another.Create a materials list
Identify each type of material or componentIdentify the different dimensions or sizes of eachMake a list that sorts them by type, size and quantity of each size
Make a list of ways that each of the materials or components need to be processed (modifi ed). Processing will fall under these categories
Layout (measuring and marking for further processing)Separated (modifi ed by removing materials such as cutting, sawing, planing, sanding, fi ling) Shaped/formed (modifi ed without removing material such as bending, twisting, com-pressing, stretching)
•
•
•
•••
•
•
•
•
•

Skilled Trades 1211Appendix A Page 44
Combined (joining together by mechanical [nails, screws, overlapping joints], adhesive [glues, soldering], or cohesive [welding, solvents] meansFinished (covering with a protective layer)
Make a list of the fabrication sequence. Determine the logical sequence. What needs to be done fi rst? What needs to be done last? What are the steps to get from fi rst to last task? Are there some tasks that need to be done before others can be done? Write up the list of steps. Rearrange them as necessary as you review and think about the logic of the sequence.
Make a list of tools and equipment needed to do the fabrication.
Materials processing can only be done with tools and equipment. After making a materials list and planning a fabrication sequence, you should have a good idea of the processes that need to be applied to the materialsLook at each step in the sequence, identify the processes that need to be applied to the materials and identify the tools and equip-ment needed to perform the tasks
•
••
•
•
•
•
•
Identify training and certifi cation needed to use the tools
Have you used this tool? Don’t assume that you know how to use it effectively just because it may be a familiar tool. Safe use is not always obvious. Effi cient use (best re-sults for least effort) is seldom obvious even for simple tools. Sometimes the two are synonymous, sometimes they are not. Safe, effi cient use is the goalFrom the list of required tools and equip-ment, identify who in the group will be using which ones. Make a three column list that has name, tool, training/certifi cation. Indicate for each name, which tool and if training/certifi ca-tion is needed.
When the plan is complete, do a review to determine if you understand everythingHave the plan reviewed by your teacher for authorization to move to fabrication
•
•
•
•
•
•

Skilled Trades 1211 Appendix A Page 45
Skilled Trades 1211Appendix A Page 46
Student Safety
Student safety is a multi-level issue. It requires
Clearly stated rules of conductClearly stated operating procedures for use of any tools, equipment and materialsObvious, effective, and consistent modeling of safe procedures by the teacherRigorous teaching and assessment of student knowledge and performance with respect to safety and safe operation of tools, equipment and materials Consistent enforcement of safe practicesConsistent and appropriate use of safety protection such as safety glasses and hearing protectors.
ReferencesIn addition to the references in the guide, these sites offer excellent information on shop and tool safety
Workshop safety rules at http://www.technologystudent.com/health1/safetyr1.htmSafety in mechanical workshops at http://www.shef.ac.uk/safety/mech/mech1.htmlSafety PDF links at http://www.leeds.ac.uk/safety/library/mach.htmWorkplace safety toolkit (checklists) at http://www.nonprofi trisk.org/ws-ps/topics/popt/toolschk2-ps.htm
••••
••
••••

Skilled Trades 1211 Appendix A Page 47
Safety Instructions for the Tech Ed Lab
All activities must be approved by your in-structor before work proceeds on any project.
You must be evaluated and score 100% pass before you are allowed to use any tool or machinery.
Report all injuries to the instructor regardless of how small or slight.
Wear eye and ear protection around all ma-chinery and whenever using any tool.
Tie/fasten hair back in such a fashion that it doesn’t block your vision, and it is not a hazard for entanglement in machinery.
Wear suitable clothing in the lab. Long or loose sleeves, sweaters and coats are not per-mitted around machinery. Remove any loose item that might present a hazard, such as, necklaces, pendants, watches, rings etc.
Obey the operating instructions of the ma-chinery that you are using.
1.
2.
3.
4.
5.
6.
7.
Notify the instructor if people are exhibiting unsafe behavior.
Bring any faulty or improperly operating equipment to the attention of the instructor.
Maintain a safe working area around machin-ery.
Keep tools and materials from projecting over the edge of benches.
Immediately clean up and dispose of chips, dust, and waste generated from projects.
Keep the fl oor clear of dust, scraps, litter and debris.
Immediately wipe up or clean spilled liquid materials.
Place oily rags and other combustible materi-als into approved disposal containers.
8.
9.
10.
11.
12.
13.
14.
15.

Skilled Trades 1211Appendix A Page 48
Safety Rules For Using Power Equipment
Do not operate any machinery until you have received proper instruction and certifi cation on that machine, and have been approved by the instructor to use it. Be sure to obtain permission each time you use the machine.
Wear proper eye and hearing protection at all times.
Have the instructor check your work setup before starting any activity.
Check and make all adjustments to your ma-chinery before turning on the power.
Make sure that all persons are outside the work zone for the machine before starting or beginning work.
Guards must be in place and functioning properly. NEVER disable a guard on a piece of machinery.
Only one person should be using a piece of machinery unless the process requires a help-er. Helpers should operate in the designated safe location. The operator should control the workpiece at all times
1.
2.
3.
4.
5.
6.
7.
Start and stop your own machinery and never leave the machinery until it comes to a full stop.
Do not leave a piece of machinery running unattended.
Disconnect all power sources before perform-ing any type of cleaning or maintenance.
Keep your hands, fi ngers, and limbs a safe distance from moving parts, as designated by the regulations for that machine.
Keep machinery clear of all tools and other items. The machinery should not be used as a storage surface.
Keep the fl oor around the machinery clear of all liquids, dust, or scraps to prevent slipping.
Keep you attention on the task at hand. Don’t talk or become distracted while operating ma-chinery. Do not distract or interrupt anyone operating machinery.
Notify the instructor of any malfunctioning machinery or tool.
8.
9.
10.
11.
12.
13.
14.
15.

Skilled Trades 1211 Appendix A Page 49
Student Safety Pledge Form
Safety Pledge
I, _____________________, am enrolled in ST1201. I pledge to follow all safety instructions and rules and regulations for operating tools and equipment. In particular, I will:
1. Follow all safety rules for the lab.
2. Never use or operate a machine without fi rst having:
a. permission from the instructor,
b. proper instruction and training in the operation of that machinery.
c. earned a 100% pass on the machine operation and safety test.
3. Immediately report all injuries or accident to the instructor.
4. Not engage in behaviors that endanger my own, or others, personal safety in the technology lab.
This safety pledge for students is based on:
1. The student having received proper instruction from the instructor.
2. The student assuming responsibility for following prescribed safety rules and procedures.
3. Written permission from the students parents/guardians.
Date: _____________________ Student’s Signature: _____________________
I hereby give my consent to allow my son/daughter to operate all machinery and equipment necessary to the requirements of the ST1201 course in which he is enrolled.
Date: _____________________ Parent’s Signature: ______________________
Parents are invited to visit the shop to inspect the machines and to see them in operation.

Skilled Trades 1211Appendix A Page 50
Tools Listed by Trade
The following should be noted about these tool lists
These lists include some of the tools employed in the trade. They are not lists of required tools for the course. The lists are not intended to be complete or comprehensive, rather as an indication of the range of tools that trades persons use.All of these tools require instruction before students use them. Even the simplest tools have best prac-tices which increase effectiveness and decrease riskAll tools have levels of risk associated with their use. Risk is managed with proper instruction and workshop management.Some of these tools require safety tests before students can use them. Where such tests are required a 100% pass is required on verbal and written components and on performance tests.Tool safety sheets are provided in Appendix B for many of the tools that require safety testing before use.
•
•
•
•
•
•

Skilled Trades 1211 Appendix A Page 51
Carpentry Tools
Job Site ToolsHand saw (crosscut)Hand plane (block, smooth)Utility knivesWood chisels (1/4, 3/8, 1/2, 3/4) and wooden mallet12 ounce and 16 ounce claw hammersNail setTry, mitre and framing squaresMetric and imperial measuring tapes & rules2 foot and 4 foot levelsLaser levelPlumb bobChalk line and chalkSmall pry barRechargeable electric drills1/2 inch electric drillSets countersinks, twist drills, spade bits and auger bits for power drillsSet Vixx bits for center boring screw holes in hingesHole saw with assorted sizes (also used for plumbing)CountersinkPneumatic brad nailer (3/4 to 2 inch)Pneumatic framing nailer1-2 hp portable compressor (also needed for sheet metal)Power miterbox (laser line would improve safety)Rotary orbital action sander with dust collec-tion port
••••
••••••••••••
•
•
••••
•
•
Shop toolsStationary drill pressBand sawTable saw6” jointer12 inch or larger planerOscillating spindle sanderLathe
•••••••

Skilled Trades 1211Appendix A Page 52
Electrical Tools
Wire T-stripperFibreglass handled hammerHeavy duty side-cutting pliersHeavy duty needle-nose pliersHeavy duty diagonal cutting pliersSoldering gun and soldering iron1000V insulated fl at, Robertson and Phillips screwdrivers in standard sizes (or a reasonable facsimile)Electricians locking knife
•••••••
•
Locking tape measureMulti-meterNon-contact continuity testerSafety glasses Wire cuttersWire strippersCircuit testerDrillsSaws
•••••••••
Pipe and soil pipe cuttersTapes, rules, and squaresReaming and deburring toolsPipe, chain, and bench viseSoapstoneCutting tools (hacksaw, hole saw, jab saw, back saw)Pliers (groove joint, slip joint, locking)Snips (left, right, straight)Chisels (cold, punch)Propane torch, fl ame shield, solder, fl ux (You must be tested and score a 100% pass on the knowledge and practical use of the tool. You may not use the tool until you have been tested)
••••••
••••
Emery clothSafety glassesAdjustable wrenches, 6 and 10 inch sizesBasin, pipe, strap, monkey, spud, and chain wrenchesBuilder, laser, water, line and torpedo levels
••••
•
Plumbing Tools

Skilled Trades 1211 Appendix A Page 53
Lather Tools
Wall board lifterDrywall tape reelerHand sanderDrywall sawStud fi nderDrywall squareLevelDrywall corner toolPlaster hawkPole sander
••••••••••
Drywall hammerOutside corner toolUtility sawUtility knifeStiltsTaping knivesPutty knifeFinishing knifePlastering trowels
•••••••••
Painter Tools
Paint roller handles for 4 and 10 inch rollersPaint traysDrop clothsWallpaper tray
••••
Sheet Metal Tools
Hand ToolsMachinist try square3 head machinist squareSteel safety straight edgeAdjustable bevelScribersAutomatic centre punchCompassLeft, right, and straight aviation snipsPop riveterClampsHeavy duty locking utility knifeHand operated nibbling toolDeburrerHand seaming tool Electric drill
•••••••••••••••
Pneumatic ToolsPneumatic nibbling toolPneumatic shear (straight or pistol grip)Pneumatic punch and fl anging tool
Machines30 inch 3-in-1 sheet metal machine (shear, brake, roll former)Small air compressor (1-2 hp)Drill press
•••
•
••

Skilled Trades 1211Appendix B Page 54
Appendix B
Rubrics and Safety Tests
Rubrics 56
Tool Safety Sheets 64

Skilled Trades 1211 Appendix B Page 55
Skilled Trades 1211Appendix B Page 56
Rubrics
Two general and 4 design rubrics are supplied
KnowledgeWhere multiple concepts are assessed, expand the “Understanding of Content” section accordingly
SkillsWhere multiple skills are assessed, add each one to the “Ability to Apply Skills” section
Design Part 1: Opportunity SelectionDesign Part 1: Design BriefDesign Part 2: PlanningDesign Part 2: Fabrication
References
In addition to references in the guide,
Holistic rubrics at http://pals.sri.com/pals/tasks/5-8/ME122/rubric.htmlPerformance assessment at http://fcit.usf.edu/assessment/performance/assessb.htmlRules for writing rubrics at http://pals.sri.com/guide/scoringdetail.html
••
••
••••
•••

Skilled Trades 1211 Appendix B Page 57
Knowledge Building Rubric
Rating Scale4. Exceeds Defi ned
Outcomes3. Meets Defi ned
Outcomes2. Meets Defi ned
Outcomes1. Meets Defi ned
Outcomes0. Has not
Completed Defi ned Outcomes
Exceptional quality and attention to detail. Consistently performs above the standard
Above average quality. Consistently performs to the standard
Average quality. Meets the standard better than 50% of the time
Below average. Meets standards with assistance
Unacceptable. Does not meet the outcome
Scoring Grid
Planning and Management Score
Identifi es what is being asked
Set goals and plans a sequence of stepsto achieve each goal
Prioritizes tasks and manages time wisely
Planning and Management Score
Research Score
Uses multiple sourcesUses a variety of information gathering techniquesDetermines relevance of information in an effective and timely mannerReferences sources appropriately
Research Score
Understanding of Content Score
Identifi es what is being asked
Can accurately explain the major con-cepts or ideasCan accurately explain the more subtle details of a conceptCan make appropriate decisions and take appropriate actions based on un-derstanding of the content
Understanding of Content Score
Presentation and Reporting Score
Identifi es what is being asked
Sequences content in a logical mannerCreates accurate informationCreates information that is appropri-ately detailedPresents material in a syntactically cor-rect manner
Presentation and Reporting Score
Work Practices and Teamwork Score
Effectively troubleshoots common problems and devises ways to overcome themCollaborates effectively in work groups and teamsTakes on leadership and other team rolesCorrectly and consistently documents work in the work log
Work Practices and Teamwork Score

Skilled Trades 1211Appendix B Page 58
Skill Building Rubric
Rating Scale4. Exceeds Defi ned
Outcomes3. Meets Defi ned
Outcomes2. Meets Defi ned
Outcomes1. Meets Defi ned
Outcomes0. Has not
Completed Defi ned Outcomes
Exceptional quality and attention to detail. Consistently performs above the standard
Above average quality. Consistently performs to the standard
Average quality. Meets the standard better than 50% of the time
Below average. Meets standards with assistance
Unacceptable. Does not meet the outcome
Scoring Grid
Planning and Management Score
Identifi es what is being asked
Set goals and plans a sequence of stepsto achieve each goal
Prioritizes tasks and manages time wisely
Organizes and works in an orderly manner
Planning and Management Score
Tools and Equipment Score
Gets permission to use equipmentSelects and uses appropriate toolsRecognizes and controls health and safety hazards, for example loose clothes, dust control and proper guardsUses proper protective equipmentUse appropriate aids to manage the workpiece, for example a mitre gauge on the table saw or clamping the workpiece for portable tools
Tools and Equipment Score
Ability to Apply Skills Score
With appropriate instruction and practice acquires and uses specifi c skill 1
“ skill 2Ability to Apply Skills Score
Materials Score
Selects materials appropriate to the task
Uses materials in a manner that mini-mizes wasteUses tools and techniques appropriate to the properties of the material
Materials Score
Work Practices and Teamwork Score
Effectively troubleshoots common problems and devises ways to overcome themCollaborates effectively in work groups and teamsTakes on leadership and other team rolesCorrectly and consistently documents work in the work logCommunications ideas and information effectively
Work Practices and Teamwork Score

Skilled Trades 1211 Appendix B Page 59
Design Part 1: Opportunity Selection Rubric
Rating Scale4. Exceeds Defi ned
Outcomes3. Meets Defi ned
Outcomes2. Meets Defi ned
Outcomes1. Meets Defi ned
Outcomes0. Has not
Completed Defi ned Outcomes
Exceptional quality and attention to detail. Consistently performs above the standard
Above average quality. Consistently performs to the standard
Average quality. Meets the standard better than 50% of the time
Below average. Meets standards with assistance
Unacceptable. Does not meet the outcome
Scoring Grid
Planning and Management Score
Identifi es what is being asked
Set goals and plans a sequence of stepsto achieve each goal
Prioritizes tasks and manages time wisely
Organizes and works in an orderly manner
Planning and Management Score
Project Selection Score
Assesses opportunities for a design proj-ect related to the trades
Establishes assessment criteria
Rate the options using their assessment criteria
Selects an option for a design project related to the trades
Using the results of their assessment, selects an option
Gives a rationale for their selection
Project Selection Score
Work Practices and Teamwork Score
Effectively troubleshoots common problems and devises ways to overcome themCollaborates effectively in work groups and teamsTakes on leadership and other team rolesCommunications ideas and information effectively
Correctly and consistently documents work in the work log
Work Practices and Teamwork Score

Skilled Trades 1211Appendix B Page 60
Design Part 1: Design Brief Rubric
Rating Scale4. Exceeds Defi ned
Outcomes3. Meets Defi ned
Outcomes2. Meets Defi ned
Outcomes1. Meets Defi ned
Outcomes0. Has not
Completed Defi ned Outcomes
Exceptional quality and attention to detail. Consistently performs above the standard
Above average quality. Consistently performs to the standard
Average quality. Meets the standard better than 50% of the time
Below average. Meets standards with assistance
Unacceptable. Does not meet the outcome
Scoring Grid
Planning and Management Score
Identifi es what is being asked
Set goals and plans a sequence of stepsto achieve each goal
Prioritizes tasks and manages time wisely
Organizes and works in an orderly manner
Planning and Management Score
The Design Brief Score
Project DescriptionTask Statement
Project Includes
Conditions Affecting the ProjectWhat the Solution Must Do
The Design Brief Score
Work Practices and Teamwork Score
Effectively troubleshoots common problems and devises ways to overcome themCollaborates effectively in work groups and teamsTakes on leadership and other team rolesCommunications ideas and information effectively
Correctly and consistently documents work in the work log
Work Practices and Teamwork Score

Skilled Trades 1211 Appendix B Page 61
Design Part 2: Planning Rubric
Rating Scale4. Exceeds Defi ned
Outcomes3. Meets Defi ned
Outcomes2. Meets Defi ned
Outcomes1. Meets Defi ned
Outcomes0. Has not
Completed Defi ned Outcomes
Exceptional quality and attention to detail. Consistently performs above the standard
Above average quality. Consistently performs to the standard
Average quality. Meets the standard better than 50% of the time
Below average. Meets standards with assistance
Unacceptable. Does not meet the outcome
Scoring Grid
Planning and Management Score
Identifi es the subsystems for the fabrication task
Uses the trade-specifi c symbols to make sketches
Produces properly structured orthographic and/or isometric sketches that convey ideas for additions, modifi cations or changes to the plan
Creates a list of required materials sorted by type, dimensions or other appropriate characteristic
Planning and Management Score
Tools and Equipment Score
Identifi es a list of tools and equipment required for the process, including for layout, separating, shaping, combining, and fi nishingIdentifi es tools that they are qualifi ed / not qualifi ed to use and makes arrangements for those they need certifi cation on
Tools and Equipment Score
Fabrication Sequence Score
Identifi es the sequence of tasks for this part of the project
Identifi es the tasks from this project in the overall sequence for the total proj-
ectAbility to Apply Skills Score
Work Practices and Teamwork Score
Effectively troubleshoots common problems and devises ways to overcome themCollaborates effectively in work groups and teamsTakes on leadership and other team rolesCommunications ideas and information effectively
Correctly and consistently documents work in the work log
Work Practices and Teamwork Score

Skilled Trades 1211Appendix B Page 62
Design Part 2: Fabrication Rubric
Rating Scale4. Exceeds Defi ned
Outcomes3. Meets Defi ned
Outcomes2. Meets Defi ned
Outcomes1. Meets Defi ned
Outcomes0. Has not
Completed Defi ned Outcomes
Exceptional quality and attention to detail. Consistently performs above the standard
Above average quality. Consistently performs to the standard
Average quality. Meets the standard better than 50% of the time
Below average. Meets standards with assistance
Unacceptable. Does not meet the outcome
Scoring Grid
Planning and Management Score
Organizes fabrications tasks according to the plan
Implements tasks in the planned order
Modifi es the plan as needed to meet changing work conditions
Planning and Management Score
Use of Materials Score
Makes effective use of the material listSelects materials as specifi ed by the codes or regulations for each trade
Uses tools and techniques appropriate to the properties of the material
Uses materials in a manner that minimizes waste
Use of Materials Score
Tools and Equipment Score
Gets permission to use equipmentSelects and uses appropriate tools
Adjusts tools properly before use
Uses appropriate techniques to layout, and separate/shape/combine materials
Recognizes and controls health and safety hazards, for example loose clothes, dust control and proper guards
Uses proper protective equipment
Use appropriate aids to manage the workpiece, for example a mitre gauge on the table saw or clamping the workpiece for portable tools
Tools and Equipment Score

Skilled Trades 1211 Appendix B Page 63
Fabrication Sequence Score
Effectively troubleshoots the fabrication process and makes modifi cations to the work plan as needed
Using the work plan as reference, correctly lays out the cutting pattern on materials
Using the work plan as reference, correctly separates materials to complete each of the subsystems, for example cuts joists with a power mitre saw
Using the work plan as reference, correctly shapes materials to complete each of the subsystems, for example folds sheet metal to make a fascia
Using the work plan as reference, correctly combines materials to complete each of the subsystems, for example fastens with construction adhesive or nails
Fabrication Sequence Score
Work Practices and Teamwork Score
Takes appropriate measures to mini-mize risk for themselves and others by
Engaging in safe practices as designated by standard shop safety rules
Using tools and materials only when authorized and certifi ed
Handling materials in a safe and proper fashion
Adjusting tools and equipment for the material and task being performed
Keeping the work place clean and tidy
Effectively troubleshoots common problems and devises ways to overcome them
Collaborates effectively in work groups and teams
Takes on leadership and other team roles
Correctly and consistently documents work in the work log
Work Practices and Teamwork Score

Skilled Trades 1211Appendix B Page 64
Tool Safety Sheets
Tools
Safety sheets are supplied for the following toolsTable SawRadial Arm SawDrill PressJointer PlanerBand SawPower Mitre SawScroll Saw
••••••••
Electric DrillJig SawLatheRouterOscillating Spindle SanderBench GrinderChiselHand Plane
••••••••
References
Text References
Wagner & Smith, unit 4, page 75-100Koel, chapter 9- 17, page 68-122Ummstattd & Davis,
chapter 18, page 267-280chapter 21-28, page 305-480chapter 31, page 523-540,
Website references
Machine Safety at http://ncsudesign.org/PDFs/tool_book.pdfTexas Technical University Shop Rules at http://www.arch.ttu.edu/resources/shop/ShopManual.aspAssessing the Quality of a Product at http://www.orinda.k12.ca.us/ois/teachers/AllensInformation.htmLab Safety Manual and Hazardous Materials Guide at http://www.fbe.unsw.edu.au/staff/mariano.ramirez/IDLabManual2003.pdfUniversity of Louisiana at Lafayette—Lab Safety at http://arts.louisiana.edu:16080/resources/safety.pdfMTEA Safety Resource—Checklist and Tests at http://www.mtea.net/PDF%20Files/3-Construction%20Tech.pdfPennsylvania Safety Manual at http://www.mtea.net/PDF%20Files/Pennsylvaniasafety.pdf (Page 131, Machine Tool Tests)
•••
•••
•••
•
•
•
•

Skilled Trades 1211 Appendix B Page 65
Table Saw
Adjustments
Blade heightBlade angleRip fenceMitre Gauge
Standard operations with guards in place
RippingCrosscutting
••••
••
Operations that can only be performed with the guard removed
DadoingRabbeting
••
Safety Checklist
Setup Operation Shut down
Requests permission to use equipment
Removes or secures loose clothes and jewelry and confi nes long hair
Wears the proper personal protective equipment
Does not change blades without teacher supervision
Sets blade to proper height–3 mm or 1/8” above the work piece
Adjusts and properly locks fence or mitre gauge
Checks to see that all guards and other safety devices are in place and functioning.
Only uses the saw if all guards are in place
Always uses rip fence for ripping and mitre gauge for crosscutting. Never uses both simultaneously
Always uses a push stick for ripping to prevent hands from coming within 150 mm or 6” of the blade
Stands to one side of the blade when performing any operation
Measures off the blade only after it has come to a complete stop
Allows the blade to come to a complete stop before waste stock is removed from the table
When a helper is assisting with long and/or wide stock, the operator controls the work piece
Keeps fl oor and machine surfaces free from scrap materials.
Makes sure the machine has come to a complete stop prior to cleaning
Returns tools and accessories to their proper location
Cleans up equipment and work area
Lowers blade and returns the mitre gauge and blade to 90o.

Skilled Trades 1211Appendix B Page 66
Radial Arm Saw
Adjustments
Blade heightBlade angleMotor rotationArm angle
Standard operations with guards in place
CrosscuttingMitre cuts
••••
••
Compound mitre cutsDadoingRipping (not recommended as it is a danger-ous operation)Rabbeting (not recommended as it is a danger-ous operation)
Operations that can only be performed with the guard removed
None
•••
•
•
Safety Checklist
Setup Operation Shut down
Requests permission to use equipment
Removes or secures loose clothes and jewelry and confi nes long hair
Wears the proper personal protective equipment
Does not change blades without teacher supervision
Sets blade to proper height
Adjusts and properly locks
main armmotor carriage slidemotor mount rotationblade angle
Checks to see that all guards and other safety devices are in place and functioning.
••••
Only uses the saw for cross cutting and dadoing operations. Never uses the saw for ripping or rabbeting operations.
For cross cutting and dadoing operations, controls the feed speed to prevent climb-cutting
Keeps hands at least eight to ten inches from the cut
Stands to one side of the blade when performing any operation
Measures off the blade only after it has come to a complete stop
Allows the blade to come to a complete stop before waste stock is removed from the table
Keeps fl oor and machine surfaces free from scrap materials.
Makes sure the machine has come to a complete stop prior to cleaning
Returns tools and accessories to their proper location
Cleans up equipment and work area
Returns saw to standard setup for 90 degree crosscut

Skilled Trades 1211 Appendix B Page 67
Drill Press
Adjustments
Table heightTable angleChuckChuck speeds (belt and pulley adjustments)
Standard operations (No Guards)
Drilling using a wide variety of cuttersSandingMorticing
••••
•••
Required auxiliary supports
Clamps and/or hold downs for all workpiecesGuide fences or support blocks for non-rectan-gular workpieces
••
Safety Checklist
Setup Operation Shut down
Requests permission to use equipment
Removes or secures loose clothes and jewelry and confi nes long hair
Wears the proper personal protective equipment
Selects and mounts the proper drill bit or accessory
Removes the key from the chuck
Adjusts the machine to the correct speed
Checks the condition and position of pulley guards
Mounts the work securely in the proper vise or clamp
Adjusts the depth stop to the correct depth
Centres punches metal parts prior to drilling
Checks drill bit for straightness
Adjusts table height and angle
Checks drill bit alignment and depth of cut
Uses a V-block to hold round stock
Does not hold workpiece by hand for drilling
Only drills properly clamped and braced workpieces
Turns off power if the drill gets caught in a work piece
Applies even pressure when drilling
Raises the drill bit occasionally to clear cuttings
Uses cutting/lubricating fl uids if necessary
Drills a pilot hole for larger holes
Removes cuttings with a brush
Keeps fl oor free from scrap materials.
Makes sure the machine has come to a complete stop prior to cleaning
Returns tools and accessories to their proper location
Cleans up equipment and work area
Returns equipment to original state

Skilled Trades 1211Appendix B Page 68
Jointer
Adjustments
Infeed table height (depth of cut)Outfeed table height (to align with cutter, only done on installation of cutters)Fence
width of cut (amount of cutter exposed)angle of cut
••
•••
Standard operations with guards in place
Jointing a surfaceJointing an edge
Operations that can only be performed with the guard removed
Cutting a rabbet (not recommended for stu-dent operation)
••
•
Safety Checklist
Setup Operation Shut down
Requests permission to use equipment
Removes or secures loose clothes and jewelry and confi nes long hair
Wears the proper personal protective equipment
Never adjusts the out-feed table.
Checks and makes all adjustments and with power off
Checks condition and operation of guards
Identifi es grain direction in the wood in order to joint in the proper direction
Adjusts depth of cut to a maximum of 3 mm or 1/8”.
Uses jointer only with the guard in place
Joints in direction of grain
Makes several multiple thin cuts rather than one heavy cut
Only joints material with an absolute minimum length of twice the size of the knives
6” (15 cm) - 12” (30 cm) length 8” (20 cm) - 16” (40 cm) length
Only joints stock greater than 12 mm or 1/2” in thickness
Uses push block for fl at work
Does not pass hand directly over the top of the cutter head
Keeps area clean and fl oor free of scrap materials.
••
Makes sure the machine has come to a complete stop prior to cleaning
Returns tools and accessories to their proper location
Cleans up equipment and work area
Returns adjustments to original state

Skilled Trades 1211 Appendix B Page 69
Safety Checklist
Setup Operation Shut down
Requests permission to use equipment
Removes or secures loose clothes and jewelry and confi nes long hair
Wears the proper personal protective equipment
Ensures feed area is clear of debris
Sees that the work piece is free of loose knots, nails, dirt and fi nish materials
Determines grain and feed direction
Adjusts depth of cut, normal 2mm or 1/16”
Planes in the direction of the grain
Never looks directly into the front or rear opening of the planer when it is in operation
Does not plane stock less that 300 mm or 12” long, or less that 6 mm or 1/4” thick.
Uses a follower stick if required for short stock
Keeps hands clear of infeed and outfeed rollers in lower table
Stands to one side of the stock when planing
When a helper is assisting with long stock, the operator controls the work piece
Shuts power off before attempting to remove
Stock that has become stuck
Keeps area around equipment free of scrap.
Makes sure the machine has come to a complete stop prior to cleaning
Returns tools and accessories to their proper location
Cleans up equipment and work area
Returns adjustments to original state
Planer
Adjustments
Depth of cut
Standard operations with guards in place
Surfacing a workpiece
•
•
Operations that can only be performed with the guard removed
None •
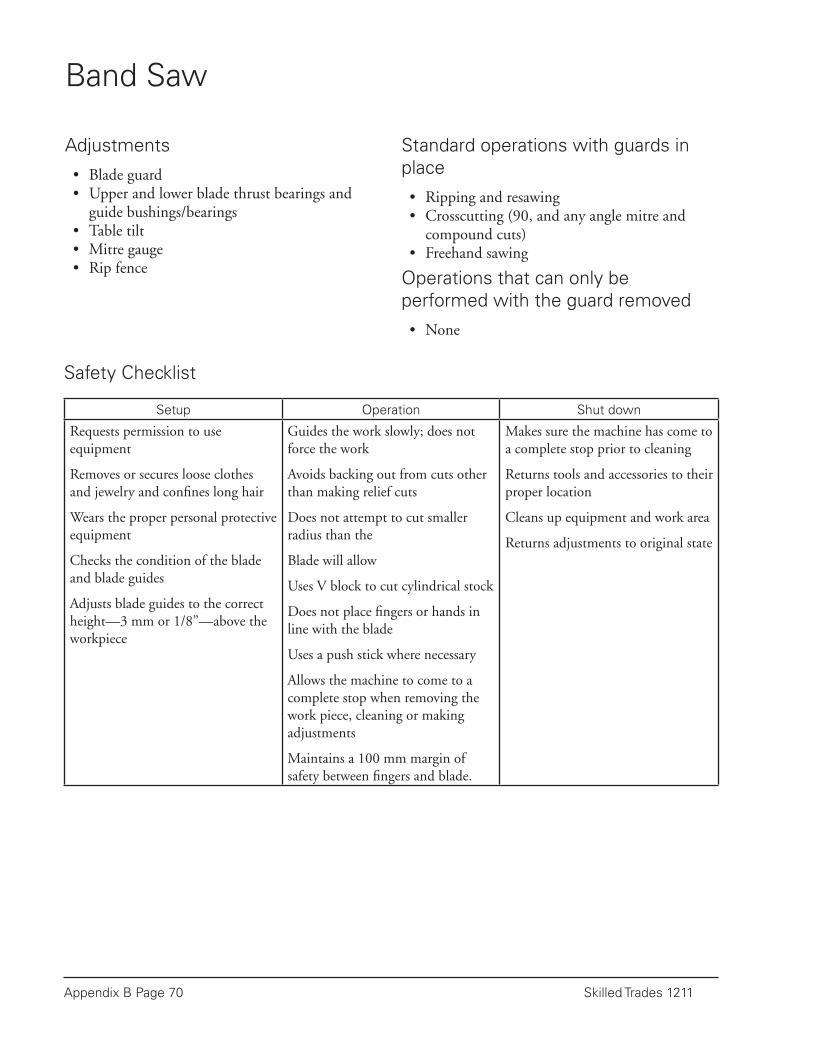
Skilled Trades 1211Appendix B Page 70
Safety Checklist
Setup Operation Shut down
Requests permission to use equipment
Removes or secures loose clothes and jewelry and confi nes long hair
Wears the proper personal protective equipment
Checks the condition of the blade and blade guides
Adjusts blade guides to the correct height—3 mm or 1/8”—above the workpiece
Guides the work slowly; does not force the work
Avoids backing out from cuts other than making relief cuts
Does not attempt to cut smaller radius than the
Blade will allow
Uses V block to cut cylindrical stock
Does not place fi ngers or hands in line with the blade
Uses a push stick where necessary
Allows the machine to come to a complete stop when removing the work piece, cleaning or making adjustments
Maintains a 100 mm margin of safety between fi ngers and blade.
Makes sure the machine has come to a complete stop prior to cleaning
Returns tools and accessories to their proper location
Cleans up equipment and work area
Returns adjustments to original state
Band Saw
Adjustments
Blade guardUpper and lower blade thrust bearings and guide bushings/bearingsTable tilt Mitre gauge Rip fence
••
•••
Standard operations with guards in place
Ripping and resawingCrosscutting (90, and any angle mitre and compound cuts)Freehand sawing
Operations that can only be performed with the guard removed
None
••
•
•
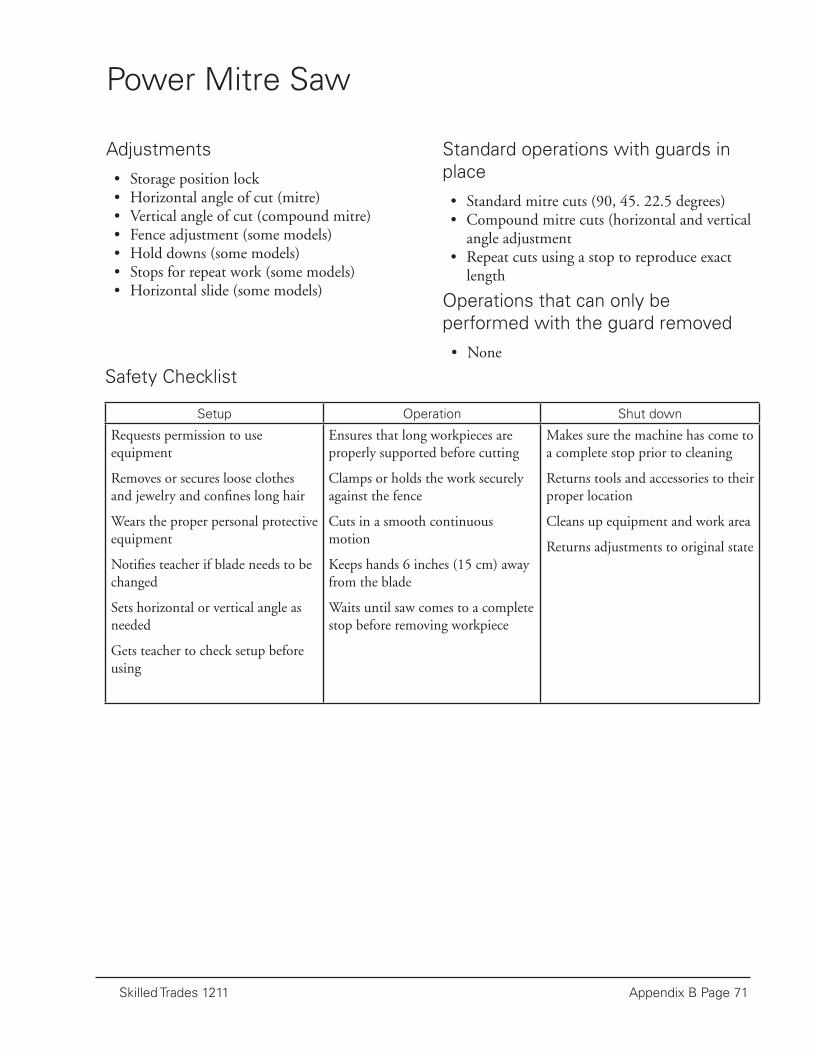
Skilled Trades 1211 Appendix B Page 71
Safety Checklist
Setup Operation Shut down
Requests permission to use equipment
Removes or secures loose clothes and jewelry and confi nes long hair
Wears the proper personal protective equipment
Notifi es teacher if blade needs to be changed
Sets horizontal or vertical angle as needed
Gets teacher to check setup before using
Ensures that long workpieces are properly supported before cutting
Clamps or holds the work securely against the fence
Cuts in a smooth continuous motion
Keeps hands 6 inches (15 cm) away from the blade
Waits until saw comes to a complete stop before removing workpiece
Makes sure the machine has come to a complete stop prior to cleaning
Returns tools and accessories to their proper location
Cleans up equipment and work area
Returns adjustments to original state
Power Mitre Saw
Adjustments
Storage position lockHorizontal angle of cut (mitre)Vertical angle of cut (compound mitre)Fence adjustment (some models)Hold downs (some models)Stops for repeat work (some models)Horizontal slide (some models)
•••••••
Standard operations with guards in place
Standard mitre cuts (90, 45. 22.5 degrees)Compound mitre cuts (horizontal and vertical angle adjustmentRepeat cuts using a stop to reproduce exact length
Operations that can only be performed with the guard removed
None
••
•
•

Skilled Trades 1211Appendix B Page 72
Safety Checklist
Setup Operation Shut down
Requests permission to use equipment
Removes or secures loose clothes and jewelry and confi nes long hair
Wears the proper personal protective equipment
Make all adjustments with the power off, then rotate the motor by hand as a fi nal check
Make sure all guards are in place and operating correctly
Makes sure that hold down is pressing lightly on the work piece
Chooses the correct blade and correct speed for the material to be cut, and for the smallest radius required
Ensures the blade is held fi rmly in the chucks, and the chucks are properly mounted in the holders
Sets the table angle for the required cut
Uses the saw only with the guard/hold-down in place
Guides the material slowly through the machine with both hands, keeping fi ngers away from the cut line.
Makes sure the machine has come to a complete stop prior to cleaning
Returns tools and accessories to their proper location
Cleans up equipment and work area
Returns adjustments to original state
Stationary Scroll Saw
Adjustments
Blade removal and replacementHeight of the hold-down / guardTable tilt
••••
Standard operations with guards in place
Cutting wood along a line, any direction
Operations that can only be performed with the guard removed
Not recommended, as the guard also aids cut-ting by keeping the wood from lifting with the blade (a hold-down)
•
•

Skilled Trades 1211 Appendix B Page 73
Safety Checklist
Setup Operation Shut down
Requests permission to use equipment
Removes or secures loose clothes and jewelry and confi nes long hair
Wears the proper personal protective equipment
Selects correct bit and size for the material being drilled
Ensures that bit is properly mounted in the chuck and the chuck is securely tightened
Ensures workpiece is properly secured or clamped
Center-punches holes before drilling
Holds drill securely, usually using the second hand to steady and guide it
Withdraws the bit frequently to clear the hole
Uses the proper lubricant when drilling metals
Uses a guide such as a square or adjustable bevel for visual alignment to ensure the hole is at the correct angle
Makes sure the machine has come to a complete stop prior to cleaning
Returns tools and accessories to their proper location
Cleans up equipment and work area
Returns adjustments to original state
Electric Drill
Adjustments
Chuck
Standard operations (No guards)
DrillingCountersinking
•
••
Operations that can only be performed with the guard removed
Not applicable•

Skilled Trades 1211Appendix B Page 74
Safety Checklist
Setup Operation Shut down
Requests permission to use equipment
Removes or secures loose clothes and jewelry and confi nes long hair
Wears the proper personal protective equipment
Checks stock for balance and soundness
Securely mounts work between centres or to the face plate
Adjusts tool rest to the correct height and distance from the work piece
Makes sure cutting tools are sharp. If not, notify the teacher to have them sharpened
Adjusts lathe to operate at the correct speed
Sets guard to correct distance where one is provided
Rotates spindle by hand to check clearance before starting
Stands to one side when starting the lathe
Selects the appropriate cutting tools
Holds the cutting tools securely and at the proper angles to the work
Frequently readjusts tool rest to maintain distance to work piece
Adjust tool speed as needed dependant upon the progress in the turning
Allows work piece to fully stop before adjusting the tool rest or measuring the work piece
Removes tool rest before sanding
Makes sure the machine has come to a complete stop prior to cleaning
Returns tools and accessories to their proper location
Cleans up equipment and work area
Returns adjustments to original state
Lathe
Adjustments
Rotational speedTail stockTool restCenters (drive, center, live)FaceplatesAssorted internal and external clamping chucks
••••••
Standard operations with guards in place (guards only on some models)
Spindle turningFaceplate turning
Operations that can only be performed with the guard removed
SandingFrench polishingSpindle turningFaceplate turning
••
••••

Skilled Trades 1211 Appendix B Page 75
Safety Checklist
Setup Operation Shut down
Requests permission to use equipment
Removes or secures loose clothes and jewelry and confi nes long hair
Wears the proper personal protective equipment
Checks bit for suitability to task
Gets teacher to install appropriate bit
Adjusts depth of cut or plunge distance, to take 1/4 inch (6mm) deep or less cuts
Sets up router fence or clamps guides in place or sets up a template for routing
Routes only with the aid of a template, fence or guide.
Starts the router with the bit away from the wood
Grips the router carefully with both hands to counteract against starting torque
Feeds the router at a constant speed, not slow enough to burn the wood or so fast as to cause bogging down in the cut
Cuts in multiple passes, removing about 6 mm of wood at a time
Cuts in the direction against the bit rotation to prevent climb cutting
Allows the router to come to a complete stop before laying it down
Places the router on its side or top when done
Makes sure the machine has come to a complete stop prior to cleaning
Returns tools and accessories to their proper location
Cleans up equipment and work area
Adjusts router so that the bit is inside the base
Router (Hand held use)
Adjustments
Fixed basebit changesdepth of cut
Plunge basebit changesdepth of plunge cut
Router fenceoffset from fence to bit
•••
•••
••
Standard operations with guards in place
Pattern routing with upper or lower bearing bitEdge routing with router fenceThrough dado or rabbet routing with guidesPlunge base routing
stopped routing with templates
Operations that can only be performed with the guard removed
None
••••
•
•
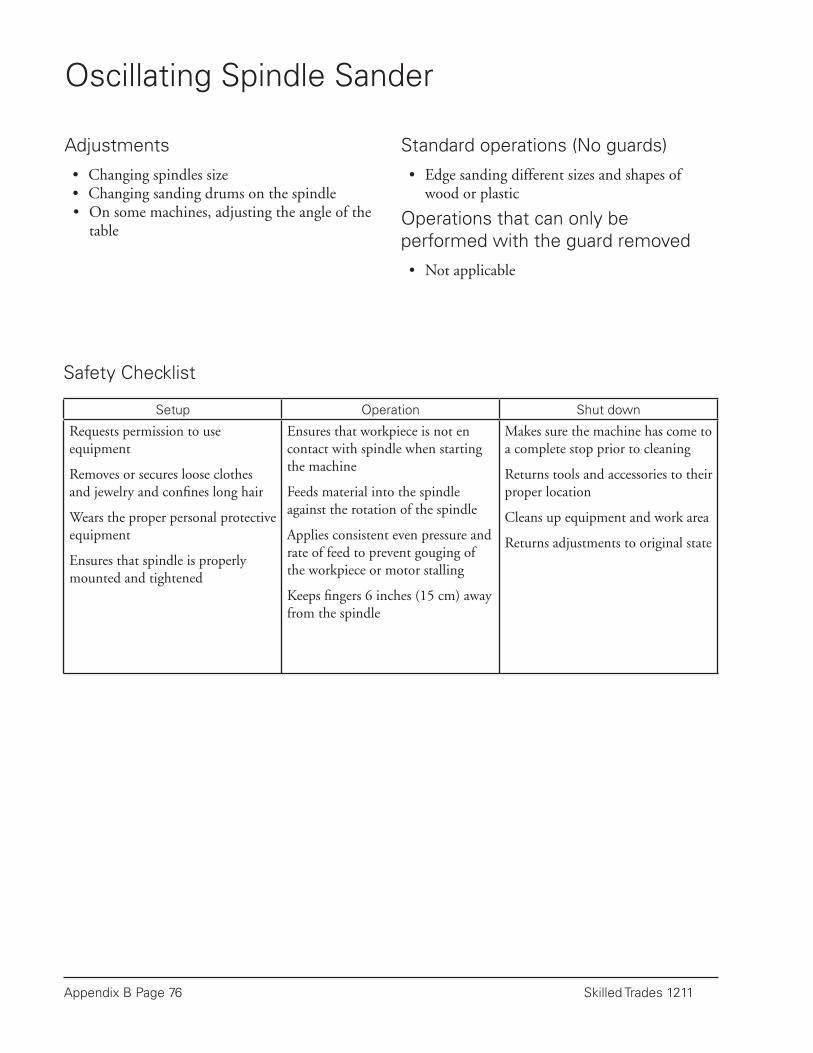
Skilled Trades 1211Appendix B Page 76
Safety Checklist
Setup Operation Shut down
Requests permission to use equipment
Removes or secures loose clothes and jewelry and confi nes long hair
Wears the proper personal protective equipment
Ensures that spindle is properly mounted and tightened
Ensures that workpiece is not en contact with spindle when starting the machine
Feeds material into the spindle against the rotation of the spindle
Applies consistent even pressure and rate of feed to prevent gouging of the workpiece or motor stalling
Keeps fi ngers 6 inches (15 cm) away from the spindle
Makes sure the machine has come to a complete stop prior to cleaning
Returns tools and accessories to their proper location
Cleans up equipment and work area
Returns adjustments to original state
Oscillating Spindle Sander
Adjustments
Changing spindles sizeChanging sanding drums on the spindleOn some machines, adjusting the angle of the table
•••
Standard operations (No guards)
Edge sanding different sizes and shapes of wood or plastic
Operations that can only be performed with the guard removed
Not applicable
•
•

Skilled Trades 1211 Appendix B Page 77
Safety Checklist
Setup Operation Shut down
Requests permission to use equipment
Removes or secures loose clothes and jewelry and confi nes long hair
Wears the proper personal protective equipment
Notifi es the teacher if grinding or buffi ng wheels need to be changed
Ensures that guards are in place and properly adjusted before grinding or sharpening
Ensures that tool rests are in place and properly adjusted before grinding or sharpening
Waits until the grinder has reached full rotational speed before placing the workpiece against the wheel
Uses correct techniques, depending on the nature of the workpiece
Frequently cools the workpiece to prevent changes to the temper of the metal
Makes sure the machine has come to a complete stop prior to cleaning
Returns tools and accessories to their proper location
Cleans up equipment and work area
Returns adjustments to original state
Bench Grinder
Adjustments
GuardsTool rest
••
Standard operations with the guard in place
GrindingSharpening
Operations that can only be performed with the guard removed
Buffi ng, with the addition of a buffi ng wheel and compound
••
•

Skilled Trades 1211Appendix B Page 78
Safety Checklist
Setup Operation Shut down
Requests permission to use equipment
Removes or secures loose clothes and jewelry and confi nes long hair
Wears the proper personal protective equipment
Clamps the workpiece securely
Carries the chisel with the blade down and away from the body
Passes a chisel to another person handle fi rst
Operates the chisel so that it cuts away from the body, especially the hands
When free hand chiselling, holds the chisel with both hands
When using a mallet, Hold the chisel securely against the workpiece before striking it on the handle tip
Returns tools and accessories to their proper location
Cleans up equipment and work area
Returns adjustments to original state
Chisel
Adjustments
None
Standard operations
Free hand chisellingChiselling with a striking tool such as a mallet
•
••

Skilled Trades 1211 Appendix B Page 79
Safety Checklist
Setup Operation Shut down
Requests permission to use equipment
Removes or secures loose clothes and jewelry and confi nes long hair
Wears the proper personal protective equipment
Places plane on its side on the bench when not in use
Determines wood grain direction to identify best planing direction
Adjusts the depth and angle of cut to suit the workpiece
Clamps the workpiece securely before planing
Applies marks to the workpiece to identify areas to be planed and limits of the planing operation
Planes in a smooth continuous stroke
Applies proper pressure to the correct end of the plane on starting, planning, and ending phases of the stroke
Observes results and modifi es techniques to prevent tear out and to ensure the workpiece is fl attened to a true plane
Returns tools and accessories to their proper location
Cleans up equipment and work area
Returns adjustments to original state
Hand Plane
Adjustments
Basic Plane Iron
Depth of cutAngle of iron
Mouth opening (some models)Advanced
FrogPlane Iron CapLever Cap
••
••
••
•••
Standard operations
Planing edge or face grainPlaning end grain
••