simple drip irrigation system manual - usaidpdf.usaid.gov/pdf_docs/pnaeb671.pdf · simple drip...
TRANSCRIPT

Simple Drip Irrigation System Manual
Developed for USAID/Nepal's
Education For Income Generation Program (EIG)
February 2009


Contents
Section
1 Introduction
2 Benefits and limitations
3 Components of the system
4 Installation procedure
Materials and equipment required4.1
for installation
4.2 Land selection and basic preparation
4.3 Preparation of the head structure
4.4 Fixing the outlet tap and fine filter
Fixing the tank and connecting the4.5
mainline pipes
4.6 Laying the drip lines
4.7 Locating the planting spots
4.8 Preparation of the planting pits
Operation of the drip system5
(schedule of irrigation)Maintenance and storage of the drip
6 system
6.1 Cleaning the filters
6.2 Fencing the crop field
6.3 Flushing the pipes
6.4 Protecting the tank
6.5 Storage
7 Where to purchase the technology
1
Page No.
2
2-3
3-5
6
6
7
8
9
9
10
11
12
12
13
13
13
14
14
14
15
1. INTRODUCTION Drip irrigation is the most efficient method of irrigation because it applies water only to the plant root zone, where it is most beneficial. A simplified low-cost version of drip irrigation has been developed in Nepal and is called “Simple Drip Irrigation.” For the past several years this technology has been successfully used to irrigate both winter and spring vegetable crops by thousands of farmers in the hill region of Nepal.
However, despite its simple design, information is still required for correct installation of the system. Therefore, this booklet serves as a step by step installation guideline for a variety of layouts of a VERY SMALL sized system, which irrigates 90m also includes important operation and management techniques.
It is expected that these guidelines will be useful for lead farmers and field technicians to understand drip irrigation systems and enable them to assist farmers in correct installation and operation.
BENEFITS AND LIMITATIONS 2.
Drip irrigation has number of advantages over other methods of
irrigation. Even with a small volume of water ef
is possible because water losses due to deep percolation and
evaporation are very low. Unlike flood irrigation, with drip
irrigation the entire plot is not wet, which drastically reduces
weed growth. It is also possible to apply fertilizer with the
irrigation water through the drip system. Because of these
characteristics substantial water, labor and time are saved and
2

crop yield is increased . The technology is easy to understand, install and operate, and if managed properly, system components last for more than five years. On average, the financial investment for the drip system can be recovered in less than a year with sales of high value crops.
Drip irrigation is useful for most land conditions, even regions with a scarce water supply and undulating land with porous soil where surface irrigation is unfeasible. It works best with crops grown in rows, and can be used in conjunction with other agricultural techniques, such as the use of plastic houses.
However, there are also some limitations of drip technology. It is not suitable for closely grown crops such as garlic, onion, and leafy vegetables. If filters are not properly maintained , the emitters can become clogged with solids. Similarly, if the system is not well attended there may be a chance of damage or theft of the components.
3. COMPONENTS OF THE SYSTEM
,. Head tank Outlet set Main line set
€ it)
Drip pipe set Filters
3
System components
Component Quantity
50 Lit re head tank
Tap outlet set 1 set a) Tap 1
b) Nut 2 c) Wash ers d) Level pipe
Filters a) Coa rse fil ter b) Fin e fil ter c) Screen fil ter
Main line set a) Main line, vertical (m) b) Main line, horizontal (m) c) Vertical "T" d) Horizontal "T" e)
Drip pipe set a) Lateral d rip lines b) Pegs c) End plugs d) Baffles
1 set 1 6 1 4 2
4 sets 4
8 4
80 (20 per late ral)
4
Sketch
Rng
Tap
Leve p pe Nut Washers
Coarse fi ter
Screen fi ter
F ne fi ter
Latera dr p nes
Peg Baffle End p ug
crop yield is increased. The technology is easy to understand,
install and operate, and if managed properly, system
components last for more than five years. On average, the
financial investment for the drip system can be recovered in less
than a year with sales of high value crops.
Drip irrigation is useful for most land conditions, even regions
with a scarce water supply and undulating land with porous
soil where surface irrigation is unfeasible. It works best with
crops grown in rows, and can be used in conjunction with other
agricultural techniques, such as the use of plastic houses.
However, there are also some limitations of drip technology.
It is not suitable for close ly grown crops such as garlic, onion,
and leafy vegetables. If filters are not properly maintained, the
emitters can become clogged with solids. Similarly, if the system
is not well attended there may be a chance of damage or theft
of the components.
3. COMPONENTS OF THE SYSTEM
Head tank
Drip pipe set
Outlet set Main line set
3
~ ~ w
Filters
System components
Component Quantity Sketch
50 Litre head tank
Tap outlet set a) Tap b) Nut c) Washers
d) Level pi pe
Fil t ers a) Coarse fil t er b) Fine filter c) Screen filter
1 set , 2
Main line set 1 set a) Main line, vertical (m) 1 b) Main line, horizontal (m) 6 c) Vertical "T" d) Horizontal " T" e) ~ L"
Drip pipe set a) Lateral drip lines b) Pegs
c) End plugs d) Baffles
4
2
4 sets 4
8
4
80
(20 per lateral)
4
Rog
'lID Tap
Leve p pe
p@@ Nut Washers
~ Coarse fi ter
Screen fi ter
F ne fi ter
00.-' T "L"
Latera dr p nes ,. ~ Peg Baffle End p ug
,.._____"",~_:, He
Fine Washers , / Vertical : End
Vertical T /
D ?""~ ripT
n hne
.,..,.--,-c
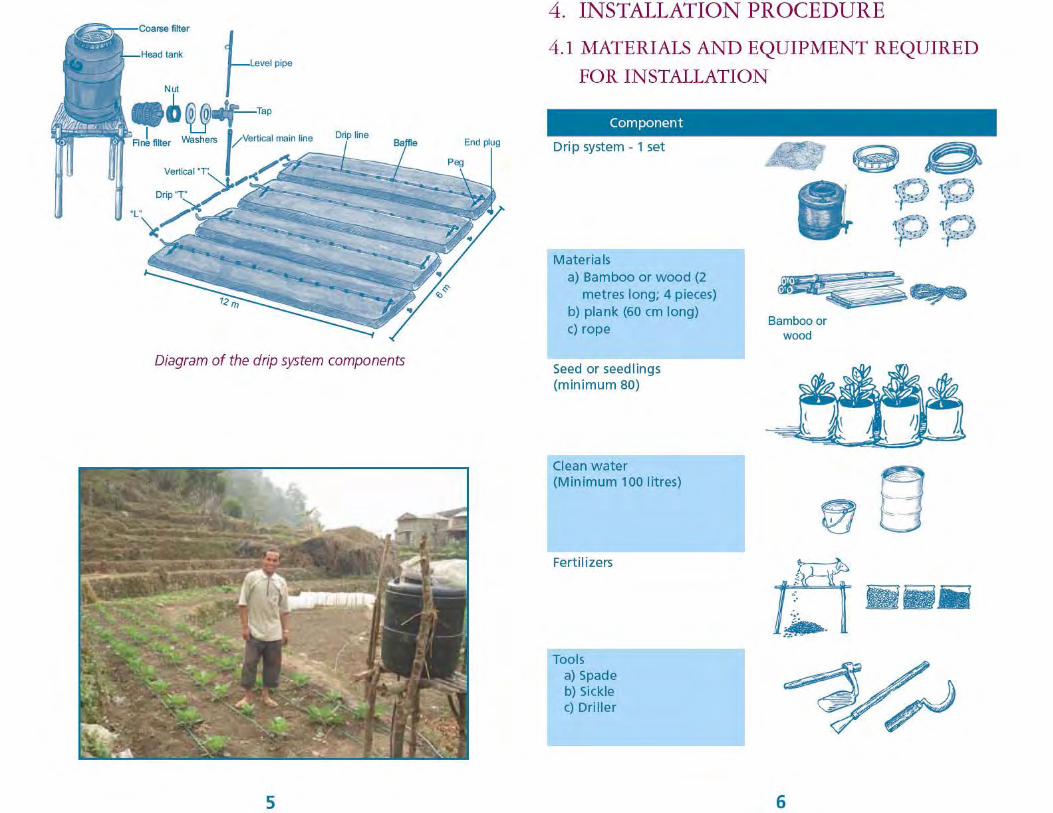
Diagram of the drip system components
5
4. INSTALLATION PROCEDURE
4.1 MATERIALS AND EQUIPMENT REQUIRED
FOR INSTALLATION
Component
Drip system - 1 set
~ 1::> 1(~ 1(~ .,tc# .,tc#
1df) Materials
a) Bamboo or wood (2 metres long; 4 pieces)
b) plank em long) Bamboo or
c) rope wood
Seed or seedlings (minimum 80)
Clean water (Minimum 100 litres) 8 Fert ilizers
iilii
Tools a) Spade b) Sickle c) Driller
6
Diagram of the drip system components
5
4. INSTALLATION PROCEDURE
4.1 MATERIALS AND EQUIPMENT REQUIRED
FOR INSTALLATION
Component
Drip system - 1 set
Materials a) Bamboo or wood (2
metres long; 4 pieces) b) plank (60 em long) c) rope
Seed or seedlings (minimum 80)
Clean water (Minimum 100 litres)
Fertilizers
Tools a) Spade b) Sickle c) Driller
Bamboo or wood
6

4.2 LAND SELECTION AND BASIC
PREPARATION
Choose a land of dimensions 12 metres long and 7 metres wide . It is best to install the system on flat land . If flat land is not available, it is also possible to install drip system on sloped land.
Prepare four crop beds each 12 metres long and 1.5 metres wide as shown in the following diagram .
1.5 m
Crop beds on flat land
1.5 m
Crop beds on sloped land
7
Drip pipe and Mainline pipes can be used to measure the length and width of the plot.
12m
4 .3 PREPARATION OF HEAD STRUCTURE
In order to ensure the required pressure to ef the drip system, a head structure has to be made to rest the head tank upon . This can be a simple table -like structure made with locally-available wood or bamboo . The most important feature of the head structure is its height. It must be between 75cm to 1 metre above the ground.
75cm - 1m
Head structure on
Head structure for sloped land
8
4.2 LAND SELECTION AND BASIC
PREPARATION
Choose a land of dimensions 12 metres long and 7 metres wide . It is best to install the system on flat land. If flat land is not available, it is al so possible to install drip system on sloped land .
Prepare four crop bed s each 12 metres long and 1.5 metres wide as shown in the foll owing diagram.
Crop beds on flat land
Crop beds on sloped land
7
Drip pipe and Mainline pipes can be used to measure the length and width of the plot.
~ !: ~ ~ ~ , , , ,
12m
4 .3 PREPARATION OF HEAD STRUCTURE
In order to ensure the required pressure to ef the drip system, a head structure has to be made to rest the head tank upon . This can be a simple table-like structure made with locally-available wood or bamboo. The most important feature of the head struct ure is its height . It must be between 75cm to 1 metre above the ground.
on
Head structure for sloped land
8

.
4.4 FIXING THE OUTLET TAP AND FINE FILTER
In order to fix the outlet tap, insert the threaded portion through the outlet hole of the tank. Put one washer over the threaded portion of the outlet tap from inside the tank. Then , holding the outlet tap with one hand, screw the nut clockwise onto the threaded portion of the outlet tap. From inside the tank, screw the fine filter onto the outlet tap. Keep the level pipe vertical by inserting on to the ring on the outside of the tank near the top (as shown in components table).
Fixing the outlet tap
4.5 FIXING THE TANK AND CONNECTING THE MAINLINE PIPES
Set the tank on the platform and cover the mouth with the net filter followed by the coarse filter. Attach the vertical mainline onto the outlet tap. Unroll the horizontal mainline. Attach one " L" to each end of the horizontal mainline, and one "T " to each of the remaining holes on the horizontal mainline. Lay the horizontal mainline on one edge of the plot such that the " Ts" and " Ls" are close to the middle of each bed .
coarse filter Connecting the mainline pipe
9
4.6 LAYING THE LATERAL DRIP
Unroll the drip lines and connect the open end of all4 lateral drip lines with the previously attached " Ts" and " Ls." At this point in installation, two options for locating the position of the drip pipes are available, depending on the desired crop spacing For crops such as cauliflower and cabbage, set up two lateral drip lines per bed (see Option 1.) For crops such as cucumber eggplant, pumpkin, and gourds, use one lateral drip line per bed (see Option 2.) Now use the pegs to fix both ends of each lateral
drip line, keeping the pipe straight.
connecrma rne mamtme owe
Option 1: Two crop rows per bed Option 2: One crop row per bed
10
4.4 FIXING THE OUTLET TAP AND FINE FILTER
In order to fix the outlet tap, insert the threaded portion through the outlet hole of the tank. Put one washer over the threaded portion of the outlet tap from inside the tank. Then, holding the outlet tap with one hand, screw the nut clockwise onto the threaded portion of the outlet tap. From inside the tank, screw the fine filter onto the out let tap. Keep the level pipe vertical by inserting on to the ring on the outside of the tank near the top (as shown in components table) .
4.5 FIXING THE TANK AND CONNECTING THE MAINLINE PIPES
Set the tank on the platform and cover the mouth with the net filter followed by the coarse filter. Attach the verti cal mainline onto the outlet tap. Unroll the horizontal mainline. Attach one ttl" to each end of the horizontal mainline, and one "T" to each of the remaining holes on the horizontal mainline. lay the horizontal mainl ine on one edge of the plot such that the "Ts" and " ls" are close to the middle of each bed .
4.6 LAYING THE LATERAL DRIP
Unroll the drip lines and conne<tthe open end of all 4 lateral
drip lines with the previously attached "Ts" and "ls." At this
point in installation, two options for locating the position of the
drip pipes are available, depending on the desired crop spacing .
For crops such ascauliflower and ca bbage, set up two latera I
drip lines per bed (see Option 1.) For crops such as cucumber
eggplant, pumpkin, and gourds, use one lateral drip line per bed
(see Option 2.) Now use the pegs to fix both ends of each lateral
drip line, keeping the pipe straight.
Option 1: Two crop rONS per bed Option 2: One crop row per bed
9 10

4.7 LOCATING THE PLANTING SPOTS
With the gate valve closed, fill the tank with water to near full. Open the gate valve and check to see if the drippers are functioning. If any of the drip holes are creating spray along the lateral drip line, place a baffle over that drip hole.AIIow the system to run for about 5 minutes. Close the gate valve and mark the wet spots. For " two crop row" (Option 1) installation, move
the lateral drip line over to the next row of the same bed . Operate the system for 5 minutes once again to locate the planting spots in each second row per bed.
Filling the tank
M arking the wet spots
11
4 .8 PREPARATION OF THE PLANTING
Using the wet marks created, dig the pits for planting . and fertilizer according to typical agronomic practice. Operate the drip system and perform transplantation/seeding after the recommended 8-12 hour waiting period.
Preparing the planting pits
5. OPERATION OF DRIP SYSTEM
In order to properly operate the drip system , ensure the following:
The drip pipes are correctly laid and the baffles are close to the plants There is no debris or dirt in the filters Fittings are tight enough to prevent leaking
With the gate valve closed , fill the tank with water near the top. Open the gate valve to irrigate.
Irrigation requirement during rainfall should be judged by observing the soil moisture. It is recommended to keep irrigate daily in the first month of the growing season. In later stages, the interval of irrigation can be extended up to 3 days.
The following table can be used as a reference for the daily irrigation requirements of both winter and spring crops in the middle hills of Nepal.
12
4.7 LOCATING THE PLANTING SPOTS
With the gate valve closed, fill the tank with water to near
full. Open the gate valve and check to see if the drippers are functioning . If any of the drip holes are creating spray along
the lateral drip line, place a baffle over that drip hole.Allow the
system to run for about 5 minutes . Close the gate valve and mark the wet spots. For "two crop row" (Option 1) installation, move
the lateral drip line over to the next row of the same bed . Operate the system for 5 minutes once again to locate the planting spots in each second row per bed.
Filling the tank
11
4.8 PREPARATION OF THE PLANTING
Using the wet marks created, dig the pits for planting .
and fertilizer according to typical agronomic practice. Operate
the drip system and perform transplantation/seeding after the
recommended 8-12 hour waiting period.
Preparing the planting pits
5. OPERATION OF DRIP SYSTEM
In order to properly operate the drip system, ensure the following:
• The drip pipes are correctly laid and the baffles are close to the plants
• There is no debris or dirt in the filters • Fittings are tight enough to prevent leaking
With the gate valve closed, fill the tank with water near the top. Open the gate valve to irrigate.
Irrigation requirement during rainfall should be judged by observing the soil moisture. It is recommended to keep irrigate daily in the first month of the growing season. In later stages, the interval of irrigation can be extended up to 3 days.
The following table can be used as a reference for the daily irrigation requirements of both winter and spring crops in the middle hills of Nepal.
12

Schedule of irrigation
WINTER Oct 100 2 30 minutes
Planting: Oct Nov 150 3 45 minutes
Harvesting: Jan Dec 200 4 1 hour
Jan 150 3 45 minutes
SPRING Feb 100 2 30 minutes
Planting: Feb M ar 300 6 1.5 hour
Harvesting: Apr Apr 250 5 1.25 hour
6. MAINTENANCE AND STORAGE OF THE DRIP SYSTEM
For proper functioning of the drip system, the following maintenance is required.
6.1 CLEANING THE FILTERS
Depending on the turbidity of the water used, the coarse and net filters should be removed and cleaned at least once a week by rinsing with good quality water (for example, water used for domestic use).
6.2 FENCIN G THE CROP FIELD
It is recommended to put up a fence around the crop field where the drip system is in use in order to prevent damage or theft of the equipment and to keep animals from harming crops.
13
Cleaning the coarse filter
6.3 FLUSHING OF PIPES
If the filters are not maintained properly, the drippers can become clogged . To clean the clogged drippers, insert a pin through the drip hole . If several drippers are found to be blocked simultaneously, it is suggested to flush the pipe by opening all the ends of the pipeline until dirt from the pipes is completely removed.
6.4 PROTECTING THE TANK
During non-irrigation hours, it is recommended to cover the tank with a plasti c sheet or old cloth to extend the life of the equipment.
6.5 STORAGE
Every component of the drip system should be stored in a safe pla ce during the rainy season when irrigation is not required. However, drip systems in use under plastic houses may be used throughout the rainy season and do not require storage.
14
Schedule of irrigation
WINTER Oct '00 2 30 minutes
Planting: Oct Nov '50 3 45 minutes
Harvesting: Jan Dec 200 4 1 hour
Jan '50 3 45 minutes
SPRING Feb 100 2 30 minutes
Planting: Feb Mar 300 6 1.5 hour
Harvesting: Apr Apr 250 5 1.25 hour
6. MAINTENANCE AND STORAGE OF THE DRIP SYSTEM
For proper functioning of the drip system, the following
maintenance is required.
6. 1 CLEANING THE FILTERS
Depending on the turbidity of the water used, the coarse and
net filters should be removed and cleaned at least once a week
by rinsing with good quality water (for example, water used for domestic use).
6.2 FENCING THE CROP FIELD
It is recommended to put up a fence around the crop field where
the drip system is in use in order to prevent damage or theft of
the equipment and to keep animals from harming crops.
13
Cleaning the coarse filter
6. 3 FLUSHING OF PIPES
If the filters are not maintained properly, the drippers can
become clogged . To clean the clogged drippers, insert a pin
through the drip hole . If several drippers are found to be
blocked simultaneously, it is suggested to flush the pipe by
opening all the ends of the pipeline until dirt from the pipes is
completely removed.
6.4 PROTECTING THE TAN K
During non-irrigation hours, it is recommended to cover the
tank with a plastic sheet or old cloth to extend the life of the
equipment.
6.5 STORAGE
Every component of the drip system should be stored in a safe
place during the rainy season when irrigation is not required.
However, drip systems in use under plastic houses may be used
throughout the rainy season and do not require storage.
14
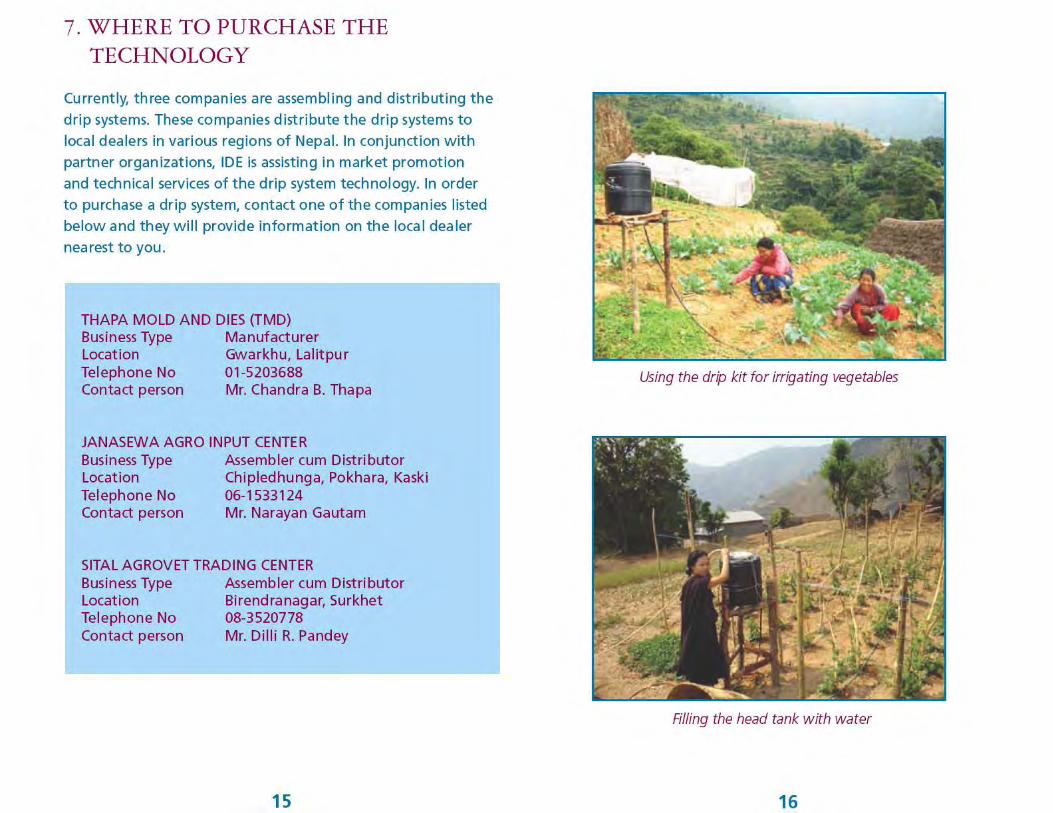
7. WHERE TO PURCHASE THE TECHNOLOGY
Currently, three companies are assembling and distributing the
drip systems. These companies distribute the drip systems to
local dealers in various regions of Nepal. In conjunction with
partner organizations, IDE is assisting in market promotion
and technical services of the drip system technology. In order
to purchase a drip system, contact one of the companies listed
below and they will provide information on the local dealer
nearest to you.
THAPA MOLD AND DIES (TMD) Business Type Manufacturer Location Gwarkhu , Lalitpur Telephone No 01 -5203688 Contact person Mr. Chandra B. Thapa
JANASEWA AGRO INPUT CENTER Business Type Assembler cum Distributor Location Chipledhunga, Pokhara, Kaski Telephone No 06-1533124 Contact person Mr. Narayan Gautam
SITAL AGROVET TRADING CENTER Business Type Assembler cum Distributor Location Birendranagar, Surkhet Telephone No 08-3520778 Contact person Mr. Dilli R. Pandey
15
Using the drip kit for irrigating vegetables
Filling the head tank with water
16
7. WHERE TO PURCHASE THE TECHNOLOGY
Currently, three companies are assembling and distributing the
drip systems. These companies distribute the drip systems to
local dealers in various regions of Nepal. In conjunction with
partner organizations, IDE is assisting in market promotion
and technical services of the drip system technology. In order
to purchase a drip system, contact one of the companies listed
below and they will provide information on the local dealer
nea rest to you .
THAPA MOLD AND DIES (TMD) Business Type Manufacturer location Gwarkhu, Lalitpur Telephone No 01-5203688 Contact person Mr. Chandra B. Thapa
JANASEWA AGRO INPUT CENTER Business Type Location Telephone No Contact person
Assembler cum Distributor Chipledhunga, Pokhara, Kaski 06-1533124 Mr. Narayan Gautam
SITAL AGROVET TRADING CENTER Business Type Location Telephone No Contact person
Assembler cum Distributor Birendranagar,Surkhet 08-3520778 Mr. Dilli R. Pandey
15
Using the drip kit for irrigating vegetables
Filling the head tank with water
16