shots and shot plans - pearsoncmg.comptgmedia.pearsoncmg.com/images/chap05_0321238338/... · shots...
TRANSCRIPT

Chapterfive
105
Shots and Shot Plans
Telling a story visually is the essence of cinematic art. Although the audience gets much ofits information from dialogue, the experience of film and video captivates our brains withimagery, much as dreams do.
Ideally, pictures—not dialogue—should carry your story. In fact, at some film schools first-year students have to do all their projects as silent movies, which forces them to think visu-ally. Videomakers who fail to learn this lesson generally make movies and presentationsthat are little more than radio with pictures.
Shot plans and storyboards are twin techniques that help you visu-alize how you’re going to tell your story with a sequence of images.A storyboard shows how each shot will look on the screen. A shotplan lets you diagram individual shots to show camera setups andother technical choices you intend to make to get those shots.
PLANNING YOUR SHOTS
Planning your shots is only one part of a larger story development process that begins withyour script or presentation outline, and carries through to the decisions you make in theediting room. We surveyed the basics of writing a script in Chapter 2. Continuing at thatoverview level, this chapter follows through on translating your story into a logicalsequence of pictures. This is a creative process built upon practices in film and televisioncraft that have evolved over the last century.
We treat the subject of shots and shot design in the video Ten Ways to Shoot a Chair(Figure 5.1).
SHOT PLAN: Diagram showingcamera setups and positions ofactors required to capture allshots needed for a scene.
05RWDV2(105-134).qxd 02/27/2004 03:04 PM Page 105

Turning Theory into PicturesShot design involves several disciplines:
• Art. Different types of shots affect the artistic, perceptual, and emotional impressionyou make on an audience.
• Technique. Your knowledge of the optical characteristics of various lenses and theways camcorders capture images will affect how you design your story.
• Organization. Your shot plan affects how you tackle the production job and whoyou select for your crew, as well as how you develop your shooting schedule, stageyour setups, and direct camera operations.
The principles of shot design and the techniques of drawing shot plans apply to all typesof shooting, whether news-style or film-style. Granted, in news-style shooting you’ll prob-ably have little or no time to make formal plans, but you’ll get better results if you knowhow to design film-style shots and setups well in advance of the first shooting day.
Figure 5.1 Our survey of cinematography is set in a fictional classroom whereProfessor Hightower instructs Holly, a young student, on the techniques of shot size, lens selection, camera angle, and camera movement.
106 CHAPTER FIVE: SHOTS AND SHOT PLANS
05RWDV2(105-134).qxd 02/27/2004 03:04 PM Page 106

From Storyboard to Shot ListAccomplished videomakers develop distinctive styles, not only in terms of aesthetics (howshots look and how stories are told) but also in how they apply technical aspects of cine-matography and directing to their work.
One important way videomakers differ from each other in their approaches to shot plan-ning is the extent to which they rely on storyboards (Figure 5.2). As discussed in Chapter 2,a storyboard is a preproduction planning tool that arranges sequences of shots as thumb-nail sketches on a page. (See Figure 2.5 in Chapter 2.)
Figure 5.2 (Top) Here’s a storyboard frame created with Storyboard Quick.You can manipulate pre-drawn characters and position them on drawnbackgrounds or, as shown here, against imported location photos. (Bottom)Compare with the corresponding scene from When Harried Met Sally.
107PLANNING YOUR SHOTS
05RWDV2(105-134).qxd 02/27/2004 03:04 PM Page 107
The purpose of a storyboard is to give you a sense of whether your shots work for visualstorytelling. Continuity, conflict, and character ideas should come across at a glance, with-out having to read the dialogue (which is usually written with key actions summarizedunderneath each storyboard frame).
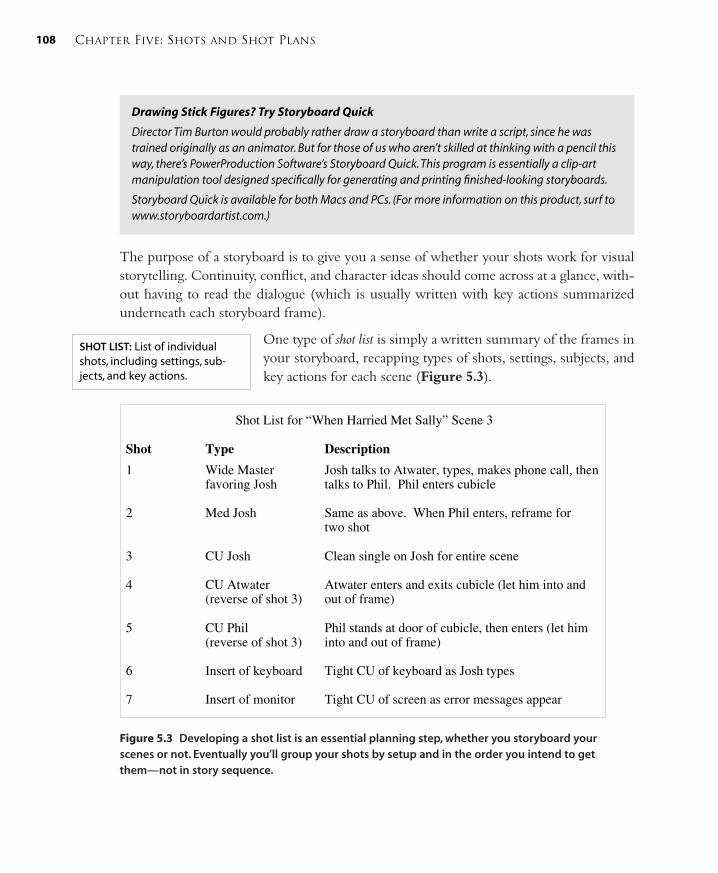
One type of shot list is simply a written summary of the frames inyour storyboard, recapping types of shots, settings, subjects, andkey actions for each scene (Figure 5.3).
Figure 5.3 Developing a shot list is an essential planning step, whether you storyboard yourscenes or not. Eventually you’ll group your shots by setup and in the order you intend to getthem—not in story sequence.
SHOT LIST: List of individualshots, including settings, sub-jects, and key actions.
Drawing Stick Figures? Try Storyboard Quick
Director Tim Burton would probably rather draw a storyboard than write a script, since he wastrained originally as an animator. But for those of us who aren’t skilled at thinking with a pencil thisway, there’s PowerProduction Software’s Storyboard Quick. This program is essentially a clip-artmanipulation tool designed specifically for generating and printing finished-looking storyboards.
Storyboard Quick is available for both Macs and PCs. (For more information on this product, surf towww.storyboardartist.com.)
108 CHAPTER FIVE: SHOTS AND SHOT PLANS
05RWDV2(105-134).qxd 02/27/2004 03:04 PM Page 108

If you don’t want to go to the time and effort of developing a storyboard, you should atleast make simple shot-plan diagrams, which is another way to develop shot lists. Somedirectors—so green they don’t know better or so experienced they can do without them—don’t use storyboards or shot plans at all, but work directly from a script and visualize it intheir heads. That’s like building a house without a set of blueprints. Such an approachmight work for a one-person runner-and-gunner. But when you need to communicateyour vision to some other member of your crew, you’ll wish you had it all on paper.
This chapter follows a logical progression: script to storyboard, to shot plan, to shot list.However, you don’t necessarily need a storyboard and a shot plan. For example, if you’reshooting an action movie, you’d be wise to use a storyboard to help you visualize yourshots before you think about sets or locations. But if your video involves people talking ina room, and it relies heavily on dialogue, first seeing the physical space and its props canbe more important than storyboarding ahead of time. In these situations, you might firstdraw up a shot plan—concentrating on placement of actors and camera in the space—thenuse that shot plan to produce your shot list.
Structured vs. Improvisational ApproachesThe extent to which you can plan your shots depends on how much experimentation you intend to encourageon the set. Sticking closely to a preconceived shot plan isa structured approach, the way Alfred Hitchcock worked,for example, or how Steven Spielberg directs. Permittingvariations on the plan, or starting a shoot with no plan atall, is an improvisational approach; Francis Ford Coppolaand Robert Altman often work this way.
Steven Spielberg is renowned in the industry for his highly structured approach. Once ascript is approved, he has a storyboard created for every shot of every scene in the script. Andwhen he’s shooting, he goes for the shots in the storyboard—frame for frame, if possible.
Robert Altman works at the other extreme. He’s famous for encouraging improvisationand experimentation on the set. In consultation with his DP, he chooses a camera setupthat will capture the desired action. But the framing of shots, the movement of actors, theexact lines they will say, the number and variety of takes—these are all subject to change,depending on the chemistry of the moment.
STRUCTURED APPROACH:Adhering strictly to a storyboardor shot plan.
IMPROVISATIONAL APPROACH:Permitting experimentation onthe set in terms of actors’ perfor-mances and/or shot design.
109PLANNING YOUR SHOTS
05RWDV2(105-134).qxd 02/27/2004 03:04 PM Page 109

If you’re a relatively inexperienced moviemaker, you’ll find the discipline and paperworkof the structured approach can help keep you on budget and on schedule. If you’re a long-time director who knows how to cope with the unpredictability of the production process,you stand a better chance of getting away with an improvisational shooting style.
In any case, for more information on the practical impacts of these antithetical approachesin preproduction planning, see “Casting and Improvisation for DV” in Chapter 8.
TELLING STORIES WITH PICTURES
Before you get involved with designing individual shots, there are some overall principlesof visual storytelling you need to think about.
Don’t Forget Establishing ShotsPlanning your shots will succeed if you think about how they’ll flow together in the edit.Transitions between scenes are particularly important.
For example, when you begin a new scene, the audience must rec-ognize and understand the new setting. You need to provide a shotto establish the new location, usually called an establishing shot. Itmight simply be a shot of the building a character is about to enter.
So when you’re planning your shots, be sure to include transitions. When you’re editing,you may find that a transitional shot isn’t necessary—it may be possible to cut directly fromone situation to another without confusing the audience. But it’s good to have the option.
REALITY CHECK: It’s the mark of a polished screenwriter to anticipate transitions in the script,even if the director or editor eventually might choose some other technique to bridge scenes.The idea is to carry the eye—and the interest—of the audience from one scene to the next. Areally slick transition permits an actor to step from one time and place into another, as if step-ping into the next room. For example, in one scene, we see an arrested suspect being usheredinto the rear door of a squad car. As the officer closes the door, we cut to the barred door of ajail cell slamming shut behind the prisoner.
Pay Attention to ContinuityContinuity is visual common sense, and it refers to how shots match up with one anotherwhen they are assembled. An assembled sequence should give a unified, convincing impres-sion of uninterrupted time, space, and action. For example, showing an actor as left-handedin one scene and right-handed in another is a break in continuity. If she wears a purpledress in one shot and yellow pants in the next shot (of the same scene), that’s another
ESTABLISHING SHOT: Image thatintroduces the audience to anew setting in which the nextaction takes place.
110 CHAPTER FIVE: SHOTS AND SHOT PLANS
05RWDV2(105-134).qxd 02/27/2004 03:04 PM Page 110

break. Ultimately, continuity is an editing issue, but you can’t get it right unless you planyour shots with the concept in mind.
NOTE: As with other aesthetic aspects of shot design, moviemakers have been known to dis-agree on the importance of maintaining continuity. To paraphrase director Oliver Stone (whoused stronger language): “Continuity is for people with no guts.”
On a fully crewed movie set, a person called a script supervisor watches each take, makes notes on problematicdetails (such as non-matching clothing), and advises thedirector of possible breaks in continuity. If your produc-tion can’t afford a full-time script supervisor, continuityshould be the concern of the director or camera operator.
There are three key principles of continuity to keep inmind when designing your shots.
Don’t Cross the Stage Line
The stage line is an imaginary line drawn between two actors on the set (Figure 5.4). Toassure visual continuity, make sure all your camera setups are on the same side of the line,often called “the axis” in filmmaking. If you fail to follow this rule (also known as “the 180degree rule”), characters may seem to swap positions on screen during the same scene,which can be disorienting to your audience. If you stay on the same side of the stage line,Adam will always be on the left side of the screen and Amanda will always be on the right,no matter how you frame them. This is a little hard to visualize if you’re new to the concept,but experienced moviemakers know how important it is.
Figuring out the stage-line rule can become complex if the scene includes three or moreactors. In this situation, there are effectively multiple stage lines, one between each pair ofactors. One simplified approach is to find a central element—a table, for example—andshoot the scene from just two setups, one on either side of the table, respecting a singlestage line drawn through the table’s center.
But ultimately, there aren’t any hard and fast rules for handling the stage line in multiple-character scenes. Your best guideline is your own intuitive sense of continuity, gained fromwatching movies all your life. Here’s our best advice, which is more of a guideline than astrict rule: Actors should always appear to be looking toward the person they’re talking to,even if that person isn’t in the frame. If the listener is offscreen, decide where he is in rela-tion to the speaker and maintain that imaginary stage line. If the actors’ eye contact doesn’tseem logical, find an alternate setup. This is where a detailed storyboard helps, especiallyas you discuss the problem with the actors and the DP.
SCRIPT SUPERVISOR: Productionstaff member who observesshooting to assure compliancewith the script and avoid breaksin continuity; also provides theeditor with shot-by-shot scriptnotes and the director’s pre-ferred takes.
STAGE LINE: Imaginary linebetween two actors on a set;setups should not cross thestage line.
111TELLING STORIES WITH PICTURES
05RWDV2(105-134).qxd 02/27/2004 03:04 PM Page 111

REALITY CHECK: If you’ve ever wondered why people in movies or on television only sit aroundthree sides of a table, it’s to make working with the stage line easier. If you use all four sides, atleast one of the actors will always have his back to the audience. And you’d have to shoot thescene from more angles, further complicating the stage-line problem.
Some moviemakers—disciples of Oliver Stone, perhaps—deliberately experiment withcrossing the stage line. But be prepared for a challenge in the editing room if you decideto try it.
Respect Screen Direction
Screen direction refers to how subjects move within the two-dimensional space of the frame.Stated as a basic rule, respecting continuity of screen direction requires maintaining a
consistent point of view and frame of reference for the audience.For example, if a character is walking from left to right in the firstshot of a sequence, and you cut away for the second shot, whenyou return to the character in shot three, he should still be walk-ing left to right and not right to left.
Another illustration: Think of an actor walking down the sidewalk. Her goal is the frontdoor of an apartment building, but that door isn’t shown in the first shot. In the firstshot, we see her walking from right to left. In the next shot, we see her friend waiting
RULE OF SCREEN DIRECTION:Motion of actors within theframe must preserve continuityfrom one shot to the next.
Figure 5.4 The stage lineconnects two actors in ascene and divides the play-ing area in half. Plan tomake all your camerasetups on one side of theline or the other. Directorswith experience in live the-ater can think of the stageline as marking the edge ofa proscenium stage. Theaudience can’t go behindthe footlights. (The symbolthat looks like the top viewof a parrot is the film-maker’s convention for thesubject: The “wings” arearms and the “beak” is thenose, indicating the direc-tion the subject is facing.)
No setups!
Permissible camera setups
Symbol forcamera
Stage line
112 CHAPTER FIVE: SHOTS AND SHOT PLANS
05RWDV2(105-134).qxd 02/27/2004 03:04 PM Page 112

expectantly for her at the building entrance. To preserve continuity of screen direction, thefriend must be looking to screen right, expecting her approach. For best effect, the build-ing entrance should be on the left side of the frame, to establish it as the ultimate goal of
the walker’s journey from right to left. Also, compose the shot sothat most of the air, or empty space in the frame, is in front of theexpectant friend. The audience will get the idea that the walkerwill enter the frame there.
If you want to show the actor approaching the building entrance in a series of shots, youmust always show her moving from right to left. The only way to change screen directionwithout confusing the audience is to interpose a neutral shot—one with the actor comingright at the camera (or moving directly away from it). Then you can show her walking leftto right in the next shot. However, if you now cut back to the friend waiting at theentrance, he must be looking to screen left.
Some aspects of screen direction are rooted more in moviemaking convention than in real-ity. For example, if you’re cutting back and forth between two sides of a telephone con-versation, it will look more natural if one character holds the phone to her left ear, and theother to his right.
As with other principles of continuity, some filmmakers deliberately violate screen direc-tion. Don’t risk confusing your audience this way—at least, not on your first project.
Avoid Time-Dependent Elements (The Problem ofthe Burning Cigarette)
Sometimes the best way to fix continuity problems is to avoid them in the first place. Aperfect example is the so-called burning cigarette problem, which refers to the difficulty ofpreserving continuity when you’re shooting any time-dependent process that you can’tcontrol—a burning cigarette, ice cream melting, or a slow leak in a tire that’s going flat. Forinstance, if the actor’s cigarette is burned down to the butt in the first shot, it will be abreak in continuity to see him holding a freshly lit one in the next, unless you interpose ashot of him lighting up a new smoke.
Naturally, there are ways of dealing with these problems. A production assistant can startseveral cigarettes burning at various times, and hand one of appropriate length to the actorjust before a take. You can use multiple dishes of ice cream, kept cold offscreen at variousstages of thawing. You can repeatedly inflate the sagging tire to match previous takes.
However, unless the effect is essential to your story, a much better fix is to simply eliminateproblem elements from the scene before they become a problem! When you’re planningyour shots, look out for elements that might create continuity problems and try to replacethem with less complicated alternatives.
AIR: Cinematographer’s term forempty space within the compo-sition of a shot.
113TELLING STORIES WITH PICTURES
05RWDV2(105-134).qxd 02/27/2004 03:04 PM Page 113

DIRECT AUDIENCE ATTENTION
When you’re designing your shots, you can employ various techniques to help direct theaudience’s attention.
ColorAll things being equal, viewers will focus on the brightest (or most unusual) color in theshot. For instance, you could put your main character in a pink top and dress everyone elsein beige. Similarly, in a sea of white hats the audience will watch the black one. Or youcould make the clue on a cluttered coffee table big, shiny, and orange.
Videographers find that color is a particularly good way to draw attention, especially sincethe contrast range of video is relatively narrow, and simply increasing the illumination onyour subject to draw attention isn’t always an option. (For more information on using colorin coordination with your lighting plan, see “Use Color to Direct the Eye” in Chapter 6.)
Faces and EyesFrom birth, human beings are conditioned to look into and study other people’s faces. It’s
no different in the movies. Actors’ faces are the most interestingobjects in any shot, the eyes most of all. (For information onmatching eye lines in closeups, see “Over-the-Shoulder Shot” laterin this chapter.)
FocusAn effective way to draw audience attention is by camera focus, particularly if the camera changes focus (or racksfocus) during the shot. This is a common technique infilm, but selective focus is more difficult to achieve invideo because of video’s greater depth of field. (For moreinformation, see the “Making Video Look Like Film”sidebar in Chapter 3.)
TIP: To optimize the effect of selective focus in video, try using a telephoto lens with a wide aper-ture in dim light.You can also use a camera adapter such as the P+S Technik Pro35Digital ImageConverter, which increases the effective target size of the CCD to about the size of a 35mm frame,permitting use of motion-picture lenses. For more information, surf to www.pstechnik.de.
RACK FOCUS: Named for the flatgear called a “rack” (half of therack-and-pinion focusing mech-anism on old-style movie cam-eras), to change focus during a shot.
EYE LINE: Imaginary line connect-ing two actors’ eyes as they lookat one another.
114 CHAPTER FIVE: SHOTS AND SHOT PLANS
05RWDV2(105-134).qxd 02/27/2004 03:04 PM Page 114

Moving Actor or ObjectThe audience will follow whomever or whatever happens to be moving in a shot. If sev-eral objects are moving in a frame, the audience will be drawn to the one moving thefastest. And as we’ve mentioned earlier in this chapter, some of your best editing choicesjoin two disparate actions that seem to blend into one continuous movement across thecut. In effect, by following the action, the viewer’s interest is being pulled into the newscene.
Exceptional ObjectUnique physical characteristics of objects—size, shape, or texture—can make them standout. The audience will quickly spot a vintage car in the midst of a traffic jam, even if it isn’tin the center of the frame.
TEN WAYS TO SHOOT A CHAIR
From a creative viewpoint there are countless ways to shoot a chair—or any other subject—but from a technical viewpoint we’ll concentrate on just ten (Table 5.1).
The ten basic ways to design a shot derive from varying framing, lens selection, cameraangle, and camera movement. The creativity of cinematography and the impact of visualstorytelling come into play when you apply these factors in different combinations tomanipulate audience perception and emotions.
You can use any combination of framing, lens selection, camera angle, and camera move-ment to design a shot. Each of these variables has a different effect on the way the audi-ence perceives the subject or action.
Table 5.1 Variable Factors in Shot Composition
Framing (Size of Subject) Lens Selection (Focal Length) Camera Angle
Closeup Wide angle Low angle
Medium shot Normal Neutral
Long shot Telephoto High angle
Camera movement Camera movement Camera movement
115TEN WAYS TO SHOOT A CHAIR
05RWDV2(105-134).qxd 02/27/2004 03:04 PM Page 115

TYPES OF SHOTS
Shots can be classified in many ways, depending on their function in the visual storytellingprocess. For instance, a given shot might be a two-shot, adolly shot, and an establishing shot—all at the same time.
Size of SubjectThe first variable in classifying shots is the apparent size of the subject of the shot.
Closeup
The closeup (CU) generally frames an actor’s head and shoulders, emphasizing her facialexpressions and emotions (Figure 5.5). Variations include a medium closeup (MCU), whichis a bit wider, and an extreme closeup (ECU), which shows only a portion of the face, cut-ting off either the chin or the forehead.
The traditional way to frame a closeup is to leave some space above the actor’s head. Butin a variation named for the studio that specialized in promoting star quality, the Warner’scloseup is so tight, the frame line intersects the top of the actor’s head.
Medium Shot
A medium shot (MS) shows the actor from the waist up (Figure 5.6). A medium shot is theperfect choice for showing upper-body movement, such as gestures in dialogue scenes, orfor showing two or more actors having a conversation.
The closeup and the medium shot are most frequently used to frame a scene in visualstorytelling.
Long Shot
A long shot (LS) shows the actor’s entire body along with a good deal of her environment(Figure 5.7). Use long shots to emphasize action (running or combat, for example), toframe groups of people, and to orient the audience to the physical space of a set or loca-tion. A variation called the extreme long shot (ELS) looks at the subject from very far away,as if the viewer were spying unobserved from a great distance.
TWO-SHOT: A shot that framestwo actors.
116 CHAPTER FIVE: SHOTS AND SHOT PLANS
05RWDV2(105-134).qxd 02/27/2004 03:04 PM Page 116

Focal LengthAnother way of classifying shots is by focal length, which is determined by which lens youselect. No matter how you frame your shot or how big your subjects appear in it, you havea variety of choices for focal length.
Wide Angle
A wide-angle lens captures a wider field of view than the human eye (Figure 5.8). It offersgreat depth of field—almost everything in the shot, near and far, will be in focus. And itexaggerates distances so objects appear farther away than they really are.
You can use a wide-angle lens to distort the facial features of your subject by shooting herin closeup (Figure 5.9). Some comedy directors think wide-angle shots of dialogue scenesheighten the sense of fun.
Telephoto
Shots made with a telephoto lens magnify the subject, bringing it closer and flattening theimage. Telephoto shots have shallow depth of field, which usually means that if the sub-ject is in focus, the background will be soft, or blurred. A telephoto lens minimizes facialcontours and can flatter an actor’s face in closeup (Figure 5.10).
Figure 5.6 The medium shot is appropriate for showing dialogue, gestures, and body language, provided that there isn’t a lot ofaction in the scene.
Figure 5.5 The closeup is a mainstay ofmoviemaking since it emphasizes emotion inthe face. If the scene includes vigorous bodymovement, you’ll either have to move the cam-era to follow the action or go to a wider shot.
117TYPES OF SHOTS
05RWDV2(105-134).qxd 02/27/2004 03:04 PM Page 117

Figure 5.10 If you’re going for a closeup of a star and want to make her look as good aspossible, use a long lens. A telephoto lens compresses the contours of the face in a pleasing way. Add a diffusion filter to eliminatefreckles and small blemishes.
Figure 5.9 A wide-angle closeup is seldomflattering to the face and forces you to placethe camera so close the actors may feel uncom-fortable. Unless you are going for this oddeffect, use a longer lens and move the camera back.
Figure 5.8 A shot done with a wide-angle lensis sometimes called a wide shot (WS).
Figure 5.7 The long shot is commonly usedfor establishing shots and opening shots ofscenes. It shows body-length views of theactors and gives the audience a chance to seea location. You might start a speech in a longshot, but these shots aren’t very good for film-ing dialogue; you’ll want to cut to a tightershot for most of the actor’s speech.
118 CHAPTER FIVE: SHOTS AND SHOT PLANS
05RWDV2(105-134).qxd 02/27/2004 03:05 PM Page 118

Normal
A normal lens approximates how a scene would actually look to the viewer’s unaided eye.
Varying the Camera AngleA third set of shot descriptions refers to the angle of the camera in relation to the subject.You can use one of these camera angles in combination with any subject size and any lenschoice. Camera angle adds an emotional charge to a shot and can make even a dull mediumshot taken with a normal lens seem unusual and striking. Here are your options.
Low Angle
Looking up at the subject from a camera position near the floor, a low camera angle makes thesubject loom over the viewer (Figure 5.11). The effect can be one of power and domination.
Neutral Angle
A shot at eye level is a neutral angle and gives no particular emotional perspective to ourview of the subject.
High Angle
A high camera angle looks down on the subject from above (Figure 5.12). The effect exaltsthe audience over the subject, diminishing the actor’s power or importance. You’ll oftensee a high-angle long shot used at the conclusion of a movie as a kind of God’s-eye-view,implying a larger perspective on the human events we’ve just witnessed.
Figure 5.12 A high-angle shot can make aperson seem weak or powerless.
Figure 5.11 The effect of a low-angle shot is tomake a person look powerful or domineering.
119TYPES OF SHOTS
05RWDV2(105-134).qxd 02/27/2004 03:05 PM Page 119

Moving the CameraYou can add camera movements to any shot we’ve discussed so far. Camera movementscan be complex, involving many different motions, changes of speed, and changes ofdirection in the same shot. High-budget productions sometimes use computer con-trolled camera mounts for special-effects work so that complicated movements will besmooth, repeatable, and error free.
Pan
In this move, the camera is mounted on a tripod and rotates from side to side—left to right,or right to left—on the same level. You could use panning to survey the landscape in a longshot or to follow the action in a tennis game (Figure 5.13).
Tilt
Again, the camera is mounted on a tripod, but this time it tilts up or down. You might tiltto follow the flight of a rocket, capture the descent of a monkey from a tree, or progres-sively reveal the height of a building (Figure 5.14).
Figure 5.13 In a panning shot, thecamera swivels from side to side onthe tripod head, staying in the samehorizontal plane.
Pan
120 CHAPTER FIVE: SHOTS AND SHOT PLANS
05RWDV2(105-134).qxd 02/27/2004 03:05 PM Page 120

Zoom
In a zoom, the camera doesn’t actually move, it just seems to move. A zoom is a lens adjust-ment that changes the optics from a wide-angle to a narrow-angle configuration, or vice versa, during theshot, thereby increasing or decreasing the magnificationof the subject. The view with increased magnification isa telephoto shot.
Another term for zooming in is pushing in. The oppositemove is called pulling out (Figure 5.15).
REALITY CHECK: You can push in on the lens between takes to quickly set up a closeup with-out changing camera positions. This is a time-honored low-budget technique, especially inepisodic television, where tight shooting schedules are the norm. Perhaps because of its extensiveuse on TV, movie directors and DPs tend to disapprove of the practice. Yes, it’s a quick and dirtyalternative to doing a new setup, but at the end of a long shooting day when light is fadingfast, we wouldn’t hesitate to use it to get one more precious shot.
Figure 5.15 In a zoom shot, the cameraposition doesn’t change. The operatoradjusts the lens continuously from wide(W) to telephoto (T) when zooming in,and from T to W when zooming out.
Wide
W T
Telephoto
W T
TELEPHOTO SHOT: Done with a long lens, a narrow-anglecloseup taken from a great distance.
PUSH IN: Zoom in.
PULL OUT: Zoom out.
Figure 5.14 Tilting the cameraswivels it upward or downward on the head, staying in the samevertical plane.
Tilt
121TYPES OF SHOTS
05RWDV2(105-134).qxd 02/27/2004 03:05 PM Page 121

Dolly
Named for a camera mount that rolls on tires or tracks, a dolly shot wheels the camera intoward the subject (a dolly in) or away from the subject (a dolly out). Dollying in on an actorhas the same effect as walking up to the person: it increases the sense of intimacy. Dollyingout produces a sense of withdrawal, even alienation (Figure 5.16).
Truck
Moving the camera parallel to a moving subject while keeping a constant distance is calledtrucking. A common use of trucking is to keep up with an actor as she walks or runs(Figure 5.17).
Crane
Named for the piece of equipment that raises or lowers the camera, a crane shot may alsorequire panning, tilting, or zooming to keep the subject framed as the camera goes up,
down, forward, or back. An upward-moving crane shot gives theaudience a sense of soaring, downward movement of swoopingor invasion.
Figure 5.16 The camera rolls toward the subject when dollying in, awaywhen dollying out.
Dolly
CRANE: Counterweighted leverfor raising or lowering a camera.
122 CHAPTER FIVE: SHOTS AND SHOT PLANS
05RWDV2(105-134).qxd 02/27/2004 03:05 PM Page 122

Some camera dollies have a mechanical boom arm that can be used to create a small-scale version of a craneshot. (In general, a crane can extend upward to about 15 feet, a boom arm about six.) Using the boom arm ofthe dolly is referred to as booming up or booming down(Figure 5.18).
Figure 5.18 In a crane shot, the camera is raised or lowered. Other adjustments, such astilting, will probably be needed to keep the subject in the frame.
Crane
BOOM ARM: Dolly-mountedcrane.
BOOMING: Raising (booming up)or lowering (booming down) the camera on a boom arm;crane shot.
Figure 5.17 In a trucking shot, the cam-era rolls parallel to the actor.
Trucking
Walking
Finish Start
123TYPES OF SHOTS
05RWDV2(105-134).qxd 02/27/2004 03:05 PM Page 123

Dolly Counter-Zoom
The complex camera move called a dolly counter-zoom(best known from Alfred Hitchcock’s Vertigo) is a favoriteof student filmmakers because its effect can be thrilling,and it’s fun to do. But it’s not easy to do well!
You can execute the dolly counter-zoom in one of two ways:
• Dolly in on the subject while zooming out.
• Dolly out while zooming in.
Both methods use a zoom lens to change focal length while shooting—and while movingthe camera.
The first method changes from a telephoto closeup to a wide-angle closeup. The effect isto signal a character having a frightening revelation. It’s a staple of horror movies (accom-panied by the all-too-familiar reek-reek-reek effect on the soundtrack).
The second method—moving out while zooming in—changes from a wide-angle closeupto a telephoto closeup. The effect is to give the sense that the world is closing in on a char-acter—a criminal cowering on hearing the jury’s verdict, for example.
Executing a smooth dolly counter-zoom can be challenging because the shot won’t be con-vincing or effective unless the dolly and zoom movements occur at exactly the same time,at exactly the same rate, in perfect coordination.
The dolly counter-zoom has an intoxicating effect on aspiring DPs and camera operators,but if it doesn’t work, you’ll be smart to cut it in the editing room. As you might imagine,the sure sign of a rookie is a dolly counter-zoom that has no reason for being there otherthan the moviemaker’s urge to try it.
Hollywood movies make extensive use of camera movement, including crane and dollyshots. These kinds of setups can be expensive, considering the cost of hiring and operat-ing a crane, or the time and labor involved in laying a track for a dolly. Camera movementis another hallmark of that film-look quality audiences expect—along with artistic lighting,selective focus, rich audio, and lots of other high-priced effects.
REALITY CHECK: You can do camera moves even if you don’t have the budget to rent a dolly or crane. Go handheld, use hand-carried mounts, or improvise with a shopping cart,child’s wagon, skateboard, or even sit the camera operator on a blanket and pull him along aslick floor. For more information on doing these shots successfully, see “Moving the CameraDuring a Shot” in Chapter 9.
DOLLY COUNTER-ZOOM: Zoomingout while dollying in, or zoom-ing in while dollying out.
124 CHAPTER FIVE: SHOTS AND SHOT PLANS
05RWDV2(105-134).qxd 02/27/2004 03:05 PM Page 124

USING SHOTS AS STORYTELLING ELEMENTS
So far in this chapter, we’ve discussed the technical categorization of shots, touching onlybriefly on how you might use them to tell stories. Now let’s look at shots from a functionalpoint of view.
Certain kinds of shots and combinations of shots have become filmmaking traditions (orclichés): the flattering closeup shot with a telephoto lens at neutral angle, for example, orthe scene-opening combo of long-shot, medium-shot, closeup. But you don’t have to beconstrained by those choices just because they are mainstays of both talented directors andstudio hacks.
In fact, you can apply any set of technical choices we’ve discussed to any of the followingstorytelling functions.
Establishing ShotAn establishing shot introduces the audience to a new setting. Traditionally, it would be anLS or ELS of the geographic location where the scene will take place. But if the scene istaking place in a diner, the establishing shot could just as easily be an ECU of a waiter’shand pouring a cup of coffee.
Master ShotIn the traditional approach to scene coverage, a master shotis an MS or LS of an entire scene, from beginning to end.If the editor uses it to open the scene, it can establish theactors in the setting. Inserted elsewhere in a sequence, itgives the editor a reliable alternative to closeup dialogueshots.
Two-ShotA two-shot simply means that two actors are included in the frame; two-shots are gener-ally framed as MS. If the scene involves only the two characters, a two-shot could be amaster. Or, a two-shot could be a tighter shot of a wider master, to draw the audience intothe emotional conflict between two characters in a scene involving many people.
COVERAGE: A complete enoughset of shots for a scene so theeditor has every angle she needsto make the edited scene work.
MASTER SHOT: Continuous takeof an entire scene, showing allthe actors.
125USING SHOTS AS STORYTELLING ELEMENTS
05RWDV2(105-134).qxd 02/27/2004 03:05 PM Page 125

Over-the-Shoulder ShotThis shot centers one actor in the frame as viewed over the shoulder (OTS) of another. In atraditional approach, it’s a closeup of the speaker’s upper torso, including the listener’sshoulder and the side of her head. This framing lets you show some of the listener’s body
movements as she reacts to what’s being said—nodding her head,for example. But it’s just as valid for the person facing the cam-era to be the listener. His silent reactions to the speaker can bemuch more interesting to the audience.
TIP: An over-the-shoulder shot can use a stand-in, or double, for a subject who’s unavailable.When you shoot over the double’s shoulder, only a portion of the back of his head will appear inthe frame—eliminating the need for close physical resemblance with the original subject. Youcan dub in the subject’s dialogue later without having to sync it because viewers can’t see thedouble’s lips move. However, if the shot is done badly—if the angle is wrong or if the double’smotions appear unmotivated—the audience will become aware that the double is just stand-ing there bobbing her head rather than speaking lines.
Reverse AngleIn a pair of shots, if the second shot appears to view the scene from a direction more or lessopposite to the first shot, it’s a reverse angle. In most cases, the reverse shouldn’t be exactlyreverse—a 180-degree reverse would cross the stage line between the actors. Instead, areverse is any complementary shot from a nearly opposite direction that doesn’t cross thestage line. So, if the first shot were a CU on Amanda shooting over Adam’s right shoulder,the matching reverse would be a CU on Adam, looking over Amanda’s left shoulder.(Shooting over her right shoulder would commit the error of crossing the stage line.)
In choosing camera angles for reverse angles—as well as for inter-cut closeups in general—be guided by the eye line between theactors. If you shoot Amanda, a tall actor, looking down at Adamin one shot, the camera in the reverse angle should be lower—near Adam’s eye level—so he’s looking up at Amanda. The cam-
era should also be just to one side of the eye line, so the actors appear to be looking intoeach other’s eyes, not into the camera lens. (An exception to this rule: a matching pair ofECU shots with the actors looking directly into the lens, as if at each other, is a techniquedirectors like Steven Soderbergh have used to heighten the emotional intensity of a con-frontation scene.)
INTERCUT: Insert one shot intoanother; also, cutting back andforth repeatedly from one shotto another.
OVER-THE-SHOULDER: Close upof one character, shot frombehind another character in the scene; OTS.
126 CHAPTER FIVE: SHOTS AND SHOT PLANS
05RWDV2(105-134).qxd 02/27/2004 03:05 PM Page 126

REALITY CHECK: The correct focus of attention in an OTS shot is just a few inches to oneside of the camera lens. Rookie actors sometimes make the mistake of looking directly into the camera, but the director or anyone watching the monitor will catch it. A subtler problem all but the most experienced actors can have is breaking attention and glancing away, how-ever briefly, or blinking during a take. (Blinking is particularly hard to see on the set.) The effecton the audience is a jarring break in concentration, making the actor come across as weak orindecisive. For more information on the subject of actors’ sight lines, see Michael Caine’s bookand companion video, Acting in Film.
A reverse that follows a CU on one character and shows the CUof the other, is a matching closeup, or matching single.
SingleA single shows just one actor in the frame, usually (but not necessarily) in closeup.
In a variation on the single—the so-called dirty single—a small portion of the listener’s bodycan appear. This might be a hand, or the side of the face, but not quite as much as you’dsee in a conventional over-the-shoulder shot. The dirty single has become common inthe small-screen television era because it lets you take a closer look, to see some physicalinteraction between actors. You might use a dirty single if the listener’s hand motion is sig-nificant to the story—picking up a knife, say, as the other actor threatens her.
To distinguish it from the dirty variation, a single is sometimes called a clean single.
REALITY CHECK: From a practical standpoint, it can be tempting to shoot a clean singlewithout the other actor being present at all—which might conserve the offscreen actor’s laborhours but leaves the on-camera actor delivering lines to a stand-in, crew member, or emptyspace—none of which are likely to motivate an interesting performance.
InsertThe insert is a shot that’s briefly intercut with a longer scene to show an object or some
other meaningful detail. Traditionally it’s a CU or ECU. Anexample would be a CU of a newspaper headline inserted into adialogue scene in which two characters are discussing the news.
INSERT: Shot briefly intercut witha longer scene, usually showingsome meaningful detail.
SINGLE: Shot that frames oneactor; or “clean single.”
127USING SHOTS AS STORYTELLING ELEMENTS
05RWDV2(105-134).qxd 02/27/2004 03:05 PM Page 127
REALITY CHECK: Tight inserts don’t show surround–ings of a particular location or set. Wise productionmanagers take advantage of this and often sched-ule all inserts at the end of a production or at someother convenient time, usually done by a separate,less senior crew called the second unit. Studiossometimes shoot all their inserts on separate, smallersound stages called insert stages.
CutawayA cutaway is any shot that takes the audience out of ascene, usually to add information. For example, wesee a man hurry offscreen and then cut away to hiswife in another location glancing anxiously at herwatch. Or during a shot of two characters walking onthe beach you might cut away to a shot of a seagullfloating over the waves. Although using a cutaway isultimately an editing decision, you won’t have theclips to work with if you don’t plan the shots in advance.
REALITY CHECK: Stock footage, or clips from a film or video archive, can be an economicalsource of cutaways, particularly if the duration of the shot is so short the audience doesn’t havea chance to study it for details that might not match.
POVA point-of-view (POV) shot shows us what one character sees and helps the audience iden-tify with him. In most other types of shots, the actors must stay focused on each other, notat the camera. But in the matching reverse of a POV, the other actor must look straight into
the lens. One use of the POV is a horror-movie stereotype—toshow the concealed monster’s view of the unwitting victim. (Atscreenings, cinema buffs have been known to yell, “Watch out!There’s a camera operator in the bushes!”)
POV (POINT OF VIEW): Shotshowing what one character is seeing.
SECOND UNIT: Often used onlarge-scale movie productions;auxiliary director and locationcrew that may shoot concur-rently with the main productionto save time and expense bycapturing establishing shots,backgrounds, inserts, and so on.
INSERT STAGE: Small soundstage on a movie lot used pri-marily to shoot inserts, or tightcloseups of props or gestures;small stage in television studioused for remote interviews andfield reporting, typically with thelocal cityscape added electroni-cally in the background.
CUTAWAY: Any shot that inter-rupts or follows a scene, relievesits tension, or comments on it.
128 CHAPTER FIVE: SHOTS AND SHOT PLANS
05RWDV2(105-134).qxd 02/27/2004 03:05 PM Page 128

ReactionA reaction shot shows an actor’s response to something he’s just heard or seen. Like the cutaway, the juxtapositionof a reaction shot is an editing choice, but if your coverageonly includes talking heads, you won’t have the option.
REALITY CHECK: When shooting closeups for an emotional dialogue scene, directors shouldpay particular attention to the performance the actor is giving in the spaces between thelines—when listening to the offscreen actor. These reactions are often more important to theemotional truth of a character than the lines of dialogue, and these reaction shots can be usedin the edit to heighten the scene’s impact. For more information on getting good reaction shots,see “Working with Actors” in Chapter 9.
BLOCKING THE ACTION
Blocking is a term inherited from live theater to describe an actor’s movements on stage. Your ideas about block-ing a scene will have a big impact on camera placementand other elements of your shot plan.
Naturally, you want to limit the actors’ movements so they won’t stray beyond the bound-aries of the set or move into areas that would be out of focus or poorly lit. At the same time,effective blocking is every bit as important—sometimes more so—than dialogue in con-veying information and emotion to the audience.
REALITY CHECK: Screenwriting instructors talk about the notion of “character” as the totalityof a person’s actions. In a theatrical sense, blocking defines action within a playing area, or set.Yes, dialogue contributes to character. However, as in life, audiences are convinced more bywhat people actually do than by what they say they’re going to do.
Blocking should be repeatable from one take to another, or your shots may fail to main-tain continuity when you cut them together. Also, if there’s too much variation in block-ing, you will never know if you have captured the scene the way you visualized it in yourstoryboard and shot plan. Improvisational directors who permit spontaneous variations inactors’ blocking must be prepared to spend more time in the edit finding ways to preservecontinuity in the assembled takes.
BLOCKING: An actor’s movementswithin a scene.
REACTION SHOT: A shot thatshows an actor’s facial expressionor body language in response tosome speech or action.
129BLOCKING THE ACTION
05RWDV2(105-134).qxd 02/27/2004 03:05 PM Page 129

DRAWING SHOT PLANS
All the elements we’ve discussed in this chapter culminate in a shot plan—a document thatdiagrams your camera setups, blocking of actors, and shots for every scene (Figure 5.19).
One important reason to draw up a shot plan for every scene is to make sure you will actu-ally get the coverage you need. And the purpose of coverage, as noted earlier, is to assurethat you have enough material to assemble the scene in the editing room without gaps inthe action or breaks in the continuity. Remember, when you’re working film style, you’llbe shooting out of sequence. In the frenzy of production, you’ll be concerned with gettingall the shots on your list before the light is gone or your location becomes unavailable.So—unless you have a really sharp script supervisor—if a shot isn’t on your list, it won’tmake it into the can.
As shown in Figure 5.19, the traditional approach to covering a scene assumes dialoguebetween two actors. The scene in the example is a sequence of two conversations: FirstJosh talks to his boss, Atwater, who exits; then coworker Phil enters, crosses to speakwith Josh, and exits.
The Josh-Atwater-Phil scene is Scene 3 from the short When Harried Met Sally. You’ll find boththe finished video and the script on the disc.
Input from the Rehearsal Process
Filmmakers who favor improvisational methods often criticize structured shootists for a lack ofspontaneity due to blocking that’s worked out in advance.
Improvisational directors trust their actors to figure out where their bodies want to go in the heat ofthe moment. The resulting action may well be more realistic, more inventive, and more interesting towatch than the preconceived idea in a script or storyboard.
But waiting until you get on the set to figure out the blocking is risky. Some directors get away withit, but it takes a fair amount of experience (and luck) to set camera and lights if you don’t knowexactly where the actors are going to be.
A good compromise is to allow plenty of time for rehearsals. Hold preproduction sessions to readthrough the scene with actors. Let them play it out, and watch how they naturally want to move.Then, after rehearsal (but well before shoot day), you can design your shots and draw up your shotplan with its blocking informed by the rehearsal process.
130 CHAPTER FIVE: SHOTS AND SHOT PLANS
05RWDV2(105-134).qxd 02/27/2004 03:05 PM Page 130

Figure 5.19 Here’s a shot plan for Scene 3 of When Harried Met Sally. Do oneshot plan for each short scene. For longer scenes, draw a plan for every two orthree setups on the same set. Your plan won’t include lighting at this point:Concern yourself with translating your shot designs into the physical reality of actors talking and moving in the physical space.
"When Harried Met Sally" Scene 3Director: Pete Shaner
Keyboard
Monitor
Desk
Chair
Windows
CubiclePartition
A = JoshB = AtwaterC = Phil
Doorway
Camera
Enter Exit
Wide master favoring Josh (same blocking for Atwater and Phil
entrances/exits, Atwater enters and exits,
then Phil enters, stands next to Josh)
MS Josh – reframe for two-shot when Phil enters
Clean single CU Josh – entire scene
CU Atwater – Reverse of
CU Phil – Reverse of
Insert – ECU keyboard
Insert – ECU monitor screen
&&
A
C
B/C
131DRAWING SHOT PLANS
05RWDV2(105-134).qxd 02/27/2004 03:05 PM Page 131

Among the numbered camera setups, the first one captures the entire scene in a mastershot. Arrows indicate the actors’ blocking, and text written below the diagram describes theaction.
The second setup doesn’t require moving the camera. Instead, it calls for reframing fromMS on Josh to a two-shot when Phil enters. (Reframing might also involve pushing in orpulling out.)
The third setup calls for getting a clean single on Josh for the duration of the entire scene.Since Josh is the main character of the story, the audience will presumably be interested inhis reactions. The editor will have the option of cutting back to this CU at any point ratherthan going to the wide-shot master.
The fourth and fifth camera setups capture reverse CUs of Atwater and Phil, in turn. Aswith the master shot, you have the option of pushing in from these positions to get ECUs.Depending on the length of the actors’ speeches, you might not need to shoot the wholescene each time. However, remember that reaction shots can be extremely useful in theediting room for telling a story, so it’s a bad plan to shoot an actor only when she’s talking.
Setups six and seven get in very close on Josh’s keyboard and monitor to show his handstyping and the document he’s editing on the screen.
When developing your shot plans, think about how the scene will cut together. In a mas-ter-scene approach like this one, the editor will probably intercut the CUs and ECUs tocome progressively closer to the subjects as the scene unfolds—pulling viewers into thescene. Cutting back to the master shot would have the opposite effect—relieving tensionand giving the audience a chance to reflect.
It’s possible that you won’t use the master shot at all when you do your edit. You may cutfrom the previous scene directly to a CU, or even an ECU of the speaker to tell the storywith more impact. You might not need to use the master to orient the audience to the set-ting, especially if they were expecting to return there or if the emotional content of thespeech is more important. But think of the master shot as protection in case your closeupswon’t cut together for some reason.
TIP: Cutting back to the master can cover breaks in continuity between closeups. For example,if cutting from one closeup to another crosses the stage line, the effect will be less jarring if youcut to the master first, then to the second closeup on the “wrong” side of the line.
A good shot plan follows through on the visual concepts in the script and storyboard, andit anchors your shot designs within the real constraints of a particular set.
132 CHAPTER FIVE: SHOTS AND SHOT PLANS
05RWDV2(105-134).qxd 02/27/2004 03:05 PM Page 132
EXTRACTING THE SHOT LIST
Now, working from your shot plan, make a list of the shots you intend to get, in the orderyou intend to get them. (Refer again to Figure 5.3.) If you’re working from a storyboardand didn’t do a shot plan to accompany it, you’ll have to give some thought to the order ofsetups and shooting.
Start by listing the shots in story sequence, then sort them by master shot, and finally byincreasing degrees of closeup. For example:
1. Master two shot: Josh and Phil at the desk
2. All Josh’s CUs
3. All Josh’s ECUs
4. All Phil’s CUs
5. All Phil’s ECUs
6. All inserts
7. Next master shot: reverses on Atwater and Phil at door
As your production planning evolves, you’ll probably re-sort the list several times, group-ing shots by location, interior or exterior, day or night, scene, setup, and shooting day. Forexample, it’s wise to shoot exteriors before interiors, regardless of their sequence in thestory. That way, if it rains and you can’t shoot the exteriors, you’ll still have shots you canget indoors.
You can then use the shot plan and shot list to open discussions with the DP and crewabout the details of camera setups and lighting. (For more information on lighting yoursetups for DV, see “Three-Point Lighting” in Chapter 6.)
MAKING IT VISUAL
Shot design is where good screenwriting and visualization intersect. The inspiration for acompelling image may come from the writer in her shot description or from the directoras he develops a storyboard. But the visual concept has to be in the design of the shot orthe editor will be short of usable material.
133MAKING IT VISUAL
05RWDV2(105-134).qxd 02/27/2004 03:05 PM Page 133

A classic example of expert visualization is a scene in The Merry Widow, a romantic com-edy directed by Ernst Lubitsch in 1934. The plot requires that the King find out theQueen has taken a lover. If this were a television soap opera—a notorious instance ofradio-with-pictures—a trusted servant might tell the King the disturbing news. That’s theobvious choice, and it’s not a particularly interesting one.
But here’s how Lubitsch, a consummate master of subtle screen sexuality, and his screen-writer, Samson Raphaelson, get the idea across—with no dialogue at all:
On leaving his marriage bed in the morning, the King dresses hastily, takes leave of theQueen, and hurries down the long circular stairway of the castle. Halfway down he pats hismiddle and realizes he’s forgotten something. He returns to the bedroom, grabs a swordbelt from the bedpost, makes another fond farewell, and takes leave of his wife once more.On his way down the stairs he tries to buckle the belt around his ample belly—only to findit’s too small for him.
Now, that’s telling a story with pictures.
134 CHAPTER FIVE: SHOTS AND SHOT PLANS
05RWDV2(105-134).qxd 02/27/2004 03:05 PM Page 134