sharepoint resouce booking app
DESCRIPTION
Create a simple resource booking system in SharePoint 2013. This step by step instruction is a complement to the video found at http://www.kalmstrom.com/Tips/SharePoint2013ResourceBooking.htmTRANSCRIPT

www.kalmstrom.com 1
SharePoint Resource Booking System
Create a simple resource booking system to handle five meeting rooms
Step 1, create a Services list app
1) Go to the Site Contents
2) Click on ”add an app”
3) Click on ”Custom List”
4) Enter the Name Services
5) Click ”Create”
Step 2, add services to the list
1) Go to the ”Services” list
2) Click on the ”List” tab
3) Click on ”edit this list”
4) Enter in the Services
a) Coffee
b) High Tea
c) Lunch
d) Dinner and Entertainment
www.kalmstrom.com 2
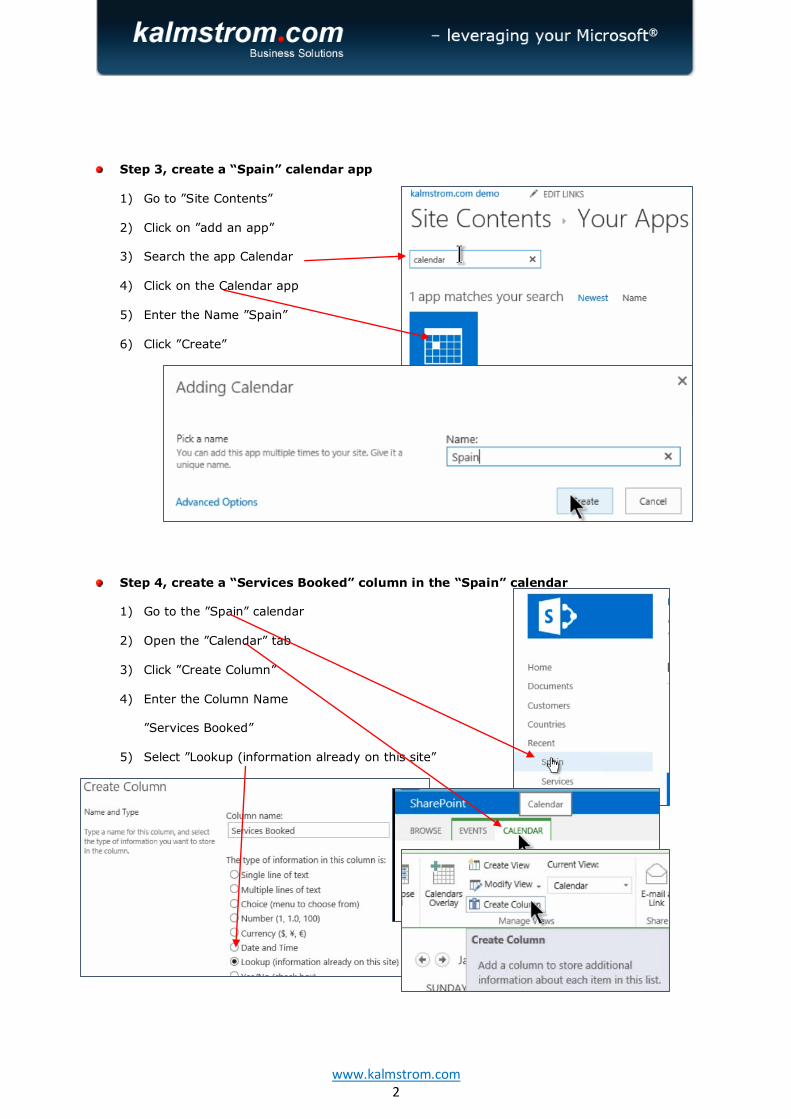
Step 3, create a “Spain” calendar app
1) Go to ”Site Contents”
2) Click on ”add an app”
3) Search the app Calendar
4) Click on the Calendar app
5) Enter the Name ”Spain”
6) Click ”Create”
Step 4, create a “Services Booked” column in the “Spain” calendar
1) Go to the ”Spain” calendar
2) Open the ”Calendar” tab
3) Click ”Create Column”
4) Enter the Column Name
”Services Booked”
5) Select ”Lookup (information already on this site”

www.kalmstrom.com 3
6) Select to get information from ”Services”
7) Select the ”Title” column
8) Check ”Allow multiple values”
9) Click OK
10) Check the column:
a) Go to the “Events” tab
b) Click on “New Event”
c) Make sure you can add the services.
Step 5, save the “Spain” calendar as a resource calendar template
1) Go to the ”Calendar” tab
2) Click on ”List Settings”
3) Click on ”Save list as template”
4) Fill out the fields
a) File name: ResourceCalendar
b) Template name: ResourceCalendar
5) Click OK
6) Click Ok to the dialog box

www.kalmstrom.com 4
Step 6, create a “Sweden” resource calendar
1) Go to ”Site Contents”
2) Click on ”add an app”
3) Search for ”Resource”
4) Click on ”ResourceCalendar”
5) Enter the name ”Sweden”
6) Click Create
Step 7, create an Estonia resource calendar
1) Go to ”Site Contents”
2) Click on ”add an app”
3) Search for ”Resource”
4) Click on ”ResourceCalendar”
5) Enter the name ”Estonia”
6) Click Create
Step 8, create an “India” resource calendar
1) Go to ”Site Contents”
2) Click on ”add an app”
3) Search for ”Resource”
4) Click on ”ResourceCalendar”
5) Enter the name ”India”
6) Click Create
www.kalmstrom.com 5
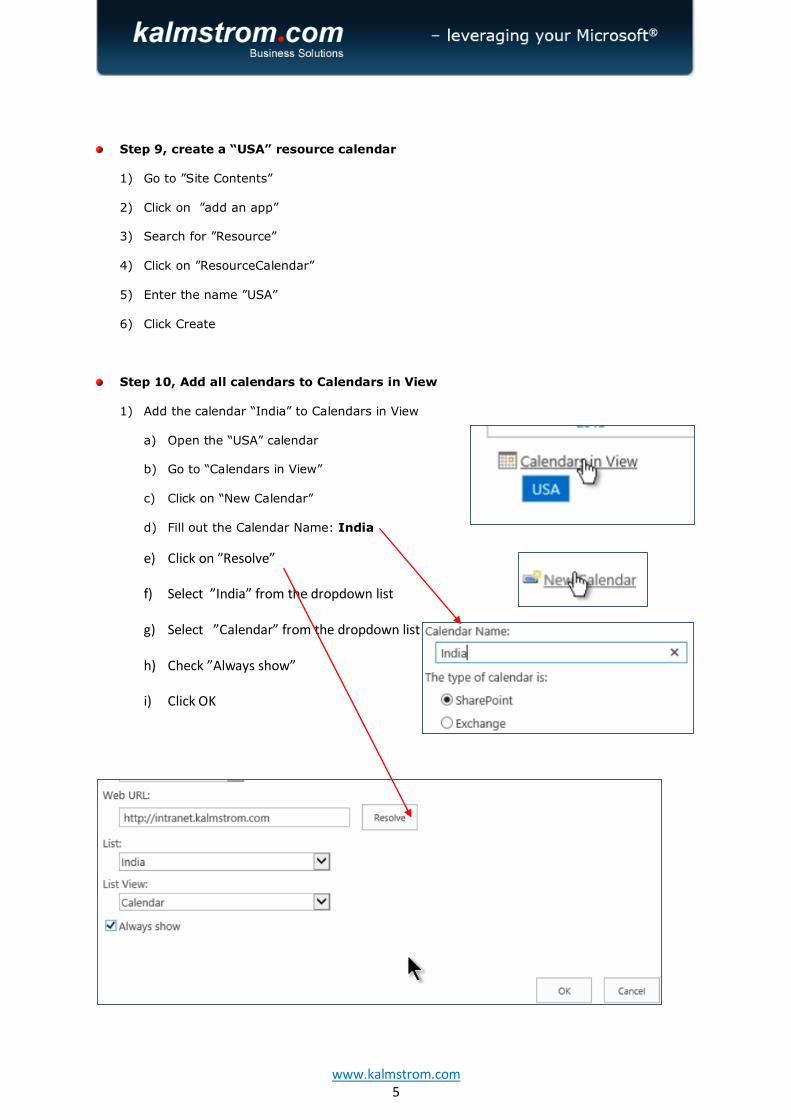
Step 9, create a “USA” resource calendar
1) Go to ”Site Contents”
2) Click on ”add an app”
3) Search for ”Resource”
4) Click on ”ResourceCalendar”
5) Enter the name ”USA”
6) Click Create
Step 10, Add all calendars to Calendars in View
1) Add the calendar “India” to Calendars in View
a) Open the “USA” calendar
b) Go to “Calendars in View”
c) Click on “New Calendar”
d) Fill out the Calendar Name: India
e) Click on ”Resolve”
f) Select ”India” from the dropdown list
g) Select ”Calendar” from the dropdown list
h) Check ”Always show”
i) Click OK

www.kalmstrom.com 6
2) Add the calendar “Estonia” to Calendars in View
a) Click on “New Calendar”
b) Fill out the Calendar Name: Estonia
c) Select color
d) Click “Resolve”
e) Select “Estonia” from the dropdown list
f) Select “Calendar” the dropdown list
g) Check “Always show”
h) Click OK
3) Add the calendar “Sweden” to Calendars in View
a) Click on “New Calendar”
a) Fill out the Calendar Name: Sweden
b) Select Color
c) Click “Resolve”
d) Select “Sweden” from the dropdown
e) Select “Calendar” from the dropdown
f) Check “Always show”
g) Click OK
4) Add the calendar “Spain” to Calendars in View
a) Click on “New Calendar”
b) Fill out the Calendar Name: Spain
c) Select Color
d) Click “Resolve”
e) Select “Spain” from the dropdown list
f) Select “Calendar” from the dropdown list
g) Check “Always show”
h) Click OK
i) Again Click OK

www.kalmstrom.com 7
5) Check if the booking works by clicking a date in one of the calendars, make a booking and
see that it shows up in the correct calendar.
Step 11, Connect the resource calendars to Outlook
1) Go to “India”
2) Click on the “Calendar” tab at the top
3) Click on “Connect to Outlook”
4) Click “Allow” to the dialog box
5) Click ”Yes” to the dialog box
www.kalmstrom.com 8
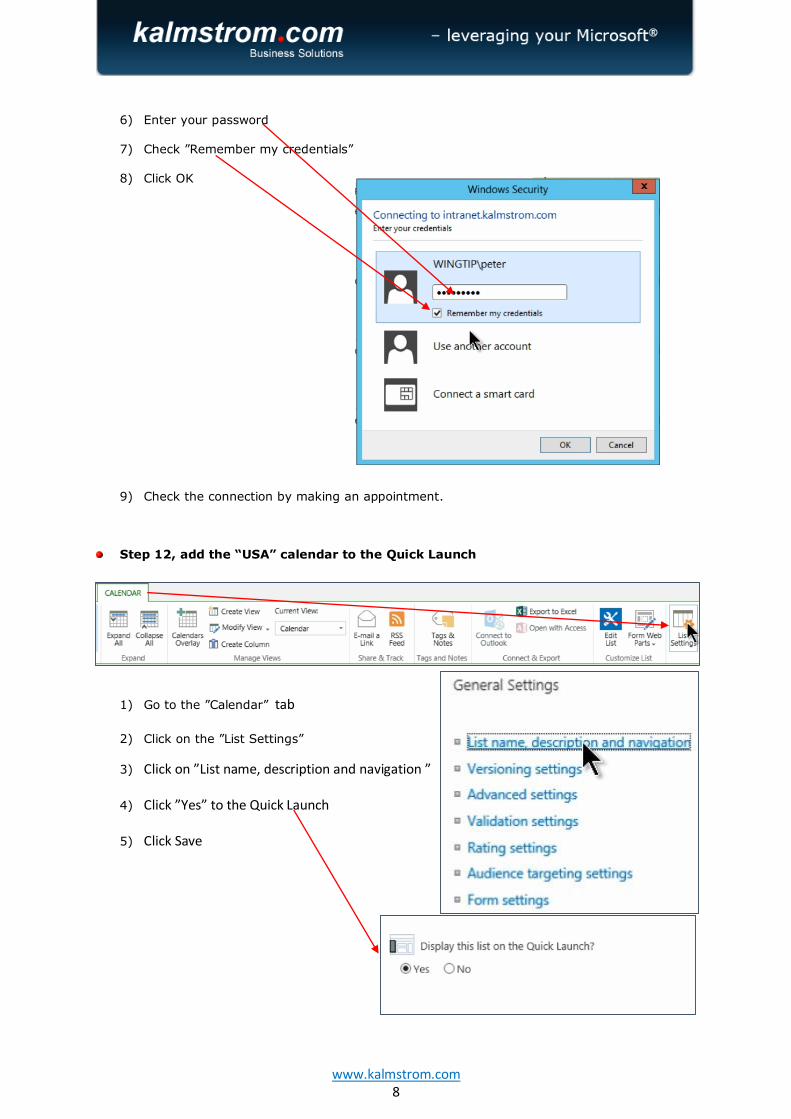
6) Enter your password
7) Check ”Remember my credentials”
8) Click OK
9) Check the connection by making an appointment.
Step 12, add the “USA” calendar to the Quick Launch
1) Go to the ”Calendar” tab
2) Click on the ”List Settings”
3) Click on ”List name, description and navigation ”
4) Click ”Yes” to the Quick Launch
5) Click Save

www.kalmstrom.com 9
Step 13, Rename the ”USA” calendar
2) Go to the home page
3) Go to the “Settings” icon at the top
4) Click on “Site settings”
5) Click “Quick Launch” under the Look and Feel
6) Click on the edit button at ”USA”
7) Rename it to Resource booking
8) Click OK