servo-electric rotary pan-tilt actuator type pw 70-90
TRANSCRIPT

Translation of the original manual
02.01-A/PW/0389353/en
Servo-electric rotary pan-tilt actuator
Type PW 70-90
Assembly and operating manual

Translation of the original manual
2 02.01/PW/0389353/en
Imprint:
Copyright:
This manual remains the copyrighted property of SCHUNK GmbH & Co. KG. It is solely
supplied to our customers and operators of our products and forms part of the unit. This
documentation may not be duplicated or made accessible to third parties, in particular
competitive companies, without our prior permission.
Technical changes:
We reserve the right to make alterations for the purpose of technical improvement.
Document number: 0389353
Edition: 02.01-A / 14.08.2012 / en
© SCHUNK GmbH & Co. KG, Lauffen/Neckar
All rights reserved
Dear Customer,
Congratulations on choosing a SCHUNK product. By choosing SCHUNK, you have
opted for the highest precision, top quality and best service.
You are going to increase the process reliability of your production and achieve
best machining results – to the customer's complete satisfaction.
SCHUNK products are inspiring.
Our detailed assembly and operation manual will support you.
Do you have further questions? You may contact us at any time – even after purchase.
You can reach us directly at the mentioned addresses in the last chapter of these in-
structions.
Kindest Regards,
Your SCHUNK GmbH & Co. KG
Precision Workholding Systems
Bahnhofstr. 106 – 134
D-74348 Lauffen/Neckar
Tel. +49-7133-103-2503
Fax +49-7133-103-2189
www.schunk.com

Table of contents
02.01/PW/0389353/en 3
Table of contents
1 About this manual ................................................................................................. 5
1.1 Purpose/validity .......................................................................................... 5
1.2 Target groups ............................................................................................. 5
1.3 Applicable documents ................................................................................ 5
1.4 Symbols in this manual .............................................................................. 6
1.5 Terms used in this manual ......................................................................... 6
2 Basic safety notes ................................................................................................ 7
2.1 Intended use .............................................................................................. 7
2.2 Environmental and operating conditions .................................................... 7
2.3 Controlled production ................................................................................. 7
2.3.1 Condition of the inputs/ outputs (I/O) ............................................. 8
2.3.2 Protective equipment ..................................................................... 8
2.3.3 Constructional changes, attachments or modifications .................. 8
2.3.4 Special standards .......................................................................... 8
2.4 Personnel qualification ............................................................................... 9
2.5 Safety-conscious working........................................................................... 9
2.6 Notes on particular risks ........................................................................... 10
3 Warranty .............................................................................................................. 11
4 Scope of delivery ................................................................................................ 11
5 Accessories ......................................................................................................... 12
5.1 Connecting elements ............................................................................... 12
6 Technical Data .................................................................................................... 13
6.1 Basic data ................................................................................................ 13
6.2 Factory settings / DEFAULT Value .......................................................... 14
6.3 Power supply requirements ...................................................................... 14
7 Description of the module .................................................................................. 15
7.1 Structure................................................................................................... 15
7.2 Functional principle .................................................................................. 16
7.3 Connection cap board .............................................................................. 17
8 Assembly and commissioning .......................................................................... 18
8.1 Mechanical Connection ............................................................................ 18

Table of contents
4 02.01/PW/0389353/en
8.2 Example of mounting ............................................................................... 19
8.3 Electrical connection ................................................................................ 19
8.3.1 EMV-fitting ................................................................................... 20
8.3.2 RS232 interface ........................................................................... 23
8.3.3 CAN interface .............................................................................. 25
8.3.4 Interface PROFIBUS DP .................................................................. 28
8.3.5 DEFAULT and BOOT function ..................................................... 30
8.4 System integration ................................................................................... 32
8.4.1 System structure .......................................................................... 32
8.4.2 SCHUNK Motion protocol ............................................................ 32
8.4.3 Most important commands .......................................................... 33
9 Troubleshooting.................................................................................................. 38
9.1 Module does not move ............................................................................. 38
9.2 The module is sluggish or jerky ................................................................ 38
9.3 The module's motor is not turning ............................................................ 38
9.4 Module stops abruptly .............................................................................. 38
10 Maintenance and care ........................................................................................ 39
10.1 Maintenance intervals .............................................................................. 39
10.2 Dismantling the module ............................................................................ 39
11 EC declaration of incorporation ........................................................................ 40

About this manual
02.01/PW/0389353/en 5
1 About this manual
1.1 Purpose/validity
This manual is part of the module and describes the safe
and proper use during all phases of operation.
This manual is valid only for the module specified on the
front page.
1.2 Target groups
Target group Task
Manufacturer, operator Keep this manual available for the personnel at all
times.
Require personnel to read and observe this manual and
the applicable documents, especially the safety notes
and warnings.
Skilled personnel, fitter Read, observe and follow this manual and the
applicable documents, especially the safety notes and
warnings.
Table 1
1.3 Applicable documents
You can find the following documents on our homepage:
Document Purpose
Catalog Technical data or application parameters of the module
and information on accessories. The last version is always
valid.
Software manual
(MotionControl.pdf)
More detailed information about the parameters and spe-
cial features of the individual bus systems.
General terms of bussi-
ness
Including notes on the warranty.
Table 2

About this manual
6 02.01/PW/0389353/en
1.4 Symbols in this manual
To give you quick access to information, the following sym-
bols will be used in this guide:
Symbol Designation
DANGER Dangers for persons.
Nonobservance causes death or serious injuries.
WARNING Dangers for persons.
Nonobservance can cause death or serious injuries.
NOTICE Information on avoiding material damage, for explanation or to
optimize the work processes.
Prerequisite for a handling instruction.
Handling instruction, also measures in a warning or note.
1.
2.
3. ...
Step-by-step handling instruction.
Observe the order.
Component/spare part represented in a graphic.
Part/detail shown in a graphic which is part of a spare part or
which must be provided by the customer.
(10), (/10/) Reference in the text or in a handling instruction to a part that is
represented in a graphic.
Master M Slave S Parameter will be transferred from Master M to Slave S
Table 3
1.5 Terms used in this manual
Term Meaning
Cycle A cycle includes the following movement:
One rotating motion (1x to specified position and 1x back to
initial position)
Table 4

Basic safety notes
02.01/PW/0389353/en 7
2 Basic safety notes
2.1 Intended use
This module has been designed for pivoting and turning
workpieces or other objects.
The module is intended for installation in a machine. The
requirements of the applicable guidelines must be observed
and complied with.
The module may be used only in the context of its defined
application parameters.
Any other use or use exceeding that specified is an in-
fringement of use for intended purpose. The manufacturer
bears no liability for damage resulting from such use.
2.2 Environmental and operating conditions
The module may be used only in the context of its
defined application parameters (see chapter 6, page 13
and catalog).
Make sure that the environment is clean and the ambient
temperature corresponds to the specifications per the
catalog. Maintenance intervals.
(see chapter 10.1, page 39)
Make sure that the environment is free from splash
water and vapors as well as from abrasion or processing
dust. Excepted are modules that are designed specially
for contaminated environments.
2.3 Controlled production
The module represents the state of the art and the recog-
nized safety rules at the time of delivery. However, it can
present risks if, for example:
• The module is not used in accordance with its intended
purpose.
• The module is not installed or maintained properly.

Basic safety notes
8 02.01/PW/0389353/en
• The EC Machinery Directive, the VDE directives, the
safety and accident-prevention regulations valid at the
usage site, or the safety and installation notes are not
observed.
2.3.1 Condition of the inputs/ outputs (I/O)
During the run-up of the module not defined I/O conditions
may occur.
Do not allow a direct connection with actuators.
2.3.2 Protective equipment
Provide protective equipment per EC Machinery
Directive.
2.3.3 Constructional changes, attachments or modifications
Additional drill holes, threads, or attachments that are not
offered as accessories by SCHUNK may be attached only
with permission of SCHUNK.
2.3.4 Special standards
The following harmonized standards were adhered to:
• Industrial scientific and medical (ISM) radio-frequency
equipment - Electromagnetic disturbance
characteristics - Limits and methods of measurement
(IEC/CISPR 11:2003 + A1:2004, modified + A2:2006);
German version EN 55011:2007 + A2:2007 class A (this
is equivalent to EN 61000-6-4:2004)
• Electromagnetic compatibility (EMC) - Part 6-2: Generic
standards - Immunity for industrial environments
(IEC 61000-6-2:2005); German version EN 61000-6-
2:2005

Basic safety notes
02.01/PW/0389353/en 9
2.4 Personnel qualification
The assembly, initial commissioning, maintenance, and re-
pair of the module may be performed only by trained spe-
cialist personnel.
The assembly, initial commissioning, maintenance, and re-
pair of the module may be performed only by trained spe-
cialist personnel.
Every person called upon by the operator to work on the
module must have read and understood the complete As-
sembly and Operating Manual, especially chapter 2 "Basic
safety notes". This applies particularly to occasional per-
sonnel such as maintenance personnel.
2.5 Safety-conscious working
Avoid any manner of working that may interfere with the
function and operational safety of the module.
Observe the safety and accident-prevention regulations
valid at the usage site.

Basic safety notes
10 02.01/PW/0389353/en
2.6 Notes on particular risks
Risk of injury from objects falling and being ejected!
Provide protective equipment to prevent objects from
falling or being ejected, such as processed workpieces,
tools, chips, fragments, rejects.
Risk of injury when the machine/system moves
unexpectedly!
Do not move parts by hand when the energy supply is
connected.
Do not reach into the open mechanism or the movement
area of the module.
Remove the energy supplies before installation,
modification, maintenance, or adjustment work.
Perform maintenance, modifications, and additions
outside the danger zone.
For all work, secure the module against accidental
operation.

Warranty
02.01/PW/0389353/en 11
3 Warranty
The warranty is valid for 24 months from the delivery date to
the production facility under the following conditions:
• Observation of the maintenance intervals
(see chapter 10.1, page 39)
• Observation of the ambient conditions and operating conditions (see chapter 2.2, page 7)
Parts touching the workpiece are not part of the warranty.
Also observe our general terms of business.
4 Scope of delivery
The scope of delivery includes:
• Servo-electric rotary pan-tilt actuator Type PW in the
version ordered
• USB to RS232 converter inclusive driver CD
• DVD
Content of DVD:
• MCDemo (configuration and commissioning tool)
• Operating manual in PDF format
• MotionControl software manual in PDF format
Note
The module is delivered without connection cap ASK. It can
be ordered separately as accessory.
Connection cap ASK is necessary for operation.
The following accessories are available for the module:
• Connecting elements (PAM)
• Hybrid cable
• Connection cables
Order accessories separately.
For additional accessories, see catalog.

Accessories
12 02.01/PW/0389353/en
Notes
Older versions require the PowerConfig tool from the DVD
for flashing. If older versions are to be used, contact your
SCHUNK representative.
5 Accessories
5.1 Connecting elements
See catalog for exact type designations of compatible
connecting elements.
/1/ straight /3/ right-angle
/2/ conical /4/ adapter plate
Figure 1
/2/
/3/
/1/
/4/

Technical Data
02.01/PW/0389353/en 13
6 Technical Data
6.1 Basic data
Further technical data can be found in our catalog The most
recent version applies.
Size 70 90
Mass [kg] 1,8 3,4
Noise emission [dB(A)] ≤ 70 ≤ 70
IP rating
(when using DMI-connection cap)
54 54
Ambient temperature [°C]
Min. +5 +5
Max. +55 +55
Rated torque [Nm] 12,0 23,0
Peak torque [Nm] 24,0 46,0
Angle of rotation [°] ±120 ±120
Max. acceleration [°/s²] 960 600
Max. angular velocity [°/s] 240 150
Rated torque [Nm] 2,0 12,0
Peak torque [Nm] 4,0 24,0
Angle of rotation [°] >360 >360
Max. acceleration [°/s²] 1440 960
Max. angular velocity [°/s] 360 240
Rated voltage [V DC] 24 24
Rated current [A] 4 4
Max. current [A] 8 8
X X
X X
Interface
RS232
CAN
PROFIBUS, DP X X
Power supply [V DC] 24 24
Rated current [A] 0,5 0,5
Sensor system Encoder Encoder
Table 5
Mechanical
operating data
Axis 1
Axis 2
Electrical operating
data
Electronic control
unit

Technical Data
14 02.01/PW/0389353/en
6.2 Factory settings / DEFAULT Value
Reference Axis 1 Axis 2
Interface RS232 RS232
Data rate 9600 9600
Module address 13 14
Table 6
6.3 Power supply requirements
Designation Value
Output power supply (motor) 24 V DC
Power supply for logic 24 V DC +10% / -4%;
Residual ripple < 150mVSS;
Switching peak < 240mVSS
Connection value Number of modules x Rated module current x 1,2
Table 7

Description of the module
02.01/PW/0389353/en 15
7 Description of the module
7.1 Structure
/1/ Axis 2 (swivel axis) /4/ Assembly interface for attachments
/2/ Axis 1 (tilt axis) /5/ Connection cap with blind plug M16x1.5
/3/ Base plate with four fixing bores and metric cable fitting for EMC connection
Figure 2 Servo-electric rotary pan-tilt actuator
Note
Only tilt axis (Axis 1) can be controlled via DIO’s.
/2/
/1/
/3/
/4/
/5/

Description of the module
16 02.01/PW/0389353/en
7.2 Functional principle
Figure 3
The actuator (in this case a DC motor per axis) is controlled
by the internal logic. The required parameters are trans-
ferred from the higher level controller (master) to the internal
logic.
The following parameters can be transferred from the con-
troller (master) to the internal logic:
• Current I;
• Velocity v;
• Acceleration a
• Position
Notes
All possible parameters and the relevant features of the
individual bus systems are described in more detail in
the document about the SCHUNK Motion protocol (see
DVD, document: MotionControl.pdf).
Actuator Sensors
Module is moving (Process flow)
Power supply
internal Logic (control unit) / communication interface
Display Operation
User interface / Control (Master)
Environmental interference (H, M, T/°C(°F))

Description of the module
02.01/PW/0389353/en 17
7.3 Connection cap board
Front of board Rear of board
Figure 4
On the front of the board (connection side) are the connect-
ing terminals X1, X2 and X3. The individual jumper connec-
tors (JP1-JP5) for each interface and the motor output
(+UB, -UB) are also located here.
Function of terminals:
• X1 is the main connecting terminal for the module's
communication
• X2 is for the links to other modules
• X3 is for the use of digital inputs and outputs Additional
sensors can be connected here. The assignment of
this terminal is independent of the interfaces .
On the rear of the board (plug-in side to module) are the
socket strips and the jumper connectors for the "BOOT"
and "DEFAULT" functions. (see chapter 8.3.5, page 30)

Assembly and commissioning
18 02.01/PW/0389353/en
8 Assembly and commissioning
8.1 Mechanical Connection
WARNING
Risk of injury when the machine/system moves
unexpectedly!
Switch off energy supply.
The installation position of the module has been de-
signed so that cable wrapping is not possible.
Use suitable connecting elements (adapter plate) to
connect the module in the machine / system.
Observe the permissible length of engagement.
Observe the tightening torque of the screws.
1 - Connecting element (bracket) 3 - Centering sleeves
2 - Fixing screws 4 - PW module
Figure 5 Mounting of the module
The customer must provide the following fixing materials:
Item Fixing material PW 70 PW 90
Base plate Axis 2 Base plate Axis 2
/2/ Permissible screws 4x M4 6x M4 6x M5 4x M5
Table 8 Fixing material (provided by customer)

Assembly and commissioning
02.01/PW/0389353/en 19
8.2 Example of mounting
/1/ Servo-electric swivel unit (PR)
/2/ Servo-electric swivel unit (PW)
/3/ Force/torque sensor (FCT)
/4/ Servo-electric 2-finger parallel gripper (PG)
/5/ Connection elements (PAM, adapter plate)
Figure 6
8.3 Electrical connection
Notes
The cable color throughout this chapter relates to the use of
a SCHUNK connecting cable.
NOTICE
Damage of electronics is possible!
In case of a high payload, dynamic energy may build up.
The customer has to take care that the dynamic energy
will be discharged.
We recommend to use our brake chopper
(Type: ACC3EA001 Id-No. 9951 504)
/1/
/2/
/3/
/4/
/5/

Assembly and commissioning
20 02.01/PW/0389353/en
8.3.1 EMV-fitting
WARNING
Risk of injury when the machine/system moves
unexpectedly!
Switch off energy supply.
NOTICE
Damage to board if screws are too tight!
Only fix the screws in place on the board.
Notes
Observe the maximum electrical energy values.
(see chapter 6, page 13)
1 Connection cap (ASK) 10 Metric cable fitting M16 (EMC)
2 Board /1/ Connection cap screws (4x M4x35mm)
7 Screws for board /2/ Blind plug M16
Figure 7
/2/
/1/

Assembly and commissioning
02.01/PW/0389353/en 21
The module is delivered without connection cap ASK. It can
be ordered separately as accessory.
Connection cap ASK is necessary for operation.
(for item, see Figure 7, page 20)
1. Loosen the screws (/1/) for the connection cap (1) with a
hexagon socket wrench (size 3).
2. Detach the connection cap (1) from the module.
3. Carefully unscrew the screws (7) for the board (2) with
a hexagon socket wrench (size 2.5).
4. Carefully remove the board (2) from the connection cap
(1) and place it safely to one side.
5. Unscrew the blind plug (/2/) to achieve an optimum
connecting cable position.
6. Pull the connecting cable through the metric cable
fitting (10).
7. Strip approximately 50mm from the connecting cable.
8. Strip around 5 mm of the individual wires, sufficient for
the terminals.
9. Push the outer connecting cable shielding back over the
cable sheath.
10. Fix the shielding in place with shrink hose in such a way
that the shielding remains visible at the end of the
sheath. (see Figure 8, page 22)
11. Pull the connecting cable through the connection cap
(1) and connect the board (2) according to the required
interface. (see chapter 8.3.2, page 23)
12. Pull the metric cable fitting (10) over the shrink hose
so that the individual wires are still visible.
(see Figure 8, page 22)
13. Screw metric cable fitting (10) onto connection cap (1).
14. Carefully slide the board (2) back into the connection
cap (1).
15. Carefully tighten the screws (7) on the board (2).
EMC fitting

Assembly and commissioning
22 02.01/PW/0389353/en
16. Replace the connection cap (1) on the module and
tighten the screws (/1/) to a maximum of 3 Nm.
Figure 8 EMC fitting
Connecting cable
EMC fitting
Outer shielding
Wire strands
Shrink hose

Assembly and commissioning
02.01/PW/0389353/en 23
8.3.2 RS232 interface
The communication interface RS232 can’t be used as a field
bus system because of its properties.
The RS232 interface should be only used as a
parameterization interface.
Figure 9 RS232 circuit diagram
The module is the last
bus subscriber in the sys-
tem:
Set jumper board
(enclosed pack) as
termination.

Assembly and commissioning
24 02.01/PW/0389353/en
Figure 10 Connection board: Terminal strip X1 and connection to 9-pin SUB D socket
Connection Terminal SCHUNK cable color
RS232 interface Tx brown
Rx white
GND (Rx/Tx) black (from Rx/Tx)
Logic connection 24V red 0,25 mm²
GND blue 0,25 mm²
Output power supply +UB red 2,5 mm²
-UB blue 2,5 mm²
Table 9 RS232 connection: Assignment of terminal strip X1
Figure 11 Combining module n with module n+1
When combining several modules, the signals from module
n are looped through to module n+1. The wires from termi-
nal X2 on module n are connected to terminal X1 on module
n+1.
Combining several
modules
Solder side 9-pin SUB D socket

Assembly and commissioning
02.01/PW/0389353/en 25
8.3.3 CAN interface
Figure 12 CAN circuit diagram
The module is the last
bus subscriber in the sys-
tem:
Set jumper board
(enclosed pack) as
termination.

Assembly and commissioning
26 02.01/PW/0389353/en
Figure 13 Connection board: Terminal strip X1 and jumper board for termination
Connection Terminal SCHUNK cable color
CAN interface Bus_H yellow
Bus_L green
PE shield
Logic connection 24V brown 0,25 mm²
GND white 0,25 mm²
Output power supply +UB red 2,5 mm²
-UB blue 2,5 mm²
Table. 10 CAN connection Assignment of terminal strip X1
Connection Terminal SCHUNK cable color
CAN interface Bus_H white
Bus_L red
PE shield
Logic connection 24V red 0,25 mm²
GND blue 0,25 mm²
Output power supply +UB red 2,5 mm²
-UB blue 2,5 mm²
Table 11 CAN connection Assignment of terminal strip X1
SUB D socket solder side Pin Terminal
2 Bus_L
7 Bus_H
Table 12 CAN assignment of 9-pin SUB D socket
Until 2010-12
From 2011-01

Assembly and commissioning
02.01/PW/0389353/en 27
Figure 14 Combining module n with module n+1
When combining several modules, the signals from module
n are looped through to module n+1. The wires from termi-
nal X2 on module n are connected to terminal X1 on module
n+1.
Combining several
modules

Assembly and commissioning
28 02.01/PW/0389353/en
8.3.4 Interface PROFIBUS DP
Figure 15 PROFIBUS DP circruit diagram
The module is the last
bus subscriber in the
system:
Set jumper board
(enclosed pack) as
termination.
Assembly and commissioning
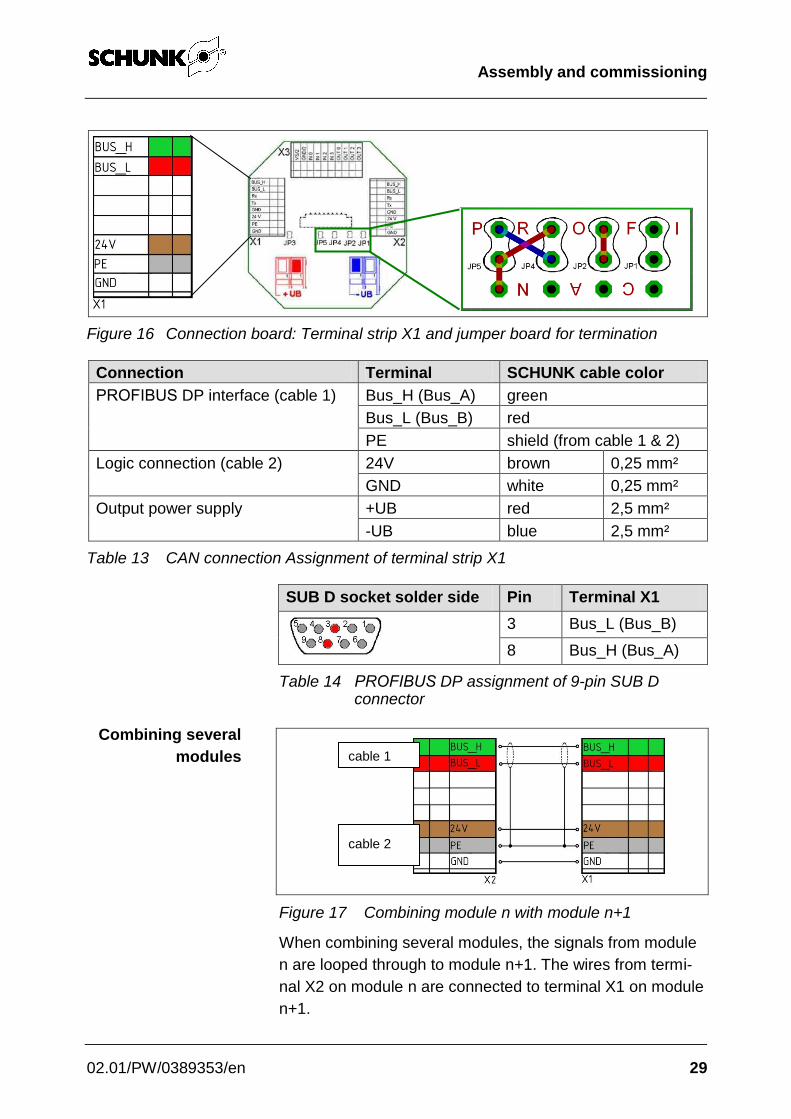
02.01/PW/0389353/en 29
Figure 16 Connection board: Terminal strip X1 and jumper board for termination
Connection Terminal SCHUNK cable color
PROFIBUS DP interface (cable 1) Bus_H (Bus_A) green
Bus_L (Bus_B) red
PE shield (from cable 1 & 2)
Logic connection (cable 2) 24V brown 0,25 mm²
GND white 0,25 mm²
Output power supply +UB red 2,5 mm²
-UB blue 2,5 mm²
Table 13 CAN connection Assignment of terminal strip X1
SUB D socket solder side Pin Terminal X1
3 Bus_L (Bus_B)
8 Bus_H (Bus_A)
Table 14 PROFIBUS DP assignment of 9-pin SUB D connector
Figure 17 Combining module n with module n+1
When combining several modules, the signals from module
n are looped through to module n+1. The wires from termi-
nal X2 on module n are connected to terminal X1 on module
n+1.
Combining several
modules cable 1
cable 2

Assembly and commissioning
30 02.01/PW/0389353/en
8.3.5 DEFAULT and BOOT function
Figure 18 Connection board: Rear
The module can be reset to the factory settings using the
DEFAULT function:
1. Turn off the power supply.
2. Unscrew the four screws (M4 x 35mm) for the
connection cap using a hexagon socket wrench (size 3).
3. Detach the connection cap from the module.
4. Place the jumper (enclosed pack) at the DEFAULT
connector on the connection board.
5. Reconnect the connection cap to the module.
6. Turn on the power supply for around 10 seconds.
7. Turn off the power supply and detach the connection
cap from the module.
8. Disconnect the jumper from the DEFAULT connector.
9. Reconnect the connection cap to the module.
10. Tighten the connection cap screws uniformly.
The module is now set to the DEFAULT values.
(see chapter 6.2, page 14)
Setting the module
to factory settings

Assembly and commissioning
02.01/PW/0389353/en 31
Applicable for firmware 1.3.x till 15.04.2010:
New firmware can be loaded to the module using the BOOT
function:
RS232 communication interface is connected and active.
(see chapter 8.3.2, page 23)
1. Turn off the power supply.
2. Unscrew the four screws (M4 x 35mm) for the
connection cap using a hexagon socket wrench (size 3).
3. Detach the connection cap from the module.
4. Place the jumper (enclosed pack) at the BOOT
connector on the connection board.
5. Reconnect the connection cap to the module.
6. Turn on the power supply again.
7. The module is in BOOT mode. New firmware is
transferred to the module using the MCDemo tool
(see MotionControl.pdf)
8. Turn off the power supply.
9. Detach the connection cap from the module.
10. Disconnect the jumper from the BOOT connector.
11. Reconnect the connection cap to the module.
12. Tighten the connection cap screws uniformly.
Notes
For further information, refer to the MotionControl.pdf
document on the DVD supplied.
Applicable for firmware 1.4.x from 16.04.2010:
Module can be overwritten with a new firmware by the func-
tion „Modul“ – „Firmware update“ of the software MCDEMO
(included on the provided CD).
Note
Versions of software and firmware need to be.adapted to
each other.
Loading new
firmware to the
module

Assembly and commissioning
32 02.01/PW/0389353/en
8.4 System integration
8.4.1 System structure
Figure 19
The data is transferred in INTEL Format (Little Endian For-
mat).
Notes
The number of modules connected depends on the bus
used. A maximum of 255 IDs can be assigned (see DVD,
Document: MotionControl.pdf).
8.4.2 SCHUNK Motion protocol
Figure 20
The data frame of the Motion protocol always includes the
following elements:
• D-Len (1-byte)
• Command Code (1 byte)
D-Len (Data Length) specifies the number of subsequent
items of user data including the command byte. The data
Data format
Control system (Master)
PLC / PC
Module 1 Module 2 Module 3 (...)
field bus

Assembly and commissioning
02.01/PW/0389353/en 33
frame consists of one byte, therefore a Motion protocol
message can transfer a maximum of 255 data bytes.
The D-Len byte is always followed by the command code,
consisting of one byte. If necessary, the command code is
followed by the relevant parameters required. If required, a
"master command" can be extended with a "sub-command".
All commands sent are immediately confirmed by the mod-
ule with a response (acknowledge). This response also
uses the data frame described above (D-Len, command
code, any parameters). If the request has been successfully
processed, D-Len always has a value that is not equal to
"0x02". If the request failed, D-Len has the value "0x02".
Notes
The special features of the different bus systems are de-
scribed in MotionControl.pdf (see DVD, Document: Motion-
Control.pdf).
8.4.3 Most important commands
DANGER
Risk of injury when the machine/system moves
unexpectedly due to incorrect programming!
Only specialist personnel or specially trained staff
should carry out settings and enter parameters.
Notes
In all examples, only the necessary parameters are listed,
not the optional parameters. In the examples, "M" stands
for master and "S" for slave (= module).

Assembly and commissioning
34 02.01/PW/0389353/en
Command Code: 0x92
Description: A referencing is executed.
Parameters (Master Slave): None.
Response (Slave Master): "OK" (0x4F4B) if successful.
The module executes the command.
Miscellaneous: Spontaneous response possible.
D-Len Cmd Param Meaning
M S 0x01 0x92
S M 0x03 0x92 0x4F 0x4B Successfully referenced
Table 15 Example for REFERENCE
Command Code: 0xB0
Description: Moves the module to a specified position.
Parameters (Master Slave):
• Position in configured unit system (must be specified)
• Velocity (optional)
• Acceleration (optional)
• Current (optional)
• Jerk (optional)
Response (Slave Master): If possible, the time that the
module needs for the movement is returned.
Miscellaneous: Spontaneous response when position
reached or in case of prior termination of positioning.
D-Len Cmd Param Meaning
M S 0x05 0xB0 0x00 0x00 0x20 0x41 Move to position 10.0[mm]
S M 0x05 0xB0 0xCD 0xCC 0x04 0x41 Will reach position in 8.3[sec]
Table 16 Example for MOVE POS
Referencing
Positioning

Assembly and commissioning
02.01/PW/0389353/en 35
Command Code: 0xB3
Beschreibung: A current move is executed.
Parameters (Master Slave):
Current in configured unit system (must be specified).
Response (Slave Master): "OK" (0x4F4B) if successful.
The module executes the command.
Miscellaneous: Spontaneous message is possible.
D-Len Cmd Param Meaning
M S 0x05 0xB3 0x00 0x00 0x60 0x40 Execute current move with 3.5[A]
S M 0x05 0xB3 0x4F 0x4B
Table 17 Example for MOVE CUR
Command Code: 0xB5
Description: A velocity move is executed.
Parameters (Master Slave):
• Velocity in configured unit system (must be specified)
• Current (optional)
Response (Slave Master): "OK" (0x4F4B) if successful.
The module executes the command.
Miscellaneous: Spontaneous message is possible if the
module is no longer moving.
D-Len Cmd Param Meaning
M S 0x05 0xB5 0x9A 0x99 0x31 0x41 Execute velocity move with
11.1[mm/s]
S M 0x05 0xB5 0x4F 0x4B
Table 18 Example for MOVE VEL
Current move
Velocity move

Assembly and commissioning
36 02.01/PW/0389353/en
Command Code: 0x91
Description: The module is braked and stopped in the cur-
rent position.
Parameters (Master Slave): None.
Response (Slave Master): "OK" (0x4F4B) if successful.
Miscellaneous: Spontaneous message is possible.
D-Len Cmd Param Meaning
M S 0x01 0x91
S M 0x03 0xB5 0x4F 0x4B OK
Table 19 Example for CMD STOP
Command Code: 0x90
Description: The module is stopped as quickly as possible.
If a brake is fitted and appropriately configured, it is acti-
vated immediately. The motor phases are short circuited.
Parameters (Master Slave): None.
Response (Slave Master): Error message "ERROR
EMERGENCY STOP" is triggered.
Miscellaneous: Can only be reset by "CMD ACK".
D-Len Cmd Param Meaning
M S 0x01 0x90
S M 0x03 0x88 0xD9 Emergency stop executed
Table 20 Example for CMD EMERGENCY STOP
Stop module
Emergency stop

Assembly and commissioning
02.01/PW/0389353/en 37
Command Code: 0x8B
Description: Acknowledgement of an error message.
Parameters (Master Slave): None.
Response (Slave Master): "OK" (0x4F4B)
Miscellaneous: When all errors have been successfully
acknowledged, after sending "OK" (0x4F4B), an info mes-
sage "INFO NO ERROR" is also sent.
D-Len Cmd Param Meaning
M S 0x01 0x8B
S M 0x03 0x8B 0x4F 0x4B OK
Table 21 Example for CMD ACK
Notes
For further information, refer to the MotionControl.pdf
document on the DVD supplied.
Acknowledge error

Troubleshooting
38 02.01/PW/0389353/en
9 Troubleshooting
9.1 Module does not move
Possible causes Remedial measures
Communication with the module is
not possible
Check bus connection
(see chapter 8.3, page 19)
Table 22
9.2 The module is sluggish or jerky
Possible causes Remedial measures
Dirt deposits in the cavities Clean the module
(see chapter 10.1, Page 39)
Table 23
9.3 The module's motor is not turning
Possible causes Remedial measures
No voltage connected Check the power supply
Insufficient voltage Check the power supply requirements.
(see chapter 6.3, Page 14)
Table 24
9.4 Module stops abruptly
(This can be reported by the module using the
ERROR_CABLE_BREAK (0x76) parameter if the GSD file
supplied has been integrated.)
Possible causes Remedial measures
Bus cable fault (connection to module
broken)
Check bus cable for damage and replace if
necessary.
For more troubleshooting, see
MotionControl.pdf.
Table 25

Maintenance and care
02.01/PW/0389353/en 39
10 Maintenance and care
10.1 Maintenance intervals
WARNING
Risk of injury when the machine/system moves
unexpectedly!
Switch off energy supply.
Size 70 90
Interval [Mio. Cycles] 2 2
Table 26
The module complies with protection class IP 54 with
mounted connection cap DMI.
Clean the module dry, remove all coarse dirt and chips
from the cavities on the module.
Check for damage and replace the module if necessary.
Any repair work on the module may only be carried out by
SCHUNK.
Call the service hotline or your SCHUNK contact
Send the module to SCHUNK with a repair request.
10.2 Dismantling the module
The module may only be dismantled by SCHUNK as other-
wise the mechanism or internal electronics may be dam-
aged.

EC declaration of incorporation
40 02.01/PW/0389353/en
11 EC declaration of incorporation
In terms of the EC Machinery Directive 2006/42/EC, annex II B
Manufacturer/
distributor
SCHUNK GmbH & Co. KG.
Spann- und Greiftechnik
Bahnhofstr. 106 – 134
74348 Lauffen/Neckar, Germany
We hereby declare that the following product:
Product designation Servo-electric rotary pan-tilt actuator
Type designation: PW 70, 90, 90-B2
ID number: 0307340, 307342, 0306618
meets the applicable basic requirements of the Directive Machinery (2006/42/EC).
The incomplete machine may not be put into operation until conformity of the machine into
which the incomplete machine is to be installed with the provisions of the Machinery Directive
(2006/42/EC) is confirmed.
Applied harmonized standards, especially:
EN ISO 12100-1 Safety of machines - Basic concepts, general principles for design --
Part 1: Basic terminology, methodology
EN ISO 12100-2 Safety of machines - Basic concepts, general principles for design --
Part 2: Technical principles
The manufacturer agrees to forward on demand the special technical documents for the in-
complete machine to state offices.
The special technical documents according to Annex VII, Part B, belonging to the incomplete
machine have been created.
Person responsible for documentation:
Mr. Uwe Heinz. Address: see manufacturers address
Location, date/signature: Lauffen, Germany, January 2011 ppa.
Title of the signatory Director for Development