securitycenter 4.0 upgrade guide -...
TRANSCRIPT

SecurityCenter 4.0
Upgrade Guide
January 14, 2011
(Revision 10)
The newest version of this document is available at the following URL:
http://cgi.tenable.com/SecurityCenter_4.0_Upgrade.pdf

Copyright 2004-2011, Tenable Network Security, Inc. 2
Table of Contents
TABLE OF CONTENTS .............................................................................................. 2
INTRODUCTION...................................................................................................... 3
SOFTWARE REQUIREMENTS ................................................................................... 4
SUPPORTED OPERATING SYSTEMS ..................................................................................... 4 DEPENDENCIES ........................................................................................................... 4
Third-Party Packages ............................................................................................ 4 Tenable Applications ............................................................................................. 5
LICENSING ................................................................................................................ 5
CHANGES IN SECURITYCENTER 4 ........................................................................... 6
NEW FEATURES .......................................................................................................... 6 UPGRADE WIZARD ....................................................................................................... 6
UPGRADING SECURITYCENTER .............................................................................. 7
RUN THE RPM UPGRADE................................................................................................ 7 LAUNCH THE UPGRADE WIZARD ....................................................................................... 9
Introduction ....................................................................................................... 10 License Upload ................................................................................................... 10 Organization & Users .......................................................................................... 12 Nessus Scanners ................................................................................................ 13 Zones................................................................................................................ 13 Repositories ....................................................................................................... 14 Passive Scanners ................................................................................................ 14 Log Correlation Engine ........................................................................................ 15 SMTP Settings .................................................................................................... 15 LDAP Settings .................................................................................................... 16 Assets ............................................................................................................... 16 Policies .............................................................................................................. 16 Credentials ........................................................................................................ 17 Queries ............................................................................................................. 17 Complete ........................................................................................................... 17
UPGRADING FROM THE LCE MANAGER TO SECURITYCENTER ............................... 18
REMOVAL AND BACK OUT ..................................................................................... 19
REMOVING SECURITYCENTER 4 SOFTWARE ........................................................................ 19 REMOVING SECURITY CENTER 3 SOFTWARE ....................................................................... 20 REVERTING FROM SECURITYCENTER 4 TO SECURITY CENTER 3 ................................................. 20
ABOUT TENABLE NETWORK SECURITY ................................................................. 21
APPENDIX 1: OBJECT CONVERSION ..................................................................... 22
NESSUS SCAN RESULTS .............................................................................................. 22 REPOSITORY SNAPSHOTS ............................................................................................. 22

Copyright 2004-2011, Tenable Network Security, Inc. 3
Introduction
This document describes the process of upgrading from Tenable Network Security’s
SecurityCenter product with an emphasis on upgrading from 3.4.x to SecurityCenter 4.
Hardware and software requirements as well as detailed step-by-step instructions are
included along with important notes and warnings to help ensure the success of the upgrade
to SecurityCenter 4.
Since many of Tenable’s customers have requirements to maintain separation of duties, the
SecurityCenter 4.0 documentation has been separated into the following documents to
better organize the material based on the organizational role. Note that there may be some
overlap in roles as well as content provided with each of the following guides:
SecurityCenter 4.0 Architecture – This document describes the SecurityCenter
architecture and provides a high-level view of how the components interact. This
document is beneficial for those who are considering purchasing SecurityCenter.
SecurityCenter 4.0 Installation Guide – This document provides instructions for
the installation of SecurityCenter 4 and LCE manager. The target audience for this
document is system administrators who need to install the SecurityCenter
application. Included in this document are quick instructions for the admin user to
add a Nessus scanner and create a user account to launch a test scan to ensure
SecurityCenter is correctly installed.
SecurityCenter 4.0 Upgrade Guide – This document describes the process of
upgrading to the latest version of SecurityCenter 4.
SecurityCenter 4.0 Administration Guide – This document provides instructions
for the administration of SecurityCenter and LCE manager by the admin user. The
admin user is the first user to log into the SecurityCenter after the initial installation
and is responsible for configuration tasks such as defining organizations,
repositories, Nessus scanners, LCE servers and PVS sensors. The admin user does
not have the ability to create and launch Nessus scans.
SecurityCenter 4.0 User Guide – This document provides instructions for using
SecurityCenter and LCE manager from an Organization Head user or lesser account.
Please share your comments and suggestions with us by emailing them to
Users are strongly encouraged to read this entire document before upgrading and utilize the
steps provided to ensure deployment success.
A basic understanding of Linux/Unix, Windows, computer hardware and vulnerability
scanning with Nessus is assumed.
Standards and Conventions
Throughout the documentation, filenames, daemons and executables are indicated with a courier bold font such as gunzip, httpd and /etc/passwd.
Command line options and keywords are also indicated with the courier bold font.
Command line options may or may not include the command line prompt and output text
from the results of the command. Often, the command being run will be boldfaced to indicate what the user typed. Below is an example running of the Unix pwd command:
Copyright 2004-2011, Tenable Network Security, Inc. 4
# pwd
/opt/sc3/daemons
#
Important notes and considerations are highlighted with this symbol and grey text
boxes.
Tips, examples and best practices are highlighted with this symbol and blue text
boxes.
Software Requirements
Supported Operating Systems
SecurityCenter 4 is available for Red Hat Enterprise Server 4 (32-bit only), 5 and CentOS
5.3 (32/64-bit).
Dependencies
Third-Party Packages
The following programs must be installed on the system prior to installing the
SecurityCenter / LCE manager package:
java-1.6.0-openjdk.i386
openssh-4.3p2-29.el5
sharutils-4.6.1-2
expat-1.95.8-8.2.1
perl-5.8.8-18.el5_3.1
gdbm-1.8.0-26.2.1
libtool-1.5.22-6.1
libtool-ltdl-1.5.22-6.1
libxml2-2.6.26-2.1.2.7
ncurses-5.5-24.20060715
readline-5.1-1.1
Either the Sun Java JRE or OpenJDK along with their accompanying dependencies
must be installed on the system hosting the SecurityCenter for SecurityCenter 4.x
reporting to function properly.
Although it is possible to force the installation without all required dependencies, if
your version of Red Hat or CentOS is missing certain dependencies, this will cause
problems with a wide variety of functions that are not readily apparent. Tenable’s
Support team has observed different types of failure modes for SecurityCenter
when dependencies to the installation RPM are missing. If you require assistance
or guidance in obtaining these dependencies, please contact our Support team at

Copyright 2004-2011, Tenable Network Security, Inc. 5
compat-libstdc++-33-3.2.3-61
libxslt-1.1.17-2.el5_2.2
Please note that the versions listed above were the most recent at the time of this
writing. Always use the latest stable production version of each package.
To determine which version is on your system, run the following command for each of the
packages (replace “sharutils” with the appropriate package):
# rpm –qa | grep sharutils
If one of the prerequisite packages is missing, it can be installed using the “yum” or “rpm”
package managers. For example, install Java with “yum” using the command below:
# yum -y install java-1.6.0-openjdk.i386
Tenable Applications
If you are running Tenable’s Log Correlation Engine (LCE), please note that LCE 3.4.1 is
required to work with SecurityCenter 4. LCE 3.6 is recommended however, because the
SecurityCenter requires this version for some functionality, such as Asset Summary reports,
to function properly.
To upgrade to SecurityCenter 4, you must be running Security Center 3.4 or greater. If you
are running an older release of Security Center, please upgrade to Security Center 3.4
before upgrading to SecurityCenter4.
Table 1 – SecurityCenter 4 Product Compatibility
Product Version
Nessus 4.x
LCE 3.4.1 (3.6
recommended)
PVS 3.0
SecurityCenter (remote/offline repository) 4.x
Table 2 – LCE Manager Product Compatibility
Product Version
LCE 3.4.1 (3.6
recommended)
Licensing

Copyright 2004-2011, Tenable Network Security, Inc. 6
A new license key is required to complete the process of upgrading from Security Center 3
to SecurityCenter 4. The Nessus Activation Code from the SecurityCenter 3 system will be
transferred during the upgrade. Please contact Tenable Support ([email protected]) or
Licensing ([email protected]) to obtain the new key and Activation Code.
Changes in SecurityCenter 4
This section provides an overview of some of the new features and changes that are of
particular interest to current Security Center 3 customers. For more details on these
features and changes, please refer to the appropriate SecurityCenter 4 document as
described in the Introduction.
New Features
Repositories
Customizable roles
Remote/Offline repositories
Customizable dashboard
Watchlists
Improved Reporting Interface (drag and drop)
Object-based credential management
FLEX user interface and navigation
Contextual online help and tooltips
LCE IDS event processing
Tighter integration with Nessus policies and features
Upgrade Wizard
The Upgrade Wizard converts an existing Security Center 3.4 installation to SecurityCenter
4. It is necessary to use the Upgrade Wizard since there have been changes in file layout
and user management as follows:
File Layout
Security Center 3.4 – installed base resides in /opt/sc3
SecurityCenter 4 – installed base resides in /opt/sc4
User Management
When upgrading from SC 3.4.x to SC 4.x, only the primary admin account is
retained. Additional administrator accounts must be recreated.
Security Center 3.4 SecurityCenter 4
Customer Organization
Primary Security Manager Organization Head
Security Manager Manager

Copyright 2004-2011, Tenable Network Security, Inc. 7
End User End User
SecurityCenter 4 provides more granular role definitions and the ability to assign
repositories. During the upgrade process, the Upgrade Wizard provides the opportunity to
edit settings before they are converted.
Upgrading causes all organizational users to be transferred under the management
of the Organization Head user by default. Users can be transferred under the
management of another user during the upgrade process if desired.
The following items are not migrated during the upgrade. Items that can be recreated must
be done so post-upgrade:
Since only custom scan policies are migrated over during upgrade (i.e., the built-in
scan policies like “Operating System Identification” are not migrated over), any
scans that are migrated over that were using any of these built-in scan policies will
have a status of “Disabled”. The user must edit these scans and select a new scan
policy in order to re-enable the scan.
Custom reports
One-time and dependent Nessus scans
Individual scan results (See Appendix 1)
Vulnerability trend snapshots (See Appendix 1)
Raw log searches
IDS events (new IDS events will be stored on the LCE)
Upgrading SecurityCenter
To perform an upgrade, download the new RPM to your running SecurityCenter server from
the Tenable Support Portal. Within the SecurityCenter, wait for any in-progress scans to
finish or manually pause them (scans are held in a state where they can be resumed at any
point). Then, upgrade the SecurityCenter using a command similar to the following:
# rpm –Uvh SecurityCenter-4.x.x-es5.i386.rpm
Run the RPM Upgrade
SecurityCenter 4 upgrades require that the SecurityCenter currently be running
version 3.4 or greater.
If the Sun Java JRE or OpenJDK is not installed, the following warning is displayed:
[WARNING] SecurityCenter has detected that Sun Java JRE or OpenJDK is
not installed. One of these must be installed for SC4.X reporting to
function properly.
Install the latest version of either of these software packages before running any
reports.

Copyright 2004-2011, Tenable Network Security, Inc. 8
Prior to upgrading, it is recommended that the “/opt/sc3” directory be backed up
to a separate location. The command to create the backup is:
# tar -Pzcf sc3_backup.tar.gz /opt/sc3
After running this backup command, move the sc3_backup.tar.gz file to a
different location.
The SecurityCenter processes do not need to be stopped manually prior to the
upgrade, however, if any jobs are currently running on the SecurityCenter (e.g.
Nessus scans), the following message is displayed along with the related process
names and their PIDs:
“SecurityCenter has determined that the following jobs are still
running. Please wait a few minutes before performing the upgrade
again. This will allow the running jobs to complete their tasks”
Either stop the processes manually or try the upgrade again after the jobs
complete.
During the upgrade process, SecurityCenter will produce the log file /tmp/sc4.install.log. This file is important for debugging purposes and should
not be removed. Once the upgrade process is complete, the file will be moved to /opt/sc4/admin/logs/install.log.
To upgrade from Security Center 3.4.x to SecurityCenter 4, use rpm with the “-Uvh”
switches from the command-line of the SecurityCenter server. Use “sudo -i” when
performing sudo upgrades of SecurityCenter to ensure the proper use of environmental
variables. Output similar to the following is generated:
# rpm -Uvh SecurityCenter-4.0-es5.i386.rpm
Preparing... ###########################################
[100%]
1:SecurityCenter warning: /opt/sc4/application.db created as
/opt/sc4/application.db.rpmnew
warning: /opt/sc4/jobqueue.db created as /opt/sc4/jobqueue.db.rpmnew
########################################### [100%]
Installing Nessus plugins ... complete
Applying database updates ... complete.
By default, SecurityCenter will listen for HTTP/HTTPS requests on ALL
available interfaces. To complete your installation, please point your
web browser to one of the following URL(s):
https://x.x.x.x/sc4
log in as admin/password, change your password and configure SecurityCenter
using the administrative web interface.
Stopping SecurityCenter daemons
Copyright 2004-2011, Tenable Network Security, Inc. 9
Starting SecurityCenter daemons
SecurityCenter daemons started successfully
#
The warning messages in this output are informational only and indicate that RPM is saving the packaged databases with .rpmnew extensions to not overwrite the
current databases.
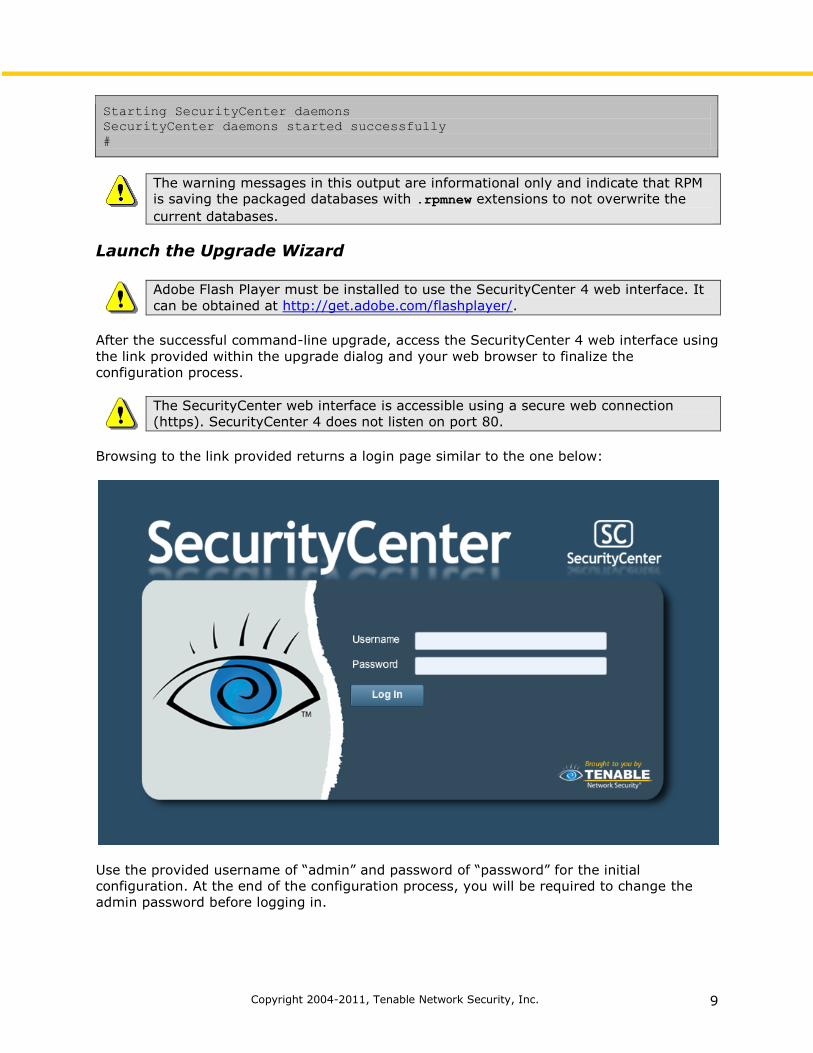
Launch the Upgrade Wizard
Adobe Flash Player must be installed to use the SecurityCenter 4 web interface. It
can be obtained at http://get.adobe.com/flashplayer/.
After the successful command-line upgrade, access the SecurityCenter 4 web interface using
the link provided within the upgrade dialog and your web browser to finalize the
configuration process.
The SecurityCenter web interface is accessible using a secure web connection
(https). SecurityCenter 4 does not listen on port 80.
Browsing to the link provided returns a login page similar to the one below:
Use the provided username of “admin” and password of “password” for the initial
configuration. At the end of the configuration process, you will be required to change the
admin password before logging in.

Copyright 2004-2011, Tenable Network Security, Inc. 10
Introduction
The browser configuration steps consist of tab items displayed on the left-hand side of the
SecurityCenter Upgrade screen displayed below, starting with the Introduction tab:
Each tab item must be completed before moving on to the next. If you need to go back to a
previous tab item, just click on the “Previous” button. At the Introduction screen click on
“Next” to perform the license upload process.
License Upload
SecurityCenter 4 upgrades require a new license key for upgrades. Please contact
Tenable Support ([email protected]) or Licensing ([email protected]) to
obtain the new key or if any errors occur when entering the license key.
To upload a new license key, click on “Browse” to obtain the license key file from your local
system. The format of the key file name is:
tenable-sc4-<#>-<#>.key
An example of the License Upload screen is shown below:

Copyright 2004-2011, Tenable Network Security, Inc. 11
After uploading the license, the page indicates a valid license:
If an invalid license is uploaded, the Upload Wizard will display an error message in red and
prompt again to upload a valid license key file.
Once a valid license has been uploaded and “Next” has been clicked, a user can
not return to this page. Other configuration steps after this one do contain “Back”
buttons and allow the user to return to previous screens.
After uploading a valid license key and confirming the Nessus Activation Code, click on
“Next” to continue.

Copyright 2004-2011, Tenable Network Security, Inc. 12
Organization & Users
Upgrading causes all organizational users to be transferred under the management
of the Organization Head user by default. Users can be transferred under the
management of another user during the upgrade process if desired.
The Organization & Users tab provides the ability to create/edit the Organization and
Organization Head details, previously referred to as the “Customer” and “Primary Security
Manager”. The Upgrade Wizard will automatically convert your existing Customers, Primary
Security Managers and Users to the new format.
If there are users below the organization head you may drag and drop them to rearrange
the hierarchy. The Organization Head cannot be deleted or moved.
Please see the SecurityCenter 4 Administration and User Guides for further details related to
these roles.
In the screen capture above, the Organization name can be modified by clicking on the
“Update Name” command button to the right of the Organization Name. The Organization
Head user can be modified by clicking on the edit icon in the upper right-hand corner of the
user information block.

Copyright 2004-2011, Tenable Network Security, Inc. 13
In addition to the edit ability, a “Zoom” tool is available to adjust the size of the user icon.
Drag the slider up or down depending on the desired size. Once the Organization and
Organization Head details have been edited and confirmed, click on “Next” to continue.
Nessus Scanners
The Nessus Scanners tab provides the option to edit or remove existing Nessus
scanner(s). To do so, highlight the scanner and click on “Edit”. A dialog similar to the screen
capture below is displayed:
Once the changes are complete, save them and then click on “Next” to continue.
Zones
This tab provides the option to edit/delete scan zone settings. A listing of current zones and
the number of scanners associated with each zone is displayed.

Copyright 2004-2011, Tenable Network Security, Inc. 14
To ensure that your Organization(s) have the necessary scanner access, click on “Edit” to
confirm the current settings. If no changes are desired, click on “Next” to continue.
Repositories
The Repositories tab provides the option to edit the existing “Repositories” and assign
associations between the existing Repositories and Customers.
Add or remove an association by clicking on the “Organizations” block. This toggles the line
that illustrates the association between the two entities. Note that an association has not
yet been created between the repository and organization in the screen capture above.
Editing the repository is as simple as clicking on the dropdown at the top of the screen to
select the desired repository and clicking on “Edit”.
If more than one repository exists, multiple repositories can be assigned to a
single organization as needed. In the same way, multiple organizations can share
a single repository if desired.
Here the name, description and IP ranges for the repository can be changed. Once the
changes have been made, click on “Next” to continue on to the “Passive Scanners” tab.
Passive Scanners
The Passive Scanners tab provides the ability to view or edit Passive Vulnerability
Scanners (PVS) and assign them to repositories. Repository assignment ensures that the
vulnerability data discovered by the PVS device is stored in the assigned repository.
It is important that at least one repository be assigned for each available Passive
Scanner. Confirm in the Passive Scanners screen that the “# of Repositories”
setting is the desired value.

Copyright 2004-2011, Tenable Network Security, Inc. 15
Once all Passive Scanner changes are completed, click on “Next” to continue.
Log Correlation Engine
The Log Correlation Engine tab provides the ability to view or edit Log Correlation Engine
(LCE) settings. Of particular interest is the ability to assign Organization access to the LCE.
If more than one Organization or LCE exists, it is important to confirm that the appropriate
organization access is assigned to the desired LCE. Click on “Next” to continue.
SMTP Settings
The SMTP Settings tab provides the ability to view, enter or edit email server settings used
to send alerts, reports and notifications and also perform other email-based functions.
After entering the required fields, click on “Check Email Configuration” to confirm that
the email settings are correct. Click on “Next” to continue.

Copyright 2004-2011, Tenable Network Security, Inc. 16
LDAP Settings
The LDAP Settings tab provides the ability to utilize an external LDAP repository for
SecurityCenter 4 logins. Consult your system administrator for the correct LDAP server
settings.
Once all required fields have been completed, click on “Test LDAP Configuration” to
confirm. Click on “Next” to continue.
Assets
The Assets tab displays the assets, if any, that will be ported from Security Center 3 to 4.
Click on the “Organization” dropdown to see the assets for each organizational unit or
application. No changes are performed on this page. Review the items to be ported and click
on “Next” to continue. An example of the Assets screen is shown below:
Policies
The Policies tab displays the policies, if any, that will be ported from Security Center 3 to
SecurityCenter 4. Click on the “Organization/Application” dropdown to see the policies
for each organizational unit or application. No changes are performed on this page. Review
the items to be upgraded and click on “Next” to continue. An example of the Policies screen
is shown below:

Copyright 2004-2011, Tenable Network Security, Inc. 17
Credentials
The Credentials tab displays credentials, if any, that will be ported from Security Center 3
to SecurityCenter 4. Click on the “Organization/Application” dropdown to see the
credentials for each organizational unit or application. No changes are performed on this
page. Review the items to be upgraded and click on “Next” to continue.
Queries
The Queries tab displays the queries, if any, that will be ported from Security Center 3 to
SecurityCenter 4. Click on the “Organization” dropdown to see the queries for each
organizational unit or application. No changes are performed on this page. Review the items
to be upgraded and click on “Next” to continue.
Complete
At this stage, all configuration has been completed and a page is displayed with a progress
meter and grayed out “Finish” button.
Do not reload the browser window or change to a new screen until the database
conversion process is complete.
Copyright 2004-2011, Tenable Network Security, Inc. 18
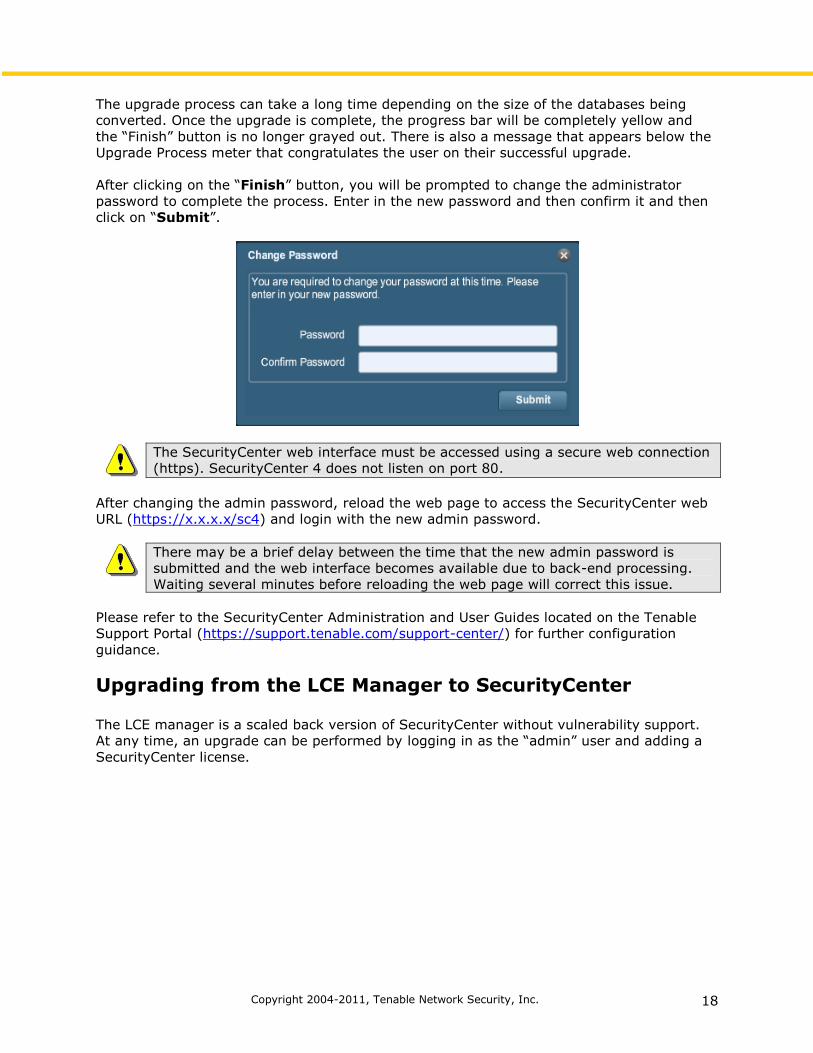
The upgrade process can take a long time depending on the size of the databases being
converted. Once the upgrade is complete, the progress bar will be completely yellow and
the “Finish” button is no longer grayed out. There is also a message that appears below the
Upgrade Process meter that congratulates the user on their successful upgrade.
After clicking on the “Finish” button, you will be prompted to change the administrator
password to complete the process. Enter in the new password and then confirm it and then
click on “Submit”.
The SecurityCenter web interface must be accessed using a secure web connection
(https). SecurityCenter 4 does not listen on port 80.
After changing the admin password, reload the web page to access the SecurityCenter web
URL (https://x.x.x.x/sc4) and login with the new admin password.
There may be a brief delay between the time that the new admin password is
submitted and the web interface becomes available due to back-end processing.
Waiting several minutes before reloading the web page will correct this issue.
Please refer to the SecurityCenter Administration and User Guides located on the Tenable
Support Portal (https://support.tenable.com/support-center/) for further configuration
guidance.
Upgrading from the LCE Manager to SecurityCenter
The LCE manager is a scaled back version of SecurityCenter without vulnerability support.
At any time, an upgrade can be performed by logging in as the “admin” user and adding a
SecurityCenter license.

Copyright 2004-2011, Tenable Network Security, Inc. 19
After submitting the new license, there is a delay between when the upgrade occurs and the
SecurityCenter user interface is available for configuration. Please allow several minutes to
transpire before attempting to login.
After upgrading, configuration must occur to make the SecurityCenter fully
functional. Please refer to the SecurityCenter Admin and User guides for assistance
with performing the necessary configuration steps.
Moving from SecurityCenter3.x or SecurityCenter 4.x to the LCE manager is not
supported.
Removal and Back Out
The sections below describe steps required to remove unneeded SecurityCenter software
and also to revert from SecurityCenter 4 to Security Center 3.
Removing SecurityCenter 4 Software
To remove the SecurityCenter 4 package, log into the SecurityCenter server from the
command-line and run the following command:
# rpm –e <SecurityCenter Package>
# rpm -e SecurityCenter-4.0.3-es5
warning: /opt/sc4/support/conf/SecurityCenter.cert saved as
/opt/sc4/support/conf/SecurityCenter.cert.rpmsave
warning: /opt/sc4/support/conf/SecurityCenter.pem saved as
/opt/sc4/support/conf/SecurityCenter.pem.rpmsave
warning: /opt/sc4/support/etc/openldap/ldap.conf saved as
/opt/sc4/support/etc/openldap/ldap.conf.rpmsave
warning: /opt/sc4/support/conf/httpd.conf saved as
/opt/sc4/support/conf/httpd.conf.rpmsave
warning: /opt/sc4/support/conf/extra/httpd-ssl.conf saved as
/opt/sc4/support/conf/extra/httpd-ssl.conf.rpmsave
warning: /opt/sc4/support/conf/extra/httpd-default.conf saved as
/opt/sc4/support/conf/extra/httpd-default.conf.rpmsave
warning: /opt/sc4/jobqueue.db saved as /opt/sc4/jobqueue.db.rpmsave
warning: /opt/sc4/application.db saved as /opt/sc4/application.db.rpmsave

Copyright 2004-2011, Tenable Network Security, Inc. 20
warning: /opt/sc4/admin/users/1/messages.db saved as
/opt/sc4/admin/users/1/messages.db.rpmsave
#
The warning messages in this output are informational only and indicate that RPM
will save the existing databases with an extension of .rpmsave.
Manually delete the “/opt/sc4” directory to remove any additional files or folders not
removed during the rpm remove process with the following command:
# rm –rf /opt/sc4
Removing Security Center 3 Software
The Upgrade Wizard does not remove the old Security Center 3 software and data, but
retains it in case a back out is needed or desired. Once you are satisfied with the new SecurityCenter 4 upgrade, you can simply delete the contents of /opt/sc3.
Reverting from SecurityCenter 4 to Security Center 3
In the event that a back out is required, use the following steps:
1. Remove the SecurityCenter 4 package by running:
# rpm –e <SecurityCenter Package>
2. Reinstall the Security Center 3 package. Because the SecurityCenter 4 upgrade
retains the Security Center 3 configuration, no data files are touched.
Any custom changes to the Security Center 3 Apache or PHP configuration must be
recreated as they are automatically removed during the SC3 to SC4 upgrade
process.
If keys were used for authentication between Security Center 3 and Nessus, they
will need to be restored because SecurityCenter 4 uses different key names. The original keys are located in “/opt/sc3/daemons/” and are appended with
“.backup”. Remove the “.backup” extension to ensure that Security Center 3 uses
them for authentication.
3. Restart the Security Center processes:
# service SecurityCenter restart
4. Once you are comfortable that Security Center 3 is fully functional, remove the
SecurityCenter 4 files (if desired) by running:
# rm –rf /opt/sc4

Copyright 2004-2011, Tenable Network Security, Inc. 21
About Tenable Network Security
Tenable, headquartered in Columbia, Md., USA, is the world leader in Unified Security
Monitoring. Tenable provides agent-less solutions for continuous monitoring of
vulnerabilities, configurations, data leakage, log analysis and compromise detection. For
more information, please visit us at http://www.tenable.com/.
TENABLE Network Security, Inc.
7063 Columbia Gateway Drive
Suite 100
Columbia, MD 21046
TEL: 1-410-872-0555
http://www.tenable.com/

Copyright 2004-2011, Tenable Network Security, Inc. 22
Appendix 1: Object Conversion
Because of the architectural and data-related differences between Security Center 3 and
SecurityCenter 4, a number of objects are not automatically converted in a typical upgrade.
In most cases, these objects are not required, however command-line tools are provided in
the event that object conversion is required. These command-line tools and their syntax are
described below.
The SecurityCenter Services must be stopped before using these tools by running “service SecurityCenter stop”. Restart them after the tool has been run using
“service SecurityCenter start”
Nessus Scan Results
Usage:
# convertIndiScans.php [Customer ID] [Organization ID] [Days]
Arguments:
[Customer ID] – A valid customer serial number from Security Center 3
[Organization ID] - A valid organization ID from SecurityCenter 4
[Days] - Number of days from the current date to pull individual scans from Security
Center 3
Example:
# /opt/sc4/support/bin/php /opt/sc4/src/tools/convertIndiScans.php 10 1 30
The original scan name, scan start/stop time, policy and user who ran the scan are retained,
if possible.
Repository Snapshots
You must have an existing Security Center 3 installation on the same machine you
are executing the tool from. The original Security Center 3 installation is saved by
default during the upgrade.
Usage:
# convertSnapshots.php [Customer ID] [Repository ID] [Days]
Arguments:
[Customer ID] - A valid customer serial number from Security Center 3
[Repository ID] - A valid repository ID from SecurityCenter 4
[Days] - Number of days from the current date to pull snapshots from Security
Center 3
Example:
# /opt/sc4/support/bin/php /opt/sc4/src/tools/convertSnapshots.php 10 1 30