scissors, you can do this. the style fits, and looks ... fighter's tear. 2 typically, for a...
TRANSCRIPT

-Sewing machine; no fancy stitches required. -Scissors; ones that cut, and aren’t covered in tape. -Soft measuring tape; standard size. -Pins; if you use the blighted things. -Iron; makes things flat. -Water bottle (makes is way easier to iron linen) -Surger; not necessary, but nice for internal seams and hems. -Scrap paper for notes, and a pencil. -Flat ruler and a crayon
1
-First you'll need Fabric. About two and three quarters yards for 45" fabric, and about 2.5 yards for 60" fabric. Cottons, and Linens preferred. For the neck line facing you might need some extra scrap in a complementing fabric. -Thread. Either the same color as the fabric or a neat contrasty one. -Patience.
If you know your way around a sewing machine, and have a passing familiarity with scissors, you can do this. The style fits, and looks good on just about everyone, saves fabric and prevents fighter's tear.

2
Typically, for a tunic that fits most, you cut two panels front and back, of 30”x 40”. These measurements are negotiable, and you can make your tunic to size if you like. Just measure around the fattest part of your middle. Be honest, you don’t want to end up with a tight tunic. Now, add ten inches. You heard me. Do it. You want room to move and fight right? Divide that number by two and and you have the width. Now, measure from the top of your shoulder to where you want the tunic to fall, (knee, ankle, ect.) now add five inches. Tada! Take the Width x Length and cut yourself two panels.
length of tunic
fold
line
raw
edg
e
selvage selvage
selvage
raw
edg
e
length of tunic
Now for complicated cutting.

raw edge
selv
age
selv
age
fold
line
eventualshoulder slant eventual
neck holeeventualshoulder slant
3
Take those two panels you cut and lay them right side to right side, if they have a right side. Then fold them in half along the long side, so that the width is halved. Lay the folded panels on a flat surface like the floor or a big table. Lay the raw edges toward you and the fold further away. With your handy scissors come about an inch and a half down from the top corner and cut at a slant. Snip across until you get nearly to the middle. This is the shoulder slant, and helps the tunic fit your body and tear much less often than a flat shoulder.

4
A great band name.
Make a mark or finger press bout three inches from the edge of the fabric on the shoulder slant. Measure about one and a half inches down the side of the tunic from the shoulder. Make another mark. Now sketch a loose curve, from one mark to the other, that fatter on the bottom (See diagram). make sure that the end of curve meets the outside of the fabric at a right angle on both ends. Now measure that edge with your soft tape, and note the leangth of the curve, you'll use it in a minute when you cut out the sleeves.
half of width of
tunic
sleeve hole
neck hole
length of tunic
shoulder slant
5 inches
2 inches
9 inches
1 1/2 inches

5
10 inches
fold
line
10 in
ches
10 inches
3 inches 3 inches
That thing your head goes through.
Your neck isn't set evenly on your torso. It sits a little forward, and as such the back neckline shouldn't be as deep as the front. So with the panels still folded, cut a shallow curve, peaking at about two inches in the center, starting about four inches from the fold. Cutting through the front and the back panels gives you a guide for cutting the deeper front to match. Finally separate the panels, on the one you intend to be the front, cut a deeper curve, at least another two inches. If you intend to do a keepy hole neckline, leave it as is, but if you are using a curved neck, make sure that your head is going to fit through that sucker.
With any of these cutting steps If you feel more comfortable you can use a tailor's crayon and a ruler to sketch on the fabric before hand.

Measure out two boxes for the sleeves. Typical measurement is 25" wide by 15" long. Feel free to adjust to your taste. For instance, when I make for myself, use 20"x12" panels.
Match the sleeves up and fold them together in half along the center of the width, just like you did the body. Fold in half again, and finger press or mark the mid line. Open the fabric back up so that it is only folded once. Measure down the folded side. About four inches. Do the same on the other side. Now lay your measuring tape across the sleeve on it's edge, and make a soft 'S' curve that is the same length as the sleeve hole. Remember that measurement you write down earlier? It doesn't have to be perfect, close is good.
Now you have two sleeves! And the body panels! Now you need gores!
finger pressmidline
sleeve cut
6

These are triangles that are inserted into the side seams to make the skirt wider, and more ... uh twirly. Unless you are a dude, then it’s ... manly twirl.
To make take a rectangle of fabric. You probably have one left over from the sleeves. If you don’t, you want one that is about the same size as one. 20 x 15 or so. Bigger is fine, smaller gets kinda wonky. And if you want to add more gores, go for it.
Pick up the rectangle by opposing corners so that it folds along the diagonal. Lay it down on the table and finger press the edge. Open the fabric and cut along the finger pressing. Now you’ll have two triangles.
trim
Fold in half, one of the shorter sides towards the long side and cut off excess fabric.
fold
cut this part off
gore piece
7
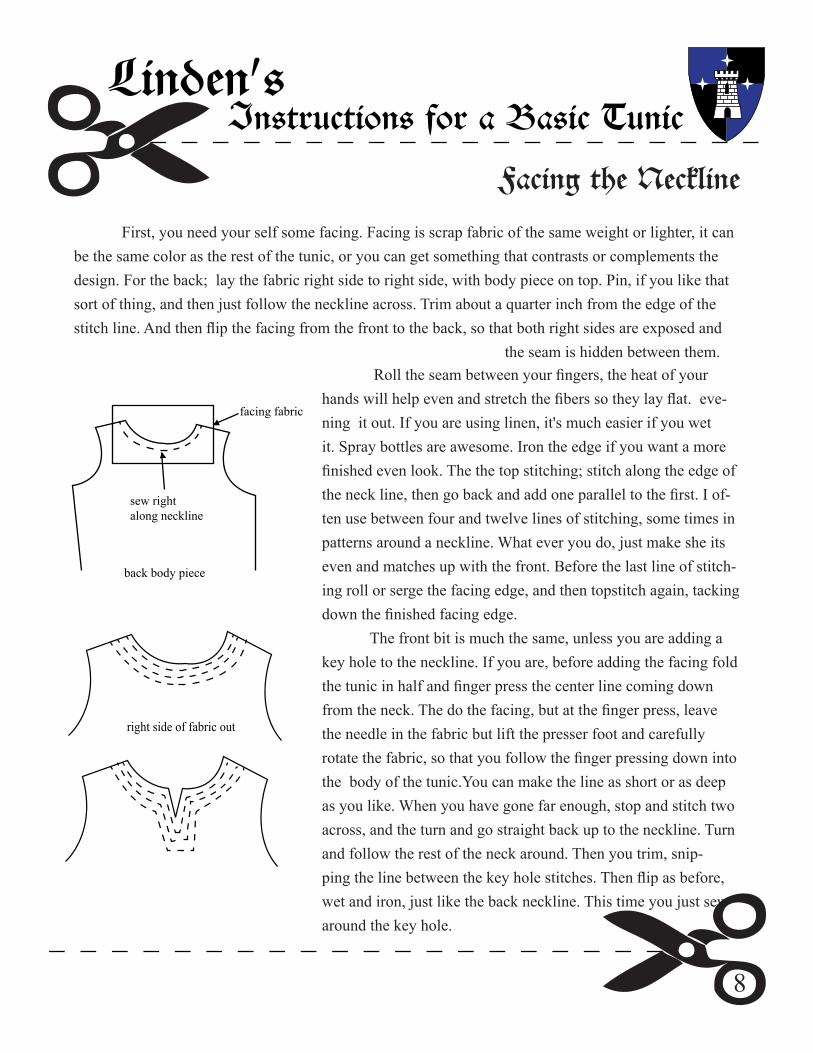
First, you need your self some facing. Facing is scrap fabric of the same weight or lighter, it can be the same color as the rest of the tunic, or you can get something that contrasts or complements the design. For the back; lay the fabric right side to right side, with body piece on top. Pin, if you like that sort of thing, and then just follow the neckline across. Trim about a quarter inch from the edge of the stitch line. And then flip the facing from the front to the back, so that both right sides are exposed and the seam is hidden between them.
back body piece
facing fabric
sew right
along neckline
right side of fabric out
8
Roll the seam between your fingers, the heat of your hands will help even and stretch the fibers so they lay flat. eve-ning it out. If you are using linen, it's much easier if you wet it. Spray bottles are awesome. Iron the edge if you want a more finished even look. The the top stitching; stitch along the edge of the neck line, then go back and add one parallel to the first. I of-ten use between four and twelve lines of stitching, some times in patterns around a neckline. What ever you do, just make she its even and matches up with the front. Before the last line of stitch-ing roll or serge the facing edge, and then topstitch again, tacking down the finished facing edge. The front bit is much the same, unless you are adding a key hole to the neckline. If you are, before adding the facing fold the tunic in half and finger press the center line coming down from the neck. The do the facing, but at the finger press, leave the needle in the fabric but lift the presser foot and carefully rotate the fabric, so that you follow the finger pressing down into the body of the tunic.You can make the line as short or as deep as you like. When you have gone far enough, stop and stitch two across, and the turn and go straight back up to the neckline. Turn and follow the rest of the neck around. Then you trim, snip-ping the line between the key hole stitches. Then flip as before, wet and iron, just like the back neckline. This time you just sew around the key hole.

facing fabric
no more than 2 stitches over
finger pressedcenter line
front body piece
9

front piece
wrong side
right side
sew this sew this
sleeve pieceright side
right side
wrong side
sleeve pieceright side
sew thesetwo together
10
Now the easy bit, the sewing together.
Put the body pieces together, right side to right side. So the shoulders meet. Stitch across, and back stitch each one. Then surge or roll the edge, the top stitch down so that the seam is folded toward the back of the tunic.
Fold the sleeve in half so that the curved edge is on the top. Finger press a few inches down the center. Lay the center of the curve at the top of the shoulder with the finger pressing matching the shoulder seam, right side to right side. Pin, if you like those sorts of things. Open the sleeve, and stitch across one side of the sleeve to the bottom of the arm hole. You'll have to hold the pieces apart and shift them so that thy will fit, since they will not lay together. Flip the whole thing over and do the other side. The serge the edge, and top stitch in toward the body. When you top stitch always fold the seam toward the center or larger part of the garment. Do the same with the other sleeve. Then flip the tunic inside out, and line up the bottom of the sleeve at the joint to the body. You want these to match as closely a possible. Making an 'X' under the arm. Start from the x seam and sew toward the end of the sleeve. Don't worry about the edge of the sleeve seam, if it comes out uneven, you can fix it when you trim and roll it under.
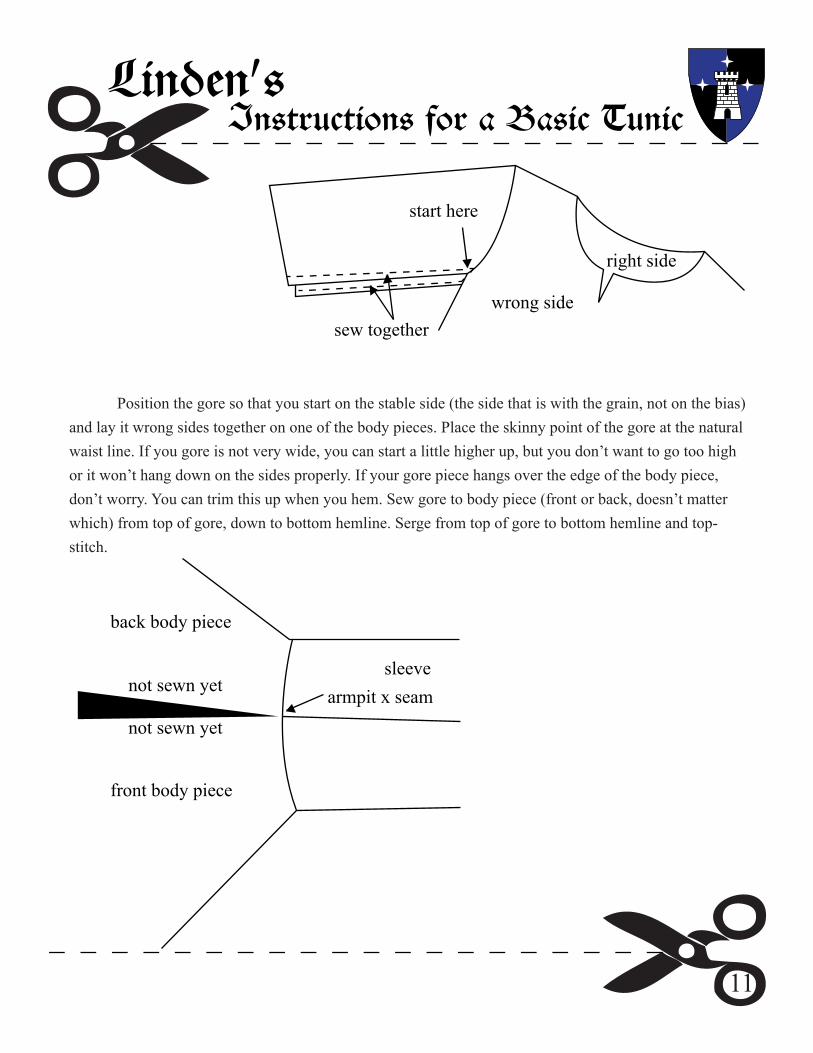
start here
sew togetherwrong side
right side
sleevearmpit x seamnot sewn yet
not sewn yet
back body piece
front body piece
Position the gore so that you start on the stable side (the side that is with the grain, not on the bias) and lay it wrong sides together on one of the body pieces. Place the skinny point of the gore at the natural waist line. If you gore is not very wide, you can start a little higher up, but you don’t want to go too high or it won’t hang down on the sides properly. If your gore piece hangs over the edge of the body piece, don’t worry. You can trim this up when you hem. Sew gore to body piece (front or back, doesn’t matter which) from top of gore, down to bottom hemline. Serge from top of gore to bottom hemline and top-stitch.
11

gore
wrong side
body piece natural waist point
sew here
Sew up the other side of the gore to the other body piece. Serge second side of gore all the way from the bottom of the gore, up through the side of the body, all the way down the sleeve in one pass. Topstitch down.
first side ofgore (stable edge)
back body
armpit xfront body
end serge at wrist
sleeve
serge start here
Serge all internal seams and topstitch down. Cover stitch bottom hem or roll and topstitch.
Voila!
12Thanks to Joy Khol and Alona TwoTrees for the help!