santricity storage manager 11
TRANSCRIPT

SANtricity® Storage Manager 11.20
Software Installation Reference
NetApp, Inc.495 East Java DriveSunnyvale, CA 94089U.S.
Telephone: +1 (408) 822-6000Fax: +1 (408) 822-4501Support telephone: +1 (888) 463-8277Web: www.netapp.comFeedback: [email protected]
Part number: 215-09079_B0April 2015


Contents
Deciding whether to use this guide ............................................................. 6Deciding on the management method ........................................................ 8
Key terms .................................................................................................................... 8
access volume .................................................................................................. 8
in-band management ....................................................................................... 8
out-of-band management ................................................................................. 8
stateless address autoconfiguration ................................................................. 8
storage manager event monitor ....................................................................... 8
Things to know: Management method ........................................................................ 8
Things to know: In-band and out-of-band requirements ........................................... 10
Deciding what packages to install ............................................................. 14Key terms .................................................................................................................. 14
client .............................................................................................................. 14
host ................................................................................................................ 14
multi-path driver, failover driver ................................................................... 14
storage management software ....................................................................... 14
storage management station .......................................................................... 14
storage manager event monitor ..................................................................... 14
Things to know: Host operating systems .................................................................. 14
Things to know: Storage management software components ................................... 15
Installing SANtricity Storage Manager .................................................... 19Minimum system requirements for SANtricity Storage Manager ............................ 19
Procedure: Installing the SANtricity Storage Manager software .............................. 19
Installing the storage manager packages using silent mode .......................... 20
Installing the storage management software on the AIX OS using the
command prompt ..................................................................................... 22
Server core setup procedure: Installing the storage management software
.................................................................................................................. 25
Installing the storage management software on the Solaris OS .................... 27
Configuring the host bus adapters (Solaris hosts) ......................................... 28
Starting SANtricity Storage Manager and adding storage arrays tothe management domain ....................................................................... 30
Things to know: Storage array .................................................................................. 30
Things to know: Initial DHCP configuration of the controller management ports
and default IP addresses ...................................................................................... 30
Things to know: Naming the storage array ............................................................... 31
Determining the appropriate procedure to add the storage array to the
management domain ............................................................................................ 31
Adding the storage array to the management domain using automatic discovery:
Out-of-band management .................................................................................... 32
Table of Contents | 3
Adding the storage array to the management domain by initially using DHCP
and then changing to static addressing ................................................................ 33
Manually adding a storage array to the management domain: Out-of-band
management ......................................................................................................... 35
Adding the storage array to the management domain and configuring DHCP
addressing ............................................................................................................ 36
Adding the storage array to the management domain: In-band management ........... 37
Adding the storage array and manually configuring the controllers by using the
in-band method initially ...................................................................................... 38
Adding the storage array and manually configuring the controllers by setting up
a temporary private network ................................................................................ 39
Configuring other SANtricity initial setup information ......................... 42Things to know: Enterprise Management Window and Array Management
Window ................................................................................................................ 42
Things to know: AutoSupport (ASUP) messages ..................................................... 44
Things to know: Alert notifications using email or SNMP traps .............................. 45
Things to know: Passwords ....................................................................................... 45
Things to know: Features .......................................................................................... 46
Defining the hosts ....................................................................................... 47Key terms .................................................................................................................. 47
host context agent .......................................................................................... 47
Things to know: Hosts ............................................................................................... 47
Things to know: Host groups .................................................................................... 47
Things to know: Storage partitions ........................................................................... 47
Procedure: Defining the hosts ................................................................................... 50
Configuring the storage ............................................................................. 51Key terms .................................................................................................................. 51
Default Group ................................................................................................ 51
disk pool ........................................................................................................ 51
free capacity .................................................................................................. 51
full disk encryption (FDE) ............................................................................ 51
hot spare drive ............................................................................................... 51
Redundant Array of Independent Disks (RAID) ........................................... 51
storage partition ............................................................................................. 52
unconfigured capacity ................................................................................... 52
volume ........................................................................................................... 52
volume group ................................................................................................. 52
Things to know: Data assurance ................................................................................ 52
Things to know: Allocating capacity ......................................................................... 53
Things to know: Disk pools and disk pool volumes ................................................. 54
Things to know: Disk pool benefits .............................................................. 54
Things to know: Volume groups and volumes .......................................................... 55
Things to know: Host-to-volume mappings and storage partitions .......................... 55
Things to know: Hot spare drives .............................................................................. 56
Things to know: Full disk encryption (FDE) ............................................................ 56
4 | SANtricity Storage Manager 11.20 Software Installation Reference
Procedure: Configuring the storage ........................................................................... 58
Resolving problems .................................................................................... 60Procedure: Resolving problems ................................................................................ 60
Correcting a partially managed storage array ........................................................... 60
Key terms ...................................................................................................... 60
Things to know: Partially managed storage arrays ....................................... 60
Procedure: Automatically adding a partially managed storage array ........... 61
Appendix A: Boot device installation ....................................................... 62Boot device support ................................................................................................... 62
Installing the boot device .......................................................................................... 62
General preparation ....................................................................................... 62
Preparing the storage array as a boot device ................................................. 63
Preparing the host .......................................................................................... 65
Copyright information ............................................................................... 66Trademark information ............................................................................. 67How to send comments about documentation and receive update
notifications ............................................................................................ 68
Table of Contents | 5

Deciding whether to use this guide
This guide describes key concepts related to software installation and initial configuration. This guidealso provides installation procedures for installation of the SANtricity Storage Manager® software onthe AIX, Solaris, and Windows Server Core platforms and installation instructions for using silentmode or setting up the storage array as a boot device.
Use the table below to determine whether you should use this guide or an alternative guide. Thesedocuments are available from: NetApp Support.
If you want to.... See...
Understand key concepts related to softwareinstallation and configuration and storageprovisioning
• This guide
• SANtricity Storage Manager online help.
• SANtricity Storage Manager Concepts Guide
Install and provision in a Linuxenvironment
• SANtricity Storage Manager FC Configurationand Provisioning for Linux Express Guide
• SANtricity Storage Manager iSCSIConfiguration and Provisioning for LinuxExpress Guide
• SANtricity Storage Manager SAS Configurationand Provisioning for Linux Express Guide
• SANtricity Storage Manager InfinibandConfiguration and Provisioning for LinuxExpress Guide
Install and provision in a VMwareenvironment
• SANtricity Storage Manager FC Configurationand Provisioning for VMware Express Guide
• SANtricity Storage Manager iSCSIConfiguration and Provisioning for VMwareExpress Guide
• SANtricity Storage Manager SAS Configurationand Provisioning for VMware Express Guide
Install and provision in a Windowsenvironment (not Windows server core)
• SANtricity Storage Manager FC Configurationand Provisioning for Windows Express Guide
• SANtricity Storage Manager iSCSIConfiguration and Provisioning for WindowsExpress Guide
• SANtricity Storage Manager SAS Configurationand Provisioning for Windows Express Guide
Install SANtricity in a Windows ServerCore environment
This guide
Set up the storage array on a boot device This guide
6

If you want to.... See...
Install the Storage Manager packages usingsilent mode
This guide
Configure multipath drivers SANtricity Storage Manager Multipath DriversGuide
Deciding whether to use this guide | 7

Deciding on the management method
You can manage a storage array using the in-band method, the out-of-band method, or both.
Note: You need to know the storage management method that you plan to use before you installand use SANtricity Storage Manager software.
Key terms
access volume
A special volume that is used by the host-agent software to communicate management requests andevent information between the management station and the storage array. An access volume isrequired only for in-band management.
in-band management
A method to manage a storage array in which a storage management station sends commands to thestorage array through the host input/output (I/O) connection to the controller. The SMagent must beinstalled for this method to work correctly.
out-of-band management
A method to manage a storage array in which a storage management station sends commands to thestorage array through the Ethernet connections on the controller. This is the recommendedmanagement method.
stateless address autoconfiguration
A method for setting the Internet Protocol (IP) address of an Ethernet port automatically. Thismethod is applicable only for IPv6 networks.
storage manager event monitor
An application in the storage management software that monitors all activities on a storage array. TheEvent Monitor runs continuously on a host or storage management station. The Storage ManagerEvent Monitor is also referred to as the Event Monitor and the Persistent Monitor.
Things to know: Management methodNote: There are several options for configuring the management ports, depending on themanagement method you use and whether or not you use a DHCP server or IPv6 stateless addressauto-configuration. See Starting SANtricity Storage Manager and adding storage arrays to themanagement domain on page 30 for details.
Use the key terms and the following figures to determine the management method that you will use.
Note: The following example shows the Client running on a second host. However, the Client canrun on the same host as the Agent.
Example of in-band management topology:
8

Example of out-of-band management topology:
Deciding on the management method | 9
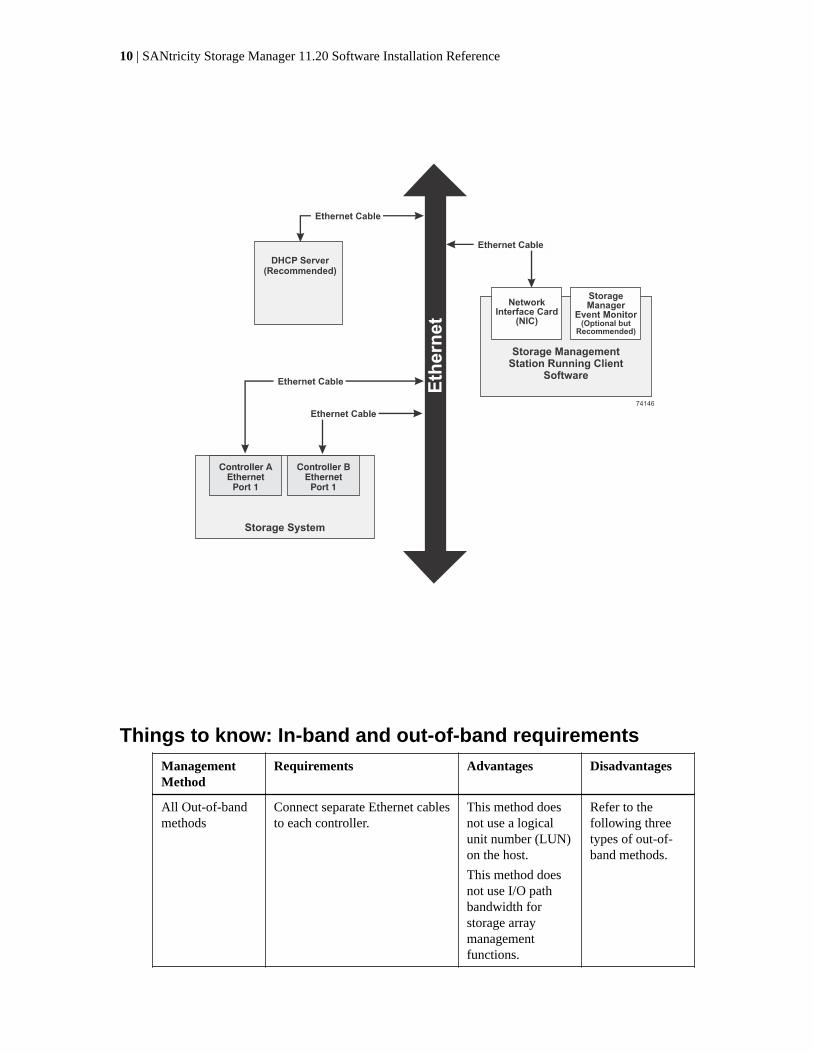
Things to know: In-band and out-of-band requirementsManagementMethod
Requirements Advantages Disadvantages
All Out-of-bandmethods
Connect separate Ethernet cablesto each controller.
This method doesnot use a logicalunit number (LUN)on the host.
This method doesnot use I/O pathbandwidth forstorage arraymanagementfunctions.
Refer to thefollowing threetypes of out-of-band methods.
10 | SANtricity Storage Manager 11.20 Software Installation Reference

ManagementMethod
Requirements Advantages Disadvantages
Out-of-bandwithout a DHCPserver
Manually configure the networksettings on the controllers.
You mustmanuallyconfigure thenetwork settingson the controllers.
Ethernet cablesare required.
Out-of-band –IPv6 statelessaddress auto-configurationwithout a DHCPserver (IPv6networks only)
Connect at least one router forsending the IPv6 network addressprefix in the form of routeradvertisements.
The router is necessary to routethe IPv6 packets outside the localnetwork.
No additionalmanual networkconfiguration isrequired on thecontrollers.
By default, thecontrollersautomatically obtaintheir IP addresses bycombining the auto-generated link localaddress and the IPv6network addressprefix after you turnon the power to thecontroller-drive tray.
Ethernet cablesare required.
A router isrequired.
Deciding on the management method | 11

ManagementMethod
Requirements Advantages Disadvantages
Out-of-band witha DHCP server(IPv4 networksonly)
Connect separate Ethernet cablesto each controller.
Assign either static IP addressesor dynamic IP addresses to thecontrollers using your DHCPserver. Alternatively, theSANtricity Storage ManagerAMW can be used to set the IPaddresses after the storage arrayhas been discovered. It isrecommended that you eitherreserve the controller IPs in theDHCP server or assign a static IPaddress so that the managementport addresses will not change ifthe power to the storage array isdisrupted.
Check your DHCP server for theIP addresses that are associatedwith the media access control(MAC) addresses of thecontrollers.
The MAC address appears on alabel on each controller in theform: xx.xx.xx.xx.xx.xx .
No additionalmanual networkconfiguration isrequired on thecontrollers.
By default, thecontrollersautomatically obtaintheir IP addressesfrom the DHCPserver after you turnon the power to thecontroller-drive tray.
You do not need toinstall host-agentsoftware.
This method doesnot use a specialAccess Volume tocommunicate withthe host.
This method doesnot use the SAS,Fibre Channel oriSCSI bandwidth forstorage arraymanagementfunctions.
Ethernet cablesare required.
12 | SANtricity Storage Manager 11.20 Software Installation Reference

ManagementMethod
Requirements Advantages Disadvantages
In-band Install the host agent software(SMagent) on at least one of theI/O-attached hosts.
The host-agent software, which isincluded with the storagemanagement software, managesthe storage array through the datapath from an I/O-attached host oran Ethernet connection from astorage management station tothe I/O-attached host that isrunning the host-agent software.
The in-band method requires aspecial access volume tocommunicate between the hostand the storage array. Thisvolume is created automatically.
If a firewall is installed on theI/O-attached host, ensure thatport 2463 is open.
No additionalmanual networkconfiguration isrequired on thecontroller.
This method usesboth a LUN on thehost and the SAS,Fibre Channel, oriSCSI bandwidthfor storage arraymanagementfunctions.
This method is notsupported onInfiniBandsystems.
This method is notsupported onsome OSes(VMware, OS X).
Deciding on the management method | 13
Deciding what packages to install
This topic explains key terminology and describes the different storage management softwarecomponents and the packages required on different machines.
Key terms
client
1. An intelligent device or system that requests services from other intelligent devices, systems, orappliances.
2. An asymmetric relationship with a second party (a server) in which the client initiates requests andthe server responds to those requests.
host
A computer that is attached to a storage array. A host accesses volumes assigned to it on the storagearray. The access is through the HBA host ports or through the iSCSI host ports on the storage array.
multi-path driver, failover driver
A driver that manages the input/output (I/O) data connection for storage arrays with redundantcontrollers. If a component (cable, controller, host adapter, and so on) fails along with the I/O dataconnection, the multi-path driver automatically reroutes all I/O operations to the other controller.Multi-path drivers might require installation on the I/O attached servers, or they might be part of thehost OS.
storage management software
Software that saves data from a network to a physical and logical organization of drives. The data isspread out across multiple drives, copied (physically or virtually) to another location, or both, forfailure protection and redundancy.
storage management station
A computer running storage management software that adds, monitors, and manages the storagearrays on a network.
storage manager event monitor
An application in the storage management software that monitors all activities on a storage array. TheEvent Monitor runs continuously on a host or storage management station. The Storage ManagerEvent Monitor is also referred to as the Event Monitor and the Persistent Monitor.
Things to know: Host operating systemsFor information about host OS versions for I/O attach hosts, HBA information specific to youroperating system, host processor requirements, multipath driver requirements, JRE levels, andSANboot support, see the NetApp Interoperability Matrix Tool.
14

Things to know: Storage management software componentsThis section provides information about installing the storage management software.
Client – This package contains both the Graphical User Interface (GUI) and the Command LineInterface (CLI) for managing the storage array. This package also contains a monitor service thatsends alerts when a critical problem exists with the storage array.
Utilities – This package contains utilities that let the operating system recognize the volumes thatyou create on the sstorage array and to view the operating system-specific device names for eachvolume.
Agent – This package contains software that allows a management station to communicate with thecontrollers in the storage array over the I/O path of a host (see Things to know: In-band and out-of-band requirements on page 10). This package is required for in-band management.
Failover driver – This package contains the multi-path driver that manages the I/O paths into thecontrollers in the storage array. If a problem exists on the path or a failure occurs on one of thecontrollers, the driver automatically reroutes the request from the hosts to the other controller in thestorage array.
Note: The Microsoft Virtual Disk Service (VDS) and Volume Shadow Copy Service (VSS)providers might be part of the SANtricity Storage Manager package for Windows Server.
Use the figures and tables that follow to determine the software packages that should be installed oneach machine. You must install the utilities and the failover driver on each host that is attached to thestorage array.
Note: During the client installation, you might be asked whether you want to start the eventmonitor. Start the monitor on only one host that runs continuously. If you do not have eventmonitor running on one host, you will not receive critical alert notifications and you will not haveaccess to the AutoSupport (ASUP) feature. If you start the monitor on more than one host, youreceive duplicate alert notifications about problems with the storage array. If you install SANtricitycomponents on more than one host and are not asked about the event monitor, it is recommendedthat you verify that the monitor is active on only one of the systems.
Software configurations:
Deciding what packages to install | 15
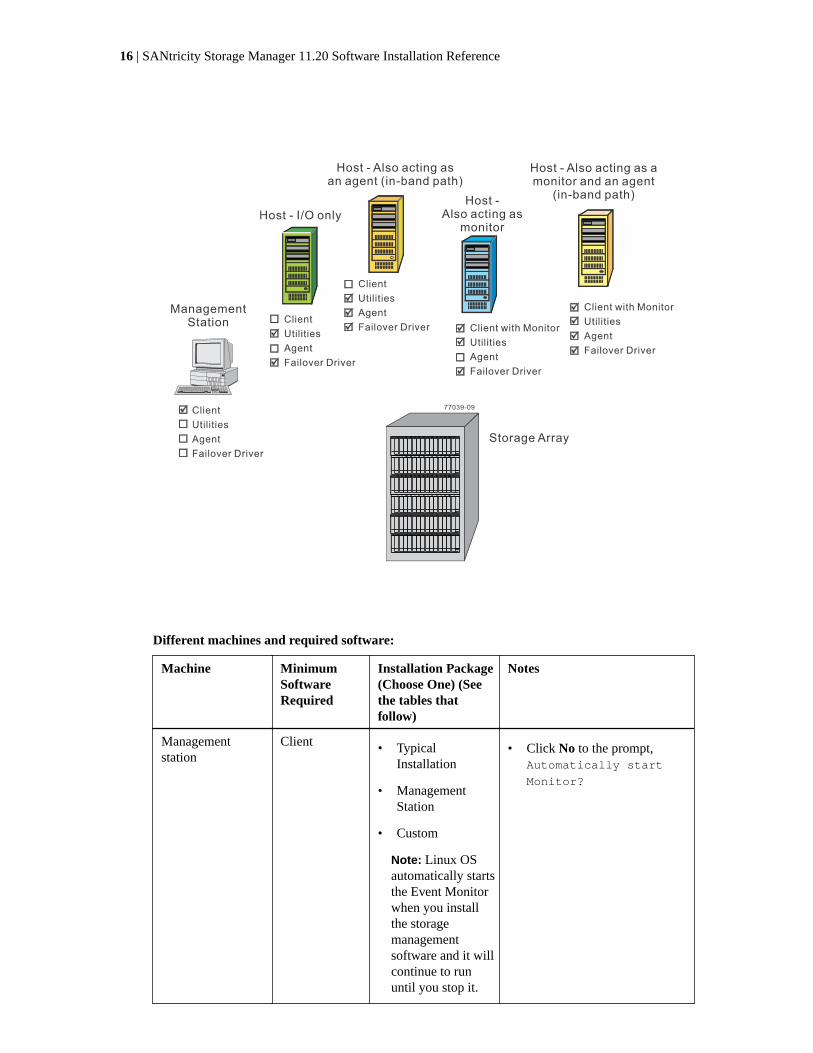
Different machines and required software:
Machine MinimumSoftwareRequired
Installation Package(Choose One) (Seethe tables thatfollow)
Notes
Managementstation
Client • TypicalInstallation
• ManagementStation
• Custom
Note: Linux OSautomatically startsthe Event Monitorwhen you installthe storagemanagementsoftware and it willcontinue to rununtil you stop it.
• Click No to the prompt,Automatically start
Monitor?
16 | SANtricity Storage Manager 11.20 Software Installation Reference

Machine MinimumSoftwareRequired
Installation Package(Choose One) (Seethe tables thatfollow)
Notes
Managementstation with theStorage ManagerEvent Monitoralways running
Client • TypicalInstallation
• ManagementStation
• Custom
• Click Yes to the prompt,Automatically start
Monitor?
Host (I/O only) • Utilities
• Failoverdriver
• TypicalInstallation
• Host
• Custom
• Be aware that some operatingsystems require the manualinstallation of the RedundantDual Active Controller(RDAC) failover driver.
• All AIX I/O attach hostsrequire the ODM utility. Thisis automatically installed withthe SMinstaller, or it can bedownloaded as a standalonepackage from NetAppSupport.
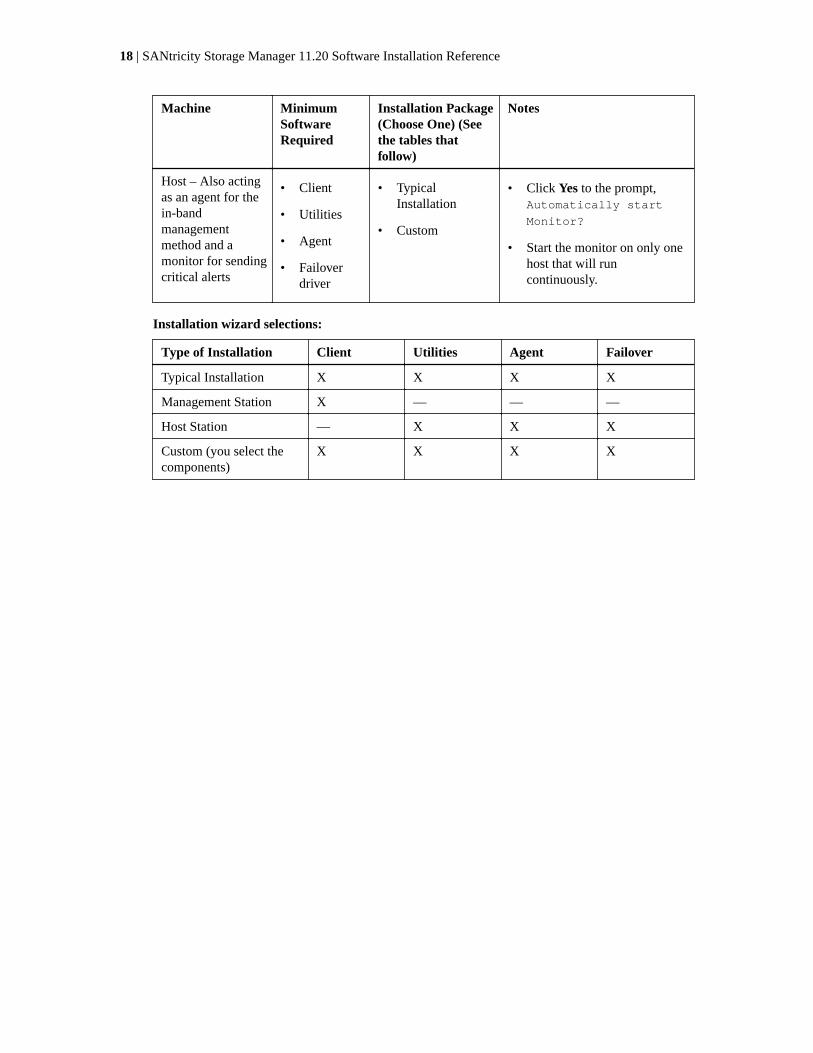
Host – Also actingas an agent for thein-bandmanagementmethod
• Client(either onthis host oron amachinewithnetworkaccess tothis host)
• Utilities
• Agent
• Failoverdriver
• TypicalInstallation
• Host (no clientinstall)
• Custom
Click No to the prompt,Automatically start
Monitor?
Host – Also actingas a monitor forsending criticalalerts
• Client
• Utilities
• Failoverdriver
• TypicalInstallation
• Custom
• Click Yes to the prompt,Automatically start
Monitor?
• Start the monitor on only onehost that will runcontinuously.
Deciding what packages to install | 17
Machine MinimumSoftwareRequired
Installation Package(Choose One) (Seethe tables thatfollow)
Notes
Host – Also actingas an agent for thein-bandmanagementmethod and amonitor for sendingcritical alerts
• Client
• Utilities
• Agent
• Failoverdriver
• TypicalInstallation
• Custom
• Click Yes to the prompt,Automatically start
Monitor?
• Start the monitor on only onehost that will runcontinuously.
Installation wizard selections:
Type of Installation Client Utilities Agent Failover
Typical Installation X X X X
Management Station X — — —
Host Station — X X X
Custom (you select thecomponents)
X X X X
18 | SANtricity Storage Manager 11.20 Software Installation Reference
Installing SANtricity Storage Manager
This section describes how to install SANtricity Storage Manager (hereinafter referred to as thestorage management software) for operating systems that do not have coverage in SoftwareConfiguration and Provisioning Express Guides. Currently, these operating systems are Solaris andAIX.
The separate native installation packages are supplied with SANtricity Storage Manager in thenative directory. Refer to the NetApp Interoperability Matrix Tool for updates.
Some operating systems support using the storage array as a boot device. For assistance with settingup this configuration, refer to NetApp Interoperability Matrix at NetApp Interoperability Matrix Toolfor compatibility information and your HBA vendor for specific SAN boot instructions. Then see Appendix A: Boot device installation on page 62.
If you are running a Windows Server Core version, make sure that you have performed theprocedures in Server core setup procedure: Installing the storage management software on page 25.
If you are running AIX, install SANtricity Storage Manager by performing the steps in Installing thestorage management software on the AIX OS using the command prompt on page 22.
If you are running Solaris, install SANtricity Storage Manager by performing the steps in Installingthe storage management software on the Solaris OS on page 27.
Minimum system requirements for SANtricity StorageManager
The system that will contain the SANtricity Storage Manager client must have the followingminimum requirements for RAM, CPU speed, and temporary disk space.
• RAM: 2 GB for Java Runtime Engine
• CPU speed: Use the Interoperability Matrix Tool (NetApp Interoperability Matrix Tool) toconfirm that your host's processor is supported. All speeds available for a supported CPU aresufficient to run the SANtricity Storage Manager.
• Temporary disk space:
Operating system Available temporary disk space (MB)
Windows Server 2008 R2 434
Windows Server 2012 434
Linux 390
Solaris 540
AIX 525
Procedure: Installing the SANtricity Storage Managersoftware
About this task
Note: Refer to NetApp Support for information about how the product is distributed.
19
Note: Make sure that you have the correct administrator or superuser privileges to install thesoftware.
Steps
1. If you are installing from a DVD, insert the DVD in the DVD drive. Otherwise, go to step 2 onpage 20.
Depending on your operating system, a program autoplays and shows a menu with installationselections. If the menu does not appear, you must manually open the install folder and locatethe installation package needed.
2. Install the software installation packages that are required for your storage configuration.
You might be required to open a window or terminal to run one of these commands.
• hsw_executable.exe -i console
• hsw_executable.exe -i silent
In the commands, hsw_executable.exe is the file name for the storage management softwareinstallation package.
• When using the console parameter during the installation, questions appear on the consolethat enable you to choose installation variables. This installation does not use a graphical userinterface (GUI). Contact your technical support Representative if you need to change theinstallation options.
• When using the silent parameter during the installation, the command installs the storagemanagement software using all of the defaults. A silent installation uses a resource file thatcontains all of the required information, and it does not return any windows until theinstallation is complete. This installation does not use a GUI. Contact your technical supportRepresentative if you need to change the installation options.
These examples show the actual command used to launch the installation wizard for aparticular operating system.
• Windows operating systems – Double-click the executable file. In general, the executablefile begins with SMIA followed by the operating system name, such as SMIA-WS32.exe .
• UNIX operating systems – At the command prompt, type the applicable command to startthe installer, and press Enter. For example, type a command that is similar to thiscommand: sh DVD_name.bin. In this command, DVD_name.bin is the name of theinstallation DVD, such as SMIA-LINUX.bin .
Note: Make sure that your screen display is correctly set to run commands.
Use the information in the on-screen instructions to install the software.
Installing the storage manager packages using silent mode
You can use the Silent installation mode for any OS that is supported by Install. To install the storagemanager packages using the Silent mode, locate the specified components in the installer.propertiesfile by entering the command SMIA.xx.xx.xx.xx.bin -f installer.properties.
Options for silent installation
The installer provides four options for Silent mode installation:
• All (client, agent, utils, failover driver)
20 | SANtricity Storage Manager 11.20 Software Installation Reference

• Custom1 (client only)
• Custom2 (host only)
• Custom
You can make the following changes to these options by changing the value ofCHOSEN_INSTALL_SET, which is located in the installer.properties file.
• To install all components: CHOSEN_INSTALL_SET=All
• To install only the client set: CHOSEN_INSTALL_SET=Custom1
• To install the host configuration set: CHOSEN_INSTALL_SET=Custom2
• To install a customized configuration set: CHOSEN_INSTALL_SET=Custom
Custom installation parameters
These four features are available for you to install:
• SMclient
• SMagent
• SMutil
• RDAC
You can install one or more of the four features by entering the corresponding value. For example, toinstall only the SMclient and the SMutil, enter the parameterCHOSEN_INSTALL_FEATURE_LIST=SMclient,SMutil.
The default installer.properties file
Consider the following information about the default installer.properties file:
• If this file is named installer.properties and is in the same directory as the installer, it isautomatically accessed when you run the installer. If it is named something different or is in adifferent directory, you can enter the following -f option in the installer:INSTALLER_UI=silent
Determine which of the following install sets you want to use:
• All: SMclient, SMagent, SMutils, failover, ttsp
• Custom: Select one or more installs sets (SMclient, SMagent, SMutils, failover, ttsp)
• Custom1: SMclient only
• Custom2: SMutil, SMagent, failover
After you have determined which install set to use, enter the corresponding value. For example, toinstall only the SMclient enter the value:
CHOSEN_INSTALL_SET=Custom1
If you have previously selected the Custom install set, you can choose to install only the componentsthat you want by selecting them in the check boxes that are shown on the screen. The valid values areSMclient, SMagent, SMutil, and RDAC. For example, if you want to install only the SMclient, youwould enter the following value:
CHOSEN_INSTALL_FEATURE_LIST=SMclient
Installing SANtricity Storage Manager | 21

You can specify whether or not to start the monitor service by entering either 0 for Yes, or 1 for No.For example, to start the monitor service, enter the following:
AUTO_START_CHOICE=0
You can choose whether or not to reboot the system when the installation completes by enteringeither Yes or No. For example, if you do not want the system to reboot after the installationcompletes, enter the following command:
USER_REQUESTED_RESTART=NO
Note: If the failover driver was removed during the uninstall, you will need to set the value to NOand manually reboot the system.
Note: The auto-reboot does not work for the uninstall.
If a failover driver is included in the install set, you can choose which failover driver to install. If thisvariable is not set in a Silent installation, or if it is set to something that is not included in the bundle,an error is logged and the installation exits. The valid value is mpio so you would enter the followingcommand:
REQUESTED_FO_DRIVER=mpio
Installing the storage management software on the AIX OS using thecommand prompt
About this task
Use this procedure to install the storage management software packages on the AIX OS. When youinstall the new software, earlier versions of the software are automatically removed as part of thatprocess.
For this procedure, you must first obtain an installation file that is specific to your operating systemand to the release level of the storage management software from your storage vendor. In thefollowing steps, the installation file is identified as SMIA-AIX-11.20.nnnn.nnnn.bin . Thecharacters nnnn.nnnn are, in practice, alpha-numeric characters: for example, SMIA-AIX-11.20.0000.0178.bin .
Steps
1. Make sure that you have root privileges, which are required to install the software.
2. Download or copy the installation file, SMIA-AIX-11.20.nnnn.nnnn.bin, to a directory onyour host.
• To download the installation file, navigate to NetApp Support and download the E-Series/EF-Series SANtricity Storage Manager 11.20.nnnn.nnnn and Related Software package for AIX.
3. Change your current directory to the installation directory by typing cd <install> on thecommand line and then pressing Enter.
<install> is the name of the directory on your server to which you downloaded the installationfile.
4. Change the file permissions for the installer using the chmod 777 SMIA-AIX-11.20.*.bincommand.
This will allow you to run the installer.
22 | SANtricity Storage Manager 11.20 Software Installation Reference

5. Execute the installer using the ./SMIA-AIX-11.20.*.bin command.
The following messages appear in the console window:
Preparing to install...Extracting the JRE from the installer archive...Unpacking the JRE...Extracting the installation resources from the installer archive...Configuring the installer for this system's environment...Launching installer...Graphical installers are not supported by the VM. The console mode will be used instead...=================================================================SANtricity (created with InstallAnywhere)--------------------------------------------------------------Preparing CONSOLE Mode Installation...============================================================Introduction------------The installation program will allow you to select and installthe storage array host software and tools required to configure,manage, and monitor a storage array.Respond to each prompt to proceed to the next step in the installation.If you want to change something on a previous step, type 'back'.You may cancel this installation at any time by typing 'quit'.PRESS <ENTER> TO CONTINUE:
6. Press Enter when prompted.
The first section of the license agreement is displayed in the console window.
7. Continue pressing Enter as you read through the license agreement.
8. When asked DO YOU ACCEPT THE TERMS OF THIS LICENSE AGREEMENT? (Y/N): enter Yto accept.
You are prompted to select your installation type.
9. Based on the type of installation that you are performing, select one of these options by enteringthe corresponding number.
The steps in this procedure describe a typical (full) installation.
• Enter 1 to choose Typical (Full Installation) . This selection, which is the default,installs all of the packages on the system. Choose this option if you do not know whichinstallation type to select.
• Enter 2 to choose Management Station . This selection installs the software that is neededto configure, manage, and monitor a storage array. This option is for your workstation ormanagement computer.
• Enter 3 to choose Host . This selection installs the storage array server software. Use this typeof installation for the host (server) that is connected to the storage array.
• Enter 4 to choose Customize . This selection lets you customize the features to be installed.
A pre-installation summary appears.
=====================================================================Pre-Installation Summary------------------------Please Review the Following Before Continuing:Install Folder: /opt/StorageManagerRequired Disk Space875 MB
Installing SANtricity Storage Manager | 23

Available Disk Space5,032 MBPRESS <ENTER> TO CONTINUE:
10. Press Enter to continue.
The installation may take several minutes. After it has completed, the following message appears:
=====================================================================Installation Complete---------------------Congratulations. SANtricity has been successfully installed to:/opt/StorageManagerPRESS <ENTER> TO EXIT THE INSTALLER:
11. Press Enter to exit the installer.
Several files and program packages are installed to the /opt/SMgr directory and the /opt/StorageManager directory.
12. Issue a re-scan on the server by typing cfgmgr.
A re-scan allows the server to recognize the changes you have made without rebooting.
AIX uses the native MPIO (non-ALUA) for failover. After you have installed the host package,see the SANtricity Storage Manager Multipath Drivers Guide to configure the multipath driver.
Installing E-Series entries in the ODM on AIX and VIOS
Note: If you have installed the SMinstaller on AIX, you do not need to perform this procedure.
Note: You must install the ODM package on all AIX I/O attached hosts.
The Object Data manager (ODM) manages a database of information about the system and deviceconfiguration integrated into the AIX OS and Virtual I/O Server (VIOS). VIOS enables you to sharephysical resources between logical AIX partitions.
Uninstalling previous E-Series entries
Step
1. To uninstall the previous E-Series entries package, run the following command:
> installp -ug disk.fcp.netapp_eseries.rte
When the previous E-Series entries package has been successfully uninstalled, a confirmationmessage appears:
Installation Summary--------------------Name Level Part Event Result----------------------------------------------------------------------disk.fcp.netapp_eseries.rte 1.1.0.0 USR DEINSTALL SUCCESS
Installing new E-Series entries
Steps
1. Download the ODM entries file (disk.fcp.netapp_eseries.1.1.0.0.bff) from NetApp Support.
24 | SANtricity Storage Manager 11.20 Software Installation Reference

2. To install the new E-Series entries package, run the following command:
> installp -agwX -d [device] disk.fcp.netapp_eseries.rte
When the new E-Series entries package has been successfully installed you receive a confirmationmessage similar to the following:
Installation Summary----------------------Name Level Part Event Result----------------------------------------------------------------------disk.fcp.netapp_eseries.rte 1.1.0.0 USR APPLY SUCCESS
3. Issue a re-scan on the server by typing cfgmgr. A re-scan allows the server to recognize thechanges you have made without rebooting. Alternatively, you can reboot the server.
Validating the ODM in AIX and VIOS
About this task
The Object Data Manager (ODM) manages a database of information about the system and deviceconfiguration integrated into the AIX and VIOS operating systems. After you install the E-Seriesentries package, you must validate that the ODM was updated to enable failover.
Step
1. To validate that the ODM was updated, run the following command:
> lslpp -l disk.fcp.netapp_eseries.rte
Verify the state is COMMITTED, as in the following:
Fileset Level State Description----------------------------------------------------------------------Path: /usr/lib/objreposdisk.fcp.netapp_eseries.rte 1.1.0.0 COMMITTED NetApp E-Series Software
Server core setup procedure: Installing the storage management software
Before you begin
For this procedure, you must first obtain an installation file that is specific to your operating systemand to the release level of the storage management software. In the following steps, the installationfile is identified as SMIA-WINX64-11.20.nnnn.nnnn.exe. The characters nnnn.nnnn are, in practice,alpha-numeric characters: for example, SMIA-WINx64-11.20.0300.0020.exe. Download this filefrom NetApp Support.
Steps
1. Download or copy the installation file, SMIA-WINx64-11.20.nnnn.nnnn.exe, to a directory onyour host.
2. You have three options for doing the installation:
Installing SANtricity Storage Manager | 25

• You can specify the console parameter during the installation, for example:
<hsw executable.exe> -i console
Using this option, questions appear on the console that enable you to choose installationvariables. This installation does not use a graphical user interface (GUI). Contact yourtechnical support Representative if you need to change the installation options.
• You can specify the silent parameter during the installation, for example:
<hsw executable.exe> -i silent
Using this option, the command installs the storage management software using all of thedefaults. A silent installation uses a resource file that contains all of the required information,and it does not return any windows until the installation is complete. This installation does notuse a graphical user interface (GUI). Contact technical support if you need to change theinstallation options.
• You can use the SANtricity InstallAnywhere installation. For example:
<hsw executable.exe>
3. Change your current directory to the installation directory by typing cd <installdirectory> on the command line and then select Enter.
4. Type SMIA-WINx64-11.20.nnnn.nnnn.exe.
The SANtricity Storage Manager InstallAnywhere dialog is displayed.
5. Press the Next button on the first screen of the SANtricity Storage Manager InstallAnywherewizard.
The license agreement is displayed on the second screen of the wizard.
6. Select the I accept the terms of the license agreement radio button, then select Next.
The Select Installation Type screen is displayed.
7. On the Select Installation Type screen, select the Typical (Full Installation) radio button. Thischoice installs both the SMclient software as well as the MPIO multipath driver. Select Next.
The Automatically Start Monitor? screen is displayed.
8. On the Automatically Start Monitor? screen, select either the Automatically start monitor orthe Do not automatically start the monitor radio button, then select Next.
The Pre-Installation Summary screen is displayed. Make note of the Install directory where thesoftware will reside.
9. On the Pre-Installation Summary screen, select the Yes, restart my system radio button. Thenselect Done.
10. After the system reboots, make sure that the appropriate files are listed in the installationdirectory (for example C:\ProgramFiles (x86)\StorageManager).
A full installation should include these directories:
• util (SMutil)
• client (SMclient)
26 | SANtricity Storage Manager 11.20 Software Installation Reference
• agent (SMagent)
11. Change to the client directory and type SMclient.bat.
12. For failover and other host-side setup information, see the SANtricity Storage Manager MultipathDrivers Guide and the SANtricity 11.20 Windows express guide appropriate for your protocol.
Installing the storage management software on the Solaris OS
About this task
Use this procedure to install the storage management software packages on the Solaris OS. Whenyou install the new software, earlier versions of the software are automatically removed as part ofthat process.
For this procedure, you must first obtain an installation file that is specific to your operating systemand to the release level of the storage management software from NetApp Support. In the followingsteps, the installation file is identified as SMIA-SOLX86-11.20.00nn.nnnn.bin (for the Intel x86platform) or SMIA-SOL-11.20.06nn.nnnn.bin (for the SPARC platform). The characters nn.nnnnare, in practice, alpha-numeric characters: for example, SMIA-SOLX86-11.20.0000.0178.bin.
Steps
1. Make sure that you have root privileges, which are required to install the software.
2. Download or copy the installation file, SMIA-SOLX86-11.20.nnnn.nnnn.bin or SMIA-SOL-11.20.nnnn.nnnn.bin, to a directory on your host.
• To download the installation file, navigate to NetApp Support and download the E-Series/EF-Series SANtricity Storage Manager 11.20.06.nnnn.nnnn and related software package for yourSolaris platform.
3. Change your current directory to the installation directory by typing cd <install> on thecommand line and then pressing Enter.
<install> is the name of the directory on your server to which you downloaded the installationfile.
4. Change the file permissions for the installer using the chmod 777 SMIA-SOL*.bin command.
This action allows you to run the installer.
5. Execute the installer using the ./SMIA-SOL*.bin command.
The following messages appear in the console window:
Preparing to install...Extracting the JRE from the installer archive...Unpacking the JRE...Extracting the installation resources from the installer archive...Configuring the installer for this system's environment...Launching installer...
After the software is loaded, the Introduction window appears.
6. Click Next.
The License Agreement window appears.
7. Select the option that accepts the terms of the License Agreement.
8. Click Next.
The Select Installation Type window appears.
Installing SANtricity Storage Manager | 27

9. Based on the type of installation you are performing, select one of these options.
The steps in this procedure describe a typical (full) installation.
• Typical (Full Installation) – This selection, which is the default, installs all of the packageson the system. Choose this option if you do not know which installation type to select.
• Management Station – This selection installs the software that is needed to configure,manage, and monitor a storage array. This option is for your workstation or managementcomputer.
• Host – This selection installs the storage array server software. Use this type of installation forthe host (server) that is connected to the storage array.
• Custom – This selection lets you customize the features to be installed.
The installation type that you select is highlighted in blue text.
10. Click Next.
A Software Incompatibility Detected screen may appear if there is a previous version of theSANtricity software installed on your system. If this is the case, click OK to override the pre-existing version.
The Pre-Installation Summary window appears.
11. Click Install.
The Installing window appears while the software is loading. When the software is loaded, theInstall Complete window appears.
Important:
If you cancel an installation before the installation completes or while the progress bar is stillvisible, the installation stops prematurely. The software creates an installation log. You mustmanually uninstall the software. If you cancel the installation before the progress bar is visible,you do not need to uninstall the software.
12. To exit the installation program, click Done.
Several files and program packages are installed to the /opt/SMgr directory and the /opt/StorageManager directory.
13. If you have volumes mapped to the server from a previous installation of the SANtricity software,run devfsadm -C, devfsadm, and cfgadm -al.
These commands ensure that the server continues to have access to the mapped volumes.
14. Solaris uses the native MPx10 for failover. After installing the host package, see the SANtricityStorage Manager Multipath Drivers Guide to enable MPx10 on the host.
Configuring the host bus adapters (Solaris hosts)
A host bus adapter (HBA) is an adapter on the communications bus of the host computer. Thisadapter acts as a bridge and provides connectivity between both the host computer and the storage.Host bus adapters free up critical server processing time. Depending on the configuration of yourstorage array, you must set up the HBA to enable storage access using Fibre Channel (FC), iSCSI,SAS, or Infiniband connections.
You must set up the operating system (OS) type in SANtricity Storage Manager, using StoragePartition Mapping to configure the system to operate with the OS and multipath driver that isinstalled on the host. In addition, other operating system and failover driver settings may benecessary to make sure that your storage array runs properly. For details, refer to Defining the hostson page 47.
28 | SANtricity Storage Manager 11.20 Software Installation Reference

Refer to NetApp Interoperability Matrix at NetApp Interoperability Matrix Tool for host operatingsystem, driver, and component compatibility information, as well as any specific configurationrequirements or restrictions.
When configuring the failover or multi-path driver, refer to theSANtricity Storage ManagerMultipath Drivers Guide for detailed information about configuring these drivers. There might beadditional steps required to configure the drivers for Asymmetric Logical Unit Access (ALUA)support. ALUA is a feature of the controllers that provides access to a volume through any controllerport.
Installing SANtricity Storage Manager | 29
Starting SANtricity Storage Manager and addingstorage arrays to the management domain
This topic describes starting SANtricity Storage Manager, adding storage arrays to the managementdomain, and naming the storage array. The procedures used will vary depending on the networkconfiguration in use and how you may have initially configured the controllers.
Things to know: Storage array• Make sure that you have connected all of the applicable cables.
• Make sure that you have turned on the power to the storage array (powering on the attached drivetrays first, and then the controller-drive tray or controller tray).
• Make sure that you have installed the applicable storage management software.
Things to know: Initial DHCP configuration of the controllermanagement ports and default IP addresses
By default, E-Series controllers ship with DHCP enabled on both network ports. When the networkport is in a 'link down' state, that is, disconnected from a LAN, the SANtricity Storage Managerreports its configuration as either static, displaying an IP address of 0.0.0.0 (earlier releases), orDHCP enabled with no IP address reported (later releases). After the network port is in a 'link up'state (that is, connected to a LAN), it attempts to obtain an IP address through DHCP.
If the controller is unable to obtain a DHCP address on a given network port, it reverts to a default IPaddress, which may take up to 3 minutes. The default IP addresses are as follows:
Controller 1 (port 1): IP Address: 192.168.128.101
Controller 1 (port 2): IP Address: 192.168.129.101
Controller 2 (port 1): IP Address: 192.168.128.102
Controller 2 (port 2): IP Address: 192.168.129.102
Note: Port 2 on the controllers should be reserved for Customer Support usage, so the defaultnetwork settings of DHCP enabled should not be changed.
The default addresses are not persisted across link down events. When a network port on a controlleris set to use DHCP, the controller attempts to obtain a DHCP address on every link up event,including cable insertions, reboots, and power cycles. Any time a DHCP attempt fails, the defaultstatic IP address for that port is used.
If you want to use DHCP to assign the IP address of the controller, you need to connect the controllerto a network that can process DHCP requests to obtain a DHCP address for the controller. Whenusing DHCP, use a permanent DHCP lease.
If you prefer to use a static IP address, set a static IP using SANtricity Storage Manager. After a staticIP is configured, it remains set through all link down/up events.
30
Things to know: Naming the storage array• A storage array name can consist of letters, numbers, and the special characters underscore (_),
hyphen (-), and pound sign (#). No other special characters are permitted.
• Limit the name to 30 characters. Any leading and trailing spaces in the name are deleted.
• Use a unique, meaningful name that is easy to understand and to remember. Avoid arbitrarynames or names that would quickly lose their meaning in the future. When you have named astorage array, the prefix “Storage Array” is automatically added to the name shown in the Logicalpane and in the Enterprise Management Window. For example, if you named the storage array“Engineering,” it appears as “Storage Array Engineering.”
• The storage management software does not check for duplicate names. Check the EnterpriseManagement Window to make sure that the name you have chosen is not used by another storagearray.
• When you first discover a storage array or manually add it, the storage array will have a defaultname of “unnamed.”
Determining the appropriate procedure to add the storagearray to the management domain
You decided what kind of method to use in Deciding on the management method on page 8. See thefollowing table to determine the correct procedure to use to add the storage array to the managementdomain.
If you are... Do this...
• Using out-of-band management and DHCPaddressing of the management ports, and themanagement station is on the same sub-network as the array.
• Using out-of-band IPv6 stateless addressauto-configuration without a DHCP server(IPv6 networks only) and the managementstation is on the same subnetwork as thestorage.
See Adding the storage array to themanagement domain using automatic discovery:Out-of-band management on page 32.
• Using out-of-band management and DHCPaddressing of the management ports, andyou will get the controller management portIP addresses from the DHCP servers to addthe array to the management domain.
• Using out-of-band IPv6 stateless addressauto-configuration without a DHCP server(IPv6 networks only) and the managementstation is NOT on the same subnetwork asthe storage.
See Manually adding a storage array to themanagement domain: Out-of-band managementon page 35.
Starting SANtricity Storage Manager and adding storage arrays to the management domain | 31

If you are... Do this...
Using DHCP addressing of the managementports for initial discovery of the array, and thenswitching to use static management portaddressing.
See Adding the storage array to themanagement domain by initially using DHCPand then changing to static addressing on page33.
Using out-of-band management and want toconfigure DHCP addressing of the managementports. You previously used the Installation andSetup Guide and initially configured themanagement ports to use the default IPaddresses.
See Adding the storage array to themanagement domain and configuring DHCPaddressing on page 36.
Using out-of band management and will not beusing DHCP addressing. You are not using IPv6stateless address auto-configuration. Yourmanagement station is not on the same sub-network as the storage array.
Choose one of the following options:
• Use in-band management temporarily toconfigure the controllers. This option is forFibre Channel and SAS environments only.See Adding the storage array and manuallyconfiguring the controllers by using the in-band method initially on page 38.
• Temporarily set up a private network toconfigure the controller management ports.You will first need to configure themanagement station so that it resides on thesame subnetwork during controllermanagement IP configuration. See Addingthe storage array and manually configuringthe controllers by setting up a temporaryprivate network on page 39.
Using in-band management. See Adding the storage array to themanagement domain: In-band management onpage 37.
Adding the storage array to the management domain usingautomatic discovery: Out-of-band management
Before you begin
The prerequisites for this procedure include:
• The management station is attached to the same subnet as the storage.
• Ethernet cables are attached to each controller.
• The DHCP server is configured to assign a permanent (static) DHCP lease.
• If you are using IPv6 stateless address auto configuration without a DHCP server, you haveconnected at least one router for sending the IPv6 network address prefix in the form of routeradvertisements. By default, the controllers automatically obtain their IP addresses by combiningthe auto-generated link local address and the IPv6 network address prefix after you turn on thepower to the controller-drive tray.
32 | SANtricity Storage Manager 11.20 Software Installation Reference

Steps
1. Open the SANtricity Storage Manager.
The Enterprise Management Window (EMW) is displayed.
Note: When you open SANtricity Storage Manager for the first time, the Select AdditionMethod screen prompts you to select whether you want to choose the Automatic or Manualmethod to add a new storage array.
2. On the Select Addition Method screen, select the Automatic radio button, and then select OK.
This process finds all of the storage arrays on the local sub-network. Several minutes might lapseto complete the process.
3. In the EMW Devices tab, double-click the storage array to open the Array ManagementWindow (AMW).
When you open the AMW for the first time, the Disk Pool Automatic Configuration screen isdisplayed. Select No to dismiss the wizard and name the storage array.
4. Name the storage array.
a. In the EMW Setup tab, select Name/Rename Storage Arrays.
b. In the Select storage array list, select the storage array you added.
c. In the Storage array name field, type a name for the storage array. Storage array names mustnot exceed 30 characters and cannot contain spaces. Names can contain letters, numbers,underscores (_), hyphens(-), and pound signs (#). Choose a descriptive name for the storagearray to make it easier for data center administrators to manage the storage resources overtime.
5. Go to Configuring other SANtricity initial setup information on page 42 to continue setting upthe storage array.
Adding the storage array to the management domain byinitially using DHCP and then changing to static addressing
Before you begin
The prerequisites for this procedure include:
• The management station is attached to the same subnet as the storage.
• Ethernet cables are attached to each controller.
Steps
1. Open the SANtricity Storage Manager.
The Enterprise Management Window (EMW) is displayed.
Note: When you open SANtricity Storage Manager for the first time, the Select AdditionMethod screen prompts you to select whether you want to choose the Automatic or Manualmethod to add a new storage array.
2. On the Select Addition Method screen, select the Automatic radio button, and then select OK.
This process finds all of the storage arrays on the local sub-network. Several minutes might lapseto complete the process.
Starting SANtricity Storage Manager and adding storage arrays to the management domain | 33

3. In the EMW Devices tab, double-click the storage array to open the Array ManagementWindow (AMW).
When you open the AMW for the first time, the Disk Pool Automatic Configuration screen isdisplayed. Select No to dismiss the wizard and name the storage array.
4. Name the storage array.
a. In the EMW Setup tab, select Name/Rename Storage Arrays.
b. In the Select storage array list, select the storage array you added.
c. In the Storage array name field, type a name for the storage array. Storage array names mustnot exceed 30 characters and cannot contain spaces. Names can contain letters, numbers,underscores (_), hyphens(-), and pound signs (#). Choose a descriptive name for the storagearray to make it easier for data center administrators to manage the storage resources overtime.
5. Configure the network configuration information of the controllers, using information you obtainfrom your network administrator.
a. Select the Hardware tab in the AMW.
b. Select Hardware > Controller > Configure > Management Ports.
c. On the Change Network Configuration dialog box, select Controller A, Port 1 in theEthernet port drop-down list.
d. From the Speed and duplex mode drop-down list, select Auto-negotiate.
Attention: Possible Connectivity Issues - After you select Auto-negotiate, make sure thatyour Ethernet switch also is set to Auto-negotiate.
e. Depending on the format of your network configuration information, select the Enable IPv4check box, the Enable IPv6 check box, or both check boxes.
f. Depending on the format you have selected, enter the network configuration information (IPaddress, subnet mask, and gateway or IP address and routable IP address) in the IPv4 Settingstab or the IPv6 Settings tab.
Note: You must obtain the network configuration information from your networkadministrator.
g. Select Controller B, Port 1 in the Ethernet port drop-down list, and repeat step c through stepf for controller B.
h. Select OK.
6. Return to the EMW, select the storage array, and then select Edit > Remove > Storage Array.
7. On the EMW Setup tab, select Add Storage Arrays.
8. On the Select Addition Method dialog box, select the Manual radio button.
9. On the Add New Storage Array - Manual screen, make sure that the default Out-of-bandmanagement radio button is selected. Enter the IP address assigned to controller A, port 1, andcontroller B, port 1, on the storage array you are adding.
10. Go to Configuring other SANtricity initial setup information on page 42 to continue setting upthe storage array.
34 | SANtricity Storage Manager 11.20 Software Installation Reference
Manually adding a storage array to the managementdomain: Out-of-band management
Before you begin
The prerequisites for this procedure include:
• If you are using DHCP, the DHCP server is configured to assign a permanent (static) DHCPlease. You have obtained the IP addresses of the controller management ports from the DHCPserver.
• If you are using IPv6 stateless address auto-configuration without a DHCP server, you haveconnected at least one router for sending the IPv6 network address prefix in the form of routeradvertisements. You have obtained the IP addresses of the controllers.
Steps
1. Open SANtricity Storage Manager.
The Enterprise Management Window (EMW) is displayed.
Note: When you open SANtricity Storage Manager for the first time, the Select AdditionMethod screen prompts you to select whether you want to choose the Automatic or Manualmethod to add a new storage array.
2. On the Select Addition Method screen, select the Manual radio button, and then select OK.
3. On the Add New Storage Array - Manual screen, make sure that the default Out-of-bandmanagement radio button is selected. Enter the IP address assigned to controller A, port 1, andcontroller B, port 1, on the storage array you are adding.
Note: You can enter the IP addresses in either the IPv4 format or the IPv6 format.
Note: Alternatively, you can enter the DNS/network name of each controller.
4. Select Add.
5. On the Storage Array Added screen, select No to finish adding storage arrays.
6. In the EMW Devices tab, double-click the storage array to open the Array ManagementWindow (AMW).
When you open the AMW for the first time, the Disk Pool Automatic Configuration screen isdisplayed. Select No to dismiss the wizard and finish setting up the management IP addresses.
7. Name the storage array.
a. In the EMW Setup tab, select Name/Rename Storage Arrays.
b. In the Select storage array list, select the storage array you added.
c. In the Storage array name field, type a name for the storage array. Storage array names mustnot exceed 30 characters and cannot contain spaces. Names can contain letters, numbers,underscores (_), hyphens(-), and pound signs (#). Choose a descriptive name for the storagearray to make it easier for data center administrators to manage the storage resources overtime.
d. Select OK.
Starting SANtricity Storage Manager and adding storage arrays to the management domain | 35
8. Go to Configuring other SANtricity initial setup information on page 42 to continue setting upthe storage array.
Adding the storage array to the management domain andconfiguring DHCP addressing
During this procedure, you change the storage array management ports you configured in theInstallation and Setup Guide from static addressing to DHCP addressing.
Steps
1. Disconnect the private network you set up using the Installation and Setup Instructions, changeyour management station to connect to your regular network, and prepare the DHCP server.
a. Make sure your DHCP server is connected to your regular network and that it is configured toassign a permanent (static) DHCP lease.
b. Disconnect the management station from the switch or hub and reconnect it into your LAN.
c. Change the management station to use DHCP. Refer to your operating system documentationfor instructions on how to change the network settings on the management station and how toverify that the address has changed.
d. Disconnect port 1 of each controller from the switch or hub and reconnect it into your LAN.
2. Open the SANtricity Storage Manager.
The Enterprise Management Window (EMW) is displayed.
Note: When you open SANtricity Storage Manager for the first time, the Select AdditionMethod screen prompts you to select whether you want to choose the Automatic or Manualmethod to add a new storage array.
3. On the Select Addition Method screen, select the Automatic radio button, and then select OK.
This process finds all of the storage arrays on the local sub-network. Several minutes might lapseto complete the process.
4. In the EMW Devices tab, double-click the storage array to open the Array ManagementWindow (AMW).
When you open the AMW for the first time, the Disk Pool Automatic Configuration screen isdisplayed. Select No to dismiss the wizard and name the storage array.
5. Name the storage array.
a. In the EMW Setup tab, select Name/Rename Storage Arrays.
b. In the Select storage array list, select the storage array you added.
c. In the Storage array name field, type a name for the storage array. Storage array names mustnot exceed 30 characters and cannot contain spaces. Names can contain letters, numbers,underscores (_), hyphens(-), and pound signs (#). Choose a descriptive name for the storagearray to make it easier for data center administrators to manage the storage resources overtime.
6. Go to Configuring other SANtricity initial setup information on page 42 to continue setting upthe storage array.
36 | SANtricity Storage Manager 11.20 Software Installation Reference
Adding the storage array to the management domain: In-band management
Before you begin
The prerequisites for this procedure include:
• The host agent software is installed on a host attached to the storage array.
• You know the host name or IP address of this host.
• For Red Hat Linux 7.1 (RHEL 7.1): Load the sg driver to ensure that SANtricity Storage Managercan discover the management LUN. If the sg driver is not loaded, in-band management will notfunction.
Steps
1. Open the SANtricity Storage Manager.
The Enterprise Management Window (EMW) is displayed.
Note: When you open SANtricity Storage Manager for the first time, the Select AdditionMethod screen prompts you to select whether you want to choose the Automatic or Manualmethod to add a new storage array.
2. On the Select Addition Method screen, select the Manual radio button, and then select OK.
3. On the Add New Storage Array - Manual screen, select the In-band management radiobutton. Enter the host name or IP address of the host that is running the host-agent software, andselect Add.
Note: You can enter the IP addresses in either the IPv4 format or the IPv6 format.
4. On the Storage Array Added screen, select No to finish adding storage arrays.
5. In the EMW Devices tab, double-click the storage array to open the Array ManagementWindow (AMW).
When you open the AMW for the first time, the Disk Pool Automatic Configuration screen isdisplayed. Select No to dismiss the wizard and finish setting up the management IP addresses.
6. Name the storage array.
a. In the EMW Setup tab, select Name/Rename Storage Arrays.
b. In the Select storage array list, select the storage array you added.
c. In the Storage array name field, type a name for the storage array. Storage array names mustnot exceed 30 characters and cannot contain spaces. Names can contain letters, numbers,underscores (_), hyphens(-), and pound signs (#). Choose a descriptive name for the storagearray to make it easier for data center administrators to manage the storage resources overtime.
d. Select OK.
7. Go to Configuring other SANtricity initial setup information on page 42 to continue setting upthe storage array.
Starting SANtricity Storage Manager and adding storage arrays to the management domain | 37

Adding the storage array and manually configuring thecontrollers by using the in-band method initially
Before you begin
The prerequisites for this procedure include:
• The host agent software is installed on a host attached to the storage array.
• You know the host name or IP address of this host.
• You have obtained the network configuration information from your network administrator for thecontrollers (IP address, subnet mask, and gateway or IP address and routable IP address).
Note: This method does not work if the controller-drive tray uses an iSCSI protocol. When youinitially configure an array in this environment, there are no IP addresses set up on the iSCSI ports,required for iSCSI sessions from the host to the storage array and in-band management. If you useiSCSI protocol, see Adding the storage array and manually configuring the controllers by settingup a temporary private network on page 39.
Steps
1. Open the SANtricity Storage Manager.
The Enterprise Management Window (EMW) is displayed.
Note: When you open SANtricity Storage Manager for the first time, the Select AdditionMethod screen prompts you to select whether you want to choose the Automatic or Manualmethod to add a new storage array.
2. On the Select Addition Method screen, select the Manual radio button, and then select OK.
3. On the Add New Storage Array - Manual screen, select the In-band management radiobutton. Enter the host name or IP address of the host that is running the host-agent software, andselect Add.
Note: You can enter the IP addresses in either the IPv4 format or the IPv6 format.
4. On the Storage Array Added screen, select No to finish adding storage arrays.
5. In the EMW Devices tab, double-click the storage array to open the Array ManagementWindow (AMW).
When you open the AMW for the first time, the Disk Pool Automatic Configuration screen isdisplayed. Select No to dismiss the wizard and finish setting up the management IP addresses.
6. Name the storage array.
a. In the EMW Setup tab, select Name/Rename Storage Arrays.
b. In the Select storage array list, select the storage array you added.
c. In the Storage array name field, type a name for the storage array. Storage array names mustnot exceed 30 characters and cannot contain spaces. Names can contain letters, numbers,underscores (_), hyphens(-), and pound signs (#). Choose a descriptive name for the storagearray to make it easier for data center administrators to manage the storage resources overtime.
d. Select OK.
38 | SANtricity Storage Manager 11.20 Software Installation Reference

7. Configure the network configuration information of the controllers, using information you obtainfrom your network administrator.
a. Select the Hardware tab in the AMW.
b. Select Hardware > Controller > Configure > Management Ports.
c. On the Change Network Configuration dialog box, select Controller A, Port 1 in theEthernet port drop-down list.
d. From the Speed and duplex mode drop-down list, select Auto-negotiate.
Attention: Possible Connectivity Issues – After you select Auto-negotiate, make sure thatyour Ethernet switch also is set to Auto-negotiate.
e. Depending on the format of your network configuration information, select the Enable IPv4check box, the Enable IPv6 check box, or both check boxes.
f. Depending on the format you have selected, enter the network configuration information (IPaddress, subnet mask, and gateway or IP address and routable IP address) in the IPv4 Settingstab or the IPv6 Settings tab.
Note: You must obtain the network configuration information from your networkadministrator.
g. Select Controller B, Port 1 in the Ethernet port drop-down list, and repeat step c through stepf for controller B.
h. Select OK.
8. Return to the EMW, select the storage array, and then select Edit > Remove > Storage Array.
9. On the EMW Setup tab, select Add Storage Arrays.
10. On the Select Addition Method dialog box, select the Manual radio button.
11. On the Add New Storage Array - Manual screen, make sure that the default Out-of-bandmanagement radio button is selected. Enter the IP address assigned to controller A, port 1, andcontroller B, port 1, on the storage array you are adding.
12. Go to Configuring other SANtricity initial setup information on page 42 to continue setting upthe storage array.
Adding the storage array and manually configuring thecontrollers by setting up a temporary private network
Before you begin
The prerequisites for this procedure include:
• You have connected the management station directly into Ethernet port 1 on each controller.
• Alternatively, you have connected the management station and controllers with a hub (thisrequires an Ethernet cross-over cable).
• If you do not have a hub, you have connected the management station and controllers indirectlyusing an Ethernet switch.
• You have obtained the network configuration information from your network administrator for thecontrollers (IP address, subnet mask, and gateway or IP address and routable IP address).
Starting SANtricity Storage Manager and adding storage arrays to the management domain | 39
Note: All controller -drive trays use Auto-MDIX (automatic medium-dependent interfacecrossover) technology to detect the cable type and configure the connection to the managementstation accordingly. You only need to use an Ethernet cross-over cable if you are using a hubconnection.
Steps
1. Change the IP address on the TCP/IP port on the management station from an automaticassignment to a manual assignment by using the default IP address subnet of the controllers.
a. Make note of the current IP address of the management station so that you can revert back toit after you have completed the procedure.
Note: You must set the IP address for the management station to something other than thecontroller IP addresses (for example, use 192.168.128.100 for an IPv4 network, or useFE80:0000:0000:0000:02A0:B8FF:FE29:1D7C for an IPv6 network.
Note: In an IPv4 network, the default IP addresses for Ethernet port 1 on controller A andcontroller B are 192.168.128.101 and 192.168.128.102, respectively.
b. Change the IP address. Refer to your operating system documentation for instructions on howto change the network settings on the management station and how to verify that the addresshas changed.
c. If your network is an IPv4 network, check the subnet mask to verify that it is set to255.255.255.0, which is the default setting.
d. From a command prompt, ping the controller IPs to make sure they are accessible.
Example
> ping 192.168.128.102
Reply from 192.168.128.102: bytes = 32 time<1ms TTL = 64
Ping statistics for 192.168.128.102:
Packets: Sent = 4, Received =4, Lost = 0 (0% loss)
Approximate round trip times in milli-seconds:
Minimum = 0ms, Maximum = 0mx, Average = 0 ms
2. Open the SANtricity Storage Manager.
The Enterprise Management Window (EMW) is displayed.
Note: When you open SANtricity Storage Manager for the first time, the Select AdditionMethod screen prompts you to select whether you want to choose the Automatic or Manualmethod to add a new storage array.
3. On the Select Addition Method screen, select the Automatic radio button, and then select OK.This process finds all the storage arrays on the local sub-network. Several minutes might lapse tocomplete the process.
40 | SANtricity Storage Manager 11.20 Software Installation Reference

4. In the EMW Devices tab, double-click the storage array to open the Array ManagementWindow (AMW).
When you open the AMW for the first time, the Disk Pool Automatic Configuration screen isdisplayed. Select No to dismiss the wizard and finish setting up the management IP addresses.
5. Name the storage array.
a. In the EMW Setup tab, select Name/Rename Storage Arrays.
b. In the Select storage array list, select the storage array you added.
c. In the Storage array name field, type a name for the storage array. Storage array names mustnot exceed 30 characters and cannot contain spaces. Names can contain letters, numbers,underscores (_), hyphens(-), and pound signs (#). Choose a descriptive name for the storagearray to make it easier for data center administrators to manage the storage resources overtime.
d. Select OK.
6. Configure the network configuration information of the controllers, using information you obtainfrom your network administrator.
a. Select the Hardware tab in the AMW.
b. Select Hardware > Controller > Configure > Management Ports.
c. On the Change Network Configuration dialog box, select Controller A, Port 1 in theEthernet port drop-down list.
d. From the Speed and duplex mode drop-down list, select Auto-negotiate.
Note: Attention Possible Connectivity Issues – After you select Auto-negotiate, makesure that your Ethernet switch also is set to Auto-negotiate.
e. Depending on the format of your network configuration information, select the Enable IPv4check box, the Enable IPv6 check box, or both check boxes.
f. Depending on the format you have selected, enter the network configuration information (IPaddress, subnet mask, and gateway or IP address and routable IP address) in the IPv4 Settingstab or the IPv6 Settings tab.
Note: You must obtain the network configuration information from your networkadministrator.
g. Select Controller B, Port 1 in the Ethernet port drop-down list, and repeat step c through stepf for controller B.
h. Select OK.
7. Disconnect the Ethernet cable from your management station, and reconnect the Ethernet cablesfrom the controllers into your regular network.
8. Complete the steps necessary to change the management station’s IP address back to what it wasinitially.
9. Go to Configuring other SANtricity initial setup information on page 42 to continue setting upthe storage array.
Starting SANtricity Storage Manager and adding storage arrays to the management domain | 41

Configuring other SANtricity initial setupinformation
In this section, you learn about the Enterprise Management Window and Array Management WindowSetup tabs and some key concepts for alert notification, setting a storage array password, andmanaging premium features. You use the SANtricity Storage Manager, including the online helptopics, to perform the tasks. The tasks included below provide a reference to the menu or tab optionto use in SANtricity Storage Manager.
Initial Configuration Task SANtricity menu or tab option
Configuring the delivery method forAutoSupport messages
From the Enterprise Management Window, selectthe Devices tab, select Discovered Storage Arrays,and then select Tools > AutoSupport >Configuration. Use the SANtricity online help ifneeded to complete the task.
Setting alert notifications From the Enterprise Management Window, selectthe Devices tab, select a node and then select Edit >Configure Alerts. Use the SANtricity online help ifneeded to complete the task.
Setting up a storage array password From the Array Management Window, selectStorage Array > Security > Set Password. Usethe SANtricity online help if needed to complete thetask.
Managing premium features From the Array Management Window, selectStorage Array > Premium Features. Use theSANtricity online help if needed to complete thetask.
Things to know: Enterprise Management Window and ArrayManagement Window
User Interface Description
EnterpriseManagementWindow
It is the main window that you see when you first start SANtricity StorageManager.
It provides you with a view of all of the storage arrays, including thepartially managed storage arrays, in your management domain.
It allows you to automatically or manually add and remove storage arrays,set alert notifications (through either AutoSupport (ASUP) messages oremail and SNMP), and perform other high-level configuration functions.
It provides a high-level status of the health of each storage array and asummary status of all of the storage arrays, including the partially managedstorage arrays, in your management domain.
It allows you to manage and configure an individual storage array bylaunching the Array Management Window.
42
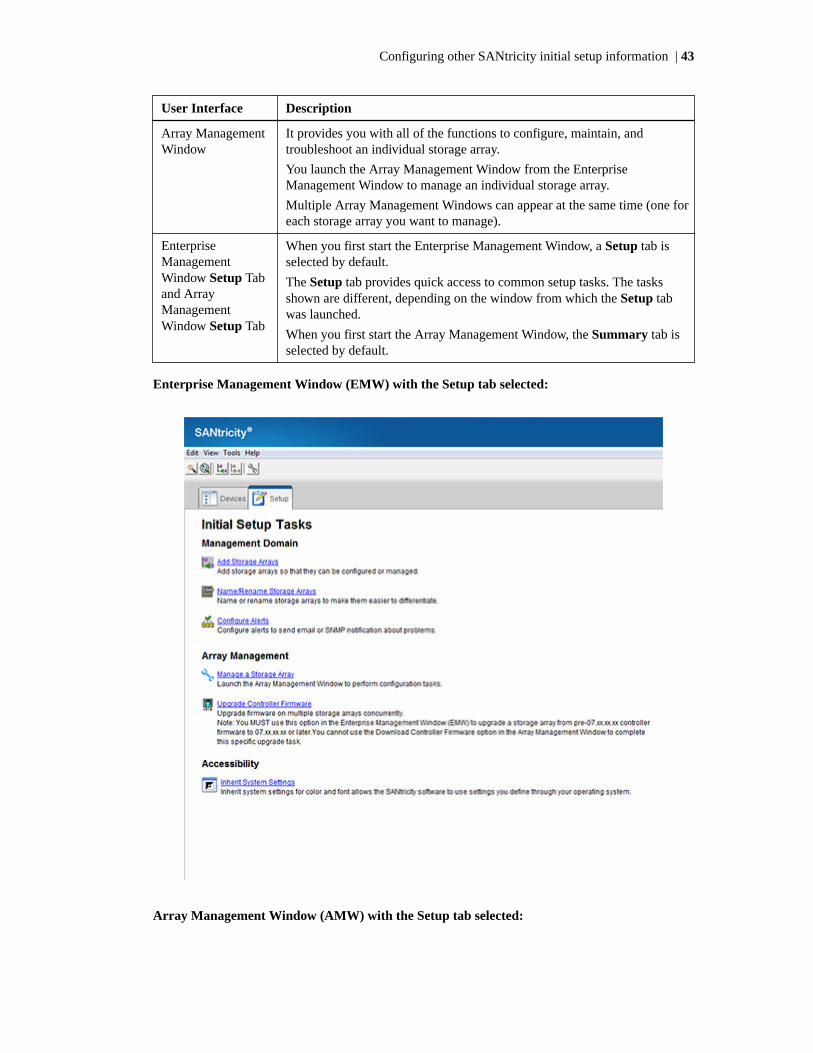
User Interface Description
Array ManagementWindow
It provides you with all of the functions to configure, maintain, andtroubleshoot an individual storage array.
You launch the Array Management Window from the EnterpriseManagement Window to manage an individual storage array.
Multiple Array Management Windows can appear at the same time (one foreach storage array you want to manage).
EnterpriseManagementWindow Setup Taband ArrayManagementWindow Setup Tab
When you first start the Enterprise Management Window, a Setup tab isselected by default.
The Setup tab provides quick access to common setup tasks. The tasksshown are different, depending on the window from which the Setup tabwas launched.
When you first start the Array Management Window, the Summary tab isselected by default.
Enterprise Management Window (EMW) with the Setup tab selected:
Array Management Window (AMW) with the Setup tab selected:
Configuring other SANtricity initial setup information | 43
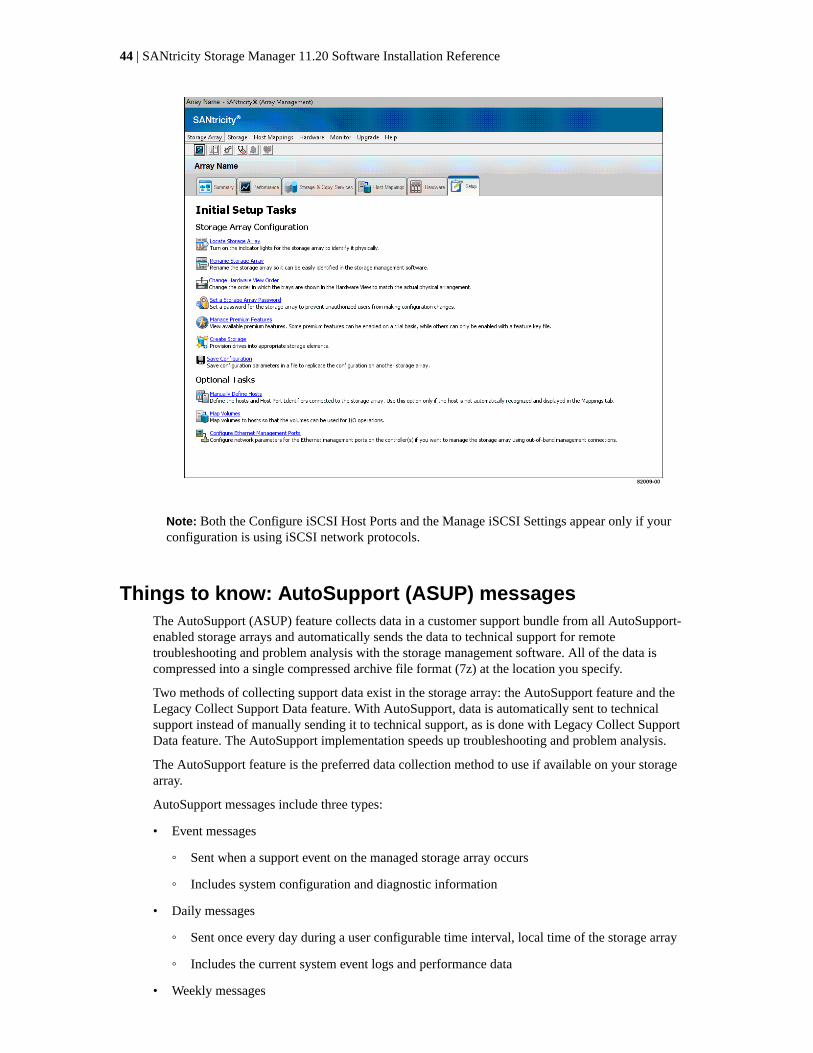
Note: Both the Configure iSCSI Host Ports and the Manage iSCSI Settings appear only if yourconfiguration is using iSCSI network protocols.
Things to know: AutoSupport (ASUP) messagesThe AutoSupport (ASUP) feature collects data in a customer support bundle from all AutoSupport-enabled storage arrays and automatically sends the data to technical support for remotetroubleshooting and problem analysis with the storage management software. All of the data iscompressed into a single compressed archive file format (7z) at the location you specify.
Two methods of collecting support data exist in the storage array: the AutoSupport feature and theLegacy Collect Support Data feature. With AutoSupport, data is automatically sent to technicalsupport instead of manually sending it to technical support, as is done with Legacy Collect SupportData feature. The AutoSupport implementation speeds up troubleshooting and problem analysis.
The AutoSupport feature is the preferred data collection method to use if available on your storagearray.
AutoSupport messages include three types:
• Event messages
◦ Sent when a support event on the managed storage array occurs
◦ Includes system configuration and diagnostic information
• Daily messages
◦ Sent once every day during a user configurable time interval, local time of the storage array
◦ Includes the current system event logs and performance data
• Weekly messages
44 | SANtricity Storage Manager 11.20 Software Installation Reference
◦ Sent once every week during a user configurable time interval, local time of the storage array
◦ Includes configuration and system state information
Before you configure the AutoSupport feature, make sure the following conditions are true:
• The AutoSupport feature must be enabled and activated on the storage array. (The AutoSupportfeature is activated and de-activated globally on a storage management station and may beenabled or disabled for an individual storage array.)
• The Storage Manager Event Monitor must be running on at least one machine with access to thestorage array and, preferably, on no more than one machine.
Things to know: Alert notifications using email or SNMPtraps
Setting alert destinations lets you specify addresses for the delivery of email messages and SNMPtrap messages whenever a critical problem occurs with the storage array. For more specificnotifications, you can configure the alert destinations at the storage management station, host, andstorage array levels.
• To set up alert notifications using SNMP traps, you must copy and compile a managementinformation base (MIB) file on the designated network management stations. The MIB file mightbe part of the storage management software package, or separately available in the download areawhere you obtained the management software.
• To send email to alert destinations, you must specify a mail server and a sender email address.
• To decode and show SNMP traps sent by the storage management software, you can configure ahost running a network management station to perform these tasks. You must copy and compile amanagement information base (MIB) file on the designated network management stations.
• You must have Event Monitor running on a machine (a management station or a host) to receivealerts. The machine should be one that runs continuously.
Note: If you choose not to automatically enable the event monitor during installation, you donot receive critical alert notifications. However, you can start Event Monitor later, assumingEvent Monitor is installed on at least one machine with access to the storage array. Note thatEvent Monitor must be running and that alert settings must already be configured at the time ofan alertable event. Otherwise, there will be no alert for that event because alerts were notenabled at the time of that event.
Things to know: Passwords• You can configure each storage array with an Administrator password and a Monitor password.
◦ Setting an Administrator password for your storage array protects it from being modified byunauthorized users. Modifying commands includes any functions that change the state of thestorage array, such as creating volumes and modifying the cache settings.
◦ Setting a Monitor password allows users, who are not allowed to modify storage arrayconfigurations, to view storage array configurations and to monitor storage array healthconditions.
• For increased protection, use a long password with at least 15 alphanumeric characters. Themaximum password length is 30 characters.
• Passwords are case sensitive.
Configuring other SANtricity initial setup information | 45

• You will be asked for a password only when you first attempt to change the configuration (such ascreating a volume) or when you first perform a destructive operation (such as deleting a volume).You must exit both the Array Management Window and the Enterprise Management Window tobe asked for the password again.
• If you no longer want to have the storage array password-protected, enter the current password,and then leave the New password text box and the Confirm password text box blank.
Note: Only a user with the Administrator password can set or change the Monitor password. Ifa user with View-only access (Monitor Password) attempts to launch the Set Password dialog,the system prompts for the Administrator password.
Note: Both the Administrator storage array password and the Monitor storage array passwordare different from the pass phrase used for Drive Security.
Note: If you forget your password, you must contact your technical support Representative forhelp to reset it.
Things to know: FeaturesYou enable a feature through a feature key file that you obtain from NetApp Support Site at NetAppSupport. The feature is either enabled or disabled.
46 | SANtricity Storage Manager 11.20 Software Installation Reference

Defining the hosts
Note: If you will not use storage partitions, you can skip the information about Things to know:Host groups on page 47 and Things to know: Storage partitions on page 47, and go to Procedure: Defining the hosts on page 50.
Note: You must know the unique initiator port name of each HBA port (World Wide Port Names inthe case of FC). See the HBA utility or operating system documentation for instructions to obtainthese unique initiator or WWPN port names.
Key terms
host context agent
A software component that runs on each of the hosts in a storage area network (SAN). The hostcontext agent collects SAN topology information from the host and sends the information to eachstorage array that is attached to the host. The host context agent collects the host name, the host type,and the unique initiator port name for each HBA host or, in the case of FC, the World Wide Identifier(WWID) for each HBA host port. The host context agent is not available on all supported OSes. If itis not available, the hosts can be defined manually.
Things to know: HostsThe host adapters in the hosts that are attached to the storage array are known to the storagemanagement software. However, in most cases the storage management software does not knowwhich host adapters are associated with which hosts. Only when the SMagent services runs on thehost that is attached to a storage array can the storage management software associate HBA ports tothat host.
Note: If your operating system configures automatically, then, by default, the host context agentautomatically defines all attached hosts that are running SMagent in the mapping view of theAMW with a default mapping scheme which you can modify to the needs of your configuration.
Things to know: Host groups• A host group is a group (cluster) of two or more hosts that share access, in a storage partition, to
specific volumes on the storage array. You can create an optional logical entity in the storagemanagement software. You must create a host group only if you will use storage partitions.
• If you must define a host group, you can define it through the Define Hosts Wizard described in Procedure: Defining the hosts on page 50.
Things to know: Storage partitions• A storage partition is a logical entity that consists of one or more volumes that can be accessed by
a single host or can be shared among hosts that are part of a host group. You can think of astorage partition as a virtual storage array. That is, take the physical storage array and divide it upinto multiple virtual storage arrays that you can then restrict to be accessible only by certainhosts.
47

• You do not create storage partitions in this step, but you must understand them to define yourhosts.
• Even if you do not use storage partitions, you must select the Host Operating System type for theDefault Group.
• You do not need to create storage partitions if these conditions exist:
◦ You have only one attached host that accesses all of the volumes on the storage array.
◦ You plan to have all of the attached hosts share access to all of the volumes in the storagearray.
Note: When you have multiple hosts accessing the volumes in a storage partition, you musthave some type of clustering software on the hosts to manage volume sharing and accessibility.
Example of no additional storage partitions required:
• You do need to create storage partitions if these conditions exist:
48 | SANtricity Storage Manager 11.20 Software Installation Reference

◦ You want certain hosts to access only certain volumes.
Example of additional storage partitions required (homogeneous host):
◦ You have hosts with different operating systems (heterogeneous) attached in the same storagearray. You must create a storage partition for each type of host.
Example of additional storage partitions required (heterogeneous host):
Defining the hosts | 49

Procedure: Defining the hosts
Steps
1. From the Setup tab on the Enterprise Management Window, click Manage a Storage Array.
The Select Storage Array dialog appears.
2. Highlight the storage array on which you want to define a host, and click OK.
The associated Array Management Window is launched.
3. If you are setting up an iSCSI environment, from the Setup tab on the Array ManagementWindow, select Configure iSCSI Host Ports.
If the storage array does not contain a 10Gb host interface card, change the default value of theConfigure Ethernet port speed drop-down list from 10 Gbps to 1 Gbps.
4. From the Setup tab on the Array Management Window, click Manually Define Hosts.
5. Use the on-screen instructions and the online help topics to define your hosts and associate theHBA host ports. This procedure also allows you to define a host group. Make sure you confirm orset the Default Operating System for your host or hosts even if you are using Default Group toensure proper settings for failover.
50 | SANtricity Storage Manager 11.20 Software Installation Reference

Configuring the storage
This topic describes how you can group and manage your storage within the storage array formaximum efficiency.
Key terms
Default Group
A standard node to which all host groups, hosts, and host ports that do not have any specificmappings are assigned. The standard node shares access to any volumes that were automaticallyassigned default logical unit numbers (LUNs) by the controller firmware during volume creation.
disk pool
A set of drives that is logically grouped. A disk pool provides the overall capacity needed to createone or more volumes. A disk pool is similar to a volume group, with the following differences. Thedata in a disk pool is stored randomly on all of the drives in the disk pool, unlike data in avolumegroup which is stored on the same set of drives. You do not specify a RAID level for a disk pool. Adisk pool does not use hot spare drives. A disk pool allows a large number of drives to be grouped.
free capacity
Unassigned space in a volume group or disk pool that can be used to create volumes.
full disk encryption (FDE)
A type of drive technology that can encrypt all data being written to its disk media.
hot spare drive
A spare drive that contains no data and that acts as a standby in case a drive fails in a RedundantArray of Independent Disks (RAID) Level 1, RAID Level 3, RAID Level 5, or RAID Level 6volume. The hot spare drive can replace the failed drive in the volume. Hot spare drives are used onlyin volume groups, not disk pools.
Redundant Array of Independent Disks (RAID)
CONTEXT [Storage System] A disk array in which part of the physical storage capacity is used tostore redundant information about user data stored on the remainder of the storage capacity. Theredundant information enables reconstruction of user data in the event that one, or two for RAID 6and Dynamic Disk Pools, of the array's member disks or the access path to it fails.
51

Although it does not conform to this definition, disk striping is often referred to as RAID (RAIDLevel 0). (The Dictionary of Storage Networking Terminology )
storage partition
A logical entity that is made up of one or more storage array volumes. These storage array volumescan be accessed by a single host or can be shared with hosts within a host group.
unconfigured capacity
The available space on drives of a storage array that has not been assigned to a disk pool or a volumegroup.
volume
The logical component created for the host to access storage on the storage array. A volume iscreated from the capacity available on a disk pool or a volume group. Although a volume mightconsist of more than one drive, a volume appears as one logical component to the host.
volume group
A set of drives that is logically grouped and assigned a RAID level. Each volume group createdprovides the overall capacity needed to create one or more volumes.
Things to know: Data assuranceThe Data Assurance (DA) feature checks for and corrects errors that might occur as data iscommunicated between a host and a storage array. DA is implemented using the SCSI direct-accessblock-device protection information model. DA creates error-checking information, such as cyclicredundancy checks (CRCs) and appends that information to each block of data. Any errors that mightoccur when a block of data is either transmitted or stored are then detected and corrected by checkingthe data with its error-checking information.
Only certain configurations of hardware, including DA-capable drives, controllers, and host interfacecards (HICs), support the DA feature. When you install the DA feature on a storage array, SANtricityStorage Manager provides options to use DA with certain operations. For example, you can create avolume group or disk pool that includes DA-capable drives, and then create a volume within thatvolume group or disk pool that is DA-enabled. Other operations that use a DA-enabled volume haveoptions to support the DA feature.
Note: Neither iSCSI (over TCP/IP) nor the SRP InfiniBand host ports support the Data Assurance(DA) feature. The iSER (iSCSI Extensions for RDMA/IB) Infiniband host ports do support the DAfeature.
If you choose to create a DA-capable volume group or disk pool, select the check box for either theCreate a Data Assurance (DA) capable volume group or Create a Data Assurance (DA) capabledisk pool. This check box is enabled only when there is at least one DA-capable drive in the storagearray and is, by default, selected if it is enabled.
When the DA feature is enabled, the DA Enabled check box appears in the Create volume dialog boxunder Quality of Service Attributes. This check box is enabled only when there is at least one DA-capable drive in the storage array and is, by default, selected if it is enabled. If you choose to enableDA, it must be enabled at the time of volume creation as it cannot be enabled later after volumeinitialization has completed.
When the DA feature is enabled, the DA Enabled column appears in the Source volume list in theCreate Copy Wizard – Introduction dialog. If you choose to copy a DA-enabled source volume to atarget volume that is not DA enabled, you are prompted to confirm your choice. The copy can becompleted, but the resulting copy is not DA enabled.
52 | SANtricity Storage Manager 11.20 Software Installation Reference

Note: If a volume group or disk pool is DA-capable and contains a DA-enabled volume, use onlyDA-capable drives for hot spare coverage. A volume group or disk pool that is not DA capablecannot contain a DA-enabled volume.
You can verify that a drive contains DA-enabled volumes by checking that the DA-enabled volumeproperty is set to yes.
Things to know: Allocating capacityThe drives in your storage array provide the physical storage capacity for your data. Before you canstore data, you must configure the physical storage capacity into logical entities, known as volumegroups, disk pools, and volumes.
Volume groups and disk pools are sets of drives that the controller collects together. Volume groupsand disk pools have these characteristics:
• They appear as one larger drive.
• They increase the performance of the storage array.
• They let the controller write to the multiple drives in the volume group or disk pool at the sametime.
• They protect your data.
• They use Redundant Array of Independent Disks (RAID) technology.
The volume is a logical entity that your host uses to store data. Volume groups and disk pools canhold one or more volumes. You create volumes from free capacity in the volume group or disk pool.
Keep the following in mind as you configure your storage array capacity:
• The operating system (OS) for your host might have specified limits about how many volumes thehost can access. Keep these limits in mind when you create volumes for a particular host.
• Make sure that some unconfigured capacity stays in the form of one or more unassigned drives.Keep some unconfigured capacity so that you have capacity available for additions or changes toyour configuration. You might need unconfigured capacity for one of these modifications:
◦ Creating one or more snapshot (legacy) volumes
◦ Increasing the free capacity of a volume group or disk pool to add new volumes
◦ Expanding a snapshot (legacy) repository volume
◦ Configuring one or more hot spare drives
◦ Note: Hot spare drives apply only to volume groups. Disk Pools do not use hot spare drives.
• Mixing drives with different media types or interface types within one volume group or disk poolis not permitted. For example, you cannot mix hard drives with Solid State Disks (SSDs).
• If you are adding capacity to a Data Assurance (DA)-capable volume group or disk pool, use onlydrives that are DA capable. If you add a drive or drives that are not DA-capable, the volume groupor disk pool no longer has DA capabilities, and you no longer can enable DA on newly createdvolumes within the volume group or disk pool.
• If you are adding capacity to a Drive Security Full Disk Encryption (FDE)-capable volume groupor disk pool, use only drives that are FDE capable. If you add a drive or drives that are not FDEcapable, the volume group or disk pool no longer has FDE capabilities, and you no longer havethe option to enable Drive Security on newly created volumes within the volume group or diskpool.
Configuring the storage | 53

Things to know: Disk pools and disk pool volumesThe Dynamic Disk Pool feature is a way to deliver RAID protection and consistent performance. Adisk pool is a set of drives that is logically grouped together in the storage array. The drives in eachdisk pool must be of the same physical drive type and drive media type, and they must be similar insize. As with a volume group, you can create one or more volumes in the disk pool. However, thedisk pool is different from the volume group by the way the data is distributed across the drives thatcomprise the disk pool.
In a volume group, the data is distributed across the drives based on a RAID level. You can specifythe RAID level when you create the volume group. The data for each volume is written sequentiallyacross the set of drives that comprise the volume group.
In a disk pool, the storage management software distributes the data for each volume across a set ofdrives that have been algorithmically selected from the disk pool. The data for any volume in a diskpool is distributed across all drives in the disk pool, unless the volume is very small. Each disk poolmust have a minimum of eleven drives. Although there is no limit on the maximum number of drivesthat can comprise a disk pool, the disk pool cannot contain more drives than the maximum limit foreach storage array. The storage management software automatically configures the RAID level whenyou create the disk pool. You cannot set or change the RAID level of disk pools or the volumes in thedisk pools.
Note: Because disk pools can co-exist with volume groups, a storage array can contain both diskpools and volume groups.
Things to know: Disk pool benefits
• Easy to Create – It is easy to create a disk pool in the storage management software. To create adisk pool, simply select the drives from a list of eligible drive candidates. After a disk pool iscreated, you create volumes.
• Better Utilization of Drives – When new drives are added to an existing disk pool, the storagemanagement software automatically redistributes the data across the new capacity, which nowincludes the new drives that you added. The data in the volumes remain accessible when you addthe drives to the disk pool. When you delete disk pool volumes, the capacity of those volumes isadded to the total usable capacity of the disk pool and, therefore, can be reused.
Note: You have the option to manually create a disk pool, if you prefer not to proceed with theautomatic disk pool creation process.
• Improved Reconstruction Experience – Disk pools do not use hot spare drives for dataprotection like a volume group does. Instead, spare capacity is allocated within each drive thatcomprises the disk pool, thus distributing the reconstruction workload. This means thatreconstruction of failed drives completes faster and has less impact on performance thantraditional volume group reconstruction.
• Reduced Administration – You can configure the storage management software to send alertnotifications when the configured capacity of a disk pool is reaching a specified percentage offree capacity. Additionally, you do not need to manage any hot spare drives because the sparecapacity is distributed within the disk pool.
For more information about Disk Pools, refer to SANtricity Storage Manager Concepts Guide andthe online help in SANtricity Storage Manager.
54 | SANtricity Storage Manager 11.20 Software Installation Reference

Things to know: Volume groups and volumes• You can create a single volume or multiple volumes per volume group. You can create more than
one volume per volume group to address different data needs or because of limits on themaximum capacity of a single volume.
Note: If you choose to copy a Data Assurance (DA)-enabled source volume to a target volumethat is not DA enabled, you are prompted to confirm your choice. The copy can be completed,but the resulting copy is not DA enabled. For more information about how volume copy isaffected by DA-enabled volumes, refer to the online help for SANtricity Storage Manager.
• While creating volume groups, you should make sure that the drives that comprise the volumegroup are located in different drive trays. This method of creating volume groups is called trayloss protection. Tray loss protection guarantees accessibility to the data on the volumes in avolume group if a total loss of communication occurs with a single drive tray. Communicationloss might occur due to loss of power to the drive tray or failure of the drive tray ESMs.
• If your drive trays or controller-drive trays have multiple drawers within them, make sure that thedrives that comprise the volume group are located in different drawers within each drive tray.
• The RAID levels supported are RAID Level 0, RAID Level 1, RAID Level 3, RAID Level 5,RAID Level 6, and RAID Level 10 (1 + 0).
◦ RAID Level 0 provides no data redundancy.
◦ RAID Level 10 is not a separate RAID level choice but is automatically enabled when youcreate a RAID Level 1 volume group that consists of four or more drives.
◦ You can assign RAID Level 1 only to volume groups with an even number of drives.
◦ You can assign RAID Level 3 or RAID Level 5 only to volume groups with three or moredrives.
◦ You can assign RAID Level 6 only to volume groups with five or more drives.
Things to know: Host-to-volume mappings and storagepartitions
• Each volume that you create must be mapped to a logical address called a logical unit number(LUN). The host uses this address to access data on the volume.
• When you create a volume manually, you have two choices for mapping:
◦ Default mapping – Choose this option if you do not intend to use storage partitions. Thestorage management software automatically assigns a LUN to the volume and makes thevolume available to all of the hosts that are attached to the storage array in the Default Group(partition). Make sure to set the Default Host Operating System.
◦ Map later (assign specific mapping) – Choose this option if you intend to use storagepartitions. Use the Define Storage Partition Wizard to indicate the host group or host, specifythe volumes that you want the host group or host to access, and access the LUNs to assign toeach volume.
Configuring the storage | 55
Things to know: Hot spare drives• The hot spare drive adds a level of redundancy to your storage array. Make sure that you create
hot spare drives for each type of drive in your storage array.
• Hot spare drives do not provide protection for RAID Level 0 volume groups because dataredundancy does not exist on these volume groups.
• A hot spare drive is not dedicated to a specific volume group but instead is global, which meansthat a hot spare drive will be used for any failed drive in the storage array. The hot spare drivemust be the same drive type and have a capacity that is equal to or larger than the particular faileddrive in order to spare for the failed drive.
Note: Hot spare drives are supported in volume groups, but they are not supported in disk pools.
Things to know: Full disk encryption (FDE)Drive Security is a feature that prevents unauthorized access to the data on a drive that is physicallyremoved from the storage array. Controllers in the storage array have a security key. Secure drivesprovide access to data only through a controller that has the correct security key.
The Drive Security feature requires security-capable Full Disk Encryption (FDE) drives. A security-capable FDE drive encrypts data during writes and decrypts data during reads. Each security-capabledrive has a unique drive encryption key.
When you secure the drives in a security-capable volume group or disk pool, the drives in thatvolume group or disk pool become security enabled. When a security-capable FDE drive has beensecurity enabled, the drive requires the correct security key from a controller to read or write the data.All of the drives and controllers in a storage array share the same security key. The shared securitykey provides read and write access to the drives, while the drive encryption key on each drive is usedto encrypt the data. A FDE drive works like a non-FDE drive until it is security enabled.
Security-enabled drives transition to a security-locked state when the controller-drive tray is poweredoff or if a drive is removed from the drive tray. In this state, the data is inaccessible until the correctsecurity key is provided by a controller.
You can view the Drive Security status of any drive in the storage array from the Drive Propertiesdialog. The status information reports whether the drive is one of the following:
• Security– Capable or non-capable
• Secure – Security enabled or disabled
• Read/Write Accessible – Security locked or unlocked
You can view the security status of any volume group in the storage array from the Volume GroupProperties dialog. The status information reports whether the volume group or disk pool is one of thefollowing:
• Security-capable or not capable
• Secure
The following table shows how to interpret the security properties status of a volume group.
56 | SANtricity Storage Manager 11.20 Software Installation Reference

Security-Capable – Yes Security-Capable – No
Secure – Yes The volume group is composedof all FDE drives and is in aSecure state.
Not applicable. Only FDE drives can bein a Secure state.
Secure – No The volume group is composedof all FDE drives and is in aNon-Secure state.
The volume group is not entirelycomposed of FDE drives.
When the Drive Security feature has been enabled, the Drive Security menu appears in the StorageArray menu under Security. The Drive Security menu has these options:
• Create Key
• Change Key
• Import Key
• Save Key
• Unlock Drives
• Validate Key
Note:
If you have not created a security key for the storage array, only the Create Key option is active.
If you have created a security key for the storage array, the Create Key option is inactive with acheck mark to the left. The Change Key option, the Save Key option, and the Validate Key optionare now active.
The Unlock Drives option is active if any security-locked drives exist in the storage array.
When the Drive Security feature has been enabled, the Secure Drives option appears in the VolumeGroup menu. The Secure Drives option is active if these conditions are true:
• The volume group or disk pool selected in the Storage & Copy Services tab is not securityenabled but is composed entirely of security-capable drives.
• The volume group contains no snapshot (legacy) base volumes or snapshot (legacy) repositoryvolumes.
• The volume group is in Optimal state.
• A security key is set up for the storage array.
The Secure Drives option is inactive if the previous conditions are not true.
The Secure Drives option is inactive with a check mark to the left if the volume group is alreadysecurity enabled.
You can erase security-enabled drives instantly and permanently so that you can reuse the drives inanother volume group or in another storage array. You also can erase them if the drives are beingdecommissioned.
Attention: Permanently inaccessible data – When you erase security-enabled drives, the data onthat drive becomes permanently inaccessible and cannot be read.
When all of the drives that you have selected in the Hardware tab are security enabled, and none ofthe selected drives are part of a volume group, the Erase Security option appears in the Drive menu.
Configuring the storage | 57
Note: The storage array password protects a storage array from potentially destructive operationsby unauthorized users. The storage array password is independent from the Drive Security featureand should not be confused with the pass phrase that is used to protect copies of a Drive Securitysecurity key. However, it is good practice to set a storage array password before you create,change, or save a Drive Security security key or unlock secure drives.
Procedure: Configuring the storage
Steps
1. From the Setup tab on the Enterprise Management Window, click Manage a Storage Array.
The Select Storage Array dialog appears.
2. Highlight the storage array on which you want to configure storage, and click OK.
The associated Array Management Window is launched.
3. From the Setup tab on the Array Management Window, select Create Storage.
4. Choose the applicable configuration task:
• Automatic configuration – This method either uses the drives to provision disk pools so thatdata can be distributed for quick reconstruction or creates volume groups with equal-sizedcapacity volumes and also automatically assigns appropriate hot spare drive protection. Usethis method if you do not have unique capacity requirements for each disk pool or volumegroup, or you want a quick method to configure disk pools or volume groups, volumes, andhot spare drives. You can choose from a list of suggested configurations, or you can createyour own custom configuration.
• Manual configuration – This method creates storage manually by selecting one of thefollowing: Create disk pool, Configure hot spares (volume groups only), Create volumegroups, or Create SSD Cache (only available when SSD drives are present).
Create disk pool – This method allows you to select a collection of drives to provision into a diskpool. Data is distributed over a larger set of drives for quick reconstruction and recovery.
Configure hot spares (volume groups only) – This method lets you either have the softwareautomatically assign applicable hot spare protection (which is identical to the automaticconfiguration method described previously) or manually create a hot spare drive from anunassigned drive that you select.
Create volume groups – This method creates volume groups, a set of drives to provide capacity,and a RAID level for one or more volumes. Use this method if you have unique capacityrequirements for most of the volumes that you will create and you want more control inspecifying various parameters.
Create SSD Cache - This method creates SSD Cache, a set of Solid-State Disk (SSD) drives thatyou logically group together in your storage array to improve read-only performance. This optionis only available if you have SSD drives in your system.
5. To map the volume groups, volumes, and hot spare drives, perform one of these actionsdepending on your storage partition requirements. Refer to the on-screen instructions and theonline help topics for more information.
• No storage partition is required, and you selected the automatic configuration method –Go to step 6.
• No storage partition is required, and you selected the manual configuration method –Verify whether all volumes are mapped to the Default Group, and go to step 8.
58 | SANtricity Storage Manager 11.20 Software Installation Reference

• A storage partition is required – Go to step 7.
6. Perform these actions:
a. From the Setup tab on the Array Management Window, click Map Volumes.
b. Select the Default Group, and assign each volume a logical unit number (LUN).
c. Go to step 8.
Note: To map all volumes into the Default Group, you must select the Default Mappingoption while creating the volumes.
7. Perform these actions:
a. Click the Host Mappings tab.
b. Specify the applicable host or host group, volumes, and LUNs.
c. Select Host Mappings > Define, and click Storage Partition.
d. Refer to the on-screen instructions.
e. Repeat step a through step d for each storage partition.
f. Go to step 8.
8. After you have created all of the volumes and mappings, use the applicable procedures on yourhosts to register the volumes and to make them available to your operating system.
• Depending on your operating system, two utilities are included with the storage managementsoftware (hot_add and SMdevices). These utilities help register the volumes with the hostsand also show the applicable device names for the volumes.
• You also need to use specific tools and options that are provided with your operating system tomake the volumes available (that is, assign drive letters, create mount points, and so on). Referto your host operating system documentation for details.
Note: After you configure the volume, you can change the cache memory settings of thevolume. See the online help for SANtricity Storage Manager.
Configuring the storage | 59

Resolving problems
If you noted any amber LEDs during Turning on the Power and Checking for Problems in thehardware installation documents, the Enterprise Management Window should show a correspondingindication.
Procedure: Resolving problems
Steps
1. Click the Devices tab of the Enterprise Management Window to check the status of the storagearrays.
2. Double-click the storage array with the Needs Attention condition.
The associated Array Management Window (AMW) is launched.
3. Click the Hardware tab of the AMW to see the configuration.
4. Perform one of these actions, depending on the status shown:
• Optimal – No problems need to be resolved.
• Needs Attention – Go to step 5.
• Unresponsive – Refer to the online help topics in the Enterprise Management Window for theprocedure.
5. From the AMW, select Monitor > Health > View Health (Recovery Guru) to launch theRecovery Guru. Follow the steps in the Recovery Guru to resolve the problem.
Correcting a partially managed storage arrayNote: You only need to perform this step if you have partially managed storage arrays.
Key terms
partially managed storage array
A condition that occurs when only one controller is defined or can be reached when the storage arrayis added to or found by the storage management software. In this case, volume managementoperations can be done only on volumes owned by the reachable controller. Many other managementoperations that require access to both controllers are not available.
Things to know: Partially managed storage arrays
You can identify a storage array as a partially managed storage array if you see these indications forthe storage array:
• When you close the Add New Storage Array – Manual dialog after adding the storage array, aPartially Managed Storage Arrays dialog appears.
• When you try to manage the storage array using the Array Management Window, a PartiallyManaged Storage Arrays dialog appears.
60

• When you select View > Partially Managed Storage Arrays, the storage array is listed in thePartially Managed Storage Arrays dialog.
Procedure: Automatically adding a partially managed storage array
About this task
Note: These steps are for out-of-band partially managed storage arrays only. For in-band partiallymanaged storage arrays, verify the connection, and refer to the SANtricity Storage Manager onlinehelp topic “Rescanning a Host for a New Storage Array” for more information on rescanning thehost.
Steps
1. From the Enterprise Management Window, select View > Partially Managed Storage Arrays.
2. Select the required partially managed storage array from the list of storage arrays.
3. Click Add More to add the information about the second controller.
The Add New Storage Array – Manual dialog appears.
4. Manually enter the host names or the IP addresses of the controllers (out-of-band managementmethod) or the host name or IP address of the host running the host-agent software (in-bandmanagement method), and click Add.
The storage array appears in the Enterprise Management Window.
Note: You can enter IP addresses in either the IPv4 format or the IPv6 format.
Resolving problems | 61

Appendix A: Boot device installation
Use these procedures if you are setting up the storage array as a boot device.
Boot device supportNot all operating systems support the use of a storage array as a boot device. Support for using a bootdevice also depends on the type of host connection. Fibre Channel and SAS connections aresupported. InfiniBand and iSCSI connections are not supported. The following table shows whichoperating systems support this configuration.
Operating System Boot Device Support
Windows Server 2012
Windows Server 2008 R2
Hyper-V
Yes, where supported by the HBAs
Solaris Yes, where supported by the HBAs
HP-UX Yes, where supported by the HBAs
RHEL Yes, where supported by the HBAs
VMware Yes, where supported by the HBAs
Mac OS X No
AIX Yes, where supported by the HBAs
Installing the boot deviceThis section contains procedures to install a boot device on a storage array.
Before you install the storage management software components on the host, you must prepare thestorage array and the host.
Attention: Possible loss of data access – When you use boot device on a storage array, make surethat you have redundant connections with failover protection between the host and the storagearray. Refer to the Host Cabling chapter in the Hardware Cabling Guide for information about suchconnections.
You must have administrator privileges to access this software. You must use the volume mapped toLUN 0 as the boot device. Some operating systems support booting only from LUN 0.
General preparation
About this task
To prepare the storage array as a boot device, perform these procedures in order:
Steps
1. Perform the instructions in Preparing the storage array as a boot device .
2. Perform the instructions in Preparing the host on page 65.
62

Result
Before you proceed with the installation, confirm the following items:
• Make sure that you have access to a storage management station for the storage array. The storagemanagement station is a host with SMclient software installed, and is not the host that you willconfigure to use the boot device.
• Make sure that you know the Internet Protocol (IP) addresses or host names of the controllers inthe storage array from which you want to boot.
• If you have questions or concerns about the installation procedures, contact technical support.
Preparing the storage array as a boot device
About this task
Perform the following tasks in the order in which they appear.
Starting the SMclient software
Steps
1. On the management station (the external host with SMclient software installed), start the existingstorage management software with the procedure for your operating system:
• UNIX-based operating systems – At the prompt, type SMclient and press Enter.
• Windows operating systems – Select Start > Programs > SANtricity Storage ManagerSMclient.
After the client software starts, the Enterprise Management Window window and the SelectAddition Method dialog box appear:
2. To close the Select Addition Method dialog box, click Cancel.
3. Select Edit > Add Storage Array.
The Add New Storage Array dialog box appears.
4. Add the Internet Protocol (IP) addresses or host names of the controllers in the storage array.
You must add the IP addresses or host names of the controllers one at a time. For moreinformation, refer to the online help topics in the Enterprise Management Window.
The storage array that you plan to use as the boot device appears in the Enterprise ManagementWindow.
Configuring the boot volume on the storage array
Steps
1. In the Enterprise Management Window, select the storage array in the Device Tree.
2. Select Tools > Manage Storage Array.
The Array Management Window for the selected storage array appears.
3. Select the Storage & Copy Services tab.
4. To determine where you can create a boot volume for the host, examine the Free Capacity nodeson the storage array.
Appendix A: Boot device installation | 63

Note: You cannot create a volume on an Unconfigured Capacity node. You must create avolume on a Free Capacity node.
Note: If you do not have at least 2 GB of capacity on a Free Capacity node, you need to freeenough capacity for the boot volume before you can continue. Refer to the SANtricity StorageManager Concepts Guide or the SANtricity online help for information about freeing capacity.
5. Go to Starting SANtricity Storage Manager and adding storage arrays to the managementdomain .
Configuring the boot volume on a free capacity node
Steps
1. Right-click the Free Capacity node that you want to use, and click Create Volume.
The Create Volume Specify Parameters dialog appears.
2. On the Create Volume Specify Parameters dialog, select the choices that are appropriate for theboot volume.
a. If you are creating the volume on a disk pool, leave the Create thin volume checkboxunchecked.
Note: If you are creating the volume from a volume group, the Create thin volumecheckbox will not appear.
b. Select the appropriate unit for the new volume capacity from the drop-down list, and the newvolume capacity.
Note: A capacity of 4 GB is recommended. Consult your operating system documentationfor information on the amount of space needed for the operating system. A minimum of 2GB is required.
c. Enter the volume name.
Note: The volume name must not exceed 30 characters and cannot contain spaces. Useunderscores or dashes to separate elements within the volume name (for example,Boot_Volume).
d. In the Map to host drop-down, select the Map Later option.
e. Specify the Quality of Service attributes. Use the onscreen flyovers and the SANtricity onlinehelp system to get more information about particular attributes.
Note: If you are creating the volume from a volume group, select the File System choicefor the Volume I/O characteristic.
3. Select Finish to create the volume.
4. Use the Storage Partition feature to map the volume to the host by using LUN 0.
Note: For additional information about how to map volumes that use Storage Partitions, referto the online help topics in the Array Management Window.
5. Choose one of the following options:
• If your host supports asynchronous logical unit access (ALUA), go to Preparing the host onpage 65.
• If your host does not support ALUA, go toEnsuring a single path to the storage array .
64 | SANtricity Storage Manager 11.20 Software Installation Reference

Ensuring a single path to the storage array
About this task
After you have configured a boot volume, make sure that there is a single path to the storage array.The path must be configured to the controller that owns the boot volume (controller A).
Note: If you removed a previously installed version of RDAC in a root-boot environment, you donot need to remove the installed version of RDAC again.
Steps
1. Remove the host interface cable to the alternate path.
Attention: Possible data corruption – When you start the storage array, there must be only asingle path to the storage array when RDAC is removed. The path must be to the controller thatowns the boot volume. If the host is permitted to start without RDAC and still has dual paths tothe storage array, the data might become unusable.
2. Boot the host system.
3. Go to Preparing the host on page 65.
Preparing the host
About this task
Attention: Possible loss of access to the boot device and the operating system – After youinstall the boot device, never delete the volume mapped to LUN 0 or select Configure > ResetConfiguration. Performing these actions causes loss of access to the boot device and the operatingsystem.
In this procedure, the default boot path refers to controller A , which owns the boot volume. Thealternate boot path refers to controller B.
Steps
1. Enable the BIOS on the HBA that is connected to the default boot path.
For procedures about how to enable the HBA BIOS, refer to the host system documentation andthe HBA documentation. After the BIOS is enabled, the host reboots automatically.
2. Install the operating system on the host.
3. After the installation is complete, restart the operating system.
Appendix A: Boot device installation | 65

Copyright information
Copyright © 1994–2015 NetApp, Inc. All rights reserved. Printed in the U.S.
No part of this document covered by copyright may be reproduced in any form or by any means—graphic, electronic, or mechanical, including photocopying, recording, taping, or storage in anelectronic retrieval system—without prior written permission of the copyright owner.
Software derived from copyrighted NetApp material is subject to the following license anddisclaimer:
THIS SOFTWARE IS PROVIDED BY NETAPP "AS IS" AND WITHOUT ANY EXPRESS ORIMPLIED WARRANTIES, INCLUDING, BUT NOT LIMITED TO, THE IMPLIEDWARRANTIES OF MERCHANTABILITY AND FITNESS FOR A PARTICULAR PURPOSE,WHICH ARE HEREBY DISCLAIMED. IN NO EVENT SHALL NETAPP BE LIABLE FOR ANYDIRECT, INDIRECT, INCIDENTAL, SPECIAL, EXEMPLARY, OR CONSEQUENTIALDAMAGES (INCLUDING, BUT NOT LIMITED TO, PROCUREMENT OF SUBSTITUTEGOODS OR SERVICES; LOSS OF USE, DATA, OR PROFITS; OR BUSINESS INTERRUPTION)HOWEVER CAUSED AND ON ANY THEORY OF LIABILITY, WHETHER IN CONTRACT,STRICT LIABILITY, OR TORT (INCLUDING NEGLIGENCE OR OTHERWISE) ARISING INANY WAY OUT OF THE USE OF THIS SOFTWARE, EVEN IF ADVISED OF THEPOSSIBILITY OF SUCH DAMAGE.
NetApp reserves the right to change any products described herein at any time, and without notice.NetApp assumes no responsibility or liability arising from the use of products described herein,except as expressly agreed to in writing by NetApp. The use or purchase of this product does notconvey a license under any patent rights, trademark rights, or any other intellectual property rights ofNetApp.
The product described in this manual may be protected by one or more U.S. patents, foreign patents,or pending applications.
RESTRICTED RIGHTS LEGEND: Use, duplication, or disclosure by the government is subject torestrictions as set forth in subparagraph (c)(1)(ii) of the Rights in Technical Data and ComputerSoftware clause at DFARS 252.277-7103 (October 1988) and FAR 52-227-19 (June 1987).
66

Trademark information
NetApp, the NetApp logo, Go Further, Faster, AltaVault, ASUP, AutoSupport, Campaign Express,Cloud ONTAP, Clustered Data ONTAP, Customer Fitness, Data ONTAP, DataMotion, Fitness, FlashAccel, Flash Cache, Flash Pool, FlashRay, FlexArray, FlexCache, FlexClone, FlexPod, FlexScale,FlexShare, FlexVol, FPolicy, GetSuccessful, LockVault, Manage ONTAP, Mars, MetroCluster,MultiStore, NetApp Insight, OnCommand, ONTAP, ONTAPI, RAID DP, RAID-TEC, SANtricity,SecureShare, Simplicity, Simulate ONTAP, Snap Creator, SnapCenter, SnapCopy, SnapDrive,SnapIntegrator, SnapLock, SnapManager, SnapMirror, SnapMover, SnapProtect, SnapRestore,Snapshot, SnapValidator, SnapVault, StorageGRID, Tech OnTap, Unbound Cloud, and WAFL andother names are trademarks or registered trademarks of NetApp, Inc., in the United States, and/orother countries. All other brands or products are trademarks or registered trademarks of theirrespective holders and should be treated as such. A current list of NetApp trademarks is available onthe web at http://www.netapp.com/us/legal/netapptmlist.aspx.
67

How to send comments about documentation andreceive update notifications
You can help us to improve the quality of our documentation by sending us your feedback. You canreceive automatic notification when production-level (GA/FCS) documentation is initially released orimportant changes are made to existing production-level documents.
If you have suggestions for improving this document, send us your comments by email to [email protected]. To help us direct your comments to the correct division, include in thesubject line the product name, version, and operating system.
If you want to be notified automatically when production-level documentation is released orimportant changes are made to existing production-level documents, follow Twitter account@NetAppDoc.
You can also contact us in the following ways:
• NetApp, Inc., 495 East Java Drive, Sunnyvale, CA 94089 U.S.
• Telephone: +1 (408) 822-6000
• Fax: +1 (408) 822-4501
• Support telephone: +1 (888) 463-8277
68