sageestimating (formerlysagetimberlineoffice...
TRANSCRIPT
Sage Estimating(formerly Sage Timberline OfficeEstimating)Getting Started with MAS 90/200 Integrator

NOTICE
This document and the Sage Timberline Office software may be used only in accordance with the accompanying Sage Timberline Office End User License Agreement. You may not use, copy, modify, or transfer the Sage Timberline Office software or this documentation except as expressly provided in the license agreement.
©2011 Sage Software, Inc. All rights reserved. Sage, the Sage logos and the Sage product and service names mentioned herein are registered trademarks or trademarks of Sage Software, Inc., or its affiliated entities. All other trademarks are the property of their respective owners.
08/2011 Document Number: 200010710301970

v
ContentsGet Started
Introduction . . . . . . . . . . . . . . . . . . . . . . . . . . . . . . . . . . . . . . . . . . . . . . . . . . . . . . . . . . . . . . . . . . . . 1
Overview . . . . . . . . . . . . . . . . . . . . . . . . . . . . . . . . . . . . . . . . . . . . . . . . . . . . . . . . . . . . . . . . . . . . . . . . . .1Requirements . . . . . . . . . . . . . . . . . . . . . . . . . . . . . . . . . . . . . . . . . . . . . . . . . . . . . . . . . . . . . . . . . . . . . .1Install at a Server . . . . . . . . . . . . . . . . . . . . . . . . . . . . . . . . . . . . . . . . . . . . . . . . . . . . . . . . . . . . . . . 3
Installation Steps . . . . . . . . . . . . . . . . . . . . . . . . . . . . . . . . . . . . . . . . . . . . . . . . . . . . . . . . . . . . . . . . . . .3Install at an Estimating Workstation . . . . . . . . . . . . . . . . . . . . . . . . . . . . . . . . . . . . . . . . . . . . . 11
Installation Steps . . . . . . . . . . . . . . . . . . . . . . . . . . . . . . . . . . . . . . . . . . . . . . . . . . . . . . . . . . . . . . . . . .11Transfer Estimating Data to MAS 90 or MAS 200 . . . . . . . . . . . . . . . . . . . . . . . . . . . . . . . . . . . 15
Overview . . . . . . . . . . . . . . . . . . . . . . . . . . . . . . . . . . . . . . . . . . . . . . . . . . . . . . . . . . . . . . . . . . . . . . . . .15Support Information . . . . . . . . . . . . . . . . . . . . . . . . . . . . . . . . . . . . . . . . . . . . . . . . . . . . . . . . . . . . 27
Contact Customer Support . . . . . . . . . . . . . . . . . . . . . . . . . . . . . . . . . . . . . . . . . . . . . . . . . . . . . . . . . . .27

1
Section 1Introduction
Overview
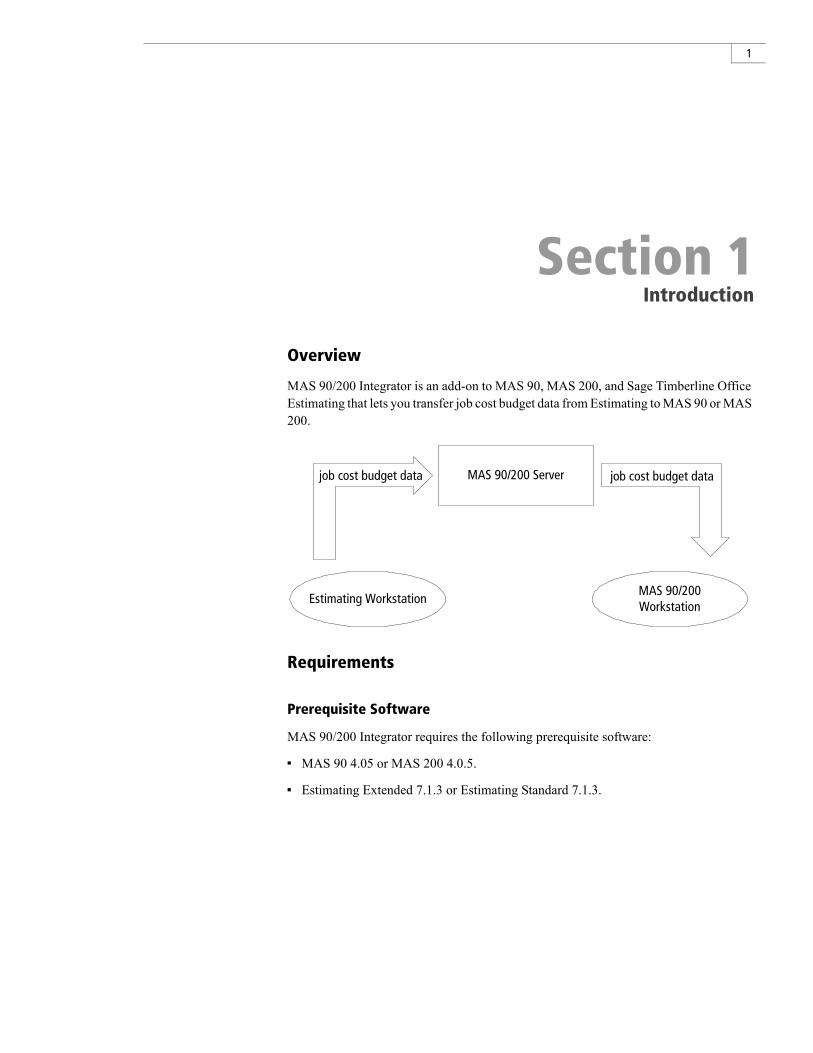
MAS 90/200 Integrator is an add-on to MAS 90, MAS 200, and Sage Timberline Office Estimating that lets you transfer job cost budget data from Estimating to MAS 90 or MAS 200.
Requirements
Prerequisite Software
MAS 90/200 Integrator requires the following prerequisite software:
MAS 90 4.05 or MAS 200 4.0.5.
Estimating Extended 7.1.3 or Estimating Standard 7.1.3.
Estimating Workstation
MAS 90/200 Server
MAS 90/200Workstation
job cost budget datajob cost budget data
2
Get Started
Section 1
NOTE: This product works with both Estimating Extended and Estimating Standard. From this point forward in this document, the term “Estimating” refers to both products.
System Requirements
MAS 90/200 Integrator does not have additional system requirements beyond those for MAS 90, MAS 200, and Sage Timberline Office Estimating.
Abide by the system requirements for the products that you have installed. For example, abide by Estimating system requirements for computers that have Estimating, and abide by MAS 90 system requirements for computers that have MAS 90. If you have a computer with both Estimating and MAS products, abide by the system requirements for both products.
Estimating system requirements are available on the Estimating DVD at D:\Documents\GetStarted.pdf. (D:\ represents your DVD-ROM drive.)
MAS 90 system requirements are available at http://www.bestsoftware.com/PDF/mas/spec/MAS_90_Hardware_Reqs_Spec.pdf.
MAS 200 system requirements are available at http://www.bestsoftware.com/PDF/mas/spec/MAS_200_Hardware_Reqs_Spec.pdf.

3
Section 2Install at a Server
Installation Steps
You must install MAS 90/200 Integrator server components and the MAS interface to a server that contains MAS 90 or MAS 200. Please follow these steps:
1 At the server that contains MAS 90 or MAS 200, back up all MAS 90 or MAS 200 program files and data files. If the server also contains Timberline Estimating program files and data files, back up these files as well.

4
Get Started
Section 2
2 Quit all programs and services for the duration of the installation. This includes programs that may be running in the background such as antivirus, e-mail, and backup programs.
3 At the server, log on with full administrative rights.
Full administrative rights are defined as write access to the Windows registry and all folders on the computer (including rights to the root of all hard drives).
If you do not know whether you have full administrative rights, ask your network administrator for assistance. You can also ask your network administrator to log on with the network administrator ID before you start the installation.
4 Insert the MAS 90/200 Integrator DVD into the DVD-ROM drive of the server. The Timberline Office window should appear.
If the Timberline Office window does not appear, click [Start] > Run. In the Run window, click in the Open box and type D:\Install.exe; then click [OK]. (D:\ represents your DVD-ROM drive.)
5 In the Timberline Office window, click 2 Install server components; then follow the instructions in the resulting windows.
5
Install at a Server
Section 2
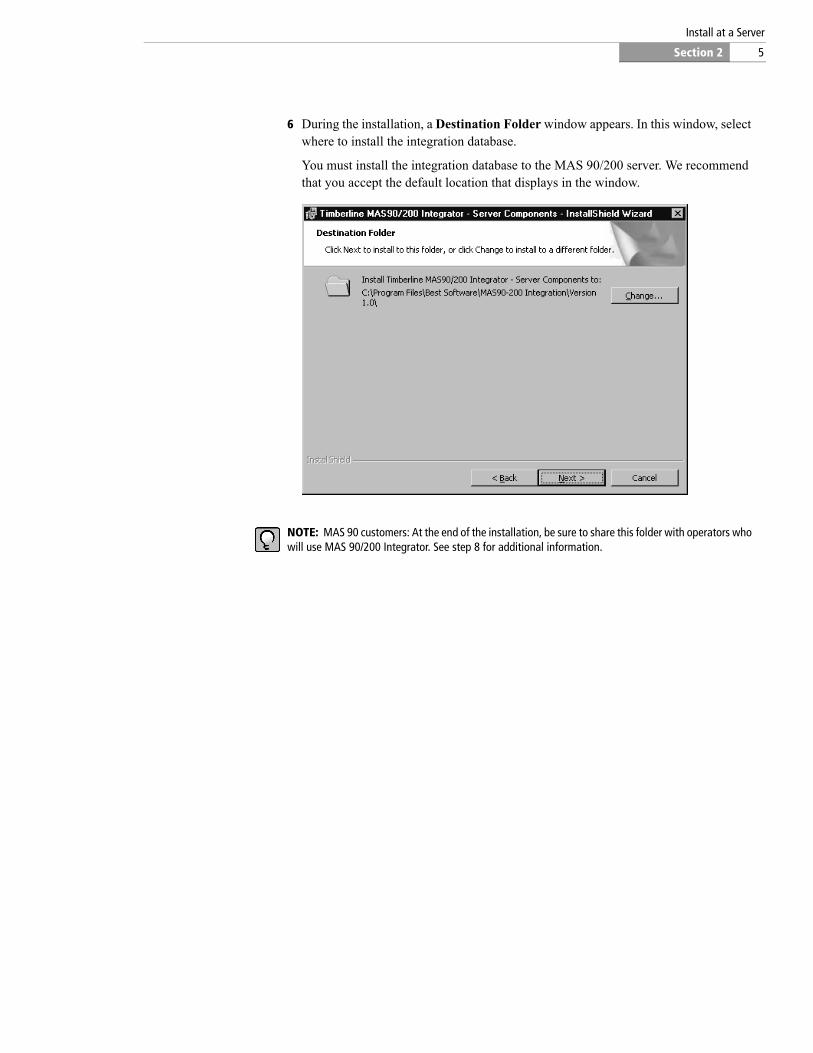
6 During the installation, a Destination Folder window appears. In this window, select where to install the integration database.
You must install the integration database to the MAS 90/200 server. We recommend that you accept the default location that displays in the window.
NOTE: MAS 90 customers: At the end of the installation, be sure to share this folder with operators who will use MAS 90/200 Integrator. See step 8 for additional information.

6
Get Started
Section 2
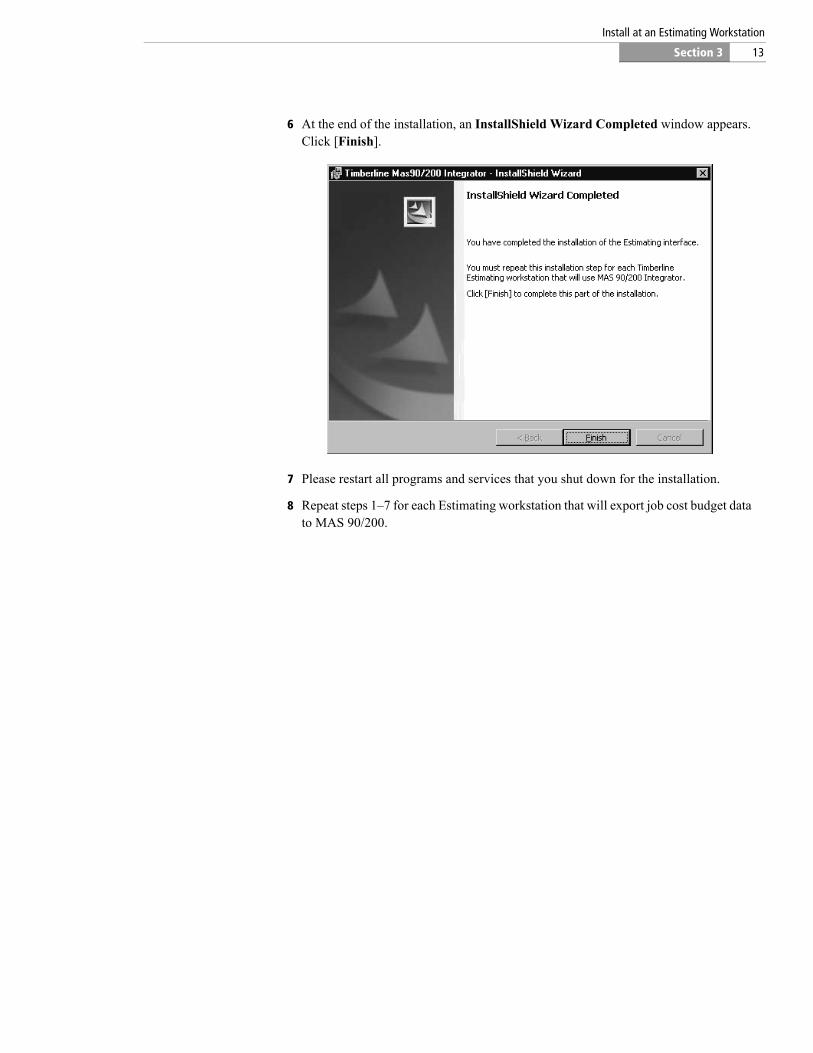
7 At the end of the installation, an InstallShield Wizard Completed window appears. Click [Finish].
8 If you are a MAS 90 customer, share the folder in which you installed the integration database (step 6) with operators who will use MAS 90/200 Integrator. Give read and write access to the folder.

7
Install at a Server
Section 2
9 While still at the server that contains MAS 90/200, restart the installation. Click [Start] > Run. In the Run window, click in the Open box and type D:\Install.exe; then click [OK]. (D:\ represents your DVD-ROM drive.)
10 In the Timberline Office window, click 3 Install MAS 90/200 interface; then follow the instructions in the resulting windows.
11 During the installation, a Choose Destination Location window appears.
If you use MAS 90, click [Next >] to accept the default destination location.
If you use MAS 200, you must click [Change] and then select the C:\Program Files\Best\MAS 200\Version4\mas90 destination location. After you have changed the destination, click [Next >].

8
Get Started
Section 2
NOTE: If a MAS 200 operator continues with the installation without changing the destination location, the installation program displays a message that says The target directory selected does not contain a 4.05 installation of MAS 90 or MAS 200. Choose another directory.

9
Install at a Server
Section 2
12 At the end of the installation, an InstallShield Wizard Completed window appears. Click [Finish].
13 Please restart all programs and services that you shut down for the installation.


11
Section 3Install at an Estimating Workstation
Installation Steps
1 At a workstation that contains Estimating, back up all Estimating program files and data files that exist on the workstation.
2 Quit all programs and services for the duration of the installation. This includes programs that may be running in the background such as antivirus, e-mail, and backup programs.
3 At the workstation, log on with full administrative rights.

12
Get Started
Section 3
Full administrative rights are defined as write access to the Windows registry and all folders on the computer (including rights to the root of all hard drives).
If you are unsure whether you have full administrative rights, ask your network administrator for assistance. You can also ask your network administrator to log on with the network administrator ID before you start the installation.
4 Insert the MAS 90/200 Integrator DVD into the DVD-ROM drive of the workstation. The Timberline Office window should appear.
If the Timberline Office window does not appear, click [Start] > Run. In the Run window, click in the Open box and type D:\Install.exe; then click [OK]. (D:\ represents your DVD-ROM drive.)
5 In the Timberline Office window, click 4 Install Timberline Estimating interface; then follow the instructions in the resulting windows.
13
Install at an Estimating Workstation
Section 3
6 At the end of the installation, an InstallShield Wizard Completed window appears. Click [Finish].
7 Please restart all programs and services that you shut down for the installation.
8 Repeat steps 1–7 for each Estimating workstation that will export job cost budget data to MAS 90/200.


15
Section 4Transfer Estimating Data to MAS 90 or MAS 200
Overview
In order to successfully transfer your estimating data from Sage Timberline Office Estimating to MAS 90 or MAS 200 Job Cost, you must first set up the Estimating database with MAS 90 or MAS 200 cost codes. Typically, costs are estimated in more detail than they are tracked in Job Cost. Estimating includes a Job Cost Phase for items, which lets you summarize costs in Job Cost. When you assign MAS 90 or MAS 200 cost codes to the Job Cost Phase in Estimating, the estimate detail on those items is summarized to the MAS 90 or MAS 200 cost code. The steps in this section illustrate how to assign those cost codes to Estimating, and how to transfer estimating data.

16
Get Started
Section 4
Enable the Integrator
1 In MAS 90 or MAS 200, select Modules > Job Cost > Setup > Import Estimates Setup.
2 In the Import Estimates window, select the Integrate with Timberline Estimating check box.
3 Enter the directory on the server where you installed the MAS 90/200 Integrator database.
NOTE: This is not the location of your Sage Timberline Office Estimating database, but the location of the MAS integrator database where estimates are stored while waiting to be imported.
4 You will receive a prompt to run the customizer update. Click [Yes].
Print a Cost Code List in MAS 90 or MAS 200
Use the cost code list from MAS 90 or MAS 200 as a guide when you enter the cost codes as job cost phases in Estimating. You will print the cost codes now and enter them in a later step.
1 In MAS 90 or MAS 200, select Modules > Job Cost > Setup > Cost Code Maintenance.
17
Transfer Estimating Data to MAS 90 or MAS 200
Section 4
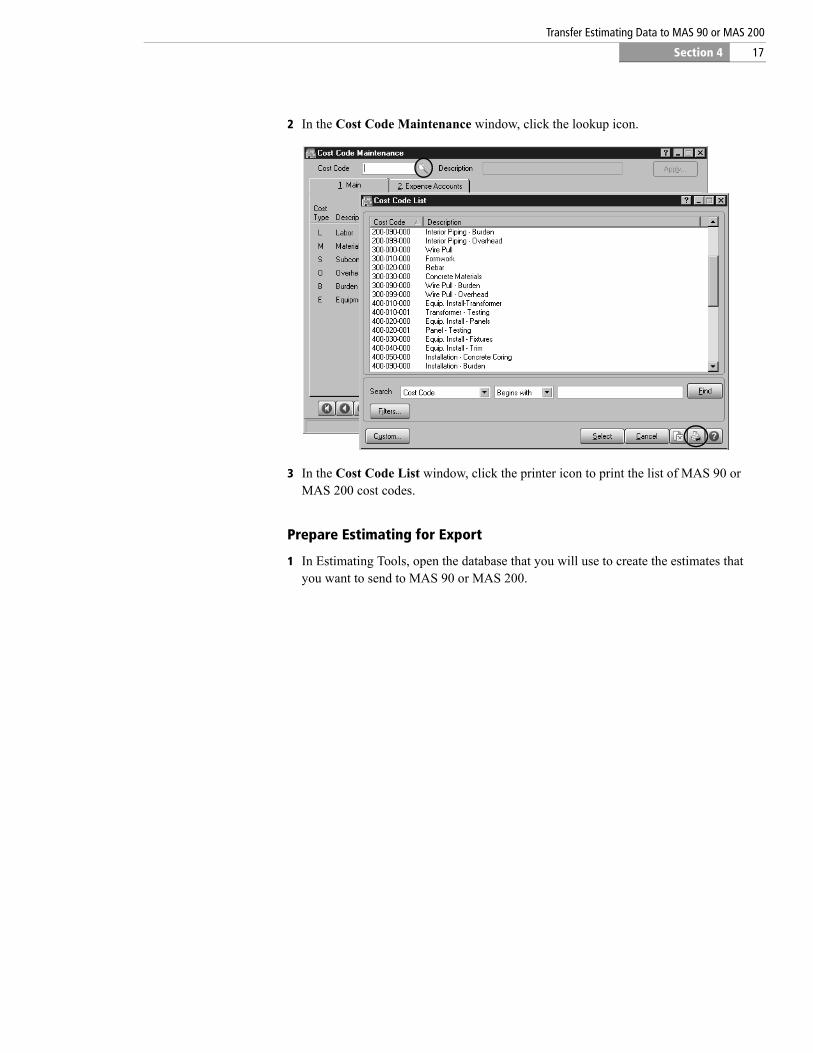
2 In the Cost Code Maintenance window, click the lookup icon.
3 In the Cost Code List window, click the printer icon to print the list of MAS 90 or MAS 200 cost codes.
Prepare Estimating for Export
1 In Estimating Tools, open the database that you will use to create the estimates that you want to send to MAS 90 or MAS 200.
18
Get Started
Section 4
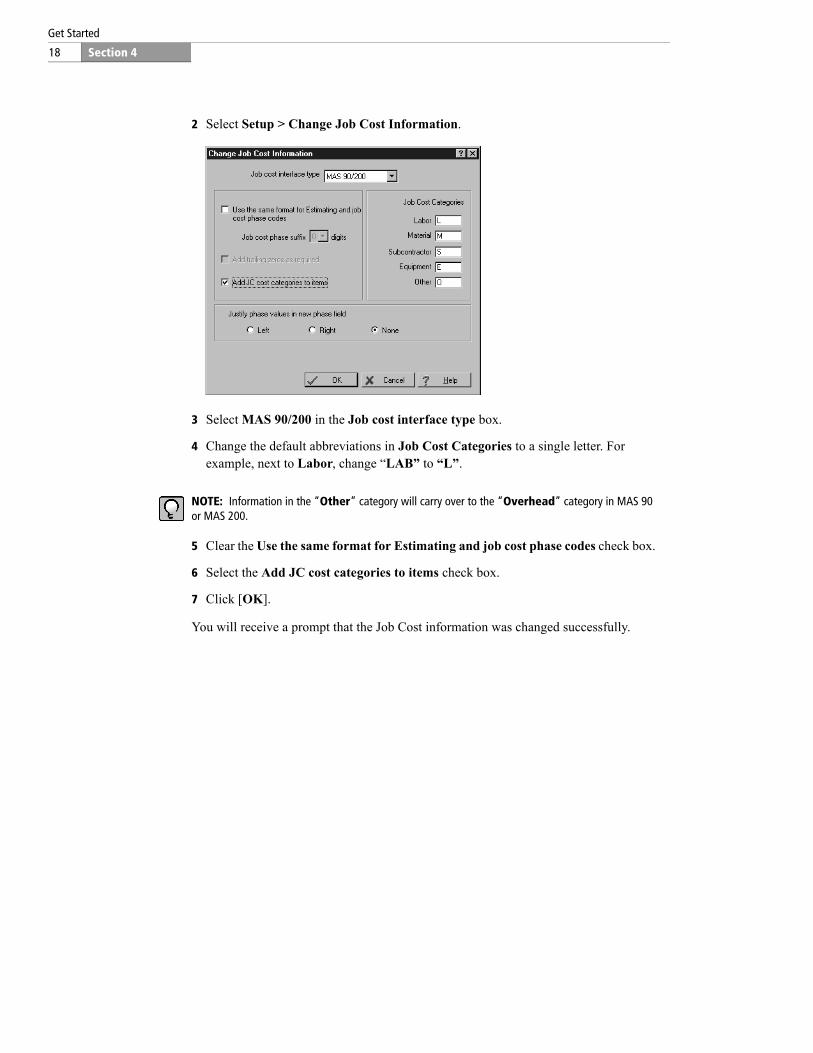
2 Select Setup > Change Job Cost Information.
3 Select MAS 90/200 in the Job cost interface type box.
4 Change the default abbreviations in Job Cost Categories to a single letter. For example, next to Labor, change “LAB” to “L”.
NOTE: Information in the “Other” category will carry over to the “Overhead” category in MAS 90 or MAS 200.
5 Clear the Use the same format for Estimating and job cost phase codes check box.
6 Select the Add JC cost categories to items check box.
7 Click [OK].
You will receive a prompt that the Job Cost information was changed successfully.

19
Transfer Estimating Data to MAS 90 or MAS 200
Section 4
Enter MAS 90 or MAS 200 Cost Codes in Estimating
You can assign MAS 90 or MAS 200 cost codes to an Estimating phase in Sage Timberline Office’s Database Editor. You can then assign those cost codes to items in that phase. After you assign MAS 90 or MAS 200 cost codes to items, future use of these items in an estimate will also include the MAS 90 or MAS 200 cost code assignments.
Use the following method if all items in your estimate phase will be assigned to the same Job Cost cost code. If they are different, see “Assign Cost Codes Directly to Items” on page 20.
1 Open Database Editor, and browse to the same database you opened in Estimating Tools in the previous section.
2 Select View > Phases.
3 Enter the MAS 90 or MAS 200 cost codes in the JC Phase cell as they appear on the cost code list printout. You can rapidly copy data from one cell to cells beneath it. Type the data you want to copy into a cell. Select the cell and cells below it. Right-click and select Fill Down. To select cells that are not next to each other in the column, press CTRL while you use the mouse to select cells.
4 Click the Items icon.

20
Get Started
Section 4
NOTE: To simplify this process, hide all Items columns except those containing job cost phase and job cost category information. Select one or more column headers, then right-click and select Hide Column.
5 Assign cost codes to items by selecting the row-header for each item. You can select all row headers in the table if needed. Right-click and select Inherit JC Phase.
Assign Cost Codes Directly to Items
If you will assign different cost codes to items in a phase, enter the MAS 90 or MAS 200 cost code directly on the item.
1 Open Database Editor, and browse to the database that you will use to create the estimates you will send to MAS 90 or MAS 200.
2 Select View > Items.
3 Scroll to the Job Cost Phase cell for each category, such as Labor, Material, Equipment, etc.
4 Enter the MAS 90 or MAS 200 cost codes as they appear in the cost code list printout. You can rapidly copy data from one cell to cells beneath it. Type the data you want to copy into a cell. Select the cell and cells below it. Right-click and select Fill Down. To select cells that are not next to each other in the column, press CTRL while you use the mouse to select cells.
Make Adjustments to the Estimate
If the estimate was created before you updated the database with MAS 90 or MAS 200 cost codes, you must must add the cost codes directly in the estimate.
Once you perform takeoff for existing estimates, you can make adjustments to the job cost codes that are assigned to the estimate items in the Detail window. For example, you may want to perform the adjustments for job-specific cost codes.
1 Open an estimate, and select the item in the Description column.
21
Transfer Estimating Data to MAS 90 or MAS 200
Section 4
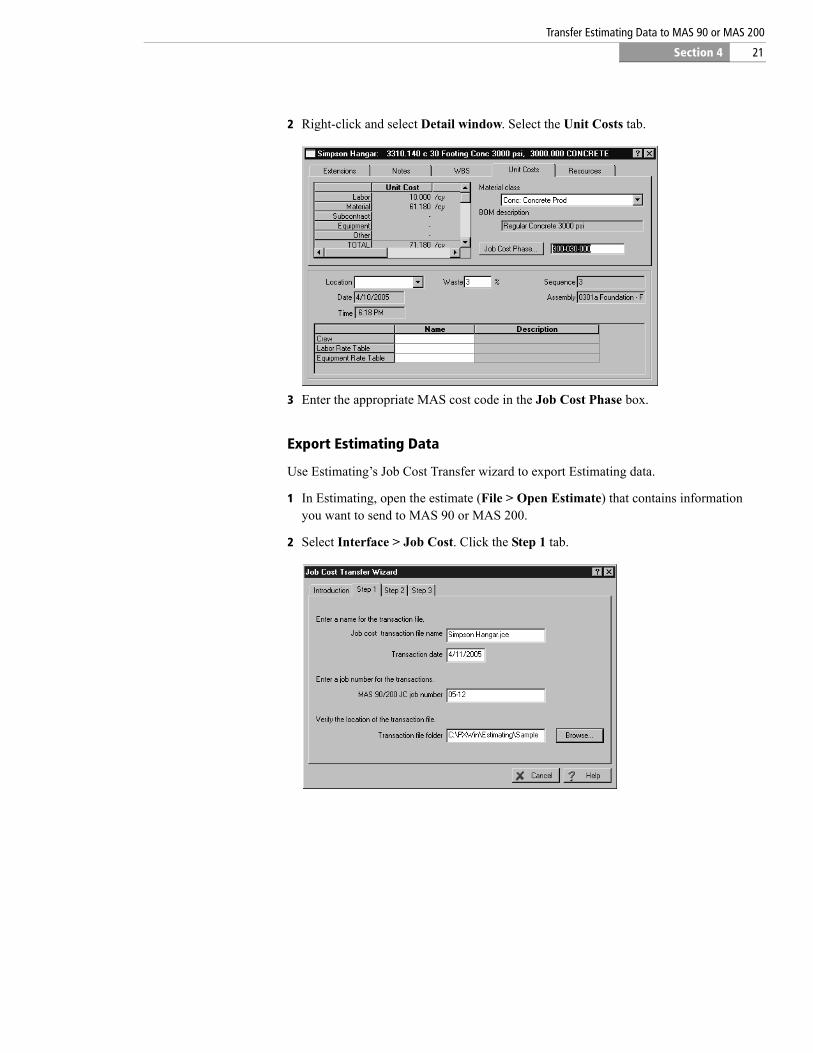
2 Right-click and select Detail window. Select the Unit Costs tab.
3 Enter the appropriate MAS cost code in the Job Cost Phase box.
Export Estimating Data
Use Estimating’s Job Cost Transfer wizard to export Estimating data.
1 In Estimating, open the estimate (File > Open Estimate) that contains information you want to send to MAS 90 or MAS 200.
2 Select Interface > Job Cost. Click the Step 1 tab.

22
Get Started
Section 4
3 Enter the job identification number in the MAS 90/200 job number box. The number you enter appears in MAS 90 or MAS 200 in the Import Estimates window as the Job ID.
NOTE: Consider making a practice of entering the same number that you will use as the job number in MAS Job Cost. Although the number you enter does not need to be the same as the Job Cost job number, it will simplify your process.
4 Enter the name of the server where you installed MAS 90/200 Integrator server components in the Sage Remote Target Server box. If you entered this location in Database > Database Settings > Job Cost tab, you can skip this step.
5 Click the Step 3 tab; then click [Generate Transactions].
Import Estimating Data Into MAS 90 or MAS 200
The Estimating data you generated is now ready for you to import into MAS 90 or MAS 200.
1 Open MAS 90 or MAS 200.
2 Select Modules > Job Cost > Main > Job Masterfile Maintenance.
3 Set up a new job for this estimate by entering a new number in the Job No. box and specifying a customer number in the Customer No. box.

23
Transfer Estimating Data to MAS 90 or MAS 200
Section 4
or
Click the Lookup icon, and select an existing job from the Job Number List window.
Click the Help icon for more information about setting up a job.
NOTE: You can enter the same job number that you entered in Estimating’s Job Cost Transfer wizard. See “Export Estimating Data” on page 21 for more information.
4 Click [Import Estimate] to open the Import Estimate window.
5 Select the estimate you want to import.
One of the following import statuses will display:
OK
Invalid Data—when any of the cost code records have warnings.
Estimate amount exceeds maximum—the estimate total is greater than $99,999,999.99.
Header quantity but no unit of measure—the header record includes Total Units, but no Unit of Measure.
If the Import Status is OK, click [Proceed].
24
Get Started
Section 4
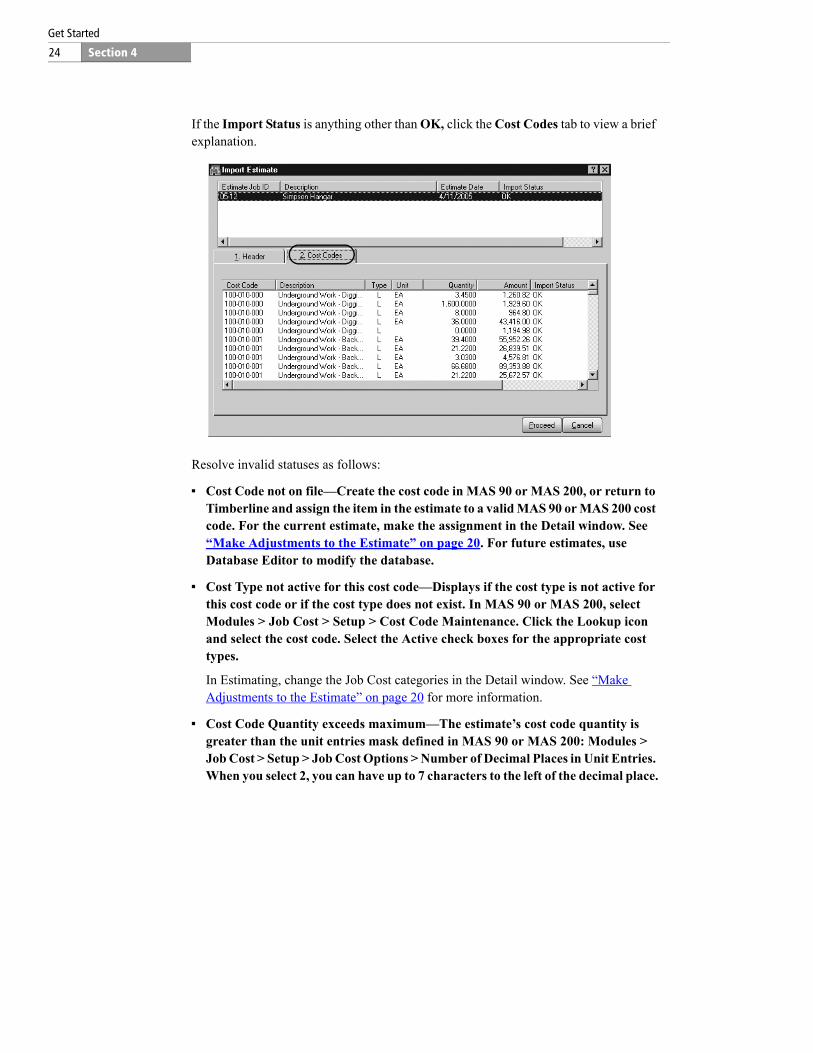
If the Import Status is anything other than OK, click the Cost Codes tab to view a brief explanation.
Resolve invalid statuses as follows:
Cost Code not on file—Create the cost code in MAS 90 or MAS 200, or return to Timberline and assign the item in the estimate to a valid MAS 90 or MAS 200 cost code. For the current estimate, make the assignment in the Detail window. See “Make Adjustments to the Estimate” on page 20. For future estimates, use Database Editor to modify the database.
Cost Type not active for this cost code—Displays if the cost type is not active for this cost code or if the cost type does not exist. In MAS 90 or MAS 200, select Modules > Job Cost > Setup > Cost Code Maintenance. Click the Lookup icon and select the cost code. Select the Active check boxes for the appropriate cost types.
In Estimating, change the Job Cost categories in the Detail window. See “Make Adjustments to the Estimate” on page 20 for more information.
Cost Code Quantity exceeds maximum—The estimate’s cost code quantity is greater than the unit entries mask defined in MAS 90 or MAS 200: Modules > Job Cost > Setup > Job Cost Options > Number of Decimal Places in Unit Entries. When you select 2, you can have up to 7 characters to the left of the decimal place.
25
Transfer Estimating Data to MAS 90 or MAS 200
Section 4
In Estimating, change the unit of measure to a bigger unit, so that the quantity decreases. For example, track by square yard instead of square foot.
Total Cost Code Quantity exceeds maximum—The total quantity for one estimating cost code or cost type is greater than the unit entries mask defined in MAS 90 or MAS 200: Modules > Job Cost > Setup > Job Cost Options > Number of Decimal Places in Unit Entries. When you select 2, you can have up to 7 characters to the left of the decimal place.
In Estimating, change the unit of measure to a bigger unit, so that the quantity decreases. For example, track by square yard instead of square foot.
Cost Code Amount exceeds maximum—The estimating cost code amount is greater than 7.2 digits. In Estimating, split the amount between two cost codes.
Total Cost Code Amount exceeds maximum—The total amount for one estimating cost code or cost type is greater than 7.2 digits. In Estimating, split the amount between two cost codes.
Quantity but no Unit of Measure—The record has a quantity but no unit of measure. Return to Estimating and select the item in the Description column. Right-click and select Detail window. Click the Extensions tab. Select the category cost, then right-click and select Category Detail. Set the Quantities to JC to none. For future estimates, modify the unit of measure in Database Editor.
Multiple UOMs for Cost Code/Cost Type—Multiple units of measure exist for this cost code or cost type. Return to Estimating and select the item in the Description column. Right-click and select Detail window. Click the Extensions tab. Select the category cost, then right-click and select Category Detail. Set the Quantities to JC to none. For future estimates, modify the unit of measure in Database Editor.
NOTE: After you make changes that correct the invalid status, you must regenerate transactions in Sage Timberline Office and reimport the estimate in MAS 90 or MAS 200.
You will be prompted when the estimate data has been successfully imported.
Where to Find Estimating Information in MAS 90 or MAS 200
The best way to view estimating data that you import is to print the Job Cost Code Detail report. (MAS 90 or MAS 200: Modules > Job Cost > Custom Reports > Job Cost Code Detail Report.)

26
Get Started
Section 4
Imported estimating data also appears in detail on the Main and Job Status tabs of the Job Masterfile Maintenance window.
Menu path—Modules > Job Cost > Main > Job Masterfile Maintenence > [Cost Code]
Menu path—Modules > Job Cost > Main > Job Masterfile Maintenence > Job Status tab
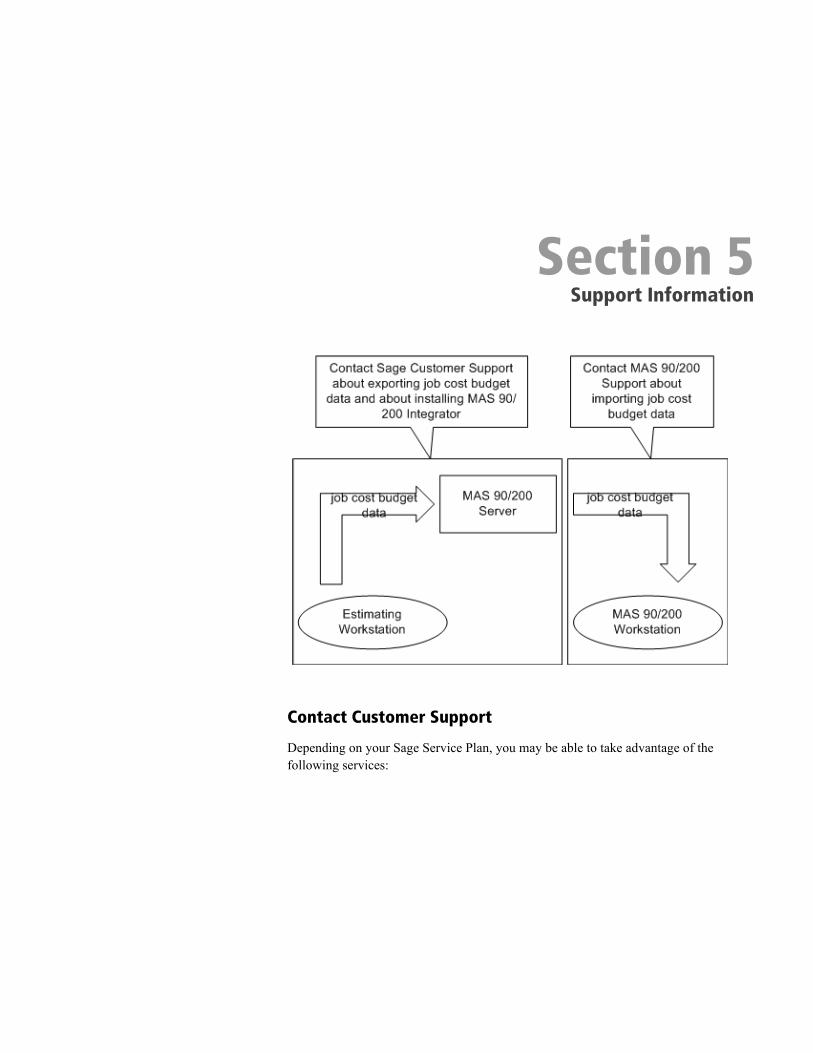
Section 5Support Information
Contact Customer Support
Depending on your Sage Service Plan, you may be able to take advantage of the following services:
28
Get Started
Section 5
Sage Customer Portal
You may log on to the Sage Customer Portal at https://customers.sagenorthamerica.com/irj/portal/anonymous/login to access any of the following services:
Knowledgebase: Find answers to your questions, access downloads, and subscribe to your favorite articles. This service is available online 24/7.
Live Chat: Chat online with a customer support analyst - a great option for quick questions. Chat hours are the same as our telephone support hours (see below).
Online Support Request: Submit an online support ticket when you have a non-urgent question. One of our call center support analysts will assist you. Online support hours are the same as our customer support call center hours (see below).
Sage Customer Support Call Center
Telephone Support: When you have a more urgent question or would prefer to speak to a customer support analyst directly, call us at 800-551-8307. Telephone support is available Monday through Friday from 6 a.m. to 5 p.m. Pacific Time with the following exceptions:
Every Thursday from 2 p.m. to 3 p.m. Pacific Time (closed for customer support staff meetings)
Standard United States holidays
Quarterly company meetings
Upgrading Your Service Plan
If your service plan does not provide online or telephone customer support and you would like to add or upgrade a service plan, please call 800-858-7098.
Training Information
Learn about the Anytime Learning and Realtime Learning sessions that are available, view schedules of online sessions, or look for classroom training near you.
You can directly access Sage University from the Help menu in applications (Help > Sage Timberline Office on the Web > Sage Software University). This website offers a variety of professional product training options.