s30 maint-en-1006 de20783
TRANSCRIPT

Replacement of refractories 2
of the grate of the ashpan 3
of the grate shaker 4
of the bolt and the bolt spring of the drum 4
of the drum positioner 5
Rotation of the drum 5
Replacement of the damper and its regulator 6
of the upper tight seal between body and drum 6
of the lower tight seal between body and drum 8
of the door locking mechanism 9
of the panes 10
of the «anti-convection» seals and the pane on the solid door 11
of the door seals 12
List of spare parts 14
maintenance
S 3
0 m
aint.
EN
10
-06
SN
20
78
3 >
...

S30 maint. EN 10-062
1
A
B
E F
D
2 3
6
2 Tools needed : - 1 flat screwdriver - 1 3 mm and 1 4 mm Allen key - 1 8 mm open-end spanner - 1 adjustable locking wrench - 1 socket-head screwdriver and
7 mm and 8 mm sockets - 1 spatula
3 Open the door using the cold handgrip.
6 Re-assembly : - vertical refractories (4B) - smoke deflector (5) - horizontal refractories (4A)
CC
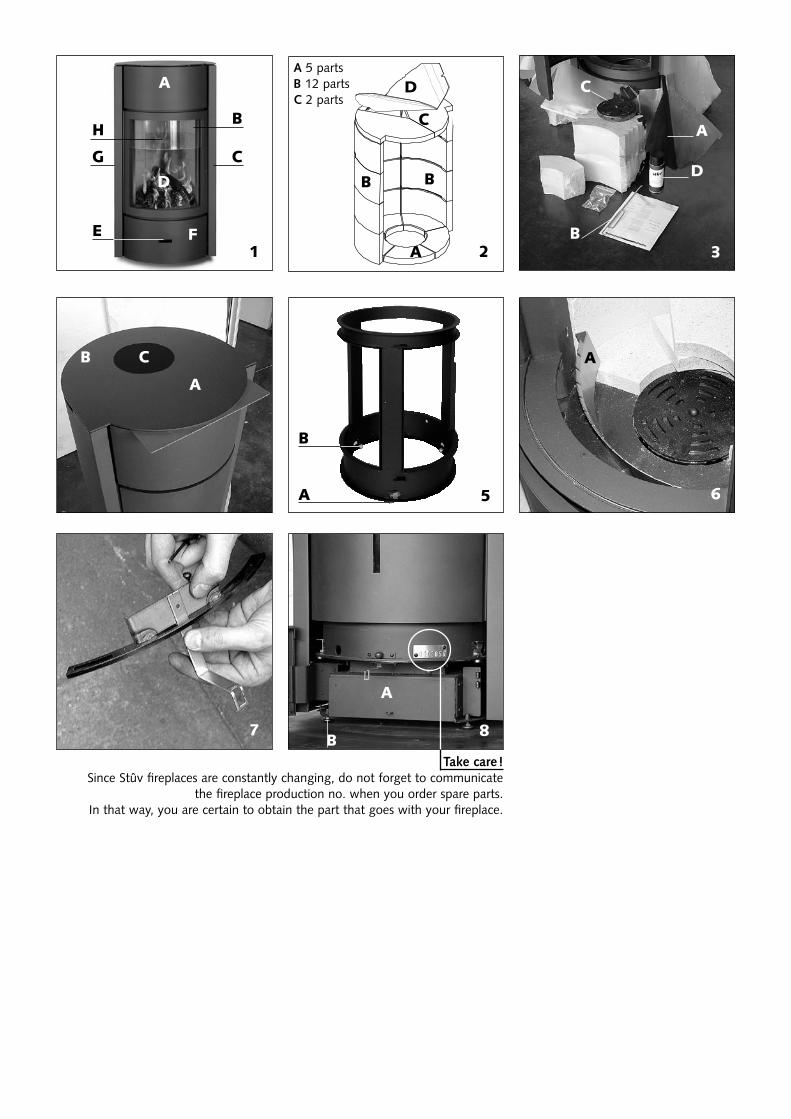
1 General view of the Stûv 30 A front panel B «open fire» door C side facings D combustion chamber E damper regulator F ashpan door
Replacement of refractories
5
4 & 5 Remove steel bar supporting horizontal vermiculite refractors by simply pushing it out of its notches. Remove horizontal vermiculite refractors (4 C) then smoke deflec-tor (4 D & 5) upwards.
Then remove horizontal refractors from the bottom of the hearth which are lose (4 A). Remove the smoke deflector at least once a year to prevent soot clogging the smoke outlet.
4
A 5 partsB 12 partsC 2 parts
B
D
A
C
B

S30 maint. EN 10-063
2
2 Open a door. Take out the 2 front refractories.
4 & 5 Detach the 3 parts making up the grate. Position the support for fixed lower grate. the three lugs should fit into the half-moons cut out of the bot-tom of the fireplace. Be careful : the opening marked A should be on the right.
1 Grate mechanism A black button of the grate shaker B removable upper grate C fixed lower grate D fork
3 Remove the grate with its pin.
6 Refit refractors. Using the black button of the grate shaker (photo 1 A & 6 A) turn the fork clockwise (photo 1 D) as far as it will go. Then position the removable upper grate (photo 1B), making sure to insert its shank into the fork (photo 1D).
1A
B CD
4
A
5
3
1. Disassembly of the grate
2. Re-assembly of the grate
A 6
Replacement of the grate of the ashpan

S30 maint. EN 10-064
2 Unscrew the 2 parts of the grate shaker by holding the black button with your right hand and the fork with your left hand.
1 2 3
1 Open a door. Take out the front refractories. Remove the grate and the grate holder.
3 Unscrew the black button of the metal rod to allow the 2 parts of that rod to come out through the inside of the fireplace.
2 3
4
4 Unscrew the black button to take out the spring.
2 Unscrew the 2 M5 screws, using the 8 mm socket spanner.
3 Take the bolt out of the drum.
Replacement of the grate shaker
Replacement of the bolt and the bolt spring of the drum
1
1 Open the ashpan door.

S30 maint. EN 10-065
2. Replacing the drum guide bearing
2
2 Using an 8 mm flat spanner, undo 2 screws holding drum positioner
To put the positioner back in place, insert the positioner and screw the 2 screws with the fan washers. Do not tighten.Check that the door is perfectly in line with the front panel and the ashpan door, and then tighten the two screws.
The positioner is the fixed afemale component, which allows the bolt to immobilise the drum.
1 2 3
1 View of the drum with : - guide bearing - support bearing
2 Rotate the drum for easy access to the bearing (or to the gripping hook).
3 Insert a flat screwdriver between the rail and the lower ring of the drum in order to raise it slightly.Using the No. 4 Allen spanner, loosen the screw (2 or 3 turns) and move the gripping hook rightwards to take out the bearing through the hole provided for that purpose.
1 2
2 Using the No. 4 Allen spanner, unscrew the screw located in the bearing pin. Do not forget to put the washer back in place between the bearing and the lower ring of the drum.
1 Turn the drum to have easy access to the bearing.
1. Replacement of the drum holder bearing of the gripping hook
2’2’
Replacement of the drum positioner
Rotation of the drum
1
1 Open the ashpan door.

S30 maint. EN 10-066
Carefully observe the position of the seal before removing it.
1 2
2 Unscrew and remove the front panel (you can also remove the side facings to make the operation easier.
3 Unscrew the 3 hexagonal-headed screws of the stainless-steel seal retainer.
3
1 Take out the plates located on the top of the fireplace.
4
4 Take out the damper through the inside of the fireplace and its regu-lator though the outside.
1 2
2 Take out the primary air deflector. 3 Unscrew the screw holding the damper regulator, using the 8 mm spud wrench.
3
1 Remove the 2 front refractories.
A
Replacement of the upper tight seal between body and drum
Replacement of the damper and its regulator

S30 maint. EN 10-067
5 6
4 Take out the stainless-steel seal retainer.
7
7 Remove the 2 front refractories covering the bottom of the fire-place.
8
8 Take out the stainless-steel primary air deflector.
9
9 Remove the 2 vertical protective sections by raising tahem through the holes provided for fixing the barbecue grill.
5 Using an 8 mm open-end spanner and an 8 mm spud wrench, uns-crew the bolt that holds the upper crosspiece in place.
6 Turn the drum 10 cm towards the right. Remove the upper cross-piece.
10 11
11 Take out the vertical seal retainers. 12 Take out the worn seal.
12
10 Unscrew the bolts that keep the vertical seal retainers in place. To save time, loosen the seal retai-ner bolts without removing them.
4

S30 maint. EN 10-068
Carefully observe the position of the seal before removing it.
13 Fit the new seal with the flexible part towards the front and the thin part against the surface of the fireplace. Fix the left vertical seal retainer first, tightening only the lower bolt, then pull the seal upwards while tightening the other 2. Do the same with the vertical seal on the right and then fit the rest of the seal evenly along the horizontal part.
Check the tightness of the seal by rotating the drum several times.13
5 6
5 Take out the stainless-steel, primary air deflector.
6 Remove the 2 vertical protective sections by raising them through the holes provided for fixing the barbe-cue grill.
2 3
3 Turn the drum 10 cm to the right. Remove the refractories covering the bottom of the fireplace.
4 Remove the 2 front refractories covering the bottom of the fire-place.
4
2 Using an 8 mm open-end spanner and an 8 mm spud wrench, uns-crew the bolt that holds the upper crosspiece in place.
1
1 Open the door slightly. Turn the drum 10 cm to the right. Raise the door to remove it from its hinges, then push it to the left.
1
2
Replacement of the lower tight seal between body and drum

S30 maint. EN 10-069
7 Unscrew the Allen screws and M5 nut holding the lower crosspiece.
7 8 9
9 Take out the seal. For installing the seal, work in the opposite direction.
8 Position the drum in the solid door position, and remove the door by lifting it off its hinges. Turn the drum towards the left to bring the hole (15 mm Ø) level with the vertical body seal. Through the hole you can see the hexagonal-head screw that keeps the lower horizontal seal retainer in position. Unscrew it (turn 2 or 3 times). Do the same on the right.
Replacement of the door locking mechanism
1 2
1 Unscrew the 2 screws, using the 8 mm spud wrench. Fit the new door striker.
2 Using a socket spanner, undo 2 bolts holding door striker.
Door locking mechanism has two distinct elements : the striker plate on the drum, and the striker on the door.

S30 maint. EN 10-0610
1
1
2
2 3
1 Slightly half-open the door.
4 5 6
5 Replace the window.
2 Turn the drum 10 cm rightwards. Lift the door to take it off its hinges, then push it leftwards. Rest it on a support to keep it steady.
3 Remove the door lock. Carefully observe its position !
8
8 Put the door back in place.
6 Tighten the window clamps while pushing the window so as not to damage the edge of the window. Be careful, place the side without projections facing the window.
7
7 Refit the door lock.
4 Unscrew the clamps that hold the window in place.
The procedure is the same for the glass door and for the «open fire» door.
Replacement of the panes

S30 maint. EN 10-0611
1 2 3
1 Slightly half-open the door.
4 5
5 To replace the windowpane, you must remove the grey self-adhe-sive seal. Replace the pane. Fit a new self-adhesive seal.
6
6 Engage screws for heat shield.
2 Turn the drum 10 cm rightwards. Lift the door to take it off its hinges, then push it leftwards. Rest it on a support to keep it steady.
3 Using the 8 mm spud wrench, unscrew the thermal shield on the solid door.
7
7 Insert the upper seal between the shield and the door. Using the spatula, slide the lower joint under the lug, then insert the rest of the joint along the width of the ther-mal shield. The seals should fill the groove along its full length.
8 Put the heat shield back in place.8
4 Take out the heat shield.
1
2
Replacement of the «anti-convection» seals and the pane on the solid door

S30 maint. EN 10-0612
1 2 3
1 Slightly half-open the door.
4
2 Turn the drum 10 cm rightwards. Lift the door to take it off its hin-ges, then push it leftwards. Rest it on a support to keep it steady.
3 Remove the door seal – all you have to do is pull it.
4 Using the spatula, replace the seal, starting by the lower hinge side.
In order to make sure it is airti-ght, be sure to stretch the vertical sections and spread the rest along the horizontal sections.
1
2
Replacement of the door seals

S30 maint. EN 10-0613
S30 maint. EN 10-0614
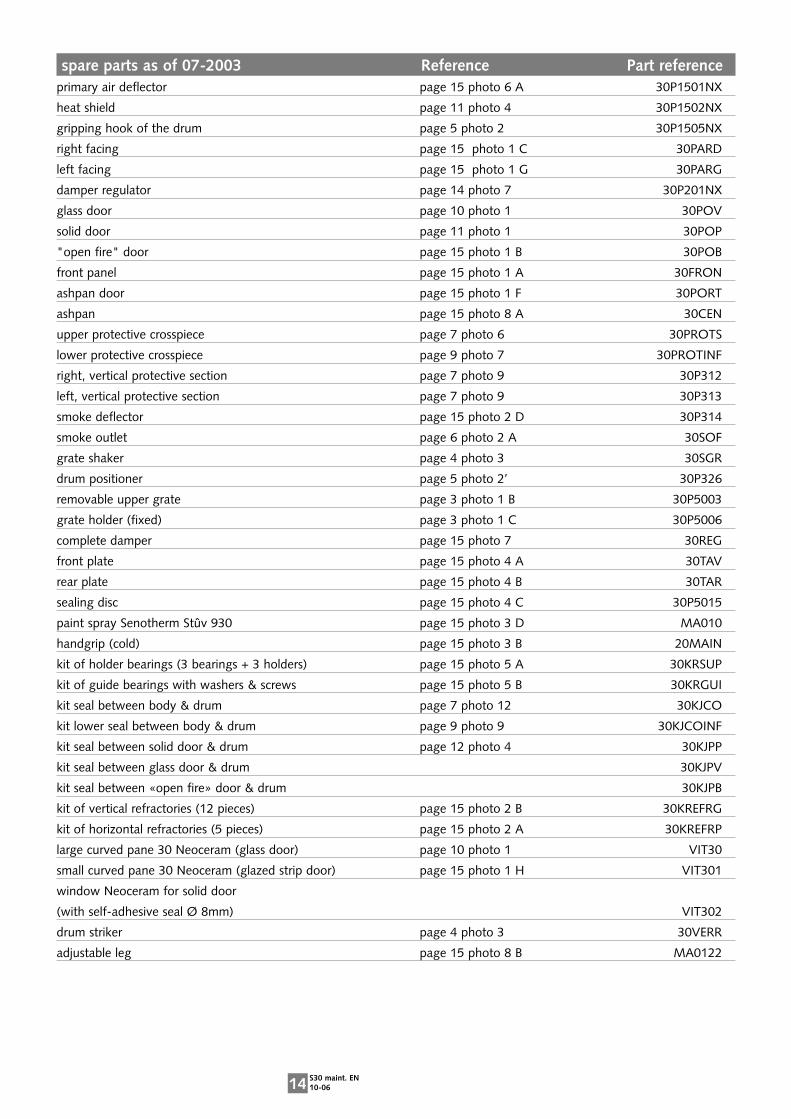
spare parts as of 07-2003 Reference Part referenceprimary air deflector page 15 photo 6 A 30P1501NX
heat shield page 11 photo 4 30P1502NX
gripping hook of the drum page 5 photo 2 30P1505NX
right facing page 15 photo 1 C 30PARD
left facing page 15 photo 1 G 30PARG
damper regulator page 14 photo 7 30P201NX
glass door page 10 photo 1 30POV
solid door page 11 photo 1 30POP
"open fire" door page 15 photo 1 B 30POB
front panel page 15 photo 1 A 30FRON
ashpan door page 15 photo 1 F 30PORT
ashpan page 15 photo 8 A 30CEN
upper protective crosspiece page 7 photo 6 30PROTS
lower protective crosspiece page 9 photo 7 30PROTINF
right, vertical protective section page 7 photo 9 30P312
left, vertical protective section page 7 photo 9 30P313
smoke deflector page 15 photo 2 D 30P314
smoke outlet page 6 photo 2 A 30SOF
grate shaker page 4 photo 3 30SGR
drum positioner page 5 photo 2’ 30P326
removable upper grate page 3 photo 1 B 30P5003
grate holder (fixed) page 3 photo 1 C 30P5006
complete damper page 15 photo 7 30REG
front plate page 15 photo 4 A 30TAV
rear plate page 15 photo 4 B 30TAR
sealing disc page 15 photo 4 C 30P5015
paint spray Senotherm Stûv 930 page 15 photo 3 D MA010
handgrip (cold) page 15 photo 3 B 20MAIN
kit of holder bearings (3 bearings + 3 holders) page 15 photo 5 A 30KRSUP
kit of guide bearings with washers & screws page 15 photo 5 B 30KRGUI
kit seal between body & drum page 7 photo 12 30KJCO
kit lower seal between body & drum page 9 photo 9 30KJCOINF
kit seal between solid door & drum page 12 photo 4 30KJPP
kit seal between glass door & drum 30KJPV
kit seal between «open fire» door & drum 30KJPB
kit of vertical refractories (12 pieces) page 15 photo 2 B 30KREFRG
kit of horizontal refractories (5 pieces) page 15 photo 2 A 30KREFRP
large curved pane 30 Neoceram (glass door) page 10 photo 1 VIT30
small curved pane 30 Neoceram (glazed strip door) page 15 photo 1 H VIT301
window Neoceram for solid door
(with self-adhesive seal Ø 8mm) VIT302
drum striker page 4 photo 3 30VERR
adjustable leg page 15 photo 8 B MA0122
8
Take care !Since Stûv fireplaces are constantly changing, do not forget to communicate
the fireplace production no. when you order spare parts. In that way, you are certain to obtain the part that goes with your fireplace.
1
A
A
B
E F
D
CG
2
5 6
7
3
A
A
B
A
A
B C
B
C
D
B
A 5 partsB 12 partsC 2 parts
B
D
A
C
B
2
H

Stûv fireplaces are designed and made in Belgium by :Concept & Forme sa - rue Jules Borbouse 4 - B-5170 Bois-de-Villers (Belgium)
tél : +32 (0)81 43 47 96 - fax : +32 (0)81 43 48 [email protected] - www.stuv.eu
Prin
ted
on 1
00%
rec
ycle
d pa
per.
- St
ûv r
eser
ves
the
righ
t to
impl
emen
t m
odif
icat
ions
wit
hout
not
ice.