rx-v585 owner's manual - hifix.co.uk · owner's manual • this unit is a product for...
TRANSCRIPT

AV Receiver
Owner's Manual
• This unit is a product for enjoying video and music at home.• This manual explains preparations and operations for everyday users of the unit.• Read the supplied booklet “Quick Start Guide” before using the unit.
EN

CONTENTSBEFORE USING THE UNIT 7How to use this manual............................................................................ 7
How to use this manual......................................................................................................................................................... 7
Checking the accessories.......................................................................... 7Checking the accessories...................................................................................................................................................... 7
Using the remote control......................................................................... 7Insert the batteries in the remote control....................................................................................................................... 7
Operating range of the remote control........................................................................................................................... 7
FEATURES 8What you can do with the unit................................................................. 8Part names and functions...................................................................... 10
Part names and functions of the front panel............................................................................................................... 10
Part names and functions of the front display............................................................................................................ 12
Part names and functions of the rear panel................................................................................................................. 13
Part names and functions of the remote control....................................................................................................... 14
PREPARATIONS 151 Connecting speakers........................................................................ 15
Names and functions of speakers.................................................................................................................................... 15
Speaker systems and speakers to be connected....................................................................................................... 16
Speaker requirements.......................................................................................................................................................... 16
Setting the speaker impedance....................................................................................................................................... 17
Cable requirements.............................................................................................................................................................. 17
How to connect speakers................................................................................................................................................... 17
How to place speakers (speaker systems).................................................................................................................... 19
Connecting front speakers that support bi-amp connections............................................................................. 24
2 Connecting a TV................................................................................ 25HDMI connection with a TV............................................................................................................................................... 25
VIDEO (composite video) connection with a TV........................................................................................................ 25
3 Connecting playback devices.......................................................... 26HDMI connection with a video device such as a BD/DVD player......................................................................... 26
Connection other than HDMI with a playback device............................................................................................. 26
Connecting to the jack on the front panel................................................................................................................... 27
4 Connecting the FM/AM antennas.................................................... 28Connecting the FM/AM antennas................................................................................................................................... 28
5 Preparing for connecting to a network........................................... 29Preparing for connecting to a network......................................................................................................................... 29
Connecting a network cable (wired connection)...................................................................................................... 29
Preparing wireless antennas (wireless connection).................................................................................................. 30
6 Plugging in the power cable............................................................ 30Plugging in the power cable............................................................................................................................................. 30
7 Selecting the on-screen menu language........................................ 31Selecting the on-screen menu language...................................................................................................................... 31
8 Configuring the necessary speaker settings.................................. 32Assigning speaker configuration..................................................................................................................................... 32
Optimizing the speaker settings automatically (YPAO).......................................................................................... 33
Error messages from YPAO................................................................................................................................................ 35
Warning messages from YPAO......................................................................................................................................... 36
9 Setting MusicCast............................................................................. 37What is MusicCast.................................................................................................................................................................. 37
Using MusicCast CONTROLLER......................................................................................................................................... 37
Adding the unit to the MusicCast network.................................................................................................................. 37
ENJOYING SOUND 38Enjoying sound field effects.................................................................. 38
Select your favorite sound mode..................................................................................................................................... 38
Enjoying 3D sound fields (CINEMA DSP 3D)................................................................................................................ 38
Enjoying sound field effects optimized for the type of content........................................................................... 39
Enjoying sound field effects without surround speakers (Virtual CINEMA DSP)............................................ 39
Enjoying surround sound with 5 speakers placed in front (Virtual CINEMA FRONT).................................... 39
Enjoying surround sound with headphones (SILENT CINEMA)............................................................................ 39
En2

Enjoying unprocessed playback............................................................ 40Enjoying original sound (straight decode)................................................................................................................... 40
Enjoying multichannel playback without sound field effects (surround decoder)....................................... 40
Enjoying pure high fidelity sound (direct playback)................................................................................................. 41
Enjoying enhanced bass sound............................................................. 41Enhancing the bass (Extra Bass)....................................................................................................................................... 41
Enjoying enhanced compressed music................................................. 42Playing back digitally compressed formats with enriched sound (Compressed Music Enhancer)......... 42
Enjoying Dolby Atmos® and DTS:X™..................................................... 42Enjoying Dolby Atmos® and DTS:X™.............................................................................................................................. 42
Enjoying music in multiple rooms......................................................... 43Playing back music in multiple rooms........................................................................................................................... 43
Connecting Zone B speakers............................................................................................................................................. 43
Operating the Zone B........................................................................................................................................................... 44
Correcting volume difference between Zone A and Zone B................................................................................. 45
Adjusting the volume for Zone B separately............................................................................................................... 45
PLAYBACK 46Basic playback procedure...................................................................... 46
Basic procedure for playing back video and music................................................................................................... 46
Switching information on the front display................................................................................................................. 47
Item names and functions of the playback screen.................................................................................................... 48
Item names and functions of the browse screen....................................................................................................... 49
Listening to FM/AM radio....................................................................... 50Setting the frequency steps............................................................................................................................................... 50
Selecting a frequency for reception............................................................................................................................... 51
Selecting a preset station................................................................................................................................................... 52
Registering radio stations automatically (Auto Preset)........................................................................................... 52
Registering a radio station manually.............................................................................................................................. 53
Clearing preset stations....................................................................................................................................................... 54
Displaying the Radio Data System information......................................................................................................... 54
Receiving traffic information automatically................................................................................................................ 55
Playing back music stored on a Bluetooth® device.............................. 56Playback Bluetooth® device music on the unit........................................................................................................... 56
Playing back music with AirPlay............................................................ 57Playback of iTunes/iPhone music contents with AirPlay........................................................................................ 57
Playing back music stored on a USB storage device............................ 58Playback of USB storage device contents..................................................................................................................... 58
Playing back music stored on media servers (PCs/NAS)...................... 59Media sharing setup on media servers (PCs/NAS)..................................................................................................... 59
Playing back music stored on media servers (PCs/NAS)......................................................................................... 59
Listening to Internet radio..................................................................... 61Selecting an Internet radio station.................................................................................................................................. 61
Registering favorite Internet radio stations................................................................................................................. 61
Listening to music streaming services.................................................. 62Listening to a streaming service...................................................................................................................................... 62
Useful playback functions...................................................................... 63SCENE function....................................................................................................................................................................... 63
Shortcut function................................................................................................................................................................... 65
Configuring playback settings for different playback sources(Option menu)......................................................................................... 67
Basic operation of the Option menu.............................................................................................................................. 67
Option menu items............................................................................................................................................................... 68
Switching the input source................................................................................................................................................ 69
Adjusting the tone of the audio output........................................................................................................................ 69
Configuring DSP/Surround................................................................................................................................................ 69
Correcting volume differences during playback........................................................................................................ 72
Enabling Lipsync adjustment............................................................................................................................................ 72
Checking information about the video/audio signals............................................................................................. 73
Combining audio of another input source with video of the current input source...................................... 73
Selecting a video source to be output with the selected audio source............................................................ 74
Switching between stereo and monaural for FM radio reception...................................................................... 74
Setting presets for radio stations..................................................................................................................................... 75
Receiving traffic information automatically................................................................................................................ 76
Configuring the shuffle setting........................................................................................................................................ 76
Configuring the repeat setting......................................................................................................................................... 77
Enabling volume control via AirPlay............................................................................................................................... 77
Adding an Internet radio station to the “Favorites” folder..................................................................................... 77
Removing an Internet radio station from the “Favorites” folder.......................................................................... 77
En3

CONFIGURATIONS 78Configuring various functions (Setup menu)....................................... 78
Basic operation of the Setup menu................................................................................................................................ 78
Setup menu items................................................................................................................................................................. 79
Configuring the speaker settings.......................................................... 82Setting your speaker system............................................................................................................................................. 82
Setting the use of a subwoofer......................................................................................................................................... 82
Setting the size of the front speakers............................................................................................................................. 82
Setting the use of a center speaker and its size.......................................................................................................... 83
Setting the use of surround speakers and their size................................................................................................. 83
Setting the use of surround back speakers and their size...................................................................................... 84
Setting the use of presence speakers and their size................................................................................................. 84
Setting the layout of the presence speakers............................................................................................................... 85
Setting the crossover frequency of the low-frequency components................................................................. 85
Setting the phase of the subwoofer............................................................................................................................... 85
Setting the use of Extra Bass.............................................................................................................................................. 85
Setting the use of Virtual CINEMA FRONT.................................................................................................................... 86
Setting the distance between each speaker and the listening position........................................................... 86
Adjusting the volume of each speaker.......................................................................................................................... 86
Setting the equalizer............................................................................................................................................................ 87
Outputting test tones.......................................................................................................................................................... 87
Configuring the HDMI settings.............................................................. 88Setting the use of HDMI Control...................................................................................................................................... 88
Setting the output of HDMI audio from the TV speaker......................................................................................... 88
Setting the use of HDMI Standby Through.................................................................................................................. 88
Setting the use of 4K upscaling of the HDMI video signal...................................................................................... 88
Setting the version of HDCP used on the HDMI input jacks.................................................................................. 89
Setting the audio jack used for TV audio input.......................................................................................................... 89
Linking the standby modes of the unit and the TV................................................................................................... 89
Setting the use of ARC......................................................................................................................................................... 89
Setting the use of SCENE link playback......................................................................................................................... 90
Configuring the sound settings............................................................. 91Setting the use of Center Spread..................................................................................................................................... 91
Adjusting the center localization (broadening effect) of the front sound field.............................................. 91
Setting the use of Monaural Mix...................................................................................................................................... 91
Setting the adjustment method of the Lipsync function....................................................................................... 91
Adjusting the delay of the Lipsync function................................................................................................................ 92
Adjusting the volume of dialogue sound..................................................................................................................... 92
Adjusting the volume of dialogue sound during DTS:X™ playback.................................................................... 92
Adjusting the perceived height of dialogue sound.................................................................................................. 93
Setting the scale of the volume display........................................................................................................................ 93
Setting the dynamic range adjustment method....................................................................................................... 93
Setting the limit value of the volume............................................................................................................................. 94
Setting the initial volume for when the unit is turned on...................................................................................... 94
Adjusting the volume for Zone B in conjunction with the volume for Zone A............................................... 94
Configuring the power supply settings................................................ 95Setting the amount of time for the auto-standby function................................................................................... 95
Setting the use of the eco mode...................................................................................................................................... 95
Configuring the function settings......................................................... 96Automatically changing the input source names displayed on the front display......................................... 96
Manually changing the input source names displayed on the front display.................................................. 96
Setting input sources to be skipped when operating the INPUT key................................................................ 97
Adjusting the brightness of the front display............................................................................................................. 97
Preventing accidental changes to the settings.......................................................................................................... 97
Setting the unit's functions for the RED/GREEN/YELLOW/BLUE keys of the remote control.................... 98
Configuring the network settings......................................................... 99Checking the network information of the unit........................................................................................................... 99
Setting the network connection method (Wired/Wireless)................................................................................... 99
Setting the network parameters automatically (DHCP).......................................................................................... 99
Setting the network parameters manually................................................................................................................ 100
Setting the MAC address filter........................................................................................................................................ 100
Setting the use of a Digital Media Controller............................................................................................................ 101
Setting the use of the Network Standby function.................................................................................................. 101
Setting the network name of the unit......................................................................................................................... 102
Setting the power interlock from the unit to MusicCast compatible devices.............................................. 102
Updating the firmware via the network..................................................................................................................... 102
En4

Configuring the Bluetooth® settings.................................................. 103Setting the use of Bluetooth®......................................................................................................................................... 103
Terminating the connection between a Bluetooth® device and the unit...................................................... 103
Setting the use of the Bluetooth® Standby function.............................................................................................. 103
Configuring the language settings..................................................... 104Setting the on-screen menu language....................................................................................................................... 104
Configuring the advanced settings (ADVANCED SETUP menu)....... 105Basic operation of the ADVANCED SETUP menu..................................................................................................... 105
ADVANCED SETUP menu items..................................................................................................................................... 105
Changing the speaker impedance setting (SP IMP.).............................................................................................. 106
Selecting the remote control ID (REMOTE ID).......................................................................................................... 106
Changing the FM/AM tuning frequency setting (TU)............................................................................................ 106
Switching the video signal type (TV FORMAT)......................................................................................................... 106
Selecting the HDMI 4K signal format (4K MODE).................................................................................................... 107
Setting DTS Format Notification (DTS MODE).......................................................................................................... 107
Backuping and restoring all the settings (BKUP/RSTR)......................................................................................... 108
Restoring the default settings (INIT)............................................................................................................................. 109
Updating the firmware (UPDATE)................................................................................................................................. 109
Checking the firmware version (VERSION)................................................................................................................. 109
TROUBLESHOOTING 110When any problem appears................................................................. 110
If trouble occurs, first check the following:................................................................................................................ 110
Power, system, or remote control trouble................................................................................................................. 110
Audio trouble....................................................................................................................................................................... 112
Video trouble........................................................................................................................................................................ 115
FM/AM radio trouble......................................................................................................................................................... 116
USB trouble........................................................................................................................................................................... 116
Network trouble.................................................................................................................................................................. 117
Bluetooth® trouble.............................................................................................................................................................. 119
Error indications on the front display................................................. 120Error indications on the front display.......................................................................................................................... 120
APPENDIX 122Updating the unit’s firmware via the network................................... 122
Firmware updates............................................................................................................................................................... 122
Updating the unit’s firmware via the network......................................................................................................... 123
Connecting to a network wirelessly.................................................... 124Selecting a wireless network connection method.................................................................................................. 124
Setting up a wireless connection using the WPS button..................................................................................... 125
Setting up a wireless connection using an iOS device.......................................................................................... 125
Setting up a wireless connection by selecting from the list of available access points............................ 126
Setting up a wireless connection manually............................................................................................................... 127
Setting up a wireless connection by using the WPS PIN code........................................................................... 128
Input/output jacks and cables............................................................. 129Video/audio jacks................................................................................................................................................................ 129
Video jacks............................................................................................................................................................................. 129
Audio jacks............................................................................................................................................................................ 129
Using presence speakers...................................................................... 130Presence speaker layout................................................................................................................................................... 130
Installing the presence speakers in Front Height position.................................................................................. 130
Installing the presence speakers in Overhead position........................................................................................ 130
Using Dolby Enabled speakers as the presence speakers.................................................................................... 131
Glossary................................................................................................. 132Glossary of audio information........................................................................................................................................ 132
Glossary of HDMI and video information................................................................................................................... 133
Glossary of network information................................................................................................................................... 134
Glossary of Yamaha technologies................................................................................................................................. 134
Supported devices and file formats.................................................... 135Supported Bluetooth® devices....................................................................................................................................... 135
Supported USB devices..................................................................................................................................................... 135
Supported AirPlay devices............................................................................................................................................... 135
Supported file formats...................................................................................................................................................... 135
Video signal flow.................................................................................. 136Video signal flow................................................................................................................................................................. 136
Additional information on HDMI......................................................... 137HDMI Control and synchronized operations............................................................................................................ 137
Audio Return Channel (ARC)........................................................................................................................................... 138
HDMI signal compatibility............................................................................................................................................... 139
En5

Trademarks........................................................................................... 140Trademarks............................................................................................................................................................................ 140
Specifications........................................................................................ 141Specifications........................................................................................................................................................................ 141
Default settings.................................................................................... 145Default settings of the Option menu........................................................................................................................... 145
Default settings of the Setup menu............................................................................................................................. 145
Default settings of the ADVANCED SETUP menu.................................................................................................... 146
En6

BEFORE USING THE UNITHow to use this manual
How to use this manualWhen reading this manual, mind the following items.
• Some features are not available in certain regions.
• Due to product improvements, specifications andappearance are subject to change without notice.
• This manual mainly explains operations using themenu displayed on the TV screen. Operations withthe TV screen menu are only available when your TVis connected to the unit via HDMI.
• This manual explains operations using the suppliedremote control.
• This manual describes all the “iPod touch”, “iPhone”and “iPad” as the “iPhone”. “iPhone” refers to “iPodtouch”, “iPhone” and “iPad”, unless otherwisespecified.
Warning:
Indicates precautions for the possibility of death orserious injury.
Caution:
Indicates precautions for the possibility of minor ormoderate injury.
Notice:
Indicates precautions for use to avoid the possibility ofmalfunction/damage to the unit.
Note:
Indicates instructions and supplementary explanationsfor optimum use.
Checking the accessories
Checking the accessoriesCheck that the following accessories are supplied withthe product.
£ AM antenna £ FM antenna
* One of the above is supplieddepending on the region ofpurchase.
£ YPAO microphone £ Remote control
£ Batteries (AAA, R03, UM-4)(x2)
£ Quick Start Guide
NoteAccess the Yamaha Downloads site to download the latest Owner'sManual and Quick Start Guide. http://download.yamaha.com/
Using the remote control
Insert the batteries in the remotecontrolInsert the batteries the right way round.
Operating range of the remotecontrolPoint the remote control at the remote control sensor onthe unit and remain within the operating range shown inthe following figure.
Within 6 m (20 ft)
30° 30°
En7

FEATURESWhat you can do with the unit
Supporting 2- to 7.1-channelspeaker systemAccording to the number of speakers that you areusing, you can enjoy your favorite acoustic spaces invarious styles.
• “Using 5.1.2-channel system” (p.19)
• “Using 7.1-channel system” (p.20)
• “Using 5.1-channel system” (p.21)
• “Using 3.1.2-channel system” (p.22)
• “Using Virtual CINEMA FRONT” (p.23)
• “Playing back music in multiple rooms” (p.43)
Automatically optimizing thespeaker settings (YPAO)YPAO function detects speaker connections, measuresthe distances from them to your listening position byusing YPAO microphone measurement, and thenautomatically optimizes the speaker settings, such asvolume balance and acoustic parameters, to suit yourroom (YPAO: Yamaha Parametric room AcousticOptimizer).
• “Optimizing the speaker settings automatically(YPAO)” (p.33)
Enjoying sound field effects withmuch presenceThe unit is equipped with a variety of sound programsand surround decoders that allow you to enjoyplayback sources with your favorite sound mode (suchas sound field effect or stereo playback).
• “Enjoying 3D sound fields (CINEMA DSP3D)” (p.38)
• “Enjoying sound field effects optimized for the type ofcontent” (p.39)
• “Enjoying sound field effects without surroundspeakers (Virtual CINEMA DSP)” (p.39)
• “Enjoying surround sound with headphones (SILENTCINEMA)” (p.39)
• “Enjoying original sound (straight decode)” (p.40)
• “Enjoying multichannel playback without sound fieldeffects (surround decoder)” (p.40)
• “Enjoying pure high fidelity sound (directplayback)” (p.41)
• “Enhancing the bass (Extra Bass)” (p.41)
• “Playing back digitally compressed formats withenriched sound (Compressed MusicEnhancer)” (p.42)
• “Enjoying Dolby Atmos® and DTS:X™” (p.42)
Wide variety of supportedcontent via networkWhen the unit is connected to a network, you can enjoythe various kinds of content via network on the unit.
• “Playback of iTunes/iPhone music contents withAirPlay” (p.57)
• “Playing back music stored on media servers (PCs/NAS)” (p.59)
• “Selecting an Internet radio station” (p.61)
• “Listening to a streaming service” (p.62)
Playing back content of variousdevicesA number of HDMI jacks and various input/output jackson the unit allow you to connect video devices (such asBD/DVD players), audio devices (such as CD players),Bluetooth devices (such as smartphones), gameconsoles, USB storage devices, and other devices. Youcan play back content of them.
• “Selecting a frequency for reception” (p.51)
• “Playback Bluetooth® device music on theunit” (p.56)
• “Playback of USB storage device contents” (p.58)
En8

Useful functionsThe unit is equipped with the various useful functions.The SCENE function allows you to select the inputsource and settings registered to the correspondingscene, such as sound program and CompressedMusic Enhancer on/off, with just one touch. When theunit is connected to an HDMI Control-compatible TVwith an HDMI cable, you can control the unit (such aspower and volume) with TV remote control operations.
• “Selecting the input source and favorite settings withone touch (SCENE)” (p.63)
• “Registering a favorite content as shortcut” (p.65)
• “HDMI Control and synchronizedoperations” (p.137)
• “Audio Return Channel (ARC)” (p.138)
Useful applications
Application: “AV SETUP GUIDE”AV SETUP GUIDE is an application that assistsyou with cable connections between AV Receiverand playback devices as well as AV Receiversetup. This app guides you through the varioussettings such as speaker connections, TV andplayback device connections and selecting thespeaker system.
For details, search for “AV SETUP GUIDE” on the AppStore or Google Play.
Application: “AV CONTROLLER”AV CONTROLLER is an application that assistsyou with various operations of AV Receiverwithout the remote control. This app allows younot only to control the unit’s power and volumebut also to select the input source and start/stopplayback.
For details, search for “AV CONTROLLER” on the AppStore or Google Play.
Application: "MusicCastCONTROLLER"
MusicCast CONTROLLER is an application thatallows you to link a MusicCast compatible deviceto other MusicCast compatible devices in otherrooms and play them back simultaneously. Thisapp lets you use your smartphone or other mobiledevice instead of the remote control to easilyselect music to play back as well as configure theunit and MusicCast compatible devices.
For details, search for “MusicCast CONTROLLER” onthe App Store or Google Play.
En9

Part names and functions
Part names and functions of the front panelThe part names and functions of the front panel are as follows.
PROGRAMTONE CONTROL STRAIGHT
(CONNECT)
AUX USB
AUDIO 5V 1A
SCENE
INPUTPHONES
SILENT CINEMA
YPAO MIC
MEMORYINFO (WPS) PRESET FM AM TUNING
DIRECT
VOLUME
TVBD
DVD NET RADIO
2 3 4 6 7 851 09 A
B C D E F H I JG
1 z (power) key
Turns on/off (standby) the unit.
2 Standby indicator
Lights up when the unit is in standby mode under any ofthe following conditions.
• HDMI Control is enabled (p.88)
• Standby Through is enabled (p.88)
• Network Standby is enabled (p.101)
• Bluetooth Standby is enabled (p.103)
3 YPAO MIC jack
For connecting the supplied YPAO microphone (p.33).
4 Remote control sensor
Receives remote control signals (p.7).
5 INFO (WPS) key
Selects the information displayed on the front display(p.47).
Enters the wireless LAN connection setup (WPS buttonconfiguration) by holding down for a few seconds (p.125).
6 MEMORY key
Registers FM/AM radio stations as preset stations (p.52).
Registers Bluetooth, USB, or network content as a shortcutby holding down for a few seconds (p.65).
7 PRESET keys
Select a preset FM/AM radio station (p.52).
Recall Bluetooth, USB, or network content that is registeredas a shortcut (p.66).
8 FM and AM keys
Switch between FM and AM (p.51).
9 TUNING keys
Select the radio frequency (p.51).
: Front display
Displays information (p.12).
A DIRECT key
Enables/disables the direct playback mode (p.41).
B PHONES jack
For connecting headphones.
C INPUT keys
Select an input source.
D TONE CONTROL key
Adjusts the level of high-frequency range (Treble) and low-frequency range (Bass) individually (p.69).
En10
E SCENE keys
Switch with one touch between multiple settings set usingthe SCENE function. Also, turns on the unit when it is instandby mode (p.63).
F PROGRAM keys
Select a sound program or a surround decoder (p.38).
G STRAIGHT (CONNECT) key
Enables/disables the straight decode mode (p.40).
Enters the MusicCast network addition and the wirelessLAN setup by holding down for 5 seconds (p.37).
H AUX jack
For connecting devices, such as portable audio players(p.27).
I USB jack
For connecting a USB storage device (p.58).
J VOLUME knob
Adjusts the volume.
En11

Part names and functions of the front display
The part names and functions of the front display are as follows.
-ResHi YPAO VOL.
PARTY2
32
SB
ENHANCERECO
OUT A-DRC
SLEEP
STEREO TUNED
VOL.
SL SW SR
SBL SBR
MUTE VIRTUAL
ZONELINK MASTER
BA
FPRFPL
1 5 7 9342 0 A6
CB CFED G
8
H
1 HDMI
Lights up when HDMI signals are being input or output.
OUT
Lights up when HDMI signals are being output.
2 LINK MASTER
Lights up when the unit is the master device of theMusicCast network.
3 Firmware update indicator
Lights up when a firmware update is available via thenetwork.
4 Bluetooth indicator
Light up while the unit is connected to a Bluetooth device.
5 CINEMA DSP
Lights up when CINEMA DSP 3D (p.38) is working.
6 SLEEP
Lights up when the sleep timer is on.
7 STEREO
Lights up when the unit is receiving a stereo FM radiosignal.
TUNED
Lights up when the unit is receiving an FM/AM radio stationsignal.
8 ZONE indicators
Indicate the zone to which the sound is output (p.45).
9 A-DRC
Lights up when Adaptive DRC (p.71) is working.
: Volume indicator
Indicates the current volume.
A VIRTUAL
Lights up when the virtual processing (p.39) is working.
B ECO
Lights up when the eco mode (p.95) is enabled.
C Cursor indicators
Indicate the remote control cursor keys currentlyoperational.
D Information display
Displays the current status (such as input name and soundmode name). You can switch the information by pressingINFO (p.47).
E Wireless LAN indicator
Light up while the unit is connected to a wireless network(p.124).
NoteThis indicator may light up when the unit is added to theMusicCast network. For details, see “Adding the unit to theMusicCast network” (p.37).
F ENHANCER
Lights up when Compressed Music Enhancer (p.42) isworking.
G Speaker indicators
Indicate speaker terminals from which signals are output.
A Front speaker (L)
S Front speaker (R)
D Center speaker
F Surround speaker (L)
G Surround speaker (R)
H Surround back speaker (L)
J Surround back speaker (R)
B Presence speaker (L)
N Presence speaker (R)
L Subwoofer
H MUTE
Blinks when audio is temporarily muted.
En12

Part names and functions of the rear panel
The part names and functions of the rear panel are as follows.
OPTICAL
COAXIAL
COAXIAL
VIDEOVIDEOVIDEO
AMFM75 Ω
ANTENNA(RADIO)
MONITOR OUT
PRE OUTSUBWOOFER
(BD/DVD)
2 31 4
ARC
NETWORK(NET)
FRONT CENTER
SPEAKERS
SURROUNDAV 3
AUDIO 1
AUDI0 2
AUDI0 3
AV 2AV 1
(TV)
1
2
HDMI (HDCP2.2)HDMI OUT(HDCP2.2)
b c e f
g h
aa
ji k
d
The area around the video/audio output jacks is marked in whiteon the actual product to prevent improper connections.
1 Wireless antennas
For a wireless (Wi-Fi) connection to a network (p.124) anda Bluetooth connection (p.56).
2 HDMI OUT jack
For connecting to an HDMI-compatible TV and outputtingvideo/audio signals (p.25). When using ARC, TV audiosignal can also be input through the HDMI OUT jack.
3 HDMI 1–4 jacks
For connecting to HDMI-compatible playback devices andinputting video/audio signals (p.26).
4 ANTENNA jacks
For connecting to FM and AM antennas (p.28).
5 NETWORK jack
For a wired connection to a network (p.29).
6 Power cable
For connecting to an AC wall outlet (p.30).
7 AV jacksAUDIO jacks
For connecting to video/audio playback devices andinputting video/audio signals (p.26).
8 MONITOR OUT jack
For connecting to a TV and outputting video signals(p.25).
9 SUBWOOFER PRE OUT 1–2 jacks
For connecting to a subwoofer (with built-in amplifier)(p.18).
: SPEAKERS terminals
For connecting to speakers (p.15).
A VOLTAGE SELECTOR
(Taiwan, Brazil and Central and South America modelsonly)Selects the switch position according to your local voltage(p.30).
En13

Part names and functions of the remote control
The part names and functions of the supplied remote control are as follows.
TUNING
PRESET
MUTE
TUNING
MEMORY
TOP MENU HOME POP-UP/MENU
DISPLAYRETURN
SETUP OPTION
FM/AM
VOLUME
PROGRAM
USB
STRAIGHT ENHANCER BASS
INPUT
BDDVD
TV
SCENE
RADIO
SLEEP
ENTER
BLUEYELLOWGREENRED
DIRECT
ZONE A ZONE B
NET
NET
BLUETOOTH
3
4
5
7
8
6
1
0
B
C
D
E
A
9
2
1 Remote control signal transmitter
Transmits infrared signals.
2 z (receiver power) key
Turns on/off (standby) the unit.
3 SLEEP key
Pressing this key repeatedly will specify the time (120 min,90 min, 60 min, 30 min, off), in which the unit switches tothe standby mode.
4 ZONE switch
Changes the zone that is controlled by the remote control(p.44).
5 SCENE keys
Switch with one touch between multiple settings set usingthe SCENE function. Also, turn on the unit when it is instandby mode (p.63).
6 Sound mode keys
Select a sound mode (p.38).
7 Input selection keys
Select an input source for playback.
NotePresses NET repeatedly to select a desired network source.
8 SETUP key
Displays the setup menu (p.78).
9 Menu operation keys
Operates the menu.
9:ABC External device operation keys
Let you perform playback operations when “USB” or “NET”is selected as the input source, or control playback of theHDMI Control-compatible playback device.
Note The playback devices must support HDMI Control. Some
HDMI Control-compatible devices cannot be used. You can assign the unit's functions to the RED/GREEN/
YELLOW/BLUE keys (p.98).A Playback operation keys
Controls playback of the external device.
B VOLUME keys
Adjust the volume.
C MUTE key
Mutes the audio output.
D OPTION key
Displays the option menu (p.67).
E DISPLAY key
Turns on/off the browse screen, playback screen, etc.
En14

PREPARATIONS1 Connecting speakers
Names and functions of speakersThe names and functions of speakers connected to the unit are as follows.
4
1 2
9 9
E R
5
6 7
3
10° to 30° 10° to 30°
0.5 to 1 m(1.6 to 3.3 ft)
0.5 to 1 m(1.6 to 3.3 ft)
1.8 m (5.9 ft) 1.8 m (5.9 ft)
0.3 m (1 ft) or more
NoteUse this diagram as a reference for the ideal speaker layout for the unit. Your speaker layout does not needto match the diagram exactly, since the YPAO function can be used to automatically optimize the speakersettings (such as distances) to suit the actual speaker layout.
Speaker type Abbr. Function
Front (L/R) 1/2 Produce front channel sounds (stereo sounds).
Center 3Produces center channel sounds (such as movie dialogueand vocals).
Surround (L/R) 4/5Produce surround channel sounds. Surround speakersalso produce surround back channel sounds when nosurround back speakers are connected.
Surround back (L/R) 6/7 Produce surround back channel sounds.
Presence (L/R) E/R Produce CINEMA DSP 3D effect sounds or heightschannel sounds of Dolby Atmos and DTS:X contents.
Subwoofer 9Produces LFE (low-frequency effect) channel sounds andreinforces the bass parts of other channels.
NoteThe unit provides three layout patterns for presence speakers. You can choose a layout pattern that suitsyour listening environment. Front Height Overhead Dolby Enabled SP
En15

Speaker systems and speakers to be connectedSelect the speaker layout for the number of speakers that you are using and place thespeakers and subwoofer in your room.
Speaker typeSpeaker system
(the number of channels)
7.1/5.1.2 5.1 2.1
Front (L/R) 1/2
Center 3
Surround (L/R) 4/5 *3
Surround back (L/R) 6/7 *1
Presence (L/R) E/R *2 *4
Subwoofer 9
If you have seven speakers, use two of them as surround back speakers (*1) orpresence speakers (*2).
If you have five speakers, use two of them as surround speakers (*3) or presencespeakers (*4).
Note “5.1.2-channel” denotes “standard 5.1-channel plus 2 for overhead speaker channels”. When using surround back speakers, be sure to connect the surround back left and right speakers. Using
only one surround back speaker was discontinued. You can also connect up to 2 subwoofers (with built-in amplifier) to the unit. Two subwoofers connected to
the unit output the same sounds.
Speaker requirementsSpeakers and subwoofers to be connected to the unit must meet the followingrequirements:
• (U.S.A. and Canada models only)Under its default settings, the unit is configured for 8-ohm speakers. Whenconnecting 6-ohm speakers, set the unit’s speaker impedance to “6 Ω MIN”. Fordetails, see the following:– “Setting the speaker impedance” (p.17)
• (Except for U.S.A. and Canada models)Use speakers with an impedance of at least 6 W.
• Use a subwoofer with built-in amplifier.
Note Prepare the number of speakers according to your speaker system. Be sure to connect the front left and right speakers.
En16

Setting the speaker impedance(U.S.A. and Canada models only)
Under its default settings, the unit is configured for 8-ohm speakers. When connecting6-ohm speakers, set the speaker impedance to “6 Ω MIN”.
1 Before connecting speakers, connect the power cable to an ACwall outlet.
2 While holding down STRAIGHT on the front panel, press z(power).
(power)z
STRAIGHT
3 Check that “SP IMP.” is displayed on the front display.
ENHANCER
LINK
ECO
MASTER
OUT 2 -ResHi YPAO VOL. A-DRC
SLEEP
STEREO
PARTY
TUNED ZONE3 B2 A
VOL.
FPR
SL SW SR
SBL SB SBR
FPL
MUTE VIRTUAL
SP IMP.••8¬MIN
4 Press STRAIGHT to select “6 Ω MIN”.
5 Press z (power) to set the unit to standby mode and remove thepower cable from the AC wall outlet.
You are now ready to connect the speakers.
Cable requirementsUse the following types of commercially-available cables to connect speakers to theunit:
Speaker cables (the number of speakersrequired)
Audio pin cable (for connecting a subwoofer)
–
+
–
+
How to connect speakers
n Connecting the speakerConnect a speaker cable between the negative (–) terminal of the unit and thenegative (–) terminal of the speaker, and between the positive (+) terminal of the unitand the positive (+) unit of the speaker.
Notice
When connecting the speaker cables, take notice of the following: Prepare speaker cables in a place away from the unit, to avoid accidentally dropping wire strands into
the unit's interior which could result in a short circuit or malfunction of the unit. Improper connecting of the speaker cables may cause a short circuit and also damage the unit or the
speakers.– Twist the bare wires of the speaker cables firmly together.
– Do not let the bare wires of the speaker cable touch one another.
– Do not let the bare wires of the speaker cable come into contact with the unit’s metal parts (rear paneland screws).
En17

Note Remove the unit’s power cable from an AC wall outlet before connecting the speakers. Be sure to connect the front left and right speakers. (U.S.A. and Canada models only)
Under its default settings, the unit is configured for 8-ohm speakers. When connecting 6-ohm speakers,set the unit’s speaker impedance to “6 Ω MIN”. For details, see the following:– “Setting the speaker impedance” (p.17)
1 Remove approximately 10 mm (3/8”) of insulation from the ends ofthe speaker cable, and twist the bare wires of the cable firmlytogether.
2 Loosen the speaker terminal.
3 Insert the bare wires of the cable into the gap on the side (upperright or bottom left) of the terminal.
4 Tighten the terminal.
FRONT
aa
b
d
c+ (red)
- (black)
This completes the connection.
Note If “Check SP Wires” appears on the front display when the unit is turned on, turn off the unit, and then
confirm that the speaker cables are not short circuited. (U.S.A., Canada, China, Taiwan, Brazil, Central and South America and General models only)
When using a banana plug, tighten the speaker terminal and insert a banana plug into the end of theterminal.
FRONT
a
b
Banana plug
n Connecting the subwooferUse an audio pin cable to connect the subwoofer.
Note Unplug the power cables of the unit and subwoofer from the AC wall outlets before connecting thesubwoofer.
AUDIO 3
2
1
Audio pin cable
En18

How to place speakers (speaker systems)
nUsing 5.1.2-channel systemTo have a full effect of Dolby Atmos or DTS:X contents, we recommend this speakersystem. The presence speakers produce a natural 3-dimensional sound field includingoverhead.
Note When installing the presence speakers on the ceiling above the listening position, or when using Dolby
Enabled speakers as the presence speakers, the presence speaker layout settings must be changed. Fordetails, see the following:– “Setting the layout of the presence speakers” (p.85)
You can also connect up to 2 subwoofers (with built-in amplifier) to the unit. Two subwoofers connected tothe unit output the same sounds.
n For Front Height of the presence speakers layout
4
1 2
9 9
E R
5
3
10° to 30° 10° to 30°
0.5 to 1 m(1.6 to 3.3 ft)
0.5 to 1 m(1.6 to 3.3 ft)
1.8 m (5.9 ft) 1.8 m (5.9 ft)
n For Overhead of the presence speakers layout
4
1 2
9 9
5
3
E R
10° to 30° 10° to 30°
OPTICAL
COAXIAL
COAXIAL
VIDEOVIDEOVIDEO
AMFM75 Ω
ANTENNA(RADIO)
MONITOR OUT
PRE OUTSUBWOOFER
(BD/DVD)
2 31 4
ARC
NETWORK(NET)
FRONT CENTER
SPEAKERS
SURROUNDAV 3
AUDIO 1
AUDI0 2
AUDI0 3
AV 2AV 1
(TV)
1
2
HDMI (HDCP2.2)HDMI OUT(HDCP2.2)
3 RE45219 9
En19

nUsing 7.1-channel systemThis speaker system allows you to enjoy extended surround sound using the surroundback speakers.
NoteYou can also connect up to 2 subwoofers (with built-in amplifier) to the unit. Two subwoofers connected tothe unit output the same sound.
4
1 2
9 9
5
6 7
3
10° to 30° 10° to 30°
0.3 m (1 ft) or more
OPTICAL
COAXIAL
COAXIAL
VIDEOVIDEOVIDEO
AMFM75 Ω
ANTENNA(RADIO)
MONITOR OUT
PRE OUTSUBWOOFER
(BD/DVD)
2 31 4
ARC
NETWORK(NET)
FRONT CENTER
SPEAKERS
SURROUNDAV 3
AUDIO 1
AUDI0 2
AUDI0 3
AV 2AV 1
(TV)
1
2
HDMI (HDCP2.2)HDMI OUT(HDCP2.2)
3 7645219 9
En20

nUsing 5.1-channel systemThis is a basic speaker layout recommended for enjoying surround sound.
NoteYou can also connect up to 2 subwoofers (with built-in amplifier) to the unit. Two subwoofers connected tothe unit output the same sounds.
4
1 2
9
5
3
10° to 30° 10° to 30°
OPTICAL
COAXIAL
COAXIAL
VIDEOVIDEOVIDEO
AMFM75 Ω
ANTENNA(RADIO)
MONITOR OUT
PRE OUTSUBWOOFER
(BD/DVD)
2 31 4
ARC
NETWORK(NET)
FRONT CENTER
SPEAKERS
SURROUNDAV 3
AUDIO 1
AUDI0 2
AUDI0 3
AV 2AV 1
(TV)
1
2
HDMI (HDCP2.2)HDMI OUT(HDCP2.2)
3 45219
En21

nUsing 3.1.2-channel systemWe recommend this speaker layout when you cannot place speakers in the back ofthe room. You can also enjoy Dolby Atmos or DTS:X content with this speaker system.
Note When installing the presence speakers to the ceiling above the listening position or using the Dolby
Enabled speakers as the presence speakers, configure your presence speaker layout. For details, see thefollowing:– “Setting the layout of the presence speakers” (p.85)
You can also connect up to 2 subwoofers (with built-in amplifier) to the unit. Two subwoofers connected tothe unit output the same sound.
1 2
9
E R
3
0.5 to 1 m(1.6 to 3.3 ft)
0.5 to 1 m(1.6 to 3.3 ft)
1.8 m (5.9 ft) 1.8 m (5.9 ft)
OPTICAL
COAXIAL
COAXIAL
VIDEOVIDEOVIDEO
AMFM75 Ω
ANTENNA(RADIO)
MONITOR OUT
PRE OUTSUBWOOFER
(BD/DVD)
2 31 4
ARC
NETWORK(NET)
FRONT CENTER
SPEAKERS
SURROUNDAV 3
AUDIO 1
AUDI0 2
AUDI0 3
AV 2AV 1
(TV)
1
2
HDMI (HDCP2.2)HDMI OUT(HDCP2.2)
3 RE219
En22

nUsing Virtual CINEMA FRONTThis speaker layout is recommended if you cannot place speakers in the back of theroom.
Note To use Virtual CINEMA FRONT, the speaker configuration settings must be changed. For details, see the
following:– “Assigning speaker configuration” (p.32)– “Setting the use of Virtual CINEMA FRONT” (p.86)
You can also connect up to 2 subwoofers (with built-in amplifier) to the unit. Two subwoofers connected tothe unit output the same sounds.
1 2
93
54
OPTICAL
COAXIAL
COAXIAL
VIDEOVIDEOVIDEO
AMFM75 Ω
ANTENNA(RADIO)
MONITOR OUT
PRE OUTSUBWOOFER
(BD/DVD)
2 31 4
ARC
NETWORK(NET)
FRONT CENTER
SPEAKERS
SURROUNDAV 3
AUDIO 1
AUDI0 2
AUDI0 3
AV 2AV 1
(TV)
1
2
HDMI (HDCP2.2)HDMI OUT(HDCP2.2)
3 45219
En23

Connecting front speakers that support bi-ampconnectionsYou can connect the front speakers that support bi-amp connections.
To enable the bi-amp function, configure the necessary speaker settings. For details,see the following:
• “Assigning speaker configuration” (p.32)
• “Setting your speaker system” (p.82)
Notice
Before making bi-amp connections, remove any brackets or cables that connect a woofer with atweeter. Refer to the instruction manual of the speakers for details. If you are not making bi-ampconnections, make sure that the brackets or cables are connected before connecting the speakercables.
1 2
OPTICAL
COAXIAL
COAXIAL
VIDEOVIDEOVIDEO
AMFM75 Ω
ANTENNA(RADIO)
MONITOR OUT
PRE OUTSUBWOOFER
(BD/DVD)
2 31 4
ARC
NETWORK(NET)
FRONT CENTER
SPEAKERS
SURROUNDAV 3
AUDIO 1
AUDI0 2
AUDI0 3
AV 2AV 1
(TV)
1
2
HDMI (HDCP2.2)HDMI OUT(HDCP2.2)
The unit (rear)
Note The following speakers cannot be connected simultaneously.
– Presence speakers– Surround back speakers– Zone B speakers– Bi-amp speakers
The FRONT terminals and SURROUND BACK/PRESENCE/BI-AMP/ZONE B terminals output the samesignals.
En24

2 Connecting a TV
HDMI connection with a TVConnect a TV to the unit with an HDMI cable. If you connect a TV that supports ARC tothe unit, you can output video/audio to the TV or input TV audio to the unit.
OPTICAL
COAXIAL
COAXIAL
VIDEOVIDEOVIDEO
AMFM75 Ω
ANTENNA(RADIO)
MONITOR OUT
PRE OUTSUBWOOFER
(BD/DVD)
2 31 4
ARC
NETWORK(NET)
FRONT CENTER
SPEAKERS
SURROUND
SINGLE
AV 3
AUDIO 1
AUDI0 2
AUDI0 3
AV 2AV 1
(TV)
1
2
HDMI (HDCP2.2)HDMI OUT(HDCP2.2)
HDMI OUT(HDCP2.2)
HDMI
HDMIHDMI HDMIHDMI
HDMI
(ARC)
The unit (rear) HDMI OUT jack HDMI input
TV
About Audio Return Channel (ARC)
ARC allows audio signals to travel both ways with a single HDMI cable. To use ARC, connect to the TVusing an HDMI cable that supports ARC.
Note If you connect a TV that supports HDMI Control to the unit with an HDMI cable, you can control the unit’s
power and volume with the TV’s remote control. To use HDMI Control and ARC, you need to configure the HDMI settings on the unit. For details on the
settings, see the following:– “HDMI Control and synchronized operations” (p.137)– “Audio Return Channel (ARC)” (p.138)
If your TV does not support Audio Return Channel (ARC), a digital optical cable connection between theTV and the unit is needed.
VIDEO (composite video) connection with a TVConnect a TV to the unit with a video pin cable and a digital optical cable.
OPTICAL
COAXIAL
COAXIAL
VIDEOVIDEOVIDEO
AMFM75 Ω
ANTENNA(RADIO)
MONITOR OUT
PRE OUTSUBWOOFER
(BD/DVD)
2 31 4
ARC
NETWORK(NET)
FRONT CENTER
SPEAKERS
SURROUND
SINGLE
AV 3
AUDIO 1
AUDI0 2
AUDI0 3
AV 2AV 1
(TV)
1
2
HDMI (HDCP2.2)HDMI OUT(HDCP2.2)
OPTICAL
AUDIO 1(TV)
MONITOR OUT VIDEO
OPTICAL
O O
V V
The unit (rear)
AUDIO 1 (OPTICAL) jack
MONITOR OUT (VIDEO) jackVideo input
(composite video)
Audio output(digital optical)
TV
Note If you connect your TV to the unit with a cable other than HDMI, video input to the unit via HDMI cannot be
output to the TV. For details, see the following:– “Video signal flow” (p.136)
Operations with TV screen are available only when your TV is connected to the unit via HDMI. A digital optical cable connection allows audio from the TV to be played back on the unit. A digital optical
cable connection is not needed in the following case:– If you will receive TV broadcasts only from the set-top box
En25

3 Connecting playback devices
HDMI connection with a video device such as aBD/DVD playerConnect a video device to the unit with an HDMI cable.
OPTICAL
COAXIAL
COAXIAL
VIDEOVIDEOVIDEO
AMFM75 Ω
ANTENNA(RADIO)
MONITOR OUT
PRE OUTSUBWOOFER
(BD/DVD)
2 31 4
ARC
NETWORK(NET)
FRONT CENTER
SPEAKERS
SURROUND
SINGLE
AV 3
AUDIO 1
AUDI0 2
AUDI0 3
AV 2AV 1
(TV)
1
2
HDMI (HDCP2.2)HDMI OUT(HDCP2.2)
HDMI
HDMI
HDMI
The unit (rear)
HDMI OUT jack
HDMI 1–4 jacks
Video device
Note To watch video input to the HDMI 1–4 jacks, you need to connect your TV to the HDMI OUT jack of the unit.For details, see the following: “HDMI connection with a TV” (p.25)
Connection other than HDMI with a playback device
nVIDEO (composite video) connection with a videodevice
Connect a video device to the unit with a video pin cable and an audio cable (digitalcoaxial or stereo pin cable). Choose a set of input jacks (on the unit) depending on theaudio output jacks available on your video device.
Output jacks on video deviceInput jacks on the unit
Video Audio
Composite video
Digital coaxial AV 1 (VIDEO + COAXIAL)
Analog stereo AV 2–3 (VIDEO + AUDIO)
Digital optical You need to change the combinationof video/audio input jacks (p.73).
OPTICAL
COAXIAL
COAXIAL
VIDEOVIDEOVIDEO
AMFM75 Ω
ANTENNA(RADIO)
MONITOR OUT
PRE OUTSUBWOOFER
(BD/DVD)
2 31 4
ARC
NETWORK(NET)
FRONT CENTER
SPEAKERS
SURROUND
SINGLE
AV 3
AUDIO 1
AUDI0 2
AUDI0 3
AV 2AV 1
(TV)
1
2
HDMI (HDCP2.2)HDMI OUT(HDCP2.2)
R
L
COAXIAL
VIDEO
COAXIAL
VIDEO
AV 1
C C
L
R
L
R
V V
The unit (rear)
AV 1 (COAXIAL) jack or AV 2–3(AUDIO) jacks
AV 1–3 (VIDEO) jacksVideo output
(composite video)
Audio output(digital coaxial or analog
stereo)
Video device
Note If you connect a video device to the unit via composite video connection, you need to connect your TV to
the MONITOR OUT (VIDEO) jack of the unit. For details, see the following:– “VIDEO (composite video) connection with a TV” (p.25)
If the combination of video/audio input jacks available on the unit does not match your video device,change its combination according to the output jacks of your device. For details, see the following:– “Combining audio of another input source with video of the current input source” (p.73)
En26

nAUDIO connection with an audio device such as a CDplayer
Connect audio devices such as CD players and MD players to the unit. Depending onthe audio output jacks available on your audio device, choose one of the followingconnections.
NoteTo use a turntable, a commercially-available phono equalizer amplifier is required. Connect the output of thephono equalizer amplifier to the unit.
Audio output jacks on audio device Audio input jacks on the unit
Digital optical AUDIO 1 (OPTICAL)
Digital coaxial AUDIO 2 (COAXIAL)AV 1 (COAXIAL)
Analog stereo AUDIO 3 (AUDIO)AV 2–3 (AUDIO)
OPTICAL
COAXIAL
COAXIAL
VIDEOVIDEOVIDEO
AMFM75 Ω
ANTENNA(RADIO)
MONITOR OUT
PRE OUTSUBWOOFER
(BD/DVD)
2 31 4
ARC
NETWORK(NET)
FRONT CENTER
SPEAKERS
SURROUND
SINGLE
AV 3
AUDIO 1
AUDI0 2
AUDI0 3
AV 2AV 1
(TV)
1
2
HDMI (HDCP2.2)HDMI OUT(HDCP2.2)
R
L
COAXIAL
OPTICAL
COAXIAL
AUDI0 2
OPTICAL
AUDIO 1(TV)
C C
L
R
L
R
O O
The unit (rear)
AV 1–3 jacksAUDIO 1–3 jacks
Audio output(either digital optical, digital coaxial,
or analog stereo)
Audio device
Note “AUDIO1” is set as TV audio input at the factory. If you have connected any external device to the AUDIO 1jacks, use “TV Audio Input” in the “Setup” menu to change the TV audio input assignment. To use the SCENEfunction, you also need to change the input assignment for SCENE (TV). For details, see the following: “Setting the audio jack used for TV audio input” (p.89) “Registering a scene” (p.64)
Connecting to the jack on the front panelUse the AUX jack on the front panel to temporarily connect devices such as portableaudio players to the unit.
Caution Before making a connection, stop playback on the device and turn down the volume on the unit. The
volume may be unexpectedly loud, and this could result in damage to hearing.
NoteYou need to prepare the audio cable that matches the output jacks on your device.
PROGRAMTONE CONTROL STRAIGHT
(CONNECT)
AUX USB
AUDIO 5V 1A
INPUT
TVBD
DVD NET RADIO
The unit (front)
Portable audio player
If you select “AUX” as the input source by pressing INPUT, the audio played back onthe device will be output from the unit.
En27

4 Connecting the FM/AM antennas
Connecting the FM/AM antennasConnect the supplied FM/AM antennas to the unit.
Fix the end of the FM antenna to a wall, and place the AM antenna on a flat surface.
OPTICAL
COAXIAL
COAXIAL
VIDEOVIDEOVIDEO
AMFM75 Ω
ANTENNA(RADIO)
MONITOR OUT
PRE OUTSUBWOOFER
(BD/DVD)
2 31 4
ARC
NETWORK(NET)
FRONT CENTER
SPEAKERS
SURROUND
SINGLE
AV 3
AUDIO 1
AUDI0 2
AUDI0 3
AV 2AV 1
(TV)
1
2
HDMI (HDCP2.2)HDMI OUT(HDCP2.2)
The unit (rear)
FM antennaAM antenna
Assembling and connecting the AM antenna
ReleaseHold down Insert
Note Unwind only the length of cable needed from the AM antenna unit. The wires of the AM antenna have no polarity.
En28

5 Preparing for connecting to a network
Preparing for connecting to a networkThe unit supports wired and wireless connections. Select a connection methodaccording to your network environment.
If you are using a router that supports DHCP in the wired connection, you do not needto configure any network settings for the unit.
Note You need to configure the network settings if your router does not support DHCP or if you want to configurethe network parameters manually. For details, see the following: “Setting the network parameters manually” (p.100)
To connect the unit to a wireless network, select one of the following methods toconfigure the wireless network settings.
l Method using the MusicCast setting When adding the unit to the MusicCast network, you can also configure the unit’s
wireless network settings at once. If you use MusicCast CONTROLLER, werecommend the wireless connection to MusicCast network. For details, see thefollowing:– “Adding the unit to the MusicCast network” (p.37)
l Other methods For details, see the following:
– “Selecting a wireless network connection method” (p.124)
Connecting a network cable (wired connection)Connect the unit to your router with a commercially-available STP network cable(CAT-5 or higher straight cable).
You can enjoy Internet radio or music files stored on media servers, such as PCs andNetwork Attached Storage (NAS), on the unit.
OPTICAL
COAXIAL
COAXIAL
VIDEOVIDEOVIDEO
AMFM75 Ω
ANTENNA(RADIO)
MONITOR OUT
PRE OUTSUBWOOFER
(BD/DVD)
2 31 4
ARC
NETWORK(NET)
FRONT CENTER
SPEAKERS
SURROUND
SINGLE
AV 3
AUDIO 1
AUDI0 2
AUDI0 3
AV 2AV 1
(TV)
1
2
HDMI (HDCP2.2)HDMI OUT(HDCP2.2)
LAN
WAN
Network Attached Storage(NAS)Internet
Modem
Wirelessrouter
PC
Network cable
The unit (rear)
Note If you are using a router that supports DHCP, you do not need to configure any network settings for the
unit, as the network parameters (such as the IP address) will be assigned automatically to it. You onlyneed to configure the network settings if your router does not support DHCP or if you want to configure thenetwork parameters manually. For details, see the following:– “Setting the network parameters manually” (p.100)
You can check whether the network parameters (such as IP address) are properly assigned to the unit.For details, see the following:– “Checking the network information of the unit” (p.99)
En29

Preparing wireless antennas (wireless connection)Stand the wireless antennas upright for connecting to the wireless network or aBluetooth device wirelessly.
For information on how to connect the unit to a wireless network, see the following:
• “Preparing for connecting to a network” (p.29)
Notice
Do not apply excessive force on the wireless antenna. Doing so may damage the antenna.
6 Plugging in the power cable
Plugging in the power cable
Warning(Taiwan, Brazil and Central and South America models only)Make sure you set VOLTAGE SELECTOR of the unit BEFORE plugging the power cable into an AC walloutlet. Improper setting of VOLTAGE SELECTOR may cause damage to the unit and create a potentialfire hazard.Before plugging in the power cable
Set the switch position of VOLTAGE SELECTOR according to your local voltage. Voltages are AC 110–120/220–240 V, 50/60 Hz.
OPTICAL
COAXIAL
COAXIAL
VIDEOVIDEOVIDEO
AMFM75 Ω
ANTENNA(RADIO)
MONITOR OUT
PRE OUTSUBWOOFER
(BD/DVD)
2 31 4
ARC
NETWORK(NET)
FRONT CENTER
SPEAKERS
SURROUNDAV 3
AUDIO 1
AUDI0 2
AUDI0 3
AV 2AV 1
(TV)
1
2
HDMI (HDCP2.2)HDMI OUT(HDCP2.2)
110V120V
220V240V
VOLTAGE SELECTOR
The unit (rear)
VOLTAGE SELECTOR
After all the connections are complete, plug in the power cable.
OPTICAL
COAXIAL
COAXIAL
VIDEOVIDEOVIDEO
AMFM75 Ω
ANTENNA(RADIO)
MONITOR OUT
PRE OUTSUBWOOFER
(BD/DVD)
2 31 4
ARC
NETWORK(NET)
FRONT CENTER
SPEAKERS
SURROUNDAV 3
AUDIO 1
AUDI0 2
AUDI0 3
AV 2AV 1
(TV)
1
2
HDMI (HDCP2.2)HDMI OUT(HDCP2.2)
The unit (rear)
To an AC wall outlet
En30

7 Selecting the on-screen menu language
Selecting the on-screen menu languageSelect the desired on-screen menu language.
1 Press z (receiver power) to turn on the unit.
2 Turn on the TV and switch the TV input to display video from theunit (HDMI OUT jack).
Note When you turn on the unit for the first time, a message regarding the network setup appears. Youcan switch the language on this message screen.
3 Press SETUP.
4 Use the cursor keys to select “Language” and press ENTER.
5 Use the cursor keys to select the desired language.
6 To exit from the menu, press SETUP.
This completes the necessary settings.
NoteThe information on the front display is provided in English only.
En31

8 Configuring the necessary speaker settings
Assigning speaker configurationIf you use any of the following speaker configurations, perform the following procedureto configure the corresponding speaker settings manually before performing YPAO.
• Using the surround back speakers
• Using the bi-amp connection (playing back more high-quality sounds with bi-ampconnections)
• Using the Zone B speakers
• Using the surround speakers for front 5.1-channel system (Virtual CINEMA FRONT)
• Using the presence speakers for Dolby Atmos or DTS:X playback
Note For details on the speaker configurations, see the following: “Using 7.1-channel system” (p.20) “Connecting front speakers that support bi-amp connections” (p.24) “Playing back music in multiple rooms” (p.43) “Using Virtual CINEMA FRONT” (p.23) “Presence speaker layout” (p.130)
1 Press z (receiver power) to turn on the unit.
2 Turn on the TV and switch the TV input to display video from theunit (HDMI OUT jack).
NoteIf you turn on the unit for the first time, the message regarding the network setup appears. For now,press RETURN and proceed to Step 3.
3 Press SETUP.
4 Use the cursor keys to select “Speaker” and press ENTER.
5 Use the cursor keys to select “Configuration” and press ENTER.
6 Configure the corresponding speaker settings.
Using surround back speakers, bi-amp connections or Zone B speakers,select your speaker system in “Power Amp Assign”. For details, see thefollowing:– “Setting your speaker system” (p.82)
Using the surround speakers for front 5.1-channel system (VirtualCINEMA FRONT), select “On” in “Virtual CINEMA FRONT”. For details,see the following:– “Setting the use of Virtual CINEMA FRONT” (p.86)
Using the presence speakers for Dolby Atmos or DTS:X playback, select“Presence” in “Power Amp Assign”, and then select your presencespeaker layout in “Layout”. For details, see the following:– “Setting the layout of the presence speakers” (p.85)
7 To exit from the menu, press SETUP.
This completes the speaker settings.
En32

Optimizing the speaker settings automatically(YPAO)The Yamaha Parametric room Acoustic Optimizer (YPAO) function detects speakerconnections, measures the distances from them to your listening position(s), and thenautomatically optimizes the speaker settings, such as volume balance and acousticparameters, to suit your room.
Note Use YPAO after connecting a TV and speakers to the unit. Configure the corresponding speaker settings manually before performing YPAO. For details on the
settings, see the following:– “Assigning speaker configuration” (p.32)
During the measuring process, test tones are output at high volume, and you cannot adjust the volume. During the measuring process, keep the room as quiet as possible and do not stand between the
speakers and the YPAO microphone for accurate measurement. Do not connect headphones.
1 Press z (receiver power) to turn on the unit.
2 Turn on the TV and switch the TV input to display video from theunit (HDMI OUT jack).
3 Turn on the subwoofer and set the volume to half. If the crossoverfrequency is adjustable, set it to maximum.
VOLUME HIGH CUT
CROSSOVER/
MIN MAXMIN MAX
9
4 Place the YPAO microphone at your listening position andconnect it to the YPAO MIC jack on the front panel.
Place the YPAO microphone at your listening position (same height asyour ears). We recommend the use of a tripod as a microphone stand.You can use the tripod screws to stabilize the microphone.
1 2
39
4 5
The unit (front)
Ear height
The following screen appears on the TV.
1
1 Setting of “Power Amp Assign” in the “Setup” menu
En33

5 To start the measurement, use the cursor keys to select “Start”and press ENTER.
The measurement will start in 10 seconds. Press ENTER to start themeasurement immediately.
The following screen appears on the TV when the measurement finishes.
1
2
3
4
1 The number of speakers (front side/rear side/subwoofer)
2 Speaker distance (nearest/farthest)
3 Adjustment range of speaker output level
4 Warning message (if available)
Note To stop the measurement temporarily, press RETURN. If any error message (such as E-1) or warning message (such as W-1) appears, see the
following:– “Error messages from YPAO” (p.35)– “Warning messages from YPAO” (p.36)
A speaker with a problem is indicated by blinking of the speaker indicators in the front display. If multiple warnings are given (when operating with the front display), use the cursor keys to
check the other warning messages.
6 Confirm the results displayed on the screen and press ENTER.
7 Use the cursor keys to select “SAVE” and press ENTER.
The adjusted speaker settings are applied.
NoteTo finish the measurement without applying the result, select “CANCEL”.
8 Disconnect the YPAO microphone from the unit.
This completes optimization of the speaker settings.
Notice
The YPAO microphone is sensitive to heat, so should not be placed anywhere where it could beexposed to direct sunlight or high temperatures (such as on top of AV equipment).
En34

Error messages from YPAOIf any error message is displayed during the measurement, resolve the problem andperform YPAO again.
Error message
TV screen
ENHANCER
LINK
ECO
MASTER
OUT 2 -ResHi YPAO VOL. A-DRC
SLEEP
STEREO
PARTY
TUNED ZONE3 B2 A
FPR
SBL SB SBR
FPL
MUTE VIRTUAL
E-5:NOISYVOL.
SL SW SRE-9:CANCELFront display
Error message Cause Remedy
E-1:No Front SP
(E-1:NO FRNT SP)Front speakers are notdetected.
Exit YPAO, turn off the unit, and thencheck the speaker connections.
E-2:No Sur. SP
(E-2:NO SUR SP)
One of the surroundspeakers cannot bedetected.
E-3:No F.PRNS SP
(E-3:NO FPR SP)
One of the presencespeakers cannot bedetected.
E-4:No Sur. Back SP
(E-4:NO SUR BACK SP)
One of the surround backspeaker cannot bedetected.
E-5:Noisy
(E-5:NOISY)The noise is too loud.
Keep the room quiet and retry YPAO. Ifyou select “PROCEED”, YPAO takes themeasurement again and ignores anynoise detected.
E-6:Check Sur.
(E-6:CHECK SUR)
Surround back speakers areconnected, but no surroundspeakers are connected.
Surround speakers need to beconnected in order to use surround backspeakers. Exit YPAO, turn off the unit,and then reconnect the speakers.
E-7:No MIC
(E-7:NO MIC)The YPAO microphone hasbeen removed.
Connect the YPAO microphone to theYPAO MIC jack firmly and retry YPAO.
E-8:No Signal
(E-8:NO SIGNAL)The YPAO microphonecannot detect test tones.
Connect the YPAO microphone to theYPAO MIC jack firmly and retry YPAO. Ifthis error occurs repeatedly, contact thenearest authorized Yamaha dealer orservice center.
E-9:User Cancel
(E-9:CANCEL)The measurement has beencanceled. Retry or exit YPAO as necessary.
E-10:Internal Err.
(E-10:INTERNAL)An internal error hasoccurred.
Exit YPAO, and turn off and on the unit. Ifthis error occurs repeatedly, contact thenearest authorized Yamaha dealer orservice center.
Note Text in parentheses denotes indicators on the front display. To exit the YPAO measurement for resolving the problem, use the cursor keys to select “EXIT” and press
ENTER. For the error messages E-5 and E-9 only, you can proceed with the current YPAO measurement. Press
ENTER, and then use the cursor keys to select “PROCEED” and press ENTER. To retry the YPAO measurement from beginning, press ENTER, and then use the cursor keys to select
“RETRY” and press ENTER.
En35

Warning messages from YPAOIf a warning message is displayed after the measurement, you can still apply themeasurement results by following on-screen instructions.
However, we recommend you perform YPAO again in order to use the unit with theoptimal speaker settings.
Warning message
TV screen
ENHANCER
LINK
ECO
MASTER
OUT 2 -ResHi YPAO VOL. A-DRC
SLEEP
STEREO
PARTY
TUNED ZONE3 B2 A
FPR
SBL SB SBR
FPL
MUTE VIRTUALVOL.
SL SW SRW-1:PHASE
Problem speaker (blinks)
Front display
Warning message Cause Remedy
W-1:Out of Phase
(W-1:PHASE)
A speaker cable may beconnected with the reversepolarity (+/-).
Check the cable connections (+/-) of theproblem speaker.
If the speaker is connected incorrectly:
Turn off the unit, reconnect the speakercable.
If the speaker is connected correctly:
Depending on the type of speakers orroom environment, this message mayappear even if the speakers areconnected correctly. In this case, youcan ignore the message.
W-2:Over Distance
(W-2:DISTANCE)
A speaker is placed morethan 24 m (80 ft) from thelistening position.
Exit YPAO, turn off the unit, and place theproblem speaker within 24 m (80 ft) of thelistening position.
W-3:Level Error
(W-3:LEVEL)
There are significant volumedifferences between thespeakers.
Check the usage environment and cableconnections (+/-) of each speaker, andthe volume of the subwoofer. If there isany problem, exit YPAO, turn off the unit,and then reconnect speaker cable orcorrect the speaker positions. Werecommend using the same speakers orspeakers with specifications that are assimilar as possible.
NoteText in parentheses denotes indicators on the front display.
En36

9 Setting MusicCast
What is MusicCastMusicCast is a brand new wireless musical solution from Yamaha, allowing you toshare music among all of your rooms with a variety of devices. You can enjoy musicfrom your smartphone, PC, NAS drive and music streaming service anywhere in yourhouse with one easy-to-use application. For more details and a lineup of MusicCastcompatible products, refer to the following site:http://www.yamaha.com/musiccast/
• Seamlessly control all MusicCast compatible devices with the dedicated application“MusicCast CONTROLLER”.
• Link a MusicCast compatible device to another device in a different room and playthem back simultaneously.
• Play back music from music streaming services. (The compatible music streamingservices may differ depending on your region and product).
• Configure wireless network settings of MusicCast compatible devices.
Using MusicCast CONTROLLERTo use the network features on the MusicCast compatible device, you need thededicated application “MusicCast CONTROLLER” for the operation. Search for thefree application “MusicCast CONTROLLER” on the App Store or Google Play andinstall it to your device.
Adding the unit to the MusicCast networkPerform the following procedure to add the unit to the MusicCast network. You canalso configure the unit’s wireless network settings at once.
NoteThe SSID and security key for your network will be needed.
1 Tap the “MusicCast CONTROLLER” application icon on yourmobile device and tap “Setup”.
NoteIf you have already connected other MusicCast compatible devices to the network, tap “Settings”and then “Add New Device”.
2 Operate the “MusicCast CONTROLLER” application following theon screen instructions, then hold down CONNECT on the frontpanel of the unit for 5 seconds.
CONNECT
3 Operate the “MusicCast CONTROLLER” application following theonscreen instructions to set up the network.
This completes adding the unit to the MusicCast network and the network settings.
Note AirPlay and DSD audio cannot be delivered. When the direct playback mode is enabled, input sources other than the network sources, Bluetooth and
USB cannot be delivered. If you configure the unit's wireless settings with this method, the wireless LAN indicator of the front display
lights up when the unit is connecting to a network (even if a wired connection is used). You can interlock the power of MusicCast devices with the power of the unit (the MusicCast master). For
details on the settings, see the following:– “Setting the power interlock from the unit to MusicCast compatible devices” (p.102)
En37

ENJOYING SOUNDEnjoying sound field effects
Select your favorite sound modeThe unit is equipped with a variety of sound programs and surround decoders thatallow you to enjoy playback sources with your favorite sound mode (such as soundfield effect or stereo playback).
TUNING
PRESET
MUTE
TUNING
MEMORY
TOP MENU HOME POP-UP/MENU
DISPLAYRETURN
SETUP OPTION
FM/AM
VOLUME
PROGRAM
USB
STRAIGHT ENHANCER BASS
INPUT
BDDVD
TV
SCENE
RADIO
SLEEP
ENTER
BLUEYELLOWGREENRED
DIRECT
ZONE A ZONE B
NET
NET
BLUETOOTH
PROGRAM
STRAIGHT ENHANCER BASS
BDDVD
TV
SCENE
RADIO
SLEEP
DIRECT
ZONE A ZONE B
NETBDDVD
TV
SCENE
RADIO
SLEEP
ZONE A ZONE B
NET
STRAIGHT
DIRECT
ENHANCER
BASS
PROGRAM
Note The sound mode can be applied separately to each input source. You can check which speakers are currently outputting sound by looking at the speaker indicators on the
front display. You can assign the unit's functions of sound mode to the RED/GREEN/YELLOW/BLUE keys of the remote
control. For details, see the following:– “Setting the unit's functions for the RED/GREEN/YELLOW/BLUE keys of the remote control” (p.98)
Enjoying 3D sound fields (CINEMA DSP 3D)
The unit is equipped with a variety of sound programs that utilize Yamaha's originalDSP technology (CINEMA DSP 3D). It allows you to easily create sound fields likeactual movie theaters or concert halls in your room and enjoy natural three-dimensional sound fields.
ENHANCER
LINK
ECO
MASTER
OUT 2 -ResHi YPAO VOL. A-DRC
PARTY
TUNED ZONE3 B2 A
FPR
SBL SB SBR
FPL
MUTE VIRTUAL
SLEEP
STEREO
VOL.
SL SW SR Sci-Fi
Sound program category“CINEMA DSP” lights up
Sound program
Note You can adjust the sound field effect level. For details, see the following:
– “Adjusting the sound field effect level” (p.71) The sound mode can be applied separately to each input source.
En38
Enjoying sound field effects optimized for the type ofcontentThe unit is equipped with a variety of sound programs.
You can enjoy playback sources with your favorite sound mode, such as with a soundfield effect added or with stereo playback.
• We recommend a sound program in the “MOVIE” category to enjoy video content.
• We recommend a sound program in the “MUSIC” category to enjoy music content.
• We recommend a sound program in the “STEREO” category to enjoy stereoplayback.
For details on the sound programs, see the following:
• “Selecting sound programs” (p.69)
Note You can select a sound program by pressing PROGRAM.
Enjoying sound field effects without surroundspeakers (Virtual CINEMA DSP)If you select one of the sound programs (except 2ch Stereo and 7ch Stereo) when nosurround speakers are connected, the unit automatically creates the surround soundfield using the front speakers.
Note When Virtual CINEMA DSP is working, “VIRTUAL” lights up on the front display.
Enjoying surround sound with 5 speakers placed infront (Virtual CINEMA FRONT)You can enjoy the surround sound even when the surround speakers are placed infront.
When “Virtual CINEMA FRONT” in the “Setup” menu is set to “On”, the unit creates thevirtual surround speakers in the rear side to allow you to enjoy multichannel surroundsound with the 5 speakers placed in the front.
Note For details on the settings, see the following:
– “Setting the use of Virtual CINEMA FRONT” (p.86) When Virtual CINEMA FRONT is working, “VIRTUAL” lights up on the front display.
Enjoying surround sound with headphones (SILENTCINEMA)
You can enjoy surround or sound field effects, like a multichannel speaker system, withstereo headphones by connecting the headphones to the PHONES jack and selectinga sound program or a surround decoder.
En39

Enjoying unprocessed playback
Enjoying original sound (straight decode)When STRAIGHT is pressed and the straight decode mode is enabled, the unitproduces stereo sound from the front speakers for 2-channel sources such as CDs,and produces unprocessed multichannel sounds for multichannel sources.
LINK
ECO
MASTER
OUT 2 A-DRC
ZONE3 B2 A
FPR
SBL SB SBR
FPL
MUTE VIRTUAL
-SLEEP
STEREO
PARTY
TUNED
ResHi YPAO VOL.ENHANCER
VOL.
SL SW SR STRAIGHTEach time you press the key, the straight decode mode is enabled or disabled.
Enjoying multichannel playback without sound fieldeffects (surround decoder)Press PROGRAM to select “Sur.Decode”. The previously selected surround decoder isselected. The surround decoder enables multichannel playback from 2-channelsources without sound field effects.
TUNING
PRESET
MUTE
TUNING
MEMORY
TOP MENU HOME POP-UP/MENU
DISPLAYRETURN
SETUP OPTION
FM/AM
VOLUME
PROGRAM
USB
STRAIGHT ENHANCER BASS
INPUT
BDDVD
TV
SCENE
RADIO
SLEEP
ENTER
BLUEYELLOWGREENRED
DIRECT
ZONE A ZONE B
NET
NET
BLUETOOTH
PROGRAM
STRAIGHT ENHANCER BASS
BDDVD
TV
SCENE
RADIO
SLEEP
DIRECT
ZONE A ZONE B
NET
STRAIGHT ENHANCER BASS
BDDVD
TV
SCENE
RADIO
SLEEP
DIRECT
ZONE A ZONE B
NET
PROGRAM
ENHANCER
LINK
ECO
MASTER
OUT 2 -ResHi YPAO VOL. A-DRC
SLEEP
STEREO
PARTY
TUNED ZONE3 B2 A
SBL SB SBR
MUTE VIRTUALVOL.
SL SW SR †‡ DsurFPL FPR
“SUR. DECODE” appears
Note You cannot change the previously selected surround decoder by pressing PROGRAM. To change it, use
“Sur.Decode” in the “Option” menu. For details, see the following:– “Selecting the surround decoder used in the program” (p.70)
For details on each decoder, see the following:– “Glossary of audio decoding format” (p.132)
You can adjust the surround decoder parameters in “DSP Parameter” in the “Setup” menu. For details,see the following:– “Adjusting the center localization (broadening effect) of the front sound field” (p.91)– “Setting the use of Center Spread” (p.91)
The selected surround decoder may not work for some input sources. We recommend Dolby Surround while network streaming is Dolby contents. When the Dolby Surround decoder or the Neural:X decoder is selected, virtual surround processing (such
as Virtual CINEMA FRONT) does not work. For details, see the following:– “Enjoying sound field effects without surround speakers (Virtual CINEMA DSP)” (p.39)– “Enjoying surround sound with 5 speakers placed in front (Virtual CINEMA FRONT)” (p.39)
En40

Enjoying pure high fidelity sound (direct playback)When DIRECT is pressed and the direct playback mode is enabled, the unit playsback the selected source with the least circuitry. It allows you to enjoy Hi-Fi soundquality.
ENHANCER
LINK
ECO
MASTER
OUT 2 -ResHi YPAO VOL. A-DRC
SLEEP
STEREO
PARTY
TUNED ZONE3 B2 A
FPR
SBL SB SBR
FPL
MUTE VIRTUALVOL.
SL SW SR DIRECTEach time you press the key, the direct playback mode is enabled or disabled.
Note When the direct playback mode is enabled, the following functions are not available.
– Selecting sound programs– Using the Zone B function– Adjusting the tone control– Operating the on-screen “Setup” and “Option” menus– Viewing information on the front display (when not in operation)
When the direct playback mode is enabled, the front display may become dark.
Enjoying enhanced bass sound
Enhancing the bass (Extra Bass)Press BASS to enable Extra Bass and enjoy enhanced bass sound, regardless of thesize of the front speakers and the presence or absence of a subwoofer.
Each time you press the key, Extra Bass is enabled or disabled.
Note You can also use “Extra Bass” in the “Setup” menu to enable/disable Extra Bass. For details, see thefollowing: “Setting the use of Extra Bass” (p.85)
En41

Enjoying enhanced compressed music
Playing back digitally compressed formats withenriched sound (Compressed Music Enhancer)
Press ENHANCER to enable Compressed Music Enhancer and add depth andbreadth to the sound, allowing you to enjoy a dynamic sound close to the originalsound before it was compressed. This function can be used along with any othersound modes.
LINK
ECO
MASTER
OUT 2 - A-DRC
SLEEP
STEREO
PARTY
TUNED ZONE3 B2 A
FPR
SBL SB SBR
FPL
MUTE VIRTUAL
ResHi YPAO VOL.
VOL.
SL SW SR Enhancer On
ENHANCER
“ENHANCER” lights up
Each time you press the key, Compressed Music Enhancer is enabled or disabled.
Note Compressed Music Enhancer does not work on the following audio sources.
– Signals whose sampling frequency is over 48 kHz– DSD audio
You can also use “Enhancer” in the “Option” menu to enable/disable Compressed Music Enhancer. Fordetails, see the following:– “Setting Compressed Music Enhancer” (p.72)
Enjoying Dolby Atmos® and DTS:X™
Enjoying Dolby Atmos® and DTS:X™Playing back Dolby Atmos or DTS:X content creates realistic sound that comes fromevery direction, including overhead. To receive the full effect of Dolby Atmos or DTS:Xcontent, we recommend a speaker system with presence speakers.
Note For details on the speaker system with the presence speakers, see the following: “Using 5.1.2-channel system” (p.19)
About Dolby Atmos®
Dolby Atmos contents are decoded as Dolby TrueHD or Dolby Digital Plus in the following situations.(Dolby Atmos PCM format is always decoded as Dolby Atmos.)– Neither surround back nor presence speakers are used.– Headphones are used (2-channel playback).
When the Dolby Atmos decoder is selected, virtual surround processing (such as Virtual CINEMAFRONT) does not work. For details, see the following:– “Enjoying sound field effects without surround speakers (Virtual CINEMA DSP)” (p.39)– “Enjoying surround sound with 5 speakers placed in front (Virtual CINEMA FRONT)” (p.39)
About DTS:X™
When DTS:X contents are played back, you can adjust the volume of dialogue sounds in “DTSDialogue Control” in the “Setup” menu. For details, see the following:– “Adjusting the volume of dialogue sound during DTS:X™ playback” (p.92)
When the DTS:X decoder is selected, virtual surround processing (such as Virtual CINEMA FRONT)does not work. For details, see the following:– “Enjoying sound field effects without surround speakers (Virtual CINEMA DSP)” (p.39)– “Enjoying surround sound with 5 speakers placed in front (Virtual CINEMA FRONT)” (p.39)
En42

Enjoying music in multiple rooms
Playing back music in multiple roomsThe Zone A/B function allows you to play back an input source in the room where theunit is installed (Zone A) and in another room (Zone B).
For example, you can turn on Zone A (turn off Zone B) when you are in the living room,and turn on Zone B (turn off Zone A) when you are in the study room. Also, you canturn on both zones when you want to enjoy the same input source in those roomssimultaneously.
Living room (Zone A)
Study room (Zone B)
Note Multichannel sources are mixed down to 2 channels and output to the Zone B. The same input source is applied to both Zone A and Zone B. By default, the volume for Zone B changes in conjunction with the volume for Zone A. If there is volume
difference between Zone A/B, you can correct it, and also you can adjust the volume for Zone Bseparately. For details, see the following:– “Correcting volume difference between Zone A and Zone B” (p.45)– “Adjusting the volume for Zone B separately” (p.45)
You can automatically enable/disable the audio output to Zone A/B in conjunction with a scene selection.For details, see the following:– “Registering a scene” (p.64)
Connecting Zone B speakersConnect the device that will be used in Zone B to the unit.
Notice
Remove the unit’s power cable from the AC wall outlet before connecting speakers. Ensure that the bare wires of the speaker cable do not touch one another or come into contact with the
unit’s metal parts. Doing so may damage the unit or the speakers. If the speaker cables short circuit,“Check SP Wires” will appear on the front display when the unit is turned on.
Connect the speakers placed in Zone B to the unit with speaker cables.
To utilize the SURROUND BACK/PRESENCE/BI-AMP/ZONE B terminals for Zone Bspeakers, set “Power Amp Assign” in the “Setup” menu to “Zone B” after connectingthe power cable to an AC wall outlet. For details, see the following:
• “Setting your speaker system” (p.82)
1 2
1 2
39
4 5
PRE OUTSUBWOOFER
SPEAKERS
1
2
The unit (rear)
Zone A
Zone B
Note The following speakers cannot be connected simultaneously. Presence speakers Surround back speakers Zone B speakers Bi-amp speakers
En43

Operating the Zone BBasic procedure for playing back music in Zone B is as follows.
1 Slide the Zone switch to “ZONE B”.
TUNING
PRESET
MUTE
TUNING
MEMORY
TOP MENU HOME POP-UP/MENU
DISPLAYRETURN
SETUP OPTION
FM/AM
VOLUME
PROGRAM
USB
STRAIGHT ENHANCER BASS
INPUT
BDDVD
TV
SCENE
RADIO
SLEEP
ENTER
BLUEYELLOWGREENRED
DIRECT
ZONE A ZONE B
NET
NET
BLUETOOTH
PROGRAM
STRAIGHT ENHANCER BASS
BDDVD
TV
SCENE
RADIO
SLEEP
DIRECT
ZONE A ZONE B
NET
PROGRAM
STRAIGHT ENHANCER BASS
BDDVD
TV
SCENE
RADIO
SLEEP
DIRECT
NET ZONE A
ZONE B
2 Press z (receiver power).
Each time you press the key, the ZONE B audio output is on or off.
ENHANCER
LINK
ECO
OUT -ResHi YPAO VOL. A-DRC
SLEEP
STEREO
PARTY
TUNED
FPR
SBL SB SBR
FPL
MUTE VIRTUAL
MASTER
2
VOL.
SL SW SR
ZONE
HDMI1
“ZONE B” lights up
3 Use the input selection keys to select an input source.
PRESET
TUNINGTUNING
MEMORY
BLUEYELLOWGREENRED
POP-UP/MENUHOMETOP MENU
DISPLAYRETURN
OPTION
ENTER
SETUP
MUTE
VOLUME
BLUETOOTH
NET
USB
FM/AM
INPUT
PROGRAM
BASSENHANCERDIRECTSTRAIGHT
BDDVD
TV
SCENE
RADIONET
SLEEP
ZONE A ZONE B
PRESET
TUNINGTUNING
MEMORY
BLUEYELLOWGREENRED
POP-UP/MENUHOMETOP MENU
DISPLAYRETURN
OPTIONOPTION
ENTER
SETUPSETUP
MUTE
VOLUME
BLUETOOTH
NET
USB
FM/AM
INPUT
PROGRAM
BASSENHANCERDIRECTSTRAIGHT
BDDVD
TV
SCENE
RADIONET
SLEEP
ZONE A ZONE B
PRESET
TUNINGTUNING TUNINGTUNING
MEMORYMEMORY
BLUEYELLOWGREENRED
POP-UP/MENUHOMETOP MENU
DISPLAYRETURN
OPTION
ENTER
SETUP
MUTE
BLUETOOTH
NET
USB
FM/AM
INPUT VOLUME
BLUETOOTH
NET
USB
FM/AM
INPUT
PROGRAM
BASSENHANCERDIRECTSTRAIGHT
BDDVD
TV
SCENE
RADIONET
SLEEP
ZONE A ZONE B
MUTE
FM/AM
VOLUME
PROGRAM
USB
INPUT
NET
BLUETOOTH
MUTE
VOLUME
PROGRAM
Input selection keys
NoteThe same input source is applied to both Zone A and Zone B.
4 Start playback on the external device or select a radio station.
En44

Correcting volume difference between Zone A andZone BIf you are bothered by volume difference between Zone A/B, perform the followingprocedure to adjust the volume for Zone B.
NoteSlide the Zone switch to “ZONE A” in menu operations.
1 Press OPTION.
2 Use the cursor keys to select “Volume Trim” and press ENTER.
3 Use the cursor keys to select “ZoneB Trim” and adjust the setting.
Setting range
-10.0 dB to +10.0 dB (0.5 dB increments)
4 Press OPTION.
This completes the settings.
Note This setting is not effective when “ZoneB Volume” in the “Setup” menu is set to “Async.”. For details, see thefollowing: “Adjusting the volume for Zone B in conjunction with the volume for Zone A” (p.94)
Adjusting the volume for Zone B separatelyYou can separately adjust the volume for Zone B using the remote control.
NoteSlide the Zone switch to “ZONE A” in menu operations.
1 Press SETUP.
2 Use the cursor keys to select “Sound” and press ENTER.
3 Use the cursor keys to select “Volume” and press ENTER.
4 Use the cursor keys to select “ZoneB Volume” .
5 Use the cursor keys to select “Async.” and press ENTER.
NoteWhen “ZoneB Volume” is set to “Async.”, the volume for Zone B is temporarily set to -40 dB.
6 Press SETUP.
7 Slide the Zone switch to “ZONE B”.
8 Press VOLUME to adjust the volume for Zone B.
Note To mute the audio output to Zone B, press MUTE.
En45

PLAYBACKBasic playback procedure
Basic procedure for playing back video and musicBasic procedure for playing back video and music is as follows.
1 Turn on the external devices (such as a TV or BD/DVD player)connected to the unit.
2 Use the input selection keys to select an input source.
MUTE
FM/AM
VOLUME
PROGRAM
USB
INPUT
NET
BLUETOOTH
TUNING
PRESET
MUTE
TUNING
MEMORY
TOP MENU HOME POP-UP/MENU
DISPLAYRETURN
SETUP OPTION
FM/AM
VOLUME
PROGRAM
USB
STRAIGHT ENHANCER BASS
INPUT
BDDVD
TV
SCENE
RADIO
SLEEP
ENTER
BLUEYELLOWGREENRED
DIRECT
ZONE A ZONE B
NET
NET
BLUETOOTH
PROGRAM
VOLUME
MUTE
Input selection keys
3 Start playback on the external device or select a radio station.
4 Press VOLUME to adjust the volume.
Note To mute the audio output, press MUTE. Press MUTE again to unmute. Refer to the instruction manual for the external device.
En46

Switching information on the front displayPress INFO on the front panel to select between the various display items on the frontdisplay, as shown in the following table.
ENHANCER
LINK
ECO
MASTER
OUT 2 -ResHi YPAO VOL. A-DRC
SLEEP
STEREO
PARTY
TUNED ZONE3 B2 A
FPR
SBL SB SBR
FPL
MUTE VIRTUALVOL.
SL SW SRAudio DecoderItem
About 3 seconds after a display item is selected, its corresponding informationappears.
ENHANCER
LINK
ECO
MASTER
OUT 2 -ResHi YPAO VOL. A-DRC
SLEEP
STEREO
PARTY
TUNED ZONE3 B2 A
SBL SB SBR
MUTE VIRTUAL
FPL FPR
VOL.
SL SW SR †‡ DsurInformation
Currently input source Displayed item
HDMI
AV
AUX
AUDIO
Input (input source name), DSP Program (sound mode name), AudioDecoder (decoder name*)
Bluetooth
USBSong (song title), Artist (artist name), Album (album name), DSPProgram (sound mode name), Audio Decoder (decoder name*)
SERVER
AirPlay
Song (song title), Artist (artist name), Album (album name), DSPProgram (sound mode name), Audio Decoder (decoder name*), IPAddress, Ethernet MAC, Wi-Fi MAC
NET RADIOSong (song title), Album (album name), Station (station name), DSPProgram (sound mode name), Audio Decoder (decoder name*), IPAddress, Ethernet MAC, Wi-Fi MAC
MusicCast LinkDSP Program (sound mode name), Audio Decoder (decoder name*),IP Address, Ethernet MAC, Wi-Fi MAC
TUNER
Frequency (frequency), DSP Program (sound mode name), AudioDecoder (decoder name*)
(U.K., Europe, Russia and Middle East models only)Radio Data System data is also available when the unit is tuned into aRadio Data System broadcasting station. For details, see thefollowing:
• “Displaying the Radio Data System information” (p.54)
* The name of the audio decoder currently activated is displayed. If no audio decoderis activated, “Decoder Off” appears.
NoteAvailable items vary depending on the selected input source. The displayed item can also be appliedseparately to each input group which is shown in the table and divided by ruled lines.
En47

Item names and functions of the playback screenThe item names and functions of the playback screen, available when your TV isconnected to the unit via HDMI, are as follows.
2
1
1 Status indicators
Display the current shuffle/repeat settings and playback status (such as play/pause).
2 Playback information
Displays the artist name, album name, song title, and elapsed time.
Use the following remote control keys to control playback.
TUNING
PRESET
MUTE
TUNING
MEMORY
TOP MENU HOME POP-UP/MENU
DISPLAYRETURN
SETUP OPTION
FM/AM
VOLUME
PROGRAM
USB
STRAIGHT ENHANCER BASS
INPUT
BDDVD
TV
SCENE
RADIO
SLEEP
ENTER
BLUEYELLOWGREENRED
DIRECT
ZONE A ZONE B
NET
NET
BLUETOOTH
TUNING
PRESET
TUNING
MEMORY
TOP MENU HOME POP UP/MENU
BLUEYELLOWGREENRED
TUNING
PRESET
TUNING
BLUEYELLOWYELLYELLGREENRED
External device operationkeys
External deviceoperation keys
Function
a Resumes playback from pause.
s Stops playback.
d Stops playback temporarily.
fSkips forward/backward.
g
Note Displayed items vary depending on the content of playback.
En48

Item names and functions of the browse screenThe item names and functions of the browse screen, available when your TV isconnected to the unit via HDMI, are as follows. The browse screen appears when thenext input source is selected.
• USB
• SERVER
• NET RADIO
1 4
2 5
3
1 List name
2 Contents list
Displays the list of contents. Use the cursor keys to select an item and press ENTERto confirm the selection.
3 Item number/total
4 Status indicators
Display the current shuffle/repeat settings and playback status (such as play/pause).
5 Operation menu
Use the cursor keys to select an item. Press ENTER to confirm the selection.
Icon Function
Moves 10 pages backward.
Moves to the previous page of the list.
Moves to the next page of the list.
Moves 10 pages forward.
Moves to the playback screen.
Note Displayed items vary depending on the content of playback. A content selected by the cursor is displayed on the front display.
En49

Listening to FM/AM radio
Setting the frequency steps(Asia, Taiwan, Brazil, General, and Central and South America models only)
At the factory, the frequency step setting is set to 50 kHz for FM and 9 kHz for AM.Depending on your country or region, set the frequency steps to 100 kHz for FM and10 kHz for AM.
1 Set the unit to standby mode.
2 When holding down STRAIGHT on the front panel, press z(power).
(power)z
STRAIGHTPROGRAM
3 Press PROGRAM to select “TU”.
ENHANCER
LINK
ECO
MASTER
OUT 2 -ResHi YPAO VOL. A-DRC
SLEEP
STEREO
PARTY
TUNED ZONE3 B2 A
VOL.
FPR
SL SW SR
SBL SB SBR
FPL
MUTE VIRTUAL
TU••••FM50/AM9
4 Press STRAIGHT to select “FM100/AM10”.
5 Press z (power) to set the unit to standby mode and turn it onagain.
This completes the settings.
En50

Selecting a frequency for receptionYou can tune into a radio station by specifying its frequency.
Note The radio frequencies differ depending on the country or region where the unit is being used. The explanationof this section uses a display with frequencies used in U.K. and Europe models.
1 Press FM/AM to select “TUNER” as the input source.
“TUNER” is selected as the input source and the frequency currentlyselected is displayed on the front display.
ENHANCER
LINK
ECO
MASTER
OUT 2 -ResHi YPAO VOL. A-DRC
SLEEP
STEREO
PARTY
TUNED ZONE3 B2 A
MUTE VIRTUALVOL.
FM 87.50MHz
2 Press TUNING to set a frequency.
Hold down the key for about a second to search stations automatically.
TUNING
PRESET
MUTE
TUNING
MEMORY
TOP MENU HOME POP-UP/MENU
DISPLAYRETURN
SETUP OPTION
FM/AM
VOLUME
PROGRAM
USB
STRAIGHT ENHANCER BASS
INPUT
BDDVD
TV
SCENE
RADIO
SLEEP
ENTER
BLUEYELLOWGREENRED
DIRECT
ZONE A ZONE B
NET
NET
BLUETOOTH
TUNING
PRESET
TUNING
MEMORY
TOP MENU HOME POP UP/MENU
BLUEYELLOWGREENRED
PRESET
MEMORY
TOP MENU HOME POP UP/MENU
BLUEYELLOWYELLYELLGREENRED
TUNING
ENHANCER
LINK
ECO
MASTER
OUT 2 -ResHi YPAO VOL. A-DRC
SLEEP PARTY
ZONE3 B2 A
FPR
SBL SB SBR
FPL
MUTE VIRTUALVOL.
SL SW SR
STEREO TUNED
FM 98.50MHz
On the front display, “TUNED” lights up when the unit is receiving anFM/AM radio station signal.
“STEREO” lights up when the unit is receiving a stereo FM radio signal.
Note You can watch videos input from external devices while listening to radio. For details, see thefollowing: “Selecting a video source to be output with the selected audio source” (p.74)
En51

Selecting a preset stationTune into a registered radio station by selecting its preset number.
1 Press FM/AM to select “TUNER” as the input source.
“TUNER” is selected as the input source and the frequency currentlyselected is displayed on the front display.
2 Press PRESET to select the desired radio station.
TUNING
PRESET
MUTE
TUNING
MEMORY
TOP MENU HOME POP-UP/MENU
DISPLAYRETURN
SETUP OPTION
FM/AM
VOLUME
PROGRAM
USB
STRAIGHT ENHANCER BASS
INPUT
BDDVD
TV
SCENE
RADIO
SLEEP
ENTER
BLUEYELLOWGREENRED
DIRECT
ZONE A ZONE B
NET
NET
BLUETOOTH
TUNING
PRESET
TUNING
MEMORY
TOP MENU HOME POP UP/MENU
BLUEYELLOWGREENRED
TUNINGTUNING
MEMORY
TOP MENU HOME POP UP/MENU
BLUEYELLOWYELLYELLGREENRED
PRESET
ENHANCER-ResHi YPAO VOL. A-DRC
SLEEP PARTY
ZONE3 B2 A
MUTE VIRTUAL
FPR
SBL SB SBR
FPL
LINK
ECO
MASTER
OUT 2
VOL.
SL SW SR
STEREO TUNED
01:FM 98.50MHz
Note“No Presets” appears on the front display when no radio stations are registered.
Registering radio stations automatically (AutoPreset)Automatically register FM radio stations with strong signals.
Note You can register up to 40 radio stations as presets. To register AM radio stations, see the following:
– “Registering a radio station manually” (p.53) (U.K., Europe, Russia and Middle East models only)
Only Radio Data System broadcasting stations are registered automatically by the Auto Preset function.
1 Press FM/AM to select “TUNER” as the input source.
“TUNER” is selected as the input source and the frequency currentlyselected is displayed on the front display.
2 Press OPTION.
3 Use the cursor keys to select “Preset” and press ENTER.
ENHANCER
LINK
ECO
MASTER
OUT 2 -ResHi YPAO VOL. A-DRC
SLEEP
STEREO
PARTY
TUNED ZONE3 B2 A
FPR
SL SW SR
SBL SB SBR
FPL
MUTE VIRTUALVOL.
Preset
The preset number from which to start the registration is displayed on thefront display.
Note To specify the preset number from which to start the registration, press cursor keys or PRESET toselect a preset number.
4 To start the Auto Preset process, press ENTER.
ENHANCER
LINK
ECO
MASTER
OUT 2 -ResHi YPAO VOL. A-DRC
SLEEP PARTY
ZONE3 B2 A
MUTE VIRTUAL
STEREO TUNED
FPR
SBL SB SBR
FPL
SL SW SR
VOL.
01:FM 87.50MHz
“SEARCH” appears during Auto Preset
Preset number from which to start the registration
The Auto Preset process starts and “SEARCH” appears during AutoPreset.
Note To cancel the Auto Preset process, press RETURN.
When the Auto Preset process finishes, “FINISH” appears on the front display and the“Option” menu closes automatically.
ENHANCER
LINK
ECO
MASTER
OUT 2 -ResHi YPAO VOL. A-DRC
SLEEP
STEREO
PARTY
TUNED ZONE3 B2 A
FPR
SL SW SR
SBL SB SBR
FPL
MUTE VIRTUALVOL.
Auto Preset
En52
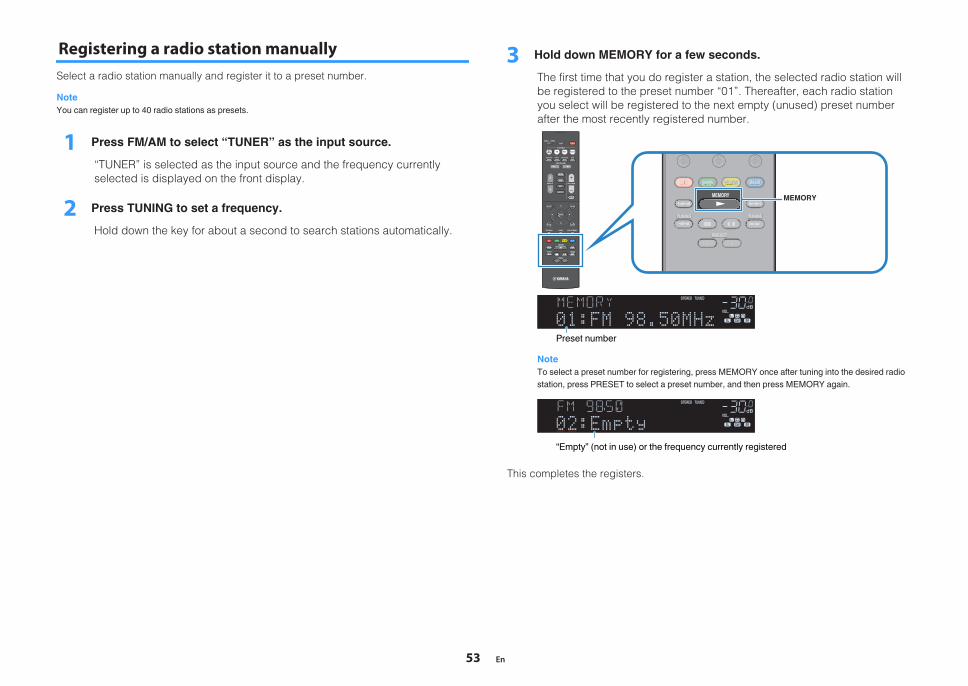
Registering a radio station manuallySelect a radio station manually and register it to a preset number.
NoteYou can register up to 40 radio stations as presets.
1 Press FM/AM to select “TUNER” as the input source.
“TUNER” is selected as the input source and the frequency currentlyselected is displayed on the front display.
2 Press TUNING to set a frequency.
Hold down the key for about a second to search stations automatically.
3 Hold down MEMORY for a few seconds.
The first time that you do register a station, the selected radio station willbe registered to the preset number “01”. Thereafter, each radio stationyou select will be registered to the next empty (unused) preset numberafter the most recently registered number.
TUNING
PRESET
MUTE
TUNING
MEMORY
TOP MENU HOME POP-UP/MENU
DISPLAYRETURN
SETUP OPTION
FM/AM
VOLUME
PROGRAM
USB
STRAIGHT ENHANCER BASS
INPUT
BDDVD
TV
SCENE
RADIO
SLEEP
ENTER
BLUEYELLOWGREENRED
DIRECT
ZONE A ZONE B
NET
NET
BLUETOOTH
TUNING
PRESET
TUNING
MEMORY
TOP MENU HOME POP UP/MENU
BLUEYELLOWGREENRED
TUNING
PRESET
TUNING
TOP MENU HOME POP UP/MENU
BLUEYELLOWYELLYELLGREENRED
MEMORY
ENHANCER
LINK
ECO
MASTER
OUT 2 -ResHi YPAO VOL. A-DRC
SLEEP PARTY
ZONE3 B2 A
MUTE VIRTUAL
FPR
SBL SB SBR
FPL
VOL.
SL SW SR01:FM 98.50MHz
STEREO TUNED
Preset number
NoteTo select a preset number for registering, press MEMORY once after tuning into the desired radiostation, press PRESET to select a preset number, and then press MEMORY again.
ENHANCER
LINK
ECO
MASTER
OUT 2 -ResHi YPAO VOL. A-DRC
PARTY
ZONE3 B2 A
FPR
SBL SB SBR
FPL
MUTE VIRTUAL
SLEEP
VOL.
SL SW SR02:Empty
TUNEDSTEREO
“Empty” (not in use) or the frequency currently registered
This completes the registers.
En53

Clearing preset stationsClear radio stations registered to the preset numbers.
1 Press FM/AM to select “TUNER” as the input source.
“TUNER” is selected as the input source and the frequency currentlyselected is displayed on the front display.
2 Press OPTION.
3 Use the cursor keys to select “Preset” and press ENTER.
ENHANCER
LINK
ECO
MASTER
OUT 2 -ResHi YPAO VOL. A-DRC
SLEEP
STEREO
PARTY
TUNED ZONE3 B2 A
FPR
SL SW SR
SBL SB SBR
FPL
MUTE VIRTUALVOL.
Preset
4 Use the cursor keys to select “CLEAR”.
5 Use the cursor keys to select a preset station to be cleared andpress ENTER.
ENHANCER
LINK
ECO
MASTER
OUT 2 -ResHi YPAO VOL. A-DRC
SLEEP PARTY
ZONE3 B2 A
MUTE VIRTUAL
FPR
SBL SB SBR
FPL
VOL.
SL SW SR
STEREO TUNED
01:FM 98.50MHzPreset station to be cleared
If the preset station is cleared, “Cleared” appears and then the next in-usepreset number is displayed.
01:Cleared
6 Repeat step 5 until all desired preset stations are cleared.
7 Press OPTION.
This completes the clearing preset stations.
Displaying the Radio Data System information(U.K., Europe, Russia and Middle East models only)
Radio Data System is a data transmission system used by FM stations in manycountries. The unit can receive various types of Radio Data System data, such as“Program Service”, “Program Type”, “Radio Text” and “Clock Time”, when it is tunedinto a Radio Data System broadcasting station.
1 Tune into the desired Radio Data System broadcasting station.
Note We recommend using “Auto Preset” to tune into the Radio Data System broadcasting stations. Fordetails, see the following: “Registering radio stations automatically (Auto Preset)” (p.52)
2 Press INFO on the front panel to select between the variousdisplay items.
ENHANCER
LINK
ECO
MASTER
OUT 2 -ResHi YPAO VOL. A-DRC
SLEEP PARTY
ZONE3 B2 A
MUTE VIRTUAL
FPR
SBL SB SBR
FPL
VOL.
SL SW SR
STEREO TUNED
Program TypeItem name
About 3 seconds after a display item is selected, its correspondinginformation appears.
ENHANCER
LINK
ECO
MASTER
OUT 2 -ResHi YPAO VOL. A-DRC
SLEEP PARTY
ZONE3 B2 A
MUTE VIRTUAL
FPR
SBL SB SBR
FPL
VOL.
SL SW SR
STEREO TUNED
ClassicsInformation
Program Service Program service name
Program Type Current program type
Radio Text Information on the current program
Clock Time Current time
DSP Program Sound mode name
Audio Decoder Decoder name
Frequency Frequency
Note“Program Service”, “Program Type”, “Radio Text”, and “Clock Time” are not displayed if the radiostation does not provide the Radio Data System service.
En54

Receiving traffic information automatically(U.K., Europe, Russia and Middle East models only)
When “TUNER” is selected as the input source, the unit automatically receives trafficinformation. To enable this function, perform the following procedure to set the trafficinformation station.
1 When “TUNER” is selected as the input source, press OPTION.
2 Use the cursor keys to select “Traffic Program” and press ENTER.
The traffic information station search will start in 5 seconds. Press ENTERagain to start the search immediately.
Note To search upward/downward from the current frequency, press the cursor keys while “READY”
is displayed. To cancel the search, press RETURN.
The following screen appears for about 3 seconds when the searchfinishes.
ENHANCER
LINK
ECO
MASTER
OUT 2 -ResHi YPAO VOL. A-DRC
SLEEP PARTY
ZONE3 B2 A
MUTE VIRTUAL
FPR
SBL SB SBR
FPL
VOL.
SL SW SR
STEREO TUNED
TP FM101.30MHzTraffic information station (frequency)
Note“TP Not Found” appears for about 3 seconds when no traffic information stations are found.
En55

Playing back music stored on a Bluetooth® device
Playback Bluetooth® device music on the unitYou can play back music files stored on a Bluetooth device (such as smartphones) onthe unit.
Bluetooth device(such as smartphones)
The unit
Note Use the wireless antennas that are standing upright for connecting to a Bluetooth device wirelessly. For
details, see the following:– “Preparing wireless antennas (wireless connection)” (p.30)
To use the Bluetooth function, turn on the Bluetooth function of a Bluetooth device. To use the Bluetooth function, set “Bluetooth” in the “Setup” menu to “On”. For details, see the following:
– “Setting the use of Bluetooth®” (p.103) For details on supported Bluetooth devices, see the following:
– “Supported Bluetooth® devices” (p.135)
1 Press BLUETOOTH to select “Bluetooth” as the input source.
2 On the Bluetooth device, select the unit (network name of theunit).
A connection between the Bluetooth device and the unit will be made.
If the pass key is required, enter the number “0000”.
3 On the Bluetooth device, select a song and start playback.
The playback screen is displayed on the TV.
Note If the unit detects the Bluetooth device previously connected, the unit automatically connects to
the Bluetooth device after Step 1. To establish another Bluetooth connection, first terminate thecurrent Bluetooth connection.
To terminate the Bluetooth connection, perform one of the following operations.– Perform the disconnect operation on the Bluetooth device.– Select an input source other than “Bluetooth” on the unit.– Select “Disconnect” in “Audio Receive” in the “Setup” menu.
En56

Playing back music with AirPlay
Playback of iTunes/iPhone music contents withAirPlayThe AirPlay allows you to play back iTunes or iPhone/iPad/iPod touch music on the unitvia network.
PC
iTunes
(Wired network or wireless network)
iPhone/iPad/iPod touch
The unitRouter
Note For details on supported iPhone devices, see the following: “Supported AirPlay devices” (p.135)
1 Start iTunes on the PC or display the playback screen on theiPhone.
2 On the iTunes/iPhone, click (tap) the AirPlay icon and select theunit (network name of the unit) as the audio output device.
iOS 10 (example) iTunes (example)
3 Select a song and start playback.
The unit automatically selects “AirPlay” as the input source and startsplayback.
The playback screen is displayed on the TV.
Caution When you use iTunes/iPhone controls to adjust volume, the volume may be unexpectedly loud. This
could result in damage to the unit or speakers. If the volume suddenly increases during playback, stopplayback on the iTunes/iPhone immediately. We recommend volume controls from iTunes/iPhonewithin the limited range by setting “Volume Interlock (Vol.Interlock)” in the “Option” menu.
Note You can turn on the unit automatically when starting playback on iTunes or iPhone. For details on the
settings, see the following:– “Setting the use of the Network Standby function” (p.101)
You can edit the network name (the unit’s name on the network) displayed on iTunes/iPhone. For details,see the following:– “Setting the network name of the unit” (p.102)
You can adjust the unit’s volume from the iTunes/iPhone during playback. To disable volume controls fromiTunes/iPhone, see the following:– “Enabling volume control via AirPlay” (p.77)
En57

Playing back music stored on a USB storage device
Playback of USB storage device contentsYou can play back music files stored on a USB storage device on the unit.
Note For details on playable USB devices and USB file formats, see the following: “Supported USB devices” (p.135) “Supported file formats” (p.135)
1 Connect the USB storage device to the USB jack.
STRAIGHT
(CONNECT)
AUX USB
AUDIO 5V 1A
RADIO
The unit (front)
USB storage device
Note If the USB storage device contains many files, it may take time to load them. In this case,
“Loading…” appears on the front display. Stop playback of the USB storage device before disconnecting it from the USB jack. Connect a USB storage device directly to the USB jack of the unit. Do not use extension cables. The unit cannot charge USB devices while it is in standby mode.
2 Press USB to select “USB” as the input source.
The browse screen is displayed on the TV.
NoteIf playback is ongoing on your USB storage device, the playback screen is displayed.
3 Use the cursor keys to select an item and press ENTER.
If a song is selected, playback starts and the playback screen isdisplayed.
Note To return to the top level while on the browse screen, hold down RETURN. To switch the screen mode browse/playback/off, press DISPLAY.
Note You can configure the shuffle/repeat settings for playback of contents. For details, see the following:
– “Configuring the shuffle setting” (p.76)– “Configuring the repeat setting” (p.77)
You can register contents as shortcuts and access them directly. For details, see the following:– “Registering a favorite content as shortcut” (p.65)
En58

Playing back music stored on media servers (PCs/NAS)
Media sharing setup on media servers (PCs/NAS)To play back music files stored on your media servers, first you need to configure themedia sharing setting on each music server.
The setting procedure may vary depending on the media server. The followingprocedure is a setup example for Windows Media Player 12.
Note For a media server with software except Windows Media Player installed, refer to the instruction manual
for the device or software and configure the media sharing settings. The setting procedure may vary depending on the view setting of Windows Media Player or the settings of
PC.
1 Start Windows Media Player 12 on your PC.
2 Select “Stream”, then “Turn on media streaming”.
3 Click “Turn on media streaming”.
4 Select “Allowed” from the drop-down list next to the unit’s modelname.
5 Click “OK” to exit.
This completes the settings.
NoteFor details on media sharing settings, refer to Windows Media Player help.
Playing back music stored on media servers (PCs/NAS)You can play back music files stored on your media server on the unit.
Note You need to configure the media sharing setting on each music server in advance. For details, see the
following:– “Media sharing setup on media servers (PCs/NAS)” (p.59)
To use this function, the unit and your PC must be connected to the same router. You can check whetherthe network parameters (such as the IP address) are properly assigned to the unit. For details, see thefollowing:– “Checking the network information of the unit” (p.99)
The audio may be interrupted while using the wireless network connection. In this case, use the wirednetwork connection.
For details on playable file formats, see the following:– “Supported file formats” (p.135)
1 Press NET to select “SERVER” as the input source.
The browse screen is displayed on the TV.
NoteIf playback of a music file selected from the unit is ongoing on your PC, the playback screen isdisplayed.
2 Use the cursor keys to select a music server and press ENTER.
En59

3 Use the cursor keys to select an item and press ENTER.
If a song is selected, playback starts and the playback screen isdisplayed.
Note To return to the top level while on the browse screen, hold down RETURN. To switch the screen mode browse/playback/off, press DISPLAY.
Note You can configure the shuffle/repeat settings for playback of contents. For details, see the following:
– “Configuring the shuffle setting” (p.76)– “Configuring the repeat setting” (p.77)
You can also use the Digital Media Controller (DMC) to control playback. For details, see the following:– “Setting the use of a Digital Media Controller” (p.101)
You can register contents as shortcuts and access them directly. For details, see the following:– “Registering a favorite content as shortcut” (p.65)
En60

Listening to Internet radio
Selecting an Internet radio stationSelect an Internet radio station and start playback.
Note To use this function, the unit must be connected to the Internet. You can check whether the network
parameters (such as the IP address) are properly assigned to the unit. For details, see the following:– “Checking the network information of the unit” (p.99)
You may not be able to receive some Internet radio stations. The unit uses the airable.Radio service. airable is a service of Tune In GmbH. This service may be discontinued without notice. Folder names are different depending on the language.
1 Press NET to select “NET RADIO” as the input source.
The browse screen is displayed on the TV.
2 Use the cursor keys to select an item and press ENTER.
If an Internet radio station is selected, playback starts and the playbackscreen is displayed.
Note To return to the top level while on the browse screen, hold down RETURN. To switch the screen mode browse/playback/off, press DISPLAY.
Registering favorite Internet radio stationsYou can register the Internet radio station in playback at present to the “Favorites”folder.
1 While listening to Internet radio, press OPTION.
2 Use the cursor keys to select “Add to favorites” and pressENTER.
On the playback screen, the current station is added to the “Favorites”folder. On the browse screen, the station selected in the list is added tothe “Favorites” folder.
When the registering process finishes, the “Option” menu closesautomatically.
Note Radio stations registered to favorites are displayed with “«”. To remove a station that is registered to favorites, select the station and then select “Remove from
favorites”. You can register Internet radio stations as shortcuts and access them directly. For details, see the
following:– “Registering a favorite content as shortcut” (p.65)
En61

Listening to music streaming services
Listening to a streaming serviceYou can listen to a streaming service with the MusicCast CONTROLLER on yourmobile device. On the MusicCast CONTROLLER screen, select the room name thatwas specified for the unit, and then select the streaming service to be tuned into by itsstation name. For details, see the MusicCast CONTROLLER app.
Note Service is limited to certain areas. Services supported with the unit may not be available depending upon some regions where the unit is
purchased. Service may change or be discontinued without notice. After registering the unit in the MusicCast CONTROLLER app, you can use the streaming service. For
details, see the following:– “Adding the unit to the MusicCast network” (p.37)
To use this function, the unit must be connected to the Internet. You can check whether the networkparameters (such as the IP address) are properly assigned to the unit. For details, see the following:– “Checking the network information of the unit” (p.99)
For details on music streaming services, see the supplements for streaming services. Access the YamahaDownloads site to download the supplement. http://download.yamaha.com/
En62

Useful playback functions
SCENE function
n Selecting the input source and favorite settings withone touch (SCENE)
The SCENE function allows you to select the following settings with just one touch.
• Input source
• Sound program
• Compressed Music Enhancer On/Off
• SCENE link playback
• Target zones
You can register four SCENE functions that are assigned to four SCENE keys on theremote control respectively.
n Selecting a registered scenePress SCENE, and then the input source and settings registered to the correspondingscene are selected. The unit turns on automatically when it is in standby mode.
TUNING
PRESET
MUTE
TUNING
MEMORY
TOP MENU HOME POP-UP/MENU
DISPLAYRETURN
SETUP OPTION
FM/AM
VOLUME
PROGRAM
USB
STRAIGHT ENHANCER BASS
INPUT
BDDVD
TV
SCENE
RADIO
SLEEP
ENTER
BLUEYELLOWGREENRED
DIRECT
ZONE A ZONE B
NET
NET
BLUETOOTH
PROGRAM
STRAIGHT ENHANCER BASS
BDDVD
TV
SCENE
RADIO
SLEEP
DIRECT
ZONE A ZONE B
NET
PROGRAM
STRAIGHT ENHANCER BASS
SLEEP
DIRECT
ZONE A ZONE B
SCENE
By default, the following settings are registered for each scene.
SCENE
Input HDMI1 AUDIO1 NET RADIO TUNER
Sound program Sci-Fi STRAIGHT 7ch Stereo 7ch Stereo
Compressed MusicEnhancer
Off On On On
SCENE link playback On On Off Off
Target zone Zone A Zone A Zone A Zone A
Note For details on the sound program, Compressed Music Enhancer and target zones, see the following:
– “Enjoying sound field effects optimized for the type of content” (p.39)– “Playing back digitally compressed formats with enriched sound (Compressed Music Enhancer)” (p.42)– “Operating the Zone B” (p.44)
The SCENE link playback function allows you to automatically turn on the TV or start playback of anexternal device connected to the unit via HDMI, in conjunction with a scene selection. For details, see thefollowing:– “Setting the use of SCENE link playback” (p.90)
En63

n Registering a sceneYou can change the default setting and register the function that is assigned to eachSCENE key.
Note We recommend registering the scene with playing back the content that you want to register.
1 Perform the following operations to prepare the settings you wantto assign to a scene. Select an input source Select a sound program or straight decode Enable/disable Compressed Music Enhancer Enable/disable SCENE link playback Enable/disable the audio output to Zone A/B
2 Hold down the desired SCENE key until “SET Complete” appearson the front display.
ENHANCER
LINK
ECO
MASTER
OUT 2 -ResHi YPAO VOL. A-DRC
SLEEP
STEREO
PARTY
TUNED ZONE3 B2 A
FPR
SBL SB SBR
FPL
MUTE VIRTUALVOL.
SL SW SR SET Complete This completes the registers.
Note For details on the settings, see the following: “Enjoying sound field effects optimized for the type of content” (p.39) “Playing back digitally compressed formats with enriched sound (Compressed Music Enhancer)” (p.42) “Setting the use of SCENE link playback” (p.90) “Operating the Zone B” (p.44)
En64

Shortcut function
n Registering a favorite content as shortcutYou can register favorite Bluetooth, USB, media server and network content asshortcuts and access them directly by selecting the shortcut numbers.
Note You can register up to 40 contents as shortcuts. You can also use the “Favorites” feature to register Internet radio stations. For details, see the following:
– “Registering favorite Internet radio stations” (p.61) The unit registers Bluetooth or AirPlay as an input source. No individual content can be registered.
1 Play back a song or a radio station to be registered.
2 Hold down MEMORY for a few seconds.
TUNING
PRESET
MUTE
TUNING
MEMORY
TOP MENU HOME POP-UP/MENU
DISPLAYRETURN
SETUP OPTION
FM/AM
VOLUME
PROGRAM
USB
STRAIGHT ENHANCER BASS
INPUT
BDDVD
TV
SCENE
RADIO
SLEEP
ENTER
BLUEYELLOWGREENRED
DIRECT
ZONE A ZONE B
NET
NET
BLUETOOTH
TUNING
PRESET
TUNING
MEMORY
TOP MENU HOME POP UP/MENU
BLUEYELLOWGREENRED
TUNING
PRESET
TUNING
TOP MENU HOME POP UP/MENU
BLUEYELLOWYELLYELLGREENRED
MEMORY
ENHANCER
LINK
ECO
MASTER
OUT 2 -ResHi YPAO VOL. A-DRC
SLEEP PARTY
ZONE3 B2 A
MUTE VIRTUAL
FPR
SBL SB SBR
FPL
STEREO TUNED
VOL.
SL SW SR01:Empty
Shortcut number (flashes)
“MEMORY” appears on the front display and the shortcut number towhich the item will be registered blinks.
NoteTo change a shortcut number to which the item will be registered, use PRESET to select theshortcut number after step 2.
ENHANCER
LINK
ECO
MASTER
OUT 2 -ResHi YPAO VOL. A-DRC
SLEEP PARTY
ZONE3 B2 A
MUTE VIRTUAL
FPR
SBL SB SBR
FPL
STEREO TUNED
VOL.
SL SW SR02:Empty
“Empty” (not in use) or item currently registered
3 Press MEMORY.
The registered shortcut number and “Memorized” appear on the frontdisplay.
This completes the registers.
En65

n Recalling a registered content as shortcutRecall a registered content (Bluetooth, USB, media server and network content) byselecting the shortcut number.
NoteYou can register up to 40 contents as shortcuts.
1 Press BLUETOOTH, NET or USB.
TUNING
PRESET
MUTE
TUNING
MEMORY
TOP MENU HOME POP-UP/MENU
DISPLAYRETURN
SETUP OPTION
FM/AM
VOLUME
PROGRAM
USB
STRAIGHT ENHANCER BASS
INPUT
BDDVD
TV
SCENE
RADIO
SLEEP
ENTER
BLUEYELLOWGREENRED
DIRECT
ZONE A ZONE B
NET
NET
BLUETOOTH
MUTE
FM/AM
VOLUME
PROGRAM
USB
INPUT
NET
BLUETOOTH
MUTE
FM/AM
VOLUME
PROGRAM
INPUT
USB
NET
BLUETOOTH
2 Press PRESET to select a desired content.
TUNING
PRESET
MUTE
TUNING
MEMORY
TOP MENU HOME POP-UP/MENU
DISPLAYRETURN
SETUP OPTION
FM/AM
VOLUME
PROGRAM
USB
STRAIGHT ENHANCER BASS
INPUT
BDDVD
TV
SCENE
RADIO
SLEEP
ENTER
BLUEYELLOWGREENRED
DIRECT
ZONE A ZONE B
NET
NET
BLUETOOTH
TUNING
PRESET
TUNING
MEMORY
TOP MENU HOME POP UP/MENU
BLUEYELLOWGREENRED
TUNINGTUNING
MEMORY
TOP MENU HOME POP UP/MENU
BLUEYELLOWYELLYELLGREENRED
PRESET
ENHANCER
LINK
ECO
MASTER
OUT 2 -Res YPAO VOL. A-DRC
SLEEP PARTY
ZONE3 B2 A
MUTE VIRTUAL
FPR
SBL SB SBR
FPL
STEREO TUNED
Hi
VOL.
SL SW SR01:USB
Playback of the selected content starts.
Note “No Presets” appears on the front display when no items are registered. The registered item cannot be recalled in the following cases.
– A USB storage device which contains the registered item is not connected to this unit.– A PC which contains the registered item is turned off or not connected to the network.– The registered network content is temporarily unavailable or out of service.– The registered item (file) has been deleted or moved to another location.– A Bluetooth connection cannot be established.
When you register music files stored on a USB storage device or a media server (PC/NAS), thisunit memorizes the relative position of the music files in the folder. If you have added or deletedany music files to or from the folder, this unit may not recall the music file correctly. In suchcases, register the items again.
The registered content (songs and Internet radio stations) can be displayed as a list and easilyremoved by using MusicCast CONTROLLER on your mobile device. For details, see thefollowing:– “Using MusicCast CONTROLLER” (p.37)
En66

Configuring playback settings for different playback sources (Option menu)
Basic operation of the Option menuPerform the following basic procedure to operate the “Option” menu. With the “Option”menu, you can configure different playback settings according to the input sourcecurrently being played back.
1 Press OPTION.
POP-UP/MENUHOMETOP MENU
DISPLAYRETURN
OPTION
ENTER
SETUP
MUTE
POP-UP/MENUHOMETOP MENU
DISPLAYRETURN
OOPTION
ENTER
PSETUP
MUTE
POP-UP/MENUHOMETOP MENU
DISPLAYRETURN
OPTION
ENTER
SETUP
MUTE
PRESET
TUNINGTUNING
MEMORY
BLUEYELLOWGREENRED
POP-UP/MENUHOMETOP MENU
DISPLAYRETURN
OPTION
ENTER
SETUP
MUTE
VOLUME
BLUETOOTH
NET
USB
FM/AM
INPUT
PROGRAM
BASSENHANCERDIRECTSTRAIGHT
BDDVD
TV
SCENE
RADIONET
SLEEP
ZONE A ZONE B
PRESET
TUNINGTUNING
MEMORY
BLUEYELLOWGREENRED
POP-UP/MENUHOMETOP MENU
DISPLAYRETURN
OPTIONOPTION
ENTER
SETUPSETUP
MUTE
VOLUME
BLUETOOTH
NET
USB
FM/AM
INPUT
PROGRAM
BASSENHANCERDIRECTSTRAIGHT
BDDVD
TV
SCENE
RADIONET
SLEEP
ZONE A ZONE B
PRESET
TUNINGTUNING TUNINGTUNING
MEMORYMEMORY
BLUEYELLOWGREENRED
POP-UP/MENUHOMETOP MENU
DISPLAYRETURN
OPTION
ENTER
SETUP
MUTE
BLUETOOTH
NET
USB
FM/AM
INPUT VOLUME
BLUETOOTH
NET
USB
FM/AM
INPUT
PROGRAM
BASSENHANCERDIRECTSTRAIGHT
BDDVD
TV
SCENE
RADIONET
SLEEP
ZONE A ZONE B
MENUME POP-UP/MENUPOP-UP/MENUPOP-UP/MENUPOP-UP/MENUPOPOP-UPP-UP//MENUMENUHOMEHOMEHOMEHOMEHOHOMEMETOTOTTOOP MENUP MENUP MEP MENNUU
DISPLAYDISPLADISPLARETURN
ENTER
SETUPP
MUTE
OPTION
ENHANCER
LINK
ECO
MASTER
OUT 2 -ResHi YPAO VOL. A-DRC
SLEEP PARTY
ZONE3 B2 A
MUTE VIRTUAL
FPR
SBL SB SBR
FPL
STEREO TUNED
VOL.
SL SW SRInput SelectFront display
TV screen
2 Use the cursor keys to select an item and press ENTER.
3 Use the cursor keys to select a setting.
4 Press OPTION.
This completes the settings.
Note For details on the default settings, see the following: “Default settings of the Option menu” (p.145)
En67

Option menu itemsUse the following table to configure playback settings of the unit.
Note Available items vary depending on the selected input source. Text in parentheses denotes indicators on the front display. Depending on the region of purchase, some menu items for audio streaming services are also available.
Item Function Page
Input Select (Input Select) Switches the input source. p.69
Tone Control (Tone Control)Adjusts the level of high-frequency range and low-frequency range individually. p.69
DSP/Surround(DSP/Surround)
Program (PRG) Select the sound programs and stereo playback. p.69
Sur.Decode (SrDec)
Select which surround decoder is used whenSur.Decode is selected as the program. p.70
DSP Level (DSP Level)
Adjusts the sound field effect level. p.71
Adaptive DRC(A.DRC)
Sets whether the dynamic range (from maximum tominimum) is automatically adjusted to the volume. p.71
Enhancer(Enhancer)
Enables/disables Compressed Music Enhancer. p.72
Volume Trim(Volume Trim)
Input Trim(In.Trim)
Corrects volume differences between input sources. p.72
Subwoofer Trim(SW.Trim)
Fine-adjusts the subwoofer volume. p.72
ZoneB Trim (ZB.Trim)
Corrects volume differences between Zone A/B. p.72
Lipsync (Lipsync)Enables/disables the “Lipsync” setting in the “Setup”menu. p.72
Signal Information (Signal Info.) Displays information about the video/audio signals. p.73
Audio In (Audio In)Combines the video of the selected input source withthe audio of a different input source. p.73
Video Out (Video Out)Selects a video source to be output together with theselected audio source. p.74
FM Mode (FM Mode)Switches between “Stereo” and “Monaural” for FMradio reception. p.74
Item Function Page
Preset (Preset)
Auto Preset(AUTO)
Automatically registers FM radio stations with strongsignals as presets. p.75
Clear Preset(CLEAR)
Clear radio stations registered to preset numbers. p.75
Traffic Program(TrafficProgram)
(U.K., Europe, Russia and Middle East models only)
Automatically searches for a traffic informationstation.
p.76
Shuffle (Shuffle) Configures the shuffle setting. p.76
Repeat (Repeat) Configures the repeat setting. p.77
Volume Interlock (Vol.Interlock)Enables/disables volume control from iTunes/iPhonevia AirPlay. p.77
Add to favorites (Add to Fav.)
Remove from favorites(RemovefromFav.)
Adds your favorite Internet radio station to the“Favorites” folder, or removes it from the “Favorites”folder.
p.77
En68

Switching the input sourceSwitches the input source. Press ENTER to switch to the selected input source.
Option menu
“Input Select”
Adjusting the tone of the audio outputAdjusts the level of high-frequency range (Treble) and low-frequency range (Bass)individually.
Option menu
“Tone Control”
Choices
Treble, Bass
Setting range
-6.0 dB to +6.0 dB (0.5 dB increments)
Note When both “Treble” and “Bass” are 0.0 dB, “Bypass” appears. You can also adjust the tone with the front panel controls. Press TONE CONTROL to select “Treble” or
“Bass”, then press PROGRAM to make an adjustment. If you set an extreme value, sounds may not match those from other channels.
Configuring DSP/Surround
n Selecting sound programsSelect sound programs and stereo playback.
NoteYou can select a sound program by pressing PROGRAM.
Option menu
“DSP/Surround” > “Program”
MUSIC
Hall in Munich
This program simulates a Munich concert hall with approximately 2,500seats that uses stylish wood for the interior finishing. Fine, beautifulreverberations spread richly, creating a calming atmosphere. Thelistener’s virtual seat is at the center left of the arena.
Hall in Vienna
This program simulates a 1700-seat, middle-sized concert hall with ashoebox shape that is traditional in Vienna. Pillars and ornate carvingscreate extremely complex reverberations from all around the audience,producing a very full, rich sound.
ChamberThis program creates a relatively wide space with a high ceiling, like anaudience hall in a palace. It offers pleasant reverberations that aresuitable for courtly music and chamber music.
Cellar Club
This program simulates an intimate concert venue with a low ceiling andhomey atmosphere. A realistic, live sound field delivers powerful soundsthat make you feel as if you are sitting in the front row in front of a smallstage.
The Roxy TheatreThis program creates the sound field of a 460-seat rock music concertvenue in Los Angeles. The listener’s virtual seat is at the center left of thehall.
The Bottom LineThis program creates the sound field at stage front in The Bottom Line, afamous New York jazz club once. The floor can seat 300 people to theleft and right in a sound field offering real and vibrant sound.
En69

MOVIE
Sports
This program allows listeners to enjoy the rich vividness of sportbroadcasts and light entertainment programs. In sports broadcasts, thecommentators’ voices are positioned clearly at the center, while theatmosphere inside the stadium is realistically conveyed by the peripheraldelivery of the sounds of the fans in a suitable space.
Action Game
This program is suitable for action games, such as car racing andfighting games. The reality of, and emphasis on, various effects makesthe player feel like they are right in the middle of the action, allowing forgreater concentration. Use this program in combination with CompressedMusic Enhancer for a more dynamic and strong sound field.
Roleplaying Game
This program is suitable for role-playing and adventure games. Thisprogram adds depth to the sound field for natural and realisticreproduction of background music, special effects, and dialogue from awide variety of scenes. Use this program in combination withCompressed Music Enhancer for a clearer and more spatial sound field.
Music Video
This program allows you to enjoy videos of pop, rock, and jazz concerts,as if you were there yourself. Immerse yourself in the hot concertatmosphere thanks to the vividness of the singers and solos on stage, apresence sound field that emphasizes the beat of rhythm instruments,and a surround sound field that reproduces the space of a big live hall.
Standard
This program creates a sound field that emphasizes the surround feelingwithout disturbing the original acoustic positioning of multichannel audio.Its design is based on the concept of the ideal movie theater, in whichthe audience is surrounded by beautiful reverberations from the left,right, and rear.
Spectacle
This program delivers the scale and grandeur of spectacular movieproductions. It delivers an expansive sound space to match thecinemascope wide-screen, and boasts a broad dynamic range,providing everything from small delicate sounds to powerful loud booms.
Sci-Fi
This program clearly reproduces the finely elaborated sound design ofthe latest Sci-Fi and SFX movies. You can enjoy a variety ofcinematographically created virtual spaces reproduced with clearseparation between dialogue, sound effects, and background music.
Adventure
This program is ideal for reproducing the sound design of action andadventure movies precisely. The sound field restrains reverberations, butputs emphasis on reproducing a sensation of expansiveness on bothsides, powerful space expanded widely to the left and right. Therestrained depth creates a clear and powerful space, while alsomaintaining the articulation of the sounds and the separation of thechannels.
Drama
This program features stable reverberations that match a wide range ofmovie genres, from serious dramas to musicals and comedies. Thereverberations are modest, but suitably stereophonic. The sound effectsand background music are reproduced with a gentle echo that does notimpinge on the articulation of the dialogue. You’ll never get tired listeningfor long periods.
Mono Movie
This program reproduces monaural video sources, such as classicmovies, in an atmosphere of a good old movie theater. The programcreates a pleasant space with depth, by adding breadth and theappropriate reverberation to the original audio.
STEREO
2ch Stereo
Use this program to mix down multichannel sources to 2 channels. Whenmultichannel signals are input, they are down mixed to 2 channels andoutput from the front speakers (this program does not utilize CINEMADSP).
7ch Stereo
Use this program to output sound from all speakers. When you play backmultichannel sources, the unit mixes down the source to 2 channels, andthen outputs the sound from all speakers. This program creates a largersound field and is ideal for background music at parties.
UNPROCESSED
Sur.DecodeThe surround decoder enables multichannel playback from 2-channelsources without sound field effects.
StraightWhen the straight decode mode is enabled, the unit produces stereosound from the front speakers for 2-channel sources such as CDs, andproduces unprocessed multichannel sounds for multichannel sources.
Note For details on “Sur.Decode”, see the following: “Selecting the surround decoder used in the program” (p.70)
n Selecting the surround decoder used in the programSelect the surround decoder used when “Sur.Decode” is selected in “Program” in the“Option” menu or selected by pressing PROGRAM.
Note For details on “Program” in the “Option” menu, see the following: “Selecting sound programs” (p.69)Option menu
“DSP/Surround” > “Sur.Decode”
En70

Settings
AutoUses the decoder automatically selected by input source. The DTSNeural:X decoder is selected for DTS sources and the Dolby Surrounddecoder is selected for other sources.
bDsur
Dolby Surround decoder. Expands the sound using a method optimizedfor the layout of the installed speakers. It produces the extendedsurround sound optimized for your speaker system. A real acousticspace (including overhead) will be created especially when object-based audio (such as Dolby Atmos content) is played.
Neural:X
DTS Neural:X decoder. Expands the sound using a method optimizedfor the layout of the installed speakers. It produces the extendedsurround sound optimized for your speaker system. A real acousticspace (including overhead) will be created especially when object-based audio (such as DTS:X content) is played.
Neo:6 CinemaUses the DTS Neo:6 decoder (or DTS-ES Matrix decoder) suitable formovies. Sounds will be output from the surround/surround backspeakers.
Neo:6 MusicUses the DTS Neo:6 decoder (or DTS-ES Matrix decoder) suitable formusic. Sounds will be output from the surround/surround backspeakers.
Note For details on each decoder, see the following:
– “Glossary of audio decoding format” (p.132) You can adjust the surround decoder parameters in “DSP Parameter” in the “Setup” menu. For details,
see the following:– “Adjusting the center localization (broadening effect) of the front sound field” (p.91)– “Setting the use of Center Spread” (p.91)
The selected surround decoder may not work for some input sources. We recommend Dolby Surround while network streaming is Dolby contents. The Neural:X decoder does not work for Dolby Digital Plus or Dolby TrueHD signals. Select “Auto” or
“bDsur” for these signals. When the Dolby Surround decoder or the Neural:X decoder is selected, virtual surround processing (such
as Virtual CINEMA FRONT) does not work. For details, see the following:– “Enjoying sound field effects without surround speakers (Virtual CINEMA DSP)” (p.39)– “Enjoying surround sound with 5 speakers placed in front (Virtual CINEMA FRONT)” (p.39)
nAdjusting the sound field effect levelAdjusts the sound field effect level.
Option menu
“DSP/Surround” > “DSP Level”
Setting range
-6 dB to +3 dB (1 dB increments)
nAdjusting the dynamic range automaticallySets whether the dynamic range (from maximum to minimum) is automatically adjustedwhen the volume level is adjusted. When it is set to “On”, the dynamic range becomesnarrow at a low volume and wide at a high volume. It is useful for listening to playbackat a low volume at night.
Option menu
“DSP/Surround” > “Adaptive DRC”
Settings
Off The dynamic range is not automatically adjusted.
On Automatically adjusts the dynamic range.
En71

n Setting Compressed Music EnhancerEnables/disables Compressed Music Enhancer.
Option menu
“DSP/Surround” > “Enhancer”
Settings
Off Disables Compressed Music Enhancer.
On Enables Compressed Music Enhancer.
Note This setting is applied separately to each input source. You can also use ENHANCER on the remote control to enable/disable Compressed Music Enhancer. For details on Compressed Music Enhancer, see the following:
– “Playing back digitally compressed formats with enriched sound (Compressed Music Enhancer)” (p.42)
Correcting volume differences during playback
n Correcting volume differences between input sourcesCorrects volume differences between input sources. If you are bothered by volumedifferences when switching between input sources, use this function to correct it.
Option menu
“Volume Trim” > “Input Trim”
Setting range
-6.0 dB to +6.0 dB (0.5 dB increments)
NoteThis setting is applied separately to each input source.
nAdjusting the subwoofer volumeFine-adjusts the subwoofer volume.
Option menu
“Volume Trim” > “Subwoofer Trim”
Setting range
-6.0 dB to +6.0 dB (0.5 dB increments)
n Correcting volume difference between Zone A andZone B
If you are bothered by volume difference between Zone A/B, adjust the volume forZone B.
Option menu
“Volume Trim” > “ZoneB Trim”
Setting range
-10.0 dB to +10.0 dB (0.5 dB increments)
Note This setting is not effective when “ZoneB Volume” in the “Setup” menu is set to “Async.”. For details, see thefollowing: “Adjusting the volume for Zone B in conjunction with the volume for Zone A” (p.94)
Enabling Lipsync adjustmentEnables/disables the adjustment configured in “Lipsync” in the “Setup” menu.
Note For details on “Lipsync” in the “Setup” menu, see the following: “Setting the adjustment method of the Lipsync function” (p.91)Option menu
“Lipsync”
Settings
Off Disables the “Lipsync” adjustment.
On Enables the “Lipsync” adjustment.
NoteThis setting is applied separately to each input source.
En72

Checking information about the video/audio signalsDisplays information about the video/audio signals.
Option menu
“Signal Information”
Format Audio format of the input signal
ChannelThe number of source channels in the input signal (front/surround/LFE)
For example, “3/2/0.1” means 3 front channels, 2 surround channels, andLFE.
Sampling The number of samples per second of the input digital signal
Video In Type and resolution of the input digital signal
Video Out Type and resolution of the output digital signal
NoteTo switch the information on the front display, press the cursor keys.
Combining audio of another input source with videoof the current input sourceSelect the audio of a different input source to play back together with the video of thecurrently selected input source. For example, use this function in the following cases.
• Connecting a playback device that supports HDMI video output, but not HDMIaudio output
Option menu
“Audio In”
Input sources
HDMI 1-4, AV 1-3
Settings
AV 1-3, AUDIO 1-3
Video/audio input jacks available on the unit
Output jacks on video device Input jacks on the unit
Video Audio Video Audio
HDMI
Digital optical HDMI 1–4 AUDIO 1 (OPTICAL)
Digital coaxial HDMI 1–4 AUDIO 2 (COAXIAL)AV 1 (COAXIAL)
Analog stereo HDMI 1–4 AUDIO 3 (AUDIO)AV 2–3 (AUDIO)
Composite video Digital optical AV 1–3 (VIDEO) AUDIO 1 (OPTICAL)
Necessary settingFor example, if you have connected a video device to AV 2 (VIDEO) and AUDIO 1(OPTICAL) jack of the unit, change the combination setting as follows.
OPTICAL
COAXIAL
COAXIAL
VIDEOVIDEOVIDEO
AMFM75 Ω
ANTENNA(RADIO)
MONITOR OUT
PRE OUTSUBWOOFER
(BD/DVD)
2 31 4
ARC
NETWORK(NET)
FRONT CENTER
SPEAKERS
SURROUND
SINGLE
AV 3
AUDIO 1
AUDI0 2
AUDI0 3
AV 2AV 1
(TV)
1
2
HDMI (HDCP2.2)HDMI OUT(HDCP2.2)
VIDEO
OPTICAL
OPTICAL
AUDIO 1(TV)
VIDEO
AV 2
O O
V V
The unit (rear)
AUDIO 1 (OPTICAL) jack
AV 2 (VIDEO) jackVideo output
(composite video)
Audio output(digital optical)
Set-top box
En73

1 Press INPUT to select “AV 2” (video input jack to be used) as theinput source.
2 Press OPTION.
MUTE
TOP MENU HOME POP-UP/MENU
DISPLAYRETURN
SETUP OPTION
ENTER
TUNING
PRESET
MUTE
TUNING
MEMORY
TOP MENU HOME POP-UP/MENU
DISPLAYRETURN
SETUP OPTION
FM/AM
VOLUME
PROGRAM
USB
STRAIGHT ENHANCER BASS
INPUT
BDDVD
TV
SCENE
RADIO
SLEEP
ENTER
BLUEYELLOWGREENRED
DIRECT
ZONE A ZONE B
NET
NET
BLUETOOTH
MUTE
TOP MENU HOME POP-UP/MENU
DISPLAYDISPLADISPLARETURN
SETUPP
OPTION
ENTER
Cursor keys
3 Use the cursor keys to select “Audio In” and press ENTER.
ENHANCER
LINK
ECO
MASTER
OUT 2 -ResHi YPAO VOL. A-DRC
SLEEP
STEREO
PARTY
TUNED ZONE3 B2 A
FPR
SL SW SR
SBL SB SBR
FPL
MUTE VIRTUALVOL.
Audio In
4 Use the cursor keys to select “AUDIO 1” (audio input jack to beused).
ENHANCER
LINK
ECO
MASTER
OUT 2 -ResHi YPAO VOL. A-DRC
SLEEP
STEREO
PARTY
TUNED ZONE3 B2 A
FPR
SL SW SR
SBL SB SBR
FPL
MUTE VIRTUALVOL.
Audio•••AUDIO1
5 Press OPTION.
This completes the necessary settings.
Selecting a video source to be output with theselected audio sourceSelects a video source to be output together with the selected audio source. Forexample, you can watch the video from a different source while listening to the radio.
Option menu
“Video Out”
Input sources
AUX, AUDIO 1-3, TUNER, (network sources), AirPlay, MusicCast Link, SERVER, NETRADIO, Bluetooth, USB
Settings
Off Does not output video.
HDMI 1-4, AV 1-3 Outputs video input through the corresponding video input jacks.
Switching between stereo and monaural for FM radioreceptionSwitch between stereo and monaural for FM radio reception. When the signalreception for an FM radio station is unstable, switching to monaural may improve it.
Option menu
“FM Mode”
Settings
Stereo Enables stereo for FM radio reception.
Monaural Enables monaural for FM radio reception.
En74

Setting presets for radio stations
n Registering radio stations automaticallyAutomatically register FM radio stations with strong signals.
Note You can register up to 40 radio stations as presets. To register AM radio stations, see the following:
– “Registering a radio station manually” (p.53) (U.K., Europe, Russia and Middle East models only)
Only Radio Data System broadcasting stations are registered automatically by the Auto Preset function.Option menu
“Preset” > “Auto Preset”
1 Press FM/AM to select “TUNER” as the input source.
“TUNER” is selected as the input source and the frequency currentlyselected is displayed on the front display.
2 Press OPTION.
3 Use the cursor keys to select “Preset” and press ENTER.
ENHANCER
LINK
ECO
MASTER
OUT 2 -ResHi YPAO VOL. A-DRC
SLEEP
STEREO
PARTY
TUNED ZONE3 B2 A
FPR
SL SW SR
SBL SB SBR
FPL
MUTE VIRTUALVOL.
Preset
The preset number from which to start the registration is displayed on thefront display.
Note To specify the preset number from which to start the registration, press cursor keys or PRESET toselect a preset number.
4 To start the Auto Preset process, press ENTER.
ENHANCER
LINK
ECO
MASTER
OUT 2 -ResHi YPAO VOL. A-DRC
SLEEP PARTY
ZONE3 B2 A
MUTE VIRTUAL
STEREO TUNED
FPR
SBL SB SBR
FPL
SL SW SR
VOL.
01:FM 87.50MHz
“SEARCH” appears during Auto Preset
Preset number from which to start the registration
The Auto Preset process starts and “SEARCH” appears during AutoPreset.
Note To cancel the Auto Preset process, press RETURN.
When the Auto Preset process finishes, “FINISH” appears on the front display and the“Option” menu closes automatically.
ENHANCER
LINK
ECO
MASTER
OUT 2 -ResHi YPAO VOL. A-DRC
SLEEP
STEREO
PARTY
TUNED ZONE3 B2 A
FPR
SL SW SR
SBL SB SBR
FPL
MUTE VIRTUALVOL.
Auto Preset
n Clearing preset stationsClear radio stations registered to the preset numbers.
Option menu
“Preset” > “Clear Preset”
1 Press FM/AM to select “TUNER” as the input source.
“TUNER” is selected as the input source and the frequency currentlyselected is displayed on the front display.
2 Press OPTION.
3 Use the cursor keys to select “Preset” and press ENTER.
ENHANCER
LINK
ECO
MASTER
OUT 2 -ResHi YPAO VOL. A-DRC
SLEEP
STEREO
PARTY
TUNED ZONE3 B2 A
FPR
SL SW SR
SBL SB SBR
FPL
MUTE VIRTUALVOL.
Preset
4 Use the cursor keys to select “CLEAR”.
En75

5 Use the cursor keys to select a preset station to be cleared andpress ENTER.
ENHANCER
LINK
ECO
MASTER
OUT 2 -ResHi YPAO VOL. A-DRC
SLEEP PARTY
ZONE3 B2 A
MUTE VIRTUAL
FPR
SBL SB SBR
FPL
VOL.
SL SW SR
STEREO TUNED
01:FM 98.50MHzPreset station to be cleared
If the preset station is cleared, “Cleared” appears and then the next in-usepreset number is displayed.
01:Cleared
6 Repeat step 5 until all desired preset stations are cleared.
7 Press OPTION.
This completes the clearing preset stations.
Receiving traffic information automatically(U.K., Europe, Russia and Middle East models only)
When “TUNER” is selected as the input source, the unit automatically searches for atraffic information station.
Option menu
“Traffic Program”
1 When “TUNER” is selected as the input source, press OPTION.
2 Use the cursor keys to select “Traffic Program” and press ENTER.
The traffic information station search will start in 5 seconds. Press ENTERagain to start the search immediately.
Note To search upward/downward from the current frequency, press the cursor keys while “READY”
is displayed. To cancel the search, press RETURN.
The following screen appears for about 3 seconds when the searchfinishes.
ENHANCER
LINK
ECO
MASTER
OUT 2 -ResHi YPAO VOL. A-DRC
SLEEP PARTY
ZONE3 B2 A
MUTE VIRTUAL
FPR
SBL SB SBR
FPL
VOL.
SL SW SR
STEREO TUNED
TP FM101.30MHzTraffic information station (frequency)
Note“TP Not Found” appears for about 3 seconds when no traffic information stations are found.
Configuring the shuffle settingConfigure the shuffle setting for playback.
Option menu
“Shuffle”
Settings
Off Turns off the shuffle function.
On Plays back songs in the current album (folder) in random order.
Note This setting is available only when “USB” or “SERVER” is selected as the input source.
En76

Configuring the repeat settingConfigure the repeat setting for playback.
Option menu
“Repeat”
Settings
Off Turns off the repeat function.
One Plays back the current song repeatedly.
All Plays back all songs in the current album (folder) repeatedly.
Note This setting is available only when “USB” or “SERVER” is selected as the input source.
Enabling volume control via AirPlayEnables/disables volume control from iTunes/iPhone via AirPlay. When other than “Off”is set, you can adjust the unit’s volume from the iTunes/iPhone during playback.
Option menu
“Volume Interlock”
Settings
Off Disables volume control from iTunes/iPhone.
Limited Enables volume control from iTunes/iPhone within the limited range (-80 dB to -20 dB and mute).
Full Enables volume control from iTunes/iPhone in the full range (-80 dB to +16.5 dB and mute).
Adding an Internet radio station to the “Favorites”folderRegister the currently playing Internet radio station to the “Favorites” folder.
Option menu
“Add to favorites”
1 While listening to Internet radio, press OPTION.
2 Use the cursor keys to select “Add to favorites” and pressENTER.
When the registering process finishes, the “Option” menu closesautomatically.
Removing an Internet radio station from the“Favorites” folderRemove an Internet radio station from the “Favorites” folder.
Option menu
“Remove from favorites”
1 Use the cursor keys to select the station to be removed from the“Favorites” folder.
2 Press OPTION.
3 Use the cursor keys to select “Remove from favorites” and pressENTER.
When the removing process finishes, the “Option” menu closesautomatically.
En77

CONFIGURATIONSConfiguring various functions (Setup menu)
Basic operation of the Setup menuPerform the following basic procedure to operate the “Setup” menu. You can configurethe unit’s various functions with the “Setup” menu.
Note If new firmware is available, the message screen appears. If new firmware is available, the envelope icon (p) appears in the screen. For details on firmware updating, see the following:
– “Firmware updates” (p.122)
1 Press SETUP.
POP-UP/MENUHOMETOP MENU
DISPLAYRETURN
OPTION
ENTER
SETUP
MUTE
POP-UP/MENUHOMETOP MENU
DISPLAYRETURN
OOPTION
ENTER
PSETUP
MUTE
POP-UP/MENUHOMETOP MENU
DISPLAYRETURN
OPTION
ENTER
SETUP
MUTE
PRESET
TUNINGTUNING
MEMORY
BLUEYELLOWGREENRED
POP-UP/MENUHOMETOP MENU
DISPLAYRETURN
OPTION
ENTER
SETUP
MUTE
VOLUME
BLUETOOTH
NET
USB
FM/AM
INPUT
PROGRAM
BASSENHANCERDIRECTSTRAIGHT
BDDVD
TV
SCENE
RADIONET
SLEEP
ZONE A ZONE B
PRESET
TUNINGTUNING
MEMORY
BLUEYELLOWGREENRED
POP-UP/MENUHOMETOP MENU
DISPLAYRETURN
OPTIONOPTION
ENTER
SETUPSETUP
MUTE
VOLUME
BLUETOOTH
NET
USB
FM/AM
INPUT
PROGRAM
BASSENHANCERDIRECTSTRAIGHT
BDDVD
TV
SCENE
RADIONET
SLEEP
ZONE A ZONE B
PRESET
TUNINGTUNING TUNINGTUNING
MEMORYMEMORY
BLUEYELLOWGREENRED
POP-UP/MENUHOMETOP MENU
DISPLAYRETURN
OPTION
ENTER
SETUP
MUTE
BLUETOOTH
NET
USB
FM/AM
INPUT VOLUME
BLUETOOTH
NET
USB
FM/AM
INPUT
PROGRAM
BASSENHANCERDIRECTSTRAIGHT
BDDVD
TV
SCENE
RADIONET
SLEEP
ZONE A ZONE B
MENUME POP-UP/MENUPOP-UP/MENUPOP-UP/MENUPOP-UP/MENUPOPOP-UPP-UP//MENUMENUHOMEHOMEHOMEHOMEHOHOMEMETOTOTTOOP MENUP MENUP MEP MENNUU
DISPLAYDISPLADISPLARETURN
OPTIONOPTION
ENTER
MUTE
SETUP
2 Use the cursor keys to select a menu and press ENTER.
3 Use the cursor keys to select an item and press ENTER.
4 Use the cursor keys to select a setting and press ENTER.
5 Press SETUP.
This completes the settings.
Note For details on the default settings, see the following: “Default settings of the Setup menu” (p.145)
En78

Setup menu items
Use the following table to configure various functions of the unit.
Menu Item Function Page
Speaker
Configuration
Power Amp Assign Selects a speaker system. p.82
Subwoofer Selects whether or not a subwoofer is connected. p.82
Front Selects the size of the front speakers. p.82
Center Selects whether or not a center speaker is connected and its size. p.83
Surround Selects whether or not surround speakers are connected and their size. p.83
Surround Back Selects whether or not surround back speakers are connected and their size. p.84
Presence Selects whether or not presence speakers are connected and their size. p.84
Layout Selects the layouts of the presence speakers. p.85
Crossover Sets the lower limit of the low-frequency component that can be output from speakers whose size is set to “Small”. p.85
Subwoofer Phase Sets the phase of the subwoofer. p.85
Extra Bass Enables/disables Extra Bass. p.85
Virtual CINEMA FRONT Enables/disables the front 5-channel speaker (Virtual CINEMA FRONT) configuration. p.86
Distance Sets the distance between each speaker and the listening position. p.86
Level Adjusts the volume of each speaker. p.86
Equalizer Adjusts the tone with an equalizer. p.87
Test Tone Enables/disables the test tone output. p.87
HDMI
HDMI Control Enables/disables HDMI Control. p.88
Audio Output Enables/disables audio output from a TV. p.88
Standby Through Selects whether to output video/audio (input through HDMI jacks) to the TV when the unit is in standby mode. p.88
4K Upscaling Enables/disables the upscaling function. p.88
HDCP Version Selects the version of HDCP used on the HDMI input jacks. p.89
TV Audio Input Selects an audio input jack of the unit to be used for TV audio input. p.89
Standby Sync Selects whether to use HDMI control to link the standby behavior of the TV and the unit. p.89
ARC Enables/disables ARC. p.89
SCENE Enables/disables SCENE link playback. p.90
En79

Menu Item Function Page
Sound
DSP Parameter
Center Spread Selects whether to spread the center channel signals to left and right when a 2-channel source is played. p.91
Center Image Adjusts the center localization (broadening effect) of the front sound field. p.91
Monaural Mix Enables/disables monaural sound output. p.91
LipsyncSelect Selects the method to adjust the delay between video and audio output. p.91
Adjustment Adjusts the delay between video and audio output manually. p.92
Dialogue
Dialogue Level Adjusts the volume of dialogue sounds. p.92
DTS Dialogue Control Adjusts the volume of dialogue sounds for DTS content. p.92
Dialogue Lift Adjusts the perceived height of dialogue sounds for the screen position. p.93
Volume
Scale Switches the scale of the volume display. p.93
Dynamic Range Selects the dynamic range adjustment method for bitstream audio (Dolby Digital and DTS signals) playback. p.93
Max Volume Sets the limit value of the volume. p.94
Initial Volume Sets the initial volume for when this receiver is turned on. p.94
ZoneB Volume Selects whether to adjust the volume for Zone B in conjunction with the volume for Zone A. p.94
ECOAuto Power Standby Set the amount of time for the auto-standby function. p.95
ECO Mode Enables/disables the eco mode (power saving mode). p.95
Function
Input Rename Changes the input source name displayed on the front display. p.96
Input Skip Set which input sources are skipped when operating the INPUT key. p.97
Dimmer Adjusts the brightness of the front display. p.97
Memory Guard Prevents accidental changes to the settings. p.97
Remote Color Key Set the unit's functions for the RED/GREEN/YELLOW/BLUE keys of the remote control. p.98
Network
Information Displays the network information of the unit. p.99
Network Connection Selects the network connection method. p.99
IP Address Configures the network parameters (such as IP address). p.99
MAC Address Filter Sets the MAC address filter to limit access to the unit from other network devices. p.100
DMC Control Selects whether to allow a Digital Media Controller (DMC) to control playback. p.101
Network Standby Selects whether to enable/disable the function that turns on the unit from other network devices. p.101
Network Name Edits the network name (the unit’s name on the network) displayed on other network devices. p.102
MusicCast Link Power InterlockSelects whether turning on the power of the master device of the MusicCast network (this unit) also turns on thepower of other devices of the network. p.102
Network Update Updates the firmware via the network. p.102
En80

Menu Item Function Page
Bluetooth
Bluetooth Enables/disables the Bluetooth functions. p.103
Audio ReceiveDisconnect Terminates the Bluetooth connection between the Bluetooth device (such as smartphones) and the unit. p.103
Bluetooth Standby Selects whether to enable/disable the function that turns on the unit from Bluetooth devices (Bluetooth standby). p.103
Language Select an on-screen menu language. p.104
En81

Configuring the speaker settings
Setting your speaker systemSelect the setting according to the speakers that are connected.
Setup menu
“Speaker” > “Configuration” > “Power Amp Assign”
Settings
Presence Select this option when you use presence speakers in the 5.1.2 system.
Sur.Back Select this option when you use a normal speaker system (not using thepresence speakers, Zone B speakers or bi-amp connections).
BI-AMP Select this option when you connect front speakers that support bi-ampconnections.
Zone B Select this option when you use Zone B speakers in addition to thespeaker system in the main zone (Zone A).
5.1ch Select this option when you don't use the SURROUND BACK/PRESENCE/BI-AMP/ZONE B terminals.
Note For details on the speaker system, see the following: “Speaker systems and speakers to be connected” (p.16) “Connecting front speakers that support bi-amp connections” (p.24) “Playing back music in multiple rooms” (p.43)
Setting the use of a subwooferSelects the setting according to the use of your subwoofer.
Setup menu
“Speaker” > “Configuration” > “Subwoofer”
Settings
UseSelect this option when a subwoofer is connected.
The subwoofer will produce LFE (low-frequency effect) channel audio andlow-frequency components from other channels.
NoneSelect this option when no subwoofer is connected.
The front speakers will produce LFE (low-frequency effect) channel audioand low-frequency components from other channels.
Setting the size of the front speakersSelects the setting according to the size of your front speakers.
Setup menu
“Speaker” > “Configuration” > “Front”
Settings
SmallSelect this option for small speakers.
The subwoofer will produce front channel low-frequency components(configurable in “Crossover”).
LargeSelect this option for large speakers.
The front speakers will produce all of the front channel frequencycomponents.
Note When configuring the speaker size, as a general guideline, select “Large” if the woofer diameter of your
speaker is 16 cm (6‑1/4”) or larger, or “Small” if it is smaller than 16 cm (6‑1/4”). “Front” is automatically set to “Large” when “Subwoofer” is set to “None”. For details on “Subwoofer” in the
“Setup” menu, see the following:– “Setting the use of a subwoofer” (p.82)
En82

Setting the use of a center speaker and its sizeSelects the setting according to the use and size of your center speaker.
Setup menu
“Speaker” > “Configuration” > “Center”
Settings
SmallSelect this option for small speakers.
The subwoofer or front speakers will produce center channel low-frequency components (configurable in “Crossover”).
LargeSelect this option for large speakers.
The center speaker will produce all of the center channel frequencycomponents.
NoneSelect this option when no center speaker is connected.
The front speakers will produce center channel audio.
NoteWhen configuring the speaker size, as a general guideline, select “Large” if the woofer diameter of yourspeaker is 16 cm (6.1/4”) or larger, or “Small” if it is smaller than 16 cm (6.1/4”).
Setting the use of surround speakers and their sizeSelects the setting according to the use and size of your surround speakers.
Setup menu
“Speaker” > “Configuration” > “Surround”
Settings
SmallSelect this option for small speakers.
The subwoofer or front speakers will produce surround channel low-frequency components (configurable in “Crossover”).
LargeSelect this option for large speakers.
The surround speakers will produce all of the surround channel frequencycomponents.
NoneSelect this option when no surround speakers are connected.
The front speakers will produce surround channel audio. Virtual CINEMADSP works in this case.
Note When configuring the speaker size, as a general guideline, select “Large” if the woofer diameter of your
speaker is 16 cm (6.1/4”) or larger, or “Small” if it is smaller than 16 cm (6.1/4”). For details on Virtual CINEMA DSP, see the following:
– “Enjoying sound field effects without surround speakers (Virtual CINEMA DSP)” (p.39)
En83

Setting the use of surround back speakers and theirsizeSelects the setting according to the use and size of your surround back speakerswhen “Power Amp Assign” in the “Setup” menu is set to “Sur.Back”.
Setup menu
“Speaker” > “Configuration” > “Surround Back”
Note For details on “Power Amp Assign” in the “Setup” menu, see the following: “Setting your speaker system” (p.82)Settings
SmallSelect this option for small speakers.
The subwoofer or front speakers will produce surround back channel low-frequency components (configurable in “Crossover”).
LargeSelect this option for large speakers.
The surround back speakers will produce all of the surround back channelfrequency components.
NoneSelect this option when no surround back speakers are connected.
The surround speakers and subwoofer (or front speakers) will producesurround back channel audio.
Note When configuring the speaker size, as a general guideline, select “Large” if the woofer diameter of your
speaker is 16 cm (6.1/4”) or larger, or “Small” if it is smaller than 16 cm (6.1/4”). When using surround back speakers, be sure to connect the surround back left and right speakers. Using
only one surround back speaker was discontinued. “Surround Back” is not available when “Virtual CINEMA FRONT” is set to “On”. For details on “Virtual
CINEMA FRONT” in the “Setup” menu, see the following:– “Setting the use of Virtual CINEMA FRONT” (p.86)
Setting the use of presence speakers and their sizeSelects the setting according to the use and size of your presence speakers when“Power Amp Assign” in the “Setup” menu is set to “Presence”.
Setup menu
“Speaker” > “Configuration” > “Presence”
Note For details on “Power Amp Assign” in the “Setup” menu, see the following: “Setting your speaker system” (p.82)Settings
SmallSelect this option for small speakers.
The subwoofer or front speakers will produce presence channel low-frequency components (configurable in “Crossover”).
LargeSelect this option for large speakers.
The presence speakers will produce all of the presence channelfrequency components.
NoneSelect this option when no presence speakers are connected.
The front speakers will produce presence channel audio.
Note When configuring the speaker size, as a general guideline, select “Large” if the woofer diameter of yourspeaker is 16 cm (6.1/4”) or larger, or “Small” if it is smaller than 16 cm (6.1/4”).
En84

Setting the layout of the presence speakersSelects a presence layout when presence speakers are used. This setting facilitatesthe optimization of the sound field effect.
Setup menu
“Speaker” > “Configuration” > “Layout”
Settings
Front Height Select this option when presence speakers are installed on the front wall.
Overhead Select this option when presence speakers are installed to the ceiling.
Dolby Enabled SP Select this option when using the Dolby Enabled speakers as thepresence speakers.
Note This setting is not available when “Presence” is set to “None”. For details on “Presence” in the “Setup”
menu, see the following:– “Setting the use of presence speakers and their size” (p.84)
For details on the layouts of the presence speakers, see the following:– “Presence speaker layout” (p.130)
Setting the crossover frequency of the low-frequencycomponentsSets the lower limit of the low-frequency components that can be output from aspeaker whose size is set to “Small”. A frequency sound lower than the specified valuewill be produced from the subwoofer or front speakers.
Setup menu
“Speaker” > “Configuration” > “Crossover”
Settings
40 Hz, 60 Hz, 80 Hz, 90 Hz, 100 Hz, 110 Hz, 120 Hz, 160 Hz, 200 Hz
NoteIf the volume and crossover frequency are adjustable on your subwoofer, set the volume to half andcrossover frequency to maximum.
Setting the phase of the subwooferSets the phase of the subwoofer. When the bass sound is lacking or unclear, switchthe subwoofer phase.
Setup menu
“Speaker” > “Configuration” > “Subwoofer Phase”
Settings
Normal Does not reverse the subwoofer phase.
Reverse Reverses the subwoofer phase.
Note This setting is not available when “Subwoofer” is set to “None”. For details on “Subwoofer” in the “Setup”menu, see the following: “Setting the use of a subwoofer” (p.82)
Setting the use of Extra BassEnables/disables Extra Bass. When Extra Bass is enabled, you can enjoy enhancedbass sounds, regardless of the size of the front speakers and the presence orabsence of the subwoofer.
Setup menu
“Speaker” > “Configuration” > “Extra Bass”
Settings
Off Disables Extra Bass.
On Enables Extra Bass.
NoteYou can also use BASS on the remote control to enable/disable Extra Bass.
En85

Setting the use of Virtual CINEMA FRONTSelects whether to use Virtual CINEMA FRONT.
Note Select “On” only when utilizing the Virtual CINEMA FRONT configuration. For details, see the following: “Using Virtual CINEMA FRONT” (p.23)Setup menu
“Speaker” > “Configuration” > “Virtual CINEMA FRONT”
Settings
Off Disables Virtual CINEMA FRONT
On Enables Virtual CINEMA FRONT
Note This setting is not available when “Surround” is set to “None”. For details on “Surround” in the “Setup” menu,see the following: “Setting the use of surround speakers and their size” (p.83)
Setting the distance between each speaker and thelistening positionSets the distance between each speaker and the listening position so that sounds fromthe speakers reach the listening position at the same time.
Setup menu
“Speaker” > “Distance”
Choices
Front L, Front R, Center, Surround L, Surround R, Surround Back L, Surround Back R,Presence L, Presence R, Subwoofer
Setting range
0.30 m to 24.00 m (1.0 ft to 80.0 ft), 0.05 m (0.2 ft) increments
NoteSelect the unit of distance from “Meter” or “Feet” in “Unit”.
Adjusting the volume of each speakerAdjusts the volume of each speaker to suit your listening position.
Setup menu
“Speaker” > “Level”
Choices
Front L, Front R, Center, Surround L, Surround R, Surround Back L, Surround Back R,Presence L, Presence R, Subwoofer
Setting range
-10.0 dB to +10.0 dB (0.5 dB increments)
Note Test tone output helps you to adjust the speaker balance while confirming its effect. For details, see thefollowing: “Outputting test tones” (p.87)
En86

Setting the equalizerSelects the type of equalizer to be used and adjusts the tone.
Setup menu
“Speaker” > “Equalizer” > “EQ Select”
Settings
PEQ Applies the parametric equalizer values obtained by the YPAOmeasurement.
GEQ Select this option when you want to adjust the equalizer manually.
Off Does not use the equalizer.
When selecting “GEQ”
1 Use the cursor keys to select “Channel” and to select the desiredspeaker channel.
2 Use the cursor keys to select the desired band (frequency) and toadjust the gain.
Setting range
-6.0 dB to +6.0 dB
3 Press SETUP.
This completes the settings.
Note Test tone output helps you to adjust the equalizer while confirming its effect. For details, see the following:
– “Outputting test tones” (p.87) “PEQ” is available only when the YPAO has been performed. For details on the YPAO, see the following:
– “Optimizing the speaker settings automatically (YPAO)” (p.33)
Outputting test tonesEnables/disables the test tone output. Test tone output helps you to adjust the speakerbalance or equalizer while confirming its effect.
Setup menu
“Speaker” > “Test Tone”
Settings
Off Does not output test tones.
On Outputs test tones automatically when you adjust the speaker balance orequalizer.
En87

Configuring the HDMI settings
Setting the use of HDMI ControlEnables/disables HDMI Control. HDMI Control allows you to operate external devicesvia HDMI.
Setup menu
“HDMI” > “HDMI Control”
Settings
Off Disables HDMI Control.
OnEnables HDMI Control.
Configure the settings in “TV Audio Input”, “Standby Sync”, “ARC”, and“SCENE”.
Note To use HDMI control, you need to perform the HDMI Control link setup after connecting HDMI Control-compatible devices. For details, see the following: “HDMI Control and synchronized operations” (p.137)
Setting the output of HDMI audio from the TVspeakerEnables/disables audio output from a TV connected to the HDMI OUT jack when“HDMI Control” is set to “Off”.
Note For details on “HDMI Control” in the “Setup” menu, see the following: “Setting the use of HDMI Control” (p.88)Setup menu
“HDMI” > “Audio Output”
Settings
Off Disables audio output from the TV.
On Enables audio output from the TV.
Setting the use of HDMI Standby ThroughSelect whether to output video/audio (input through HDMI jacks) to the TV when theunit is in standby mode.
NoteIf this function is set to “On” or “Auto”, you can use the input selection keys (HDMI 1–4) to select an HDMIinput even when the unit is in standby mode (the standby indicator on the unit blinks).
Setup menu
“HDMI” > “Standby Through”
Settings
Off Does not output video/audio to the TV.
Auto Automatically selects whether to output video/audio depending on thestatus of the connected device.
On Outputs video/audio to the TV. (The unit consumes more power than when “Off” or “Auto” is selected.)
Note “Off” is not selectable when “HDMI Control” is set to “On”. For details on “HDMI Control” in the “Setup” menu, see the following:
– “Setting the use of HDMI Control” (p.88)
Setting the use of 4K upscaling of the HDMI videosignalEnables/disables the upscaling function. When it is enabled, 1080p content isdisplayed at 4K resolution.
Setup menu
“HDMI” > “4K Upscaling”
Settings
Off Disables the upscaling function.
On Enables the upscaling function.
En88

Setting the version of HDCP used on the HDMI inputjacksSelects the HDCP version of the HDMI input jacks for watching 4K video content.
Setup menu
“HDMI” > “HDCP Version”
Input sources
HDMI 1–4
Settings
Auto Automatically sets the version of HDCP according to content.
1.4 Sets the version of HDCP to always be 1.4.
Setting the audio jack used for TV audio inputSelects an audio input jack of the unit to be used for TV audio input when “HDMIControl” is set to “On”. The unit’s input source automatically switches to TV audio whenthe TV input is switched to its built-in tuner.
Note For details on “HDMI Control” in the “Setup” menu, see the following: “Setting the use of HDMI Control” (p.88)Setup menu
“HDMI” > “TV Audio Input”
Settings
AV 1–3, AUDIO 1–3
Note When using ARC to input TV audio to the unit, the input jacks selected here will be used for TV Audio Input.
Linking the standby modes of the unit and the TVSelect whether to use HDMI control to link the unit's standby mode to the TV's powerwhen “HDMI Control” is set to “On”.
Note For details on “HDMI Control” in the “Setup” menu, see the following: “Setting the use of HDMI Control” (p.88)Setup menu
“HDMI” > “Standby Sync”
Settings
Off Does not set the unit to standby mode when the TV is turned off.
On Sets the unit to standby mode when the TV is turned off.
Auto Sets the unit to standby mode when the TV is turned off only when the unitis receiving TV audio or HDMI signals.
Setting the use of ARCSelect whether to output TV audio to the speakers connected to the unit when “HDMIControl” is set to “On”.
Note For details on “HDMI Control” in the “Setup” menu, see the following: “Setting the use of HDMI Control” (p.88)Setup menu
“HDMI” > “ARC”
Settings
Off Disables ARC.
On Enables ARC.
Note You do not need to change this setting normally. In case noises are produced from the speakers connectedto the unit because TV audio signals input to the unit via ARC are not supported by the unit, set “ARC” to “Off”and use the TV’s speakers.
En89

Setting the use of SCENE link playbackEnables/disable SCENE link playback when “HDMI Control” is set to “On”.
When SCENE link playback is enabled, HDMI Control-compatible devices connectedto the unit via HDMI automatically work as follows when a scene is selected.
• TV: turning on and displaying video from the playback device
• Playback device: starting playback
Note For details on “HDMI Control” in the “Setup” menu, see the following: “Setting the use of HDMI Control” (p.88)Setup menu
“HDMI” > “SCENE”
Choices (SCENE keys)
BD / DVD, TV, NET, RADIO
Settings
Off Disables SCENE link playback for the selected SCENE key.
On Enables SCENE link playback for the selected SCENE key.
Note SCENE link playback may not work properly due to the compatibility between devices. We recommend usingTV and playback devices from the same manufacturer so that HDMI Control works more effectively.
En90

Configuring the sound settings
Setting the use of Center SpreadSelects whether to spread the center channel signals to left and right when a 2-channel source is played. This setting is effective when “bDsur” is selected.
Setup menu
“Sound” > “DSP Parameter” > “Center Spread”
Settings
Off Disables Center Spread.
On Enables Center Spread.
Note If you feel the center sound is too strong, set this function to “On”. For details on the surround decoder, see the following:
– “Selecting the surround decoder used in the program” (p.70)
Adjusting the center localization (broadening effect)of the front sound fieldAdjusts the center localization (broadening effect) of the front sound field. Adjust thishigher to strengthen the center localization (less broadening effect) or lower to weakenit (more broadening effect). This setting is effective when “Neo:6 Music” is selected.
Setup menu
“Sound” > “DSP Parameter” > “Center Image”
Setting range
0.0 to 1.0
Note For details on the surround decoder, see the following: “Selecting the surround decoder used in the program” (p.70)
Setting the use of Monaural MixEnables/disables monaural sound output. This function can be applicable when thesound program is set to “7ch Stereo” only.
Setup menu
“Sound” > “DSP Parameter” > “Monaural Mix”
Settings
Off Disables monaural sound output.
On Enables monaural sound output.
Setting the adjustment method of the LipsyncfunctionSelects the method for adjusting the delay between video and audio output.
Setup menu
“Sound” > “Lipsync” > “Select”
Settings
ManualSelect this option when you want to adjust the delay between videoand audio output manually.
Adjust the audio output timing in “Adjustment”.
Auto
Adjusts the delay between video and audio output automatically whena TV that supports an automatic lipsync function is connected to theunit via HDMI.
If necessary, you can fine-adjust the audio output timing in“Adjustment”.
Note You can enable/disable the Lipsync function by input sources in “Lipsync” in the “Option” menu. For
details, see the following:– “Enabling Lipsync adjustment” (p.72)
For details on “Adjustment” in the “Setup” menu, see the following:– “Adjusting the delay of the Lipsync function” (p.92)
En91

Adjusting the delay of the Lipsync functionAdjusts the delay between video and audio output manually when “Select” is set to“Manual”. You can fine-adjust the audio output timing when “Select” is set to “Auto”.
Setup menu
“Sound” > “Lipsync” > “Adjustment”
Setting range
0 ms to 500 ms (1 ms increments)
Note For details on “Select” in the “Setup” menu, see the following: “Setting the adjustment method of the Lipsync function” (p.91)
Adjusting the volume of dialogue soundAdjusts the volume of dialogue sounds that are hardly heard.
Setup menu
“Sound” > “Dialogue” > “Dialogue Level”
Setting range
0 to 3 (higher to strengthen)
Note This setting is not available when one of the following conditions is met. Dolby Atmos content or DTS:X content is played back. The Dolby Surround or Neural:X decoder is working.
Adjusting the volume of dialogue sound duringDTS:X™ playbackAdjusts the volume of dialogue sounds that are hardly heard for DTS:X content.
Setup menu
“Sound” > “Dialogue” > “DTS Dialogue Control”
Setting range
0 to 6 (higher to strengthen)
NoteThis setting is available only when DTS:X content which supports the DTS Dialogue Control feature is playedback.
En92

Adjusting the perceived height of dialogue soundAdjusts the perceived height of dialogue sounds when the position (height) of dialoguesound is artificial. If the dialogue sounds as if it is coming from below the screen, youcan raise its perceived height by increasing this setting.
NoteThis setting is available only when one of the following conditions is met. One of the sound programs (except for 2ch Stereo and 7ch Stereo) is selected when presence speakers
are used. Virtual Presence Speaker (VPS) is working.
(You may hear dialogue sounds from the surround speakers depending on the listening position.)Setup menu
“Sound” > “Dialogue” > “Dialogue Lift”
Setting range
0 to 5 (The bigger the value the higher the position)
Ideal position
Setting the scale of the volume displaySwitches the scale of the volume display.
Setup menu
“Sound” > “Volume” > “Scale”
Settings
dB Displays the volume in the “dB” unit.
0-97 Displays the volume in the numeric value (0.5 to 97.0).
Setting the dynamic range adjustment methodSelects the dynamic range adjustment method for bitstream audio (Dolby Digital andDTS signals) playback.
Setup menu
“Sound” > “Volume” > “Dynamic Range”
Settings
Maximum Produces audio without adjusting the dynamic range.
Standard Optimizes the dynamic range for regular home use.
Min/AutoSets the dynamic range for clear sound even at night or at low volumes.
When playing back Dolby TrueHD signals, the dynamic range isautomatically adjusted based on the input signal information.
En93

Setting the limit value of the volumeSets the limit value of the volume adjusted by using such as VOLUME keys on theremote control.
Setup menu
“Sound” > “Volume” > “Max Volume”
Setting range
-60.0 dB to +15.0 dB (5.0 dB increments), +16.5 dB [20.0 to 95.0 (5.0 increments),97.0]
Setting the initial volume for when the unit is turnedonSets the initial volume when the unit is turned on.
Setup menu
“Sound” > “Volume” > “Initial Volume”
Settings
Off Sets the level to the volume level of the unit when it last entered standbymode.
Mute Sets the unit to mute the audio output.
-80.0 dB to +16.5 dB(0.5 dB increments)[0.5 to 97.0 (0.5 increments)]
Sets the level to the specified volume level.
Note This setting works only when the volume level is set lower than “Max Volume”. For details on “Max Volume” inthe “Setup” menu, see the following: “Setting the limit value of the volume” (p.94)
Adjusting the volume for Zone B in conjunction withthe volume for Zone ASelects whether to adjust the volume for Zone B in conjunction with the volume forZone A.
Setup menu
“Sound” > “Volume” > “ZoneB Volume”
Settings
Sync. Adjusts the volume for Zone B in conjunction with the volume for Zone A.
Async. Does not adjust the volume for Zone B in conjunction with the volume forZone A. Adjust the volume for Zone B separately.
Note If “ZoneB Volume” is set to “Async.”, the volume for Zone B is temporarily set to -40 dB. As necessary, adjustthe volume using the remote control. For details, see the following: “Adjusting the volume for Zone B separately” (p.45)
En94

Configuring the power supply settings
Setting the amount of time for the auto-standbyfunctionSet the amount of time for the auto-standby function.
Setup menu
“ECO” > “Auto Power Standby”
Settings
Off Does not set the unit to standby mode automatically.
5 minutes, 20 minutes Sets the unit to standby mode when you have not operated the unit andthe unit has not detected any input signal for the specified time.
2 hours, 4 hours, 8 hours, 12 hours
Sets the unit to standby mode when you have not operated the unit for thespecified time.
NoteJust before the unit enters standby mode, “AutoPowerStdby” appears and then countdown starts in the frontdisplay.
Setting the use of the eco modeYou can reduce the unit’s power consumption by setting the eco mode to “On”. Afterchanging the setting, be sure to press ENTER to restart the unit.
When the eco mode is enabled, you can reduce the unit’s power consumption.
Setup menu
“ECO” > “ECO Mode”
Settings
Off Disables the eco mode.
On Enables the eco mode.
Note When “ECO Mode” is set to “On”, the front display may become dark. If you want to play audio at high volume, set “ECO Mode” to “Off”.
En95

Configuring the function settings
Automatically changing the input source namesdisplayed on the front displayAutomatically changes the input source names displayed on the front display. You canselect a name created by the Auto Rename function.
Setup menu
“Function” > “Input Rename”
Input sources
HDMI 1-4, AV 1-3, AUDIO 1-2
1 Use the cursor keys to select an input source to be renamed.
2 Use the cursor keys to select “Auto”.
3 To change another input source name, repeat steps 1 to 2.
4 Press SETUP.
This completes the settings.
NoteWhen “Auto” is selected, the created name is saved even after the external device is disconnected. To resetto the default setting, switch the setting to “Manual” and then back to “Auto”.
Manually changing the input source namesdisplayed on the front displayAllows the input source names displayed on the front display to be set manually.
Setup menu
“Function” > “Input Rename”
Input sources
HDMI 1-4, AV 1-3, AUX, AUDIO 1-3, TUNER, MusicCast Link, SERVER, NET RADIO,USB
1 Use the cursor keys to select an input source to be renamed.
2 Use the cursor keys to select “Manual” and press ENTER.
The edit screen is displayed.
3 Use the cursor keys and ENTER key to edit the name, and thenselect “OK” and press ENTER.
Note To cancel the entry, select “CANCEL”. If you select "RESET", the default input name will be inserted into the editing area.
4 To change another input source name, repeat steps 1 to 3.
5 Press SETUP.
This completes the settings.
En96

Setting input sources to be skipped when operatingthe INPUT keySet which input sources are skipped when operating the INPUT key.
You can select the desired input source quickly by using this function.
Setup menu
“Function” > “Input Skip”
Input sources
HDMI 1-4, AV 1-3, AUX, AUDIO 1-3, TUNER, NET, Bluetooth, USB
Settings
Off Does not skip the selected input source.
On Skips the selected input source.
Note When using AV CONTROLLER, you cannot select the input sources set to “On” in this function.
Adjusting the brightness of the front displayAdjusts the brightness of the front display.
Setup menu
“Function” > “Dimmer”
Setting range
-4 to 0 (higher to brighten)
Note The front display may become dark when “ECO Mode” is set to “On”. For details, see the following: “Setting the use of the eco mode” (p.95)
Preventing accidental changes to the settingsPrevents accidental changes to the settings.
Setup menu
“Function” > “Memory Guard”
Settings
Off Does not protect the settings.
On Protects the settings until “Off” is selected.
NoteWhen “Memory Guard” is set to “On”, the lock icon (o) is displayed on the menu screen.
En97

Setting the unit's functions for the RED/GREEN/YELLOW/BLUE keys of the remote controlSet the unit's functions for the RED/GREEN/YELLOW/BLUE keys of the remote control.
Setup menu
“Function” > “Remote Color Key”
Settings
DefaultAssigns the functions of devices connected to the unit with an HDMIcable.
This setting is effective when “HDMI Control” is set to “On”.
Input
Assigns the unit's input sources to each key. The assigned input sourcescan be set separately.
Input sources
HDMI 1-4, AV 1-3, AUX, AUDIO 1-3, TUNER, NET, Bluetooth, USB
Default
RED: HDMI2, GREEN: HDMI4, YELLOW: AV 2, BLUE: AUX
Program
Assigns the functions of sound mode to each key.
RED: MOVIE
GREEN: MUSIC
YELLOW: STEREO
BLUE: SUR.DECODE
TV Control
Assigns the functions of TV Control to each key.
RED: EXIT (closes the menu on the TV)
GREEN: INFO (displays information about the TV such as the resolution)
YELLOW: BROADCAST (switches the TV broadcast type)
BLUE: INPUT (switches the TV input)
This setting is effective when “HDMI Control” is set to “On”.
Note For details on “HDMI Control” in the “Setup” menu, see the following:
– “Setting the use of HDMI Control” (p.88) To use HDMI control, you need to perform the HDMI Control link setup after connecting HDMI Control-
compatible devices. For details, see the following:– “HDMI Control and synchronized operations” (p.137)
HDMI Control might not work properly.
En98

Configuring the network settings
Checking the network information of the unitDisplays the network information of the unit.
Setup menu
“Network” > “Information”
Status The connection status of the NETWORK jack
Connection Connection method
SSID The access point to which the unit is connected
MusicCast Network Readiness or not for the MusicCast Network
MAC Address (Ethernet)MAC address
MAC Address (Wi-Fi)
IP Address IP address
Subnet Mask Subnet mask
Default Gateway The IP address of the default gateway
DNS Server (P) The IP address of the primary DNS server
DNS Server (S) The IP address of the secondary DNS server
Setting the network connection method (Wired/Wireless)Selects the network connection method.
Setup menu
“Network” > “Network Connection”
Choices
Wired Select this option when you want to connect the unit to a network witha commercially-available network cable.
Wireless(Wi-Fi) Select this option when you want to connect the unit to a network viathe wireless router (access point).
Note For details on the network connection, see the following: “Preparing for connecting to a network” (p.29)
Setting the network parameters automatically(DHCP)Set the network parameters (such as IP address, Subnet Mask, and Default Gateway)automatically using a DHCP server.
Setup menu
“Network” > “IP Address” > “DHCP”
Settings
Off Does not use a DHCP server. Configure the network parameters manually.
On Uses a DHCP server to automatically obtain the unit’s network parameters(such as IP address).
En99

Setting the network parameters manuallySet the network parameters (such as IP address, Subnet Mask, and Default Gateway)manually.
Setup menu
“Network” > “IP Address”
1 Set “DHCP” to “Off”.
2 Use the cursor keys to select a parameter type.
IP Address Specifies an IP address.
Subnet Mask Specifies a subnet mask.
Default Gateway Specifies the IP address of the default gateway.
DNS Server (P) Specifies the IP address of the primary DNS server.
DNS Server (S) Specifies the IP address of the secondary DNS server.
3 Use the cursor keys to move the edit position and to select avalue.
4 To set another parameter, press RETURN and repeat steps 2 to 3.
5 Press SETUP.
This completes the settings.
Setting the MAC address filterSets the MAC address filter to limit access to the unit from other network devices.
Note Operation of the AirPlay function or the DMC is not limited by this setting. You can specify up to 10 network devices that are permitted to access the unit.Setup menu
“Network” > “MAC Address Filter” > “Filter”
Settings
Off Disables the MAC address filter.
On Enables the MAC address filter. Specify the MAC addresses of thenetwork devices that will be permitted access to the unit.
When selecting “On”
1 Use the cursor keys to select an MAC address number.
2 Use the cursor keys to move the edit position and to select avalue.
3 To specify another MAC address, press RETURN and repeat steps1 to 2.
4 Press SETUP.
This completes the settings.
En100

Setting the use of a Digital Media ControllerSelects whether to allow a Digital Media Controller (DMC) to control playback. A DigitalMedia Controller (DMC) is a device that can control other network devices through thenetwork. When this function is enabled, you can control playback of the unit fromDMCs (such as Windows Media Player 12) on the same network.
Setup menu
“Network” > “DMC Control”
Settings
Disable Does not allow DMCs to control playback.
Enable Allows DMCs to control playback.
Setting the use of the Network Standby functionSelects whether the unit can be turned on from other network devices (networkstandby).
Setup menu
“Network” > “Network Standby”
Settings
Off Disables the network standby function.
OnEnables the network standby function.
(The unit consumes more power than when “Off” is selected.)
AutoEnables the network standby function.
(If “Network Connection” is set to “Wired”, the unit is set to the powersaving mode when the network cable is disconnected.)
With an advanced energy saving design, this product achieves a low powerconsumption of not more than two watts when in Network Standby mode.
En101

Setting the network name of the unitEdits the network name (the unit’s name on the network) displayed on other networkdevices.
Setup menu
“Network” > “Network Name”
1 Press ENTER to enter the name edit screen.
2 Use the cursor keys and ENTER key to edit the name.
3 Select “OK” to confirm the new name and press ENTER.
4 Press SETUP.
This completes the settings.
Setting the power interlock from the unit toMusicCast compatible devicesSelects whether turning on the power of the master device of the MusicCast network(this unit) also turns on the power of other devices of the network.
Setup menu
“Network” > “MusicCast Link Power Interlock”
Settings
Off Disables the power interlock from the unit (MusicCast master).
On Enables the power interlock from the unit (MusicCast master).
Updating the firmware via the networkUpdates the firmware via the network. You can select “Perform Update” after the unit isready for firmware update. You can also check the firmware version and system ID.
Setup menu
“Network” > “Network Update”
Note Firmware update takes about 20 minutes or more. If the Internet connection speed is slow, or the unit is connected to the wireless network, network update
may not be possible depending on the condition of the network. In this case, wait until firmware update isready, or update the firmware using the USB memory device. For details on using the USB memorydevice, see the following:– “Updating the firmware (UPDATE)” (p.109)
En102

Configuring the Bluetooth® settings
Setting the use of Bluetooth®Enables/disables the Bluetooth function.
Setup menu
“Bluetooth” > “Bluetooth”
Settings
Off Disables the Bluetooth function.
On Enables the Bluetooth function.
Terminating the connection between a Bluetooth®device and the unitTerminates the Bluetooth connection between a Bluetooth device (such as asmartphone) and the unit.
Setup menu
“Bluetooth” > “Audio Receive” > “Disconnect”
Select “Disconnect” and press ENTER to terminate the Bluetooth connection.
NoteThis setting is not available when no Bluetooth devices are connected.
Setting the use of the Bluetooth® Standby functionSelects whether to enable/disable the function that turns on the unit from Bluetoothdevices (Bluetooth standby). If this function is set to “On”, the unit automatically turnson when a connect operation is performed on the Bluetooth device.
Setup menu
“Bluetooth” > “Audio Receive” > “Bluetooth Standby”
Settings
Off Disables the Bluetooth standby function.
On Enables the Bluetooth standby function. (The unit consumes more power than when “Off” is selected.)
Note This setting is not available when “Network Standby” is set to “Off”. For details, see the following: “Setting the use of the Network Standby function” (p.101)
En103

Configuring the language settings
Setting the on-screen menu languageSelect the on-screen menu language.
Setup menu
“Language”
Settings
English English
日本語 Japanese
Français French
Deutsch German
Español Spanish
Русский Russian
Italiano Italian
中文 Chinese
NoteThe information on the front display is provided in English only.
En104

Configuring the advanced settings (ADVANCED SETUP menu)
Basic operation of the ADVANCED SETUP menuPerform the following basic procedure to operate the “ADVANCED SETUP” menu whileviewing the front display.
1 Set the unit to standby mode.
2 While holding down STRAIGHT on the front panel, pressz (power).
(power)z
STRAIGHTPROGRAM
The top item and its setting of the “ADVANCED SETUP” menu appear onthe front display.
3 Press PROGRAM to select an item.
4 Press STRAIGHT to select a setting.
5 Press z (power) to set the unit to standby mode and turn it onagain.
This completes the settings.
Note For details on the default settings, see the following: “Default settings of the ADVANCED SETUP menu” (p.146)
ADVANCED SETUP menu itemsUse the following table to configure system settings of the unit.
Item Function Page
SP IMP.(U.S.A. and Canada models only)
Changes the speaker impedance setting.p.106
REMOTE ID Selects the unit’s remote control ID. p.106
TU(Asia, Taiwan, Brazil, General, and Central and South Americamodels only)
Changes the FM/AM tuning frequency setting.p.106
TV FORMAT Switches the video signal type of HDMI output. p.106
4K MODE Selects the HDMI 4K signal format. p.107
DTS MODE Selects the information to be sent to the BD player connected tothe unit about the DTS formats that the unit supports. p.107
BKUP/RSTR Backups and restores all the settings for the unit. p.108
INIT Restores the default settings. p.109
UPDATE Updates the firmware. p.109
VERSION Checks the version of firmware currently installed on the unit. p.109
En105

Changing the speaker impedance setting (SP IMP.)(U.S.A. and Canada models only)
ENHANCER
LINK
ECO
MASTER
OUT 2 -ResHi YPAO VOL. A-DRC
SLEEP
STEREO
PARTY
TUNED ZONE3 B2 A
VOL.
FPR
SL SW SR
SBL SB SBR
FPL
MUTE VIRTUAL
SP IMP.••8¬MINChange the unit’s speaker impedance settings depending on the impedance of thespeakers connected.
ADVANCED SETUP menu
“SP IMP.”
Settings
6 Ω MIN Select this option when you connect 6-ohm speakers to the unit.
8 Ω MIN Select this option when you connect 8-ohm or higher speakers to the unit.
Selecting the remote control ID (REMOTE ID)
ENHANCER
LINK
ECO
MASTER
OUT 2 -ResHi YPAO VOL. A-DRC
SLEEP
STEREO
PARTY
TUNED ZONE3 B2 A
VOL.
FPR
SL SW SR
SBL SB SBR
FPL
MUTE VIRTUAL
REMOTE ID••ID1Change the unit’s remote control ID so that it matches the remote control’s ID (default:ID1). When using multiple Yamaha AV receivers, you can set each remote control witha unique remote control ID for its corresponding receiver.
ADVANCED SETUP menu
“REMOTE ID”
Settings
ID1, ID2
Changing the remote control ID of the remote control
• To select ID1, while holding down the left cursor key, hold down SCENE (BD/DVD)for 5 seconds.
• To select ID2, while holding down the left cursor key, hold down SCENE (TV) for 5seconds.
Changing the FM/AM tuning frequency setting (TU)(Asia, Taiwan, Brazil, General, and Central and South America models only)
ENHANCER
LINK
ECO
MASTER
OUT 2 -ResHi YPAO VOL. A-DRC
SLEEP
STEREO
PARTY
TUNED ZONE3 B2 A
VOL.
FPR
SL SW SR
SBL SB SBR
FPL
MUTE VIRTUAL
TU••••FM50/AM9Change the FM/AM tuning frequency setting of the unit depending on your country orregion.
ADVANCED SETUP menu
“TU”
Settings
FM100/AM10 Select this when you want to adjust the FM frequency by 100-kHz stepsand AM by 10-kHz steps.
FM50/AM9 Select this when you want to adjust the FM frequency by 50-kHz stepsand AM by 9-kHz steps.
Switching the video signal type (TV FORMAT)
ENHANCER
LINK
ECO
MASTER
OUT 2 -ResHi YPAO VOL. A-DRC
SLEEP
STEREO
PARTY
TUNED ZONE3 B2 A
VOL.
FPR
SL SW SR
SBL SB SBR
FPL
MUTE VIRTUAL
TV FORMAT•NTSCSwitch the video signal type of HDMI output so that it matches to the format of your TV.
Since the unit automatically selects the video signal type so that it matches to the TV, itis unnecessary to change the setting normally. Change the setting only when imageson the TV screen do not appear correctly.
ADVANCED SETUP menu
“TV FORMAT”
Settings
NTSC, PAL
En106

Selecting the HDMI 4K signal format (4K MODE)
ENHANCER
LINK
ECO
MASTER
OUT 2 -ResHi YPAO VOL. A-DRC
SLEEP
STEREO
PARTY
TUNED ZONE3 B2 A
VOL.
FPR
SL SW SR
SBL SB SBR
FPL
MUTE VIRTUAL
4K MODE•MODE 1Selects the format of signals input/output at the unit when HDMI 4K compatible TV andplayback device are connected to the unit.
ADVANCED SETUP menu
“4K MODE”
Settings
MODE 1Inputs/outputs 4K signals shown in the following table. Depending on theconnected device or HDMI cables, video may not be displayed correctly.In this case, select “MODE 2”.
MODE 2 Inputs/outputs 4K signals shown in the following table.
NoteWhen “MODE 1” is selected, use a Premium High Speed HDMI Cable or Premium High Speed Cable withEthernet.
Format
MODE 1 MODE 2
8 bit 10 bit 12 bit 8 bit 10 bit 12 bit
4K/60, 50 Hz
RGB 4:4:4 4 – –
YCbCr 4:4:4 4 – –
YCbCr 4:2:2 4 –
YCbCr 4:2:0 4 4 –
4K/30, 25, 24 Hz
RGB 4:4:4 4 4 –
YCbCr 4:4:4 4 4 –
YCbCr 4:2:2 4 4
Setting DTS Format Notification (DTS MODE)
ENHANCER
LINK
ECO
MASTER
OUT 2 -ResHi YPAO VOL. A-DRCSLEEPSTEREO
PARTYTUNED ZONE
3 B2 A
VOL.FPR
SL SW SRSBL SB SBR
FPLMUTE VIRTUAL
DTS MODE•MODE1This setting informs the BD player about the DTS formats that the unit supports.
ADVANCED SETUP menu
“DTS MODE”
Settings
MODE 1This mode conforms to the DTS:X standard.
Use this setting under normal circumstances.
MODE 2 Use this setting if the BD player fails to properly output a DTS signal evenwhen it is playing back DTS-HD or DTS:X content.
En107

Backuping and restoring all the settings (BKUP/RSTR)
ENHANCER
LINK
ECO
MASTER
OUT 2 -ResHi YPAO VOL. A-DRC
SLEEP
STEREO
PARTY
TUNED ZONE3 B2 A
VOL.
FPR
SL SW SR
SBL SB SBR
FPL
MUTE VIRTUAL
BKUP/RSTR•BKUPBackups and restores all the unit's setting to a USB memory device. Prepare a USBmemory device using FAT16 or FAT32 format in advance.
ADVANCED SETUP menu
“BKUP/RSTR”
Settings
RSTR Restores all the previous backuped settings.
BKUP Backups all the settings.
1 Connect the USB memory device to the USB jack on the frontpanel.
2 To start the process, press STRAIGHT to select “BKUP” or“RSTR” and then press INFO on the front panel.
3 Press INFO again after the confirmation message appears on thefront display.
4 When “Complete” appears on the front display, press z (power)to set the unit to standby mode and turn it on again.
If “Failed” appears on the front display, check the following and start theprocess again.
In case of “BKUP”:• You cannot overwrite save. When you save the settings repeatedly, please move the
file in different folder.
• The file is stored by the name of “MC_backup_(model name).dat” in the route of theUSB memory device.
In case of “RSTR”:• Check that the file is stored in the route of the USB memory device.
Note “RSTR” is effective after backuping all the settings. Do not turn off the unit during the backuping and restoring process. Otherwise, the settings may not be
restored correctly. The user information (such as account, password) is not saved.
En108

Restoring the default settings (INIT)
ENHANCER
LINK
ECO
MASTER
OUT 2 -ResHi YPAO VOL. A-DRC
SLEEP
STEREO
PARTY
TUNED ZONE3 B2 A
VOL.
FPR
SL SW SR
SBL SB SBR
FPL
MUTE VIRTUAL
INIT••••CANCELRestores the default settings for the unit.
ADVANCED SETUP menu
“INIT”
Choices
ALL Restores the default settings for the unit.
CANCEL Does not perform an initialization.
Updating the firmware (UPDATE)
ENHANCER
LINK
ECO
MASTER
OUT 2 -ResHi YPAO VOL. A-DRC
SLEEP
STEREO
PARTY
TUNED ZONE3 B2 A
VOL.
FPR
SL SW SR
SBL SB SBR
FPL
MUTE VIRTUAL
UPDATE•••••USBNew firmware that provides additional features or product improvements will bereleased as needed. Updates can be downloaded from our website to a USB memorydevice. You can update the firmware using this USB memory device. For details, referto the information supplied with updates.
ADVANCED SETUP menu
“UPDATE”
Choices
USB Update the firmware using a USB memory device.
NETWORK Update the firmware via the network.
NoteDo not perform this menu unless firmware update is necessary. Also, make sure you read the informationsupplied with updates before updating the firmware.
Checking the firmware version (VERSION)
ENHANCER
LINK
ECO
MASTER
OUT 2 -ResHi YPAO VOL. A-DRC
SLEEP
STEREO
PARTY
TUNED ZONE3 B2 A
VOL.
FPR
SL SW SR
SBL SB SBR
FPL
MUTE VIRTUAL
VERSION••xx.xxCheck the version of firmware currently installed on the unit.
ADVANCED SETUP menu
“VERSION”
En109

TROUBLESHOOTINGWhen any problem appears
If trouble occurs, first check the following:Make sure of the following when the unit does not function properly.
• The power cables of the unit, TV and playback devices (such as BD/DVD players)are connected to AC wall outlets securely.
• The unit, subwoofer, TV and playback devices (such as BD/DVD players) are turnedon.
• The connectors of each cable are securely inserted in to jacks on each device.
If there is no problem with the power and cables, refer to the instructions shown in“When any problem appears” corresponding to the trouble of the unit.
If the problem you are experiencing is not listed or if the instructions do not help, turnoff the unit, disconnect the power cable, and contact the nearest authorized Yamahadealer or service center.
Power, system, or remote control trouble
n The power does not turn onl The protection circuitry has been activated three times consecutively.
If the standby indicator on the unit blinks when you try to turn on the power, as asafety precaution, capability to turn on the power is disabled. Contact your nearestYamaha dealer or service center to request repair.
n The power does not turn on in synchronization with theTV
l HDMI Control on the unit is disabled. If turning off the unit is not synchronized to the TV either, check the setting of HDMI
Control on the unit. For details on HDMI Control, see the following:– “Setting the use of HDMI Control” (p.88)
l HDMI Control on the TV is disabled. If only turning on the unit is not synchronized to the TV, check the setting on the
TV. For details, refer to the instruction manual for the TV and set HDMI Control onthe TV.
l Because of a power failure, the unit's power is no longer synchronized. Disconnect the HDMI cables and power cables, and after five minutes, reconnect
the cables of playback devices first, then the unit, and then the TV. Then, checkthat the power is synchronized.
n The power does not turn offl The internal microcomputer has frozen, due to an external electric shock (such
as lightning or excessive static electricity) or to a drop in the power supplyvoltage. Hold down z (power) on the front panel for more than 15 seconds to reboot the
unit. If the problem persists, disconnect the power cable from the AC wall outletand plug it again.
En110

n The power turns off (standby mode) immediatelyl The unit was turned on while a speaker cable was shorted.
Twist the bare wires of each speaker cable firmly and reconnect to the unit andspeakers. For details, see the following:– “Connecting the speaker” (p.17)
n The unit enters standby mode automaticallyl The sleep timer worked.
Turn on the unit and start playback again.
l The auto-standby function activated because the unit was not used for thespecified time. To disable the auto-standby function, set “Auto Power Standby” in the “Setup”
menu to “Off”. For details, see the following:– “Setting the amount of time for the auto-standby function” (p.95)
l The speaker impedance setting is incorrect. Set the speaker impedance to match your speakers. For details, see the following:
– “Changing the speaker impedance setting (SP IMP.)” (p.106)
l The protection circuitry has been activated because of a short circuit. Twist the bare wires of each speaker cable firmly and reconnect to the unit and
speakers. For details, see the following:– “Connecting the speaker” (p.17)
n The unit is not reactingl The internal microcomputer is frozen, due to an external electric shock (such
as lightning or excessive static electricity) or to a drop in the power supplyvoltage. Hold down z (power) on the front panel for more than 15 seconds to reboot the
unit. If the problem persists, disconnect the power cable from the AC wall outletand plug it again.
n The unit cannot be controlled using the remote controll The unit is out of the operating range.
Use the remote control within the operating range. For details, see the following:– “Operating range of the remote control” (p.7)
l The batteries are weak. Replace with new batteries.
l The unit’s remote control sensor is exposed to direct sunlight or stronglighting. Adjust the lighting angle, or reposition the unit.
l The remote control IDs of the unit and the remote control are not identical. Change the remote control ID of the unit or the remote control. For details, see the
following:– “Selecting the remote control ID (REMOTE ID)” (p.106)
l The remote control is set to the Zone B operation mode. Set the remote control to the Zone A operation mode. For details, see the following:
– “Part names and functions of the remote control” (p.14)
En111

n Cannot select the desired input source even if “INPUT”is pressed
l The function which skips some input sources is set. Set “Input Skip” of the desired input source in the “Setup” menu to “Off”. For
details, see the following:– “Setting input sources to be skipped when operating the INPUT key” (p.97)
n The RED/GREEN/YELLOW/BLUE keys of the remotecontrol do not operate
l The device which is connected to the unit via HDMI does not support theoperation of the RED/GREEN/YELLOW/BLUE keys. Use a device which supports the operation of the RED/GREEN/YELLOW/BLUE
keys.
l The settings of the RED/GREEN/YELLOW/BLUE keys of the unit's remotecontrol have been changed. Set the “Remote Color Key” settings in the “Setup” menu to “Default”. For details,
see the following:– “Setting the unit's functions for the RED/GREEN/YELLOW/BLUE keys of the
remote control” (p.98)
Audio trouble
nNo soundl Another input source is selected.
Select an appropriate input source with the input selection keys. For details, seethe following:– “Basic procedure for playing back video and music” (p.46)
l Signals that the unit cannot reproduce are being input. Some digital audio formats cannot be played back on the unit. Ensure that the
signals are types that the unit is able to play back. For details on supported fileformats, HDMI audio formats or compatible decoding format, see the following:– “Supported file formats” (p.135)– “Specifications” (p.141)
l Zone B is disabled. Slide the Zone switch to “ZONE B”, and then operate Zone B. For details, see the
following:– “Operating the Zone B” (p.44)
l The cable connecting the unit and playback device is defective. If there is no problem with the connection, replace with another cable.
n The volume cannot be increasedl The maximum volume is set too low.
Use “Max Volume” in the “Setup” menu to adjust the maximum volume. For details,see the following:– “Setting the limit value of the volume” (p.94)
l A device connected to the output jacks of the unit is not turned on. Turn on all devices connected to the output jacks of the unit.
En112

nNo sound is coming from a specific speakerl The playback source does not contain a signal for the channel.
To check it, use “Signal Information” in the “Option” menu. For details, see thefollowing:– “Checking information about the video/audio signals” (p.73)
l The currently selected sound program/decoder does not use the speaker. To check it, use “Test Tone” in the “Setup” menu. For details, see the following:
– “Outputting test tones” (p.87)
l Audio output of the speaker is disabled. Perform YPAO or use “Configuration” in the “Setup” menu to change the speaker
settings. For details, see the following:– “Optimizing the speaker settings automatically (YPAO)” (p.33)– “Setting the use of a subwoofer” (p.82)– “Setting the size of the front speakers” (p.82)– “Setting the use of a center speaker and its size” (p.83)– “Setting the use of surround speakers and their size” (p.83)– “Setting the use of surround back speakers and their size” (p.84)– “Setting the use of presence speakers and their size” (p.84)
l The volume of the speaker is set too low. Perform YPAO or use “Level” in the “Setup” menu to adjust the speaker volume.
For details, see the following:– “Optimizing the speaker settings automatically (YPAO)” (p.33)– “Adjusting the volume of each speaker” (p.86)
l The speaker cable connecting the unit and the speaker is defective. Check the unit’s SPEAKERS terminals and the speaker’s terminals. If there is no
problem with the connection, replace a breaking speaker cable with anotherspeaker cable.
l The speaker is malfunctioning. To check it, replace with another speaker. If the problem persists with using
another speaker, the unit may be malfunctioning.
nNo sound is coming from the surround back speakerl “Power Amp Assign” is not set to “Sur.Back”.
When “Power Amp Assign” in the “Setup” menu is set to “Presence”, “BI-AMP”,“Zone B” or “5.1ch”, you cannot use the surround back speakers. To use thesurround back speakers, set “Power Amp Assign” to “Sur.Back”. For details, seethe following:– “Setting your speaker system” (p.82)
nNo sound is coming from the subwooferl The playback source does not contain Low Frequency Effect (LFE) or low-
frequency signals. To check it, set “Extra Bass” in the “Setup” menu to “On”, in order to output the
front channel low-frequency components from the subwoofer. For details, see thefollowing:– “Setting the use of Extra Bass” (p.85)
l Subwoofer output is disabled. Perform YPAO or set “Subwoofer” in the “Setup” menu to “Use”. For details, see
the following:– “Optimizing the speaker settings automatically (YPAO)” (p.33)– “Setting the use of a subwoofer” (p.82)
l The volume of the subwoofer is too low. Adjust the volume on the subwoofer.
l The subwoofer has been turned off by its auto-standby function. Disable the auto-standby function of the subwoofer or adjust its sensitivity level.
En113

nNo sound from the playback device connected to theunit with HDMI
l The TV does not support HDCP (High-bandwidth Digital Content Protection). Refer to the instruction manuals for the TV and check the TV’s specifications.
l The number of devices connected to the HDMI OUT jack exceeds the limit. Disconnect some of the HDMI devices.
nNo sound from the TV when HDMI Control is usedl The TV is set to output audio from the TV speakers.
Change the audio output setting on your TV so that the TV audio is output from thespeakers connected to the unit.
l A TV that does not support ARC is connected to the unit only with an HDMIcable. Use a digital optical cable to make an audio connection. For details, see the
following:– “HDMI connection with a TV” (p.25)
l If the TV is connected to the unit with an audio cable, the TV audio inputsetting does not match the actual connection. Use “TV Audio Input” in the “Setup” menu to select the correct audio input jack.
For details, see the following:– “Setting the audio jack used for TV audio input” (p.89)
l If you are trying to use ARC, ARC is disabled on the unit or TV. Set “ARC” in the “Setup” menu to “On”, and enable ARC on the TV. For details,
see the following:– “Setting the use of ARC” (p.89)
nOnly the front speakers work on multichannel audiol The playback device is set to output 2-channel audio (such as PCM) only.
To check it, use “Signal Information” in the “Option” menu. If necessary, changethe digital audio output setting on the playback device. For details, see thefollowing:– “Checking information about the video/audio signals” (p.73)
nNoise/hum is heardl The unit is too close to another digital or radio frequency device.
Move the unit further away from the device.
l The cable connecting the unit and playback device is defective. If there is no problem with the connection, replace with another cable.
n The sound is distortedl The volume of the unit is too high.
Turn down the volume. If “ECO Mode” in the “Setup” menu is set to “On”, set it to“Off”. For details, see the following:– “Setting the use of the eco mode” (p.95)
l A device (such as an external power amplifier) connected to the unit’s audiooutput jacks is not turned on. Turn on all devices connected to the unit’s audio output jacks.
En114

Video trouble
nNo videol Another input source is selected on the unit.
Select an appropriate input source with the input selection keys.
l Another input source is selected on the TV. Switch the TV input to display the video from the unit.
l The video signal output from the unit is not supported by the TV. Check the video output setting of the playback device. For information about video
signals supported by the TV, refer to the instruction manuals for the TV.
l The cable connecting the unit and TV (or playback device) is defective. If there is no problem with the connection, replace with another cable.
nNo video from the playback device connected to theunit with HDMI
l The input video signal (resolution) is not supported by the unit. To check the information about the current video signal (resolution) and video
signals supported by the unit, see the following:– “Checking information about the video/audio signals” (p.73)– “HDMI signal compatibility” (p.139)
l The TV does not support HDCP (High-bandwidth Digital Content Protection). Refer to the instruction manuals for the TV and check the TV’s specifications.
l The number of devices connected to the HDMI OUT jack is over the limit. Disconnect some of the HDMI devices.
nNo image (contents required the HDCP 2.2 - compatibleHDMI device) from the playback device
l The TV (HDMI input jack) does not support HDCP 2.2. Connect the unit to the TV (HDMI input jack) that supports HDCP 2.2. (The
Warning message can be displayed on the TV screen.)
n The menu of the unit is not displayed on the TVl The TV is not connected to the unit via HDMI.
You can display the menu of the unit on the TV only when they are connected withan HDMI cable. If necessary, use an HDMI cable to connect them. For details, seethe following:– “HDMI connection with a TV” (p.25)
l Another input source is selected on the TV. Switch the TV input to display the video from the unit (HDMI OUT jack).
En115

FM/AM radio trouble
n FM radio reception is weak or noisyl There is multi-path interference.
Adjust the FM antenna height or orientation, or place it in a different location.
l Your area is too far from the FM station transmitter. To select monaural FM radio reception, set “FM Mode” in the “Option” menu to
“Monaural”. Or use an outdoor FM antenna. For details on “FM Mode”, see thefollowing:– “Switching between stereo and monaural for FM radio reception” (p.74)
nAM radio reception is weak or noisyl The noises may be caused by fluorescent lamps, motors, thermostats, or other
electrical equipment. It is difficult to completely eliminate noise. It may be reduced by using an outdoor
AM antenna.
n Radio stations cannot be selected automaticallyl Your area is too far from the FM station transmitter.
Select the station manually. Or use an outdoor antenna. We recommend using asensitive multi-element antenna. For details on selecting the station manually, seethe following:– “Selecting a frequency for reception” (p.51)
l The AM radio signal is weak. Adjust the AM antenna orientation. Select the station manually. Use an outdoor AM
antenna. For details on selecting the station manually, see the following:– “Selecting a frequency for reception” (p.51)
nAM radio stations cannot be registered as presetsl Auto Preset has been used.
Auto Preset is for registering FM radio stations only. Register AM radio stationsmanually. For details, see the following:– “Registering a radio station manually” (p.53)
USB trouble
n The unit does not detect the USB devicel The USB device is not connected to the USB jack securely.
Turn off the unit, reconnect your USB device, and turn the unit on again.
l The file system of the USB device is not FAT16 or FAT32. Use a USB device with FAT16 or FAT32 format.
n Folders and files in the USB device cannot be viewedl The data in the USB device is protected by the encryption.
Use a USB device without an encryption function.
n The unit does not perform continuous playback on filesof USB device
l When the unit detects a series of unsupported files during playback, playbackstops automatically. Do not save unsupported files (such as images and hidden files) in folders for
playback.
En116

Network trouble
n The network feature does not functionl The network parameters (IP address) have not been obtained properly.
Enable the DHCP server function on your router and set “DHCP” in the “Setup”menu to “On” on the unit. If you want to configure the network parametersmanually, check that you are using an IP address which is not used by othernetwork devices in your network. For details, see the following:– “Setting the network parameters automatically (DHCP)” (p.99)– “Setting the network parameters manually” (p.100)
l The unit does not support IPv6 network. Connect IPv4 network.
n The unit cannot connect to the Internet via a wirelessrouter (access point)
l The wireless router (access point) is turned off. Turn on the wireless router.
l The unit and the wireless router (access point) are too far apart. Place the unit and the wireless router (access point) closer to each other.
l There is an obstacle between the unit and the wireless router (access point). Move the unit and the wireless router (access point) in a location where there are
no obstacles between them.
l The wireless router (access point) is set to use the wireless channel 14. Change settings of the wireless router (access point) to use one of the wireless
channels from 1 to 13.
nWireless network is not foundl Microwave ovens or other wireless devices in your neighborhood might
disturb the wireless communication. Turn off these devices.
l Access to the network is restricted by the firewall settings of the wirelessrouter (access point). Check the firewall setting of the wireless router (access point).
n The unit does not detect the media server (PC/NAS)l The media sharing setting is not correct.
Configure the sharing setting and select the unit as a device to which musiccontents are shared. For details, see the following:– “Media sharing setup on media servers (PCs/NAS)” (p.59)
l Some security software installed on your media server is blocking the accessof the unit to your media server. Check the settings of security software installed on your media server.
l The unit and media server are not in the same network. Check the network connections and your router settings, and then connect the unit
and the media server to the same network.
l The MAC address filter is enabled on the unit. In “MAC Address Filter” in the “Setup” menu, disable the MAC address filter or
specify the MAC address of your media server to allow it to access to the unit. Fordetails, see the following:– “Setting the MAC address filter” (p.100)
n The files in the media server (PC/NAS) cannot beviewed or played back
l The files are not supported by the unit or the media server. Use the file format supported by both the unit and the media server. For
information about the file formats supported by the unit, see the following:– “Supported file formats” (p.135)
En117

n The Internet radio cannot be playedl The selected Internet radio station is currently not available.
There may be a network problem at the radio station, or the service may havebeen stopped. Try the station later or select another station.
l The selected Internet radio station is currently broadcasting silence. Some Internet radio stations broadcast silence at certain of times of the day. Try
the station later or select another station.
l Access to the network is restricted by the firewall settings of your networkdevices (such as the router). Check the firewall settings of your network devices. The Internet radio can be
played only when it passes through the port designated by each radio station. Theport number varies depending on the radio station.
n The iPhone does not recognize the unit when usingAirPlay
l The unit is connected to a multiple SSID router. Access to the unit might be restricted by the network separation function on the
router. Connect the iPhone to the SSID which can access the unit. (Connect it tothe Primary SSID at the top of the list.)
n The application for mobile devices does not detect theunit
l The unit and mobile device are not in the same network. Check the network connections and your router settings, and then connect the unit
and mobile device to the same network.
l The MAC address filter is enabled on the unit. In “MAC Address Filter” in the “Setup” menu, disable the MAC address filter or
specify the MAC address of your mobile device to allow it to access to the unit. Fordetails, see the following:– “Setting the MAC address filter” (p.100)
l The unit is connected to a multiple SSID router. Access to the unit might be restricted by the network separation function on the
router. Connect the iPhone to the SSID which can access the unit. (Connect it tothe Primary SSID at the top of the list.)
n Firmware update via the network is failedl It may not be possible depending on the condition of the network.
Update the firmware via the network again or use a USB memory device. Fordetails, see the following:– “Updating the firmware via the network” (p.102)
En118

Bluetooth® trouble
nA Bluetooth® connection cannot be establishedl The Bluetooth function of the unit is disabled.
Enable the Bluetooth function. For details, see the following:– “Setting the use of Bluetooth®” (p.103)
l Another Bluetooth device is already connected to the unit. Terminate the current Bluetooth connection and then establish a new connection.
For details, see the following:– “Playback Bluetooth® device music on the unit” (p.56)
l The unit and the Bluetooth device are too far apart. Move the Bluetooth device closer to the unit.
l There is a device (such as microwave oven and wireless LAN) that outputssignals in the 2.4 GHz frequency band nearby. Move the unit and the Bluetooth device away from those devices.
l The Bluetooth device does not support A2DP. Use a Bluetooth device that supports A2DP.
l The connection information registered on the Bluetooth device is not workingfor some reason. Delete the connection information on the Bluetooth device, and then establish a
connection between the Bluetooth device and the unit again. For details, see thefollowing:– “Playback Bluetooth® device music on the unit” (p.56)
nNo sound is produced, or the sound is interruptedduring playback with Bluetooth® connection
l The volume of the Bluetooth device is set too low. Turn up the volume of the Bluetooth device.
l The Bluetooth device is not set to send audio signals to the unit. Switch the audio output of the Bluetooth device to the unit.
l The Bluetooth connection has been terminated. Establish a Bluetooth connection between the Bluetooth device and the unit again.
For details, see the following:– “Playback Bluetooth® device music on the unit” (p.56)
l The unit and the Bluetooth device are too far apart. Move the Bluetooth device closer to the unit.
l There is a device (such as microwave oven and wireless LAN) that outputssignals in the 2.4 GHz frequency band nearby. Move the unit and the Bluetooth device away from those devices.
En119

Error indications on the front display
Error indications on the front displayRefer to the following table when the error message is indicated on the front display.
Message Cause Remedy
Access denied Access to the media servers (PCs/NAS) is denied.Configure the sharing settings and select the unit as a device to which music contents are shared. Fordetails, see the following:
• “Media sharing setup on media servers (PCs/NAS)” (p.59)
Access error
The unit cannot access the USB device. Turn off the unit and reconnect your USB device. If the problem persists, try another USB device.
There is a problem with the signal path from the network to the unit.
Make sure your router and modem are turned on, and check the connection between the unit and yourrouter (or hub). For details, see the following:
• “Connecting a network cable (wired connection)” (p.29)
• “Preparing wireless antennas (wireless connection)” (p.30)
Check SP Wires The speaker cables are short circuited.Twist the bare wires of the cables firmly and connect to the unit and speakers properly. For details, seethe following:
• “Connecting the speaker” (p.17)
Internal Error An internal error has occurred. Contact the nearest authorized Yamaha dealer or service center.
No content There are no playable files in the selected folder. Select a folder that contains files supported by the unit.
No device The unit cannot detect the USB device. Turn off the unit and reconnect your USB device. If the problem persists, try another USB device.
Not connectedThe network cable is not connected. Connect the network cable properly.
The wireless router (access point) is not found. Make sure the wireless router (access point) is turned on.
Please wait The unit is preparing for connecting to the network. Wait until the message disappears. If the message stays more than 3 minutes, turn off the unit and turnit on again.
RemID MismatchThe remote control IDs of the unit and the remote control are notidentical.
Change the remote control ID of the unit or the remote control. For details, see the following:
• “Selecting the remote control ID (REMOTE ID)” (p.106)
Unable to play
The unit cannot play back the songs stored on the iPhone for somereason.
Check the song data. If it cannot be played on the iPhone itself, the song data or storage area may bedefective.
The unit cannot play back the songs stored on the media servers(PCs/NAS) for some reason.
Ensure that the files are types that the unit is able to play back. If the unit supports the file format, butstill cannot play back any files, the network may be overloaded with heavy traffic. For information aboutthe formats supported by the unit, see the following:
• “Supported file formats” (p.135)
USB Overloaded An overcurrent is flowing through the USB device. Turn off the unit and reconnect your USB device. If the problem persists, try another USB device.
Version error Firmware update failed.
Update the firmware again. For details, see the following:
• “Updating the firmware (UPDATE)” (p.109)
• “Updating the unit’s firmware via the network” (p.123)
En120

Message Cause Remedy
Update failed. Firmware update failed.
Press STRAIGHT and select a firmware updating method, then press INFO to update the firmwareagain. For details, see the following:
• “Updating the firmware (UPDATE)” (p.109)
• “Updating the unit’s firmware via the network” (p.123)
FILE NOT READY Preparation for firmware update is not finish yet. Wait a while before updating the firmware again.
En121

APPENDIXUpdating the unit’s firmware via the network
Firmware updatesNew firmware that provides additional features or product improvements will bereleased as needed. If the unit is connected to the Internet, new firmware isdownloaded via the network. When a firmware update is ready, the following messageappears after SETUP is pressed.
You can switch the language.
For details on the firmware update, see the following:
• “Updating the unit’s firmware via the network” (p.123)
Notice
Do not operate the unit or disconnect the power cable or network cable during firmware update. If thefirmware update is interrupted, there is a possibility that the unit will malfunction. In this case, contactyour nearest authorized Yamaha dealer or service center to request repair.
Note The firmware update indicator on the front display lights up when a firmware update is ready. This
indicator might not light up when the network connection speed is too slow or a later firmware update isavailable.
Firmware update takes about 20 minutes or more. You might not get the message or the lighting up firmware update indicator on the front display depending
on the condition of the network connection. In this case, update the firmware using the USB memorydevice. For details, see the following:– “Updating the firmware (UPDATE)” (p.109)
For details on firmware updates, visit the Yamaha website.
En122

Updating the unit’s firmware via the networkConfirm the on-screen description displayed after SETUP is pressed, and start thefirmware update.
1 Read the on-screen description and press the down cursor key.
The next screen appears.
2 To start the firmware update, press ENTER.
The on-screen display turns off.
3 If “UPDATE SUCCESS PLEASE POWER OFF!” appears on thefront display, press z (power) on the front panel.
The firmware update is complete.
Note Firmware update takes about 20 minutes or more. You might not get the message or the lighting up firmware update indicator on the front display depending
on the condition of the network connection. In this case, update the firmware using the USB memorydevice. For details on using the USB memory device, see the following:– “Updating the firmware (UPDATE)” (p.109)
For details on update, visit the Yamaha website. If you want to perform update when turning off the unit, press not ENTER but the down cursor key in step
2, and follow the on screen instructions. When you turn off the unit, a screen asking you to confirm thefirmware update is displayed, and press ENTER to start the firmware update. After the firmware update iscomplete, the unit will turn off automatically.
To perform update when turning off the unit, refer to the following instructions and supplementaryexplanations.– The firmware update can be started by pressing INFO on the front panel.– The unit turns off automatically without performing the firmware update if two minutes pass after the
screen to confirm the firmware update is displayed.– To cancel the firmware update process, press RETURN, and the unit will turn off.– The unit turns off without performing the firmware update if you turn off the unit with AV CONTROLLER
or MusicCast CONTROLLER.
En123

Connecting to a network wirelessly
Selecting a wireless network connection methodSelect a wireless connection method according to your network environment.
Note You need to configure the network settings if your router does not support DHCP or if you want to
configure the network parameters manually. For details, see the following:– “Setting the network parameters manually” (p.100)
When the unit is added to a MusicCast network, the network settings can be configured at the same time.If you use MusicCast, this method is recommended. For details, see the following:– “Adding the unit to the MusicCast network” (p.37)
Mobile device(such as iPhone)
Internet
Modem
Wireless router
The unit
1 Press z (receiver power) to turn on the unit.
2 Turn on the TV and switch the TV input to display video from theunit (HDMI OUT jack).
3 Press SETUP.
4 Use the cursor keys to select “Network” and press ENTER.
5 Use the cursor keys to select “Network Connection” and pressENTER.
6 Use the cursor keys to select “Wireless(Wi-Fi)” and press ENTER.
The following connection methods are available.
• “Setting up a wireless connection using the WPS button” (p.125)
• “Setting up a wireless connection using an iOS device” (p.125)
• “Setting up a wireless connection by selecting from the list of available accesspoints” (p.126)
• “Setting up a wireless connection manually” (p.127)
• “Setting up a wireless connection by using the WPS PIN code” (p.128)
En124

Setting up a wireless connection using the WPSbuttonYou can easily set up a wireless connection with one push of the WPS button.
Setup menu
“Network” > “Network Connection” > “Wireless(Wi-Fi)”
1 Use the cursor keys to select “WPS Button” and press ENTER.
2 Read the on-screen description and push the WPS button on thewireless router (access point).
When the connection process finishes, “Completed” appears on the frontdisplay.
If “Not connected” appears, repeat from step 1 or try another connectionmethod.
This completes the network settings.
Note The unit may not connect to the wireless router (access point) using WEP as the encryption method. In
this case, try another connection method. You can use INFO (WPS) on the front panel. Hold down INFO (WPS) for a few seconds to set up a
wireless connection and then “Press WPS button on Access Point” appears on the front display, push theWPS button.
About WPS
WPS (Wi-Fi Protected Setup) is a standard established by the Wi-Fi Alliance, which allows easyestablishment of a wireless home network.
Setting up a wireless connection using an iOS deviceYou can set up a wireless connection by applying the connection settings on iOSdevices (iPhone/iPad/iPod touch).
Before proceeding, confirm that your iOS device is connected to a wireless router.
Note This process will restore the default settings for the following.
– Network settings– Bluetooth settings– Bluetooth, USB, media server and network content registered as shortcuts– Internet radio stations registered to “Favorites”– Account information for the network services
You need iOS device with iOS 7 or later. (The following procedure is a setup example for iOS 10.) This configuration does not work if the security method of your wireless router (access point) is WEP. In
this case, use other connection method.Setup menu
“Network” > “Network Connection” > “Wireless(Wi-Fi)”
1 Use the cursor keys to select “WAC(iOS)” and press ENTER.
2 Read the on-screen description and press ENTER.
NoteWhen you use wired network connection, a warning message is displayed on the screen.Disconnect the network cable from the unit, and then press ENTER.
3 On the iOS device, select the unit as the AirPlay speaker in the Wi-Fi screen.
iOS 10 (example of English version)
The name of the unit
En125

4 Select the network (access point) of which you want to share thesettings with the unit.
The network currently selected
Tap here to start setup
When the sharing process finishes, the unit is automatically connected tothe selected network (access point) and “Completed” appears on thefront display.
If “Not shared” or “Not connected” appears, press ENTER to repeat fromstep 1 or try another connection method.
5 Press SETUP.
This completes the network settings.
Setting up a wireless connection by selecting fromthe list of available access pointsYou can set up a wireless connection by selecting an access point from the list ofwireless LAN routers (access points) found by the unit. You need to manually enter thesecurity key.
Setup menu
“Network” > “Network Connection” > “Wireless(Wi-Fi)”
1 Use the cursor keys to select “Access Point Scan” and pressENTER.
After searching for access points, the list of available access pointsappears on the TV.
2 Use the cursor keys to select the desired access point and pressENTER.
The wireless connection setting screen appears on the TV.
Access Point X
3 Press ENTER.
The edit screen appears.
En126

4 Use the cursor keys and ENTER to enter the security key.
5 When finished entering the key, use the cursor keys to select“OK” and press ENTER.
The previous wireless connection setting screen appears on the TV.
6 Use the cursor keys to select “Connect” and press ENTER to startthe connection process.
When the connection process finishes, “Completed” appears on the TVscreen.
If “Not connected” appears, repeat from step 2 or try another connectionmethod.
7 Press SETUP.
This completes the network settings.
Setting up a wireless connection manuallyYou can set up a wireless connection by entering the required information manually.You need to set up the SSID (network name), encryption method and security key foryour network.
Setup menu
“Network” > “Network Connection” > “Wireless(Wi-Fi)”
1 Use the cursor keys to select “Manual Setting” and press ENTER.
The manual setting screen appears.
2 Use the cursor keys to select “SSID” and press ENTER.
The edit screen appears.
3 Use the cursor keys and ENTER to enter the SSID of the accesspoint.
En127

4 When finished entering the key, use the cursor keys to select“OK” and press ENTER.
The previous manual setting screen appears on the TV.
5 Use the cursor keys to select “Security” and select the encryptionmethod.
Choices
None, WEP, WPA-PSK(AES), Mixed Mode
NoteIf you select “None”, the connection may be insecure since the communication is not encrypted.
6 Use the cursor keys to select “Security Key” and press ENTER.
The edit screen appears.
Note If you select “None” in step 5, this item is not available.
7 Use the cursor keys and ENTER to enter the security key.
8 When finished entering the key, use the cursor keys to select“OK” and press ENTER.
The previous manual setting screen appears on the TV.
9 Use the cursor keys to select “Connect” and press ENTER to startthe connection process.
When the connection process finishes, “Completed” appears on the TVscreen.
If “Not connected” appears, check that all the information is enteredcorrectly, and repeat from step 2.
10 Press SETUP.
This completes the network settings.
Setting up a wireless connection by using the WPSPIN codeYou can set up a wireless connection by entering the unit’s PIN code into the wirelessrouter (access point). The method is available if the wireless router (access point)supports the WPS PIN code method.
Setup menu
“Network” > “Network Connection” > “Wireless(Wi-Fi)”
1 Use the cursor keys to select “PIN Code” and press ENTER.
The list of available access points appears on the TV.
2 Use the cursor keys to select the desired access point and pressENTER.
The PIN code of the unit appears on the TV screen.
3 Enter the unit’s PIN code into the wireless router (access point).
For details on settings, refer to the instruction manual of the wirelessrouter (access point).
4 Press ENTER to start the connection process.
When the connection process finishes, “Completed” appears on the TVscreen.
If “Not connected” appears, repeat from step 2 or try another connectionmethod.
5 Press SETUP.
This completes the network settings.
En128

Input/output jacks and cables
Video/audio jacks
nHDMI jacksTransmit digital video and digital sound through asingle jack. Use an HDMI cable.
HDMI cable
Note Use a 19-pin HDMI cable with the HDMI logo. We recommend
using a cable less than 5.0 m (16.4 ft) long to prevent signal qualitydegradation.
The unit’s HDMI jacks support the HDMI Control, Audio ReturnChannel (ARC), and 3D and 4K Ultra HD video transmission(through output) features.
Use a Premium High Speed HDMI Cable or Premium High SpeedCable with Ethernet to enjoy 3D or 4K Ultra HD videos.
Video jacks
nVIDEO jacksTransmit analog video signals. Use a video pin cable.
Video pin cable
Audio jacks
nOPTICAL jackTransmit digital audio signals. Use a digital opticalcable. If there is a protective cap on the tip of thecable, remove it before using the cable.
OPTICAL
Digital optical cable
n COAXIAL jacksTransmit digital audio signals. Use a digital coaxialcable.
Digital coaxial cable
nAUDIO jacksTransmit analog stereo audio signals.
(Stereo L/R jacks)Use a stereo pin cable (RCA cable).
Stereo pin cable
(Stereo mini jack)Use a stereo mini-plug cable.
Stereo mini-plug cable
En129

Using presence speakers
Presence speaker layoutThe following three layout patterns are available for the presence speakers. Choose alayout pattern that suits your listening environment.
• Front Height
• Overhead
• Dolby Enabled SP
Note You can enjoy Dolby Atmos, DTS:X or Cinema DSP 3D with any layout pattern. When using presence speakers, configure the “Layout” setting in the “Setup” menu before automatically
optimizing the speaker settings (YPAO). For details, see the following:– “Setting the layout of the presence speakers” (p.85)
Installing the presence speakers in Front HeightpositionInstall the presence speakers on the front wall (Front Height).
It delivers a natural sound field with excellent linkage of left, right, top and bottomsound spaces, and sound extensity effectively.
Installing the presence speakers in OverheadpositionInstall the presence speakers to the ceiling above the listening position (Overhead).
It delivers realistic overhead sound effects and sound field with excellent linkage offront and rear sound spaces effectively.
Caution Be sure to use speakers that are made for ceiling use and take anti-drop measures. Ask a qualified
contractor or dealer personnel for installation works.
Note When installing presence speakers to a ceiling, install them just above the listening position, or the ceilingbetween the extensions of the front speakers and listening position.
En130

Using Dolby Enabled speakers as the presencespeakersUse Dolby Enabled speakers as the presence speakers.
This utilizes sound reflected from ceiling and lets you enjoy overhead sound only fromspeakers that are placed at the same level as traditional speakers.
Note Place the Dolby Enabled speakers on top of or near the traditional front speakers. A Dolby Enabled speaker unit may be integrated into a traditional speaker. For details, refer to the
instruction manual of the Dolby Enabled speakers.
En131

Glossary
Glossary of audio information
nGlossary of audio decoding formatThis is a glossary of the technical terms related to audio decoding format used in thismanual.Dolby Atmos
Introduced first in the cinema, Dolby Atmos brings a revolutionary sense of dimension andimmersion to the Home Theater experience. Dolby Atmos is an adaptable and scalable objectbased format that reproduces audio as independent sounds (or objects) that can be accuratelypositioned and move dynamically throughout the 3 dimensional listening space during playback.A key ingredient of Dolby Atmos is the introduction of a height plane of sound above the listener.
Dolby Atmos Stream
Dolby Atmos content will be delivered to your Dolby Atmos enabled AV receiver via Dolby DigitalPlus or Dolby TrueHD on Blu-ray Disc, downloadable files and streaming media. A Dolby Atmosstream contains special metadata that describes the positioning of sounds within the room. Thisobject audio data is decoded by a Dolby Atmos AV receiver and scaled for optimum playbackthrough Home Theater speaker systems of every size and configuration.
Dolby Digital
Dolby Digital is a compressed digital audio format developed by Dolby Laboratories, Inc. thatsupports 5.1-channel audio. This technology is used for audio on most DVD disc.
Dolby Digital Plus
Dolby Digital Plus is a compressed digital audio format developed by Dolby Laboratories, Inc. thatsupports 7.1-channel audio. Dolby Digital Plus remains fully compatible with the existingmultichannel audio systems that support Dolby Digital. This technology is used for audiostreaming services on the Internet and audio on BD (Blu-ray Disc).
Dolby Surround
Dolby surround is a next generation surround technology that intelligently up mixes stereo; 5.1and 7.1 content for playback through your surround speaker system. Dolby surround iscompatible with traditional speaker layouts, as well as Dolby Atmos enabled playback systemsthat employ in-ceiling speakers or products with Dolby speaker technology.
Dolby TrueHD
Dolby TrueHD is an advanced lossless audio format developed by Dolby Laboratories, Inc. tooffer a high-definition home theater experience with the quality of the studio master. Dolby TrueHDcan carry up to eight channels of 96 kHz/24-bit audio (up to six channels of 192 kHz/24-bit audio)simultaneously. This technology is used for audio on BD (Blu-ray Disc).
DTS 96/24
DTS 96/24 is a compressed digital audio format that supports 5.1-channel and 96 kHz/24-bitaudio. This format remains fully compatible with the existing multichannel audio systems thatsupport DTS Digital Surround. This technology is used for music DVDs, etc.
DTS Dialog Control
DTS Dialog Control allows you to boost the dialog. This can be useful in noisy environments tohelp make the dialog more intelligible. People with impaired hearing may also benefit. Note thatthe content creator may disable the use of this feature in the mix, so that DTS Dialog Control maynot always be available. Note that updates to your AVR may add more functionality to DTS DialogControl or increase the range of the feature.
DTS Digital Surround
DTS Digital Surround is a compressed digital audio format developed by DTS, Inc. that supports5.1-channel audio. This technology is used for audio on most DVD discs.
DTS-ES
DTS-ES creates total 6.1-channel audio from 5.1-channel sources that are recorded with DTS-ES.This decoder adds a surround back sound to the original 5.1-channel sound. In the DTS-ES Matrix6.1 format, a surround back sound is recorded in the surround channels, and in the DTS-ESDiscrete 6.1 format, a discrete surround back channel is recorded.
DTS Express
DTS Express is a compressed digital audio format that supports 5.1-channel audio and allows ahigher compression rate than the DTS Digital Surround format developed by DTS, Inc. Thistechnology is developed for audio streaming services on the Internet and secondary audio on BD(Blu-ray Disc).
DTS-HD High Resolution Audio
DTS-HD High Resolution Audio is a compressed digital audio format developed by DTS, Inc. thatsupports 7.1-channel and 96 kHz/24-bit audio. DTS-HD High Resolution Audio remains fullycompatible with the existing multichannel audio systems that support DTS Digital Surround. Thistechnology is used for audio on most BD (Blu-ray Disc).
DTS-HD Master Audio
DTS-HD Master Audio is an advanced lossless audio format developed to offer a high-definitionhome theater experience with the quality of the studio master by DTS, Inc. DTS-HD Master Audiocan carry up to eight channels of 96 kHz/24-bit audio (up to six channels of 192 kHz/24-bit audio)simultaneously. This technology is used for audio on BD (Blu-ray Disc).
DTS Neo: 6
DTS Neo: 6 enables 6-channel playback from 2-channel sources. There are two modes available:“Music mode” for music sources and “Cinema mode” for movie sources. This technology providesdiscrete full-bandwidth matrix channels of surround sound.
DTS:X
DTS:X is the next generation object-based, multi-dimensional audio technology from DTS.Unbound from channels, DTS:X conveys the fluid movement of sound to create an incredibly rich,realistic and immersive soundscape - in front of, behind, beside and above the audience - moreaccurately than ever before. DTS:X offers the ability to automatically adapt the audio to thespeaker layout that best fits the space, from a television’s built-in speakers to a home surroundtheater system to a dozen or more speakers in a commercial cinema. Immerse yourself atwww.dts.com/dtsx
En132

DSD (Direct Stream Digital)
DSD (Direct Stream Digital) technology stores audio signals on digital storage media, such asSACD (Super Audio CDs). The signals are stored at a high-frequency sampling rate (such as 11.2MHz). The highest frequency response is equal to or higher than 100 kHz, with a dynamic rangeof 120 dB. This technology offers better audio quality than that used for CDs.
FLAC
FLAC is a file format for lossless audio data compression. FLAC is inferior to lossy compressedaudio formats in compression rate but provides higher audio quality.
MP3
One of the compressed digital audio format used by MPEG. With psychoacoustic technologies,this compression method achieves a high compression rate. Reportedly, it is capable ofcompressing data quantity by about 1/10 maintaining a certain level of audio quality.
MPEG-4 AAC
An MPEG-4 audio standard. It is used for mobile telephones, portable audio players, and audiostreaming services on Internet because it allows a high compression rate of data whilemaintaining better audio quality than MP3.
Neural:X
Neural:X is the latest downmixing/upmixing and spatial remapping technology from DTS. It is builtin to DTS:X to provide upmix of Neural:X-encoded and non-encoded (PCM) data. In DTS:X forAVRs and Sound Bars, Neural:X can produce up to 11.x channels.
PCM (Pulse Code Modulation)
PCM is a signal format under which an analog audio signal is digitized, recorded, and transmitted.This technology is the basis of all other audio format. This technology is used as a lossless audioformat called Linear PCM for audio on a variety of media, including CDs.
Sampling frequency/Quantization bit
Sampling frequency and quantization bits indicate the quantity of information when an analogaudio signal is digitized. These values are noted as in the following example: “48 kHz/24-bit”.
• Sampling frequencySampling frequency (the number of times the signal is sampled per second) is called thesampling rate. When the sampling frequency is higher, the range of frequencies that can beplayed back are wider.
• Quantization bitThe number of quantization bits indicate the degree of accuracy when converting the soundlevel into a numeric value. When the number of quantized bits is higher, the expression of thesound level is more accurate.
WAV
Windows standard audio file format, which defines the method of recording the digital dataobtained by converting audio signals. By default, the PCM method (no compression) is used, butyou can also use other compression methods.
WMA (Windows Media Audio)
One of the compressed digital audio formats developed by Microsoft Corporation. Withpsychoacoustic technologies, this compression method achieves a high compression rate.Reportedly, it is capable of compressing data quantity by about 1/20 maintaining a certain level ofaudio quality.
nGlossary of audio information other than audiodecoding format
This is a glossary of the technical terms related to audio information used in thismanual.Bi-amplification connection (Bi-amp)
A bi-amplification connection uses two amplifiers for a speaker. When you use the bi-amplificationconnection, the unit drives the tweeter and woofer in a speaker with the discrete amplifiers. As aconsequence, the tweeter and woofer provide clear audio signal without the interference.
LFE (Low Frequency Effects) 0.1 channel
This channel reproduces low-frequency bass signals and has a frequency range from 20 Hz to120 Hz. This channel is added to the channels for all bands with Dolby Digital or DTS to enhancelow frequency audio effects. This channel is labeled 0.1 because it is limited to only low frequencyaudio.
Lip sync
Video output sometimes lags behind audio output due to the complexity of signal processingcaused by an increase in video signal capacity. Lip sync is a technique for automaticallycorrecting the timing lag between audio and video output.
Glossary of HDMI and video informationThis is a glossary of the technical terms related to HDMI and video information used inthis manual.Composite video signal
With the composite video signal system, color, brightness, and synchronization data signals arecombined and transmitted with a single cable.
Deep Color
Deep Color is a technology that HDMI specification supports. Deep Color increases the number ofavailable colors within the boundaries defined by the RGB or YCbCr color space. Conventionalcolor systems process the color using 8 bits. Deep Color processes the color with 10, 12, or 16bits. This technology allows HDTVs and other displays to increase from millions of colors tobillions of colors and eliminate on-screen color banding for smooth tonal transitions and subtlegradations between colors.
HDMI
HDMI (High-Definition Multimedia Interface) is the world-wide standard interface for digital audio/video signal transmission. This interface transmits both digital audio and digital video signalsusing a single cable without any loss. HDMI complies with HDCP (High-bandwidth Digital ContentProtection) and provides a secure audio/video interface. For further information on HDMI, visit theHDMI website at “http://www.hdmi.org/”.
x.v.Color
“x.v.Color” is a technology that the HDMI specification supports. It is a more extensive colorspace than sRGB and allows the expression of colors that were not hitherto possible. Whileremaining compatible with the color gamut of sRGB standards, “x.v.Color” expands the colorspace, and thus can produce more vivid, natural images.
En133

Glossary of network informationThis is a glossary of the technical terms related to network information used in thismanual.SSID
SSID (Service Set Identifier) is a name that identifies a particular wireless LAN access point.
Wi-Fi
Wi-Fi (Wireless Fidelity) is a technology that allows an electronic device to exchange data orconnect to the Internet wirelessly using radio waves. Wi-Fi offers the advantage of eliminating thecomplexity of making connections with LAN cables by using wireless connection. Only productsthat complete Wi-Fi Alliance interoperability tests can carry the “Wi-Fi Certified” trademark.
WPS
WPS (Wi-Fi Protected Setup) is a standard established by the Wi-Fi Alliance, which allows easyestablishment of a wireless home network.
Glossary of Yamaha technologiesThis is a glossary of the technical terms related to Yamaha technologies used in thismanual.CINEMA DSP (Digital Sound Field Processor)
Since the surround sound systems were originally designed for use in movie theaters, their effectis best experienced in a theater that has many speakers designed for acoustic effects. Sincehome conditions (such as room size, wall material, and number of speakers) can differ so widely,it is inevitable that there are differences in the sound that you hear. Based on a wealth of actuallymeasured data, CINEMA DSP, Yamaha’s original DSP technology provides the audiovisualexperience of a movie theater in your own home.
CINEMA DSP 3D
The actually measured sound field data contain the information of the height of the sound images.CINEMA DSP 3D mode achieves the reproduction of the accurate height of the sound images sothat it creates the accurate and intensive 3D sound fields in a listening room.
Compressed Music Enhancer
The Compressed Music Enhancer feature compensates for missing harmonics in compressionmusic formats (such as MP3). As a result, this technology provides improved performance for theoverall sound system.
SILENT CINEMA
Yamaha has developed a natural, realistic sound effect DSP algorithm for headphones.Parameters for headphones have been set for each sound program, so that accuraterepresentations of all the sound programs can be enjoyed on headphones.
Virtual CINEMA DSP
Virtual CINEMA DSP allows the system to virtually reproduce the sound field of the surroundspeakers with front left and right speakers. Even if the surround speakers are not connected, theunit creates the realistic sound field in a listening room.
Virtual Presence Speaker (VPS)
Virtual Presence Speaker allows the system to virtually reproduce the height of the 3D sound fieldwithout presence speakers. Even if the presence speakers are not connected, the unit creates the3D sound field in your room.
Virtual Surround Back Speaker (VSBS)
Virtual Surround Back Speaker allows the system to virtually reproduce the sound field of thesurround back speakers with surround speaker. Even if the surround back speakers are notconnected, the unit adds a sense of depth to the rear sound filed of CINEMA DSP.
YPAO (Yamaha Parametric room Acoustic Optimizer)
The Yamaha Parametric room Acoustic Optimizer (YPAO) function detects speaker connections,measures the distances from them to your listening position(s), and then automatically optimizesthe speaker settings, such as volume balance and acoustic parameters, to suit your room.
En134

Supported devices and file formats
Supported Bluetooth® devicesThe following Bluetooth devices can be used by the unit.
• Bluetooth devices that support A2DP can be used.
• Operation of all Bluetooth devices cannot be guaranteed.
Supported USB devicesThe following USB devices can be used by the unit.
• This unit is compatible with USB memory devices that are in FAT16 or FAT32 format. Do not connect any other type of USB devices.
• USB devices with encryption cannot be used.
• Operation of all USB devices cannot be guaranteed.
Supported AirPlay devicesAirPlay works with iPhone, iPad, and iPod touch with iOS 4.3.3 or later, Mac with OS XMountain Lion or later, and PC with iTunes 10.2.2 or later.
Made for.
iPhone 7 Plus, iPhone 7, iPhone SE, iPhone 6s Plus, iPhone 6s, iPhone 6 Plus, iPhone6, iPhone 5s, iPhone 5c, iPhone 5, iPhone 4s
iPad Pro (10.5″), iPad Pro (12.9″) 2nd Generation, iPad Pro (12.9″) 1st Generation,iPad Pro (9.7″), iPad mini 4, iPad Air 2, iPad mini 3, iPad Air, iPad mini 2, iPad mini,iPad (5th generation), iPad (4th generation), iPad (3rd generation), iPad 2
iPod touch (6th generation), iPod touch (5th generation)
(as of February 2018)
Supported file formatsThe following file formats can be used by the unit.
FileSamplingfrequency(kHz)
Quantizationbit (bit)
Bitrate (kbps)Number ofchannels
Support forgaplessplayback
WAV *32/44.1/48/88.2/96/176.4/192
16/24/32 - 2 4
MP3 32/44.1/48 - 8 to 320 2 -
WMA 32/44.1/48 - 8 to 320 2 -
MPEG-4 AAC 32/44.1/48 - 8 to 320 2 -
FLAC32/44.1/48/88.2/96/176.4/192
16/24 - 2 4
ALAC32/44.1/48/88.2/96 16/24 - 2 4
AIFF32/44.1/48/88.2/96/176.4/192
16/24/32 - 2 4
DSD2.8 MHz/5.6 MHz/11.2 MHz
1 - 2 -
* Linear PCM format only. 32 bit-float files cannot be played back.
• The playable file formats differ depending on the software installed on mediaservers (PCs/NAS). Refer to the instruction manual of the server software for details.
• Digital Rights Management (DRM) contents cannot be played back.
En135

Video signal flow
Video signal flowVideo signals input from a video device to the unit are output to a TV as follows.
HDMIHDMI
VIDEOVIDEO
HDMI HDMI
VIDEO MONITOR OUT
Video device The unit TV
HDMI connection
Composite video connection
HDMI in HDMI out
VIDEO in VIDEO out
En136
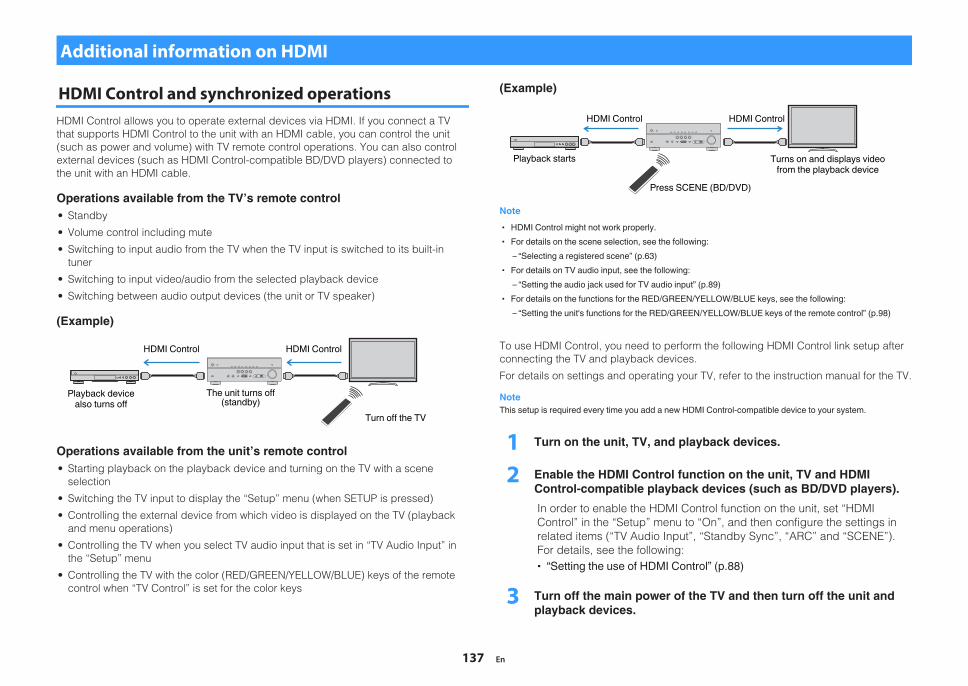
Additional information on HDMI
HDMI Control and synchronized operationsHDMI Control allows you to operate external devices via HDMI. If you connect a TVthat supports HDMI Control to the unit with an HDMI cable, you can control the unit(such as power and volume) with TV remote control operations. You can also controlexternal devices (such as HDMI Control-compatible BD/DVD players) connected tothe unit with an HDMI cable.
Operations available from the TV’s remote control• Standby
• Volume control including mute
• Switching to input audio from the TV when the TV input is switched to its built-intuner
• Switching to input video/audio from the selected playback device
• Switching between audio output devices (the unit or TV speaker)
(Example)
HDMI Control HDMI Control
The unit turns off(standby)
Playback devicealso turns off
Turn off the TV
Operations available from the unit’s remote control• Starting playback on the playback device and turning on the TV with a scene
selection
• Switching the TV input to display the “Setup” menu (when SETUP is pressed)
• Controlling the external device from which video is displayed on the TV (playbackand menu operations)
• Controlling the TV when you select TV audio input that is set in “TV Audio Input” inthe “Setup” menu
• Controlling the TV with the color (RED/GREEN/YELLOW/BLUE) keys of the remotecontrol when “TV Control” is set for the color keys
(Example)
HDMI Control HDMI Control
Press SCENE (BD/DVD)
Playback starts Turns on and displays videofrom the playback device
Note HDMI Control might not work properly. For details on the scene selection, see the following:
– “Selecting a registered scene” (p.63) For details on TV audio input, see the following:
– “Setting the audio jack used for TV audio input” (p.89) For details on the functions for the RED/GREEN/YELLOW/BLUE keys, see the following:
– “Setting the unit's functions for the RED/GREEN/YELLOW/BLUE keys of the remote control” (p.98)
To use HDMI Control, you need to perform the following HDMI Control link setup afterconnecting the TV and playback devices.
For details on settings and operating your TV, refer to the instruction manual for the TV.
NoteThis setup is required every time you add a new HDMI Control-compatible device to your system.
1 Turn on the unit, TV, and playback devices.
2 Enable the HDMI Control function on the unit, TV and HDMIControl-compatible playback devices (such as BD/DVD players).
In order to enable the HDMI Control function on the unit, set “HDMIControl” in the “Setup” menu to “On”, and then configure the settings inrelated items (“TV Audio Input”, “Standby Sync”, “ARC” and “SCENE”).For details, see the following: “Setting the use of HDMI Control” (p.88)
3 Turn off the main power of the TV and then turn off the unit andplayback devices.
En137

4 Turn on the unit and playback devices and then turn on the TV.
5 Switch the TV input to display the video from the unit.
6 Check that the input, to which the playback device is connectedon the unit, is selected.
If not, select the input source manually.
7 Check that the video from the playback device is displayed on theTV.
8 Check that the unit is properly synchronized with the TV byturning off the TV or adjusting the TV volume with the TV remotecontrol.
Note If HDMI Control does not work properly, the problem may be solved by turning the playback device off and
on again, or by unplugging the power plug and plugging it in again. Also, HDMI Control may not workproperly if the number of connected devices exceeds the limit. In this case, disable HDMI Control ondevices not in use.
If the unit is not synchronized to the TV’s power operations, check the priority of the audio output settingon the TV.
We recommend using TV and playback devices from the same manufacturer so that HDMI Control worksmore effectively.
Audio Return Channel (ARC)ARC allows you to input TV audio to the unit with the HDMI cable which transmits videosignal to the TV.
Check the following after the HDMI Control settings.
Note For details on the HDMI Control settings, see the following: “HDMI Control and synchronized operations” (p.137)
1 Select a TV program with the TV remote control.
2 Check that the input source of the unit will be automaticallyswitched to “AUDIO1” and the TV audio will be played back on theunit.
If you cannot hear the TV audio, check the following:
• “ARC” in the “Setup” menu is set to “On”. For details, see the following:– “Setting the use of ARC” (p.89)
• The HDMI cable is connected to the ARC-compatible HDMI jack (HDMI jack marked“ARC”) on the TV.
Some HDMI jack on the TV is not compatible with ARC. For details, refer to theinstruction manual for the TV.
Note If the audio is interrupted while using ARC, set “ARC” in the “Setup” menu to “Off” and use a digital optical
cable to input TV audio to the unit. For details, see the following:– “Setting the use of ARC” (p.89)– “OPTICAL jack” (p.129)
When using ARC, connect a TV with an HDMI cable that supports ARC. “AUDIO1” is set as TV audio input at the factory. If you have connected any external device to the AUDIO
1 jacks, use “TV Audio Input” in the “Setup” menu to change the TV audio input assignment. To use theSCENE function, you also need to change the input assignment for SCENE (TV). For details, see thefollowing:– “Setting the audio jack used for TV audio input” (p.89)– “Registering a scene” (p.64)
En138

HDMI signal compatibilityConfirm the following HDMI signal used by the unit.
• When CPPM copy-protected DVD-Audio is played back, video/audio signals maynot be output, depending on the type of the DVD player.
• The unit is not compatible with HDCP-incompatible HDMI or DVI devices. Fordetails, refer to the instruction manual for each device.
• To decode audio bitstream signals on the unit, set the playback deviceappropriately so that the device outputs the bitstream audio signals directly (doesnot decode the bitstream signals on the playback device). For details, refer to theinstruction manual for the playback device.
• If the playback device can decode the bitstream audio signals of audiocommentaries, you can play back the audio sources with the audio commentariesmixed down by using digital audio input (OPTICAL or COAXIAL jacks). For details,refer to the instruction manual for the playback device. The unit is not compatiblewith audio commentaries for BD, such as audio content downloaded from theinternet.
En139

Trademarks
TrademarksThe trademarks used in this manual are as follows.
Manufactured under license from Dolby Laboratories. Dolby, DolbyAtmos, Dolby Surround, Dolby Vision, and the double-D symbol aretrademarks of Dolby Laboratories.
For DTS patents, see http://patents.dts.com. Manufactured underlicense from DTS, Inc. DTS, the Symbol, DTS in combination withthe Symbol, DTS:X, and the DTS:X logo are registered trademarksor trademarks of DTS, Inc. in the United States and/or othercountries. © DTS, Inc. All Rights Reserved.
Supports iOS 7 or later for setup using Wireless AccessoryConfiguration.
“Made for iPod,” “Made for iPhone,” and “Made for iPad” mean thatan electronic accessory has been designed to connect specificallyto iPod, iPhone, or iPad, respectively, and has been certified by thedeveloper to meet Apple performance standards.
Apple is not responsible for the operation of this device or itscompliance with safety and regulatory standards.
Please note that the use of this accessory with iPod, iPhone, oriPad may affect wireless performance.
iTunes, AirPlay, iPad, iPhone, iPod, and iPod touch are trademarksof Apple Inc., registered in the U.S. and other countries.
iPad Air and iPad mini are trademarks of Apple Inc.
App Store is a service mark of Apple Inc.
The terms HDMI, the HDMI Logo, and High-Definition MultimediaInterface are trademarks or registered trademarks of HDMILicensing LLC in the United States and other countries.
x.v.Color™
“x.v.Color” is a trademark of Sony Corporation.
Windows™
Windows is a registered trademark of Microsoft Corporation in theUnited States and other countries.
Internet Explorer, Windows Media Audio and Windows MediaPlayer are either registered trademarks or trademarks of MicrosoftCorporation in the United States and/or other countries.
Android™
Google Play™
Android and Google Play are trademarks of Google Inc.
The Wi-Fi CERTIFIED™ Logo and Wi-Fi Protected Setup arecertification marks of Wi-Fi Alliance®.
Wi-Fi, Wi-Fi CERTIFIED, Wi-Fi Protected Setup and WPA2 areregistered trademarks or trademarks of Wi-Fi Alliance®.
The Bluetooth® word mark and logos are registered trademarksowned by Bluetooth SIG, Inc. and any use of such marks byYamaha Corporation is under license.
“SILENT CINEMA” is a trademark of Yamaha Corporation.
MusicCast is a trademark or registered trademark of YamahaCorporation.
Yamaha Eco-Label is a mark that certifies products of highenvironmental performance.
Google Noto Fonts
This product uses the following fonts.
Copyright © June 2015, Google(https://www.google.com/get/noto/#sans-lgc), with Reserved FontName Noto Sans Version 1.004.
Copyright © June 2015, Google(https://www.google.com/get/noto/help/cjk/), with Reserved FontName Noto Sans CJK Version 1.004.
This Font Software is licensed under the SIL Open Font License,Version1.1.
This license is available with a FAQ at: http://scripts.sil.org/OFL
Explanations regarding GPL
This product utilizes GPL/LGPL open-source software in somesections. You have the right to obtain, duplicate, modify, andredistribute this open-source code only. For information on GPL/LGPL open source software, how to obtain it, and the GPL/LGPLlicense, refer to the Yamaha Corporation website(http://download.yamaha.com/sourcecodes/musiccast/).
Licenses
For information on the licenses of the third-party software in thisproduct, refer to the following.
http://(IP address of this product*)/licenses.html
* IP address of this product is checked with MusicCastCONTROLLER.
En140

Specifications
SpecificationsThe specifications of this unit are as follows.
Input jacks
Analog Audio• Audio x 4 (including AUX)
Digital Audio (Supported frequencies: 32 kHz to 96 kHz)• Optical x 1• Coaxial x 2
Video• Composite x 3
HDMI Input• HDMI x 4
Other jacks• USB x 1 (USB2.0)• NETWORK (Wired) x 1 (100Base-TX/10Base-T)
Output jacks
Analog Audio• Speaker Out x 7 (FRONT L/R, CENTER, SURROUND L/R, SURROUND BACK L/R*)
* Note: assignment is possible [SURROUND BACK, PRESENCE, BI-AMP (FRONT L/R), ZONEB]
• Subwoofer Out x 2 (mono x 2)• Headphone x 1
Video• Composite x 1
HDMI Output• HDMI OUT x 1
Other jacks
YPAO MIC x 1
HDMI
HDMI Features:• 4K UltraHD Video (include 4K/60, 50Hz 10/12bit), 3D Video, ARC (Audio Return Channel), HDMI
Control (CEC), Auto Lip Sync, Deep Color, “x.v.Color”, HD audio playback, Selectable HDMIinput in HDMI standby mode, 21:9 Aspect Ratio, BT.2020 Colorimetry, HDR Compatible(HDR10, Dolby Vision, HLG)
Video Format (Repeater Mode)• VGA• 480i/60 Hz• 576i/50 Hz• 480p/60 Hz• 576p/50 Hz• 720p/60 Hz, 50 Hz• 1080i/60 Hz, 50 Hz• 1080p/60 Hz, 50 Hz, 30 Hz, 25 Hz, 24 Hz• 4K/60Hz, 50Hz, 30 Hz, 25 Hz, 24 Hz
Audio Format• Dolby Atmos• Dolby TrueHD• Dolby Digital Plus• Dolby Digital• DTS:X• DTS-HD Master Audio• DTS-HD High Resolution Audio• DTS Express• DTS• DSD 2-ch to 6-ch (2.8 MHz)• PCM 2-ch to 8-ch (Max. 192 kHz/24-bit)
Content Protection: HDCP 2.2 compatible
Link Function: CEC supported
TUNER
Analog Tuner• [U.K., Europe, Russia and Middle East models] FM/AM with Radio Data System x 1 (TUNER)• [Other models] FM/AM x 1 (TUNER)
En141

USB
Capable of Mass Storage Class USB Memory
Current Supply Capacity: 1.0 A
Bluetooth
Sink Function• Source Device to AVR (ex. Smartphone/Tablet)• Supported profile
– A2DP, AVRCP• Supported codec
– SBC, AAC
Bluetooth version• Ver. 4.2
Wireless output• Bluetooth Class 2
Maximum communication distance• 10 m (33 ft) without interference
Network
PC Client Function
AirPlay supported
Internet Radio
Wi-Fi function• Capable of WPS by PIN Method and Push-Button-Method• Capable of sharing with iOS devices by wireless connection• Available Security Method: WEP, WPA2-PSK (AES), Mixed Mode, None• Wireless LAN Standards: IEEE 802.11 a/b/g/n/ac*
* 20 MHz channel bandwidth only
Compatible Decoding Formats
Decoding Format• Dolby Atmos• Dolby TrueHD, Dolby Digital Plus• Dolby Digital• DTS:X• DTS-HD Master Audio, DTS-HD High Resolution Audio, DTS Express• DTS, DTS 96/24, DTS-ES Matrix 6.1, DTS-ES Discrete 6.1
Post Decoding Format• Dolby Surround• DTS Neo: 6 Music, DTS Neo: 6 Cinema• Neural:X
Audio Section
Rated Output Power (2-channel driven)
• [U.S.A. and Canada models] (20 Hz to 20 kHz, 0.09% THD, 8 Ω)• [Other models] (20 Hz to 20 kHz, 0.09% THD, 6 Ω)
– Front L/R 80 W+80 W
• [U.S.A. and Canada models] (1 kHz, 0.9% THD, 8 Ω)
– Front L/R 95 W+95 W
– Center 95 W
– Surround L/R 95 W+95 W
– Surround Back L/R 95 W+95 W
Rated Output Power (1-channel driven)
• [U.S.A. and Canada models] (1 kHz, 0.9% THD, 8 Ω)• [Other models] (1 kHz, 0.9% THD, 6 Ω)
– Front L/R, Center, Surround L/R, Surround Back L/R 115 W/ch
Maximum Effective Output Power (1-channel driven)
• [U.S.A. and Canada models]
(1 kHz, 10% THD, 8 Ω)– Front L/R, Center, Surround L/R, Surround Back L/R
140 W/ch
(1 kHz, 10% THD, 6 Ω)– Front L/R, Center, Surround L/R, Surround Back L/R
145 W/ch
• [Other models] (1 kHz, 10% THD, 6 Ω)
– Front L/R, Center, Surround L/R, Surround Back L/R 135 W/ch
Dynamic Power (IHF)
• [U.S.A. and Canada models]
– Front L/R (8/6/4/2 Ω) 120/140/170/190 W
• [Other models]
– Front L/R (6/4/2 Ω) 140/170/190 W
Damping Factor
• Front L/R, 20 Hz to 20 kHz, 8 Ω 100 or more
Input Sensitivity / Input Impedance
• AV 2 etc. (1 kHz, 100 W/6 Ω) 200 mV/47 kΩ
En142
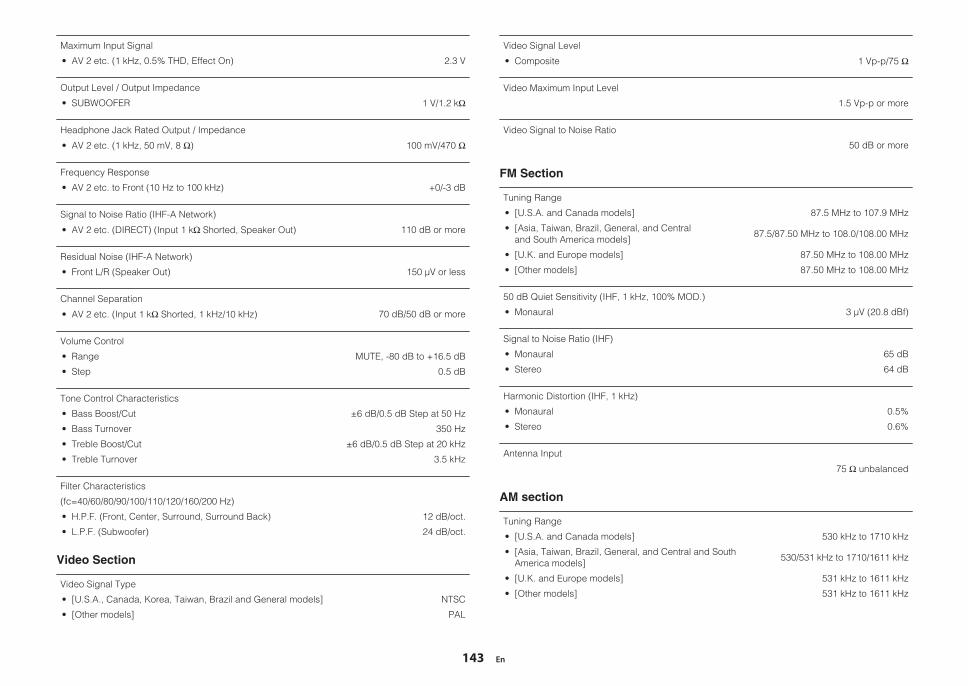
Maximum Input Signal
• AV 2 etc. (1 kHz, 0.5% THD, Effect On) 2.3 V
Output Level / Output Impedance
• SUBWOOFER 1 V/1.2 kΩ
Headphone Jack Rated Output / Impedance
• AV 2 etc. (1 kHz, 50 mV, 8 Ω) 100 mV/470 Ω
Frequency Response
• AV 2 etc. to Front (10 Hz to 100 kHz) +0/-3 dB
Signal to Noise Ratio (IHF-A Network)
• AV 2 etc. (DIRECT) (Input 1 kΩ Shorted, Speaker Out) 110 dB or more
Residual Noise (IHF-A Network)
• Front L/R (Speaker Out) 150 μV or less
Channel Separation
• AV 2 etc. (Input 1 kΩ Shorted, 1 kHz/10 kHz) 70 dB/50 dB or more
Volume Control
• Range MUTE, -80 dB to +16.5 dB
• Step 0.5 dB
Tone Control Characteristics
• Bass Boost/Cut ±6 dB/0.5 dB Step at 50 Hz
• Bass Turnover 350 Hz
• Treble Boost/Cut ±6 dB/0.5 dB Step at 20 kHz
• Treble Turnover 3.5 kHz
Filter Characteristics
(fc=40/60/80/90/100/110/120/160/200 Hz)
• H.P.F. (Front, Center, Surround, Surround Back) 12 dB/oct.
• L.P.F. (Subwoofer) 24 dB/oct.
Video Section
Video Signal Type
• [U.S.A., Canada, Korea, Taiwan, Brazil and General models] NTSC
• [Other models] PAL
Video Signal Level
• Composite 1 Vp-p/75 Ω
Video Maximum Input Level
1.5 Vp-p or more
Video Signal to Noise Ratio
50 dB or more
FM Section
Tuning Range
• [U.S.A. and Canada models] 87.5 MHz to 107.9 MHz
• [Asia, Taiwan, Brazil, General, and Centraland South America models] 87.5/87.50 MHz to 108.0/108.00 MHz
• [U.K. and Europe models] 87.50 MHz to 108.00 MHz
• [Other models] 87.50 MHz to 108.00 MHz
50 dB Quiet Sensitivity (IHF, 1 kHz, 100% MOD.)
• Monaural 3 μV (20.8 dBf)
Signal to Noise Ratio (IHF)
• Monaural 65 dB
• Stereo 64 dB
Harmonic Distortion (IHF, 1 kHz)
• Monaural 0.5%
• Stereo 0.6%
Antenna Input
75 Ω unbalanced
AM section
Tuning Range
• [U.S.A. and Canada models] 530 kHz to 1710 kHz
• [Asia, Taiwan, Brazil, General, and Central and SouthAmerica models] 530/531 kHz to 1710/1611 kHz
• [U.K. and Europe models] 531 kHz to 1611 kHz
• [Other models] 531 kHz to 1611 kHz
En143

General
Power Supply
• [U.S.A. and Canada models] AC 120 V, 60 Hz
• [Brazil and Central and South Americamodels] AC110 to 120/220 to 240 V, 50/60 Hz
• [Taiwan model] AC110 to 120 V, 50/60 Hz
• [China model] AC 220 V, 50 Hz
• [Korea model] AC 220 V, 60 Hz
• [Australia model] AC 240 V, 50 Hz
• [UK, Europe, Russia and Middle Eastmodels] AC 230 V, 50 Hz
• [Asia and General models] AC 220 to 240 V, 50/60 Hz
Power Consumption
260 W
Standby Power Consumption
• HDMI Control Off, Standby Through Off 0.1 W
• HDMI Control On, Standby Through Auto (No Signals) 1.0 W
• HDMI Control On, Standby Through On (No Signals) 1.0 W
• HDMI Control Off, Standby Through Off, Network Standby On
– Wired 1.3 W
– Wireless (Wi-Fi) 1.4 W
• HDMI Control On, Standby Through On, Network Standby On
– Wired 2.1 W
– Wireless (Wi-Fi) 2.2 W
• HDMI Control Off, Standby Through Off, Bluetooth Standby On 1.4 W
• HDMI Control On, Standby Through On, Bluetooth Standby On 2.0 W
Maximum Power Consumption
• [Taiwan and General models] 600 W
Dimensions (W x H x D)
435 x 161 x 327 mm (17-1/8” x 6-3/8” x 12-7/8”)
Reference Dimensions (with wireless antenna upright)
* Including legs and protrusions
435 x 225.5 x 327 mm (17-1/8” x 8-7/8” x 12-7/8”)
Weight
8.1 kg (17.9 lbs)
* The contents of this manual apply to the latest specifications as of the publishing date. To obtainthe latest manual, access the Yamaha website then download the manual file.
En144

Default settings
Default settings of the OptionmenuThe default settings of the “Option” menu are asfollows.
Tone Control Treble, BassBypass (0.0 dB)
* When both “Treble” and “Bass” are0.0 dB, “Bypass” appears.
DSP/Surround
• DSP Level 0 dB
• Adaptive DRC Off
• Enhancer
– TUNER, (network sources), AirPlay,SERVER, NET RADIO, Bluetooth, USB On
– Others Off
Volume Trim
• Input Trim 0.0 dB
• Subwoofer Trim 0.0 dB
• ZoneB Trim 0.0 dB
Lipsync On
Video Out Off
FM Mode Stereo
Shuffle Off
Repeat Off
Volume Interlock Limited
Default settings of the SetupmenuThe default settings of the “Setup” menu are as follows.
Speaker
Configuration
• Power Amp Assign Presence
• Subwoofer Use
• Front Small
• Center Small
• Surround Small
• Surround Back None
• Presence Small
• Layout Front Height
• Crossover 80 Hz
• Subwoofer Phase Normal
• Extra Bass Off
• Virtual CINEMA FRONT Off
Distance 3.00 m (10.0 ft)
Level 0.0 dB
Equalizer Off
Test Tone Off
HDMI
HDMI Control Off
Audio Output Off
Standby Through Off
4K Upscaling Off
HDCP Version
• HDMI 1-4 Auto
TV Audio Input AUDIO1
Standby Sync Auto
ARC On
SCENE
• BD / DVD, TV On
• NET, RADIO Off
Sound
DSP Parameter
• Center Spread Off
• Center Image 0.3
• Monaural Mix Off
Lipsync
• Select Auto
(This setting is effective when a TV thatsupports an automatic lipsync function is
connected to the unit via HDMI.)
• Adjustment 0 ms
Dialogue
• Dialogue Level 0
• DTS Dialogue Control 0
• Dialogue Lift 0
(This setting is available only whenone of the sound programs (except
for 2ch Stereo and 7ch Stereo) isselected when presence speakers
are used, or Virtual PresenceSpeaker (VPS) is working.)
En145

Volume
• Scale dB
• Dynamic Range Maximum
• Max Volume +16.5 dB
• Initial Volume Off
• ZoneB Volume Sync.
ECO
Auto Power Standby
• U.K., Europe, Russia, Middle East andKorea models 20 minutes
• Other models Off
ECO Mode Off
Function
Input Rename
• HDMI 1-4 Auto
• Others Manual
(For AUX, AUDIO3, TUNER, MusicCastLink, SERVER, NET RADIO, USB only
“Manual” can be selected.)
Input Skip Off
Dimmer 0
Memory Guard Off
Remote Color Key Default
Network
Information -
Network Connection Wired
IP Address
• DHCP On
MAC Address Filter Off
DMC Control Enable
Network Standby Auto
Network Name -
MusicCast Link Power Interlock Off
Network Update -
Bluetooth
Bluetooth On
Audio Receive
• Disconnect -
• Bluetooth Standby On
Language
English
Default settings of theADVANCED SETUP menuThe default settings of the “ADVANCED SETUP” menuare as follows.
SP IMP.
(U.S.A. and Canada models only)8 Ω MIN
REMOTE ID ID1
TU
(Asia, Taiwan, Brazil, General, and Centraland South America models only)
FM50/AM9
TV FORMAT
• U.S.A., Canada, Korea, Taiwan, Braziland Central and South America models NTSC
• Other models PAL
4K MODE MODE 1
DTS MODE MODE 1
BKUP/RSTR BKUP
INIT CANCEL
UPDATE USB
VERSION -
En146

Yamaha Global Sitehttps://www.yamaha.com/
Yamaha Downloadshttp://download.yamaha.com/
Manual Development Group© 2018 Yamaha Corporation
Published 03/2018 NV-A0
AV17-0136