roik 2 universal navigation box · 2017. 9. 7. · (ilitek ili2139ds) [email protected] ....
TRANSCRIPT
- MODEL : ROiK Octa
ROiK Octa
- DATE : 2017.05.31Carso
lution
s.com
.ua
[email protected] www.carsolutions.com.ua

1. Main Spec.
OS : Android 5.1.1(Lollipop)
CPU : NXP5430Q - Cortex-A53 Octa Core @1.6Ghz Mali-400 MP4 GPU
Memory : 2GB DDR3 @800Mhz
NAND : 16GB (eMMC)
SD Card : 8GB (SDHC Class10, Max 32GB support, FAT32)
USB : USB2.0 High Speed Port x 2
Telecommunication : 802.11 b/g/n WiFi, Bluetooth 4.0
GPS : Ublox7
Touch : Resistor and Capacitive touch support both
RGB : 800x480 / 480x234
LVDS OUT : Digital 800x480 LVDS OUT
Speaker : 2W
FM Transmitter : 88.0Mhz~108.0Mhz
I/O : AV IN, Stereo Audio Out
Voltage: DC 12V ~ 24V
Temperature : Storage -20 C ~ +80 C/ Operating -15 C ~ +70 C
Size: 122mm(W) x 88mm(H) x 23mm(D)
Weight : 184gCarso
lution
s.com
.ua
[email protected] www.carsolutions.com.ua

2. Dimension
146mm(W) x 88mm(H) x 23mm(D)
146mm
88mm
23mm
Carso
lution
s.com
.ua
[email protected] www.carsolutions.com.ua

3. External Appearance - 1
POWERRGB OUT
GPS
DIP SW AV IN/OUT
USB2KEYMODE SWSD SLOT
DIGITAL
LVDS OUT
USB1
UARTWIFI/BT
Carso
lution
s.com
.ua
[email protected] www.carsolutions.com.ua

4. External Appearance - 2
USB2 USB1KEYSD SLOT
DIGITAL
LVDS OUTPOWER RGB OUT DIP SWAV IN/OUT GPS WIFI/BTUART
MODE SW
Carso
lution
s.com
.ua
[email protected] www.carsolutions.com.ua

5. Power Connector Pin Assignment
BAT(Battery Power)
GND
ACC 12V IN
1
2
3
1 2 3
Carso
lution
s.com
.ua
[email protected] www.carsolutions.com.ua

6. RGB OUT Connector Pin Assignment
1 2 3 4 5 6 7
Red
Green
Blue
1
2
3
C-Sync
GND
NC
4
5
6
NC7
Carso
lution
s.com
.ua
[email protected] www.carsolutions.com.ua

7. AV IN/OUT Connector Pin Assignment
531 97 151311 1917
642 108 161412 2018
2321
2422
Speaker +
AUX OUT R
AUX OUT L
Capacitive Touch SCL
Capacitive Touch SDA
Capacitive Touch Interrupt
Touch X-
Touch X+
UART TX
UART RX
AVIN
NC
1
3
5
7
9
11
13
15
17
19
21
23
Speaker -
GND
GND
GND
Capacitive Touch 3.3V
Capacitive Touch Reset
Touch Y-
Touch Y+
MIC +
MIC -
GND
FMT ANTENA
2
4
6
8
10
12
14
16
18
20
22
24
Carso
lution
s.com
.ua
[email protected] www.carsolutions.com.ua

8. Product Composition
GPS Box Power Cable AV Cable RGB OUT Cable
External GPS
Antenna
Capacitive
Touch Cable
Resistor
Touch Cable
Speaker
SD Card WiFi/BT
AntennaLVDS OUT
HDMI Cable
MIC
SD Card
Reader 1EACarso
lution
s.com
.ua
[email protected] www.carsolutions.com.ua

9. DIP S/W Setting
* ON : DOWN, OFF : UP
ON 1 2
ON 1 2 3 4
PIN
1
2
OFF
DIGITAL LVDS OUT
ON
RGB OUT
Use Car GPS Cable (Option)
Use External GPS Antenna
PIN
1
2
3
4
OFF
Resistor Touch,UART Touch
ON
Capacitive Touch
RGB 800x480 RGB 480x234
NC NC
Capacitive Touch(GOODIX GT9XX)
Capacitive Touch(ILITEK ILI2139DS)
* DIP S/W 2 Must ON
* USE DIP S/W4 when DIP S/W 1 is ON
Carso
lution
s.com
.ua
[email protected] www.carsolutions.com.ua

10. DIP S/W Setting 2
Use UART or Resistor Touch
Use Capacitive Touch (GOODIX GT9XX)
DIGITAL LVDS OUT 800x480 (Block RGB Signal)
RGB 800x480
RGB 480x234
GPS Power OFF(Use car GPS Cable – Option)
GPS Power ON(Use External GPS Antenna– MUST ON)
ON 1 2 ON 1 2 3 4
ON 1 2 ON 1 2 3 4
ON 1 2 ON 1 2 3 4
ON 1 2 ON 1 2 3 4
ON 1 2 ON 1 2 3 4
ON 1 2
ON 1 2 ON 1 2 3 4
ON 1 2 ON 1 2 3 4
Use Capacitive Touch (ILITEK ILI2139DS)ON 1 2 ON 1 2 3 4
Carso
lution
s.com
.ua
[email protected] www.carsolutions.com.ua

11. Install Manual - Capacitive touch
VIDEO
INTERFACE
RGB IN
ACC 12V
Capacitive touch
Speaker
GPS
AUX OUT (CAR)
V AV IN
L
R
+ -
Car battery
VIDEO
INTERFACE
LVDS IN
ON 1 2
* Digital LVDS OUT always on , DIP S/W 1 = OFF * RGB OUT = DIP S/W 1 = ON * Capacitive Touch = DIP S/W 1 = ON
ON 1 2 3 4
Use Capacitive Touch
(Goodix GT9xx)
ON 1 2 3 4
Use Capacitive Touch
(ILITEK ILI2139DS)
Carso
lution
s.com
.ua
[email protected] www.carsolutions.com.ua

11-1. Capacitive Touch Setting (GOODIX GT9xx)
1.Run Device Setting app 2. Select Capacitive Touch Setting
3.Select adjust cap setting file 4. Waiting for reset device
* DIP S/W 1 = ON, DIP S/W 4 = OFF : Capacitive Touch Goodix GT9xx Model DIP S/W 1 = ON, DIP S/W 4 = ON : Only Audi Q7 Capacitive Touch ILITEK ILI2139DS ModelCar
solut
ions.c
om.u
a
[email protected] www.carsolutions.com.ua

12. Install Manual - Resistive touch
Resistor touch
VIDEO
INTERFACE
RGB IN
ACC 12V
V AV IN
L
R
+ -
Car Battery
VIDEO
INTERFACE
LVDS IN
ON 1 2
Speaker
* Digital LVDS OUT always on , DIP S/W 1 = OFF * RGB OUT = DIP S/W 1 = ON * Resistive Touch = DIP S/W 1 = OFF
ON 1 2 3 4
Use Resistive Touch
Carso
lution
s.com
.ua
[email protected] www.carsolutions.com.ua

13. Install Manual – UART touch
TX
RX
RX
TX
VIDEO
INTERFACE
RGB IN
ACC 12V
V AV IN
L
R
+ -
Car Battery
VIDEO
INTERFACE
LVDS IN
ON 1 2
Speaker
ROiK UART RX connect with UART TX
ROiK UART TX connect with UART RX
* Digital LVDS OUT always on , DIP S/W 1 = OFF * RGB OUT = DIP S/W 1 = ON * UART Touch = DIP S/W 1 = OFF
Use UART Touch
ON 1 2 3 4
Carso
lution
s.com
.ua
[email protected] www.carsolutions.com.ua

14. Calibration – Resistive touch
Push button 2~3 sec after booting
Calibration mode After calibration, push screen few second
* Capacitive touch panel no need set calibrationCarso
lution
s.com
.ua
[email protected] www.carsolutions.com.ua
15. Device Settings
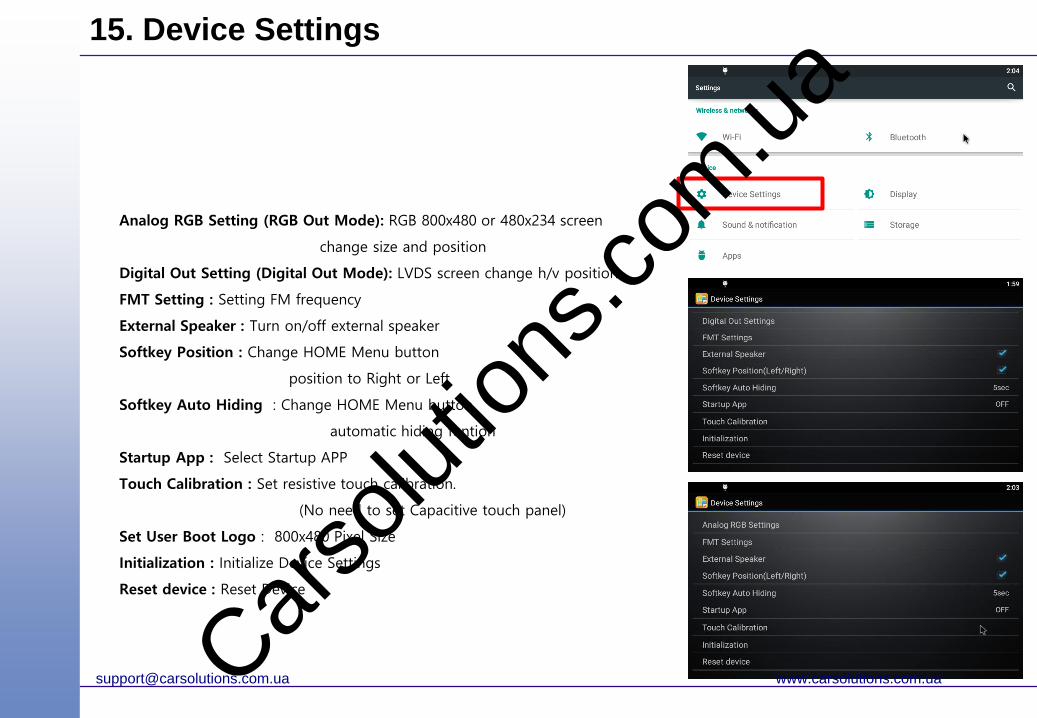
Analog RGB Setting (RGB Out Mode): RGB 800x480 or 480x234 screen
change size and position
Digital Out Setting (Digital Out Mode): LVDS screen change h/v position
FMT Setting : Setting FM frequency
External Speaker : Turn on/off external speaker
Softkey Position : Change HOME Menu button
position to Right or Left
Softkey Auto Hiding : Change HOME Menu button
automatic hiding funtion
Startup App : Select Startup APP
Touch Calibration : Set resistive touch calibration.
(No need to set Capacitive touch panel)
Set User Boot Logo : 800x480 Pixel Size
Initialization : Initialize Device Settings
Reset device : Reset Device
Carso
lution
s.com
.ua
[email protected] www.carsolutions.com.ua

16. FMT Settings
FM Transmitter On/Off or select FM frequency.
Button + , - change FM frequency by 0.05Mhz FM.
Carso
lution
s.com
.ua
[email protected] www.carsolutions.com.ua

17. User Logo Update
Set User Boot Logo Activate
1. On SD-Card Root folder exist “userlogo” file. (File type = BMP image file)
2. Run Device Setting App
3. Click ‘Set Use Boot Logo’ and reboot ROIK
If bmp file path is not on “/sdcard/userlogo”, and file name is not same,
‘Set User Boot Logo’ not activate
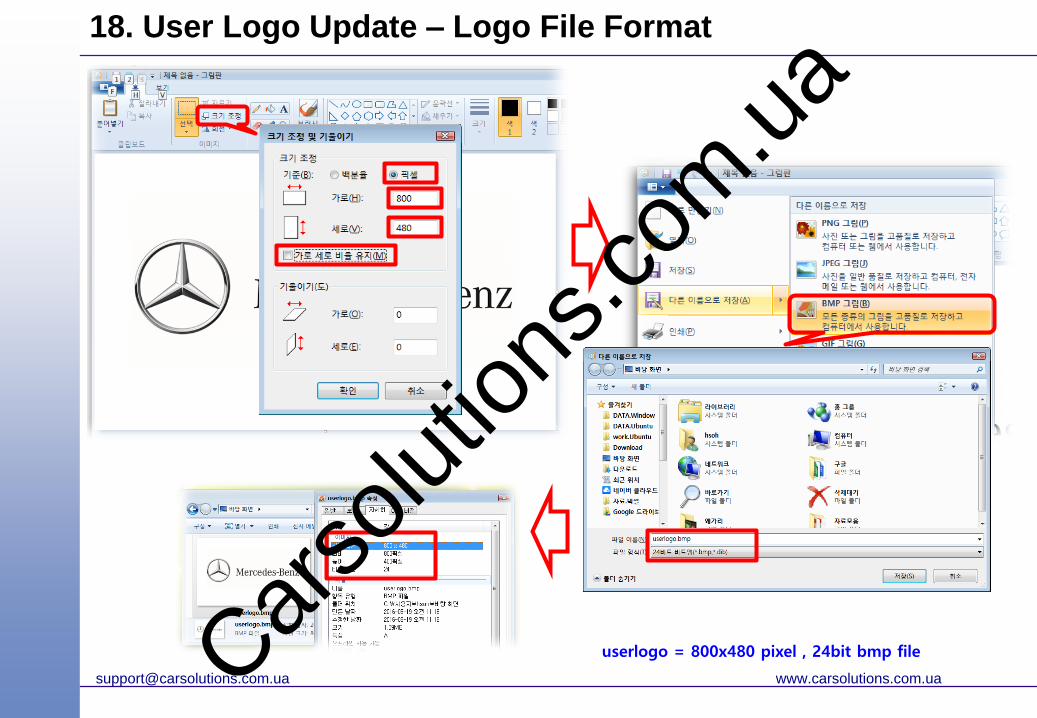
* userlogo = 800x480 pixel , 24bit bmp file
Hidden Menu
Carso
lution
s.com
.ua
[email protected] www.carsolutions.com.ua
18. User Logo Update – Logo File Format
userlogo = 800x480 pixel , 24bit bmp fileCarso
lution
s.com
.ua
[email protected] www.carsolutions.com.ua

19. Firmware Upgrade
Copy ‘system_roik4’ folder to SD Card root and insert to GPS.
Push hold this button and turn on (re-connect power cable), it will start upgrade
*‘/sdcard/system_roik4’ Folder have ‘partmap.txt / boot.img / root.img’ files
Carso
lution
s.com
.ua
[email protected] www.carsolutions.com.ua