roger´s systems & services gmbhwindshield wipers are not damaged by the impact spot; thus, no...
TRANSCRIPT

- 1 -
roger´s Systems & Services GmbH1030 Wien, Hohlweggasse 10, Österreich, Tel.: ++43/1/798 51 68, Fax: ++43/1/798 51 68 20
web: www.rogers.co.at, e-mail: [email protected]
FN 266837 H / Handelsgericht: 1030 Wien, Marxergasse 1A, Geschäftsführerin: Janete Koop, UID-Nr.: ATU 62017944
Instructions for the use of Professional / Complete / Workshop and Economy Setedited by Roger Koop
1. 0. General information on damage caused by stones on laminated windshields of motor vehicles and on roger´s windshield repair system:
1. 1. The problem: Fractures on laminated windshields caused by stones.
1. 2. The solution: Repair of the damage using roger´s windshield repair system instead of replacement, because ...
... damage caused by stones may be considered as a major defect in the legal test to extend the vehicle registration.
... a windshield fracture lowers the resale value of a used car.
... a vehicle with a fractured windshield might not be allowed to cross a international border.
... repairing a windshield is a much cheaper alternative to replacing it, and, from a macro-economic point of view, saves enormous amounts of money.
... most insurers will be happy to pay less for a windshield repair than for its replacement.
... the repair system is a modern alternative to throwing away damaged windshields,whichcannotberecycled,asthiswouldnotbeprofitable.
... most car repair shops can afford not take part in this trend (yearly more than 2.000.000 windshields will be repaired worldwide).
... with money saving repair a car repair shop will give greater satisfaction to at its customers, if the competitor offers only replacement. Such a customer will remember this the next time he has a problem with his car.
1. 3. The method: roger´s windshield repair system: the most widespread, reliable and best equipped method of windshield repair. All fractures caused by the impact of stones - whether star fractures, cow´s eyes, multiple and shattering fractures - can be easily repaired.

- 2 -
Star fracture cow´s eye half cow´s eye multiple fracture
And the most best equipped tool sets for a comparable price - no competitor to roger´s offers so many tools and materials in its sets for repairing all kinds of damages caused by stones .
The volume of the equipment parts are important, lastly, for the repair results and for what charges can be made for the repairs.
1. 4. Typical examples of damage to laminated glass:
1. 5. roger´srepairprocess(insimplifiedform):
1. The impact spot is cleared 2. the roger´s tool holder is 3. the injection cylinder is ofdirtandlooseglassfrag- fixedabovethedamagedspot,... screwedinandfilledwithments, ... roger´sfillingresin, ...
4. the roger´sfillingresin 5.theroger´s resiniscured 6.afterapplyingfinishingpenetrates the damaged under UV-light, making the resin, the repaired spot isspot under pressure; damaged spot permanently scraped and polished. air is vacuumed out, ... glued, ...
1. 6. Results of the repair:
Repairs carried out with roger´s windshield repair system restore the windshield perma- nently. It is fully functional again and recovers all its original qualities, once again becom- ing
- tough - shatterproof - non-ageing - thermally resistant - chemically resistant - wear-resistant Any optical disturbance caused by the damage is eliminated - depending on the degree and the age of the damage - almost completely or at least to an acceptable degree.
- 3 -
1. 7. The outstanding quality of roger´s repairs is due to:
- the world´s best-equipped windshield repair equipment at the user´s disposal, contai- ning all tools and materials necessary to cope with any kind of fracture caused by stones.
- roger´s special method of vacuuming the air out of the fracture.
- the unmatched spreading, moistening and adhesive power characteristics of roger´s fillingandfinishingmaterials.
- the unequalled holding power of roger´s adhesive materials. - the ageing stability of roger´s adhesive materials: there is no greying or yellowing and no opening up.
- a theoretical and practical training of the user by means of a comprehensive written and audio-visual repair documentation.
- a variety of special tools and materials for:
+ wet, dirty or old fractures (wash primer and drying procedure) + extensiveshatteringfracturesofthesurface(durablefinishingresineveninlarge surface shattering fractures) + fissures(crackstretchingdeviceandspecialadhesivetape) + repairs of vertical bus and truck windshields (vertical or bus adapter) + double impacts (special adhesive tape)
- andarefractionindexofthefillingandfinishingmaterialsidenticalwiththatof laminated windshields.
1. 8. roger´s technology and development today:
roger´s is not only at the top of the list of manufacturers of glass repair systems due to its excellent quality of materials and tools, but sets the pace for them.
This is due to roger´s philosophy which was established in 1988, the year of the company´s foundation:
On the one hand, the customer is not provided with a temporary, but with a permanent solution of his stone damage - which was not the case before due to the inadequate quality of the technologies on the market.
On the other hand, due to the high quality of roger´s tools and materials, the user works withawidelyacceptedsystem,whichmeanspermanentprofitablebusinessforhim.
Only some one who has done repairs with a „cheap“ system one which later goes yellow, gets reopenings, or grey, or from which the sealings break out; knows how much his own reputation will suffer from such bad repairs.
Because the customers connects the repair with the workshop and not with the system used.
Only with good repairs can you achieve customer satisfaction.

- 4 -
damage caused by stone
outer layer glasssynthetic intermediate layerinner layer glass
2. 0. Technical data about laminated glass and the effects of stone impacts on them:
2. 1. What are laminated windshields? What is their purpose and use?
For security and construction reasons, laminated windshields have been successful against the toughened-glass screens which only a couple of years ago were still used in some car types.Theseformertoughened-glassscreensconsistedofasinglebentandhardenedfloat- glass screen of a thickness of 4 to 6 mm which used to break in thousands of tiny splinters when shattered.
Thelaminatedwindshieldisasafetyglassnormallyconsistingoftwolayersoffloat-glass jointly bent in a bending oven. A polyvinyl butyral foil is pressed in-between them in a hot and vacuum condition. The function of the thermoplastic foil is to hold the individual broken pieces and splinters together when the windshield shatters, thereby reducing the danger of injuries to the passengers inside the car. After breaking or shattering, weblike fissuringoccurs,butthewholestructureremainsintact.
Nowadays, the function of laminated windshields is not only to increase the safety of the car passengers, but as supporting structure of the car: they are not only inserted into the frame of the car body with a rubber sealing, but they are glued to it. But this is exactly why the prices for the replacement of windshields have literally exploded. The average price for the replacement of a laminated passenger car windshield is today approx. Euro 500.- (without VAT), with a tendency to further increase.
2. 2. Technical data about laminated glass in motor vehicles:
Total thickness: 4.5 to 9 mm Thickness of foil: usually 0.8 mm Thermal resistance: 90° C (for max. 30 min.) Refraction index: 1.52
2. 3. The impact of stones on laminated windshields of motor vehicles and its effects:
Sooner or later every stone impact means the end of the windshield:
- for single-layered hard-glass windshields, which are going out of use, it occurs immedi ately on impact - for laminated windshields, it happens gradually, through: + theformationoffissuresfromtheimpactofstonesuntilthescreeniscompletely fractured (caused by thermal tension, jolts, movement of the frame); + penetration of damp; + soiling of the impact spot due to the penetration of dirty rainwater or the use of thawing agents or car wash shampoos; + coloration of the foils (due to the above mentioned reasons); + lossoftoughnessandfunction(defectsasdefinedbylaw); + optical irritation of the driver (dazzlement during night drives).
Moreover,thewindshieldprofilerubbersaredamagedbyconstantlywipingoverthe impact spot, thereby leaving water stripes on the shield.
- 5 -
cow´s eye starfissure half moon
full moonmulti fracture shatter bubble
fissuredouble impactshatter fractures
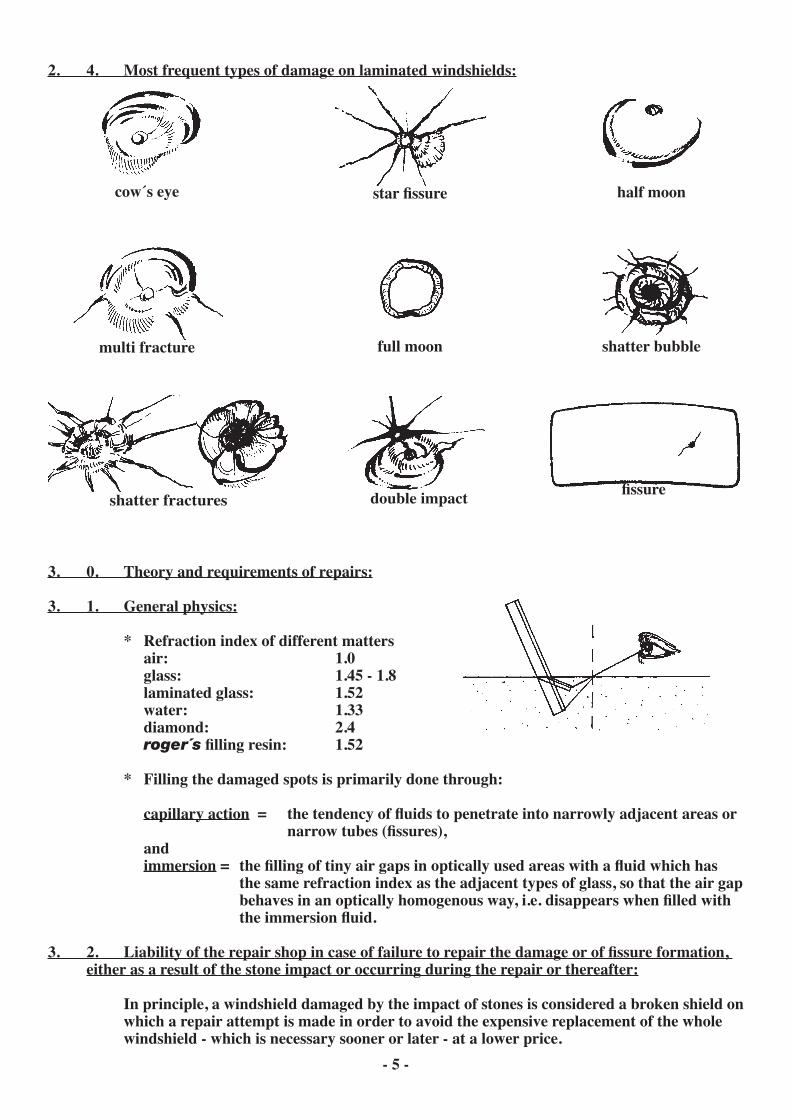
2. 4. Most frequent types of damage on laminated windshields:
3. 0. Theory and requirements of repairs:
3. 1. General physics:
* Refraction index of different matters air: 1.0 glass: 1.45 - 1.8 laminated glass: 1.52 water: 1.33 diamond: 2.4 roger´sfillingresin: 1.52
* Filling the damaged spots is primarily done through:
capillary action= thetendencyoffluidstopenetrateintonarrowlyadjacentareasor narrowtubes(fissures), and immersion= thefillingoftinyairgapsinopticallyusedareaswithafluidwhichhas the same refraction index as the adjacent types of glass, so that the air gap behavesinanopticallyhomogenousway,i.e.disappearswhenfilledwith theimmersionfluid.
3. 2. Liabilityoftherepairshopincaseoffailuretorepairthedamageoroffissureformation, either as a result of the stone impact or occurring during the repair or thereafter:
In principle, a windshield damaged by the impact of stones is considered a broken shield on which a repair attempt is made in order to avoid the expensive replacement of the whole windshield - which is necessary sooner or later - at a lower price.

- 6 -
Thus, in case of failure of the repair, the customer can refuse to pay it partly or in total (in case of failure, we recommend our users to voluntarily refuse payment). The client is not entitled to a new windshield!
Shouldafissureextendbeyondthedamagespotduringtherepair,thentheprinciple, according to which the damaged windshield is considered broken, applies, although this may cause disagreement with the customer. We recommend to avoid critical repairs when- evertheyareidentifiedassuch,andtoinformthecustomerabouttheriskinvolved.
Thesameapplieswheneverafissureoccursaftertherepair,whichisunlikelybutnot impossible.
In such a case, the customer can ask for reimbursement of the amount of the repair. We recommend signing an agreement with the user´s insurance company in case of stone damage, to cover such rare - but still possible - critical cases.
3. 3. Required repair results:
- enduring adhesiveness - mechanical restoration of the toughness of the windshield - no residual air (= optical impairment) - a smooth and enduring surface (an additional advantage lies in the fact that the windshield wipers are not damaged by the impact spot; thus, no water stripes on the windshield) - optically perfect repair work - nosubsequentgreying,yellowing,openingup,orformationoffissures - chemical and thermal restoration of the original qualities of the windshield - ageing resistance of the repair work
3. 4. Requirements of the repair shop:
Idealconditionsforthiskindofrepairareinahalloragaragewithartificiallight,because the adhesives set under UV-light. Therefore, there should be little exposure to daylight, which also contains UV-light (increasingly now, due to the expanding ozone hole over the northern hemisphere).
If work under daylight cannot be avoided, then it should be carried out in the shadow or by using the UV-protection foils contained in the tool case, which can be pulled over the tool-holderinordertoprotectthefillingresinfrombeingexposedtoUV-lightduringthe repair, which would cause its premature hardening.
Furthermore, temperatures above 35°C may soften the thermoplastic foil between the glass screens.Asaconsequence,fillingresinmaypenetratebetweenfoilandscreenduringthe repair process, which may result in the formation of ghost edges and resin clouds.
Temperatures below 10°C may cause the material to thicken, which may give lim-ited repairresultsbecausetheresinisthennotcapableofpenetratingthetinyfissures of the damaged spots, and the air cannot be completely removed by the thickened material.

- 7 -
4. 0. The repair procedure in practice:
4. 1. Preliminary inspection - examination of the basic conditions:
In order to determine whether to repair or not, a preliminary inspection should ascertain the following:
* whatkindofdamageisit?Canitberepairedatall?Isthereafissure?Howlong and what degree of soiling? * what is the size of the damage? Large shattering fractures soil quickly. * is the damage dirty? This can be checked by holding a white and a black piece of paper against the damaged spot from inside the screen. * what is the general condition of the windshield as a whole? Edge delaminations and/or colorations indicate that the general condition of the laminated windshield is bad and thatthereisahighriskofoverfilling. * where is the damage located? Observe the legal provisions. * and, last but not least, what type of car is it? The owner of a luxury car will have differentcriteriaofqualitythan,forinstance,atruckfleetmanager:thereisgreat variety in customers demands.
4. 2. Legal provisions excluding repairs:
“Germanlaw”hasestablishedadefinitionofthe“farvisualfield”,inwhichnorepairsmay be carried out. This provision has been declared valid in most countries of the world.
Itcontainsarestrictiontocarryoutrepairsinthefollowingvisualfieldofthewindshield of a passenger car:
And similarly for truck and bus windshields:
Detaileddefinitionsaretobefoundinthe“Verordnung3001oftheTVK/60,Erg.Lfg.II/87” (“Regulation 3001”), which deals with the “Conditions for the repair of laminated windshields”.

- 8 -
In practice, the customer must be informed about the legal regulations, should the damage bewithintherestrictedareaofthe“visualfield”.
If the customer nevertheless wants the repair to be carried out on his own responsibility, then the bill has to state that there is no guarantee for the repair and that the repair shop is not liable, should the vehicle fail to pass the technical control test.
4. 3. Working temperature during the repair:
Note that the temperature of the windshield should be between +15°C and +30°C. Other wise the windshield has to be either cooled down or heated up.
If the windshield is too cold in the cold season or in winter, let the car and the windshield defroster run for a while so as to heat it up from inside on the whole surface. Check the temperature by laying your hand on the windshield from outside.
In case it is summer and the windshield has heated up due to direct sun exposure, then the car should be placed in the shade or in a shaded area for a while. Again, warmness to the touch should be checked with the hand.
4. 4. Careful inspection of the damage:
After having decided to make a repair, a careful examination of the damage must be carried out:
- dirt: hold a white and a black piece of paper against the damaged spot. A repair should only be made if the damaged spot doesn´t show conspicuous soiling or greying - caused by water penetrating into the damaged spot - , because they usually cannot be removed even with a wash primer.
- dampness: can be determined by pressing the pusher - contained in the tool case - with pulsations against the centre of the impact cone: if there is water in the damaged spot, it canbeseenflowingoffandbackintheexteriorareasofthedamage.
- ageing dirt: if it is not too heavy, treat it with a red washing cylinder and a wash primer - (includedonlyintheProfi-/Complete-Set)detailedprocessdescriptioninsection4.6.
- is the damage to the outside or to the inside (which is rare, but sometimes occurs, mostly whenitconsistsoffissures)? 4. 5. Preparations and preliminary work:
- clean the damaged spot and adjacent area (radius of 20 cm) with a cleaning paper and a normalglasscleaneravailableonthemarket.TAKECAREnottoletcleaningfluidget into the damaged spot (most of them contain silicone oil in order to clean without causing stripes!!!). Therefore it is recommendable to soak the cleaning paper with the glass cleaner instead of spraying it directly on the screen.
- fixthemirror,whichiscontainedinthetoolcase,withasuckerontheinsideofthe windshield behind the damaged spot in such a way that the damage is clearly visible in the centre of the mirror from outside.
- carefully remove any loose glass splinters and surface dirt from the opening where the impactoccurredbyuseofacarbidedrawingpin(TAKECAREnottomakeany scratchesonthescreenintheimpactarea,asthismightimpairthefinalresult).

- 9 -
- cleartheimpactspot-whichwilllaterabsorbthefillingresin-withthecarbidedrawing pin without increasing its diameter.
- some repair shops use carbide borers or drills for the removal of glass splinters and dirt!
4. 6. Cleaning and preparing damp, dirty or old damaged spots with the wash primer (included onlyintheProfi-/Complete-Set):
In order to achieve maximum cleaning and the required adhesive action, dirty and damp oroldstone-impactdamage(3monthsormore)definitelyshouldreceivepre-treatment with the wash primer. Dry and freshly damaged spots may also receive this treatment.
It is easier to remove water, dirt or grease by using a wash primer than to dry it out with heat only. The wash primer increases adhesiveness by creating a cohesive chemical connection between the glass and the adhesive. Furthermore, it is never certain what kinds of different agents (thawing agent, car-wash shampoos etc.) have entered into the damaged spot prior to the repair. Therefore the wash primer is also recommended in case of dry damage.
Thus the wash primer preparatory procedure makes it possible to repair even old, wet and greasy damage and to improve already existing optical deterioration or impairment.
It must be made clear however that it is not possible to repair such damage to the same degree of optical quality as fresh damage. A considerable improvement is nevertheless possible by means of the washing primer.
Adhesive power according to tests carried out by roger´s windshield repair system:
+ dry fresh damage pre-treated with wash primer: over 600 kp/cm2
+ dry, fresh damage without preparatory treatment: approx. 500 kp/cm2
+ old, dry damage without preparatory treatment: 200 - 400 kp/cm2
+ damp or greasy damage or damage which was merely dried out, but without preparatory treatment: 50 - 150 kp/cm2
Detailed instructions for use of the wash primer:
Taketheredwashprimercylinder(includedonlyintheProfi-/Complete-Set)outofthetool caseandunscrewtheinjectorscrew.Witharazor-blade,whichyoualsofindinthetool case, cut the screw thread off the injector screw to enable it to move back and forth inside the cylinder.
Now insert the injector screw into the cylinder: the bottom of the injector screw must reach the interior sealings of the cylinder. Check by looking from the bottom through the sealing into the cylinder.
Use one of the injection syringes of the tool case to push 0.3 - 0.4 ml wash primer into the red cylinder which you must hold upside down. Centre the cylinder on the impact spot with the cylinder sealing until it gently touches the windshield.Holditinthispositionwithonehand.
With the other hand, carefully move the injector screw in and out against the cylinder, thereby pressing wash primer into the impact damaged spot and residual air out of it. TAKECAREnottoexerttoomuchpressureonthewashprimerasthismightforcefluid between foil and glass!

- 10 -
After moving the injector screw in and out repeatedly, wash primer is pressed into the dam- aged spot and sucked out again, thereby washing it out. The wash primer binds water, grease and dirt, which are removed along with it.
At the same time, the damaged spot is physically stretched a bit and chemically prepared by improving the adhesiveness.
After approx. 30 - 60 seconds of washing, remove the cylinder and shake out the dirty wash primer on a cleaning paper.
Suckoutthefluidmixturefromthedamagedspotusingthevacuumpump(includedonly intheProfi-/Complete-andWorkshop-Set),thePVC-hoseandthetransparentsuctioncup (includedonlyintheProfi-/Complete-Set).Warmtherearsideofthedamagedspotwith the car cigarette lighter heated up by the battery connection adapter.
As soon as the damaged spot is clearly discernable, remove the transparent suction cup and now warm the front side of the damage with the cigarette lighter in order to vaporize residual wash primer, until the damaged spot is completely dry.
With the trigger, exert a little pressure on the impact cone (as you would do with wet damage) to check if the wash primer is completely removed.
Depending on the type of impairment (dampness, age, dirt, grease) the procedures of washing with the wash primer, sucking it out with the vacuum pump, warming and vaporizingmayberepeated,changingthewashprimereverytime.TAKECARE:although the wash primer doesn´t damage the varnish paint of the car, we do recommend that theydonotcomeincontact.Itisalsohighlyinflammable!
The wash primer cylinder may be used repeatedly. Clean it from time to time by letting washprimerflowthroughit.
4. 7. Mounting the tool-holder:
Take the tool-holder out of the case and unscrew the suction cup by means of the lifting and lowering screw nut in the centre on top.
Lightly smear vacuum sealing agent around the edge of the suction cup. This has to be done in order to avoid the tool-holder sliping away during the repair process or even falling offthewindshieldundertheeffectofairsuction,ifbychanceithasbeenfixedonasmall unnoticed surface shattering fracture!
Fix the tool-holder with the suction cup - which has been moved out - adjacent to the damagedspotsothatthecentreoftheball-head-intowhichthefilling-resincylinderis later screwed - lies above the damaged spot itself. Then screw down the lifting and lowering screw nut in the centre until the three feet of the tool-holder plate stay on the windshield, exerting only little pressure on it.
Take care that there is not too much pressure between the suction cup and the tool-holder plateasthismightcreatenewfissuresmovingoutfromthedamagedspotorbelowthe suction cup!!!
This is one of the most frequently made mistakes in the use of this system, and after some experience with it, the user realizes how little pressure on the suction cup is necessary to keep the tool-holder properly stuck on the windshield!!!

- 11 -
4.8.1.Mountingthefilling-resincylinder:
Takethefilling-resinpackageoutofthetool-case,cutoff1.5cmofthebroadsidewitha razor-bladeorscissorsandtakethefilling-resincylinderoutofthebag-forthetimebeing, leavethefilling-resincontainerinthebag.
Closethepackageagaintoprotectitscontentfromdaylight.Thefilling-resincontainer should be exposed to daylight - which contains UV-light - as little as possible, as this may cause it to gelatinize or to polymerize, which makes it unusable!!!
Unscrew the injector screw from the cylinder.
Swivel the swivel arm approx. 2 cm to the left or right side away from the impact point.
* Beginnerstaketherubbersealingoutofthefilling-resincylinderandscrewitintothe ball-head until the latter touches the windshield.
Nowopenthefixingnutoftheball-headandcentrecylinderperpendiculartothe windshieldinorderthatthebottomcylinderopeningtouchesitflushonitswholesur- face.Closethefixingnutoftheball-headagain.Screwinthefilling-resincylin- der again to adjust it. Check that the bottom opening of the cylinder is properly set on thewindshield.Ifnecessary,readjustbyreopeningthefixingnutandcloseitagain.
Nowunscrewthefilling-resincylinderandputtherubbersealingintheopeningof the cylinder again.
Screwthefilling-resincylinderbackintotheball-headuntiltherubbersealingalmost touches the windshield showing dark, circular shading of the cylinder rubber resting on the windshield.
* Experienceduserswillscrewinthefillingresincylinderincludingthecylinder sealant into the ball head until the sealant touches the glass surface slightly. Than theywillopenthefixingnutslightlyandmaketheoptimaladjustmentofthefilling-resin cylinder against the windshield (until the cylinder stands at a right angel to the glass surface). This is visible in the mirror as a dark, circular shading of the cylinder rubber resting on the windshield.
Than screw back the cylinder slightly. Swivel back the arm into its basic position. And if necessary a correction can be made now by slipping the whole tool-holder until the filling-resincylinderiscentredexactlyabovetheimpactspot.
This will be done as long until the cylinder is adjusted correctly to the impact point.
This can be checked by looking through the upper cylinder opening (into which the injector screw will be screwed later) down to the impact spot and to the mirror until the boreofthefilling-resincylinderisinlinewiththecentreofthedamagedspot.
The vacuum gel applied between suction cup and screen surface acts as a lubricant.
Assoonasthesealofthefilling-resincylinderiscentredexactlyabovetheimpactspot, carefully adjust the lifting and lowering screw nut of the suction cup (2 or 3 quarter-turns are enough!).

- 12 -
Nowscrewthefilling-resincylinderintotheball-headuntilthesealingrubberofthe cylinder gently rests on the damaged spot. This is visible in the mirror as a dark, circular shading of the cylinder rubber resting on the screen.
Iftheimpactspotishardtosee,youmaywavetheswivelarmofthefilling-resincylinder 2 - 3 cm in one or the other direction. The cylinder seal as it rests on the screen can be better observed from an adjacent clean area of the windshield.
Never overscrew the cylinder, thus pressing the sealing too tightly, as this may closeuptheopeningoftheimpactspot,whichwillmakeithardertofillintheresinandto suckoffair,orevenleadtotheenlargementofoldfissuresortotheformationofnewones arising from the impact spot.
Untilthatitmaycanhappenthatbyremovingthepressure,thefillingofthedamagegets reopened in the upper areas after taking away the cylinder and while curing the resin. 4. 8. 2.Useofthebusadapter(includedonlyintheProfi-/Complete-Set):
Incaseofrepairsofverticalscreens,theproblemisthatthefillingresinisn’tconcentrated in the bottom of the cylinder, but dispersed in the bore of the injector screw. And the vacuum procedure can´t be applied.
The tool-case contains a vertical or bus adapter to be used for vertical screens of trucks, buses and vans.
The tool-holder is applied on the screen as described in section 4.7.
Butinsteadofthefilling-resincylinder,itisthebusadapterthatisfirstscrewedintothe ball-headandcentredperpendicularlyagainstthescreen(justlikethenormalfilling-resin cylinder, as described in paragraphs 5 and 8 of section 4.8.1.).
As soon as the sealing of the bus adapter gently rests on the screen, adjust the busadapterwiththefixingnutoftheball-headandthecounternut,insuchawaythat thethreadedopeningintheupperpartofthebusadapter,forthefilling-resincylinder points upward.
If such a twist of the bus adapter will be necessary, an after adjustment will have to be made again so that the bus adapter will be at last in a right angle position to the glass surface (as described in paragraphs 5 and 8 of section 4.8.1.).
As soon the bus adapter is adjusted correctly penetrate the needle as deeply as possible through the upper part of the bus adapter into the lower part until it touches the glasssurface.Thaninject0.25mlfillingresinintothelowerpartofthebusadapter.
Again,stowthefilling-resincontainment,thesyringeandtheneedleinthebagtokeep them away from the daylight.
Nowscrewthefilling-resincylinderintotheupperpartofthebusadapteruntilitssealing properly rests on the bottom of the upper part of the bus adapter.

- 13 -
4. 9. Injectionoffilling-resin,firstlow-pressurephase:
Takeoutthefillingresincontainerfromtheresinbag.Unscrewtheredstopperfromthe container. Screw on the needle with its protective cover.
Cover the container with the orange socket to protect the resin against daylight.
Remove the needle cover from the needle, stick the needle into the cylinder as deep aspossible.Injectintothecylinder(ifthefilling-resincylinderhasneverbeenusedbefore) 0.3 ml, otherwise 0.2 ml.
Remove the needle from the cylinder, hold the syringe upwards and remove the piston just enough to suck up all the resin from the needle into the syringe. Lay the syringe aside to avoid resin dropping out by laying.
Replace the needle cover on the needle. Stow the whole resin container in the resin bag to protect it from daylight. The resin container should be taken out of the bag only when needed. Donotexposefillingandfinishingresintothesundirectlyorindirectly(forinstance repairs in halls near large and open gates), while they are in use. The increasing UV- radiation of the sun due to the growing ozone hole in the northern hemisphere may lead to premature hardening of the repair materials. Screwtheinjectorscrewslowlyintothecylinderuntilyoucanseethatthefillingresin enters the damaged spot. Don´t give it too much pressure!!!
Observethisprinciple:Thelowerthepressureonthefilling-resin,thebettertherepair result! Take your time with the repair of this type of damage: after all, the whole procedure doesn´t take longer than 40 to 60 minutes. Time is your best helper to get a really good repair!
Hastyrepairs,madewithalotofmanipulation,willnotbeassatisfactoryastheycould have been if more time had been taken.
Assoonastwothirdsofthedamagedareaisfilledwithresin,screwouttheinjector screw until the upper edge of its thread is visible at the upper edge of the cylinder.
The air at the edge of the damaged spot will move towards the centre and from there up into the cylinder. In this way you remove the largest air bubbles.
Waitabitandthenoncemorescrewtheinjectorscrewintothecylinderandputthefilling resin under pressure.
4. 10. Putting the damaged spot under vacuum with the help of the vacuum pump (included only intheProfi-/Complete-andWorkshop-Set):
Assoonasthreequarterstofourfifthsofthedamagedareaisfilledwithresin,screwout the injector screw completely, insert the black connection piece of the PVC-hose of the handvacuumpumpintotheupperpartofthefilling-resincylinderandintroducea maximum vacuum (approx. 70 mbar residual pressure).

- 14 -
As a result of this procedure, an almost-vacuum situation is produced in the upper part of thecylinder,abovethefillingresin.Atthesametime,theairinthedamagedspotisstill undernormalpressure(aprox.1000mbar)becauseitislockedbythefillingresin(which, since it is physically heavier than air, cannot move upward).
This situation causes the air to expand inside the damage and to escape in the form of bubbles from the damaged spot and through the resin and cylinder.
In order to increase this effect, warm the damage 2 - 3 times from the rear side with the cigarettelighterwhichwasheatedupinthebatteryconnectionadapter(TAKECARE: there are a very small number of cars, for instance the Porsche 956, whose windshields are coated with polycarbonate on the inside of the shield. This method cannot be used for the windshield of these cars as it would break them!!!). This causes the air to further expand and the resin to dilute a bit, which in turn makes it easier for the resin to penetrate into the smallest gaps of the damaged area after stopping the vacuum action.
Don´t heat up the repair place to often, because that may soften the thermoplastic interlayerinbetweentheglasses,andthenextpressurephasefillingresinmaybe pressedinbetweenfoilandglass.Whichcancreateghostrimsandresinflowersnextto the repair.
Remove the connection of the vacuum pump after 3 - 5 minutes. This brings the air pressure at the upper part of the cylinder back to a normal level. But inside the damaged area,thetemporaryvacuumhasproducedastateofnear-vacuumwhichfirstexisted intheupperpartofthecylinderandledthefillingresininthelowerpartofthecylinder to move into the damaged areas.
roger´s offers a 240 V vacuum-pump with a residual pressure of 1 mbar to repair-shops which carry out more than 100 repairs per month. This pump speeds up the air suction in the damaged area considerably and thus accelerates the repair process.
4. 11. Repetition of pressure and vacuum procedures:
Pressure and vacuum procedures should be repeated until the damaged spot, upon with drawalloftheinjectorscrew,isoptimallyandcompletelyfilledwithresin(i.e.whenthere is neither pressure nor vacuum in it) and completely free of air bubbles, and remains so for 1 - 3 minutes.
4. 12. Visual inspection from all sides:
Swivelthetool-holder,withthefilling-resincylinder,2-4cmtotheleftortotherightand inspect the damaged spot from all sides.
Inspect from different angles in order not to overlook air bubbles still left in the damaged spot. If you don´t get them out, they will remain locked up in the damage irrevocably and thus cause some residual irritation.
4. 13. Difficultcases:Youcan´tgettheairoutcompletely-whatcanyoudo?
The most essential principle is: “It is more important to get the air out of the damage than to get the resin in!!!”

- 15 -
The most frequent mistake is to reverse this principle!!! Especially when they have littleexperience,usersfocusonpressingtheresinintothedamagedspotandfightingthe air bubbles with too much manipulation, i.e. with too much heat and mechanical activity, whichmakeingthefinalrepairresultlookbad!
In the case of so-called high-pressure repairs, air is often locked up at the edges of the damaged spots or even pressed between foil and glass which may later cause them to expand under sun exposure, so that you will have unremovable air bubbles around the damaged spot.
Youhavetobearinmindthatthesizeofthesecracks,fissuresanddetachmentsofglass caused by stones are in the range of hundredths and thousandths of millimetres, and it wouldbeamiracletofillthemupwithresinefficientlyinnotime.
Then what can you do if you have problems getting the air out?
- Operate the vacuum pump by inserting it into the cylinder for a long time (10 minutes) and simultaneously warm the damaged spot with the cigarette lighter from the rear side, but only once or twice.
Youcanhardlydoanythingwrongwithvacuum.
The effect of warmth under vacuum is not as dangerous as under pressure, which may evenleadtoanoverfillofresin(intothespacebetweenfoilandglass)duetoasoftening of foil. The cigarette lighter, which is heated by a battery connection adapter supplied with the tool-case, has the advantage against ordinary cigarette lighters, repair-shop or paint fans, that a lot of warmth is conveyed to the damaged spot from the rear side, but quickly escapes. A main problem with glass is that it stores heat very well. But this may have disastrous effects in three ways:
1. If the damaged spot has been heated for too long and over a surface too large, it is then compressed in on itself (cone of the damage against the surrounding glass surface) as a result of the heat expansion of glass. The repair may then look perfectly done and beautiful, but it isn´t: after a premature hardening and the subsequent cooling, openings in the damaged parts may appear in consequence of the return of the glass to a normal temperature.
2. Applyingtoomuchheatandlaterexertingtoomuchresinpressuremayoverfill thedamagedspotandleadtoghostedgesorresincloudsoreventoresinflowers between the glass and the foil!
3. Thefillingmaterialmaycoalesce,whichmakesitimpossibletoproceedtofinal treatmentwiththefinishingresin.
Applying heat and later strong pressure can completely ruin a windshield!
Therefore, stick to these main principles for a “beautiful” windshield repair:
- take your time - produce little pressure between the sucking cup and the tool holder - exert little pressure from the sealing lip of the cylinder on the damaged spot - work more with vacuum, less with pressure - heat up the damaged spot moderately and let it cool off in between.
- 16 -
- After the vacuum phase and prior to screwing in the injector screw again, exert slight pressure on the impact cone with the trigger through the cylinder opening. This has two effects:
The impact cone, which was sucked towards the surrounding glass, will be pushed back a bit.
Furthermore,thishelpsthefillingresintopenetratemoreeasilyintothedamagedspot- which is still under vacuum - , and it will later help the residual air to get out.
- In case of a large damage area, check if there is enough resin in the cylinder! Work with 0.25-0.35mlfillingresin!
- Longbutweakpressurestages,suchasstar-fractureswithlongfissures,orlightdamage with very small impact spots.
- Slightpressurewiththetriggercontainedinthetool-case,onthefissuresspreadingout of the impact spot causes them to open slightly downward so as to enable the resin to enter. Withthisprocedureitcanalsobecheckedwhetherthefissureshavebeenfilledproperly.
- Slight pressure from behind with the thumb or with the roger´s crack stretching device (not included in the Sets, extra available special tool) against the damaged spot are possible. But, for beginners, these are hazardous methods of correction because they can create newfissures.
- For cases where the connection between the impact spot and the underlying damage is too small or where there is no such connection (there are such cases!!), it is advisable to carefully bore a connection using the drill and the carbide bit and to strike with a punch and a drawing pin (as described under section 4.14).
- Curing under pressure should only be carried out if some tiny air bubbles are left which reallycan’tberemoved.Thisshouldbemadelaterallytothetool-holderandthefilling- resin, under pressure, and it crushes the bubbles to invisibility.
Curing from the rear side doesn´t work (in most cases) because the foil in the front screen contains a UV-protection additive which protects the interior of the car from damages caused by sun exposure!
- For the so-called two- and three-pedes (star-fractures), it often happens that one of the cracks or all of them don´t have a connection with the impact spot. In such a case it is recommended to carefully bore a connection with the drill and the carbide bit and then to strike with a punch and a drawing pin (as described under section 4.14).
- For shattering fractures also, careful boring with the drilling machine and the carbide drill and striking into the cone with a punch and a drawing pin (as described under section 4.14) can be useful to enable the shattered parts inside the cone, which are full oftinycracks,tobetterfillupwithresin.
- The crack stretching device (not supplied with the tool-set) can be used to open up cracks and star-fractures under high pressure by exerting mechanical counter pressure on the damaged spot from behind.
But this is a risky method which should only be followed by experienced users!

- 17 -
4. 14. Boring of damage caused by stones and striking them with punch and drawing pin:
Some damage have little or no connection between the impact, which is sometimes invisible or imperceptible, and the underlying damage or the existing cracks. This makes it neces- sary to carefully bore with the drill and the carbide bit and then to strike into the damaged spot with a punch and a drawing pin (used as a striking tool due to its ideal weight).
The procedure is as follows: the carbide bit is inserted in the drill chuck.
* If an impact is perceptible, a hole is bored in a right angle in its centre with very little pressure. Just until the glass comes out of the bore hole as white powder. Than the drill is withdrawn to cool down the carbide drill bit while rotating it for a bit.
* Ifnoimpactcanbediscerned,firstgrindasmallindentationabovethecentreofthe impact spot, holding the drill at an angle of 30 - 45° to the windscreen. The drill is best handled if you hold it tightly in one hand, which supports itself on the screen, while the other hand guides it. Whilst the drill bit is moved down slowly to the glass surface.
Itsquietimportanttoholdthedrillfirmlyandtomovethedrillbitdownslowlyto the glass surface to avoid a side slipping over the glass surface which would create ugly and not really repairable extra damages.
As soon an initial bore hole has been created, further boring can proceed at a right angel in its centre with very little pressure. Estimately so long until the glass comes out of the bore hole as white powder. Than the drill is withdrawn to cool down the carbide drill bit while rotating it for a bit.
Butpleasebearinmindthatthestateofaggregationofglassissemifluid,whichmeansthat if boring goes on too long or if too much pressure is exerted on the drill, the high temperatures may cause the glass to melt (which in turn glues the drill disks).
Boring should almost reach the foil of the screen (the thickness of the outer layer of glass is usually 1.9-2 mm for passenger cars and 2.5-3 mm for trucks, vans and buses.
Don´t bore into the foil!! Because this will create yellow or brown foil burns (train yourself with an old windshield to get some practice!)
Then, with the punch and the drawing pin (which has the ideal weight for this kind of exercise), carefully strike a small cow´s eye on the bottom of the boring axially into the impact spot.
4. 15. Final inspection:
Swing the swivel arm with the ball-head aside and wait for 1 or 2 minutes to see if air bubbles appear from the edge.
Before proceeding with curing, it is imperative that there are no bubbles left: not only do they look ugly on the windshield and remain there forever, but the polymerization shrinkage during the hardening process makes them even grow!
- 18 -
Moreover,thedamageshouldbefilled“tosaturation”andnotoverfilled.Insuchaway, a certain body of resin will remain on the spot despite the polymerization shrinkage during the hardening process, and there will be no appearance of iridescent surfaces on the formerly damaged spot, no detachments, and no grey or silver moons on the edge of the former damage area.
4.16. Curingofthefillingresin:
Whenthedamageisperfectlyfilledandnofurtherchangesinthefillinghaveoccurred, suck off the resin remaining in the cylinder, with the reserve resin syringe and needle.
Keepthefilling-resinsyringeinitspackandprotectitfromdaylight.Thematerialinside the syringe can be used for the next repair.
Take off the tool-holder! Remove the water-soluble vacuum-gel left in the suction cup with cleaning paper and water.
Use the razor blade contained in the tool-case to cut off remaining resin from the impact spot 2 - 4 times.
Cure the repair work for 2 - 3 minutes using the UV-lamp!
Note: the 6 W UV-tube has a maximum working life of 2,000 hours, but it emits UV-rays in the range required only for a period of 1,000 hours. Thereafter the tube produces no curing effect anymore, although it still emits light. Replace the tube with the reserve tube (inclu- dedonlyintheProfi-/Complete-Set)inthetool-case.
TAKECAREnottoturnonthelampwithouttubeorwithanold,flickeringtube,asthis may destroy the power transistor - despite its sophisticated electronics - and occasion unnecessary repair costs.
4. 17. Impact-spotorsurfacesealingwiththefinishingresin:
The competition has no or no adequate materials for surface sealing.
Eithertheyfillupthesurfaceshatteringfractureswithfilling-resin,whichisinappropriate and cracks after a while.
Ortheyofferfinishing-resinsforsurfacesealing,whichsoonturngreyoryellowandcrack after max. 3 - 6 months.
Thesurfacesealingisnotonlyanimportantpartoffinishinggoodstonedamagerepair.It mustremaintransparentforyears,bedefinitelydurableandnotchangeinanyway.Inthis way the stone damage repair will be a really acceptable alternative to the changeing of windshields.
A repair which turns yellow, whose surface sealing will burst out again irritates the driver, just like the unrepaired stone damage.
WhatIsworseisthatithasnotrestoredthephysicalfirmnessofthewindshield. Anditalsodoesnotfulfiltheopticalclaims.Moreovertherequirementsofthelawhave not been met (keyword: yearly inspection).

- 19 -
drillhole-fillinginstages
outer layer glass
foil layer
roger´shasdevelopedafinishing-resinbasedontechnologyoftheAustrianskiindustry. Thisindustryrequiresahighlevelofpermanentflexibilityofthebasiccomponentsaswell as lack of yellowing or brittleness for the ski products which are used in areas with high UV-exposure (mountains have a much higher UV-exposure than other areas). This resin doesn’tturngreyoryellowanddoesn’tcrackeveninareassufferingfromincreasedUV- radiation such as New-Zealand, southern Australia, southern Argentina and southern Chile. Even large shattering fractures of the size of a thumb-nail can be permanently repaired with this resin.
- Minorshatteringfracturescanbeattendedasawholebycompletelyfillingthemwith finishingresin.Buttakecaretoremoveevensmallairbubbleswithf.i.thetriggerbefore the cure process, as they are growing during cureing.
- Theremovalofairbubblescanbecheckedbyexertingvacuumonthefinishingresinvia the suction cup connected to the vacuum pump by a PVC-hose. After a complete removalofallbubbles,slowlycoverthefinishingresinwithfinishingfoil(toavoidsmall bubbles developing again) and let it cure under the UV-light for 2 - 3 minutes.
- Incaseofdeeper(morethan0.5mm)surfaceshatteringfractures,thefinishingresin must be applied in layers of approx. 0.5 mm.
Again take care to have all bubbles completely removed.
Leteachlayercurefor1minute-withoutfinishfoil.
Beforebringingonthelastfinishingresinlayerusetherazorbladetocutoffremaining resin from the impact spot 2 - 3 times.
Nowcoverthelastlayer,whichcompletelyfillsupthesurfaceshatteringfracture,witha finishingfoilandletitcurefor2-3minutes.
* Sealing of boring holes - see section 4.18!!
4. 18. Sealing of boring holes:
Fillboringholeswithfinishingresin(asshownintheillustrationbelow)inseveralstages andletthemcureaftereveryfilling. Ifsuchaboringholeisfilledandlatercuredallatonce,thematerialinsidecuresfromtop to bottom due to the decreasing intensity of radiation going the same way. As soon as the tophascured,nomoreresincanflowintotheholeanymore,andthisproducesavacuum bubble in the bottom of the hole due to the polymerization shrinkage!

- 20 -
4. 19. Final work:
RemovetheUV-lamp,peeloffthefinishingfoil(wipeofftheremainingresinfromthefoil, since it can always be reused!)
Now remove remnants of the resin from the windshields using the razor blade crosswise in an angle of approx. 80°. Shave, but DON´T CUT!
Better less and carefully than too much and violently, in order not to make scratches on or pit the surface. Because a pit sealant can´t be polished up.
Such a „staying grey effect“ is one of the most frequently made and claimed working mistakes.
Polishupthefinishingresinusingpolish,polishingdiskanddrill.DO NOT press too hard on the polishing disk, otherwise the repair work will be heated up by heat due to friction!
5. 0. Repairoffissures:
5. 1. General information:
Generally speaking, roger´s windshield repair system is a system to repair damages causedbystonesratherthantorepairfissures-whichisnotonlyvalidfortheroger´s system, but for all systems available on the market. Some suppliers of wind- shield repair systems claim the opposite in order to sell their systems.
Notthatyoucouldbringtheresinintothefissures.Andthatfreshfissuresaren´trepairable orthattheadhesivepowerwouldnotbehighenough.Indeedyoudefinitelycanrepair fissureslastingly.Butinpracticetherearelimitstoit.Because:
1. mostfissuresarefullofdirt.Becausemostfissuresdon´tspreadoutfromthe impact spot instantly, with the client having them repaired right away, but they creepslowly,dirtpenetratesintothem,andclientsusuallycomeforarepairwhenit’s already too late.
2.iffissuresbecomelongerorcomeoutorendinthewindshield edge,akinkiscreatedinthesurfacewhichstaysthere,whenthefissurehasbeen repaired-whichcanbeverifiedbylookingparallelabovetheglasssurfacewhere thefissurerepairhasbeendone.Thisneverfulfilsthelawrequirements,especiallythe ECER43regulation(whichdescribeswhatcharacteristicsawindshieldhastofulfil).
Therefore,inpracticeonlyfissuresofmax.10cmlength(passengercars)and30cmlength (trucks, vans and buses) can be repaired.
Longerfissuresareboredattheends,butnotfilled.
5. 2. Boringoffissures:
Forpassengercars,mostofthetimeitisnotnecessary(bythewaythatnotlongerfissures thanmax.10cmlongwillberepaired)toboreoutfissuresspreadingoutfromthe impactspot.Theyarecompletelyfilledonthebasisofcapillaryactionbydroppingfilling resinintothefissurepartswhicharenotyetfilledbytheresinappliedontheimpactspot.

- 21 -
However,fissuresofmorethan10cmlength(atbuses,trucksandvans)shouldbebored out at their end.
The procedure is as follows: the carbide bit is inserted in the drill chuck of the drill.
Thenasmallindentationisgroundatadistanceof1-1.5mmfromtheendofthefissure at an angle of 30 - 45° to the windshield. The drill is best handled if you hold it tightly in one hand, which supports itself on the screen, while the other hand guides it, while the drill bit is moved down slowly to the glass surface. As soon as an initial bore hole has been created, the further boring should be at a right angle in its centre with very little pressure, Just until the glass comes out of the bore hole as white powder. Than the drill is withdrawn to cool down the carbide drill bit while rotatinging for a little bit.
Butpleasebearinmindthatthestateofaggregationofglassissemifluid,whichmeansthat if boring takes too long or if too much pressure is exerted on the drill, the high temperatures may cause the glass to melt (which in turn glues the drill disks).
Boring should almost reach the foil of the screen (the thickness of the outer layer of glass is usually 1.9-2 mm for passenger cars and 2.5-3 mm for trucks, vans and buses.
Don´t bore into the foil!! Because this will create yellow and brown foil burns (train yourself with an old windshield to get some practice!)
Then, with the punch and the drawing pin (which has the ideal weight for this kind of exercise), carefully strike a small cow´s eye on the bottom of the boring axially into the impact spot.
5. 3. Sealingoffissureborings:
Fillboringholeswithfinishingresin(asshownintheillustrationonpage19undersection 4.18.)inseveralstagesandletthemcureaftereveryfilling.
Ifsuchaboringisfilledandlaterhardenedallatonce,thematerialintheholehardens from top to bottom due to the decreasing intensity of radiation going the same way. As soonasthetophashardened,nomoreresincanflowintotheholeanymore,andthismay produce a vacuum bubble in the bottom of the hole due to the polymerization shrinkage!
5. 4. Fillingfissureswithresin:
Theeasiestmethodoffillingfissureswithresinistotakeadvantageoftheircapillaryaction.
Withverticalfissures,onebeginsatthebottomandgraduallyfillsthemup.
Withhorizontalfissures,itdoesn’tmatterwhereonebegins,butifastone-impacthas occurred-whichwasusuallyrepairedfirst-,itisnormallybegunattheotherend.
Thefissureshouldbefilledupbyusingthedropperoftheresincontainer,butonly as long as the resin completely penetrates and the air escapes. Only then should the next dropgointothenextpartofthefissure.Thisisdonetoavoidairbubbles.
Thismethodworksfinewithfreshfissuresandgivesgoodresults.

- 22 -
However,dependingonthepressingofthefissure,evenfreshfissuresmayfilluptooslowly. In such a case, exert a little pressure with the thumb or with roger´s crack stretching device (not included in the Sets, extra available special tool) on the rear side of the damaged spot to improve the situation.
Due to its increased risk, only experienced persons should use this method.
Afterfilling,theadhesivetapeisstuckoverthefissuretoenableittocure. Thereafter, remove the adhesive tape again and use the razor blade to cut off left-over resin.
Oldfissureswhichhavealreadybeendampand/orinwhichsiliconeorgreasehavebeen deposited,usuallystartfillingupnicelyatfirst,butthenbubblesturnup,orthefissures don’taccepttheresin.Inthiscasewehavetoestimatethecreatablerepairresult!
Freshfissurescanoftenberepairedsowellastobecomealmostinvisible.Butapenetration ofwater-evenifoccurredonlyonce-willdeterioratethefinalrepairresult.Therefore, onecanimaginetherepairresultofanoldanddirtyfissure.Cleaningthefissurewith washprimerismostlyhopeless.Witholdfissurestheopticalimprovementisnotmorethan 75 % or less.
On the other hand the optical improvement is often less important, f.i. in the case of the panorama windscreens of buses, as compared with passenger cars.
Especiallyifthedamageisnotinthevisualfieldandyouconsiderthepriceofawindscreen replacement.
Veryoften,stoppingthefissurewillbeofprimeimportance,andtheopticalimprovement will come second. For the customer, cost-saving outweighs aesthetic appearance.
Insuchcases,methodno.2isused:fillingafissurewhichhasfilledupbadlyorinwhich bubbles have formed.
Takethefilling-resincylinderandunscrewtheinjectorscrewuntiltheupperpartofits threadalignswiththeupperedgeofthecylinder.Thenfillapprox.0.5mlfillingresininto thecylinder,headheldfirst,usingtheresinsyringe. Applythecylinderonthefissurespotandpressgentlywithonehand.Screwintheinjector screwandexertlightpressureontheresinuntilyouseethatitpenetratesintothefissure.
Nowmovethecylinderalongthefissurewhilecontinuingtoscrewtheinjectorscrewin untilyouseethattheresinentersintothefissureandthatbubblesareforcedoutbythe penetrating resin.
Especially at that methode is a mechanical pressure from the backside against the crack in the frontside with the roger´s crack stretching device (not included in the Sets, extra available special tool) useful. Afterasuccessfulfilling,theadhesivetapeisstuckoverthefissuretoenableittocure.
Thereafter, remove the adhesive tape again and use the razor blade to cut off left-over resin.
- 23 -
Athirdmethodofrepairingfissuresistouseaspecialadhesivetapewhichhasparticularly good adhesiveness and is resistant to resins for a certain time.
Afterdrilling,theadhesivetapeiscentricallystuckoverthefissure(avoidingtheformation of air pockets) and lightly smoothed down. A hole is made with the drawing pin through the tape at the place where the drilling was done. Nowthetool-holderisattachedasinthecaseofastone-impactspot.Thefilling-resincylin- der is screwed in and placed over the drill hole, with the sealing gently resting on the damage.Fillthecylinderwith0.3mlfillingresin(use0.5mlforbuswindshieldsinorder toavoidpressingairintothefissure).Ifnecessary,refillwithresin!Nowputtheresinunder pressureusingtheinjectorscrew,wherebytheresinispressedintothefissurelikeinto a pipe.
Also with this methode, a mechanical pressure from the back against the crack in the front with the roger´s crack stretching device (not included in the Sets, extra available special tool) can be useful.
Afterthefissurehasbeencompletelyfilled-whetherthewholefissureorsectionsofit-, removethetool-holder.Peelofftheadhesivetapeonlyafterthefissurehashardened.
Scrape off the remains of the resin with the razor blade, seal the boring holes with finishingresin(asdescribedinsection4.18.Sealingofboringholes)andthenpolish.

- 24 -
or
6. 0. Types of damage / special repair and boring instructions:
Full moon full moon ring has no connection to surface; boring required
when close together: special adapter. Double impact If not: adhesive tape over both impacts andfillthroughaholeinthetape
Half-moonwithnocon- carbideboringintofissure. nection to impact hole Impact spot treated separately
Halfcow’seyebadly carbide-boreinimpacthole, fillablebyheavypressure: strikeopenwithpunch
Smallimpactwithstar- boreinfissure, cracks, with strong strike open with punch pressing or none at all:
Large shattering fractures: special adapter or adhesive tape, then cure (if necessary, under pressure)
Air pocket at edge: vacuum and warmth from the rear side
Air pocket at centre: vacuum stage and warmth from the rear side
Half-moonwithfissures: fillslowly,perhapsboringandstriking with punch required
capillaryfillingorfillingbyuseof Fissure: adhesive tape; After boring, perhaps cure under pressure
- 25 -
7. 0. Summary of the instructions for use:
3. 4. Requirements for the repair shop:
* wheneverpossible,workinahallorgaragewithartificiallight * if work under daylight cannot be avoided, use UV-protection foil.
4. 1. Preliminary inspection - examination of the basic conditions:
* what kind of damage? * size of the damage? * Degree of soiling * condition of the windshield - edge delaminations and/or colorations * quality requirements - type of car in relation to size of damage 4. 2. Legal provisions excluding repairs:
* donotrepairinthe“visualfield”ofcars,trucksandbuses.
4. 3. Working temperature during the repair: +15°C to +30°C:
4. 4. Careful inspection of the damage:
* damage to the outside or to the inside? * determine exactly the degree of soiling * dampness? * age? * findoutifpre-treatmentwithwashprimernecessary
4. 5. Preparations and preliminary work:
* clean windshield adjacent to damaged spot * fixthemirrorontherearsideofthedamagedspot * remove glass splinters and dirt from the impact by use of a drawing pin
4. 6. Cleaning damp, dirty or old damaged spots with the red wash primer cylinder and the wash primer:
* Cut the screw thread off the red injector screw with a razor blade, then insert it again into the cylinder * fill0.3-0.4mlwashprimerintothecylinderheldupsidedown * centre the cylinder on the impact spot with cylinder sealing and press wash primer in by moving injector screw in and out * repeatprocedurewhendamageiscompletelyfilledwithwashprimer:thisrinsesthe damage, has a cleaning effect and improves the adhesiveness * after 30 sec. of rinsing, remove cylinder and put damage under vacuum, using vacuum pump, PVC-hose and transparent suction cup. Simultaneously, heat up the damage from the rear side with the cigarette lighter. * as soon as the damaged spot is clearly discernable, stop the vacuum and now warm the front side of the damage with the cigarette lighter until it is completely dry. * check by exerting a little pressure with the trigger on the impact cone (as you would do with wet damage) * repeat procedure if necessary

- 26 -
4. 7. Mounting the tool-holder:
* bring suction cup in position * smear vacuum sealing agent around the edge of the suction cup * fixthetool-holderonthescreensothatthecentreoftheball-headliesexactlyabove the damaged spot * screw down the lifting and lowering screw until the three feet of the tool-holder plate stayonthewindshield.Don’tscrewdowntoomuch!
4. 8. 1. Mountingthefilling-resincylinder:
* openfilling-resinpackage;forthetimebeing,takeonlythefilling-resincylinderoutof thepackage.Closepackage,protectfilling-resincontainmentfromdaylight * unscrew injector screw from cylinder and take the rubber sealing out of the cylinder * screwfilling-resincylinderintotheball-headuntilitsbottomopeningalmosttouches the windshield * openthefixingnut;cylinderiscentredverticallytothewindshieldinorder thatthebottomcylinderopeningtouchesitflush;screwdownfixationscrewnutagain * readjust the cylinder and check if the bottom opening still sits close on the windshield. If not,openthefixingnutoncemore,readjustthecylinderandclosethefixingscrewagain * screw cylinder out of the ball-head again and press the sealing rubber into the cylinder * waveswivelarmoffilling-resincylinder2-3cmandscrewthelatterintotheball-head until the rubber sealing gently rests on the screen. Then go back into the initial position * Checkthattheboreofthefilling-resincylinderisinlinewiththecentreofthedamaged spot by looking through the upper cylinder opening. If necessary, a correction can be made by slipping the whole tool-holder * Carefully adjust the lifting screw nut of the suction cup (2 or 3 quarter turns are enough!)
4. 8. 2. Use of the bus adapter:
* incaseofrepairsofverticalscreens,verticallyadjustthefilling-resincylinder.Then screwthebusadapter(notthefilling-resincylinder)intotheball-head,untilits sealing gently rests on the screen. Then return with swivel arm to initial position * adjustbusadapterwithfixingthenutoftheball-headandthecounternutinsuchaway thattheopeningintheupperpartofthebusadaptertoscrewthefilling-resincylinder in, points upwards * nowinject0.25mlfillingresinasdeeplyaspossibleintotheboreofthebusadapter * screwthefilling-resincylinderintothebusadapteruntilitssealingrestsonthescreen
4. 9. Filling-resin injection:
* injectresinintothecylinder(0.3mlifthefilling-resincylinderhasneverbeenused before, otherwise 0.2 ml) * stow resin container to protect it from daylight! * screwinjectorscrewintothecylinderuntilyoucanseethatthefillingresinentersthe damaged spot. Don´t give it too much pressure! Take your time! * assoonastwothirdstothreequartersofthedamagedpartsarefilledwithresin,screw out the injector screw: this will cause most of the air in the damage to escape through the cylinder * repetition of the pressure and vacuum procedure
4. 10. Putting the damaged spot under vacuum:
* assoonasthreequarterstofourfifthsofthedamagedspotarefilled,screwoutthe injector screw completely, produce vacuum in the cylinder by means of a connection piece, a hose and the vacuum pump * warm the damage once or twice - not more often - with the cigarette lighter from the rear side * remove the vacuum after 5 minutes. The damaged area is in a vacuum state now, the cylinder has a normal air pressure again. This situation occasions the resin to be literally sucked into the damaged areas. In most cases, light pressure with the injector screw helpstofillthedamagecompletely

- 27 -
4. 11. Repetition of pressure and vacuum procedures:
* untildamageiscompletelyfilled
4. 12. Visual inspection:
* from all sides and different angles
4. 13. Difficultcases:Howcanyouhelpyourself?
* put cylinder under vacuum for a long time * thereafter, exert slight pressure on the resin and, consequently, on the impact with the trigger through the cylinder * in case of large damages: is there enough resin in the cylinder? * keep minimum pressure stages, but for a long time * exert pressure on the damaged spot with thumb or crack stretching device from behind. But be careful!!! * ifthereislittleornoconnectiontothedamageortosomefissures,boreandstrike using punch and drawing pin * cureunderpressure-curingfrombehinddoesn’tworkinmostcase
4. 14. Boring of damages caused by stones and striking with punch and drawing pin:
* insert carbide bit in drill chuck * if an impact is perceptible, a hole is vertically bored in it slowly and with very little pressure. After each boring, the drill is withdrawn to cool down. Don´t bore into the foil!! * ifnoimpactcanbeseen,firstgrindasmallindentationonthespotwhereyouwilllater bore (hold the drill angularly); then bore vertically; act slowly and exert little pressure. Aftereachboring,thedrilliswithdrawntocooldown.Don’tboreintothefoil!!
4. 15. Final inspection:
* waveswivelarmasideandcheckifthedamageisreallyfilledupandthatthereisno air left over * wait for a minute, then prepare for curing
4. 16. Cureingofthefillingresin:
* drawoffthefillingresinremaininginthecylinder,withtheresinsyringeandneedle. Don´tputitbackintothefilling-resincontainer * take off the tool-holder; clean suction cup from vacuum-gel * use razor blade to cut off remaining resin from the impact spot * cure the resin for 2 - 3 minutes using the UV-lamp
4. 17. Surfacesealingwiththefinishingresin:
* applysmallquantitiesoffinishingresinontheimpactspot: - incaseofminordamages,filltheholeatonce; - in case of deeper damages, apply in layers (each layer must cured separately) * take care to remove all air bubbles before starting the hardening process * beforecuring,cutoffremainingfinishingresinwithrazorblade * thedifferentlayersoffinishingresinarecuredwithoutfinishingfoil, onlythelastlayerisalwayscoveredwithfinishingfoil.

- 28 -
4. 18. Sealing of boring holes:
* Boringholesandlargesurfacesplinterdamagesmustalwaysbefilledandhardenedin stages,otherwisevacuumbubbleswillappearatthebottomofthefinishingresin.
4. 19. Final work:
* peeloffandcleanthefinishingfoilasitwillbereused * scrapeoffremnantsofthefinishingresincrosswisewithrazorblade(exertonlylittle pressureinordernottomakescratches);don’tcutoffleftoverfinishingresin!!! * polishupthefinishingresinusingpolish,polishingdiskanddrill.
5. 0. Repairoffissures:
5. 2. Boringoffissures:
Boringisonlynecessaryincaseoffissuresofmorethan10cmlength. This is done as follows:
* the carbide drill is held at an angle to windscreen and a small indentation is ground at a distanceof1-1.5mmfromtheendofthefissure * then bore vertically into the windshield. Bore for 1 sec., remove for 1 sec. for cooling * do not bore as deep as the screen foil, stop just before * thenstrikeasmallcow’seyeattheendofthefissurewiththepunchandthedrawing pin:thefissurewillthencreepintotheholeallbyitself,oryouhelpitbyknockinga bit from the rear side.
5. 3. Thesealingoffissureboringsiscarriedoutasdescribedinsection4.18.:
5. 4. Fillingfissureswithresin:
* itisdonebyuseofcapillaryaction.Dropresinintothefissure.Startattheendofit,and alwayswaituntiltheresinhascompletelypenetratedintothefissure,thendropinto the next spot * thefissureisfilledbyuseofanadhesivetapewhichisstuckoverthefissure.Forthe finalboringprocedure,aholeispiercedthroughthetape.Thetool-holderissetup,the fillingcylinderisscrewedin,0.4mlresinisputintoit,theinjector-screwisscrewedin. Nowputthefissureunderpressure. * athirdmethodistofillresinintothecylinderheldupsidedown,toapplythecylinderon thefissurespotandthentoexertpressureontheresin.Whilecontinuingtoscrewthe injectorscrewin,movethecylinderalongthefissureastheresinpenetratesit.
- 29 -
T A B L E O F C O N T E N T S
1. 0. General information on damage caused by stones on laminated windshields of motor vehicles, and on roger´s windshield repair system 11. 1. The problem 1 1. 2. The solution 11. 3. The method 1+21. 4. Typical examples of damage to laminated glass 21. 5. roger´s repairprocess(insimplifiedform) 21. 6. Results of the repair 21. 7. What accounts for the outstanding quality of roger´s repairs? 31. 8. roger´s technology and development today 3 2. 0. Technical data about laminated glass and the effects of stone impacts on them 42. 1. What are laminated windshields? What is their purpose and use? 42. 2. Technical data about laminated glass in motor vehicles 42. 3. The impact of stones on laminated windshields of motor vehicles and its effects 42. 4. Most frequent types of damage on laminated windshields 53. 0. Theory and requirements of repairs 53. 1. General physics 53. 2. Liabilityoftherepairshopincaseoffailuretorepairthedamageoroffissure formation during the repair 5+63. 3. Required repair results 63. 4. Requirements of the repair shop 64. 0. The repair procedure in practice 74. 1. Preliminary inspection - examination of the basic conditions 74. 2. Legal provisions excluding repairs 7+84. 3. Working temperature during the repair 84. 4. Careful inspection of the damage 84. 5. Preparations and preliminary work 8+94. 6. Cleaning and preparing damp, dirty or old damaged spots with the wash primer 9+104. 7. Mounting the tool-holder 10 4. 8. 1. Mountingthefilling-resincylinder 11+124. 8. 2. Use of the bus adapter 124. 9. Injectionoffilling-resin 134. 10. Putting the damaged spot under vacuum 13+144. 11. Repetition of pressure and vacuum procedures 144. 12. Visual inspection from all sides 144. 13. Difficultcases:Youcan´tgettheairoutcompletely-whatcanyoudo? 14-164. 14. Boring of damages caused by stones and striking them with punch and drawing pin 174. 15. Final inspection 17+184. 16. Hardeningofthefillingresin 184. 17. Impact-spotorsurfacesealingwiththefinishingresin 18+194. 18. Sealing of boring holes 194. 19. Final work 205. 0. Repairoffissures 205. 1. General information 205. 2. Boringoffissures 20+215. 3. Sealingoffissureborings 215. 4. Fillingfissureswithresin 21-236. 0. Types of damage / special repair and boring instructions 247. 0. Summary of the instructions for use 25-28 Table of contents 29

- 30 -
NotizenNotes

- 31 -
NotizenNotes