rifeng pex piping system installation...
TRANSCRIPT

Rifeng PEX Piping System Installation Guidelines
(Updated June 2008)

Contact us at: [email protected] page: 2
Index1. Rifeng PEX pipe descriptions.......................................................................................... P-3
2. Marking and explanation.................................................................................................P-3
Explanation........................................................................................................................ P-3
3. Rifeng PEX System fittings and tools..............................................................................P-4
3.1 Fittings available............................................................................................................................... P-43.2 Tools available ................................................................................................................................. P-5
4. Making a connection.........................................................................................................P-5
4.1Connecting PF1 screw fittings with Rifeng PEX pipes.................................................................P-54.2 Connecting PF2 axial-press fittings with Rifeng PEX pipes.......................................................P-74.3 Connecting PF5 radial-press fittings with Rifeng PEX pipes.....................................................P-8
5. Installation.......................................................................................................................P-10
5.1 Manifold System..............................................................................................................................P-115.2 Pipe-in-corrugated pipe.................................................................................................................. P-115.3 Fixing the corrugated pipe..............................................................................................................P-115.4 Pipe-in-insulation pipe....................................................................................................................P-125.5 Termination Box Sets......................................................................................................................P-125.6 Expansion and Contraction............................................................................................................P-135.7 Bend pipe with/without Supports..................................................................................................P-135.8 Pipe fixing........................................................................................................................................ P-145.9 Pipework..........................................................................................................................................P-14
6. Test system.......................................................................................................................P-15
7. Pipe line flushing............................................................................................................. P-16
Contact us at: [email protected] page: 3
Rifeng PEX Piping System Installation guidelines
Notice: This manual contains recommended installation instructions for Rifeng PEX piping system.
Failure to observe these installation instructions may result in substandard performance of the system.Rifeng Piping Systems expressly disclaim any responsibility or liability for substandard performanceresulting from failure to comply with installation instructions.
1. Rifeng PEX pipe descriptions
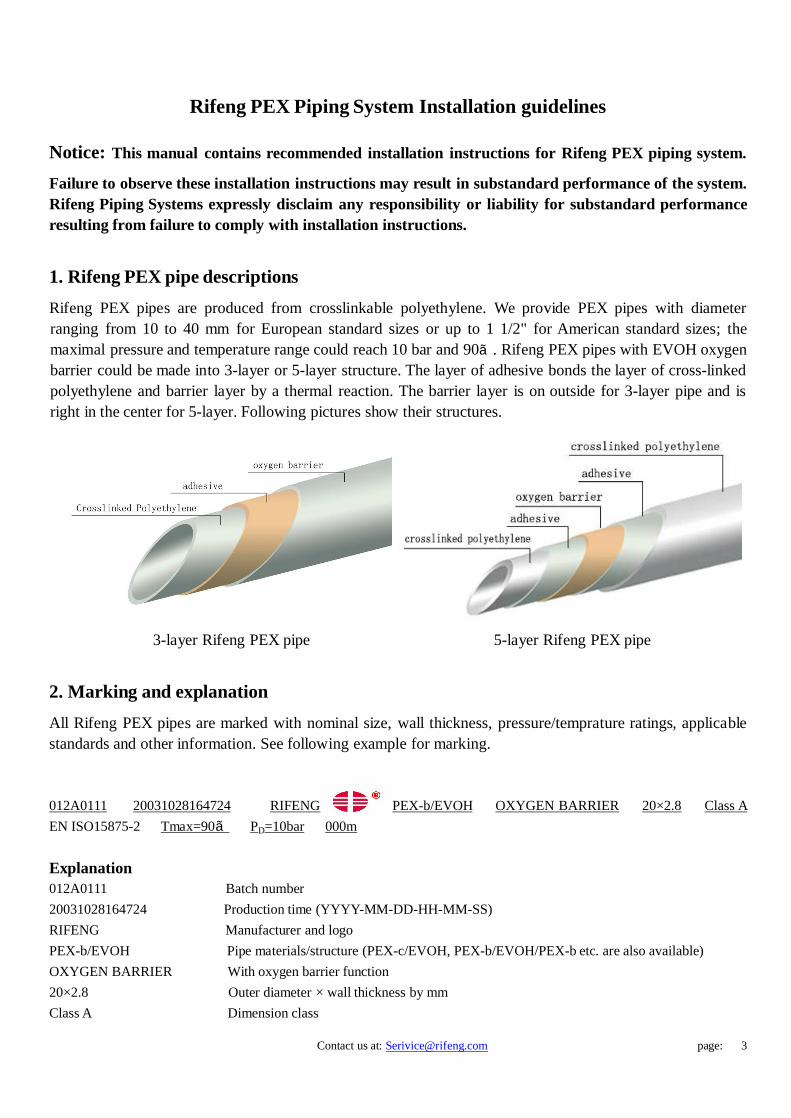
Rifeng PEX pipes are produced from crosslinkable polyethylene. We provide PEX pipes with diameterranging from 10 to 40 mm for European standard sizes or up to 1 1/2" for American standard sizes; themaximal pressure and temperature range could reach 10 bar and 90℃. Rifeng PEX pipes with EVOH oxygenbarrier could be made into 3-layer or 5-layer structure. The layer of adhesive bonds the layer of cross-linkedpolyethylene and barrier layer by a thermal reaction. The barrier layer is on outside for 3-layer pipe and isright in the center for 5-layer. Following pictures show their structures.
3-layer Rifeng PEX pipe 5-layer Rifeng PEX pipe
2. Marking and explanation
All Rifeng PEX pipes are marked with nominal size, wall thickness, pressure/temprature ratings, applicablestandards and other information. See following example for marking.
012A0111 20031028164724 RIFENG PEX-b/EVOH OXYGEN BARRIER 20×2.8 Class A
EN ISO15875-2 Tmax=90℃ PD=10bar 000m
Explanation012A0111 Batch number
20031028164724 Production time (YYYY-MM-DD-HH-MM-SS)
RIFENG Manufacturer and logo
PEX-b/EVOH Pipe materials/structure (PEX-c/EVOH, PEX-b/EVOH/PEX-b etc. are also available)
OXYGEN BARRIER With oxygen barrier function
20×2.8 Outer diameter ×wall thickness by mm
Class A Dimension class

Contact us at: [email protected] page: 4
EN ISO 15875-2 Reference Standard number
Tmax=90℃ Maximum design temperature
PD=10bar Design pressure
3. Rifeng PEX System fittings and tools
Fittings: Made of strong brass by forging, PF1 screw fitting, PF2 axial-press fitting and PF5 radial-pressfitting are available for PEX pipe. PF1 and PF2 fittings are dimensionally designed according to EuropeanEN ISO 15875 PEX piping system standards, popular in Europe, Oceania,South America and other areaswhere European standard is prevailing, while PF5 is dimensionally designed to American ASTM F1807 andASTM F876/877 PEX piping system standards.
3.1 Fittings available
PF1: series: Special tool is not necessary.
PF2 series: Special tool is necessary.
PF5 series: Special tool is necessary

Contact us at: [email protected] page: 5
3.2 Tools available
4. Making a connection
IMPORTANT:Rifeng Piping Systems disclaim any responsibility or liability failures due tounauthorized tools,components or fittings application in Rifeng PEX piping system.User can consult usfor suitable fittings or tools at [email protected] or by tel:86-757-82229829.
4.1Connecting PF1 screw fittings with Rifeng PEX pipes1. Cut the pipe vertically with a pipe cutter(GJ2-2), make sure to cut in a proper way.
Cutter : GJ2-2
Designed for smooth, even cutting, the tool's jaw should fit firmly over thepipe to allow a square, burr-free cut .
Expander tool: (KKQ-16, KKQ-20, KKQ25, KKQ-32)
The expanding adapter is to expand the pipe end in order to insert the PF2fitting into the pipe. It’s better to expand the pipe end twice.
The Axial-pressing Tool: (KYQ-16, KYQ-20,KYQ25, KYQ-32) for PF2 fittinginstallationSmall, light and very handy, complete assortment of Rifeng compression heads,quick and interchangeable
15" Manual pressing crimp: (SYQ2-3/8-3/4 ), for PF5 fitting(copper crimp ringstyle) installation, including crimp ring and crimp gage.
19" Manual pressing crimp: (SYQ2-1-1 1/4 ), for PF5 fitting(copper crimp ringstyle) installation, including crimp ring and crimp gage.
Contact us at: [email protected] page: 6
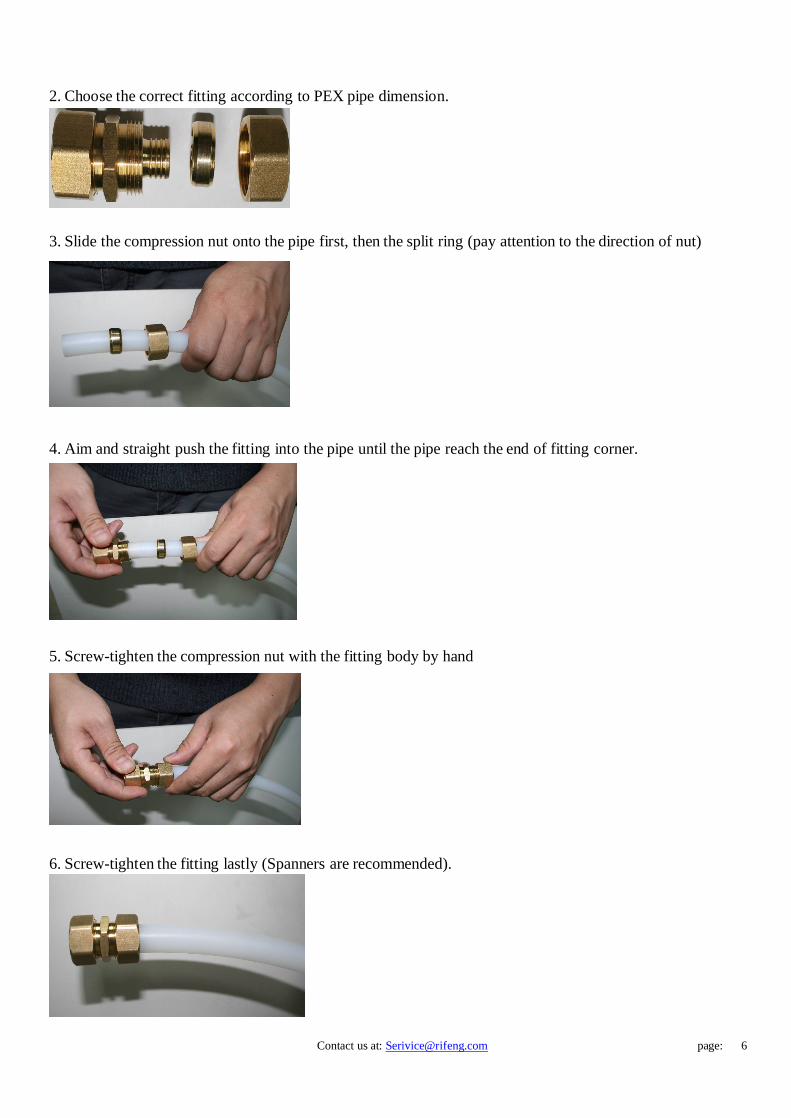
2. Choose the correct fitting according to PEX pipe dimension.
3. Slide the compression nut onto the pipe first, then the split ring (pay attention to the direction of nut)
4. Aim and straight push the fitting into the pipe until the pipe reach the end of fitting corner.
5. Screw-tighten the compression nut with the fitting body by hand
6. Screw-tighten the fitting lastly (Spanners are recommended).

Contact us at: [email protected] page: 7
4.2 Connecting PF2 axial-press fitting with Rifeng PEX pipes1, Cut the pipe vertically by PEX pipe cutter(GJ2-2), make sure to cut in a proper way.
2, Choose right size of expander head for the expanding adapter.
3, Expand the pipe end
4, Installation of fitting
Note: There are different sizes of expander head for pipe andfitting installation in the kit, make sure select the right headbefore expanding. The two handles of the expander must remain90-degree open for installing the head.
a) Slide the fitting sleeve on to the pipe firstly but do not tooclose to the pipe end which is to be expanded and connectedwith fitting insert, keep the handles of the expander 90-degreeopen while fully inserting the expander head into the pipe end.
b) Close the handles until they are locked with 30-degree openbetween them, then return to 90-degree position and pull thehead out off the pipe.
a) After expanding the pipe end, fully straight push the fittinginsert into the pipe and move the sleeve towards the expandedpipe end position.

Contact us at: [email protected] page: 8
4.3 Connecting PF5 radial-press fittings with Rifeng PEX pipes1, Cut the pipe vertically by PEX pipe cutter(GJ2-2), make sure to cut in a proper way.
2, Choose the right size of fitting and jaw of the crimping tool.
b) Choose the right size of compression heads for the axial-pressing tool and install the heads by following the toolinstruction.
c) Place the fitting and the sleeve in the compression groove at theright position(as shown from the picture), then close and open upthe handles repeatedly along the ratchet bar until the sleeve isstopped by the metal block on the fitting.
d) Remove the tool head and check the compressing.

Contact us at: [email protected] page: 9
3, Slide the copper crimp ring onto the pipe at the open end. then insert the ribbed end of the fitting into thepipe until the pipe reaches the shoulder of the fitting, make sure the insert is completely inside the pipe, andthe contact between fitting and pipe is clean and free of impurity.
4 The crimp ring should be positioned on the pipe so the edge of the crimp ring is 1/8 to 1/4 inch(3.2 to6.4mm)from the end of the pipe.
5. The jaws of the crimping tool should be centered over the crimp ring, and the tool should be held so thatthe crimping jaws are perpendicular to the axis of the barb. The jaws of the crimping tool should be closedaround the crimp ring,compressing the crimp ring onto the pipe.
Warning:The crimp ring should not be crimped more than once.

Contact us at: [email protected] page: 10
Important:Crimping tools should be checked and adjusted before use. Users could make a testing crimpconnection and check it with the crimp gage. If the connection is proper, the tool is regarded as good forwork. We recommend checking each crimp connection with the Gage.
6. Crimp gage is included in the kit of Rifeng Manual pressing tools(SYQ2-3/8-3/4 ) and (SYQ2-1-1 1/4 ),please see below picture of the gage, and read the note for which section is "Go" Gage or "No-Go" Gage.After making crimp connections, users should use the appropriate opening of this flat "Go/No-Go" Gage tocheck your finished crimp.If the crmped ring slides into the "Go" slot section,but stops at the scale(see belowpicture) between "Go"and "No-Go" section,then the pressing is acceptable.
If the crimped ring fails to go across the "Go"slot section,or if the crimped ring goes across the scale,thecrimped joint must be replaced,additionally,the crimp tool may need adjustment,follow the recommendationsof the tool manufacturers.
Crimp gage included in the kit of Rifeng Manual pressing tool SYQ2-3/8-3/4
5. Installation
The Rifeng PEX Plumbing System is widely used in potable water system, under floor heating system andsnow melting system etc. Each of them could be made from Manifold System, Pipe-in-Pipe System etc. Usersshould read below guidelines. If you have any questions, please do not hesitate to consult us.
There is a scale on each tooth,each tooth is
for one diameter's crimp check.
The section below the scale is "Go" area.
The section above the scale is "No-Go" area

Contact us at: [email protected] page: 11
5.1 Manifold SystemThe basic principle of the Rifeng manifold system is to provide joint free pipe runs from a centrallypositioned manifold to each radiator valve or tap or water outlet. The system can be designed with one singlepipe dimension from the manifold to the draw-off point, which simplifies design and installation work. Withjoints only at the manifold and the radiator, taps, the risk of leakage from joints is considerably reduced andthere are no connections within the walls. Since also there are no other draw-off points on the same pipe,pressure and temperature variations are minimal when taps are turned on and off. Small pipe diameters andfewer fittings save on installation time and labour costs.
5.2 Pipe-in-corrugated pipe systemRifeng Pipe-in-Corrugated Pipe allows the pipe to be withdrawn and replaced particularly in solid floors orwalls. Supplied to site with the pipe already threaded into the corrugated pipe, this system saves time andmoney on site. Any leakage is retained within the corrugated pipe and can be detected. In addition, in aconcealed pipe run without any Tee-joints, an accidentally damaged section of pipe can be withdrawn andreplaced whilst minimizing structural damage.
5.3 Fixing the corrugated pipeCorrugated pipe should be properly fixed to simplify any subsequent pipe replacement. Rifeng Pipe-in-Corrugated pipe should be laid with the fewest possible bends and the largest possible bend radii. This willalso make it easier to remove the pipe at a later stage if necessary. In concrete structures, corrugated pipes
Contact us at: [email protected] page: 12
should be fixed to the reinforcing steel with metal or plastic ties. In a floor screed, corrugated pipe should befixed to the surface of the concrete slab with suitably sized plastic clips. Fixings must not deform or damagethe pipe or the corrugated pipe.Where the pipe bends, the Corrugated pipe should be supported using a pipe bend support or fixed at eitherside of the bend using suitable clips.
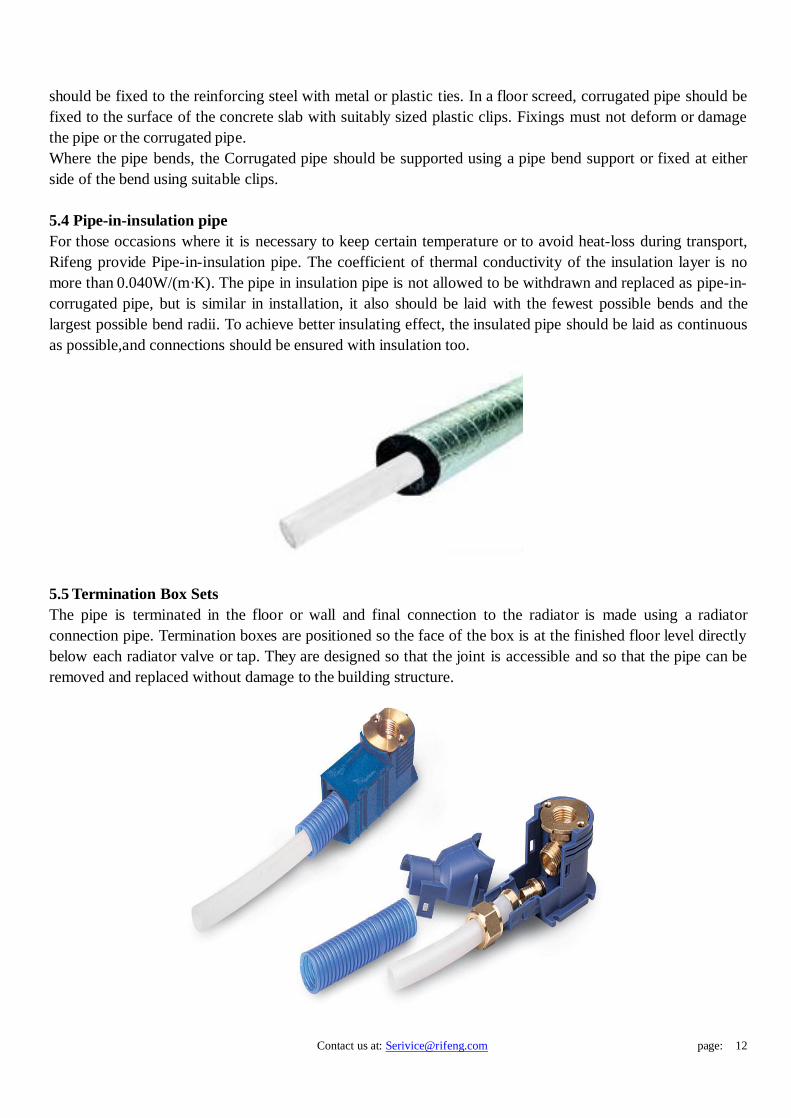
5.4 Pipe-in-insulation pipeFor those occasions where it is necessary to keep certain temperature or to avoid heat-loss during transport,Rifeng provide Pipe-in-insulation pipe. The coefficient of thermal conductivity of the insulation layer is nomore than 0.040W/(m·K). The pipe in insulation pipe is not allowed to be withdrawn and replaced as pipe-in-corrugated pipe, but is similar in installation, it also should be laid with the fewest possible bends and thelargest possible bend radii. To achieve better insulating effect, the insulated pipe should be laid as continuousas possible,and connections should be ensured with insulation too.
5.5 Termination Box SetsThe pipe is terminated in the floor or wall and final connection to the radiator is made using a radiatorconnection pipe. Termination boxes are positioned so the face of the box is at the finished floor level directlybelow each radiator valve or tap. They are designed so that the joint is accessible and so that the pipe can beremoved and replaced without damage to the building structure.

Contact us at: [email protected] page: 13
5.6 Expansion and ContractionAs is common with all plastic materials, Rifeng PEX pipe has a higher coefficient of expansion than metal.This must be considered when installing plastic pipework. All hot water pipes should be laid in soft serpentinebends or with expansion loops to accommodate the expansion.
Allow for 1.5% expansion & contraction of the pipe when installed at 20°C for use at 80°C .
Contraction or shrinkage up to 1.5% of the pipe length occurs when the pipes have been in use and thetemperature and pressure drops. The grip of a correctly installed fitting is greater than that of the shrinkageforce, and if the pipe has been installed allowing for expansion, there should be no problem. After about 15temperature cycles the pipe will stabilize and no more shrinkage will occur.
5.7 Bend pipe with/without SupportsRifeng PEX pipes may normally be bent without the need for any special tool. To make a bend in Rifeng PEXpipe, fix the pipe at one end and gently curve the pipe by hand and fix the pipe at the other end. Use pipe bendsupports to hold the pipe in position. The minimum bend radius is given below table and care should be takennot to bend the pipe beyond this radius since this may cause the pipe to kink. Pipes that have been damagedduring bending should not be used.
Table for bend radius
Bending with support 1 Bending with support 2
DimensionBend radius
DimensionBend radius
Without support With support Without support With support
10 45 27 22 110 90
12 60 27 25 130 120
15 75 60 28 140 130
16 80 74 32 160 130
18 90 74 38 220
20 100 80 40 220

Contact us at: [email protected] page: 14
5.8 Pipe fixingRifeng PEX pipes are not self-supporting and should be fixed using pipe clips to provide adequate supportwhilst allowing for thermal expansion. A certain degree of sagging is to be expected in horizontal pipe runs,this will not affect the performance of the pipe. Rifeng supply a variety of plastic pipe clips to fix Rifeng pipeproducts into position.
U-clip Plastic socket closed/open aluminium socket fixed/slide socket
Supports should always be installed at either side of a bend. It is recommended that pipes be supported at notmore than 150 mm from connections, junctions, valves and other controls. Additional support must always beprovided for pumps and other heavy items. Below table is recommended spacing of fixing points for internalpipework.
Table for recommended spacing of fixing points
5.9 Pipework●Pipes which pass through walls, floors, concrete or brickwork must be protected by a suitable pipe sleeve,such as Rifeng pipe in corrugated pipe.
●Pipes laid in floors or walls should be run in soft serpentine bends to allow for thermal movement of thepipe. This also applies to pipe-in-corrugated pipe and pipe-in-insulation pipe.
●Where pipes cross-over, do not allow hot and cold water pipes to come into contact with each other.
●The relative positions of cold water pipes to hot water pipes should be such that the cold water pipes are notwarmed, particularly when pipes are running parallel.
●Do not allow pipe to make contact with any sharp or abrasive surfaces which could damage the pipe.
●Pipe at high level or in ceiling voids can be laid on a metal tray which will allow for thermal movement.
Caution:Pressure testing should be performed right after piping installation,if there is no leakage found
Diameter(mm)
Horizontalrums (mm)
Vertical runs(mm)
Diameter(mm)
Horizontalrums (mm)
Verticalruns (mm)
10 400 500 22 700 90012 400 500 25 800 100015 500 600 28 800 100016 500 600 32 900 120018 600 800 38 900 120020 600 800 40 900 1200

Contact us at: [email protected] page: 15
after pressure testing, the piping system can then be buried with concretes,for maximum alloweddiameters and shapes of hard blocks which might be included in the burying concretes,please followlocal codes or regulations.Rifeng Piping Systems expressly disclaim any responsibility or liability forany damage on the established piping system resulting from hard blocks included in buring concreteswith exceeding diameters or out-of-regulation sharp shapes.
The following pressure testing with water is just for installer’s reference,installer can use localinstallation practices or codes for intallation checking.
6. Test system
Hydraulic pressure testing shall be undertaken before the Rifeng PEX pipes system is taken into operation.Hydraulic pressure testing is not a substitute for the correct installation of the PEX pipe and associated fittings.It is essential that the correct size, inserts and fittings are used for the pipe and that thermal movements aretaken into account when installing the pipe.
The test pressure applied to the system should be 10 bar or 1.5 times of the maximum pressure rating of thelowest rated component in the system.The maximum test pressure applied to Rifeng PEX pipe should notexceed 15 bar at 20°C. Other equipment in the system, such as boilers, valves, etc. should be checked withmanufacturer as to their maximum pressure rating before any pressure test of the complete system isperformed.
A pressure gage must be connected at the lowest point of the installation being tested and a visualinspection of all pipe connections is to be made before pressure testing with water.
Vent and fill the system with potable drinking water.
Visually inspect the whole system for leaks.
Pressurize the installation to a test pressure of not less than 1.5 times the maximum working pressure.The maximum test pressure applied to Rifeng PEX pipe should not exceed 15 bar at 20°C.
Apply the test pressure by pumping for a period of 30 times. Inspect for leaks.
Reduce the pressure in the pipework by bleeding water from the system to 0.5 times the maximumworking pressure.

Contact us at: [email protected] page: 16
Close the bleed valve. Visually check for leakage and monitor for 90 minutes. If there is no reduction inpressure the system is regarded as leak tight.
7. Pipe line flushing
Total system is to be flushed thoroughly as soon as possible after installation of the piping and following thepressure test. To ensure a sufficient flushing effect, this procedure could be based on pulsating flow of wateror water and air.
Warning: Once the pressure test and flush complete, you should expel water with compressed air.Because the test water might cause freezing or damage of the piping system in winter prior to use.
Rifeng Piping Systems claim this Rifeng PEX Piping System Installation Guidelines does not include allcases possibly met during Rifeng PEX piping system’s services. If users meet any new case or have anyquestions on above guidelines, please contact us by email: [email protected] or by tel:86-757-82229829.