retro kitchen tea towels - janome america: world's … · page 1 retro kitchen tea towels by...
TRANSCRIPT
Page 1
www.janome.com
Retro Kitchen Tea TowelsBy LuAnn Hartley
Janome Supplies:• Janome embroidery/sewing machine• SQ23 Hoop with magnets• SQ14 Hoop• Clothsetter• “P” embroidery foot• “F” satin stitch foot• Edge Guide Foot • 2 empty bobbins
Sewing Supplies:• 3 Tea Towels• Red embroidery thread• Teal embroidery thread• Cotton thread to match towels• 1 piece of red fabric 7” x 7”• 2 pieces of teal fabric 7” x 7”• 2 pieces of teal fabric 4” x 7”• 1 piece 15” x 20” Tearaway stabilizer• 1 piece of 8” x 20” Tearaway stabilizer• 2 pieces of 15” x 20” Sticky back stabilizer• 1/4 yard of Steam a Seam 2• 5/8 yard of red decorative ribbon• 1 1/4 yard of teal decorative ribbon

Page 2
www.janome.com
Applique Embroidery:Seasoned with Love Tea Towel
1. Purchase and download applique patterns from www.Janome-Embroidery.com. a. Seasoned with Love Applique #12611-26 b. Sugar Label Applique #12611-22 c. Flour Label Applique #12611-21 d. Monogram 1 Applique #12611-27
2. Open design Seasoned with Love in Horizon Link or Janome MBX software and print the template on Jenny Haskins Template Magic.
3. Load design to the machine.
4. Position the template on one end of the tea towel and center the design.
5. Apply Steam a Seam 2 to the red and teal fabrics as per manufacturer’s instructions.
6. Place 15” x 20” Tearaway behind the design area and hoop the tea towel in SQ23 Hoop with magnets.
7. Set the machine up for embroidery and attach the “P” embroidery foot.
8. Wind one bobbin with red embroidery thread and one bobbin with teal embroidery thread.
9. Thread the machine with teal thread and bobbin.
Retro Kitchen Tea Towels
Page 3
www.janome.com
Retro Kitchen Tea Towels
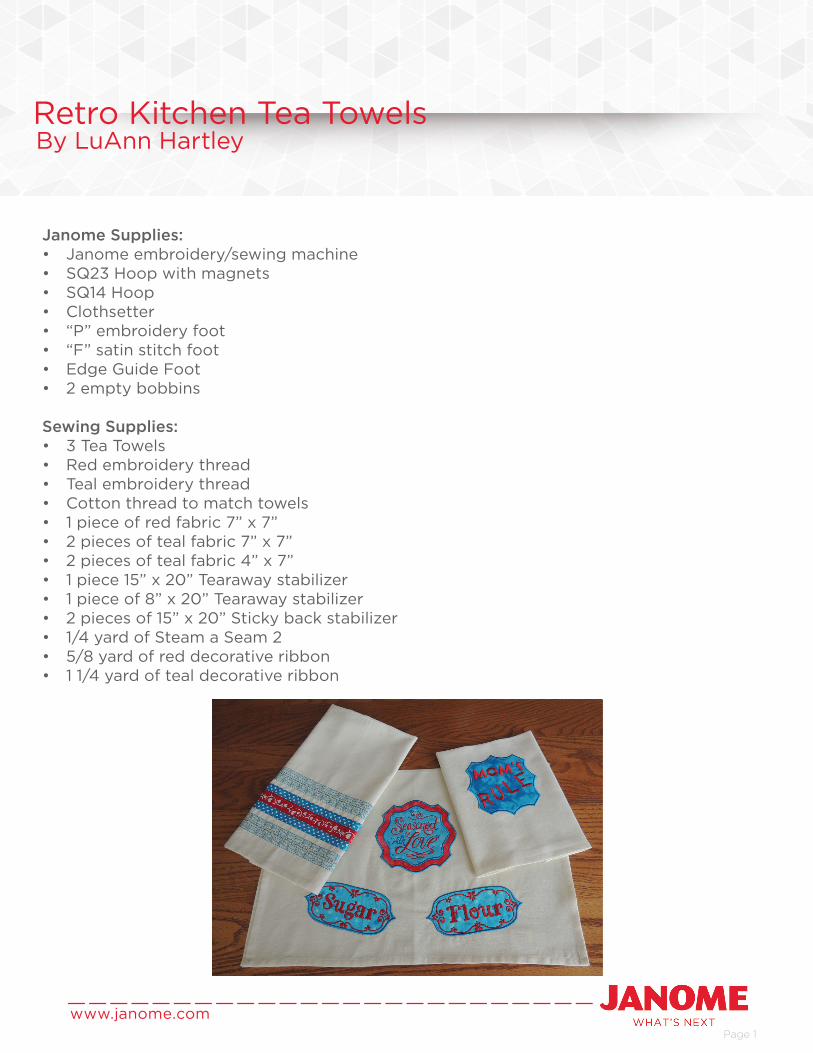
10. Stitch color #1 which will be a placement line. Place 7” x 7” red fabric over this area. Stitch color #2 > tack down line. Trim the excess fabric.
11. Stitch color #3 > small motif placement line. Place 7” x 7” teal fabric over this area. Stitch color #4 > tack down line. Trim the excess fabric.
12. Stitch color #5 > satin stitch lines.
13. Stitch color #6.
14. Thread the machine with red thread and bobbin and then stitch color #7.
Page 4
www.janome.com
Retro Kitchen Tea Towels
15. Remove Tearaway.
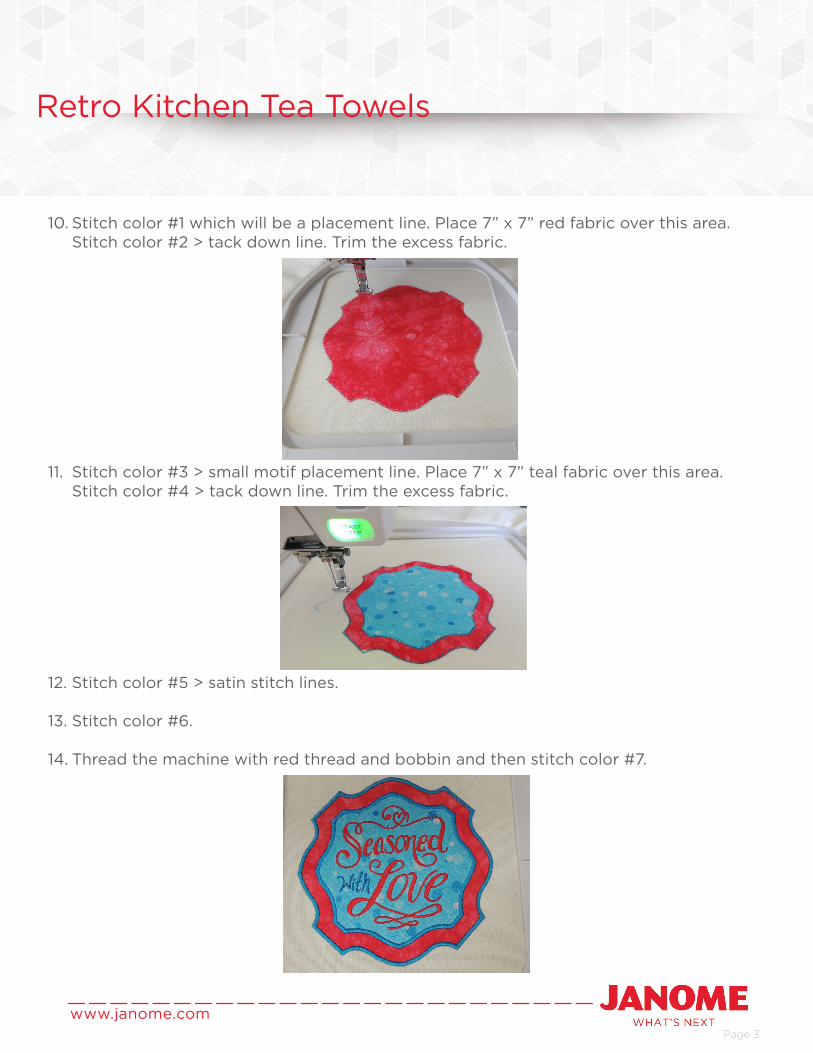
16. Load Sugar Label Applique #12611-22 and Flour Label Applique #12611-21 design into the machine.
17. Print the templates through Horizon Link or MBX software.
18. Thread the machine with teal thread and bobbin.
19. Hoop the sticky back stabilizer in SQ23 hoop. Place the Sugar Label Applique design in one corner below the previous design. Use Clothsetter to help with placement of the design.
20. Stitch color #1 > placement line. Place 4” x 7” teal fabric over the area.
21. Stitch color #2> tack down line. Trim the excess fabric.
Page 5
www.janome.com
Retro Kitchen Tea Towels
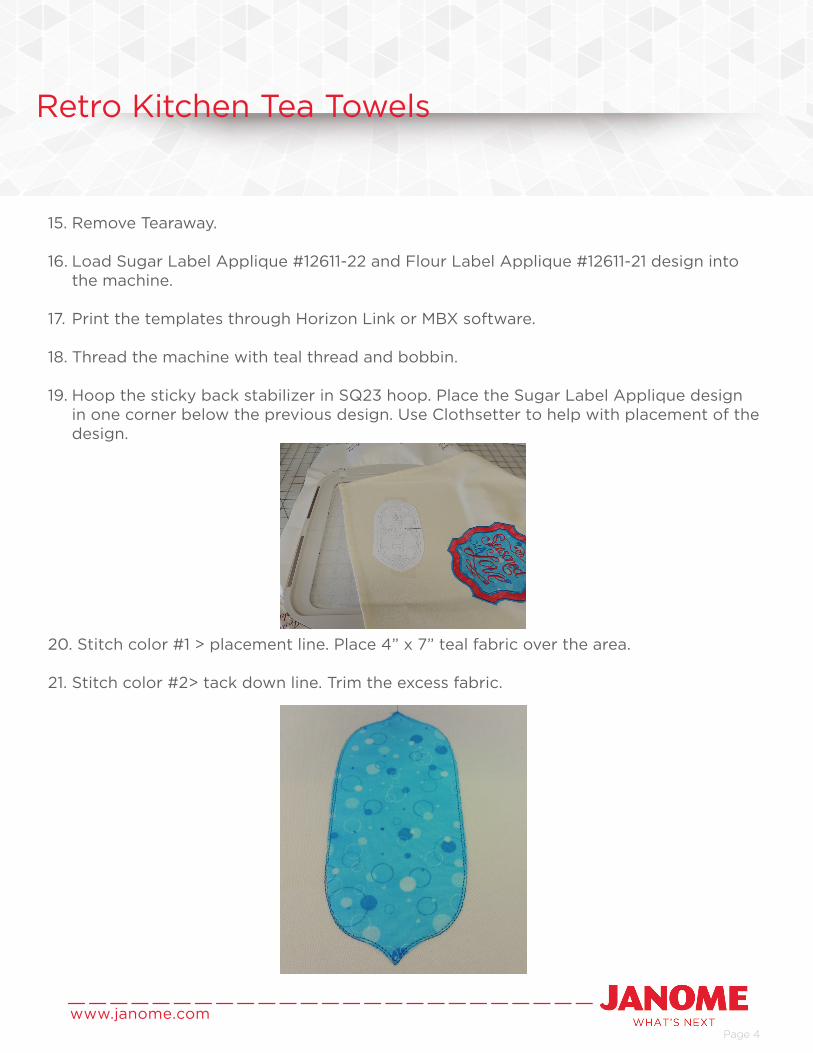
22. Stitch color #3 > satin stitch.
23. Thread the machine with red thread and bobbin. Stitch color #4 and #5.
24. Remove the stabilizer.
25. Hoop the sticky back stabilizer in SQ23 hoop and stitch Flour Label Applique in the opposite corner following the directions in step 17-24.
Decorative Ribbon Tea Towel:
1. Draw a line 4” up from the bottom of the tea towel.
2. Place the red decorative ribbon on this line with the ribbon off of the edge of the towel on both sides. (We will turn this under later.)

Page 6
www.janome.com
Retro Kitchen Tea Towels
3. Place 1 piece of teal decorative ribbon beside the red decorative ribbon and pin into place.
4. Thread the machine with red thread and bobbin.
5. Attach “F” satin stitch foot.
6. Select Quilt stitch.
7. Sew the ribbons together making sure the center of the stitch is between both ribbons and catches each one on the outward stitch.
8. Place the other teal decorative ribbon on the opposite side of the red decorative ribbons and stitch down using the same stitch.
9. Thread the machine with teal thread and bobbin.
10. Attach the Edge Guide Foot. Adjust the guide on the foot with the adjusting screw so that the needle just stitches on the ribbon.
Page 7
www.janome.com
Retro Kitchen Tea Towels
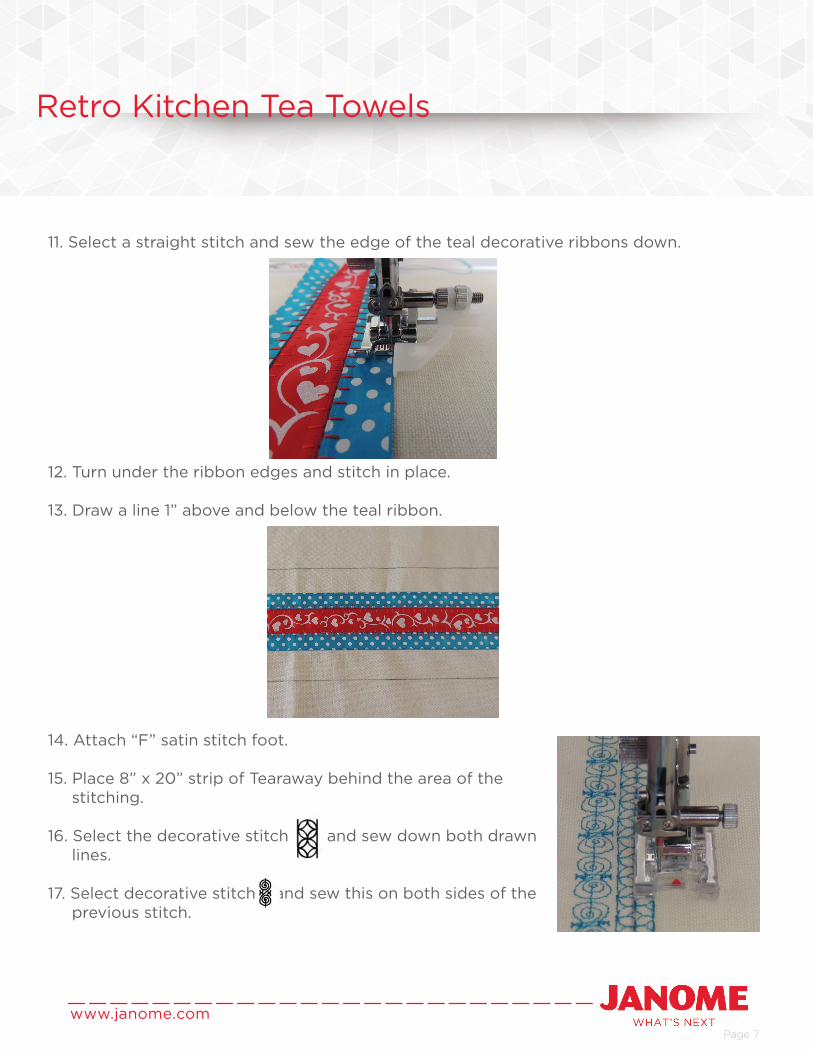
11. Select a straight stitch and sew the edge of the teal decorative ribbons down.
12. Turn under the ribbon edges and stitch in place.
13. Draw a line 1” above and below the teal ribbon.
14. Attach “F” satin stitch foot.
15. Place 8” x 20” strip of Tearaway behind the area of the stitching.
16. Select the decorative stitch and sew down both drawn lines.
17. Select decorative stitch and sew this on both sides of the previous stitch.
Page 8
www.janome.com
Retro Kitchen Tea Towels
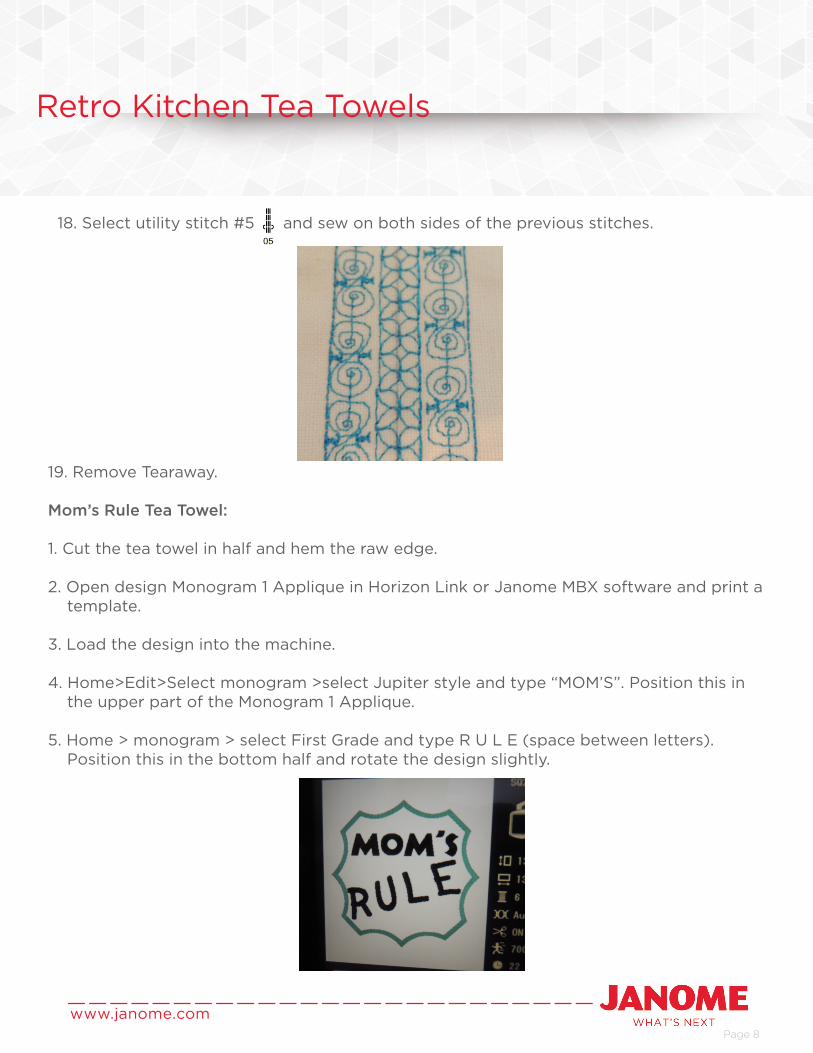
18. Select utility stitch #5 and sew on both sides of the previous stitches.
19. Remove Tearaway.
Mom’s Rule Tea Towel:
1. Cut the tea towel in half and hem the raw edge.
2. Open design Monogram 1 Applique in Horizon Link or Janome MBX software and print a template.
3. Load the design into the machine.
4. Home>Edit>Select monogram >select Jupiter style and type “MOM’S”. Position this in the upper part of the Monogram 1 Applique.
5. Home > monogram > select First Grade and type R U L E (space between letters). Position this in the bottom half and rotate the design slightly.
Page 9
www.janome.com
Retro Kitchen Tea Towels
6. Thread the machine with teal thread and bobbin.
7. Hoop the towel and 10” x 14” Tearaway stabilizer in SQ14 hoop.
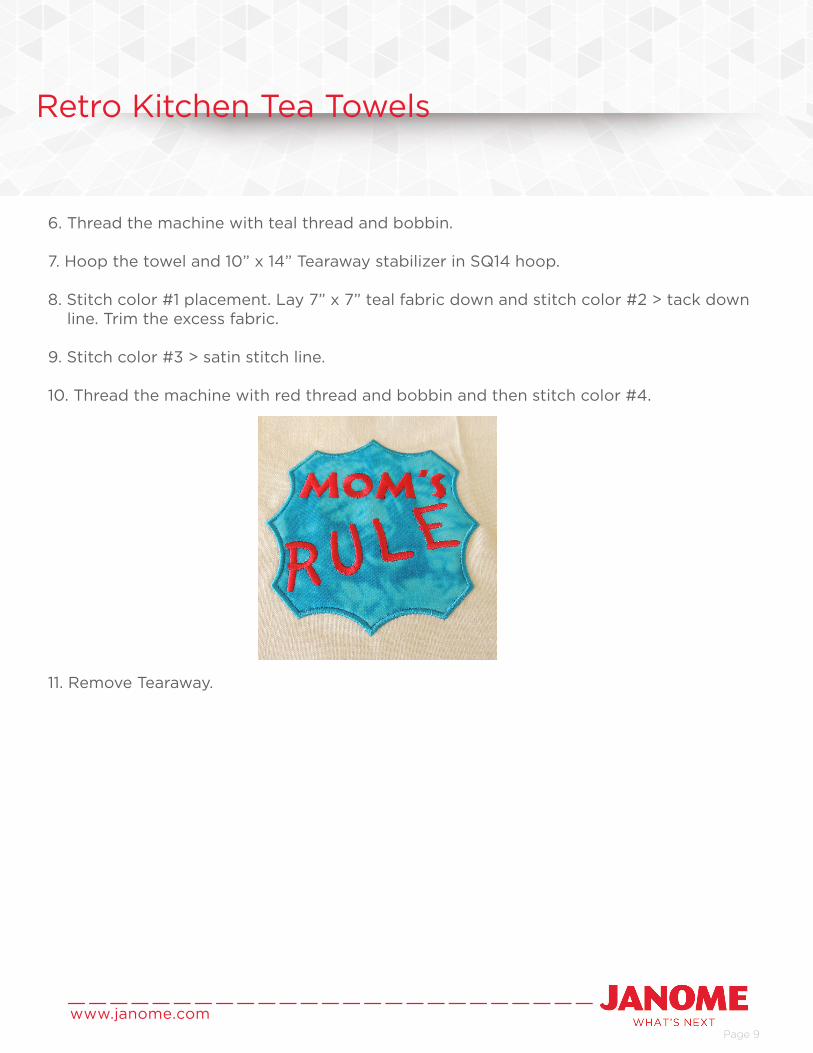
8. Stitch color #1 placement. Lay 7” x 7” teal fabric down and stitch color #2 > tack down line. Trim the excess fabric.
9. Stitch color #3 > satin stitch line.
10. Thread the machine with red thread and bobbin and then stitch color #4.
11. Remove Tearaway.