reporting tools —generating a report by adding a new...
TRANSCRIPT

Adding a New Run Control ID 1/29/16 page 1 of 12
Reporting Tools —Generating a Report by Adding a New Run
Control ID for Your BI Publisher Report BI Publisher reports, using Query Report Scheduler, require the use of a Run Control,
which is a slightly different process than using PS Query. The Run Control configuration is an essential step in generating a report, as a run control can be used time and again—with minor
changes, if necessary—to generate a BI Publisher report. The following steps demonstrate how to set up a Run Control for the purpose of producing a BI Publisher report.
Privacy Disclosure
Disclosure of information from student records is governed by the Federal Family Educational Rights and Privacy Act (FERPA) and in part by the State of California Education Code. UCB maintains a campus policy governing disclosure of information from student records. This policy provides reasonable interpretations of those laws and protects the student’s right of privacy as guaranteed by the State of California’s constitution. For more information, the entire policy can be found at: http://registrar.berkeley.edu/ferpa.html
You must not release any private student information to any person or organization without the student’s written consent, and must only handle all UCB information for authorized work-related purposes, according to the Minimum Security Standards for Electronic Information (MSSEI).
Private student information is considered Level 1 and includes, but is not limited to, academic records, information in personnel files, student conduct issues, SID, certain personal contact information, as well as other sensitive information encountered while on the job. Level 2 information, which if exposed to unauthorized persons, causes extreme impact. It includes but is not limited to Social Security Numbers, Credit Card Numbers and medical information.
1. After you have logged in to Campus Solutions, click the Main Menu link at the top, left of the window.
NOTE: Your menu view may be different from the example here, based on your security access and functions.
1.

Adding a New Run Control ID 1/29/16 page 2 of 12
2. Scroll downwards, if necessary, and select Reporting Tools.
3. Click the BI Publisher link.
4. Click Query Report Scheduler.
2.
3.
4.
Adding a New Run Control ID 1/29/16 page 3 of 12
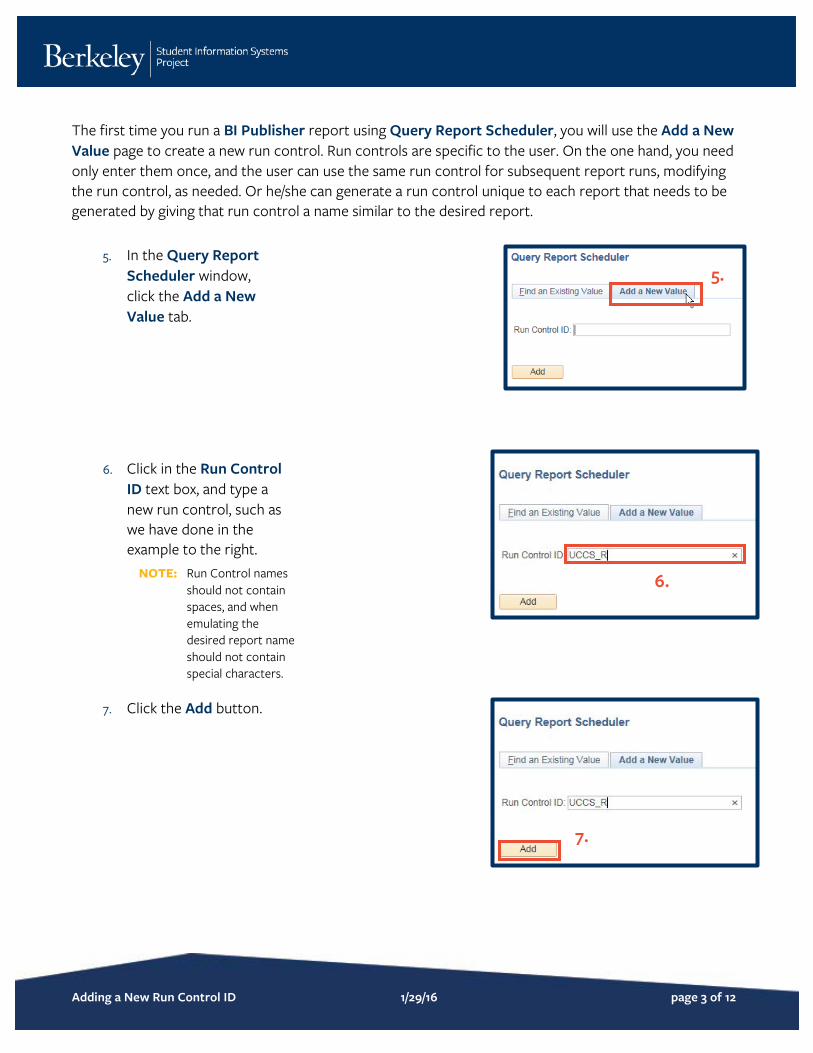
The first time you run a BI Publisher report using Query Report Scheduler, you will use the Add a New Value page to create a new run control. Run controls are specific to the user. On the one hand, you need only enter them once, and the user can use the same run control for subsequent report runs, modifying the run control, as needed. Or he/she can generate a run control unique to each report that needs to be generated by giving that run control a name similar to the desired report.
5. In the Query Report Scheduler window, click the Add a New Value tab.
6. Click in the Run Control ID text box, and type a new run control, such as we have done in the example to the right.
NOTE: Run Control names should not contain spaces, and when emulating the desired report name should not contain special characters.
7. Click the Add button.
6.
5.
7.

Adding a New Run Control ID 1/29/16 page 4 of 12
8. In the Query Report Scheduler window, click in the Report Name text box, and then click the Lookup list magnifying glass ( ).
NOTE: In the Report Name text box, you could also type the first few characters of the report name, and then select the report from the pop-up list that appears.
9. From the Search Results, select the required report.
Observe that the Search Results page to the right is displaying the first 30 of 93 records, so you may have to click the Show More Rows button ( ) to view the part of the Search Results list showing the desired report.
8.
9.

Adding a New Run Control ID 1/29/16 page 5 of 12
10. In the Search Results parameters window, type the term in the Term field, or click the Lookup icon, and select the term from the Lookup list.
NOTE: In this instance, Term and Institution are the only required fields.
To the right we see that we are viewing
61–90 of 93 reports.
9.
10.

Adding a New Run Control ID 1/29/16 page 6 of 12
11. Click the OK button.
12. If necessary, change the parameters by clicking the Update Parameters link. (When done, click the OK button to return to Query Report Scheduler.)
11.
12.

Adding a New Run Control ID 1/29/16 page 7 of 12
13. Click the Run button.
14. After accepting the default configurations for Type and Format, or changing them, click the OK button
14.
13.

Adding a New Run Control ID 1/29/16 page 8 of 12
15. Within the Query Report Scheduler window, click Save.
16. Click the Process Monitor link.
15.
16.

Adding a New Run Control ID 1/29/16 page 9 of 12
17. Run Status should equal Success, Distribution Status should equal Posted, and Details should equal Details. If not, click Refresh before continuing.
18. Click the Main Menu link.
17.
18.

Adding a New Run Control ID 1/29/16 page 10 of 12
19. Select Reporting Tools.
20. Select Report Manager.
20.
19.

Adding a New Run Control ID 1/29/16 page 11 of 12
21. Click the Administration tab.
22. Click the PDF of the report, shown in the Report List. (It should be the top report displayed.)
23. Once you select the PDF, that PDF file will appear in a new browser tab or window. Using the Acrobat command bar, you can save or print your report.
22.
23.
21.

Adding a New Run Control ID 1/29/16 page 12 of 12
24. When done, close the report’s broswer tab to exit the report.
25. In the Navigation Bar that runs across the top of the window, click the Home button to return to Campus Solutions’ home page, or click Sign out to exit Campus Solutions.
NOTE: To completely exit Campus Solutions, exit your browser, as well, at the end of a browser work session. Do not leave your open browser unattended
Support:
For questions or assistance, please contact Campus Shared Services IT.:
• Call 510-664-9000 (press option 1, then option 2 to reach SIS support) • Email: [email protected] • Submit a ticket: https://shared-services-help.berkeley.edu/new_ticket/it
25.
24.