renaissance faire: what to wear? - city of albuquerque · easy renaissance garb - 1 renaissance...
TRANSCRIPT

Easy Renaissance Garb - 1
RENAISSANCE FAIRE
WHAT TO WEAR?
What do you wear to a Renaissance Fair? Most people think of heavy, stiff clothing with
a farthingale (cone-shaped hoop skirt) for women and short, full pants worn with tights for men.
But most people didn’t dress that way most of the time, just as we wouldn’t wear a
cocktail dress to hike or grocery shop or a tuxedo to change the oil or cook dinner. Even the
nobility and the rich often wore wool rather than silk.
Women wore a mid-calf or ankle length smock of white linen. Over it, working women
often wore an overskirt and a vest-like bodice. Sometimes the bodice had sleeves, sometimes not.
A common kind of bodice in the Low Countries reached from the waist to just under the bust and
was wide laced in front. See pictures 1 and 2. Instructions for this bodice are at the end of this
article.
See pictures 3, 4, 5 and 6 for bodices which are more like vests or jackets. Women also
wore dresses, either plain or ornate. Figures 7, 8, 9, 10. However, they tended to be rather fitted,
making them more challenging to sew. The Spanish “loose gown” is less so, but is open from the
waist down, so it must be worn over at least a skirt, if not a full underdress.
Men wore a shirt and some form of breeches—often the short, puffy kind (“pumpkin
pants”), full or semi-fitted knee-length breeches, or even ankle-length trousers that look almost
modern. In addition, they wore a doublet which reached the waist and usually had long sleeves.
Usually a jerkin (a sleeveless or short-sleeved garment with at least a short skirt) went over the
doublet. Men engaged in strenuous work, like soldiers, dock workers, pages or torturers often
did not put anything over the doublet, or sometimes simply wore a jerkin over their shirt. Figures
11, 12, 13, 14, 15, 16, 17, 18, and Fig. 2.
See more information below.

Easy Renaissance Garb - 2
Fig.1 Detail from
Market Scene by
Pieter Aertsen,
ca. 1560.
This market
woman’s outfit
consists of a
white smock,
skirt with
attached waist
cincher bodice*,
apron and veil:
practical, easy to
make and
authentic. The
apron is usually
white. This one
may simply be
dirty.
*For ease of
construction,
make the waist
cincher
separately.
Isabella of Portugal, 1548, by
Titian.
Too uncomfortable for a fair, not
to mention too difficult and
expensive.
Philip II of Spain. A little too
formal, perhaps.
Spanish dockworkers, 1529, by Christopher Weiditz. The
other end of the spectrum.
end

Easy Renaissance Garb - 3
Fig. 2. Market Scene, by Joachim Beukelaer, 1563.
Her waist cincher matches her skirt. She wears a small cap, which may be simply
a gathered circle of linen, far back on her head. The man wears long pants (which could
be duplicated by using a scrub pant or pajama bottom pattern (or karate pants). We can’t
see his shirt; it’s covered by a black doublet, with a brown, short-sleeved jerkin over it.
A hat with a low, flat crown and a pair of clogs would work.

Easy Renaissance Garb - 4
Fig. 3. Castilian lady, ca. 1530.
The smock here has long sleeves, gathered at
intervals down the arm, but a simpler sleeve
would take less fabric, be more convenient,
easier to sew, and not inauthentic. A vest
pattern, modified to have a square or rounded
neck would work for the bodice. The skirt
decoration is probably appliqué but could be
left off or replaced by a border of ribbon. She
has chopines on her feet, tall clogs meant to
keep the hem of her skirt up off the dust or
mud.
Fig. 4 Detail of Velazquez
painting, Old Woman Frying Eggs
(early 17th
century). Note the
invisible front closing—probably
hooks and eyes—and the small
peplum which distinguished many
Spanish women’s jackets from
English jackets, like that of
Elizabeth I, shown in Fig. 5.

Easy Renaissance Garb - 5
Fig. 5. Queen
Elizabeth’s jacket
(back view), ca. 1578,
in Boston Museum of
the Fine Arts.
This jacket is very
similar to the
Folkwear Bolivian
Milkmaid jacket
shown in Fig. 6. It
could be as plain or as
decorative as desired.
This was heavily
embroidered. Don’t
use brocade
upholstery fabric for
this unless you have a
lot of it and plenty of
time to match the
designs.
Fig. 6. Folkwear Bolivian
Milkmaid Jacket. The bottom
version is very similar to Queen
Elizabeth’s jacket from 1578.
Make it in light wool, cotton
twill, broadcloth, velveteen or
cotton velvet. Close the front
with buttons and loops or hooks
and eyes, and wear a white
linen or cotton filler underneath
(if you don’t wear a smock).

Easy Renaissance Garb - 6
Fig. 8. Mixing dough in Zeeland, by
Christoper Weiditz, 1529.
Fig. 7. Portrait by Bordone, 1550’s. A
handsome but complicated dress: the
sleeves are separate and are pinned or
tied on so that a line of the very ornate
smock shows between the shoulder
strap and the sleeve.
Fig. 9. The style
known as a Spanish
loose gown was
copied all over
Europe in the 16th
century. This
example is from
Germany. It would
have been worn over
a kirtle, which would
have been worn over
a smock. The loose
gown might have
long sleeves or short,
like this one. If it had
long sleeves, the
kirtle might be
sleeveless.
Fig. 10. Woman
from Navarre,
Spain, 1st half 16
th
century.

Easy Renaissance Garb - 7
Fig.11. Doublet and trunk hose
(pumpkin pants) of Don Garzia
de Medici, 1562.
Fig. 12. The Tailor, by Giovanni
Moroni, ca. 1570. Another example
of doublet and trunk hose, this one
middle class.
Fig. 13. Hernan Cortés, 1529,
by Weiditz. His jerkin is long
enough to cover his trunk
hose.
Fig. 14. Spanish ship’s captain,
1529, in a similar jerkin over pants
that are probably ankle length
when standing.

Easy Renaissance Garb - 8
Fig. 15. Noble Galician, (from Galicia
in northern Spain) by Vecellio, ca.
1590. See also Fig. 2 for long pants on
a middle-class Dutchman.
Fig. 16. Detail from Market Scene by
Pieter Aertsen, ca. 1560. A middle-class
jerkin worn over a shirt, with no doublet.
Fig. 17. Detail from The Victors
of Lepanto, ca. 1575, showing
Venetian breeches.
Fig. 18. Spanish musketeer, from The Exercise
Of Arms, by Jacob de Gheyn, 1597, wearing
Walloon breeches.
Easy Renaissance Garb - 9
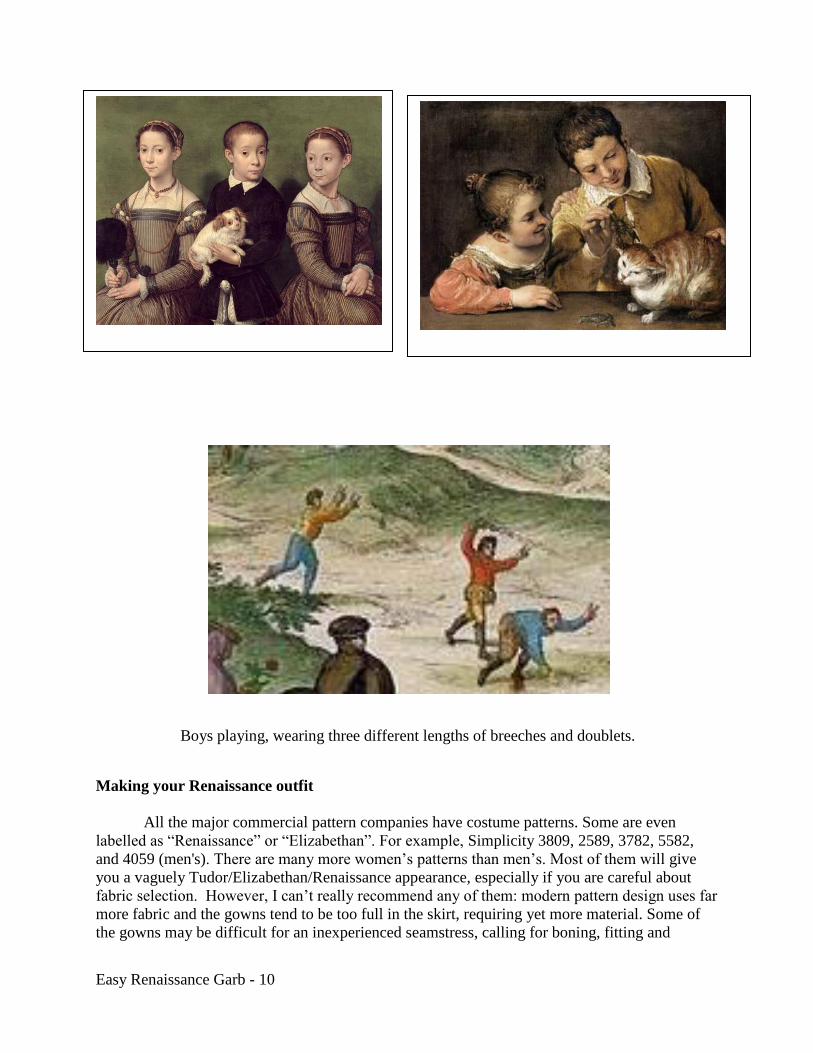
CHILDREN’S WEAR
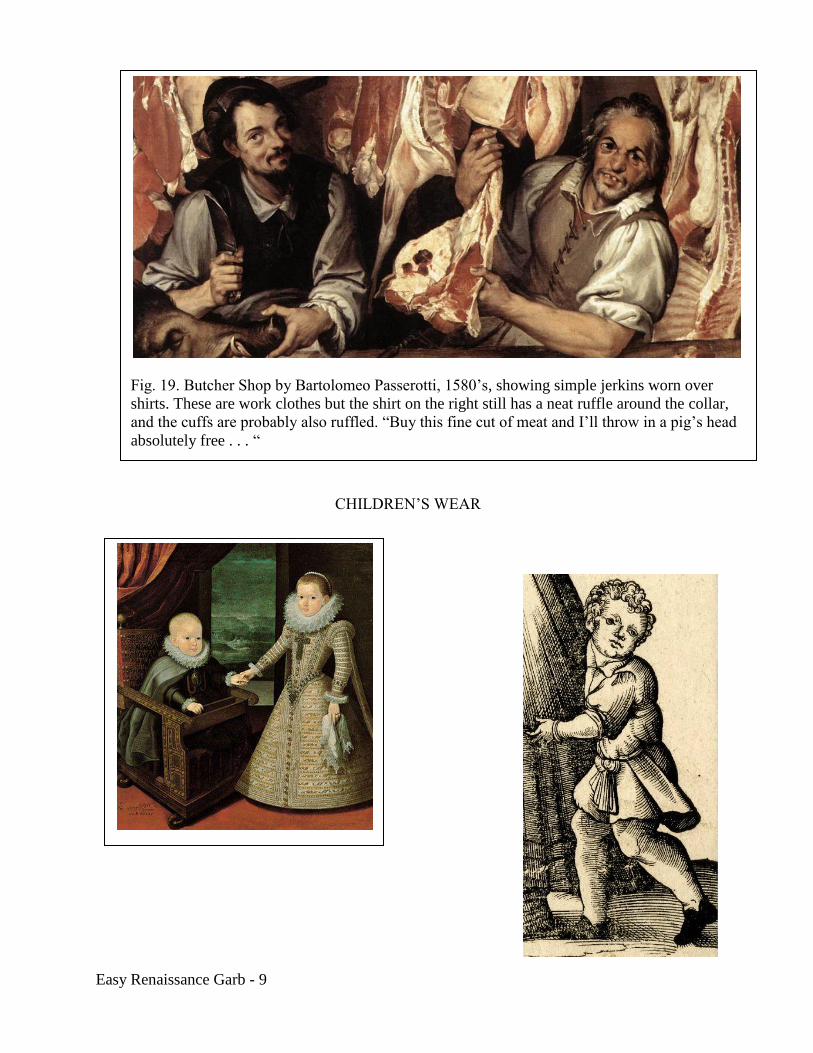
Fig. 19. Butcher Shop by Bartolomeo Passerotti, 1580’s, showing simple jerkins worn over
shirts. These are work clothes but the shirt on the right still has a neat ruffle around the collar,
and the cuffs are probably also ruffled. “Buy this fine cut of meat and I’ll throw in a pig’s head
absolutely free . . . “
Easy Renaissance Garb - 10
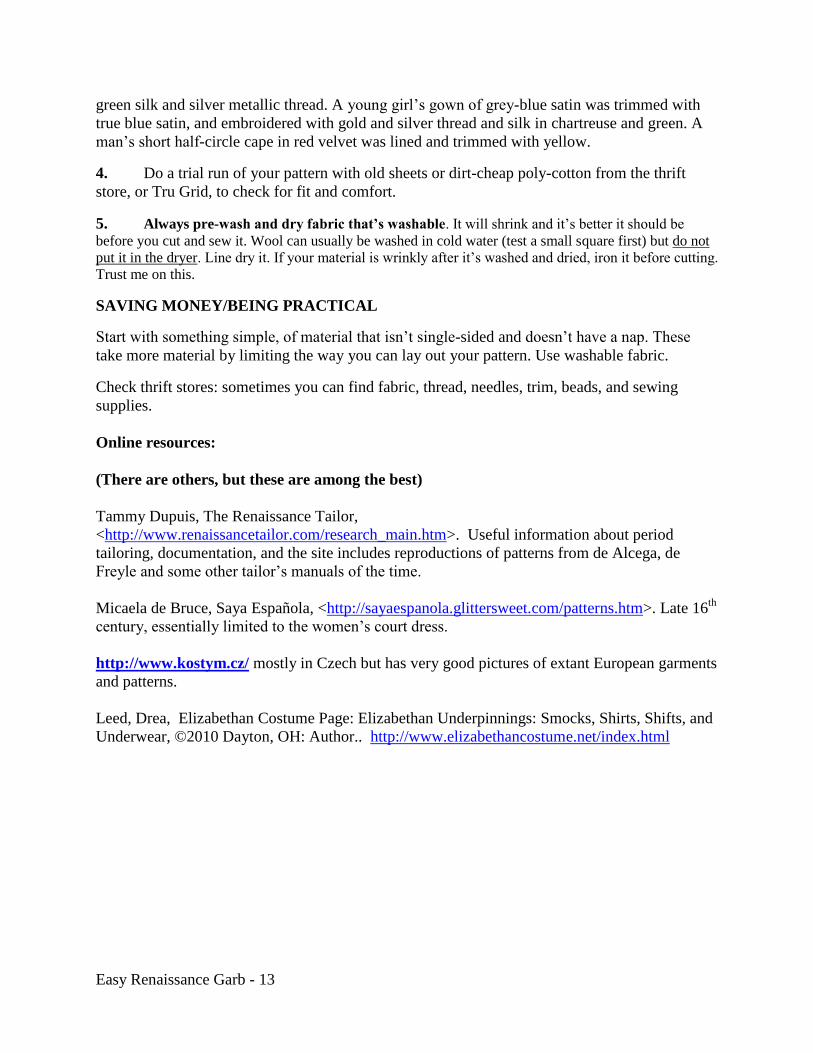
Boys playing, wearing three different lengths of breeches and doublets.
Making your Renaissance outfit
All the major commercial pattern companies have costume patterns. Some are even
labelled as “Renaissance” or “Elizabethan”. For example, Simplicity 3809, 2589, 3782, 5582,
and 4059 (men's). There are many more women’s patterns than men’s. Most of them will give
you a vaguely Tudor/Elizabethan/Renaissance appearance, especially if you are careful about
fabric selection. However, I can’t really recommend any of them: modern pattern design uses far
more fabric and the gowns tend to be too full in the skirt, requiring yet more material. Some of
the gowns may be difficult for an inexperienced seamstress, calling for boning, fitting and
Easy Renaissance Garb - 11
zippers. Most of the patterns are more complicated than an authentic 16th
century pattern would
be.
If you want a “court style” gown, or a “wench” outfit and are comfortable with a
traditional pattern, the pattern books at your fabric store are a good start (men’s patterns are in
short supply, however). There are companies online that provide more authentic patterns, such
as “Mantua Maker”, “Reconstructing History”, and “Margo Anderson’s Historic Costume
Patterns”. They are more expensive than the commercial patterns, but are usually on heavyweight
paper. Look at them for inspiration and an idea of what the clothing really looked like.
For your first excursion into 16th
century dress, you may want to keep it simple. I am
including some simple patterns: for a man’s/woman’s shirt or smock, Walloon breeches and a
“waist cincher” bodice, and suggestions for other garments and accessories, all of them easy and
cheap to make. If you want “pumpkin pants”, I’ve got very simple instructions for those, too.
Quick & dirty methods I can recommend:
A slightly oversize drawstring scrub pant or pajama bottom (or karate pants) can be used to make
the long pants shown in Figures 2, 14 and 15. By shortening the pattern to knee length
(approximately) and putting a casing for elastic inside the legs, you can make Venetian breeches.
If you don’t want to sew from scratch, thrift stores like Savers often have scrub pants.
A vest pattern makes an adequate sleeveless jerkin or doublet. If it has a pocket option, leave it
off. If you don’t want to do buttons and button holes, eliminate the overlap where the buttons and
the holes meet, and use grommets to make lacing holes instead. Or sew hooks and eyes inside the
front edges, or pin rows of safety pins on the inside edges out of sight, and lace through them.
To make a skirted jerkin, cut trapezoidal pieces to join to the bottom edges of the vest pieces. See
below, under Patterns. For a fuller skirt (as in Figures 13 and 16), cut the trapezoids a little wider
and gather the top edges to the vest bottom edges.
A woman’s bodice can be made from a vest pattern, too.
Accessories:
A drawstring pouch (plenty of instructions online).
A wicker basket with a square of white cotton or linen covering it can hold your purse,
sunscreen, cell phone, and anything else you need to carry.
Apron: a rectangle of white linen or cotton can be tucked into the top of the skirt, or you can add
ties, like a modern apron. A plain white dish towel or tea towel makes an adequate simple apron
with no sewing involved. Or you can make one from an old white sheet.
Shoes: Mary Janes, clogs, loafers (if not too dressy); soft boots look well with Walloon breeches.
Headgear: For men, the round flat cap was common, although other styles were also worn. Low-
crowned, wide-brimmed straw hats are authentic and widely available at very little cost. You can

Easy Renaissance Garb - 12
sew or pin in ribbons for ties (useful in windy weather). See Figures 2 (man’s hat, worn in Spain
as well as in the Low Countries), and women’s hats:
Sewing hints:
1. Allow yourself enough time to plan it and sew it.
2. Choose the right material. (Don’t use knits, polyester, anything stretchy, anything glittery,
prints, crushed/panne velvet, lace wider than about 3 inches, neon colors.) Period fabrics were:
wool, linen, and silk, and various blends of these. Shirts and smocks were always white linen.
For economy and convenience, I suggest either an old white cotton sheet or white muslin for
shirts and smocks, and a heavy cotton for outer garments. Twill is a good weight, and so is some
broadcloth. Cotton velveteen or cotton velvet is good, if you find some at a really good price.
Some cotton drapery fabric is good, if it’s a solid color or has a woven-in (not printed) pattern.
3. Good colors are rich tones like burgundy or wine red, deep green, maroon, topaz yellow,
black, and brown. Pastels were less common, except for use in embroidery, although a very deep
pink was sometimes used. Garments were sometimes embroidered with very vivid (and
clashing) colors: one shirt featured alternating bands of red silk and gold metallic thread and
Left: Detail from a Breughel painting, 1565,
showing 3 straw hats and kerchief head wrap.
Below: Detail from Weiditz. A typically
Spanish hat. Sometimes the top tassel is
replaced by a flat button-like disk.
Easy Renaissance Garb - 13
green silk and silver metallic thread. A young girl’s gown of grey-blue satin was trimmed with
true blue satin, and embroidered with gold and silver thread and silk in chartreuse and green. A
man’s short half-circle cape in red velvet was lined and trimmed with yellow.
4. Do a trial run of your pattern with old sheets or dirt-cheap poly-cotton from the thrift
store, or Tru Grid, to check for fit and comfort.
5. Always pre-wash and dry fabric that’s washable. It will shrink and it’s better it should be
before you cut and sew it. Wool can usually be washed in cold water (test a small square first) but do not
put it in the dryer. Line dry it. If your material is wrinkly after it’s washed and dried, iron it before cutting.
Trust me on this.
SAVING MONEY/BEING PRACTICAL
Start with something simple, of material that isn’t single-sided and doesn’t have a nap. These
take more material by limiting the way you can lay out your pattern. Use washable fabric.
Check thrift stores: sometimes you can find fabric, thread, needles, trim, beads, and sewing
supplies.
Online resources:
(There are others, but these are among the best)
Tammy Dupuis, The Renaissance Tailor,
<http://www.renaissancetailor.com/research_main.htm>. Useful information about period
tailoring, documentation, and the site includes reproductions of patterns from de Alcega, de
Freyle and some other tailor’s manuals of the time.
Micaela de Bruce, Saya Española, <http://sayaespanola.glittersweet.com/patterns.htm>. Late 16th
century, essentially limited to the women’s court dress.
http://www.kostym.cz/ mostly in Czech but has very good pictures of extant European garments
and patterns.
Leed, Drea, Elizabethan Costume Page: Elizabethan Underpinnings: Smocks, Shirts, Shifts, and
Underwear, ©2010 Dayton, OH: Author.. http://www.elizabethancostume.net/index.html
Easy Renaissance Garb - 14
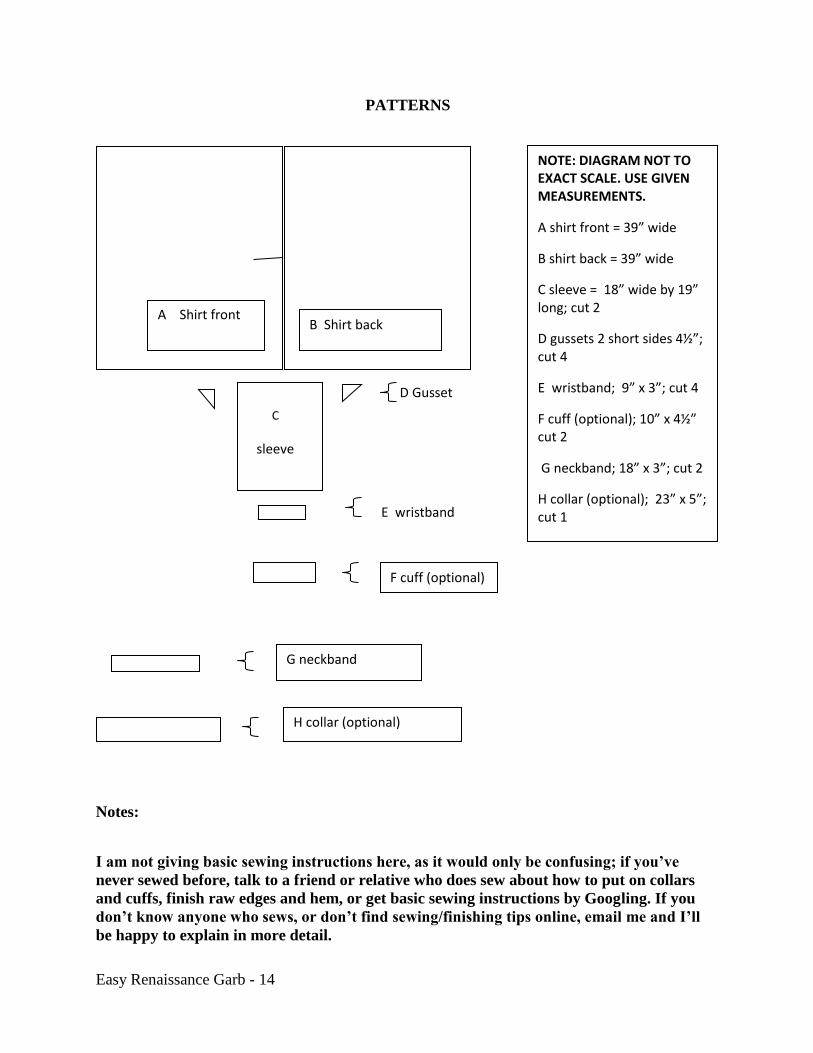
PATTERNS
D Gusset
Notes:
I am not giving basic sewing instructions here, as it would only be confusing; if you’ve
never sewed before, talk to a friend or relative who does sew about how to put on collars
and cuffs, finish raw edges and hem, or get basic sewing instructions by Googling. If you
don’t know anyone who sews, or don’t find sewing/finishing tips online, email me and I’ll
be happy to explain in more detail.
A Shirt front
B Shirt back
C
sleeve
NOTE: DIAGRAM NOT TO EXACT SCALE. USE GIVEN MEASUREMENTS.
A shirt front = 39” wide
B shirt back = 39” wide
C sleeve = 18” wide by 19” long; cut 2
D gussets 2 short sides 4½”; cut 4
E wristband; 9” x 3”; cut 4
F cuff (optional); 10” x 4½” cut 2
G neckband; 18” x 3”; cut 2
H collar (optional); 23” x 5”; cut 1 E wristband
F cuff (optional)
G neckband
H collar (optional)
Easy Renaissance Garb - 15
The given dimensions will fit most people. If you are a great deal taller, shorter or chubbier
than most, measure to make sure the chest is big enough, the sleeves are wide/long enough,
etc.
Length: 39 inches long is a good man’s shirt length (although in the 16th
century, they were often
calf-length, and doubled as nightshirts). For a woman’s smock, increase the length to about 45”
to 55”, depending on height and whether you want it calf length or ankle length.
Seams: Use a ½ inch seam allowance.
Neck slit: At the top center of the front piece (A), cut a vertical slit about 9” to 10” long.
Neck opening: With the right sides of the front and back (B) together, sew the top from the side
edges in toward the center for 9¾ inches on each side. This should leave 19½ inches open at the
top.
Neckband: Gather the neck opening to a long edge of the neckband (G) and sew.
Collar: Gather the collar to the other long edge of the neckband and sew.
Hint: The second neckband piece is used as a facing to conceal the seams where the neckband is
attached to the shirt and collar.
Sleeves: Sew one of the gussets to each side of the top of the sleeves. Match the center of the top
of the sleeve to the shoulder seam.
Sewing the sides of the shirt: Sew together from the wrist end of the sleeve up, along the long
side of the gussets and down the side of the shirt.
Wristbands and cuffs: Treat them the same as the neckband and collar.
Hem. Attach ties to the ends of the neckband to tie the neck closed.
OPTIONAL: You can trim the collar and cuff edges with a little narrow lace (preferably cotton
lace). You can leave the collar and cuffs off, in which case you’ll have a shirt with band collar
and cuffs.
Woman’s smock: No differences except length (see Note above).

Easy Renaissance Garb - 16
JERKIN:
You can make a jerkin by modifying a vest pattern. Most vest patterns look pretty much like the
following:
Shorten the vest by folding the pattern ½ inch below the marked waistline. Make the skirt
sections by cutting patterns out of tissue, newspaper or wrapping paper similar to the below
sections:
The top of the section should be the same width as the bottom of the vest section to which it will
be sewn unless you want a fuller look (Figs. 13 and 16). The bottoms should flare out a little,
evenly (unlike the sketches above . . . ). Cut the pieces out and sew them up. Face the arm holes
and neck, either with ready-made bias tape or with some of the same fabric, cut on the bias. The
front edges should meet in the center of the chest. Use grommets to make lacing holes, or sew a
few hooks and eyes inside to fasten it. You can modify the neck in front and make it higher.
Easy Renaissance Garb - 17
SKIRT
Use an inexpensive A-line skirt pattern (four gores) with elastic in the waist. Lengthen the pattern
so it’s long enough to reach your ankle after hemming. Follow pattern directions for making the
elastic waist and hemming.
Walloon Breeches circa 1588:
Inseam 13¼ inches
Waist 25 inches
Leg bottom 17 inches
Outseam 34½”
Crotch seam
Angle = 90°
Angle = 70°
@ 7½ inches
Cut 4 pieces. Sew outseams
together. Sew inseams. Sew
crotch seam. Fold top edge
down to make a casing for
elastic, leaving a couple of
inches unsewn at center front so
elastic can be inserted. Do the
same for each leg, leaving the
unsewn section at the side
seam.
Wear with shirt and doublet or
jerkin.

Easy Renaissance Garb - 18
WAIST CINCHER BODICE
According to sources I respect, this bodice was actually cut in one piece and attached at the waist
to a skirt, making it a dress. But for quick-and-easy, I suggest making it as follows:
1. Measure from your waist up to just under your bust (dimension A). Measure around your
waist (dimension B) and just under your bust(dimension C).
2. Cut a piece of firm material (like twill or light canvas).
Dimension C minus 2 inches*
Dimension A
Dimension B minus 2 inches*
*Your under-bust measurement may not be bigger than your waist measurement. If it isn’t, your
material will look like this, more or less:
Dimension C minus 2 inches
Dimension A
Dimension B minus 2 inches
3. Turn the raw edges under (or line it).
4. Either put a row of grommets down the two short edges so you can lace through them, or
pin a row of safety pins inside down each side to use as lacing rings.
5. Make 2 straps out of matching fabric (or out of grosgrain ribbon in a color that matches).
They will need to be long enough to go from the top of the main piece under your arm, over your
shoulder and back down to the same point under your arm. Pin them inside.
6. Put it on. Lace it up. Wear it with a matching skirt.

Easy Renaissance Garb - 19