remote data terminal configuration guide
TRANSCRIPT

TimeClock Plus Remote Data Terminal
Configuration Guide
Remote Data Terminal Configuration Guide © Data Management, Inc. All Rights Reserved. This documentation may change without notice.
Rem
ote
Dat
a T
erm
inal
Co
nfi
gu
rati
on
Gu
ide
Remote Data Terminal Configuration Guide To access the bookmarks go to View > Navigation Panels > Bookmarks.
This document provides instruction on the configuration and operation of a Remote Data Terminal. Using a terminal, employees can clock in/out via a remote TimeClock device rather than via a PC using the On-Screen TimeClock. The purpose of a terminal is to collect punches and communicate those back to the TimeClock Plus database. Self-service options may also be enabled to allow employees to perform timekeeping related functions such as viewing their hours, schedules, or accruals.
1.0. Setting up WinRemote Configuring and activating a terminal is the purpose of WinRemote.
WinRemote must either be opened (can be minimized to the system tray) or running as a service in order for the terminal to remain activated and communicate with the database.
Since the terminal’s operation relies on WinRemote running, the computer where you choose to run WinRemote needs to be available at all times (e.g., a server). If the terminal cannot communicate with the database (perhaps the server goes down) then there is a feature called Fallback mode (available on certain terminals) which allows employees to still clock in and out. It saves the punches to a file on the terminal and, when communication with the server is restored, the punches are imported into TimeClock Manager.
1.0.1. Configuring and Starting a Serial Terminal Once the terminal has been connected to the serial port of a computer (using the serial cable and adapter provided):
1. On the computer where the terminal is connected, open WinRemote.
2. When you first open it, there will be no ports listed. 3. To add a COM port, click Port > Add port. 4. Double click on the port or select it and click Configure.
Rev. 2/2/11
TimeClock Plus Remote Data Terminal
Configuration Guide
Remote Data Terminal Configuration Guide © Data Management, Inc. All Rights Reserved. This documentation may change without notice.
Rem
ote
Dat
a T
erm
inal
Co
nfi
gu
rati
on
Gu
ide
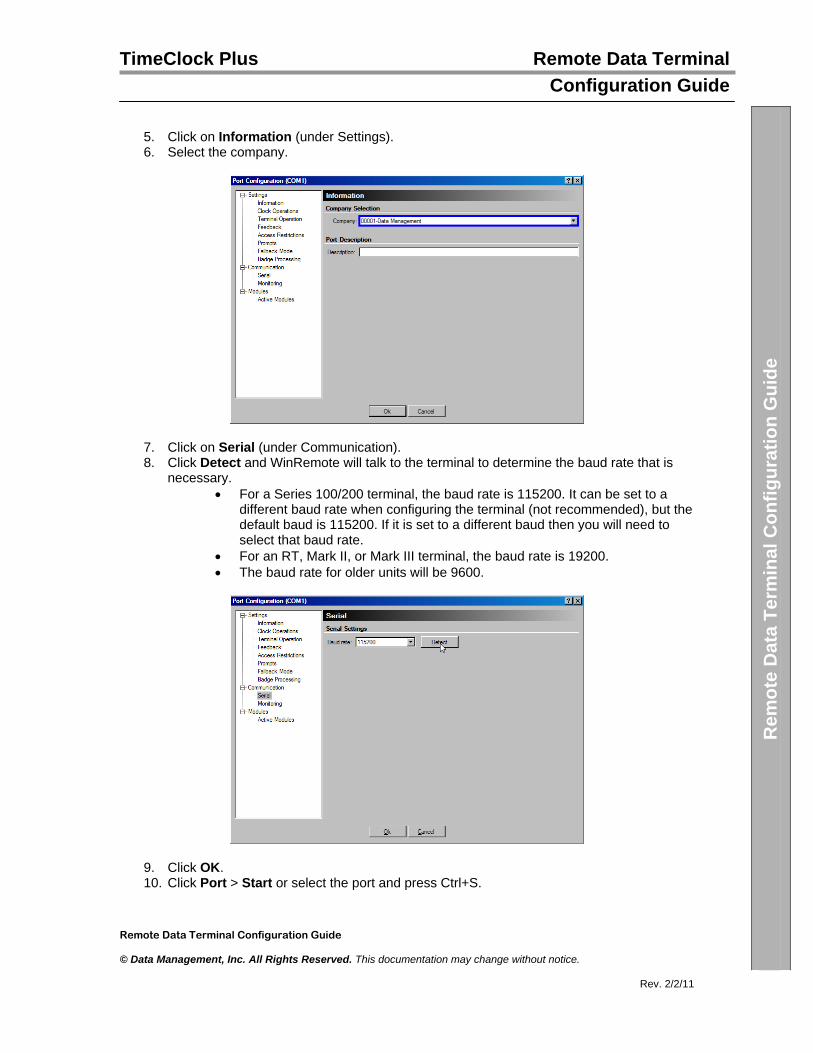
5. Click on Information (under Settings). 6. Select the company.
7. Click on Serial (under Communication). 8. Click Detect and WinRemote will talk to the terminal to determine the baud rate that is
necessary. For a Series 100/200 terminal, the baud rate is 115200. It can be set to a
different baud rate when configuring the terminal (not recommended), but the default baud is 115200. If it is set to a different baud then you will need to select that baud rate.
For an RT, Mark II, or Mark III terminal, the baud rate is 19200. The baud rate for older units will be 9600.
9. Click OK. 10. Click Port > Start or select the port and press Ctrl+S.
Rev. 2/2/11

TimeClock Plus Remote Data Terminal
Configuration Guide
Remote Data Terminal Configuration Guide © Data Management, Inc. All Rights Reserved. This documentation may change without notice.
Rem
ote
Dat
a T
erm
inal
Co
nfi
gu
rati
on
Gu
ide
For terminals that include a finger scanner or work in conjunction with a hand scanner, please refer to the documentation that is included with those units to learn more about installing and configuring them.
1.0.2. Configuring and Starting an Ethernet Terminal Once the terminal has been connected to your network:
1. On a computer in the same network as the terminal (and a computer that will be available at all times – e.g., a server), open WinRemote.
2. When you first open it, you will need to add an Ethernet port. You may click Locate to search for Ethernet terminals on your network. The type of terminal and IP address on that terminal will be listed.
3. Click Port > Add port.
4. Select Ethernet port and click OK. 5. Double click on the port or select it and click Configure. 6. Click on Information (under Settings). 7. Select the company.
Rev. 2/2/11

TimeClock Plus Remote Data Terminal
Configuration Guide
Remote Data Terminal Configuration Guide © Data Management, Inc. All Rights Reserved. This documentation may change without notice.
Rem
ote
Dat
a T
erm
inal
Co
nfi
gu
rati
on
Gu
ide
8. Click on Ethernet (under Communication). 9. Next to Network address or name, enter an IP address that is available. You may click
Ping to see if a device on your network responds (if a device has already been assigned that IP).
For more information on entering an IP address on the terminal, please refer to the documentation that was included with the terminal.
10. By default, the incoming port on the terminal is 3001 but, if this number was changed, then enter the new port number.
11. Click OK. 12. Click Port > Start or select the port and press Ctrl+S.
For terminals that include a finger scanner or work in conjunction with a hand scanner, please refer to the documentation that is included with those units to learn more about installing and configuring them.
Rev. 2/2/11

TimeClock Plus Remote Data Terminal
Configuration Guide
Remote Data Terminal Configuration Guide © Data Management, Inc. All Rights Reserved. This documentation may change without notice.
Rem
ote
Dat
a T
erm
inal
Co
nfi
gu
rati
on
Gu
ide
1.0.3. Running WinRemote as an Application/Service The port must be running for the terminal to communicate with the TimeClock Plus database, which means WinRemote must always be running. It may run as an application or as a service. Running WinRemote as an application means that you will have to open WinRemote manually should the computer ever be logged off or rebooted. Alternatively you may create a shortcut to WinRemote and add it to the Startup folder so that Windows automatically opens it when you log on. Whether you open WinRemote manually or have Windows open it for you, the port has to then be started.
There is an option to automatically start the port. If you plan to run WinRemote as an application then we recommend that you enable this option. Please refer to the next section: Enabling Auto Start.
Running WinRemote as a service means that Windows will run WinRemote silently in the background. This is the recommended approach.
1. In WinRemote, click Service > Install service. 2. Click Start service.
Although WinRemote is running as a service, the port needs to be started, so you will want to configure the port and enable the option to automatically start the port. For more information, please refer to the next section: Enabling Auto Start
1.0.4. Enabling Auto Start If WinRemote is running as an application then we recommend enabling the option to automatically start the port. If WinRemote is running as a service then the auto start option must be enabled for the terminal to start.
1. In WinRemote, highlight the COM/ETH port. 2. Click Configure. 3. Click on Terminal Operation (under Settings). 4. Place a check next to the option: Automatically start this terminal when WinRemote
starts. 5. Click OK.
Rev. 2/2/11

TimeClock Plus Remote Data Terminal
Configuration Guide
Remote Data Terminal Configuration Guide © Data Management, Inc. All Rights Reserved. This documentation may change without notice.
Rem
ote
Dat
a T
erm
inal
Co
nfi
gu
rati
on
Gu
ide
1.1. Complete Overview of Port Configuration 1.1.1. Information Company – This drop down list will contain the company/companies contained in the TimeClock Plus database. Select the company for the terminal on this port. Description – This is an optional field where a description of the port may be entered. The name will appear in the list of ports on the main screen of WinRemote to make it easier distinguishing between terminals. If you have more than one terminal then entering a description is recommended. For example, a company with two terminals (with one by the front desk and the other by a side entrance) could enter a description of “Front Desk” for the port of the terminal up front, and a description of “Side Entrance” for the port of the other terminal.
1.1.2. Clock Operations Show confirmation screen on manual entry (recommended) If enabled, the confirmation screen, which shows the employee’s name, date, and time, will appear when the employees enter their employee number on the terminal for an operation.
The confirmation is helpful when employees enter their employee number because if an employee mis-enters the number and, by chance, enters the number of another employee then the employee will see the wrong name and press No/Esc.
Show confirmation screen on non-manual entry (magnetic, barcode, biometric, etc.) – If enabled, the confirmation screen, which shows the employee’s name, date, and time, will appear when the employee swipes a card (magnetic or bar code), scans a finger, or scans a hand for an operation.
Rev. 2/2/11

TimeClock Plus Remote Data Terminal
Configuration Guide
Remote Data Terminal Configuration Guide © Data Management, Inc. All Rights Reserved. This documentation may change without notice.
Rem
ote
Dat
a T
erm
inal
Co
nfi
gu
rati
on
Gu
ide
Display message on successful clock operations – If enabled, a success message will appear after a successful operation. Ask for job code when changing cost code – If enabled, the employee will be prompted to choose a job code when changing cost codes. Since the employee is changing to a different cost code, he/she will only be permitted to choose a job code that requires cost codes. If disabled, the same job code from the last cost code will be used by the new cost code.
This option and the one under it (Ask for cost code when changing job code) are only valid if you have the Job Costing module.
Ask for cost code when changing job code – If enabled, the employee will be prompted to choose a cost code when changing job codes. This will not happen if the employee is changing to a job code that doesn’t require a cost code. If disabled, the same cost code from the last job code worked will be used by the new job code. Force badge usage to perform a clock operation (No manual entry) – When swiping a badge (magnetic or bar code), there is still an option to enter the employee number. For example, when employees press Clock In, they can either swipe a badge or enter their number. If this option is enabled then the ability to enter their employee number will be removed. When the employees press Clock In, for example, the screen will read: Swipe Badge Now and won’t accept a manually entered employee number.
If you want to require your employees to swipe a badge then enable this. It is also a good option to protect the employees since one employee could see another entering his number and access his hours.
Log failed clock operations – If enabled, operations that failed will be logged in a text file. To view this file, click View Log out beside this option. An example of a failure would be an employee who presses No/Esc during a clock operation. Allow message viewing from the view menu – If enabled, a Messages button will be added to the View menu on the terminal. Messages sent to the employee (and management messages) will appear after the employee completes a clock operation regardless of this option, but if you enable this, a Messages button will be available on the View screen of the terminal. Default to last cost code used when clocking in – If enabled, the last cost code that was selected will be used when clocking back in from a break. Allow a job code change into the same job code – This setting allows employees to change tracked fields throughout the day without moving into another job code. Enable QuickPunch – When swiping a badge (magnetic or bar code), the employee must first press the desired clock operation. If enabled, employees will be able to swipe their badge from the terminal’s main screen for clock in and clock out operations only. If the employee is clocked in, the terminal will initiate a clock out, and if the employee is clocked out, the terminal will initiate a clock in.
Rev. 2/2/11

TimeClock Plus Remote Data Terminal
Configuration Guide
Remote Data Terminal Configuration Guide © Data Management, Inc. All Rights Reserved. This documentation may change without notice.
Rem
ote
Dat
a T
erm
inal
Co
nfi
gu
rati
on
Gu
ide
A QuickPunch is an option for terminals with a card reader. It allows employees to swipe a badge without having to first press Clock In or Clock Out. When they swipe their badge from the main menu, the system checks their status in the database and initiates the appropriate operation. Any operations besides clocking in and out will require the employee to press a button (e.g., going on a break).
For Fallback terminals, this option is not available when the terminal is in Fallback mode. In Fallback mode, it cannot communicate with the database, which means it doesn’t know whether the employee is clocked in or clocked out. Ignore a repeated QuickPunch within how many seconds of the first
QuickPunch – If enabled, a quick punch will not be permitted within x seconds of the last quick punch. This was added to prevent employee error. For example, an employee swipes the badge to clock out, starts talking to someone, and then forgets he swiped, so he swipes again and now he’s clocked back in. Enabling this will prevent him from swiping again. He will get a message that the punch is too soon and realize he already swiped. This option will only be available if the option above it: Enable QuickPunch is enabled.
Operations Allowed From This Device – The operations checked will be available on the terminal connected to this port.
1.1.3. Terminal Operation Automatically start this terminal when WinRemote starts – If enabled, the port will automatically start when WinRemote is opened or the service is started. This option needs to be enabled if you are running WinRemote as a service.
Display current company time at idle screen – If enabled, the time will appear at the top of the terminal. The time shown will either be the database server time or the local time (depends on the time retrieval method selected in TimeClock Manager (Configuration > Preferences > Defaults > Global Settings > Time Settings).
Rev. 2/2/11

TimeClock Plus Remote Data Terminal
Configuration Guide
Remote Data Terminal Configuration Guide © Data Management, Inc. All Rights Reserved. This documentation may change without notice.
Rem
ote
Dat
a T
erm
inal
Co
nfi
gu
rati
on
Gu
ide
Display minutes only (no seconds) – If enabled, the time on the terminal will
only include the hour and minutes. Seconds will not appear. This option will only be available if the option above it: Display current company time at idle screen is enabled.
Beep when a key is pressed – If enabled, pressing a button will produce a beep. Beep when a badge is successfully read – If enabled, a successful badge will produce a beep. Allow badge test by pressing “00” at the idle screen – If enabled, pressing 0 twice on the terminal’s main screen will bring up the Badge Test screen. Allow terminal identification by pressing “11” at the idle screen – If enabled, pressing 1 twice on the terminal’s main screen will bring up the COM port number (for a Serial terminal) or IP address (for an Ethernet terminal), the name of the computer where WinRemote is controlling the terminal, and how long the port has been active. Terminal contains a legacy magnetic card reader (before 2003) – For terminals including the RDT 2000 and Mark II with a magnetic reader, this should be enabled. Idle release (in seconds) – Screens on the terminal (e.g., the confirmation screen) will remain opened until they are idle for this length of time.
1.1.4. Feedback
Operation Successful Feedback Number of beeps – After a successful operation, the terminal will produce the number of beeps entered here. 0 will disable the beep. Beep tone – This controls the pitch of the successful beep(s).
Rev. 2/2/11

TimeClock Plus Remote Data Terminal
Configuration Guide
Remote Data Terminal Configuration Guide © Data Management, Inc. All Rights Reserved. This documentation may change without notice.
Rem
ote
Dat
a T
erm
inal
Co
nfi
gu
rati
on
Gu
ide
LED Duration – After a successful operation, the indicator light on the terminal will remain lit for this length of time (seconds). Operation Failure Feedback Number of beeps – If an operation fails, the terminal will produce the number of beeps entered here. 0 will disable the beep. Beep tone – This controls the pitch of the failed beep(s) LED Duration – If an operation fails, the indicator light on the terminal will remain lit for this length of time (seconds).
1.1.5. Access Restrictions Certain employees, classifications, or job codes may be restricted from using a Remote Data Terminal at specific locations.
1. Click Add.
Rev. 2/2/11

TimeClock Plus Remote Data Terminal
Configuration Guide
Remote Data Terminal Configuration Guide © Data Management, Inc. All Rights Reserved. This documentation may change without notice.
Rem
ote
Dat
a T
erm
inal
Co
nfi
gu
rati
on
Gu
ide
2. Enter the description of this restriction. 3. Select the restriction type from one or more of the three tabs. You may choose to only
allow or to not allow the selected employees, classifications, or job codes on this computer.
4. Select the employees, classifications, or job codes from the list that should be allowed or not allowed (depending on the restriction type you selected).
5. Click OK. 6. On any workstations where you want those items to be allowed/not allowed, select the
restriction in the list and click Set Active.
Rev. 2/2/11

TimeClock Plus Remote Data Terminal
Configuration Guide
Remote Data Terminal Configuration Guide © Data Management, Inc. All Rights Reserved. This documentation may change without notice.
Rem
ote
Dat
a T
erm
inal
Co
nfi
gu
rati
on
Gu
ide
1.1.6. Prompts The prompts on the terminal may be changed. Perhaps you want to simply change the TimeClock Plus title at the top of the main screen to your company name or maybe you want to change the wording of several prompts. This can be especially useful if you want to create prompts that are in another language.
1. Click Edit prompts.
Rev. 2/2/11

TimeClock Plus Remote Data Terminal
Configuration Guide
Remote Data Terminal Configuration Guide © Data Management, Inc. All Rights Reserved. This documentation may change without notice.
Rem
ote
Dat
a T
erm
inal
Co
nfi
gu
rati
on
Gu
ide
2. Click Add.
3. Enter a name for this prompt file. 4. Select the dimensions of the screen.
For Series 100/200 terminals, select 6x21. For anything prior to the Series 100/200, select 4x20.
5. If there is another prompt file in the database then you may select it as a template and the prompt you are adding will inherit the prompts from the selected prompt file.
6. Click OK. 7. Navigate through the tree of prompts to the prompt you wish to change.
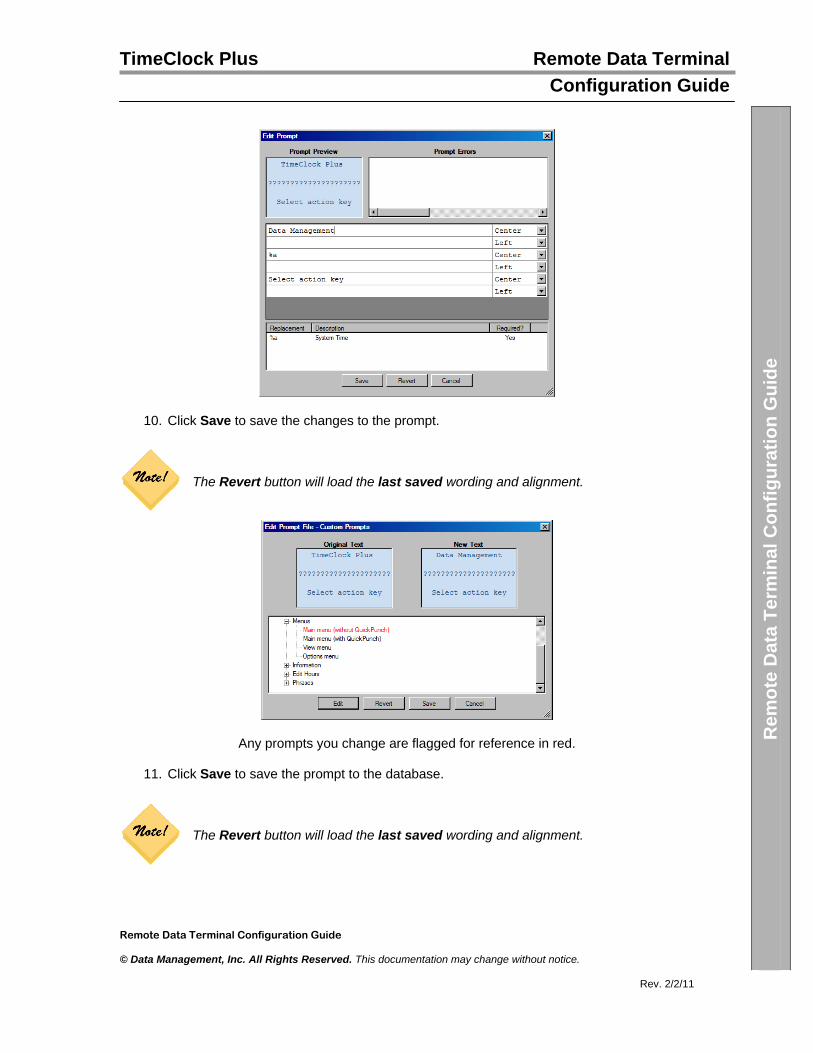
8. Select the prompt and click Edit. 9. Change any of the wording or alignment. In the example below, the first line of the
original prompt (shown in the upper left) was TimeClock Plus and it is being changed to Data Management (shown in the middle of the window).
Rev. 2/2/11
TimeClock Plus Remote Data Terminal
Configuration Guide
Remote Data Terminal Configuration Guide © Data Management, Inc. All Rights Reserved. This documentation may change without notice.
Rem
ote
Dat
a T
erm
inal
Co
nfi
gu
rati
on
Gu
ide
10. Click Save to save the changes to the prompt.
The Revert button will load the last saved wording and alignment.
Any prompts you change are flagged for reference in red.
11. Click Save to save the prompt to the database.
The Revert button will load the last saved wording and alignment.
Rev. 2/2/11

TimeClock Plus Remote Data Terminal
Configuration Guide
Remote Data Terminal Configuration Guide © Data Management, Inc. All Rights Reserved. This documentation may change without notice.
Rem
ote
Dat
a T
erm
inal
Co
nfi
gu
rati
on
Gu
ide
1.1.7. Fallback Mode If a Remote Data Terminal cannot communicate with the database (perhaps the server goes down) then there is a feature called Fallback mode (available on certain terminals) which allows employees to still clock in and out. It saves the punches to a file on the terminal and, when communication with the server is restored, the punches are imported into TimeClock Manager.
Fallback timeout – If communication with the database or WinRemote is lost, WinRemote tries to re-establish communication. If communication cannot be re-established after 1 minute then the terminal will go offline. X seconds after it goes offline (X = the number entered here), Fallback mode will be engaged.
1.1.8. Badge Processing The characters on a badge (magnetic or bar code) can simply represent the employee number or can consist of more than one field. For example, an employee who has more than one clockable job code could have a card with his employee number and job code and another card with his employee number and a different job code. When the employee clocks in, he would swipe the appropriate card to identify himself and then swipe it again with the job code.
If QuickPunch is enabled and the confirmation screen is disabled on a non-manual entry (the Clock Operations section of WinRemote), the employee in the example above could swipe his card without touching the terminal once.
In another example, a manager could have a card with her TimeClock Plus user ID and override password for overriding clock restrictions. When an employee clocked in too early, the manager could swipe her card at the override screen to identify her and then swipe it again for the override password.
Rev. 2/2/11

TimeClock Plus Remote Data Terminal
Configuration Guide
Remote Data Terminal Configuration Guide © Data Management, Inc. All Rights Reserved. This documentation may change without notice.
Rem
ote
Dat
a T
erm
inal
Co
nfi
gu
rati
on
Gu
ide
For most companies that use badges, all of the characters represent the employee number. If that is your situation then this tab does not need to be changed. However, when the characters on a badge include more than one field, the badge must be parsed in this section of WinRemote. Badge parsing is identifying which characters represent the selected entry location.
1.1.8.1. Example of Badge Parsing Assume that your badges will be encoded with 6 characters and the first four will be your employee number while the last 2 will be your job code.
1. For Entry Location, select Employee. 2. Under Parse Settings, select Use portion of the badge. 3. For Starting at position, enter 1 and for Length, enter 4.
Now that the employee portion of the badge has been identified, it’s time to identify the job code portion.
4. For Entry Location, select Job Code. 5. Under Parse Settings, select Use last characters in badge. 6. For Number of characters to use at end of badge, enter 2. employee has been
identified Now the job code portion of the badge has been identified and you’re finished.
Rev. 2/2/11

TimeClock Plus Remote Data Terminal
Configuration Guide
Remote Data Terminal Configuration Guide © Data Management, Inc. All Rights Reserved. This documentation may change without notice.
Rem
ote
Dat
a T
erm
inal
Co
nfi
gu
rati
on
Gu
ide
1.1.8.2. Complete Overview of Badge Processing Entry location – This is the information that you are identifying. Parse Settings Use all characters in the badge – If selected, TimeClock Plus will look at the entire badge to determine the entry location. So if 1234 is encoded on the badge and the entry location selected is Employee, the system would read 1234 as the employee number during a swipe. Use portion of the badge – If selected, TimeClock Plus will look at only a portion of the badge to determine the entry location. Assume 1234 is encoded on the badge and that:
The entry location selected is Employee The Starting at position is 1 The Ending at position 2
The system would read 12 as the employee number during a swipe. Use last characters in badge – If selected, TimeClock Plus will look at the last x characters on the badge to determine the entry location. Assume 1234 is encoded on the badge and that:
Entry location selected is Employee The number of characters to use at end of badge is 2
The system would read 34 as the employee number during a swipe. Proximity Translation
Disabled – If selected, WinRemote will not translate meaning the system will read the binary number when scanning the badge.
Occurs prior to parsing the badge – If selected, WinRemote will translate the badge number from binary to decimal first and then parse it.
Occurs after parsing the badge – If selected, WinRemote will parse the badge number first and then translate what was parsed to decimal.
Assume the badge number (in the binary) is 11101101101111011100010001 and the employee number is a portion of that: 11101101101111011100010001. With prior to parsing selected and Use last characters in badge (3 being entered):
The employee would swipe the card The binary would be translated to decimal 62322449 62322449 would be parsed. The employee number: 449.
With after parsing selected and Use portion of badge (Start: 10, End: 25):
The employee would swipe the card The binary would be parsed 0111101110001000 The 0111101110001000 would be translated to decimal: 31624.
Cost Code levels are separated by what character – For users with the Job Costing module, the cost code levels may be encoded on a badge. If so, a character must be included between
Rev. 2/2/11

TimeClock Plus Remote Data Terminal
Configuration Guide
Remote Data Terminal Configuration Guide © Data Management, Inc. All Rights Reserved. This documentation may change without notice.
Rem
ote
Dat
a T
erm
inal
Co
nfi
gu
rati
on
Gu
ide
each level to separate level 1 from level 2 and level 2 from level 3. Enter the character (after you click OK, WinRemote will convert the character you entered to its ASCII character.
1.1.9. Serial When configuring the port for a serial terminal, this section will be available. Baud rate – This is the baud rate of a serial terminal. For Series 100/200 terminals, the baud rate may be changed on the terminal. The baud rate selected in WinRemote needs to match that baud rate. By default, the baud rate for a Series 100/200 terminais 115200
l .
Detect button – Clicking this button will cause WinRemote will talk to the terminal and determine the baud rate that is necessary.
1.1.10. Ethernet When configuring the port for an Ethernet terminal, this section will be available.
Network address or name – This is the IP address of the terminal or name (if you configured WINS or DNS entries for the terminal on your server).
Rev. 2/2/11

TimeClock Plus Remote Data Terminal
Configuration Guide
Remote Data Terminal Configuration Guide © Data Management, Inc. All Rights Reserved. This documentation may change without notice.
Rem
ote
Dat
a T
erm
inal
Co
nfi
gu
rati
on
Gu
ide
For more information on entering an IP address on the terminal, please refer to the documentation that was included with the terminal.
Ping button – Clicking this button will send a ping command to the address or name entered. This will help you determine if a device on your network responds (if a device has already been assigned that IP or name). Port number – This is the port number that the terminal communicates with. By default, the incoming port on the terminal is 3001 but, if this number is changed, then enter the new port number. Startup delay – This is the delay when starting the port (in milliseconds).
1.1.11. Monitoring
Enable automatic screen refresh on this terminal – If enabled, the screen on the terminal will refresh every x seconds. Enable connection monitoring on the terminal – If enabled, WinRemote will query the terminal every x seconds to ensure that there is still two way communication. If there is not, it will attempt to restart the port (which will be noted in the activity log).
1.1.12. Active Modules If you purchase a WinRemote module (e.g., the fingerprint module or hand scanner module) then, after downloading and installing the module with Auto Update and loading the module with Module Manager, it will appear in this section. Select it and click Configure to make changes to the module.
Rev. 2/2/11

TimeClock Plus Remote Data Terminal
Configuration Guide
Remote Data Terminal Configuration Guide © Data Management, Inc. All Rights Reserved. This documentation may change without notice.
Rem
ote
Dat
a T
erm
inal
Co
nfi
gu
rati
on
Gu
ide
1.2. Terminal and Badge Diagnostics 1.2.1. Terminal Port Diagnostics This process allows you to determine what port a terminal is connected to and how long it has been operating.
This test can only be performed if the option Allow id terminal with 11 is enabled for the terminal’s port in WinRemote (on the Terminal tab).
1. When the terminal is active, on the terminal’s main menu, press 1 twice. 2. The terminal’s port and uptime will display on the terminal screen. 3. Press any terminal key to return to the main menu.
1.2.2. WinRemote Activity Log WinRemote keeps an Activity Log to let you view recent transactions on each terminal. The log includes a summary record for each successful transaction.
1. In WinRemote, highlight the COM/ETH port. 2. Click Port > Activity log to view the log information for that port. 3. Press the Clear button if you want to clear the log.
1.2.3. Badge Test (for badge reader equipped terminals) If your terminal has a badge reader (barcode/magnetic/proximity), you can perform the following process to test badges and determine what is encoded on them.
This test can only be performed if the option Allow badge test using “00” at the idle screen is enabled for the terminal’s port in WinRemote (configure the port > Terminal Operation under Settings).
1. When the terminal is active, on the terminal’s main menu, press 0 twice and then 1 for an
employee badge test. This will pull the employee number.
If you parsed the badge meaning, for example, part of the number on your badge represents your employee number and the next part represents the job code, then you can press 0 twice and enter 2 to scan the job code portion, 3 to scan the cost code portion (requires Job Costing module), etc.
2. Swipe a badge and the number will display on the terminal screen. 3. Continue swiping additional cards as needed and press the No/Esc key when you are
finished to return to the main menu.
Rev. 2/2/11

TimeClock Plus Remote Data Terminal
Configuration Guide
Remote Data Terminal Configuration Guide © Data Management, Inc. All Rights Reserved. This documentation may change without notice.
Rem
ote
Dat
a T
erm
inal
Co
nfi
gu
rati
on
Gu
ide
1.3. Clock Operations at the Terminal This section provides instructions on clocking operations and is a useful tool for employees when just learning to use TimeClock Plus. 1.3.1. Clocking In
1. Press the terminal’s Clock In key. 2. Identify yourself (by entering your employee number on the keypad and pressing Enter,
swiping a badge, or placing your finger/hand on the scanner for recognition). 3. On the confirmation screen, ensure that your name appears. Press the Yes/Enter key to
accept or No/Esc to return to the main menu.
If there are any restrictions then the restriction will appear. If you are authorized to clock in then a manager will need to enter his/her override password OR swipe a card on which the override password is encoded.
4. If you have more than one clockable job code, then enter the job code you are clocking
into and press the Yes/Enter key. If you do not know the job code number, press the period key or Clock In/Clock Out keys to move through the list of available job codes.
If enabled, tracked fields (such as tips in a restaurant or parts on a production floor) will be collected after the job code.
1.3.2. Clocking Out
1. Press the terminal’s Clock Out key. 2. Identify yourself (by entering your employee number on the keypad and pressing Enter,
swiping a badge, or placing your finger/hand on the scanner for recognition). 3. On the confirmation screen, ensure that your name appears. Press the Yes/Enter key to
accept or No/Esc to return to the main menu.
If there are any restrictions then the restriction will appear. If you are authorized to clock in then a manager will need to enter his/her override password OR swipe a card on which the override password is encoded.
If enabled, tracked fields (such as tips in a restaurant or parts on a production floor) will be collected after the job code.
Rev. 2/2/11

TimeClock Plus Remote Data Terminal
Configuration Guide
Remote Data Terminal Configuration Guide © Data Management, Inc. All Rights Reserved. This documentation may change without notice.
Rem
ote
Dat
a T
erm
inal
Co
nfi
gu
rati
on
Gu
ide
1.3.3. Going on a Break
1. Press the terminal’s Start Break key. 2. If there is more than one break type in the TimeClock Manager (Configuration >
Preferences > Defaults > Global Settings > Breaks) then each break type will appear with a number. Enter the number that corresponds with the break you are taking.
3. Identify yourself (by entering your employee number on the keypad and pressing Enter, swiping a badge, or placing your finger/hand on the scanner for recognition).
4. On the confirmation screen, ensure that your name appears. Press the Yes/Enter key to accept or No/Esc to return to the main menu.
If enabled, tracked fields (such as tips in a restaurant or parts on a production floor) will be collected after the job code.
1.3.4. Changing Job Codes
1. Press the terminal’s Job Code key. 2. Identify yourself (by entering your employee number on the keypad and pressing Enter,
swiping a badge, or placing your finger/hand on the scanner for recognition). 3. On the confirmation screen, ensure that your name appears. Press the Yes/Enter key to
accept or No/Esc to return to the main menu. 4. Enter the job code you are moving to and press the Yes/Enter key. If you do not know
the job code number, press the period key or Clock In/Clock Out keys to move through the list of available job codes.
If enabled, tracked fields (such as tips in a restaurant or parts on a production floor) will be collected after the job code.
1.3.5. Viewing Hours
In order for employees to be able to view their hours from the terminal, this option must be enabled in the TimeClock Manager (Configuration > Preferences > Defaults > Client Settings > Miscellaneous).
1. Press the terminal’s Clock In or Clock Out key. 2. Identify yourself (by entering your employee number on the keypad and pressing Enter,
swiping a badge, or placing your finger/hand on the scanner for recognition). 3. On the confirmation screen, press the 5 key. 4. After you view your hours, press the No/Esc key to return to the main screen.
Rev. 2/2/11

TimeClock Plus Remote Data Terminal
Configuration Guide
Remote Data Terminal Configuration Guide © Data Management, Inc. All Rights Reserved. This documentation may change without notice.
Rem
ote
Dat
a T
erm
inal
Co
nfi
gu
rati
on
Gu
ide
1.3.6. Viewing Last Punch
In order for employees to be able to view their last punch from the terminal, this option must be enabled in the TimeClock Manager (Configuration > Preferences > Defaults > Client Settings > Miscellaneous).
1. Press the terminal’s Clock In or Clock Out key. 2. Identify yourself (by entering your employee number on the keypad and pressing Enter,
swiping a badge, or placing your finger/hand on the scanner for recognition). 3. On the confirmation screen, press the 8 key. 4. After you view your last punch, press the No/Esc key to return to the main screen.
1.3.7. Viewing a Schedule
In order for employees to be able to view their current schedule, this option must be enabled in the TimeClock Manager (Configuration > Preferences > Defaults > Client Settings > Miscellaneous).
1. Press the terminal’s Clock In or Clock Out key. 2. Identify yourself (by entering your employee number on the keypad and pressing Enter,
swiping a badge, or placing your finger/hand on the scanner for recognition). 3. On the confirmation screen, press the period key. 4. Press 1 or 2 to view this week or next week’s schedule. 5. Press the Yes/Enter key to cycle through the schedule or press the No/Esc key to return
the main menu.
1.3.8. Submitting a Time-Off Request
This is only an option on the Series 100/200 terminal. In order for employees to be able to submit a time-off request, this option must be enabled in the TimeClock Manager (Configuration > Preferences > Defaults > Client Settings > Request Entry).
1. Press the terminal’s View key. 2. Press the number that appears next to Time-Off. 3. Identify yourself (by entering your employee number on the keypad and pressing Enter,
swiping a badge, or placing your finger/hand on the scanner for recognition). 4. Enter the Date of the time-off and press the Yes/Enter key. 5. Next to Start, enter the time that the time-off begins (using the Clock In and Clock Out
keys to move between AM and PM) and press the Yes/Enter key. For example, if you work from 8-5 and you are only taking the morning off, the Start would be 8:00 AM.
Rev. 2/2/11
TimeClock Plus Remote Data Terminal
Configuration Guide
Remote Data Terminal Configuration Guide © Data Management, Inc. All Rights Reserved. This documentation may change without notice.
Rem
ote
Dat
a T
erm
inal
Co
nfi
gu
rati
on
Gu
ide
6. Next to End, enter the time that the time-off is over (using the Clock In and Clock Out keys to move between AM and PM) and press the Yes/Enter key. For example, if you work from 8-5 and you are only taking the morning off, the End would be 5:00 PM.
7. Next to Days, select the number of days for this time-off (using the Clock In and Clock Out keys to increase and decrease the number) and press the Yes/Enter key. If left at 1, the request will only be made for the day entered in step 4.
8. Next to Code, select the leave code for this time-off request or select N/A which will leave it up to the manager to enter (if approved). Use the Clock In and Clock Out keys to move through the list of leave codes.
9. Confirm the request by pressing Yes/Enter. Pressing No/Esc will return you to the screen in steps 4-7 to make any changes.
10. Press any key on the submitted message to return to the main menu.
1.3.9. Overriding Clock Restrictions If restrictions are enabled (schedule, break return, overtime, or hour total restrictions) and the employee attempts to clock in or out at a time that is restricted, a manager can elect to approve the early/late clock operation by entering his/her Remote Data Terminal - Override password. An override will allow the employee to proceed with the operation and a record of the override as well as the manager responsible will be saved.
If none of the managers (users) were given a Remote Data Terminal - Override password in TimeClock Manager (User List) then the operation will just not be allowed.
Rev. 2/2/11

TimeClock Plus Remote Data Terminal
Configuration Guide
Remote Data Terminal Configuration Guide © Data Management, Inc. All Rights Reserved. This documentation may change without notice.
Rem
ote
Dat
a T
erm
inal
Co
nfi
gu
rati
on
Gu
ide
1.4. Editing Hours at the Terminal
This option must be enabled in TimeClock Manager (Configuration > Preferences > Defaults > Client Settings >Miscellaneous) AND the right to edit hours from a terminal will need to be granted to the user (Configuration > User List > select the user > in the User Rights on the right, expand the TimeClock WinRemote branch > Edit Hours).
1.4.1. Adding a Record To add a clocked in record or to enter a clock out time for a record that is clocked in:
1. Press the terminal’s 6 key. 2. Select your user ID by pressing the terminal’s Clock In or Clock Out key to move
through the list of active users. 3. Enter the Hour Edit password, and press the Yes/Enter key. 4. Enter the employee number you wish to add an in/out to and press the Yes/Enter key. 5. Press the Yes/Enter key to confirm. 6. Press 1 to add hours. 7. Press 1 to add a segment, 2 to add a clock in, or 3 to add a time sheet. 8. Enter the shift information.
For adding a segment, enter the In Time, In Date, Out Time, and Out Date. For adding a clocked in record, enter the In Time and In Date. For adding a time sheet, enter the In Time, In Date, and the Hours (length of
the shift). Press the F4 key to move to the next position of each field, Yes/Enter to move to the next field, and F3 to move to the previous position/field. To move between AM and PM, press the F1 and F2 keys or press any of the numbers on the terminal.
9. Press the Yes/Enter key after the last field. 10. Select the job code and press Yes/Enter.
If enabled, tracked fields (such as tips in a restaurant or parts on a production floor) will be collected after the job code.
Rev. 2/2/11

TimeClock Plus Remote Data Terminal
Configuration Guide
Remote Data Terminal Configuration Guide © Data Management, Inc. All Rights Reserved. This documentation may change without notice.
Rev. 2/2/11
Rem
ote
Dat
a T
erm
inal
Co
nfi
gu
rati
on
Gu
ide
1.4.2. Editing or Clocking Out a Record
1. Press the terminal’s 6 key. 2. Select your user ID by pressing the terminal’s Clock In or Clock Out key to move
through the list of active users. 3. Enter the Hour Edit password, and press the Yes/Enter key. 4. Enter the employee number you wish to edit a record for and press the Yes/Enter key. 5. Press the Yes/Enter key to confirm. 6. Press 2 to edit hours. 7. Press 1 to edit a segment or 2 to clock a record out.
If you pressed 1:
8. Press any key to access the list of records and find the record you wish to edit (using F3
and F4 to move through the list). 9. When you find the record, press Yes/Enter. 10. Change the shift information as necessary and press Yes/Enter. 11. Change the job code if necessary and press Yes/Enter.
If enabled, tracked fields (such as tips in a restaurant or parts on a production floor) will be collected after the job code.
If you pressed 2: 12. Enter the Out Time and Out Date.
Press the F4 key to move to the next position of each field, Yes/Enter to move to the next field, and F3 to move to the previous position/field. To move between AM and PM, press the F1 and F2 keys or press any of the numbers on the terminal.
13. Press the Yes/Enter key after the last field. 14. Select the job code and press Yes/Enter.
If enabled, tracked fields (such as tips in a restaurant or parts on a production floor) will be collected after the job code.