reimagine teaching and learning with windows 8socialsciences.dadeschools.net/files/mobile_devices/to...
TRANSCRIPT

Reimagine Teaching and
Learning with Windows 8.1 Teacher Academy

Reimagine Teaching and Learning with Windows 8.1 – Teacher Academy 2
Overview Who Should Use This Handbook
This handbook is for teachers participating in the Reimagine Teaching and Learning with
Windows 8.1 Teacher Academy. Use this guide for planning, reflection, note taking, and reference
for future activities.
Learning Objectives
1. Be confident navigating and organizing the desktop, as well as using other basic features
of Windows 8.1, like working with apps and tiles, and pinning them to the task bar and
Start screen.
2. Perform actions with the five charms – Search, Share, Start, Devices and Settings.
3. Learn and perform basic actions of Windows 8.1 for touch, mouse and keyboard.
4. Navigate the Windows Store, download and install apps, and become familiar with specifically
what’s available for education.
5. Set up email, and learn more about mail options, including the mail app, the desktop Outlook
client, Outlook.com and the Office 365 portal.
6. Be more organized and drive stronger search results while browsing the web with Internet
Explorer 11 and Bing.
7. Save and share files to a PC or tablet via OneDrive.
Length
Six-hours

Reimagine Teaching and Learning with Windows 8.1 – Teacher Academy 3
Reimagine Teaching and Learning
with Windows 8.1 Learning is more powerful and dynamic with tools that are already right in front of you – and it’s up
to you to impress this on students in the classroom. The tools and technology of Windows 8.1 should
engage students in a dynamic, interactive, fun – yet effective way. This is 21st century learning, and
all age groups can benefit from effective teaching that gets more out of the everyday tools on a PC
or tablet.
This six-hour academy allows teacher participants to take a much deeper dive into Windows 8.1 in the
classroom, with a special focus on topics like the apps available today – or soon to be available –
assisting educators in reaching Common Core State Standards.
The first part of the training focuses on basic navigation – including making Start come alive with Live
tiles, exploring the desktop, Charms and navigating the Windows Store working with apps. During the
second half, topics covered include setting up email, curated searching with Bing, OneDrive file
organization and how to personalize the device to make it work for you and your students.
The session will culminate with teachers applying their learning with the development of a lesson plan,
and leaving at the end of the day feeling comfortable and knowledgeable about how they can bring
Windows 8.1 into classrooms in a way that truly reimagines student learning.

Reimagine Teaching and Learning with Windows 8.1 – Teacher Academy 4
Getting Around Windows 8.1 Here are some common tasks and shortcuts that you might want to perform using the Start screen.
Two ways to get to your desktop
1. The desktop tile on your Start screen.
2. If you have a keyboard: Windows + D.
Four ways to get back to Start
1. Charms > Windows icon (This charm is referred to as the Start Charm).
2. The windows button in the center of the device, just below the screen.
3. Desktop > Start icon in lower left corner.
4. Windows key on keyboard.
Pinning apps to Start
1. Press and hold or right-click the app you want to pin to Start. You can select more than one
app and pin them all at once.
2. Tap or click Pin to Start. The apps you pinned will appear at the end of your Start screen.
Unpinning/customizing apps on Start
1. Hold the tile down until the “customize” menu comes up at the bottom.
2. You can unpin, change the size and depending on the app, you might be able to pin to the
taskbar, uninstall, open a new window, run as administrator, or open new location.
3. You can select more than one tile at a time as well.
4. Right now, tap “unpin from start.”
Moving tiles on your Start screen
1. On the Start screen, press and hold the tile you want to move. (If you’re using a mouse, click
and hold the tile).
2. Tap or click Resize.
3. Choose the size you want.

Reimagine Teaching and Learning with Windows 8.1 – Teacher Academy 5
To create a group of tiles
1. On the Start screen, press and hold or right-click the tiles you want to group together.
2. Drag them to an open space, and when a gray bar appears behind them, release the tiles.
This will create a new group.
3. If you want to name the group, tap or click where it says Name group above the group, and
then enter a new name.
4. Once you've created a group, you can move the entire group around on your Start screen.
To move a group of tiles
1. On the Start screen, pinch to zoom out. (If you’re using a mouse, click the zoom icon in the
lower-right corner of your screen.)
2. Press and drag or click and drag the group of tiles you want to move to where you want it
to go.
3. Once you’re done moving groups, tap or click anywhere on the screen to zoom back in.
Using apps side-by-side
1. Open an app that you'd like to use.
2. Slide in from the top of the screen until an opening appears behind the app, then drag the
app to the left or right side.
If you’re using a mouse, drag the top of the screen down until an opening appears
behind the app, then drag it to the left or right.
3. Go back to Start and open a second app. It will appear next to the first app.
4. To resize the apps, drag the divider between the apps.
Open a third app
1. If you go back to Start and open a third app, it’ll appear on top of the first two. You can tap
or click the left or right side of the third app to replace one of the apps underneath it.
2. If you want to use all three apps on the same screen, drag the third app until an open space
appears next to or between the other apps. If a space doesn’t open, your screen can only fit
two apps at a time.
Reimagine Teaching and Learning with Windows 8.1 – Teacher Academy 6
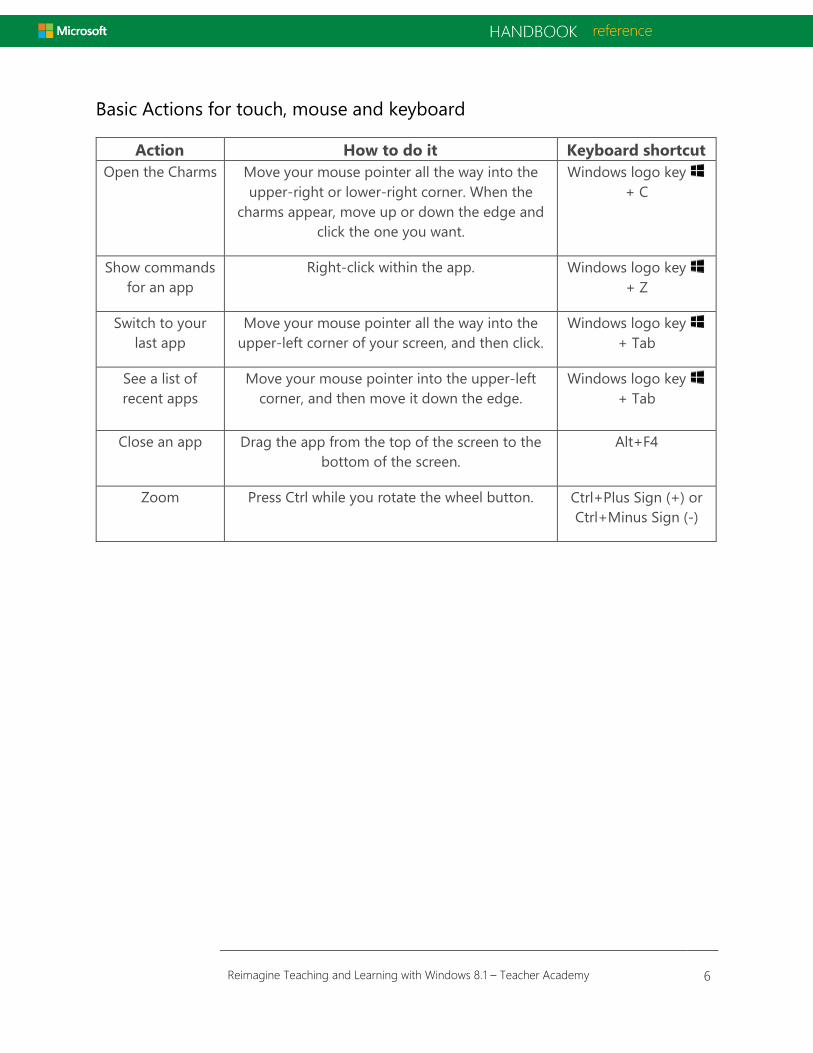
Basic Actions for touch, mouse and keyboard
Action How to do it Keyboard shortcut
Open the Charms Move your mouse pointer all the way into the
upper-right or lower-right corner. When the
charms appear, move up or down the edge and
click the one you want.
Windows logo key
+ C
Show commands
for an app
Right-click within the app. Windows logo key
+ Z
Switch to your
last app
Move your mouse pointer all the way into the
upper-left corner of your screen, and then click.
Windows logo key
+ Tab
See a list of
recent apps
Move your mouse pointer into the upper-left
corner, and then move it down the edge.
Windows logo key
+ Tab
Close an app Drag the app from the top of the screen to the
bottom of the screen.
Alt+F4
Zoom Press Ctrl while you rotate the wheel button. Ctrl+Plus Sign (+) or
Ctrl+Minus Sign (-)

Reimagine Teaching and Learning with Windows 8.1 – Teacher Academy 7
Navigating the Desktop
If the desktop tile isn't on the Start screen, you can pin it by following these steps:
1. On the Start screen, slide up from the middle of the screen to see the Apps view. (If you're
using a mouse, click the arrow near the lower-left corner of the screen.)
2. Press and hold or right-click Desktop, and then tap or click Pin to Start. (If you can't find the
Desktop tile, start typing Desktop.)
Right click on the Windows button in the lower left corner of the Desktop to see the features
available in 8.1.

Reimagine Teaching and Learning with Windows 8.1 – Teacher Academy 8
Using File Explorer
The File explorer gives you access to local and cloud files:
1. If you have your device attached to a Microsoft account, you will see OneDrive – access all
your OneDrive files as well as save to OneDrive simply. You can choose which files only live in
the cloud and which are cached on the hard drive of your device so that you can also access
them offline.
2. Homegroup is a group of PCs on a home network that can share files and printers. Using a
homegroup makes sharing easier. You can share pictures, music, videos, documents, and
printers with other people in your homegroup. This setting is only relevant if you decide to set
up a homegroup at home and connect this device to it.
3. This PC (local drive) – Everything saved local is located here from documents to music to
pictures. Be aware that your district might have redirected documents folders, so that your
documents folder might actually be redirecting to a folder on your network and not on
your device.
4. Network – As you log onto your network(s) specific locations are kept here.
5. Favorites - These are actually shortcuts to the places you go most often. You can add more
places by following these steps:

Reimagine Teaching and Learning with Windows 8.1 – Teacher Academy 9
a) Navigate to the folder you access frequently.
b) Click and hold the folder icon.
c) Drag it under Favorites. You should see a black line appear and you can drop it in
that location.
d) Drag and drop to re-organize.
e) Right click and select “remove” to remove it from Favorites.
Notes

Reimagine Teaching and Learning with Windows 8.1 – Teacher Academy 10
Arrange apps your way
Windows 8.1 enables you to arrange apps to suit your needs. Take a look at the following examples:
1 STEM: kindergarten-grades 4/5
2 STEM: grades 9-12

Reimagine Teaching and Learning with Windows 8.1 – Teacher Academy 11
3 STEM: higher education
Notes

Reimagine Teaching and Learning with Windows 8.1 – Teacher Academy 12
The five kinds of Charms
1. Search: When you put a query in the search box, the integrated search brings back
every instance of that word (or words) that appear on your computer, in your files,
photos, music, apps, and then searches Bing for possible web resources.
2. Share: This charm enables an application to share its content to another application.
3. Start: This charm enables you to quickly and easily return to the Start Screen from the
desktop.
4. Devices: This offers a quick way to send files and info to other devices that are
connected to your PC, like your printer, Xbox, phone, speakers, TV, or a projector. The
list of devices available in the Devices charm depends on the devices you have and
whether they’re connected to your PC.
5. Settings: The settings charm is different because it is always connected to whatever
app you are in. If you are on the desktop, the settings menu will be desktop settings. If
you are on your start screen, they are your start screen settings, and if you are in an
app, such as news or weather (or any other), they are the settings for that app. The key
is to look just under the word Settings at the top to see what the settings relate to.
Charm’s benefits
Search:
Share:
Start:
Devices:
Settings:

Reimagine Teaching and Learning with Windows 8.1 – Teacher Academy 13
The Windows Store and Apps
Exploring Categories:
1. Swipe down from the top edge of the screen (or if you’re using a mouse, right-click) to see
the categories in the Store, and then tap or click the category you want. There is a category
for Education Apps.
2. If you know the name of the app you want or are looking for apps by a specific publisher,
enter the name into the search box in the upper-right corner of the Store. You'll see results
for apps that match your search.)

Reimagine Teaching and Learning with Windows 8.1 – Teacher Academy 14
Common Core State Standards:
1. Reference the PDF handout: “Apps for Education.”
2. Spend some time delving into the Teachers and Students section that best fit your teaching
assignment, doing any research on the apps that is helpful. Take some notes here, and after
five minutes, be prepared to share:
a) Which app you most want to learn more about, and why.
b) Which app you already are familiar with and…
c) How any of these apps impact education?
Notes

Reimagine Teaching and Learning with Windows 8.1 – Teacher Academy 15
Getting Around Notes

Reimagine Teaching and Learning with Windows 8.1 – Teacher Academy 16
Getting Things Done Setting up Email
Different schools/systems handle email in different ways. This is a great time for educators to compare
with each other best practices for using email with what works and how it impacts learning.
If your email address ends in a different domain, like gmail.com, yahoo.com, or comcast.net, here's
how to add it.
1. On the Start screen, tap or click Mail.
2. Swipe in from the right edge of the screen, and then tap Settings.
(If you're using a mouse, point to the lower-right corner of the screen, move the mouse
pointer up, and then click Settings.)
3. Tap or click Accounts, tap or click Add an account, and then tap or click the type of account
you'd like to add.
4. Enter your email address and password for the account, and then tap or click Connect.
1. Set up Email o Mail app
o Outlook.com
o Outlook
2. Setting up the Mail app o To check if you have signed in with a Microsoft
account
o To add an account to the Mail App
o To get your contacts
3. Outlook.com o To create a new Microsoft account and sign in
to Outlook.com
o To manage your contacts in Outlook.com

Reimagine Teaching and Learning with Windows 8.1 – Teacher Academy 17
Email Setup Notes

Reimagine Teaching and Learning with Windows 8.1 – Teacher Academy 18
Browsing the Web
The address bar is your starting point for browsing the web, with a combined address bar and search
box so you can surf, search, or get suggestions all from one place. It stays tucked out of the way when
you’re not using it to make more room for sites. To make the address bar appear, swipe up from the
bottom of the screen, or click the bar at the bottom of the screen if you're using a mouse.
In the space below, take notes on important features to help you during browsing, such as:
1. Multitasking with tabs and windows.
2. Opening and switching between tabs.
3. Using multiple browsing windows.
4. Customizing (pinning sites to your Start screen, reading, saving and sharing web
content, etc.).
1. Surf Enter a URL in the address bar to go to straight to a site.
Or, tap or click the address bar to see sites you visit often
(these are your frequent sites.)
2. Search Enter a term in the address bar and tap or click Go to
search the web with your default search engine.
3. Get suggestions Don’t know where you want to go? Enter a word in the
address bar to get website, app, and search suggestions as
you type. Just tap or click one of the suggestions above
the address bar.

Reimagine Teaching and Learning with Windows 8.1 – Teacher Academy 19
Reading View
When you’re flipping through your favorite online content, look for the Reading view icon in the
address bar. Reading view clears away the clutter – like ads – so stories are front and center. Tap or
click the icon to open the page in Reading view. When you want to get back to browsing, just tap or
click the icon again.

Reimagine Teaching and Learning with Windows 8.1 – Teacher Academy 20
OneDrive
The Benefits of OneDrive: How would you and/or students benefit in their classes? Come up with at
least 5 good quick reasons/ways they would benefit fron this cloud-based app in one of your classes.
Notes
1.
2.
3.
4.
5.
Reimagine Teaching and Learning with Windows 8.1 – Teacher Academy 21
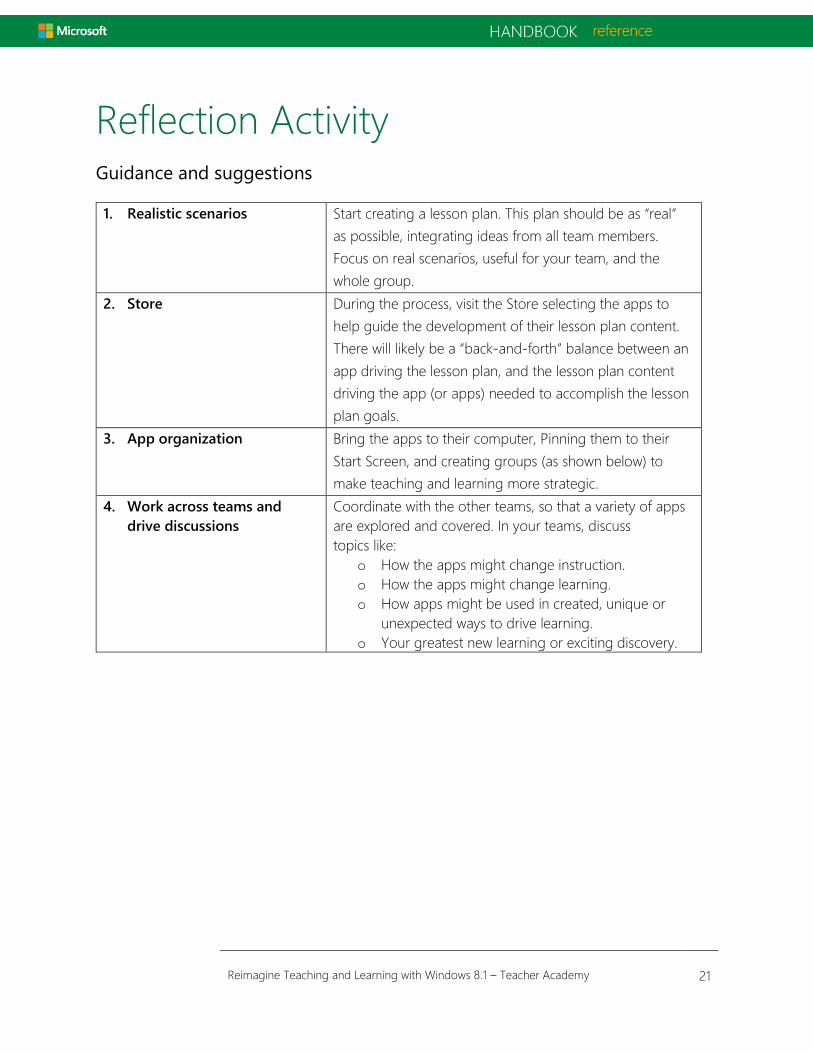
Reflection Activity Guidance and suggestions
1. Realistic scenarios Start creating a lesson plan. This plan should be as “real”
as possible, integrating ideas from all team members.
Focus on real scenarios, useful for your team, and the
whole group.
2. Store During the process, visit the Store selecting the apps to
help guide the development of their lesson plan content.
There will likely be a “back-and-forth” balance between an
app driving the lesson plan, and the lesson plan content
driving the app (or apps) needed to accomplish the lesson
plan goals.
3. App organization Bring the apps to their computer, Pinning them to their
Start Screen, and creating groups (as shown below) to
make teaching and learning more strategic.
4. Work across teams and
drive discussions
Coordinate with the other teams, so that a variety of apps
are explored and covered. In your teams, discuss
topics like:
o How the apps might change instruction.
o How the apps might change learning.
o How apps might be used in created, unique or
unexpected ways to drive learning.
o Your greatest new learning or exciting discovery.

Reimagine Teaching and Learning with Windows 8.1 – Teacher Academy 22
Reflection Activity Notes

Reimagine Teaching and Learning with Windows 8.1 – Teacher Academy 23
Want More? For more information on Microsoft in Education, please visit: www.microsoft.com/education. Here you
will find education tools, resources, and communities for educators. Popular resources include:
Bing for schools ad free Search for schools.
Bing daily lesson plans.
Connect your school - Skype in the Classroom.
Tools for building lesson plans aligned to the CCSS with the Common Core
Implementation Kit.
Get started with Office 365 for Education with OneDrive – free for schools.
Featured Tutorials and How-to guides for Office Products.
Office templates for education professionals.
Proven online educator development resources- Join the Microsoft in Education
Network.