real analog - circuits 1 chapter 6: lab projects · pdf filereal analog - circuits 1 chapter...
TRANSCRIPT
Real Analog - Circuits 1Chapter 6: Lab Projects
© 2012 Digilent, Inc. 1
6.4.2: Non-ideal Inductor Effects
Overview:
Voltage-current relationships for ideal inductors do not always adequately explain measured inductor voltagesand currents. In this assignment, we will measure inductor voltages and currents which do not agree well withidealized inductor relationships we have employed earlier. After recognizing the differences between themeasured data and our mathematical models, we will use a non-ideal inductor model to better approximate thephysical behavior of the inductor.
Before beginning this lab, you should be able to: After completing this lab, you should be able to:
Apply the inductor voltage-current relationsto calculate a inductor’s voltage from itscurrent and vice-versa
Use the Analog Discovery’s arbitrarywaveform generator and oscilloscope toapply and measure time-varying waveforms(Lab 6.2.1)
Use a math channel on the AnalogDiscovery to determine the current througha resistor from the voltage drop across theresistor (Labs 6.3.1, 6.4.1)
Model an non-ideal inductor as an idealinductor in series with a resistor
Identify some effects of non-ideal inductors frommeasured data
This lab exercise requires:
Analog Discovery module Digilent Analog Parts Kit Digital multimeter (DMM)
Symbol Key:
Demonstrate circuit operation to teaching assistant; teaching assistant should initial lab notebook andgrade sheet, indicating that circuit operation is acceptable.
Analysis; include principle results of analysis in laboratory report.
Numerical simulation (using PSPICE or MATLAB as indicated); include results of MATLABnumerical analysis and/or simulation in laboratory report.
Record data in your lab notebook.
Real Analog – Circuits 1Lab Project 6.4.2: Non-ideal Inductor Effects
© 2012 Digilent, Inc. 2
General Discussion:
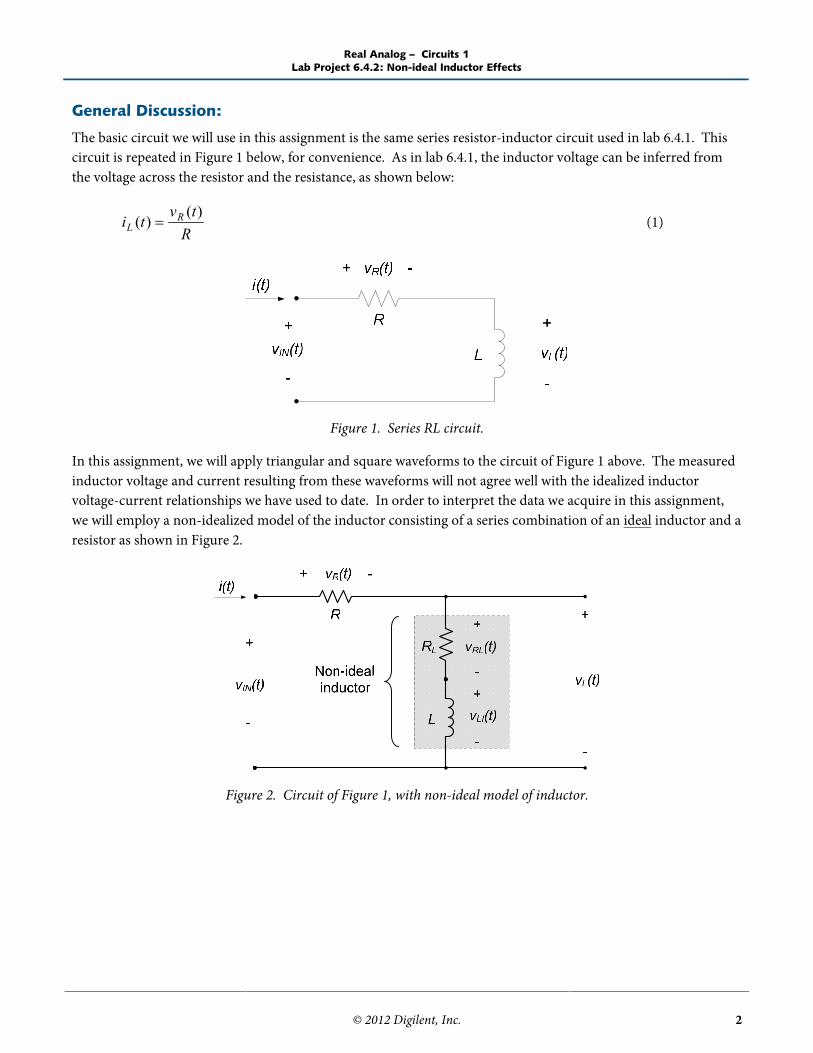
The basic circuit we will use in this assignment is the same series resistor-inductor circuit used in lab 6.4.1. Thiscircuit is repeated in Figure 1 below, for convenience. As in lab 6.4.1, the inductor voltage can be inferred fromthe voltage across the resistor and the resistance, as shown below:
Rtvti R
L)(
)( (1)
Figure 1. Series RL circuit.
In this assignment, we will apply triangular and square waveforms to the circuit of Figure 1 above. The measuredinductor voltage and current resulting from these waveforms will not agree well with the idealized inductorvoltage-current relationships we have used to date. In order to interpret the data we acquire in this assignment,we will employ a non-idealized model of the inductor consisting of a series combination of an ideal inductor and aresistor as shown in Figure 2.
Figure 2. Circuit of Figure 1, with non-ideal model of inductor.
Real Analog – Circuits 1Lab Project 6.4.2: Non-ideal Inductor Effects
© 2012 Digilent, Inc. 3
Pre-lab:
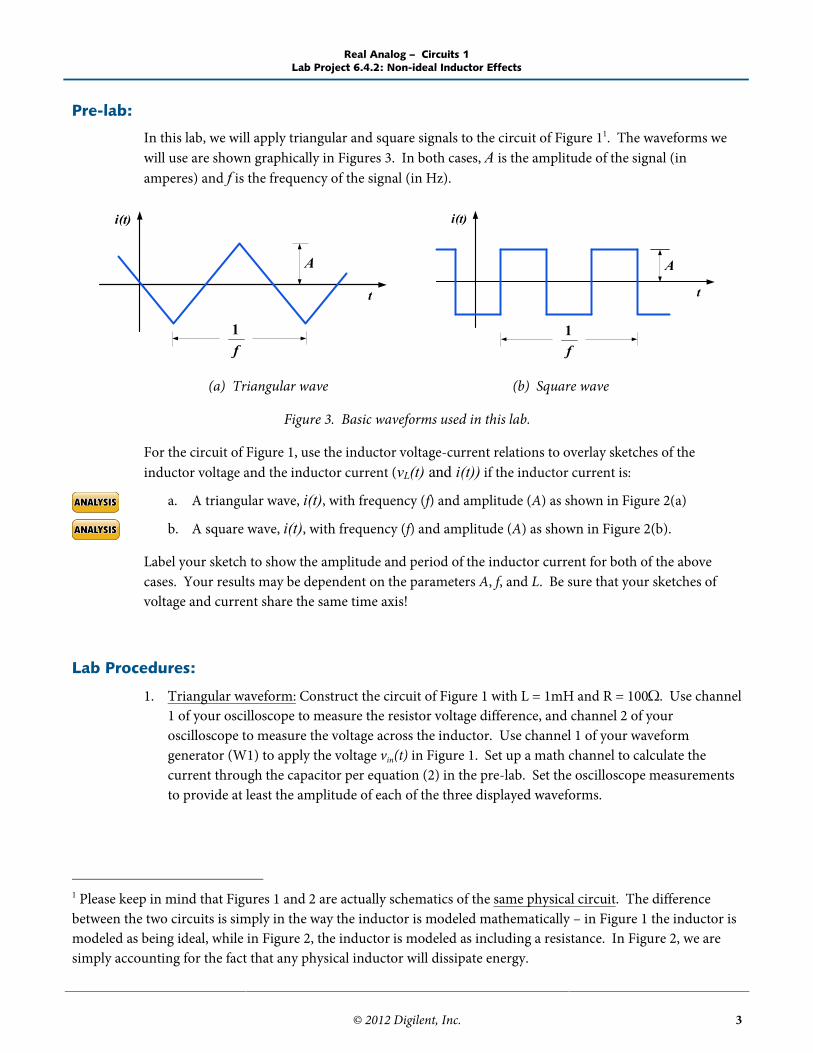
In this lab, we will apply triangular and square signals to the circuit of Figure 11. The waveforms wewill use are shown graphically in Figures 3. In both cases, A is the amplitude of the signal (inamperes) and f is the frequency of the signal (in Hz).
i(t)
t
f1
A
i(t)
t
f1
A
(a) Triangular wave (b) Square wave
Figure 3. Basic waveforms used in this lab.
For the circuit of Figure 1, use the inductor voltage-current relations to overlay sketches of theinductor voltage and the inductor current (vL(t) and i(t)) if the inductor current is:
a. A triangular wave, i(t), with frequency (f) and amplitude (A) as shown in Figure 2(a)
b. A square wave, i(t), with frequency (f) and amplitude (A) as shown in Figure 2(b).
Label your sketch to show the amplitude and period of the inductor current for both of the abovecases. Your results may be dependent on the parameters A, f, and L. Be sure that your sketches ofvoltage and current share the same time axis!
Lab Procedures:
1. Triangular waveform: Construct the circuit of Figure 1 with L = 1mH and R = 100Ω. Use channel1 of your oscilloscope to measure the resistor voltage difference, and channel 2 of youroscilloscope to measure the voltage across the inductor. Use channel 1 of your waveformgenerator (W1) to apply the voltage vin(t) in Figure 1. Set up a math channel to calculate thecurrent through the capacitor per equation (2) in the pre-lab. Set the oscilloscope measurementsto provide at least the amplitude of each of the three displayed waveforms.
1 Please keep in mind that Figures 1 and 2 are actually schematics of the same physical circuit. The differencebetween the two circuits is simply in the way the inductor is modeled mathematically – in Figure 1 the inductor ismodeled as being ideal, while in Figure 2, the inductor is modeled as including a resistance. In Figure 2, we aresimply accounting for the fact that any physical inductor will dissipate energy.
Real Analog – Circuits 1Lab Project 6.4.2: Non-ideal Inductor Effects
© 2012 Digilent, Inc. 4
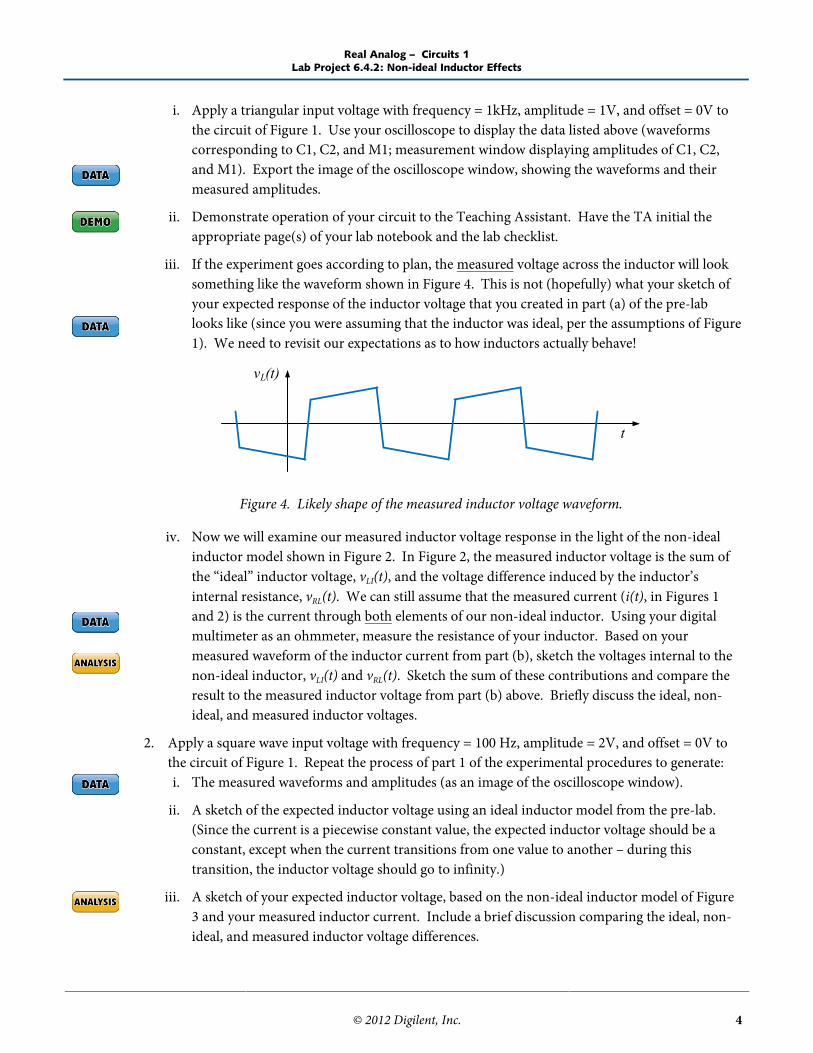
i. Apply a triangular input voltage with frequency = 1kHz, amplitude = 1V, and offset = 0V tothe circuit of Figure 1. Use your oscilloscope to display the data listed above (waveformscorresponding to C1, C2, and M1; measurement window displaying amplitudes of C1, C2,and M1). Export the image of the oscilloscope window, showing the waveforms and theirmeasured amplitudes.
ii. Demonstrate operation of your circuit to the Teaching Assistant. Have the TA initial theappropriate page(s) of your lab notebook and the lab checklist.
iii. If the experiment goes according to plan, the measured voltage across the inductor will looksomething like the waveform shown in Figure 4. This is not (hopefully) what your sketch ofyour expected response of the inductor voltage that you created in part (a) of the pre-lablooks like (since you were assuming that the inductor was ideal, per the assumptions of Figure1). We need to revisit our expectations as to how inductors actually behave!
vL(t)
t
Figure 4. Likely shape of the measured inductor voltage waveform.
iv. Now we will examine our measured inductor voltage response in the light of the non-idealinductor model shown in Figure 2. In Figure 2, the measured inductor voltage is the sum ofthe “ideal” inductor voltage, vLI(t), and the voltage difference induced by the inductor’sinternal resistance, vRL(t). We can still assume that the measured current (i(t), in Figures 1and 2) is the current through both elements of our non-ideal inductor. Using your digitalmultimeter as an ohmmeter, measure the resistance of your inductor. Based on yourmeasured waveform of the inductor current from part (b), sketch the voltages internal to thenon-ideal inductor, vLI(t) and vRL(t). Sketch the sum of these contributions and compare theresult to the measured inductor voltage from part (b) above. Briefly discuss the ideal, non-ideal, and measured inductor voltages.
2. Apply a square wave input voltage with frequency = 100 Hz, amplitude = 2V, and offset = 0V tothe circuit of Figure 1. Repeat the process of part 1 of the experimental procedures to generate:i. The measured waveforms and amplitudes (as an image of the oscilloscope window).
ii. A sketch of the expected inductor voltage using an ideal inductor model from the pre-lab.(Since the current is a piecewise constant value, the expected inductor voltage should be aconstant, except when the current transitions from one value to another – during thistransition, the inductor voltage should go to infinity.)
iii. A sketch of your expected inductor voltage, based on the non-ideal inductor model of Figure3 and your measured inductor current. Include a brief discussion comparing the ideal, non-ideal, and measured inductor voltage differences.