tecsun radios australia tecsun · s-2000 tecsun fm-stereo/ lw / mw / shortwave / aircraft band...
TRANSCRIPT
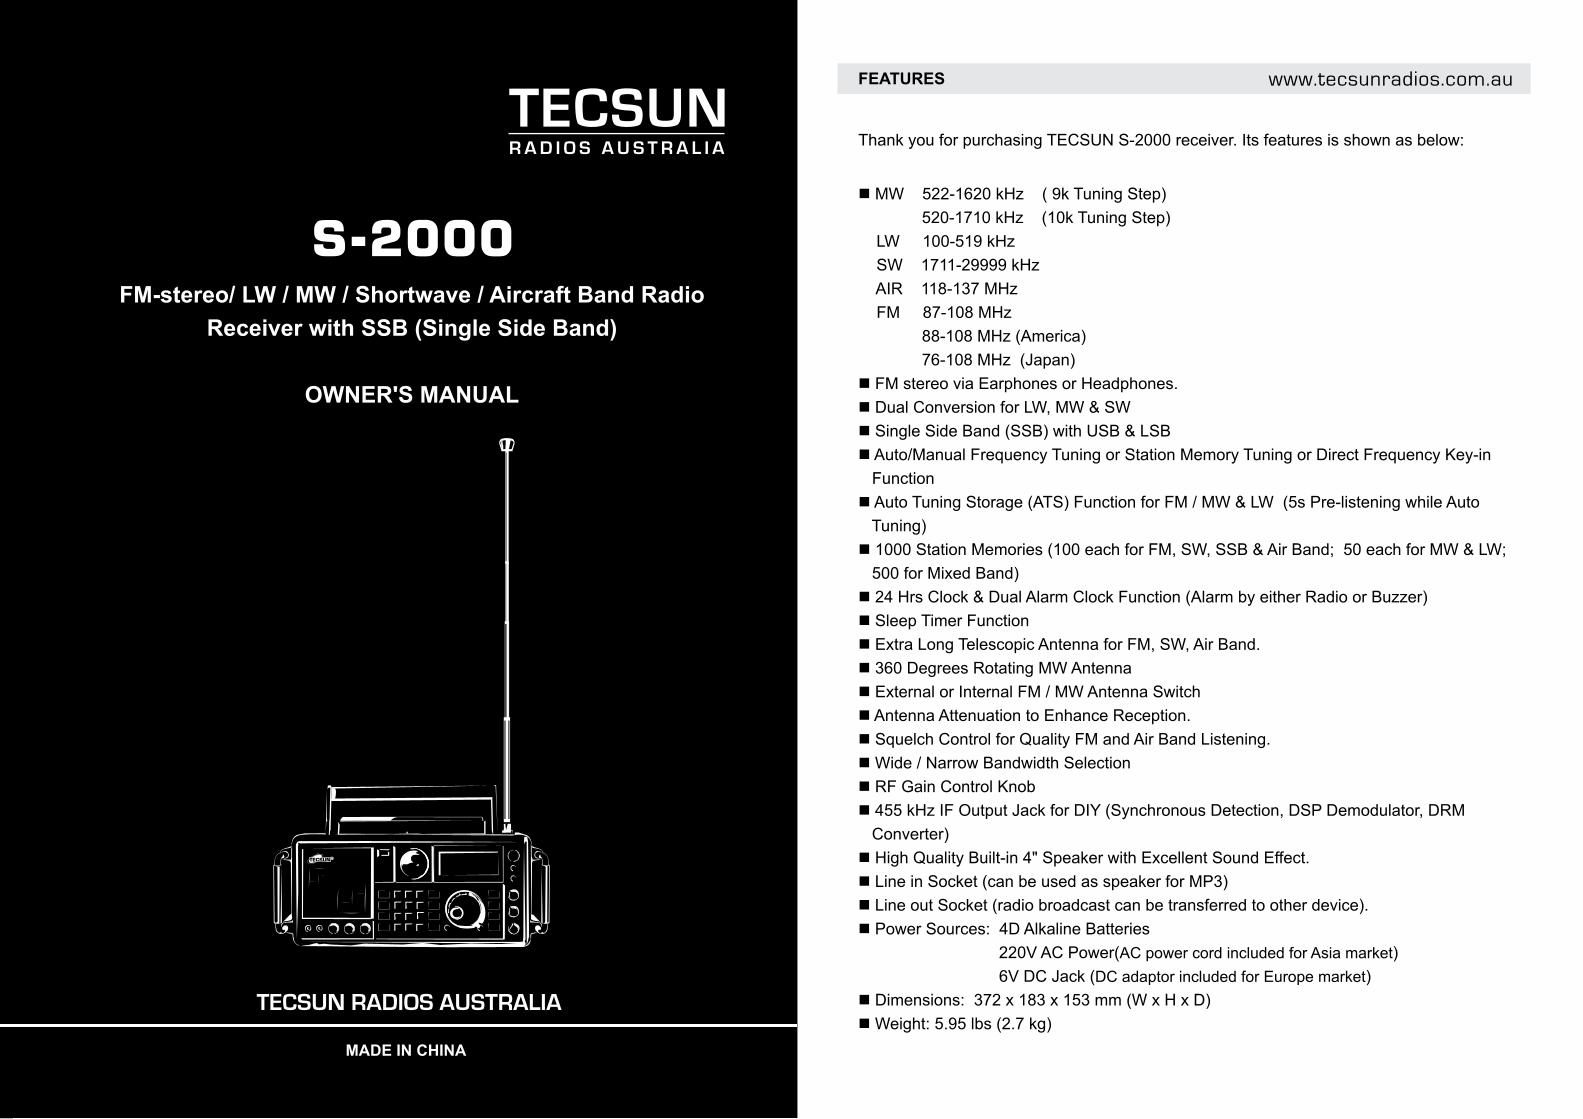
S-2000
TECSUN
FM-stereo/ LW / MW / Shortwave / Aircraft Band Radio
Receiver with SSB (Single Side Band)
OWNER'S MANUAL
TECSUN RADIO CO., LTD.
MADE IN CHINA
VE
R.2
03
-20
10
TECSUNwww.tecsun.com.cn
TECSUN RADIO CO., LTD.
24/9 Powells Road, Brookvale, NSW 2100 Australia Ph: +61 2 9939 4377
Email: [email protected] www.tecsunradios.com.au
TECSUN RADIOS AUSTRALIA
R A D I O S A U S T R A L I A
TECSUN
FEATURES
Thank you for purchasing TECSUN S-2000 receiver. Its features is shown as below:
n MW 522-1620 kHz ( 9k Tuning Step)
520-1710 kHz (10k Tuning Step)
LW 100-519 kHz
SW 1711-29999 kHz
AIR 118-137 MHz
FM 87-108 MHz
88-108 MHz (America)
76-108 MHz (Japan)
n FM stereo via Earphones or Headphones.
n Dual Conversion for LW, MW & SW
n Single Side Band (SSB) with USB & LSB
n Auto/Manual Frequency Tuning or Station Memory Tuning or Direct Frequency Key-in
Function
n Auto Tuning Storage (ATS) Function for FM / MW & LW (5s Pre-listening while Auto
Tuning)
n 1000 Station Memories (100 each for FM, SW, SSB & Air Band; 50 each for MW & LW;
500 for Mixed Band)
n 24 Hrs Clock & Dual Alarm Clock Function (Alarm by either Radio or Buzzer)
n Sleep Timer Function
n Extra Long Telescopic Antenna for FM, SW, Air Band.
n 360 Degrees Rotating MW Antenna
n External or Internal FM / MW Antenna Switch
n Antenna Attenuation to Enhance Reception.
n Squelch Control for Quality FM and Air Band Listening.
n Wide / Narrow Bandwidth Selection
n RF Gain Control Knob
n 455 kHz IF Output Jack for DIY (Synchronous Detection, DSP Demodulator, DRM
Converter)
n High Quality Built-in 4" Speaker with Excellent Sound Effect.
n Line in Socket (can be used as speaker for MP3)
n Line out Socket (radio broadcast can be transferred to other device).
n Power Sources: 4D Alkaline Batteries
220V AC Power( )
6V DC Jack ( )
n Dimensions: 372 x 183 x 153 mm (W x H x D)
n Weight: 5.95 lbs (2.7 kg)
AC power cord included for Asia market
DC adaptor included for Europe market
S-2000
TECSUN
FM-stereo/ LW / MW / Shortwave / Aircraft Band Radio
Receiver with SSB (Single Side Band)
OWNER'S MANUAL
TECSUN RADIO CO., LTD.
MADE IN CHINA
VE
R.2
03
-20
10
TECSUNwww.tecsun.com.cn
TECSUN RADIO CO., LTD. TECSUN RADIOS AUSTRALIA
www.tecsunradios.com.au
R A D I O S A U S T R A L I A
TECSUN
1
TABLE OF CONTENTS
LCD DISPLAY INDICATION .................................... .................................
QUICK START........................................................................................................................
TECSUN S-2000 PRODUCT ASSEMBLY DIAGRAM ..........................................................
S-2000 QUICK START GUIDE...........................................................................................
S-2000 OPERATION MANUAL
..................................................................................................................
.......................................................................................................
.................................................................
.....................................................................................
..............................................................................................................
...............................................................................................................
.........................................................................................................
....................................................................................................................
.............................................................................................
..............................................................................................
........................................................................................
.........................................................................................
....................................................................................................................
................................................................................................
................................................................................................................
.................................................................................
.........................................................................................................
...............................................................................................................
......................................................................................................
.............................................................
...........................................................................................................
........................................................................................................
.....................................................................................
.................................................................................................
............................................................................
........................................................................................................
.........................................................................................................
...........................................................................................
...........................
POWER SUPPLY
LISTEN TO THE RADIO
STORING FREQUENCIES INTO MEMORY
LISTENING TO WHAT'S STORED.
DELETE MEMORY
CLOCK SETTING
ALARM SETTING
SLEEP TIMER.
USING THE LIGHT BUTTON
BW (BANDWIDTH) BUTTON
FM ST. (FM STEREO) BUTTON.
SW METER BAND SELECTION
TUNING STEP
LOCK THE TUNING KNOB
RESET BUTTON
SSB (SINGLE SIDE BAND) TUNING
LINE OUT SOCKETS
LINE-IN SOCKET
455kHZ AM IF OUTLET
ANTENNA ATEENUATOR (ANT. ATT.) BUTTON
RF GAIN CONTROL
SQUELCH CONTROL
EXTERNAL ANTENNA SOCKETS
SYSTEM CODE SETTING
CHECK THE SYSTEM CODE SETTING
TROUBLESHOOTING
SPECIFICATIONS.
MESSAGE ALERT STATUS
2
3
4
5-7
8
9
10~11
12
13
14
14-15
16
17
17
17
17
18
18
18
18
19
19
19
20
20
20
21
22
22
23
24-25
26-28
Page
2
SLEEP
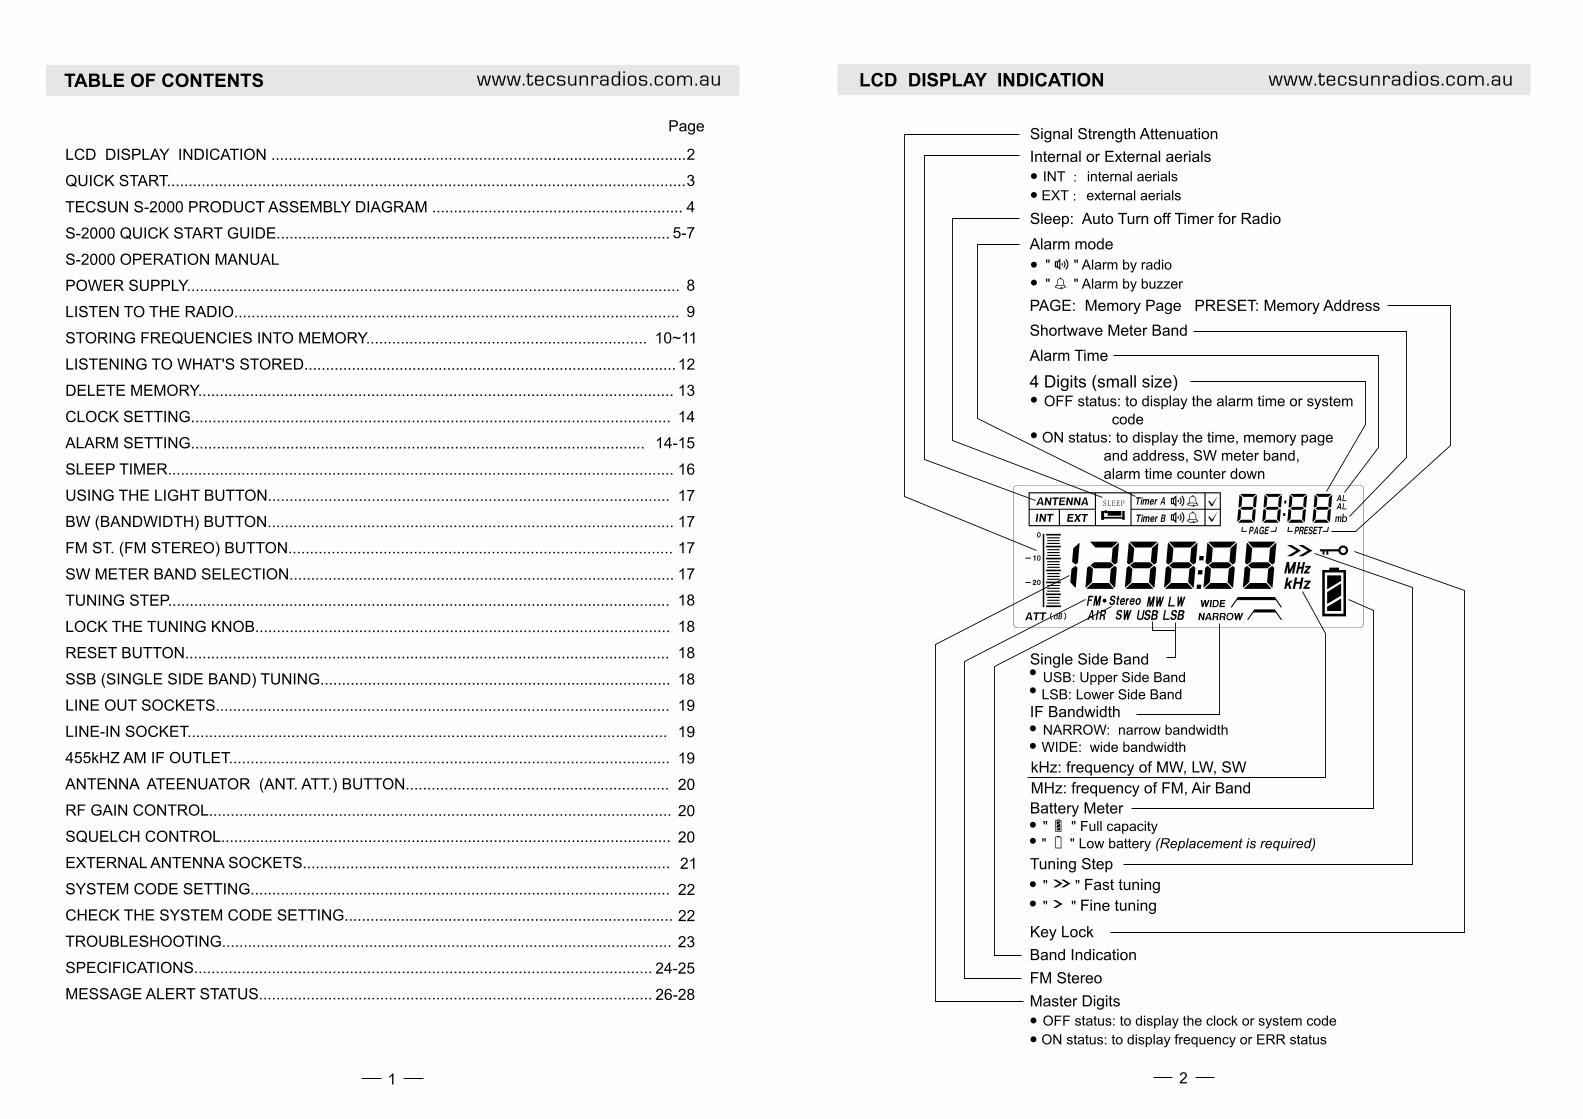
LCD DISPLAY INDICATION
Key Lock
FM Stereo
Master Digits OFF status: to display the clock or system code
ON status: to display frequency or ERR status
Band Indication
PAGE: Memory Page PRESET: Memory Address
Shortwave Meter Band
Internal or External aerials INT :internal aerials
EXT :external aerials
Tuning Step
Fast tuning
Fine tuning
" "
" "
Sleep: Auto Turn off Timer for Radio
Battery Meter Full capacity Low battery (Replacement is required)
" " " "
4 Digits (small size) OFF status: to display the alarm time or system code ON status: to display the time, memory page and address, SW meter band, alarm time counter down
Alarm mode
Single Side Band USB: Upper Side Band LSB: Lower Side Band
" " Alarm by radio
" " Alarm by buzzer
Alarm Time
IF Bandwidth NARROW: narrow bandwidth WIDE: wide bandwidth
Signal Strength Attenuation
kHz: frequency of MW, LW, SW
MHz: frequency of FM, Air Band
www.tecsunradios.com.auwww.tecsunradios.com.au
LIGHT/SNOOZE
BFO stands for Beat Frequency Oscillator. This control knob is used to fine tune a sideband signal.
Memory mode/ Frequency mode
Memory Page
- Frequency mode: short press for a station tuning and long press for Auto tuning.- Memory mode: short press for a recalling of preset and long press for auto tuning of memory.
- Turn on the radio and short press the PAGE button (the address page will flash in the right corner of the LCD. - Turn the TUNING knob or use the “ / “ buttons to select the page that you want go to; shortly press PAGE again to confirm.
PAGE
STEP/FAST-SLOW/LOCK Tuning step/lock
- Short press SETP/FAST-SLOW/LOCK button: to select either FAST or SLOW tuning step.- Long press SETP/FAST-SLOW/LOCK button: to lock the TUNING knob.
VF= Variable-Frequency Oscillator mode, VM= memory modeShort press the VM/VF button to change VM/VF mode.
The MW/LW antenna is located at the top of the radio; rotate it for best MW/LW reception.
LIGHT- 3 seconds light on: short press the LIGHT button.- Always light on: long press the LIGHT button.SNOOZEWhen the alarm is activated, press the LIGHT/SNOOZE button to deactivate the timer for 10 minutes.
Clock set
Alarm by radio or by buzzer
CLOCK SETTING1. Long press the TIME button, when HOUR is flashing, turn the TUNING knob to adjust the hour.2. Shortly press the TIME button, when MINUTE is flashing then turns the TUNING knob to adjust the minute.3. Press the TIME button to confirm.* One can set the clock either when the radio is on or off.
The alarm time setting is same as the clock setting. After the alarm time is set,there is one more playing timer (1~90minutes) needs to be adjusted and for active the alarm by radio. To turn off the timer, Press the TIMER A ON/OFF button over and over to deactivate the alarm when “ “ or “ “ are disappeared.
※The operation method is as same as TIMER A.
EAR Earphone Socket
LINE IN Line in Socket
Turn on the radio and go into Shortwave. Press the SSB button and tune in signals on USB, press the SSB button again to LSB. To return to SW band press the SSB button once more.
Press the FM ST. button when in the FM band to take the radio in or out of stereo reception mode. When using speaker to listen FM ST., please turn off FM ST. function for better sound.
Short press BW button to choose wide or narrow selectivity. This may help to reduce interference for some frequencies. Selecting WIDE, usually results of better audio fidelity, while selecting narrow that limits the audio fidelity somewhat.
Band width selectorBW
Single Side BandSSB
FM Stereo FM ST.
DELETE
EXT ANT.
INT. ANT.
50
500
SWANT.
FMANT.
SWANT.
L R
TIME
TIMER A ON/OFF
- Plug in earphones and headphones using a 3.5 mm (1/8 inch) stereo plug.
The LINE-IN socket is on the lower left front of the radio and allows you to route the sound from another device to the TECSUN S-2000. Use a cord with a 3.5 mm (1/8 inch) stereo plug.
DELETE ONE MEMORY-Turn on the radio and press the VM/VF button, causing PAGE and PRESET to appear in the display's upper right corner. -Use the numeric keypad, the TUNING knob or the up/down tuning buttons ( / ) to select the memory that you want to delete. To delete the memory press the DELETE button and release after a “B”sounds, note that “ “starts blinking on the LCD, then press DELETE button again to confirm. Please refer to the TECSUN S-2000 manual for QUICK DELETING and DELETING A PAGE.
TUNING Tuning knob
One can use the TUNING knob to adjust the clock, tune to a station, select a memory address and a memory page.
Telescope Antenna for FM/SW/AIR band
SLEEP Sleep Timer
The ANT.ATT button, located on the upper right front of the radio, is used to attenuate a signal.
RF GAIN Radio Frequency Gain
SQUELCH
SSB BFO Beat Frequency Oscillator
Pull out the telescope antenna and change its length or direction to get better reception when tuning on FM/SW/AIR band.
- The sleep timer enables the radio to play any length of time from 1~120 minutes and then turn off automatically . - Press the SLEEPbutton to turn on the sleep timer. Notice that the number of minutes to play appears in the display. While it appears there, keep pressing on the SLEEPbutton to adjust the sleep timer in between1 to 120 minutes.
ANT. ATT Antenna Attenuator
Using the squelch control eliminates background noise.
POWER
Short press the POWER button to turn on or turn off the radio.
MEMORY
-Turn on the radio and tune to a station that you want to store into memory. -Shortly press the MEMORY button note that PRESET will flash in the right corner of the LCD. Press the MEMORY button to confirm it (or it will automatically confirm after 3 seconds).
- Short press MW/LW button: to select MW or LW band.- Long press on MW band: to start MW ATS.- Long press on LW band: to start LW ATS.
- Short press FM button: to select FM band.- Long press FM button: to start FM ATS.
- Short press SW button: to select SW band.- Sequentially press SW button: to select a SW meter band.
- Short press AIR button: to select AIR band.
FM
MW/LW
SW Short-wave band
AIR Aircraft band
0~9 Numeric keys
- Frequency mode: direct key in a station frequency.- Memory mode: direct key in a memory number to listen to what's stored.
The RF (radio frequency) gain controller is adjusted manually to improve the radio's rejection of interference from adjacent frequencies that may interfere, especially on Shortwave.
ATT. TUNE
L R
VM / VF
RESET
Press the RESET only when the radio seems to stop functioning properly.
QUICK START
3
TIMER B ON/OFF
455kHz AM IF OUT
Alarm by radio or by buzzer
GND
MW/LW ROTATABLE ANTENNA
MW/LW ROTATABLE ANTENNA
ROTATABLE MW/LW ANTENNA
BASS / TREBLE / VOLUME Adjusting knobs
Up and Down button
Connect to external AM antennaExternal ring type AM antenna AM antenna tuner
NOTE: it will cut off the internal AM antenna when an external AM antenna is connected.
INT. ANT. :Use of internal telescopic antennaEXT. ANT.:Use of external antenna
INT./EXT. antenna select switch
50 ohm FM external antenna
50 ohm SW external antenna
500 ohm high-impedance external SW antenna
Right side
S-2000 Rear
To an amplifier or a recorder.
To the LINE IN sockets
To the computer
To the LINE IN sockets
Synchronous demodulator, SSB demodulator
Software radio (DSP) demodulator
DRM 455/12kHz converter etc
www.tecsunradios.com.au
4
24
25
26
27
28
30
33
29
32
35
34
36
18
19
20
21
22
23
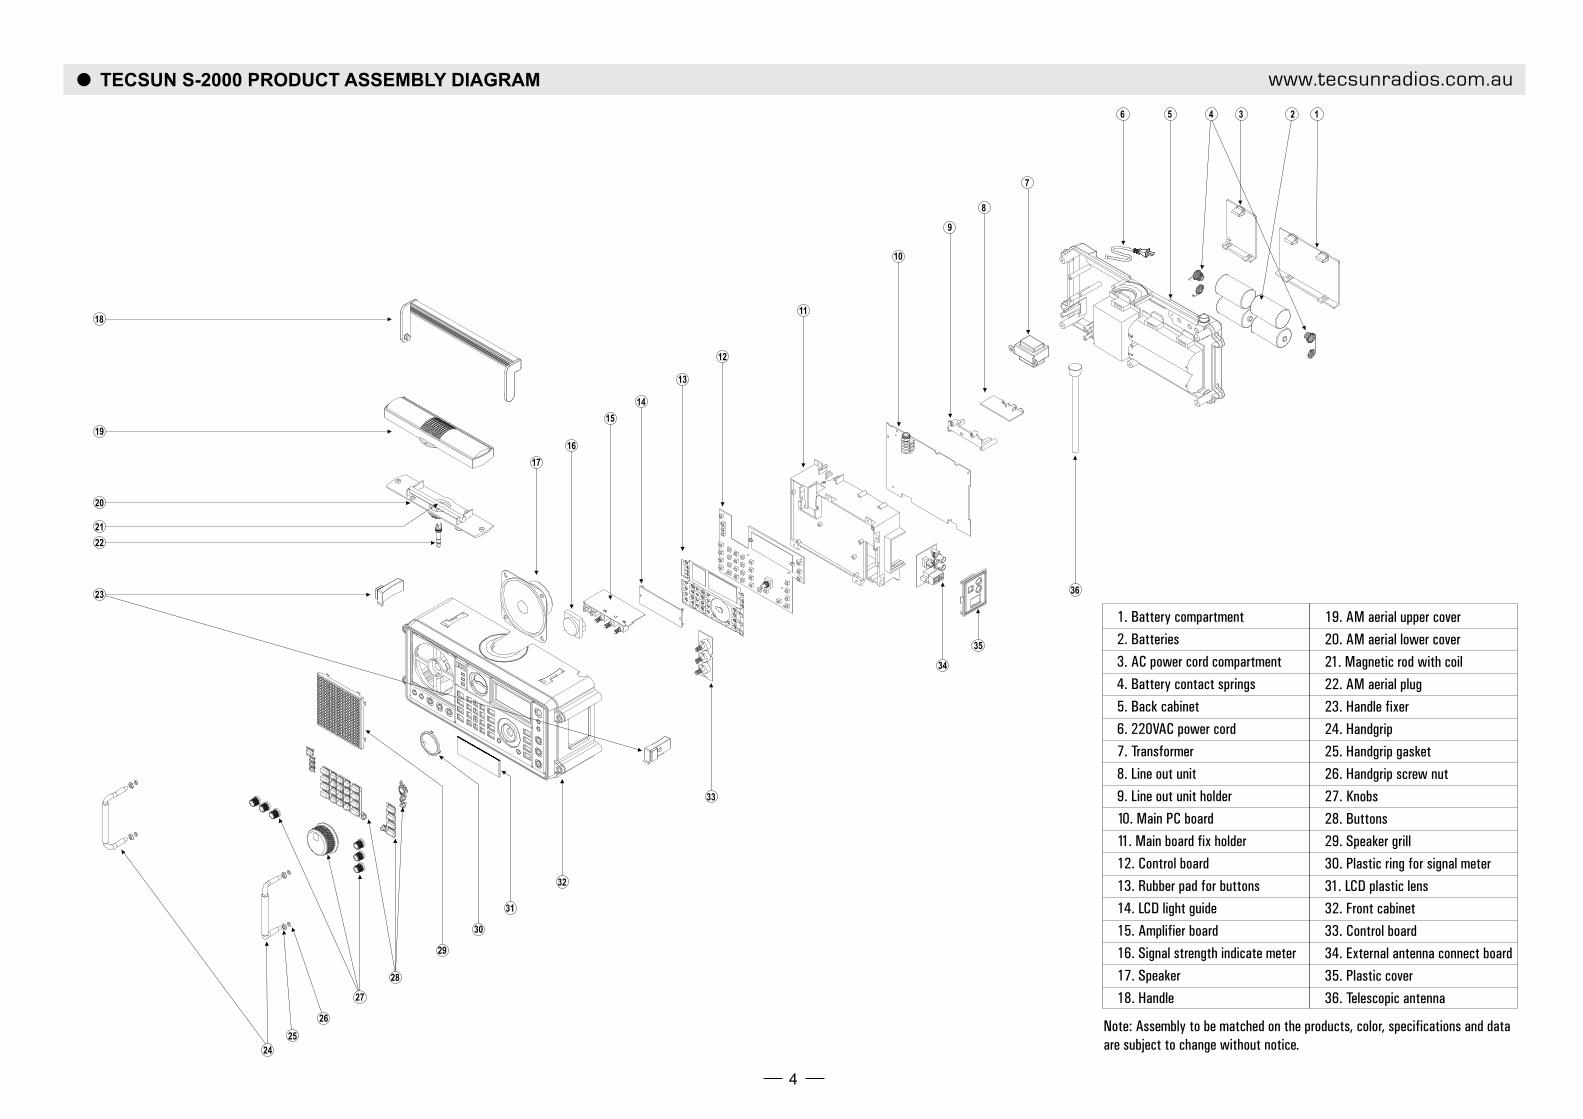
TECSUN S-2000 PRODUCT ASSEMBLY DIAGRAM
12
11
13
14
16
17
1. Battery compartment
2. Batteries
3. AC power cord compartment
4. Battery contact springs
5. Back cabinet
6. 220VAC power cord
7. Transformer
8. Line out unit
9. Line out unit holder
10. Main PC board
11. Main board fix holder
12. Control board
13. Rubber pad for buttons
14. LCD light guide
15. Amplifier board
16. Signal strength indicate meter
17. Speaker
18. Handle
13 25
7
8
9
10
31
4
6
15
Note: Assembly to be matched on the products, color, specifications and data are subject to change without notice.
19. AM aerial upper cover
20. AM aerial lower cover
21. Magnetic rod with coil
22. AM aerial plug
23. Handle fixer
24. Handgrip
25. Handgrip gasket
26. Handgrip screw nut
27. Knobs
28. Buttons
29. Speaker grill
30. Plastic ring for signal meter
31. LCD plastic lens
32. Front cabinet
33. Control board
34. External antenna connect board
35. Plastic cover
36. Telescopic antenna
www.tecsunradios.com.au
5
ALARM SETTING
There are two independently programmable alarm timers (TIMER A ON/OFF & TIMER B ON/OFF)
to turn it on and off at the specified time.
To set for TIMER A ON/OFF:
1. Press the TIMER A ON/OFF button with a "B" sound until you see the alarm hour flashing. While
it's flashing adjust the hour with the TUNING knob and press the TIMER A ON/OFF button with a
"BB" sound. Notice that the alarm minutes are flashing.
2. While it's flashing adjust the alarm minutes with the TUNING knob and press the TIMER A
ON/OFF button. Notice the sleep timer flashing in the box at the top of the display.
3. While it's flashing turn the TUNING knob to adjust the time that the radio is to play(1~90 minutes).
4. Press the TIMER A ON/OFF button again to confirm setting, or simply let the flashing number
time-out to confirm it automatically meanwhile with a long "B--" sounds.
5. To set for TIMER B ON/OFF is the same as for TIMER A ON/OFF.
Note:
Once the alarm is on (by radio or buzzer), only the POWER, SLEEP, LIGHT/SNOOZE, and RESET
buttons can be operated. Press the POWER or SLEEP buttons to turn off the alarm.
Alarm by Buzzer or Radio:
Press on TIMER A ON/OFF key to select “ “ in TIMER A section. Now the alarm will be on by
buzzer.
Note:
In TIMER A or B section, “ “ means TIMER is set by radio; “ “ means TIMER is set by
buzzer, and [ ] means TIMER is off.
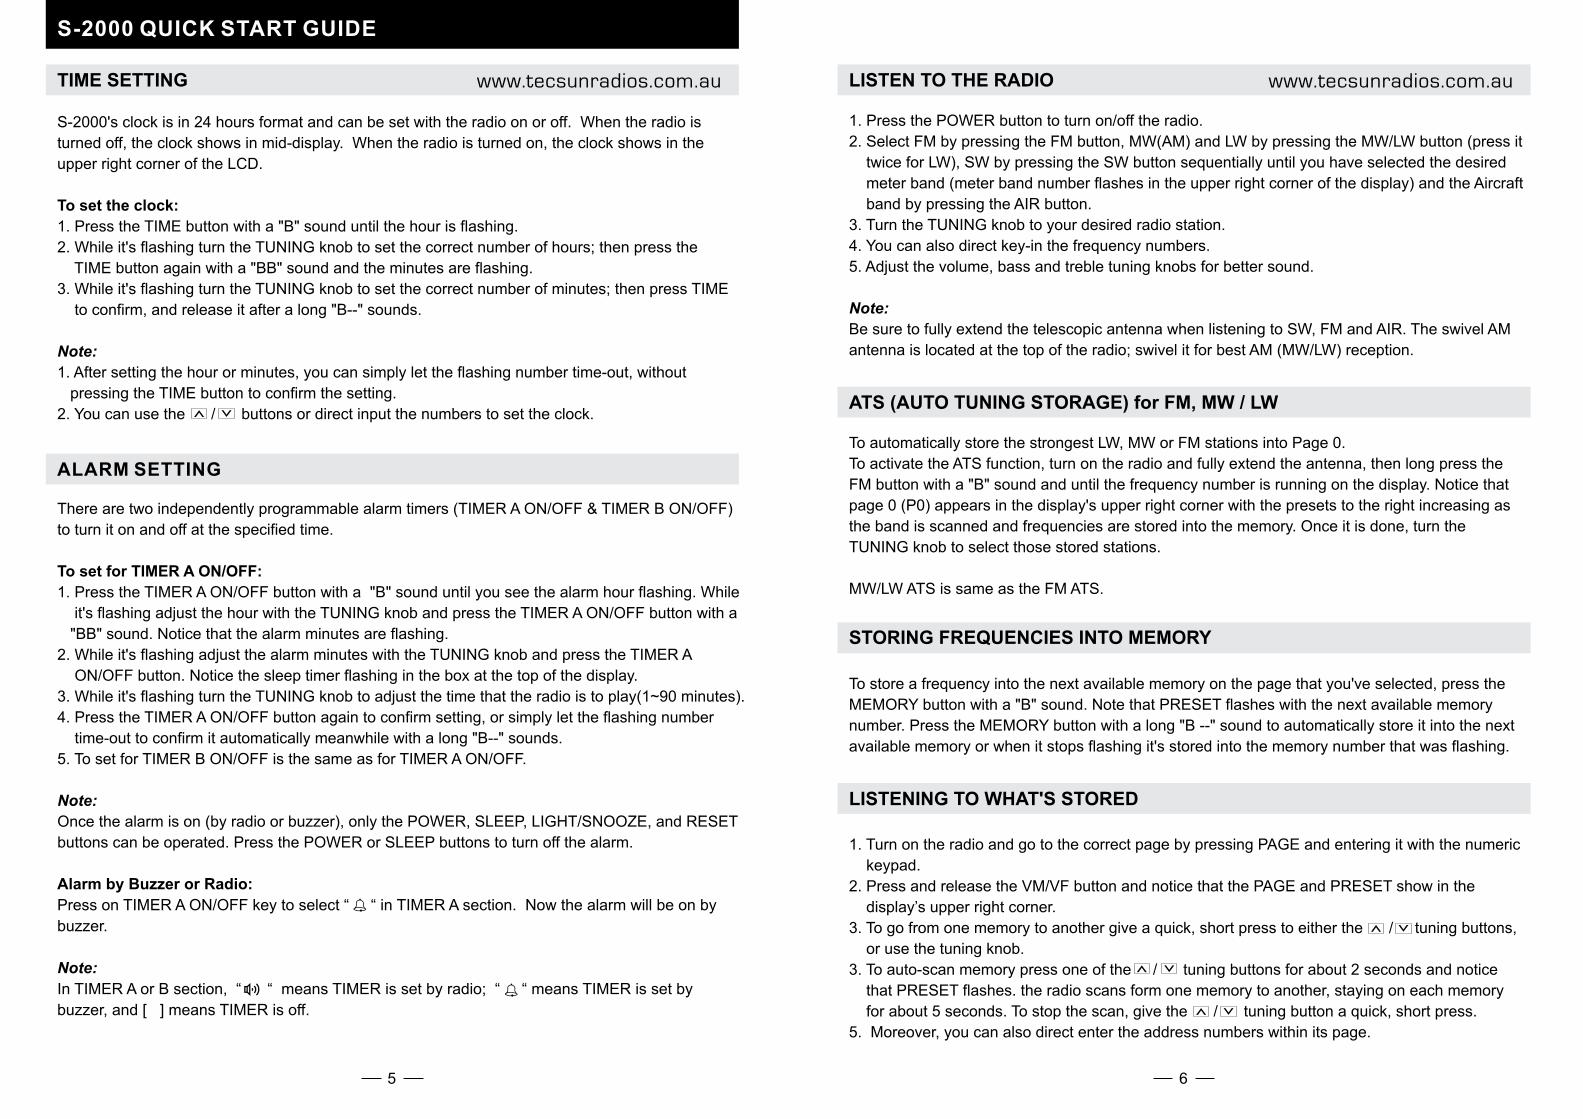
S-2000 QUICK START GUIDE
TIME SETTING
S-2000's clock is in 24 hours format and can be set with the radio on or off. When the radio is
turned off, the clock shows in mid-display. When the radio is turned on, the clock shows in the
upper right corner of the LCD.
To set the clock:
1. Press the TIME button with a "B" sound until the hour is flashing.
2. While it's flashing turn the TUNING knob to set the correct number of hours; then press the
TIME button again with a "BB" sound and the minutes are flashing.
3. While it's flashing turn the TUNING knob to set the correct number of minutes; then press TIME
to confirm, and release it after a long "B--" sounds.
Note:
1. After setting the hour or minutes, you can simply let the flashing number time-out, without
pressing the TIME button to confirm the setting.
2. You can use the / buttons or direct input the numbers to set the clock.
6
LISTEN TO THE RADIO
1. Press the POWER button to turn on/off the radio.
2. Select FM by pressing the FM button, MW(AM) and LW by pressing the MW/LW button (press it
twice for LW), SW by pressing the SW button sequentially until you have selected the desired
meter band (meter band number flashes in the upper right corner of the display) and the Aircraft
band by pressing the AIR button.
3. Turn the TUNING knob to your desired radio station.
4. You can also direct key-in the frequency numbers.
5. Adjust the volume, bass and treble tuning knobs for better sound.
Note:
Be sure to fully extend the telescopic antenna when listening to SW, FM and AIR. The swivel AM
antenna is located at the top of the radio; swivel it for best AM (MW/LW) reception.
ATS (AUTO TUNING STORAGE) for FM, MW / LW
To automatically store the strongest LW, MW or FM stations into Page 0.
To activate the ATS function, turn on the radio and fully extend the antenna, then long press the
FM button with a "B" sound and until the frequency number is running on the display. Notice that
page 0 (P0) appears in the display's upper right corner with the presets to the right increasing as
the band is scanned and frequencies are stored into the memory. Once it is done, turn the
TUNING knob to select those stored stations.
MW/LW ATS is same as the FM ATS.
STORING FREQUENCIES INTO MEMORY
To store a frequency into the next available memory on the page that you've selected, press the
MEMORY button with a "B" sound. Note that PRESET flashes with the next available memory
number. Press the MEMORY button with a long "B --" sound to automatically store it into the next
available memory or when it stops flashing it's stored into the memory number that was flashing.
LISTENING TO WHAT'S STORED
1. Turn on the radio and go to the correct page by pressing PAGE and entering it with the numeric
keypad.
2. Press and release the VM/VF button and notice that the PAGE and PRESET show in the
display’s upper right corner.
3. To go from one memory to another give a quick, short press to either the / tuning buttons,
or use the tuning knob.
3. To auto-scan memory press one of the / tuning buttons for about 2 seconds and notice
that PRESET flashes. the radio scans form one memory to another, staying on each memory
for about 5 seconds. To stop the scan, give the / tuning button a quick, short press.
5. Moreover, you can also direct enter the address numbers within its page.
www.tecsunradios.com.au www.tecsunradios.com.au
7
DELETE MEMORY
1. Delete one memory
- Turn on the radio and press the VM/VF button, causing PAGE and PRESET to appear in the
display's upper right corner.
- Use the numeric keypad, the tuning knob, or the / buttons to select the memory that you
want to delete.
- To delete the memory, press DELETE button with a "B" sound and notice that DEL flashes in the
display. Press the DELETE button again with a long "B --" sound to confirm.
2. Delete a memory page
- Turn on the radio and select the page that you want to delete by pressing PAGE, note that PAGE
flashes in the display's upper right. While it's flashing use the numeric keypad, the tuning knob
or the / buttons to select the page that you wish to delete.
- Press and release the VM/VF button so that PAGE and PRESET appear in the display's upper
corner. If [ - - ] appears above PRESET in the display's upper right corner, the page is already
deleted and you don't have to continue.
- Press DELETE for about 3 seconds with a "BB" sound or until starts blinking on the LCD,
press the DELETE button again with a long "B--" sound to confirm.
AUTO SCAN STATION AND PRESET MEMORY
AUTO SCAN STATION
To auto scan station, turn on the radio and select your desired band.
Long press one of the / buttons with a "B" sound to activate the
Auto Scan function. In Auto Scan the radio scans from one station to
the next, stays on the new station for 5 seconds and then moves on.
You can press any button with a "BB" sound to stop the Auto Scan
function.Frequency status
Frequency
Memory status
Time
AUTO SCAN MEMORY
Turn on the radio and press VM/VF with a "BB" sound, then press one
of the / buttons for about 2 seconds with a "B" sound and notice
that PRESET flashes. The radio scans from one memory to another,
staying on each memory for about 5 seconds.
You can press any button with a "BB" sound to stop Auto Scan and
listen to your favorite broadcast.
Frequency
Page and Preset
8
~220V AC CORD
USING BATTERIES- Open the battery compartment cover and insert
4 x UM 1 (D size) batteries according to the polarity
diagram imprinted on the battery compartment floor.
- The S-2000 has a battery power indicator in the
LCD. Fresh batteries will show a full power level
of 3 bars. If the indicator shows one bar or the
sound becomes weak and distorted, replace the
batteries.
- The radio will turn off automatically if the batteries
become too weak.
- Check the batteries periodically for leakage. As a
precaution, remove the batteries to prevent possible
leakage if it is to be stored for long periods without
use.
POWER SUPPLY
Batteries insertion
POWER BY AC (For Asia market) Open the AC power cord compartment, pull out the
220V AC cord and plug it into the wall outlet.
USING DC ADAPTER Connect the adaptor, first to the wall outlet, then to
the S-2000 (Assure the unit is turned off).
NOTE:
- Adapter: DC 6V/350mA, negative polarity
- If there's a power failure with the AC or the AC
adaptor and batteries installed, the batteries will
take over and supply power to the radio.
(For Europe market)
~220V AC CORD
S-2000 OPERATION MANUAL
www.tecsunradios.com.au www.tecsunradios.com.au
9
LISTEN TO THE RADIO
Press the POWER button to turn on the radio, select your band by pressing the FM, MW/LW, SW,
or AIR button.
There are three methods to tune in the radio station:
USING TUNING KNOBThe TUNING knob can be used to tune stations. Select FAST or SLOW tuning with the STEP
button, under the tuning knob. FAST/SLOW tuning is shown in the chart below for each band.
If you want to LOCK the tuning knob press the STEP button for about 3 seconds. Do a quick,
short press to unlock it.
FM MW LW SW AIR SSB
FAST 0.1MHz 9/10kHz 9kHz 5kHz 0.025MHz 5kHz
SLOW 0.01MHz 1kHz 1kHz 1kHz 0.001MHz 1kHz/BFO
Note: Be sure to fully extend the telescopic antenna when listening to SW, FM and AIR. The
swivel AM (MW/LW) antenna is located at the top of the radio; swivel it for best AM (MW/LW)
reception.
Quick, short, sequential presses of the / buttons enables tuning up or down frequency. A
longer press engages Auto Tuning. During Auto tuning, the radio scans from one station to the
next, stays on the new station for 5 seconds and then moves on.
To stop Auto Tuning, press any key.
USING / BUTTON TUNING
DIRECT FREQUENCY ENTRY Use this method when the desired frequency of a radio station is known. MW and SW frequencies
are entered in kilohertz (kHz), e.g. 567 kHz or 15100 kHz; FM and AIR frequencies are entered in
megahertz (MHz), e.g. 100.8 MHz, ignoring the decimal point. Use the numeric keypad to enter
the frequency directly.
Note:
- No need to enter decimal point for FM and Air Band when input the frequency numbers. For
example, FM 89.0 MHz, Just ENTER 8 9 0 or FM 104.0 MHz, ENTER 1 0 4 0. (or press 8 9
ENTER, and 1 0 4 ENTER).
- For SW band in between 1711~2999kHz, simply input the frequency number then press ENTER
to confirm. For example, SW 2650kHz, just input 2650 ENTER . If SW frequency in between
3000~29999kHz, just input the numbers directly (no need to press the ENTER button to confirm).
- For any mis-typed number, simply press DELETE button to cancel it.
- will appear on the display, when entering any outbound frequency.
10
STORING FREQUENCIES INTO MEMORY
There are 1000 memories with S-2000. 500 memories fixed within P0 page, and 500 memories
set for other storage space. Please see bellows:
Memory PAGE 0, noted as 'P0', consists of 500 memories, 100 assigned for FM, SW, SSB and
Air Band; 50 memories each assigned for MW and LW.
Memory PAGE 1 -10, noted as 'P1', 'P2', etc., consists of 50 memories per page, 500 memories
total. You can also change the pages within the system setting.
FM
SW
SSB
AIR
MW
LW
P0 (page)
100
100
100
100
50
50
ATS
Storage space in P0 pageBand
Store
10 pages each with 50 memories
20 pages each with 25 memories
25 pages each with 20 memories
50 pages each with 10 memories
(See the system setting chart to
change above pages)
Other storage space
500 MEMORIES
1) ATS (AUTO TUNING STORAGE)
One can automatically store the strongest LW, MW or FM stations into its own Page 0.
Turn on the radio and select the band that you want ATS to take place in, either MW/LW or FM.
Press the MW/LW or FM and release after a "B" sounds. Notice that page 0 (P0) appears in the
display's upper right corner with the presets to the right increasing asthe band is scanned and
frequencies are stored into the memory. It will stop when
ATS finishes with a long "B --" sound and listen to the radio
station stored in P0:01.
Then you can use the TUNING knob or the / buttons
to select and listen to what's stored.
Frequency changing flashing
Note:Some noise-stations and blank-stations may also store into page 0 during ATS process cause by the interference. Please try the ATS again by lower down the telescopic antenna for FM stations or rotate the MW/LW antenna for MW & LW stations or press ANT.ATT. button to lower the ATT. (dB) level.
If the interference is very bad for ATS, please change to manual storage.
2) MANUAL STORAGE
To manually store a frequency into a memory, turn on the radio and tune to a station that you
want to store into memory, then long press the MEMORY button / short press it twice / or
short press it and wait for 3 seconds until a long B sound to confirm it.
www.tecsunradios.com.au www.tecsunradios.com.au
flashing
flashing
11
3) AUTO SCAN (QUICK) STORAGE
- Press and release the VM/VF button with a "B" sound and notice the time shows in the upper
right corner of display.
- Press / buttons for about 2 seconds, a "B" will sound,
and the radio scans from one station to another, staying on
each station for about 5 seconds. Quick press the MEMORY
button with a long "B --" sound to store your desired station
before the frequency running to the next available station.
To stop the scan, press any buttons except the MEMORY
button.
Note: This function is not available for Air Band and SW SSB.
Frequency changing flashing
4) STORE A STAION INTO ANOTHER PAGE
To store a frequency into a memory in another page, first choose the page, then the memory
location and then store the frequency.
- Turn on the radio and tune to your desired station.
- Shortly press the MEMORY button with a "B" sound, note
that PRESET will flash in the right corner of the LCD.
- Shortly press the PAGE button with another "B" sound and
PAGE will flash in the right corner of the LCD.
- While the PAGE is flashing, use the / buttons or turn
the TUNING knob or key in the number of a page to select
the page that you want to store into.
- Press the [MEMORY] button to confirm it with a long "B --" sound (or it will automatically confirm
after 3 seconds with a long "B --" sound.)
PAGE changing
12
LISTENING TO WHAT'S STORED
- Turn on the radio and go to the correct page by pressing PAGE and entering it with the numeric
keypad or using the TUNING knob or / button.
- Press and release the VM/VF button with a "BB" sound and
notice that the PAGE and PRESET show in the display's
upper right corner.
- To go from one memory to another give a quick, short press
to either the / button, or rotate the TUNING knob.
- To auto-scan memory press one of the / buttons for
about 2 seconds with a "B" sound and notice that
flashes in the upper right corner. The radio scans from one
memory to another, staying on each memory for about 5
seconds. To stop the scan, short press any button with a
"B" sound.
To go to a memory you already know, direct key in two digits of the memory location.
NOTE:
1. There is no auto-scan memory function in AIR and SW SSB band.
2. If the page is 50, only key in 1-9 of the memory location.
3. When " - - - - " appeared in the display with a "BB" sound after you key in a number of the
memory, means there is nothing stored.
4. When " " appeared with a long "B" sound, means the number keying in excess.
PAGE / PRESET
PRESET changing flashing
AIRAuto Sorting memory
Utilize the AIR button to automatically sort stored stations [ . This function is able to:1. Clearing up duplicate stations. Especially useful after storing stations manually, as you might sometimes store a station more than once.2. Auto- sorting the sequence of stored stations. -- In page P0, select your desired band to find all stored stations in sequence of frequency (from small to large). -- In page 01-XX (10/20/25/50 pages), all stored stations are placed in sequence of (from small to large), and in sequence of FM, SW, MW, Air band, LW.
How to operate the Auto Sorting memory function:In radio-off mode, to auto sort the memory from page to page, press and hold the [ ] button for 2 seconds until the memory page number in the upper right corner starts running.
[ ] ]
frequency
New added function – Sorting all stored station memories automatically
www.tecsunradios.com.au www.tecsunradios.com.au
flashing
flashing
13
DELETE MEMORY
DELETE PRESET MEMORY
- Turn on the radio and press the VM/VF button with a "BB"
sound, causing PAGE and PRESET to appear in the display's
upper right corner.
- Use the numeric keypad, the TUNING knob or the up/down
buttons ( / ) to select the memory that you want to delete.
- To delete the memory press the DELETE button for about
1 second and release after a "B" sound, note that the PRESET
and are blinking on the display. Then quickly short press
the DELETE button again to confirm with a long "B" sounds.
If you do not press DELETE to confirm in 3 seconds while the
PRESET and are blinking, the deleting process will be quitted.
PAGE / PRESET
DELETE A MEMORY PAGE
- Turn on the radio and select the page that you want to delete by pressing PAGE with a "B"
sound, note that page flashes in the display's upper right. While it's flashing use the numeric
keypad, the TUNING knob or the up or down buttons ( ) to select the page that you/
wish to delete.
- Press and release the VM/VF button with a "BB" sound, so that PAGE and PRESET appear
in the display's upper right corner.
If " - - " appears above PRESET in the display's upper right corner, the page is already
deleted and you don't have to continue.
- Press DELETE for about 3 seconds with a "BB" sound or until
PAGE is blinking, then press DELETE again with a long
"B --" sound. If you do not press DELETE to confirm in 3
seconds while the PAGE and are blinking, it will exist
the process, memory will not be deleted.
QUICK DELETE WITH AUTO SCAN
- Press and release the VM/VF button with a "BB" sound and notice the PAGE and PRESET
appear in the upper right corner of display.
- To auto scan memory, press one of the / buttons for about
2 seconds with a "B" sound. The radio scans from one memory
to another, staying on each memory for about 5 seconds. To
delete the memory give the DELETE button a quick, short press
(shows on the display) and a long "B--" sounds. QUICK DELETE
14
CLOCK SETTING
The clock shows in the center of the LCD when the radio is off.
The clock shows in the upper right corner of the LCD when the radio is on.
The TECSUN S-2000's clock is in 24-hour format and can be set with the radio on or off. When the radio is turned off, the clock shows in mid-display. When the radio is turned on, the clock shows in the upper right corner of the LCD display.
To set the clock:
Press the TIME button for about a second with a "B" sound until you see the hour flashing.
1. While it's flashing turn the TUNING knob to set it to the
correct hour, then press TIME again with a "BB" sound
to confirm and note that the minutes are flashing. Turn
the TUNING knob to set it to the correct minutes; then
press TIME with a long "B" sound to confirm.
2. Another way to set the clock is by direct enter hour and
minutes with numbers.
(For example, 14:50pm, just enter 1 4 5 0)
Note:
1. After setting the hour or minutes you can simply let the
flashing number time-out, without pressing the TIME
button to confirm the setting.
2. You can also use the buttons to adjust the hour /
and minute instead of using the TUNING knob.
flashing
flashing
ALARM SETTING
There are two independently programmable alarm timers (TIMER A or TIMER B ON/OFF) to
turn it on and off at a specified time.
To set an alarm:
1. Turn off the radio and press the TIMER A or B ON/OFF
button with a "B" sound or until you see the alarm hour
flashing in the upper right corner of the display. While
it's flashing adjust the hour with the TUNING knob and
press the TIMER A or B ON/OFF button with a "BB"
sound and notice that the alarm minutes are flashing.
flashing
2. While it's flashing, adjust the alarm minutes with the
TUNING knob and press the TIMER A or B ON/OFF
button with another "BB" sound and notice the sleep
timer flashing in the box at the top of the display.
SLEEP
flashing
www.tecsunradios.com.au www.tecsunradios.com.au
15
3. While it's flashing, adjust the time that the radio is to play (1~90 minutes) with the TUNING
knob and press the TIMER A or B ON/OFF button with a long "B--"sound or simply let the
flashing number time-out to confirm it automatically.
After the alarm setting, it will auto start the alarm by radio
note that " " appears on the display.
Note:
You can also use the up or down ( / ) buttons to adjust the hour and minute or direct key in
hour and minute instead of the TUNING knob.
To activate the alarm by radio
SELECT ALARM BY RADIO OR BY BUZZER
The TECSUN S-2000 has two alarm modes, alarm by radio
or by buzzer.
1. To activate the alarm by radio, press TIMER A or B ON/OFF
once with a "B" sound and notice that the " " symbol shows
up in the TIMER A or B display section.
2. To activate the alarm by buzzer, press again the TIMER A or B
ON/OFF with a "BB" sound and notice that the " " symbol
appears in the TIMER A or B display section.
3. Press again the TIMER A or B ON/OFF button with a long "B--"
sound and notice nothing appears in the TIMER A or B display
section to turn off the alarm.
To activate the alarm by radio
To activate the alarm by buzzer
Note:
1. Once the alarm is activated, no matter whether the radio is on or off, the alarm will force to
listen to the station that stored in TIMER A or TIMER B, or to make a sequential sound by the
buzzer, and turn off the radio in the time presetting in TIMER A or TIMER B.
2. In "Timer A" or "Timer B" section:
" " Means timer is set by radio
" " Means timer is set by buzzer.
" " Means Timer is off.
TO TURN OFF THE ALARM
Once the alarm is on by radio or buzzer, only the POWER, SLEEP, LIGHT/SNOOZE, and RESET
buttons can be operated. Press the POWER or SLEEP buttons to turn off the alarm.
flashing
16
flashing
Note:
If there is no station stored into TIMER A or TIMER B or the station being stored is out, noises
will be heard when the alarm is activated by radio.
STORING A STATION TO TIMER A OR TIMER B
- Turn on the radio and tune to a station that you want to store into
TIMER A or B.
- Long press TIMER A or B ON/OFF button with a "B" sound, note
that " " will flash in the top of the display and then stays in
section TIMER A or B.
SNOOZE
When the alarm is activated, press the SNOOZE button to
temporarily deactivate the timer for 10 minutes, notice that
" " or " " is blinking on the display before the alarm is
activated again. You allow to use 3 times of the SNOOZE
function within the alarm period, after that you can turn off
the alarm by press it again and " " or " " stays.
flashing
" " or " "
the display when snooze is on.
is blinking on
SLEEP TIMER
The sleep timer enables the TECSUN S-2000 to play any length of play time from 1-120 minutes
and then turn off automatically.
To turn on the sleep timer, press the SLEEP button under the
POWER button. Notice that the number of minutes to play
appears in the display, then you can either rotate the TUNING
knob or press / buttons or keep pressing the SLEEP
button to adjust your desired sleep timer. Press again the
SLEEP button or just leave it for about 3 seconds with a long
"B -- " sound to confirm your setting.
www.tecsunradios.com.au www.tecsunradios.com.au
17
USING THE LIGHT BUTTON
A quick press of the LIGHT button which gives about 3 seconds of illumination to the SIGNAL
strength indicator and the display. A long press lights these for as long as the radio is turned on,
so be careful if you're operating on batteries, because it will make them drain faster. If your AC
adapter is connected, it's fine to keep the light on while the radio plays. To turn off it by short
pressing the LIGHT button again.
BW (BANDWIDTH) BUTTON
Use the BANDWIDTH button to choose wide or narrow
selectivity, which is shown in the lower right corner of the
display as WIDE or NARROW. This may help reduce
interference on some frequencies. Using WIDE usually
results in better audio fidelity, while using narrow limits the
audio fidelity somewhat. You can use it in FM, MW, LW,
SW and SW SSB band.
NARROW bandwidth
WIDE bandwidth
FM ST. (FM STEREO) BUTTON
Press the FM ST. button when in the FM band to take the radio
in or out of stereo reception mode. When it's in stereo mode,
STEREO appears under the left side of the frequency in the
display, next to FM. As long as you are not using headphones
or earphones, it can be left in mono mode. Stereo shows
SW METER BAND SELECTION
There are three ways to select SW meter band:
1. A sequence of short press of SW button, a digit of meter band
with [mb] flashes on the top right corner of the display and the
lowest frequency of the meter band shows in the center of the
display.
2. Short press the SW button, notice that the meter band flashes on the top right corner of the
display and then use the / buttons to select your desired meter.
3. Short press the SW button, notice that the meter band flashes on the top right corner of the
display and then directly input the number of meter band, press again the SW button to confirm.
For example, when it is in SW band, key in number 19, it goes to 19 meter band note that 19 mb
is on the top right corner of the display and 15000 kHz shows in the center.
Note:
It goes to the lowest frequency of each meter band after your selection.
Meter band shows
18
LOCK THE TUNING KNOB
TUNING STEP
RESET BUTTON
When you use the TUNING knob and the / buttons to tune in stations you can select
FAST/SLOW tuning with the STEP button under the tuning knob. Short press the STEP button
with a "B" sound, the tuning step goes SLOW " "; short press the STEP button again with a
"BB" sound, the tuning step goes FAST " ".
FAST/SLOW tuning is shown in the chart below for each band.
FM
MW
LW
SW
STEP
AIR
(FAST) (SLOW)
0.1 MHz
9 /10kHz
9 kHz
5 kHz
0.025MHz
TUNING
1MHz
100kHz
0.1MHz
100kHz
100kHz
0.01 MHz
1kHz
1 kHz
1 kHz
0.001MHz
0.1MHz
9 /10kHz
0.025MHz
9kHz
5kHz
BAND TUNING
STEP button
If you want to LOCK the TUNING knob, press the STEP
button for about 3 seconds with a long "B--" sound, note
that " " shows on the display followed " " or " ".
Press again the STEP button with a "B" sound to unlock
it and notice that " " disappears. " " shows on the display
The reset button is located in the left under the TUNING knob. Press it only when the radio seems
to stop functioning properly to reboot the unit.
SSB (SINGLE SIDE BAND) TUNING
SSB enables listening to shortwave two way communications using the single sideband mode
such as amateur radio, Morse code, Weather-fax transmissions and other signals often referred
to as 'utility' signals.
To use the SSB control, turn on the TECSUN S-2000 and go into Short-wave. Press the SSB
button with a "B" sound and notice that USB appears in the display, to the right of SW.
Press the SSB button again with a "BB" sound and notice that LSB appears to the right of SW.
Press the SSB button with a long "B--" sound, it goes to AM mode and USB or LSB disappears.
USB is the abbreviation for Upper Sideband; LSB is the abbreviation for Lower Sideband. You
can now direct key in the SSB frequency you know to tune in
signals. Also notice that on the lower right front of the radio is
a control knob labeled SSB BFO. BFO stands for Beat
Frequency Oscillator. This control knob is used to fine tune
a sideband signal frequency. USB or LSB shows
www.tecsunradios.com.au www.tecsunradios.com.au
19
455kHZ AM IF OUTLET
LINE OUT SOCKETS
LINE-IN SOCKET
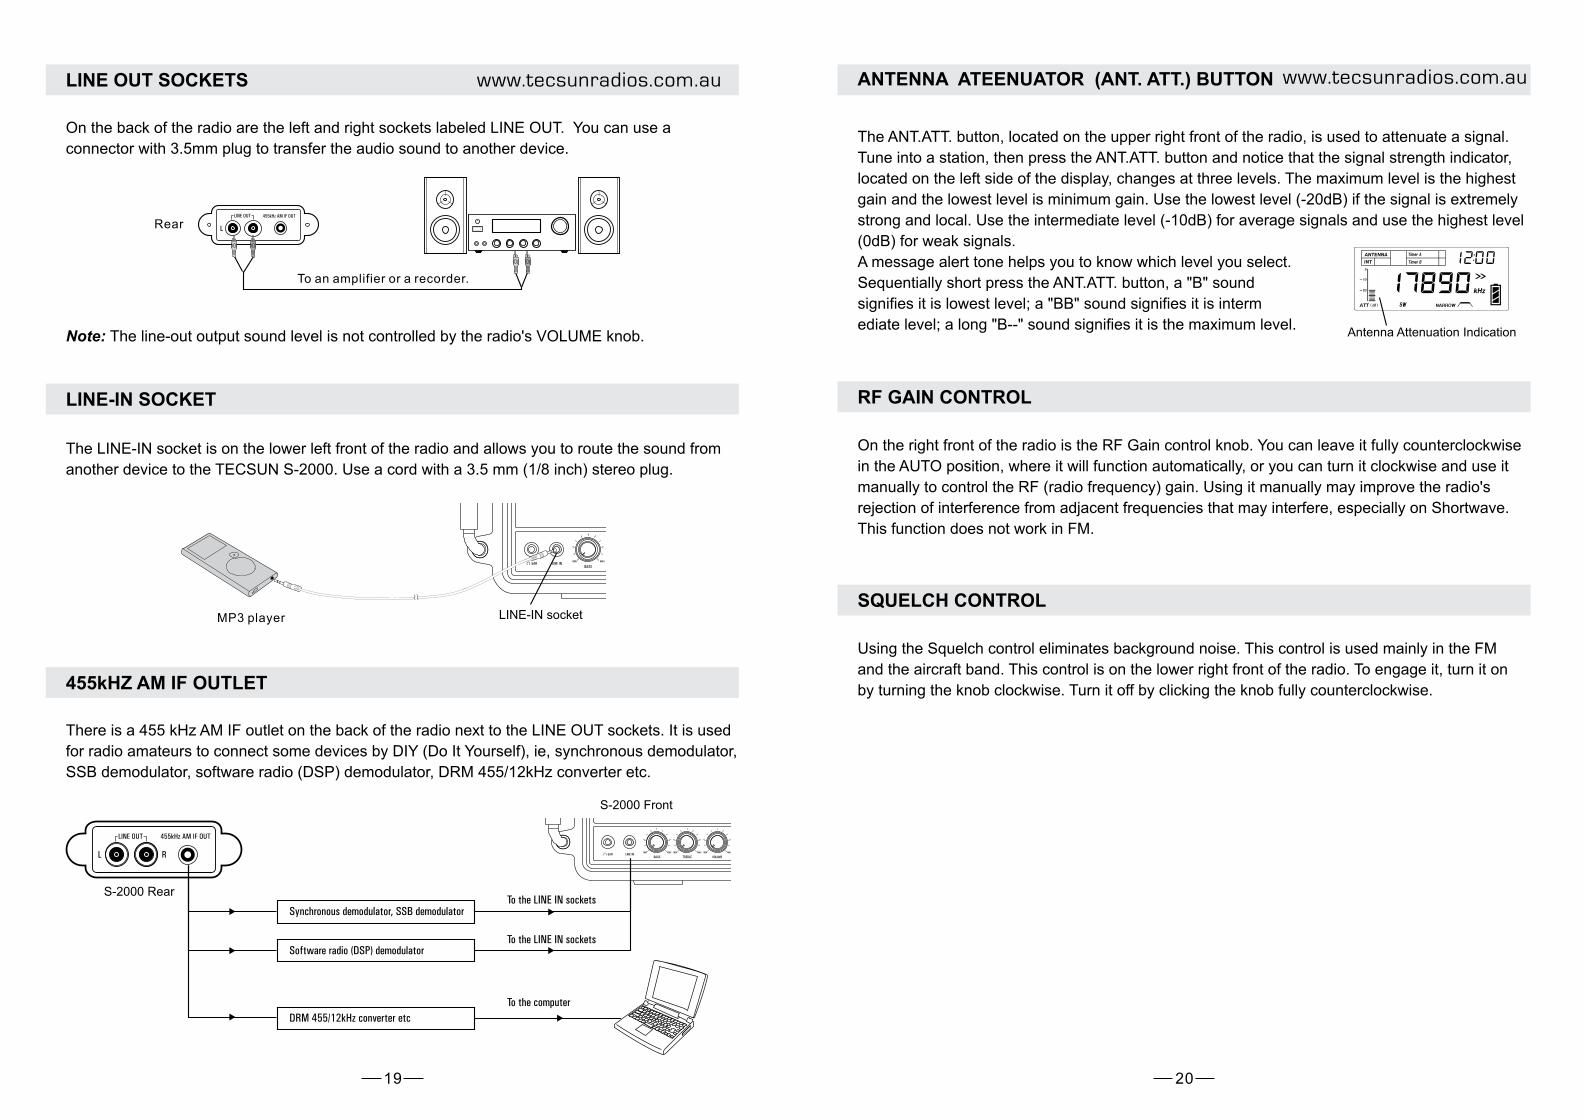
On the back of the radio are the left and right sockets labeled LINE OUT. You can use a
connector with 3.5mm plug to transfer the audio sound to another device.
Note: The line-out output sound level is not controlled by the radio's VOLUME knob.
L Rear
To an amplifier or a recorder.
The LINE-IN socket is on the lower left front of the radio and allows you to route the sound from
another device to the TECSUN S-2000. Use a cord with a 3.5 mm (1/8 inch) stereo plug.
MP3 player LINE-IN socket
There is a 455 kHz AM IF outlet on the back of the radio next to the LINE OUT sockets. It is used
for radio amateurs to connect some devices by DIY (Do It Yourself), ie, synchronous demodulator,
SSB demodulator, software radio (DSP) demodulator, DRM 455/12kHz converter etc.
L R
S-2000 Front
S-2000 Rear
Synchronous demodulator, SSB demodulatorTo the LINE IN sockets
To the LINE IN socketsSoftware radio (DSP) demodulator
DRM 455/12kHz converter etc
To the computer
20
ANTENNA ATEENUATOR (ANT. ATT.) BUTTON
The ANT.ATT. button, located on the upper right front of the radio, is used to attenuate a signal.
Tune into a station, then press the ANT.ATT. button and notice that the signal strength indicator,
located on the left side of the display, changes at three levels. The maximum level is the highest
gain and the lowest level is minimum gain. Use the lowest level (-20dB) if the signal is extremely
strong and local. Use the intermediate level (-10dB) for average signals and use the highest level
(0dB) for weak signals.
A message alert tone helps you to know which level you select.
Sequentially short press the ANT.ATT. button, a "B" sound
signifies it is lowest level; a "BB" sound signifies it is interm
ediate level; a long "B--" sound signifies it is the maximum level.Antenna Attenuation Indication
RF GAIN CONTROL
On the right front of the radio is the RF Gain control knob. You can leave it fully counterclockwise
in the AUTO position, where it will function automatically, or you can turn it clockwise and use it
manually to control the RF (radio frequency) gain. Using it manually may improve the radio's
rejection of interference from adjacent frequencies that may interfere, especially on Shortwave.
This function does not work in FM.
SQUELCH CONTROL
Using the Squelch control eliminates background noise. This control is used mainly in the FM
and the aircraft band. This control is on the lower right front of the radio. To engage it, turn it on
by turning the knob clockwise. Turn it off by clicking the knob fully counterclockwise.
www.tecsunradios.com.au www.tecsunradios.com.au
21
EXTERNAL ANTENNA SOCKETS
The external antenna sockets are used to connect the TECSUN S-2000 to advanced performance
antennas.
FOR MW/LW
On the rotated AM antenna, at the top of radio, is a socket for 50 or 75 Ohm plug-in AM antenna.
A loop antenna or an antenna tuner can be connected to the radio to improve the reception of
MW/LW.
ATT. TUNE
LINE OUT
L R
Connect to external AM antennaExternal ring type AM antenna AM antenna tuner
NOTE: it will cut off the internal AM antenna when an external AM antenna is connected.
FOR FM/SW
On the right side of the radio are the 50 Ohm BNC sockets for FM and Shortwave. 50 or 75 Ohm
coaxial cable can be used to feed the properly designed antenna.
There is also a black and red socket, labeled 500 Ohms, designed to work with a high impedance
Shortwave Antenna, 500 Ohms, such as a long wire antenna. Plug a long piece of wire, 10 to 35
meters or 30 to 100 feet, into the red socket and position it above ground, running in as much a
straight line as possible, not touching any other metal objects. If you do this indoors, position the
wire as close to windows as possible. Plug a 10 to 20 meter or 30 to 60 feet wire into the black
socket and let it run on the floor or ground. Or attach the black socket to a cold water pipe with as
short a piece of wire as possible.
When using external sockets, select EXT. ANT. with the selector switch on the right side of the radio.
When using the internal antennas of the radio, switch it to INT. ANT.
WARNING:
Always unplug all antennas that are mounted outside when a lightning storm is predicted.
EXT ANT.
INT. ANT.
50
500
SWANT.
FM
ANT.
SWANT.
50 ohm FM external antenna
INT. ANT. :Use of internal telescopic antenna
EXT. ANT.:Use of external antenna
GND
INT./EXT. antenna select switch
50 ohm SW external antenna
500 ohm high-impedance external SW antenna
Right side
22
SYSTEM CODE SETTING
To enter different system codes turn off the radio and perform a quick, short press of the ENTER
button with a "B" sound. " " appears on the upper right corner of the display. Enter the
system code as below, then push ENTER to confirm the system code while a long "B--" sounds.
CODE For memory page setting (500 memories)
00 * 10 pages; each page 50 memories
20 20 pages; each page 25 memories
25 25 pages; each page 20 memories
50 50 pages; each page 10 memories
Step (MW)
09 * 9 kHz
10 10 kHz (North America)
Type of batteries
29 * Normal D size batteries (1.5V each battery)
28 Rechargeable batteries (1.2V each battery)
FM frequency range
76 76-108 MHz (Japan)
87 * 87-108 MHz
88 87.5-108 MHz(North America)
Note: " * " means default setting by the manufacturer.
CHECK THE SYSTEM CODE SETTING
Turn off the radio and long press the ENTER button for about 3 seconds, the system settings
show in the display in sequence as "Memory page setting Step (MW) FM frequency range
Time setting and the frequency designated of Timer A and Timer B Type of batteries".
www.tecsunradios.com.au www.tecsunradios.com.au
23
TROUBLESHOOTING
PROBLEM PROBABLE CAUSE SOLUTION
Can't turn on the radio
or no display or light.
(A) Power connection.
(B) Batteries are discharged
or not installed for portable
operation, no AC power.
(A) Check power supply cables.
(B) Check/re-install batteries for
portable operation.
The radio auto turns off
while listening.
(A) Batteries are discharged.
(B) Activate the alarm by radio.
(C) Sleep time is over.
(A) Check/re-install batteries.
(B) Turn on the radio again.
(C) Turn on the radio again.
Noises or nothing
stored into memory
when ATS.
(A) The signal is too weak.
(B) Strong interference nearby.
(A) Manually tuning or direct key
in frequency.
(B) Use the ANT.ATT or shorten
the telescope antenna, then
ATS.
No reception when
using external antenna.
The antenna selection switch
is on INT. ANT.
Switch it to EXT. ANT. position.
Only noises is heard
when alarm by radio.
There is no station stored into
TIMER A or TIMER B or the
station is sleep when alarm by
radio.
Store a station into TIMER A or
TIMER B.
No stereo when using
earphones.
(A) FM signal is too weak.
(B) FM ST. is set to MONO.
(C) The broadcast is MONO.
(A) Try to change the antenna's
direction and its length, or use
an external antenna.
(B) Set the FM ST. to stereo.
No function. The MCU is in accident. Use the RESET button to reboot
the unit.
Selectivity
FM Stereo crosstalk
IF Frequency
24
SPECIFICATIONS
Frequency range
LW
MW
SW
AIR
FM
100-519kHz
522-1620kHz ----------------- system code "09"
520-1710 kHz (America) -- system code "10"
1711-29999kHz
118-137MHz
87-108MHz
76-108MHz (Japan)
87.5-108MHz (America)
Sensitivity
LW (S/N=26dB)
MW (S/N=26dB)
SW (S/N=26dB)
SSB (S/N=10dB)
AIR (S/N=10dB)
FM (S/N=30dB)
Less than 3mV/m
Less than 0.35mV/m
Less than 18μV
Less than 1μV
Less than 5μV
Less than 3μV
AM Wideband ±10kHz, Greater than 40dB
Narrowband ±5kHz, Greater than 60dB
Better than 30dB
Signal to Noise Ratio
MW
SW
FM
Greater than 45dB
Greater than 50dB
Greater than 60dB
SSB, AM: 1st IF : 55.845MHz
2nd IF: 455kHz
FM: 1st IF: 10.7MHz (Single Conversion)
Image Rejection
MW/LW/SW
AIR
FM
55.845MHz: Greater than 90dB
455kHz: Greater than 80dB
Greater than 90dB
Greater than 60dB
IF Rejection
AM
FM
55.845MHz: Greater than 60dB
455kHz: Greater than 60dB
10.7MHz: Greater than 100dB
www.tecsunradios.com.au www.tecsunradios.com.au
25
AGC Performance AGC range: Wider than 80dB
Threshold : 12μV
RF GAIN 20dB
Antenna Attenuation Three levels: 0dB,-10dB,-20dB
Internal Antennal 1200mm telescoping whip (for use on FM, AIR, SW and SSB
bands)
lFerrite rod antenna φ10X120mm(HQ) (for use from 100kHz
through 1800kHz)
External Antenna
InputFM
SW
50Ω (BNC type)AIR
50Ω (BNC type), 500Ω
IF: 455kHz
Signals output greater than 60mV when input greater than 3μV
IF Output
Line Audio Outputs Stereo left and right 300Mv, 4.7kΩ for each output.
Earphone Jack φ3.5mm, 8~32Ω, stereo type
Internal Speaker 8Ω / 2W, φ100mm
Power supply
DC 6V / 350mA, negative polarity
Outside diameter: φ5.5mm,Core diameter: φ2mm
DC Jack
Batteries : D size, UM1 (alkaline) x 4
AC ~220V/50Hz (AC power cord included for Asia market)
Rated Current 350mA
(Output 650mW, Distortion less than 1%)
Maximum Current less than500mA
(Output 1500mW)
Current Consumption
Quiescent Current
Standby Current less than 85uA
FM less than 70mA
MW less than 80mA
SW less than 90mA
SSB less than 95mA
Dynamic Current
o o-5 C to +50 C
Operating
Temperature
Size
Weight 2.7kg (batteries NOT included)
372 (W) X 183 (H) X 153 (D) mm (front handle included)
(DC adaptor included for Europe market)
26
MESSAGE ALERT STATUS
LIGHT/SNOOZE
TIME
TIMER A (B)
B
BB
BB
BB
B
B
BB
B-- Light On/Off
SLEEP
B
BB
BB
BB
B
USB - Upper Side Band
LSB - Side BandLower
AM
SSB
B
BB
BWNARROW
WIDE
“ ” appears
B
FM ST.
MONO.
STEREO
Delete Digits DEL ETE Every time B Delete a digit.
B
BB
MEMORY
B
BB
Delete one
memory or a
memory page
DEL ETE
FUNCTION BUTTON OPERATION TONE DISPLAY
Light temporarily
Light always
Light off
Light for 3 seconds.
Light until no power.
Turn off the light.
B--
Time setting
Hour adjusting
Minute adjusting
Confirm or Auto confirm
Alarm setting
Alarm hour adjusting
Alarm minute adjusting
Playing time adjusting
Confirm or Auto confirm
Activate radio alarm
Activate buzzer alarm
Deactivate the alarm
B--
Hour flashes
Minute flashes
Playing time, “√” and ” “ flash
“ ” appears
“ ” appears
Both “ ” and ” “ display
Hour flashes
Minute flashes
Nothing flashes
B--
Bandwidth
B--
SSB Signal
Listening*
FM stereo “ ” is on when a stereobroadcast is received
Start to delete one memory
Start to delete a memory page
Confirm deleting
PRESET and flash“ ”
PAGE and flash“ ”
Deleting finished.
Store a frequency
into memory
Storing
Confirm or auto confirm
PRESET flashes in the upper right corner.
PRESET flashes in the upper right corner.
PRESET stays.
Quick store MEMORY During the auto tuning, everystoring.
B
“ ” appears
“ ” appears
“ ” appears
Both“ ” and “ ” display
“ ” is not on
www.tecsunradios.com.au www.tecsunradios.com.au
27
MESSAGE ALERT STATUS
ETEER
B
BB
B
B-- Confirm or system
setting
B
Go inSW,
TUNING knob,
UP/DOWN
B
B
FUNCTION BUTTON OPERATION TONE DISPLAY
B--
ATS(Auto tuning
storage)
BB
BMW/LW band
selection
Go in/out the
range of a meter
band Time displays in the upper right corner
AIR band selectionAIR appears and a AIR frequencydisplays
Every operation
An error occurred
Complete the system code setting
B--
Start or finish its operation.
” “ appears
MW/LWFM
To start
Stop ATS by pressing any key
End of ATS
Frequency and PRESET changed
Frequency stays
P0:01 shows in the upper right corner and its frequency displays
FM band selection” “ displays
appears and a FM frequencyFM FM B
MW/LWMW
LW
” “ appears and a MW frequency
displays
” “ displays
appears and a LW frequency
BSW band selection SW
SW
Select a SW meter band
” “ appears and a MW frequency
displays
A meter band flashes in the upper right corner
B
Go out
A meter band flashes in the upper right corner
AIR AIR
Tuning step and
lockSTEP/LOCK
Slow tuning
Fast tuning
Lock the tuning konb
Unlock
B
BB
B--
B
“ “ is on
“ “ is on
Auto scaning UP/DOWN
Start scaning
Stop scaning by pressing any key
B
BB
Auto-scan memory
Start auto-scan
Stop scaning by pressing any key
B
BBUP/DOWN
“ “ appears
“ “ disappears
“ “ flashes and frequency changed
“ “ and the frequency stay
“ “ flashes and the memory
number changes
“ “ and the memory number stay
28
MESSAGE ALERT STATUS
Mode alternation frequency and memory
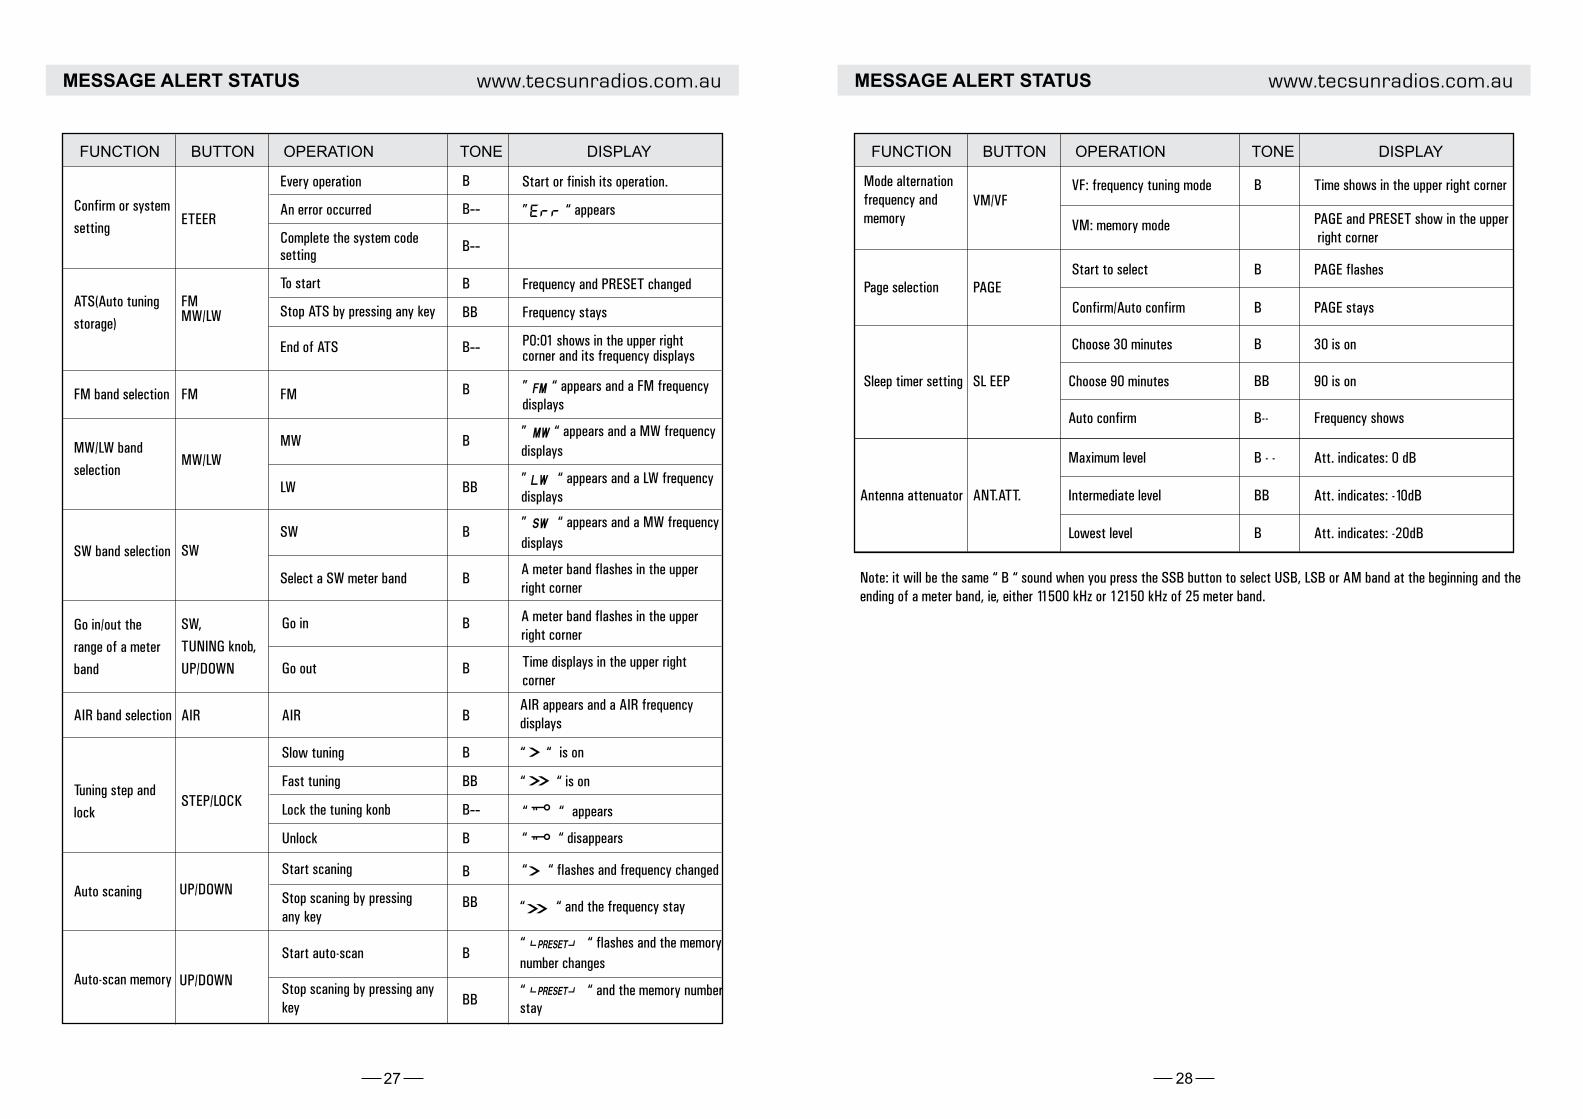
FUNCTION BUTTON OPERATION TONE DISPLAY
Page selection PAGE
VM/VFTime shows in the upper right cornerBVF: frequency tuning mode
VM: memory mode PAGE and PRESET show in the upper right corner
Start to select B
Confirm/Auto confirm B
PAGE flashes
PAGE stays
Sleep timer setting SL EEP
Choose 30 minutes 30 is on
Choose 90 minutes 90 is on
Auto confirm
B
BB
B-- Frequency shows
Antenna attenuator ANT.ATT.
Maximum level B - - Att. indicates: 0 dB
Intermediate level BB Att. indicates: -10dB
Lowest level B Att. indicates: -20dB
Note: it will be the same “ B “ sound when you press the SSB button to select USB, LSB or AM band at the beginning and the ending of a meter band, ie, either 11500 kHz or 12150 kHz of 25 meter band.
www.tecsunradios.com.au www.tecsunradios.com.au