6 unique handmade jewelry making - beaded …beadedjewelryart.com/wp-content/uploads/6-unique...make...
TRANSCRIPT

6 Unique Handmade Jewelry Making
Ideas by Poli Ness

All Rights Reserved. No part of this publication may be reproduced in any form or by
any means, including scanning, photocopying, or otherwise without prior written
permission of the copyright holder. Copyright © 2012

Table of Contents
1. Free Gift
2. Introduction
3. Few Words About Seed Beads
4. TUTORIAL 1: Earrings "Grape Clusters"
5. TUTORIAL 2: Bracelet "Wet Asphalt”
6. TUTORIAL 3: Earrings "Summer Tune"
7. TUTORIAL 4: Earrings for any Occasion
8. TUTORIAL 5: Necklace Ogalala Lace
9. TUTORIAL 6: Tubular Earrings
10. Few Words from the Author
11. Make Money from Your Craft
12. My Other Books
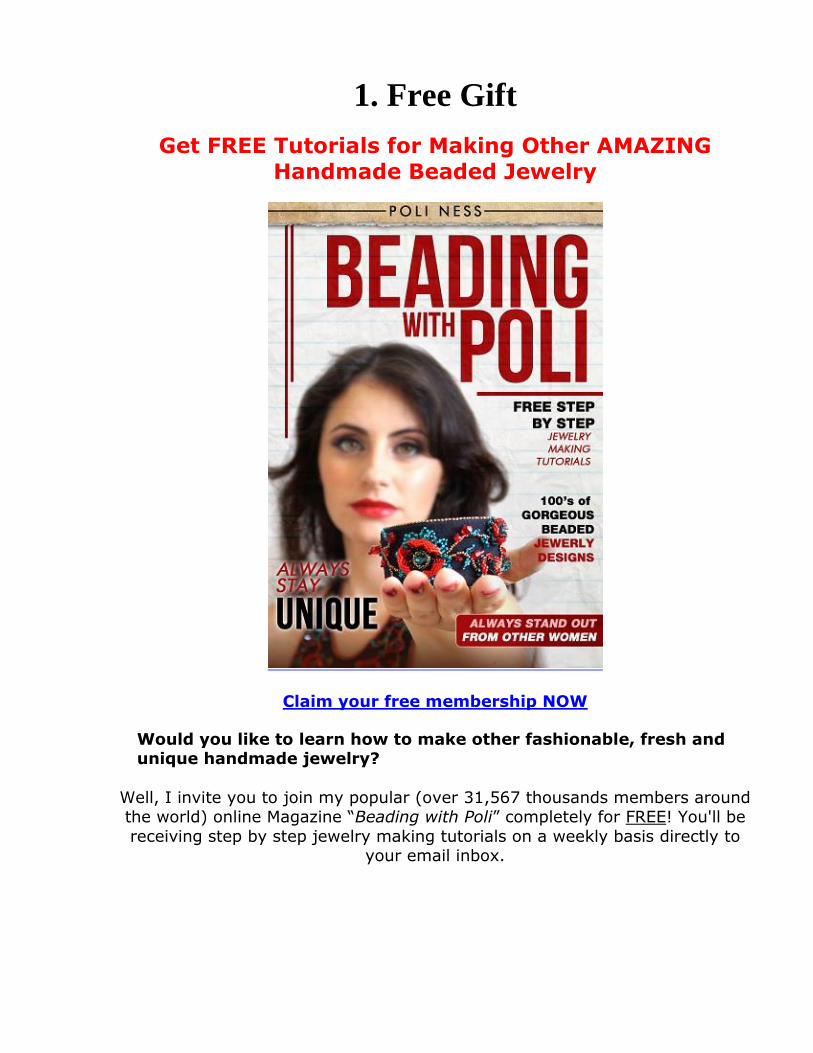
1. Free Gift
Get FREE Tutorials for Making Other AMAZING
Handmade Beaded Jewelry
Claim your free membership NOW
Would you like to learn how to make other fashionable, fresh and unique handmade jewelry?
Well, I invite you to join my popular (over 31,567 thousands members around the world) online Magazine “Beading with Poli” completely for FREE! You'll be
receiving step by step jewelry making tutorials on a weekly basis directly to your email inbox.

2. Introduction
Do you want to look attractive, stylish and unique? Nowadays fashion magazines set new trends literally on everything: shoes, clothes, accessories,
jewelry. It’s not surprising that jewelry, made of seed beads, has recently become very popular.
Variety of colors, fancy forms and different textures, which you can match and
mix, will turn jewelry into masterpiece. But you will be mistaken if you think that beading with seed beads is a diligent and laborious work. There are a lot of
various techniques and simple methods available to create fabulous jewelry with seed beads.
These items of craft work will always look unique and glamorous, and what's more important they will be made by your own hands. You will be able to
create your unique jewelry, which will complete your outfit with its distinctive and glamorous design.
In this tutorial you will find comprehensible schemes, used by seed bead
jewelry designers in making simple and sophisticated items. We will explore these schemes on example of a particular jewelry item. You will then apply
these techniques while making your own items according to your fantasy and style.
You will also find photos of items and schemes with detailed instructions and
explanation how to make one or another jewelry item. Further to the above, each item has full description of materials used for beading of this item.

3. Few Words About Seed Beads
To make a new item you will need seed beads of particular size, thread or nylon thread, a needle, scissors, other findings (such as rings, clasps) and
some other instruments.
It is important to use seed beads of the sizes, described in the tutorial, for each
jewelry item. Choosing the set of colors is up to you, however. Sizes and colors are often specified on the package.
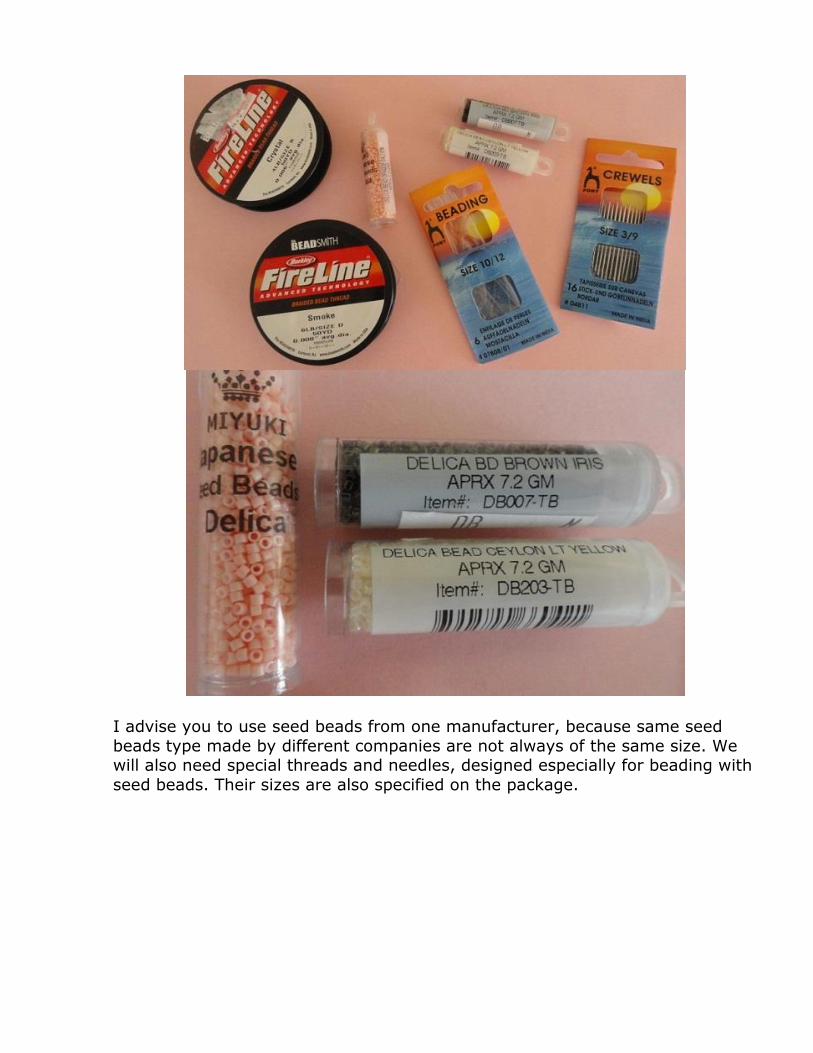
I advise you to use seed beads from one manufacturer, because same seed
beads type made by different companies are not always of the same size. We will also need special threads and needles, designed especially for beading with
seed beads. Their sizes are also specified on the package.

Other instruments and equipment, which you will need for making a particular
item, will be mentioned in each tutorial. You can purchase all the needed instruments and equipment at specialized beading stores. In case you either
face difficulties in finding such stores near you or you just prefer to order everything you need directly from the Internet, I've got a very convenient
solution for you. Instead of running around the city for finding all the required tools, I’ve provided you with an option to get all the necessary equipment
directly from suppliers whom I consistently order from.
This way you won’t only save your valuable time but you will also get the best
prices as well as high quality tools, which is very important for our kind of job. So don’t repeat my mistakes; don’t go and buy the cheapest tools and
equipment out there! It doesn’t worth it; believe me. I know exactly what I’m talking about since I went through it in the beginning of my designing career!
Invest one time in quality equipment and you’ll be able to use it literally for decades over and over again.
Anyway, in the end of the day, this is your choise which tools and equipment to
use and where to get them from. Go for whichever option you feel is the best for you. I just give you here an alternative way, which I wish somebody could
provide me with when I started.
Good luck!
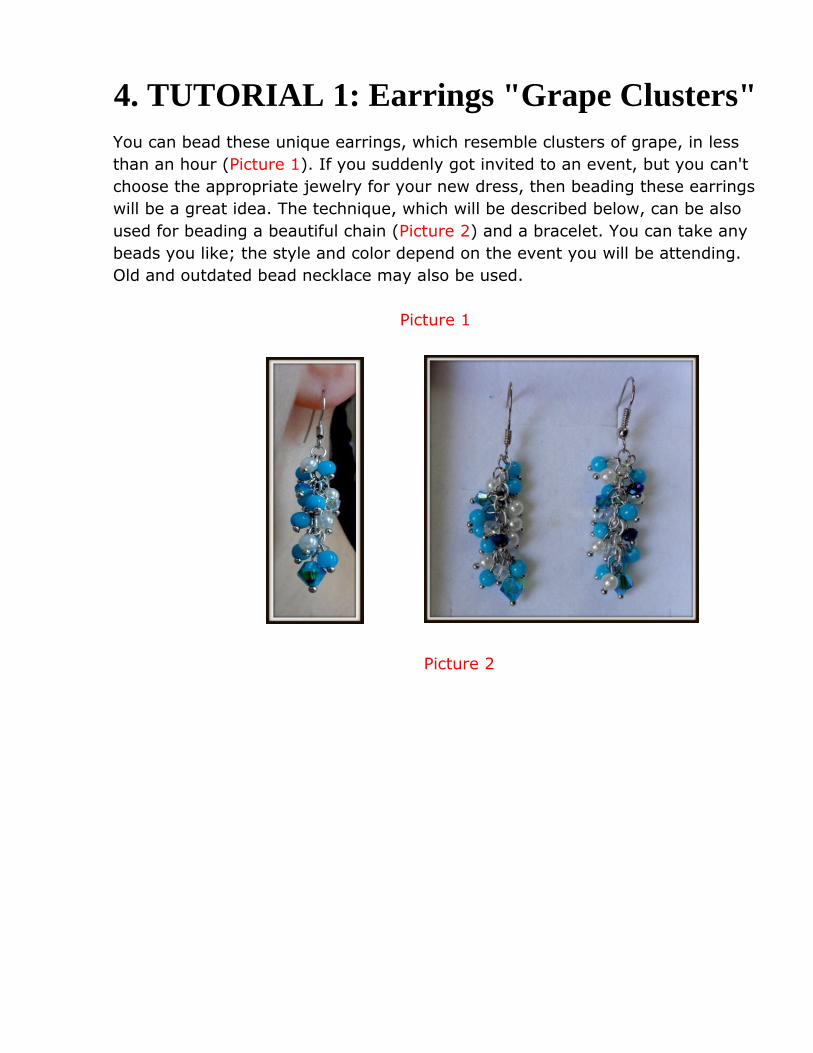
4. TUTORIAL 1: Earrings "Grape Clusters"
You can bead these unique earrings, which resemble clusters of grape, in less
than an hour (Picture 1). If you suddenly got invited to an event, but you can't
choose the appropriate jewelry for your new dress, then beading these earrings
will be a great idea. The technique, which will be described below, can be also
used for beading a beautiful chain (Picture 2) and a bracelet. You can take any
beads you like; the style and color depend on the event you will be attending.
Old and outdated bead necklace may also be used.
Picture 1
Picture 2
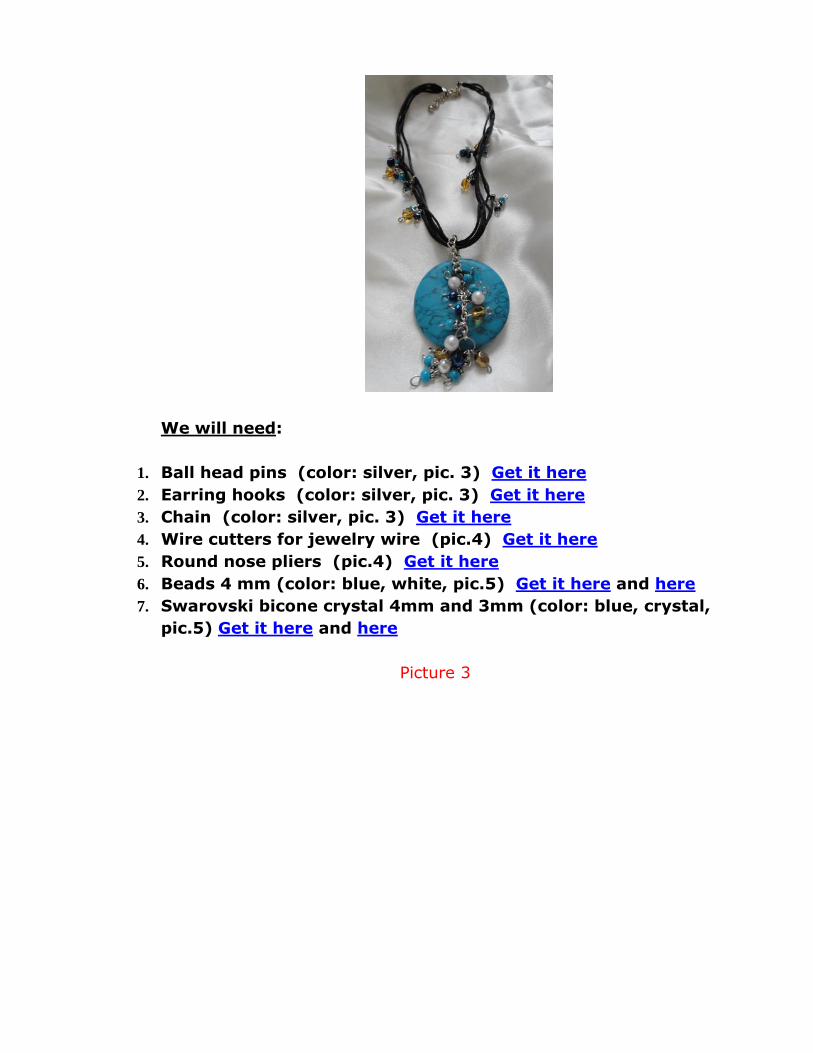
We will need:
1. Ball head pins (color: silver, pic. 3) Get it here
2. Earring hooks (color: silver, pic. 3) Get it here
3. Chain (color: silver, pic. 3) Get it here
4. Wire cutters for jewelry wire (pic.4) Get it here
5. Round nose pliers (pic.4) Get it here
6. Beads 4 mm (color: blue, white, pic.5) Get it here and here
7. Swarovski bicone crystal 4mm and 3mm (color: blue, crystal,
pic.5) Get it here and here
Picture 3
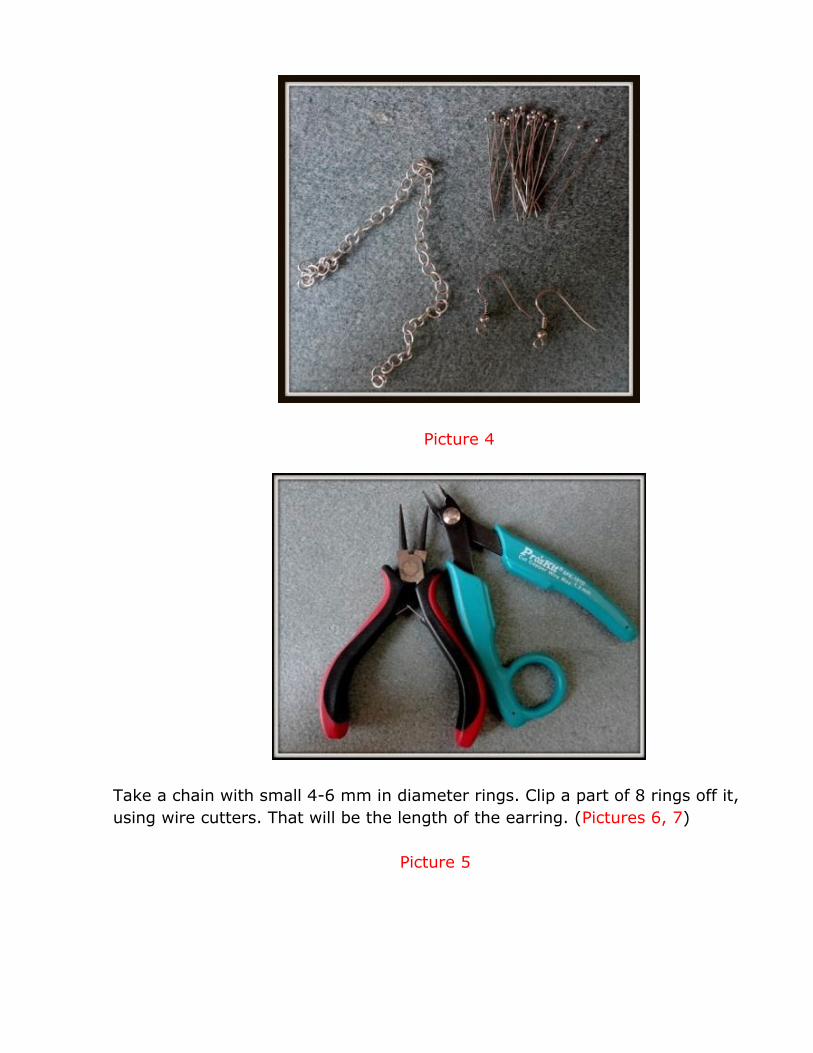
Picture 4
Take a chain with small 4-6 mm in diameter rings. Clip a part of 8 rings off it,
using wire cutters. That will be the length of the earring. (Pictures 6, 7)
Picture 5

Picture 6
Picture 7
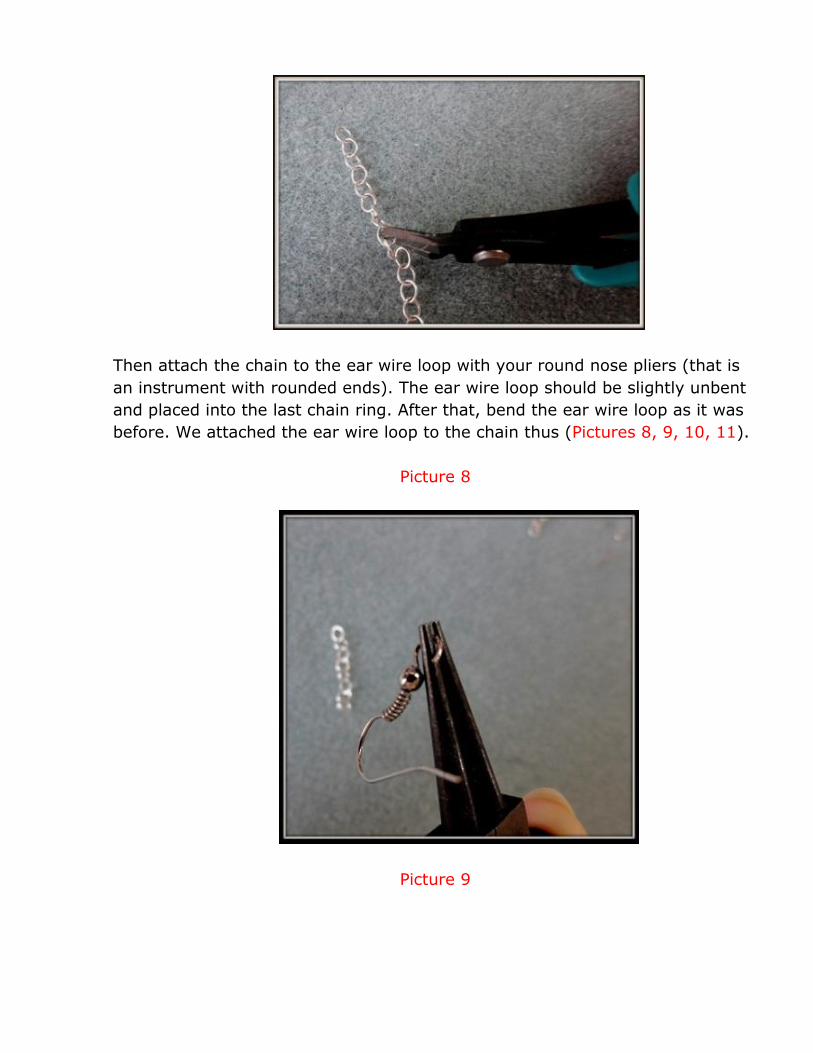
Then attach the chain to the ear wire loop with your round nose pliers (that is
an instrument with rounded ends). The ear wire loop should be slightly unbent
and placed into the last chain ring. After that, bend the ear wire loop as it was
before. We attached the ear wire loop to the chain thus (Pictures 8, 9, 10, 11).
Picture 8
Picture 9
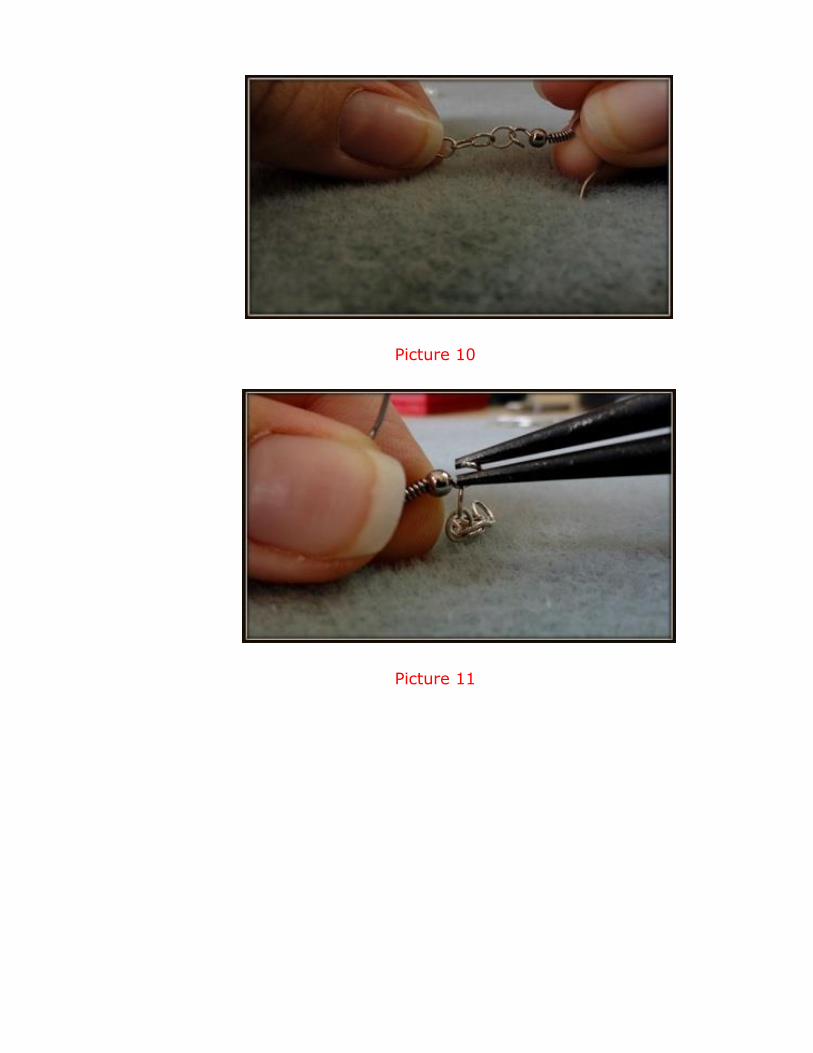
Picture 10
Picture 11
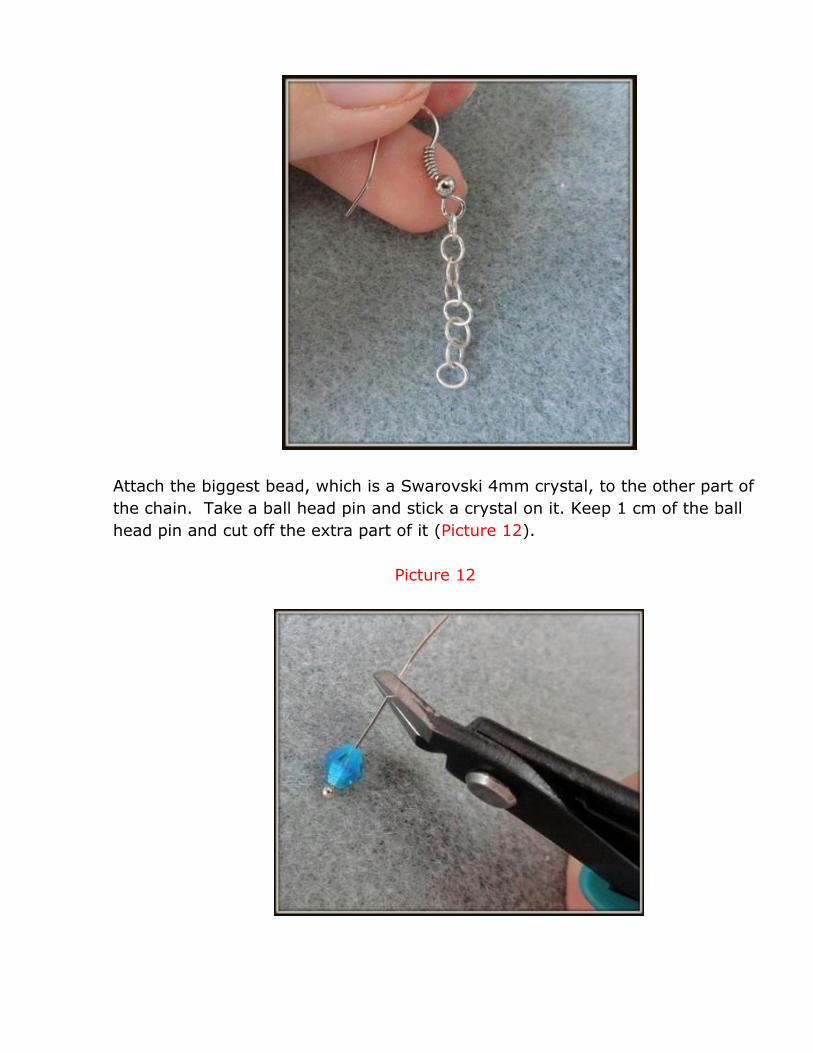
Attach the biggest bead, which is a Swarovski 4mm crystal, to the other part of
the chain. Take a ball head pin and stick a crystal on it. Keep 1 cm of the ball
head pin and cut off the extra part of it (Picture 12).
Picture 12

Use the round nose pliers to bend the part of the ball head pin with the crystal
and attach it to the other ring of the chain. After connecting the chain and the
loop, bend the loop down close to the bead. (Picture 13, 14, 15)
Helpful tip: To bend the end of the pin, we should grasp it near its end
and bend a loop close to the crystal. Round nose pliers are specially
designed to bend loops on stiff wires.
Picture 13
Picture 14
Picture 15
Thus, on the one end of the chain we have an ear wire loop and there is a
crystal on the other (Picture16).

Picture 16
We will be inserting beads on the chain in any color order. Insert 2-3 beads
almost on every ring of the chain. The technique of inserting beads is the same
we used for attaching the Swarovski crystal.
Take a ball head pin and stick a crystal on it. Keep 1 cm of the ball head pin
and cut off the extra part of it (Picture 17). Use round nose pliers to bend the
end of pin as a loop and attach it to the second ring of the chain (Picture 18
and 19). After connecting the chain and the loop, bend the loop down close to
the bead.
Picture 17
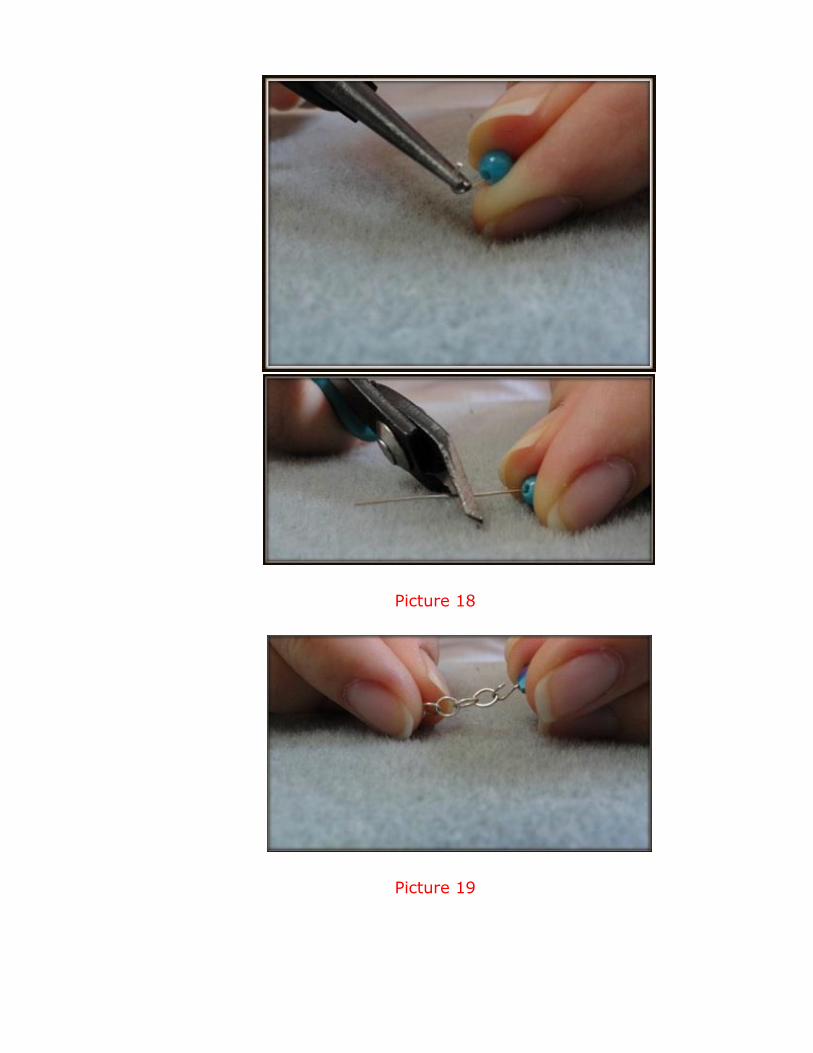
Picture 18
Picture 19
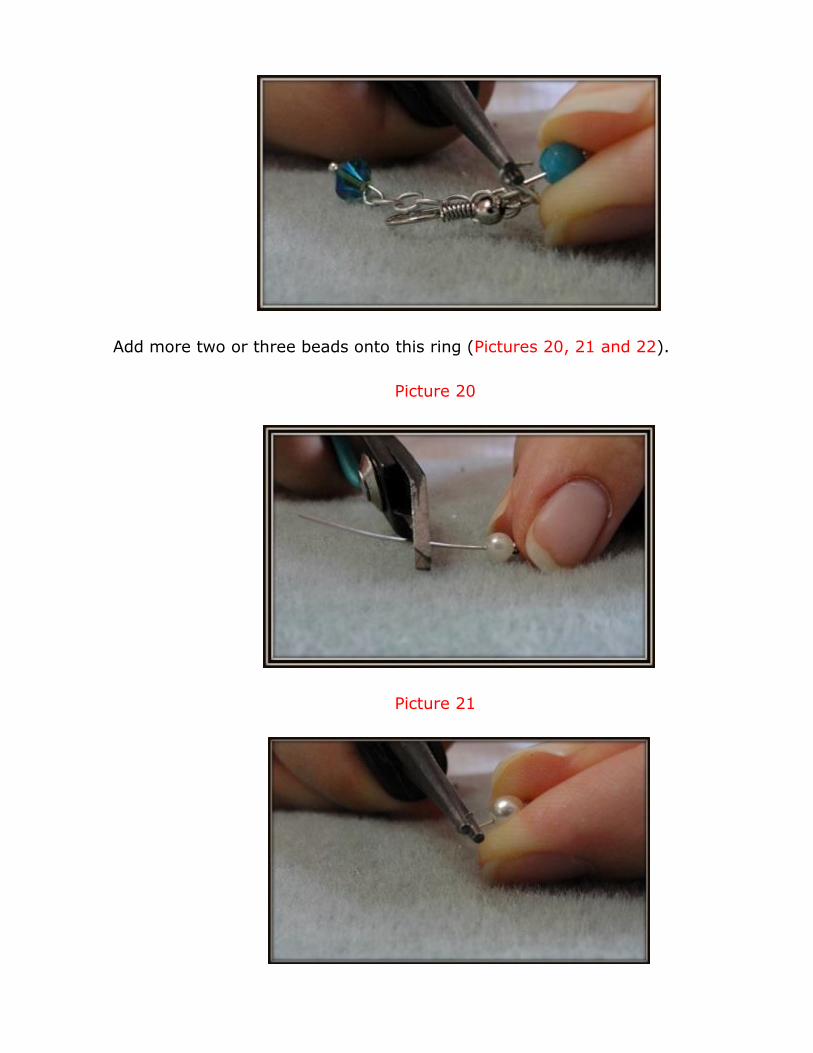
Add more two or three beads onto this ring (Pictures 20, 21 and 22).
Picture 20
Picture 21
Picture 22
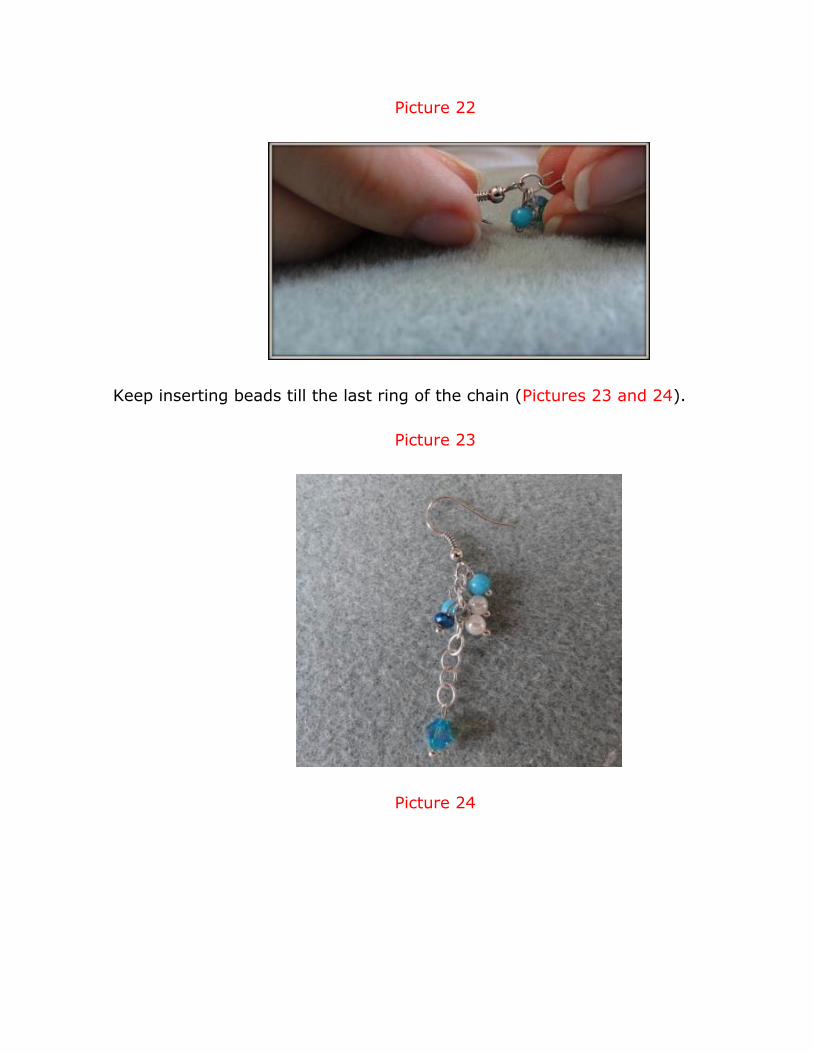
Keep inserting beads till the last ring of the chain (Pictures 23 and 24).
Picture 23
Picture 24
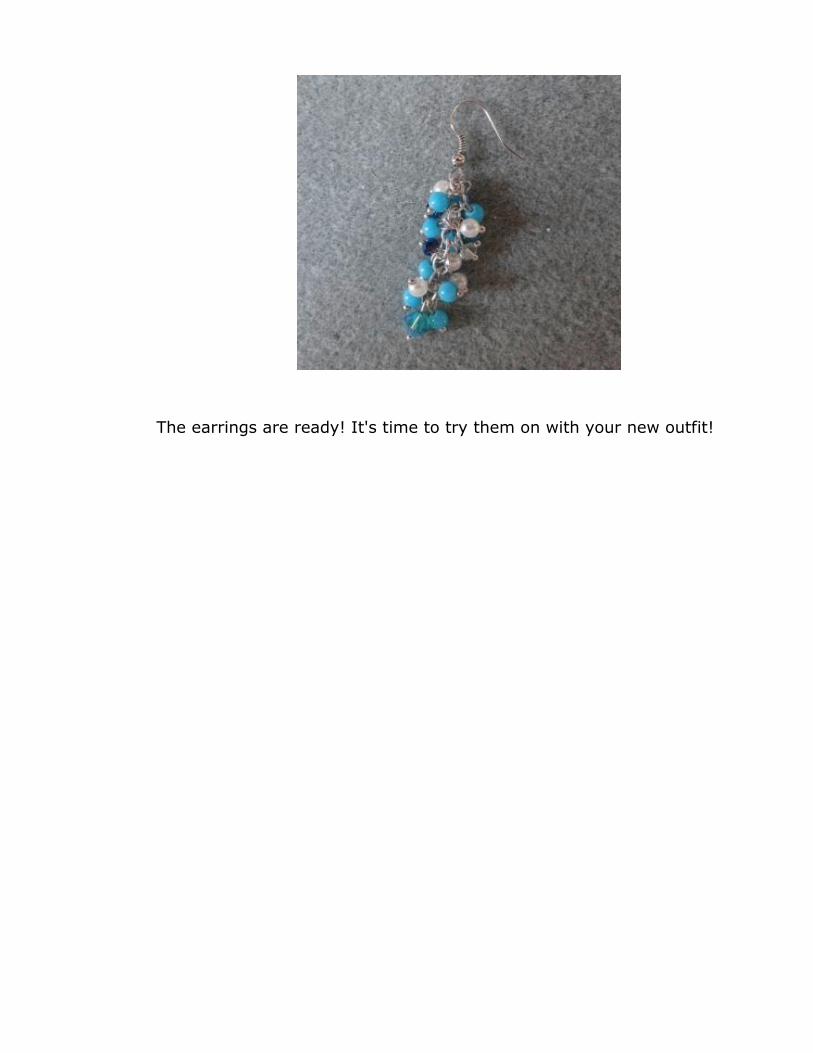
The earrings are ready! It's time to try them on with your new outfit!

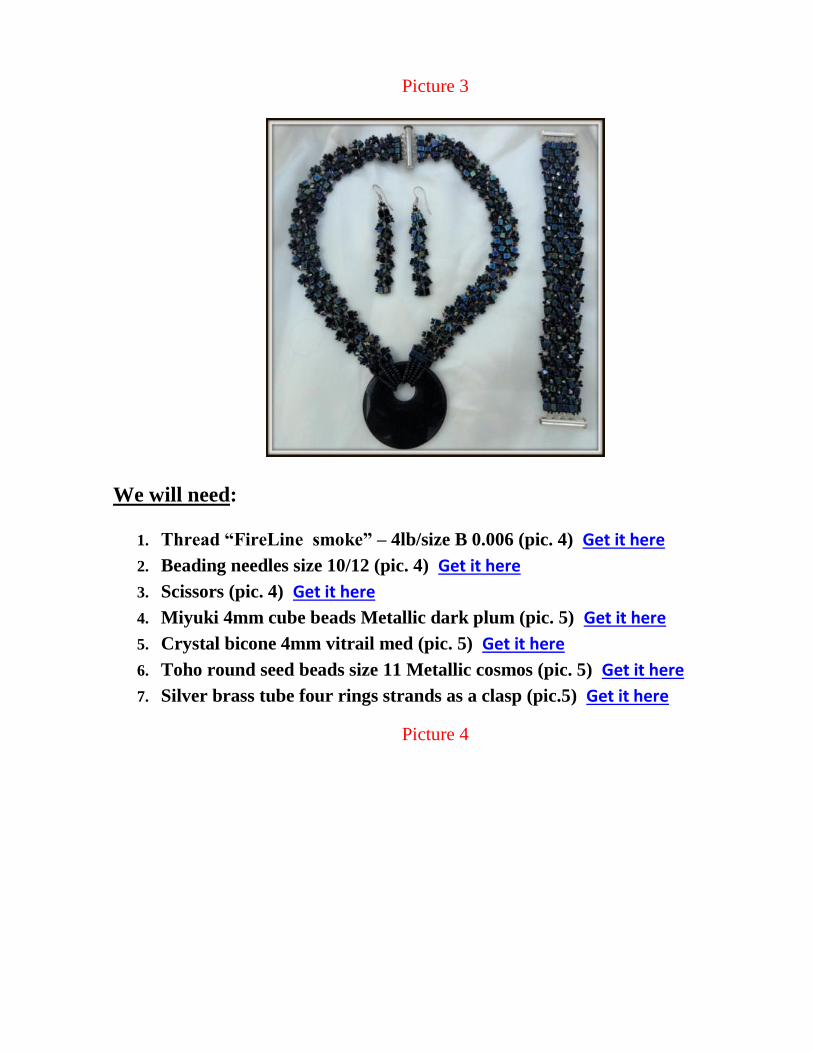
5. TUTORIAL 2: Bracelet "Wet Asphalt”
This bracelet is made of three kinds of beads, which have different sizes and shapes
(Picture 1). Thanks to that combination, the bracelet will look very glamorous, unique
and rich. It won't take much time to bead it, as the technique is very simple and easy.
You can use the same technique to bead a necklace and earrings (Pictures 2, 3).
Picture 1
Picture 2
Picture 3
We will need:
1. Thread “FireLine smoke” – 4lb/size B 0.006 (pic. 4) Get it here
2. Beading needles size 10/12 (pic. 4) Get it here
3. Scissors (pic. 4) Get it here
4. Miyuki 4mm cube beads Metallic dark plum (pic. 5) Get it here
5. Crystal bicone 4mm vitrail med (pic. 5) Get it here
6. Toho round seed beads size 11 Metallic cosmos (pic. 5) Get it here
7. Silver brass tube four rings strands as a clasp (pic.5) Get it here
Picture 4
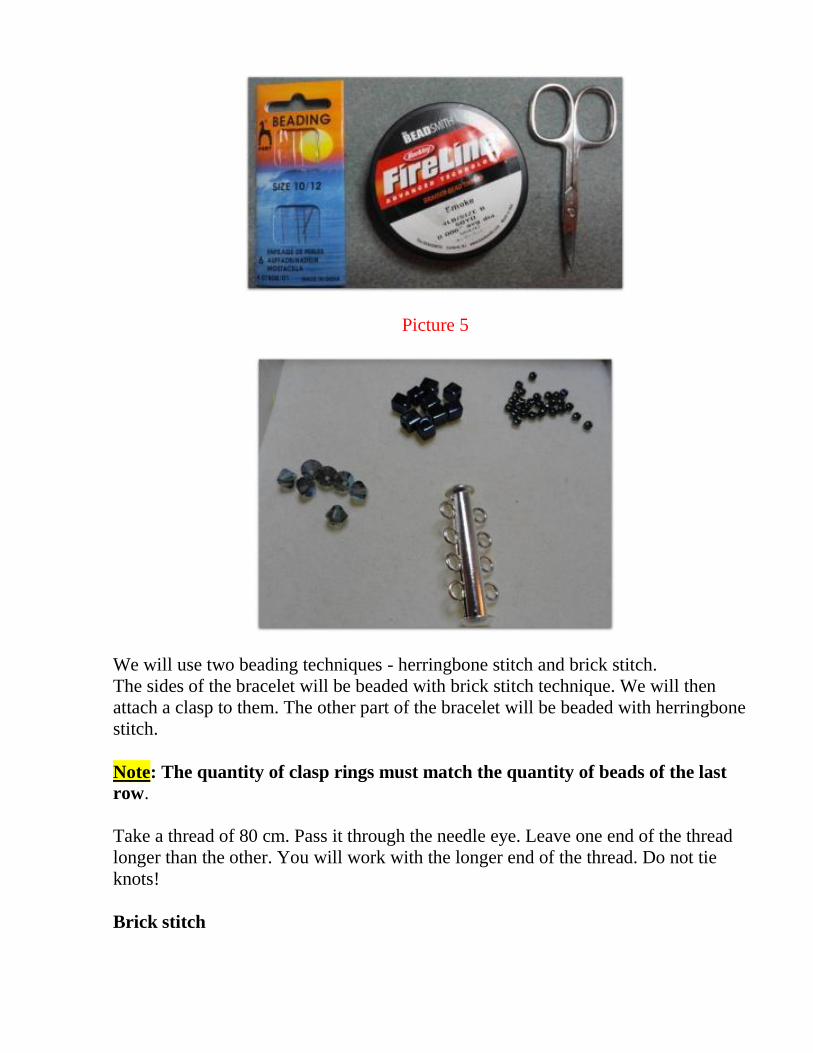
Picture 5
We will use two beading techniques - herringbone stitch and brick stitch.
The sides of the bracelet will be beaded with brick stitch technique. We will then
attach a clasp to them. The other part of the bracelet will be beaded with herringbone
stitch.
Note: The quantity of clasp rings must match the quantity of beads of the last
row.
Take a thread of 80 cm. Pass it through the needle eye. Leave one end of the thread
longer than the other. You will work with the longer end of the thread. Do not tie
knots!
Brick stitch
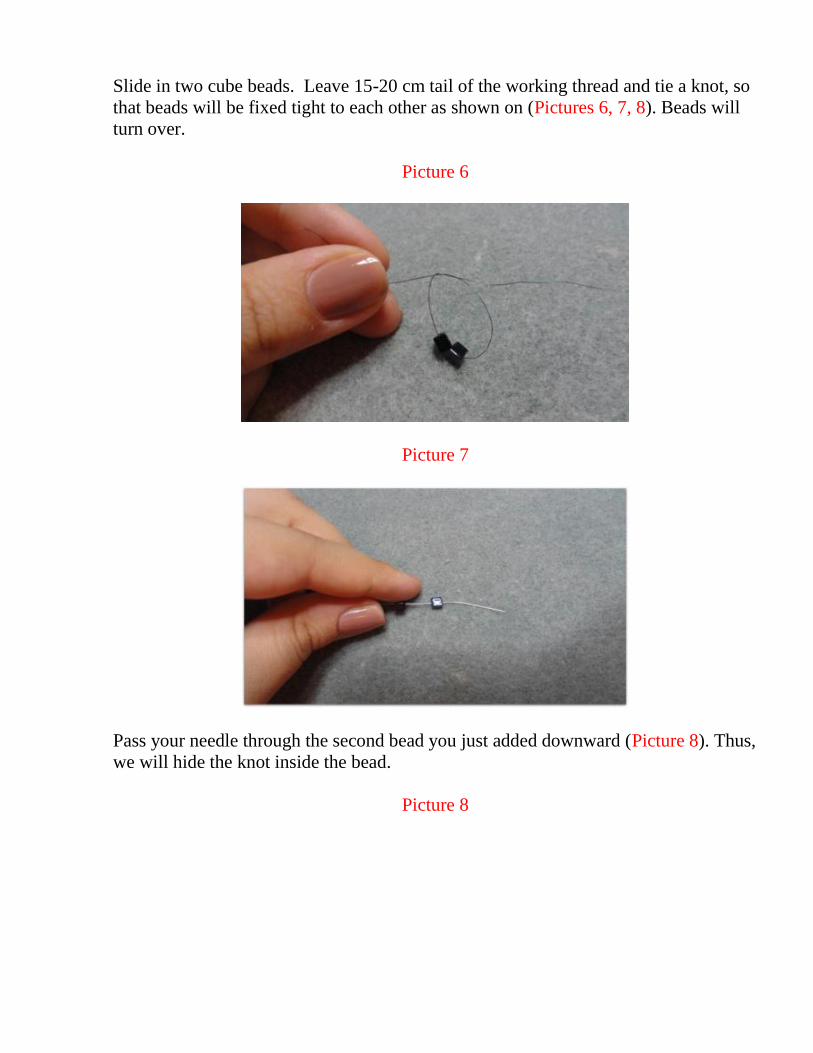
Slide in two cube beads. Leave 15-20 cm tail of the working thread and tie a knot, so
that beads will be fixed tight to each other as shown on (Pictures 6, 7, 8). Beads will
turn over.
Picture 6
Picture 7
Pass your needle through the second bead you just added downward (Picture 8). Thus,
we will hide the knot inside the bead.
Picture 8

Slide in the third cube bead and pass the needle through the second bead downward
(Picture 9). Return your needle to the third bead upward. Thus we connected three
beads (Picture 10).
Picture 9
Picture 10

Keep inserting beads this way (Picture 11).
Picture 11
The quantity of beads should be even, that is why you can insert another two or four
(or more) depending on the desirable width of the bracelet.
For this particular bracelet we used 4 beads (Picture 12).
The side edge of the bracelet is ready.
Picture 12
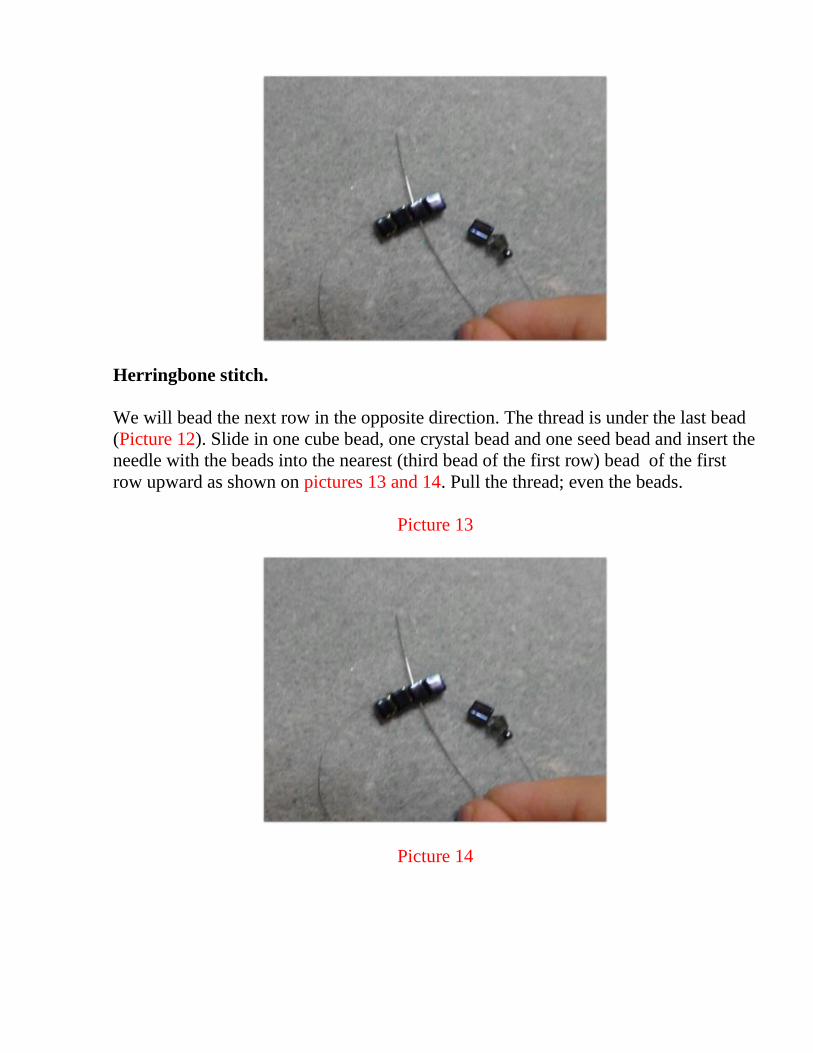
Herringbone stitch.
We will bead the next row in the opposite direction. The thread is under the last bead
(Picture 12). Slide in one cube bead, one crystal bead and one seed bead and insert the
needle with the beads into the nearest (third bead of the first row) bead of the first
row upward as shown on pictures 13 and 14. Pull the thread; even the beads.
Picture 13
Picture 14
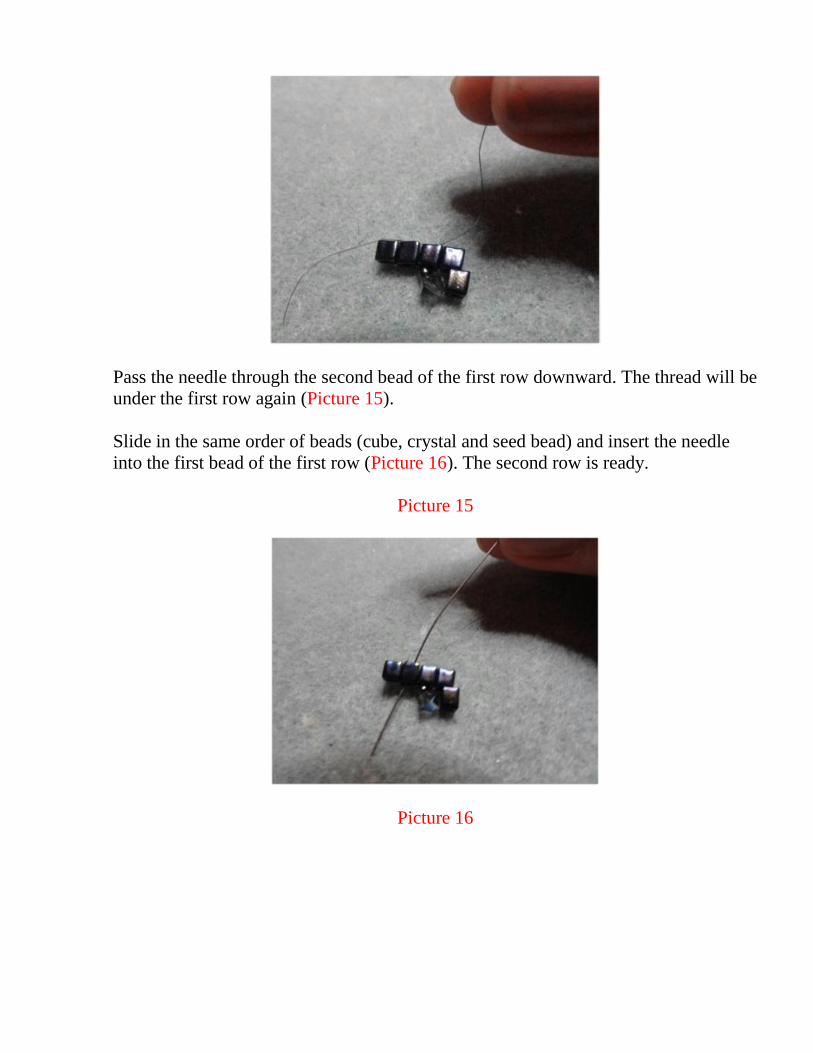
Pass the needle through the second bead of the first row downward. The thread will be
under the first row again (Picture 15).
Slide in the same order of beads (cube, crystal and seed bead) and insert the needle
into the first bead of the first row (Picture 16). The second row is ready.
Picture 15
Picture 16
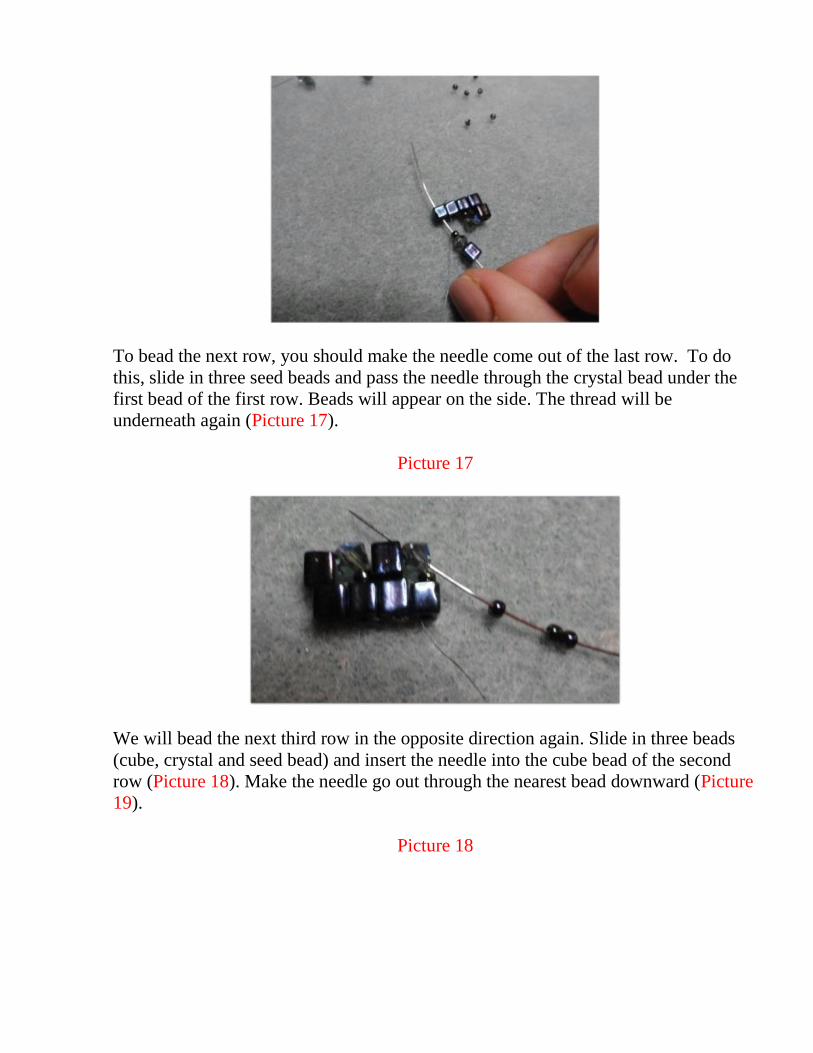
To bead the next row, you should make the needle come out of the last row. To do
this, slide in three seed beads and pass the needle through the crystal bead under the
first bead of the first row. Beads will appear on the side. The thread will be
underneath again (Picture 17).
Picture 17
We will bead the next third row in the opposite direction again. Slide in three beads
(cube, crystal and seed bead) and insert the needle into the cube bead of the second
row (Picture 18). Make the needle go out through the nearest bead downward (Picture
19).
Picture 18
Picture 19
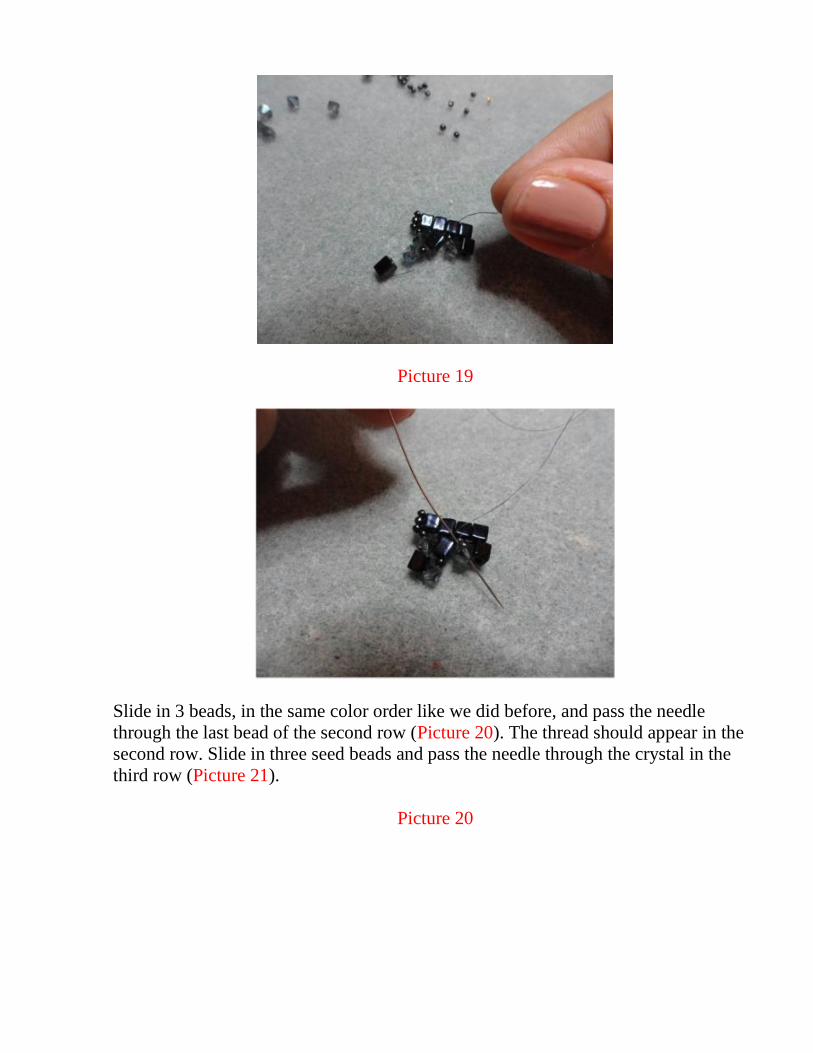
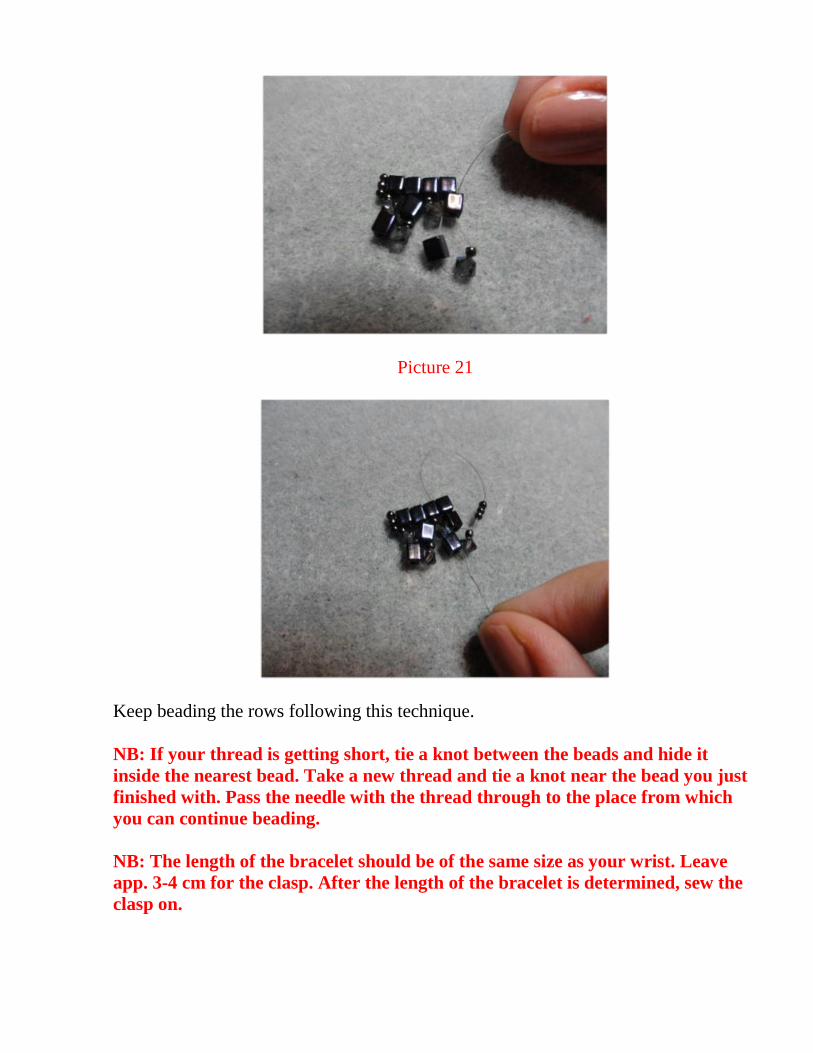
Slide in 3 beads, in the same color order like we did before, and pass the needle
through the last bead of the second row (Picture 20). The thread should appear in the
second row. Slide in three seed beads and pass the needle through the crystal in the
third row (Picture 21).
Picture 20
Picture 21
Keep beading the rows following this technique.
NB: If your thread is getting short, tie a knot between the beads and hide it
inside the nearest bead. Take a new thread and tie a knot near the bead you just
finished with. Pass the needle with the thread through to the place from which
you can continue beading.
NB: The length of the bracelet should be of the same size as your wrist. Leave
app. 3-4 cm for the clasp. After the length of the bracelet is determined, sew the
clasp on.

When beading the last row, instead of the three beads we used before (cube, crystal
and seed bead) slide in 2 cube beads in turns (Picture 22). Slide in 3 seed beads and
make your needle come out of the first bead of the last row (Picture 23).
Picture 22
Picture 23
Then sew the beads using brick stitch technique to fix them tight together. First, sew
them in one direction, and then in the opposite to ensure their stability (Picture 24,
25).

Picture 24
Picture 25
Make the thread come out of the last side bead. Finish beading your bracelet with
attaching the clasp. You can sew your clasp on unfastened it or fastened. You will see
it in both variants on the pictures below.
Take a clasp and pass the needle through the first ring. Return the needle to the first
bead (Picture 26, 27).
Picture 26
Picture 27
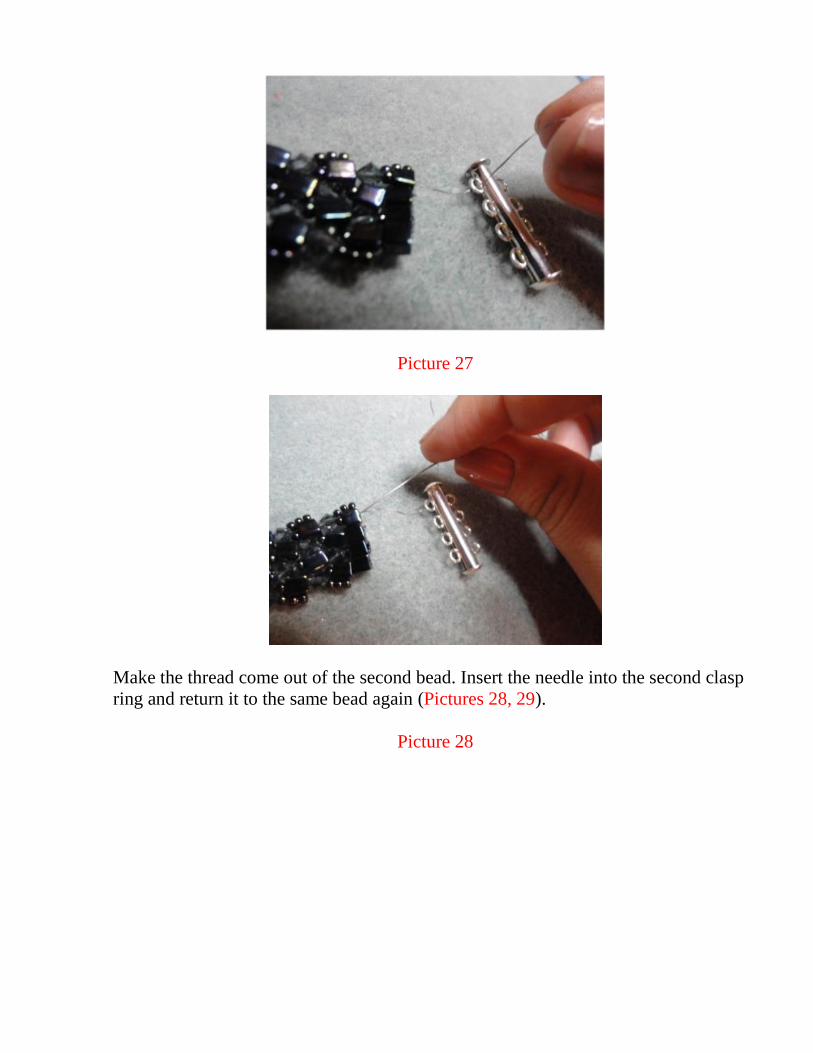
Make the thread come out of the second bead. Insert the needle into the second clasp
ring and return it to the same bead again (Pictures 28, 29).
Picture 28
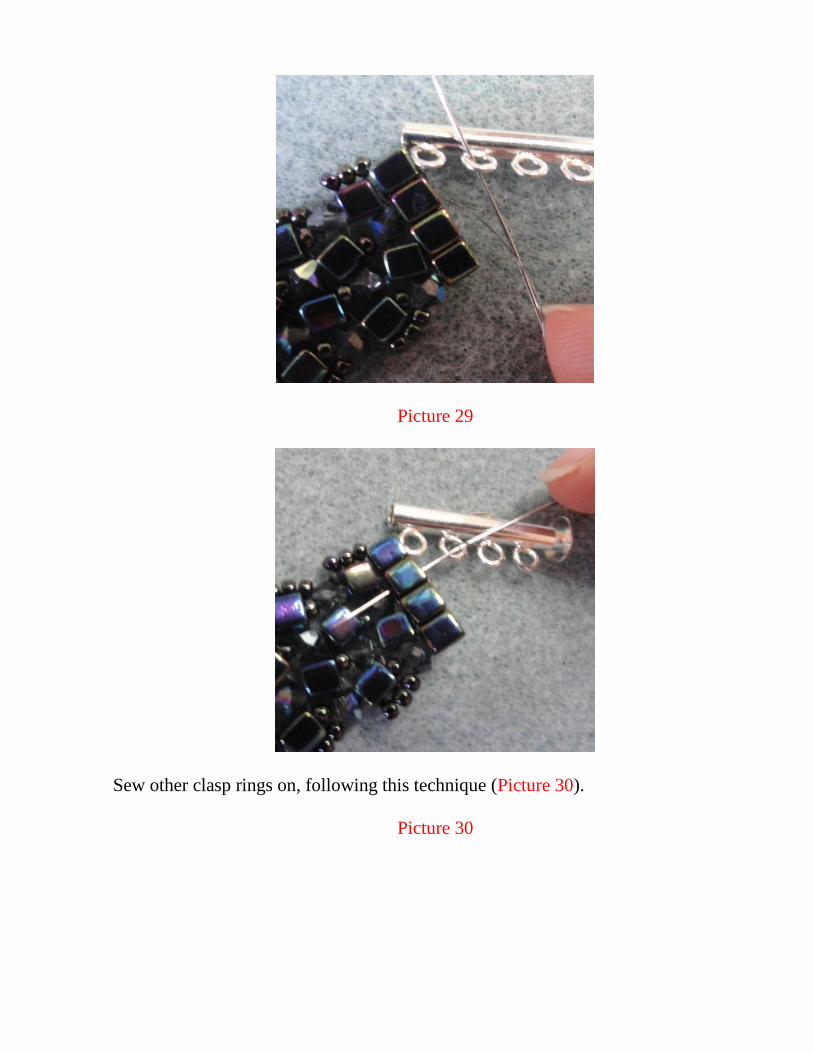
Picture 29
Sew other clasp rings on, following this technique (Picture 30).
Picture 30
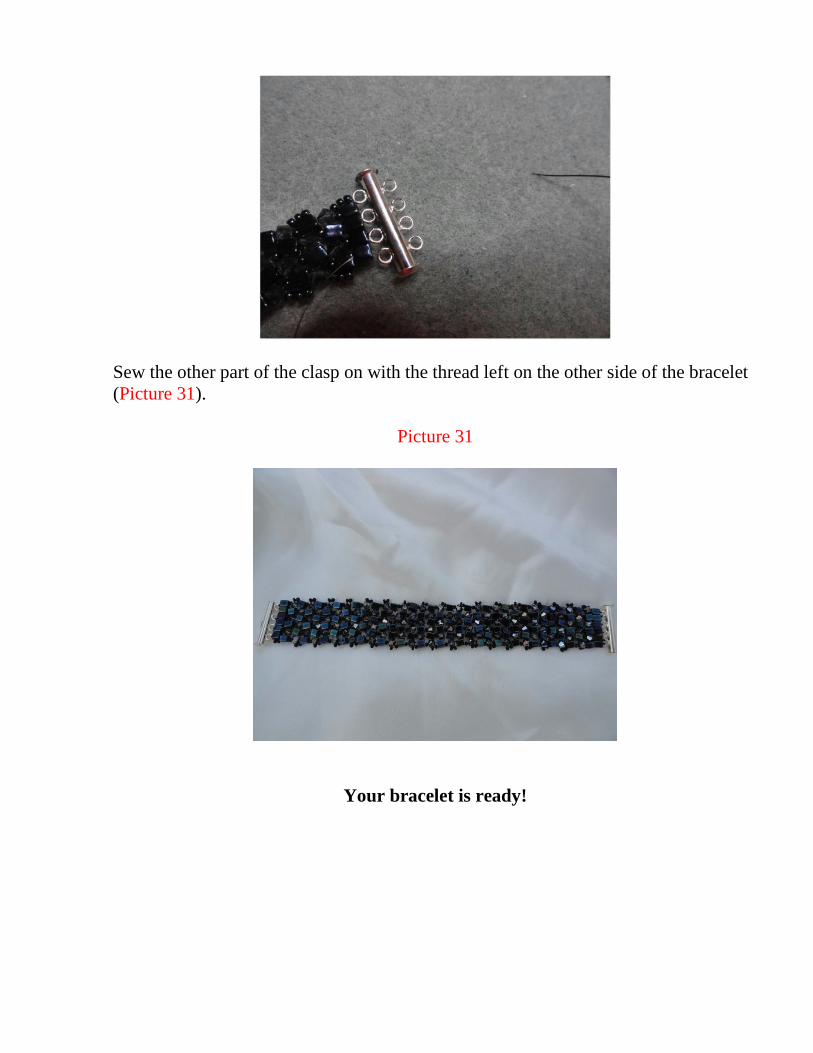
Sew the other part of the clasp on with the thread left on the other side of the bracelet
(Picture 31).
Picture 31
Your bracelet is ready!
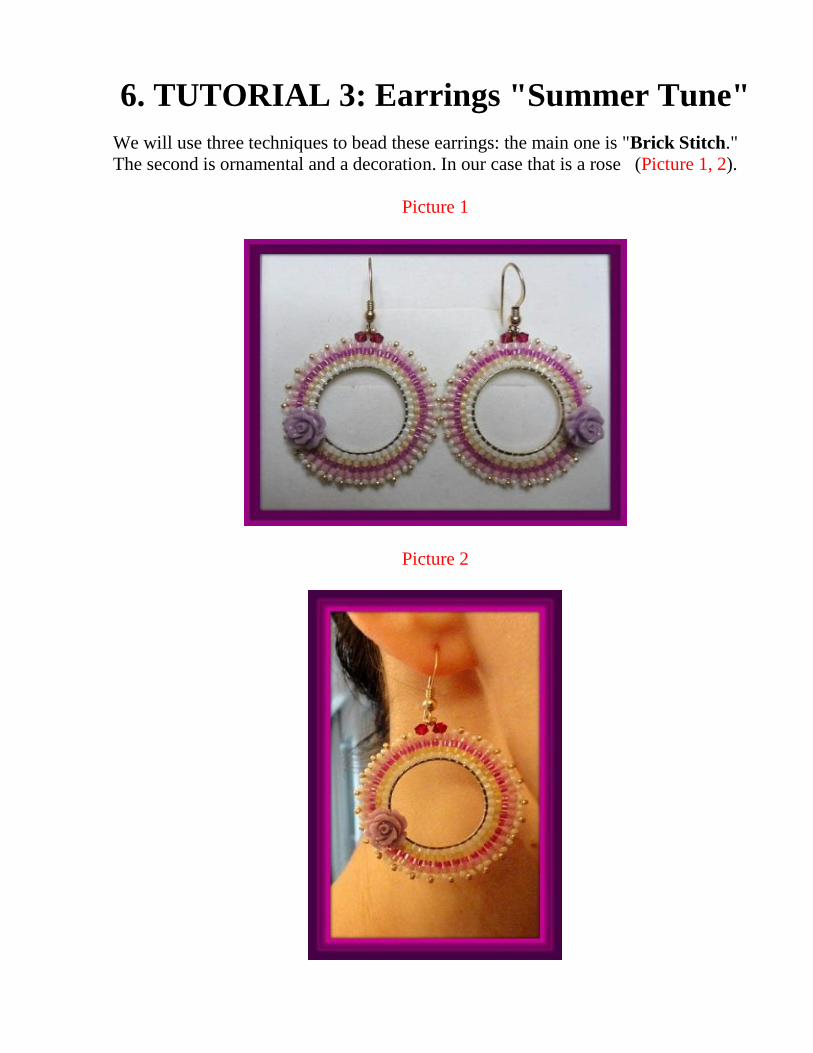
6. TUTORIAL 3: Earrings "Summer Tune"
We will use three techniques to bead these earrings: the main one is "Brick Stitch."
The second is ornamental and a decoration. In our case that is a rose (Picture 1, 2).
Picture 1
Picture 2
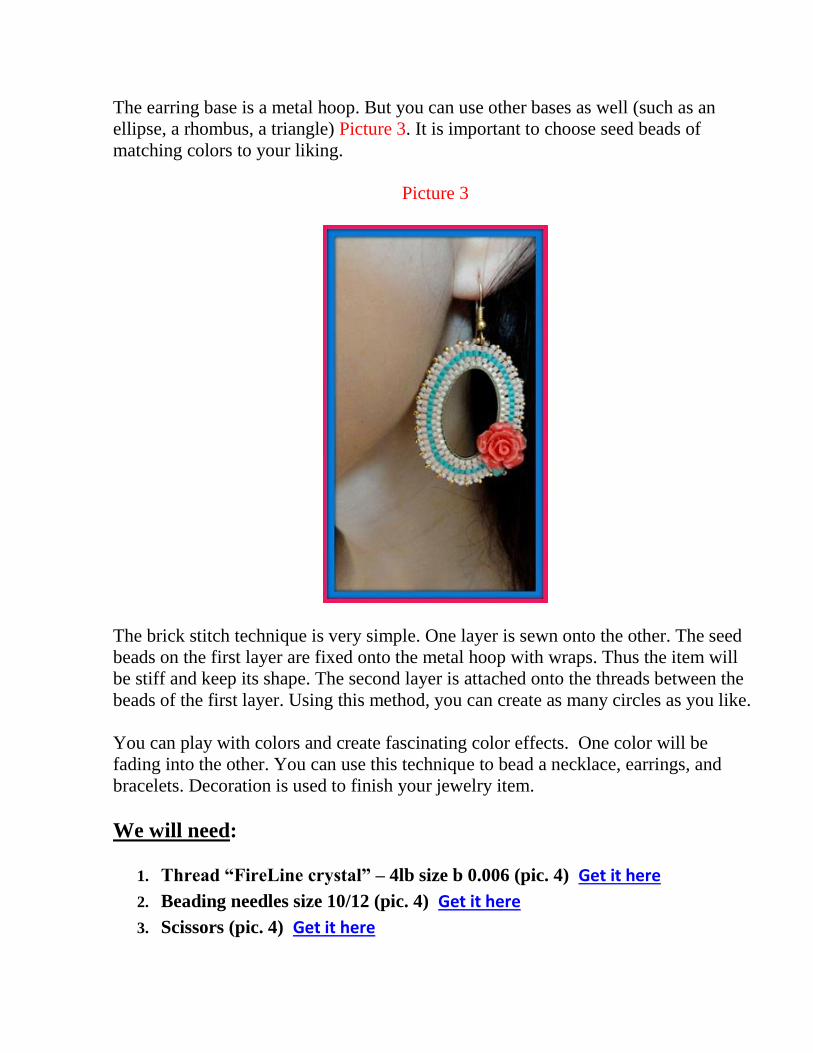
The earring base is a metal hoop. But you can use other bases as well (such as an
ellipse, a rhombus, a triangle) Picture 3. It is important to choose seed beads of
matching colors to your liking.
Picture 3
The brick stitch technique is very simple. One layer is sewn onto the other. The seed
beads on the first layer are fixed onto the metal hoop with wraps. Thus the item will
be stiff and keep its shape. The second layer is attached onto the threads between the
beads of the first layer. Using this method, you can create as many circles as you like.
You can play with colors and create fascinating color effects. One color will be
fading into the other. You can use this technique to bead a necklace, earrings, and
bracelets. Decoration is used to finish your jewelry item.
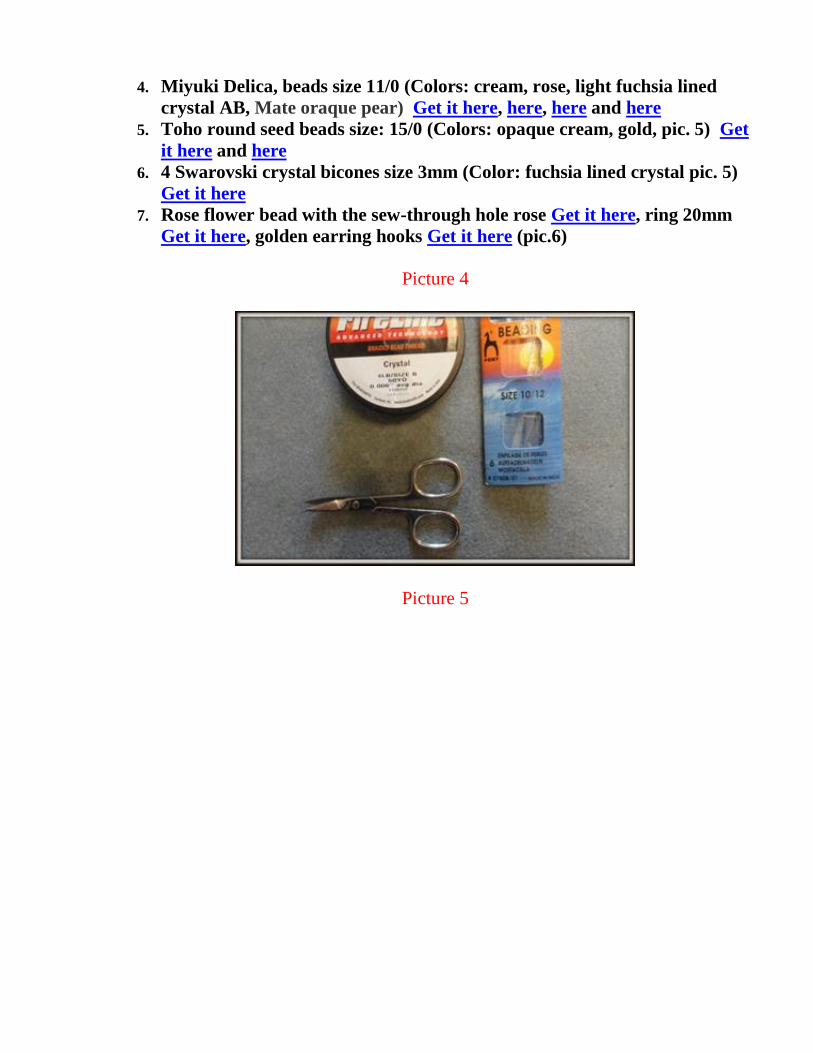
We will need:
1. Thread “FireLine crystal” – 4lb size b 0.006 (pic. 4) Get it here
2. Beading needles size 10/12 (pic. 4) Get it here
3. Scissors (pic. 4) Get it here
4. Miyuki Delica, beads size 11/0 (Colors: cream, rose, light fuchsia lined
crystal AB, Mate oraque pear) Get it here, here, here and here
5. Toho round seed beads size: 15/0 (Colors: opaque cream, gold, pic. 5) Get
it here and here
6. 4 Swarovski crystal bicones size 3mm (Color: fuchsia lined crystal pic. 5)
Get it here
7. Rose flower bead with the sew-through hole rose Get it here, ring 20mm
Get it here, golden earring hooks Get it here (pic.6)
Picture 4
Picture 5

Picture 6
Take a thread of app. 50-60 cm. Pass it through the needle eye. Leave one end of the
thread longer than the other (Picture 7). Pass the long end of the thread through the
hoop and tie a knot (twice or three times).
Brick stitch
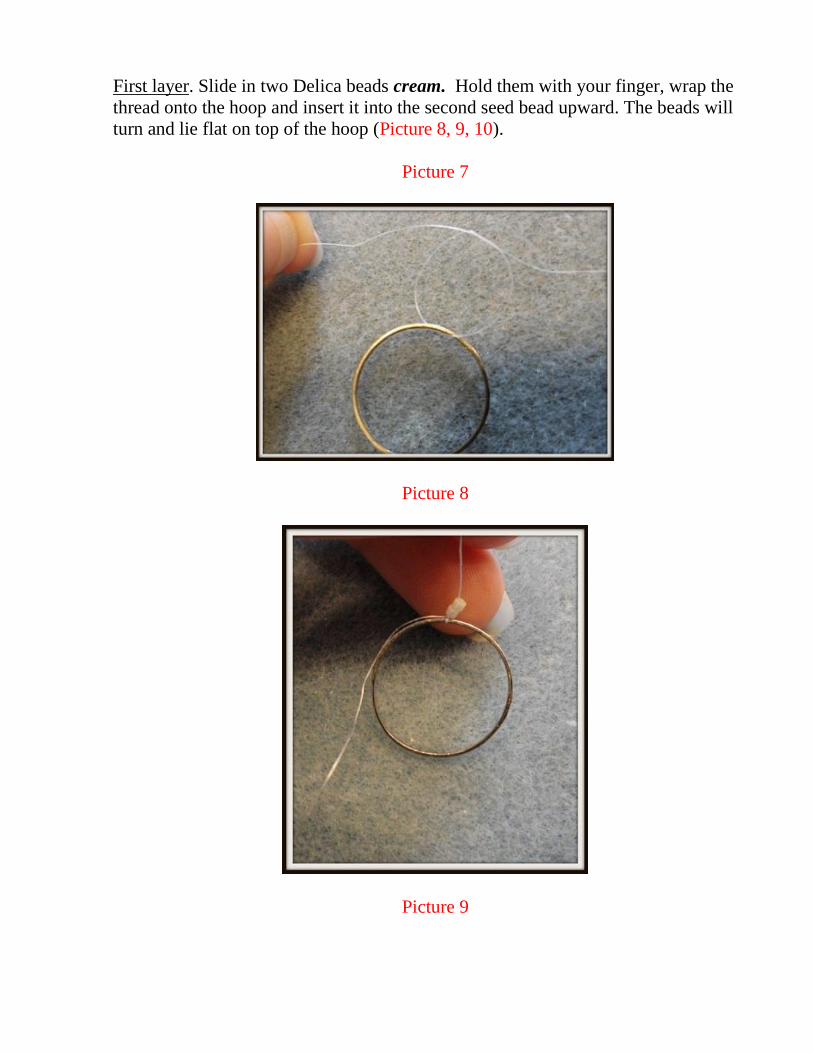
First layer. Slide in two Delica beads cream. Hold them with your finger, wrap the
thread onto the hoop and insert it into the second seed bead upward. The beads will
turn and lie flat on top of the hoop (Picture 8, 9, 10).
Picture 7
Picture 8
Picture 9
Picture 10
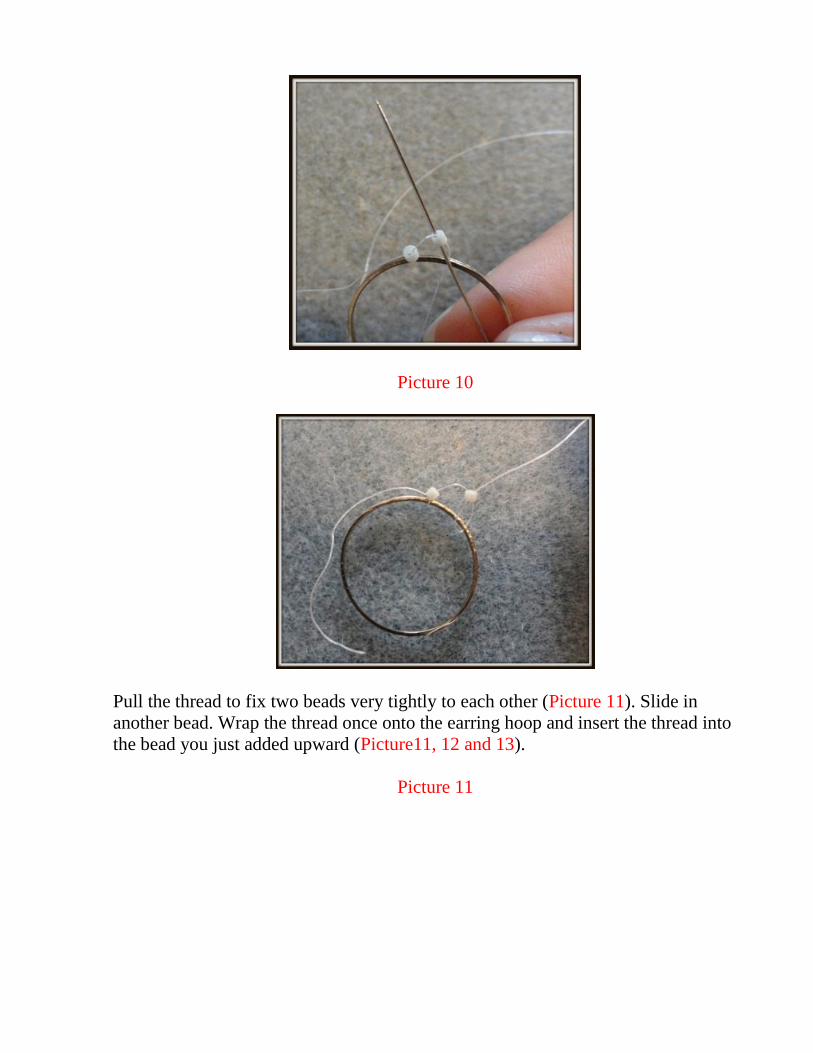
Pull the thread to fix two beads very tightly to each other (Picture 11). Slide in
another bead. Wrap the thread once onto the earring hoop and insert the thread into
the bead you just added upward (Picture11, 12 and 13).
Picture 11

Picture 12
Picture 13
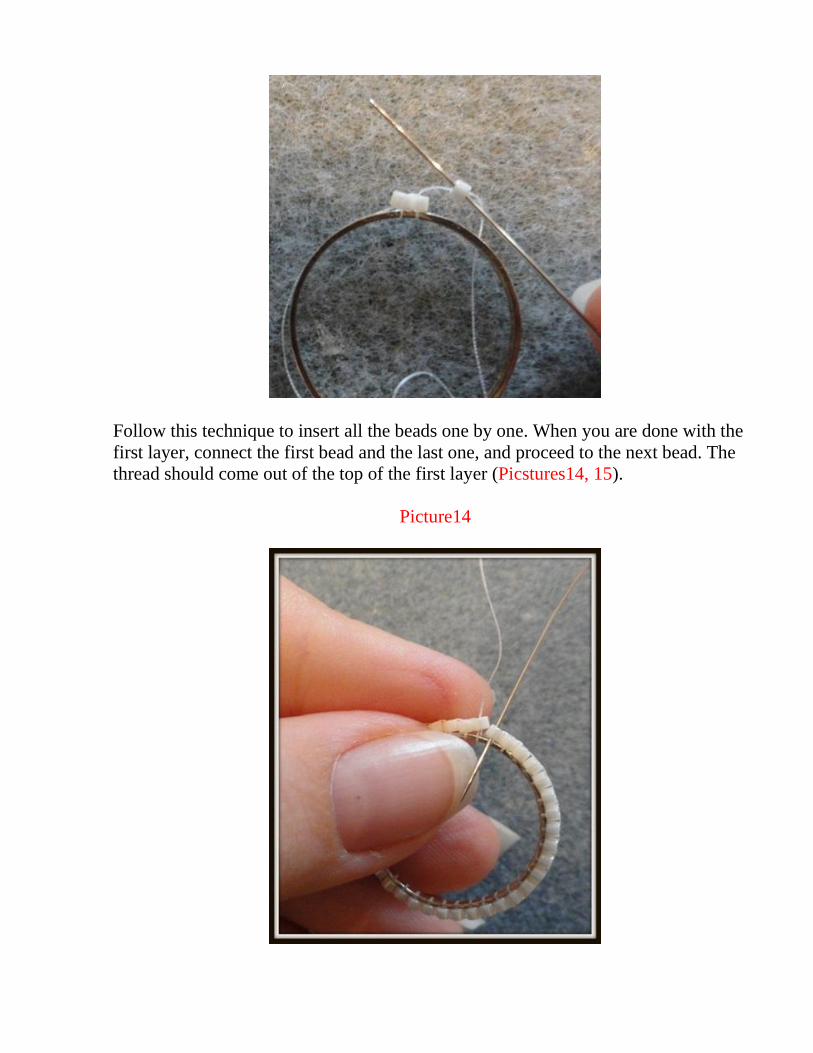
Follow this technique to insert all the beads one by one. When you are done with the
first layer, connect the first bead and the last one, and proceed to the next bead. The
thread should come out of the top of the first layer (Picstures14, 15).
Picture14
Picture 15
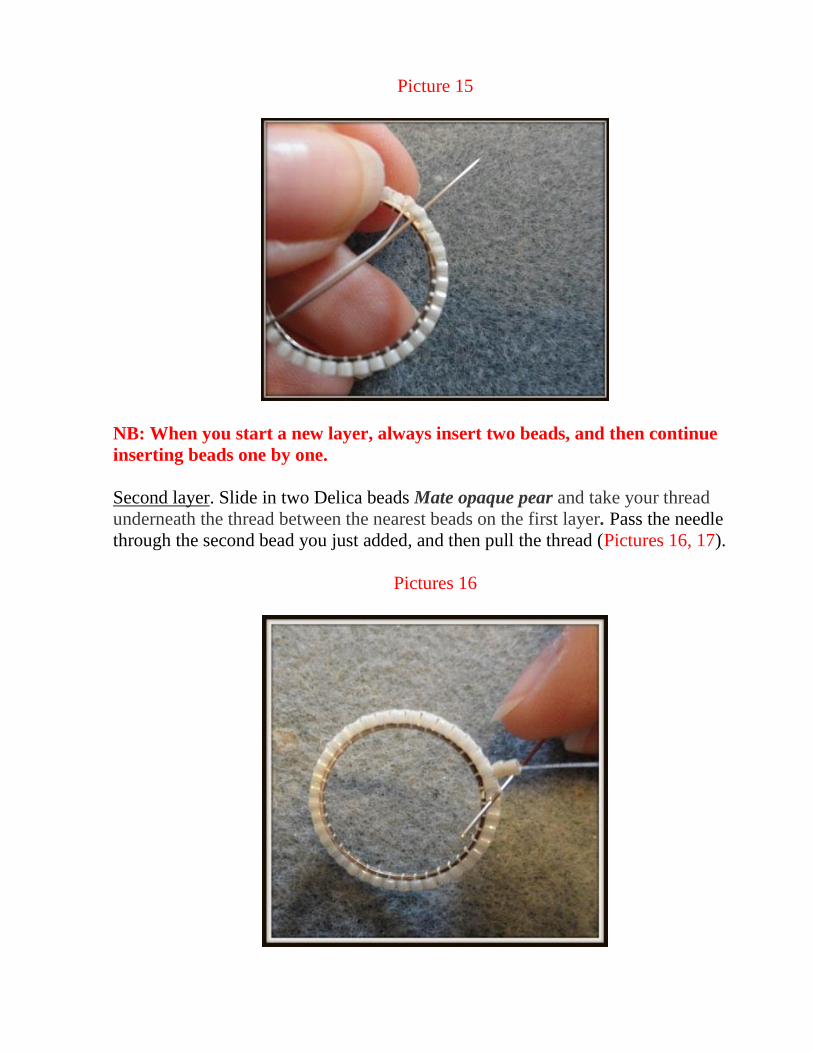
NB: When you start a new layer, always insert two beads, and then continue
inserting beads one by one.
Second layer. Slide in two Delica beads Mate opaque pear and take your thread
underneath the thread between the nearest beads on the first layer. Pass the needle
through the second bead you just added, and then pull the thread (Pictures 16, 17).
Pictures 16
Pictures 17
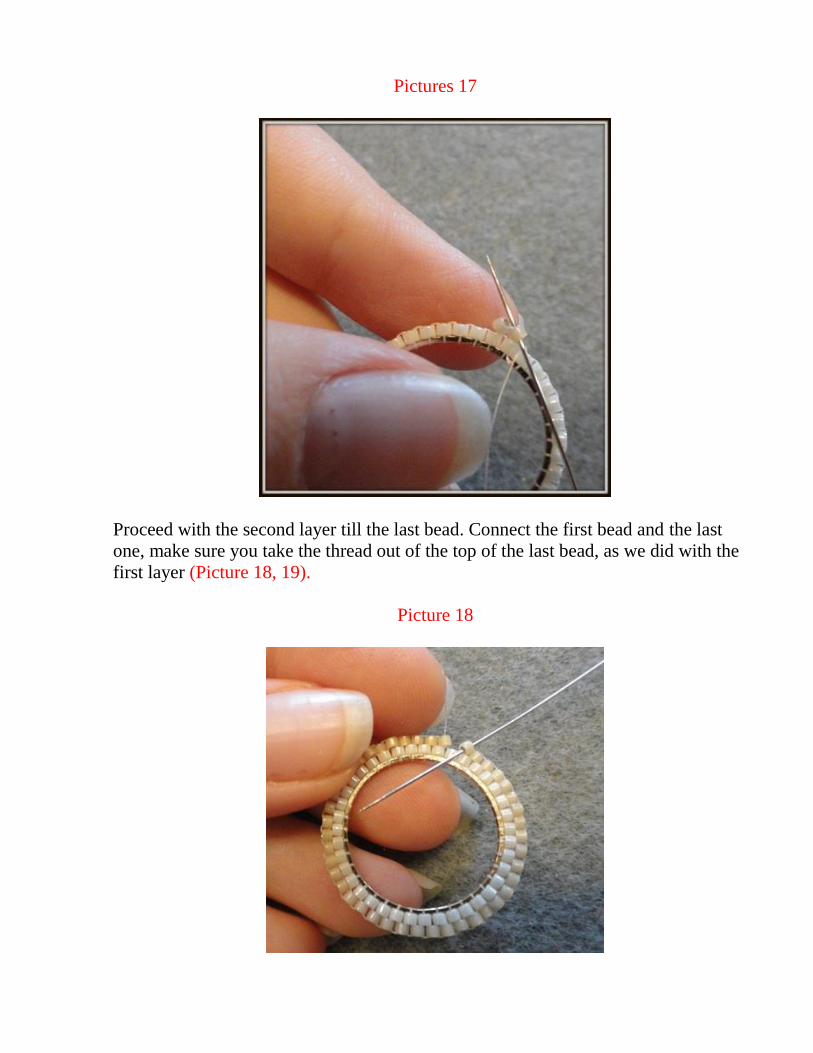
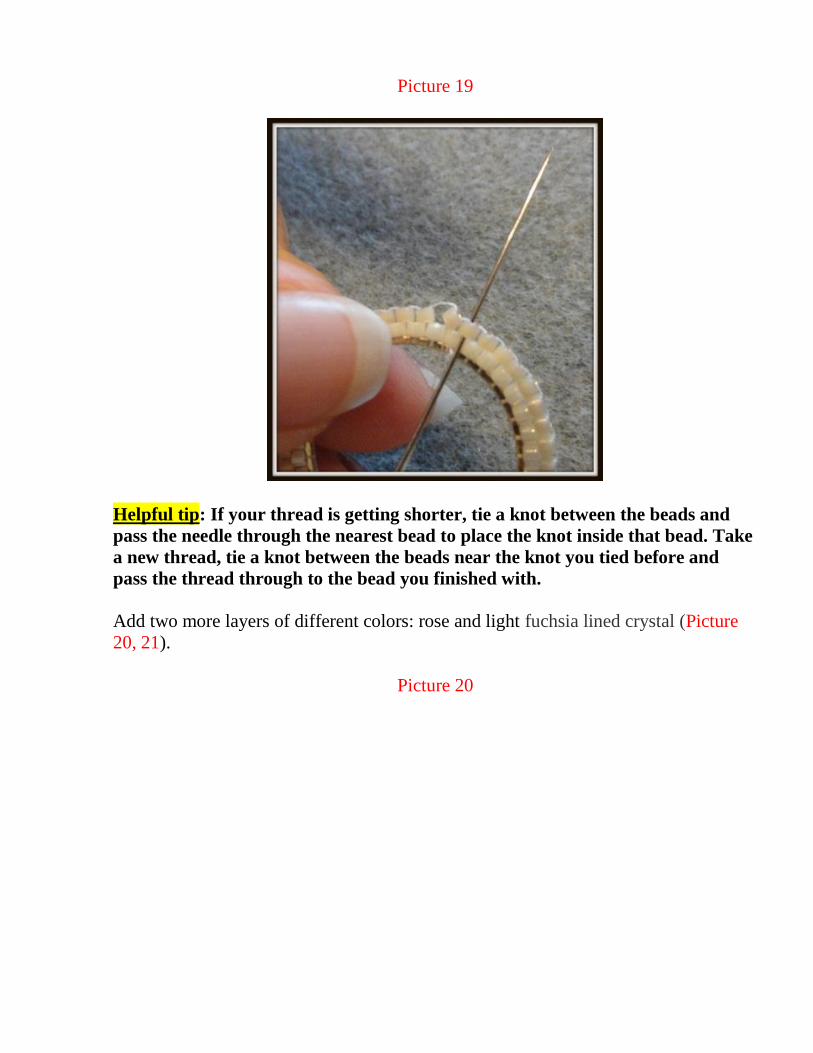
Proceed with the second layer till the last bead. Connect the first bead and the last
one, make sure you take the thread out of the top of the last bead, as we did with the
first layer (Picture 18, 19).
Picture 18
Picture 19
Helpful tip: If your thread is getting shorter, tie a knot between the beads and
pass the needle through the nearest bead to place the knot inside that bead. Take
a new thread, tie a knot between the beads near the knot you tied before and
pass the thread through to the bead you finished with.
Add two more layers of different colors: rose and light fuchsia lined crystal (Picture
20, 21).
Picture 20
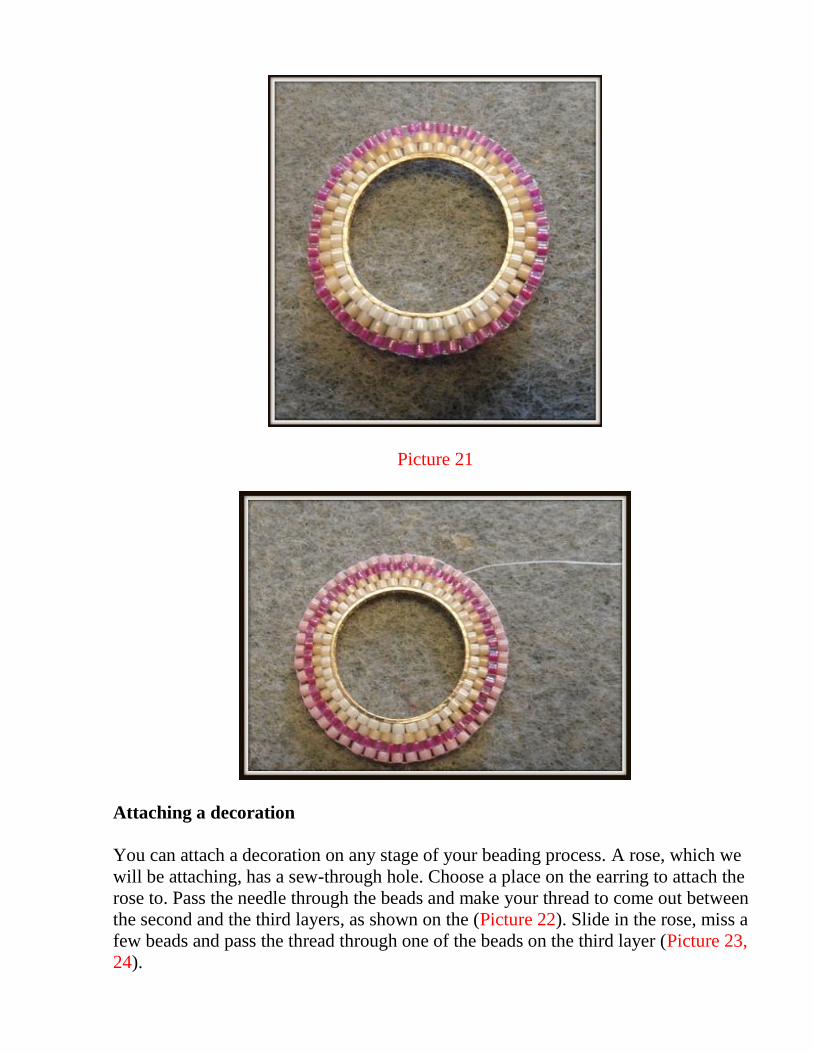
Picture 21
Attaching a decoration
You can attach a decoration on any stage of your beading process. A rose, which we
will be attaching, has a sew-through hole. Choose a place on the earring to attach the
rose to. Pass the needle through the beads and make your thread to come out between
the second and the third layers, as shown on the (Picture 22). Slide in the rose, miss a
few beads and pass the thread through one of the beads on the third layer (Picture 23,
24).

Picture 22
Picture 23
Picture 24
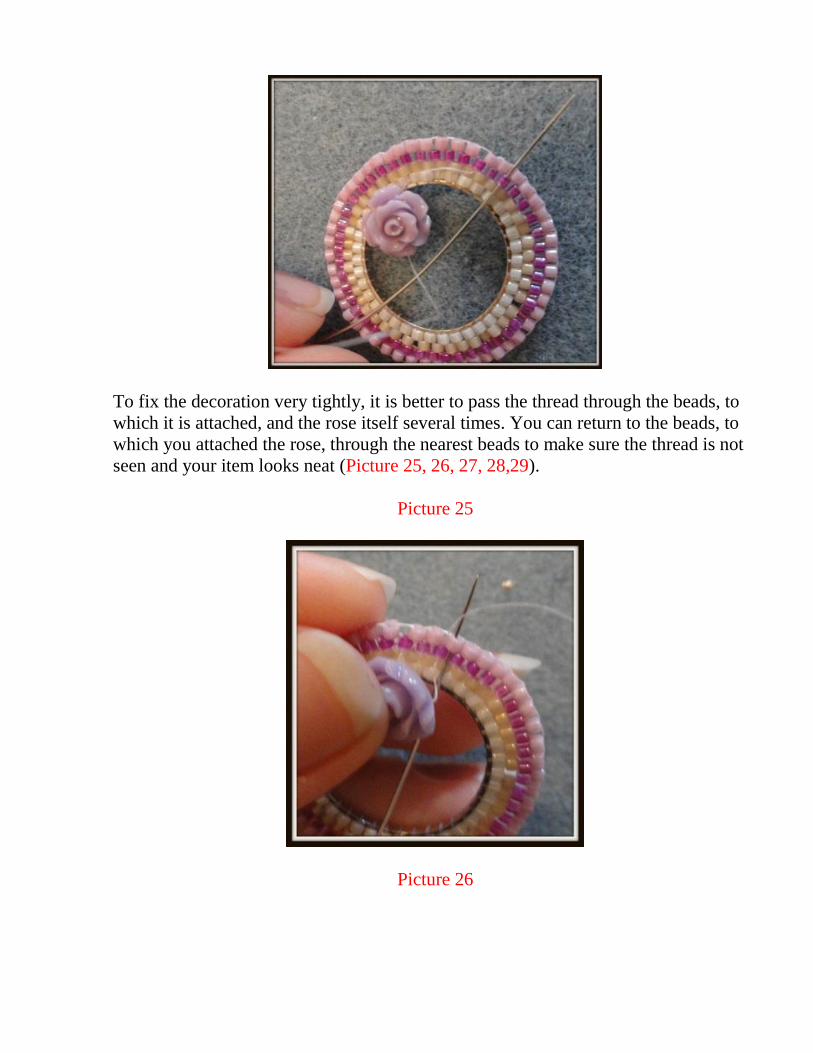
To fix the decoration very tightly, it is better to pass the thread through the beads, to
which it is attached, and the rose itself several times. You can return to the beads, to
which you attached the rose, through the nearest beads to make sure the thread is not
seen and your item looks neat (Picture 25, 26, 27, 28,29).
Picture 25
Picture 26
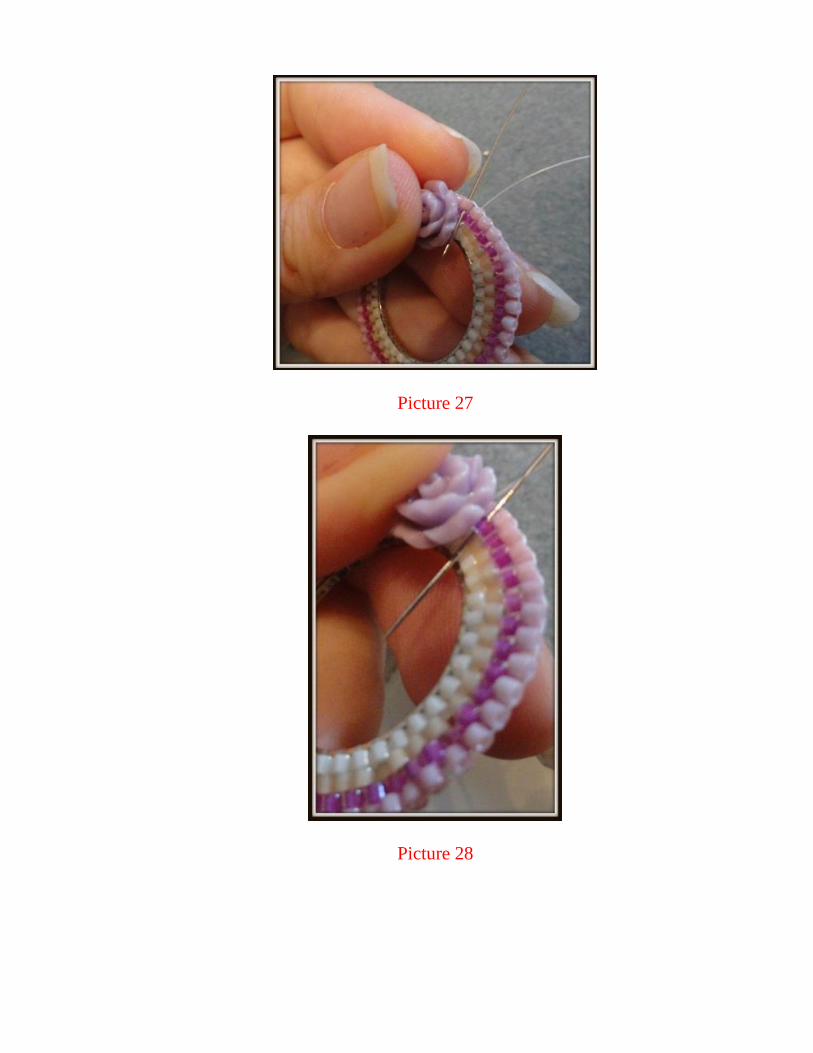
Picture 27
Picture 28

Picture 29
Picture 30
Make the thread to come out of the last layer (Picture 30).
Ornamental technique and attaching of the ear wire.
The last layer is ornamental. Thus we will hide the thread, which is above the last
layer. We won't bead any more layers. The ear wire will be attached to this layer.
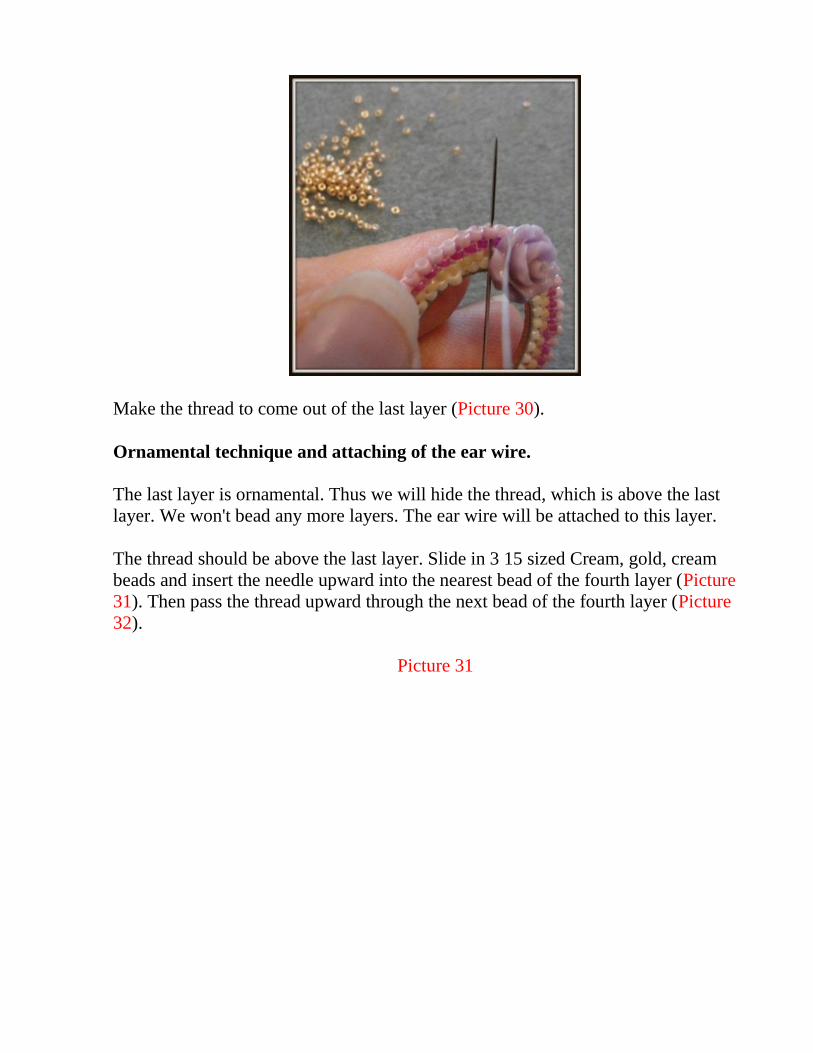
The thread should be above the last layer. Slide in 3 15 sized Cream, gold, cream
beads and insert the needle upward into the nearest bead of the fourth layer (Picture
31). Then pass the thread upward through the next bead of the fourth layer (Picture
32).
Picture 31

Picture 32
Slide in 3 beads in the same color order like we just did and pass the needle into the
next bead of the same layer (Picture 33). In such a way we will come out of the one
bead, slide in 3 new ones and insert the needle into the nearest bead.
Picture 33
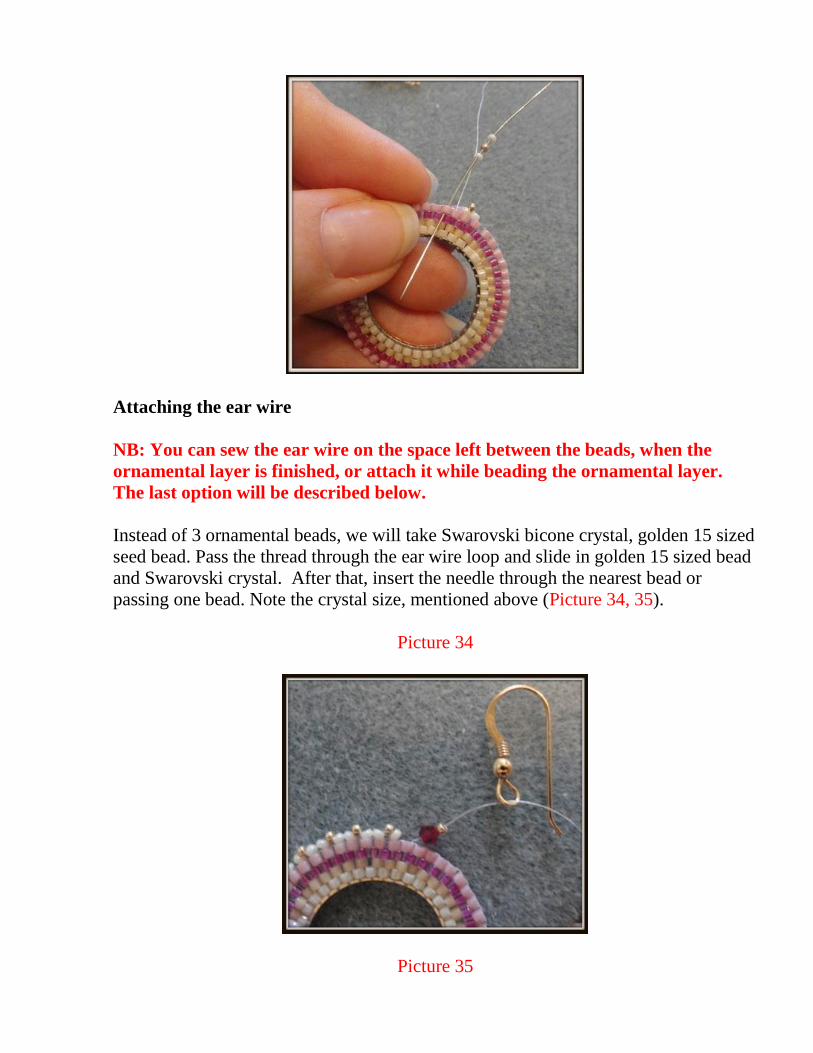
Attaching the ear wire
NB: You can sew the ear wire on the space left between the beads, when the
ornamental layer is finished, or attach it while beading the ornamental layer.
The last option will be described below.
Instead of 3 ornamental beads, we will take Swarovski bicone crystal, golden 15 sized
seed bead. Pass the thread through the ear wire loop and slide in golden 15 sized bead
and Swarovski crystal. After that, insert the needle through the nearest bead or
passing one bead. Note the crystal size, mentioned above (Picture 34, 35).
Picture 34
Picture 35
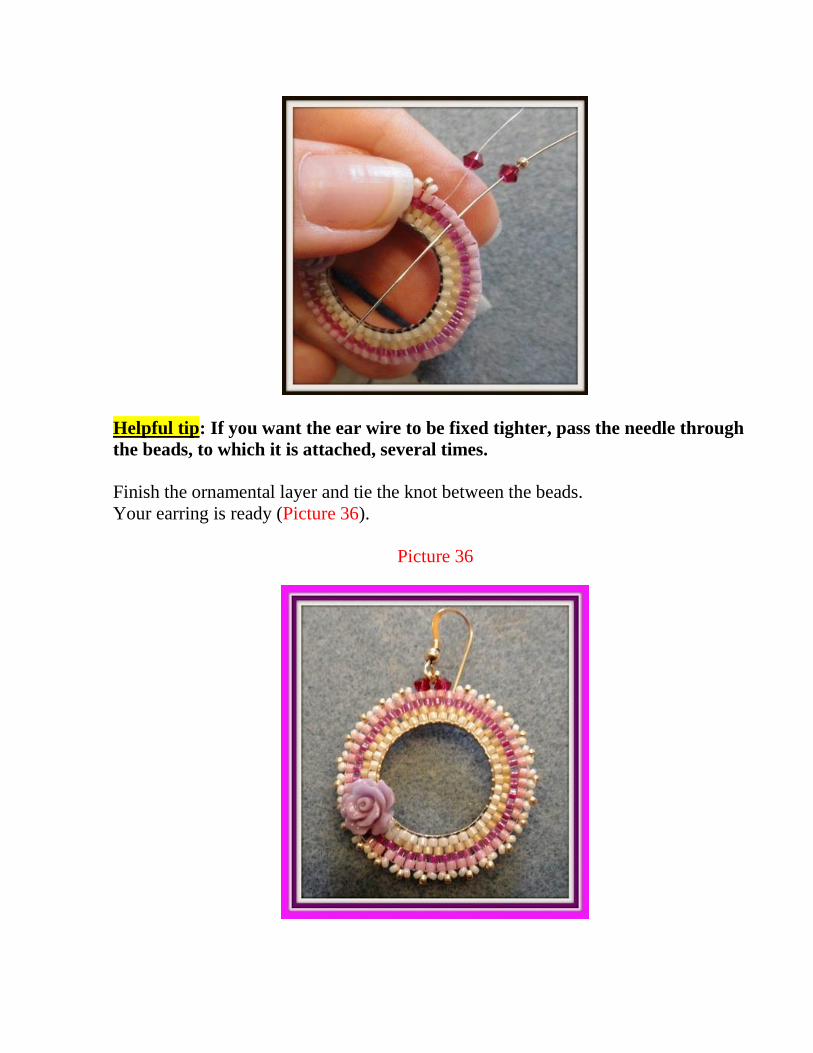
Helpful tip: If you want the ear wire to be fixed tighter, pass the needle through
the beads, to which it is attached, several times.
Finish the ornamental layer and tie the knot between the beads.
Your earring is ready (Picture 36).
Picture 36

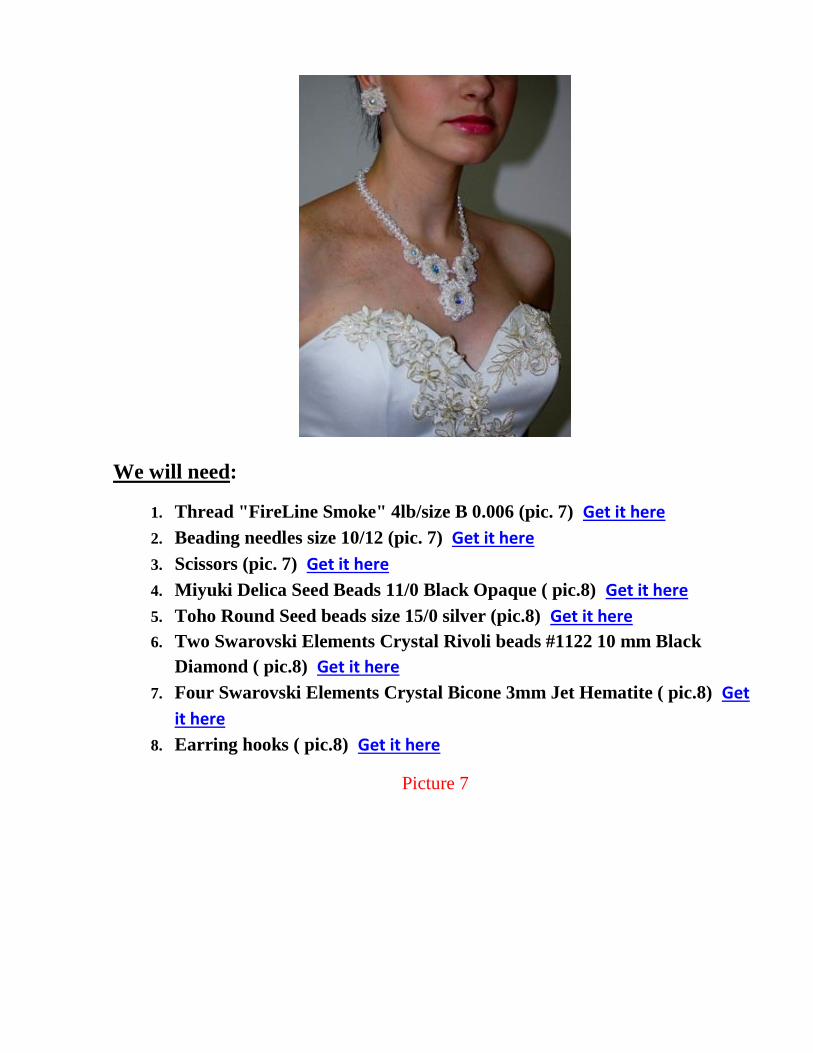
7. TUTORIAL 4: Earrings for any Occasion
One of the most popular techniques among bead designers and artists is bezeling a
rivoli. There are several methods to do this, but in my opinion the neatest and the
most good-looking one is the Peyote stitch. To learn this technique we will bead
earrings with Swarovski crystal (Picture 1). We will bezel the rivoli with beads.
You should take seed beads of the same size. The better the quality of your seed
beads, the more expensive your piece of jewelry will look.
Picture 1
You can see examples of jewelry beaded with this technique on (Pictures 2, 3, 4, 5,
and 6).
Picture 2
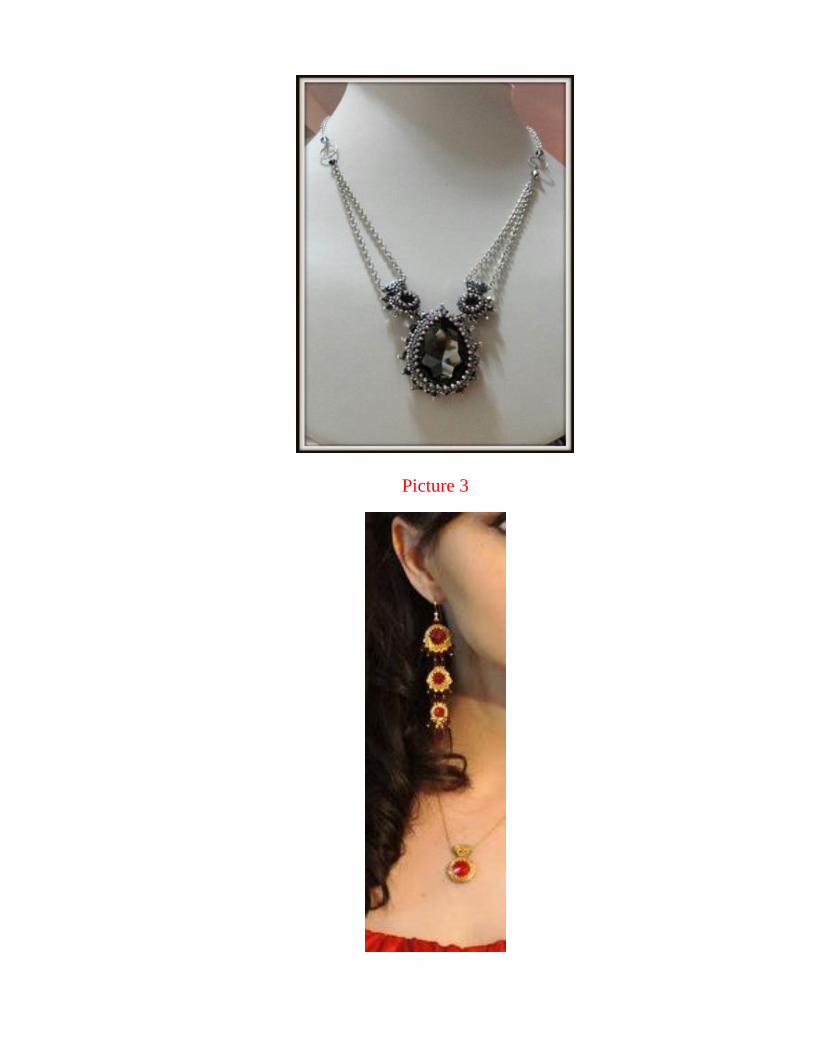
Picture 3

Picture 4
Picture 5
Picture 6
We will need:
1. Thread "FireLine Smoke" 4lb/size B 0.006 (pic. 7) Get it here
2. Beading needles size 10/12 (pic. 7) Get it here
3. Scissors (pic. 7) Get it here
4. Miyuki Delica Seed Beads 11/0 Black Opaque ( pic.8) Get it here
5. Toho Round Seed beads size 15/0 silver (pic.8) Get it here
6. Two Swarovski Elements Crystal Rivoli beads #1122 10 mm Black
Diamond ( pic.8) Get it here
7. Four Swarovski Elements Crystal Bicone 3mm Jet Hematite ( pic.8) Get
it here
8. Earring hooks ( pic.8) Get it here
Picture 7
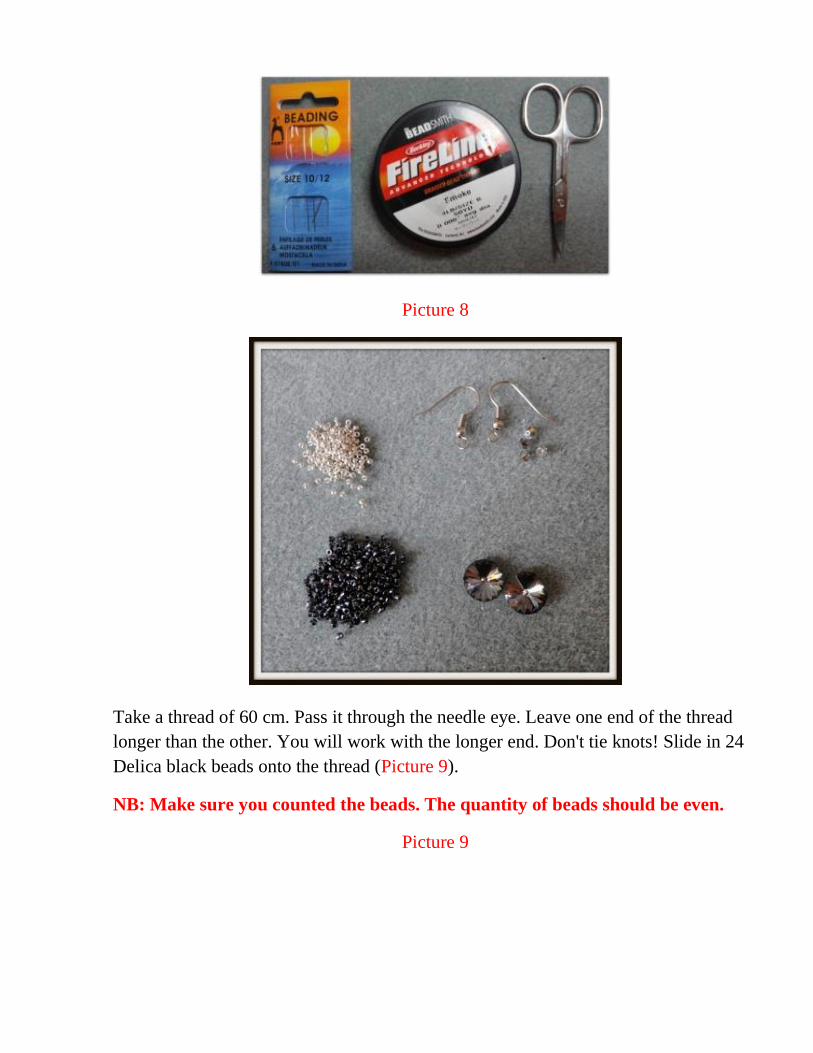
Picture 8
Take a thread of 60 cm. Pass it through the needle eye. Leave one end of the thread
longer than the other. You will work with the longer end. Don't tie knots! Slide in 24
Delica black beads onto the thread (Picture 9).
NB: Make sure you counted the beads. The quantity of beads should be even.
Picture 9

Helpful tip: If you bezel larger rivoli, you should count an even quantity of beads
and make a circle around it. The rivoli should be the size of the circle.
String the beads onto the thread almost to the end of it, leaving the tail of 4-5 cm. Pass
the thread through all the strung beads (from the first one to the last) and tie them into
a ring (Picture 10, 11).
Picture 10
Picture 11
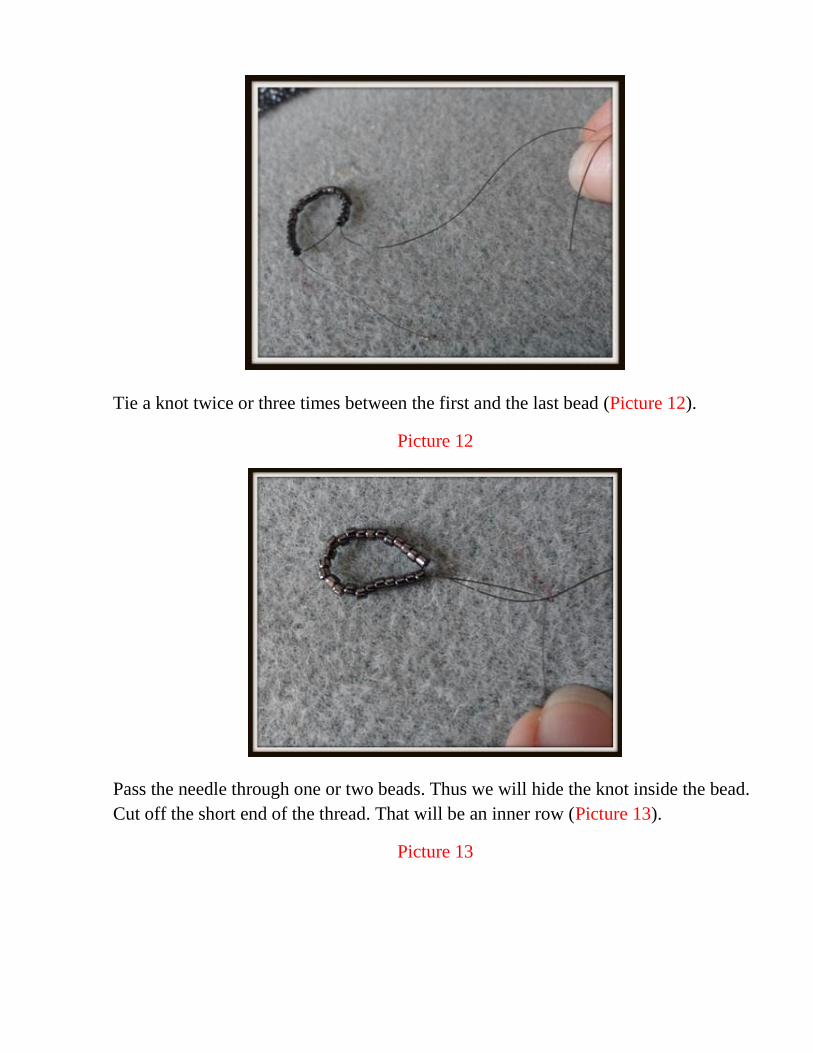
Tie a knot twice or three times between the first and the last bead (Picture 12).
Picture 12
Pass the needle through one or two beads. Thus we will hide the knot inside the bead.
Cut off the short end of the thread. That will be an inner row (Picture 13).
Picture 13
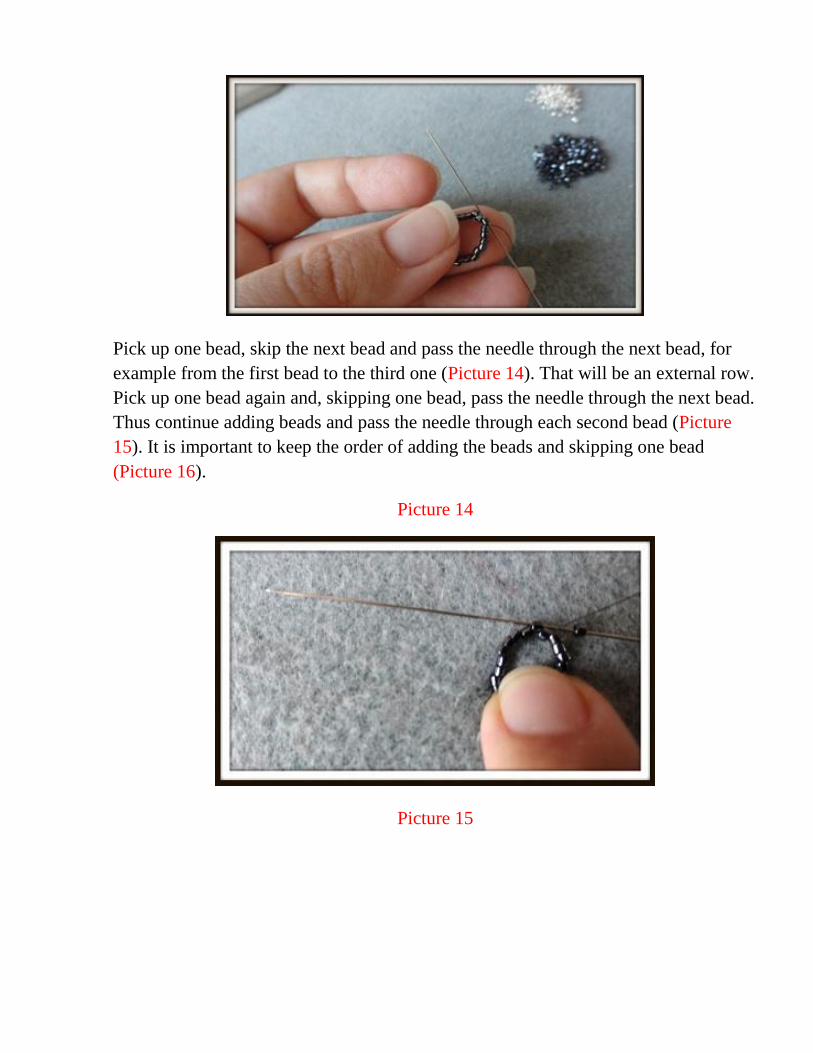
Pick up one bead, skip the next bead and pass the needle through the next bead, for
example from the first bead to the third one (Picture 14). That will be an external row.
Pick up one bead again and, skipping one bead, pass the needle through the next bead.
Thus continue adding beads and pass the needle through each second bead (Picture
15). It is important to keep the order of adding the beads and skipping one bead
(Picture 16).
Picture 14
Picture 15

Picture 16
Helpful tip: Moving in a circle, try to bead in the same direction.
Finish the row.
NB: Beading every new row, we should finish in the bead, with which we started. To
begin a next row, we should slide into the first bead of the previous row.
Pass the needle through the first bead of the external row, as shown on the (Picture
17).
Picture 17

Now bead next external row. Keep sliding in one bead and passing the needle through
each bead of the external row (Picture 18).
Picture 18
The circle will be expanding.
Helpful tip: Beading first rows don't pull the thread very tight.
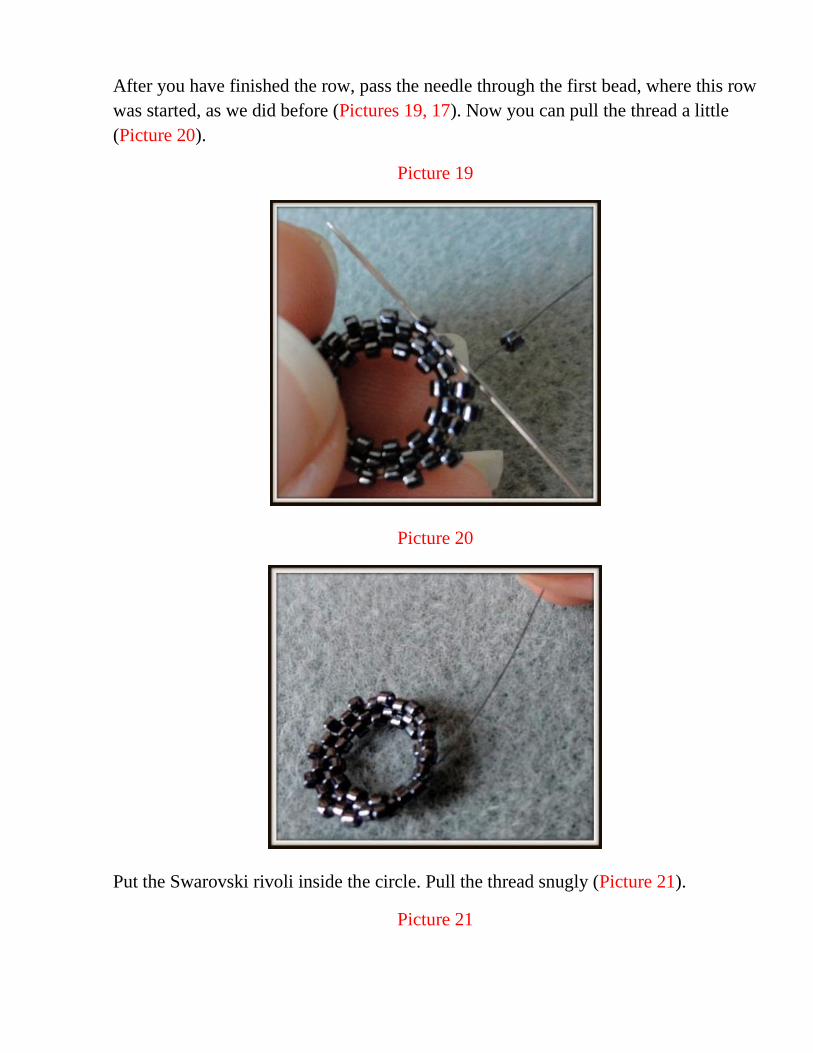
After you have finished the row, pass the needle through the first bead, where this row
was started, as we did before (Pictures 19, 17). Now you can pull the thread a little
(Picture 20).
Picture 19
Picture 20
Put the Swarovski rivoli inside the circle. Pull the thread snugly (Picture 21).
Picture 21
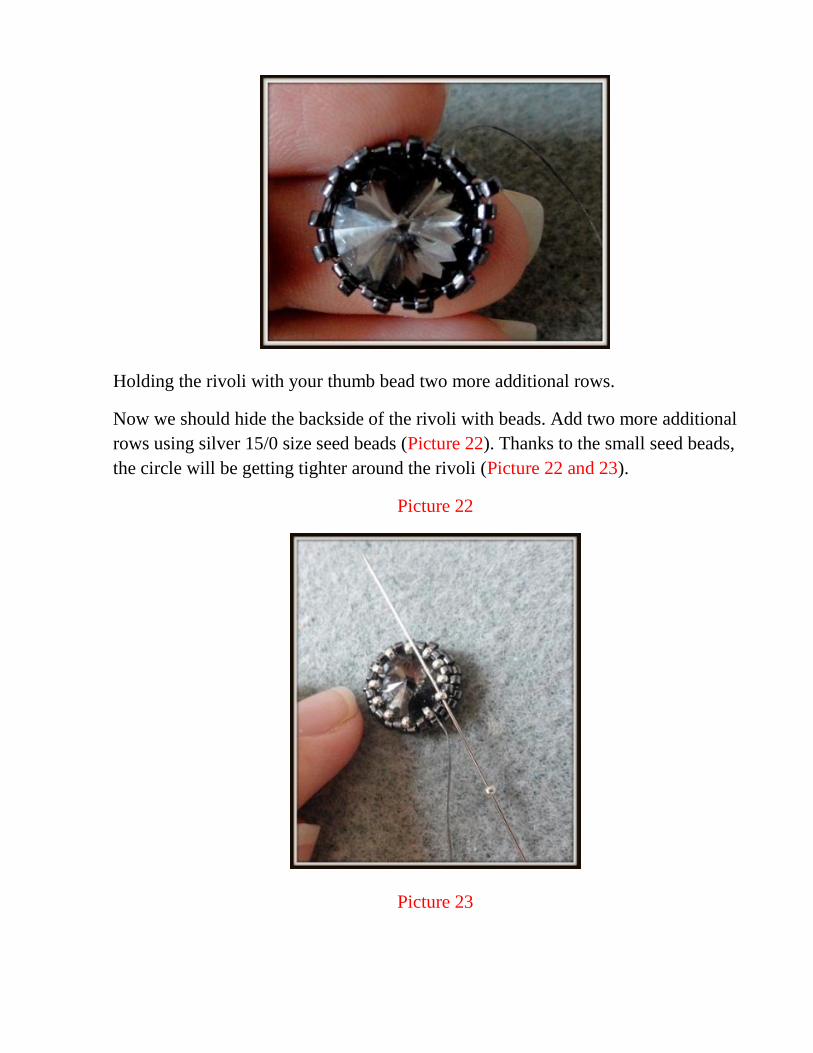
Holding the rivoli with your thumb bead two more additional rows.
Now we should hide the backside of the rivoli with beads. Add two more additional
rows using silver 15/0 size seed beads (Picture 22). Thanks to the small seed beads,
the circle will be getting tighter around the rivoli (Picture 22 and 23).
Picture 22
Picture 23
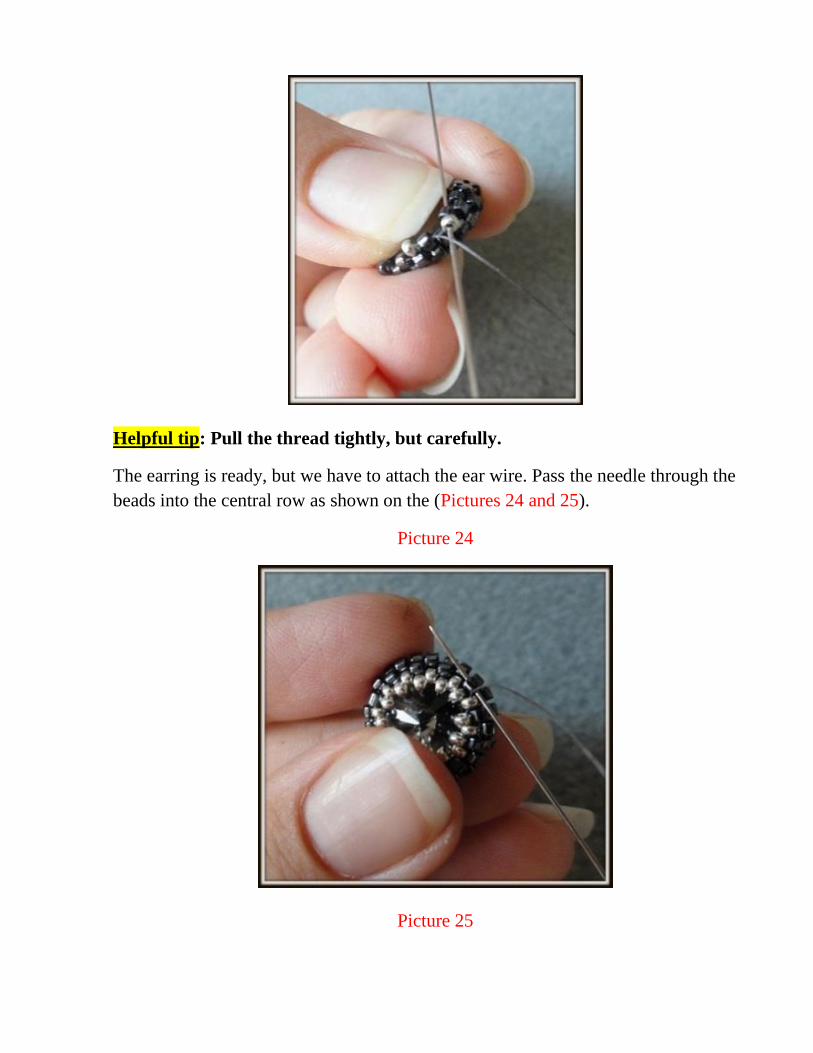
Helpful tip: Pull the thread tightly, but carefully.
The earring is ready, but we have to attach the ear wire. Pass the needle through the
beads into the central row as shown on the (Pictures 24 and 25).
Picture 24
Picture 25

String a 3mm crystal and a 15/0 silver bead onto the thread and pass it through the ear
wire loop (Pictures 26 and 27).
Picture 26
Picture 27
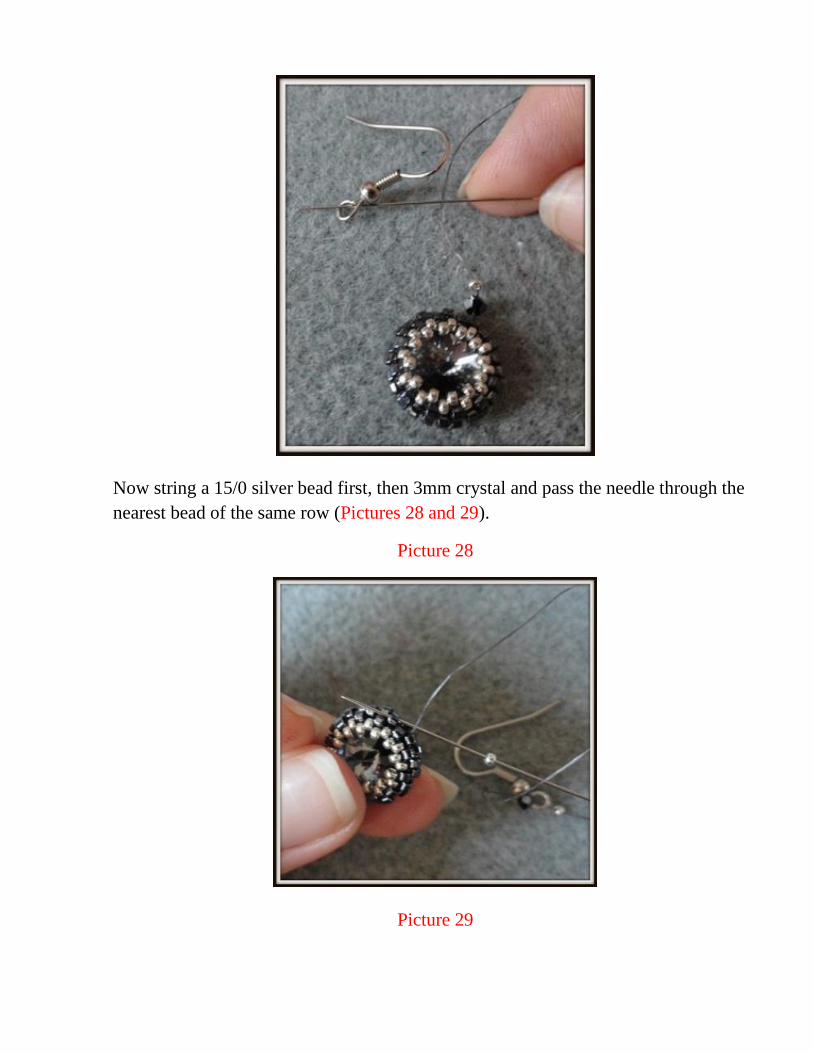
Now string a 15/0 silver bead first, then 3mm crystal and pass the needle through the
nearest bead of the same row (Pictures 28 and 29).
Picture 28
Picture 29

Helpful tip: To fix the ear wire loop very tight, you should pass the needle
through all the beads several times. You can do this as you like. Try to pass the
needle through the beads in such a way that the needle will be hidden and your
piece looks very neat. Below I will describe my method, but you can attach it as
you like.
Make sure your needle come out of the next seed bead of the previous row. Then turn
your needle, skip two nearest beads and return your needle in the opposite direction.
You can move from one row to another (Picture 30 and 31).
Picture 30
Picture 31
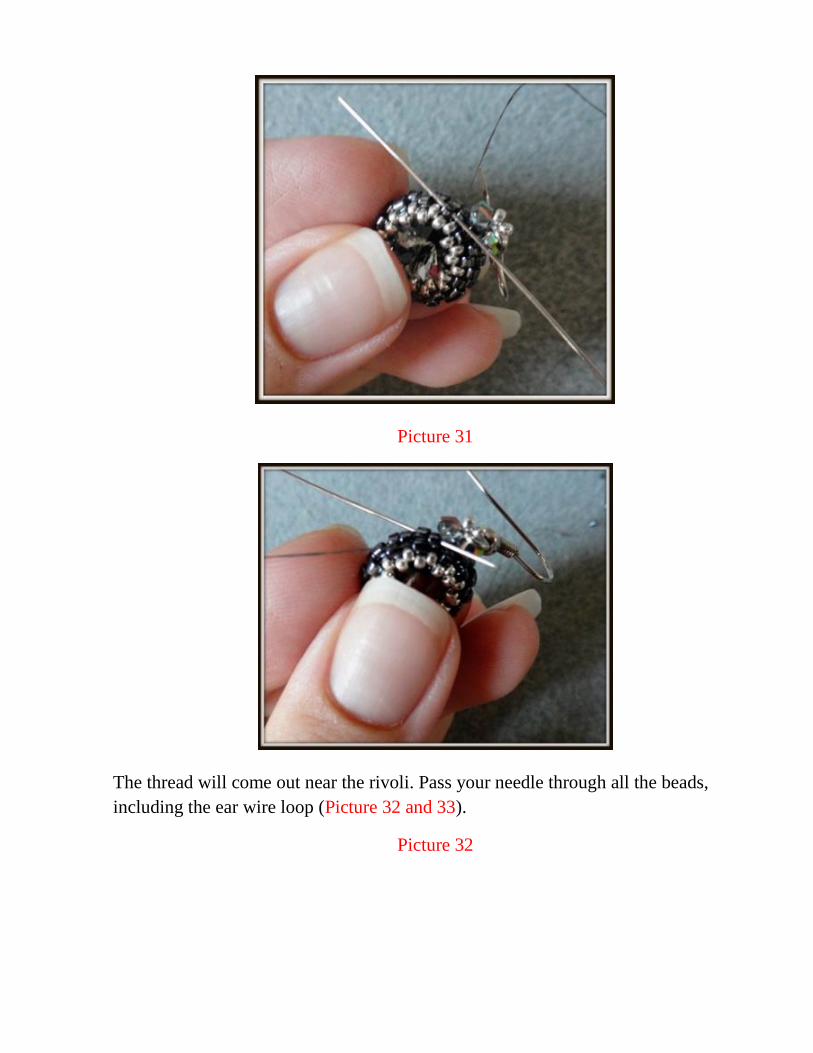
The thread will come out near the rivoli. Pass your needle through all the beads,
including the ear wire loop (Picture 32 and 33).
Picture 32
Picture 33
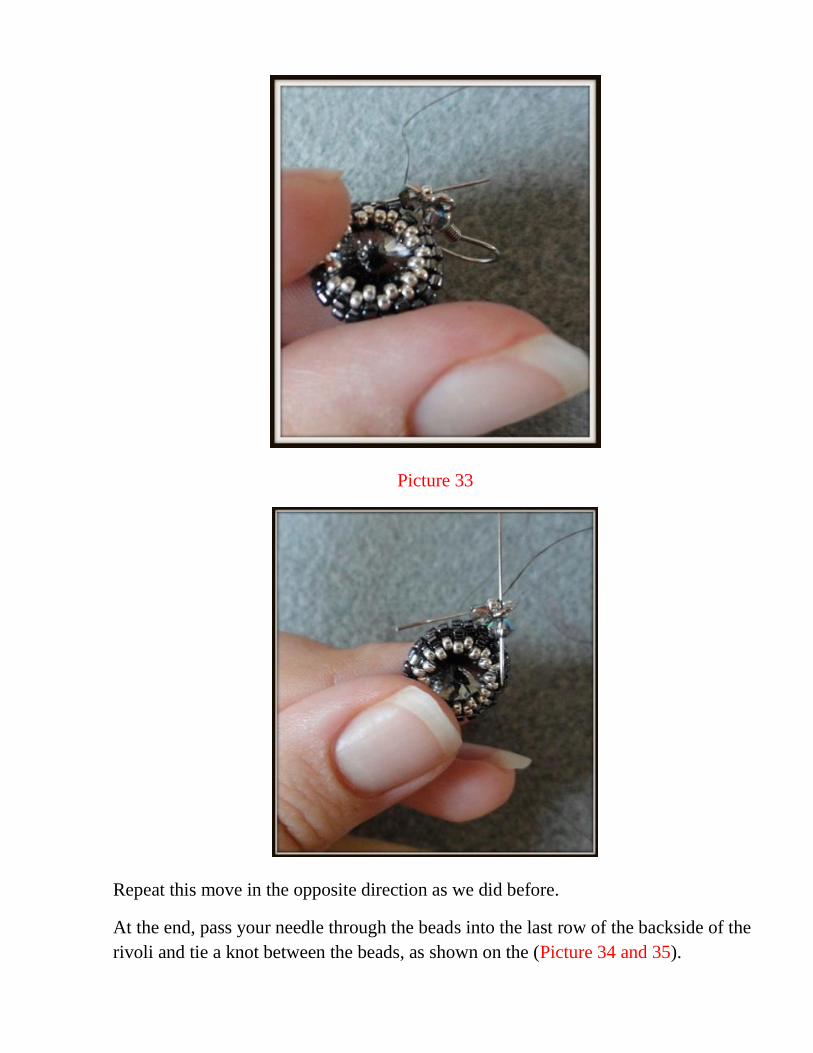
Repeat this move in the opposite direction as we did before.
At the end, pass your needle through the beads into the last row of the backside of the
rivoli and tie a knot between the beads, as shown on the (Picture 34 and 35).

Picture 34
Picture 35
Pass the needle into the nearest bead to hide the knot and clip the thread. The earrings
are ready to complete your new outfit!

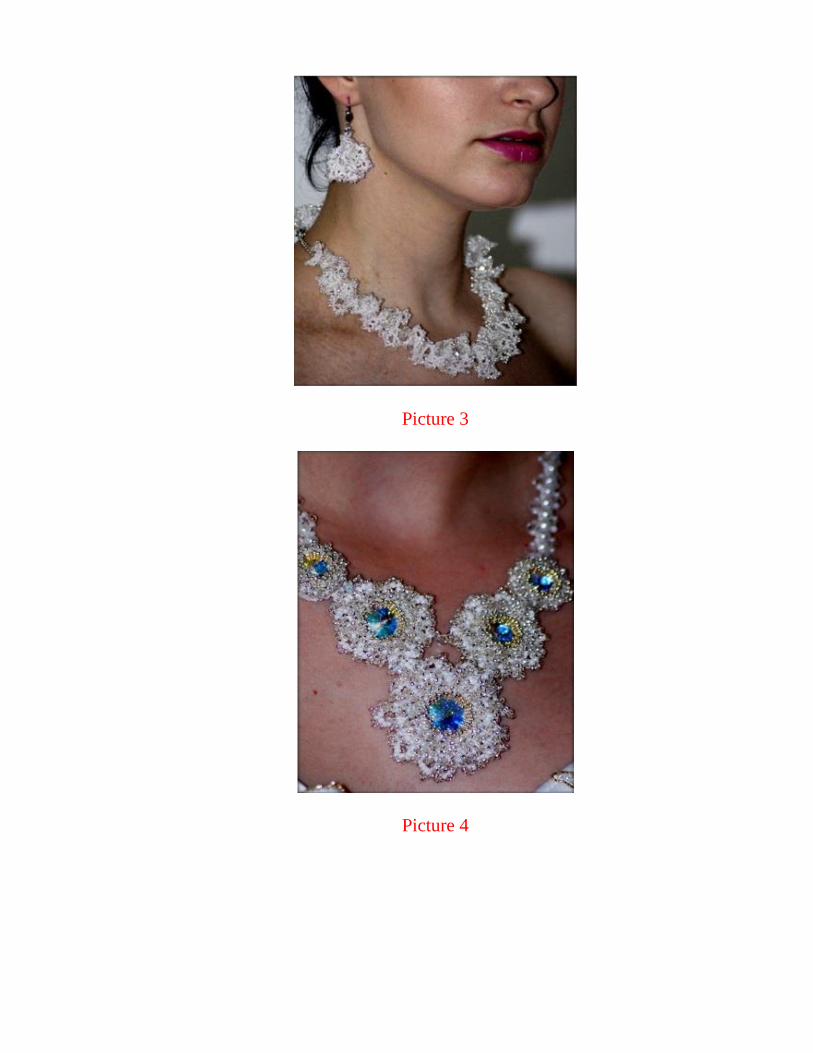
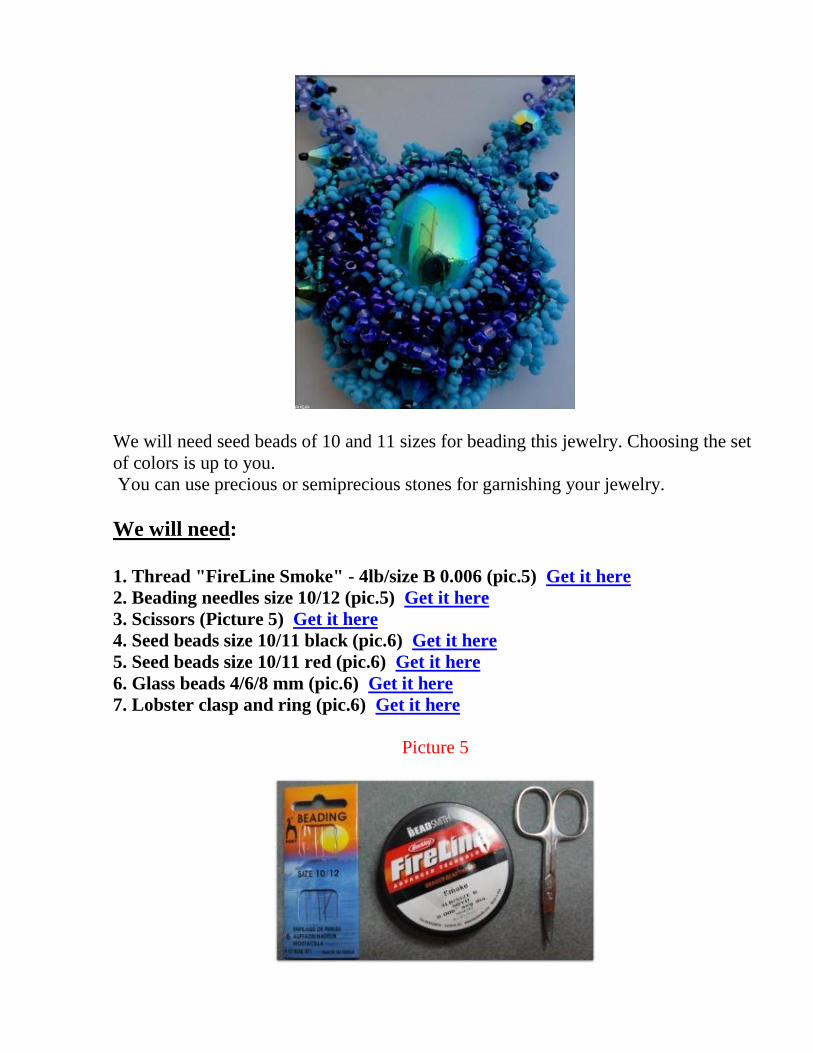
8. TUTORIAL 5: Necklace Ogalala Lace
One of the most famous beading techniques is lace beading technique or also known
as "Ogalala" (Picture 1 and 2). You can use this technique for beading different kinds
of jewelry such as a necklace, earrings or bracelets (Picture 3 and 4). Ogalala
technique will always look very glamorous, feminine and festive. It will complete
your everyday outfit or evening gown. It is not surprising that brides always choose
this kind of jewelry for their wedding dresses.
Picture 1
Picture 2
Picture 3
Picture 4
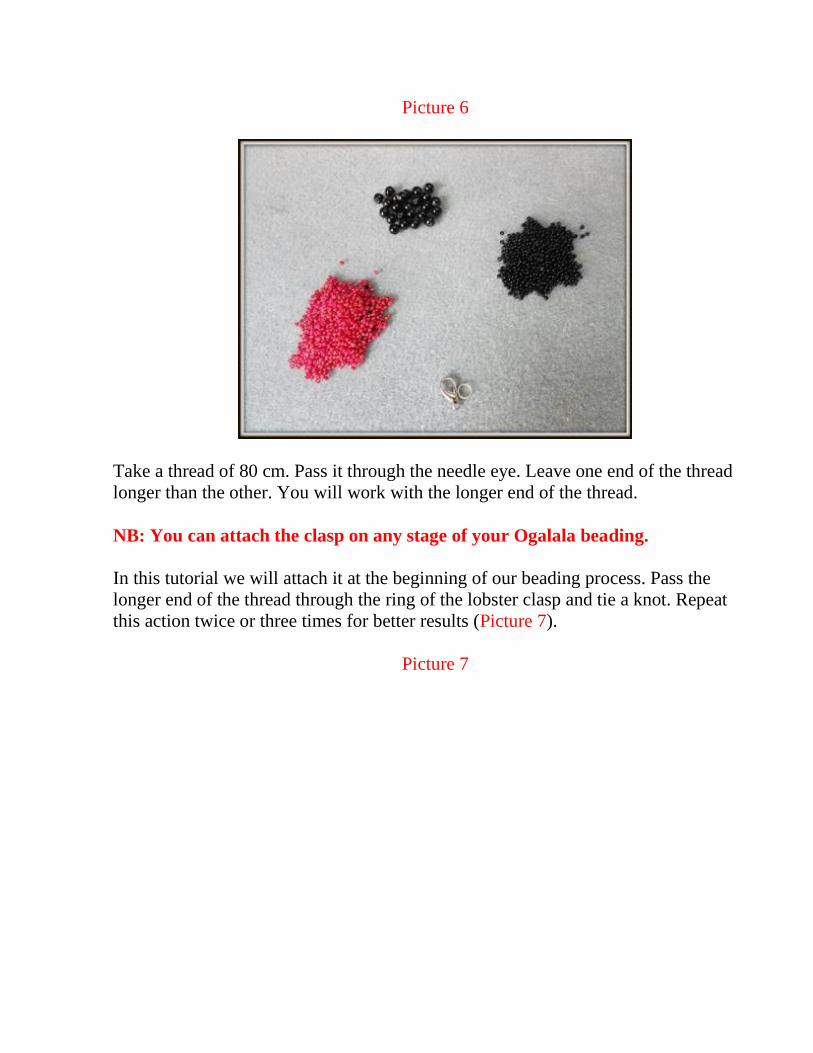
We will need seed beads of 10 and 11 sizes for beading this jewelry. Choosing the set
of colors is up to you.
You can use precious or semiprecious stones for garnishing your jewelry.
We will need:
1. Thread "FireLine Smoke" - 4lb/size B 0.006 (pic.5) Get it here
2. Beading needles size 10/12 (pic.5) Get it here
3. Scissors (Picture 5) Get it here
4. Seed beads size 10/11 black (pic.6) Get it here
5. Seed beads size 10/11 red (pic.6) Get it here
6. Glass beads 4/6/8 mm (pic.6) Get it here
7. Lobster clasp and ring (pic.6) Get it here
Picture 5
Picture 6
Take a thread of 80 cm. Pass it through the needle eye. Leave one end of the thread
longer than the other. You will work with the longer end of the thread.
NB: You can attach the clasp on any stage of your Ogalala beading.
In this tutorial we will attach it at the beginning of our beading process. Pass the
longer end of the thread through the ring of the lobster clasp and tie a knot. Repeat
this action twice or three times for better results (Picture 7).
Picture 7
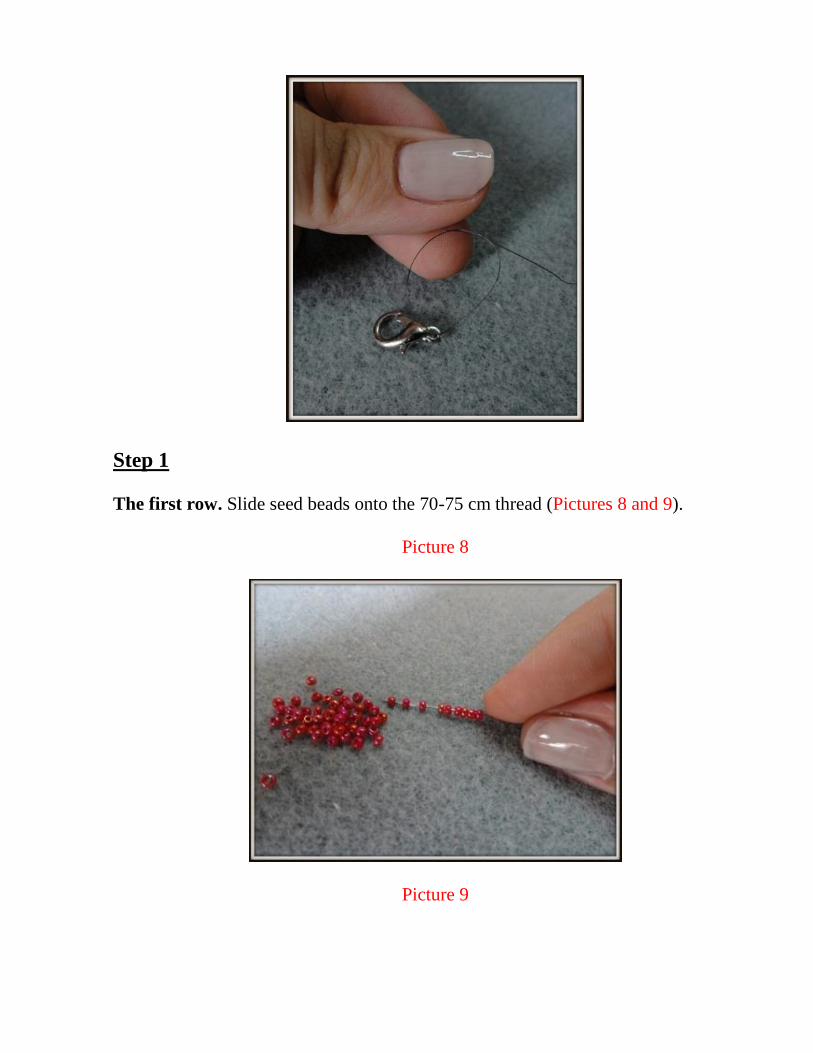
Step 1
The first row. Slide seed beads onto the 70-75 cm thread (Pictures 8 and 9).
Picture 8
Picture 9
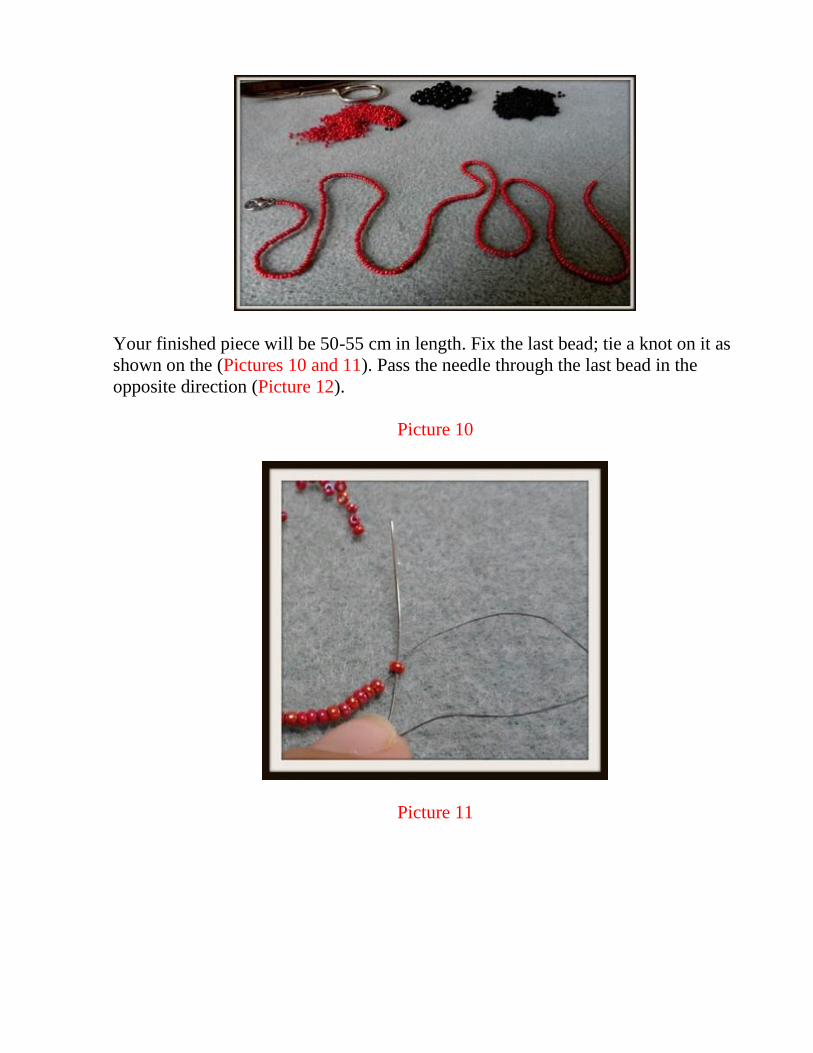
Your finished piece will be 50-55 cm in length. Fix the last bead; tie a knot on it as
shown on the (Pictures 10 and 11). Pass the needle through the last bead in the
opposite direction (Picture 12).
Picture 10
Picture 11
Picture 12
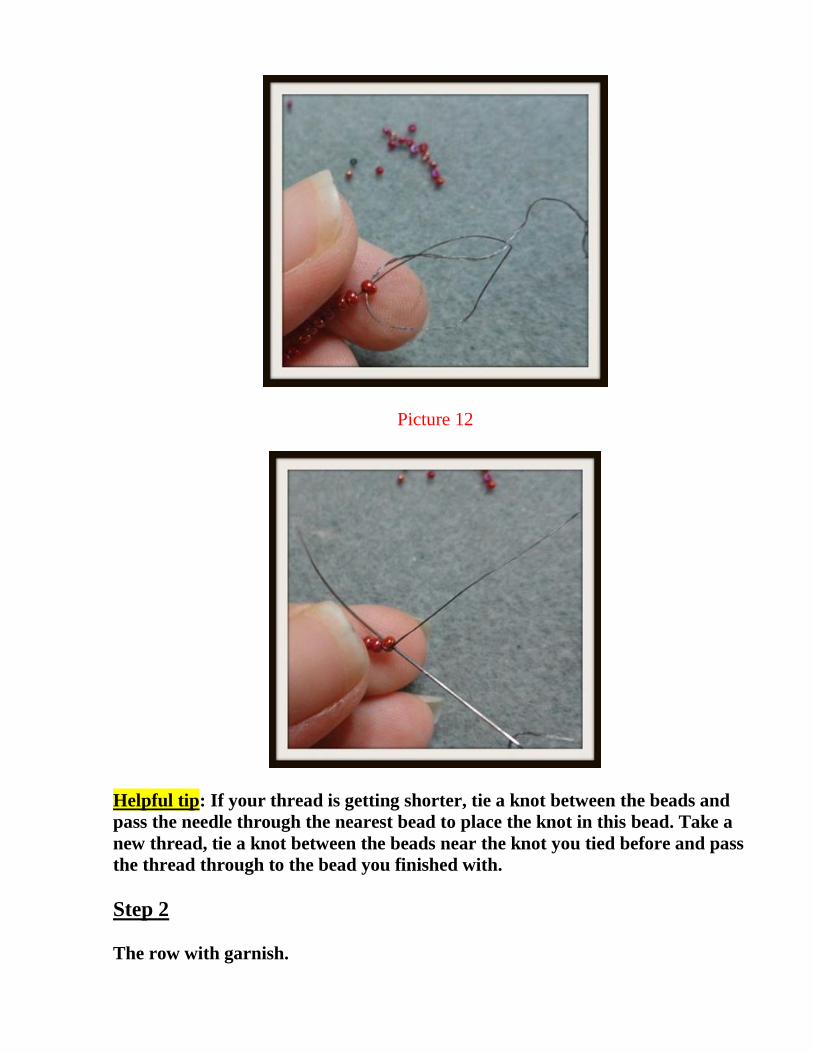
Helpful tip: If your thread is getting shorter, tie a knot between the beads and
pass the needle through the nearest bead to place the knot in this bead. Take a
new thread, tie a knot between the beads near the knot you tied before and pass
the thread through to the bead you finished with.
Step 2
The row with garnish.
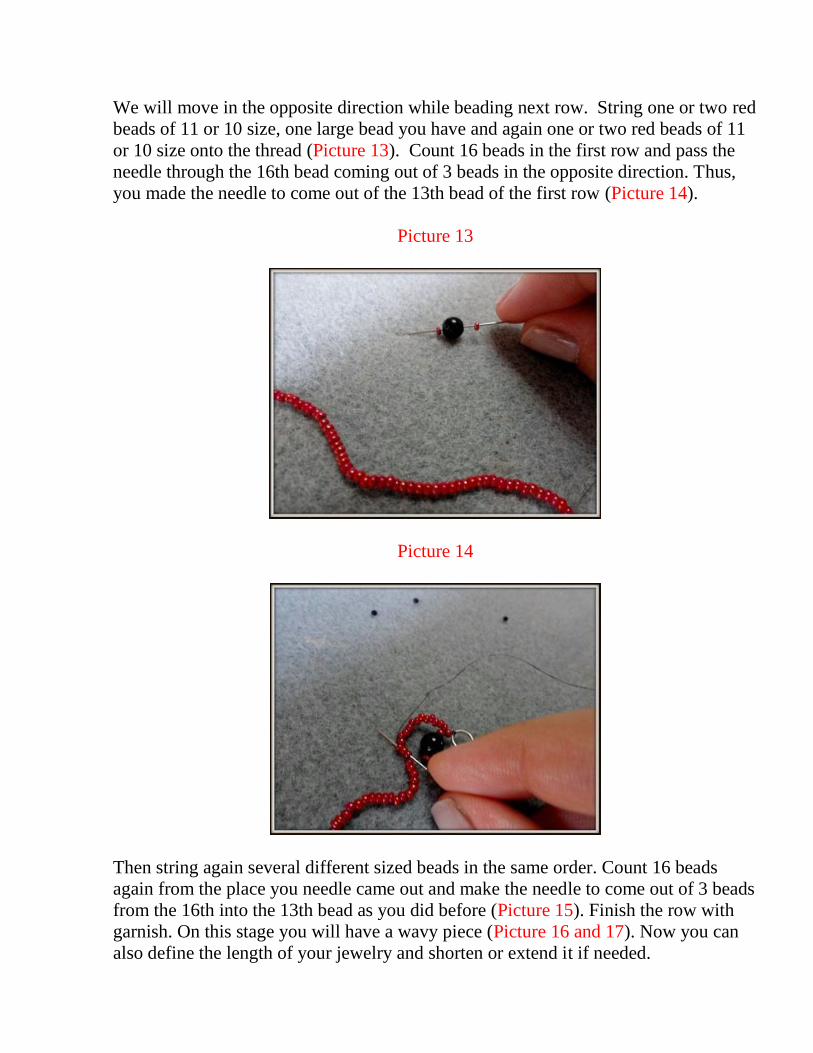
We will move in the opposite direction while beading next row. String one or two red
beads of 11 or 10 size, one large bead you have and again one or two red beads of 11
or 10 size onto the thread (Picture 13). Count 16 beads in the first row and pass the
needle through the 16th bead coming out of 3 beads in the opposite direction. Thus,
you made the needle to come out of the 13th bead of the first row (Picture 14).
Picture 13
Picture 14
Then string again several different sized beads in the same order. Count 16 beads
again from the place you needle came out and make the needle to come out of 3 beads
from the 16th into the 13th bead as you did before (Picture 15). Finish the row with
garnish. On this stage you will have a wavy piece (Picture 16 and 17). Now you can
also define the length of your jewelry and shorten or extend it if needed.
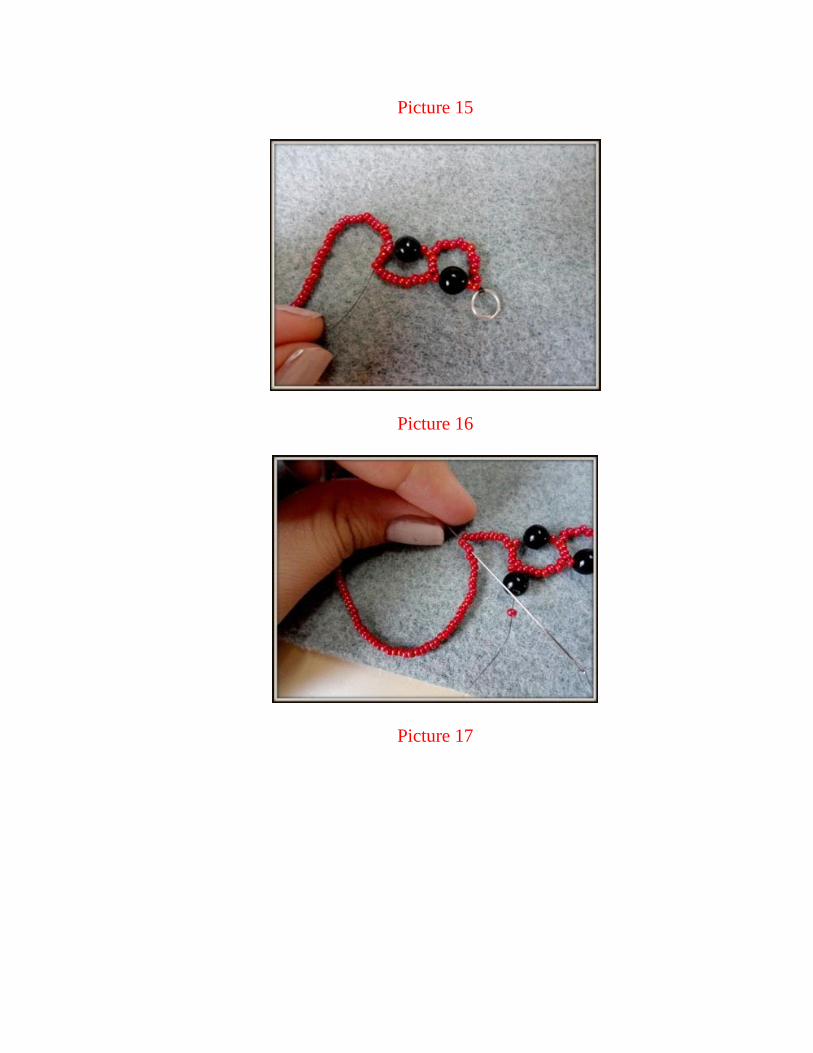
Picture 15
Picture 16
Picture 17

Step 3
The second row.
We will bead the second row in the opposite direction again. Make your needle come
out of the last bead of the previous row, now the last bead will be the first one. Slide
in 3 black seed beads and make your needle come out passing one bead. Your needle
will come out of the first bead onto the third one (Picture 18).
Picture 18
String 3 black seed beads and pass the needle through the third bead to the sixth one.
Beading this way your needle will pass through each second bead (Picture 19 and 20).
Pictures 19
Pictures 20
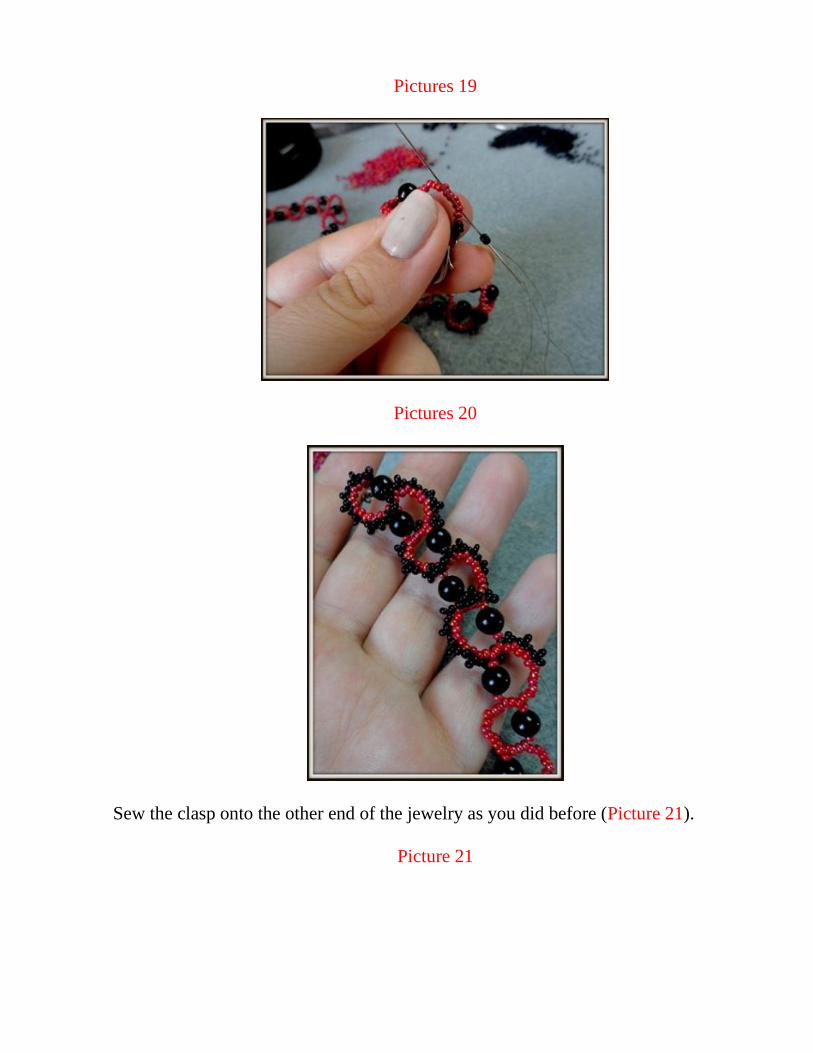
Sew the clasp onto the other end of the jewelry as you did before (Picture 21).
Picture 21

NB: Bead each next row in the opposite direction!
Step 4
The third row.
Pass the needle through several beads at once and make it run out of the central bead
of the previous row (Picture 22).
Picture 22
Slide in 5 red beads and pass the needle through the central bead of the previous row
(which we beaded with black beads) Picture 23. Repeat this action, stringing 5 beads

and passing the needle with them through the central beads of the black row (Picture
24).
Picture 23
Picture 24
Complete the third row.
Step 5
The fourth row.
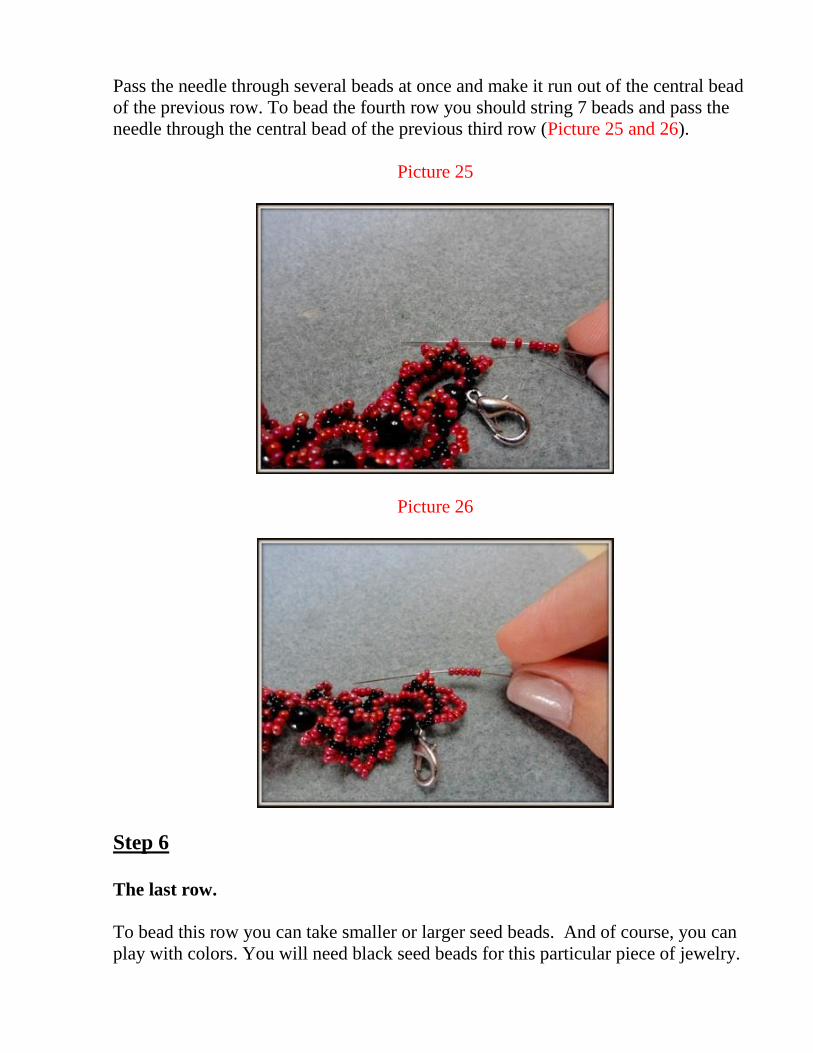
Pass the needle through several beads at once and make it run out of the central bead
of the previous row. To bead the fourth row you should string 7 beads and pass the
needle through the central bead of the previous third row (Picture 25 and 26).
Picture 25
Picture 26
Step 6
The last row.
To bead this row you can take smaller or larger seed beads. And of course, you can
play with colors. You will need black seed beads for this particular piece of jewelry.
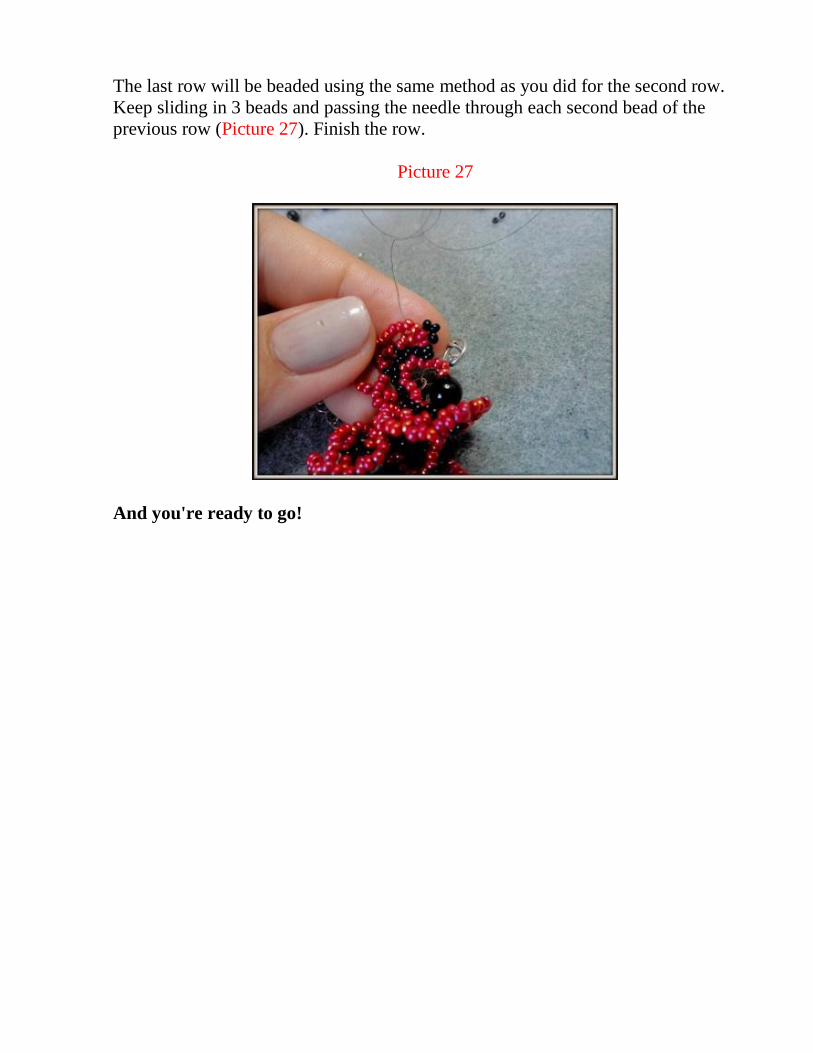
The last row will be beaded using the same method as you did for the second row.
Keep sliding in 3 beads and passing the needle through each second bead of the
previous row (Picture 27). Finish the row.
Picture 27
And you're ready to go!
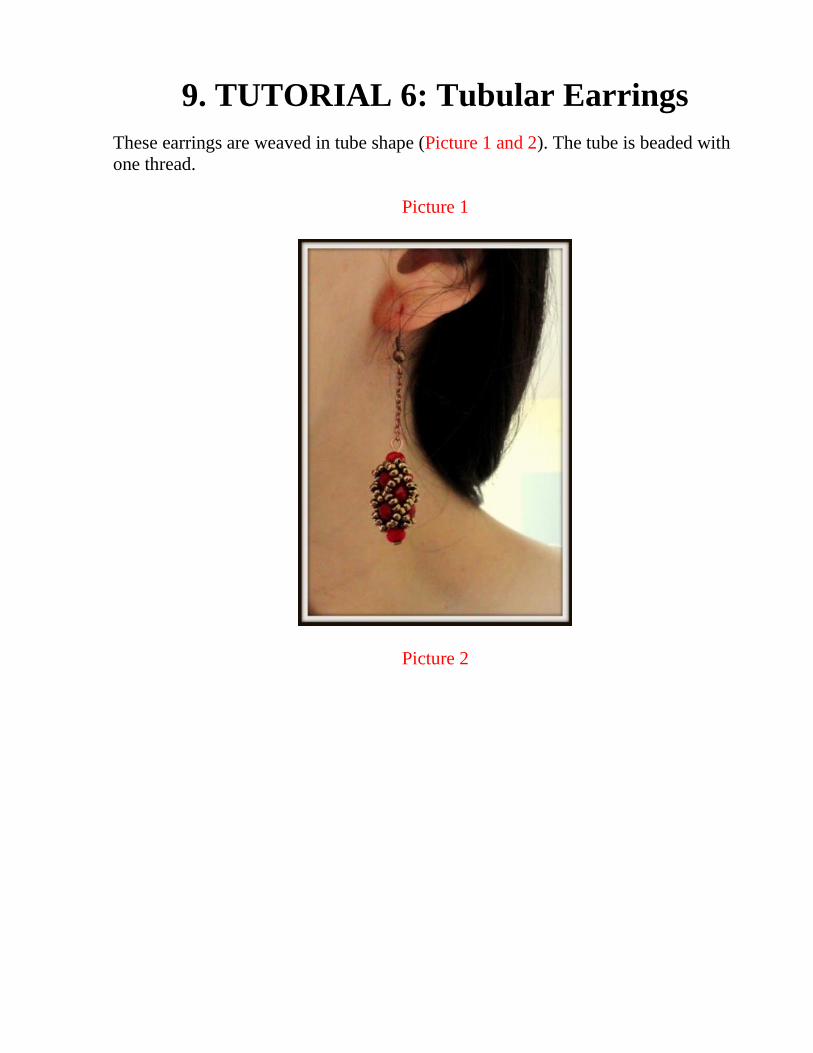
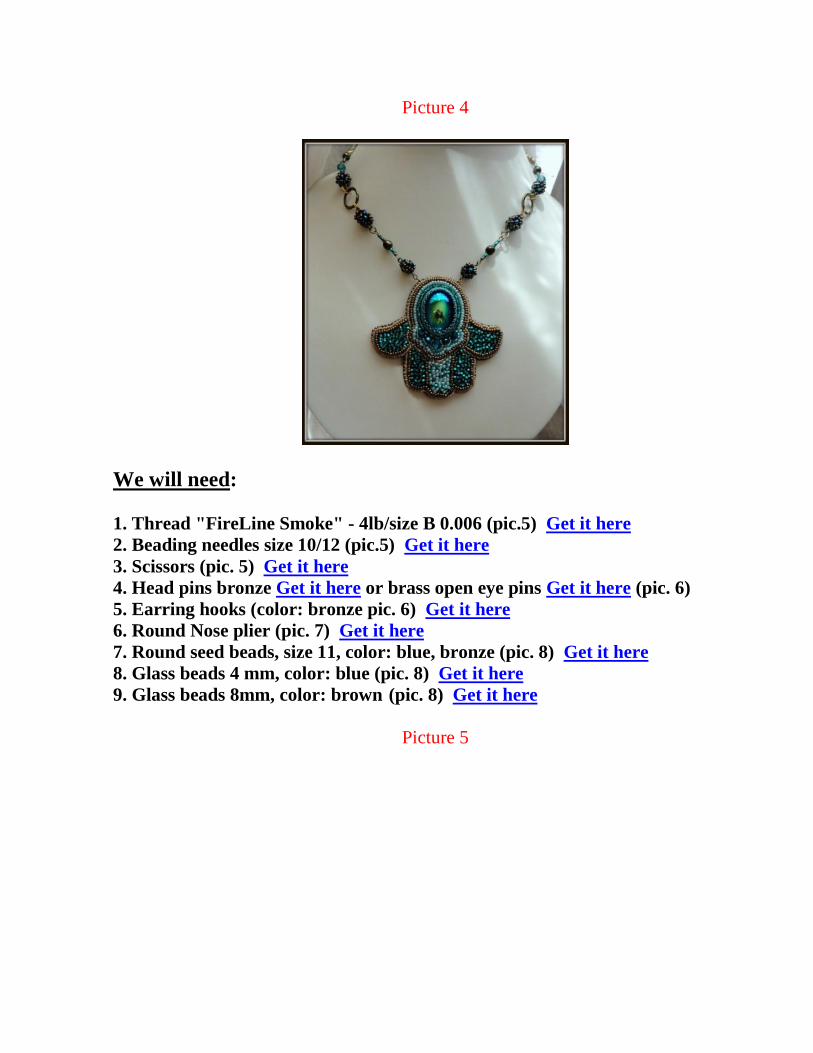
9. TUTORIAL 6: Tubular Earrings
These earrings are weaved in tube shape (Picture 1 and 2). The tube is beaded with
one thread.
Picture 1
Picture 2
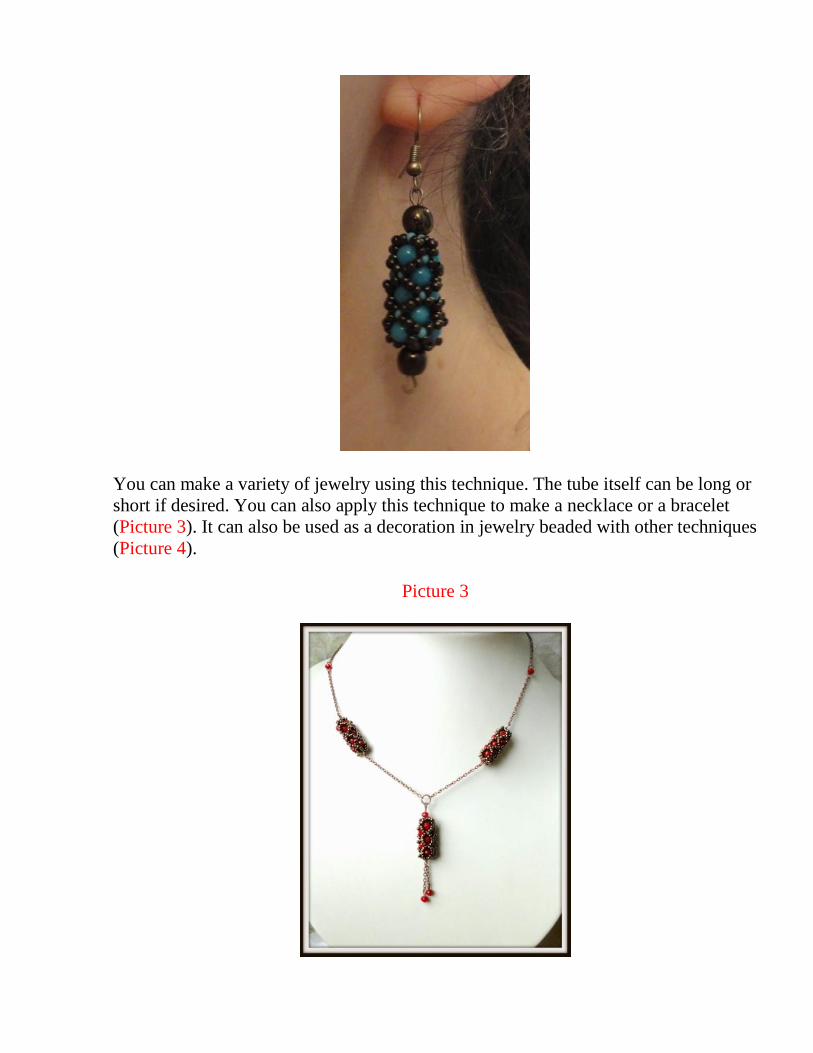
You can make a variety of jewelry using this technique. The tube itself can be long or
short if desired. You can also apply this technique to make a necklace or a bracelet
(Picture 3). It can also be used as a decoration in jewelry beaded with other techniques
(Picture 4).
Picture 3
Picture 4
We will need:
1. Thread "FireLine Smoke" - 4lb/size B 0.006 (pic.5) Get it here
2. Beading needles size 10/12 (pic.5) Get it here
3. Scissors (pic. 5) Get it here
4. Head pins bronze Get it here or brass open eye pins Get it here (pic. 6)
5. Earring hooks (color: bronze pic. 6) Get it here
6. Round Nose plier (pic. 7) Get it here
7. Round seed beads, size 11, color: blue, bronze (pic. 8) Get it here
8. Glass beads 4 mm, color: blue (pic. 8) Get it here
9. Glass beads 8mm, color: brown (pic. 8) Get it here
Picture 5
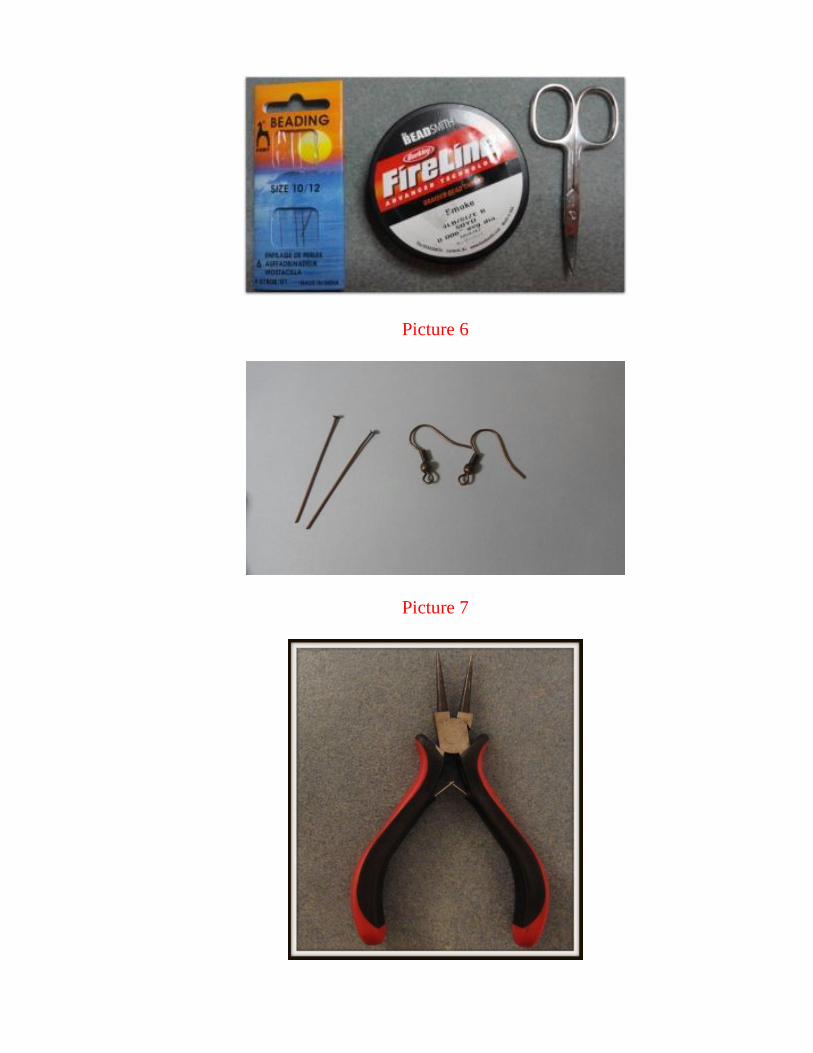
Picture 6
Picture 7
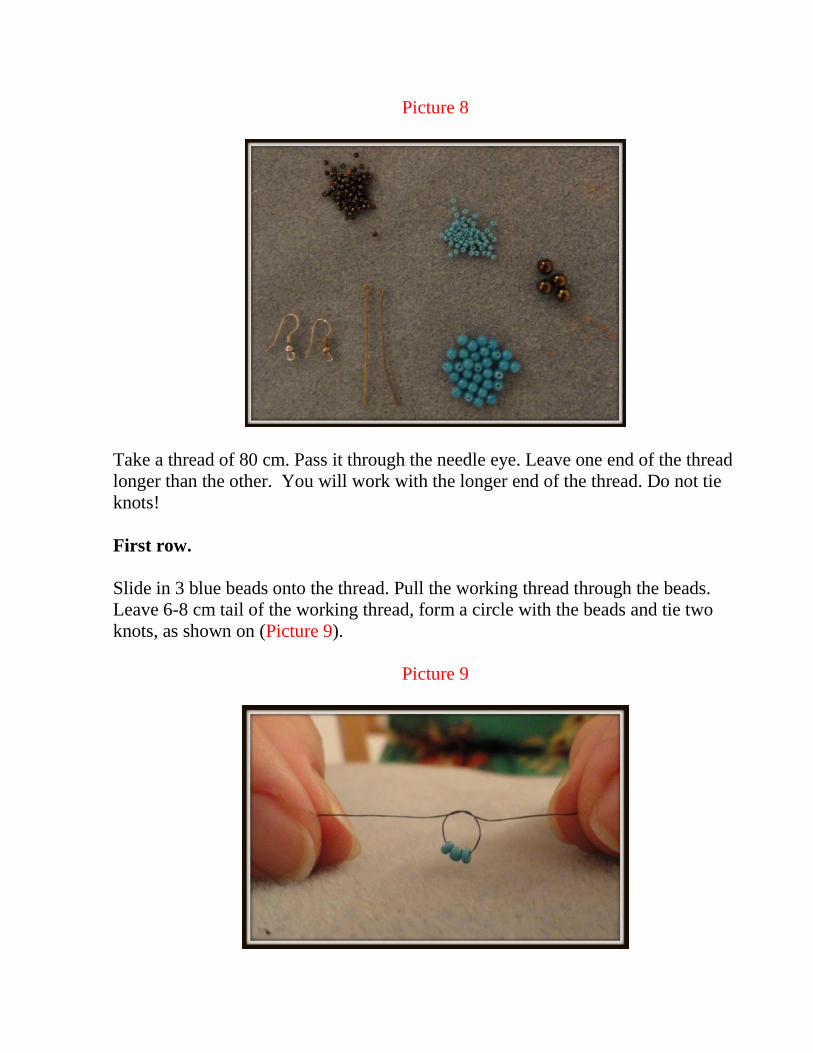
Picture 8
Take a thread of 80 cm. Pass it through the needle eye. Leave one end of the thread
longer than the other. You will work with the longer end of the thread. Do not tie
knots!
First row.
Slide in 3 blue beads onto the thread. Pull the working thread through the beads.
Leave 6-8 cm tail of the working thread, form a circle with the beads and tie two
knots, as shown on (Picture 9).
Picture 9

Picture 10
Pass the needle through the nearest bead (Picture 10).
The knot will be hidden inside the bead. The short end of the thread can be cut. Now
you have a circle of three beads. That is the first row(Picture 8).
Second row.
Passing the needle up through each blue bead, string 5 or 7 11mm beads and bring the
needle through the next blue bead of the first row. You are making a new circle of
beads (Picture 11, 12 and 13).
Picture 11
Picture 12
Picture 13

You must take odd number of beads. We use 5 beads in our piece and so that you
don't get confused, string rows in such color order: two brown beads, third blue bead
in the middle and two brown ones again.
You must create three circles in the second row (Picture 14).
Picture 14
The needle is in the blue bead of the first circle (Picture 14).
NB: The number of 11mm sized beads in the circles of the second row will
depend on the size of the bigger beads. If your bead is bigger than 4mm, as
described in our instruction, then you should take more 11mm beads and their
quantity should be odd.
Third row.
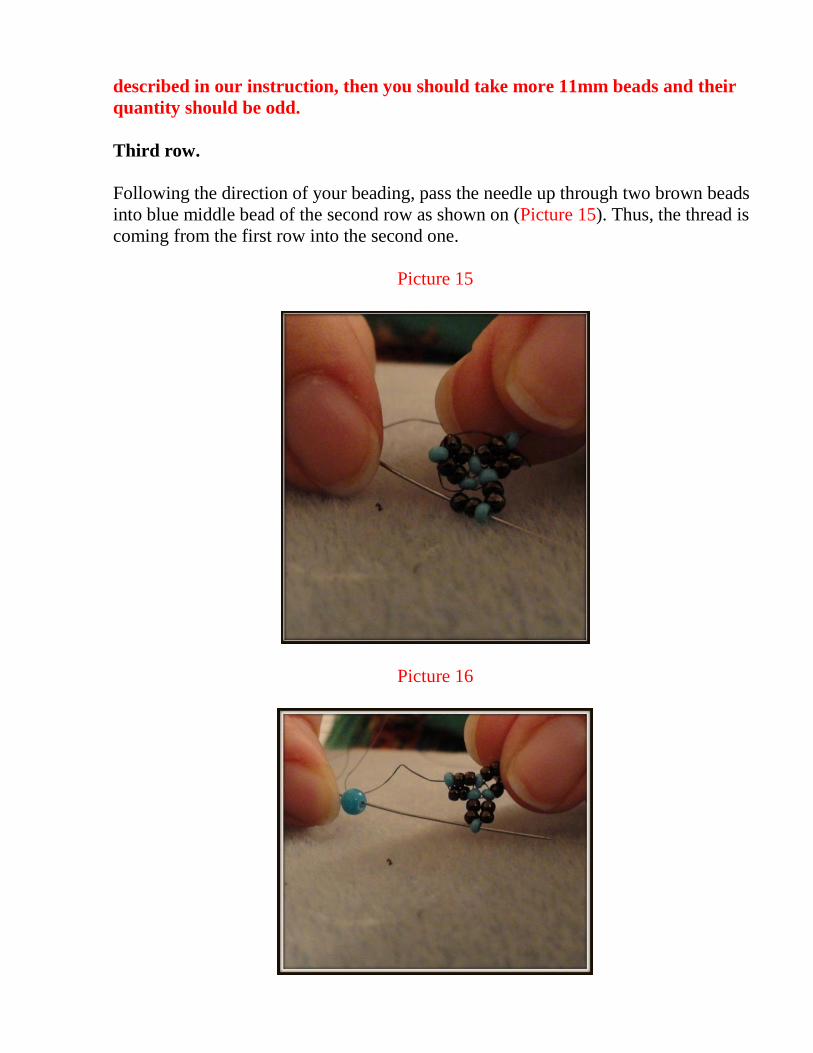
Following the direction of your beading, pass the needle up through two brown beads
into blue middle bead of the second row as shown on (Picture 15). Thus, the thread is
coming from the first row into the second one.
Picture 15
Picture 16
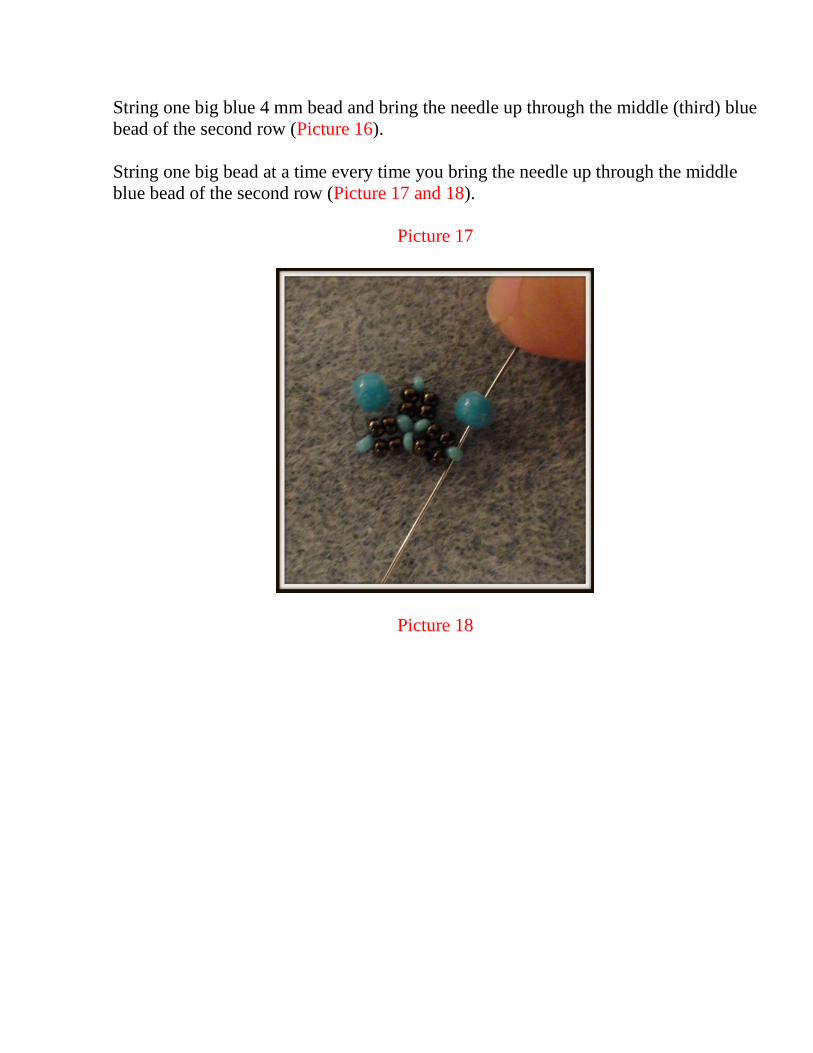
String one big blue 4 mm bead and bring the needle up through the middle (third) blue
bead of the second row (Picture 16).
String one big bead at a time every time you bring the needle up through the middle
blue bead of the second row (Picture 17 and 18).
Picture 17
Picture 18
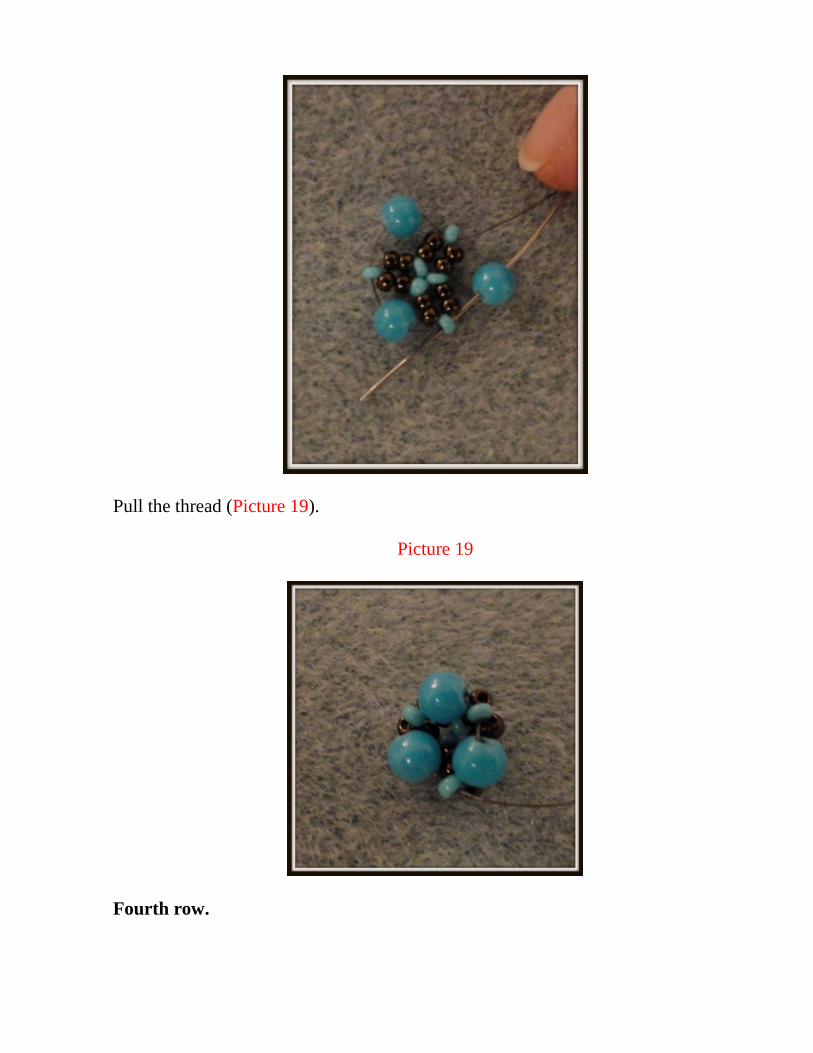
Pull the thread (Picture 19).
Picture 19
Fourth row.

We will continue to add more rows using beading techniques of the second row and
the third one interchangeably. The fourth row will be beaded the same as the second
row. Create 3 new circles around big beads by stringing 5 or 7 beads of the same color
(Picture 20, 21 and 22).
Picture 20
Picture 21
Picture 22
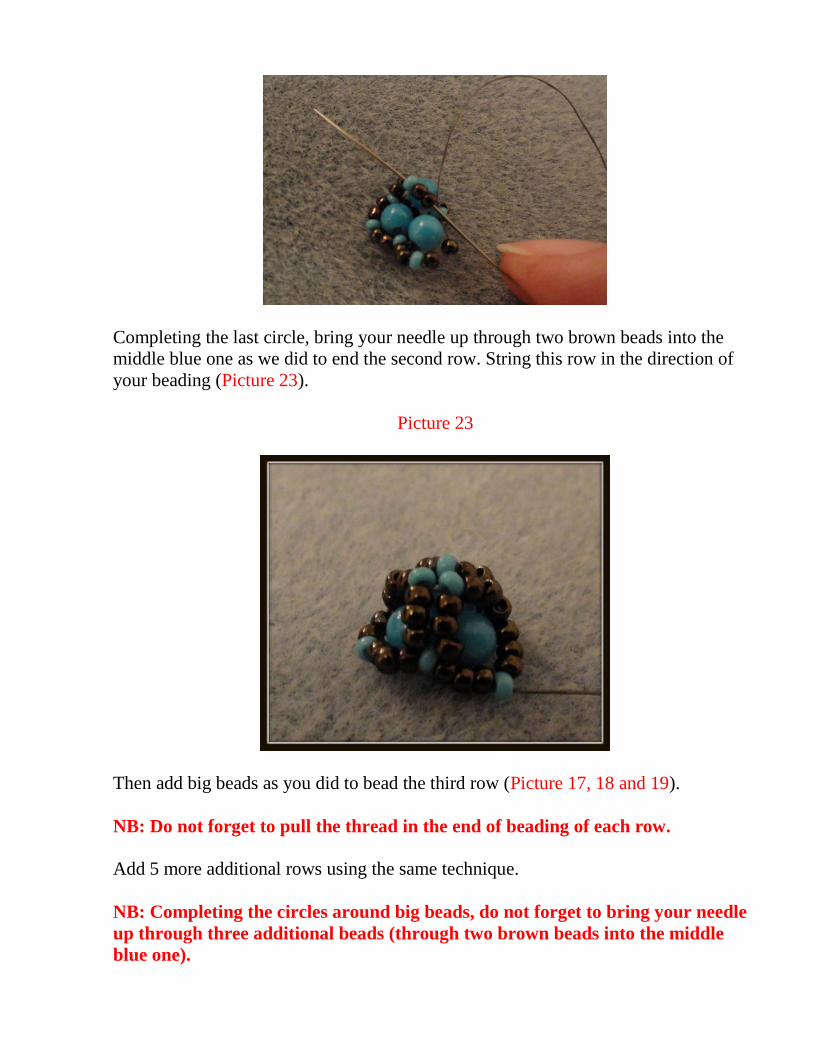
Completing the last circle, bring your needle up through two brown beads into the
middle blue one as we did to end the second row. String this row in the direction of
your beading (Picture 23).
Picture 23
Then add big beads as you did to bead the third row (Picture 17, 18 and 19).
NB: Do not forget to pull the thread in the end of beading of each row.
Add 5 more additional rows using the same technique.
NB: Completing the circles around big beads, do not forget to bring your needle
up through three additional beads (through two brown beads into the middle
blue one).
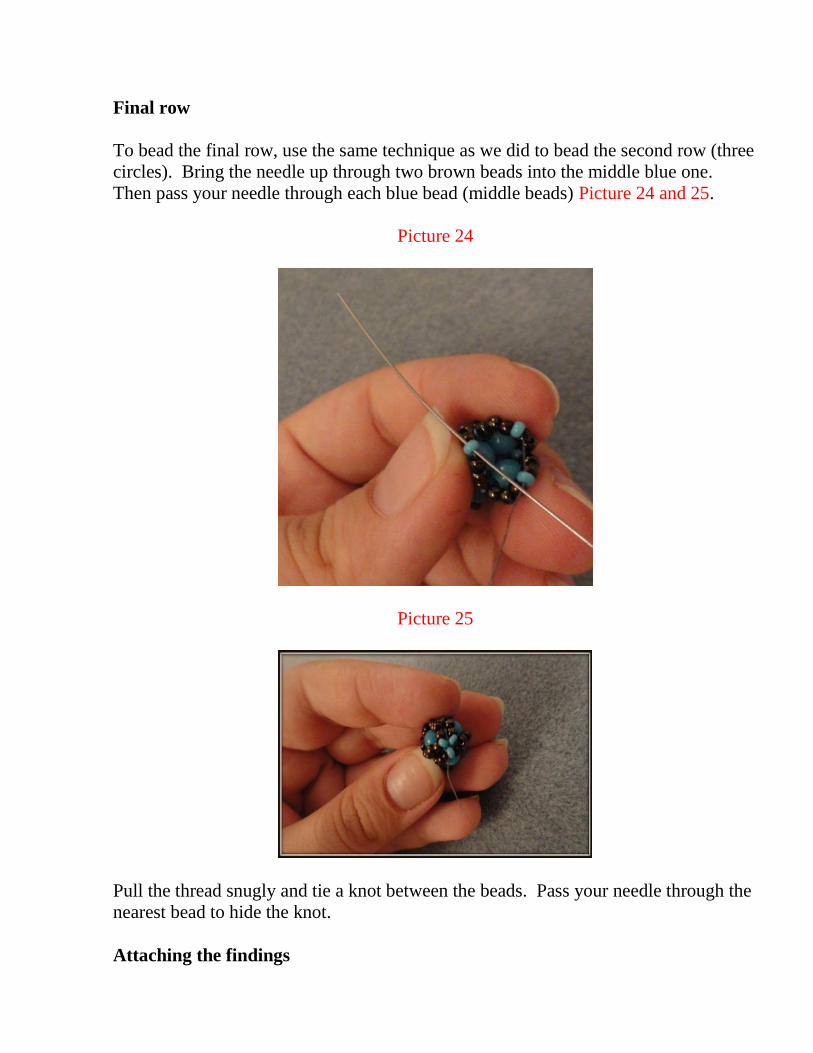
Final row
To bead the final row, use the same technique as we did to bead the second row (three
circles). Bring the needle up through two brown beads into the middle blue one.
Then pass your needle through each blue bead (middle beads) Picture 24 and 25.
Picture 24
Picture 25
Pull the thread snugly and tie a knot between the beads. Pass your needle through the
nearest bead to hide the knot.
Attaching the findings
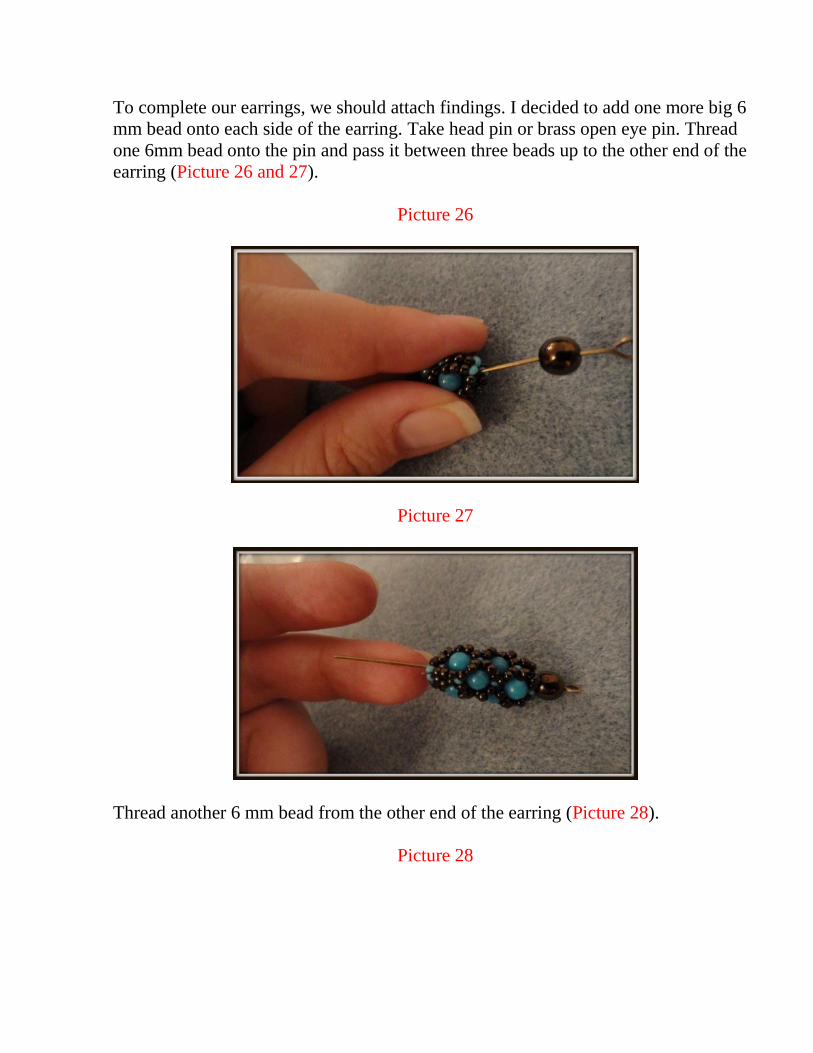
To complete our earrings, we should attach findings. I decided to add one more big 6
mm bead onto each side of the earring. Take head pin or brass open eye pin. Thread
one 6mm bead onto the pin and pass it between three beads up to the other end of the
earring (Picture 26 and 27).
Picture 26
Picture 27
Thread another 6 mm bead from the other end of the earring (Picture 28).
Picture 28

Bend the end of the pin with your round nose pliers to make a half loop (Picture 29).
Picture 29
Attach the earring hook into the half loop and close the loop.
Helpful tip: If you want to add other decorations onto the pin, you should better
take brass open eye pins. If your piece of jewelry is complete, then it is better to
take hat pins or eye pins.

10. Few Words from the Author
Finally you’ve reached the end of my practical guide! Congrats! Well, as you perhaps understood I’m completely passionate about handmade beaded
jewelry, probably as much as you are. In fact, this was my first book; my baby.
I would like to ask you a favor. I really want to hear your honest feedback on
how I did. I would even say I need your constructive critic. Please leave your review with you honest feedback about my book.
Click Here to Leave a Review on Amazon
I would like to know whether this book was helpful for you or you would
suggest improving, adding, or clarifying certain part of the book. Your feedback
is very important!
It won't even take three minutes of your time while every feedback will make a huge difference for me! I very appreciate your willingness to improve and make
this book even more helpful for future readers!
Get FREE Tutorials for Making Other AMAZING
Handmade Beaded Jewelry

Claim your free membership NOW
Would you like to learn how to make other fashionable, fresh and unique handmade jewelry?
Well, I invite you to join my popular (over 31,567 thousands members around
the world) online Magazine “Beading with Poli” completely for FREE! You'll be receiving step by step jewelry making tutorials on a weekly basis directly to
your email inbox.

11. Make Money from Your Craft
Finally, an Easy to Follow, Step-By-Step Roadmap
to Make Money Making Simple Wire Name
Jewelry No Matter What your Previous Experience
Get More Details Here
12. My Other Books
Here are my other best-selling books which you can get on Amazon
1. How to Make Earrings with Beads
2. How to Make Beaded Bracelets
3. How to Make Necklaces with Beads