rapid fire hunter’s star - wordpress.com
TRANSCRIPT

Rapid Fire Hunter’s Star Directions pg. 1
Rapid Fire Hunter’s StarCu�ing Dimensions - Petite Star Ruler
Technique Developed by Deb Tucker© Studio 180 Design, Ltd.
To make your �rst project, use the “Basic recipe” enclosed for a wall hanging sample (four by four blocks). Once you’ve worked through the process, use the chart below to help determine future project requirements.
Each block contains the following pieces: two triangles, two trapezoids and four star points. By doing a li�le mathematics it is simple to calculate the number of strips you will need to cut and hence the amount of yardage you will need to buy. Below is a chart outlining the number of units possible from strips of fabric cut from standard 42” width.
Points to remember with theRapid Fire technique:
1) All triangles are cut oversized and then trimmed down a�er the block is sewn.
2) �e star points begin as long strips of fabric and not individual diamonds.
3) �e trapezoids are the only shape that need to be cut to an exact shape and size.
Anatomy of a Hunter’s Star Block
As with most patchwork, careful measuring, cu�ing, pressing and sewing with an accurate ¼” seam allowance give best results
�e Math - Example
- Determine the number of blocks and the size of blocks Example 6 blocks x 8 blocks (for a total of 48 blocks) Using 8” blocks.
- Determine the number of pieces needed Example 48 Light value triangles (1 per block) 48 Medium value triangles (1 per block) 48 Light value trapezoids (1 per block) 48 Medium value trapezoids (1 per block) 192 Star points/diamonds (4 diamonds x 48 blocks)
- Examine chart below.
- Determine the number of strips and units to cut Example 5 strips 8” wide wi� yield 50 triangles Need - 40” light value fabric for triangles Need - 40” medium value fabric for triangles 10 Strips 1¾” wide wi� yield 50 trapezoids Need - 17½” light value fabric for triangles Need - 17½” medium value fabric for triangles 16 Strips 2¼” wide wi� yield 192 star points Need - 36” for star points
- Add up the number of strips (number of inches) neces-sary to determine total number of yards for piecework.
- Don’t forget to add additional yardage for your borders and bindings.
All strips should be cut across the Width of 100% co�on fabric.
5” Blocks - Triangle Strips Trapezoid Strips Star Point Strips
6” Blocks - Triangle Strips Trapezoid Strips Star Point Strips
7” Blocks - Triangle Strips Trapezoid Strips Star Point Strips
8” Blocks - Triangle Strips Trapezoid Strips Star Point Strips
8 Squares/ 16 half square triangles13 Trapezoids using 5” cu�ing guides12 Star Points/diamonds
7 Squares/ 10 half square triangles9 Trapezoids using 6” cu�ing guides12 Star Points/diamonds
6 Squares/ 8 half square triangles7 Trapezoids using 7” cu�ing guides12 Star Points/diamonds
5 Squares/ 10 half square triangles5 Trapezoids using 8” cu�ing guides12 Star Points/diamonds
Cut 5”Cut 1¾”Cut 2¼”
Cut 6”Cut 1¾”Cut 2¼”
Cut 7”Cut 1¾”Cut 2¼”
Cut 8”Cut 1¾”Cut 2¼”
Cut size of each strip xWidth of Fabric (WoF)
Yield per Strip
© Studio 180 Design, Ltd.

Rapid Fire Hunter’s Star Directions pg. 2
Basic Recipe: Petite Wall QuiltUsing 6” Blocks and Petite Star Template
© Studio 180 Design, Ltd.
Two Color Quilt ProjectShown in Diagram: 24” x 24” Before Borders
From Dark Fabric(s) ¾ Yard Cut 2 strips 6” x WoF (Width of Fabric) Cut into 8 squares 6” x 6” �en cut into 16 half square triangles
Cut 2 strips 1¾” x WoF Using Rapid Fire Petite Star template Cut 16 trapezoids using the 6” guidelines
Cut 3 strips 2¼” WoF (for star points)
From Light Fabric(s) ¾ Yard Cut 2 strips 6” x WoF (Width of Fabric) Cut into 8 squares 6” x 6” �en cut into 16 half square triangles
Cut 2 strips 1¾” x WoF Using Rapid Fire Petite Star template Cut 16 trapezoids using the 6” guidelines
Cut 3 strips Cut 2¼” WoF (for star points)
NOTE�e cu�ing directions are for the INTERIOR PIECING ONLY.
Additional strips and fabric will be needed for the borders.
An Extra ½ to ¾ yard or two or more fabrics will be needed to make borders and bindings
From Dark Fabric(s) - for background piecing ½ Yard Cut 2 strips 6” x WoF and proceed as above Cut 2 strips 1¾” x WoF and proceed as above
From Light Fabric(s) - for background piecing ½ Yard Cut 2 strips 6” x WoF and proceed as above Cut 2 strips 1¾” x WoF and proceed as above
From Accent Fabric(s) - for stars/diamonds ½ Yard Cut 6 strips 2¼” x WoF
�ree Color Quilt Project
Four Color Quilt Project From Dark Fabric(s) - for background piecing ½ Yard Cut 2 strips 6” x WoF and proceed as above Cut 3 strips 1¾” x WoF and proceed as above
From Light Fabric(s) - for background piecing ½ Yard Cut 2 strips 6” x WoF and proceed as above Cut 2 strips 1¾” x WoF and proceed as above
From Accent Fabric #1 - for stars/diamonds ¼ Yard Cut 3 strips 2¼” x WoF
From Accent Fabric #2 - for stars/diamonds ¼ Yard Cut 3 strips 2¼” x WoF

Rapid Fire Hunter’s Star Directions pg.3© Studio 180 Design, Ltd.
Rapid Fire Hunter’s StarGeneral Directions
Technique Developed by Deb Tucker, Studio 180 Design, Ltd.
How to Cut the Trapezoid
To cut the trapezoid pieces, you will use the “Rapid Fire Hunter’s Star” ruler and the appropriate size strip. If you are working with the “Petite Star” template, all of the strips for all of the trapezoids are cut to 1¾” x WoF (Width of Fabric). If you are working with the “Large Star” template, all of the strips for all of the trapezoids are cut 2¼” x WoF.
To cut the trapezoid shape examine the diagram shown here.
- Lay the strip horizontally on your cu�ing mat. It can be folded in half either right sides or wrong sides together. Be sure to cut from the open end toward the folded end of strip in order to be able to get the listed number of trapezoids/strip.
- If right handed, lay strip(s) with selvages on le� and center fold on right. Make cuts from le� to right.
- If le� handed, lay strip(s) with selvages on the right and center fold on le�. Make cuts from right to le�.
- Rotate your template so that it is set “On Point” with the lines as shown in the diagram.
- Align the appropriate lines for the size template/block with which you will be working. (See NOTE)
- Cut on both sides of the ruler.
- Rotate the entire ruler and continue cu�ing additional trapezoids from the remainder of the strip as illustrated in the thumbnail sketch below.
8” TRAPEZOID
7” TRAPEZOID
6” TRAPEZOID
5” TRAPEZOID
5” TOP
6” TOP
7” TOP
8” TOP
Bottom Line
Bottom Line
Bottom Line
Bottom Line
6 ”
5 ”
8 ”
7 ”
STAR GUIDE
PETITE STARRAPID FIRE HUNTER’S STAR
7½”
6½”
5½”
7½”
6½”
5½”
© Studio 180 D
esign, Ltd.
NOTE �ere is a solid marked line that should align with the bo�om edge of your strip and there is an upper dashed line that should align with the top edge of the strip. If both marked lines are not on the edges of the strip, something is wrong!!! Check the size of the strip or make sure you do not have the “Star Point/Diamond” strip.
Guide LineMeasurement
# of Trapezoidsper WoF Strip
5” Line
6” Line
7” Line
8” Line
13 per strip
9 per strip
7 per strip
5 per strip
NOTE It is important to focus on the correct size and line marking for your particular block. �e Basic Recipe will use the 6” trapezoid lines.

Rapid Fire Hunter’s Star Directions pg.4© Studio 180 Design, Ltd.
Rapid Fire Hunter’s StarGeneral Directions
NOTEHalf Length Strips (21” approx.) are much easier to
work with than whole length strips (42” approx.). Petite Star should stitch 12 to 14 trapezoids on a whole
strip, and 6 trapezoids per half strip. Large Star should stitch 10 to 11 trapezoids on a whole
strip, and 5 trapezoids per half strip.
Piecing Instructions
�e following directions are wri�en in three color format. If using either a two color format or a four color format, please refer to the italicized notes in step 1, step 3, and step 6. Whenever possible I will try to note the procedures for the two color and four color options.
�e directions will be shown for the construction of four blocks/one large star block (diagram shown at right). Generally you will need to continue a step until all units are processed. No speci�c numbers will be listed here as there are general directions for making many di�erent size blocks and di�erent size project. As stated earlier, it is advisable to work through the “basic recipe”/introductory project �rst to familiarize yourself with the steps and techniques presented. One time through will solidify the steps and allow for many di�erent approaches to the Hunter’s Star design.
Quilters should use good skills when cu�ing and pressing and always sew with an accurate ¼” seam allowance.
Four blocks sewn togethermake one large star block.
Shown above in the threecolor option
Step 1 - Organize the pieces. You will need the precision cut trapezoids and the star point/diamond strips. Hold the triangle pieces until later.
Petite Star - 2¼” strips Large Star - 2½” stripsTwo Color Project - Diamond strips of both colors.�ree Color Project - A� diamond strips are the same color.Four Color Project - Two di�erent color strips. For this �rst step, choose just one color strip and hold the second color until later.
Step 3 - Stitch the trapezoids to the strip using an accurate ¼” seam allowance and a chain piecing style of sewing. Be sure to leave approximately ¼” of space between the trapezoids. Two Colors - stitch a� color #1 trapezoids to color #2 strips, then stitch a� color #2 trapezoids to color #1 strips.�ree Colors - stitch a� trapezoids to the third color diamonds strips.Four Colors - stitch a� color #1 and color #2 trapezoids to just one color diamond strips. Hold the second diamond color strip until stitching at step 6.
Step 2 - Position the trapezoids right sides together with the diamond strips. Align the pieces as illustrated. Be sure to start the lead trapezoid approximately 2¼” to 2½” down from the top edge of the diamond strip. See illustration.
Points to Remember: - Right sides together- “Pointy” end of trapezoid �rst under the needle- Cut edges carefully aligned
Use FirstHold for
Later
2¼”approx.
�ree and Four color options: Both color trapezoids
on one color strips
Dark trapezoids on light stripsLight Trapezoids on dark strips
Two Color Option
Rapid Fire Hunter’s Star Directions pg.5© Studio 180 Design, Ltd.
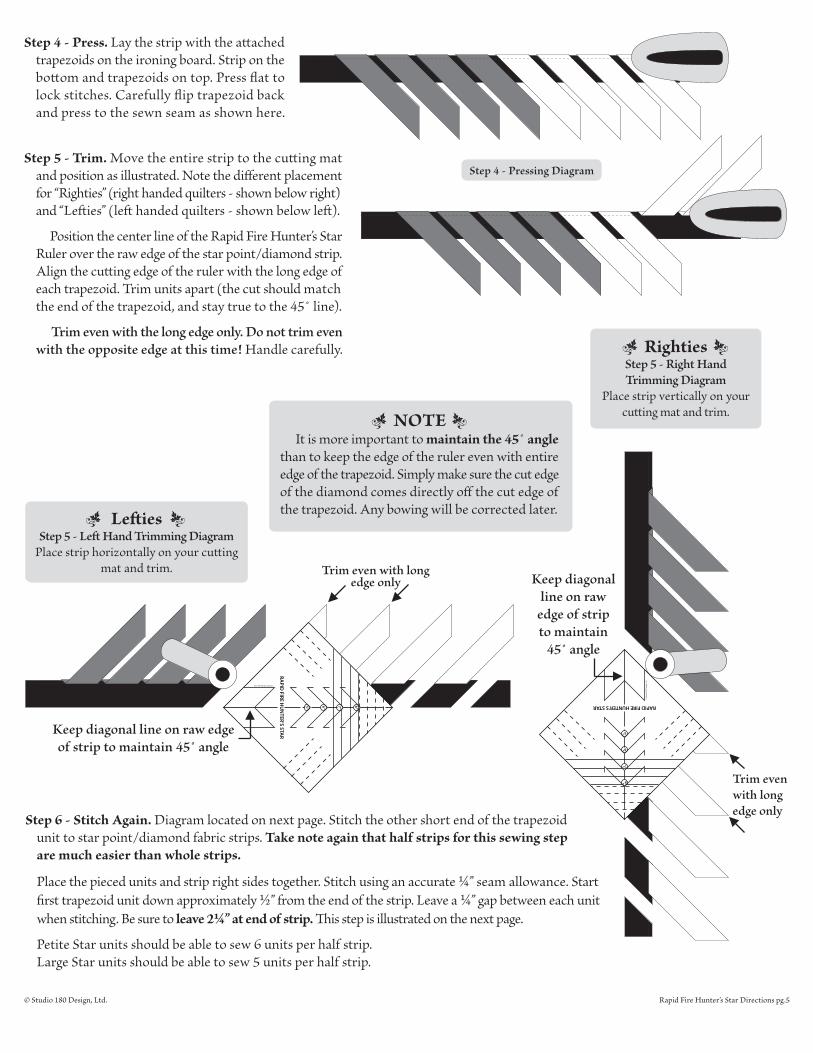
RightiesStep 5 - Right Hand Trimming Diagram
Place strip vertically on your cu�ing mat and trim.
Le�iesStep 5 - Le� Hand Trimming Diagram
Place strip horizontally on your cu�ing mat and trim.
NOTE It is more important to maintain the 45˚ angle than to keep the edge of the ruler even with entire edge of the trapezoid. Simply make sure the cut edge of the diamond comes directly o� the cut edge of the trapezoid. Any bowing will be corrected later.
Step 4 - Press. Lay the strip with the a�ached trapezoids on the ironing board. Strip on the bo�om and trapezoids on top. Press �at to lock stitches. Carefully �ip trapezoid back and press to the sewn seam as shown here.
Step 5 - Trim. Move the entire strip to the cu�ing mat and position as illustrated. Note the di�erent placement for “Righties” (right handed quilters - shown below right) and “Le�ies” (le� handed quilters - shown below le�).
Position the center line of the Rapid Fire Hunter’s Star Ruler over the raw edge of the star point/diamond strip. Align the cu�ing edge of the ruler with the long edge of each trapezoid. Trim units apart (the cut should match the end of the trapezoid, and stay true to the 45˚ line).
Trim even with the long edge only. Do not trim even with the opposite edge at this time! Handle carefully.
Step 4 - Pressing Diagram
6 ”5 ”
8 ”7 ”
RAPID
FIRE HU
NTER’S STA
R
© Studio 180 Design, Ltd.
Keep diagonal line on raw edgeof strip to maintain 45˚ angle
Trim even with longedge only
6 “
5 ”
8 ”
7 ”
RAPID FIRE HUNTER’S STAR
© S
tudi
o 18
0 D
esig
n, L
td.
Keep diagonalline on raw
edge of stripto maintain
45˚ angle
Trim evenwith longedge only
Step 6 - Stitch Again. Diagram located on next page. Stitch the other short end of the trapezoid unit to star point/diamond fabric strips. Take note again that half strips for this sewing step are much easier than whole strips. Place the pieced units and strip right sides together. Stitch using an accurate ¼” seam allowance. Start �rst trapezoid unit down approximately ½” from the end of the strip. Leave a ¼” gap between each unit when stitching. Be sure to leave 2¼” at end of strip. �is step is illustrated on the next page. Petite Star units should be able to sew 6 units per half strip.Large Star units should be able to sew 5 units per half strip.
Rapid Fire Hunter’s Star Directions pg.6© Studio 180 Design, Ltd.
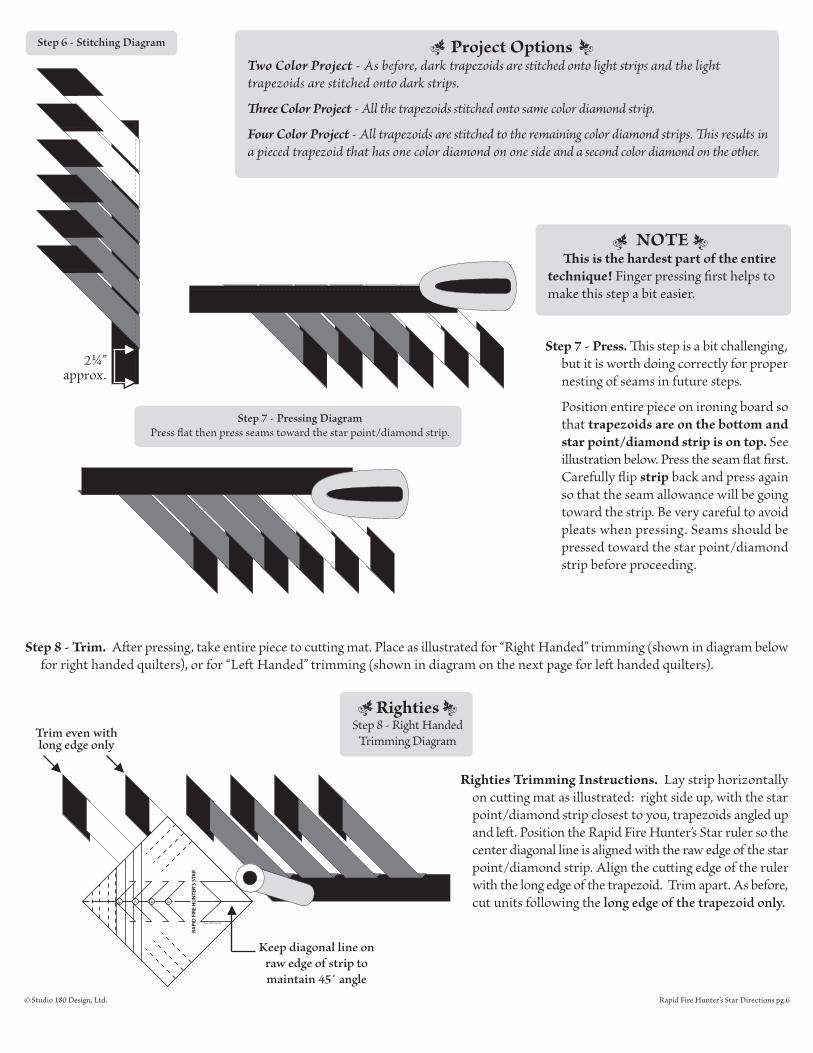
Step 8 - Trim. A�er pressing, take entire piece to cu�ing mat. Place as illustrated for “Right Handed” trimming (shown in diagram below for right handed quilters), or for “Le� Handed” trimming (shown in diagram on the next page for le� handed quilters).
Step 7 - Press. �is step is a bit challenging, but it is worth doing correctly for proper nesting of seams in future steps. Position entire piece on ironing board so that trapezoids are on the bo�om and star point/diamond strip is on top. See illustration below. Press the seam �at �rst. Carefully �ip strip back and press again so that the seam allowance will be going toward the strip. Be very careful to avoid pleats when pressing. Seams should be pressed toward the star point/diamond strip before proceeding.
Project OptionsTwo Color Project - As before, dark trapezoids are stitched onto light strips and the light trapezoids are stitched onto dark strips. �ree Color Project - A� the trapezoids stitched onto same color diamond strip. Four Color Project - A� trapezoids are stitched to the remaining color diamond strips. �is results in a pieced trapezoid that has one color diamond on one side and a second color diamond on the other.
Step 6 - Stitching Diagram
2¼”approx.
NOTE �is is the hardest part of the entire technique! Finger pressing �rst helps to make this step a bit easier.
Step 7 - Pressing DiagramPress �at then press seams toward the star point/diamond strip.
Righties Trimming Instructions. Lay strip horizontally on cu�ing mat as illustrated: right side up, with the star point/diamond strip closest to you, trapezoids angled up and le�. Position the Rapid Fire Hunter’s Star ruler so the center diagonal line is aligned with the raw edge of the star point/diamond strip. Align the cu�ing edge of the ruler with the long edge of the trapezoid. Trim apart. As before, cut units following the long edge of the trapezoid only.
RightiesStep 8 - Right Handed
Trimming DiagramTrim even withlong edge only
6 ” 5 ”8 “ 7 ”
RAPI
D F
IRE
HU
NTE
R’S
STA
R
© Studio 180 Design, Ltd.
Keep diagonal line on raw edge of strip to maintain 45˚ angle

Step 9 - Trim Again. Make the �nal trim on the trapezoid units. Use a regular rotary cu�ing ruler for this job (3” x 18” or larger will do). If working with the Rapid Fire Petite Star ruler, trim units to measure 1¾” . If working with the Rapid Fire Large Star ruler, trim units to measure 2¼”.
Trim to 1¾” forPetite Star projects.
Step 9 Diagram
Trim to 2¼” forLarge Star projects.
DEB’S HINT Make a masking tape guide several layers deep and place it exactly at the 1¾” line (for Petite Star Projects) or 2¼” line (for Large Star Projects) of your ruler. When you bump this raised edge up against the previously trimmed edge it will help the trim down process go much more quickly.
Step 10 Diagram
Match the centers, but don’t fuss too much because you will be trimming everything down soon.
Step 10 - Stitch. Sew the oversized triangle to trapezoid/diamond units. Use a triangle of the same fabric as trapezoid (this is the general rule, but variations here can result in some interesting designs). Place triangle and trapezoid units right sides together, positioning the triangle so it is in the center of the pieced trapezoid unit (an approximation will be �ne). Sew an accurate ¼” seam, chaining the pieces as you stitch them together. When �nished, press the seams toward triangles.
Step 12 - Play! Arrange the pieced triangle units into preferred design. �is is the fun part where you get to play around with the di�erent variations before stitching the triangle units together. Check out some of the thumbnail sketches below and at the top of the next page or visit my web site to see many additional variations:
www.studio180design.net
Step 11 - Press. Press seams �at �rst to lock the stitches and then press towards the triangle.
NOTE Do not automatically sew the two triangles together yet! Some layouts require light triangles to be pieced with other light triangles and dark with dark. For this reason it is best to consider design choices prior to stitching the pieced triangle units together.
Rapid Fire Hunter’s Star Directions pg.7© Studio 180 Design, Ltd.
Arrange: 2 blocks x 8 blocks to make a table runner.Arrange 4 blocks x 4 blocks to make a wall quilt
Le�iesStep 8 - Le� Handed Trimming Diagram
Step 8 continued - Le�ies Trimming Instructions. Lay strip vertically on cu�ing mat as illustrated: right side up, star point/diamond strip on right, trapezoids angled to the le� and down. Position the Rapid Fire Hunter’s Star ruler so the center diagonal line is aligned with the raw edge of the star point/diamond strip. Align the cu�ing edge of the ruler with the long edge of the trapezoid. Trim apart. As before, cut units following the long edge of the trapezoid only.
6 ”
5 ”
8 “
7 ”
RAPID FIRE HUNTER’S STAR
© S
tudi
o 18
0 D
esig
n, L
td.
Keep diagonalline on raw
edge of stripto maintain
45˚ angle
Trim evenwith longedge onlyand be sureto trim ata true 45˚
8” TRAPEZOID
7” TRAPEZOID
6” TRAPEZOID
5” TRAPEZOID
5” TOP
6” TOP
7” TOP
8” TOP
Bottom Line
Bottom Line
Bottom Line
Bottom Line
6 ”
5 ”
8 ”
7 ”
STAR GUID
E
PETITE STAR
RAPID FIRE H
UNTER’S STAR
7½”
6½”
5½”
7½”
6½”
5½”
© Studio 180 D
esign, L
td.
Align dashed lines of ruler with previously trimmed edges
Rapid Fire Hunter’s Star Directions pg.8
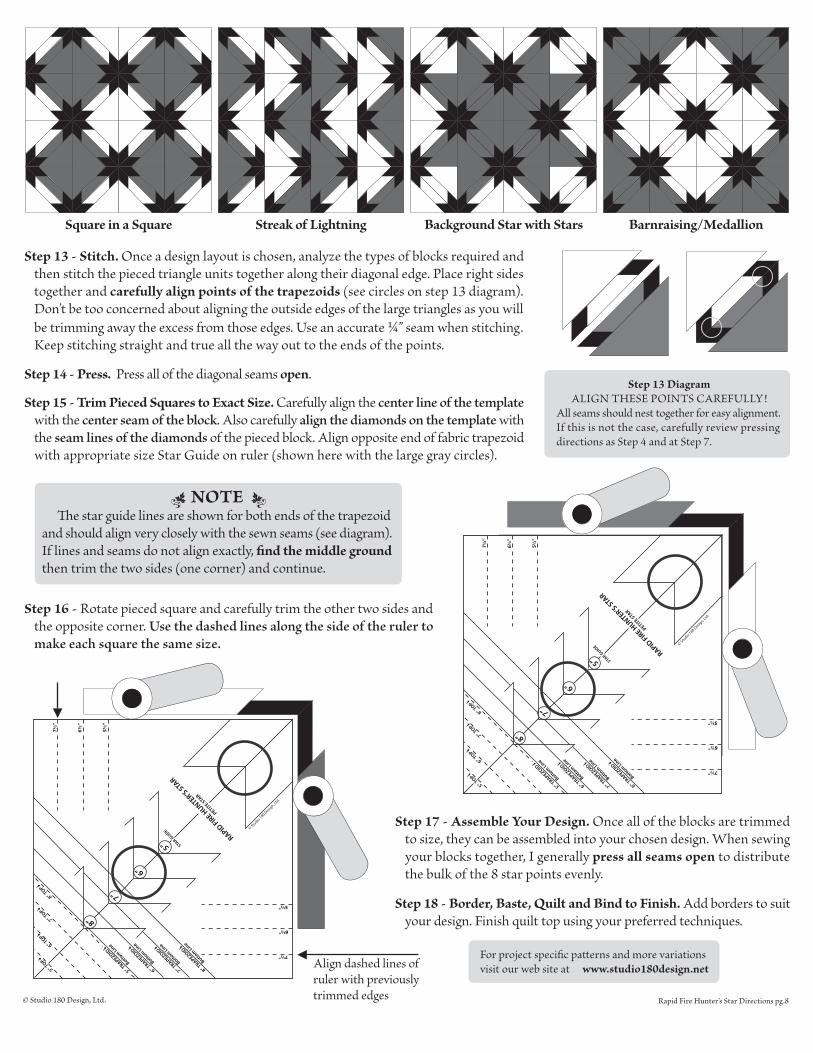
Square in a Square Streak of Lightning Background Star with Stars Barnraising/Medallion
Step 13 - Stitch. Once a design layout is chosen, analyze the types of blocks required and then stitch the pieced triangle units together along their diagonal edge. Place right sides together and carefully align points of the trapezoids (see circles on step 13 diagram). Don’t be too concerned about aligning the outside edges of the large triangles as you will be trimming away the excess from those edges. Use an accurate ¼” seam when stitching. Keep stitching straight and true all the way out to the ends of the points.
Step 15 - Trim Pieced Squares to Exact Size. Carefully align the center line of the template with the center seam of the block. Also carefully align the diamonds on the template with the seam lines of the diamonds of the pieced block. Align opposite end of fabric trapezoid with appropriate size Star Guide on ruler (shown here with the large gray circles).
Step 16 - Rotate pieced square and carefully trim the other two sides and the opposite corner. Use the dashed lines along the side of the ruler to make each square the same size.
Step 14 - Press. Press all of the diagonal seams open. Step 13 Diagram
ALIGN THESE POINTS CAREFULLY ! All seams should nest together for easy alignment. If this is not the case, carefully review pressing directions as Step 4 and at Step 7.
NOTE �e star guide lines are shown for both ends of the trapezoid and should align very closely with the sewn seams (see diagram). If lines and seams do not align exactly, �nd the middle ground then trim the two sides (one corner) and continue.
© Studio 180 Design, Ltd.
8” TRAPEZOID
7” TRAPEZOID
6” TRAPEZOID
5” TRAPEZOID
5” TOP
6” TOP
7” TOP
8” TOP
Bottom Line
Bottom Line
Bottom Line
Bottom Line
6 ”
5 ”
8 ”
7 ”
STAR GUID
E
PETITE STAR
RAPID FIRE H
UNTER’S STAR
7½”
6½”
5½”
7½”
6½”
5½”
© Studio 180 D
esign, L
td.
Step 17 - Assemble Your Design. Once all of the blocks are trimmed to size, they can be assembled into your chosen design. When sewing your blocks together, I generally press all seams open to distribute the bulk of the 8 star points evenly.
Step 18 - Border, Baste, Quilt and Bind to Finish. Add borders to suit your design. Finish quilt top using your preferred techniques.
For project speci�c pa�erns and more variations visit our web site at www.studio180design.net