rally all season - kampa · rally all season 200, ... mudwall. these will be ... your dealer will...
TRANSCRIPT

Rally All Season 200, 260 & 390
Instructions & care manual
Rally All Season 260
Some of the images shown in these instructions are other similar Kampa awnings and are for illustration purposes only.
The Rally is a registered design exclusive to Kampa UK Limited

2
IMPORTANT - PLEASE READ:
Under certain conditions all awnings will suffer from internal condensation. Depending upon the atmospheric conditions, the weather and the amount of moisture in the ground, the condensation could be quite severe and is commonly mistaken for leaking, especially as it can run down the inside of the roof and drips off ties tapes and other internal fittings. If you suspect your awning is leaking it is almost certainly condensation. Laying a waterproof groundsheet (not a breathable carpet) throughout the whole awning will help and condensation can also be improved by ensuring adequate ventilation. On some awnings we offer an optional roof lining that can also help prevent condensation and catch any drips of condensation that fall from the roof.
The Rally All Season material has a PU blade pigment, anti-ageing & waterproofing, coating over its entire surface and the main seams of the awning are sewn with a special waterproof sewing thread. This thread swells when wet to fill the needle holes but the thread needs to become wet several times before it is totally effective. This process is known as ‘weathering’ and it may take several soakings for the weathering to be fully effective. Depending upon your expectations, it may be necessary to treat some seams with a seam sealant. It can also be applied to areas where a leak may have developed. Seam sealant is available through your dealer.
The awning beading is also sewn to the awning with the special waterproof sewing thread.
WELCOME Thank you for purchasing your Kampa awning. Please read these instructions carefully before attempting to set up your awning and retain for future reference. If used properly, your awning should give you years of trouble free use. We recommend that your awning is insured against accidental and storm damage as this is not covered by the warranty.
This awning is designed for use in moderate to heavy weather. During extremely strong winds or heavy snowfall we recommend that you take your awning down. The awning is designed for touring and seasonal use; it is not designed for static or commercial use. We recommend a trial run before using your awning for the first time. This will allow you to familiarise yourself with the awning, its set up and any limitations the awning may have for your particular use. Please also check your caravan awning rail to ensure that it is not damaged or has any sharp edges that could damage your awning.

3
Before using for the first time please check the contents of your awning
200 260 390
Awning flysheet 1 1 1
All Season curved aluminium roof poles 2 3 4
All Season aluminium leg poles with adjustable feet sections
2 3 4
All Season aluminium adjustable roof stretcher pole with a clamp both ends.
1 1 1
All Season aluminium adjustable roof stretcher pole with plastic caps both ends.
1 1 1
All Season aluminium monsoon pole 1 - -
Peg bag with Heavy duty ‘Marquee type’ pegs 1 1 1
Draught skirt 1 1 1
Tie Down Kit (2 pieces) 1 1 1
Curtains 6 8 10
Carry bag 1 1 1
If you are missing any parts please contact your supplying dealer.

4
SITING Choose a site that is flat and, if possible, protected from the wind. Try to set up your awning with the doors facing away from the wind. SET UP To protect your awning from dirt and damage, it may be beneficial to lay a groundsheet or awning carpet down before unpacking. Unpack the awning, separate and identify the different parts. Slide (1) the awning beading, on the rear of the awning roof, through the caravan awning channel until it is in your required position (2). The awning should be positioned on a horizontal part of the caravan. Assemble the curved aluminium roof poles (3), these are linked together and just need slotting together ensuring that each pole is fully inserted into the adjoining pole – because of the shape of the pole they can only be assembled one way. Assemble the aluminium legs. They are spring linked and just need slotting together. They have an adjustable foot – ensure that this is in its lowest position (making pole shorter) by using the clamp adjuster. Starting at one end of the awning, push a roof pole into the pole sleeve (4), closed end first (with the plastic end cap), connect the aluminium leg pole to the end (5) and then locate the bottom of this pole onto the pin at the bottom of the awning (6). The pin is on an adjustable webbing strap. The strap can be released to make it easier to insert the pin into the bottom of the pole. Always retighten the straps to ensure that the awning is tensioned correctly.
1
2
3
4 5 6
5
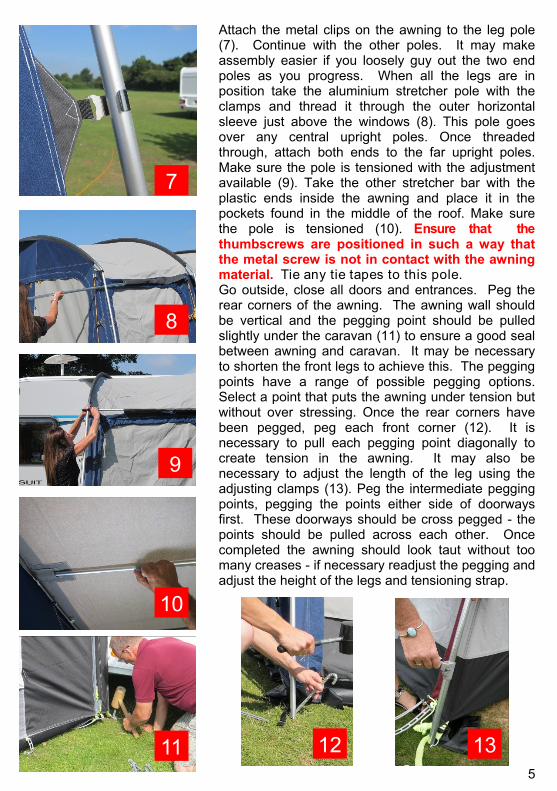
Attach the metal clips on the awning to the leg pole (7). Continue with the other poles. It may make assembly easier if you loosely guy out the two end poles as you progress. When all the legs are in position take the aluminium stretcher pole with the clamps and thread it through the outer horizontal sleeve just above the windows (8). This pole goes over any central upright poles. Once threaded through, attach both ends to the far upright poles. Make sure the pole is tensioned with the adjustment available (9). Take the other stretcher bar with the plastic ends inside the awning and place it in the pockets found in the middle of the roof. Make sure the pole is tensioned (10). Ensure that the thumbscrews are positioned in such a way that the metal screw is not in contact with the awning material. Tie any tie tapes to this pole. Go outside, close all doors and entrances. Peg the rear corners of the awning. The awning wall should be vertical and the pegging point should be pulled slightly under the caravan (11) to ensure a good seal between awning and caravan. It may be necessary to shorten the front legs to achieve this. The pegging points have a range of possible pegging options. Select a point that puts the awning under tension but without over stressing. Once the rear corners have been pegged, peg each front corner (12). It is necessary to pull each pegging point diagonally to create tension in the awning. It may also be necessary to adjust the length of the leg using the adjusting clamps (13). Peg the intermediate pegging points, pegging the points either side of doorways first. These doorways should be cross pegged - the points should be pulled across each other. Once completed the awning should look taut without too many creases - if necessary readjust the pegging and adjust the height of the legs and tensioning strap.
7
8
9
10
11 12 13

6
PEGS The Rally All Season awning comes complete with heavy duty pegs and wire pegs for pegging the mudwall. These will be suitable for many sites but there will be some instances where different pegs will be necessary. Your dealer will stock a range of pegs suitable for different types of ground. For maximum effectiveness, pegs should be driven into the ground at a 45°angle away from the pegging point. CAUTION: Pegs can be sharp. DO NOT allow children to play around the awning and ensure that suitable protective footwear is worn. GUY LINES The Rally All Season comes with guy lines pre-attached. We recommend that these guy lines are used at all times (14). Peg the guy lines so that the awning is under tension without distorting the shape, they should run in line with the seams. The guy lines can be adjusted using the runners. Guy lines should be secured using suitable pegs - see above. DO NOT allow children to play around your awning. Guy lines are a trip hazard. SEALING BUMPER PADS To help create a seal between caravan and awning the Rally All Season has sealing bumper pads (15) sewn to the rear panels. Using the rear pegging points, these bumpers should be pulled towards the caravan. An improved seal can be maintained by use of the optional rear upright pole set. Insert the top of each pole into the pocket in the top rear corner, adjust the height to bring the pole under tension and then secure the pole to the bumper pads using the tie tapes. DRAUGHT SKIRT The supplied draught skirt should be pulled through the awning rail at the bottom of your caravan (16). The ropes at the top corners can be tied to the caravan chassis to make the skirt taut. Peg down and tension the skirt using the webbing straps.
14
15
16
14

7
MONSOON POLE - RALLY All Season 200 ONLY Assemble the aluminium Monsoon Pole. Pass it over the centre aluminium stretcher bar (20). Push the one end into the pocket near the caravan (21) and the other end into the pocket at the front (22). Attach the Monsoon Pole to the roof of the awning using the two velcro straps. 20
21 22
17
18
CURTAINS & BLINDS The Rally All Season has two curtains to cover each window. They have curtain runners along their top edge that simply slide onto the curtain track sewn above each window (17). Use the plastic retainers to keep the curtains tidy during the day. MUD SKIRT The Rally comes with an internal and external mud skirt to keep out draughts. The mud skirt has eyelets that can be used with pegs to secure it to the ground (18). DO NOT use the mud skirt to peg your awning down.
STORM TIE DOWN KIT The Rally All Season is supplied with a full set of guy lines that should be used at all times. For extra security a Storm Tie Down Kit is also supplied. Attach each tie down to the awning frame, on each of the corners (19). At the other end of the tie down you will find a metal ‘D’ ring. Peg down the Storm Tie Down Kit through this ring with one of the supplied ‘Marquee style’ pegs. Ensure that the Storm Tie Down Kit is pegged under tension but not so that it distorts the shape of the awning. The tie downs should always be used in pairs.
19

8
SEAMS & WEATHERING The Rally All Season material has a PU blade pigment, anti-ageing & waterproofing, coating over its entire surface and the main seams of the awning are sewn with a special waterproof sewing thread. This thread swells when wet to fill the needle holes but the thread needs to become wet several times before it is totally effective. This process is known as ‘weathering’ and it may take several soakings for the weathering to be fully effective. Depending upon your expectations, it may be necessary to treat some seams with a seam sealant. It can also be applied to areas where a leak may have developed. Seam sealant is available through your dealer. SUITABILITY This awning is designed for use in moderate to heavy weather. During extremely strong winds or heavy snowfall we recommend that you take your awning down. The awning is designed for touring and seasonal use; it is not designed for static or commercial use. UV DEGRADATION Awning fabrics can be weakened by prolonged exposure to sunlight. The Four Season fabric has been tested under extreme conditions to resist the effects of UV but even this material will be effected in the long term. The Under normal holiday use your awning will give long service but use for extended periods in strong sunlight will soon cause deterioration. In those cases it would be wise to use a site as shaded as possible. UV degradation is not covered under the warranty. The warranty does not cover awnings used on permanent or semi permanent sites, displays or for commercial purposes. CONDENSATION Under certain conditions awnings will be affected by condensation inside. See page 2 for more information about condensation. Condensation and its effects are not covered under the warranty. MILDEW When an awning is used on a seasonal pitch, condensation can build up, especially if there is a lack of ventilation. Mildew can form over time from this build up of condensation and damage the awning and is not covered under the manufacturers warranty. We recommend that the awning is regularly ventilated to prevent the build up of condensation. SAFETY DO NOT COOK IN THE AWNING OR USE NAKED FLAMES. READ AND UNDERSTAND THE FIRE PRECAUTIONS LABEL SEWN INTO THE INSIDE OF THE AWNING.

9
DISMANTLING Reverse the set up procedure. Ensure that all parts are clean before packing in the carry bag. If the awning is wet or damp, dry fully as soon as possible. FOLDING THE AWNING Using two people, hold the awning at the tie down attachment points and lay the
awning down on the ground so that the outside of the roof is on the ground and the
front windows are upwards on top of the roof. Protect the awning from dirt and
damage, if necessary, before laying on the ground. Fold each end inwards to create a
rectangle. From the outside edges, fold the panels in half until the awning is the
correct width for the carry bag. Then roll the awning, towards the open end (end with
the awning beading). The awning should now fit into he bag. The awning frame and
the draught skirt can be rolled up with the awning.
CARE Awnings are best stored opened out. Air fully and ensure it is totally dry before packing away. Store in a well ventilated dry place. A wet/damp awning will develop mildew surprisingly quickly. Dirty awnings can be washed using clean water and a soft brush. Do not scrub and never use detergents. Poles should be protected from damage and should be stored completely dry to
prevent corrosion. . Damage due to improper use, wind damage or neglect is not
covered under the warranty. Have any damage repaired at the first opportunity.
Failure in the poles normally occurs through incorrect use. Make sure that poles sections are fully inserted into their adjoining pole and do not over stress the pole beyond its designed curve. You can purchase replacement poles from your dealer. Connecting springs or shock cord, used to connect poles together, are consumable parts and are not covered under this guarantee. Zips should be treated with care, use two hands to close and open and never tread on them. Never force a zip. We strongly recommend that you carry a comprehensive spares kit including silicone waterproof spray, seam sealer, tape for repairing split poles, and spare guy ropes and pegs for extreme weather. Repairs to the flysheet should be made by a company recommended by Kampa or your supplying dealer. Repairs and alterations made by an unauthorised company may invalidate your warranty.

10
PR
OB
LE
M
SO
LU
TIO
NS
Difficu
lty in
pu
llin
g t
he
re
ar
of th
e a
wn
ing
clo
se
to
th
e c
ara
va
n
1.
Try
lo
we
rin
g th
e fro
nt a
dju
sta
ble
le
gs.
Th
e r
ea
r p
eg
gin
g p
oin
ts
sh
ou
ld a
lwa
ys b
e p
eg
ged
first, b
efo
re a
pp
lyin
g to
o m
uch
te
nsio
n
to th
e fro
nt le
gs.
Re
ar
of a
wn
ing
is to
o c
lose
to
th
e c
ara
va
n
1.
Ad
just th
e fro
nt le
gs u
pw
ard
s
Th
e a
wn
ing
is s
ag
gin
g in
th
e r
oo
f or
co
llectin
g w
ate
r 1
. T
he
Ra
lly a
wn
ing
is u
niv
ers
al a
nd
th
e fit v
arie
s fro
m c
ara
va
n to
ca
rava
n. T
ry s
tre
tch
ing
all
ad
justa
ble
pole
s to
te
nsio
n th
e a
wn
ing
.
Th
e w
alls
sh
ou
ld b
e ta
ut w
ith
no
fla
pp
ing
ma
teria
l.
2.
Re-p
eg
th
e a
wn
ing
ensu
rin
g th
at th
e w
alls
and
ro
of a
re ta
ut
My a
wn
ing
is m
ovin
g a
long th
e a
wn
ing
ra
il 1
. P
eg
th
e a
wn
ing
ta
utly
2.
Use
th
e o
ption
al A
wn
ing
Ra
il S
top
pe
rs a
va
ilab
le fro
m y
ou
r K
am
pa
d
ea
ler
If a
co
nn
ecting
sp
rin
g b
reaks
1.
Th
ese
part
s a
re c
on
su
mab
le a
nd
are
on
ly th
ere
to
he
lp a
sse
mb
le
yo
ur
po
les,
the
y a
re n
ot str
uctu
ral. If th
ese
sp
ring
s b
eco
me
o
ve
rstr
etc
he
d o
r b
rea
k th
ey c
an
be
re
pla
ce
d w
ith
new
sp
rin
gs
ava
ilab
le fro
m y
ou
r K
am
pa
de
ale
r.
TR
OU
BL
ES
HO
OT
ING

11
PR
OB
LE
M
SO
LU
TIO
NS
If y
ou
th
ink y
ou
r aw
nin
g h
as a
wa
ter
lea
k
1.
Mo
st su
sp
ecte
d le
aka
ge
is a
ctu
ally
con
de
nsa
tio
n (
se
e
co
nd
ensa
tion s
ection
of th
is m
an
ua
l).
Th
is fo
rms o
n th
e in
sid
e o
f th
e a
wn
ing
fab
ric.
Try
to
incre
ase
th
e v
en
tila
tio
n b
y o
pe
nin
g th
e
do
ors
. A
wa
terp
roo
f g
rou
nd
she
et w
ill h
elp
sto
p m
ois
ture
fro
m th
e
gro
un
d c
ausin
g c
on
den
sa
tio
n. T
he
fa
bric,
used
to
make
th
is
aw
nin
g, h
as a
ma
ssiv
e h
yd
rosta
tic h
ead
an
d w
ate
r re
pe
llen
t m
ate
ria
l, s
o it is
extr
em
ely
un
like
ly th
at it w
ou
ld lea
k.
If y
ou
r a
wn
ing
ha
s a
wa
ter
lea
k a
t sp
ecific
p
oin
ts/a
reas
1.
Se
e S
ea
ms a
nd
Wea
the
ring
, p
ag
e 8
.
If y
ou
th
ink y
ou
r aw
nin
g h
as a
wa
ter
lea
k a
t th
e b
ea
din
g th
at a
tta
ch
es t
o th
e c
ara
va
n
1.
It i
s n
ot
po
ssib
le t
o h
ot
air t
ap
e t
he
jo
in b
etw
ee
n t
he
aw
nin
g a
nd
th
e ca
ravan
b
ea
din
g.
T
he
refo
re w
e use
a
sp
ecia
l w
ate
rpro
of
se
win
g t
hre
ad
. T
his
th
rea
d s
we
lls w
he
n w
et
to f
ill t
he
n
ee
dle
h
ole
s b
ut
the
th
rea
d n
ee
ds t
o b
eco
me
we
t se
ve
ral tim
es b
efo
re
it
is t
ota
lly e
ffe
ctive
. T
his
is k
now
n a
s ‘
we
ath
erin
g’.
Yo
u c
an
als
o
tre
at th
is s
eam
with
se
am
se
ala
nt fo
r a
qu
icker
effe
ct.

12
Kampa UK Limited Witham, CM8 3EU
© mcl/Kampa/2015
OPTIONAL EXTRAS AVAILABLE FOR YOUR AWNING
Easy Tread Groundsheet Breathable and made to fit your awning
Rear Upright Pole Set Provides an better seal between caravan and awning
Rally Enclosure Creates an enclosed area in front of your Rally awning. Available in 260, 330 & 390 sizes. A 260 Enclosure will fit onto a Rally 390.
Continental Cushioned Carpet Breathable, hardwearing and soft underfoot.
Organiser Designed to fit to the AccessoryTrack fitted inside the awning.
Hanging Rail Designed to fit to the AccessoryTrack. Shown with optional Jack Hanger
Roof Lining Insulates the roof and helps reduce the affects of condensation.
Kampa also produces an extensive range of awning furniture designed to complement your awning. Available from your Kampa specialist retailer.