quik spray twin reel spray system
TRANSCRIPT

QUALITY • PERFORMANCE • RELIABILITY • SERVICE
37 Production AvenueWarana, QLD 4575
T F
07 5493 894407 5493 8957
AU
S
TR
A L I A N M
AD
E
AU
S
TR
AL I A N
O
W
NE
D
QUIK SPRAY
INSTRUCTION MANUAL
9TBE • 10TBE
TWIN REEL SPRAY SYSTEM

Quik Spray 9TBE Manual1
We have over 20+ years of direct association and use of the highest quality Bertolini pumps.
We have sourced only the best high quality parts to incorporate into our Quik Spray range.
BERTOLINI PUMPS
Every engine that sports the ‘Green and Gold Approved’Honda symbol has been “matched”
specifically to its product to make sure it’s the right Honda engine for the job. With a Honda
motor on board, you can be assured you have the most reliable motor to last a lifetime.
Honda is in partnership with Quik Spray and we use genuine parts only, which means you can
rely on it working for a very long time.
POWERED BY HONDA
The new high power remote control transmitter achieves the highest standard of performance.
Operates over a range of up to 300 metres (long range transmitter - optional accessory).
27.195/27.145 Mhz.
REMOTE CONTROLLED TRANSMITTERS
KEY FEATURES
SUPA-SLIP HOSEQuik Spray’s own Supa-Slip® Hose is a high grade Nylon which is a polyamide bio plastic
derived from vegetable oil which offers advanced performance and strength as opposed to
the lower grade of Nylons commonly used.
The Quik Spray hose has higher operating pressures and tensile strength. It is also more
resistant to cold and hot extremes. The additives in the hose mean it is less likely to kink or
stretch giving it a longer life cycle.

Quik Spray 9TBE Manual 2
IMPO
RTAN
T WARNING
READ THIS INSTRUCTION MANUAL CAREFULLY BEFORE ATTEMPTING TO
OPERATE THIS UNIT
No part of this manual may be reproduced without written permission
from QUIK CORP PTY LTD. All information contained in this manual is
based on the latest product information available at the time of printing.
This manual should be considered a permanent part of your Quik Spray
spraying system and should remain with it at all times for technical
reference. Information given in this manual will provide the operator with
the safest and most effective use of this machine. The machine shown in
this manual may differ slightly from your mahcine, but should be similar
enough to help you understand our instructions.
WARNING
Not maintaining this unit or failing to correct a problem before operating could cause a malfunction in which serious damage to the unit or serious personal injury could occur.
Always perform a pre-operation inspection before each operation and to identify and correct any problems.
The right is reserved to make changes at any time without notice. COPYRIGHT © 2017 Quik Corp
Pty Ltd All rights reserved. Previous editions.

Quik Spray 9TBE Manual3
WELCOME TO QUIK SPRAYOn behalf of the Quik Spray team, we would like to thank you for investing in a quality Quik Spray product. Our units are
manufactured to the highest standard of quality, with every individual unit hand-assembled to guarantee our customers the best
product and service possible. As an Australian owned business your investment has enabled our every success.
As a division of Quik Corp, our team have provided over three decades of high-quality agricultural products into the Australian
market. From our humble beginnings in 1988, our product range has continually expanded and our innovation sparks from the
passion and commitment we have for the agricultural industry.
With over 30 years’ experience we have a long and proud history of supporting regional and rural communities, providing real solutions to Australian farmers, contractors and council spray teams across the country.
Producing the world’s first remote controlled retractable hose reel system in 1988, Quik Spray is the preferred choice of spray
units for farmers, councils, contractors and nurseries.
With innovation, valuable expertise and the most dedicated service, we produce superior equipement suited to the harsh
Australian environment. After 30 years, we know what it takes to make the most trusted sprayer on the market.
All Quik Spray units are fabricated and hand-assembled right here in Warana, Queensland. We control all aspects of the fabrication
and assembly process, ensuring you get the highest quality product. We are extremely proud and dedicated to providing jobs to
local employees in the manufacturing sector.

Quik Spray 9TBE Manual 4
TABLE OF CONTENTS
05 Unpacking & Mounting your unit
06 Safety Warnings
07 Pre-operation Checklist
08 Product Overview
11 General Overview
13 Radio Receiver & Transmitter
15 Operation Instructions
19 Optional Quik Spray Accessories
20 Maintenance
21 Chain And Sprocket Maintenance
22 Troubleshooting
25 Machine Specifications
26 Parts Diagrams
31 Warranty

Quik Spray 9TBE Manual5
UNPACKING YOUR UNITWhen unpacking your new Quik Spray unit, please check it
thoroughly for any transport damage that may have occured
during transit. Check that all parts and accessories that were
ordered, have been included.
Aerial/s
Transmitter/s
Instruction Manual/s
(Honda, Bertolini, Quik Spray)
All accessories as ordered
MOUNTING YOUR SPRAY UNITMount the machine securely by bolting through all mounting
lugs located at the front, middle and rear of the unit. There are
6 in total if supplied with a tank. If not supplied with a tank
there are 4. Ensure minimum of 50mm clearance from all sides
to prevent damage.
If your machine was not supplied with a tank you will
need to connect the inlet, by-pass and safety valve hoses
to the tank you have provided. All hoses and connections
must not be less in diameter than the connections on
the pump and pressure controller.
The pump suction side inlet hose must have an inline filter
with the capacity of 2.5 times of the flow rate of the p u m p .
Please ensure that hoses do not rub on any moving parts or
sharp edges.
Suction hoses should be mounted in a way to avoid the
formation of air bubbles. All threaded connections
without o-ring seals must be assembled with PTFE tape, or an
equivalent material, to ensure a perfect seal.
FIT AERIALS TO MOUNTING BASES
WARNING
DO NOT OVER-TIGHTEN THE AERIAL TO THE AERIAL BASE
Finger tighten and a tiny bit more, is all that the aerials require to be attached properly. Overtightening the aerials
can cause the coax cable to break in the solder cap of the aerial base severing the connection to the aerial. This
can result in a radio range of only 20-40 meters rendering the aerial/s incapable of receiving a signal.

Quik Spray 9TBE Manual 6
WARNING
FOR 5SDM MODELS ONLYConnect the 2 core flex wire supplied to a 12 volt battery with in-line fuse fitted in the red positive wire. The 2 pin plug can be
fitted between the unit and vehicle for ease of removal.
FOR 9TBE & 9TDE MODELS ONLY
WARNING
If you have purchased the optional lifting bar for these units it must be removed after lifting the unit to avoid vibration
damage which can result in dangerous lifting bar failure.
WARNING
PLEASE FOLLOW ALL WARNINGS AS FAILURE TO DO SO MAY RESULT IN SERIOUS INJURY, PERMANENT INJURY OR DEATH
1. DO NOT start the unit until you have read this manual carefully.
2. DO NOT let any person near the unit while it is operating.
3. DO NOT start motor with pressure lever in the “press position”
4. DO NOT pull the hose out too fast as the reel may run on, causing the hose to become entangled.
5. DO NOT alter the equipment in any manner. If repairs are necessary use only genuine factory repair parts.
6. DO NOT leave the unit running unattended at any time.
7. DO NOT operate the unit if there are any leaks from hoses, fittings, ECT. Fluids which are under high pressure
can penetrate the skin.
8. DO NOT operate near power lines, as contact could result in electrocution.
9. DO NOT refuel the engine until it has stopped and, if any fuel is spilled, make sure the area is dry before starting
the engine.
Make sure that the twin core flex is securely mounted so that it is not able to rub on any moving parts of the machine or
vehicle.
FOR ALL MODELS

Quik Spray 9TBE Manual7
Prior to operating your spray system, please read the following
instructions carefully.
1. Check all spray guns are connected and water tight
2. Ensure there is fuel in the motor (unleaded)
3. Ensure the correct oil level in pump (pump manual)
4. Ensure the correct oil level in motor (motor manual)
5. Ensure the controller 2-way ball valves in the off position
(Fig. 3)
6. Ensure the pressure lever is in bypass position (Fig. 3)
7. Ensure all safety guards and shields are in place .
8. Ensure all nuts, bolts, and screws are in place and tight
9. Ensure the radio on/off switch in the off position. (Fig. 4)
10. Make sure that the unit is in an open space (exhaust gas
is poisonous)
11. All maintenance schedules have been completed (page
13-14)
12. 12. Start engine (see engine manual)
13. 13. Adjust engine revs to approximately 2400 rpm or ¾
revs.
PRE-OPERATION CHECKLIST
Fig 3: Ball valve position Fig 4: Radio ON/OFF switch
FIG 3. - 40 bar/580 psi Sting pressure gauge.
1. Pressure engage/release lever (Pictured in the engaged
position)
2. Pressure adjustment knob.
3. Two way ball valves. (Pictured in the closed position)
4. Extra outlets.
1. ON/OFF power switch for radio electrics and power to the
electromagnetic clutch.
Leaving this switch on when machine is not in use will
drain the 12 volt battery.
2. Manual button for reel retraction.
1
1
22
34

Quik Spray 9TBE Manual 8
PRODUCT RANGE OVERVIEWSINGLE REEL SYSTEM MODEL 5SDM | 5SDE | 9SDE
5SDM | 5SDE | 9SDE Diagram Description1. Hose roller head guide
2. Supa-Slip hose
3. Aerial
4. Lifting bar (optional accessory)
5. Tank
6. Bypass & safety return line tank inlets
7. Tank lid fill inlet
8. Suction line filter
9. Radio receiver box
10. Battery
11. Sting pressure controller (4 outlet)
12. ON/OFF switch for power and manual reel retraction
13. Honda motor
14. Bertolini pump
- PA530 on 5HP
- PA530 on 9HP
- PA730 optional on 9HP models
1 2
3
4 5
6 7
8
9
10
11
12 13
14

Quik Spray 9TBE Manual9
PRODUCT RANGE OVERVIEWTWIN REEL SYSTEM - MODEL 9TBE
1
23
4
9TBE Diagram Description1. Tank
2. Lifting bar (optional accessory)
3. Bypass & safety reutrn line tank inlets
4. Tank lid fill inlet
5. Aerial
6. Aerial base
7. Hose reel retaining bar
8. 8. Hose roller head guide
9. 9. Reel belt tensioning bolt (on side of each reel)
10. Battery
11. Radio receiver box
12. ON/OFF switch for power and manual reel retraction
13. Reel belts and pullies running to electro-
magnetic clutch
14. Honda motor
15. Sting pressure controller (4 outlet)
16. T400 spray gun (optional accessory)
17. Supa-Slip hose
Side view of 9TBE
1
2
3 4
5
6
7
89
1110
12 13
14
15
16
17

Quik Spray 9TBE Manual 10
PRODUCT RANGE OVERVIEWTWIN REEL SYSTEM - MODEL 9TDE
9TDE Diagram Description
1. Hose roller guide head assembly
2. T400 spray gun (optional accessory)
3. 9HP Honda motor
4. 12 volt battery
5. Sting 4 outlet pressure controller
6. 2-way ball valve
7. Safety pressure 580psi relief valve on pump
8. ON/OFF switch and manual rewind button
1
323
45
6
78
Quik Spray 9TBE Manual11
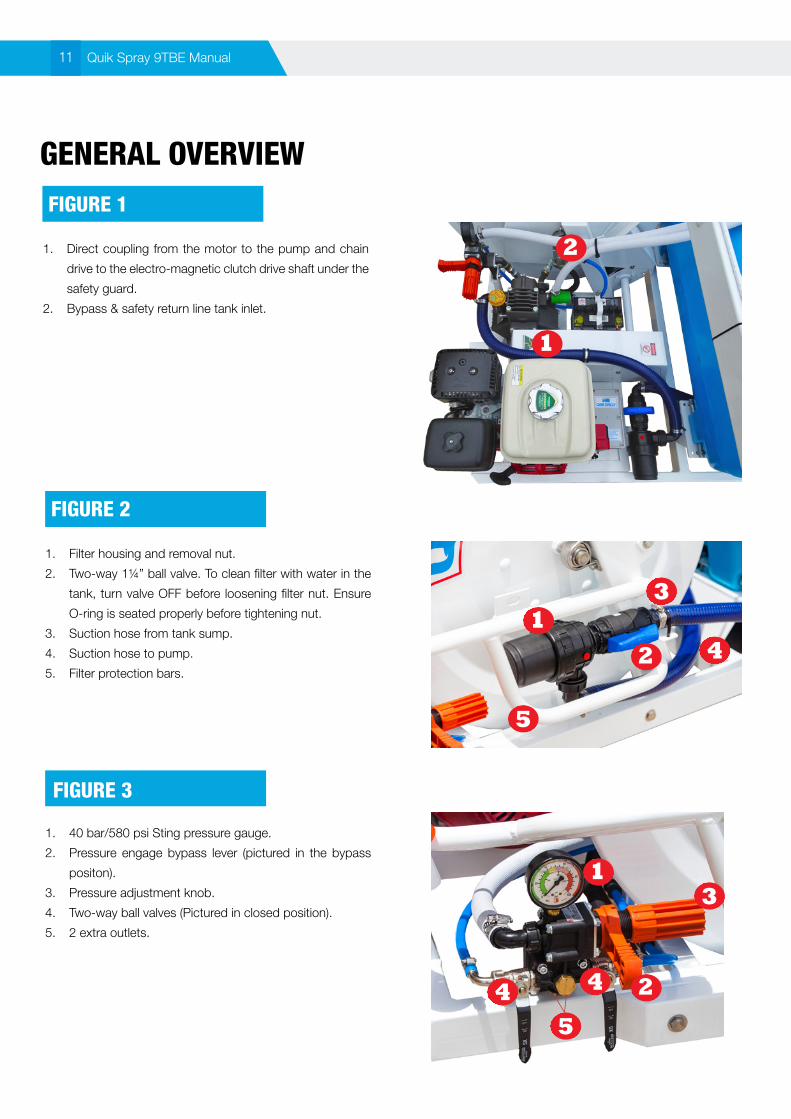
GENERAL OVERVIEW
1
21. Direct coupling from the motor to the pump and chain
drive to the electro-magnetic clutch drive shaft under the
safety guard.
2. Bypass & safety return line tank inlet.
FIGURE 1
FIGURE 2
FIGURE 3
1. Filter housing and removal nut.
2. Two-way 1¼” ball valve. To clean filter with water in the
tank, turn valve OFF before loosening filter nut. Ensure
O-ring is seated properly before tightening nut.
3. Suction hose from tank sump.
4. Suction hose to pump.
5. Filter protection bars.
1
2
3
4
5
1. 40 bar/580 psi Sting pressure gauge.
2. Pressure engage bypass lever (pictured in the bypass
positon).
3. Pressure adjustment knob.
4. Two-way ball valves (Pictured in closed position).
5. 2 extra outlets.
1
2
3
4 4
5

Quik Spray 9TBE Manual 12
GENERAL OVERVIEW
1
FIGURE 4
FIGURE 5
FIGURE 6
2
1. ON/OFF power switch for radio electrics and power to
the electromagnetic clutch.
2. Manual button for reel retraction.
Leaving this switch ON when machine is not in use will
drain the 12 volt battery, resulting in failure of electric start,
manual and remote contraction.
1. Radio reciever box.
This box contains the electrical components for the
remote controlled retraction operation.
For optimal radio control range and correct machine
operation, ensure the 12 volt battery’s voltage output is 12.5
volts.
The battery may need to be recharged from time to time
to maintain optimal voltage.
1
1. Radio transmitter.
Always use a high quality 9 volt battery to power your
radio transmitter. Replace the 9 volt battery at least every 3
months (or more frequently with continual use).
As the battery voltage reduces, the radio range
effectiveness will reduce accordingly. 1

Quik Spray 9TBE Manual13
RADIO RECEIVER & TRANSMITTER
1
23
This transmitter (remote) is the control module that is used on the following Quik Spray models
5SDM UTV 5SDE 5SCE
9SDE PTO 3PL5SDM
A B C D
27.145 MHz
7
4
5
6
1. Terminal plugfrom L to R: (A) Antenna Internal Coax - (B)
Earth - Positive - (C) 12volt Power In - (D) 12volt power
Out to Clutch).
2. The second relay to the right is not used in this single
module radio.
3. 12 volt relay motherboard.
4. 27.145 MHz receiver board. PN 4430000 The set of
12 blue and white dipswitch toggles need to match the
corresponding set in the 9volt battery compartment of
the hand held transmitter for remote operation.
5. 27.145 MHz receiver board blue operational light .
6. 27.145 MHz receiver board mother board red operational
light.
7. 27.145 MHzTransmitter. PN 4440000. The 12 blue and
white dipswitch toggles need to match the receiver board
for remote operation.

Quik Spray 9TBE Manual 14
RADIO RECEIVER & TRANSMITTER
1
2
3
4
65
27.145 & 27.195 MHz
1. Terminals from L to R: (A) Left Antenna Internal Coax - (B)
Earth - (C) 12V Positive Power In - (D) Power Out to Left
Reel Clutch - (E) Right Antenna Internal Coax - (F) Power
Out to Right Reel Clutch.
2. Left reel relay and white relay operational light.
3. Blue operational light for 27.195 mHz right receiver board.
The left 27.145 MHz blue operational light is directly under
the top board in the same location.
4. 27.195 MHz and operational light for the red mother board.
5. 27.195 MHz receiver board for the right reel. (PN 4431000).
The set of blue and white dipswitch toggles need to match
the 27.195 MHz transmitter for the right reel to operate.
The blue and white dipswitch toggles need to match the
corresponding set in the 27.145 mHz transmitter for remote
operation.
6. 27.145 MHz receiver board for the left reel (directly
underneath the top receiver board) PN 4430000.
7. 27.145 MHz left reel transmitter (PN 4440000) Dipswitch
toggles need to match the bottom left 27.145 MHz receiver
board
8. 27.195 MHz right Transmitter (PN 4441000) The blue and
white dipswitch toggles need to match the 27.195 MHz
receiver board for remote operation.
9. Right reel relay
This transmitter (remote) is the control module that is used on the following Quik Spray models
9TBE 5TCE 10TBE 3PL9TDE 9TDE
8
9
7
A B C D E F

Quik Spray 9TBE Manual15
OPERATION INSTRUCTIONS
1. Ensure pre-operation checklist has been completed.
2. Fill tank to desired level. If optional “Venturi Fast Filler” is fitted to your unit, please refer to page 18 of this manual.
Never fill tank with the lid closed.
3. Turn FUEL to the ON position.
4. Turn CHOKE ON.
5. Adjust the THROTTLE to help the engine start.
6. Turn key to START.
7. Once engine is running, close CHOKE.
8. Adjust revs on the throttle (Rabbit vs. Turtle icon) to set the desired revs on the motor.
TURNING ON UNIT
6
3
4
5
DANGER - HOT SURFACE
Honda motor exhaust will become hot when in use.
Quik Spray 9TBE Manual 16
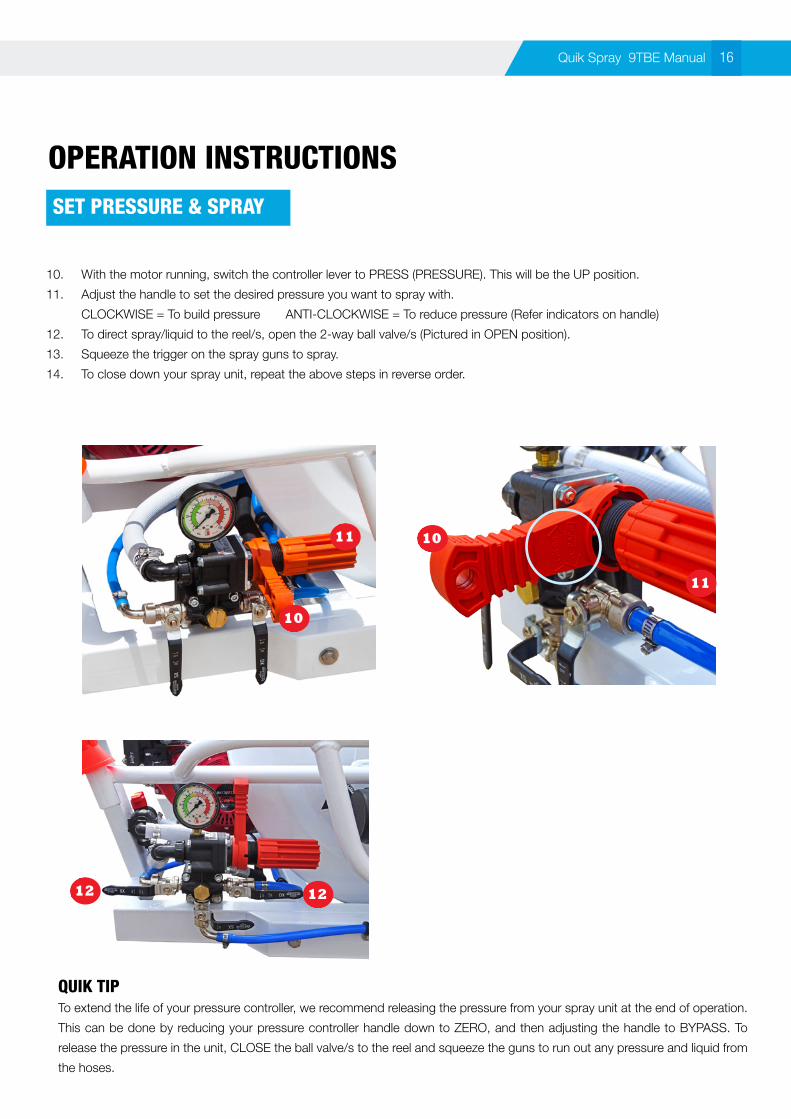
OPERATION INSTRUCTIONSSET PRESSURE & SPRAY
10. With the motor running, switch the controller lever to PRESS (PRESSURE). This will be the UP position.
11. Adjust the handle to set the desired pressure you want to spray with.
CLOCKWISE = To build pressure ANTI-CLOCKWISE = To reduce pressure (Refer indicators on handle)
12. To direct spray/liquid to the reel/s, open the 2-way ball valve/s (Pictured in OPEN position).
13. Squeeze the trigger on the spray guns to spray.
14. To close down your spray unit, repeat the above steps in reverse order.
11
11
10
10
12 12
QUIK TIPTo extend the life of your pressure controller, we recommend releasing the pressure from your spray unit at the end of operation.
This can be done by reducing your pressure controller handle down to ZERO, and then adjusting the handle to BYPASS. To
release the pressure in the unit, CLOSE the ball valve/s to the reel and squeeze the guns to run out any pressure and liquid from
the hoses.

Quik Spray 9TBE Manual17
OPERATION INSTRUCTIONS
1. Turn radio ON/OFF power switch to the ON position.
Assign each operator with a transmitter. If you are using
a twin reel system, be sure that each operator is carrying
the correct transmitter to their corresponding reel.
2. Quik Spray reels will free-wheel out to the desired
distance.
Do not pull the hose out too fast. This may cause the reel
to ‘run-on’ and become tangled.
3. When the operator is ready to retract the hose, press the
button on the transmitter to retract the hose back onto
the unit reel.
Be aware of strong retraction! Be prepared to release the
transmitter button when approaching the reel/s as personal
injury or damage to the unit may occur.
4. When operation is complete, turn radio switch to OFF
position to prevent the 12 volt battery from discharging.
5. It is recommended that the 12 volt battery be connected
to an automatic battery charger when not in use.This will
help avoid any damage to the 12 volt battery and help
keep the unit working at peak performance.
TURNING ON TRANSMITTER
TO FLUSH YOUR QUIK SPRAY
1. After use, flush your unit with Quik Flush Tank/Pump
Cleaner according to the directions on the bottle. This will
ensure your unit is cleaned and lubricated to extend the life
of the tank, pump, hoses, diaphragms, o-rings and seals.
2. Rinse tank with clean water through the guns until foaming
reduces.
OPTIONAL 12 VOLT LOW PRESSURE BOOM KIT
Your 9TBE unit can be fitted with an optional 12 volt low pressure boomless jet kit.
1. With ball valve turned ON, adjust the pressure.
Clockwise = increase, Anti-clockwise = decrease.
2. When the ball valve is closed the high pressure controller
will return to it’s pre set pressure
3. The boom control is a simple switch where Down = ON
and Up = OFF
CAUTION
The high pressure controller needs to be twice the pressure at the low pressure controller without going over
140 PSI. If you go over 140 PSI on the high pressure controller you will damage the solenoid and this is not
covered under warranty.

Quik Spray 9TBE Manual 18
OPERATION INSTRUCTIONSFILLING TANK WITH OPTIONAL “FAST FILLER”
1. Connect suction hose to floating filter and tank mounted
“Fast-Filler”.
2. Place floating filter into water supply.
3. Start engine and prime pump. (If the tank is completely
empty, add a bucket of water to the tank to facilitate
pump priming).
4. Remove the tank lid and turn ON the 2-way ball valve
from the pressure controller that runs to the “Fast-Filler”.
5. When the tank has been filled, remove the suction hose
from the water supply while the pump is still running to
avoid chemical back flow into the supply.
6. Turn OFF 2-way ball valve running from the pressure
controller to the “Fast-Filler” and proceed with Operation
Instructions.
1
2
1. This blue hose runs from the Venturi Fast Filler to the
Sting Pressure Controller and 2-way ball valve which
turns the Venturi ON or OFF.
2. Venturi Fast Filler. This comes complete with 7
meters of suction hose with floating filter attached.
This screws on to the Venturi Fast Filler at the fitting
highlighted (2) for filling from creeks and dams.
For winter storage, if freezing conditions are expected, empty pump completely and flush with a mixture of water and anti-freeze to prevent irrreparable damage to your unit.
Tank Diagram Description

Quik Spray 9TBE Manual19
For more information on our range of accessories, please call our friendly sales team on 1800 645 688 or visit our website at www.quikspray.com.au
OPTIONAL QUIK SPRAY ACCESSORIESThere are a variety of accessories you can add to your Quik Spray unit.
Aerial springs
Lifting bars and forklift mounts
T400 spray gun
Boomless Jet with mounting backet
Anabranch Liquid Handling system for safe chemical transfer
Quik Flush pump and tank wash concentrate
Quik Spray Belt - For pulling out hose by using your waist
Tany Tacho hour reader for motor
Galvanized framework
Tank fitted with Venturi style “Fast Filler” system
Floating Filter and 7 meters of suction hose for use with Venturi
12 volt low pressure boom kit with in-cab controls
Bertolini PA730 pump upgrade for 9HP systems (70 L per minute)
Projecta 12 volt automatic battery charger 1600mA
Quik Spray Canvas cover for 9TBE
Solid EF Dispenser Farmers Edition - Firefighting foam dispenser for spray unit
Extra 3/8” ID Supa-Slip spray hose -5HP systems can accommodate 150m
-9HP systems can accommdoate 200m
Extra 1/2” ID Supa-Slip spray hose -5HP systems can accommodate 100m
-9HP systems can accommodate 150m

Quik Spray 9TBE Manual 20
MAINTENANCE
DAILY
20 HOURS
YEARLY
1. Clean inline filter (Fig. 2).
2. Check oil level in pump.
3. Check all drive belts for tension and wear.
4. Check oil level in engine.
5. Check all chain drives (Refer pg. 23)
6. Check all hoses and fittings for leaks.
1. Check water in the 12 volt battery (if fitted).
2. Recharge 12 volt battery if necessary.
3. Replace 9 volt battery in transmitter/s if radio range has decreased.
4. Check all belts and adjust belt tensioning bolts if needed.
5. Check aerials and bases.
6. Wash off any salt.
7. Check all chain drives (refer to chain maintenance schedule page 14).
8. 8. Flush unit with Quik Flush according to directions on bottle.
1. Check all chain drives (Refer pg. 23)
2. Overhaul pump according to pump manual.
3. Inspect pressure controller valve and diaphragm, replace if necessary.
4. Inspect all bolts, nuts, and fittings. Tighten or replace if necessary.
5. Check reel brake belt and adjust the spring tension if necessary.
6. Make sure all safety guards and decals are in place and functional.
7. Replace 9 volt battery in transmitter/s.
8. Inspect wiring loom for damage.
9. Inspect radio receiver box lid seal and replace if necessary.
10. Change engine oil according to engine manual.
11. Test 12 volt battery voltage output. Ensure it is close to 12.5 volts for optimal radio receiver performance.

Quik Spray 9TBE Manual21
Chain maintenance for all chain sizes should be lubricated every 3 - 6 months as required.
Check all chains for tension and wear. This will be dependant on the amount of usage. Be sure to replace when indicated.
(Standard clutch drive chain on all fully integrated Quik Spray systems)
Lubricate with WD-40 or similar spray lubrication and remove run off.
Check tension. 15mm-25mm play in the chain is the accepted range. If not in that range adjust chain idler sprocket by loosening
the bolt and sliding in its holder until the acceptable range is reached. Then retighten. If the acceptable range is not achievable due
to chain stretch or wear, then the 40-1 chain must be replaced with the 40-1 chain con link which attaches one end of the chain to
the other thus forming the loop.
Also check for chain wear and sprocket wear. Replace all sprockets and chain when wear is more than 20%.
(Direct coupling from motor to pump on (5SDM, 5SDE, 9SDE, 9TDE, UTV)
Lubricate with WD-40 or similar spray lubrication and remove run off.
40-2 direct couple chain acceptable play range is 0mm-3mm. Check yearly for chain stretch, wear and check for sprocket wear.
Replace chain and chain full and ½ con links which complete the loop when play is more than 3mm. Replace both pump and motor
sprockets when wear is more than 20%.
It is recommended to always replace both sprockets at the same time to avoid future uneven chain or sprocket wear.
CHAIN AND SPROCKET MAINTENANCE
40-1 CHAIN
40-2 CHAIN

Quik Spray 9TBE Manual 22
TROUBLE SHOOTING
PUMPS AND PRESSURE CONTROLLER
PROBLEM PROBABLE CAUSE REMEDYPump does not deliver pressure
If good flow is being achieved from bypass back to the tank
Sting pressure regulator not set for pressure Set the lever to PRESS and adjust the handle
Damaged or worn seat or spring in pressure regulator
Replace with sting repair kit of new spring
Sticking pressure regulator slide Remove slid and lubricate with marine grease
Spray nozzle/s worn, missing, or exceeding pump capacity
Replace spray nozzle/s with correct size
If irregular flow from by-pass to tank
One of more of the pump valves not seating Clean or replace valves
Sucking air though the suction line, suction fittings or filter
Examine and repair
Air has not been entirely evacuated from the pump
Run pump in the BYPASS mode unitl all air is evacuated
Blocked suction filter or ball valve closed Clean filter or open ball valve
Motor to pump drive belts loose/broken or direct coupling damaged
Tension belts or replace. Replace direct coupling sprockets and chain
Ruptured spray hoses or fittings Repair or replace
Pump delivers insufficient pressure
If hoses are jumping
One or more of the pump valves not seating properly
Clean or replace valves
Diaphragm split (Oil will go milky in colour) STOP PUMP! Replace all 3. See pump manual
Air has not been entirely evacuated from the pump
Run pump with lever in BYPASS position until all air has been evacuated
Sucking air through the suction line or filter Examine and repair
Oil lever is low Top up with ASE30 or 10W30

Quik Spray 9TBE Manual23
TROUBLE SHOOTING
PROBLEM PROBABLE CAUSE REMEDYPump delivers insufficient pressure
If hoses are not jumping
Damaged or worn seat or spring in the pressure regulator
Replace
Sticking pressure regulator slide Remove slide and lubricate with marine grease
Spray nozzle/s worn, missing or exceeding the pump capacity
Replace nozzle/s with correct size
Motor to pump drive belts loose/broken or direct coupling damaged
Tension belts or replace. Replace direct coupling sprockets and chain
Leaking hoses or fittings Repair or replace
Pump is noisy Oil level is low Top up with SAE30 or 10W30
Sucking air or air in the pump Examine and repair
Blocked filter Clean filter
Oil is changing colour to white or oil is in the spray hose
One or more diaphragms are split STOP PUMP! Replace all 3. See pump manual
Water returning to tank through the safety valve hose
Worn safety valve (pressure adjusted too high)
Replace safety valve
T400 gun leaking Worn seat or seal in the handle Replace with T400 repair kit
PUMPS AND PRESSURE CONTROLLER contd.

Quik Spray 9TBE Manual 24
TROUBLE SHOOTINGRADIO ELECTRICS AND REEL REWIND
PROBLEM PROBABLE CAUSE REMEDYReel difficult to pull out Reel brake and adjustment too tight Adjust brake (Located behind clutch)
Reel rewind speed too slow Engine revs too low Increase engine revs to 3/4 revs or 2400RPM
Drive belts slipping Adjust belts with belt tensioner. Refer pg.11
Reel does not retract and manual button does NOT work
Switch not ON or faulty Switch ON or replace switch
Flat battery on unit (12 volt) Charge or replace
5SDM break in vehicle battery connection Repair
Blown fuse Replace with 10 amp fuse
Reel does not retract and manual button DOES work
Digital dipswitch code not synchronised 12 dipswitches in transmitter must correspond with the dipswitches on the receiver board
Discharged 9 volt transmitter battery Replace 9 volt battery
Wrong transmitter 9TBE or 9TDE only Right = 27.195 MHzLeft = 27.145MHz
Faulty receiver board, transmitter, pre-regulator board, relay or wiring
Call Quik Spray for radio return authorisa-tion form 1800 645 688 (07 5493 8944)
Reel only retracts at close distance
Discharged 9 volt transmitter battery Replace 9 volt battery
Aerial broken or loose on aerial base Replace aerial or tighten base. Finger tighten only. (Too much tension will cause damage to the coax cable inside the aerial base)
Coax cable broken inside of the aerial base Replace aerial base and coax cable
Low 12 volt battery on the machine Charge or replace 12 volt battery. 12.5 voltage output allows optimum performance
Faulty radio receiver board or transmitter Call Quik Spray for a radio return authorisa-tion form 1800 645 688 (07 5493 8944)
Interference from overhead powerlines or other possible sources or radio wave interference
Relocate the spraying system
WARNING
Transmitters on 9TBE and 9TDE units have two different built in frequencies; 27.145 for the left reel and 27.195 for the right reel. You cannot re-code the digital dipswitch frequency for one side to work the other side. Call Quik Spray if you are
experiencing problems to obtain a radio return authorization form.

Quik Spray 9TBE Manual25
MACHINE SPECIFICATIONS
5SDM 5SDE 9SDE 9TBE 9TDE
Reels 1 1 1 2 2
Horsepower 5.5 5.5 9 9 9
Honda Motor GX160U1 HXU
GX160U1 HXE8
GX270U HKS8
GX270UT QSE8
GX270U HKS8
Bertolini Pump PA330 PA330 PA530 PA530 PA530
Litres p/min (max)
34 34 54 54 54
PSI (max) 580 580 580 580 580
PSI (max working)
400 400 400 400 400
Electric Start No Yes Yes Yes Yes
12 Volt battery No Yes Yes Yes Yes
Flow at 100m 100PSI
9.3 litres per minute
9.3 litres per minute
17.8 litresper minute
17.8 litresper minute
17.8 litresper minute
Flow at 100m200 PSI
12.1 litres per minute
12.1 litresper minute
24.6 litresper minute
24.6 litresper minute
24.6 litresper minute
Flow at 100m250 PSI
14.2 litresper minute
14.2 litresper minute
26.6 litresper minute
26.6 litresper minute
26.6 litresper minute
Flow at 100 m300 PSI
15.5 litres per minute
15.5 litres per minute
30.7 litresper minute
30.7 litresper minute
30.7 litresper minute
Flow at 100m400 PSI
18.2 litresper minute
18.2 litresper minute
36.5 litresper minute
36.5 litresper minute
36.5 litresper minute
Weight*(No tank)
88 kg 95 kg 115 kg 175 kg 175 kg
Length*(No tank)
855 mm 855 mm 855 mm 1065 mm 1070 mm
Width*(No tank)
1100 mm 1100 mm 1100 mm 1250 mm 1195 mm
Height*(No tank)
740 mm 740 mm 740 mm 740 mm 1000 mm
Colour White White White White White
Remote control MHz
27.145 27.145 27.145 27.145 (Left)27.195 (Right)
27.145 (Left)27.195 (Right)
* Due to extensive tank size/build variations, for exact dimensions and weights of machines with the tank, please contact our office.

Quik Spray 9TBE Manual 26
PARTS DIAGRAMST-400 NOZZLE PARTS EXPLOSION

Quik Spray 9TBE Manual27
PARTS DIAGRAMSSTING PRESSURE CONTROLLER PARTS EXPLOSION

Quik Spray 9TBE Manual 28
PARTS DIAGRAMSPUMP PA330 PARTS EXPLOSION

Quik Spray 9TBE Manual29
PARTS DIAGRAMSPUMP PA530 PARTS EXPLOSION

Quik Spray 9TBE Manual 30
PARTS DIAGRAMSPUMP PA730 PARTS EXPLOSION
Quik Spray 9TBE Manual31
WARRANTY POLICYThis document sets out the warranties that are given by Quik Corp Pty Ltd (ABN 18 081 235 556) in relation to the Product purchased from or manufactured by Quik Corp.
1. Definitions1.1. In this warranty policy:“Quik Corp” means Quik Corp Pty Ltd (ABN 18 081 235 556);“Customer” means the party who originally acquired the Product from Quik Corp, or an authorised distributor, reseller or dealer for Quik Corp, for their own use.“OEM Equipment” means the items of equipment fitted to the product by Quik Corp and which items have been manufactured by others and have their own manufacturer’s warranty.“Product” means the goods or machinery that the Customer acquired and which were manufactured by Quik Corp.
2. Warranty2.1. Subject to clause 3 and clause 4, Quik Corp warrants to the Customer that the Product will be free from proven defects in material and workmanship for twelve months from the date of purchase by the Customer, unless a specific warranty period applies to a component listed in appendix A.2.2. The warranty is not transferable.
3. Limitations3.1. This warranty does not cover damages resulting from shipping and handling, abuse, accidents, alterations, normal wear or failure to maintain or use the Quik Corp product with due care.3.2. Quik Corp does not warrant that the operation of the product will be uninterrupted or error free. The Customer must read and follow all instructions and manuals for the setup, maintenance and use of the Product. If the Customer fails to do so, the product may not function correctly and may suffer other damage.3.3. This warranty does not extend to OEM equipment which has its own warrant and the Customer must rely on the OEM equipment warranty for any defects in material or workmanship relating to the OEM equipment. 3.4. This warranty does not extend to cover corrosion due to any cause nor to any damage to painted or anodised surfaces that occurs after the Customer takes delivery of the product.3.5. This warranty does not cover time required to diagnose a warranty problem.3.6. The use of parts other than Quik Corp parts for repair of warranted items will automatically negate any warranty. Warranted components must be replaced with genuine Quik Corp parts.3.7. Repairs by an unauthorised agent will automatically forfeit any warranty. Warranty repairs must be carried out by Quik Corp or an authorised Quik Corp Dealer/Service Agent only.3.8. This warranty does not cover transportation or insurance costs for Products needing repair or replacement of warranted components. Nor does it cover any freight or insurance costs in obtaining new parts or returning old parts to Quik Corp for inspection purposes.3.9. The time taken to remove and re-install a warranted part or component into other brands of equipment will not be covered by the Quik Corp warranty. Only parts and labour directly attributable to the repair of the Quik Corp unit is covered.3.10. Quik Corp does not pay for cleaning, or clean the Product, accessories or work area before or after the warranty repair.3.11. Quik Corp assumes no responsibility for improper choice of models or where products are used in excess of rated capacities and design functions, or under abnormal conditions. We make available a free technical service to help with any product selection, application or situation.
4. Repair or Replace4.1. During the warranty period, Quik Corp or its authorised Dealer/Service Agent shall repair or replace, at Quik Corp’s discretion, without charge for parts and standard labour, any part of the Quik Corp Product which fails because of defects in material or workmanship unless the damage arises from:4.1.1. Failure resulting from neglect or misuse, such as improper operation, lack of required maintenance or continued use of the Product after the discovery of a defect which results in greater damage to the Product; 4.1.2. Deteriorated or failed components such as but not limited to diaphragms, O-rings, hoses, seals, electrical wiring and connections damaged by corrosive chemicals, dirt and sand, excessive heat or moisture. The Customer should ensure the type and strength of chemicals used in the Product are compatible with the design of the Product;4.1.3. The use of accessories, hardware, or software which were not manufactured by, installed by or approved in writing by Quik Corp;4.1.4. The use of consumable items such as but not limited to oils, lubricants, diaphragms, O-rings, hoses seals, gaskets, filter elements, flow meters, clutches, drive belts, pivot pins, paint, batteries, radio transmitters, radio relays, push buttons, switches, hose rollers, aerials, spray guns and nozzles as these items are considered to be normal wear items and are not warranted;4.1.5. Component failure caused by not performing scheduled maintenance service such as oils, grease, failure to clean tanks, pumps, filters, spray lines, nozzles or any other components and not tightening or replacing loose or missing bolts, nuts, fittings, shields and covers;4.1.6. Damage or machine failure caused by carelessness or accidental damage, improper operation, inappropriate transportation or storage of the Product;4.1.7. Any contamination or leakages caused or induced by the Customer;4.1.8. Any use or operation of the Product outside the physical, electrical or environmental specifications of the Product;4.1.9. Any alterations, modifications, attachments or unauthorised repairs to the Product which have not been authorised in writing by Quik Corp; and4.1.10. Failures due to faulty or inadequate electrical sources of power.
5. OEM Warranties5.1. All OEM (Original Equipment Manufacturer) components are covered by the Original Manufacturer’s Warranty. It is the Customer’s responsibility to familiarise themselves with these warranties, and subject to clause 7, that is the only warranty given to the customer in respect of that part of the Product.
6. Statutory Rights and Exclusions (New Zealand Only)6.1. If the Product has been acquired for the purposes of a business then pursuant to section 43(2) of the Consumer Guarantees Act 1993 (“CGA”) it is agreed that the provisions of the CGA do not apply. To the fullest extent permitted by law in New Zealand, Quik Corp excludes any liability for any direct or indirect loss or damage of any kind arising from the Product, including consequential loss or damage or loss of profits, and loss or damage arising from the negligence of Quik Corp’s employees and agents. The warranty is personal to the Customer and cannot be transferred to a subsequent purchaser (although the purchaser, in some circumstances, may have rights under the CGA or the Sale of Goods Act). These exclusions do not exclude Quik Corp’s liability in respect of any warranties or guarantees implied by any relevant legislation in New Zealand which cannot legally be contracted out of.

Quik Spray 9TBE Manual 32
WARRANTY POLICY contd.
7. Warranty Claim Procedure7.1. To obtain warranty service:7.1.1. The Warranty Registration Form must be returned to Quik Corp by the Customer within 14 days of taking delivery of the Product;7.1.2. The Customer must read the Operating manual before operating the Product;7.1.3. The Customer must provide with notice of the defect Quik Corp within the warranty period and within 14 days of discovery of the claimed problem, and allow reasonable time for replacement or repair.7.2. Quik Corp may, at its discretion, request the Customer to deliver the alleged defective parts to an authorised servicing Dealer/Service Agent or to Quik Corp. Transportation of the Product to the authorised servicing Dealer/Service Agent or Quik Corp for warranty work is the responsibility of the Customer and is at the Customer’s expense. Alternatively, the Customer may request a Quik Corp service technician to travel to the site of the Product to effect repairs or replacement, however the reasonable travel costs (including traveling time) of the service technician must be paid for by the Customer.7.3. Any service outside the scope of this warranty will be charged for at Quik Corp’s rates and terms then in effect.
8. Other8.1. This warranty is in lieu of all other warranties (except those of title), expressed or implied, and there are no warranties of merchantability or fitness for a particular purpose.8.2. Unless the Product has been purchased for personal, domestic or household use, any liability of Quik Corp to the Customer arising under statute which may not be excluded restricted or modified by agreement in limited to an amount equal to, as determined by Quik Corp:8.2.1. Replacement of the Product or supply of equivalent Product;8.2.2. The repair of the Product;8.2.3. The payment of the cost of replacing or repairing the Product; or8.2.4. Refund of the purchase price paid by the Customer.8.3. Subject to clause 7.2, in no event shall Quik Corp or the authorised Dealer/Service Agent be liable for any loss of profit or any consequential, indirect or special loss, damage or injury of any kind whatsoever arising directly or indirectly from the Product or any defect.8.4. The benefits under this Warranty are in addition to other rights and remedies under a law in relation to the Product.8.5. The judgement of Quik Corp in all cases of claims under this warranty shall be final and conclusive and the Customer agrees to accept its decisions on all questions as to defect, repair and to the exchange of any part or parts.
Appendix A:1. Bertolini Pumps – Warranty period is 6 months. If Quik Flush pump and tank cleaner is used from new then the warranty period is extended to 18 months.2. Honda Motors – Refer to your Honda Manual. (Warranty period is up to 3 years)3. Radio Receiver – Warranty period is 5 years on all non-moving parts.
All information, illustrations and specifications in this manual are based on the latest information at the time of publication. The right is reserved to make changes at any time without notice.
COPYRIGHT© 2017 Quik Corp Pty Ltd All rights reserved Previous Editions COPYRIGHT© 2017

YOUR NOTES______________________________________________________________________________________
______________________________________________________________________________________
______________________________________________________________________________________
______________________________________________________________________________________
______________________________________________________________________________________
______________________________________________________________________________________
______________________________________________________________________________________
______________________________________________________________________________________
______________________________________________________________________________________
______________________________________________________________________________________
______________________________________________________________________________________
______________________________________________________________________________________
______________________________________________________________________________________
______________________________________________________________________________________
______________________________________________________________________________________
______________________________________________________________________________________
______________________________________________________________________________________
______________________________________________________________________________________
______________________________________________________________________________________
______________________________________________________________________________________
______________________________________________________________________________________
______________________________________________________________________________________
______________________________________________________________________________________
______________________________________________________________________________________
______________________________________________________________________________________
______________________________________________________________________________________
______________________________________________________________________________________
______________________________________________________________________________________
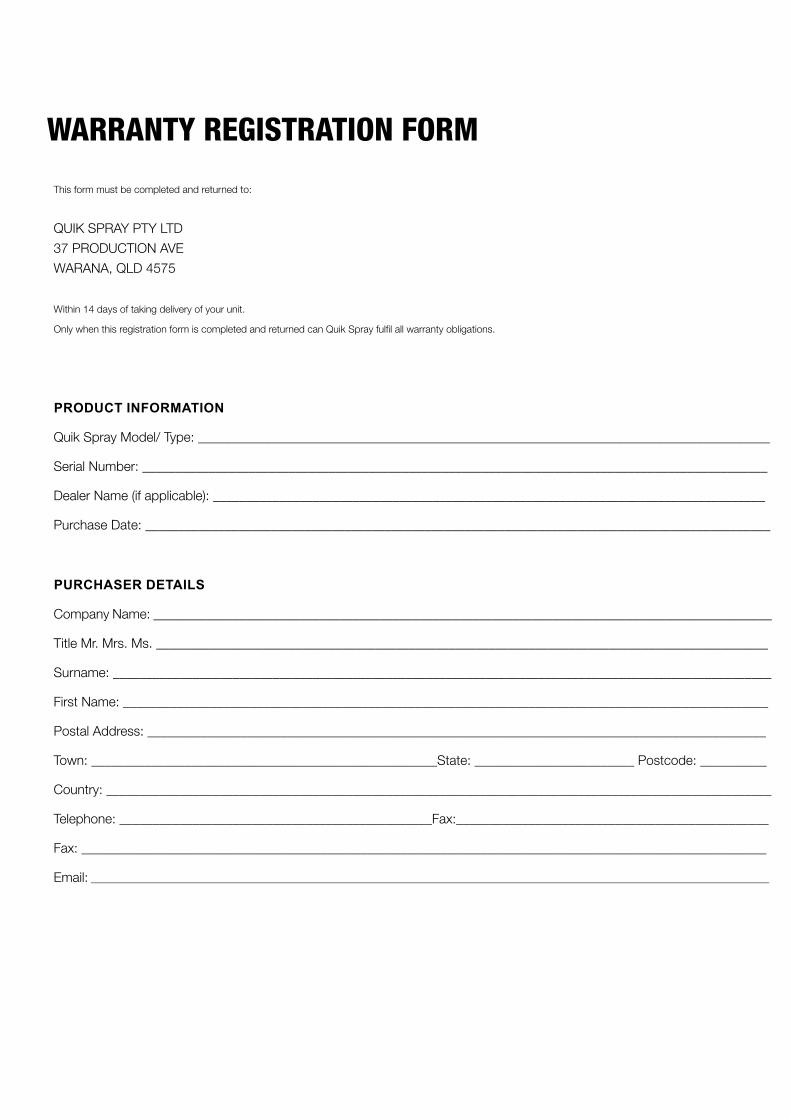
WARRANTY REGISTRATION FORM
This form must be completed and returned to:
QUIK SPRAY PTY LTD
37 PRODUCTION AVE
WARANA, QLD 4575
Within 14 days of taking delivery of your unit.
Only when this registration form is completed and returned can Quik Spray fulfil all warranty obligations.
PRODUCT INFORMATION
Quik Spray Model/ Type: ______________________________________________________________________________________
Serial Number: ______________________________________________________________________________________________
Dealer Name (if applicable): ___________________________________________________________________________________
Purchase Date: ______________________________________________________________________________________________
PURCHASER DETAILS
Company Name: _____________________________________________________________________________________________
Title Mr. Mrs. Ms. ____________________________________________________________________________________________
Surname: ___________________________________________________________________________________________________
First Name: _________________________________________________________________________________________________
Postal Address: _____________________________________________________________________________________________
Town: ____________________________________________________State: ________________________ Postcode: __________
Country: ____________________________________________________________________________________________________
Telephone: _______________________________________________Fax:_______________________________________________
Fax: _______________________________________________________________________________________________________
Email: ________________________________________________________________________________________________________________________________________

QUIK SPRAYWARRANTY DIVISION
37 PRODUCTION AVENUEWARANA QLD 4575
AUSTRALIA
AFFIX STAMP
FOLD HERE AND SEAL AT TOP FOR RETURING BY POST


Proudly Australian Owned and Operated
37 Production AvenueWarana, QLD 4575
T F
07 5493 894407 5493 8957