quick start manual for autotrack - tn.gov · quick start manual for autotrack installing autotrack...
TRANSCRIPT

Quick Start Manual for
AutoTrack
30 August 2012
Savoy Computing Services Ltd


Licence agreement This software is the property of Savoy Computing Services Limited. It may be used only under the terms of the Licence Agreement.
Disclaimer
No warranty is given as to the results or performance of this Software. The User is responsible for satisfying himself that the Software is suitable for his purpose and performs in accordance with the claims in the User Manual. It is assumed that the User is a competent practitioner who is experienced in the theories and techniques upon which the Software is based.
Copyright notice This software is the copyright of Savoy Computing Services Limited. © Savoy Computing Services Limited (1991-2012) AutoCAD and Civil 3D are registered trademarks of Autodesk, Inc. MicroStation 95, MicroStation SE, MicroStation /J, MicroStation V8, MicroStation XM, MicroStation v8i, PowerDraft, InRoads, GeoPack and PowerCivil are trademarks of Bentley Systems Incorporated. BricsCAD is a registered trademark of Bricsys Savoy Computing Services Limited Clermont House High Street Cranbrook Kent TN17 3DN England Tel : +44 (0)1580 720 011 Fax : +44 (0)1580 720 022 US: 1-866 527 3790 Eml: [email protected] Web: http://www.savoy.co.uk 30 August 2012


Quick Start Manual for AutoTrack Contents v
Contents
Installing AutoTrack 1
AutoTrack hardware lock .............................................................................................. 1 Initialising AutoTrack ..................................................................................................... 2 Updating the AutoTrack version .................................................................................... 2 Upgrading AutoTrack functionality ................................................................................ 2 Licences ........................................................................................................................ 3
Single user licences ......................................................................................... 3 Network licences .............................................................................................. 3 Trial copies ....................................................................................................... 3 Demonstration copies ...................................................................................... 3 Rental licences ................................................................................................. 3
Installing the software ................................................................................................... 4 Single user version .......................................................................................... 4 Network version ............................................................................................... 5
Installing the NetHASP Licence Manager software (Network version only) ................. 7 Installing the licence manager on a Windows NT/2000/XP/7 server ............... 7 Installing the licence manager on a Novell Netware server ........................... 12
Moving the NetHASP Licence Manager (Network version only) ................................ 12 Installing the NetHASP Licence Monitor software (Network version only) ................. 13
Installing the licence monitor on a Windows NT/2000/xp client computer .... 13 Installing, modifying, repairing or removing AutoTrack from a Windows Installer (msi) file ....................................................................................................................... 16
Installing AutoTrack ....................................................................................... 16 Modifying, repairing or removing AutoTrack .................................................. 22
Installing, modifying, repairing or removing AutoTrack from a CD or from a self-extracting installer (exe) file ........................................................................................ 25
Installing AutoTrack ....................................................................................... 25 Modifying, repairing or removing AutoTrack .................................................. 37
Some points to note .................................................................................................... 40 AutoCAD object enabler ............................................................................................. 42
To install the object enabler version from CD ................................................ 42 To install the software from the web .............................................................. 42
Scripted 'silent' installations using the self-extracting installer ................................... 43 Creating the install script ................................................................................ 43 Running a silent install ................................................................................... 44 Adding files to an installation ......................................................................... 45 Uninstalling AutoTrack ................................................................................... 45 Updating AutoTrack ....................................................................................... 45
Configuring AutoCAD manually .................................................................................. 46 Configuring MicroStation, Bentley PowerDraft, PowerCivil, Power InRoads, Power GEOPAK or MX manually................................................................................ 49 Configuring BricsCAD manually .................................................................................. 51 Resolving hardware lock problems ............................................................................. 52
Running the Licence Manager on the same computer as AutoTrack............ 52 Running the Licence Manager on a remote computer .................................. 53 Identifying and resolving problems ................................................................ 53
Technical Support ....................................................................................................... 54
Starting AutoTrack 55

vi Contents Quick Start Manual for AutoTrack
Running stand-alone AutoTrack ................................................................................. 55 Welcome dialog
(1700) ................................................................................................... 56
Demonstration Version dialog (1800)
............................................................................. 57 Rental Version dialog
(1820) .......................................................................................... 58
Transfer Licence dialog (1850)
....................................................................................... 59 Activate Licence dialog
(1840) ....................................................................................... 59
Running AutoTrack in AutoCAD ................................................................................. 60 To run AutoTrack from the Taskbar Start Programs Menu ........................... 60 To run AutoTrack from within AutoCAD ......................................................... 60 To load and run AutoTrack for AutoCAD (except Civil 3D 2010 or later) manually ......................................................................................................... 61 To load and run AutoTrack for AutoCAD Civil 3D 2010 or later manually ..... 63 Viewing AutoTrack paths in AutoCAD if you don’t have AutoTrack .............. 64
Running AutoTrack in MicroStation ............................................................................ 65 To run AutoTrack from the Taskbar Start Programs menu… ........................ 65 To run AutoTrack from within MicroStation… ................................................ 66 To load and run AutoTrack for MicroStation manually… ............................... 67
Running AutoTrack in BricsCAD ................................................................................. 68 To run AutoTrack from the Taskbar Start Programs Menu ........................... 68 To run AutoTrack from within BricsCAD ........................................................ 68 To load and run AutoTrack for BricsCAD manually ....................................... 69
The New Features dialog (1975)
.................................................................................... 71 The Getting Started dialog (not AutoTrack Templates)
(1900) ...................................... 72
A few do's and don'ts .................................................................................................. 73
Introduction 75
What AutoTrack can and can’t do ............................................................................... 75 Capabilities..................................................................................................... 75 Features ......................................................................................................... 75 AutoCAD Civil 3D 2010 and later .................................................................. 75 Limitations ...................................................................................................... 76
Migrating from WinTrack ............................................................................................. 76 Reading pre-v5 AutoTrack libraries ............................................................................ 76 How to use AutoTrack ................................................................................................. 77
Settings .......................................................................................................... 77 Modelling rigid vehicles .................................................................................. 77 Modelling articulated semi-trailer vehicles ..................................................... 77 Modelling drawbar and multi-trailer vehicles .................................................. 78 Modelling aircraft ............................................................................................ 78 Modelling combination steered vehicles ........................................................ 78 Modelling vehicles with pushing tractors ....................................................... 78 Modelling vehicles with steerable couplings .................................................. 78 Modelling Active Hitches ................................................................................ 78 Development & planning scenarios ............................................................... 79 Modelling the effects of super elevation and side friction .............................. 79 Modelling trams and light rail vehicles ........................................................... 79 Modelling conveyor systems .......................................................................... 79 Fastest line through roundabouts .................................................................. 79 Checking vertical clearances ......................................................................... 80
What’s new in version 10? .......................................................................................... 80 Manual layout .............................................................................................................. 81
Notation conventions ..................................................................................... 81 Mouse conventions ........................................................................................ 81 Default values ................................................................................................ 82
Getting help ................................................................................................................. 82 Context sensitive on-line help ........................................................................ 82 On-line assistance ......................................................................................... 82 Help tutor ........................................................................................................ 82 Online video tutorial ....................................................................................... 82

Quick Start Manual for AutoTrack Contents vii
Glossary of Terms 97
Index 111


Quick Start Manual for AutoTrack Installing AutoTrack 1
Installing AutoTrack
Although installation of AutoTrack is relatively easy we nevertheless recommend that it be undertaken only by suitably competent persons.
AutoTrack hardware lock AutoTrack is protected from illegal use by a hardware lock, a small device that must be plugged into either the parallel port or the USB port of your computer (or, in the case of network licences, file server). Without this device AutoTrack will not run.
Parallel hardware locks
The parallel port hardware lock may be connected at either end of a parallel printer cable but must be located between the computer and the printer (or plotter, T-switch, buffer etc.). Since the hardware lock will not affect the operation of the parallel port it can be left installed when AutoTrack is not in use.
Whenever possible printers or plotters that are plugged into the same parallel port as the AutoTrack hardware lock should be switched on before the program is used and left on throughout its use.
Up to four Savoy and third party hardware locks, as well as a printer, can be plugged into the same parallel port. However, users should note that whilst all Savoy program hardware locks are compatible with one another, third party hardware locks may cause problems. Such problems can usually be resolved by rearranging the order in which the hardware locks are chained or by plugging them in different ports.
USB hardware locks
USB hardware locks are becoming the norm with the gradual phasing out of the parallel port. There are fewer problems with USB dongles since they cannot be stacked.
Important Replacement Savoy hardware locks will only be issued to holders of current support and maintenance contracts on return of a damaged hardware lock. If the damaged hardware lock cannot be produced a replacement copy of AutoTrack will have to be purchased.

2 Installing AutoTrack Quick Start Manual for AutoTrack
Initialising AutoTrack Before you can use the hardware lock for the first time you will need to initialise it by entering an Initialisation Keycode. This code is normally supplied to you once you have confirmed receipt of the software and dongle.
When you run AutoTrack for the first time it will warn you that the dongle has not yet been initialised and prompt you for an initialisation code. Once you have initialised your dongle you may discard the code which you will not need again.
Note The Initialisation Keycode is different from an Update Keycode which can only be used on a dongle that has already been initialised.
Updating the AutoTrack version Each time you install a new version of AutoTrack you will need to enter an Update Keycode. This code will normally be emailed to you automatically when you download the new version.
To enter the update keycode:-
1. Install the new version of AutoTrack and run it.
2. You will be warned that you are not authorised to use this version and prompted to enter an update code.
3. Follow the prompts and enter the supplied keycode.
The update code changes the authorised version held in the dongle so once you have successfully applied the code you will not need to enter it again, even if you move the dongle to another computer.
Note The update code changes with every version and once successfully applied may be discarded.
Upgrading AutoTrack functionality The AutoTrack modules that you are able to use are controlled by the hardware lock. Extra modules, if purchased, may be activated by entering an Upgrade Keycode. This code will be supplied by Savoy once we have your confirmed order for additional modules. However, before we can generate the code we need the User Code from your installation.
To locate the User Code:-
1. Run Start > Programs > AutoTrack > Hardware Lock Manager.
2. Click Seach for Savoy hardware locks to locate your dongle.
3. Select the dongle and click Details.
4. The User Code is the second item down.
To enter the Upgrade Keycode:-
1. Run Start > Programs > AutoTrack > Hardware Lock Manager.
2. Click Search for Savoy hardware locks to locate your dongle.
3. Select the dongle and click Update.

Quick Start Manual for AutoTrack Installing AutoTrack 3
4. Follow the prompts and enter the supplied keycode.
Licences Depending upon your licence you may be able to run AutoTrack on more than one computer.
Single user licences
You may install the software on as many machines as you wish but will only be able to run it on computers running 32-bit or 64-bit Windows with an AutoTrack hardware lock plugged into the parallel or USB port.
Network licences
You may install the software on as many machines as you wish but will only be able to run it on computers running 32-bit or 64-bit Windows that have a network link to the server that has the hardware lock plugged into its parallel or USB port.
Trial copies
Trial copies of AutoTrack may be issued with a licence that has a limited life. Once the licence expires the protection system will prevent the program from operating.
To convert an evaluation copy to the full version or to extend the evaluation period, the software will need to be relicensed. Relicensing involves issuing a new hardware lock or authorisation code.
Demonstration copies
Demonstration copies do not require a hardware lock because they distort the vehicles randomly thereby rendering them useless for real work. You may install demo copies on as many computers as you wish.
Rental licences
Rental licences use a software licence which can be purchased and extended online. No physical lock is required but an internet connection is required. You may install AutoTrack on as many computers as you wish and the licence can be transferred between installations.

4 Installing AutoTrack Quick Start Manual for AutoTrack
Installing the software AutoTrack can be installed with either a single user hardware lock, which should be plugged into the computer being used, or with a network hardware lock which may be plugged into a computer remote from the one in use.
The software is available on CD or as either a Windows Installer (msi) file or a standalone self-extracting (exe) file.
The installer files have names of the form ATRxxx.EXE or ATRxxx.MSI
where xxx is the version number, e.g. ATR922.EXE. Note that these
files contain the full product and will install a full copy or update an existing copy.
The CD contains some additional utilities and has a navigation menu but otherwise the AutoTrack product is identical.
Note You can configure AutoTrack to warn you when updates become
available. If you download these updates they are placed in the My
Documents\My AutoTrack Data\Updates folder. If you obtain
updates by visiting the web site we recommend that you place these files in the same area.
Single user version
1. Switch on the computer.
2. Do not plug the dongle in yet. If you have already plugged it in then unplug it before proceeding.
3. Login to Windows making sure that you have Administrator rights and check that there is 600MB (max) free for the program files.
4. If you have a CD Insert the AutoTrack CD and when it starts select Install / Update / Remove AutoTrack. When Setup starts follow the prompts to install AutoTrack, selecting the Express install option. See Installing, modifying, repairing or removing AutoTrack from a CD or from a self-extracting installer (exe) file, later in this section, to perform a Custom install or for more details. If you have a self-extracting (exe) file Double click on the file. When Setup starts follow the prompts to install AutoTrack, selecting the Express install option. See Installing, modifying, repairing or removing AutoTrack from a CD or from a self-extracting installer (exe) file, later in this section, to perform a Custom install or for more details. If you have a Windows Installer (msi) file Double click on the file. When Setup starts follow the prompts to install AutoTrack, selecting the Typical install option. See Installing, modifying, repairing or removing AutoTrack from a Windows Installer (msi) file, later in this section to perform a Custom install or for more details.
5. Shut down the PC, plug in the dongle and restart the computer. USB dongles only

Quick Start Manual for AutoTrack Installing AutoTrack 5
If you plugged in the dongle before installing the software it probably will not be installed correctly. Refer to Removing a partially installed USB dongle to remove and reinstall it. Parallel dongles only If you have a printer connected on the same port, switch that on first, and then the computer. If you have other hardware locks connected on the same port you may need to experiment with the order.
6. If you opted to configure your system manually then carry out any manual configuration (see Configuring AutoCAD manually or Configuring MicroStation, Bentley PowerDraft, PowerCivil, Power InRoads, Power GEOPAK or MX manually later in this section).
7. Repeat for any other computers on which you want to be able to run AutoTrack.
Removing a partially installed USB dongle
1. Unplug the USB dongle.
2. Run the Hardware Lock Wizard and if there is a driver installed, click the Uninstall Driver button.
3. Rerun the Hardware Lock Wizard and click the Install Driver button.
4. Plug the USB dongle in.
5. Click Search for Savoy Hardware Locks to check that the dongle can be found.
6. Close the Hardware Lock Wizard.
Network version
Warning The installation of the network version of AutoTrack should be carried out by a network administrator or system supervisor.
1. Decide which computer you will install the hardware lock on (the licence server) bearing in mind that this computer must be left switched on and possibly logged in at all times. We recommend that this is neither a file server nor an AutoTrack client and we do not recommend installing the network hardware lock on computers running Windows 98.
2. Login to Windows making sure that you have Administrator rights.
3. Install the NetHASP Licence Manager software (see Installing the NetHASP Licence Manager software (Network version only)).
4. USB dongle Plug the hardware lock into the USB port. Parallel dongle Close down and switch off the computer. Plug the hardware lock into the parallel port and then restart it. Note If you have a printer connected then switch that on first and then the computer. If you have other hardware locks connected then you may need to experiment with the order.

6 Installing AutoTrack Quick Start Manual for AutoTrack
5. The optional NetHASP Licence Monitor allows you to monitor licence usage and may be installed on any computer, including the server if you wish (see Installing the NetHASP Licence Monitor software (Network version only)).
6. Go to first of the computers on which you wish to install AutoTrack, login to Windows making sure that you have Administrator rights, and check that there is approximately 600MB (max) free on the installation drive for the program files.
7. If you have a CD Insert the AutoTrack CD and when it starts select Install / Update / Remove AutoTrack. When Setup starts follow the prompts to install AutoTrack, selecting the Express install option. See Installing, modifying, repairing or removing AutoTrack from a CD or from a self-extracting installer (exe) file, later in this section, to perform a Custom install or for more details. If you have a self-extracting (exe) file Double click on the file. When Setup starts follow the prompts to install AutoTrack, selecting the Express install option. See Installing, modifying, repairing or removing AutoTrack from a CD or from a self-extracting installer (exe) file, later in this section, to perform a Custom install or for more details. If you have a Windows Installer (msi) file Double click on the file. When Setup starts follow the prompts to install AutoTrack, selecting the Typical install option. See Installing, modifying, repairing or removing AutoTrack from a Windows Installer (msi) file, later in this section to perform a Custom install or for more details.
8. If you opted to configure your system manually then carry out any manual configuration (see Configuring AutoCAD manually or Configuring MicroStation, Bentley PowerDraft, PowerCivil, Power InRoads, Power GEOPAK or MX manually).
9. If you want to be able to monitor licence usage from this computer, install the NetHASP Licence Monitor (see Installing the NetHASP Licence Monitor software (Network version only)).
10. Repeat steps 6 to 11 for any other computers on which you want to be able to run AutoTrack.

Quick Start Manual for AutoTrack Installing AutoTrack 7
Installing the NetHASP Licence Manager software (Network version only)
The network licence manager can be installed on a Windows NT/2000/XP/7 network or a Novell Netware network. We do not recommend that it be installed on a computer running Windows 98.
Warning The installation of the hardware lock on a network server should be carried out by a network Administrator or system supervisor.
Installing the licence manager on a Windows NT/2000/XP/7 server
1. Do not plug in the hardware lock until you have installed the licence manager.
2. Insert the CD in the CD ROM drive. The CD will start automatically if autorun is enabled and you can proceed to step 5. If the CD does not start automatically then proceed as follows:-
3. Click the Start button and select Run. The Run dialog will appear.
Windows 2002 Run dialogue
4. Type d:setup (change the drive letter to suit your CD) and click
on OK.
5. The CD browser will appear.
CD Browser

8 Installing AutoTrack Quick Start Manual for AutoTrack
6. Click Install Network Utilities and then Install NetHASP Licence Manager on a Win32 computer.
7. The HASP Licence Manager Installation screen will appear.
NetHASP Licence Manager Installation dialog
8. Click Next. Accept the Aladdin licence agreement. The Installation Type dialog will appear.
NetHASP Licence Manager Installation Type dialog
9. We recommend that you select the Service setup. This will install the Licence Manager as an NT service and mean there is no need to log in to the computer to use the Licence Manager. If your operating system does not allow you to install the Licence Manager as a service then select the Application setup.
10. Click Next. The Choose Destination Directory dialog will appear.

Quick Start Manual for AutoTrack Installing AutoTrack 9
NetHASP Licence Manager Choose Destination Directory dialog
11. If you wish to change the default location then click Browse and select your preferred directory.
12. Click Next. The Select Program Manager Group dialog will appear.
NetHASP Licence Manager Select Program Manager Group dialog
13. Select your preferred group.
14. Click Next. At this point, if you opted (contrary to our recommendation) to install the Licence Manager as an application, the Put Into Startup Folder dialog will appear.

10 Installing AutoTrack Quick Start Manual for AutoTrack
NetHASP Licence Manager Put Into Startup Folder dialog
15. Select Put into Startup Folder if you want the licence manager to start automatically when the computer is rebooted.
16. Click Next. If you have a firewall enabled that would stop the licence manager from working then the XP SP2 Firewall Settings dialog will appear.
NetHASP Licence Manager XP SP2 Firewall Settings dialog
17. If you do not allow Setup to create the necessary firewall rules then you will have to set them up manually or AutoTrack will not work.
18. Click Next. The installation process will now start.
19. When the installation has finished the Device Driver Install dialog will appear (note that you may not see this screen if you already have a suitable device driver installed) and you will be given the opportunity to install the HASP device drivers.

Quick Start Manual for AutoTrack Installing AutoTrack 11
NetHASP Licence Manager Driver Install dialog
20. The HASP device driver must be installed before the system will work so we recommend that you click Next to install them now. You should see a message that the hardware lock drivers have been successfully installed.
21. Click Next. The Start Licence Manager dialog will appear.
NetHASP Licence Manager Start Manager dialog
22. Make certain that the correct hardware lock is plugged in. The licence manager will not start unless the key is attached.
23. Select Yes to start the Licence Manager and then click Finish.
24. At this stage if you are using a USB dongle it should be glowing to indicate that it is working.

12 Installing AutoTrack Quick Start Manual for AutoTrack
Installing the licence manager on a Novell Netware server
Warning The Licence Manager will only work on servers which have IPX installed. You should use the Win32 Licence Manager for Netware IP installations.
1. Plug the hardware lock into the parallel port of your Novell Netware file server.
2. Copy the file HASPSERVE.NLM to the system directory of the file
server.
3. To load the Licence Manager type
4. load haspserv
5. To remove the Licence Manager type
6. unload haspserv
7. To load the Licence Manager automatically, add the line
8. load haspserv
9. to the file AUTOEXEC.NCF in the sys:system directory.
Moving the NetHASP Licence Manager (Network version only)
If you wish to move the network hardware lock to a different server then proceed as follows:-
1. Uninstall or disable the NetHASP Licence Manager on the original server.
2. Install the NetHASP Licence Manager software on the new server as described above.
3. There is no need to enter a new authorisation keycode unless you have updated AutoTrack.
4. If you have set up AutoTrack to look for the licence manager at a specific IP address, you will need to update these now.

Quick Start Manual for AutoTrack Installing AutoTrack 13
Installing the NetHASP Licence Monitor software (Network version only)
The Licence Monitor can be installed on any computer on any computer on the network and allows users to see how many licences are currently available.
Installing the licence monitor on a Windows NT/2000/xp client computer
1. Insert the CD in the CD ROM drive of the chosen client computer. The CD will start automatically if autorun is enabled and you can proceed to step 4. If the CD does not start automatically then proceed as follows:-
2. Click the Start button and select Run. The Run dialog will appear.
Windows 2002 Run dialogue
3. Type d:setup (change the drive letter to suit your CD) and click
on OK.
4. The CD browser will appear.
CD Browser
5. Click Install Network Utilities and then Install NetHASP Licence Monitor on a Win32 computer.
6. The Welcome dialog will appear.

14 Installing AutoTrack Quick Start Manual for AutoTrack
Welcome dialog
7. Click Next. Accept the Aladdin licence agreement and click Next. The Choose Destination Location dialog will appear.
Choose Destination Location dialog
8. If you wish to change the default location then click Browse and select your preferred directory.
9. Click Next. The Backup Replaced Files dialog will appear.
Backup Replaced Files dialog

Quick Start Manual for AutoTrack Installing AutoTrack 15
10. We recommend that you opt to backup replaced files so that, in the event of a problem, you can reinstate your computer to the state it was revert to the prior to installing the software.
11. Click Next. The Start Installation dialog will appear.
Start Installation dialog
12. Click Next to begin the installation.
13. Once installed the Monitor can be run by selecting Start, Programs, Aladdin, Monitor, AKS Monitor.

16 Installing AutoTrack Quick Start Manual for AutoTrack
Installing, modifying, repairing or removing AutoTrack from a Windows Installer (msi) file
Run Windows as you normally would and follow the steps according to the media type.
Note Windows NT users MUST be logged in with Administrator rights to install or update AutoTrack.
Installing AutoTrack
1. If you have downloaded a Windows Installer copy of AutoTrack you will have a file with a .msi extension. The name of this file is version specific but the file for v10.00 is called atr1000.msi. If you cannot see the file extension and have two files that appear to have the same name look for the one whose type is Windows Installer Package. Double click on the file. The Welcome dialog will appear.
AutoTrack Setup Welcome dialog
2. Click Next. The End-User Licence Agreement dialog will appear.

Quick Start Manual for AutoTrack Installing AutoTrack 17
End-User Licence Agreement dialog
3. Tick I accept the terms in the licence agreement and click Next. The Customer Information dialog will appear.
Customer Information dialog
4. Enter your details and click Next. The Setup Type dialog will appear.

18 Installing AutoTrack Quick Start Manual for AutoTrack
Setup Type dialog
5. Select Typical to install AutoTrack on all available platforms. On AutoCAD platforms AutoTrack will be installed on the AutoTrack profile (which will be created if necessary). Update checking will be enabled. The XviD compression codec will be installed. Adobe Acrobat Reader will be installed if necessary. Go to step 42. Select Custom to choose which platforms you want to install or to exclude certain options. Go to step 6. Select Compact if you want to install AutoTrack on all CAD systems found but want to specify the options. This option is ideal for creating silent script installs. Go to step 10.
6. The Custom Setup dialog will appear.
Custom Setup dialog
7. Select and/or deselect the features you require from the tree view. Note that AutoTrack Setup pre-selects all CAD systems it finds on your computer.
8. Click Reset if you wish to return to the default selections.
9. The default install location is displayed just above the buttons. If you wish to change this, click Browse and select an alternative.

Quick Start Manual for AutoTrack Installing AutoTrack 19
10. Click Next. The Network Licence Setup dialog will appear.
Network Licence Setup dialog
11. Only tick This is a network version if you have a network hardware lock. Otherwise untick this option.
12. By default network versions of AutoTrack search for a network licence manager and maintain a search list automatically. We recommend that you use this default functionality. However, you may, if you wish, enter the IP addresses of up to four licence manager servers on this dialog. These addresses can also be maintained from AutoTrack.
13. Click Next. The Update Advice dialog will appear.
Update Advice dialog
14. By default end users have options to check for more recent versions of AutoTrack either automatically (at a specified time interval) or manually. If you wish to prevent users from checking for updates entirely then untick Allow update checking. If you wish to only allow them to perform manual checks then tick Allow manual check only.

20 Installing AutoTrack Quick Start Manual for AutoTrack
Finally, to allow them to check for updates but prevent them from downloading the file untick Allow downloads.
15. Click Next.
Configuration of CAD Systems dialog
16. You may either allow Setup to configure your CAD systems now or leave it until the first time the software is run. We recommend that you allow Setup to configure your CAD system so that when subsequently uninstall the software all settings and registry changes are reinstated. If you tick Add desktop shortcuts for AutoTrack Setup will add a shortcut icon for each platform that you have selected. Tick the options you require.
17. Click Next. If you have allowed Setup to configure your CAD systems then the AutoCAD Profiles dialog will appear.
AutoCAD Profiles dialog
18. On AutoCAD you can opt to install AutoTrack onto a copy of the current profile called AutoTrack or directly onto the current profile. By default it is installed on a copy of the current profile. Untick Install on a copy of the current profile if you want to add AutoTrack to the current profile. If a profile called AutoTrack already exists, AutoTrack will be added to it. If you opted to

Quick Start Manual for AutoTrack Installing AutoTrack 21
manually configure your system then AutoTrack will be installed onto the current AutoCAD profile each time it is run if necessary.
19. Click Next. The Shared Data Directory dialog will appear.
Shared Data Directory dialog
20. Tick Shared Data Directory if you wish to allow your users to share data within your organisation. The default shared data directory will be displayed just above the Browse button.
21. To change the directory, click Browse and browse to the required directory.
22. Click Next. The CAD Package Confirmation dialog will appear.
CAD Package Confirmation dialog
23. Double check that you are installing the correct versions and click Next. The Ready to install AutoTrack dialog will appear.

22 Installing AutoTrack Quick Start Manual for AutoTrack
Ready to Install AutoTrack dialog
24. Click Install to start the installation process.
25. When file copying is finished the Completed dialog will appear.
Completed dialog
26. The readme file lists new features and bugs fixed in the new version.
27. Click Finish.
Modifying, repairing or removing AutoTrack
Tip We strongly recommend that you configure your copy of AutoTrack via the AutoTrack entry in the Programs and Features applet (or, on older copies of Windows, the Add/Remove Programs applet) in Control Panel. Alternatively, proceed as follows:-
1. If you have downloaded a Windows Installer copy of AutoTrack you will have a file with a .msi extension. The name of this file is version specific but the file for v10.00 is called atr1000.msi. If you cannot see the file extension and have two files that appear to have the same name look for the one whose type is Windows Installer Package. Double click on the file.

Quick Start Manual for AutoTrack Installing AutoTrack 23
2. If you see the Welcome to the AutoTrack Setup New Install dialog then you do not have a copy of AutoTrack installed on your computer. Refer to Installing AutoTrack. Otherwise the Welcome to the AutoTrack Setup Maintenance dialog will appear.
Welcome to the AutoTrack Setup Maintenance dialog If you also get a message ‘Another version of this product is already installed...‘ then you either have a different version of AutoTrack installed or it was installed by a different installer. We recommend that you configure or remove the software via the AutoTrack entry in the Programs and Features applet in Control Panel. Alternatively, obtain a copy of the original installer.
3. Click Next. The Change, repair or remove installation dialog will appear.
Change, repair or remove installation dialog If you have installed new CAD systems since you installed AutoTrack, or if you did not originally install AutoTrack on all CAD systems on your computer, then you will have an extra option to Express Install support for the new CAD systems.

24 Installing AutoTrack Quick Start Manual for AutoTrack
Change, repair or remove installation dialog
4. If you just want to add AutoTrack support for newly installed CAD systems then click Express Install. Setup will update your system and close when it has finished. If you wish to add or remove support for a specific CAD system or to add or remove other program files (e.g. the on-line manual) select Change. Refer to step 6 onwards in Installing AutoTrack. If you have reason to believe that a file is missing or has become corrupted then select Repair. This will reinstall all the files installed by the previous setup to the same location. If you wish to remove AutoTrack from your computer select Remove. You will be asked to confirm and then AutoTrack will be removed and Setup will close.

Quick Start Manual for AutoTrack Installing AutoTrack 25
Installing, modifying, repairing or removing AutoTrack from a CD or from a self-extracting installer (exe) file
Run Windows as you normally would and follow the steps according to the media type.
Note Windows NT users MUST be logged in with Administrator rights to install or update AutoTrack.
Installing AutoTrack
1. If you have downloaded a self-extracting installer copy of AutoTrack You will have a file with a .exe extension. The full name is version specific but the file for v10.00 is called atr1000.exe. If you cannot see the file extension and have two files that appear to have the same name look for the one whose type is Application. Double click on the file to start the install and go to step 6. If you have an AutoTrack CD Insert the CD in the drive. The CD should start automatically if autorun is enabled and you can proceed to step 4. If the CD does not start automatically then proceed as follows:-
2. Click the Start button and select Run. The Run dialog will appear.
Windows XP Run dialogue
3. Type d:setup (change the drive letter to suit your CD) and click
on OK.
4. The CD browser will appear.

26 Installing AutoTrack Quick Start Manual for AutoTrack
CD Browser
5. Click Install / Update / Remove AutoTrack. Warning If you have a newer version of AutoTrack installed, or the object enabler version these must be uninstalled manually before you can install standard AutoTrack.
6. On the Choose Setup Language dialog you can select your preferred installation language. Click Next.
7. If you are installing AutoTrack for the first time on a computer the Welcome to the Installshield Wizard for AutoTrack dialog will appear. Go to the next step. If instead you see the Welcome to the AutoTrack Setup Maintenance dialog then you already have this version of AutoTrack installed on your computer. Refer to Modifying, repairing or removing AutoTrack. If you already have a different version of AutoTrack installed then you will see the Version Already Installed dialog.
Version Already Installed dialog Before you can install a new version of AutoTrack any previous version must be uninstalled. You have two options:-

Quick Start Manual for AutoTrack Installing AutoTrack 27
Select Cancel this installation if you don’t want the previous version removed just yet or if you want to remove the previous version yourself. Setup will close. Select Uninstall and Update Automatically if you want Setup to remove the previous version for you and install the new version. When it has finished uninstalling the previous version you will see the Welcome to the Installshield Wizard for AutoTrack dialog.
Welcome to the Installshield Wizard for AutoTrack dialog
8. Click Next to start the installation process. The Licence Agreement dialog will appear.
Licence Agreement dialog
9. Click Yes if you accept the terms of the licence agreement. The User Information dialog will appear.

28 Installing AutoTrack Quick Start Manual for AutoTrack
User Information dialog
10. Enter your details.
11. Click Next. The Setup Type dialog will appear.
Setup Type dialog
12. Select Express to install AutoTrack on all available platforms. On AutoCAD platforms AutoTrack will be installed on the AutoTrack profile (which will be created if necessary). Update checking will be enabled. The XviD compression codec will be installed. Adobe Acrobat Reader will be installed if necessary. Go to step 42. Select Compact if you want to install AutoTrack to all CAD systems found but want to specify the options. This option is ideal for creating silent script installs. Go to step 20. Select Custom to choose which platforms you want to install or to exclude certain options. Go to step 13.
13. The Stand-alone AutoTrack dialog will appear.

Quick Start Manual for AutoTrack Installing AutoTrack 29
Stand-alone AutoTrack dialog
14. Tick the box if you want the stand-alone Windows host installed.
15. Click Next. A series of third party CAD system selection dialogs will appear starting with BricsCAD, followed by AutoCAD 14 based CAD systems.
CAD System dialog (AutoCAD R14)
16. Select the AutoCAD R14 based systems on which you wish to run AutoTrack by ticking the appropriate boxes. Note that all CAD systems that Setup has found on your system will have the CAD program executable file in the edit box and will be selected by default. Setup can only fully install and configure AutoTrack for CAD systems that it can find.
17. If you wish to install support for a system that has no file listed then tick the option and click the appropriate Browse button. Now browse to the directory where Setup can find the required file. Any CAD system that you select that does not have a path listed will not be correctly installed.
18. Click Next. The AutoCAD 2000/2000i based system selection dialog will appear now followed by pages for AutoCAD 2002 to 2012, MicroStation systems followed by MicroStation derivative systems.

30 Installing AutoTrack Quick Start Manual for AutoTrack
CAD System dialog (MicroStation V8)
19. Select the MicroStation based systems on which you wish to run AutoTrack by ticking the appropriate boxes. Note All versions found on your computer are selected by default.
20. Click Next. The Choose Destination Location dialog will appear.
Choose Destination Location dialog
21. If you wish to change the default location then click Browse and select your preferred directory.
22. Click Next. If you selected the custom installation then the Select Components dialog will appear.

Quick Start Manual for AutoTrack Installing AutoTrack 31
Select Components dialog
23. Select the components that you require by checking the boxes.
24. Click Next. The XviD Compression Codec dialog will appear.
XviD Video Compression Codec dialog
25. If you create an AVI file of an animation you will probably need to use a video compression codec to reduce the file size to a manageable level. Various video compression codecs are installed with Windows as standard but we have found the XviD video compression codec to be better than these in terms of both compression level and quality.
26. Click Next. The Adobe Acrobat Reader dialog will appear.

32 Installing AutoTrack Quick Start Manual for AutoTrack
Adobe Acrobat Reader dialog
27. More than likely you already have Adobe Acrobat Reader installed on your computer but if you don’t then you will not be able to read or print the AutoTrack documentation.
28. Click Next. The Network Licence Setup dialog will appear.
Network Licence Setup dialog
29. Only tick This is a network version if you have a network hardware lock. Otherwise untick this option.
30. By default network versions of AutoTrack search for a network licence manager and maintain a search list automatically. We recommend that you use this default functionality. However, you may, if you wish, enter the IP addresses of up to four licence manager servers on this dialog. These addresses can also be maintained from AutoTrack.
31. Click Next. The Internet Access dialog will appear.

Quick Start Manual for AutoTrack Installing AutoTrack 33
Internet Access dialog
32. If you use a proxy server then you should enter the details here. You may suffix the Proxy server name with the port number if required, e.g. www.savoy.co.uk:8080.
33. Click Next. The Shared Data Directory dialog will appear.
Shared Data Directory dialog
34. Enter the full path of the directory you wish to use to share data within your company or department.
35. Click Next. The Update Advice dialog will appear.
34 Installing AutoTrack Quick Start Manual for AutoTrack
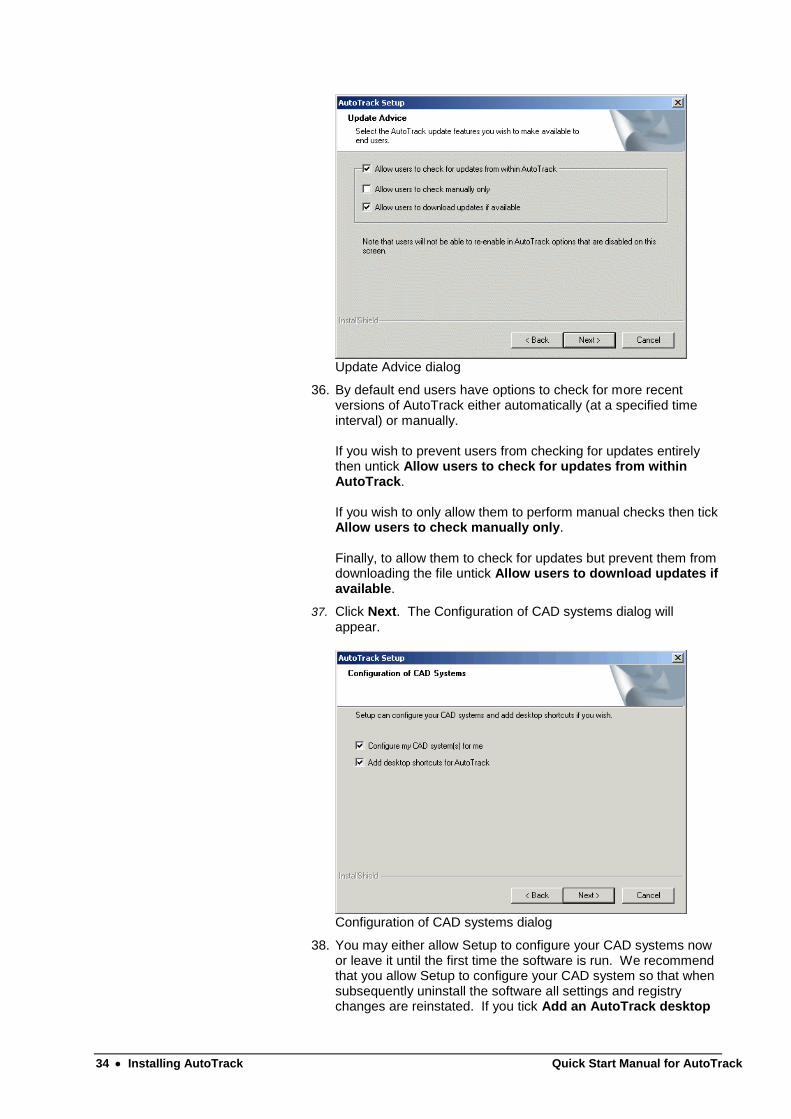
Update Advice dialog
36. By default end users have options to check for more recent versions of AutoTrack either automatically (at a specified time interval) or manually. If you wish to prevent users from checking for updates entirely then untick Allow users to check for updates from within AutoTrack. If you wish to only allow them to perform manual checks then tick Allow users to check manually only. Finally, to allow them to check for updates but prevent them from downloading the file untick Allow users to download updates if available.
37. Click Next. The Configuration of CAD systems dialog will appear.
Configuration of CAD systems dialog
38. You may either allow Setup to configure your CAD systems now or leave it until the first time the software is run. We recommend that you allow Setup to configure your CAD system so that when subsequently uninstall the software all settings and registry changes are reinstated. If you tick Add an AutoTrack desktop

Quick Start Manual for AutoTrack Installing AutoTrack 35
shortcut Setup will add a shortcut icon for each platform that you have selected. Tick the options you require.
39. Click Next. If you have allowed Setup to configure your CAD systems then the AutoCAD Profiles dialog will appear.
AutoCAD Profiles dialog
40. On AutoCAD you can opt to install AutoTrack onto a copy of the current profile called AutoTrack or directly onto the current profile. By default it is installed on a copy of the current profile. Untick Install on a copy of the current profile if you want to add AutoTrack to the current profile. If a profile called AutoTrack already exists, AutoTrack will be added to it. If you opted to manually configure your system then AutoTrack will be installed onto the current AutoCAD profile each time it is run if necessary.
41. Click Next. The Select Program Folder dialog will appear.
Select Program Folder dialog
42. By default Setup will install AutoTrack to the AutoTrack folder. Select an existing alternative or enter a new folder name if you wish. Note You will not see this dialog if you are modifying an installation.

36 Installing AutoTrack Quick Start Manual for AutoTrack
43. Click Next. The Confirm Edits dialog will appear.
Confirm Edits dialog
44. Double check that you are installing the correct versions (and on the correct AutoCAD profiles) and click Next. The installation process will now start.
45. Once AutoTrack has been installed the XviD codec will be installed if required followed by Acrobat Reader if required. In both cases, follow the prompts and accept the default values.
46. Next the hardware lock driver will be installed. During driver installation the hardware lock must be removed. The hardware lock installer is designed to run with no user interaction and should not be interrupted. You will be prompted to reinsert the hardware lock as soon as it is safe to do so.
47. When file copying is finished the Copying Complete dialog will appear.
Copying Complete dialog
48. The readme file lists new features and bugs fixed in the new version.
49. Click Next. The Setup Complete dialog will appear.

Quick Start Manual for AutoTrack Installing AutoTrack 37
Setup Complete dialog
50. If it is necessary to restart your computer then you will be given the option to restart it now or later. Select your preference and click Finish.
51. If you chose to have Setup configure your CAD system for you then you should now be able to see AutoTrack on the top menu bar in AutoCAD or under the Applications menu on MicroStation.
52. If you chose not to allow Setup to configure your CAD system for you then refer to the section entitled Configuring AutoCAD manually or Configuring MicroStation, Bentley PowerDraft, PowerCivil, Power InRoads, Power GEOPAK or MX manually as appropriate. Note AutoTrack cannot be configured to run automatically from a shortcut on Bentley MX. Users on this platform must load the product manually.
Modifying, repairing or removing AutoTrack
Tip We strongly recommend that you configure your copy of AutoTrack via the AutoTrack entry in the Programs and Features applet (or, on older copies of Windows, the Add/Remove Programs applet) in Control Panel. Alternatively, proceed as follows:-
1. If you have downloaded a self-extracting installer copy of AutoTrack You will have a file with a .exe extension. The full name is version specific but the file for v10.00 is called atr1000.exe. If you cannot see the file extension and have two files that appear to have the same name look for the one whose type is Application. Double click on the file to start the install and go to step 6. If you have an AutoTrack CD Insert the CD in the drive. The CD should start automatically if autorun is enabled and you can proceed to step 4. If the CD does not start automatically then proceed as follows:-
2. Click the Start button and select Run. The Run dialog will appear.

38 Installing AutoTrack Quick Start Manual for AutoTrack
Windows XP Run dialogue
3. Type d:setup (change the drive letter to suit your CD) and click
on OK.
4. The CD browser will appear.
CD Browser
5. Click Install / Update / Remove AutoTrack. Note If you have other applications running you may get a warning to close these applications so that shared files may be updated.
6. If you see the Welcome to AutoTrack Setup dialog then you do not have a copy of AutoTrack installed on your computer. Refer to Installing AutoTrack. If you see the Earlier Version Found dialog then you are installing a new version. If you have installed new CAD systems since you installed AutoTrack, or if you did not originally install AutoTrack on all CAD systems on your computer, the Unsupported CAD Systems Found dialog will appear.

Quick Start Manual for AutoTrack Installing AutoTrack 39
Unsupported CAD Systems Found Dialog
7. Depending upon your particular circumstances you may Add AutoTrack to newly installed CAD systems only or Add AutoTrack to all unsupported CAD systems. Setup will update your system and close when it has finished. You may also opt to Use the Modify option (see below). If none of these apply, or if you opted to use the Modify option, the Welcome to the AutoTrack Setup Maintenance dialog will appear.
Welcome to the AutoTrack Setup Maintenance dialog
8. If you wish to add or remove support for a CAD system or to add or remove other program files (e.g. the on-line manual) select Modify. Refer to step 13 onwards in Installing AutoTrack. If you have reason to believe that a file is missing or has become corrupted then select Repair. This will reinstall all the files installed by the previous setup to the same location. If you wish to remove AutoTrack from your computer select Remove. You will be asked to confirm and then AutoTrack will be removed and Setup will close.

40 Installing AutoTrack Quick Start Manual for AutoTrack
Some points to note
Windows NT based systems (NT4, 2000, XP, 2003, Vista, Windows 7, etc.)
Default location of application data files
By default the AutoTrack settings files, menus and other data files are stored in folders in the common application data directory. This is usually located as follows:-
On Windows XP or earlier it is C:\Documents and Settings\All
Users\Application Data\AutoTrack,
On Windows Vista or later it is C:\Program Data\AutoTrack.
Storing application data files elsewhere
Where ever you choose to store your AutoTrack data files all users must be granted FULL access rights to this location.
If you wish to store the AutoTrack application data files in another location then create a file in the AutoTrack installation directory called
SAVOY.INI containing the following lines:-
[SETTINGS]
ApplicationDataDir={Application Data Directory}
Where the text in brackets (and the brackets themselves) should be replaced with the full path (or the path relative to the program installation directory) of the preferred data file location. For example:-
[SETTINGS]
ApplicationDataDir=D:\Example\AutoTrackAppData
You should then grant all AutoTrack users FULL access rights to this location.
Storing application data with the program
If you would rather your settings, menus and other application data files were stored with the program then we recommend that you do not specify the installation directory itself but create a subdirectory. Create a
file in the AutoTrack installation directory called SAVOY.INI containing
the following lines (we recommend AppData as a directory name but
anything will do):-
[SETTINGS]
ApplicationDataDir=.\AppData
Then create AppData (or whatever you have called it) as a subdirectory
of the program installation directory and grant all users FULL access rights. So, if you installed AutoTrack to the default location you need to
create a directory called C:\Program Files\AutoTrack\AppData.
Access rights
AutoTrack must be installed by someone with Administrator rights. Depending upon your security policy, before you can run the software as an end user you may need to make changes to the user profiles. Login as a normal user and if AutoTrack is on the menu and runs you do not need to make the following changes. If AutoTrack is not on the menu and/or does not run then make the following changes as appropriate:-

Quick Start Manual for AutoTrack Installing AutoTrack 41
Grant all AutoTrack users FULL access rights to the common application data directory. This is usually located as follows:-
On Windows XP or earlier, in the C:\Documents and Settings\All
Users\Application Data\AutoTrack subdirectory
On Windows Vista or later, in the C:\Program Data\AutoTrack
directory.
If you have specified an alternative application data directory in the
SAVOY.INI file then grant all AutoTrack users FULL access rights to this
directory.
Copy the AutoTrack menu from the Administrator's Start Programs menu to each AutoTrack user's menu.
If you are using Roaming Profiles consult your IT Department for advice.

42 Installing AutoTrack Quick Start Manual for AutoTrack
AutoCAD object enabler In the AutoCAD version of AutoTrack the path entity is a custom object that is calculated and drawn by AutoTrack. Systems must therefore have AutoTrack installed in order to update and maintain these objects. Proxy graphics allow non-AutoTrack users to see the data (see Viewing AutoTrack paths in AutoCAD if you don’t have AutoTrack) but the functionality is very limited, e.g. you cannot snap to an AutoTrack path.
The object enabler is designed to give non-AutoTrack users limited functionality over AutoTrack data, allowing them, for example, to move reports or snap to a path to measure a distance. It also allows selection and playback of animations contained within a drawing.
The AutoTrack object enabler is free to download and is also available on the AutoTrack CD. It may be freely emailed to non-AutoTrack recipients of AutoTrack drawings. It cannot be installed with standard AutoTrack (there would be little point anyway).
This issue does not arise in the MicroStation or stand-alone versions that use different techniques.
Important Use of the object enabler does not in any way diminish our recommendation that you save proxy graphics with your drawing. Furthermore, you should note that if you make a change using the object enabler proxy graphics will only be resaved if you have the appropriate system variables set (see Viewing AutoTrack paths in AutoCAD if you don’t have AutoTrack).
To install the object enabler version from CD
1. First make sure that you do not have AutoTrack, either a demo or a full copy, installed.
2. Then insert the AutoTrack CD and when the CD menu appears, select Other Utilities. The installer will start.
3. Select Install Object Enabler version. Select Express to install the object enabler on all versions of AutoCAD found.
To install the software from the web
1. Download the object enabler version. It will have a filename of the form ATRxxxO.EXE, where xxx is the filename, e.g.
ATR920O.EXE.
2. To install the software click the Start button on the Windows taskbar and select Run.
3. Browse to the file you have downloaded and click Open followed by Run. The installer will start.
4. Select Install Object Enabler version. Select Express to install the object enabler on all versions of AutoCAD found.

Quick Start Manual for AutoTrack Installing AutoTrack 43
Scripted 'silent' installations using the self-extracting installer
AutoTrack Setup is fully ZENworks compatible allowing the full version (i.e. not the demo version) to be installed centrally and distributed on demand over a network with no user prompts.
The following instructions assume that you plan to install the software onto one or more client computers from a central source (file server).
Apart from obvious criteria such as adequate disk space, a successful silent installation requires that:-
the install source files are mapped to the same location for all client PC's, and
you either specify a Compact install or that all client computers have the selected CAD system(s) installed in the same location and run at least once.
Adobe Acrobat Reader and the XviD compression codec are third party applications and their installers require some user interaction. If you would rather users did not have to interact with the install process you should select Custom install and deselect these two options. Both items are installed if you perform an Express install.
Creating the install script
You must create the installation script on a client computer that is set up exactly as the other computers on which it will be installed silently.
1. Either copy the ATRACK directory from the AutoTrack CD to a
suitable location on your file server's hard disk, or download the
compressed file (e.g. atr920.exe) from the Savoy website to a
suitable location on your file server’s hard disk, such as a directory called ATRACK.
2. Now go to one of the client computers. To create the silent install script you need to run either setup.exe from the ATRACK
directory on the server hard disk or the downloaded file (e.g. atr920.exe) with a -r switch. The easiest way to do this is to
create a shortcut on the desktop.
3. Browse to the ATRACK directory, right click on the file
setup.exe or the downloaded file (e.g. atr920.exe) and
select Create Shortcut.
4. Move the shortcut to the desktop.
5. Right click on the new desktop shortcut, select Properties and
add -r to the end of the Target field. The Target field should
now read something like:- f:\{source location}\atrack\setup.exe –r
or
f:\{source location}\atrack\atr920.exe -r
6. Click OK to close the properties dialog.

44 Installing AutoTrack Quick Start Manual for AutoTrack
7. Double click on this shortcut to start the AutoTrack installation and follow the prompts to install AutoTrack in the normal way.
8. Your selections and values will be stored in a file called setup.iss in the Windows directory. We recommend that you
do not tick the options on the Finish dialog to view the readme file and to run the hardware lock wizard. Note If you intend to deploy AutoTrack while users are not logged in then perform a Custom install and deselect the option Configure my CAD systems for me.
Running a silent install
1. Working from a client computer, move the file setup.iss from the Windows directory back to the ATRACK directory on the server's
hard disk.
2. Now use windows explorer to browse to the file setup.exe or
atr920.exe in the ATRACK directory on the server.
3. Right click on the file and select Create Shortcut.
4. Move the shortcut to a suitable location accessible by all potential users (probably in a public area on the server).
5. Right click on the new desktop shortcut, select Properties and add the -s switch to the Target field. The Target field should
now read something like:- f:\{source location}\atrack\setup.exe –s
or
f:\{source location}\atrack\atr920.exe –s
6. Click OK to close the properties dialog.
7. Double click on the desktop shortcut to start the silent install.
8. If you want to store the setup.iss file in another location use the additional switch –f1 to show Setup where to find it. For
example (no space between the f1 and the path):-
-f1{iss file path}\setup.iss
You may wish to create different iss files for installing, removing and maintaining AutoTrack each named appropriately (e.g. install.iss,
remove.iss or maintain.iss) and referenced as described above.
Note however that the silent setup operation will fail if you run it out of sequence, e.g. if you try to remove a copy of AutoTrack that has not been installed it will fail. The error log file (setup.log) is created in the same directory as the iss file. If the last entry in the file, under the heading [ResponseResult], is ResultCode = 0 then the operation was
successful; otherwise, if failed.
Note that even a silent install will fail with an error if certain criteria are not met. These include the following:-
inadequate disk space,
previous version installed,
no CAD system selected,

Quick Start Manual for AutoTrack Installing AutoTrack 45
CAD system still running,
the CAD system not having been run,
not running with administrator rights,
not having the required level of service pack,
both AutoCAD 2000 and AutoCAD 2002 installed (not allowed by Autodesk),
failure to perform an automatic edit,
failure to create the program folder, or
failure to migrate settings.
Adding files to an installation
Setup can run a batch file or other executable after it has finished installing AutoTrack if you supply the name of the file you wish to execute as a command line switch in the following format:-
f:\{source location}\atrack\setup.exe –s –batch={batch
filename}
For example:-
c:\atrack\setup.exe –s –batch=c:\atrack\setup.bat
Note
You can use the –batch switch with the –f1 switch.
Uninstalling AutoTrack
You can uninstall AutoTrack without going to Control Panel run Setup with a -uninst switch:-
f:\{source location}\atrack\setup.exe -uninst
However, this switch will still display a confirmation prompt.
To uninstall AutoTrack silently you will need to create an uninstall script. To do this go to a client computer that has AutoTrack installed and follow the steps in Creating the install script to create an uninstall script.
Updating AutoTrack
To perform a silent update of AutoTrack, we recommend that you run two scripts, one to uninstall the old version and a second to install the new version. This will require two .iss files referenced using the –f1
switch. For example you might run:-
c:\atrack\setup.exe –s –f1c:\atrack\remove.iss
Followed by:-
c:\atrack\setup.exe –s –f1c:\atrack\install.iss
These two commands could be run from a single batch file. However, if you do this you should use the –sms switch to ensure that the first
instance of setup has finished before the second one starts. Hence your batch file would look something like this:-
c:\atrack\setup.exe –s –sms –f1c:\atrack\remove.iss
c:\atrack\setup.exe –s –sms –f1c:\atrack\install.iss

46 Installing AutoTrack Quick Start Manual for AutoTrack
Configuring AutoCAD manually Note Registry changes made by either of the following 'manual' methods will not be removed when you uninstall the product and hence we recommend that you allow Setup to configure your AutoCAD system for you.
If you chose not to allow Setup to configure your copy of AutoCAD then proceed as follows…
1. Run AutoTrack from the Start Programs menu which will load AutoCAD and AutoTrack. This will configure your system and you should then be able to see AutoTrack on your AutoCAD menu bar. Henceforth, however you run AutoCAD, AutoTrack should appear on the menu bar.
Alternatively for all versions of AutoCAD and all derivatives except Civil 3D 2010 and later…
1. Run AutoCAD as you normally do.
2. Type APPLOAD at the command line.
3. If necessary change the Files of type box to include *.ARX.
4. Click the File button and browse to the AutoTrack directory
(Normally C:\PROGRAM FILES\AUTOTRACK).
5. Highlight the program file appropriate to your CAD system as follows:- For AutoCAD R14, Map R2, Map R3, Architectural Desktop, Land Development Desktop and other derivative products load
the file ATRA140.ARX.
For AutoCAD 2000, 2000i, Map 2000, Map 2000i, Architectural Desktop 2i, Land Development Desktop 2i and other derivative
products load the file ATRA150.ARX.
For AutoCAD 2002, Map 5, Map 6, Architectural Desktop 3, Architectural Desktop 3.3, Land Desktop 3 and other derivative
products load the file ATRA1506.ARX.
For AutoCAD 2004, Map 2004, Architectural Desktop 2004, Land Desktop 2004 and other derivative products load the file ATRA160.ARX.
For AutoCAD 2005, Map 2005, Architectural Desktop 2005, Land Desktop 2005 and other derivative products load the file ATRA161.ARX.
For AutoCAD 2006, Map 2006, Architectural Desktop 2006, Land Desktop 2006, Civil 3D 2006 and other derivative products
load the file ATRA162.ARX.
For AutoCAD 2007, Map 2007, Architectural Desktop 2007, Land Desktop 2007, Civil 3D 2007 and other derivative products
load the file ATRA170.ARX.
For AutoCAD 2008, Map 2008, Architecture 2008, Land Desktop 2008, Civil 3D 2008 and other derivative products load the file

Quick Start Manual for AutoTrack Installing AutoTrack 47
ATRA171.ARX.
For AutoCAD 2009, Map 2009, Architecture 2009, Land Desktop 2009, Civil 3D 2009 and other derivative products load the file ATRA172.ARX.
For 64-bit versions of AutoCAD 2009 based products, load
the file ATRA17264.ARX.
For AutoCAD 2010, Map 2010, Architecture 2010, Land Desktop 2010 and other derivative products except Civil 3D 2010 load the
file ATRA180_ARX.ARX.
For 64-bit versions of AutoCAD 2010 based products except
Civil 3D, load the file ATRA18064_ARX.ARX.
For AutoCAD 2011, Map 2011, Architecture 2011, Land Desktop 2011 and other derivative products except Civil 3D 2011 load the
file ATRA181_ARX.ARX.
For 64-bit versions of AutoCAD 2011 based products except
Civil 3D, load the file ATRA18164_ARX.ARX.
For AutoCAD 2012, Map 2012, Architecture 2012 and other derivative products except Civil 3D 2012 load the file ATRA182_ARX.ARX.
For 64-bit versions of AutoCAD 2012 based products except
Civil 3D, load the file ATRA18264_ARX.ARX.Click Open.
For AutoCAD 2013, Map 2013, Architecture 2013 and other derivative products except Civil 3D 2013 load the file ATRA190_ARX.ARX.
For 64-bit versions of AutoCAD 2013 based products except
Civil 3D, load the file ATRA19064_ARX.ARX.
6. Click Open.
7. Back in the Load/Unload Applications dialog click the Load button and then close the Load/Unload Applications dialog.
8. If you use profiles then make the required profile current.
9. Type AUTOTRACK on the command line. AutoTrack will be
loaded and your CAD system will be configured for use.
10. Repeat steps 7 and 8 for other profiles as required.
For AutoCAD Civil 3D 2010 and later...
1. Run AutoCAD as you normally do.
2. Type NETLOAD at the command line.
3. If necessary change the Files of type box to include *.DLL.
4. Click the File button and browse to the AutoTrack directory
(Normally C:\PROGRAM FILES\AUTOTRACK).
5. Highlight the program file appropriate to your CAD system as follows:-
For AutoCAD Civil 3D 2010 load the file ATRC180_ARX.DLL.
For AutoCAD Civil 3D 2011 load the file ATRC181_ARX.DLL.
For 64-bit AutoCAD Civil 3D 2011 load the file ATRC18164_ARX.DLL.
For AutoCAD Civil 3D 2012 load the file ATRC182_ARX.DLL.
For 64-bit AutoCAD Civil 3D 2012 load the file

48 Installing AutoTrack Quick Start Manual for AutoTrack
ATRC18264_ARX.DLL.
For AutoCAD Civil 3D 2013 load the file ATRC190_ARX.DLL.
For 64-bit AutoCAD Civil 3D 2013 load the file ATRC19064_ARX.DLL.
6. Click the Open button.
7. If you use profiles then make the required profile current.
8. Type AUTOTRACK on the command line. AutoTrack will be
loaded and your CAD system will be configured for use.
9. Repeat steps 7 and 8 for other profiles as required.
1.

Quick Start Manual for AutoTrack Installing AutoTrack 49
Configuring MicroStation, Bentley PowerDraft, PowerCivil, Power InRoads, Power GEOPAK or MX manually
Setup configures all Bentley CAD variants except MX (or MXROAD) to run AutoTrack when run from the AutoTrack for [Bentley product] desktop shortcut or menu item. AutoTrack can (and must for Bentley MX) also be loaded manually via the MDL Applications dialog. However, Setup no longer creates a new workspace and no longer adds AutoTrack to the list of Available Applications in other workspaces. If you want to do this then proceed as follows…
1. Run your Bentley CAD system as you normally would.
2. Select the User or Workspace you want to configure.
3. Create or open a file.
4. If you are running Bentley MX, the Workspace menu may not be visible. Select CAD Menu from the File menu.
5. Select Configuration from the Workspace menu.
6. Select the category Primary Search Paths.
7. To make AutoTrack run in this workspace… Click on MDL Applications from the edit box at the top right and
then click the Select button. Browse to the LOADERV8
subdirectory of the AutoTrack installation directory and click Add to add it to the list. For example, if you installed AutoTrack to the
default directory you should browse to C:\PROGRAM
FILES\AUTOTRACK\LOADERV8\ (LOADER\ on versions prior to
V8) and click Add. Important If you enter the path manually using the Edit button, then note the backslash at the end of the path. This is critical.
8. Click Done to close the box. This will ensure that AutoTrack will run in MicroStation but it will not be listed in Available Applications.
9. To make AutoTrack available in this workspace… Click on Visible MDL Applications from the edit box at the top
right and click the Select button. Browse to the LOADERV8
subdirectory of the AutoTrack installation directory (LOADER\ on
versions prior to V8) and click Add to add it to the list. For example, if you installed AutoTrack to the default directory on
MicroStation V8 you should browse to C:\PROGRAM
FILES\AUTOTRACK\LOADERV8\ and click Add.
Important If you enter the path manually using the Edit button, then note the backslash at the end of the path. This is critical.
10. Click Done to close the box. This will make AutoTrack visible to you while running MicroStation but will not load it automatically.
11. Click OK to close the Configuration dialog and allow the system to recognise the new search directories.

50 Installing AutoTrack Quick Start Manual for AutoTrack
12. Now reopen the Configuration dialog by selecting Configuration from the Workspace menu.
13. Select the category Design Applications.
14. To make AutoTrack autoload in this workspace… Look for ATRACK in the list of Available Applications. Highlight the entry and click the Add button to add it to the list of Applications to Load. This will make AutoTrack load automatically when you start MicroStation with this workspace.
15. Click OK to close the Configuration dialog.
16. Restart MicroStation with this user and AutoTrack should be on the Applications menu and the toolbar should be visible.
17. Repeat the above to configure other workspaces as required.
18. Select MX Menu from the MX drop down menu to redisplay the MX menus if necessary.

Quick Start Manual for AutoTrack Installing AutoTrack 51
Configuring BricsCAD manually Note Registry changes made by either of the following 'manual' methods will not be removed when you uninstall the product and hence we recommend that you allow Setup to configure your Bricscad system for you.
If you chose not to allow Setup to configure your copy of BricsCAD then proceed as follows…
1. Run AutoTrack from the Start Programs menu which will load BricsCAD and AutoTrack. This will configure your system and you should then be able to see AutoTrack on your BricsCAD menu bar. Henceforth, however you run BricsCAD, AutoTrack should appear on the menu bar.
Alternatively for all versions of BricsCAD…
1. Run BricsCAD as you normally do.
2. Type APPLOAD at the command line.
3. If necessary change the Files of type box to include *.BRX.
4. Click the File button and browse to the AutoTrack directory
(Normally C:\PROGRAM FILES\AUTOTRACK).
5. Highlight the program file appropriate to your CAD system as follows:-
For BricsCAD v11.1, load the file ATRB1101.BRX.
For BricsCAD v11.2, load the file ATRB1102.BRX.
For BricsCAD v11.3, load the file ATRB1103.BRX.
For BricsCAD v11.4, load the file ATRB1104.BRX.
For BricsCAD v12.1, load the file ATRB1201.BRX.
For BricsCAD v12.2, load the file ATRB1202.BRX.
6. Back in the Load Application Files dialog click the Load button and then close the Load Application Files dialog.
7. Type AUTOTRACK on the command line. AutoTrack will be
loaded and your CAD system will be configured for use.

52 Installing AutoTrack Quick Start Manual for AutoTrack
Resolving hardware lock problems The Hardware Lock Wizard starts automatically to attempt to resolve hardware lock problems detected whilst running AutoTrack. The wizard should be self-explanatory but in the unlikely event that it is unable to solve the problem please contact Savoy Computing Services for assistance.
The Hardware Lock Manager may be run independently of AutoTrack from the Start, Programs, AutoTrack program folder. This may be necessary if you are installing an update or if you just wish to check the status of your hardware locks.
Running the Licence Manager on the same computer as AutoTrack
AutoTrack can now safely be run on the same computer as the Licence Manager. However, you might need to add the "loopback" IP address to the list of IP addresses to search. This is because machines listening out for broadcast messages sometimes do not respond if the request is local.
To add the "loopback" address
1. Select Hardware Lock Manager from the Start, Programs, AutoTrack menu. The Hardware Lock Manager will appear.
2. Click the Configure Network Settings button. The Network Settings screen will appear.
Network Settings dialog
3. Click Configure Network Settings and add 127.0.0.1 to the
list of searched IP addresses.
4. Click the Test Settings button to check that all is well. If not then refer to Identifying and resolving problems.

Quick Start Manual for AutoTrack Installing AutoTrack 53
Running the Licence Manager on a remote computer
AutoTrack may report one of two errors when it runs:-
1. No Free Licences Found.
2. No Licence Manager Found.
Message 1 means that there is not a problem, the licence manager has been found BUT there are no available licences, try again later.
Message 2 means that there is a problem. Refer to the next section, Identifying and resolving problems to fix it.
Identifying and resolving problems
1. Select Hardware Lock Manager from the Start, Programs, AutoTrack menu. The Hardware Lock Manager will appear.
2. Click the Configure Network Settings button. The Network Settings screen will appear.
Network Settings dialog
3. The Last Satus field should indicate the problem. Likely values include:- 15 - No Active NetHASP licence Manager was found This message means that the licence manager could not be found. To fix this, click the Add button and add the IP address of the licence manager computer. This should only be needed if the licence manager is running on a different subnet to the application, i.e. a WAN copy. Having added the IP address, click the Test Settings button to check that it now works. If after adding the IP address, the computer is still unable to find the licence manager, then you may have a firewall preventing the system from working. To verify this we suggest that you temporarily disable the firewall and click on the Test Settings button again. Note The NetHASP licence manager that we use is not compatible

54 Installing AutoTrack Quick Start Manual for AutoTrack
with the newer HASPSRM licence manager and cannot co-exist on the same server. 155 - LM old version was found This message means that the licence manager has been found BUT that it is an old version and needs upgrading. To fix this, download the latest version of the licence manager (v8.32.5.40 at the time of writing) from our web site (www.savoy.co.uk). Go to the Downloads page and select 3rd party software and links. Uninstall the current version from the licence manager machine and install the new version as a service. Note that upgrading the licence manager will NOT stop older versions of AutoTrack from running. Note also that during the upgrade process the licence manager machine may need to be re-booted. 129 - NetHASP key is not connected to the NetHASP Licence Manager This message means that the only licence manager found does not have a AutoTrack key attached. To fix this, make sure that the key is attached and then carry out the steps to add the IP address of the actual server outlined in the solution to error 15 about. 133 - Number of stations exceeded This message means that the licence manager has been found but all the licences are in use. Try again later, or use the Licence Monitor to see who is using the licences and get someone to logout.
Technical Support You may telephone Savoy Computing Services anytime during normal UK working hours on +44(0)1580 720 011. Alternatively you may fax us on +44(0)1580 720 022.
Normal working hours are 9am to 5.30pm GMT, Monday to Friday, except Bank and National Holidays.
If it's out of office hours then you might like to try our web site on which we post details of any known problems and how to work around them. The site can be accessed at www.savoy.co.uk and you can email us at [email protected]. Both of these are available from the AutoTrack drop down menu.
Finally, you can contact us by post at Savoy Computing Services Ltd., Clermont House, High Street, Cranbrook, Kent, TN17 3DN, England.

Quick Start Manual for AutoTrack Starting AutoTrack 55
Starting AutoTrack
AutoTrack can be run from within an AutoCAD or MicroStation session, from the taskbar Start, Programs menu or from a desktop icon. In future, when this manual refers to AutoTrack it is using the generic term and what each user will see depends on what version they are licenced to use.
Running stand-alone AutoTrack
Start button
2. Click on the Start button on the Taskbar and select AutoTrack for SavoyCAD from the Programs, AutoTrack menu or click on the desktop icon AutoTrack for SavoyCAD.
3. The first time the software is run, if AutoTrack cannot find a valid licence, the Welcome dialog will appear with options to run a full, rental or demo version. Select the required version.
4. If you are licenced only to use the Templates Standard version or have chosen to evaluate this product then you will see the first page of the Template Wizard. In all other versions you will be placed in the SavoyCAD editor. AutoTrack should be visible on the top menu bar and the toolbar should also be visible.

56 Starting AutoTrack Quick Start Manual for AutoTrack
Welcome dialog (1700)
The Welcome dialog appears the first time the program is run, whenever AutoTrack fails to find a valid licence or following a master reset.
5. Welcome dialog
1. By default, the language is detected automatically based upon your computer settings. However, if you would prefer to use a different language select it from the Preferred Language drop down list.
2. If you have purchased AutoTrack and have a USB or parallel dongle then simply plug it in and click Enter and Initialisation Keycode / Run a Hardware Lock Protected Version. If you have not yet initialised the dongle you will be prompted to enter the Initialisation Code. (On network versions you may need to edit your Network Settings to tell AutoTrack where to look for the dongle) If the dongle you have plugged in has already been initialised AutoTrack should just run.
3. If you have purchased AutoTrack and do NOT have a hardware lock then click Enter a non-Rental Passkey / Run a Software Licence Protected Version. The Activate Licence dialog
(1840)
will appear.
4. If you want to rent a copy of AutoTrack or receive a rental licence from a colleague, click Enter a Rental Passkey / Run Rental Version. The Rental Version dialog
(1820) will appear.
5. If you simply want to try out the software click Run a Demo Version. The Demonstration Version dialog
(1800) will appear.

Quick Start Manual for AutoTrack Starting AutoTrack 57
Demonstration Version dialog (1800)
This dialog only appears if you have opted to run a demonstration copy of AutoTrack. It allows you to select and change the product you wish to evaluate.
Demonstration Version dialog
1. Select the product(s) that you wish to evaluate.
2. To evaluate the selected product(s) click Continue.
3. To quit or to upgrade to a rental or full version, click Exit which will display the Welcome dialog
(1700).

58 Starting AutoTrack Quick Start Manual for AutoTrack
Rental Version dialog (1820)
This dialog only appears if you are using a rented copy of AutoTrack. Rental copies are managed by a licence and the text at the top indicates the status of that licence. The licence is installed on and applies to only one computer at a time but can be moved between computers as often as you wish.
Rental Version dialog
1. If the licence is valid then click Continue to use the software.
2. If you have a rental licence on your computer then you may move the rental licence to another computer by clicking Transfer licence to another computer. The Transfer Licence dialog
(1850)
will appear.
3. If you do not currently have a rental licence on your computer you can retrieve and activate a transferred licence by clicking Activate licence. The Activate Licence dialog
(1840) will appear.
4. To start a new rental click Rent. The AutoTrack Rental Express wizard will appear for you to purchase time. When this has finished you will be returned to the Rental Version dialog and you should then click Continue to use the software.
5. To renew or extend an existing rental click Extend. The AutoTrack Rental Express wizard will appear for you to purchase more time. When this has finished you will be returned to the Rental Version dialog and you should then click Continue to use the software.
6. To quit or upgrade to a full version click Exit which will display the Welcome dialog
(1700).

Quick Start Manual for AutoTrack Starting AutoTrack 59
Transfer Licence dialog (1850)
This dialog will appear when you opt to transfer an AutoTrack software licence (rental or full) to another computer.
Transfer Licence dialog
1. If you wish to advise a co-worker that this AutoTrack licence is now available enter their email address here. Your colleague will receive an email with details of how to retrieve and activate the licence on their computer. To email multiple users enter their email addresses separated by semi-colons (;). Click OK.
2. Your serial number and a passkey will be displayed; use these to activate the licence on any other computer.
Activate Licence dialog (1840)
This dialog will appear when you opt to activate a software licence (rental or full.
Activate Licence dialog
1. Enter the serial number and passkey provided by the person transferring the licence. Click OK.
2. If you cannot enter the supplied code, or if it is rejected, check that you are using the correct startup option - if you have a USB or parallel hardware lock you should click Cancel to return to the Welcome dialog
(1700) and select the correct option.
Note The original purchaser and anybody who extends the licence period will be emailed each time the licence is transferred. This is for information only and helps ensure that they are able to locate the licence.

60 Starting AutoTrack Quick Start Manual for AutoTrack
Running AutoTrack in AutoCAD AutoTrack can either be run from within an AutoCAD session or from the Taskbar Start Programs menu.
To run AutoTrack from the Taskbar Start Programs Menu
Start button
AutoTrack menu
1. Click on the Start button on the Taskbar and select AutoTrack for AutoCAD 2012 (or your alternative CAD system) from the Programs, AutoTrack menu or click on the desktop icon AutoTrack for AutoCAD 2012.
2. The first time the software is run, if AutoTrack cannot find a valid licence, the Welcome dialog
(1700) will appear with
options to run a full version (hardware lock version), activate a software licence (software locked version), run a rental or a demo version.
3. If you are running a demo copy then you will see the Demonstration Version dialog
(1800). Select which product
you wish to evaluate and click Continue. If necessary your menus will be reconfigured.
4. AutoTrack paths are only visible to non-AutoTrack users if proxy graphics have been saved with the drawing (for more information, refer to Viewing AutoTrack paths in AutoCAD if you don’t have AutoTrack). In order for these proxy graphics to be saved, several AutoCAD system variables need to be set correctly. If they are incorrect when you start AutoTrack they will be changed and you will be advised on the command line.
5. You will now be placed in the AutoCAD drawing editor and the AutoTrack menu and toolbar should be visible.
AutoTrack toolbar (appearance varies)
6. If the toolbar is not visible select Show Toolbar from the AutoTrack drop down menu.
To run AutoTrack from within AutoCAD
1. Run AutoCAD as you normally would.
2. If your system has been set up correctly AutoTrack should be on the top menu bar. AutoTrack is not yet loaded but will be as soon as you select an AutoTrack command. If the toolbar is not visible then you can select Show Toolbar from the AutoTrack drop down menu to display it.
3. Click any AutoTrack button to load AutoTrack. If you are running a network version for the first time, you may get a Hardware Lock warning. Just confirm that you are running a network version and proceed. If AutoTrack fails to find the hardware lock, edit your Network Settings and enter the IP address of the Licence Server.

Quick Start Manual for AutoTrack Starting AutoTrack 61
Note By default only the main AutoTrack toolbar is enabled with the other functions available as flyouts. If you prefer to work with the flyouts permanently displayed then click the relevant main toolbar buttons to display them and leave them open when you close AutoCAD. Alternatively on versions of AutoCAD prior to 2006 you may go to View, Toolbars and check the AutoTrack toolbars that you require.
To load and run AutoTrack for AutoCAD (except Civil 3D 2010 or later) manually
1. Run AutoCAD as you normally would.
2. Select Load Application from the Tools menu in AutoCAD or
type APPLOAD at the command line. The Load Application dialog
will appear. The dialog shown is for AutoCAD 2002 but other platforms are similar.
Load Application dialog (AutoCAD 2002)
3. Browse to the AutoTrack application directory and select the ARX file appropriate to your CAD system as follows:-
AutoCAD R14 and derivatives use ATRA140.ARX
AutoCAD 2000/2000i and derivatives use ATRA150.ARX
AutoCAD 2002 and derivatives use ATRA1506.ARX
AutoCAD 2004 and derivatives use ATRA160.ARX
AutoCAD 2005 and derivatives use ATRA161.ARX
AutoCAD 2006 and derivatives use ATRA162.ARX
AutoCAD 2007 and derivatives use ATRA170.ARX

62 Starting AutoTrack Quick Start Manual for AutoTrack
AutoCAD 2008 (32-bit) and derivatives use ATRA171.ARX
AutoCAD 2008 (64-bit) and derivatives use ATRA17164.ARX
AutoCAD 2009 (32-bit) and derivatives use ATRA172.ARX
AutoCAD 2009 (64-bit) and derivatives use ATRA17264.ARX
AutoCAD 2010 (32-bit) and derivatives use ATRA180_ARX.ARX
AutoCAD 2010 (64-bit) and derivatives use ATRA18064_ARX.ARX
AutoCAD 2011 (32-bit) and derivatives use ATRA181_ARX.ARX
AutoCAD 2011 (64-bit) and derivatives use ATRA18164_ARX.ARX
AutoCAD 2012 (32-bit) and derivatives use ATRA182_ARX.ARX
AutoCAD 2012 (64-bit) and derivatives use ATRA18264_ARX.ARX
AutoCAD 2013 (32-bit) and derivatives use ATRA190_ARX.ARX
AutoCAD 2013 (64-bit) and derivatives use ATRA19064_ARX.ARX
4. Click the Load button and close the dialog. AutoTrack will load.
5. Now type AUTOTRACK on the command line.
6. If you have installed a demo copy then you will see the Demonstration Version dialog
(1800). Select which product you
wish to evaluate and click Continue. If necessary your menus will be reconfigured.
7. AutoTrack should now be visible on the top menu and the toolbar should also be visible. If the toolbar is not visible then you can select Show Toolbar from the AutoTrack drop down menu to display it.
8. Click any AutoTrack button to load AutoTrack. If you are running a network version for the first time, you may get a Hardware Lock warning. Just confirm that you are running a network version and proceed. If AutoTrack fails to find the hardware lock edit your Network Settings and enter the IP address of the Licence Server. Note By default only the main AutoTrack toolbar is enabled with the other functions available as flyouts. If you prefer to work with the flyouts permanently displayed then click the relevant main toolbar buttons to display them and leave them open when you close AutoCAD. Alternatively on versions of AutoCAD prior to 2006 you may go to View, Toolbars and check the AutoTrack toolbars that you require.

Quick Start Manual for AutoTrack Starting AutoTrack 63
To load and run AutoTrack for AutoCAD Civil 3D 2010 or later manually
1. Run AutoCAD as you normally would.
2. Type NETLOAD at the command line. The Choose .NET
Assembly dialog will appear. The dialog shown is for AutoCAD Civil 3D 2012 but other platforms are similar.
Choose .NET Assembly dialog (AutoCAD Civil 3D 2012)
3. Browse to the AutoTrack application directory and select the .NET file appropriate to your CAD system as follows:- AutoCAD Civil 3D 2010 (32-bit) and derivatives use ATRC180_ARX.DLL
AutoCAD Civil 3D 2011 (32-bit) and derivatives use ATRC181_ARX.DLL
AutoCAD Civil 3D 2011 (64-bit) and derivatives use ATRC18164_ARX.DLL
AutoCAD Civil 3D 2012 (32-bit) and derivatives use ATRC182_ARX.DLL
AutoCAD Civil 3D 2012 (64-bit) and derivatives use ATRC18264_ARX.DLL
AutoCAD Civil 3D 2013 (32-bit) and derivatives use ATRC190_ARX.DLL
AutoCAD Civil 3D 2013 (64-bit) and derivatives use ATRC19064_ARX.DLL
4. Click the Open button and close the dialog. AutoTrack will load.
5. Now type AUTOTRACK on the command line.
6. If you have installed a demo copy then you will see the Demonstration Version dialog
(1800). Select which product you
wish to evaluate and click Continue. If necessary your menus will be reconfigured.

64 Starting AutoTrack Quick Start Manual for AutoTrack
7. AutoTrack should now be visible on the ribbon. It will also be on the menu or toolbar if you have the menu visible. If you prefer to use toolbar you can select Show Toolbar from the AutoTrack drop down menu to display it.
8. Click any AutoTrack button to load AutoTrack. If you are running a network version for the first time, you may get a Hardware Lock warning. Just confirm that you are running a network version and proceed. If AutoTrack fails to find the hardware lock edit your Network Settings and enter the IP address of the Licence Server.
Viewing AutoTrack paths in AutoCAD if you don’t have AutoTrack
In the AutoCAD version of AutoTrack the path entity is a custom object that is calculated and drawn by AutoTrack. Systems must therefore have AutoTrack installed in order to update and maintain these objects.
AutoCAD caters for drawings that contain custom objects without their authoring application being present using a system called proxy graphics. Proxy graphics are similar to an anonymous block containing an exploded version of the custom object. However, the proxy graphics will only be visible if certain system variables are set correctly on both the authoring and receiving systems.
Authoring system
In order for proxy graphics to be saved with the drawing the authoring system must have the system variable
PROXYGRAPHICS set to 1 and INDEXCTRL set to 3. When
you start AutoTrack these are set along with PROXYSHOW set
to 1 and DEMANDLOAD set to 3.
Receiving system
If the receiving system has AutoTrack installed and the startup system setting Load AutoTrack when opening drawing containing AutoTrack data is switched on, AutoTrack data will be visible just like any other entity. Likewise, if the AutoCAD object enabler is installed then any AutoTrack data will be visible. For more details of the object enabler refer to AutoCAD object enabler.
If the receiving system either does not have AutoTrack installed, or has AutoTrack installed but Load AutoTrack when opening drawing containing AutoTrack data is switched off, AutoCAD will report the missing application only
if the system variable PROXYNOTICE is set to 1. This prompt
may give the user options Show proxy graphics and/or Do not show proxy graphics. Note however that if proxy graphics have not been saved with the drawing (see above) then even opting to Show proxy graphics will not make them visible. Note also that if the default was Do not show proxy graphics and you select Show proxy graphics then
you will need to issue a REGEN in order to see the objects.
If you decide not to show the proxy graphics at the start then
setting PROXYSHOW to 1 will make them visible after the next
REGEN if they are saved in the drawing.

Quick Start Manual for AutoTrack Starting AutoTrack 65
Running AutoTrack in MicroStation AutoTrack can either be run from within a MicroStation session or from the Taskbar Start Programs menu.
To run AutoTrack from the Taskbar Start Programs menu…
Start button
AutoTrack menu
1. Click on the Start button on the Taskbar and select AutoTrack for MicroStation V8i (or your alternative CAD system) from the Programs, AutoTrack menu or double-click on the desktop icon AutoTrack for MicroStation V8i.
2. Create and/or open a drawing.
3. The first time the software is run, if AutoTrack cannot find a valid licence, the Welcome dialog will appear with options to run a full, rental or demo version. Select the required version.
4. If you have installed a demo copy then you will see the Demonstration Version dialog
(1800). Select which product
you wish to evaluate and click Continue. If necessary your menus will be reconfigured.
5. You will be placed in the MicroStation drawing editor. AutoTrack should be on the Applications menu and the tool frame should also be visible docked on the left.
AutoTrack toolframe (Appearance varies)
6. Click any AutoTrack button to load AutoTrack. If you are running a network version for the first time, you may get a Hardware Lock warning. Just confirm that you are running a network version and proceed. If AutoTrack fails to find the hardware lock edit your Network Settings and enter the IP address of the Licence Server.

66 Starting AutoTrack Quick Start Manual for AutoTrack
To run AutoTrack from within MicroStation…
1. Run MicroStation as you normally would.
2. Create and/or open a drawing.
3. If you have installed a demo copy then you will see the Demonstration Version dialog
(1800). Select which product you
wish to evaluate and click Continue. If necessary your menus will be reconfigured.
4. If your system has been set up correctly AutoTrack should be on the Applications menu. The AutoTrack tool frame may also be visible. AutoTrack is not yet loaded but will be as soon as you select an AutoTrack command.
5. Click any AutoTrack button to load AutoTrack. If you are running a network version for the first time, you may get a Hardware Lock warning. Just confirm that you are running a network version and proceed. If AutoTrack fails to find the hardware lock edit your Network Settings and enter the IP address of the Licence Server. Note By default only the main AutoTrack tool frame is enabled with the other functions available as flyouts. If you prefer to work with the flyouts permanently displayed then go to Tools, Toolboxes and check the AutoTrack toolbars that you require.

Quick Start Manual for AutoTrack Starting AutoTrack 67
To load and run AutoTrack for MicroStation manually…
1. Run MicroStation as you normally would.
2. If you are running Bentley MX the Utilities menu may not be visible. Select CAD Menu from the File drop down menu.
3. Select MDL Applications from the Utilities menu.
4. Look for ATRACK in the list of Available Applications.
5. If the application is listed then highlight it and click Load. Close the MDL Applications dialog.
6. If the application is not listed then click the Browse button and
look in the LOADER subdirectory (LOADERV8 on MicroStation V8)
of the AutoTrack installation directory for the file ATRACK.MA.
Highlight the file and click OK followed by Load.
7. If you have installed a demo copy then you will see the Demonstration Version dialog
(1800). Select which product you
wish to evaluate and click Continue. If necessary your menus will be reconfigured.
8. AutoTrack should now be visible on the top menu and the toolbar should also be visible.
9. Click any AutoTrack button to load AutoTrack. If you are running a network version for the first time, you may get a Hardware Lock warning. Just confirm that you are running a network version and proceed. If AutoTrack fails to find the hardware lock edit your Network Settings and enter the IP address of the Licence Server. Note By default only the main AutoTrack tool frame is enabled with the other functions available as flyouts. If you prefer to work with the flyouts permanently displayed then go to Tools, Toolboxes and check the AutoTrack toolbars that you require.

68 Starting AutoTrack Quick Start Manual for AutoTrack
Running AutoTrack in BricsCAD AutoTrack can either be run from within an AutoCAD session or from the Taskbar Start Programs menu.
To run AutoTrack from the Taskbar Start Programs Menu
Start button
AutoTrack menu
1. Click on the Start button on the Taskbar and select AutoTrack for BricsCAD 11 (or your alternative CAD system) from the Programs, AutoTrack menu or click on the desktop icon AutoTrack for BricsCAD 11.
2. The first time the software is run, if AutoTrack cannot find a valid licence, the Welcome dialog
(1700) will appear with
options to run a full version (hardware lock version), activate a software licence (software locked version), run a rental or a demo version.
3. If you are running a demo copy then you will see the Demonstration Version dialog
(1800). Select which product
you wish to evaluate and click Continue. If necessary your menus will be reconfigured.
4. AutoTrack paths are only visible to non-AutoTrack users if proxy graphics have been saved with the drawing (for more information, refer to Viewing AutoTrack paths in AutoCAD if you don’t have AutoTrack). In order for these proxy graphics to be saved, several AutoCAD system variables need to be set correctly. If they are incorrect when you start AutoTrack they will be changed and you will be advised on the command line.
5. You will now be placed in the AutoCAD drawing editor and the AutoTrack menu and toolbar should be visible.
AutoTrack toolbar (appearance varies)
6. If the toolbar is not visible select Show Toolbar from the AutoTrack drop down menu.
To run AutoTrack from within BricsCAD
1. Run BricsCAD as you normally would.
2. If your system has been set up correctly AutoTrack should be on the top menu bar. AutoTrack is not yet loaded but will be as soon as you select an AutoTrack command. If the toolbar is not visible then you can select Show Toolbar from the AutoTrack drop down menu to display it.
3. Click any AutoTrack button to load AutoTrack. If you are running a network version for the first time, you may get a Hardware Lock warning. Just confirm that you are running a network version and proceed. If AutoTrack fails to find the hardware lock, edit your Network Settings and enter the IP address of the Licence Server.

Quick Start Manual for AutoTrack Starting AutoTrack 69
Note By default only the main AutoTrack toolbar is enabled with the other functions available as flyouts. If you prefer to work with the flyouts permanently displayed then click the relevant main toolbar buttons to display them and leave them open when you close BricsCAD.
To load and run AutoTrack for BricsCAD manually
1. Run BricsCAD as you normally would.
2. Select Load Application from the Tools menu in BricsCAD type APPLOAD at the command line. The Load Application Files
dialog will appear. The dialog shown is for BricsCAD v11 but other platforms are similar.
Load Application Files dialog (BricsCAD)
3. Browse to the AutoTrack application directory and select the BRX file appropriate to your CAD system as follows:-
BricsCAD v11.1 use ATRB1101.BRX
BricsCAD v11.2 use ATRB1102.BRX
BricsCAD v11.3 use ATRB1103.BRX
BricsCAD v11.4 use ATRB1104.BRX
BricsCAD v12.1 use ATRB1201.BRX
BricsCAD v12.2 use ATRB1202.BRX
4. Click the Load button and close the dialog. AutoTrack will load.
5. Now type AUTOTRACK on the command line.
6. If you have installed a demo copy then you will see the Demonstration Version dialog
(1800). Select which product you
wish to evaluate and click Continue. If necessary your menus will be reconfigured.
7. AutoTrack should now be visible on the top menu and the toolbar should also be visible. If the toolbar is not visible then you can select Show Toolbar from the AutoTrack drop down menu to display it.

70 Starting AutoTrack Quick Start Manual for AutoTrack
8. Click any AutoTrack button to load AutoTrack. If you are running a network version for the first time, you may get a Hardware Lock warning. Just confirm that you are running a network version and proceed. If AutoTrack fails to find the hardware lock edit your Network Settings and enter the IP address of the Licence Server. Note By default only the main AutoTrack toolbar is enabled with the other functions available as flyouts. If you prefer to work with the flyouts permanently displayed then click the relevant main toolbar buttons to display them and leave them open when you close BricsCAD.

Quick Start Manual for AutoTrack Starting AutoTrack 71
The New Features dialog (1975)
If you have an internet connection then you will see the New Features dialog when you run AutoTrack. If you do not see the dialog then it may be because it has been switched off. In this case select Show New Features from the AutoTrack, Help drop down menu.
New Features dialog
1. If you are installing AutoTrack for the first time the main window lists the new features add to this major release, e.g. if you are installing v8.9 it will list all new features from version 8.0.
2. If you have just updated from an earlier version the main window lists the new features available since the last version you used. Thus if you update from version 7.0 it will list all new features from that version.
3. If you don’t want to be reminded of new features again then tick Don’t remind me again. You can always see check the list again by selecting Show New Features from the AutoTrack, Help drop down menu.
4. Some of the items may include links to video clips. To view these simply click the Show me link.

72 Starting AutoTrack Quick Start Manual for AutoTrack
The Getting Started dialog (not AutoTrack Templates) (1900)
System Settings button
Tutor button
Video Tutorial button
Drawing Settings button
For those who use AutoTrack infrequently we have created the Getting Started dialog. By default this appears when you first run the program from the desktop icon.
6. Getting Started dialog
1. At the top of the screen is the Internet status. AutoTrack provides extra functionality via the internet and we strongly recommend that it is enabled. If the status indicates that there is a problem then click on the System Settings button to make changes.
2. Below that is the Assistance section. The AutoTrack Tutor is not new but now you can have it run at startup; tick Start the AutoTrack Tutor by default. There may be a static tutorial provided with the product but for the most up to date information and advice we recommend that you access the online tutorial by ticking Use the Online Tutorial if available. The tutorial will run in your preferred browser and the window may need to be resized to view the page format. Click on the Tutor button or Video Tutorial button to start these features.
3. Below that is possibly the single most important settings, Drawing Scale. Enter your preferred scale or click the Drawing Settings button to configure other drawing settings.
4. The Driving Convention is set based upon your regional settings. You may change it if it is wrong.
5. The Preferred Editing Units control the units in which data is displayed. If you also wish to view or change the Reporting Units then click the Drawing Settings button.
6. When you become proficient with AutoTrack you may wish to disable the Getting Started dialog by ticking the box Do not show this dialog in future at startup. You can always display it again by selecting Getting Started from the AutoTrack drop down menu.

Quick Start Manual for AutoTrack Starting AutoTrack 73
A few do's and don'ts We have designed AutoTrack to support and interact appropriately with as many of the features of the host CAD system. However, there are a few recommended do’s and don’ts that you should bear in mind.
AutoCAD version
Do not save only exploded AutoTrack paths if you are likely to need to edit them in the future.
MicroStation version
Do not save only exploded AutoTrack paths if you are likely to need to edit them in the future.
Do not unlock or edit the AutoTrack cells using other than AutoTrack. Each AutoTrack path is held in one or more specially named locked cells (belonging to the same graphic group) to prevent it being manipulated such that the results are inconsistent with the vehicles capabilities. Unlocking or editing cells will have unpredictable results.
Do not try to edit AutoTrack data in reference drawings - AutoTrack can only access data in the master drawing.


Quick Start Manual for AutoTrack Introduction 75
Introduction
AutoTrack’s power and range of features has grown over the years and it is now no longer a single program but a suite of vehicle swept path prediction programs. It was originally developed to meet the need for a means of accurately predicting the space needed to manoeuvre large articulated vehicles. Nowadays, the program can model almost any conceivable vehicle type including vehicles with complex steering arrangements, aircraft and now, following the recent integration of AutoTram, light rail vehicles.
What AutoTrack can and can’t do
Capabilities
AutoTrack integrates completely with your CAD system adding functions that allow you to model vehicle behaviour. You simply select from a wide variety of predefined vehicles and 'drive' them through required manoeuvres on-screen. If the required vehicle is not already defined then facilities are provided to define the vehicle and add it into one of the existing libraries for future use.
Note If you are a new AutoTrack user, or have migrated from a previous version, we strongly recommend that you view the demonstration video supplied on the AutoTrack CD to gain an overview of the product. Then, for a hands-on introduction to using the program refer to the section entitled Worked Example.
Features
A number of features have been incorporated to simplify the user's task in "driving" a vehicle in this manner without the benefit of the more direct sensory feedback that would be experienced driving the vehicle for real.
It should be noted that the aim of the program is to provide accurate swept path predictions for different types of vehicles and not precise simulations of driving conditions for those vehicles. Thus, the controls have been designed with the emphasis on ease of use rather than realism.
AutoCAD Civil 3D 2010 and later
We work hard to ensure that AutoTrack functionality is the same across all platforms as far as we can. However, AutoCAD Civil 3D presents us with an opportunity to enhance the functionality to the benefit of the end user. These special features (only available in version 2010 and later) are made possible by the detailed Civil 3D building information model (BIM) database that identifies lines and shapes and allows us to add intelligence to our AutoTrack objects. For example, Civil 3D surfaces and

76 Introduction Quick Start Manual for AutoTrack
feature lines allow us to place our objects on the ground surface. Not only that but we are able to react and update the object when the surface or line changes. These features are discussed in more detail as they occur in the manual.
Limitations
Like any engineering design program, AutoTrack has limitations. In fact, the list of factors that AutoTrack ignores is extensive and includes dynamic effects, wind effects, acceleration and deceleration, sloping road surfaces and slippery road surfaces.
Whilst these factors are by no means irrelevant, if we asked you to supply a weather report, details of the condition of each tyre, a road friction coefficient and full details of the suspension you would probably give up and go back to using templates!
The fact is that AutoTrack is just like any other engineering program in which you design for idealised situations and apply safety factors to allow for real life variations.
This is exactly the way we recommend you use AutoTrack. Use the most onerous vehicles likely in a particular situation and then allow a margin for error on the results. The acceptable margin for error is something for you to assess - if you are lucky it may be the subject of local design guidelines.
Do not expect that just because a particular vehicle in the AutoTrack library can perform a given manoeuvre on your desktop you will be able to replicate it precisely in reality.
Do not assume that any of the AutoTrack defaults are recommendations and if you have a reliable source of data, use it.
It all boils down to USE YOUR ENGINEERING JUDGEMENT.
Migrating from WinTrack Due to restrictions imposed by Windows Vista support AutoTrack can no longer read WinTrack files directly. If you need to migrate WinTrack files for use with AutoTrack you should install version 7.60 or earlier, open the file and save it. The resulting file supports almost all WinTrack features. Features not supported include:-
Speed, hands-off and stationery steering reports (planned for a later release)
Full thickness tyre tread report (although tyre tread reports are read in as normal outer face wheel tracks if there is no outer face report defined)
Alternative direction symbol shapes (only the chevron shape)
Automatic grid spacing (however grid spacing may be specified)
Origin symbol (replaced by axes symbol at bottom left of screen)
Reading pre-v5 AutoTrack libraries Due to restrictions imposed by Windows Vista support AutoTrack can no longer read library files created using version of AutoTrack prior to version 5. If you need to convert an earlier format library file you should

Quick Start Manual for AutoTrack Introduction 77
install version 7.60 or earlier, open the file and save it. The resulting file can be read in all versions of AutoTrack.
How to use AutoTrack AutoTrack is really very simple to use; in most cases you will simply specify your settings, select a vehicle from one of the many provided, position and orient it on your drawing and then drive it through your drawing on-screen. If you need a vehicle that is not listed then you can create it, add it to your own vehicle library and use it just like those provided.
Each of these is described in detail in the following chapters.
Settings
How you use AutoTrack depends to a large extent upon what you want to do with it. The system is set up with default settings appropriate for a “typical” use. You will need to decide whether these are appropriate for your needs and change them if necessary.
The way a vehicle behaves is controlled partly by the vehicle parameters and partly by the environment in which it is driven. Vehicles once defined should normally be regarded as fixed. The environment settings however can and should be modified to suit your particular situation.
There are various drive modes available each of which can be used interchangeably. Each is appropriate for a particular use and you will need to decide which is best for your needs and indeed this may come down to a simple preference. All but one of the drive modes also have settings that control the way they work.
One of the most frequent causes of problems is that AutoTrack is working in one set of units (say, metres) while your CAD system is working in another (say, millimetres); so before you start work make sure that you set the AutoTrack scale to match your drawing (Refer to Drawing Settings: Scale).
AutoTrack calculates swept paths to a high degree of accuracy based upon the stated algorithms. However, you may wish to allow for the driver error or real world imperfections by modelling a safety or clearance envelope (Refer to Drawing Settings: Reports: Offset Envelope 1).
Modelling rigid vehicles
All drive modes are well suited to modelling rigid vehicles but AutoDrive is likely to give the quickest and best results.
Modelling articulated semi-trailer vehicles
Articulated lorries are best modelled using AutoDrive. Existing users may prefer Manual Drive which requires a degree of skill when reversing. Follow and Script may be appropriate if you are only modelling forwards manoeuvres. If you want to model reverse manoeuvres Script is unlikely to be of much use since it has no intelligence to deal with the over-articulation that will rapidly develop.

78 Introduction Quick Start Manual for AutoTrack
Modelling drawbar and multi-trailer vehicles
Multi-trailer vehicles that have more than one articulation point are inherently very unstable when reversing and for this reason they are rarely reversed. We do not encourage the use of AutoTrack to analyse multi-trailer vehicles performing reversing manoeuvres since it can give a false impression of the suitability of the design. Within AutoTrack, AutoDrive will give you good results.
Modelling aircraft
Taxiing aircraft are best modelled using either AutoDrive or Follow. Script may also be appropriate if you want to create templates of well-defined simple manoeuvres.
Follow will be appropriate if you want to model an aircraft following existing apron markings. If you want pilot’s eye tracking then you will need to change the Forwards Path Point to Pilot / Driver (Refer to Drawing Settings: Tracking Point). This must be done before you start driving. If your vehicle fails to negotiate a turn then you could try lengthening the segment length (Refer to System Settings: Follow Drive). The further the pilot is offset from the effective front axle the greater this value may need to be.
AutoDrive may be more appropriate if you are trying to determine the position of the apron markings. You will probably use the Forwards Arc option in AutoDrive which tries to drive with the minimum turn arcs and only use Forwards Bearing for long straight sections.
Modelling combination steered vehicles
Linkages have little effect on the most appropriate drive mode. However, rear steered vehicles do not have the benefit of Hands-Off in Manual Drive mode or Forwards Bearing in AutoDrive.
It is only possible to link entire axle groups so the best way to model a single linked axle in a multi-axle group is as a self-steered axle. Set the axle group type to Fixed and check the Self-Steered box on the axle that is linked. By default, with a self steered friction factor of 0.0, the effective axle position will be calculated on the basis of the remaining fixed axles and the wheels on the self-steered axle will turn about the centre of turn of these axles.
Modelling vehicles with pushing tractors
All vehicles must have a single tractor unit but it may be at the front, at the back or indeed, in the middle. In essence the behaviour of such a vehicle travelling forwards is equivalent to the reverse of the vehicle going backwards.
Modelling vehicles with steerable couplings
Some vehicles, notably certain quarrying trucks, have no steerable axles but instead are steered by changing the articulation angle of a coupling. These vehicles can be modelled using the active steerable coupling type.
Modelling Active Hitches
Warehouse vehicles sometimes make use of vehicles with active hitches. Active hitch refers to a rear drawbar axle which is linked to the front axle

Quick Start Manual for AutoTrack Introduction 79
or coupling. Vehicles that use this type of axle can only be reversed using Manual Drive.
Development & planning scenarios
AutoTrack may be used not only to test scenarios but also to develop alignments from scratch. Used in this way you may find the need to limit the steering angle. This can be done in several ways but arguably the most useful in a development situation is by turn radius. For example, if you were to adopt a standard curve radius for a residential development; this radius can then be set as the limiting inner wheel radius for all turns and all vehicles.
During the early planning stages of projects you may find that the good old turn template comes into its own. You could use the template wizard to generate templates for important vehicles such as refuse trucks and emergency vehicles and use them to form the basis of your road layouts. As you refine your design you can then use more sophisticated tools to test critical locations. You should bear in mind that turns generated using Script can be edited whereas those generated using the template wizard cannot.
Modelling the effects of super elevation and side friction
AutoTrack now allows you to restrict the turning radius according to super elevation and side friction. This, in conjunction with design speed, means that you can now more accurately predict higher speed paths through junctions or roundabouts. We do however urge caution before modelling high speed manoeuvres using AutoTrack; the dynamics of vehicle motion are too complex for a program of this type to fully model so the fact that AutoTrack can generate a theoretical path does not necessarily mean that it can be driven safely. USE YOUR ENGINEERING JUDGEMENT.
Modelling trams and light rail vehicles
You can only model fully rail guided vehicles such as trams using Guided Drive which is available in the light rail version. Generally speaking because the path of the tram is well defined there are fewer options. However because most new tram networks use new tram designs (albeit often heavily based upon existing trams) it is more likely that you will need to define your own vehicles.
Modelling conveyor systems
The Rail version can also be used to model certain types of conveyor systems such as are found in vehicle assembly plants.
Fastest line through roundabouts
Follow can be used to check the fastest line through roundabouts. Define the path through the roundabout as a AutoCAD spline, pline or MicroStation complex chain. Set the design speed to the highest permitted and use Follow to generate a non-editable path. AutoTrack will reduce the speed to the maximum possible. The current version does not take into account acceleration and deceleration but it does allow for dynamic effects.

80 Introduction Quick Start Manual for AutoTrack
Checking vertical clearances
The Vertical Clearance drive mode may be used to check ground clearance and / or impacts with overhead features such as bridges. Multiple axles are modelled assuming suspension movement. However, the results should be regarded as approximate since the effects of variations in suspension and loading can have a significant effect.
What’s new in version 10? Support for AutoCAD 2013 and derivatives
AutoTrack detects AutoCAD 2013 and all verticals and automatically installs support for them in Express mode.
Support for MicroStation v8i SS3
AutoTrack detects MicroStation v8i Select Series 3 and automatically installs support for them in Express mode.
Support for BricsCAD 12.2
AutoTrack detects BricsCAD v12.2 and automatically installs support for it in Express mode.
Creation of 3D corridor
Junctions can optionally create and update roadway alignments, profiles and corridor in supported CAD systems. Assemblies are provided for ‘out-of-the-box’ functionality. A new corridor settings page allows you control default behaviour and save defaults for future sessions.
New Deviation Points
The Blend Points have been supplemented by Deviation Points. Each arm now has the original Blend Point, the point at which the new design meets the existing, and a Deviation Point, the point at which the arm deviates from the selected alignment.
Roundabout crown lines
Junctions can optionally create circulatory area crown lines either as concentric circles or island to island. It can also create the arm crown lines using the Stockdale Method.
Roundabout signage
You can now define non-custom roundabout signs in junction standards. These include Give Way (or Yield), Roundabout Ahead, direction chevrons, etc. The signs are placed automatically but may be adjusted.
Roundabout levels
You can now specify the levels and crossfall at key points on the roundabout and approach arms. This data is used to build the 3D model in supported CAD systems.
Ability to run ARCADY from within AutoTrack
An option has been added to start up ARCADY from a button on the AutoTrack menu, toolbar or ribbon.
Ability to run Sign Design Pro from within AutoTrack
An option has been added to start up Sign Design Pro from a button on the AutoTrack menu, toolbar or ribbon.
Roundabout reacts to changes in defining lines in MicroStation
Quick Start Manual for AutoTrack Introduction 81
The AutoTrack roundabout object reacts to changes in the chosen alignments in MicroStation in the same way that it does already in AutoCAD.
Roundabout visibility cameras
3D animation cameras have been added at all visibility subject locations to allow visibility checking in 3D. Also, the drivers eye view can be set to ‘Looking Left’ and ‘Looking Right’.
New ‘watching’ cameras
Additional cameras have been added with predefined default viewpoints for watching junctions or parking rows.
Unlimited design vehicles in Junctions
The Design Vehicle pages in the Junction Standard Editor and Junction Properties have been revised and now you can define and use unlimited design vehicles.
Improved crossing presentation
The pedestrian crossing is now drawn with white stripes similar to the requirements of many countries.
Griptips & Glyphs in BricsCAD 12.2
Griptips and glyphs (with varying shapes and colours) are now fully supported in the BricsCAD 12.2 version.
Manual layout If the theory and algorithms used in AutoTrack are new to you then you may wish to read the section entitled Theory before using the program. Thereafter, the remaining sections cover day-to-day use of the program. We do however strongly recommend that you read the section entitled Worked Example which will give you a fast introduction to the program and get you productive as quickly as possible.
The troubleshooting section deals with some of the more common problems.
Notation conventions
Throughout this manual key depressions are shown enclosed by angle brackets thus enter <F> means type the letter F and <OR> means type
the letters O and R.
Menu options or commands are printed in a bold font.
Messages displayed by AutoTrack are printed in italics.
Text that you should type and filenames are shown in a courier font.
All screen images and functionality descriptions are for AutoTrack running on Windows XP. The screen image may vary slightly on other platforms. If functionality is different for other platforms the variations are noted.
Mouse conventions
Windows allows mouse button functionality to be reversed for left handed users. AutoTrack features a similar option. Rather than repeatedly catering for all possible configurations we have adopted the convention of using the default functionality. Thus if you have configured your mouse

82 Introduction Quick Start Manual for AutoTrack
for left handed use then for left mouse button read right mouse button and vice versa.
Default values
Throughout the program default values are displayed in red and have an asterisk alongside them. Enter any non-zero value to overwrite the default. Enter zero to reset them to the default.
Getting help If the user manual is not available try one of the alternatives.
Context sensitive on-line help
The extensive context sensitive on-line help mirrors the manual, but has the powerful windows search facilities. To get help click the Help button on any dialog or press F1.
Help is also available from the drop down menus:-
Select Help, AutoTrack Help to get a structured breakdown of the help text.
Select Help, About AutoTrack to check the program module versions.
On-line assistance
If you find what you think is a bug and wish to email support for assistance select Email Savoy Computing for assistance from the Help menu.
You can check for updates by selecting Check website for AutoTrack updates from the Help menu.
Help tutor
Tutor button
The AutoTrack Tutor is an AutoTrack help window that is displayed permanently in a convenient location on your desktop. The text updates as you move through the program. You can enable the help tutor at any time by clicking the Tutor button on the AutoTrack toolbar. We recommend that you set it to remain in the foreground at all times.
Online video tutorial
Video Tutorial button
The AutoTrack online video tutorial is a multi-media presentation designed to get you started with AutoTrack quickly. Video clips show you how to use AutoTrack to perform various tasks. It may be viewed as a continuous presentation or you may use the navigation buttons to view selected clips.

Quick Start Manual for AutoTrack Introduction 83
If you are running AutoTrack on a supported platform you will have a corridor tab. This defines how the 3D model of the roundabout is built and updated.
1. Expand Junctions in the left hand pane and click Corridor. The Corridor page will appear.
Drawing Settings dialog: Junctions: Corridor
2. The checkboxes in the upper section of the page control how much of the 3D model AutoTrack creates and updates.
3. Tick Create Alignments to create horizontal alignments in your CAD system.
4. Tick Update Alignments if you want AutoTrack to update the alignments automatically when the geometry changes. This option is only available if AutoTrack created the original alignments, i.e. if Create Alignments is ticked.
5. Tick Create Profiles to create vertical profiles along the horizontal alignments.
6. Tick Update Profiles if you want AutoTrack to update the profiles automatically when the geometry changes. This option is only available if AutoTrack created the original profiles, i.e. if Create Profiles is ticked.
7. Tick Create Corridor to create a 3D corridor model using default assemblies.
8. Tick Update Corridor if you want AutoTrack to update the corridor automatically when the geometry changes. This option is only available if AutoTrack created the original corridor, i.e. if Create Corridor is ticked.
9. By default the corridor is built using simple assemblies consisting of just a road surface with no kerbs. This is the case when Use Simple Road Assembly is ticked. These assemblies are based upon the Civil 3D Primary Road Through Intersection assembly with right and left subassemblies renamed to offside and nearside in accordance with your driving convention. Untick Use Simple Road Assembly to use more complex assemblies for the entry and exit roads. These assemblies are based upon the Civil 3D Primary Road Part Section – Daylight

84 Introduction Quick Start Manual for AutoTrack
Right (or Left) again with right and left renamed to offside and nearside in accordance with your driving convention.
10. By default the assemblies are inserted on the crown lines and targeted to the nearside kerb and centreline alignments. However under some circumstances it may be desirable to insert them on the nearside kerb alignment. Switch between them with the Use Kerb Baselines checkbox.
11. Normally you will probably want to construct the 3D model with calculated profiles; this is the default. To drape the corridor on the surface tick Drape Corridor on Surface. With this option enabled, the assemblies take their levels from the original surface profiles rather than the calculated profiles.

Quick Start Manual for AutoTrack 85

86 Quick Start Manual for AutoTrack

Quick Start Manual for AutoTrack 87


Quick Start Manual for AutoTrack 89


Quick Start Manual for AutoTrack 91


Quick Start Manual for AutoTrack 93


Quick Start Manual for AutoTrack 95


Quick Start Manual for AutoTrack Glossary of Terms 97
Glossary of Terms
Active Hitch
A type of rear axle consisting of a drawbar with the bar facing rearwards linked to the front axle or articulation point (hence ‘active’).
Actual Wheelbase
The distance between the innermost axles on a tractor, or the distance from kingpin or drawbar pivot point to the innermost rear axle on a drawbar or semi-trailer.
Approach Stopping Sight Distance
The required line of sight on approaching a roundabout. The approaching driver must be able to see a point on the yield line or the crossing from point far enough back that he can stop if necessary.
Apron
The Apron, or Overrun Area, is a zone provided outside the Centre Island for larger vehicles to track over. The outer limit of the Apron is the offside limit for normal vehicles turning 270 degrees. Note In some parts of the world (notably the USA) the apron is considered to be a part of the island, in others (notably the UK) it is considered to fall between the island and the main circulation area. In Junctions the apron is considered to fall outside the central island, i.e. the apron diameter may never be smaller than the island radius.
Apron Diameter
The diameter of the Apron, or overrun, area. The apron diameter is never smaller than the centre island diameter.
Apron Width
The Apron Width is the difference between the radius of the Apron that of the Centre Island. It may never be less than zero.
Arm
A road that connects to a junction. Known in some parts of the world as a leg.

98 Glossary of Terms Quick Start Manual for AutoTrack
AutoDrive
A means of driving the vehicle in which the path from a given position is calculated automatically as you move a target point (the cursor).
Authorisation code
A code needed to update the hardware lock to run each new version. May also be needed when you purchase extra features.
Axle Spacing
The distance between adjacent axles in a multi-axle group at the front or rear of a component.
Backward Visibility on Entry
Visibility to the right on entry to a roundabout when driving on the left or to the left on entry to a roundabout when driving on the right.
Baseline
The baseline is the line that passes along the back of a row of parking bays.
Bay markings
The bay markings include the painted lines, symbols and hatching used to delineate the preferred position of the car.
Bay style
Each different composition of markings, safety zones, symbols and parking accessories is call a bay style.
Bay symbol
Bay symbols are the graphics painted within the bay and used to indicate, for example, bay usage.
Bend island
Bend islands are placed where a row of parking bays changes direction.
Blend Point
The point on a junction arm alignment at which it joins, or blends with, the existing road.
Castor Steering
Wheels that are part of a fixed axle group but that are free to rotate. Sometimes referred to as self-steered wheels.
Quick Start Manual for AutoTrack Glossary of Terms 99
Cats Whiskers
See Predictive Turning.
Centre Island (or simply Island)
The non-traversable island at the centre of a roundabout which is the normal offside limit for vehicles turning 270 degrees. Note Some parts of the world (notably the USA) consider the centre island to include an overrun area for large trucks. Junctions regards this overrun area as falling outside the centre island.
Centreline Offset
The perpendicular distance between the tangent to the arm alignment at the ICD and the centre of the island. The offset is positive if the tangent passes the centre of the island on the opposite side to the entry road. Thus, in general, the larger the centreline offset the larger the entry deflection, and vice versa.
Circulatory Carriageway Median
The path of a vehicle travelling midway between the inscribed circle and the centre island.
Circulatory Width
The Inscribed Circle radius minus the Island radius. Note: The preferred physical vehicle path limit will typically be inside this.
Conflict Angle
See Entry Angle.
Cramp Angle
A term (seemingly used only by US fire departments) for the maxium wheel angle. See also Wheel Cut.
Crossing Visibility on Approach
To be added.
Crossing Visibility on Next Exit
To be added.
Cut-in Point
The point at which the spine of the element is tangential to the arc that it transcribes.

100 Glossary of Terms Quick Start Manual for AutoTrack
Cut-in Radius
The radius of the arc traversed by the Cut-in Point.
Definition Line
A virtual line representing a roadway limit. The physical Kerb Line may or may not coincide with this line.
Dongle
Slang name for a Hardware Lock.
Drag Lines
Lines drawn from the grips used to extend the path to the front most and rearmost grips on the vehicle. These lines vary in length according to the vehicle size and can be switched off.
Drawbar
A rigid towing bar attached rigidly to an axle. The bar and axle turn as one unit.
Drawbar Articulation Angle
The angle subtended at the axle pivot of a drawbar by the drawbar and associated trailer spine.
Drawbar Length
The length of a drawbar is measured from the centre of turning of the relevant axle group to the physical end of the drawbar. The coupling at the remote end must be defined separately in AutoTrack.
DXF File
DXF stands for Drawing Exchange Format, a text file format used to transfer data between dissimilar CAD systems. Supported by many CAD systems.
Dynamic Edit
See Dynamic Editing.
Dynamic Editing
Editing a path by dragging the grips at target points (and / or intermediate points) to new locations. The path updates automatically when the grip is dropped.
Effective Fixed Axle
The effective fixed axle is the single axle that would have the same effect on the vehicle swept path as the fixed axle group. It is the centroid of the

Quick Start Manual for AutoTrack Glossary of Terms 101
group after the effects of retracted and self-steered axles are taken into account.
Effective Front Axle Offset
The offset of the effective front axle from the reference datum. Positive if the effective axle position is behind the reference datum.
Effective Front Track Width
The distance between outer faces of the front wheels to be used in path calculations.
Effective Rear Axle Offset
The offset of the effective rear axle from the reference datum. Positive if the effective axle position is behind the reference datum.
Effective Rear Track Width
The distance between outer faces of the rear wheels to be used in path calculations.
Effective Steered Axle
The effective steered axle offset is the single axle that would have the same effect on the vehicle swept path as a given steered axle group. It is the outermost axle of the steered axle group, i.e. the furthest forward on a front axle group and the furthest back on a rear axle group.
Effective Wheelbase
The distance between the Effective Front and Rear Axles.
End island
End islands are non-parking areas placed at the ends of rows of parking bays.
Entry Angle
The entry angle or conflict angle, Φ (phi), is a geometric proxy for the angle between entering and circulating streams. It is calculated in one of two ways depending upon whether the entry and exit tangents intersect with respect to the median circulation path.
When the entry and exit tangents intersect ‘inside’ the circulatory carriageway median, the entry angle is the angle between the entry tangent and the tangent to the circulatory carriageway median at the intersection point.

102 Glossary of Terms Quick Start Manual for AutoTrack
When the entry and exit tangents intersect ‘outside’ the circulatory carriageway median, the entry angle is half the angle between the entry and exit tangents.
Entry Deflection
The extent to which a vehicle must deviate from a straight line path to negotiate the entry to the roundabout.
Entry Path Radius
The radius of the fastest vehicle path at, or close to, the entry yield line.
Entry Tangent
The tangent to the path of an entering vehicle at the intersection of the entry path and the yield line.
Exit Tangent
The tangent to the path of an exiting vehicle at the intersection of the exit path and the ICD.
Envelope
A single line representing the maximum body or wheel movement. In the case of vehicle bodies it is the outer limit of movement of any point on any body. In the case of wheels it is the outer limit of travel of any wheel.
Exit Overturn
An exit overturn is when a vehicle continues past the point at which it would normally start the turn (i.e. delays the start of the turn) prior to turning back and exiting the turn. The lateral deviation from the normal path is the exit overturn distance.

Quick Start Manual for AutoTrack Glossary of Terms 103
Fastest Line
The Fastest Line is the centreline of the path taken by a vehicle travelling as fast as possible through the junction. It is defined by various standards in different ways but usually there is a minimum offset from the apex of the path at entry, exit and island. There are also often specified starting and ending positions.
Fifth Wheel
A horseshoe shaped coupling device on a tractor that connects to a pin on a semi-trailer called a kinpin.
Flare Lane
An extra lane added at the entry to a roundabout used to manage vehicle movements.
Follow
A means of driving a vehicle in which you specify a required path as a polyline and let the vehicle attempt to follow it.
Forward Circulatory Visibility
Visibility around the circulation area.
Forward Fastest Path Visibility
Visibility from an entering vehicle on the fastest path to the conflict point on the fastest entry path from the next arm.
Forward Visibility on Entry
Visibility to the left on entry to a roundabout when driving on the left or to the right on entry to a roundabout when driving on the right.
Grips
Small squares that appear when an object is selected. Grips can be selected and moved using the mouse.
Hairpin marking
A type of parking bay marking comprising twin sidelines connected at the entrance.
Hardware Lock
A hardware lock or dongle is a security device that must be plugged into the parallel port of your computer to allow AutoTrack 5 to run.
Head up display
A display of data that the user can see without diverting his or her gaze from the task in hand.

104 Glossary of Terms Quick Start Manual for AutoTrack
HUD
See Head up display.
In bay numbering
In bay numbering is when bay numbers are placed within each marked parking bay.
Independent Bogies
Multiple linked bogies arranged along a unit each with their own turntable. Also known as Tandem Axles. See also Pendel Axles.
Inscribed Circle
The Definition Line representing the outer limit of the Circulatory Width.
Intermediate Grips
Transient editing grips that are displayed along the path between Target Points to make path editing easier. An Intermediate Grip becomes a Target Point if it is selected.
Intersection Sight Distance
Visibility to traffic entering from the previous arm and/or traffic already circulating.
Kerb Line
A line representing the roadside edge of the physical kerb.
Kerb Offset
The distance that the Kerb Line is offset (outside) the Definition Line.
Kerbside numbering
Kerbside numbering is when the bay numbers are placed adjacent to the bay.
Kerb-to-Kerb Turning Circle Radius
The radius of the smallest circle within which the vehicle's wheels can turn. It is assumed that this occurs when full steering lock is applied.
Kingpin
A pin on a semi-trailer that connects to a horseshoe shaped coupling device on a tractor called a fifth wheel.
Lane Line
A line between lanes of traffic travelling in the same direction.

Quick Start Manual for AutoTrack Glossary of Terms 105
Layer
A means of grouping objects together within an AutoCAD drawing. The properties of layers (e.g. visibility) may be controlled independently of the objects they include. See also Level, the equivalent in MicroStation.
Level
A means of grouping objects together within a MicroStation drawing. The properties of layers (e.g. visibility) may be controlled independently of the objects they include. See also Layer, the equivalent in AutoCAD.
Linkage Proportion
The linkage proportion is the proportion of the articulation or wheel angle at one end of a unit that is applied to the axle group at the other end. The proportion may be specified in terms of angles or tangents of angles. In arithmetic terms if the linkage is on an angular basis the linkage proportion would be:-
LinkageProportion = LinkedAngle/PrimaryAngle
If the linkage is on a tangential basis the linkage proportion would be:-
LinkageProportion = tan(LinkedAngle)/tan(PrimaryAngle)
We understand that the latter is the more common form of linkage and in this case the effective cut in point offset is fixed for all primary angles.
Loci
The plural of locus. See Locus.
Lock
Steering angle; thus, maximum left lock is the maximum steering possible when turning left and right lock is the maximum when turning right.
Lock to lock time
Lock-to-lock time is the time that it takes the driver of the vehicle to turn the steering from the maximum angle (full lock) in one direction to maximum angle (full lock) in the opposite direction in a single continuous movement.
Locus
The path of a moving point in space. In the context of AutoTrack the path of the wheel tracks or the body vertices. Referred to in AutoTrack in it’s plural form loci.
Manual Drive
A means of driving a vehicle that uses a control overlay displayed on screen. The vehicle moves forwards, reverse, left and right according to the position of the cursor on the control overlay.

106 Glossary of Terms Quick Start Manual for AutoTrack
Maximum Drawbar Articulation Angle
The largest Drawbar Articulation Angle permitted.
Maximum Wheel Angle
The maximum angle of any wheel in a group, i.e. at the front or at the rear. This is normally the inside wheel on the innermost axle but may be otherwise if the widths of the axles in the group vary. See alse ‘Cramp Angle’ and ‘Wheel Cut’.
Minimum Cut-in Radius
The radius of the arc traversed by the Cut-in Point when the vehicle is turning at the Maximum Steering Angle.
Model Settings
The criteria that control the how a specified vehicle should behave in a specific situation. For example, a lower limit might be placed on the allowable lock rate.
Nearside
The side closest to the passenger in a standard passenger car designed for the region.
Object enabler
An AutoCAD add-on that allows third party entities, like AutoTrack path entities, to be regenerated but not edited.
Offset Envelope
The envelope of maximum body or wheel movement with a further margin added. This may represent a safety or clearance margin.
Offside
The side closest to the driver in a standard passenger car designed for the region.
Overrun Area
See Approach Stopping Sight Distance
The required line of sight on approaching a roundabout. The approaching driver must be able to see a point on the yield line or the crossing from point far enough back that he can stop if necessary.
Apron.

Quick Start Manual for AutoTrack Glossary of Terms 107
Overturn
A technique for reducing the vehicle cut-in on corners whereby the vehicle either turns temporarily in the opposite direction (side overturn) or delays the exit from the turn (exit overturn).
Overturn angle
When performing an overturn (side or exit) the overturn angle is the angular deviation of the wheels from the path the same vehicle would take if performing a non-overturn manoeuvre.
Pendel Axles
Multiple linked bogies arranged both across and along a unit that turn in much the same manner as Ackerman axles, i.e. those axles furthest away from the centre of turn follow the widest radius arc.
Predictive Turning
Predictive Turning is an AutoDrive feature that displays the limits of the vehicle path from the last position placed and the limits of body or wheel envelope from the ghosted unselected position. Also known as “Cat’s Whiskers”.
Primary Axle
The innermost axle of a group, i.e. the rearmost axle of a front axle group and the front most axle on a rear axle group.
Privacy post
Privacy posts are used to prevent use of parking bays by unauthorized personnel.
Profile
A profile is an AutoTrack object that lets you display a side or plan view of a vehicle complete with dimensions.
Profile View
A profile view is an AutoCAD Civil 3D object that lets you display ground profiles as graphed lines on a grid. For more details please refer to the AutoCAD documentation.
Rail wheels
Wheels designed to run on rails typically with an inner flange to prevent the wheel from derailing.
Retracted Axle
An axle that is present but not in contact with the road surface. Retracted axles are ignored when AutoTrack calculates the effective axle positions.

108 Glossary of Terms Quick Start Manual for AutoTrack
Safety post
Safety posts may be placed at the ends of parking bays to prevent vehicles from overshooting.
Safety zone
Safety zones are areas of extra space provided to meet special requirements and are measured from the centres of the bay side and entrance lines.
Script
A means of driving a vehicle by issuing commands such as; forwards 10 metres, turn left 30 degrees, continue for 5 metres.
Secondary steering
A turning axle group whose angle is controllable but which is not the main steering for the vehicle. The axle may be linked to another axle or independently controllable.
Secondary steering angle
The angle of an imaginary wheel at the centre of a secondary steering axle. See Secondary steering.
Self-steering
Wheels that are part of a fixed axle group but that are free to rotate. Sometimes referred to as castors.
Separator Line
A line between lanes of traffic travelling in opposite directions.
Service type
The different usages of parking areas are called service types.
Side Overturn
A side overturn is when a vehicle starts a turn with opposite lock for a short distance prior to making the turn. The lateral deviation from the normal path is the side overturn distance.
Splitter
The splitter is formed by the boundaries of the entry and exit roadway Definition Lines and the Inscribed Circle.
Splitter Island
The Splitter may include a Splitter Island, especially if there are pedestrian crossings. The physical limits of the Splitter Island are normally inside the Splitter.

Quick Start Manual for AutoTrack Glossary of Terms 109
Steering Angle
The angle of an imaginary wheel at the centre of the controlling axle or coupling.
Stub axle
An axle carrying wheel(s) at only one end.
Stub axle length
The length of a stub axle is measured from the pivot point to the centre of the wheel group.
T-markings
A type of parking bay marking consisting of a T painted at the entrance between each adjacent parking bay . The leg of the T runs a short distance down the side of the bay and the cross runs part way along the entrance line.
Tandem Axles
See Independent Bogies.
Target Point
A point through which the vehicle must travel.
Tracking Point
The Tracking Point is the point on the vehicle that must pass through the specified Target Points. It is the point on the vehicle that you move and position when you use AutoDrive and also the point that follows the line in the Follow drive mode.
Tyred Wheels
Wheels with tyres fitted.
Vehicle class
Vehicles using parking areas are grouped into classes; vehicles with similar parking requirements.
Wall-to-Wall Turning Circle Radius
The radius of the smallest circle within which the vehicle's body can turn. It is assumed that this occurs when full steering lock is applied.

110 Glossary of Terms Quick Start Manual for AutoTrack
Wheel Cut
A term (seemingly used only by US fire departments) for the maxium wheel angle. See also Conflict Angle
See Entry Angle.
Cramp Angle.
Wheel Diameter
The diameter of the outer face of the tyre.
Wheel stop
Wheels stops are placed at the ends of bays to prevent the vehicle from overshooting.
Wheel Track
The distance between the outer faces of the wheels on an axle.

Quick Start Manual for AutoTrack Index 111
Index
A
A few do's and don'ts 73 Activate Licence dialog (1840) 59 Active Hitch 97 Actual Wheelbase 97 Adding files to an installation 45 Approach Stopping Sight Distance 97, 106 Apron 97 Apron Diameter 97 Apron Width 97 Arm 97 Authorisation code 98 AutoCAD Civil 3D 2010 and later 75 AutoCAD object enabler 42 AutoDrive 98 AutoTrack hardware lock 1 Axle Spacing 98
B
Backward Visibility on Entry 98 Baseline 98 Bay markings 98 Bay style 98 Bay symbol 98 Bend island 98 Blend Point 98
C
Capabilities 75 Castor Steering 98 Cats Whiskers 99 Centre Island (or simply Island) 99 Centreline Offset 99 Checking vertical clearances 80 Circulatory Carriageway Median 99 Circulatory Width 99 Configuring AutoCAD manually 46 Configuring BricsCAD manually 51 Configuring MicroStation, Bentley PowerDraft,
PowerCivil, Power InRoads, Power GEOPAK or MX manually 49
Conflict Angle 99, 110 Context sensitive on-line help 82
Cramp Angle 99 Creating the install script 43 Crossing Visibility on Approach 99 Crossing Visibility on Next Exit 99 Cut-in Point 99 Cut-in Radius 100
D
Default values 82 Definition Line 100 Demonstration copies 3 Demonstration Version dialog (1800) 57 Development & planning scenarios 79 Dongle 100 Drag Lines 100 Drawbar 100 Drawbar Articulation Angle 100 Drawbar Length 100 DXF File 100 Dynamic Edit 100 Dynamic Editing 100
E
Effective Fixed Axle 100 Effective Front Axle Offset 101 Effective Front Track Width 101 Effective Rear Axle Offset 101 Effective Rear Track Width 101 Effective Steered Axle 101 Effective Wheelbase 101 End island 101 Entry Angle 101 Entry Deflection 102 Entry Path Radius 102 Entry Tangent 102 Envelope 102 Exit Overturn 102 Exit Tangent 102
F
Fastest Line 103 Fastest line through roundabouts 79 Features 75 Fifth Wheel 103 Flare Lane 103 Follow 103 Forward Circulatory Visibility 103 Forward Fastest Path Visibility 103 Forward Visibility on Entry 103
G
Getting help 82 Grips 103

112 Index Quick Start Manual for AutoTrack
H
Hairpin marking 103 Hardware Lock 103 Head up display 103 Help tutor 82 How to use AutoTrack 77 HUD 104
I
Identifying and resolving problems 53 In bay numbering 104 Independent Bogies 104 Initialising AutoTrack 2 Inscribed Circle 104 Installing AutoTrack 16, 25 Installing the licence manager on a Novell
Netware server 12 Installing the licence manager on a Windows
NT/2000/XP/7 server 7 Installing the licence monitor on a Windows
NT/2000/xp client computer 13 Installing the NetHASP Licence Manager
software (Network version only) 7 Installing the NetHASP Licence Monitor software
(Network version only) 13 Installing the software 4 Installing, modifying, repairing or removing
AutoTrack from a CD or from a self-extracting installer (exe) file 25
Installing, modifying, repairing or removing AutoTrack from a Windows Installer (msi) file 16
Intermediate Grips 104 Intersection Sight Distance 104
K
Kerb Line 104 Kerb Offset 104 Kerbside numbering 104 Kerb-to-Kerb Turning Circle Radius 104 Kingpin 104
L
Lane Line 104 Layer 105 Level 105 Licences 3 Limitations 76 Linkage Proportion 105 Loci 105 Lock 105 Lock to lock time 105 Locus 105
M
Manual Drive 105
Manual layout 81 Maximum Drawbar Articulation Angle 106 Maximum Wheel Angle 106 Migrating from WinTrack 76 Minimum Cut-in Radius 106 Model Settings 106 Modelling Active Hitches 78 Modelling aircraft 78 Modelling articulated semi-trailer vehicles 77 Modelling combination steered vehicles 78 Modelling conveyor systems 79 Modelling drawbar and multi-trailer vehicles 78 Modelling rigid vehicles 77 Modelling the effects of super elevation and side
friction 79 Modelling trams and light rail vehicles 79 Modelling vehicles with pushing tractors 78 Modelling vehicles with steerable couplings 78 Modifying, repairing or removing AutoTrack 22,
37 Mouse conventions 81 Moving the NetHASP Licence Manager
(Network version only) 12
N
Nearside 106 Network licences 3 Network version 5 Notation conventions 81
O
Object enabler 106 Offset Envelope 106 Offside 106 On-line assistance 82 Online video tutorial 82 Overrun Area 106 Overturn 107 Overturn angle 107
P
Pendel Axles 107 Predictive Turning 107 Primary Axle 107 Privacy post 107 Profile 107 Profile View 107
R
Rail wheels 107 Reading pre-v5 AutoTrack libraries 76 Removing a partially installed USB dongle 5 Rental licences 3 Rental Version dialog (1820) 58 Resolving hardware lock problems 52 Retracted Axle 107

Quick Start Manual for AutoTrack Index 113
Running a silent install 44 Running AutoTrack in AutoCAD 60 Running AutoTrack in BricsCAD 68 Running AutoTrack in MicroStation 65 Running stand-alone AutoTrack 55 Running the Licence Manager on a remote
computer 53 Running the Licence Manager on the same
computer as AutoTrack 52
S
Safety post 108 Safety zone 108 Script 108 Scripted 'silent' installations using the self-
extracting installer 43 Secondary steering 108 Secondary steering angle 108 Self-steering 108 Separator Line 108 Service type 108 Settings 77 Side Overturn 108 Single user licences 3 Single user version 4 Some points to note 40 Splitter 108 Splitter Island 108 Steering Angle 109 Stub axle 109 Stub axle length 109
T
Tandem Axles 109 Target Point 109 Technical Support 54 The Getting Started dialog (not AutoTrack
Templates) (1900) 72 The New Features dialog (1975) 71 T-markings 109 To add the "loopback" address 52 To install the object enabler version from CD 42 To install the software from the web 42 To load and run AutoTrack for AutoCAD (except
Civil 3D 2010 or later) manually 61 To load and run AutoTrack for AutoCAD Civil 3D
2010 or later manually 63 To load and run AutoTrack for BricsCAD
manually 69 To load and run AutoTrack for MicroStation
manually… 67 To run AutoTrack from the Taskbar Start
Programs Menu 60, 68 To run AutoTrack from the Taskbar Start
Programs menu… 65 To run AutoTrack from within AutoCAD 60 To run AutoTrack from within BricsCAD 68 To run AutoTrack from within MicroStation… 66
Tracking Point 109 Transfer Licence dialog (1850) 59 Trial copies 3 Tyred Wheels 109
U
Uninstalling AutoTrack 45 Updating AutoTrack 45 Updating the AutoTrack version 2 Upgrading AutoTrack functionality 2
V
Vehicle class 109 Viewing AutoTrack paths in AutoCAD if you don't
have AutoTrack 64
W
Wall-to-Wall Turning Circle Radius 109 Welcome dialog (1700) 56 What AutoTrack can and can't do 75 What's new in version 10? 80 Wheel Cut 110 Wheel Diameter 110 Wheel stop 110 Wheel Track 110 Windows NT based systems (NT4, 2000, XP,
2003, Vista, Windows 7, etc.) 40