quick start guide - accu-chek
TRANSCRIPT
LAST UPDATE: 2019-08
Roche Diabetes Care GmbH Sandhofer Strasse 116 68305 Mannheim, Germany www.accu-chek.com
ACCU-CHEK, ACCU-CHEK GUIDE, and SOFTCLIX are trademarks of Roche.
© 2019 Roche Diabetes Care 07439881050-0919 07439881050(02)-0919
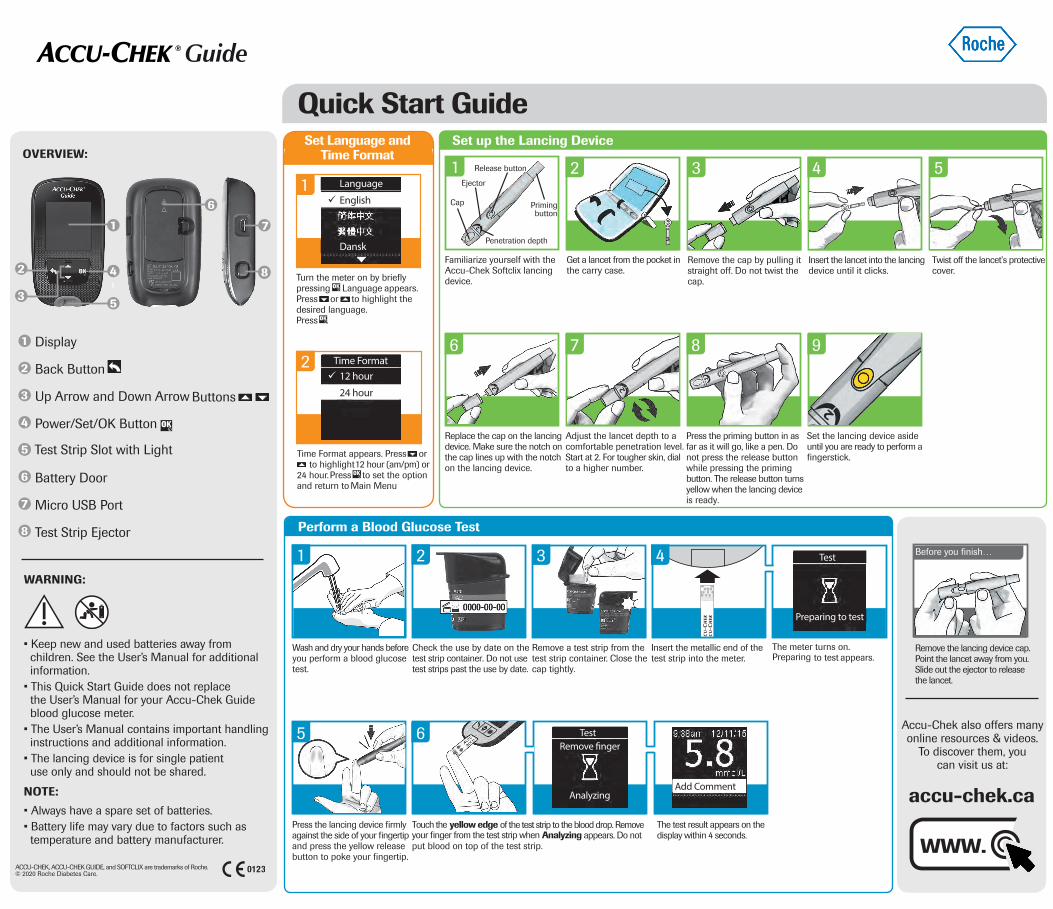
Wash and dry your hands before you perform a blood glucose test.
Check the use by date on the test strip container. Do not use test strips past the use by date.
Remove a test strip from the test strip container. Close the cap tightly.
Insert the metallic end of the test strip into the meter.
The meter turns on. Preparing to test appears.
Press the lancing device firmly against the side of your fingertip and press the yellow release button to poke your fingertip.
Touch the yellow edgeyour finger from the test strip when Analyzing appears. Do not put blood on top of the test strip.
The test result appears on the display within 4 seconds.
1 2 43
5 6
• Keep new and used batteries away from children. See the User’s Manual for additional information.
• This Quick Start Guide does not replace the User’s Manual for your Accu-Chek Guide blood glucose meter. The User’s Manual contains important handling instructions and additional information.
• The lancing device is for single patient use only and should not be shared
Start HereQuick Start Guide Familiarize yourself with the
Accu-Chek Softclix lancing device.
1
Get a lancet from the pocket in the carry case.
Remove the cap by pulling it straight off. Do not twist the cap.
Insert the lancet into the lancing device until it clicks.
Replace the cap on the lancing device. Make sure the notch on the cap lines up with the notch on the lancing device.
Adjust the lancet depth to a comfortable penetration level. Start at 2. For tougher skin, dial to a higher number.
Press the priming button in as far as it will go, like a pen. Do not press the release button while pressing the priming button. The release button turns yellow when the lancing device is ready.
Set the lancing device aside until you are ready to perform a fingerstick.
Ejector
Release button
Cap Priming button
Penetration depth
Turn the meter on by briefly pressing Language appears. Press or to highlight the desired language. Press .
1
2
Time Format appears. Press or to highlight 12 hour (am/pm) or
24 hour. Press to set the option and return to Main Menu.
Overview
1 Display
2 Back Button
3 Up Arrow and Down Arrow Buttons
4 Power/Set/OK Button
5 Test Strip Slot with Light
6 Battery Door
7 Micro USB Port
8 Test Strip Ejector
2 8
7
6
1
4
53
2 43 5
Twist off the lancet’s protective cover.
6 7 8 9
To find diabetes management apps that are compatible with your meter,
visit www.accu-chek.com.
This file may not print or view at 100%.Die lines and color breaks do not print.
Roche USA – 81331 V4/1 – 07439881050 07439881050(02) – Black
Roche USA – 81331 V4/2 – 07439881050 07439881050(02) – Cyan
Roche USA – 81331 V4/3 – 07439881050 07439881050(02) – Magenta
Roche USA – 81331 V4/4 – 07439881050 07439881050(02) – Yellow
NOTE
• Always have a spare set of batteries.• Battery life may vary due to factors such as
temperature and battery manufacturer.
81331_07439881050_07439881050_02.indd 1 9/3/2019 4:48:22 PM
of the test strip to the blood drop. Remove
Language
English
Dansk
Time Format12 hour
24 hour
Preparing to test
Test
TestRemove �nger
Analyzing
To find diabetes management appsthat are compatible with your meter,visit www.accu-chek.com.
Add Comment
LAST UPDATE: 2019-08
Roche Diabetes Care GmbH Sandhofer Strasse 116 68305 Mannheim, Germany www.accu-chek.com
ACCU-CHEK, ACCU-CHEK GUIDE, and SOFTCLIX are trademarks of Roche.
© 2019 Roche Diabetes Care 07439881050-0919 07439881050(02)-0919
Wash and dry your hands before you perform a blood glucose test.
Check the use by date on the test strip container. Do not use test strips past the use by date.
Remove a test strip from the test strip container. Close the cap tightly.
Insert the metallic end of the test strip into the meter.
The meter turns on. Preparing to test appears.
Press the lancing device firmly against the side of your fingertip and press the yellow release button to poke your fingertip.
Touch the yellow edgeyour finger from the test strip when Analyzing appears. Do not put blood on top of the test strip.
The test result appears on the display within 4 seconds.
1 2 43
5 6
• Keep new and used batteries away from children. See the User’s Manual for additional information.
• This Quick Start Guide does not replace the User’s Manual for your Accu-Chek Guide blood glucose meter. The User’s Manual contains important handling instructions and additional information.
• The lancing device is for single patient use only and should not be shared
Start HereQuick Start Guide Familiarize yourself with the
Accu-Chek Softclix lancing device.
1
Get a lancet from the pocket in the carry case.
Remove the cap by pulling it straight off. Do not twist the cap.
Insert the lancet into the lancing device until it clicks.
Replace the cap on the lancing device. Make sure the notch on the cap lines up with the notch on the lancing device.
Adjust the lancet depth to a comfortable penetration level. Start at 2. For tougher skin, dial to a higher number.
Press the priming button in as far as it will go, like a pen. Do not press the release button while pressing the priming button. The release button turns yellow when the lancing device is ready.
Set the lancing device aside until you are ready to perform a fingerstick.
Ejector
Release button
Cap Priming button
Penetration depth
Turn the meter on by briefly pressing Language appears. Press or to highlight the desired language. Press .
1
2
Time Format appears. Press or to highlight 12 hour (am/pm) or
24 hour. Press to set the option and return to Main Menu.
Overview
1 Display
2 Back Button
3 Up Arrow and Down Arrow Buttons
4 Power/Set/OK Button
5 Test Strip Slot with Light
6 Battery Door
7 Micro USB Port
8 Test Strip Ejector
2 8
7
6
1
4
53
2 43 5
Twist off the lancet’s protective cover.
6 7 8 9
To find diabetes management apps that are compatible with your meter,
visit www.accu-chek.com.
This file may not print or view at 100%.Die lines and color breaks do not print.
Roche USA – 81331 V4/1 – 07439881050 07439881050(02) – Black
Roche USA – 81331 V4/2 – 07439881050 07439881050(02) – Cyan
Roche USA – 81331 V4/3 – 07439881050 07439881050(02) – Magenta
Roche USA – 81331 V4/4 – 07439881050 07439881050(02) – Yellow
NOTE
• Always have a spare set of batteries.• Battery life may vary due to factors such as
temperature and battery manufacturer.
81331_07439881050_07439881050_02.indd 1 9/3/2019 4:48:22 PM
of the test strip to the blood drop. Remove
Language
English
Dansk
Time Format12 hour
24 hour
Preparing to test
Test
TestRemove �nger
Analyzing
To find diabetes management appsthat are compatible with your meter,visit www.accu-chek.com.
Add Comment
Quick Start Guide
• Keep new and used batteries away from children. See the User’s Manual for additional information.• This Quick Start Guide does not replace the User’s Manual for your Accu-Chek Guide blood glucose meter. • The User’s Manual contains important handling instructions and additional information.• The lancing device is for single patient use only and should not be shared.
Display
Back Button
Up Arrow and Down Arrow Buttons Power/Set/OK Button
Test Strip Slot with Light
Battery Door
Micro USB Port
Test Strip Ejector
1 7
88
6
1
14 1
5
22
23
11
12
13
14
11 15
16
17
18
OVERVIEW:
WARNING:
Perform a Blood Glucose Test
Set Language and Time Format
Set up the Lancing Device
Remove the lancing device cap. Point the lancet away from you. Slide out the ejector to release the lancet.
Before you finish…
NOTE:• Always have a spare set of batteries.• Battery life may vary due to factors such as temperature and battery manufacturer.
ACCU-CHEK, ACCU-CHEK GUIDE, and SOFTCLIX are trademarks of Roche. © 2020 Roche Diabetes Care.
accu-chek.ca
Accu-Chek also offers many online resources & videos.
To discover them, you can visit us at: