qacomplete-jiraconnector ... · qacomplete-jiraconnector installationandconfigurationinstructions...
TRANSCRIPT

QAComplete - JIRA Connector
Installation and Configuration Instructions
QAComplete Release 11
This guide walks you through installing, configuring and using the
QAComplete - JIRAConnector for synchronizing JIRA issueswith QAComplete Defects and Requirements
QAComplete Release 11
JIRAConnector Version 2.0
July, 2016

ALMComplete | QAComplete User'sGuide
Page 2 of 29
2015 SmartBear Software, AllRightsReserved. Visit us at www.smartbear.com
Integration With JIRA 3QAComplete - JIRAConnector Service 4
About the Configuration Tool 4
Requirements and Prerequisites 5
QAComplete - JIRAConnector Installation 7
Synchronization Profiles 9
Default Profile 9
JIRAKEY 10
StatusMapping 10
PriorityMapping 10
ResolutionMapping 10
Creating a New Synchronization Profile 11
Configuring GeneralSettingsof the Synchronization Profile 12
Configuring QAComplete Connection Settings 13
Configuring JIRAConnection Settings 15
Synchronizing Item Fields and Values 16
Synchronizing Users 21
SynchronizingWorkflows 23
Configuring the Synchronization Intervals 26
Configuring ProxySettings 26
Viewing Synchronization Logs 27
WorkingWith Synchronized Items 28

ALMComplete | QAComplete User'sGuide
Page 3 of 29
2015 SmartBear Software, AllRightsReserved. Visit us at www.smartbear.com
Integration With JIRAJIRA is an issue-tracking system byAtlassian. You use JIRA tomanage your projects and trackbugs, issues, use casesandrequirements.
Use theQAComplete - JIRAConnector to synchronize JIRA issueswith QAComplete Defects or Requirementsmodules to:
l Integrate issues you create in JIRA into your application/testing lifecycle in QAComplete.
l Trackand report on JIRA issues in QAComplete.
l TrackQAComplete entities in JIRA.

ALMComplete | QAComplete User'sGuide
Page 4 of 29
2015 SmartBear Software, AllRightsReserved. Visit us at www.smartbear.com
QAComplete - JIRA Connector ServiceUse theQAComplete - JIRA Connector service to integrate JIRA issueswith QAComplete Defects or Requirements.
While the service is running, it connects to your QAComplete and JIRA instancesat specified intervals and synchronizes items:
l The service loadsdata from the source system that was created or edited after the last syn-chronization.
l The service checks the fields of the source system itemsand updates the fields of the target systemso that theymatch the source items.
l If the same field hasbeen changed both in the source item and in the target item, the service willupdate the target item's field only if the source item's field hasbeen edited last. Otherwise, it willleave the target item's field unchanged.
l If you attach a file to an item in a source system, the service will copy the attachment to the appro-priate item in the target system.
Note: If you change the attachment in the source system, the service will replace theattachment in the target system as long as the file name remains the same.
l If you comment on an item in a source system, the service will copy the comment to the appropriateitem in the target system.
l The service does not synchronize cross-referencing links between items. For example, if a JIRAitem is linked to other JIRA items, the relationship between these items is not part of the syn-chronization.
The synchronization can be bi-directional, where both systemsshare updates to items, or one direction, where an item in thesource system changes, the service updates the corresponding item in the destination system.
"Synchronization Profiles" on page 9 specify synchronization parameters for each pair of items.
About the Configuration ToolTo configure and control the service, you use theQAComplete- JIRA Connector Configuration Tool.

ALMComplete | QAComplete User'sGuide
Page 5 of 29
2015 SmartBear Software, AllRightsReserved. Visit us at www.smartbear.com
The tool is shipped and installed together with the synchronization service.
To start the synchronization, clickRun Service.
To run the synchronization on demand:
l Select the profile in theSynchronization Profiles list.
l ClickSynchronize Now in the drop-downmenu.
The service will synchronize itemsspecified by the profile and then stop.
To restore links between synchronized items (youmayneed this, for example, after you re-install the service):
l Select the profile in theSynchronization Profiles list.Note: To use a profile stored in an external file, import the profile data first. See "SynchronizationProfiles" on page 9
l ClickRepair Database in the drop-downmenu, under Synchronize Now.
The service will connect to the databasesand restore the links between itemsusing the existing synchronization information.
You can view information about synchronized items in theSynchronized Items tab of the configuration tool'smain window.
To stop the service, clickStop Service.
Requirements and PrerequisitesTo integrate QAComplete with Atlassian JIRA, the following requirementsmust bemet:
l Atlassian JIRA 5.0 - 7.0must be installed on the server that hosts your JIRA database, or you canuse JIRACloud 7.0.
l JIRAmust accept remote calls. For information on how to enable JIRA for remote API calls, pleasesee the JIRA documentation.
ALMComplete | QAComplete User'sGuide
Page 6 of 29
2015 SmartBear Software, AllRightsReserved. Visit us at www.smartbear.com
l TheQAComplete account you use for the integrationmust belong to a security group that hasallprivileges for itemsyou synchronize with JIRA.
l The JIRA account you use for the integrationmust haveAdministrator privileges.
l The computer, where theQAComplete - JIRAConnector service runs, must have access to theQAComplete SOAP service and JIRAREST service.
l The computer cannot have SQL Server installed due to a conflict with SQLCompact used by theconnector.
Note: QAComplete do not support extended or Unicode characters. If items in your JIRA projects include extended orUnicode characters, the servicemay fail to synchronize the text in these itemscorrectly.
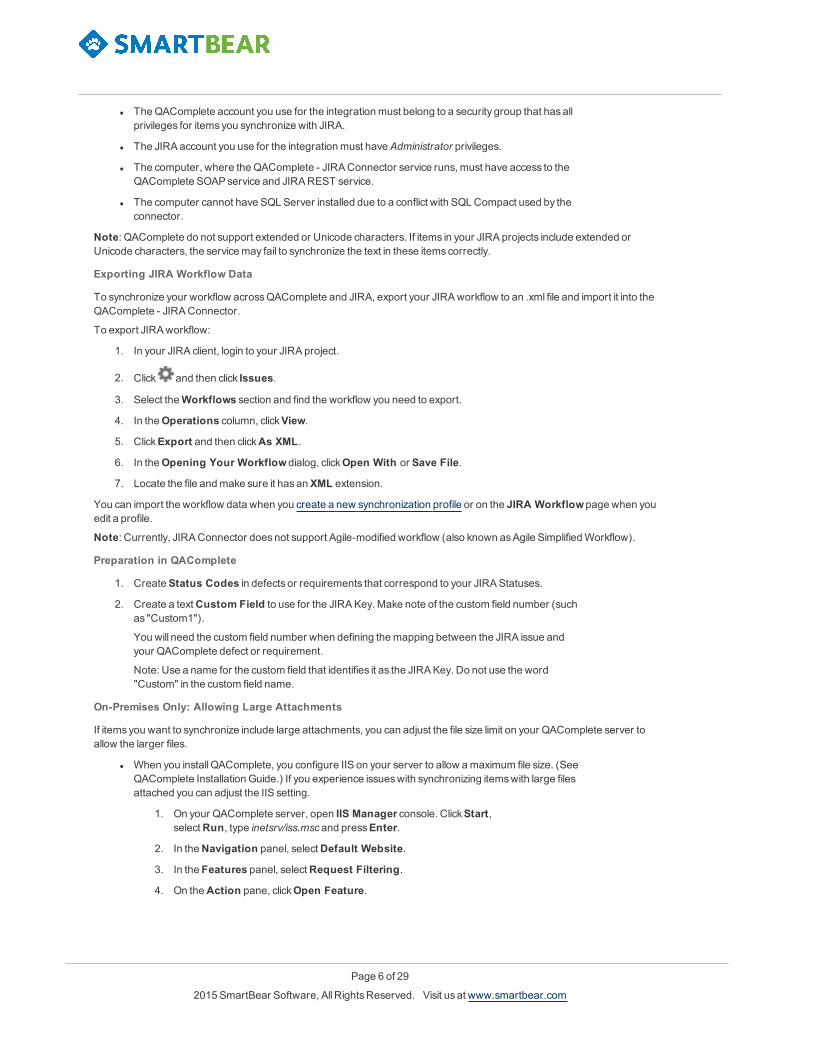
Exporting JIRA Workflow Data
To synchronize your workflow acrossQAComplete and JIRA, export your JIRAworkflow to an .xml file and import it into theQAComplete - JIRAConnector.
To export JIRAworkflow:
1. In your JIRA client, login to your JIRA project.
2. Click and then click Issues.
3. Select theWorkflows section and find the workflow you need to export.
4. In theOperations column, clickView.
5. ClickExport and then clickAs XML.
6. In theOpening Your Workflowdialog, clickOpen With or Save File.
7. Locate the file andmake sure it hasanXML extension.
You can import the workflow data when you create a new synchronization profile or on the JIRA Workflowpage when youedit a profile.
Note: Currently, JIRAConnector doesnot support Agile-modified workflow (also known asAgile SimplifiedWorkflow).
Preparation in QAComplete
1. CreateStatus Codes in defects or requirements that correspond to your JIRAStatuses.
2. Create a textCustom Field to use for the JIRAKey. Make note of the custom field number (suchas "Custom1").
You will need the custom field number when defining themapping between the JIRA issue andyour QAComplete defect or requirement.
Note: Use a name for the custom field that identifies it as the JIRAKey. Do not use the word"Custom" in the custom field name.
On-Premises Only: Allowing Large Attachments
If itemsyou want to synchronize include large attachments, you can adjust the file size limit on your QAComplete server toallow the larger files.
l When you installQAComplete, you configure IIS on your server to allow amaximum file size. (SeeQAComplete Installation Guide.) If you experience issueswith synchronizing itemswith large filesattached you can adjust the IIS setting.
1. On your QAComplete server, open IIS Manager console. ClickStart,selectRun, type inetsrv/iss.mscand pressEnter.
2. In theNavigation panel, selectDefault Website.
3. In the Features panel, selectRequest Filtering.
4. On theAction pane, clickOpen Feature.

ALMComplete | QAComplete User'sGuide
Page 7 of 29
2015 SmartBear Software, AllRightsReserved. Visit us at www.smartbear.com
5. Right-click the feature and then clickEdit Feature Settings.
6. Make sure that theMaximum allowed content length (Bytes) is setto 100000000.
7. ClickOK to save the changesand close the dialog.
l Make sure that your QAComplete web service allowsuploading large files.
1. On your QAComplete server, navigate to theC:\inet-pub\wwwroot\psWS\web.config file and open it for editing. (It is an XMLfile that you can open in anyXML or Text editor such asNotepad.)
2. Find the system.webServer node in the file.
3. Make sure that the node has the httpRuntime subnode and that thesubnode'smaxRequestLength attribute is set to 122800.
4. If needed, add the httpRuntime subnodemanually and set themaxRequestLength attribute to 122800. For example:<configuration> <system.webServer> <httpRuntime maxRequestLength="122800"/> <validation val-idateIntegratedModeConfiguration="false"/> </system.webServer> ...
5. Save the file.
Restoring Synchronization Data on Updating or Re-Installing the Service
Before you update or re-install the QAComplete - JIRAConnector service, we recommend that you store yoursynchronization profiles in external files:
l In the configuration tool, stop the service and clickManage.
l In theSynchronization Profiles dialog, select the needed profile and clickExport.
l Specify the file that will store the data.
After you update or re-install the tool, you can restore the existing links between synchronized items instead of creating andconfiguring the synchronization anew. (Otherwise, synchronized datamaybe duplicated).
l In the configuration tool, stop the service.
l Import your existing synchronization profile:
l ClickManage and then click Import.
l Browse for the file storing your synchronization data.
Or create and configure a new profile.
l On themain window of the configuration tool, select the profile in theSynchronization Profileslist.
l SelectRepair Database from the drop-downmenu.
The service will connect to the databasesand restore the existing synchronized data.
QAComplete - JIRA Connector InstallationDownload the JIRAConnector installation package from our web site.
Note: If you are anOn-Premises customer, check for your QAComplete Release number and download the correspondingJIRAConnector:
l QAComplete Release 10.0: JIRAConnector 1.0
l QAComplete Release 10.1: JIRAConnector 1.2

ALMComplete | QAComplete User'sGuide
Page 8 of 29
2015 SmartBear Software, AllRightsReserved. Visit us at www.smartbear.com
l QAComplete Releases10.2 and 11.0: JIRAConnector 2.0
Copy the installation package to themachine that will run the synchronization. This needs to be amachine that can connect toboth your JIRA instance andQAComplete.
Unzip the file and runQAComplete JIRA Connector 20 Release.exe.
Note: If you do not have SQL Server Compact 3.5 SP2 on themachine, the installation will offer to install it for you. ClickYes.ReadMicrosoft'sEULAand clickNext to continue installation.
If you have a previous version of JIRAConnector installed on the computer, the installation will offer to upgrade it. ClickYes.
Read SmartBear'sEULA, Click I Accept, then clickNext to continue installation.
If needed, change the installation folder for JIRAConnector.
Click Install to confirm the installation.
Note: If you are installing on amachine with SQL Server 2008, theremaybe a conflict with SQL Server Compact if exists onthemachine. To workaround the conflict, first uninstall SQLCompact 3.5 (x86 and x64), run the connector installation andselect Repair, and re-install SQL Server Compact from the connector installer.

ALMComplete | QAComplete User'sGuide
Page 9 of 29
2015 SmartBear Software, AllRightsReserved. Visit us at www.smartbear.com
Synchronization ProfilesFor each pair of itemsyou synchronize, you create a separate synchronization profile. A profile stores the information thatQAComplete - JIRAConnector uses to connect to your QAComplete and JIRA instanceswith rules describing how the servicecopiesdata from one system to the other.
Starting fromQAC - JIRAConnector version 1.2, you can synchronize QACompleteDefects andRequirementswith JIRAissuesof any type.
The profile you create describeshow items in aQAComplete project are synchronized with items in a JIRA project and howfields aremapped between the two.
Create and configure profileswith the QAComplete - JIRAConnector Configuration Tool.
To set up a synchronization profile:
l In the configuration tool, stop the service and clickManage.
l In theSynchronization Profiles dialog, clickAdd to create a new profile. To copy settings fromthe default profile to your new profile, selectDefault profile in theCopy settings fromdropdown list. For a description of the default profile, "Default Profile" below
l To edit an existing profile, select the desired profile in the list and clickEdit.
Creating and configuring a synchronization profile includes the following steps:
1. "Creating a New Synchronization Profile" on page 11
2. "Configuring GeneralSettingsof the Synchronization Profile" on page 12
3. "Configuring QAComplete Connection Settings" on page 13
4. "Configuring JIRAConnection Settings" on page 15
5. "Synchronizing Item Fields and Values" on page 16
6. "Synchronizing Users" on page 21
7. "SynchronizingWorkflows" on page 23
You can createmultiple profiles to synchronize different items in different projects. For example, create a profile to synchronizeJIRA bugswith QAComplete defects and a second profile to synchronize JIRA user storieswith QAComplete requirements.
To disable a profile temporary, clear the checkboxnext to the profile name in the list.
To export profile data to a file for later use, clickExport and specify the target file that will store the data.
To import profile data from an external file, click Import and browse for the need file.
Default ProfileTheQAComplete - JIRAConnector comeswith two default synchronization profiles to use asa starting point: one that linksdefects in QAComplete with JIRA issuesof the Bug type and another that linksRequirements to JIRAStories. The profilesmap default fields and choice list values in QAComplete to the corresponding default fields and valuesof JIRA bugs.
When creating your customized profile, use the default profile asa starting point by copying it to your new profile.
Note: if you have customized JIRA or QAComplete choice list values, the valueswill be different for your instance. You will needtomodify the values tomatch your choice lists.
Importing Profiles
If you do not see the default profiles in the configuration tool, you can import them from the Program Files location.
l Start the configuration tool.
l Stop the service.
l ClickManage, then Import.
l Navigate to the location where the configuration tool is installed (c:/Program Files (x86)/Sm-nartBear/qacJIRAConnector).
l In this folder look for the two profile template XML files:
ALMComplete | QAComplete User'sGuide
Page 10 of 29
2015 SmartBear Software, AllRightsReserved. Visit us at www.smartbear.com
templateProfileBugs.xmltemplateProfileRequirements.xml
l Select the profile and clickOpen. The default template will be imported and available for use.
Configuration
Once you have copied the Default Profile, complete the Settings, ALM/QAComplete and JIRA tabs. After you have configuredthe profile, click the Field Mapping tab.
Mapping
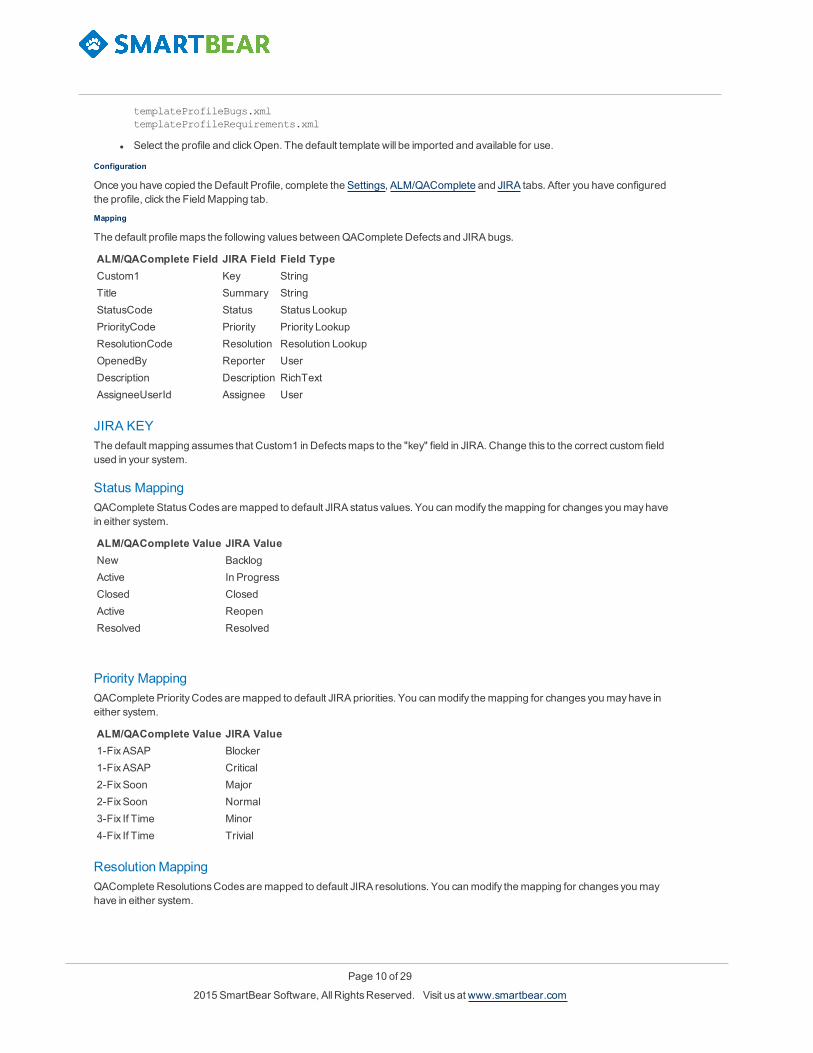
The default profile maps the following valuesbetweenQAComplete Defects and JIRA bugs.
ALM/QAComplete Field JIRA Field Field TypeCustom1 Key StringTitle Summary StringStatusCode Status StatusLookupPriorityCode Priority Priority LookupResolutionCode Resolution Resolution LookupOpenedBy Reporter UserDescription Description RichTextAssigneeUserId Assignee User
JIRA KEYThe default mapping assumes that Custom1 in Defectsmaps to the "key" field in JIRA. Change this to the correct custom fieldused in your system.
Status MappingQAComplete StatusCodesaremapped to default JIRA status values. You canmodify themapping for changes youmayhavein either system.
ALM/QAComplete Value JIRA ValueNew BacklogActive In ProgressClosed ClosedActive ReopenResolved Resolved
Priority MappingQAComplete PriorityCodesaremapped to default JIRA priorities. You canmodify themapping for changes youmayhave ineither system.
ALM/QAComplete Value JIRA Value1-FixASAP Blocker1-FixASAP Critical2-FixSoon Major2-FixSoon Normal3-Fix If Time Minor4-Fix If Time Trivial
ResolutionMappingQAComplete ResolutionsCodesaremapped to default JIRA resolutions. You canmodify themapping for changes youmayhave in either system.

ALMComplete | QAComplete User'sGuide
Page 11 of 29
2015 SmartBear Software, AllRightsReserved. Visit us at www.smartbear.com
ALM/QAComplete Value JIRA ValueByDesign Won't DoDuplicate DuplicateExternal Won't DoFixed DoneFixed FixedNot Repro Cannot ReproduceNot Repro InvalidPostponed Workaround ExistsWill Not Fix Won't Fix
Mapping is fully customizable, so you can addmapped fields andmodify themapping asneeded.
Important: If you use required fields in either JIRA or QAComplete, make sure that all required fields are fullymapped.
Creating a New Synchronization ProfileCreate a synchronization profile for the itemsyou want synchronized.
You can create separate profiles for various item types. You can also create separate profiles to synchronize items in variousQAComplete projectswith issues in various JIRA projects.
To create a new profile, in Synchronization Tool, clickManage and then clickAdd.
Note: To create a new synchronization profile (or edit an existing one), stop the service first. When you are done creating orediting the profile, restart the service.
In theAdd Synchronization Profile dialog, set up a new profile:
1. Enter the new profile name.
2. (Optional) Enter a description for the profile.
3. To synchronize your itemworkflow in QAComplete with the JIRAworkflow, import the JIRAwork-flow data:
ALMComplete | QAComplete User'sGuide
Page 12 of 29
2015 SmartBear Software, AllRightsReserved. Visit us at www.smartbear.com
l ClickLoad JIRA Workflow.
l Browse for the .xml file storing the exported workflow. For informationon how to export JIRAworkflow to a file, please see "Requirements andPrerequisites" on page 5.
l Select the needed file and clickOpen.
Note: You can import the workflow data later on the JIRA Workflowpage byediting the profile.
4. ClickOK.
To copy settings from an existing profile, select the desired profile in theCopy settings from list and clickOK. For ease ofconfiguration, select one of the default profiles asa starting point to creating your new profile.
To configure or edit an existing profile, select it in theSynchronization Profiles dialog and clickEdit.
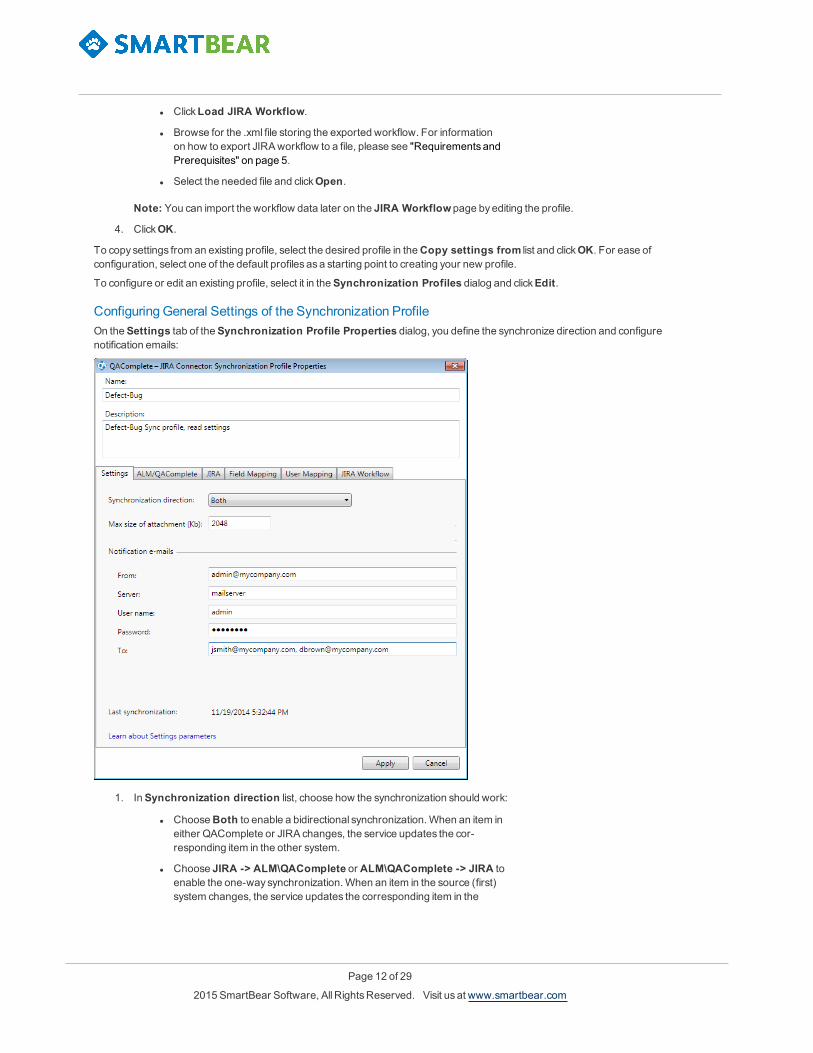
Configuring General Settings of the Synchronization ProfileOn theSettings tab of theSynchronization Profile Properties dialog, you define the synchronize direction and configurenotification emails:
1. InSynchronization direction list, choose how the synchronization should work:
l ChooseBoth to enable a bidirectional synchronization.When an item ineither QAComplete or JIRA changes, the service updates the cor-responding item in the other system.
l Choose JIRA -> ALM\QAComplete or ALM\QAComplete -> JIRA toenable the one-way synchronization.When an item in the source (first)system changes, the service updates the corresponding item in the

ALMComplete | QAComplete User'sGuide
Page 13 of 29
2015 SmartBear Software, AllRightsReserved. Visit us at www.smartbear.com
destination (second) system.
l JIRA -> ALM\QAComplete: JIRA issuesarepushed to QAComplete items.When the JIRAissue is changed, the change is pushed to QACom-plete. If the QAComplete item is changed, it doesNOT update the JIRA issue.
l Note: Changesmade in QACom-plete will be overwritten bychangesmade later in JIRA.
l ALM\QAComplete -> JIRA:QAComplete itemsare pushed to JIRA.When theQAComplete issueis changed, the changed is pushed to JIRA. If theJIRA issue is changed, it doesNOT update theQAComplete item.
l Note: Changesmade in JIRAwillbe overwritten by changesmadelater in QAComplete.
2. InMax size of attachment, enter themaximum size limit for your attachments in Kb. The defaultvalue is 2048 Kb and the upper limit is 30Mb.
3. To configure the service to send email notificationson synchronization results:
l In From, enter the email address to use as the "From" address for noti-fications.
l InServer, enter the addressof themail server used to send noti-fications.
l InUser Name andPassword, enter the account name and passwordused to connect to the email server.
l In To, enter the email address to receive the notifications. To send noti-fications to several recipients, enter their email addresses separated bycomma.
Configuring QAComplete Connection SettingsOn theALM/QAComplete tab of theSynchronization Profile Properties dialog, specify the location of your QACompleteweb service and login information for the project you want to synchronize with JIRA.

ALMComplete | QAComplete User'sGuide
Page 14 of 29
2015 SmartBear Software, AllRightsReserved. Visit us at www.smartbear.com
Note: the Department ID, Project ID and User ID are the unique numeric identifiers found in QAComplete.
1. InServer endpoint, enter the URL of your QAComplete web service.
For SaaS clients, the URL address is http://soap.qacomplete.smartbear.com/psWS.asmx.
For On-Premises clients, the URL address ishttp://[yourserver]/psws/psws.asmx.
2. In appropriate fields, enter the following authentication information:
l InAppCode, enter the application code.
For SaaS clients, use agSP.
For On-Premises clients, use agSPEnt.
l InDepartment Id, enter the numeric ID of your department.
l InUser Id, enter the numeric ID of the user that the service will use toaccessQAComplete items. This user must have full permission to theitems in the desired Project.
l InPassword, enter the password for the user.
l InProject, enter the numeric ID of the QAComplete project that youwant synchronized with JIRA.
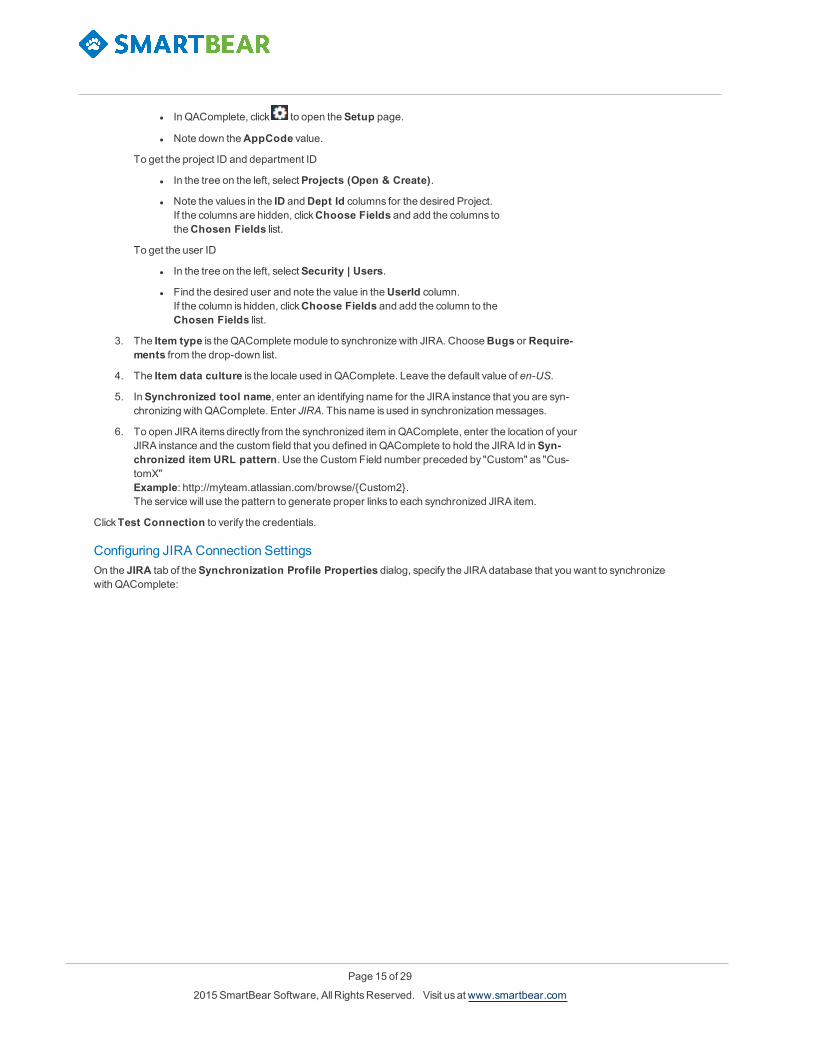
You can find the numeric IDs in QAComplete:
To get the application code
ALMComplete | QAComplete User'sGuide
Page 15 of 29
2015 SmartBear Software, AllRightsReserved. Visit us at www.smartbear.com
l In QAComplete, click to open theSetup page.
l Note down theAppCode value.
To get the project ID and department ID
l In the tree on the left, selectProjects (Open & Create).
l Note the values in the ID andDept Id columns for the desired Project.If the columnsare hidden, clickChoose Fields and add the columns totheChosen Fields list.
To get the user ID
l In the tree on the left, selectSecurity | Users.
l Find the desired user and note the value in theUserId column.If the column is hidden, clickChoose Fields and add the column to theChosen Fields list.
3. The Item type is the QACompletemodule to synchronize with JIRA. ChooseBugs or Require-ments from the drop-down list.
4. The Item data culture is the locale used in QAComplete. Leave the default value of en-US.
5. InSynchronized tool name, enter an identifying name for the JIRA instance that you are syn-chronizing with QAComplete. Enter JIRA. This name is used in synchronizationmessages.
6. To open JIRA itemsdirectly from the synchronized item in QAComplete, enter the location of yourJIRA instance and the custom field that you defined in QAComplete to hold the JIRA Id inSyn-chronized item URL pattern. Use the Custom Field number preceded by "Custom" as "Cus-tomX"Example: http://myteam.atlassian.com/browse/{Custom2}.The service will use the pattern to generate proper links to each synchronized JIRA item.
ClickTest Connection to verify the credentials.
Configuring JIRA Connection SettingsOn the JIRA tab of theSynchronization Profile Properties dialog, specify the JIRA database that you want to synchronizewith QAComplete:

ALMComplete | QAComplete User'sGuide
Page 16 of 29
2015 SmartBear Software, AllRightsReserved. Visit us at www.smartbear.com
1. InRest host, change [jira server host] to your JIRA server.
2. InUser name andPassword, enter the name and password for user account used to accessandupdate JIRA items.
3. In theProject drop-down list, select the JIRA project that you want to integrate with the QACom-plete project. The list contains all JIRA projects that the specifiied user hasaccess to.
4. In Item type, select the type of JIRA issues you want to synchronize with the specified QACompleteitems.
5. In Item data culture, leave the default locale of "en-US".
ClickTest Connection to verify the credentials.
Synchronizing Item Fields and ValuesOn the Field Mapping tab of theSynchronization Profile Properties dialog, you set up synchronization rules for eachindividual field. These rules define what the service copies from specific fields in one system to corresponding fields in theother.
Notes:
l Make sure you know of all required fields in both QAComplete itemsand in JIRA issues. Youneed tomap all required fields for a successful synchronization
l If you have synchronization rules set in QAC - JIRAConnector version prior to version 1.2, youmayget the "Some fields in Field Mapping are not supported by JIRA service" warning.
This happensbecause earlier versionsof the tool used JIRASOAP service to workwith JIRA.Starting from version 1.2, the tool uses the JIRAREST service. The format of issue fields theJIRAREST service usesmaydiffer from the format the JIRASOAP service uses. Asa result,

ALMComplete | QAComplete User'sGuide
Page 17 of 29
2015 SmartBear Software, AllRightsReserved. Visit us at www.smartbear.com
some fields in your field mappingmaybemissing. Please check your field mapping and fix themissing fields.
Synchronizing Fields
1. In the table, click in anALM/QAComplete Field cell to open a drop-down list of fields. Select thedesired field to synchronize with the corresponding data in JIRA. You can set synchronization rulesfor both the built-in and custom fields.
2. Click in the JIRA Field cell to open the drop-down list of JIRA fields for the selected item type.Select the field that corresponds to the QAComplete field.
Note: If you change the JIRA item type, the JIRAField columnwill be cleared and you need toreconfigure the field mapping.
3. In the Field Type column, choose the type of the QAComplete field.
l For lookup fields (fields that take valuesdefined in a choice list), choosethe Lookup field type. (See below.)
l For fields that store information on a user, for example,AssigneeUserId,choose theUser field type.Note: In order for the service to copy information on users properly, firstsynchronize the account information. See "Synchronizing Users" onpage 21
l For fields, that store information on the item status, priority and res-olution, choose theStatus Lookup,Priority Lookup or ResolutionLookup types. (See below.)
ALMComplete | QAComplete User'sGuide
Page 18 of 29
2015 SmartBear Software, AllRightsReserved. Visit us at www.smartbear.com
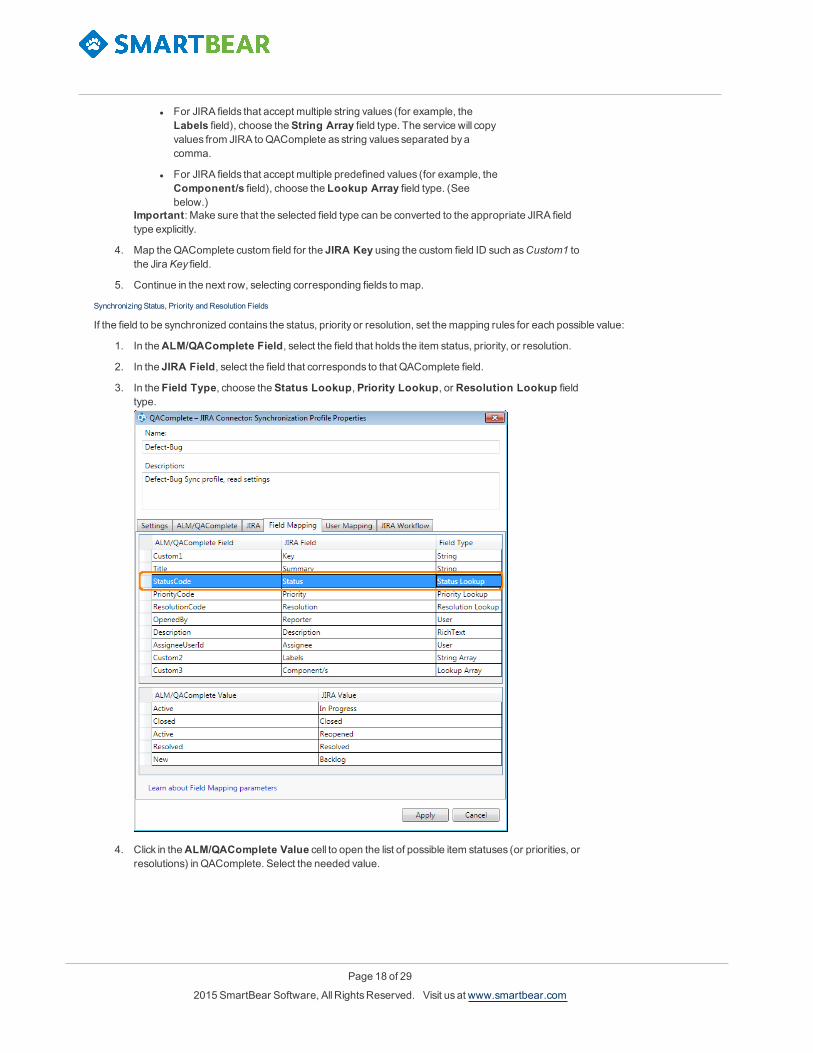
l For JIRA fields that accept multiple string values (for example, theLabels field), choose theString Array field type. The service will copyvalues from JIRA to QAComplete as string values separated byacomma.
l For JIRA fields that accept multiple predefined values (for example, theComponent/s field), choose the Lookup Array field type. (Seebelow.)
Important: Make sure that the selected field type can be converted to the appropriate JIRA fieldtype explicitly.
4. Map theQAComplete custom field for the JIRA Key using the custom field ID such asCustom1 tothe JiraKey field.
5. Continue in the next row, selecting corresponding fields tomap.
Synchronizing Status, Priority and Resolution Fields
If the field to be synchronized contains the status, priority or resolution, set themapping rules for each possible value:
1. In theALM/QAComplete Field, select the field that holds the item status, priority, or resolution.
2. In the JIRA Field, select the field that corresponds to that QAComplete field.
3. In the Field Type, choose theStatus Lookup,Priority Lookup, or Resolution Lookup fieldtype.
4. Click in theALM/QAComplete Value cell to open the list of possible item statuses (or priorities, orresolutions) in QAComplete. Select the needed value.
ALMComplete | QAComplete User'sGuide
Page 19 of 29
2015 SmartBear Software, AllRightsReserved. Visit us at www.smartbear.com
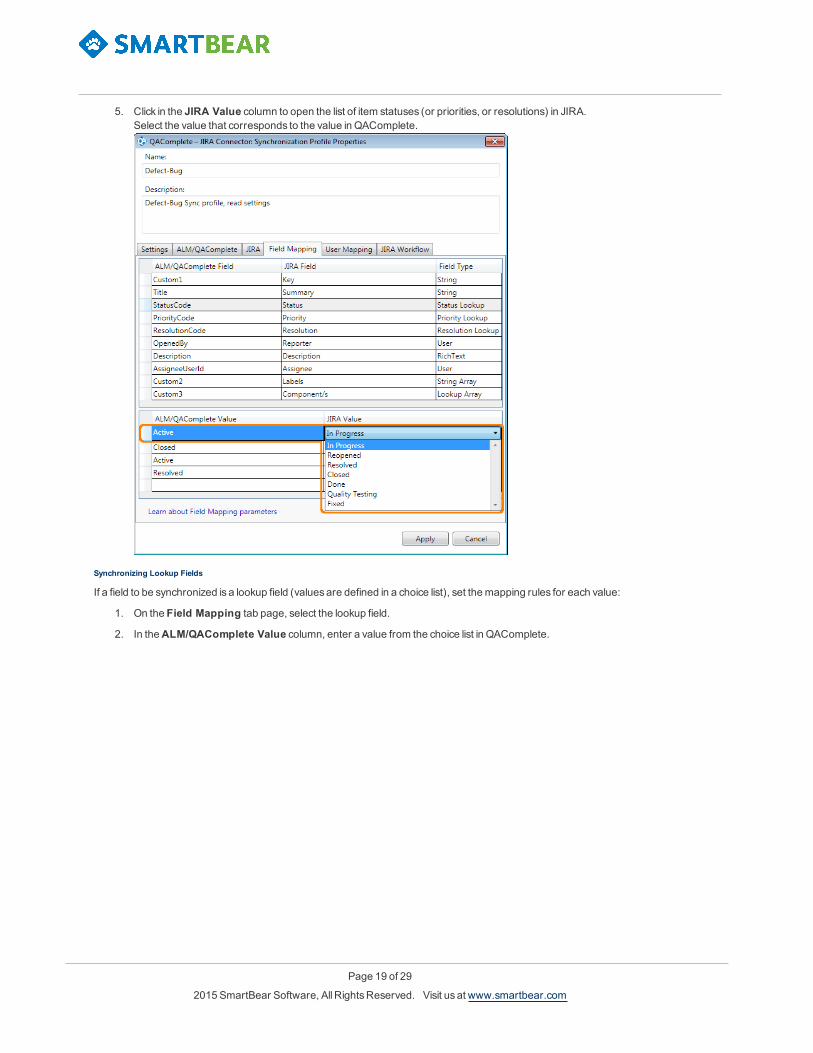
5. Click in the JIRA Value column to open the list of item statuses (or priorities, or resolutions) in JIRA.Select the value that corresponds to the value in QAComplete.
Synchronizing Lookup Fields
If a field to be synchronized is a lookup field (valuesare defined in a choice list), set themapping rules for each value:
1. On the Field Mapping tab page, select the lookup field.
2. In theALM/QAComplete Value column, enter a value from the choice list in QAComplete.

ALMComplete | QAComplete User'sGuide
Page 20 of 29
2015 SmartBear Software, AllRightsReserved. Visit us at www.smartbear.com
3. In the JIRA Value column, for each value, set the corresponding value used in JIRA.
Synchronizing Lookup Array Fields
If a field to be synchronized is amulti select field in JIRA (acceptsmultiple predefined values), set themapping rules for eachvalue:
1. On the Field Mapping tab page, select the lookup array field.
2. Click in the JIRA Value cell to open the drop-down list of available values. Select the needed value.
ALMComplete | QAComplete User'sGuide
Page 21 of 29
2015 SmartBear Software, AllRightsReserved. Visit us at www.smartbear.com
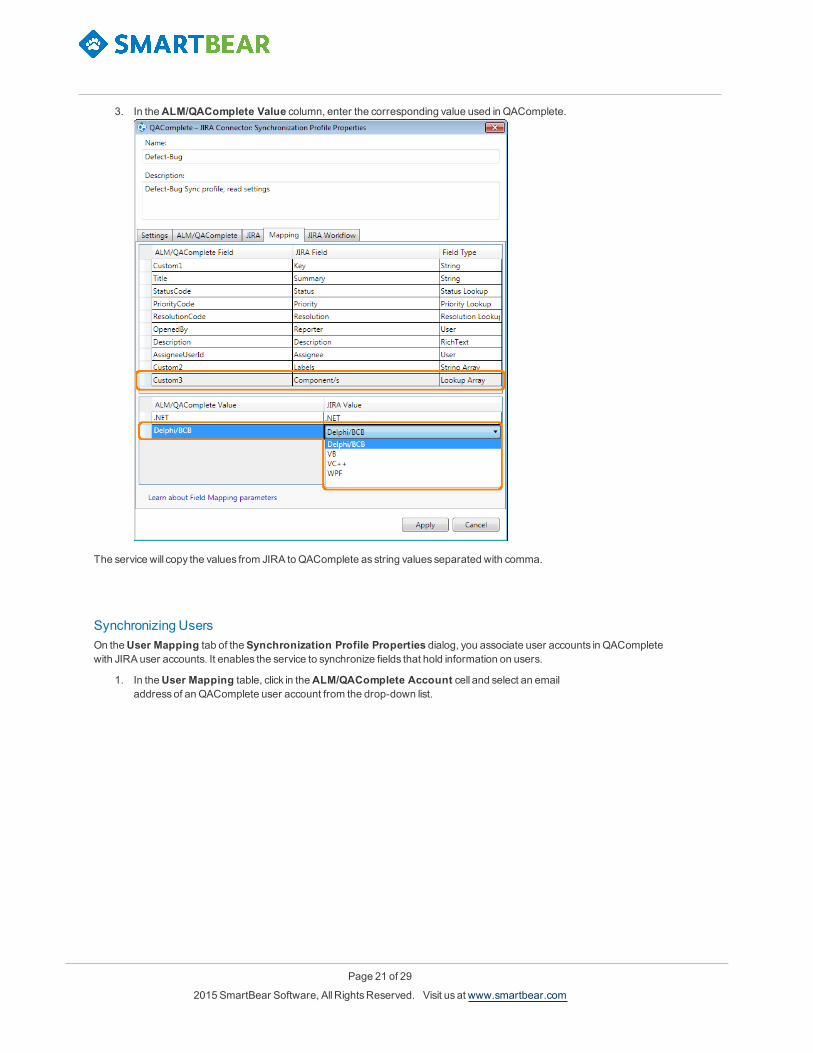
3. In theALM/QAComplete Value column, enter the corresponding value used in QAComplete.
The service will copy the values from JIRA to QAComplete as string values separated with comma.
Synchronizing UsersOn theUser Mapping tab of theSynchronization Profile Properties dialog, you associate user accounts in QACompletewith JIRA user accounts. It enables the service to synchronize fields that hold information on users.
1. In theUser Mapping table, click in theALM/QAComplete Account cell and select an emailaddressof anQAComplete user account from the drop-down list.

ALMComplete | QAComplete User'sGuide
Page 22 of 29
2015 SmartBear Software, AllRightsReserved. Visit us at www.smartbear.com
2. Click in the JIRA Account cell and select the JIRA user that you want to associate with the QACom-plete user. The list contains the users that have access to the specified JIRA project.
After you link the user accounts, synchronize the fields that holdsuser information:
1. Open the Field Mapping page.
2. In theALM/QAComplete Field column, select the field that holds the information on theQACom-plete user.
3. In the JIRA Field column, select the field that holds the information on the JIRA user.

ALMComplete | QAComplete User'sGuide
Page 23 of 29
2015 SmartBear Software, AllRightsReserved. Visit us at www.smartbear.com
4. In the Field Type column, choose theUser field type.
SynchronizingWorkflowsAworkflow defineswhat stagesan item passesduring its lifecycle in the system. You can synchronize your QACompleteworkflow with JIRAworkflow so that when an item transfers to a new state in one system, it automatically transfers to theappropriate state in another system.
To synchronize workflow, first youmust export the workflow from JIRA. See Exporting JIRAWorkflow.
The JIRA Workflow tab of theSynchronization Profile Properties dialog displays the imported JIRA workflow.

ALMComplete | QAComplete User'sGuide
Page 24 of 29
2015 SmartBear Software, AllRightsReserved. Visit us at www.smartbear.com
Important: To view the JIRAworkflow, upload the workflow data first. ClickLoad JIRA Workflowand browse for theexported XML file storing the JIRA workflow. You can also load the workflow data in theAdd Synchronization Profile dialogwhen you create a new profile.
To synchronize your QAComplete workflow with your JIRAworkflow, synchronize the statuses the item can have:
1. Open the Field Mapping page. The page defines synchronization rules for the fields.
2. In theALM/QAComplete Field column, select the field that holds the item status in QAComplete.
3. In the JIRA Field column, for that field, set the field that holds the item status in JIRA.

ALMComplete | QAComplete User'sGuide
Page 25 of 29
2015 SmartBear Software, AllRightsReserved. Visit us at www.smartbear.com
4. In the Field Type column, choose theStatus Lookup field type.
5. Click in theALM/QAComplete Value cell to open the list of item statuses in QAComplete. Select astatus.
ALMComplete | QAComplete User'sGuide
Page 26 of 29
2015 SmartBear Software, AllRightsReserved. Visit us at www.smartbear.com
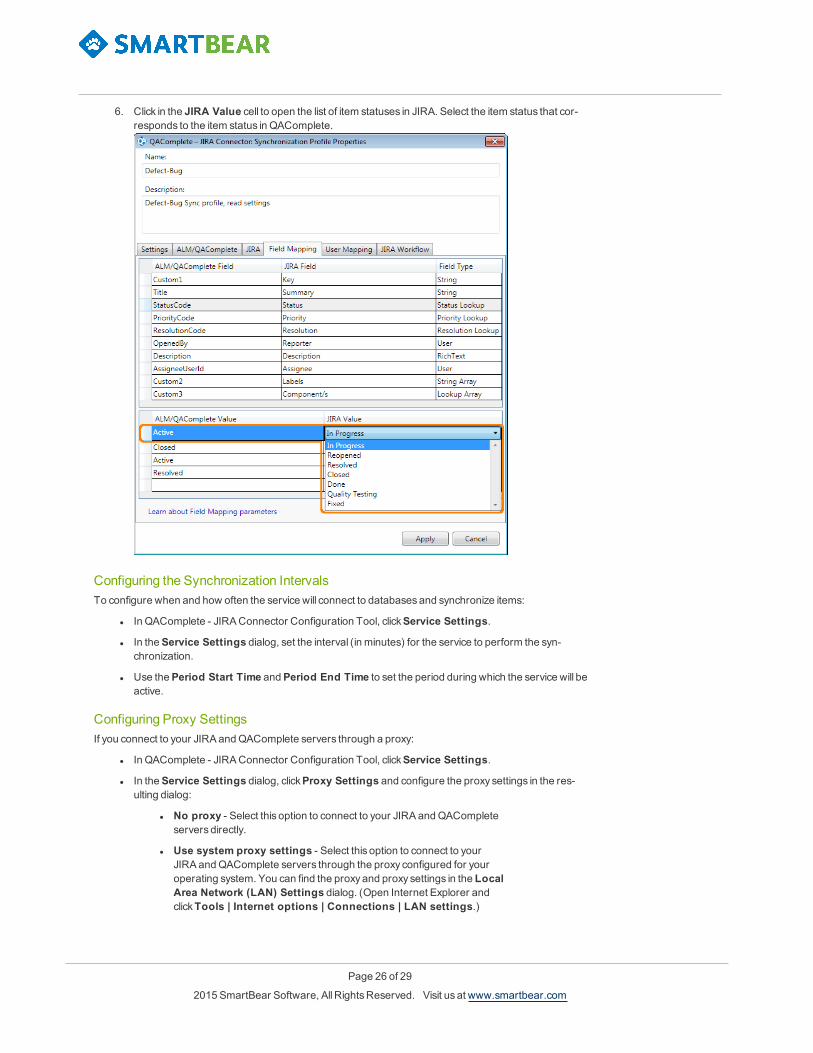
6. Click in the JIRA Value cell to open the list of item statuses in JIRA. Select the item status that cor-responds to the item status in QAComplete.
Configuring the Synchronization IntervalsTo configure when and how often the service will connect to databasesand synchronize items:
l In QAComplete - JIRAConnector Configuration Tool, clickService Settings.
l In theService Settings dialog, set the interval (in minutes) for the service to perform the syn-chronization.
l Use thePeriod Start Time andPeriod End Time to set the period during which the service will beactive.
Configuring Proxy SettingsIf you connect to your JIRA andQAComplete servers through a proxy:
l In QAComplete - JIRAConnector Configuration Tool, clickService Settings.
l In theService Settings dialog, clickProxy Settings and configure the proxy settings in the res-ulting dialog:
l No proxy - Select this option to connect to your JIRA andQACompleteservers directly.
l Use system proxy settings - Select this option to connect to yourJIRA andQAComplete servers through the proxy configured for youroperating system. You can find the proxyand proxy settings in the LocalArea Network (LAN) Settings dialog. (Open Internet Explorer andclickTools | Internet options | Connections | LAN settings.)

ALMComplete | QAComplete User'sGuide
Page 27 of 29
2015 SmartBear Software, AllRightsReserved. Visit us at www.smartbear.com
l Custom proxy - Select this option to set the proxy server that you wantto usemanually:
InProxy address, specify the network name or IP addressand(optionally) the port of the proxy server you use to connect to yourJIRA andQAComplete servers. For example,192.168.100.50:8888.
If your proxy server requiresauthentication, enter the user nameand the password to connect to the proxy server.
l ClickOK to save the changesand close the dialog.
Viewing Synchronization LogsTo view synchronization logs, go to theSynchronization Log tab from themain window of theQAComplete - JIRAConnector Configuration Tool.
The page lists all synchronization events that occurred for profile selected in theSynchronization Profiles list. Check thestatus column to see whether the synchronization event passed or failed.
ALMComplete | QAComplete User'sGuide
Page 28 of 29
2015 SmartBear Software, AllRightsReserved. Visit us at www.smartbear.com
To update the log, clickRefresh log data.
To view synchronization actionsperformed during a specific time period, set the Fromand To dates. To remove the filter, clickClear filter.
To view information only for themost recent synchronization action, selectView last synchronization only.
To export the log to review and save it outside of the QAComplete - JIRAConnector Configuration Tool:
l ClickExport Log.
l Specify the path and file name for the exported log.
l The service will export the log data to a .log file in the specified folder.
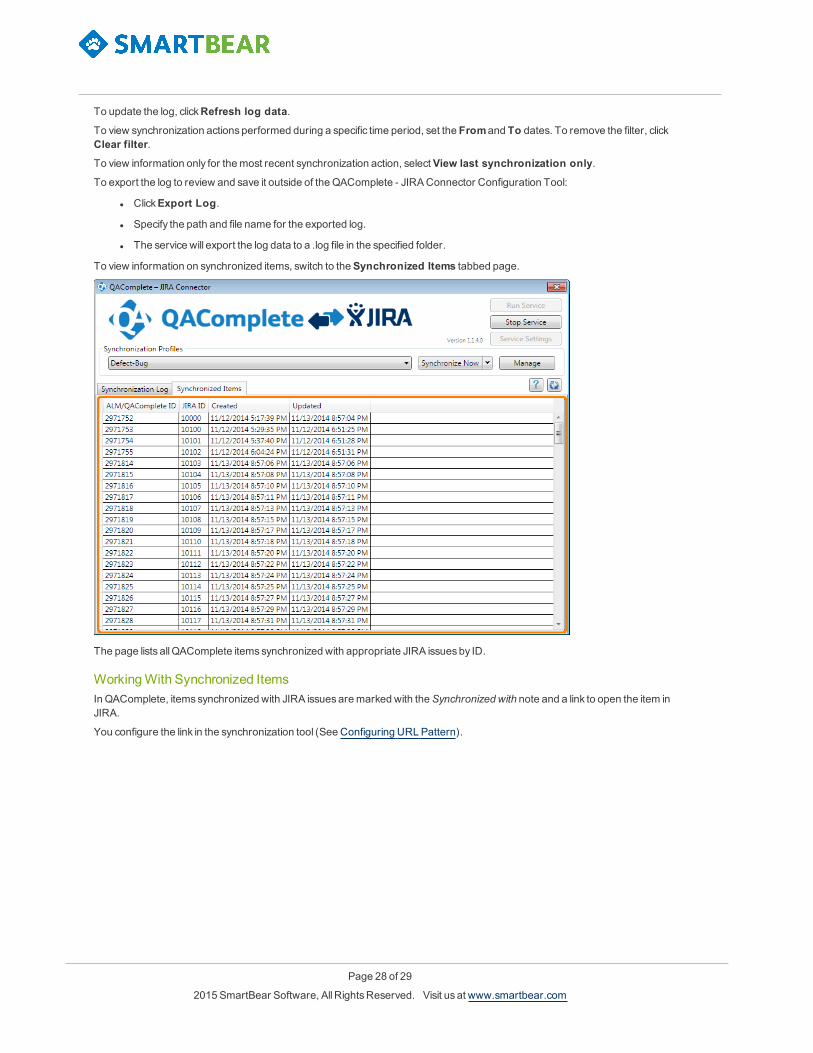
To view information on synchronized items, switch to theSynchronized Items tabbed page.
The page lists allQAComplete itemssynchronized with appropriate JIRA issuesby ID.
WorkingWith Synchronized ItemsIn QAComplete, itemssynchronized with JIRA issuesaremarked with theSynchronized with note and a link to open the item inJIRA.
You configure the link in the synchronization tool (See Configuring URL Pattern).

ALMComplete | QAComplete User'sGuide
Page 29 of 29
2015 SmartBear Software, AllRightsReserved. Visit us at www.smartbear.com
Important: The link is available only if the initial synchronization between JIRA andQAComplete wascompleted successfully.(Examine the log to review the synchronization status.)
Click the link to open the item directly in JIRA.