purdue master gardener vegetable encyclopediapurdue master gardener vegetable encyclopedia this...
TRANSCRIPT

Purdue Master Gardener Vegetable Encyclopedia 2/2011 Page 1 of 94
Purdue Master Gardener Vegetable Encyclopedia This encyclopedia provides basic information on all commonly grown vegetables. It was designed to help Purdue Master Gardeners answer question on vegetables and vegetable gardening.
- Use it as an encyclopedia, looking up information on specific vegetables rather than reading it through as a book.
- Don’t print this document out without looking it over first – it’s 94 pages! You can print out just the pages you need later, should you want a paper copy of the information. Each section introduction and individual vegetable has its own page, so printing just what you want is easy. If you want to print out the whole encyclopedia in the most concise form, see the Extension Educator at your Purdue Extension county office for a printable copy.
- Use the Bookmarks to the left side of this document to find specific topics. Page numbers are also given in the Table of Contents on page 2.
- Read Basics of Vegetable Gardening (page 3), which provides basic, general information on garden layout, fertilization, planting, and care, before you look up specific vegetables.
- Use the links to find more information. Links to websites are indicated by a solid line. If the link is broken, just use your web browser to search for the name of the site. Links to information within the encyclopedia are indicated by a dashed line. Just click and go.
About the Encyclopedia Listings
Descriptions of commonly grown vegetables contain several parts: - Snapshot. Look here for quick, basic information, a summary of the other sections. - Planting. Find detailed information on how and when to plant. - Care Notes. Includes basics of growing and fertilizing. - Harvesting. Detailed information on how and when to harvest. - Additional information. Includes interesting facts and information on varieties. - Common Problems. Cultural, disease, and insect problems you may see in your garden. - References. If publication is from a state with soil and weather very different from Indiana,
all information may not be applicable. Make sure you also check the websites listed below. Less commonly grown vegetables are covered briefly. You will still find the basics – type and size of plant, when and how to plant, when and how to harvest, and issues that might arise.
Additional Information There are many books that give details of growing vegetables, and there is lots of information on the World Wide Web. Purdue University, Cornell University, University of Illinois, and University of Kentucky all offer detailed information on their websites. Purdue Garden Publications: www.hort.purdue.edu/ext/garden_pubs.html#vegetables Cornell Vegetable Growing Guides: www.gardening.cornell.edu/homegardening/scene0391.html Illinois Watch Your Garden Grow: http://urbanext.illinois.edu/veggies/ (equivalent information is given in the book Vegetable Gardening in the Midwest, C.E. Voigt and J.S. Vandemark, University of Illinois, 1995) Kentucky Home Vegetable Gardening: www.ca.uky.edu/agc/pubs/id/id128/id128.pdf For variety recommendations, see the Illinois website listed above. Similar information is given in the book Guide to Indiana Vegetable Gardening, James A. Fizzell, Cool Spring Press, 2007. You can find ratings of varieties by fellow gardeners on the Cornell Vegetable Varieties for Gardeners website: http://vegvariety.cce.cornell.edu/.
Purdue Master Gardener Vegetable Encyclopedia 2/2011 Page 2 of 94
Contributors The information in this Encyclopedia was compiled from Cooperative Extension Service publications by Mary Welch-Keesey, Consumer Horticulture Specialist with the Department of Horticulture and Landscape Architecture, Purdue University. Additional references consulted include Smart Gardener’s Guide to Growing Vegetables by Bob Gough, Square Foot Gardening by Mel Bartholomew, and Rodale’s Successful Organic Gardening – Vegetables by Patricia Michalak and Cass Peterson. The Encyclopedia was reviewed by Agriculture and Natural Resources Extension Educators from Purdue University. A special thanks to Amanda Bailey, Amy Thompson, Larry Caplan, Bill Horan, Roy Ballard, Dave Addison, Curt Campbell, Jim Luzar, Steve Mayer, and Scott Monroe.
Table of Contents
Vegetable Type Page Vegetable Type Page Perennial vegetables 5 Sweet Corn 59 Beans and Peas 12 Okra 63 Root crops 21 Leaf Crops 64 Cole crops 31 Onions and related plants 76 Tomatoes, Peppers, and related plants
44 Cucurbits-cucumber, squash, melons
84
Potatoes and Sweet Potatoes 53
Individual Vegetables
Page Page Page Arugula 69 Corn (sweet, pop) 59 Parsnips 29 Asparagus 6 Cucumber 88 Peas 19 Beans, green snap 13 Eggplant 50 Peppers 48 Beans, Lima 15 Endive/Escarole 70 Potato 54 Beans, specialty 17 Garlic 81 Potato, sweet 57 Beets 22 Gourds 93 Pumpkin 90 Broccoli 32 Horseradish 11 Radishes 26 Broccoli raab 34 Jerusalem artichoke 10 Radishes, Chinese 28 Broccoli, Asian 39 Kale 42 Rhubarb 8 Brussels sprouts 35 Kohlrabi 43 Rutabaga 30 Cabbage 37 Leeks 82 Shallots 83 Cabbage, Chinese 39 Lettuce 65 Spinach 67 Carrot 24 Muskmelons/
other melons 91 Spinach, Malabar,
New Zealand 68
Cauliflower 40 Mustard 72 Squash, summer 89 Celery and celeriac 73 Okra 63 Squash, winter 89 Chard, Swiss 71 Onion 77 Sweet potatoes 57 Chayote 94 Onion, Egyptian 83 Swiss chard 71 Chiles 48 Onion, green 79 Tomatillo 52 Chives and garlic chives
80 Onion, pearl and boiler
79 Tomatoes 45
Cilantro/Coriander 75 Onion, potato/multiplier
83 Turnip 30
Collards 42 Parsley 74 Watermelon 92

Purdue Master Gardener Vegetable Encyclopedia 2/2011 Page 3 of 94
Basics of Vegetable Gardening • Most vegetables require full sun to grow well. A few crops (beets, carrots, kale, lettuce, onions,
radish, spinach, Swiss chard, and turnips) will produce well in part sun.
• Vegetables grow well when soil pH is 6.0-6.8, but some vegetables tolerate a higher pH.
• Most vegetables grow best in soil that has been loosened and amended with organic matter.
• Base yearly fertilization on the results of a soil test. The information in the soil test results will let you make intelligent decisions about fertilizing your garden, save money by avoiding fertilizer applications that are not needed, and help you reduce environmental pollution by avoiding excess fertilizer that runs off and pollutes streams and lakes. Use a fertilizer low in phosphorus unless the soil test indicates phosphorus levels are low and recommends addition of phosphorus.
• In the absence of soil test results, base yearly fertilization on past experience. -‐ If the vegetable garden has produced well in the past or was used to grow other plants that
were fertilized regularly, apply 0.1-0.15 lb actual N per 100 square feet. Select a fertilizer low in phosphorus.
-‐ If the area has never been used as a garden and there is no reason to believe fertility is high, apply a fertilizer that contains nitrogen, phosphorus, and potassium, applying 0.1-0.15 lb actual N per 100 square feet. Some references recommend using fertilizers with an N-P-K ratio of about 1-4-4 for this initial fertilization. For example, if you are using a fertilizer with an analysis of 5-20-20, you would apply 2-3 lb of fertilizer per 100 square feet.
• Fertilizer used in the vegetable garden can be organic or processed fertilizers. Please note: be very cautious about using manure in the vegetable garden. Manure can contain disease organisms (pathogens) that will make you sick. Avoid using fresh manure where you grow root or low-growing food plants such as lettuce. Incorporate all fresh manure into the soil at least four months before harvesting the vegetables. Thoroughly cooking foods will kill the pathogens that adhere to leaves and roots.
• You can plant vegetables in long slender rows, in squares, or in any other shape that makes sense in your garden. Tall plants should be on the north side of the garden so they don’t shade their shorter neighbors. The correct spacing will give your vegetables room to grow. Spacing is given for long slender row planting and also for “wide row” spacing. Use “wide row” spacing if you are planting in a square or other unusual shape or in several closely spaced rows. Follow the recommendations for your variety if they differ from those given here.
• Vegetables can be started by sowing seeds in the garden, by starting seeds indoors for later transplanting outdoors, or by planting purchased transplants. If you are planting seeds directly into the garden, sow more seeds than the number of plants you need, then thin based on the spacing recommended for the specific vegetable.
• Planting times are recommended for each vegetable. Weather is different each year, so use common sense when planting, paying attention to the individual plant’s sensitivity to frost, need for warm or cool weather, and long or short growing season. If you are planting seeds directly into the garden, soil temperature should guide your planting. Use a soil thermometer or find soil temperature information on the website of the Indiana State Climate Office (http://iclimate.org/).
• Planting times are given in relation to average last and first frost dates (50% chance that the last or first frost has already occurred). Purdue Master Gardeners can find the average dates for their area in Chapter 1 of the Purdue Master Gardener Manual. Average dates for all 50 states can be found on the U.S. Climate Normals site of the National Climatic Data Center http://cdo.ncdc.noaa.gov/cgi-bin/climatenormals/climatenormals.pl or find it by using your web browser to search for: CLIM20-01 freeze/frost data.

Purdue Master Gardener Vegetable Encyclopedia 2/2011 Page 4 of 94
• Though a range of planting dates is given for each vegetable, most vegetables are planted only once during that period. The exceptions are the vegetables that have a very short harvest period for each planting. For example, each radish seed produces one radish and all seeds planted at one time are harvested over a short period (7-10 days). To ensure a long, continuous harvest, small plantings are made several times during the recommended planting time (rather than a large planting at only one time). The encyclopedia will tell you if you should make several small plantings of the vegetable.
• Vegetables do best when growth is consistent through the season, not slowing and speeding up due to environmental conditions. You can’t control the weather, but you can help provide consistent conditions by irrigating when rainfall is lacking. Most vegetables need 1-1.5” of water a week.
• Side-dress with nitrogen when needed as listed in the encyclopedia or if plant appearance suggests a nitrogen deficiency (plant stunted, older leaves yellowing, and newest leaves small). Side-dressing recommendations are traditionally given in pounds of ammonium nitrate per 100 ft row. Ammonium nitrate (33-0-0) is now difficult to find in garden centers. Because of this, side-dressing recommendations are given in pounds of actual nitrogen (N) per 100 square feet (sq ft). This allows you to determine the amount of fertilizer needed, no matter the analysis. Select a fertilizer that contains mostly nitrogen and little phosphorus or potassium.
• Mulch will help keep soil moisture and temperature consistent and help control weeds.
• Estimated days to harvest or maturity is given for each vegetable. This can vary greatly depending on variety. The weather can have a great impact as well. Use information specific to your variety if it is available.
• Weeding is an important part of vegetable gardening. Most vegetables are shallow rooted. Cultivate carefully when weeding so you don’t injure the roots. Weeding on a regular schedule will let you remove the weeds when they are small and easy to pull.
• Diseases and insect pests can reduce your yield and the quality of your vegetables. Check your plants on a regular basis. It is easier to control a problem if you catch it early. Brief information on pests is given for each vegetable. Simple cultural techniques, such as crop rotation, spacing to allow air circulation, and removing plant debris at the end of the season can go a long way toward preventing these pests next year. Related plants are listed for each vegetable to help with planning your crop rotation.
• If you are a Purdue Master Gardener, more information on growing vegetables can be found in Chapter 13 of the Purdue Master Gardener Manual. Plant problems and pests are discussed in detail in Chapters 15-25. The Entomology Department at Purdue has an excellent publication on insects. See “Managing Insects in the Home Vegetable Garden”, Purdue Extension publication E-21-W, http://extension.entm.purdue.edu/publications/E-21.pdf.
Purdue Master Gardener Vegetable Encyclopedia 2/2011 Page 5 of 94
Perennial Vegetables - Introduction Only a few vegetables are grown as perennials. Some, like asparagus and rhubarb, are harvested each spring but allowed to stay in the ground all year. Others, like Jerusalem artichoke and horseradish, are completely harvested at the end of the season, but a root or stem piece is saved to plant the next summer. This last group can be moved to different spots in the garden each year, but asparagus and rhubarb stay in the same place for years. You need to dedicate garden space for asparagus and rhubarb. Make sure you place them so they do not shade your other vegetables. Links to specific vegetables Asparagus
Rhubarb
Jerusalem artichoke
Horseradish

Purdue Master Gardener Vegetable Encyclopedia 2/2011 Page 6 of 94
Perennial Vegetables Asparagus (Asparagus officinalis) Family: Liliaceae Related vegetables: Onions and related plants Snapshot • Herbaceous perennial. New shoots are harvested each year in spring, usually beginning in April,
perhaps a bit earlier in southern Indiana. Plant in full sun. • Tall, can reach a height of 6 ft. • Dormant plants called crowns are planted in spring. There is a light harvest the following year
and a full harvest, lasting 6-8 weeks, beginning the third or fourth year and thereafter. Estimated yield for a 10 ft row is 3-4 lb.
Planting • Purchase crowns and plant in spring after the soil has warmed to about 50 °F, beginning in April
and continuing through late May. • Loosen soil and correct any nitrogen, phosphorous, or potassium deficiencies, as indicated by a
soil test. Dig a trench no more than 5-6” deep and at least 12” across. Place a high-phosphorus fertilizer (about 0.5 lb actual P/50 ft row) in the bottom of the trench to encourage root growth.
• Place crowns on the bottom of the trench. Crowns should be at least 18” apart in all directions. A distance of 5 ft between rows is often recommended. Asparagus grows quickly and will fill in. Wide spacing improves airflow and reduces diseases.
• Fill the trench loosely with soil. Older references recommend adding soil gradually, 2 inches at a time, as the plant grows until the trench is filled but this is not necessary. You should see leaves in a week after planting. Irrigate as needed the year of planting.
• Do not harvest the first year. This allows the root system to become established. Care notes • Asparagus is usually drought tolerant once established. • Asparagus tolerates a higher pH than many vegetables (up to 8.0) but does not grow well if pH is
below 6.0. • Fertilize with 0.1 lb actual N/100 sq ft each year when harvest is finished. • Asparagus leaves may be called ferns or fronds. They should be left standing all summer and into
fall as long as they are green. If there were no pest problems, the brown leaves can be left on all winter. They help moderate soil temperature and will collect snow, providing additional moisture for the plant. Cut off old leaves in early spring before new shoots appear.
• Control weeds by hand weeding, using pre-emergent herbicides, or careful use of non-selective herbicides like glyphosate after harvest but before new shoots have emerged.
Harvest • The new shoots of the asparagus plants (the spears) are harvested as they emerge in spring. Do
not harvest them the year of planting. Harvest lightly for no more than 3-4 weeks the second year and 4-6 weeks the third year. Thereafter, a full harvest of 6-8 weeks is possible.
• Make sure to harvest the first spears to emerge and then harvest regularly. This will encourage the production of more spears and increase the harvest. Stop harvesting if all spears become small (less than 3/8-inch). When harvest is finished, snap all spears off at ground level. Shoots that emerge after harvest will become the summer leaves of the plant.
Purdue Master Gardener Vegetable Encyclopedia 2/2011 Page 7 of 94
• Harvest when spears are 5-8” long and tips of the spears are tight. Snap a spear by bending the top toward the ground. Cut a spear by running a knife underground just below the soil surface where the spear is emerging. Either method is acceptable but cutting may damage spears that have not emerged aboveground.
Additional Information Asparagus plants are dioecious (some plants are male, some female). Female plants produce flowers and berries in late summer. Older varieties are 50:50 male:female. Newer varieties produce only male plants and are often more vigorous and productive. They also do not produce seedlings that can become a weed problem. Common problems • Perennial weeds. Good soil preparation before planting and yearly cultivation before spears
emerge and after harvest can help control weeds. • Feeding by asparagus beetles can damage spears, making them inedible, and, later in the season,
feeding on leaves can reduce plant growth. Hand picking of adults and larvae can be effective if infestation is small. Clean up old foliage at the end of the season to reduce problems the next year. Some insecticides are available.
• Asparagus rust can stunt or kill young shoots and cause early defoliation. Some varieties are resistant. Cultural controls include cleaning up old foliage before new spears emerge in spring and wide spacing to improve airflow and help leaves dry more quickly.
References Growing Asparagus in the Home Garden, Purdue University http://www.hort.purdue.edu/hort/ext/Pubs/HO/HO_096.PDF
Purdue Master Gardener Vegetable Encyclopedia 2/2011 Page 8 of 94
Perennial Vegetables Rhubarb (may be listed as Rheum rhaponticum, Rheum x hybridum, Rheum rhabarbarum, or Rheum x cultorum) Family: Polygonaceae Related vegetables: none Snapshot • Herbaceous perennial. Leaf stalks are harvested each year in spring. Rhubarb grows from large,
fleshy rhizomes. Plant in full sun • NOTE: only petioles of leaves are edible. Leaf blades contain oxalic acid and are poisonous. They
should be safely discarded when the leaves are harvested. • Medium to tall, can reach a height of 2-4 ft. • Plant dormant plants (called crowns) any time in early spring when the ground can be worked,
starting 3-6 weeks before the average last frost date and continuing into April. • Begin harvest the third season after planting for about 4 weeks. Harvest for 8-10 weeks in later
years. Leaves should reach 10-15” before they are picked. Estimated yield for a 10 ft row is 12 lb, about 4 lb per plant.
Planting • Rhubarb needs good drainage to prevent crown rot. If your soil does not have good drainage,
grow rhubarb in a raised bed. • Rhubarb does not come true from seed and is slow to establish, so crowns (rhizome with buds)
are planted. Plant as early as 3-6 weeks before the average last frost date, as late as April. • Before planting apply fertilizer as recommended by a soil test. If available, cover area with 2-3
inches of thoroughly composted manure and work into the soil. • Crowns may be purchased or you may divide established plants. Crowns for transplanting should
have at least 2 large buds. Plant the crowns 3 ft apart, minimum row spacing is 5 ft. Each plant needs 12-15 sq ft. Place crowns so buds are only 2” below the surface.
Care notes • After harvest, side-dress with 0.1 lb actual N/100 sq ft. Water if rainfall is lacking. Keep the area
around the plants free of weeds. • Rhubarb will benefit from an application of a light layer of manure or compost as a winter mulch.
Do not cover the crowns. • Divide every 8-10 years in spring before new growth begins. If the plant has been fertilized
regularly and growing well, the production of inferior, slender stems at the beginning of the season may indicate the plant needs to be divided. Leave a crown with 3-4 buds in place and divide and transplant the rest of the plant. Late fall divisions are possible but make sure to apply a winter mulch.
Harvest • Do not harvest the year of planting or the following year. A short harvest of 4 weeks is possible
the third year. Once the plant is well-established, harvest can last for 8-10 weeks. Leaves that emerge after the harvest will become the summer leaves of the plant and replenish the root and crown of the plant.
• Harvest when stalks are 10-15” long (usually beginning in late April or May). Grasp the stalk near its base and pull slightly to one side. It should separate easily. Do not cut the stalk because it is
Purdue Master Gardener Vegetable Encyclopedia 2/2011 Page 9 of 94
easy to damage developing buds. Do not remove more than 2/3 of the developing stalks on a single plant at any one time. Stop harvesting if all leaf stalks decrease in size and thickness.
Additional information • Depending on cultivar, rhubarb stalks may be green, red, or green speckled with pink. Color is
usually stronger in cool weather, then fades as temperatures increase. Common problems • Slugs and crown rot can be a problem in moist areas. • Leaf spot diseases may occur but usually do not reduce yield. • Stalk borer and rhubarb curculio are two insect pests that may reside in grass and weeds.
Controlling weeds around rhubarb (especially curly dock, which is in the same plant family) is a good way to control these pests.
• Infertile soil, extreme heat or cold, drought, or long days may cause rhubarb to flower (bolt), producing a tall flower stalk. Old plants tend to bolt more than young ones. Cut off the flower stalk as soon as it starts to form.
References Rhubarb, Purdue University http://www.hort.purdue.edu/hort/ext/Pubs/HO/HO_097.pdf
Purdue Master Gardener Vegetable Encyclopedia 2/2011 Page 10 of 94
Perennial Vegetables Jerusalem artichoke (Helianthus tuberosus) Jerusalem artichoke, sometimes called sunchoke, is closely related to sunflowers and can grow to similar heights, 6-8 ft. This North American native is an herbaceous perennial grown for its underground tubers and harvested as an annual. Any parts left in the ground regrow the next spring. It can quickly become a weed.
Purchase tubers at garden centers or even in the grocery store. Plant Jerusalem artichokes about 6 weeks before the average last frost date. Plant 2-3” deep, 2-3 ft apart in rows at least 3 ft apart. Later planting will reduce yield.
Soils with good fertility are preferred. Control weeds when the plants are small but once established this vegetable needs little care.
Harvest after one or two light frosts cause the plants begin to die back. Cut off the stalks, then dig the tubers. Be as thorough as possible to keep this plant from becoming a weed problem. Save a few tubers to start next year’s crop. Estimated yield for a 10 ft row is 7 lb. References Artichokes in and out of the garden, University of Illinois http://web.extension.illinois.edu/champaign/homeowners/070301.html
Purdue Master Gardener Vegetable Encyclopedia 2/2011 Page 11 of 94
Perennial Vegetables Horseradish (Armoracia rusticana) Horseradish, a perennial member of the Brassicaceae or cabbage family, is grown for its root, which is used as a seasoning.
Because the whole root is harvested, horseradish is replanted early each spring, starting 6 weeks before the average last frost date and continuing through April, into early May in the northern part of the state. Place root pieces, usually about 12” long, about a foot apart at a 45 degree angle in the soil, deep enough so they will be covered by 2-3” of soil, in rows 30” apart. The plants will be 2 to 3 ft tall. Estimated yield for a 10 ft row is 4 lb.
Horseradish is easy to grow in fertile, loose soil. To get the largest roots possible, you can try “suckering” or “lifting”. Suckering is done by removing all but one or two shoots as they develop. Lifting is just lifting the plant by digging below the crown and lifting to break the side roots. Lift twice, early in the season and again mid-season. Both suckering and lifting create a large root that can be up to two lb in weight.
More than two-thirds of the nation’s crop is grown in two counties in southwest Illinois. There it is grown as an annual crop, which is what you should try to do too. Horseradish left to grow as a perennial can quickly become a weed problem. Instead, harvest all the roots each fall, in October or early November before the ground freezes. Connoisseurs believe harvesting annually and replanting also improves the flavor. Save pencil-size side roots for planting next year’s crop. Wrap in plastic and store refrigerated.
Wasabi (Wasabia japonica), another horseradish, is almost impossible to grow in the home garden. It is a perennial but hardy only to zone 8. Wasabi is an aquatic plant that grows in heavy shade and shallow, clear, cold running water. Air temperatures should be cool also, below 70 °F. It typically takes two years from planting to harvest. References Growing Horseradish in the Home Garden, University of Illinois http://web.extension.illinois.edu/champaign/homeowners/001106.html Horseradish, University of Minnesota http://www.extension.umn.edu/yardandgarden/ygbriefs/h209horseradish.html Illinois Horseradish, University of Illinois http://www.aces.uiuc.edu/vista/html_pubs/HRSRDSH/horse.html Wasabi is Quite Picky about its Growing Conditions, Real Wasabi http://www.realwasabi.com/Cultivation/index.asp Growing Wasabi in the Pacific Northwest, Pacific Northwest Extension Publication http://cru.cahe.wsu.edu/CEPublications/pnw0605/pnw0605.pdf
Purdue Master Gardener Vegetable Encyclopedia 2/2011 Page 12 of 94
Beans and Peas - Introduction Every cuisine has recipes that use beans. Together with peas, these vegetables are staples in a vegetarian diet because they are high in protein. Beans and peas can be used as a meat substitute but are delicious in their own right. Beans and peas, also called legumes, have root nodules. These nodules contain nitrogen-fixing bacteria (Rhizobium). Most soils contain the needed bacteria. Links to specific vegetables Beans, green snap and yellow wax
Beans, Lima
Beans, specialty (includes dry beans, shelly beans, black-eyed peas, garbanzo beans, yardlong beans, edible soybeans)
Peas (include sugar snap and snow peas)
Purdue Master Gardener Vegetable Encyclopedia 2/2011 Page 13 of 94
Beans and Peas Beans, green snap and yellow wax (Phaseolus vulgaris) Family: Fabaceae Related vegetables: all other beans, peas Snapshot • Warm-season annual grown for its immature fruit. • Green snap beans were previously called string beans because of stringy fibers that ran along the
front and back of the pod. Modern cultivars no longer have strings. Yellow wax beans are a color variant of green snap beans with a slightly waxier pod. Purple beans (which turn green when cooked) and flat-pod beans (Romano beans) are also available.
• Plant seeds directly in garden 1-2 weeks after average last frost date, soil at least 60 °F. • Bush type: short plants (18”); harvest period short, so plant repeatedly until mid-summer for
continual harvest (min. 50 days needed before first frost); space 2-3”, rows a minimum of 18” apart, spacing within a wide row is 4”x4”; first harvest 50-60 days after seeds planted. Estimated yield per 10 ft row is 6 lb.
• Pole type: tall plants, to height of support (6 ft+); longer harvest than bush types so only 1 or 2 plantings needed; space 4-6”, rows a minimum of 24” apart, both long linear and tepee-like supports can be used; first harvest 60-70 days after seeds planted. Estimated yield per 10 ft row is 3-4 lb.
Planting • Plant seeds directly in the soil after it has warmed to 60 °F usually 1-2 weeks after average last
frost date. If soil is too cold, germination is slow and seed is likely to rot. Seeds can be purchased pre-treated with fungicide to minimize this problem.
• Plant 1” deep in heavy soils, 1.5” deep in sandy soils. Mulching lightly with compost or sand will help seedlings emerge in heavier soils. If using vertical supports, set when seeds are planted.
• Most soils contain the necessary nitrogen-fixing Rhizobium bacteria to support bean growth. If you are concerned that your soil does not, you can purchase a bacterial inoculum. Coat the seeds with the inoculum before planting. The bacteria will become established in the soil, ready to infect the roots of the beans and peas in future years. It is not necessary to use inoculum after the first year.
Care Notes • Excess soil nitrogen will result in leaf production at the expense of bean production. Limit
nitrogen application at the beginning of the season (1 teaspoon of 5-10-5 per row foot). Side-dress only after heavy pod production or on sandy soils after heavy rains. Use 0.1 lb N/100 sq ft.
• Beans are shallow-rooted. Cultivate with care. • Do not cultivate or pick beans when the leaves or beans are wet. Bean bacterial blight is a serious
disease that is easily spread when the plants are wet. • Consistent soil moisture is important from flower bud formation to fruit set. Irrigate if rainfall is
lacking so plants receive about 1” of water a week. Harvesting • Immature pods with small seeds are eaten. Harvest while the pods are firm and crisp but before
the seeds within have developed significantly, before they begin to bulge (50-60 days after planting). Pods break easily with a snap when ready. If some pods develop past this stage, be
Purdue Master Gardener Vegetable Encyclopedia 2/2011 Page 14 of 94
sure to pick them even if they are discarded. If these pods are allowed to develop, flowering will decrease and future harvest will be reduced.
• Do not pick when pods or leaves are wet. To avoid breaking the stem, hold on to it as you pull the pods off.
• Bush types usually give one large harvest then a second smaller harvest about two weeks later. Remove plants from garden after second harvest. Pole beans provide many small harvests through most of the summer.
Common problems • Bean mosaic diseases – plant resistant varieties, there is no treatment once the plants are
infected. • Bacterial blight – use disease-free western-grown seed, do not work with plants when wet • Bean flea beetles, Mexican bean beetles, and bean leaf beetles feed on leaves and can cause
severe damage when plants are small. Bean leaf beetles will also feed on the pods, causing distortion and a potential entry point for fungal diseases. Control may be warranted.
References Growing Beans in the Home Vegetable Garden, Purdue University http://www.hort.purdue.edu/ext/HO-175.pdf Growing Snap Beans, University of Connecticut http://www.hort.uconn.edu/ipm/homegrnd/htms/47beans.htm Growing Garden Beans, Pennsylvania State University http://horticulture.psu.edu/files/hort/extension/garden_beans.pdf

Purdue Master Gardener Vegetable Encyclopedia 2/2011 Page 15 of 94
Beans and Peas Beans, Lima (Phaseolus lunatus) Family: Fabaceae Related vegetables: all other beans, peas Snapshot • Warm-season vegetable. Baby limas are annuals. Large limas are tender perennials grown as an
annual. Unlike snap beans, the mature, still tender lima bean, not the pod, is eaten. • Available as small baby limas, sometimes called butter beans, or as larger lima beans (Fordhook
is a common variety). • Plant seeds directly in the garden 2-3 weeks after average last frost date or when the soil has
warmed to 65 °F. Lima beans are more cold sensitive than snap beans. • Baby limas: short plants (18”); harvest period short, so plant repeatedly until mid-summer for
continual harvest (min. 65 days needed before first frost); space 3-4”, rows a minimum of 24” apart, spacing within a wide row is 4”x4”; first harvest 65-80 days after seeds planted. Estimated yield per 10 ft row is 1-2.5 lb shelled.
• Bush type large limas: short plants (18”); harvest period short, so plant repeatedly until mid-summer for continual harvest (min. 65 days needed before first frost); space 6”, rows a minimum of 24” apart, spacing within a wide row is 6”x6”; first harvest 65-80 days after seeds planted. Estimated yield per 10 ft row is 2-3 lb shelled.
• Pole type large limas: tall plants, to height of support (6 ft+); longer harvest than bush types; space 10-12”, rows a minimum of 36” apart, both long linear and tepee-like supports can be used; first harvest 75-85 days after seeds planted. Estimated yield per 10 ft row is 5 lb shelled.
Planting • Plant seeds directly into the soil after it has warmed to 65 °F for several days, usually 2-3 weeks
after average last frost date. If soil is too cold, germination is slow and seed is likely to rot. Seeds can be purchased pre-treated with fungicide to minimize this problem.
• Plant 0.5” deep in heavy soils, 1” deep in sandy soils. Mulching lightly with compost or sand will help seedlings emerge in heavier soils. Set vertical supports when seeds are planted. Lima beans are more sensitive to cold and wet soils than snap beans.
• Most soils contain the necessary nitrogen-fixing Rhizobium bacteria to support bean growth. If you are concerned that your soil does not, you can purchase a bacterial inoculum. Coat the seeds with the inoculum before planting. The bacteria will become established in the soil, ready to infect the roots of the beans and peas in future years. It is not necessary to use inoculum after the first year.
Care Notes • Excess soil nitrogen will result in leaf production at the expense of bean production. Limit
nitrogen application at the beginning of the season. (1 teaspoon of 5-10-5 per row foot). Side-dress only after heavy production of pods or on sandy soils after heavy rains. Use 0.1 lb N/100 sq ft.
• Beans are shallow-rooted. Cultivate with care. • Do not cultivate or pick beans when the leaves or beans are wet. Bean bacterial blight is a serious
disease that is easily spread when the plants are wet. • A cold, wet spell can cause lima bean flowers to drop, as can excessively hot and dry periods,
reducing yield. Baby limas are less susceptible to this problem.
Purdue Master Gardener Vegetable Encyclopedia 2/2011 Page 16 of 94
Harvesting • Harvest the pods, shell them, and eat the tender beans inside (about 65-75 days after planting).
Pods should be plump and firm. Taste test a few beans to make sure they are at the right stage of development. Beans that are past peak are mealy and tough-skinned. If some pods develop past this stage, be sure to pick them even if they are discarded. If allowed to develop, flowering will decrease and future harvest will be reduced.
• Do not pick when pods or leaves are wet. To avoid breaking the stem, hold on to it as you pull the pods off.
• Bush types are usually harvested in two or three pickings. Pole beans provide many small harvests, often continuing until frost. Make sure to remove beans as they reach peak.
Common problems See green snap beans References Growing Beans in the Home Vegetable Garden, Purdue University http://www.hort.purdue.edu/ext/HO-175.pdf Growing Garden Beans, Pennsylvania State University http://horticulture.psu.edu/files/hort/extension/garden_beans.pdf
Purdue Master Gardener Vegetable Encyclopedia 2/2011 Page 17 of 94
Beans and Peas Beans, specialty Horticultural Beans (Phaseolus vulgaris) Southern Cowpeas (Vigna unguiculata) Yardlong or Asparagus Beans (Vigna unguiculata ssp. sesquipedalis) Edible Soybeans or Edamame (Glycine max) Adzuki (Vigna angularis) Fava Beans (Vicia faba) Garbanzo Beans or Chickpeas (Cicer arietinum) Dry beans (Phaseolus vulgaris) (kidney, navy, black, small red, anasazi, pinto, great northern,
Jacob’s cattle and many other heirloom varieties) Snapshot • Culture is similar to snap or lima beans. All take at least 65 days to mature, some 90 days or
more. • The pod and very immature seeds of yardlong (asparagus) beans are eaten. For all others, the
beans are shelled before eating. • Horticultural beans: may be called “shelly” or “shellout” beans; both bush and pole varieties
available; heirloom varieties available; plant as described for snap beans; harvest when pods start changing from green to yellow.
• Southern cowpeas: not a true bean or pea even though it is usually called a pea; goes by many names – southern pea, cowpea, crowder pea, black-eyed pea; plant as described for lima beans; bush types mature more quickly and are more suited for Midwestern gardens; harvest and shell when pods begin to yellow for fresh peas or as dry peas when pods fully mature and dry. Estimated yield per 10 ft row is 4 lb.
• Yardlong or Asparagus Beans: popular in oriental cooking, pods can grow to 3 ft; only vining types available; plant as described for lima beans; harvest short pods (10-12”) beginning 65-80 days after planting if you want to eat the immature pod; if pods are more mature, shell beans before eating; plants will continue to produce for several weeks if harvested regularly.
• Edible soybeans: use soybean varieties selected for home gardens which mature more quickly and have better flavor than field varieties; plant as described for bush lima beans, until July 15; harvest is 80-90 days after planting; harvest when seeds fully enlarged but not yet hardened, pods will be plump, green, rough, and hairy; all pods mature at about the same time, so pull entire plant and harvest in a comfortable seat in the shade; pods are difficult to open, cook for a few minutes to soften pods and make shelling easier.
• Adzuki: also called Chinese red beans, adzukis are the basis for red bean paste and have a slightly sweet flavor; plant as you do snap beans, both bush and pole varieties are available; adzuki require a long growing season, 120 days; harvest as green beans when pods just begin to plump and are still tender or allow to mature and harvest as dry beans; pods will split open when dried thoroughly.
• Fava beans: also called broad beans, horse beans, English beans, European beans, and Windsor beans; some people of Mediterranean origin have a strong allergic reaction to fava beans. If you have not eaten them before, sample a small quantity first; fava beans require long season of cool weather so plant early, at the same time as peas, about 5 weeks before average last frost date; sow seed 1-2” deep, 3-6” apart, with rows a minimum of 24” apart. Harvest when the pods are thick and well-filled but still green, at least 85 days after planting.

Purdue Master Gardener Vegetable Encyclopedia 2/2011 Page 18 of 94
• Garbanzo beans: also known as chestnut bean, Egyptian bean, and grams; not a true bean or pea, with fine-textured foliage; usually 1 or 2 seeds per pod; require long season of warm weather – 100 days from planting to harvest; plant as described for bush lima beans; harvest as shell beans or allow to mature for dried beans.
• Dry beans: common varieties are inexpensive when purchased at groceries but unusual varieties may not be readily available and thus may be worth the effort to grow yourself; beans self-pollinate and come true from seed, so you can save a few for planting next year; dry beans require a long growing season and a dry fall so they may be problematic in Indiana; require large amount of garden space to grow suitable quantities for storage; plant as described for snap beans, both bush and pole types are available; harvest when pods and beans completely dry, when leaves have turned yellow and begin to fall; pull vines and allow plants to dry, pods should start to split and dried beans can be easily removed. Yield of dry beans can be 1 lb plus per 15 ft row.
See green snap beans and lima beans for information on care, harvesting and pests. References Growing Beans in the Home Vegetable Garden, Purdue University http://www.hort.purdue.edu/ext/HO-175.pdf Growing Garden Beans, Pennsylvania State University http://horticulture.psu.edu/files/hort/extension/garden_beans.pdf
Purdue Master Gardener Vegetable Encyclopedia 2/2011 Page 19 of 94
Beans and Peas Peas (Pisum sativum) Family: Fabaceae Related vegetables: all beans Snapshot • Cool-season annual. Usually the immature fruit (pods) and seeds are eaten. • Three types of peas are commonly grown:
-‐ Garden peas (English peas) are harvested and shelled with the tender peas inside eaten fresh. They may also be allowed to mature and dry and then used as split peas.
-‐ Snap peas or sugar snap peas are the edible-pod version of garden peas. They have low fiber pods that can be “snapped” and eaten along with the immature peas inside.
-‐ Snow peas (sometimes also called sugar peas) are edible pod peas that are flat instead of round and are popular in Chinese cuisine.
• Both short-medium varieties (18-30”) and tall varieties (to 6 ft) that need to be supported on a trellis are available. Some gardeners place twigs upright among the pea plants, even the bush type, to provide support. These twigs are called “pea sticks” or “pea brush”.
• Plant the seeds directly into the garden after soil has warmed to 45 °F, 4-6 weeks before average last frost date, 1-1.5” deep, 1-2” apart in rows 12” apart. Spacing within a wide row is 2-4”. Harvest period is short so plant repeatedly until about a week before the average first frost date to ensure a continual harvest. Vining types have a longer harvest period. Estimated yield per 10 ft row is 3 lb.
• For fall planting, assume harvest is on average first frost date and count back using days to harvest information for your variety to determine the last planting date (typically 10-12 weeks before the average first frost date for late-season varieties). Peas will not mature after a frost. Planting for a fall harvest can start as early as June in northern Indiana and in August for the warmest parts of the state.
• Harvest varies from 54 days for early varieties to 72 days and more for mid-late season varieties. Harvest for each planting is short. Sample a few pods as harvest nears to judge their maturity. Harvest by grasping stem with one hand, pod with another and snap off with thumb. Use immediately for best flavor.
Planting • Peas are planted very early, as soon as the soil can be worked. Wait until soil warms to at least
45 °F. It takes seeds about 2 weeks to germinate at 50 °F, less as the soil warms. Later plantings can catch up with early ones.
• In Indiana, planting begins in mid-February in southern Indiana, April 1 in the north, and continues for about a month, perhaps a bit longer in the cooler north.
• Plant tall varieties near supports. All types can be supported with twigs placed upright between the plants.
• Peas are available in early, mid, and late season varieties. Plan on several plantings of one type to ensure a long harvest or plant several varieties with different maturities at the same time.
• Fall plantings are possible. Germination is rapid in warm soil, but growth in the heat of late summer and the need for watering may make this a less desirable option. Plantings in late summer may take longer to mature than listed in the seed packet information.
• Most soils contain the necessary nitrogen-fixing Rhizobium bacteria to support bean growth. If you are concerned that your soil does not, you can purchase a bacterial inoculum. Coat the seeds with the inoculum before planting. The bacteria will become established in the soil, ready to
Purdue Master Gardener Vegetable Encyclopedia 2/2011 Page 20 of 94
infect the roots of the beans and peas in future years. It is not necessary to use inoculum after the first year.
Care notes • Peas grow best at 55-75 °F. The plants can withstand some frost but the flowers and pods cannot. • Peas prefer soil high in organic matter with good drainage. Poor drainage can make the plants
more susceptible to fusarium wilt and root rot. • Make sure to water if rainfall is lacking during flowering and seed enlargement. • Side-dressing usually not needed. Side-dress with 0.1 lb actual N/100 sq ft only after heavy bloom
and pod set. • Edible pod varieties are fussy about environment, need more attention to watering and are more
susceptible to mildew. Harvest • Harvest garden peas when pods are swollen. Sample every day or two to catch them at the right
stage. Pods lowest on the plant mature first. Harvest lasts about a week, usually with three pickings. Remove plant from garden when harvest is finished.
• For dried split peas, allow garden peas to remain on the vine until the pods are withered and brown. Harvest, shell, and lay them out to dry for three weeks.
• Harvest snap peas when pods start to fatten but before seeds grow large. Pods should snap when broken. If you miss the timing, harvest and shell before use, eating only the peas.
• Harvest snow peas before the individual peas have grown to the size of BBs and pods are still quite flat, usually 5 to 7 days after flowering.
• Make sure to remove any pods accidentally missed in earlier pickings to keep the plants blooming and producing. Overgrow snap and snow peas should be shelled before eating.
• All garden peas and bush type snap and snow peas have a short harvest period. Vining types of both snap and snow peas continue to grow taller and produce peas as long as the plant stays in good health and the weather stays cool.
• Use peas within 24 hours of picking. They loose their sweetness quickly after picking. Additional Information ‘Wando’ withstands hot weather better than other cultivars. Common Problems • Fusarium wilt and powdery mildew can be problems on peas. Crop rotation will help. Some
varieties are resistant to at least one of these diseases. • Damping off of seedlings and root rot can also be a problem, especially if soil stays wet. Crop
rotation will also help with this problem. • Pea aphids can sometimes be a problem. A strong stream of water may remove them.
Purdue Master Gardener Vegetable Encyclopedia 2/2011 Page 21 of 94
Root Crops - Introduction Root crops are grown for their enlarged roots. All prefer cool weather and most can be planted as both a spring and fall crop. Because the roots need to grow unimpeded, prepare the ground well. Loosen it and remove stones and clods. Roots that encounter a stone will grow around it, creating an unexpected shape. Each plant yields only one root. The leaves of beets and turnips are used as greens. Links to specific vegetables Beets
Carrots
Radishes
Chinese radishes (daikon and others)
Parsnips
Turnips
Rutabagas
Purdue Master Gardener Vegetable Encyclopedia 2/2011 Page 22 of 94
Root Crops Beets (Beta vulgaris) Family: Chenopodiaceae Related vegetables: Swiss chard and spinach Snapshot • Frost-tolerant, cool-season biennial. The swollen root and sometimes the leaves are harvested
the first year of growth. • Leaves (often called tops) are eaten as greens. Enlarged roots, which come in several shapes and
may be red, yellow, or white, are eaten as a vegetable. • Plants are short (12”-18”). • Plant seeds directly into garden starting 2-3 weeks before average last frost date. Sow thickly,
then thin to 2-3”, rows a minimum of 12” apart, spacing within a wide row is 3”x3”. Harvest period is short, so plant repeatedly for continual harvest until mid-late summer, about 2 months before the average first frost date. Beets are somewhat shade tolerant.
• Harvest at about 50 days for tops, 60 days for 1.5” roots. Beets will tolerate a light frost but do not allow to freeze in the ground. Harvest or protect if temperatures threaten to dip into the upper 20s. Estimated yield per 10 ft row is 10 lb.
Planting • As with all root crops, a well-prepared soil without stones will let the roots develop their natural
size and shape. • Purchased beet seed is usually fruit that contains several seeds. Some seed companies are now
selling single, separated seed. • Plant about 1” apart and about 1/2” deep. Cover seed with a thin layer of fine mulch or compost
rather than garden soil to prevent soil crusting which can hinder seedling emergence. • Beet seeds can be planted starting 2-3 weeks before average last frost date. They germinate best
at 65-75 °F but will germinate at temperatures as low as 40 °F. Don’t plant too early or an extended cold spell may induce plants to bolt. It’s best to let soil warm to 50 °F.
• Continue planting every 2-4 weeks to ensure continual harvest through the growing season. However, high temperatures can cause the roots to be woody, with alternating bands of light and dark red and low sugar content. Because of this, some gardeners plant spring and fall crops and avoid planting when roots will mature in the heat of summer. Plantings after August 1 may be injured by frost before they mature. Note that seedlings establish more easily under cool, moist conditions.
• After emergence, thin seedlings to 3-4”. If you like, let plants get to 3” before thinning, then eat the greens and small swollen root. If not thinned, swollen roots may not develop properly.
Care notes • To ensure the continuous growth needed for high-quality beets, provide irrigation if rainfall is
lacking. An irregular water supply may result in tough, cracked roots. High temperatures can also cause the roots to be woody, with alternating bands of light and dark red and low sugar content. Alternating bands of color do not always indicate poor quality. The heirloom variety ‘Chioggia’ is grown to produce roots with alternating bands of color.
• Beets grown in acidic soils will not do well. Leaves will look ragged. Soil pH should be pH 6-7.5. • Beets usually do not need side-dressing, especially if grown for roots rather than greens. Do side-
dress (4-6 weeks after planting) if crop shows sign of nitrogen deficiency.

Purdue Master Gardener Vegetable Encyclopedia 2/2011 Page 23 of 94
• Use shallow cultivation to control weeds so roots are not damaged. Beets do not compete well with weeds.
• Beets are somewhat shade tolerant. Harvesting • Harvest greens when plants are between 4” and 6” tall (about 50 days after planting). • Harvest beet roots by pulling up the whole plant while they are still small. 1.5” beets are tender
(60-70 days for most varieties). Beets larger than 3” are often fibrous and low quality. Check size often, as roots enlarge quickly once they reach 1.5”.
• Leave 1” of foliage on roots when harvesting to prevent bleeding of color during cooking. Common Problems • Seedlings exposed to low temperature (40-50 °F) for more than 2 weeks may begin to flower
(bolt). If this occurs, harvest the greens and replant. • Seeds planted in cold soil may rot or seedlings may damp off. Seeds pre-treated with fungicide
can be purchased, or simply wait to plant until soil has warmed. • Cercospora leaf spot is the most common disease that occurs on beets. Circular spots with
reddish brown or purplish margins are the first signs. Pre-treated seeds, crop rotation, spacing and watering practices to help leaves dry quickly, and removal of all plant debris at the end of the season can help control this disease.
• Spinach leafminer is a fly that lays eggs on beet leaves. The larvae tunnel into the leaves. The presence of this insect does not decrease yield of beet roots. It is important pest only if greens are harvested. Crop rotation can help reduce the problem.
• Flea beetles, which chew holes in the leaves, can also be a problem on seedlings. Feeding on plants with large leaves usually does not decrease yield of roots. They are more common in weedy gardens or gardens near weedy areas.
• Cutworms can be a problem on small plants, especially in gardens near weedy areas. • Aphids may feed on leaves. Remove them with a strong stream of water. References Growing Beets in the Home Garden, Ohio State University http://ohioline.osu.edu/hyg-fact/1000/1604.html Home Garden Beet Production, North Carolina State University http://www.ces.ncsu.edu/depts/hort/hil/hil-8004.html Growing Carrots, Beets, Radishes, and Other Roots Crops in Wisconsin, University of Wisconsin http://learningstore.uwex.edu/Assets/pdfs/A3686.pdf

Purdue Master Gardener Vegetable Encyclopedia 2/2011 Page 24 of 94
Root Crops Carrots (Daucus carota ssp. sativus.) Family: Apiaceae Related vegetables: Celery, fennel, parsley, parsnip Snapshot • Cool season biennial. The enlarged root is harvested the first season of growth. • Carrot roots can be white, yellow, orange, red, purple, or purplish black. Shape varies from long
and slender to short and plump. Select short varieties if your soil is heavy or shallow. Shape and color depend on temperature, age, and growing conditions as well as the characteristics of the variety you are growing. Droughty conditions produce longer roots. High temperatures result in shorter roots.
• Short plant, about 12” high. • Plant seeds directly into the garden starting 2 weeks before average last frost date. Soil should
be at least 45 °F. Spacing varies with variety, see “Planting” below. Since each plant produces only one carrot, replant every 2-3 weeks. Time the last planting to mature on the average first frost date (last planting will be 2-3 months before the average first frost date). Though carrots prefer cool weather they can be planted through most of the summer in northern Indiana. In southern Indiana, do not plant if the crop will mature in the heat of the summer. Temperatures over 75 °F as the roots mature result in poor quality carrots. Planting usually resumes in July. Carrots are somewhat shade tolerant.
• For full-size carrots, harvest when tops of the carrots are 0.75-1.5” in diameter. Carrots are ready to harvest in about 60-85 days (less for finger carrots) and each planting can be harvested for about 4 weeks. Cut off all but 1” of the tops before storing. In fall, harvest or protect as temperatures dip into the upper 20s. Mulched carrots can be harvested until the ground freezes. Estimated yield per 10 ft row is 10 lb.
Planting • Make sure to till the soil deeply to prepare for planting. Remove stones and break up clods that
could result in misshaped roots. Carrot varieties with long slender roots are usually not recommended for home gardens unless the soil is sandy.
• In early spring plant carrot seeds 1/4-1/2” deep. Later plantings can be deeper, 1/2-3/4”. Plant 2-3 seeds per inch in rows at least 12” apart.
• Carrot seeds take 2 weeks to germinate. Soil should be at least 45 °F before planting. Even at optimum temperature (about 80 °F) carrot seed can take more than a week to germinate.
• Carrot seedlings are weak and may have trouble pushing through crusted soils. After covering seeds with soil, add a thin layer of fine mulch or compost to help prevent crusting. You can also mix radish and carrot seeds together. The radish seeds germinate quickly and will mark the location of the carrots. By pushing through the soil they prevent crusting. The radishes will be ready to harvest before the carrots have put on much growth. Keep the area watered so the seeds do not dry out before germination.
• Thin seedlings when they are about an inch high. Different spacing is used for different varieties and uses. Leave 3 per inch if harvesting as finger carrots. Leave 1-2 per inch if harvesting young. Space carrots that will be allowed to grow to full size 1-2” apart. Spacing within a wide row is 3”x3”.
Purdue Master Gardener Vegetable Encyclopedia 2/2011 Page 25 of 94
Care Notes • Carrots need consistent moisture, 1-1.5” of water a week. Make sure to water if rainfall is
lacking. Carrots can become pungent and strong in flavor in dry soil and hot weather. Carrots are somewhat shade tolerant, so plant in part shade during heat of the summer.
• Side-dressing is usually not needed. Some references recommend using a fertilizer with a 1-2-2 ratio (0.15 lb actual nitrogen per 100 sq ft) when leaves are 3-4” high and again when they reach 6-8”.
• Tops of the roots exposed to sun will turn green and have an “off” flavor. To prevent this, mound soil up slightly to cover any exposed roots. If the top of the root is green when harvested, simply cut off this portion of the root before eating or cooking.
Harvesting • Harvest by pulling the entire plant from the ground. • Finger carrots are harvested when the top of the root is 0.5”, about 50 days after planting. • Full size carrots are first harvested when the top of the root is 0.75” in diameter, about 60 days
after planting. Harvest of each planting can continue for 3-4 weeks, with the last carrots being larger, perhaps 1.5” in diameter.
• A straw mulch will let you harvest carrots directly from the garden until the ground freezes. Additional information • Queen Anne’s lace, a common Indiana wildflower, is the same species as edible carrot but it does
not have an edible root. Common problems • Carrots will flower (bolt) if the root is at least ¼” in diameter and temperature falls below 50 °F
for several weeks. • Leafhoppers can spread disease such as aster yellows. Cutworms chew off seedlings at ground
level. Aphids can also be a problem. Crop rotation, good fall clean-up and keeping the area around the garden free of weeds can help. A strong stream of water may wash off aphids. Insecticides may be warranted to control leafhoppers.
• The disease aster yellows creates hairy roots and yellow tops. Control leafhoppers to prevent infection. There is no treatment for this disease. Remove infected plants from the garden to help keep the disease from spreading.
• One bacterial and two fungal diseases can cause leaf spots and degradation (generally called leaf blights). The two fungal diseases are more of a problem in humid or wet weather when the leaves do not dry. Spacing for good air circulation as well as practicing good sanitation and crop rotation will help control these diseases. Carrots grown with adequate soil nutrition may be more resistant to the diseases. Some cultivars are available that show tolerance to these diseases.
References Growing Carrots in the Home Garden, Ohio State University http://ohioline.osu.edu/hyg-fact/1000/1606.html Growing Carrots and Other Root Vegetables in the Garden, University of Minnesota http://www.extension.umn.edu/distribution/horticulture/DG0435.html

Purdue Master Gardener Vegetable Encyclopedia 2/2011 Page 26 of 94
Root Crops Radishes (Raphanus sativus) Family: Brassicaceae Related vegetables: arugula, broccoli, Brussels sprouts, cabbage (all types), cauliflower, kale, kohlrabi, mustard, rutabaga, turnip, horseradish, collards, watercress Snapshot • Cool-season annual harvested for its swollen root before the plant flowers. Some winter varieties
are considered biennials. • There are many varieties. Spring radishes reach harvesting size 3-4 weeks after seed is planted,
though some cultivars (sometimes called summer radishes) take a bit longer. Winter radishes, planted in late summer, take about 8 weeks to mature. They are often larger and more pungent than spring radishes. Oriental radishes (daikon and others) are discussed in a separate listing
• Small plant, ranging from 6-16” high. • Plant spring and summer radish seeds directly into the garden starting 6 weeks before the
average last frost date. Seeds germinate in less than a week if soil is at least 50 °F. Replant every 2 or 3 weeks continuing on until about 4 weeks after average last frost date or until temperatures average in the mid-60s. These varieties can also be planted in early fall as the weather cools. Time last planting so crop matures on average first frost date. Radishes are somewhat shade tolerant.
• Plant winter radish varieties starting in July in northern IN, in August in southern IN. Several plantings can be made. Time the last planting so crop matures on average first frost date. Remember these varieties take 2 months or so to mature.
• The first harvest of spring radishes can be made 3 weeks after planting. Small roots are sweet and mild. In general, harvest when roots reach 1-1.5” in diameter. The harvest window is short – radishes left too long become spongy (pithy) and hot. Many winter radish varieties are hot. Harvest when they reach the size for your variety. Winter radishes remain edible much longer than spring radishes. Estimated yield per 10 ft row is 10 bunches.
Planting • Plant radish seeds 1/4-1/2” deep. Thin to 1-3” for spring radishes, to about 6” for winter radishes
(seedlings can be eaten). Make sure to thin. Crowded radishes do not produce good roots. • If planting in rows, minimum row spacing is 12”, perhaps a bit wider for winter radishes. Spacing
within a wide row is about 3”x3” for spring radishes. • Because they mature so quickly, spring radishes are often planted with carrots and parsnips,
between slowly growing cole crops, or between small tomato and pepper plants. Care Notes • Steady growth is important for good development and flavor. Water if rainfall is lacking. If
growth slows, especially in hot weather, roots can become hot in flavor. Plant in part shade as weather warms.
• Spring radishes do not need side-dressing and excess nitrogen can favor leaves over root development. Longer growing varieties (summer and winter radishes) may do better with very light side-dressing.
Purdue Master Gardener Vegetable Encyclopedia 2/2011 Page 27 of 94
Harvest • Spring radishes become hot and pithy quickly if you miss the optimal harvesting window. Harvest
when roots are no more than 1.5” (smaller is better). White radishes should be no more than 3/4” in diameter. Harvest by pulling the plant out of the ground.
• Winter radishes have a longer harvest window and cold weather improves flavor. • Harvest or protect all late-planted radishes if temperatures threaten to dip into the upper 20s.
Mulched radishes should be harvested before the ground freezes. • Remove the green tops and long slender root before storing radishes. Common problems • Radishes may produce leaves and no root if over-fertilized (as mentioned above) or if it is too hot
when the crop matures, over 80 °F. • Spring radish roots may crack and split if allowed to grow too large before harvesting. • Cabbage root maggots can be a problem. Use floating row covers to keep the adult insects from
laying eggs on your crop. • Diseases are not often a problem. Practice crop rotation. Do not plant the same area with a cole
crop two years running. References Growing Carrots, Beets, Radishes, and Other Roots Crops in Wisconsin, University of Wisconsin http://learningstore.uwex.edu/Assets/pdfs/A3686.pdf
Purdue Master Gardener Vegetable Encyclopedia 2/2011 Page 28 of 94
Root Crops Chinese radishes (Raphanus sativus, sometimes listed as var. longipinnatus) If you’ve only grown spring radishes, the Chinese (oriental) radishes will surprise you. Roots of 10-20 pounds aren’t unusual and some can weigh in at 100 pounds! Leaves spread 2 ft. Chinese radishes, often known as daikon, can be many shapes – long and slender, short and rounded, even bell-shaped. The roots are often white but white with green tops and red are also available.
Oriental radishes can be eaten raw but they are often cooked. The roots are less pungent and have better quality if grown in cool weather. Some varieties are grown specifically for greens rather than roots. One, “rat-tailed radish,” is grown for its edible seedpods. All are common in cuisines throughout Asia.
Grow Chinese radishes as you would the more common spring and winter radishes. Those with short harvest times (30 days) can be planted in spring. Most need a longer growing period so plant in late summer to mature in cool weather. Plan your planting so it matures on the average first frost date. Plant seeds 1/2-3/4” deep and give the plants plenty of room, 4-6” between plants and 3 ft between rows. The soil should be loose and as deep as possible. Don’t be surprised if there is as much root growing above the soil line as below.
Chinese radishes can take 6 months to reach full size but most reach usable size in 60-70 days. They are tender and edible even when quite large. Just like spring radishes, they become hot and pithy when overmature.
Harvest varieties grown for leaves when there are enough leaves to make it worthwhile, often in less than 30 days. Just like the root varieties, they grow best in cool weather of spring and fall. References Chinese Vegetables, Purdue University http://www.hort.purdue.edu/ext/HO-187.pdf Radish, Chinese, University of Florida http://edis.ifas.ufl.edu/MV120
Purdue Master Gardener Vegetable Encyclopedia 2/2011 Page 29 of 94
Root Crops Parsnips (Pastinaca sativa) Parsnips are in the Apiaceae, like carrots, and parsnip roots even look like white carrots. The root of these biennials is harvested after the first season of growth. Parsnips take at least 120 days to mature and are considered a full-season crop. Grow them as you would carrots, in loose soil.
Though parsnips can be planted in spring, your best option may be to delay planting until mid-late June so the roots mature in October. Flavor does not fully develop until the roots have been exposed to near-freezing temperatures for 2-4 weeks. The exposure to cold turns stored starch to sugar, resulting in a sweet, nutlike flavor. If you do harvest parsnips before cold weather, store them for 2 weeks at temperatures just above freezing (but not below) to make them sweeter.
Parsnip seed does not store well, so purchase new each year. Plant seeds 1/2-3/4” deep, 2-3 seeds per inch in rows at least 18” apart. Parsnip seed is slow to germinate, like carrot seed, and seedlings have difficulty pushing through crusted soil. As with carrots, you can plant radish seeds among the parsnips to help prevent crusting and mark the location of the parsnips.
Thin seedlings to no more than 2-4” apart. Wide spacing allows the roots to become overly large and they become woody. If planting in wide rows, space 4”x4”. Side-dressing may be needed mid-season.
Leave parsnips in the ground until the tops freeze in late fall. Harvest then or cover with straw mulch and dig throughout the winter but before the soil begins to freeze and thaw in spring (roots become cracked and pithy) and before new growth begins and the roots lose their quality. Estimated yield per 10 ft row is 10-12 lb.
Caution: parsnip leaves cause an allergic reaction in some people (skin rash, blisters). Long pants and a shirt with long sleeves are recommended when handling parsnips.
Purdue Master Gardener Vegetable Encyclopedia 2/2011 Page 30 of 94
Root Crops Turnip and Rutabaga (Brassica rapa and Brassica napus) Turnip and rutabaga are biennials harvested after their first season of growth. Both are in the mustard family (Brassicaceae) and, like broccoli, cabbage, and cauliflower, perform best if they mature in cool weather.
Turnip leaves are eaten as greens. Additionally, both turnips and rutabagas are grown for their swollen roots that are used in soups and stews. Turnip roots are usually white with a purple top. Rutabagas are often tan with yellow flesh. The roots of both are more tender with better flavor if harvested before they become large.
Since the root of each plant can only be harvested once, several successive plantings will ensure a continual harvest.
Both turnip and rutabaga are hardy to fall frost. Plantings ready to harvest at about the average first frost date can just be left in the ground and harvested as needed into early winter. A heavy straw mulch will keep the soil from cooling quickly and make harvesting easier. Turnips and rutabagas, and radishes as well, are attacked by root maggots. Crop rotation will help. Turnips Turnips grow to 18”, can be planted as both a spring and fall crop, and are somewhat shade tolerant. Several different varieties are available, some preferred for greens, others for turnip roots.
In spring, begin planting seeds directly into the garden 6 weeks before average last frost. Seeds will germinate when soil is 40 °F, in 5 days or less when soil is 50 °F or warmer. Make successive plantings every 10 days or so for the next 4-6 weeks. Plant seeds 1/2” deep, either by broadcasting them, then raking, or in rows 12” apart. Turnips are usually planted thickly, then thinned to 2-4” when leaves are about 4” high. This will be your first harvest of turnip greens. Spacing within a wide row is 2”-4”.
Side-dress with 0.1 pounds actual N/100 sq ft when greens are about a third grown if growing for greens. If growing for roots, side-dressing is usually not needed.
Harvest leaves as needed when leaves are 4-6”. Greens are ready in about 30 days, turnip roots in about 60 days. Harvest roots when 2-3” in diameter by removing the whole plant from the ground.
Fall plantings can begin in July. Plan for the last planting to mature around the average first frost date. Fall turnips can tolerate temperatures into the low 20s with protection. Estimated yield per 10 ft row is 5-10 lb of either roots or greens.
Rutabagas Rutabaga is very similar to turnip but it is larger, growing to 2 ft, and takes longer to mature, about 85-95 days.
Though seed can be planted directly into the garden as early as 6 weeks before average last frost date, a spring planting is chancy, especially in southern Indiana. Extended cold weather (50-55 °F) after the seedlings emerge can cause the plant to bolt. If the weather warms quickly, the roots mature in hot weather and become very woody.
Summer plantings for a fall harvest are almost always successful. Planting starts in June, later for southern Indiana. Plan for the last planting to mature around the average last frost date (plant 10-12 weeks before that date). Plant seeds ½” deep in rows 12-18” apart to take into account rutabaga’s size. Thin to 6” when seedlings are 2” high. Greens are edible. Spacing within a wide row is 4-6”.
Side-dress with 0.1 pounds actual N/100 sq ft when plants are 4-6” tall. Plants grow to about 2 ft. Harvest when swollen roots are 3-5” in diameter. Estimated yield per 10 ft row is 35 lb.
Purdue Master Gardener Vegetable Encyclopedia 2/2011 Page 31 of 94
Cole Crops and Related Vegetables – Introduction Broccoli, Brussels sprouts, cabbage and cauliflower, collards, kale, and kohlrabi all belong to the same species, Brassica oleracea. Each has been selected for a specific form: cauliflower for its immature flower head, for example, and kohlrabi for its edible swollen stem. Collectively these vegetables are known as cole crops. All cole crops prefer cool temperatures. They need steady growth for best productivity. Cold temperatures after planting, hot weather as the crop matures, and inconsistent soil moisture can slow growth and cause problems (see the individual vegetable for details). Thus, these crops can be near failures some years and produce well in others. Most are prone to the same insect pests and diseases so crop rotation is an important management tool. Broccoli, Brussels sprouts, cabbage, cauliflower, collards and kale, and kohlrabi are discussed here. Related vegetables, also in the mustard family (Brassicaceae) - broccoli raab and Asian cabbage and broccoli – are also discussed. Other related vegetables covered in this encyclopedia are horseradish, radish, turnip and rutabaga, mustard, and arugula. For best results, just like the cole crops, these vegetables need to grow steadily and mature in cool weather. Links to specific vegetables Broccoli
Broccoli raab
Brussels sprouts
Cabbage
Asian cabbage and broccoli
Cauliflower
Collards and kale
Kohlrabi

Purdue Master Gardener Vegetable Encyclopedia 2/2011 Page 32 of 94
Cole crops and related vegetables Broccoli (Brassica oleracea var. italica) Family: Brassicaceae Related vegetables: arugula, Brussels sprouts, cabbage (all types), cauliflower, kale, kohlrabi, mustard, radish, rutabaga, turnip, horseradish, collards, watercress Snapshot • Cool season annual. • There are different types of broccoli—annual green or, more rarely, purple “heading” broccoli;
“romanesco,” which has yellowish green, conical groups of buds arranged in spirals; and sprouting broccoli, an overwintering annual or perennial, rarely grown in this country. Heading broccoli forms the large, rounded flower heads commonly seen in groceries. Sprouting broccoli forms small shoots in the leaf axils over a long period instead of forming a large head.
• Unopened flower buds, stems, and young, tender leaves can be eaten. • Medium height, about 3 ft. • In spring, plant transplants 4-6 weeks before average last frost date. Planting can continue into
April, even through May in the coldest part of the state. If growing from seed, start indoors 5-7 weeks earlier. Spacing is 18-24”, rows a minimum of 36” apart, spacing within a wide row is 12”-18”.
• For a fall harvest, plant transplants about 70 days before the average first frost date. Seeds can be planted outdoors 4-6 weeks earlier. No matter the season, broccoli grows best if it can mature when air temperatures are somewhat warm but not hot (less than 80 °F). Broccoli is very frost tolerant. Mature plants can survive temperatures down to 25 °F, perhaps lower with protection.
• First harvest is about 60 days from transplant and about 110 from seed. Cut off flower head before flowers open plus about 5” of stem. Small side shoots may develop, providing an additional harvest. Estimated yield per 10 ft row is 10 lb.
Planting • Broccoli is usually put into the garden as transplants. These can be purchased or you can grow
your own from seed. For spring planting, start seeds indoors 5-7 weeks before your anticipated planting date. Temperature optimum for germination is 70-80 °F, for seedling growth is 60-70 °F. Plant seeds 1/4-1/2” deep, seedlings appear in about 5 days.
• The first transplants can be put into the soil 4-6 weeks before the average last frost date. Seedlings should have at least 4 pairs of leaves. Smaller seedlings are very sensitive to frost.
• Planting for fall harvest is done in late summer. If using transplants, assume harvest will be on average first frost date, then count back the number of days from transplant to harvest for your cultivar plus 10 days. You can grow these transplants from seed also. Since the soil has warmed, you may be able to plant seeds directly into the garden as well as starting them indoors. Plant seeds 4-6 weeks before the anticipated transplanting date.
• Practice crop rotation. Do not plant the same area with a cole crop two years running. Care Notes • When planting in spring (into cold soil), a starter fertilizer may help the plants become
established. • Side-dress with 0.1 lb actual N/100 sq ft three weeks after transplanting when rapid growth has
begun. • Make sure plants receive 1” of water a week during head formation.
Purdue Master Gardener Vegetable Encyclopedia 2/2011 Page 33 of 94
Harvesting • First harvest is about 60 days from transplanting or 110 days from seeding. • When individual buds of broccoli are match-head size and distinct in appearance, the head is as
large as it is going to get (typically 3-6”). This size varies with cultivar. Cut off central flower cluster with 5” or more of stem when the head appears full and tight, before the flowers open.
• Side shoots with smaller flower cluster will develop on the remaining stem after the central head is removed. The more stem you leave, the more side shoots will form. You can continue to harvest these smaller heads until hot weather or a freeze stops production.
Common Problems • High temperatures (over 77 °F) cause the heads to become leafy and may prevent heads from
forming at all. • Larger transplants may respond to temperatures below 50 °F by “buttoning” (forming very small
heads). • Several caterpillars attack broccoli, feeding on stems and leaves - cabbage loopers, imported
cabbage worm, diamondback moth, cabbage webworm, and corn earworm. Cabbage aphid can be a problem. Flea beetles can damage small seedlings.
• Diseases are usually not serious. Black rot, downy and powdery mildew, Alternaria leaf spot, and soft rot can be occasional problems.
References Growing Broccoli, Cauliflower, Cabbage, and Other Cole Crops in Wisconsin, University of Wisconsin http://learningstore.uwex.edu/assets/pdfs/A3684.PDF
Purdue Master Gardener Vegetable Encyclopedia 2/2011 Page 34 of 94
Cole crops and related vegetables Broccoli raab (Brassica ruva or Brassica rapa, ruvo group) Broccoli raab (also called broccoli de rapa, rapini, broccoli turnip, Chinese flowering cabbage, choy sum) is more closely related to turnip than to broccoli. Leaves, stems, and the small 1” flower heads are eaten.
Broccoli raab is planted from seed or transplant either in early spring (4-6 weeks before the average last frost date) or late summer. You may find two varieties of seeds. One is preferred for spring planting. The one preferred for fall planting produces flowers more quickly than the spring variety.
In warmer climates a late summer planting may overwinter with the plant acting like a biennial. When planted in spring, broccoli raab grows as an annual.
Planting, culture, and problems are similar to broccoli and other Brassicaceae.
Broccoli raab is ready to harvest in 40-60 days, growing a bit faster as the weather warms. It goes to seed quickly, so make sure to harvest before flower buds open. Plants are usually 10-15” high when ready to harvest. Cut off most of the plant. If conditions remain favorable, a 2nd or 3rd harvest is possible. References Broccoli Raab, North Carolina State University http://www.ces.ncsu.edu/depts/hort/hil/hil-5-a.html Broccoli, Raab, University of Florida http://edis.ifas.ufl.edu/MV033
Purdue Master Gardener Vegetable Encyclopedia 2/2011 Page 35 of 94
Cole crops and related vegetables Brussels Sprouts (Brassica oleracea var. gemmifera) Family: Brassicaceae Related vegetables: arugula, Brussels sprouts, cabbage (all types), cauliflower, kale, kohlrabi, mustard, radish, rutabaga, turnip, horseradish, collards, watercress Snapshot • Hardy biennial harvested at the end of the first season. • Enlarged buds at the base of leaves, called sprouts, are harvested during first season of growth. • Medium height, 2- 3 ft. • Spring plantings are usually not successful. This vegetable needs a long season of growth and cool
weather as the buds mature. • For fall harvest, start seeds in mid-June to transplant into the garden in late July-early August.
Space 18-24” apart, with minimum row spacing of 24”. Spacing within a wide row is 18-24”. • First harvest is 85-100 days from transplanting, 130 days from seed. Lowest buds mature first.
Harvest when they are 1-2” in diameter. Remove the leaves at the base of the buds you harvest. Planting • Plant seeds 1/4”-1/2” deep. Germination is best at 70-80 °F and seedlings will appear in about 5
days. Grow the seedlings a bit cooler, at 60-70 °F. They will be ready for transplanting in 4-5 weeks. You may also be able to purchase transplants.
• If you try a spring planting, put transplants out early, in March or early April. • Summer planting for fall harvest are more common. Have plants in the ground by early July in
northern Indiana, by mid-August in southern Indiana. • Practice crop rotation. Do not plant the same area with a cole crop two years running. Care Notes • If planting in spring (into cold soil), a starter fertilizer may help the plants become established. • Make sure plants receive 1-1.5” of water per week. • Side-dress with 0.1 lb actual N/100 sq ft about 3 weeks after transplanting when rapid growth has
begun. Harvesting • The first sprouts will be ready to harvest in about 85 days. The lowest buds mature first, with
new buds forming as the plant continues to grow upward. Pick the buds as they reach 1-2” in size.
• As you harvest each bud, remove the leaf below it. Some gardeners believe the sprouts develop better if the lowest 6-8 leaves are removed as the sprouts develop. Then, 2-3 additional leaves are removed each week. Leaves are essential to plant growth, so always leave several leaves at the top of the plant.
• The first harvests, in warmer weather, will be every 7-14 days with 2-6 buds removed per plant. As the weather cools, harvest is more infrequent but more buds are harvested each time.
• Brussels sprouts will withstand a frost and harvest continues until a freeze. Frost may improve flavor, making them more firm and less bitter. A single plant may yield 2.5-3 pounds of sprouts over the season.
Purdue Master Gardener Vegetable Encyclopedia 2/2011 Page 36 of 94
Additional information The “s” on the end of Brussels is not a misspelling. This vegetable is named after the city of Brussels, in Belgium. Common Problems See insect pests listed under broccoli. See diseases under cabbage. References Growing Broccoli, Cauliflower, Cabbage, and Other Cole Crops in Wisconsin, University of Wisconsin http://learningstore.uwex.edu/assets/pdfs/A3684.PDF Brussels Sprouts, North Carolina State University http://www.ces.ncsu.edu/depts/hort/hil/hil-6.html
Purdue Master Gardener Vegetable Encyclopedia 2/2011 Page 37 of 94
Cole crops and related vegetables Cabbage (Brassica oleracea var. capitata) Family: Brassicaceae Related vegetables: arugula, Brussels sprouts, cabbage (all types), cauliflower, kale, kohlrabi, mustard, radish, rutabaga, turnip, horseradish, collards, watercress Snapshot • Hardy biennial harvested the first season. The terminal cluster of leaves, often called a head, is
eaten. • There are several types of cabbage. You can grow green ones, red ones, or ones with crinkled
leaves called savoy cabbage. Round heads are typical but you can also find more flattened or more pointed varieties. There are early maturing varieties, with smaller heads, that are planted in spring to mature before hot weather arrives. Late maturing varieties are commonly planted for fall harvest. They often form very large heads (several pounds) and are best used for preserving (e.g. sauerkraut).
• Plants are short, about 18”. • In spring, plant transplants 2-6 weeks before average last frost date, continuing until very early
April in southern Indiana, into May in the coldest part of the state. If growing from seed start indoors 5-7 weeks earlier. Ideal transplants are stocky, have 4-6 true leaves, and stems about the size of a pencil. Plant 12-24” apart in rows a minimum of 18” apart. Spacing within a wide row is 12-18”.
• For fall harvest, plant transplants 7-9 weeks before average first frost date (about mid-July in northern IN, late August in southern Indiana). Cabbage is quite cold tolerant and you may be able to harvest after that date.
• First heads can be harvested 7-9 weeks from transplanting though this can vary from 60 days to more than 90 days, depending on variety. Estimated yield per 10 ft row is 5-10 heads.
Planting • Sow seeds 1/4-1/2” deep. Seeds are usually started indoors but may be planted in soil for the fall
crop. Seeds germinate in 4-5 days at 70-80 °F. Grow on at 60-70 °F with cooler night temperatures.
• Once planted outdoors, transplants with fewer than 4 true leaves are more sensitive to cold than larger transplants. Very mature transplants (more than 6 leaves) may produce inferior crops or may begin to flower prematurely.
• Spring planting dates are usually given as 2-6 weeks before average last frost date. The earliest plantings are chancy because a prolonged cold spell, which will cause the plant to bolt (see “Common Problems” below), is more likely at this time. Wait until soil has warmed to 40 °F before transplanting.
• Practice crop rotation. Do not plant the same area with a cole crop two years running. Care Notes • When planting in spring (into cold soil), a starter fertilizer may help the plants become
established. • Side-dress with 0.1 lb actual N/100 sq ft about three weeks after transplanting when rapid
growth has begun. • Cabbage needs constant steady growth for best head development. Water if rainfall is lacking,
especially during head development.
Purdue Master Gardener Vegetable Encyclopedia 2/2011 Page 38 of 94
• When the heads grow too rapidly they may split. This can occur when a dry spell is followed by lots of rain or simply when warm weather stimulates rapid growth. To slow down growth and prevent splitting, grab the developing head and twist it to sever some of the roots, or simply root prune by pushing a trowel or shovel down into the soil at several points around the plant.
Harvesting • Harvest when the head is solid. For a single planting, harvest may last several weeks, with
smaller heads from the first plants harvested, larger heads later on. A single plant will yield only 1 large head.
• Spring plantings are always in danger from early hot weather, which will cause the heads to grow rapidly and split. Don’t delay harvesting of the spring crop.
• Cabbage is quite cold tolerant and you will probably be able to harvest the fall crop even after a hard frost. Mature plants can survive temperatures to almost 20 °F.
• Harvest by cutting the stem immediately under the head, leaving the loose outer leaves. • Small heads (2-4”) may grow at the base of the leaves on the cut stump, allowing a second small
harvest from each plant. Common Problems • Seedlings exposed to low temperature (40-50 °F) for more than 2 weeks may begin to flower
(bolt). This can be a problem with the spring crop. Replant if still early enough with a rapidly maturing variety.
• Cabbage yellows is a fungal disease that causes leaves to yellow and fall off. The disease can persist in the soil for several years. Disease-resistant varieties are now available and are highly recommended.
• Black rot is a bacterial disease. The veins of the leaf turn black and it soon falls. Black rot can affect cabbage, broccoli, and cauliflower. Disease-resistant varieties are now available and are highly recommended.
• For common insects, see Common Problems under broccoli. References Growing Broccoli, Cauliflower, Cabbage, and Other Cole Crops in Wisconsin, University of Wisconsin http://learningstore.uwex.edu/assets/pdfs/A3684.PDF

Purdue Master Gardener Vegetable Encyclopedia 2/2011 Page 39 of 94
Cole crops and related vegetables Asian Cabbage and Broccoli (also called Chinese or Oriental cabbage) (Brassica rapa) Several members of the mustard family (Brassicaceae), different from the plants grown in Western Europe and the US, are popular in China, Japan, and other Asian countries. Plants that look most like our common cabbage may be called celery cabbage, pe-tsai, napa or nappa (Japanese), hakusai (Japanese), pao, hsin pei tsai (Mandarin), and bow sum and bok choi (Cantonese). Depending on the variety, they may form elongated heads, rounded head, or no head at all (e.g. bok choy or pak choi, also called mustard cabbage). Chinese broccoli, which resembles sprouting broccoli, is called gai lan.
All of these plants are grown as described for cabbage and broccoli. They may be started from seed or planted as transplants in both spring and fall. Some varieties mature in 40 days from seed, others in 75. Time planting for 3-4 weeks before average last frost date. Spacing is 12” for upright varieties, 8-12” for bok choy types, and up to 24” for large heading types.
For fall crops, plan on first harvest on the average first frost date and calculate planting times from the days to harvest information. To harvest, cut off whole plant at ground level. Discard tough outer leaves. Estimated yield per 10 ft row is 7-10 heads.
Diseases and insect pests are the same as those that affect cole crops more commonly grown in the US. Crop rotation will help control these problems. Do not plant the same area with a cole crop two years running.
Some varieties, especially bok choy, seem especially prone to bolting (premature flowering) if exposed to cold weather (60 °F and below) for several days. Because of this, fall plantings are more reliable than spring plantings. References Chinese Vegetables, Purdue University http://www.hort.purdue.edu/ext/HO-187.pdf Cabbage, Chinese, University of Florida http://edis.ifas.ufl.edu/MV036

Purdue Master Gardener Vegetable Encyclopedia 2/2011 Page 40 of 94
Cole crops and related vegetables Cauliflower (Brassica oleracea var. botrytis) Family: Brassicaceae Related vegetables: arugula, Brussels sprouts, cabbage (all types), cauliflower, kale, kohlrabi, mustard, radish, rutabaga, turnip, horseradish, collards, watercress Snapshot • Cauliflower is a hardy biennial. The head, called the curd, is made of dormant flower buds. The
curd is usually white (snowball type), blanched by pulling the leaves over the head during growth. Hybrids between broccoli and cauliflower are available with purple or green heads (“broccoflower”). Purple cauliflower tastes like broccoli if harvested before frost, like cauliflower if harvested after frost. The purple color is lost during cooking.
• Plants are medium height, about 3 ft. • For spring planting, put transplants in the ground 2-3 weeks before average last frost date after
the soil has warmed to 50 °F. Do not plant so late that the curd matures in the heat of the summer. If growing from seed, plant indoors 5-7 weeks earlier. Space plants 18-24” apart with rows a minimum of 24” apart. Spacing within a wide row is 12-18”.
• For fall harvest, plant transplants 7-9 weeks before average first frost date (about mid-August in northern Indiana, late August in southern Indiana). Put transplants further apart than the spacing listed for spring plantings.
• Cauliflower is ready for harvest 50-55 days from transplanting for early season cultivars and in 70-80 days for late season varieties. Harvest by cutting far enough below the head to include several leaves to help hold the head together. Each plant produces only one head. Estimated yield per 10 ft row is 10 lb.
Planting • Sow seeds 1/4-1/2” deep. Seeds are usually started indoors but may be planted in soil for the fall
crop. Seeds germinate in 5-6 days at 70-80 °F. Grow on at 60-70 °F with cooler night temperatures.
• If using transplants, don’t let them get too large (no more than about 4”) before planting. However, plants with less than 3-4 pairs of true leaves are sensitive to frost.
• Practice crop rotation. Do not plant the same area with a cole crop two years running. Care Notes • When planting in spring (into cold soil), a starter fertilizer may help the plants become
established. • Side-dress with 0.1 lb actual N/100 sq ft about 3 wks after transplanting when rapid growth has
begun. • Cauliflower needs constant steady growth for best head development. Water if rainfall is lacking. • Blanching is necessary to obtain white curds. When the curd is 2-3” in diameter fold the leaves
below the head up over it and secure them (try a rubber band or toothpicks). The curd will grow quickly, often reaching 6-8” in diameter in 3 or 4 days in warm weather, in about 2 weeks in cool weather.
Purdue Master Gardener Vegetable Encyclopedia 2/2011 Page 41 of 94
Harvesting • Harvest cauliflower after the curd has turned white and reached mature size. Once blanching
begins, check the head every few days so it does not become overmature. Harvest cauliflower heads when they are six or more inches in diameter but before the flower parts separate. If left too long, the heads will tend to rot in warm weather and begin to flower in cool weather. If this happens, the anthers and stamens will turn the curd fuzzy and grey-brown, a condition called riciness.
• Harvest cauliflower by cutting below the head with a sharp knife. Include a few leaves with the head since they will help hold it together.
• Each plant produces only one head. Unlike broccoli and cabbage, the cut stump will not produce smaller heads for a second harvest.
• Time from planting to harvest varies greatly depending on cultivar. The seed packet or plant tag should give you this information.
• Mature cauliflower can tolerate temperatures below freezing. Harvest or protect if temperatures threaten to dip into the upper 20s.
Additional info There are cauliflower varieties that may help you avoid the problems that commonly afflict cauliflower: • Some varieties are self-blanching (though check to make sure leaves are completely covering the
head). • The purple and green-headed varieties do not need blanching because you do not want them to
be white. • There are also varieties with more tolerance to heat (for spring planting) and frost (for late
summer planting) and some with disease resistance. See the Illinois “Watch Your Garden Grow” website for recommendations (http://urbanext.illinois.edu/veggies/cauliflower.cfm).
Common problems • Cauliflower is considered to be more difficult to grow than either broccoli or cabbage. It is not as
tolerant to heat, cold, or drought. Any factor that interrupts its growth can cause problems. If growth is interrupted, the plant may button - form a small, hard, inedible head. This can be caused by using overly-large transplants, crowding transplants in small containers, cold temperatures lasting several days, a dry spell, or lack of nitrogen. Fall crops are usually more reliable because the chance of cold temperatures soon after planting and chance of hot weather as the plant matures are lower than in spring.
• If temperatures are above 80 °F during curd formation, leaves may form in the head, the head may become rough in texture, have a purple or green coloration, or simply not form at all.
• The insects and diseases that attack cabbage and broccoli can also be problems with cauliflower. Reference Growing Broccoli, Cauliflower, Cabbage, and Other Cole Crops in Wisconsin, University of Wisconsin http://learningstore.uwex.edu/assets/pdfs/A3684.PDF
Purdue Master Gardener Vegetable Encyclopedia 2/2011 Page 42 of 94
Cole crops and related vegetables Collards and Kale (Brassica oleracea var. acephala) Collards and kale are thought to be non-heading cabbages. Collards has smooth leaves, kale has crinkled leaves like a savoy cabbage. “Flowering kale” often has pink, red, or white in the leaves and is planted as an ornamental along with mums in the autumn garden.
Both collards and kale are biennials. They are harvested for their leaves during the first season of growth. Both reach about 2 ft in height and are less troubled by insect pests than other cole crops. Crop rotation will help control diseases. Collards Collards is one of the most heat and cold tolerant cole crops. In Indiana, transplants can be planted almost continuously from mid-March to August (start seed indoors 3 weeks earlier, put directly into the soil for late season plantings). Plant 6” apart, then harvest some plants as they reach 6-10” high to increase spacing to 18”. Rows should be at least 36” apart. Spacing within a wide row is 12-15”.
You can harvest a few of the largest leaves on each plant every few days. If the plant is well-cared for (side-dress with 0.1 lb actual N/100 sq ft if plant shows signs of nitrogen deficiency), it will continue to produce until frost. You can also harvest the entire crop at the 6-10” stage. Plants are ready to harvest in 50-80 days. Replant when leaves become tough.
Water during the heat of the summer if rainfall is lacking to ensure continual production. Collards can tolerate temperatures into the mid-20s. Estimated yield per 10 ft row is 10 lb. Kale Kale is cold tolerant but not as heat tolerant as collards. Grow it in spring, then again in fall. You will probably be able to harvest until the ground freezes hard in early winter. Frost improves the flavor. Avoid planting so the crop matures in summer. High temperatures slow plant growth and make the leaves tough and bitter. Kale will tolerate part shade.
Plant seed directly into the garden starting 4-6 weeks before average last frost continuing until about that date. Alternately, you can start seeds indoors 5-7 weeks before transplanting.
Fall planting begins mid-July in the north, early September in the south. The last planting should be 6-8 weeks before the average first frost date. Place 8-12” apart, rows 18” apart. Spacing within a wide row is 15-18”. Side-dress with 0.1 lb actual N/100 sq ft when plants are about one-third grown.
Harvest about 50 days after seeding, before leaves become tough and fibrous. You can harvest either the whole plant or harvest a few of the oldest leaves, continuing until the heat of summer or cold of winter stops production. Kale can tolerate temperatures into the mid-20s. Estimated yield per 10 ft row is 2-5 lb. Reference Growing Broccoli, Cauliflower, Cabbage, and Other Cole Crops in Wisconsin, University of Wisconsin http://learningstore.uwex.edu/assets/pdfs/A3684.PDF
Purdue Master Gardener Vegetable Encyclopedia 2/2011 Page 43 of 94
Cole crops and related vegetables Kohlrabi (Brassica oleracea var. gongylodes) Kohlrabi is a biennial harvested the first season of growth. Seedlings quickly form a swollen stem, sometimes called a bulb, just above ground level. The leaves stick out like spokes and the plant reaches a height of about 18”. The bulb may be light green or purple, with white flesh. Kohlrabi tastes like a sweet, mild turnip.
Like all cole crops, kohlrabi does best when allowed to mature in cool weather. For spring crop, plant seeds directly into the garden, 1/4-1/2” deep, starting about 4 weeks before average last frost date. Thin to 3-6”, with 18” minimum row spacing. Spacing within a wide row is 4-8”. Start seeds indoors 4-6 weeks earlier, then transplant for an earlier harvest. There is only one bulb per plant, so make several small plantings a few weeks apart. Kohlrabi is more tolerant of heat than other cole crops, so you may be able to continue planting for 4-6 weeks.
For fall harvest, plant seeds in mid-summer. Plant your last crop to mature a week or two after average first frost date since kohlrabi can easily survive a frost, even temperatures into the mid-20s. Varieties mature in 38-55 days.
Fertilize kohlrabi midseason with 0.1 lb actual N/100 sq ft. Water if rainfall is lacking since this will keep the bulbs from becoming tough and woody.
Insects and diseases are usually not serious problems. A few caterpillars feeding on the leaves do not reduce the harvest.
Harvest kohlrabi when the swollen stem is small and has the mildest flavor. Larger bulbs can be tough and woody. Begin harvest when it reaches 1” diameter and continue until it reaches the size for the variety you have chosen. New varieties such as 'Gigante' and 'Kossak' do not become woody. To harvest, simply pull the plant from the ground. Estimated yield per 10 ft row is 8 lb. Reference Growing Broccoli, Cauliflower, Cabbage, and Other Cole Crops in Wisconsin, University of Wisconsin http://learningstore.uwex.edu/assets/pdfs/A3684.PDF
Purdue Master Gardener Vegetable Encyclopedia 2/2011 Page 44 of 94
Tomatoes, Peppers, and Related Plants - Introduction Tomatoes, peppers and chiles, eggplant, tomatillo, and potatoes are all members of the nightshade family (Solanaceae). Though some members of this family contain poisonous alkaloids (as do potato tubers that turn green after exposure to sunlight), these five vegetables are some of the favorites of the Indiana vegetable garden. All except potatoes grow best in warm weather. All, except potato, are eaten for the tasty fruit they produce. These vegetables share some of the same pests and crop rotation can be an important control strategy. Tobacco is in the nightshade family, too. Gardeners who use tobacco should wash their hands thoroughly before working with any of these vegetables. Their hands can spread a disease, tobacco mosaic virus, to these vegetables. Tomatoes, peppers, and eggplant are covered in detail. Brief information is given for tomatillo, a vegetable popular in Mexico and other parts of the Americas. Potatoes are covered in detail in the Potatoes and Sweet Potatoes section of this encyclopedia. Links to specific vegetables Tomatoes
Peppers and Chiles
Eggplant
Tomatillo
Purdue Master Gardener Vegetable Encyclopedia 2/2011 Page 45 of 94
Tomatoes, Peppers, and Related Plants Tomatoes (Solanum lycopersicum, formerly Lycopersicon esculentum) Family: Solanaceae Related vegetables: eggplant, pepper and chiles, potato, tomatillo Snapshot • Tender (warm-season) perennial grown as an annual. The fruit is harvested. • There are many different types of tomatoes and many different ways to grow them. See
“Additional Information” below. • Height is cultivar dependent but some tomatoes can grow as tall as 6 ft, especially if staked. • Plant transplants two weeks after average last frost date. Planting can continue until
midsummer. Last planting date is about 100 days before average first frost date. • Spacing is dependent on variety. Space dwarf plants 12” apart; staked plants 15-24” apart; caged
plants and plants allowed to sprawl on the ground 24-36” apart. (see “Additional Information” below).
• Harvest tomatoes when fully colored. Time from planting to first harvest varies with cultivar, usually 60-90 days. Yield depends on cultural system, see “Additional Information” below.
Planting • You can grow your own tomatoes from seeds started indoors or buy transplants. Tomato seeds are
rarely planted directly into the garden in Indiana. • Start seeds indoors planting them 1/4-1/2” deep, 4-6 weeks before the average last frost date.
At optimum germination temperatures of 75-80 °F seedlings should appear in about 6 days. Grow them at 60-75 °F. Transplant into larger pots as the seedlings grow and give them good light so the plants stay short and stocky.
• If you purchase transplants, look for short, stocky plants with good root systems and stems about the thickness of a pencil. If you must purchase tall, leggy transplants, plant them by placing them on their side and covering the lower portion of the stem with soil. New roots will form on the stem.
• Plant out about 2 weeks after the average last frost date or when soil temperature remains above 60 °F.
• If using cages or stakes, put these in the ground as you place the transplants. • If growing in container, select container proportional to the expected size of the plant. Care notes • Tomatoes are heavy feeders. Side-dress with 0.1 lb actual N/100 sq ft three times over the
summer: 1) two weeks after first fruit set, when first tomato about golf ball size, 2) two weeks after picking first ripe tomato, 3) one month later (six weeks after picking first ripe tomato).
• Consistent soil moisture is needed to reduce incidence of blossom end rot and fruit cracking. Mulching highly recommended.
• Removing suckers is often recommended for tomatoes. The word “sucker” has a special meaning when discussing tomatoes. Suckers are not shoots growing out of the ground at the base of the plant but the side shoots that grow at the nodes on the stem. Suckers may or may not be removed depending on the cultural system you select (see “Additional Information” below).

Purdue Master Gardener Vegetable Encyclopedia 2/2011 Page 46 of 94
Harvesting • The first tomatoes typically ripen in 60-90 days (early varieties-late varieties) after transplanting.
For a single tomato fruit, time from fruit set to red maturity is 45-60 days. • Harvest tomatoes when they are fully colored. Large immature fruit that has reached the
“mature green stage” (full size but not yet red with white, star shaped zone at bottom of fruit) will ripen indoors, without sunlight, at around 70 °F if harvested before a killing freeze.
• Harvest by gently twisting stem and pulling or by cutting. Additional Information Tomatoes may be the most popular vegetable in the home garden. There are many tomato cultivars, many types of tomatoes, and many ways to grow them. A brief summary is given here. Determinate vs. indeterminate: Determinate varieties reach a certain size, set fruit, then usually decline. The fruit all matures at about the same time, a convenience if you are preserving the harvest. Indeterminate varieties set fruit throughout the season producing fewer mature fruit at any one time but often producing fruit until a killing freeze. Disease resistant varieties: many of the newer varieties are resistant to some of the worst pests of tomatoes. Look for varieties labeled as VF, VFN, or VFNT, indicating they are resistant to Verticillium, Fusarium, Nematodes, or Tobacco mosaic virus. Types and flavors of fruit: Some tomato varieties produce exceptionally large fruit, others small cherry tomatoes. Most are red but you’ll also see yellow, orange, and purple. Some are great eating tomatoes, others (the paste tomatoes) are better for making sauces. More modern varieties are bred for diseases resistance and early maturity; heirloom varieties may have the flavor (and pest problems) you remember from childhood. Some tomato varieties are noted for having low or high sugar content or low or high acidity. Since you can often buy a single plant at the garden center, it’s easy to try different varieties each year. Other Master Gardeners can recommend varieties that have performed well for them. Cultural systems: Tomato plants may be allowed to sprawl on the ground, tied to a stake, or grown inside a wire cage.
Staking produces fewer tomatoes per plant (10-15 lb yield per plant) but each plant takes up less space. Fruit may be larger and easier to pick but fruit cracking and blossom end rot may be more of a problem. If the plant is staked, one or two stems are allowed to grow and all other side-shoots (suckers) are removed.
Both sprawling and caged plants have similar yields, 15-25 lb per plant. Allowing plants to sprawl on the soil takes less work but the most space. Suckers are not removed. Fruit can become sunburned and may be susceptible to diseases if allowed to rest on the soil. Commercial tomato farms often grow tomatoes this way.
Growing tomato plants inside a wire cage is a popular home gardening method. Yield is high. It is less labor-intensive than staking tomatoes but you must purchase, then store the wire cage. Select a cage with large openings so you can reach inside to harvest the tomatoes. Removal of side-shoots (suckers) is not needed, but some gardeners remove them early in the season, allowing the plant to grow naturally later in the season. Fruit may be slower to mature on these plants than in other methods.
Purdue Master Gardener Vegetable Encyclopedia 2/2011 Page 47 of 94
Common problems • Blossom end rot, technically a lack of calcium, is usually caused by fluctuating soil moisture, not
lack of calcium in the soil. Water if rainfall is lacking. You can verify that the problem is not caused by a lack of calcium by having your soil tested.
• Lack of fruit set. Fruit set on tomatoes is sensitive to temperature. Night temperatures appear to be most important – temperatures below 59 °F or above 68 °F often prevent fruit set. Daytime temperatures over 90 °F can also reduce fruit set. Fruit production will resume when temperatures moderate.
• Fruit cracking, caused by fluctuating soil moisture. • Fruits with poor color, possibly with yellow or white-grey spots, may have sunscald or sunburn
caused by too much direct sunlight on the fruit. It is usually a result of poor foliage cover. • Tomatoes (and other members of the nightshade family) are extremely sensitive to the herbicide
2,4-D. Leaves may become cupped, elongated, or twisted and the whole plant stunted. Fruit may only partially ripen. Do not use broad-leaf lawn herbicides near the vegetable garden. Do not mulch with grass clippings from a lawn treated with broad-leaf herbicides.
• Tomatoes are especially sensitive to juglone, a compound produced by walnut trees. Tomatoes grown near walnuts will turn yellow, wilt, and die. The only solution is to plant tomatoes further from the walnut tree.
• Diseases: several fungal leafspot (often called blights) and wilt diseases, tobacco mosaic virus, bacterial spot. Purchase resistant varieties and practice crop rotation. Fungicides may be used.
• Insects: Tobacco/tomato hornworm may eat leaves and cutworms may attack seedlings and small transplants. Hornworms can be removed by hand but they are difficult to spot. Barriers around seedlings will prevent cutworm damage.
References Tomatoes, Purdue University http://www.hort.purdue.edu/ext/HO-26.pdf Blossom End Rot of Tomato Fruit, Purdue University http://www.ces.purdue.edu/extmedia/BP/BP-13.html Late Blight of Tomato and Potato, Purdue University http://www.extension.purdue.edu/extmedia/BP/BP-80-W.pdf
Purdue Master Gardener Vegetable Encyclopedia 2/2011 Page 48 of 94
Tomatoes, Peppers, and Related Plants Peppers and Chiles (Capsicum annuum, Capsicum frutescens, Capsicum chinense) Family: Solanaceae Related vegetables: eggplant, potato, tomatillo, tomato Snapshot • Tender (warm season) perennial grown as an annual. The fruit is harvested. Green peppers are
sometimes called mangos in Indiana. • You can grow peppers with small or large fruit, with mild or hot fruit (often called chiles), with
rounded or long and skinny fruit, and with fruit that matures to red, purple, yellow, or orange. Some varieties are grown as ornamentals. These almost always produce hot peppers.
• Plants of moderate height, about 3 ft. • Plant transplants in the garden starting about two weeks after the average last frost date.
Peppers are less cold tolerant than tomatoes. Delay transplanting until soil has warmed to 60 °F. Place plants 18-24” apart in rows a minimum of 18” apart. Spacing within a wide row is 12”x12”. Plants will produce all summer with perhaps a short break for the hottest weather, so repeat plantings are not necessary. You can plant as late as early-mid July and still get a crop unless you choose a variety that takes a long time to mature. Use a starter fertilizer at planting.
• Sweet peppers are usually harvested green and immature. Pick them whenever they reach usable size. Hot peppers, except jalapenos, are picked when fully ripe. All peppers will change color as they ripen, to red, yellow, orange, or purple. They will be somewhat sweeter when mature than they are when green. Typical maturity is 60-90 days after planting.
• Pick peppers and chiles carefully. The plant stems are brittle. It is best to cut off the pepper. Pulling may pull off a portion of the plant, too. Estimated yield per 10 ft row is 80 fruit.
Planting • You can grow your own pepper plants from seeds started indoors or buy transplants. Because
peppers and chiles come in so many different shapes, colors, and levels of hotness, many gardeners take advantage of the wide variety available at garden centers. Buy stocky plants 4-6” high with good green color.
• Pepper seeds are rarely planted directly into the garden in Indiana. Start seeds indoors, planting them about 1/2” deep 4-6 weeks before the average last frost date. At optimum germination temperatures of 75-80 °F seedlings should appear in 7-8 days. Grow them at 65-80 °F. Transplant into larger pots as the seedlings grow and give them good light so the plants stay short and stocky.
• Peppers will not tolerate prolonged periods below 50 °F and do not grow well in cold, wet soil. Don’t plant your peppers and chiles too early.
Care Notes • Use a starter fertilizer at planting. • Side-dress with 0.1 pounds actual N/100 sq ft after the first fruits set. • Provide 1-1.5” water per week but be careful not to overwater. Insufficient soil moisture can
lead to blossom end rot but waterlogged soils can cause the plant to drop flowers and small fruit. • Pepper plants are brittle. In areas of high wind, staking or caging may be worthwhile. • Sweet peppers grow best at 65-85 °F. They will not set fruit if temperatures fall below 60 °F or go
above 90 °F. Because of this, there is often a drop in productivity in the hottest part of the summer. Production will resume when the weather cools a bit.
Purdue Master Gardener Vegetable Encyclopedia 2/2011 Page 49 of 94
• Hot peppers can take more heat, growing best when days are over 75 and nights over 70 °F. They won’t set fruit if temperature falls below 60 °F but many will continue to produce even at temperatures over 90 °F.
Harvesting • For most cultivars, fruit begins to mature in 60-90 days after transplanting. A single fruit matures
to the green stage in 45-55 days after pollination; to colored stage 60-70 days after pollination. • Sweet peppers may be picked green or ripe (when they are red or the color for your variety). You
can begin picking when they reach a size you feel is acceptable. If you leave them until they color, they will often be sweeter in flavor.
• Most hot peppers are allowed to ripen before harvesting. Jalapenos can be picked green. • Be very careful harvesting your peppers and chiles. A yank can take off a whole section of the
plant. Use clippers or hold the plant firmly with one hand and snap off the fruit with the other. Leave about 1” of stem on the fruit.
• Fruit does not ripe all at once, so harvest regularly, about every 7-10 days. Fruit picked green will redden if stored above 50 °F
Additional Information • Most peppers and chiles are Capsicum annuum. Tabasco peppers belong to the species Capsicum
frutescens. Habanero peppers are Capsicum chinense. Despite the name, all peppers and chiles are native to the New World. Black pepper and Schezuan peppercorns are two completely different species and are not grown in American gardens.
• Pepper hotness is rated in Scoville heat units. Sweet bell peppers have a rating of 0 units. Jalapenos and cayenne are 10,000-18,000 units. Tabasco is around 40,000; habanero around 100,000, but one variety can reach over 400,000. The “hot” is caused by the chemical capsicum. It is concentrated in the inner ribs of the pepper and somewhat in the fleshy part of the fruit. There is no capsicum in the seeds.
• If you are a chile pepper enthusiast, you might enjoy visiting the website of The Chile Pepper Institute at New Mexico State University.
Common Problems • There are environmental situations that can cause problems. Blossom end rot, technically a lack
of calcium, is usually caused by fluctuating soil moisture not lack of soil calcium. Water if rainfall is lacking. (A soil test will tell you soil calcium level.) Excess soil moisture can cause fruit and flowers to drop. Off-white blotches and papery dead skin is sunscald caused by exposing the fruit to sun. It is most common if the plant has lost a number of leaves or has been exposed to severe winds. Fruit will not set below 60 °F or above 90 °F for sweet peppers.
• There are a number of viruses that infect peppers. Select varieties labeled as resistant. Some varieties are also resistant to bacterial leaf spot. Practice crop rotation. Do not plant a member of the nightshade family in the same spot two years in a row.
• Aphids may accumulate on the underside of the leaves. Look for a sticky substance called honeydew on lower leaves and fruit. Natural predators will provide some control. Aphids can usually be dislodged with a strong stream of water.
References Growing Tomatoes, Peppers, and Eggplant in Minnesota Home Gardens, University of Minnesota http://www.extension.umn.edu/distribution/horticulture/m1246.html Peppers, University of Arkansas, http://www.uaex.edu/Other_Areas/publications/pdf/FSA-6015.pdf Peppers, Iowa State University, http://www.extension.iastate.edu/Publications/PM1888.pdf
Purdue Master Gardener Vegetable Encyclopedia 2/2011 Page 50 of 94
Tomatoes, Peppers, and Related Plants Eggplant (Solanum melongena) Family: Solanaceae Related vegetables: peppers and chiles, potato, tomatillo, tomato Snapshot • Tender (warm-season) perennial grown as an annual. The fruit is harvested. • Eggplant, or aubergine, is available in varieties that produce large or small fruit. The fruit may
be pear-shaped, round, or elongated and slender. The most common varieties have purple, white, or bicolor skin, but eggplants with green, red, or orange skin are also available.
• Plants of moderate height, about 3 ft. • Eggplant is very sensitive to cold weather. Plant transplants 2 week or more after average last
frost or when daily average temperate is 68 °F and the soil has warmed to 60 °F. A cold snap can stunt the plant. Plant transplants 18-24” apart in rows a minimum of 24” apart. Spacing within a wide row is 18”x18”. Plants will produce through the summer so repeat plantings are not necessary. You can plant as late as late June and still harvest a crop.
• Eggplant can be harvested when they are about 1/3 mature size until fully grown. Fruits ready for harvest are firm and glossy. You will need to cut the fruit off the plant. Typical maturity is 60+ days after planting. Estimated yield per 10 ft row is 20 fruit.
Planting • Eggplant likes warm weather. Don’t plant too early or the plants will stall and become stunted.
Even a light frost will kill the plants. Two weeks after the average last frost date is the earliest you can plant.
• Purchase stocky transplants about 7” high with good color. • You can start seeds indoors 8-10 weeks before transplanting by planting seeds 1/4” deep.
Temperature optimum is 80-85 °F. Seedlings should appear in about 6 days. Grow on at 70-80 °F. Transplant into larger pots as the seedlings grow and give them good light so the plants stay short and stocky.
Care Notes • Use a starter fertilizer at planting. • Side-dress with 0.1 lb actual N/100 sq ft when first fruits set. • Eggplants like it hot. They grow best when daytime temperatures are 80-85 °F, nights about
70 °F. Flowering and fruit set stop below 65 °F. • Provide consistent moisture by watering if rainfall is lacking. Eggplants need 1” of water a week
for growth, up to 2” during fruit set. Lack of water during fruit set can reduce yield. Inconsistent moisture can lead to blossom-end rot.
• Eggplants usually do not need staking. Harvesting • Fruit harvested too early may contain solanine, a toxic compound. Fruit is still immature if it is
hard and your thumb cannot make an impression. It is ripe if an indentation made by your thumb pressing into the skin springs back. If the fruit is spongy and your thumb print remains, it is overmature.
• Fruit size when harvested may be 1/3 to full size for the cultivar. It should be firm and the skin should be shiny.
• If fruit becomes dull, brown, or spongy it is too mature to eat. Remove it from the plant.

Purdue Master Gardener Vegetable Encyclopedia 2/2011 Page 51 of 94
• If fruit is harvested on a regular basis, the plant will continue to bear until frost. Any fruit that has become over mature should be removed immediately.
• The fruit stem is woody and perhaps spiny. Cut, don’t pull, the fruit off the plant. Leave about an inch of stem attached to the fruit.
Common problems • Inconsistent or insufficient soil moisture or low temperatures can reduce yield. • Eggplant is susceptible to verticillium wilt. Practice crop rotation. Do not plant a member of the
nightshade family in the same spot two years in a row. • Flea beetles chew tiny holes all over the leaves and can be a serious problem. Insecticides may
be needed to control this pest. Colorado potato beetles can also be a problem. See information in the discussion of potatoes. Aphids and spider mites are an occasional problem and can often be controlled by removing them from the plant with a strong stream of water.
References Growing Tomatoes, Peppers, and Eggplant in Minnesota Home Gardens, University of Minnesota http://www.extension.umn.edu/distribution/horticulture/m1246.html Eggplant, University of Arkansas http://www.uaex.edu/Other_Areas/publications/PDF/FSA-6010.pdf
Purdue Master Gardener Vegetable Encyclopedia 2/2011 Page 52 of 94
Tomatoes, Peppers, and Related Plants Tomatillo (Physalis philadelphica) Tomatillo is a heat-loving plant just like tomatoes, peppers, and eggplants. It is harvested for its fruit, a small, tomato-like berry contained inside a papery husk.
Put tomatillo transplants in the garden 2 weeks after the average last frost date. You can start seeds indoors 3-4 weeks earlier. Give tomatillos plenty of space. The plant can grow to 3-4 ft high and wide. They may profit from being staked or caged for support. Provide adequate moisture, about 1.5” a week. Tomatillo is a warm-season annual.
The first tomatillo is ready to harvest about 90 days after transplanting. The plant will continue to yield until frost if the fruit is picked regularly. A single plant can produce 200 fruit.
Wait to side-dress, if needed, until after the first fruit sets.
Tomatillos are ready to harvest when the husk turns from green to tan. The berry should still be green or just starting to yellow. Fully ripe fruit are yellow and may lose their typical tangy flavor. Estimated yield per 10 ft row is 30 lb.
Fruit with the husk can be stored for about 2 weeks in the refrigerator; much longer if the husks are removed. Before use, remove the husk and wash the sticky residue from the skin. Tomatillos are used raw or cooked in salsa and sauces.
Tomatillos typically have few problems. Spacing to encourage air circulation and watering the soil, not the leaves, will help prevent fungal leaf diseases. Practice crop rotation. Do not plant a member of the nightshade family in the same spot two years in a row. References Tomatillos, Iowa State University http://www.extension.iastate.edu/Publications/PM1895.pdf Tomatillo, University of Kentucky http://www.uky.edu/Ag/NewCrops/introsheets/tomatillo.pdf

Purdue Master Gardener Vegetable Encyclopedia 2/2011 Page 53 of 94
Potatoes and Sweet Potatoes-Introduction No matter where you are in the world, either potatoes or sweet potatoes will be an important food crop. Potatoes prefer cool weather and are grown in temperate areas. Sweet potatoes require a long growing season and do well in tropical and subtropical climates. Both potatoes and sweet potatoes are large plants harvested for the underground storage organs they produce. Links to specific vegetables Potatoes (includes information on new potatoes and “straw potatoes”)
Sweet potatoes
Purdue Master Gardener Vegetable Encyclopedia 2/2011 Page 54 of 94
Potatoes and Sweet Potatoes Potato (Solanum tuberosum) Family: Solanaceae Related vegetables: Pepper, tomato, eggplant, tomatillo Snapshot • Cool season perennial that is harvested completely each season. The edible portion is a tuber, a
swollen stem. • The common white-fleshed potato is often called an Irish potato. There are many different
potato cultivars with different colored skin (red, light tan, dark brown) and flesh (yellow, pink, red, blue). You can get early, mid-, and late season varieties.
• Plants are moderate in height, about 2 ft. • Always purchase certified “seed potatoes” (see below) for planting. Place each piece 10-12”
apart, 2-3” deep in rows a minimum of 24” apart. Spacing within wide rows is 9-12”. • Plant seed potatoes starting about 3 weeks before the average last frost date or when soil at
planting depth has warmed to 45 °F. Do not plant into wet soil. There is no need for successive plantings because many potatoes store well. It is more important to plant early to take advantage of cool weather. Summer planting for a fall harvest is possible, especially with late-season varieties that store well. Time your planting so the potatoes are fully mature by the average first frost date.
• Early season varieties mature in 50-70 days but do not store well, late season varieties in 90-120 days and do store well.
• Potatoes harvested before full maturity are called “new potatoes”. Harvest these small potatoes about a month before full maturity usually about a week after the plant has flowered. Early season varieties are usually preferred for new potatoes. See “Harvesting” below.
• When foliage dies back, potatoes are mature. Harvest at this time or allow the potatoes to cure in the ground for several weeks. If harvesting in late fall let the vines die with the first frost, then harvest about 2 weeks later but before a hard freeze. Estimated yield per 10 ft row is 30 lb.
Planting • Potatoes are started each year by planting a small potato tuber. This tuber grows into the plant
that will produce the season’s harvest. These small potatoes are called “seed potatoes.” Purchase seed potatoes from a reputable dealer. Certified seed potatoes will be disease-free. Select ones that are firm and have not sprouted.
• If the seed potatoes are small, 1.5-2 ounces, then plant the whole potato. Larger seed potatoes can be cut into several blocky pieces, each about 1.5-2 ounces or a 1.5” cube. Most references recommend allowing the cut edge to dry, then planting with the cut side down. Each piece should have an eye. This is a bud, which will produce the new stem of the plant.
• Do not use potatoes purchased at the grocery. They are treated with a chemical to keep the eyes from sprouting. Do not use potatoes saved from your previous year’s garden. They may be contaminated with disease pathogens.
• Potatoes need loose soil with good aeration and drainage. Add organic matter to clay soils in fall rather than spring to reduce incidence of the potato scab (a disease).
• Many gardeners make a raised bed for the plant as it begins it growth. Plant the seed potatoes as described above. After the shoot emerges from the soil, gradually make a wide mound of soil around the stem, up to 6” deep (this is known as “hilling up”). Don’t bury the growing tip. The potatoes will be in this raised bed, easier to harvest and less prone to rot in wet soils.
Purdue Master Gardener Vegetable Encyclopedia 2/2011 Page 55 of 94
Care Notes • Potatoes need consistent soil moisture to ensure good tuber formation. Provide 1.5-2” a week if
rainfall is inadequate. Mulch to conserve moisture, slow weed growth, and keep the soil cool. Tubers form best at soil temperatures between 60 and 70 °F. Tubers will not form if soil temperature is over 80 °F.
• Close spacing (24” between rows rather than 36”) will allow the plants to grow a canopy that covers most of the soil. This will help slow water loss and keep the soil cool also.
• Potatoes need a soil of good fertility. Follow soil test recommendations. Side-dressing is usually not needed except on sandy soils or if growth indicates a nitrogen deficiency. Some references recommend side-dressing (0.1 lb N/100 sq ft) at hilling when plants are 4-6” high.
• Potatoes flower and set fruit, just like tomatoes and peppers. The fruit is poisonous and the plant does not come true from seed. Cut off the flowers and fruit as you have time and inclination.
Harvesting • Tubers begin to form at about the time of flowering. Flowering does not influence tuber
formation, it is just a convenient way to estimate when tubers begin to form. • Days to maturity: Early varieties 70 to 90 days, mid season varieties 90 to 120 days, late varieties
120 to 140 days. • Potatoes are ready to harvest when they are large enough for you to use, as small as 1” in
diameter for baby potatoes. The deepest tubers develop first. With care you can dig into the mound, harvest the largest potatoes and leave the smallest to develop for later harvest. These “new potatoes” do not store well, so harvest only the number you can use in a week or two. You can continue to harvest periodically through the season, until the leaves have died back, if you are careful not to injure the plant.
• Potatoes are mature when foliage dies back. If you are ready to harvest but the tops are not dying back, simply cut them off. Harvest by removing the top growth and carefully digging out the potatoes. Harvest is typically in August or September for mid and late season varieties. You can leave the potatoes to cure in the ground for 2 weeks after the tops have died back. This allows the skin to harden which will reduce rot during storage. Do not leave potatoes in the ground if it is exceptionally warm and wet (tubers may begin to sprout or rot).
• Late plantings will mature near the first frost. The frost will kill back the tops but not damage the tubers. Dig the tubers about 2 weeks after the frost but before a hard freeze. Potatoes allowed to freeze in the ground will rot in storage.
• Late-season varieties store best. Be careful not to injure the skin while digging. Store in the dark at room temperature for several weeks. Skins should harden and become difficult to rub off with your thumb. Store over the winter in the dark between 38 and 40 °F with high humidity. Do not store cut, damaged, or diseases tubers. Do not store with fruit. Gas from the fruit (the plant hormone ethylene) makes potatoes sprout.
Additional Information If you want perfectly shaped, easy to harvest potatoes, you might grow “straw potatoes”. Plant the potatoes as described above but only 1” deep. When the shoot emerges, place straw 4-6” deep around the plants and between the rows. The potatoes will form above the soil surface under the straw. The straw conserves moisture but, more importantly, keeps the soil cool. When ready to harvest, simply remove the straw and collect the potatoes.
Purdue Master Gardener Vegetable Encyclopedia 2/2011 Page 56 of 94
Common problems • The parts of a potato tuber exposed to sunlight will turn green. This is chlorophyll, which is
harmless. Unfortunately a chemical called solanine also accumulates in this area. Solanine is bitter tasting and poisonous. Prevent the problem by mounding soil over the potatoes as they grow. Store harvested potatoes in the dark. Solanine can be removed by peeling and cutting away any green portions.
• Potato scab is a serious disease. It can be prevented by lowering soil pH to 4.8-5.2. Many soils in Indiana are calcareous and it will be impossible to lower pH this much. The best option is to select varieties that are scab resistant and grow the potatoes at normal vegetable garden pH, 6.0-7.0. Other options to reduce potato scab include adding organic matter to the soil in fall rather than in spring and irrigating dry soils, especially as the plants are forming tubers (at flowering and for the next 6 weeks).
• Using only whole certified seed potatoes will help control several diseases including aster yellows. Practice crop rotation. Do not plant potato, tomato, pepper, or eggplant in the same area two years in a row.
• Late blight can devastate a potato planting, killing the plants in two weeks if conditions are right. It also infects tomatoes. This is the disease responsible for the Irish potato famine. Late blight is a fungal disease that causes dark, water-soaked spots on the leaves. Tubers can also be infected and will rot. Late blight is more common in cool, wet weather. Crop rotation, sanitation and avoiding overhead watering can help. A few late-season varieties are somewhat resistant to the disease. Fungicides can be used.
• Early blight can be a problem in hot humid weather. It usually infects older leaves on older plants causing dark circular spots. Late infections do not decrease yield but fungicide treatment may be warranted if symptoms occur before or at flowering. Some varieties are resistant.
• The Colorado potato beetle feeds on potatoes and related plants – tomato, eggplant, and pepper. It is the most serious insect pest of potato in Indiana and can completely defoliate the plant. Hand pick adults. Bt insecticides specific for Colorado potato beetle are available and effective when larvae are small. This insect can develop resistance to insecticides. Purdue Extension bulletin E-96, “Managing Insect Pests of Potato”, can provide more information.
• Hollow heart, the formation of a cavity at the center of the tuber, is a result of uneven growth caused by uneven soil moisture.
References Potatoes, Purdue University http://www.hort.purdue.edu/ext/HO-62W.pdf Growing Potatoes in the Home Garden, Cornell University http://suffolk-lamp.cit.cornell.edu/assets/Horticulture-Leaflets/Growing-Potatoes- in-the-Home-Garden.pdf Managing Insect Pests of Potato, Purdue University http://extension.entm.purdue.edu/publications/E-96.pdf Potato Pests, University of Kentucky http://www.ca.uky.edu/ENTOMOLOGY/entfacts/ef304.asp Late Blight of Tomato and Potato, Purdue University http://www.extension.purdue.edu/extmedia/BP/BP-80-W.pdf
Purdue Master Gardener Vegetable Encyclopedia 2/2011 Page 57 of 94
Potatoes and Sweet Potatoes Sweet potato (Ipomoea batatas) Family: Convolvulaceae Related vegetables: none, related to morning glory Snapshot • Warm season perennial vine that is harvested completely each season. The edible portion is a
tuberous root. • Ornamental sweet potato vines are the same species as edible sweet potatoes but are not
selected for flavor of the tuberous root. In the US, sweet potatoes are also called yams, especially if the flesh is orange. In other parts of the world, especially the tropics, yam refers to a completely different plant that produces large (70 pounds) tubers. It is a staple in many African diets.
• Plants are vines that cover the soil, only about 1 foot high. Bush type (also called bunch type) that spread only a few feet are available and more practical for a small garden.
• Purchase small plants called slips for planting. Plant 1-2 weeks after average last frost date. You need to plant by early June to allow time for growth, especially in the northern part of the state. Place transplants 12-18” apart in a mounded row about 8” high. Rows should be a minimum of 36” apart. Soil should be at least 60 °F. Sweet potato plants will die if exposed to temperatures 50 °F or below for an extended period.
• Sweet potatoes are ready to harvest 100+ days after planting. As soon as the foliage begins to yellow, cut it off, then carefully dig the tuberous roots. The roots need to be cured before storage to improve flavor (see “Harvesting” below). Estimated yield per 10 ft row is 12 lb.
Planting • Most home gardeners will purchase small transplants (slips) to place directly into the garden. • You can grow your own slips but you must be able to keep soil temperature between 70 and
80 °F. To grow your own slips, purchase certified disease-free roots. Plant the roots about an inch apart and cover with 2” of sand or light soil. As a shoot begins to grow, add another inch of soil. Each shoot will grow to 6-8 inches and produce roots in about 6 weeks. Cut off each rooted shoot (the “slip”) and plant in the garden.
• Sweet potatoes like warm soil and warm weather. A mounded row (a ridge) will dry out more quickly in spring and the soil will warm more quickly. Plant the slip into the center of the ridge.
• Some references recommend using starter fertilizer containing phosphorus (5-10-10, 10-10-10) at or soon after planting.
Care Notes • Sweet potatoes are generally easy to grow and need little care. Remove weeds when plants are
small. Once established, they are drought tolerant and need only about an inch of water a week. • In soils with good fertility, side-dressing is usually not necessary. Harvesting • Do not water the last 3 or 4 weeks before harvest. • Harvest sweet potatoes before the first frost. The leaves should be starting to yellow. If a frost
occurs, harvest immediately. Cut the vines from the roots to prevent decay. Soil temperatures below 50 °F will damage the roots.
Purdue Master Gardener Vegetable Encyclopedia 2/2011 Page 58 of 94
• Careful harvesting to avoid bruising, tearing the skin, or breaking the root is important. Place sweet potatoes in containers lined with soft material. Do not remove soil that clings to the roots if doing so will injure them. Do not save badly damaged or diseased roots.
• Harvested roots can be used immediately but flavor will improve with curing at warm temperatures. The goal is to store the roots for 10 days in high humidity at 80-85 °F (2-3 weeks at 65-75 °F). Maintain humidity by stacking and covering crates or placing the roots in a plastic bag with a few holes. Store them in a warm location – a warm room, near a furnace, or in a sunroom.
• Cured sweet potatoes should be stored cool, 55-60 °F, and in the dark. Wrapping them in newspaper will protect them from injury. Chilling injury occurs at temperatures below 50 °F. Never store them in the refrigerator.
Common Problems • Sweet potatoes have few pests. To reduce problems:
- Select varieties with disease resistance - Purchase certified disease-free slips - Remove wild morning glories from neighboring areas and - Practice crop rotation.
• Sweet potatoes grow well in soils with pH of 5.5-6.5. Diseases are more common in soil of higher pH.
• Long, stringy roots are sometimes formed if soil fertility is high or if the soil is poorly drained, a common problem in heavy, clay soils.
• Handle harvested roots carefully and store them at the correct temperature. Any wound is a potential entry point for organisms that cause rot.
References The Sweet Potato, Purdue University http://www.hort.purdue.edu/ext/HO-136.pdf
Purdue Master Gardener Vegetable Encyclopedia 2/2011 Page 59 of 94
Sweet Corn (includes information on popcorn, baby corn) Corn (Zea mays) Family: Poaceae Related vegetables: none Snapshot • Warm season annual. The ear, a long cob with seeds attached, is harvested. • There are hundreds of different varieties of corn – sweet corn, field corn, popcorn, ornamental
corn. You can grow corn that has different colored seeds (kernels) and that mature at different times. There are three general types of sweet corn – normal sugary, sugary enhanced, and supersweet. Unlike other vegetables, the seed is the edible part of the plant rather than the flesh of the fruit. See “Additional Information” below.
• Tall plant, to 6 ft, though early varieties may be shorter. • Plant seeds directly into the garden, 1/2” deep in cool, wet soil, 1-1.5” deep in drier warm soils,
2” deep in light, sandy soils. First planting can be made around the average last frost date if you’re willing to chance a lost crop. Planting later, 1-2 weeks after the average last frost date is a bit safer. The soil should be above 55 °F for normal sugary varieties, above 60 °F for sugary enhanced, and above 65 °F for supersweet varieties. Plant corn in several short rows rather than one long thin row. Plants should be 8-12” apart in rows about 30” apart. Spacing within a wide row is 12”x12”. Corn can also be planted in hills. Plant 5-6 seeds, thin to three plants per hill, space hills about 3 ft apart. Each plant produces one ear and perhaps a second smaller ear.
• Make successive plantings for continuous harvest all summer. Plan for the last planting to mature slightly before the average first frost date.
• Early varieties mature in about 60 days, late maturing varieties in 90. Ears mature about 20 days after the first silk strands appear. This is dependent on temperature. It will take longer in cool weather, less time in hot weather. Ripe corn has a green husk, dry brown silks, full-sized kernels that are fully colored at the tip of the ear, and kernels that release a milky liquid when they are punctured with your thumbnail.
Planting • There are two factors to consider when planting sweet corn:
1) Corn is wind pollinated and 2) Most types of corn cross-pollinate.
Because you eat the seed of corn rather than a fleshy fruit, the source of the pollen can influence the flavor of the kernels. • When corn begins to flower, there are many tiny flowers on the cob. Each flower produces a
single kernel of corn if it is pollinated. Pollen lands on the silks (which protrude out the tip of the husk-covered ear) and the flowers are pollinated. For all the kernels in an ear of corn to develop, every flower in the ear must be pollinated. Thus, to facilitate wind pollination, corn is usually planted in 3 or 4 short rows right next to each other, forming a square or rectangle, rather than in a single long row. If you plant several varieties, each one should form its own square.
• Because corn varieties cross-pollinate you must isolate your sweet corn from field corn, popcorn, and ornamental corn. Failure to do so will result in cross-pollination and kernels that taste starchy rather than sweet. You can isolate corn in space or in time. To isolate in space, separate varieties by at least 250 feet, preferably 400-500 feet. Try not to plant one variety downwind from another. To isolate in time, plant so maturity date for each variety is separated by at least 14 days. When you do this, pollen of one variety is released before the silks of the other variety are produced and cross-pollination does not occur.
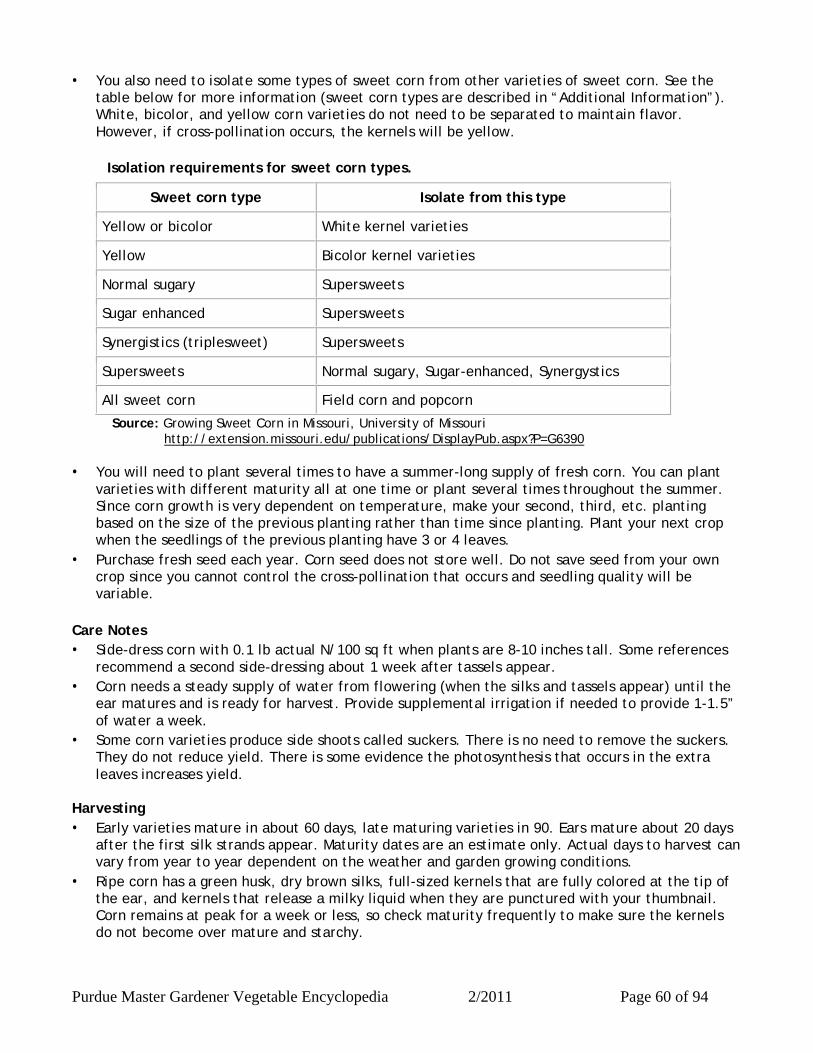
Purdue Master Gardener Vegetable Encyclopedia 2/2011 Page 60 of 94
• You also need to isolate some types of sweet corn from other varieties of sweet corn. See the table below for more information (sweet corn types are described in “Additional Information”). White, bicolor, and yellow corn varieties do not need to be separated to maintain flavor. However, if cross-pollination occurs, the kernels will be yellow.
Isolation requirements for sweet corn types.
Sweet corn type Isolate from this type
Yellow or bicolor White kernel varieties
Yellow Bicolor kernel varieties
Normal sugary Supersweets
Sugar enhanced Supersweets
Synergistics (triplesweet) Supersweets
Supersweets Normal sugary, Sugar-enhanced, Synergystics
All sweet corn Field corn and popcorn
Source: Growing Sweet Corn in Missouri, University of Missouri http://extension.missouri.edu/publications/DisplayPub.aspx?P=G6390 • You will need to plant several times to have a summer-long supply of fresh corn. You can plant
varieties with different maturity all at one time or plant several times throughout the summer. Since corn growth is very dependent on temperature, make your second, third, etc. planting based on the size of the previous planting rather than time since planting. Plant your next crop when the seedlings of the previous planting have 3 or 4 leaves.
• Purchase fresh seed each year. Corn seed does not store well. Do not save seed from your own crop since you cannot control the cross-pollination that occurs and seedling quality will be variable.
Care Notes • Side-dress corn with 0.1 lb actual N/100 sq ft when plants are 8-10 inches tall. Some references
recommend a second side-dressing about 1 week after tassels appear. • Corn needs a steady supply of water from flowering (when the silks and tassels appear) until the
ear matures and is ready for harvest. Provide supplemental irrigation if needed to provide 1-1.5” of water a week.
• Some corn varieties produce side shoots called suckers. There is no need to remove the suckers. They do not reduce yield. There is some evidence the photosynthesis that occurs in the extra leaves increases yield.
Harvesting • Early varieties mature in about 60 days, late maturing varieties in 90. Ears mature about 20 days
after the first silk strands appear. Maturity dates are an estimate only. Actual days to harvest can vary from year to year dependent on the weather and garden growing conditions.
• Ripe corn has a green husk, dry brown silks, full-sized kernels that are fully colored at the tip of the ear, and kernels that release a milky liquid when they are punctured with your thumbnail. Corn remains at peak for a week or less, so check maturity frequently to make sure the kernels do not become over mature and starchy.
Purdue Master Gardener Vegetable Encyclopedia 2/2011 Page 61 of 94
• Harvest by holding the plant with one hand and snapping off the ear with a quick downward push, twist, and pull. You do not want to tear the ear from the main stem or break the stem. Uninjured plants under good growing conditions may produce a second, smaller ear.
• The sugar in normal sugary varieties quickly turns to starch. Eat as soon as possible after harvest. Both enhanced sugary and supersweet hold their sweetness and flavor for a longer time.
• Remove the stalks from the garden after harvest and compost them. Additional Information • Corn is the only grass grown as a vegetable in the home garden. It is monoecious. The female
flowers are in the ear. Each flower has a long style, called the silk, which emerges from the top of the husk. The male flowers are in the tassels held at the top of the plant.
• The number of sweet corn varieties increases each year. You can select normal sugary, enhanced sugary, supersweet or even the new triplesweet (synergistic) varieties. Which should you grow? - Normal sugary is the original sweet corn. The kernels have a creamy texture but they aren’t
as sweet as enhanced sugary, supersweet, or triplesweet. Once picked, the sugar turns to starch very quickly. Pick and use immediately. If you must store them for a few hours, try to pick in the cool of the day and refrigerate the ears immediately.
- Sugary enhanced has more sugar than normal sugary, with tender, creamy kernels. Because it has a higher sugar content, it can be stored for longer periods and still taste sweet. Because of the excellent flavor and texture of the kernels, sugary enhanced are the preferred varieties for the home garden.
- Supersweet has three times the sugar of normal sugary. However, the kernels often have a tough coat, lack creaminess, and are missing the “corny” flavor of other varieties. They are inferior to other varieties for canning or freezing because of their texture. They do hold their sweetness for a long time, an advantage if they must be shipped long distances, but for the home gardener they can’t compete with sugary enhanced for flavor or texture. Because each variety must be isolated from every other variety of corn, they may also be more difficult to grow in a small home garden.
- Triplesweets (synergistic) combine the flavor and texture of sugary enhanced with the ability to hold their sweetness for several days. These are fairly new to the market. Honey Select is an AAS winning variety.
• Baby corn is corn harvested while the ear is still small and before pollination occurs. You can grow any sweet corn variety to get baby corn or you may be able to find cultivars advertised for baby corn production. Some of these special varieties may produce several stalks, each producing several ears. Whichever variety you use, realize that growing baby corn takes almost as much space as growing regular corn. Baby corn should be 2-4” long and 1/3-2/3” in diameter at the base. Harvest 1-3 days after the silks become visible. With the varieties that produce multiple ears, you may be able to harvest every few days over several weeks.
• For popcorn, select a popcorn variety and grow it just as you would sweet corn. It takes most popcorn varieties over 100 days to mature. Allow the ear to dry in the field as long as possible. The kernels should become hard and the husk completely dry. Husk the ears and allow them to dry in a warm well-ventilated location. Periodically pop a few kernels. When they are popping well and tasting good, the corn has dried sufficiently. Remove the kernels from the cob and store in a sealed, airtight container
Common Problems • Poor kernel development can result from poor soil fertility, poor pollination, or dry weather
during flowering and ear filling. • Birds may peck on the kernels. Raccoons may harvest whole ears.
Purdue Master Gardener Vegetable Encyclopedia 2/2011 Page 62 of 94
• Stewart’s disease is a bacterial wilt spread by flea beetles. Control beetles early in the season. Grow resistant varieties. Most new sweet corn varieties are resistant.
• Smut is a fungus that forms a black, greasy gall on the kernels. In Mexico, immature smut galls are an edible delicacy called cuitlacoche. Remove smut galls by breaking off the infected part of the ear. The rest of the ear is edible. Some varieties, especially white corn, are more susceptible to smut.
• Corn ear worms are a yearly problem, worse in the latter harvests. The insect eggs are deposited on the silks and the tiny caterpillar move down the silks, under the husk, to the kernels. Feeding damage can occur in the upper half of the ear. Insecticides must be applied before the caterpillar enters the husk, usually several applications are needed. A tight rubber band or clothespin around the tip of the husk may keep them from reaching the kernels.
• European corn borer can damage both ears and stalks. They are a problem on corn grown later in the season. One or two applications of insecticide 5 days apart when the tassels begin to emerge can control this pest. See Purdue publication E-21 “Managing Insects in the Home Vegetable Garden”, for more information.
• Flea beetles can be a problem when plants are small. On non-resistant varieties, these insects can infect the plant with Stewart’s disease. Control with an insecticide.
References: Growing Sweet Corn, Purdue University http://www.hort.purdue.edu/ext/HO-98.pdf Sweet Corn, Iowa State University http://www.extension.iastate.edu/Publications/PM1891.pdf Growing, Harvesting, and Storing Popcorn, Iowa State University http://www.ipm.iastate.edu/ipm/hortnews/node/1416 Baby Corn, Pacific NW Extension Publication http://cru.cahe.wsu.edu/CEPublications/pnw0532/pnw0532.pdf Managing Insects in the Home Vegetable Garden, Purdue University http://extension.entm.purdue.edu/publications/E-21.pdf
Purdue Master Gardener Vegetable Encyclopedia 2/2011 Page 63 of 94
Okra Okra (Abelmoschus esculentus) Okra, sometimes called gumbo, is the only commonly grown vegetable in the mallow family (Malvaceae). It is related to hibiscus, hollyhock, and cotton. It is a warm-season annual that can grow to a height of 5-6 ft, though some dwarf cultivars are available.
Okra is grown for its immature fruit called a pod. Okra begins producing fruit in 50-60 days and continues to produce all summer.
Plant seeds 1” deep after soil has warmed to 65 °F, usually at least 7-10 days after the average last frost date. Don’t delay planting if you want a long season of harvest but don’t plant into cold soil. Soaking seeds overnight sometimes speeds germination. When seedlings are 3” high, thin to final spacing – 12-24” apart in rows at least 24” apart. Spacing within a wide row is 12-18”. Seeds can also be started indoors in individual pots.
Irrigate okra as needed. Okra is more tolerant of dry soils than other vegetables. Some references suggest side-dressing with no more than 0.1 lb actual N/100 sq ft when plants begin to bloom and about every 4 weeks thereafter. However, excess nitrogen will reduce flowering. If your plants are blooming and producing well, you may not need to side-dress, especially in soils with good fertility.
Okra is best when the fruit is tender and immature, 2-3” long. The first fruit will be ready to harvest in 50-60 days. An individual fruit is ready to harvest 4-6 days after pollination. If the stem is difficult to cut, the fruit is probably too old to use. Inspect and harvest at least every other day. Remove any over-mature fruit to encourage production of new flowers. Estimated yield per 10 ft row is 5 lb.
Okra is susceptible to verticillium and fusarium wilts and to southern blight. Practice crop rotation. You may also have problems with aphids, Japanese beetles, and cucumber beetles. Caution: okra plants are prickly – wear gloves when working with this vegetable.
References Growing Okra in the Home Garden, Iowa State University http://www.ipm.iastate.edu/ipm/hortnews/2005/4-13-2005/okra.html Okra, University of Arkansas http://www.uaex.edu/Other_Areas/publications/pdf/FSA-6013.pdf
Purdue Master Gardener Vegetable Encyclopedia 2/2011 Page 64 of 94
The Leaf Crops – Introduction A number of vegetables are grown just for their leaves, which are used raw in salads or cooked to make greens. Most are cool-season vegetables that do best in spring and fall. The major leaf crops, including two herbs, parsley and cilantro, are covered in this section. Collards and kale are covered in the section on cole crops. Beet and turnip greens are sometimes eaten. These vegetables are covered in the root crop section. Mâche, or corn salad (Valerianella locusta), and radicchio (Cichorium intybus) are sometimes grown in Indiana gardens. Because their culture is similar to lettuce, they are not covered separately. Note that raddicchio especially needs a constant supply of moisture for tender, flavorful growth. Links to specific vegetables Lettuce (all types)
Spinach (including New Zealand and Malabar Spinach)
Arugula
Endive and Escarole
Chard
Celery and Celeriac
Parsley
Cilantro/Coriander
Mustard

Purdue Master Gardener Vegetable Encyclopedia 2/2011 Page 65 of 94
The Leaf Crops Lettuce (Lactuca sativa) Family: Asteraceae Related vegetables: endive and escarole, Jerusalem artichoke Snapshot • Cool season annual. Leaves are harvested before the plant begins to flower. Lettuce will bolt
(begin flowering) with hot weather, long days, warm nights, or dry soil. Lettuce that bolts looses quality and may be bitter. Some varieties are more resistant to bolting than others.
• There are four common types of lettuce: looseleaf is ready for harvest in 40-50 days. It is the type most often grown in American gardens. Butterhead, also called Boston or Bibb, forms a loose head. Cos, or romaine, is a narrow upright plant more tolerant of hot weather than other lettuce. Cos and butterhead mature in 60-70 days. Crisphead, also called iceberg, is the most difficult to grow because it is extremely sensitive to heat and takes a long time to mature, 70-120 days.
• Short plants, about 1 ft in height • Lettuce is cold tolerant and will withstand light to moderate frosts. • Plant seeds outdoors 4 weeks before the average last frost date. Transplants started indoors
about 3 weeks earlier can also be used. Soil should be 40 °F or warmer. Plant 2-4” apart for looseleaf lettuce, 6-8” apart for butterhead or cos. Minimum row spacing is 8”. You can plant several rows close together then leave a wider area as a path. Spacing within a wide row for leaf lettuce is 4-6”. Lettuce tolerates some shade, especially as the weather warms.
• If you will be harvesting the whole head, as is usually done with butterhead and cos, you will only get one head per plant. Make new plantings every 2 weeks as long as the weather is cool for a continual harvest (the last planting should be 4 weeks before the hot weather of summer begins). You can harvest in 4 weeks if using transplants, 7 weeks from seed planted in the garden. You can use this same strategy with looseleaf lettuce, replanting every two weeks. However, since no head if formed, you can also pick off the oldest leaves every few days and harvest each plant for a much longer time, until heat or a freeze destroys the crop. Estimated yield per 10 ft row is 5 lb of leaf lettuce, 15-24 heads of butterhead or cos lettuce.
• Resume planting in late summer, typically August. You can again plant every 2 weeks or so, timing harvest of the last planting for the average first frost date, though you will probably be able to harvest after that date. Protect lettuce with lightweight row covers if temperature threatens to dip into the upper 20s.
Planting • Plant seeds 1/4-1/2” deep directly in the garden after the soil has reached 40 °F or start indoors
for transplanting. At 60-75 °F, seedlings emerge in 2-3 days. • If starting indoors, keep soil between 60 and 80 °F, then grow on at 55-75 °F. • Small seedlings are easy to transplant 1-3 weeks after germination until they are half grown.
When transplanting, try to keep the bottom leaves from touching the soil. They may rot if the soil stays wet.
• Late summer plantings can be grown from seed or transplants. However, lettuce seed does not germinate well if soil temperature is above 80 °F. Make sure to water if weather is dry to ensure germination and establishment. Some shade may be beneficial.
• Lettuce seed does not store well. Purchase fresh seed each season.
Purdue Master Gardener Vegetable Encyclopedia 2/2011 Page 66 of 94
Care Notes • Water if rainfall is lacking. Lettuce needs a constant supply of water, at least 1” a week. • Late spring plantings may benefit from shading which will keep them cooler and delay bolting. • Lettuce typically does not need side-dressing. Apply a small amount of nitrogen fertilizer if
growth slows or plant shows signs of nitrogen deficiency. Harvesting • The outer leaves of looseleaf lettuce can be harvested when they are large enough to be worth
the effort and every few days thereafter until plant turns bitter and begins to bolt. You can also harvest the whole plant when it reaches maximum size, in about 50-60 days.
• Butterhead and cos varieties take longer to mature (60-70 days) and usually the whole head is cut off, though the outer leaves of butterhead can be harvested in the same way as looseleaf lettuce. The inner leaves of the butterheads may be blanched by the overarching outer leaves.
Additional Information • Crisphead (iceberg) lettuce is more difficult to grow than other types of lettuce, especially in
spring. An early planting is necessary so it matures before the first hot spell of summer. You can gain some time by starting seeds indoors and transplanting. Plant 4 weeks before average last frost date. Late summer planting for fall harvest are often more successful. Some shade may help keep the plants cool. Space plants 10-12” apart in rows at least 18” apart. It takes at least 70 days for crisphead lettuce to reach maturity.
• Mesclun is the Provençal term for a mixture of very young lettuces and greens. In Europe these mixes have exacting proportions of chervil, arugula, lettuce and endive or other ingredients to produce a salad that includes every taste and texture sensation of bitter, sweet, tangy, crunchy and silky. Grow this mix as you do lettuce. Since you are growing several different species, don’t be surprised if the plants grow at different rates. Harvest by cutting the whole plant at 3” or grow to 4-5”, cut off the top 3” and allow the plants to regrow.
• A fifth type of lettuce is stem lettuce, also called celery or asparagus lettuce. The leaves are eaten early in the season. As it matures it forms a 2” thick stem crowned with a small tuft of leaves. This stem can grow to 18” and is tender and edible. You can let it grow until just before the plant bolts. Peel off the tough outer layer of the stem and eat cooked or raw. It is popular in Chinese cuisine.
Common Problems • Lettuce can develop a bitter flavor as it begins to flower (bolt). Washing and storing the leaves in
the refrigerator for a day or two should decrease the bitterness. • Aphids may feed on the underside of the leaves. Wash off with a strong stream of water. • Tipburn is caused by inconsistent soil moisture that results in a lack of calcium in the leaves
(similar to the way that blossom end rot arises in tomatoes). The tip and edges of the leaves turn brown. To prevent, provide consistent moisture. Lettuce roots do not go deep into the soil so several light waterings a week may be more beneficial than one deep watering. Leaves with tipburn are edible, just cut off the brown portions.
References Leafy Greens for the Home Garden, Purdue University http://www.hort.purdue.edu/ext/HO-29.pdf Lettuce, University of Maryland http://www.growit.umd.edu/Vegetable%20Profiles/Lettuce.cfm
Purdue Master Gardener Vegetable Encyclopedia 2/2011 Page 67 of 94
The Leaf Crops Spinach (Spinacia oleracea) Family: Chenopodiaceae Related vegetables: beet and chard Snapshot • Cool season annual, exceptionally cold hardy. Can tolerate temperatures to 20 °F. In southern
Indiana, fall plantings may survive the winter and be harvested early the next spring. • There are two types of spinach, one with flat leaves, the other with crinkly leaves (savoy type).
Flat-leaved varieties are grown commercially because they are easy to clean. Home gardeners often grow the savoy type. Spinach bolts (begins flowering) in hot weather. “Longstanding” types are slower to bolt and are favored for spring plantings.
• Plants are short, about 1 ft. • Spinach is hard to transplant, so place seeds directly into the garden. You can plant very early, 6
weeks before average last frost date, and continue planting every 2 weeks until the average last frost date, perhaps a bit longer in northern Indiana. Plant repeatedly for a continual harvest since the whole plant is usually harvested, though you can pick just the outer leaves. Seeds germinate in 1-2 weeks depending on soil temperature. Sow thickly, then thin to 3-4” in rows a minimum of 12” apart. If you are harvesting the whole plant, you do not need to thin. Spacing within a wide row is 4”x4”. Spinach is somewhat tolerant of shade, especially in warm weather.
• Make summer plantings starting in July in northern Indiana, September in southern Indiana. Continue planting every two weeks until about a month before the average first frost date. Plant heavily. Spinach seed does not germinate well in warm soil.
• Spinach is ready to harvest in about 7 weeks from seed, usually when the plant has 5-6 leaves. Harvest the entire plant. Alternately you can pick the outer leaves. Estimated yield per 10 ft row is 5 lb.
Planting • Spinach seeds will germinate in soil temperatures as low as 40 °F, in 10 days when soil has
warmed to 50 °F. Plant as soon as the soil can be worked (usually about 6 weeks before the average last frost date).
• If you prepared the soil in the previous fall, you can even sprinkle seed over frozen ground or on top of snow.
• If planting in soil, place 1/2” deep. • Purchase fresh seed each year since spinach seed does not store well. • If you want to try to overwinter spinach for a very early season crop, plant 4 weeks before the
average first frost date, mulch heavily with straw or leaves, and harvest in early spring. It will quickly bolt so don’t delay harvest.
Care Notes • Spinach grows best in soil with a pH between 6.0 and 6.8. Seed germination and plant growth is
especially poor on more acidic soils. • Water if rainfall is lacking, providing 1” of water a week. Roots are only 2” deep, so several
shallow waterings may be more effective than one deep watering. Plants will tend to bolt if soil is dry. Spinach is tolerant of some shade, especially in warmer weather.
• Side-dress with 0.1 lb actual N/100 sq ft when plants are about 1/3 grown.
Purdue Master Gardener Vegetable Encyclopedia 2/2011 Page 68 of 94
Harvesting • Spinach is ready to harvest in about 40-50 days. You can harvest the whole plant, harvest a few
plants early to thin the planting and allow the others to mature, or pick the oldest leaves of all the plants for several weeks. Harvest immediately if the plant begins to bolt.
Additional Info • New Zealand spinach (Tetragonia expansa) is not related to common spinach. Native to New
Zealand, this tender annual grows weak, spreading stems 2-4 ft long. Its dark green leaves are smaller and fuzzier than regular spinach, but when cooked are virtually indistinguishable from the real thing. It thrives in summer heat and will produce all summer long. Plant seeds 1” deep after the average last frost date or start indoors for transplanting. Keep moist because the seeds are slow to germinate. Plant or thin to 12” in rows at least 24” apart. The plants can spread 4 ft or more. This vegetable needs no special care except irrigation if weather is dry. Harvest tender leaves and shoot tips about 3-4” long. This will encourage the plant to branch. It can also be cut back to force new growth. You can harvest until the first frost or remove from the garden when it is time to plant common spinach. Estimated yield per 10 ft row is 4 lb in one harvest.
• Malabar spinach (Basella alba), also called red vine, creeping, or Ceylon spinach, is a perennial, frost-sensitive tropical vine native to India that grows best in moist, hot weather (above 90 °F). It has a flavor similar to traditional spinach (but don’t cook too long or it becomes slimy). Plant seeds or transplants 2-3 weeks after the average last frost date. It is usually grown on a trellis but can be allowed to sprawl on the ground if you have the space. Grow in moist, fertile soils high in organic matter. Keep constantly moist to prevent flowering. First harvest is 70-80 days from planting. The stems are tough so only the leaves are eaten. It will not do well if summer is cool (temperatures 80°F or less).
Common Problems • Spinach is susceptible to air pollution injury. Ozone and sulfur dioxide will cause the leaves to be
speckled and the edges of the leaves to die. • Fungal leaf diseases can be a problem with overhead watering. A soaker hose will lessen the
problem. Improving air circulation and planting on raised beds can also help. • Cucumber mosaic virus is a blight disease that causes yellowing, stunting, and early death. There
is no cure. Plant resistant varieties. • If slugs become a problem, do not mulch around plants. References Leafy Greens for the Home Garden, Purdue University http://www.hort.purdue.edu/ext/HO-29.pdf New Zealand Spinach in the Garden, Utah State University http://extension.usu.edu/files/publications/publication/HG_Garden_2006-08.pdf Malabar Spinach, Cornell University http://www.gardening.cornell.edu/homegardening/scene9529.html
Purdue Master Gardener Vegetable Encyclopedia 2/2011 Page 69 of 94
The Leaf Crops Arugula (Eruca vesicaria var. sativa) Arugula has a biting, pungent taste, somewhat like horseradish. It is a strong flavor, so don’t overplant. You may find it called roquette, rocket salad, or pepper. It is related to mustard and cabbage. Like these members of the Brassicaceae, it likes cool weather. Arugula is an annual that grows to 8-12”.
Plant transplants 3-4 weeks before the average last frost date, 6” apart in rows a minimum of 12” apart. Spacing within a wide row is 4-6”. Start seeds indoors 4-5 weeks earlier, planting 0.5-1” deep.
Arugula is shallow-rooted and may need frequent irrigation if the weather is dry. Arugula needs consistent soil moisture to produce tender leaves.
Harvest by pulling the whole plant in about 18 days when it has 4” leaves for “baby” arugula, cutting just the outer leaves when they are 4” or larger for a more continual harvest, or removing the whole plant when leaves are 10-12” (time to maturity varies between 30 and 50 days). It remains at peak quality only a short time, so several successive plantings will ensure a continuous supply until the weather turns hot.
Furry undersides indicate the leaf will be tough. If arugula begins to send up a flower stalk (bolt) as hot weather arrives, harvest the whole planting. You can plant again in late summer - seeds indoors or in the garden in early August, transplants before the end of that month.
Arugula has few pests. See insects listed under broccoli for potential problems. Flea beetles especially can be a problem. References Arugula, Wisconsin Master Gardener Program http://wimastergardener.org/?q=Arugula
Purdue Master Gardener Vegetable Encyclopedia 2/2011 Page 70 of 94
The Leaf Crops Endive and Escarole (Chicorium endivia var. crispum and var. latifolia) Endive and escarole are lettuce-like plants. Like lettuce, they are in the Asteraceae. Endive has curled, frilly leaves; escarole has flatter leaves. Both are cool season vegetables, 12-24” tall, grown in spring and fall.
Endive and escarole are ready to harvest in 80-100 days. Because they are sensitive to hot weather and take so long to mature, endive and escarole are grown as a spring crop only in northern Indiana, planted about 4 weeks before the average last frost date. They can be planted in summer for a fall crop throughout the state.
Plant seeds directly into the garden or start transplants indoors a few weeks earlier. Plant 9-12” apart in rows at least 18” apart. Spacing within a wide row is 9-12”. In northern Indiana you can plant from 4 weeks before until 1 week after the average last frost date.
For a fall crop, plant in July. Your last planting should be about 2 months before the average first frost date. Make sure to water these late plantings during the heat of summer.
Endive and escarole are very hardy and can be harvested throughout the fall months. These vegetables need little care except watering if weather is dry. Side-dress lightly with a high-nitrogen fertilizer if growth slows.
Plants can be blanched before harvest to give them a milder flavor and a yellow-white color. Tie large outer leaves up over the head as you would for cauliflower or cover them for a week or two. Make sure the head is dry before blanching. Wet heads will tend to rot if leaves are tied over them.
Begin harvesting 80-100 days after planting when heads are well-developed. Cut entire plant off at the soil line and discard damaged leaves and any tough outer leaves. For spring plantings, harvest immediately if weather turns hot. In fall, harvest if a hard freeze is expected. Estimated yield per 10 ft row is 6 lb.
Purdue Master Gardener Vegetable Encyclopedia 2/2011 Page 71 of 94
The Leaf Crops Chard (Swiss chard) (Beta vulgaris var. cicia) Chard is a cool-season biennial harvested the first year. It is a beet grown for its leaves rather than a swollen root. It is tolerant of warm weather. A spring planting will thrive all summer and take you to the first hard freeze.
You can find chard with green-white stalks or with red stalks. The variety ‘Bright Lights’ has stalks that range from brilliant reds, to orange, peach, yellow, pink, cream, gold, and purple. All are edible. The plant can also be used as an ornamental and grows 18-24” high. It will tolerate some shade.
Plant seeds 1/2-3/4” deep or plant transplants. You can start planting 2-3 weeks before the average last frost date, when soil has warmed to about 50 °F, and continue planting through summer if you desire. A spring planting will last all season if well cared for. Space plants 6-10” apart in rows a minimum of 18” apart. Spacing within a wide row is 6–10”.
Side-dress with a bit of nitrogen if growth slows mid-season. Water if weather is dry. In fall, harvest or protect if temperature threatens to dip into the upper 20s.
Chard can be harvested in two ways: • Cut off a few of the large outer leaves of each plant, 1-2” above the soil, when they are 8-12”
long. If you are careful not to injure the growing point in the center of the plant, chard will continue to produce new leaves until frost.
• Alternately, about 60 days after planting you can harvest the whole plant by cutting it off at the soil line. Estimated yield per 10 ft row is 12 lb.
Purdue Master Gardener Vegetable Encyclopedia 2/2011 Page 72 of 94
The Leaf Crops Mustard (Brassica juncea) Mustard is an annual grown for its leaves, which are cooked to make “greens”. It is in the Brassicaceae as are broccoli and cabbage. It is a cool-season crop that will bolt (begin flowering) and become strongly flavored when hot weather arrives.
You may be able to find both curly and flat-leaved varieties. Both grow to 18-24”. Two other species, B. nigra and B. hirta, produce the seed used to make prepared mustard.
Plant seeds 1/3 -1/2” deep, 2-4” apart in rows a minimum of a foot apart. Spacing within a wide row is 6-9”. If you plant thickly, thin to the correct spacing and eat the small seedlings.
Begin planting 3 weeks before the average last frost date and make successive planting about every 10 days. Once heat arrives, harvest ends.
You can plant again in mid-late summer for fall harvest, timing the last planting to mature on the average first frost date. Mustard will tolerate a frost. Protect if temperature threatens to dip into the upper 20s.
Side-dress with 0.1 pounds actual N/100 sq ft when plants about one-third grown. Irrigate if rainfall is lacking.
As with most leafy greens you can harvest by cutting a few of the outer leaves every few days or cut the entire plant off at ground level (maturity is 40-50 days). Estimated yield per 10 ft row is 4-8 lb.
Cabbage worms can sometimes be a problem.
Purdue Master Gardener Vegetable Encyclopedia 2/2011 Page 73 of 94
The Leaf Crops Celery and Celeriac (Apium graviolens var. dulce and var. rapaceum ) Celery is a member of the Apiaceae (the celery family), along with carrot, fennel, parsley, and parsnip. It is difficult to grow in the home garden because it needs soil high in organic matter and ample moisture to avoid stringiness. It is native to wetlands so it tolerates, actually requires, more soil moisture than other vegetables. It is a biennial harvested the first season.
Celery is grown for its leaves, both petiole and blade. Celeriac is a different variety and is grown for its enlarged tuberous root, about the size of a fist, that develops at the soil line. Both plants grow about a foot high.
Celery and celeriac are grown the same way but different parts of the plant are harvested. The seeds are tiny and take 2-3 weeks to germinate, so start them indoors 10-12 weeks before average last frost date. Grow at 70-75 °F until germination, then at 60-70 °F. Harden plants by reducing water slightly and plant out 1-2 weeks before the average last frost date.
You can plant as late as mid-April in southern Indiana, mid-May in the northern part of the state. In spring, celery will take a light frost but not a moderate one. Though it survives cool weather, a prolonged cold spell after planting (10 days with night temperatures below 40 °F and days below 55 °F) will cause the plant to bolt (flower) and the celery will be inedible. Space plants 6-12” apart in rows at least 18” apart. Spacing within a wide row is 15”x15”.
Celery requires lots of water and nutrients during growth. Amend soil with organic matter and add extra fertilizer. Celery may not grow well on heavy clay soils.
Supply 2” of water a week if rainfall is lacking. Side-dress at least twice during the growing season.
There are two types of celery, golden and green. The golden types are self-blanching but have thinner, stringier stalks. Green types are more common. If you want to blanch them, tie the outer leaves over the center, wrap the stalks with paper or other material such as a cardboard milk container, or simply crowd the plants together in the row. If you are growing celeriac, use mulch or soil to keep the shoulders of the root covered.
Celery is ready to harvest in 75-90 days after transplanting. Spring plantings are more common in the Midwest but you might try a fall crop planted in June or July if you can provide ample water. Time planting so last harvest is on the average first frost date. Mature celery and celeriac can withstand a severe frost. There is no set time to harvest but if you wait too long the outer stalks will be stringy and tough. Estimated yield per 10 ft row is 8-13 lb.
Celeriac needs to grow for at least 120 days. You may harvest the root when it reaches 2” in diameter but sweetness is enhanced by a frost. If you harvest after the first frost the roots will be 3-5” in diameter. References Home Garden Celery in Eastern North Carolina, North Carolina CES http://www.ces.ncsu.edu/depts/hort/hil/hil-8027.html
Purdue Master Gardener Vegetable Encyclopedia 2/2011 Page 74 of 94
The Leaf Crops Parsley (Petroselinum crispum) Parsley is equally at home in the vegetable, herb, or ornamental garden. It is a biennial related to carrot and parsnip (in the Apiaceae). The leaves are harvested the first year. Though the plant usually survives Indiana winters to flower the next season, the leaves become tough and unpalatable as the plant begins to flower.
Select curly parsley (used mainly as garnish) or flat leaved, Italian parsley (considered to have the best flavor).
Parsley prefers full sun and soil that is fertile and high in organic matter. It is slow to germinate and best started indoors 5-8 weeks before it is planted outdoors. Soak seeds in water overnight, then sow in individual containers. Parsley develops a taproot and is difficult to transplant. Keep as much soil as possible around the roots when transplanting. Seedlings can sometimes be purchased at garden centers. Plant when weather is cool starting 1-2 weeks before average last frost date, spacing plants 8-12” apart. You can sow seeds directly into the soil as soon as it can be worked or grow parsley in containers rather than transplanting seedlings into the garden.
You can begin harvesting leaves as soon as they are large enough to use. Cut off the oldest, outside leaves if you want to continue harvesting for most of the summer and into fall.
Parsley is largely trouble-free. The most common best is the caterpillar of the eastern black swallowtail butterfly. This caterpillar will also eat the leaves of Queen Anne’s lace, so try transferring the caterpillar rather than eliminating it. You can also grow a few extra plants just for the butterflies. References Growing Parsley, University of Minnesota http://www.extension.umn.edu/distribution/horticulture/M1221.html

Purdue Master Gardener Vegetable Encyclopedia 2/2011 Page 75 of 94
The Leaf Crops Cilantro/Coriander (Coriandrum sativum) Cilantro is an herb in the Apiaceae (carrot family) that is commonly grown in vegetable and herb gardens. This annual can be harvested both for its leaves, typically called cilantro, and its seeds, typically called coriander. The leaves are a popular addition to salsa and guacamole. The seeds are used in many different cuisines. This herb has been in cultivation for over 3,000 years.
Cilantro is a short-lived annual. If you want to harvest the seeds, select “Indian coriander” that goes to seed in about 2 months. If you want leaves, look for varieties labeled as “Chinese” or “long standing”. These will be listed as slow to bolt (flower).
Plant seed directly into the garden after the average last frost date. Germination is more rapid as the soil warms. Cilantro forms a taproot that makes transplanting difficult.
Cilantro tends to flower and go to seed quickly, especially when soil temperature is above 75 °F. Mulch to keep the soil cool. For a continual harvest of leaves, make additional plantings every 3 weeks except during the hottest part of the summer. Cilantro will tolerate a light frost.
If your plants begin to flower quickly, try growing cilantro in part shade.
Harvest the oldest leaves when they become large enough to use. You will be able to do this for a few weeks but eventually the plant will start to flower and the leaves become tough, with little taste. Alternately harvest the whole plant when it reaches 6” (40-50 days after planting) and replant on a regular basis. The leaves do not store well, so plan to use them fresh.
If you are growing for seed, harvest the seed heads when they turn brown and hang upside down in paper bags to finish drying.
If you allow some plants to go to seed you may find seedlings in your garden next spring.
Cilantro has few pests. References Cilantro, Iowa State University http://www.extension.iastate.edu/Publications/PM1893.pdf
Purdue Master Gardener Vegetable Encyclopedia 2/2011 Page 76 of 94
Onions and Related Plants - Introduction Onions, leeks, chives, and garlic all add a pungent flavor to food. They look like root vegetables but they aren’t. The parts harvested and eaten are leaves or swollen stems. Onions and leeks are biennials but most of the other onion relatives are perennials. Some, like chives and Egyptian walking onions, can stay in the ground for several years. Others are harvested at the end of the season. A small part of the stem (the clove of garlic, for example) is saved and planted the next season. Links to specific vegetables Onions (includes green onions and pearl and boiler onions)
Chives and garlic chives
Garlic
Leeks
Shallots
Potato/Multiplier onions
Egyptian onions
Purdue Master Gardener Vegetable Encyclopedia 2/2011 Page 77 of 94
Onions and Related Plants Onion (Allium cepa) Family: Liliaceae, though some put it in its own family, Alliaceae Related vegetables: garlic, chives, leeks, shallots Snapshot • Cool season biennial harvested at the end of the first season. The underground bulb is eaten. • Onions can have white, yellow, or red flesh and be pungent or mild. Onions harvested when they
are small are called green onions. Onion varieties may be short-day, long-day, or day-neutral. Long-day varieties are suitable for Indiana gardens. The day-neutral varieties are new and should also do well.
• Onions are moderate sized plants, about 18” tall. • Plant onions starting 6 weeks before average last frost date. You can plant as late as May in
northern Indiana, but earlier planting will yield larger bulbs that store better. Green onions can be planted any time during the growing season. You can plant seeds, sets, or transplants. Each produces only one bulb. See “Planting” for details.
• Onions do best when early growth is in cool weather and bulbs form in warm weather. Onions that will be stored (called “dry” onions) are grown as a spring-planted summer crop in Indiana, never as a fall crop. Onions are somewhat tolerant of shade.
• Green onions can be harvested in 40-50 days if grown from seed, 30 days from sets or transplants. Pull once plants reach 6” tall and are about as thick as a pencil. Larger plants are more pungent.
• Dry onions are ready to harvest in 3-5 months, after the tops have dried and bent over. After harvest, place them in a shady, dry, well-ventilated spot until they are thoroughly dry. Trim tops to 1”. Store cool but not frozen with good ventilation. Estimated yield per 10 ft row is 10 lb.
Planting
Selecting varieties. Onion varieties may be long-day, short-day, or day-neutral. This refers to the day length that induces bulb formation. Short-day varieties begin bulb formation when days are 12-13 hours long, very early in the season, just after spring equinox (March 20). On that date in Indiana, onion plants will still be small, with few leaves. As a result, the bulbs formed will be small. Long-day varieties begin forming bulbs later in the summer when days are 14-16 hours long. The plants are large and form large bulbs. This is the preferred type of onion for Indiana.
Sweet onions (Walla Walla and Bermuda) are short-day onions. Plant transplants rather than seed so plants are large before bulb formation begins. Sweet onions are not good storage onions.
Day-neutral onions are new. Bulbs begin to form once plants reach a certain size. They should do well in Indiana.
Sets. Sets are very small onion bulbs (think of them as half-grown onions) purchased at garden centers and by mail order. Plant and water them and green leaves will soon appear. One set produces one onion. Purchase sets smaller than a dime in diameter if possible. These will form large onions that store well. Sets larger than a dime in diameter have a greater tendency to bolt (flower prematurely) before bulbs become large. They should be used for green onions rather than dry onions. As the sets grow, the bulbs will change in shape. Round sets will form onions that are flattened on top and bottom; elongated sets will form more spherical bulbs. Unfortunately, you may not know the exact variety of the sets you purchase in a garden center.
Plant sets beginning about 6 weeks before the average last frost date until about mid-May. For green onions place sets 1.5” deep and so close together they touch each other. For dry onions, place 1” deep and 2” apart. Rows should be a minimum of 12” apart. Spacing within a wide row is 3”x3”.
Purdue Master Gardener Vegetable Encyclopedia 2/2011 Page 78 of 94
You may grow your own sets by planting seed the previous July. Seed thickly, place them ¼” apart in one-foot wide rows and don’t thin. Before the first frost, bend the tops over. In a week, dig the small bulbs and dry them thoroughly for several weeks in a shaded, well-ventilated location. Store dry, dark and very cool (40 °F) over the winter and plant in early spring.
Transplants. Small onion plants can be purchased. These often produce the best storage onions. You can grow your own transplants by starting seeds indoors about 8 weeks before anticipated planting date. If they grow too tall, trim the tops to 3”. Make sure to keep the day length about 12 hours, not longer, so you do not induce bulb formation. Harden off and plant starting about 6 weeks before the average last frost date until about mid-May. Space 1” for green onions, 2” for small bulbs, up to 4” apart for large bulbs.
Seeds. Onions take a long time to grow from seed, so seeds are usually not planted directly into the garden. Since one seed, set, or transplant makes only one green or dry onion, planting seeds is the most economical. Plant them indoors and grow as transplants rather than seeding directly into the garden (unless you are growing sets for next year). If you are growing only green onions, direct seeding throughout the summer is fine. Temperature optimum for germination is 65-80 °F. Grow at 60-70 °F with night temperatures less than 55 °F. Care Notes • Onions grow best in loose, well-drained soil with plenty of organic matter. Fertilize before
planting based on a soil test but don’t skimp on the phosphorus and potassium. Onions are somewhat tolerant of shade.
• Side-dress transplants with 0.1 lb actual N/100 sq ft 2-3 weeks after planting, before June 1 • When green onions are 4” high, you can mound soil loosely around the base up to 1” in depth.
This will blanch the lower portion of the plant and make the white portion longer. Do not mound onions you are growing to maturity for storage.
• Provide 1-2” of water a week if rainfall is lacking but do not keep the soil soggy. Too much water (and too much fertilizer) will delay maturity and produce soft bulbs that do not store well. Too little water may increase pungency.
• If the plant begins to flower, harvest and use immediately. Bulbs formed from a flowering plant do not store well.
Harvesting • Onions are edible at any stage. However if you are harvesting for storage, you must pay attention
to stage of development, harvest them carefully, and dry thoroughly (cure) before storage. • Onions are mature and can be harvested for storage when the tops fall over. This does not
happen at exactly the same time for all plants. Wait until the tops of at least two-thirds of the plants (preferably more) have fallen over, then harvest all the onions at one time.
• Dig onions carefully, trying not to bruise or puncture them. Harvest the whole plant, don’t cut off the tops.
• Onions must be dried before storage. Spread them out to dry in a well-ventilated area protected from sunlight. Don’t stack the plants on top of each other. You can also place on a screen or hang in small bunches to facilitate airflow and speed drying. This may take 2-3 weeks.
• Once the onions are fully dry, you can cut off all but an inch of the tops (do not cut flush with the bulb) and store them in a dark, dry place. Temperature should be below 40 °F but they should not be allowed to freeze. Above 40 °F the bulbs will probably sprout.
• Onions will not store well if: - The plant has flowered. - It is a sweet, short-day variety. - If harvested before maturity. Green onions should be stored refrigerated, use within 7 days. - If the onion has formed a thick neck rather than a narrow one that dries well.

Purdue Master Gardener Vegetable Encyclopedia 2/2011 Page 79 of 94
- If the top is cut off flush to the bulb, creating an opening for disease organisms. - The tops are broken over before the bulb is fully mature. These onions do not dry properly. - If soil was hilled up around the plant before harvest.
Common Problems • Onions will bolt (begin flowering) if they are exposed to extended cold after planting (so don’t
plant too early) or if the sets are too large at planting. • Various fungal diseases can infect onions. Crop rotation will help control them. Some varieties
are resistant to Fusarium basal rot. • Feeding by onion thrips can reduce yield and kill seedlings. These insects are more often a
problem if your garden is near a field of small grains. Some onion varieties are resistant to thrips. Thrips are usually found between the leaves and may be difficult to eradicate.
• Onion maggots burrow into and feed on the onion bulb. They are more of a problem in northern Indiana than in the southern portion of the state. These insects can kill seedlings and injure the bulb, reducing storage life. Crop rotation and good sanitation (removing all onion bulbs and leaves from the garden at the end of the season and removing all nearby wild onion plants) will help. Row covers used immediately after planting will help keep the adult from laying eggs near your onion plants. Onion maggots have 2 or 3 generations a year. Controlling the first generation with row covers will control later populations also.
Additional Information Green Onions Small slender onions with a white base – green onions – are in every grocery. You may also hear them called scallions, spring onions, bunching onions, even Welsh onions, depending on your location. In some areas, “scallion” refers to the plant called shallots by others.
Green onions (as defined above) may be grown from just about any of the onions and onion relatives described here. To make them a green onion, just plant close together and harvest when they are still small.
One species, Allium fistulosum, always produces long slender plants with, at most, a small swelling at the end. It is a perennial, grown from Siberia to the tropics. There are bunching (several small bulbs together in a clump) and non-bunching types. They are common in oriental cooking. Some are even known as Japanese bunching onions. This is the species also known as “Welsh” onions. The name derives from the German word “welsche” meaning foreign and has nothing to do with Wales.
Allium fistulosum is hardy to at least zone 6, perhaps 5. Grow as you would common garden onion. If you want a longer white portion, 5-6 inches or more, mound soil loosely around the plant as it grows. Harvest by digging up the clump, removing some of the stems and replanting. You can also divide and replant single stems to create new plants in another location.
Pearl and boiler onions These onions are ordinary garden onions planted densely and harvested when the bulbs are small. In the north they may be short-day onions. Because these short-day onions begin to form bulbs when the plant is still small (early in the summer as day length reaches 12-13 hours), the bulbs formed are small. References Onions and Their Relatives, Purdue University http://www.hort.purdue.edu/hort/ext/Pubs/HO/HO_067.pdf Onions, Garlic, and Shallots, Virginia Cooperative Extension http://pubs.ext.vt.edu/426/426-411/426-411.html Allium fistulosum, Floridata, http://www.floridata.com/ref/A/alli_fis.cfm
Purdue Master Gardener Vegetable Encyclopedia 2/2011 Page 80 of 94
Onions and Related Plants Chives and Garlic Chives (Allium schoenoprasum and Allium tuberosum) Both chives and garlic chives are perennials harvested for their leaves, which grow to about a foot. They produce small bulbs but these are not eaten.
Chives produce purple to pink flowers in early summer. Garlic chives has white flowers in late summer. Deadhead to prevent reseeding.
Chive flowers are edible. Harvest just as they begin to open, picking them regularly to encourage repeat blooms. Chive flowers have a mild onion flavor and do not dry well. Break apart the florets and add to salads, eggs, and other dishes.
Both chives and garlic chives are easy to grow and very hardy, to zone 3. Both can be grown indoors as houseplants and harvested during winter. Simply dig a small clump after a freeze and pot up.
You can start these perennials from seed but you may also find small plants at garden centers or receive a division from a friend. Space plants about 12” apart in sun or part shade after danger of frost is past. Start seeds indoors 6-8 weeks earlier.
You can start harvesting when plants are 6 inches tall. Cut down to 2 inches as needed and use the leaves fresh. It is not necessary to cut off all the leaves in a clump. Cutting leaves from part of the clump and leaving the rest ensures you can harvest more in just a few days. If you cut off all the leaves in a clump you won’t be able to harvest again for several weeks.
Do cut frequently to encourage new bulbs to form and encourage tender new growth. Side-dress lightly twice during the growing season if you are harvesting frequently.
Divide plants every 2 or 3 years in spring or fall to prevent overcrowding. References Chives, University of Illinois http://urbanext.illinois.edu/herbs/chives.cfm Chives, North Carolina State University http://www.ces.ncsu.edu/depts/hort/hil/hil-124.html
Purdue Master Gardener Vegetable Encyclopedia 2/2011 Page 81 of 94
Onions and Related Plants Garlic (Allium sativum) Garlic produces a bulb that has many individual cloves, each made of two leaves and a vegetative bud.
Garlic is a perennial that grows to 1-2 ft. It is harvested completely at the end of each growing season.
Most garlic varieties do not flower. These are known as softneck varieties. They produce the largest bulbs and store well.
A few varieties, known has hardneck, produce a scape (a flower stalk) that may flower or produce small aerial bulbs known as bulbils. These are the most cold hardy varieties. To maximize production of hardneck types, remove the scape as it begins to curl (they can be eaten). These varieties do not store as well as softneck varieties.
Garlic needs loose soil with consistent moisture and high fertility. Use 3 lb 10-10-10 or equivalent per 100 sq ft.
Garlic needs a cold season to produce the largest bulbs so it is often planted in October (like ornamental spring-flowering bulbs). Roots will form that fall, then leaf growth begins as the soil warms in early spring. Bulbs begin to form with the long days of June. Plants that are large in June will produce large bulbs; small plants will produce small bulbs. If you must plant in spring, plant as early as you can (March) to maximize growth prior to June.
Immediately before planting, break the garlic into cloves. The largest cloves will produce the largest bulbs. Purchase bulbs grown for planting in the vegetable garden, not those grown for eating found in the grocery, which may be treated to prevent sprouting. Plant each unpeeled clove upright, 1-2” deep and 3-6” apart in rows 12” apart in October or in early spring. Spacing within a wide row is 5”x5”. Mulch plantings to conserve moisture and control weeds, which can overtake a garlic planting.
Harvest garlic when tops begin to die down but have 5 green leaves remaining, usually July or August. Plants mature enough to harvest should have cloves that are clearly visible and easily separated but that have not split the outer sheath. The transition is fairly rapid (about 2 weeks), so monitor development once the leaves start to die back. Bulbs with a split sheath are more difficult to harvest and do not store well.
Dry garlic well in a dark, airy place before storage. Estimated yield per 10 ft row is 4 lb.
Pests that attack garlic are those that bother onions.
Elephant garlic is a type of leek that produces very large bulbs but does not store well. Grow it as you do garlic. Reference Growing Garlic in Minnestota, University of Minnesota http://www.extension.umn.edu/distribution/cropsystems/dc7317.html
Purdue Master Gardener Vegetable Encyclopedia 2/2011 Page 82 of 94
Onions and Related Plants Leeks (Allium ampeloprasum) Leeks are a biennial harvested at the end of the first year of growth. Instead of forming a bulb, the leaves form a thick basal column.
Leeks grow slowly from seed and are usually placed in the garden as transplants. You can plant leek transplants starting 4 weeks before and continuing to the average last frost date, as the days begin to warm a bit (reaching into the mid-40s each day). Start seeds indoors in February for transplants. They need at least 8 weeks of growth before transplanting.
Plant 3-5” apart in rows at least 12” apart. Spacing within a wide row is 3-6”. Due to the time needed to grow to maturity, leeks are usually only planted in spring.
To make the basal column white, begin blanching when the stem becomes as thick as a pencil. Draw soil loosely around the base as the leaves grow. Leeks will grow to 2-3 ft.
You can harvest leeks throughout the summer and use as green onions. Full-sized leeks are ready to harvest in about 120 days from seed, 80 days from transplants, after the basal column has reached a diameter of 1-1.5”. The blanched portion of the basal column may be 6-8” long. Remove the whole plant and cut off the roots and all except 2” of the green leaves. Dig before a hard freeze and store in the refrigerator. You can also mulch the planting heavily with straw then harvest later in fall and in winter whenever the ground is not frozen. Harvest by the end of March before the leek begins to send up a flower stalk. Estimated yield per 10 ft row is 7-14 lb. Each transplant yields one leek.
Purdue Master Gardener Vegetable Encyclopedia 2/2011 Page 83 of 94
Onions and Related Plants Other Onion Relatives Shallots (Allium cepa var. aggregatum) Shallots are perennials harvested completely at the end of each growing season. They are a type of onion that forms a bulb with multiple sections. A papery skin divides and surrounds each section. Immature plants are harvested as green onions and, in some parts of the country, all green onions (small slender onions with a white base) are called shallots. In other parts of the country shallots are known as potato or multiplier onion. In fact, shallots and multiplier onions are closely related, with shallots gaining distinction for having a reddish papery skin and a more distinctive and delicate flavor favored in French cuisine. Shallots are almost always grown from a section of a bulb. The plants often do not often flower and produce seed. Plant 2-4 weeks before the average last frost date. Plant each section so the tips are just covered, 4-6” apart in rows at least 12” apart. Plants will grow 1-2 ft in height. The clump of shallot bulbs often forms above ground. Do not cover these bulbs with soil. For dry storage bulbs, harvest as you do dry onions. If you are growing for green onions, mound soil loosely around the plant to blanch the lower portions of the leaves. Harvest when plants are 6-8” tall and at least the thickness of a pencil. Potato/multiplier onions (Allium cepa, Aggregratum group) These onions are similar to shallots but produce more rounded bulbs. They can be very prolific, one bulb producing 10-12 bulbs of varying sizes by the end of the season. They almost never flower. Potato onions are not common and may be considered heirloom varieties. Grow as you would other onions. From a clump of bulbs of varying sizes, replant the largest bulbs next year, eat or store the small and medium sized bulbs. They store well. Once established, you can grow enough to both eat and provide bulbs for next season’s planting. Egyptian Onion (Allium cepa var. proliferum) Also known as tree onion, topsetting onion, Egyptian walking onion or Catawissa onion, this perennial member of the onion group produces large hollow leaves and grows to 2-3 ft. Instead of a flower cluster, it produces a stalk with small bulbs, called bulbils, on top. The leaves, bulbils, and underground bulbs are all edible. You can plant bulbils or divisions in spring or fall. Leaves can be cut and used as green onions, especially early in the season. Bulbils are harvested in summer as they begin to dry. These plants “walk” across your garden because the stalk with heavy bulbils on top will tend to fall over. The bulbils will root and produce a new plant away from the parent plant. This new plant will repeat the process.
Purdue Master Gardener Vegetable Encyclopedia 2/2011 Page 84 of 94
The Cucurbits - Introduction The vegetables in the Cucurbit family – cucumbers, all squashes, and melons – are almost all large, vining, sprawling plants. Don’t underestimate the space they will take in your garden. You can still grow these in a small garden, though, by selecting bush or dwarf varieties or training the vines on a vertical support.
Links to specific vegetables – please read General Information on Cucurbits (below) first Cucumber
Summer squash
Winter squash
Pumpkins
Muskmelon and other melons
Watermelon
Gourds
Chayote squash
All cucurbits are similar botanically and are grown in a similar way. General information about these vegetables is covered in this introduction. Details of growing the individual plants (planting depth, harvesting, etc.) are covered in the listing for each plant.
General Information on Cucurbits • You will find varieties that are vining, sprawling plants and others that are compact and bushy.
Vining plants are about 1 ft high; bush varieties about 3 ft high. • Cucumber, squash, and melons are all warm-season annuals grown for their immature fruit
(cucumber, summer squash) or mature fruit (winter squash and melons). They are monoecious (each plant has both male flowers and female flowers). Early in the season, each plant produces only male flowers. Later in the season, both female flowers (that produce fruit) and male flowers (that provide pollen) are produced. The typical cucumber plant first produces 10-20 male flowers before producing a female flower. If the plant is stressed or if days are long and temperatures high, the plant will produce more male flowers than female. As the season progresses and temperatures cool and days are shorter, male and female flowers will be produced in about equal numbers. (You can tell male and female apart by appearance. Female flowers have a short stem and what looks like a miniature fruit below the petals; male flowers have long stems and no miniature fruit).
• Female flowers must be pollinated, by pollen from the same or a different plant, if they are to produce fruit. Because these vegetables are closely related and similar in appearance, the question of cross-pollination between varieties and species arises. Plants of different varieties of the same species can cross-pollinate without affecting the fruits’ taste or appearance. The flesh of the fruit is made only of plant material from the female parent. Thus, if a female yellow crookneck flower is pollinated by pollen from a green zucchini, the edible part of the fruit will still be yellow crookneck. However, the plants grown from the resulting seeds will exhibit a mixture of the characteristics of both parents; they will be neither yellow crookneck nor green zucchini but a hybrid of both. Take home message: don’t worry about different cucurbits cross-pollinating. The fruit will be fine. Don’t save the seeds because you have no way of knowing the source of the pollen and what characteristics the new plant will have. The table below gives species information for common cucurbits.
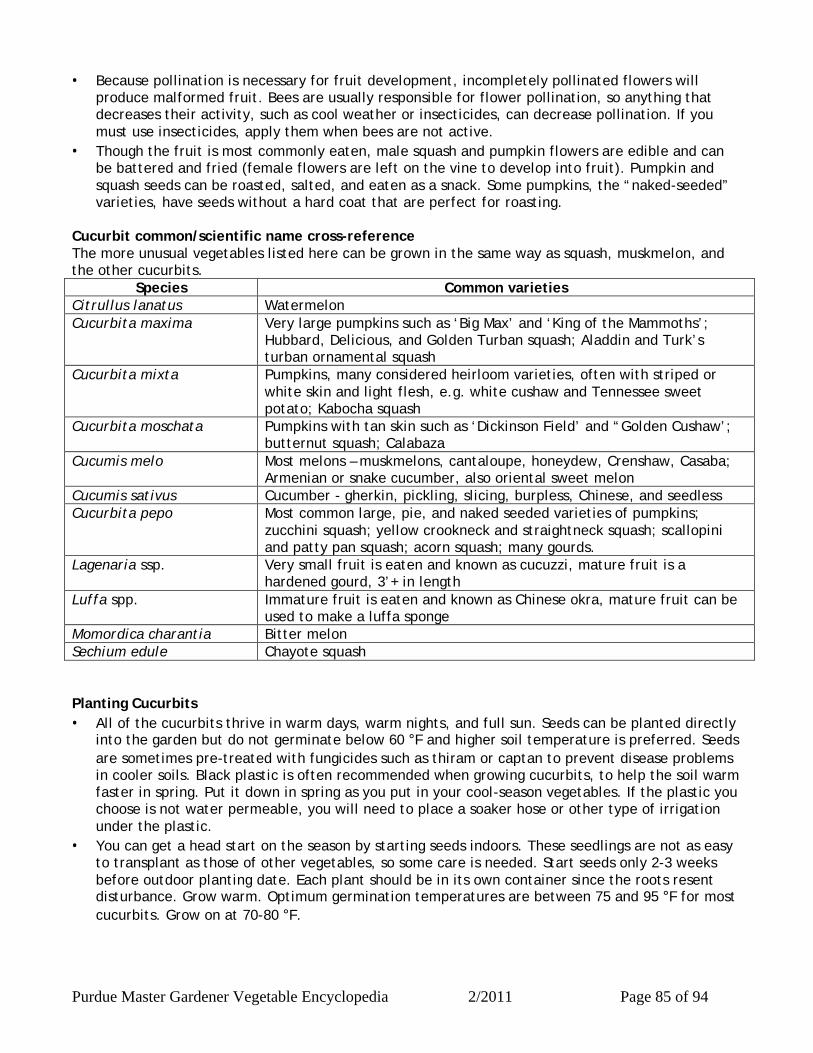
Purdue Master Gardener Vegetable Encyclopedia 2/2011 Page 85 of 94
• Because pollination is necessary for fruit development, incompletely pollinated flowers will produce malformed fruit. Bees are usually responsible for flower pollination, so anything that decreases their activity, such as cool weather or insecticides, can decrease pollination. If you must use insecticides, apply them when bees are not active.
• Though the fruit is most commonly eaten, male squash and pumpkin flowers are edible and can be battered and fried (female flowers are left on the vine to develop into fruit). Pumpkin and squash seeds can be roasted, salted, and eaten as a snack. Some pumpkins, the “naked-seeded” varieties, have seeds without a hard coat that are perfect for roasting.
Cucurbit common/scientific name cross-reference The more unusual vegetables listed here can be grown in the same way as squash, muskmelon, and the other cucurbits.
Species Common varieties Citrullus lanatus Watermelon Cucurbita maxima Very large pumpkins such as ‘Big Max’ and ‘King of the Mammoths’;
Hubbard, Delicious, and Golden Turban squash; Aladdin and Turk’s turban ornamental squash
Cucurbita mixta Pumpkins, many considered heirloom varieties, often with striped or white skin and light flesh, e.g. white cushaw and Tennessee sweet potato; Kabocha squash
Cucurbita moschata Pumpkins with tan skin such as ‘Dickinson Field’ and “Golden Cushaw’; butternut squash; Calabaza
Cucumis melo Most melons – muskmelons, cantaloupe, honeydew, Crenshaw, Casaba; Armenian or snake cucumber, also oriental sweet melon
Cucumis sativus Cucumber - gherkin, pickling, slicing, burpless, Chinese, and seedless Cucurbita pepo Most common large, pie, and naked seeded varieties of pumpkins;
zucchini squash; yellow crookneck and straightneck squash; scallopini and patty pan squash; acorn squash; many gourds.
Lagenaria ssp. Very small fruit is eaten and known as cucuzzi, mature fruit is a hardened gourd, 3’+ in length
Luffa spp. Immature fruit is eaten and known as Chinese okra, mature fruit can be used to make a luffa sponge
Momordica charantia Bitter melon Sechium edule Chayote squash Planting Cucurbits • All of the cucurbits thrive in warm days, warm nights, and full sun. Seeds can be planted directly
into the garden but do not germinate below 60 °F and higher soil temperature is preferred. Seeds are sometimes pre-treated with fungicides such as thiram or captan to prevent disease problems in cooler soils. Black plastic is often recommended when growing cucurbits, to help the soil warm faster in spring. Put it down in spring as you put in your cool-season vegetables. If the plastic you choose is not water permeable, you will need to place a soaker hose or other type of irrigation under the plastic.
• You can get a head start on the season by starting seeds indoors. These seedlings are not as easy to transplant as those of other vegetables, so some care is needed. Start seeds only 2-3 weeks before outdoor planting date. Each plant should be in its own container since the roots resent disturbance. Grow warm. Optimum germination temperatures are between 75 and 95 °F for most cucurbits. Grow on at 70-80 °F.

Purdue Master Gardener Vegetable Encyclopedia 2/2011 Page 86 of 94
• Transplants can also be purchased. Look for stocky plants with no evidence of disease or insect pests. Do not purchase plants with yellow leaves, which indicate the transplant has been stressed.
• Both homegrown and purchased transplants should have no more than 3 fully expanded true leaves when planted.
• Don’t plant too early. Wait until soil has warmed and temperatures are reliably over 50 °F. The earliest you should plant is about a week after the average last frost date. You can plant as late as early June in northern Indiana, mid-July in southern Indiana. As long as the soil is warm, earlier planting is recommended. Cucumbers and summer squash can produce all summer long. Some varieties of pumpkin and winter squash may need a long growing season to fully mature.
• Both seeds and transplants can be planted in rows, but they are often planted in hills, with 2-3 plants per hill and the hills spaced 4-8 ft apart. If using seeds, plant 5-6 seeds per hill and thin. Note: The word “hill” gives the impression of a raised area but a raised mound is usually not recommended because the soil dries out quickly. A “hill” is an area where several plants are grouped together. Hills are widely spaced, giving the plants ample room to grow.
• Use a high-phosphorus starter fertilizer at planting. • If you are not using black plastic, mulch after planting to help retain soil moisture and slow soil
temperature changes. Care Notes for Cucurbits • Side-dress around the base of the plants with 0.1 lb actual N/100 sq ft one week after flowering
begins (or when the vines begin to run on vining types) and again 3 weeks later. Exception: do not side-dress watermelon.
• Make sure to remove weeds as the vegetable plants become established. Mulch will help control weeds as well as help retain soil moisture. Once the plants begin to produce long vining stems, the leaves will shade the soil and reduce weed growth.
• Plants should receive at least an inch of water a week, provided all at once to wet the soil 6-8” deep. Consistent soil moisture is important, especially for development of the fruit. Irrigate during a dry spell. Avoid wetting the leaves if at all possible (for example, by using a soaker hose). If using a sprinkler, water early in the morning so leaves can dry. Watermelons are tropical plants and more tolerant of dry soil than the other cucurbits and need watering only during prolonged dry periods.
Harvesting Cucurbits Please also see information on individual vegetables. Cucumbers and summer squash are harvested when the fruit is immature (not fully grown and rind not yet hard). These plants will produce all summer if fruit is picked regularly and not allowed to mature on the vine. Pumpkins, winter squash, and all melons are harvested when the fruit is mature. Common problems of Cucurbits You will have more disease and insect pest problems with the cucurbits than with other vegetables.
Cultural problems: misshapen fruit due to poor pollination or low soil fertility; cracking and slitting, especially of melons, if heavy rains occur during ripening; poor flavor due to cool, wet weather, low soil fertility (especially potassium), or picking too early.
Insects: - Cucumber beetles, which damage seedlings and small plants by feeding on leaves and stems
and also on maturing fruit. They are responsible for spreading the disease bacterial wilt. Control with row covers until flowering begins.
- Squash vine borers enter the lower stem of squash and pumpkins, feed, and destroy the vascular system. If detected early (look for “sawdust” at base of plant) stems can be slit open
Purdue Master Gardener Vegetable Encyclopedia 2/2011 Page 87 of 94
and the insect removed and killed. Mound soil up around the damaged stem to encourage new roots to form and keep plant watered. Row covers before flowering can provide some protection but only if cucurbits were not planted in the same area last year. Good cultivation can destroy pupa, which overwinter in the soil. Later plantings (late June/early July) sometimes escape damage. Pumpkin and most squash are susceptible, butternut squash is resistant. Insecticides applied to the lower stem will work if timed to just before and throughout the egg laying period (before early July).
- Squash bugs feed on leaves, stems, and fruit. They can kill small plants and spread Yellow Vine Decline. Hand pick, or place a board on the soil near the plants. Bugs will congregate under a board during the night and can be killed the next morning. Insecticides, if used, should be applied as soon as the insects are noticed to prevent an even larger infestation later in the season. Make sure to treat both sides of the leaves.
Diseases: bacterial wilt spread by cucumber beetles (some varieties are resistant, watermelons do not get this disease); downy and powdery mildews; various leaf spot diseases, viruses, fruit rot, and several other diseases. When possible, plant resistant varieties. Avoid working with the plants when leaves are wet. Crop rotation can help as will a good clean-up at the end of the season. Fungicides may be required for control. References Growing Cucumbers, Melons, Squash, Pumpkins and Gourds, Purdue University http://www.hort.purdue.edu/ext/HO-8.pdf Growing Cucumbers, Peppers, Squash And Tomatoes In Containers, Ohio State University http://ohioline.osu.edu/hyg-fact/1000/1645.html Growing Cucurbits, Pennsylvania State University http://horticulture.psu.edu/files/hort/extension/cucurbits.pdf An IPM Scouting Guide for Common Problems of Cucurbit Crops in Kentucky, University of Kentucky http://www.ca.uky.edu/agc/pubs/id/id91/id91.pdf
Purdue Master Gardener Vegetable Encyclopedia 2/2011 Page 88 of 94
Cucumber Please see General Information on Cucurbits for additional information. • You can grow vining or bush cucumbers. Vining varieties can be trained on a vertical support.
Varieties for pickling produce small cucumbers with thin skin. Slicing cucumbers are larger and are used fresh. “Burpless” cucumbers have tender skin that lacks bitterness. They will be straight rather than curved if grown on a vertical support.
• You may find hybrids that produce only female flowers, called gynoecious hybrids. They produce more fruit than standard cucumber varieties and all the fruit matures at about the same time. Seed packets of these hybrids usually contain seeds of normal cucumber varieties for cross-pollination.
• Parthenocarpic varieties develop fruit without pollination and produce fruit with no seeds. These plants can be covered with floating row covers early in the season to reduce insect problems (remove covers as weather warms so plants do not overheat). If pollination does occur, seeds will be produced.
• Plant seeds 0.5-1” deep. Final spacing should be 12-24” apart in rows a minimum of 4 ft apart. For hill planting there should be 3 plants in hills spaced at least 3 ft apart. Plants on vertical supports should be 12” apart, supports at least 2.5 ft apart.
• The first fruit produced by bush cucumbers is ready to harvest in about 50 days, vining varieties in about 60 days.
• Cucumber fruit grows quickly once pollination occurs. Cucumbers for pickling are usually harvested when 2” in length, about 4-5 days after pollination. Slicing cucumbers are harvested when 6-8” long, about 15-18 days after pollination. Burpless cucumbers should be 1-1.5” in diameter and no more than 10” long. Some varieties will get much larger if not harvested. Make sure to harvest regularly, removing any large fruits you missed, so flowering will continue. If pests are controlled, cucumber plants will continue to produce all summer. Estimated yield per 10 ft row is 10 lb.
• Sometimes cucumbers become bitter. Bitterness is stronger at the stem end of the cucumber. The chemicals that cause bitterness (and the “burp”), Cucurbitacin B and Cucurbitacin C, are found in and under the skin, so peeling the cucumber may improve flavor. Bitterness is usually associated with environmental factors, occurring when plants are stressed by low moisture, high temperatures, or poor nutrition. Some varieties have more tendency toward bitterness than others. Once environmental conditions improve, newly formed cucumbers will be less bitter. If it is a continuing problem in your garden, try varieties advertised as burpless or bitter-free.
Purdue Master Gardener Vegetable Encyclopedia 2/2011 Page 89 of 94
Summer Squash Please see General Information on Cucurbits for additional information. • Common varieties include those that produce straight green fruit (zucchini, cocozelle, caserta),
yellow fruit, such as crookneck or straight neck, and scalloped fruit such as scallopini or patty pan that are often white
• Most summer squash varieties are bush type plants rather than vines. • Plant seeds 1” deep, 24-36” in rows at least 30” apart. If planting in hills, plant 3 plants in hills 4
ft apart. • Summer squash are harvested when the fruit is immature, while the skin and flesh is still tender.
Plants will continue to produce new flowers and fruit if harvested regularly, providing squash throughout the summer.
• Once pollination occurs, summer squash is ready to pick in 4-8 days. If you don’t inspect the plants every day or two, the squash will quickly grow too large. Flowering may decrease. If you find an overmature fruit, pick and discard it.
• Harvest the elongated varieties (e.g. zucchini, crookneck) when they are less than 2” in diameter and 6-8” long. Scalloped types should be 3-4” in diameter. If the rind is too tough to be marked by a thumbnail, it is too mature for the table. The first fruit is ready to harvest 40-50 days from seed. Estimated yield per 10 ft row is 60 fruit (about 15 lb).
Winter Squash Please see General Information on Cucurbits for additional information. • Winter squash fruit is harvested when it is fully mature. It stores well over winter (hence the
name). It is usually baked or made into pies. Vining, semi-vining, and bush varieties are available. Acorn, butternut, hubbard, Turk’s turban, and cushaw are types of winter squash.
• Plant seeds 1” deep. For bush varieties, space 24-36” apart in rows 6 ft apart. Vining winter squash require 50-100 sq ft per hill. For vining varieties allow 5-6 ft between hills with 2-3 plants and at least 7 ft between rows. For semi-vining varieties, thin to 2 plants per hill, 4 ft between hills, 8 ft between rows.
• Harvest as you do pumpkins, when color is deep and the rind is hard. Protect from a light freeze (cold weather improves flavor) but harvest before a hard freeze. Leave 2” of stem. Fruit which has been cut, bruised, or frozen will not keep. Store dry at 50-55 °F. Do not pile more than 2 fruit deep. Each plant should produce several fruit.
• Winter squash matures in 85-100 days from seed. Once pollination occurs, fruit matures in 60-90 days depending on variety. Estimated yield per 10 ft row is 10 lb.
Purdue Master Gardener Vegetable Encyclopedia 2/2011 Page 90 of 94
Pumpkin Please see General Information on Cucurbits for additional information. • There are many varieties of pumpkin, even several species (see the table in General Information
on Cucurbits). Grow the small ones (called pie pumpkins) for cooking, the large ones for cooking and carving, jumbo varieties for county and state fairs, and naked-seeded varieties for roasted seeds (these varieties bear large, hull-less seeds).
• Plant seeds 1” deep, final spacing for bush varieties is 24-48” in rows 6 ft apart. Vining pumpkins require 50-100 sq ft per hill. For vining varieties allow 5-6 ft between hills with 2-3 plants and at least 10 ft between rows. For semi-vining (semi-bush) varieties, thin to 2 plants per hill, 4 ft between hills, 8 ft between rows. For miniature varieties, plant in rows, 2 ft between plants, a minimum of 6 ft between rows.
• Pumpkins are ready to harvest when they are a deep, solid color. Different varieties may be orange, tan, white, or striped, so know how your variety should look. The rind should be hard. You can cover pumpkins to protect them from a light frost, but make sure to harvest before heavy frosts. Pumpkins harvested afterwards will not keep.
• Harvest carefully so the fruit is not injured. Cut the pumpkin from the vine using a sharp knife or pruning shears, leaving 3-4” of stem attached. Store dry at 50-55 °F. Estimated yield per 10 ft row is 40 lb.
• Most varieties mature in 100-110 days. Jumbo pumpkins (Cucurbita maxima varieties) take 120 days to mature. Once pollination occurs, pumpkins will ripen in 65-90 days, depending on variety. You will get only one or two large pumpkins per plant. Miniature pumpkins (about 3” in size) may yield a dozen pumpkins per plant.
Purdue Master Gardener Vegetable Encyclopedia 2/2011 Page 91 of 94
Muskmelon and other melons Please see General Information on Cucurbits for additional information. • The muskmelon of the garden produces the fruit called “cantaloupe” in the grocery. True
cantaloupe, with a hard, warty rind and green flesh, is not often grown in the US. Muskmelon (the grocery’s cantaloupe) has a netted rind.
• Honeydew, Crenshaw, and Casaba are grown in the same way as muskmelon but take much longer to mature. If you are gardening in northern Indiana, even the early maturing varieties may not ripen before a frost.
• Plant seeds 1” deep. Final spacing is 18-24” in rows at least 4 ft apart. If planting in hills, place 2 plants in hills every 3 ft or 3 plants every 4 ft. Rows are still 4 ft apart.
• Too much or too little rain during ripening can impact fruit quality and integrity. Irrigate if rainfall is lacking. Melons prefer drier, rather than wetter, soil as they near maturity.
• Fruit is heavy enough that it should be supported if plants are grown on a vertical support. Slings made of nylon stockings or cheesecloth work well.
• Each plant should produce several fruit. Early muskmelon varieties mature in about 70 days, most in 80-90 days. Honeydew matures in 85-95 days, Casaba Golden Beauty in 110. Once pollinated, a muskmelon takes 42-46 days to ripen.
• Muskmelons are ripe when the rind between the netting turns from green to tan or yellow. Gently lift the melon. The stem should separate easily from the fruit (sometimes the word “slip” is used, for example, the fruit should “slip” the vine). Estimated yield per 10 ft row is 10 melons.
• Honeydew and Crenshaw are cut from the vine when they have turned completely yellow. If kept at room temperature they will continue to improve. They are fully ripe when the blossom end (non-stem end) is soft to pressure.
• Harvest early in day when plants are dry. Check the fruit frequently as it nears ripeness, every other day early in the season, every day later on.
Purdue Master Gardener Vegetable Encyclopedia 2/2011 Page 92 of 94
Watermelon Please see General Information on Cucurbits for additional information. • By selecting different varieties you can grow watermelons that weigh only 6 pounds and others
that weigh in at 22 pounds. • You can also grow seedless watermelons. The seeds for these melons are produced by crossing a
variety with 4 sets of chromosomes with one that has 2 sets of chromosomes (2 is the normal number). The resulting seed (with 3 sets of chromosomes) will germinate, grow, and flower but, after pollination, only a few soft seeds form in the developing fruit. The seedless variety does not produce viable pollen so a second, seeded, variety must be planted nearby. If you plant a seeded variety that has a different color or shape, you will be able to tell the fruits apart once harvested. Most packets of seedless watermelon seed have a few seeds of a seeded variety included. You can tell the seeds apart before planting by size – the seedless variety has the larger seeds.
• Watermelon will tolerate a slightly lower pH than other cucurbits, growing well at pH between 5.5 and 6.8.
• Plant seeds 1” deep. Plant watermelons 24-48” apart in rows 6 ft apart. If growing in hills, hills should be 6 ft apart, in rows at least 7 ft apart with 3 plants per hill.
• Watermelons are a tropical species and are more tolerant of heat and drought than other commonly grown cucurbits.
• Large watermelons take longer to mature, 120 days for the larger ones, compared to 70-80 days for smaller ones. Once pollination occurs, the fruit matures in about 42-45 days.
• Harvest watermelons when they are fully ripe. Estimated yield per 10 ft row is 4-10 melons. • Use a combination of the following four indicators to determine when watermelons are ripe:
1. The light green, curly tendrils on the stem near the point of fruit attachment turn brown and dry. Some varieties may do this 5-10 days before the fruit is fully ripe.
2. The surface color of the fruit loses its slick appearance and turns dull. 3. The skin becomes rough and you can penetrate it with your thumbnail. 4. The cultivars that are predominantly dark green will turn a buttery yellow on the ground side.
Lighter melons will also turn yellow, but not as deep as darker melons.
• Store watermelons cool but not cold, then put them in the refrigerator to cool just before eating.
Purdue Master Gardener Vegetable Encyclopedia 2/2011 Page 93 of 94
Gourds Please see General Information on Cucurbits for additional information. • The commonly grown gourds belong to three genera – Cucurbita, Lagenaria, and Luffa. They are
most often grown for their ornamental mature fruit though very small immature fruit is edible. The Cucurbita types are most common, are very colorful, and come in unusual shapes. The Lagenaria type are typically called bottle or dipper gourds. Luffa are made into sponges.
• Grow gourds as you do other cucurbits. • Plant seeds 1” deep, less if seeds are small. Plant in rows or hills (2-3 plants per hill). Plants or
hills should be at least 6-8 ft apart. • Immature gourds can be eaten. Harvest about 1 week after flowering. • Gourds need a long growing season. Days to harvest varies greatly with variety and can be
between 100 and 180 days. • Gourds are ready to harvest when the stems dry and turn brown. The rind should be thick and
hard. If you squeeze the gourd between your fingers, there should be no give. Harvest mature gourds before frost. Cut from the vine and leave a few inches of stem attached.
• The exception is the Luffa or sponge gourd. Harvest after the vines are killed by a frost. Reference Gourds, Purdue University http://www.hort.purdue.edu/ext/HO-135.pdf

Purdue Master Gardener Vegetable Encyclopedia 2/2011 Page 94 of 94
Chayote Please see General Information on Cucurbits for additional information. • Chayote is cold-sensitive, perennial cucurbit, sometimes called chayote squash or alligator pear,
grown for its small, light green fruit. The fruit is solid when harvested rather than hollow like winter squash. It is popular in Central America and Asia. Grow it as an annual in Indiana.
• Chayote can be allowed to sprawl on the ground but it is usually grown on a vertical support. • Purchase a chayote at the grocery and plant the whole fruit at a 45 degree angle with the small
end up. If your soil is a bit poorly drained, you may have better luck starting the seed indoors to avoid overwatering from early summer rains. Plant seeds or seedlings outdoors 8-10 ft apart near the vertical support after danger of frost is past. One or two well-grown plants will feed most families.
• Provide water if rainfall is lacking but do not keep the soil soggy. Heavy nitrogen fertilization will cause leaf growth at the expense of flowering.
• Chayote is frost sensitive and may be hard to grow successfully in Indiana. The vine begins to flower 3-5 months after planting. Fruits mature in about 35 days after pollination. They are firm and green when ripe.