master gardener home vegetable guide - door county · pdf filemaster gardener home vegetable...
TRANSCRIPT

Master Gardener Home Vegetable Guide Chapter 1 – Gardening Basics Basic Needs of Plants Just like we humans need certain things to survive -- water, food, shelter, etc.--plants also have some basic needs. At a minimum, all green plants need
• Light
• Air
• Water
• Mineral nutrients.
As a gardener your role is to ensure that your plants' basic needs are met. Therefore, most gardening tasks relate directly or indirectly to filling one or more of these needs.
Why do plants need these things, and how do they use them? Let’s take a brief look at how plants work.
Photosynthesis
We humans--and all animals for that matter--must eat food to supply our bodies with energy. Plants, on the other hand, have the remarkable ability to manufacture their own food! Plants "harvest" the energy of the sun then use this energy to manufacture sugars. This process is called photosynthesis. In addition to sunlight, plants need water and air to perform photosynthesis. They use mineral nutrients, the fourth basic need, to build the necessary cell structures.
Water
Plants also need water for things besides photosynthesis. They need water to maintain cell pressure--pressure within the plant's cells is what keeps stems sturdy and leaves opened to the sunlight.
But plants lose lots of water during a process called transpiration, during which water vapor escapes from pores on the undersides of the leaves. Why should gardeners care about transpiration? Because one of the most important factors in growing healthy plants is maintaining proper moisture levels. The rate at which a plant is transpiring has a huge effect on how much water it needs!
It may be frustrating for novice gardeners to hear the advice, "Keep the soil evenly moist," rather than, "Apply 2 cups of water per day," but a plant's water needs depend on soil type, as well as on environmental factors that can vary considerably from day to day and place to place.
The warmer, drier, windier, and sunnier it is, the more water a plant loses to transpiration. During dry weather, you need to replace this lost water, or plants will wilt.

2
What type of soil do you have? You've probably heard that the ideal garden soil is a rich loam. But what exactly is this?
A rich, loamy soil contains a range of mineral particle sizes——from microscopic clays to relatively large grains of sand. These particles are bound together into groupings of various sizes called aggregates. Soil composed of these aggregates has lots of pore spaces of various sizes, and these spaces contain water and air. If all the spaces contain water, the soil is waterlogged; few plants can withstand such saturated soils for long, because plant roots need air.
Squeeze Test: Take a handful of moist soil. Compress it into a ball, then press it between your thumb and index finger and try to form a ribbon. If the ball is crumbly and won’t form a ball, it probably contains a lot of sand. The stickier the soil is, and the longer the ribbon you can form, the more clay the soil contains. A loamy soil contains a range of particle sizes: clay, sand, and silt (midway between clay and sand). Loamy soil will form a ball that crumbles when poked.
Very sandy soils have excellent drainage, but can drain so quickly that plants suffer from drought. Clay soils, on the other hand, hold water so well they can easily become waterlogged. Loam soil provides a happy medium, retaining adequate water but draining well.
Soil Test: A soil test is the only way to know what nutrients your plants need. Soils vary within your yard, community and the state. Your soil test results tell you how much and what type of fertilizer your plants need. The test also tells you the soil pH--how acidic or alkaline your soil is. You can also request tests for micronutrients and lead. Soil test results depend on how well you take the soil sample. The sample should reflect the overall lawn or garden condition. Make a representative sample by collecting small amounts of soil from various spots within the target area.
Take soil from at least five sites in areas less than 500 square feet. Take 10 samples from areas between 500 and 1000 square feet. Use a soil probe, clean shovel or garden trowel to take thin slices or cores of soil four to six inches deep. Break up cores and slices and mix together. You need one to two cups of soil for best results. Take representative samples for each area you want analyzed. Don't mix lawn and garden soils into one sample. Take separate samples for your shrub bed, lawn, problem areas, vegetable gardens and flower gardens. The plants in each area have different nutrient needs.
You can get your soil tested through the University of Wisconsin Soil and Plant Analysis Laboratory or any state certified soil-testing facility. Contact your local County University of Wisconsin Extension Office for details on submitting a soil sample.
You can take soil samples any time the ground isn't frozen. Late fall and early spring are good times to have your soil tested. This lets you use the recommendations the next gardening season.
For more information on this topic, consult UW-Extension bulletin A2166-Sampling Soil for Testing.
Sandy Soil Clay Soil Loamy Soil

3
Planning a Vegetable Garden Planning is the first and most basic step in home vegetable gardening. Planning not only saves time when you’re ready to plant but also gives you an idea of the types and quantities of seeds or plants you’ll need. Most importantly, planning helps assure that the home garden will satisfy your needs and desires. Choosing the Site Vegetables grow best in an open, level area where the soil is loose, rich, and well drained. If the quality of the soil is poor, mix in 2-3 inches of topsoil, peat moss, strawy manure, compost, or leaves plus fertilizer. The more organic matter or topsoil you add, the more you’ll improve your soil. Avoid heavy clays, sandy soils, and shady spots. Clearance with Trees and Shrubs: Avoid planting vegetables near trees and shrubs. In these locations, vegetables must compete with the other plants for light, nutrients, and water. Walnut and butternut trees pose a problem because they produce a substance called "juglone", which is toxic to some plants, particularly tomatoes. Juglone-sensitive plants may eventually wilt and die. Because the roots may remain active for several years even after the tree is cut down, a minimum distance of 50 feet is recommended between walnut trees and sensitive plants. What plants are susceptible to this type of injury? Although researchers don't know all the plants affected by juglone, evidence shows that juglone most commonly poisons potatoes and tomatoes. Other susceptible plants include some apple varieties, eggplant, pepper, beans, cucumber, rhododendron, white and red pine, white birch, cinquefoil and cotoneaster. Black raspberry plants thrive around black walnuts and butternuts while the closely related black berry quickly dies. (Reference UWEX publication A3182, Walnut and Butternut Toxicity) Sunlight: Most vegetable garden plants need full sun to thrive and produce their best. (Full sun means at least 6 hours of direct sun during the day.) Realistically, you may not have this ideal spot. So if you’ll be tilling a new garden, what’s most important? Number one is sunlight. You can improve soil and build windbreaks, but you can’t move the sun! So choose the sunniest spot you have. Soil: Choose the spot in your yard that has the best soil. You may be able to distinguish the quality of your soil by looking at your lawn. If it looks lush and healthy, then the soil supporting it is probably good for a garden. Don't pick the spot where the lawn is the worst, and figure you can get out of reseeding by locating your garden there. And avoid low spots that stay wet in the spring.
Protection from wind: Strong winds dry out plants and soil, and can topple tall plants like corn and sunflowers. Wind is a little harder to plan for, but if you have the choice, choose a spot that is protected from your area’s prevailing winds. If your worst winds come from the north, then a garden on the south edge of a row of trees will receive some protection. Just be sure your windbreak doesn’t shade your garden! You can set up a snow fence or plant some low shrubs to help break the wind without sacrificing sunlight.
Water: Locate your garden near a water source, or have hoses that will reach it. (Underground soaker hoses save water and time, so consider installing them before you plant.)

4
Choosing Varieties
How do you choose among all those luscious-sounding tomato varieties! (Especially if you are looking at photos on a cold January day!) Though there’s nothing wrong with choosing a variety because you like how it looks, you may want to consider some other characteristics that can make your job as gardener a little easier.
Disease Resistance
There are cultivars (cultivated varieties) of many garden plants that have shown resistance to certain pests. If you know a pest is common in your region, by all means choose a resistant variety! If you don’t know what pests you might encounter, you might want to plant a few disease-resistant plants anyway, just in case your non-disease-resistant choices succumb.
Short or Long Season
If you like to have the first ripe tomatoes on the block, or you live in a region with relatively short summers, choose varieties that mature the fastest. Some tomato varieties, for example, ripen 60 days after transplanting, while others need 85 days or more to mature.
Growing Habit
Bush beans, as the name implies, grow as small, freestanding plants, while pole beans need something to climb. Some types of squash grow in compact form, while others need lots of space for their vines to run.
Hybrid or Open-Pollinated
Plant breeders create hybrid plants by crossbreeding two different varieties. The term open-pollinated, on the other hand, describes plants that are pollinated by wind, insects, and other pollinators, without human intervention. Hybrid plants often are more productive and disease-resistant than open-pollinated (non-hybrid) varieties. However, there’s a drawback. If you like to save seed at the end of the season for planting the following year, avoid hybrids. Their seed doesn’t come true -- that is, the resulting offspring plants may not have all the positive characteristics of the parent plant.
Of course, if you have some favorite varieties, go ahead and plant them, even if they aren’t the most "reliable." Brandywine tomato has no particular resistance to diseases -- but if you manage to keep yours healthy, the reward will be one of the tastiest tomatoes on earth!
Seeds or Transplants?
Which seeds should you sow directly in the garden, and which do better if you plant them as seedlings (either purchasing transplants or starting the seeds indoors yourself)?
Many garden plants do just fine when you sow the seed directly in the garden. These plants usually mature relatively fast; so direct sowing works well. Plants with taproots, such as carrots, generally don’t transplant well, so it’s best to start them from seed right in the garden too.
Other plants have long growing seasons, or must be planted outdoors in early spring so they mature before the hot weather arrives. These do best when set in the garden as transplants.
Direct sow: Beans, beets, carrots, corn, lettuce, spinach, Swiss chard, peas, radish, potato
Plant transplants: Broccoli, cabbage, cauliflower, cabbage, peppers, tomatoes, okra, asparagus, rhubarb
You can go either way with these: Cucumbers, squash, muskmelon, watermelon, pumpkins, gourds

5
What Size? If you are new to gardening, you may wish to start with a relatively small garden, say 10 foot x 20 foot. Enthusiastic novices often till up a huge garden area, and then abandon it to the weeds by July. A small, well-tended garden will produce more than more than a large, neglected one.
Single rows or wide-row beds?
If space is at a premium, creating 3- to 4-foot-wide beds will allow you to grow more plants than if you plant in long single rows because less space is wasted on paths. Plants in wide rows are spaced closer together, making it easier to weed, feed, and water them.
Wide-row plantings do not have to be raised-bed plantings, but like raised beds, the width of the row should be such that you can easily reach the center of the bed from each side (3 to 4 feet).
Square Foot Gardening Square-foot gardening is a form of intensive gardening where you block off squares of space for crops rather than planting them in rows. The name comes from partitioning blocks of gardens space that are 1 ft by 1 ft. Each square holds a different vegetable, flower, or herb. These small 1-foot squares are grouped together into blocks measuring 4 ft by 4 ft square.
To avoid walking on the growing soil, the square foot garden is laid out with walking spaces around each block. You can make your paths 1, 2, or even 3 feet wide. There’s no set rule. If you wish to practice this type of intensive gardening, we recommend Mel Bartholomew’s book entitled “Square Foot Gardening.”
Tomatoes Snap Beans Lettuce Onions Radishes Beets Broccoli Swiss chard Zucchini Cucumbers
10 ft x 20 ft Bed
Square Foot Garden – Family of 4 (10 ft x 10 ft)

6
Interplanting
Growing two or more types of vegetables in the same place at the same time is known as interplanting. Proper planning is essential to obtain high production and quality of the crops planted. This technique has been practiced for thousands of years, but is just now gaining widespread support in this country. To successfully plan an interplanted garden the following factors must be taken into account for each plant: the length of the plant's growth period, its growth pattern (tall, short, below or above ground), possible negative effects on other plants, preferred season, and light, nutrient, and moisture requirements. Interplanting can be accomplished by alternating rows within a bed (plant a row of peppers next to a row of onions), by mixing plants within a row, or by distributing various species throughout the bed. For the beginner, alternating rows may be the easiest to manage.
Long season (slow maturing) and short season (quick maturing) plants like carrots and radishes, respectively, can be planted at the same time. The radishes are harvested before they begin to crowd the carrots. An example of combining growth patterns is planting smaller plants close to larger plants, (radishes at the base of beans or broccoli). Shade tolerant species like lettuce, spinach, and celery may be planted in the shadow of taller crops. Heavy feeders, such as cabbage family crops, should be mixed with less gluttonous plants. Root, leaf, and soil-building crops (legumes) may be mixed to take advantage of available nutrients.
Interplanting can help keep insect and disease problems under control. Pests are fairly crop-specific; that is, they prefer vegetables of one type or family. Mixing families of plants avoids large expanses of the pest-preferred crop, helping to contain early pest damage within a small area, and giving the gardener a little more time to deal with the problem. One disadvantage is that when it does come time to spray for pests, it's harder to be sure that all plants are protected.
All gardeners can grow vegetables more efficiently by using some of the intensive growing techniques described here. Careful management is the key to successful intensive vegetable gardens. The benefits can include greater yields per square foot, and more attractive vegetable plantings.
Table I
Some interplanting possibilities
Combine tall with low/spreading Combine fast with slower-growing
Caged tomatoes Melons Lettuce Tomatoes
Sweet corn Lettuce Radishes Sweet corn
Peas Radishes Greens Winter squash
Okra Winter squash Beets Pole beans

7
Spacing of Plants -- Intensive Gardening
Individual plants are more closely spaced in a raised bed or interplanted garden. An equidistant spacing pattern calls for plants to be the same distance from each other within the bed; that is, plant so that the center of one plant is the same distance from the centers of plants on all sides of it. In beds of more than two rows this means that the rows should be staggered so that the plants in every other row are between the plants in the adjacent rows. The distance recommended for plants within the row on a seed packet is the distance from the center of one plant to the center of the next. This results in a more efficient use of space and leaves less area to weed and mulch. The close spacing tends to create a nearly solid leaf canopy, acting as living mulch, decreasing water loss, and keeping weed problems down. However, plants should not be crowded to the point at which disease problems arise or competition causes stunting.
INTENSIVE GARDENING SPACING GUIDE
Note: to determine spacing for interplanting, add the inches for the two crops to be planted together, and divide the sum by 2. For example, if radishes are planted next to beans, add 2" + 4" = 6", then 6" divided by 2 = 3". The radishes should be planted 3" from the beans.
Plant Inches Plant Inches Asparagus 15-18 Lettuce, head 10-12
Beans, lima 4-6 Lettuce, leaf 4-6
Beans, pole 6-12 Melons 18-24
Beans, bush 4-6 Mustard 6-9
Beets 2-4 Okra 12-18
Broccoli 12-18 Onion 2-4
Brussels sprouts 15-18 Peas 2-4
Cabbage 15-18 Peppers 12-15
Cabbage, Chinese 10-12 Potatoes 10-12
Carrots 2-3 Pumpkins 24-36
Cauliflower 15-18 Radishes 2-3
Cucumber 12-18 Rutabaga 4-6
Chard, Swiss 6-9 Southern Pea 3-4
Collards 12-15 Spinach 4-6
Endive 15-18 Squash, summer 18-24
Eggplant 18-24 Squash, winter 24-36
Kale 15-18 Sweet corn 15-18
Kohlrabi 6-9 Tomatoes 18-24
Leeks 3-6 Turnip 4-6

8
Succession Planting
Succession planting is an excellent way to make the most of an intensive garden. To obtain a succession of crops, plant something new in the spots vacated by spent plants. Corn after peas is a type of succession. Relaying is another common practice, consisting of multiple plantings of one crop to provide a continuous harvest. Sweet corn and bush beans are usually recommended for relaying, but cucumbers or other crops that yield for two weeks or less are also good prospects.
One approach to relaying is to plant one variety several times at about two-week intervals (more time between early plantings in colder soil but only 10 days between the last plantings). Another approach is to make one planting of two or more varieties that differ in maturity time, e.g., 50-day and 60-day beans or early-, mid-, and late-season sweet corn. Planting a spring, summer, and fall garden is another form of succession planting. Cool season crops (broccoli, lettuce, peas) are followed by warm season crops (beans, tomatoes, peppers), and, where possible, these may be followed by more cool-season plants, or even a winter cover crop.
Starting seeds indoors for transplanting is important for effective gardening. To get the most from your garden plot, a new crop should be ready to take the place of the crop being removed. Several weeks may be gained by having 6" transplants ready to go into a vacated area. Don't forget to recondition the soil for the new plants.
Vegetables for Succession Planting
Vegetable Plant every:
Radishes 10 days
Lettuce 2 weeks
Summer squash 3 to 4 weeks
Snap beans 3 weeks
Sweet corn 2 to 3 weeks

9
Raised Beds In raised-bed gardening the planting surface is elevated to predetermined height. A raised bed can be a simple mound of soil or an elaborate wood or stone structure. There are a number of benefits to creating raised beds:
• Better drainage. Growing plants in raised beds is a logical choice for gardeners with heavy, poorly drained soils. Raised beds permit plant roots to develop in soil held above waterlogged or compacted zones. This provides a more optimum soil environment for root growth. As beds are built up, compost or other forms of organic matter may be incorporated, further improving soil structure, drainage and nutrient-holding capacity.
• Higher yields. Better root growth from improved soils leads to higher yields for food crops and lusher
growth of ornamental plantings. Also, intensive planting in raised beds means more plants can be grown in a smaller area than with conventional row-cropping techniques. No space is wasted between rows.
• Expanded growing season. Better drainage speeds soil warming and allow earlier spring planting. In wet
seasons, soil dries out faster, permitting planting to proceed between rains.
• Maintenance. Because plants are growing above the level of walkways, less stooping is required for weeding, watering and other chores. Intensively planted raised beds provide dense foliage cover, shading out much weed growth. Pathways are more defined, so you (and your visitors) are less likely to trample new plantings.
• Using difficult sites. Raised beds make gardening possible on sites where growing plants would otherwise
be impossible. Rooftop gardens and raised beds on top of solid rock are examples. Terraced raised beds turn hillsides into productive growing areas while reducing soil erosion potential.
• Disadvantages: Raised beds are not the answer for all gardeners lacking space. The initial labor cost to
establish the beds may be high. Once established, especially with permanent sides, it may be difficult to use a standard size tiller for cultivation. The tendency of the soil in raised beds to dry faster may increase the need for irrigation later in the season.
Making permanent beds. Use rot-resistant wood such as cedar, or bricks, rocks, or cement blocks to create a bed that is at least 1 foot deep, no more than 3 to 4 feet wide, and as long as you like. If the beds are wider than 3 to 4 feet, it's hard to reach the center to weed, water, and fertilize. To slow the rotting of the wood, consider lining the bed's inside walls with plastic, or painting the wood with a preservative such as copper or zinc naphthenate. (Both are safe to use for food crop beds.) The simplest method is to purchase wood treated with chromated copper arsenate salts (CCA). CCA-treated lumber is available at most local lumberyards and has a slightly green cast to it. If building the bed on soil, improve drainage by loosening the soil in the bottom of the bed with a shovel or spading fork. Then fill the bed to the top with a mixture of compost and topsoil. The corner posts shown in the above sketch can be cut flush or recessed into the ground if desired. Making temporary beds. In the garden, temporary raised beds allow you to change the design each year. Shovel garden soil into raised beds, or bring in a mixture of compost and topsoil. Beds can be any shape you desire: rectangular, curved, or even round. The basic rule of thumb is to build beds about 12 inches deep and no more than 3 to 4 feet wide. Remove sticks, rocks, and other debris, and rake the tops of the beds smooth and flat.

10
Vertical Gardening Most gardeners already use vertical growing to save space in the garden. Caging tomatoes and trellising peas are two familiar examples. Besides saving space, vegetables grown this way are easier to pick and may have less rot because the fruit does not contact the soil. Improved air circulation can reduce diseases. Growing plants vertically can mean higher yields per unit area. In addition, vegetable plants can be trained on trellises to provide welcome summer shade or privacy screens, as well as to produce food for the table.
Trellising does have some disadvantages, however. Climbing supports must be sturdy, especially in windy sites. Building and installing trellises can involve time and expense. If plants are not naturally twining, they will have to be trained or secured to trellises, and heavy fruit will require additional support. Transpiration is higher in plants growing upright, so they may require extra water. Flowers will be more exposed to the wind, which may discourage pollinators like bees, or cause flower abortion.
Types and Installation The type of vegetable determines what kind of trellis used. A wide variety of trellising materials is available. A good rule is to install the sturdiest trellis you can afford. If the trellis is part of your landscaping it should be aesthetically pleasing, too.
Posts or supports for trellises can be made from metal, wood or plastic like PVC pipe. Metal posts will last longer and are easier to install than wooden ones. Wooden posts should be treated with a preservative or they may last only one season. Posts can be used to support plastic or string mesh, or chicken wire. Plastic
and string meshes can be disposed of, plants and all, at clean-up time. Removing dead plants from chicken wire fencing may be frustrating and futile. Longer poles made of bamboo can be arranged in teepees to support climbing vegetables like pole beans.
Bamboo Trellis

11
Container Gardening
One of the most versatile and creative forms of gardening is container gardening. Planting a container garden is much like creating a floral arrangement. However, live plants can be enjoyed for a season or longer period of time. Almost any plant can be grown in a container when proper growing conditions are provided and can add a temporary splash of color and art wherever desired. Some other reasons for container gardening are:
• Your backyard or traditional gardening space is limited or unavailable. • Your time for gardening is limited. • Your mobility is limited to working in raised beds or containers. • Your gardening site is unsuitable for growing the plants you want to grow because of poor drainage, soil
conditions, or too much shade or sun. • You have a desire to be a creative garden artist!
These are some of the advantages of container gardening. The biggest disadvantages to growing plants in containers are the maintenance requirements of watering and fertilizing.
Types of Containers
Almost any type of container can be used for growing vegetable plants. For example, try using bushel baskets, drums, gallon cans, tubs or wooden boxes. The size of the container will vary according to the crop selection and space available. Pots from 6 to 10 inches in size are satisfactory for green onion, parsley and herbs. For most vegetable crops such as tomatoes, peppers and eggplant, you will find 5-gallon containers are the most suitable size. They are fairly easy to handle and provide adequate space for root growth.
Regardless of the type or size of container used, adequate drainage is a necessity for successful yields. It is advisable to add about 1 inch of coarse gravel in the
bottom of the container to improve drainage. The drain holes are best located along the side of the container, about 1/4 inch to 1/2 inch from the bottom.
Growing Media
Synthetic "soils" are best suited for vegetable container gardening. These mixes may be composed of sawdust, wood chips, peat moss, perlite, vermiculite or almost any other type of media. Regardless of what mixture is used, however, it must be free of disease and weed seeds, hold moisture and nutrients but drain well and be lightweight. Many synthetic "soils" are available from garden centers, or one can be prepared by mixing horticultural grade vermiculite, peat moss, superphosphate, and garden fertilizer. Mix the material thoroughly adding a little water to reduce dust. Wet the mix thoroughly prior to seeding or transplanting.
12
Selecting Plants for Containers Planting your container garden is much like planting a traditional garden bed. Seeds can be planted in rows or in clusters, depending on the size and shape of the container. By planting transplants rather than seeds, plants will have a head start on the growing season. Plants that are naturally smaller in size are better adapted to the confines of a container garden. But even large plants such as tomatoes, melons, and squash can be productive if given a large enough container. Many garden catalogs now feature compact cultivars of flowers and vegetables which are more suitable for growing in containers or other small spaces. Vegetables and flowers can be combined to create attractive planter displays. When mixing different plants, keep in mind the light requirements of each plant. Most vegetables require a minimum of 6 to 8 hours of direct sunlight each day for good production. Many flower species will also thrive in full sun, but there are a number of flowers, which must have partial or total shade. For recommended container size and light requirements for various crops, see UWEX publication A3382.
Watering
Soilless mixes dry out quickly and are difficult to re-wet once they’ve become very dry (due to the large amount of peat moss used). Containers with soilless mix may require twice as much water as those filled with media containing soil. If the soilless mix becomes very dry, add a wetting agent, such as a few drops of liquid dish soap, to the watering can before watering. Do not use soilless mixes in clay pots since the mix will dry out quickly. Proper watering is crucial to successful container gardening. You should check plants daily (more often during hot, dry weather), and water as often as needed. Water thoroughly, until water runs out the drainage holes. Frequent light watering promotes shallow root systems and concentrates salts near the soil.
Fertilizing
All growing media should have fertilizer mixed in before planting. A good rule-of-thumb is to add 1 cup of 5-10-10 or similar analysis fertilizer, to each bushel of soil mix. Match the fertilizer with the kind of plants being grown. Instead of fertilizing numerous times throughout the season, you may wish to incorporate a slow-release fertilizer with your soil mix at planting time.
If additional fertilization is needed, a water-soluble fertilizer (i.e., Miracle Grow, Peters, and others) can be used to supplement initial fertilization. In general, fertilize every 2 weeks.
Tips for Successful Container Gardening
• Container-grown garden plants are more susceptible to freezing, thus requiring winter protection such as mulching, using a wind screen, putting the container in the ground, or moving the container inside to a protected area.
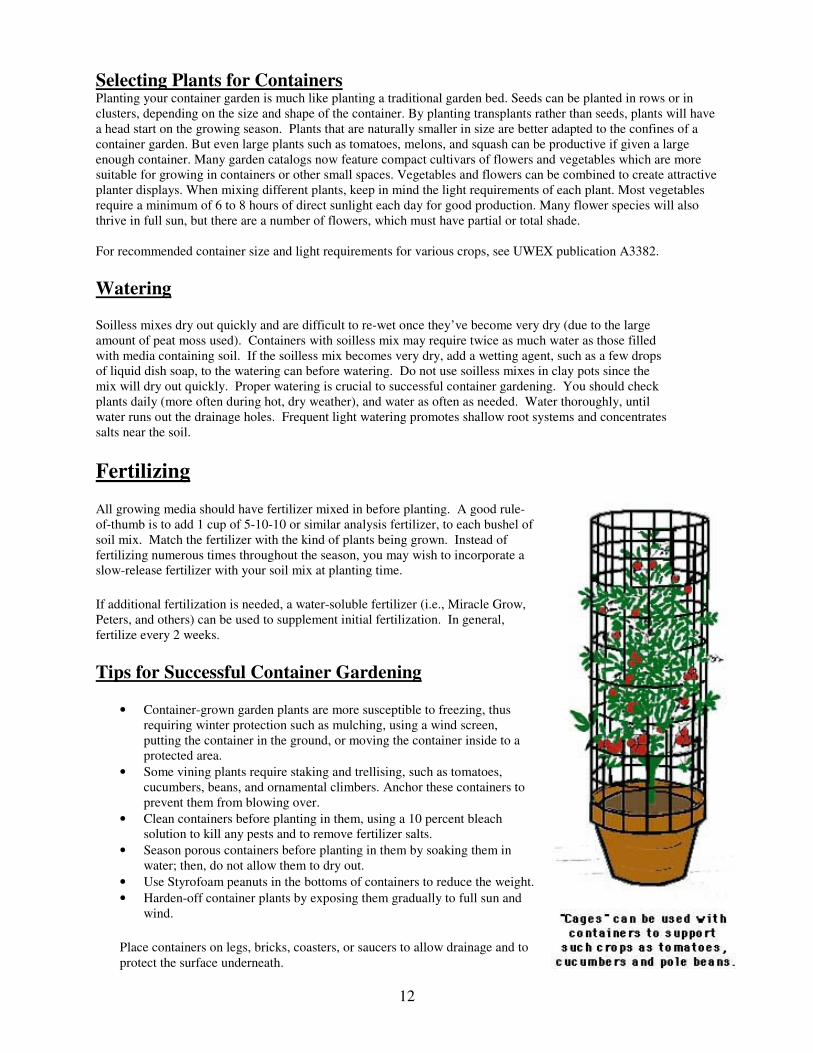
• Some vining plants require staking and trellising, such as tomatoes, cucumbers, beans, and ornamental climbers. Anchor these containers to prevent them from blowing over.
• Clean containers before planting in them, using a 10 percent bleach solution to kill any pests and to remove fertilizer salts.
• Season porous containers before planting in them by soaking them in water; then, do not allow them to dry out.
• Use Styrofoam peanuts in the bottoms of containers to reduce the weight. • Harden-off container plants by exposing them gradually to full sun and
wind.
Place containers on legs, bricks, coasters, or saucers to allow drainage and to protect the surface underneath.

13
Planting Schedule and Garden Layout
Creating a Planting Calendar
Before we dig into the soil, let’s create a calendar so we know "when to plant what."
Planting times can be a little confusing at first. For example, you should start broccoli seeds 6 weeks before transplanting, and you transplant them after the last frost date. You start pepper seedlings 8 weeks before transplanting time, and wait until a week after the last frost to set them out. Consequently your will need a planting calendar.
The first question to ask is, "When does my last spring frost occur?" This varies greatly from region to region, so it is important to find this out for your garden. In southeast Wisconsin, the average last frost date is May 15, although many gardeners use Memorial Day to be on the safe side. Note that this only indicates the average date of the last spring frost; always be prepared to protect tender plants for a few weeks after this date has passed. For fall planting, the average earliest frost date is October 15 for SE Wisconsin.
Using the “Planting Guide – MG211” at the end of this manual, take each vegetable crop and plot them on your calendar. For example:
Broccoli
• Sow seeds indoors, March 22 • Transplant outdoors 1 week before last frost date, May 8
Tomato
• Sow seeds indoors, April 22
• Transplant outdoors 2 weeks after last frost date, May 27
Cucumber
• Sow directly in garden after soil warms, June 3
Garden Layout Before the season starts, make a rough “blueprint” of your garden plot. Include in your sketch the vegetables you will plant, which rows they will be in, the distance between rows, the expected planting date, and any other information you feel would be helpful. Refer to the “Vegetable Planting Guide – MG211 and the Master Gardener Journal sheets for each individual vegetable. Keep early vegetables such as lettuce, radishes, and green onions together. Tall-growing crops like sweet corn, tomatoes, and pole beans should be grouped together at the North end of the garden, to avoid shading smaller plants. For proper pollination, plant corn in blocks of several short rows, rather than a single long row. And to stretch out the harvest season, plant the same vegetables at different times, for instance, several small weekly plantings of cabbage and beans rather than a single large planting.

14
Notes

15
Master Gardener Home Vegetable Guide Chapter 2 – Planting and Care
Starting Seeds Indoors Start your own seeds if:
1. You like to grow unusual varieties. There are thousands and thousands of vegetable and flower varieties, yet relatively few of these are commonly grown by commercial growers to sell as transplants. So if you want to try that ‘‘Moon and Stars’’ watermelon or ‘‘Candy Cane’’ zinnia, you'll probably have to start them from seed yourself.
2. You like to get a jump on spring. Starting seeds indoors is a great way to brighten up late winter and get those gardening juices flowing.
3. You want to save money. Seeds cost less than plants. You can grow dozens of plants from a single pack of tomato seed.
4. You enjoy it! And you can take pride in knowing you nurtured your vegetable and flower plants from seed.
Indoor vs. Outdoor Sowing Many garden crops, such as tomatoes, originated in tropical environments and require a long, frost-free growing season. In most regions of the U.S., if you plant tomatoes from seed after the last spring frost, you’ll be lucky to get a tomato or two before the first fall frost. That's why long-season, heat-loving plants like tomatoes, peppers, and eggplants are set in the garden as transplants, or seedlings.
Cool season crops like broccoli and cauliflower also do better when set in the garden as transplants. Crops like these suffer in the heat of summer, so setting transplants out early -- a few weeks before the last spring frost -- gives them time to mature before hot weather arrives.
Practicality aside, many gardeners start their own seeds simply because it's fun! It's a great way to gear up for the gardening season -- even while there's still snow on the ground. Not to mention the wonder of watching the transformation from hard, seemingly lifeless seed to vital, growing plant.
Seed starting isn't difficult, but there are some tips and techniques to help you get off to a successful start. We'll be talking a lot about plants' basic needs -- light, air, water, and mineral nutrients -- and the best ways to satisfy those needs. .
Choosing a Soil Mix
The growing medium used to grow vegetable transplants should be sterilized to prevent seedlings from being killed by the fungi that cause damping-off disease. A good growing mix can be prepared by using one part loamy garden soil, one part shredded peat moss, and one part sand. Sterilize this soil-peat-sand mixture by baking it in an oven for about 1 hour at 210o F.
Other types of growing media can be bought at local garden centers or from seed and garden supply catalogs. Soilless seed-starting mixes are usually made from a mixture of peat, vermiculite, and/or perlite that has been sterilized to kill microorganisms. As the name implies, they contain no actual soil. Soilless mixes are formulated to provide a good balance between water retention and drainage. Seedlings must be given a water-soluble fertilizer regularly or transplanted to sterile soil when the second pair of true leaves form. However, some mixes also contain fertilizer.

16
Choosing Containers for Seed Starting
Many types of containers used should be clean, sturdy, and fit into the space available for growing plants in the home. Wooden flats and plastic trays are good for starting a large number of seedlings in a limited work area. They take less space than individual pots. Other popular containers are pots made of compressed peat, disks of pressed peat that swell to pot-like cylinders when soaked in water, and peat cubes. Some of the simplest containers can be found right in the kitchen. Aluminum foil frozen-food trays are among the best. After cleaning the trays, poke drainage holes in the bottom with a knife. Cottage cheese dishes, bottom halves of milk cartons, ice cream cartons, egg cartons, and paper cups are other handy starting containers. Remember, all must have drainage holes to allow the excess water to run off.
Sowing Your Seeds Gather Materials
• Containers or seed starting trays
• Soilless seed –starting mix
• Labels and markers
• Seeds
Prepare Labels.
This is easier to do before you get your hands and the containers wet. Record the type of seed, variety, date of planting, and germination time
Fill Containers with Mix.
Some soilless mixes come pre-moistened, but others are dry. Dry mixes must be moistened prior to planting. It takes a while for the water to be absorbed into the mix, so plan ahead and add warm water to the mix first thing, stirring it occasionally as you prepare the other materials. Place some moistened mix in each container. Gently firm the mix so it is a little below the rim of the container. Don’t pack it down, or you’ll defeat the purpose of a light, well-drained (and well-aerated) planting mix.
Create Holes or Furrows.
Poke holes or make furrows in the mix to the depth recommended on the seed package. Since germination may not be 100%, you'll want to sow extra seeds in each container.
Sow Seeds. Place the seeds in the holes at the proper depth, then fill the hole with more mix, firming it gently.
Water. Use a plant mister to gently spritz the soil to further moisten it. Don’t use a strong stream or you may wash away the soil and leave seeds exposed.

17
Providing Adequate Light
While a sunny window may suffice for some plants for a short time, you'll generally get better, more consistent results if you use artificial lighting, either alone or to supplement window light. The type of set-up you choose is really a matter of cost and convenience. What is most important is the quality and intensity of the light.
Quality.
Use only regular fluorescent lights or special plant "grow" lights. Don't use incandescent light bulbs -- these get too hot and can burn tender plant tissues.
Intensity.
Remember this fact: Light intensity diminishes as you get further from the light source. Arrange your lighting system so that you can keep your plants as close as possible to the light source (without touching it). You'll need to be able to adjust the height of the lights as the seedlings grow.
You can rig up a homemade seed-starting set-up using shop lights and shelving. However, prefabricated seed-starting light carts are designed for this purpose, with adjustable lights, waterproof trays, etc.
Keep the lights just an inch or two, and no more than four inches, from the tops of the seedlings.
Since you will be working around electricity and water, be sure your system is grounded. Use 3-prong fixtures, and keep water away from the lights, extension cords, and fixtures.
Pre-Germination Care Keep containers warm. Most seeds germinate best at slightly warmer than room temperature (70-75F). So you may want to set your seed trays on the top of your refrigerator or near your furnace, if these spots are available -- and warm. You can also purchase special warming mats that provide consistent bottom heat for your seeds. Keep planting medium moist but not soggy. Use the mister to gently spritz the soil when the surface just begins to dry. This is especially helpful for tiny seeds such as broccoli, since they need constant, even moisture during germination. Another option is to water the containers from below until the surface is moist. Place pots in a waterproof tray, and fill the tray about a half-inch deep with lukewarm water. Let the containers sit in the water just until the soil surface is moist, then pour off the excess water and let the containers drain. Don’t let plants sit in water for more than an hour or two, or you may suffocate the roots and encourage root rot. This is a good way to water larger seeds like pumpkins that need to soak up quite a lot of water to germinate.
Cover trays. To help conserve moisture, you can place trays in a loosely tied plastic bag. Or place a piece of moistened cardboard or newspaper over the trays. Use the latter method if plants need darkness to germinate.
Check Every Day! As soon as you see signs of life poking through the soil surface, remove any covering and place the container under lights, so the plants can begin photosynthesizing and manufacturing food. It is especially important to check plants daily if you’ve covered the trays with cardboard or paper. Otherwise, tiny seedlings will immediately stretch to try to reach the light, and they’ll have skinny, weak stems.
Once they've germinated, most plants prefer cooler temperatures. In general, a room in which the temperature is somewhat cooler than room temperature (60-65F) is ideal. This encourages stout, sturdy growth.

18
Caring for Seedlings You need to check your seedlings every day, to make sure they have adequate water, and that they aren’t growing up into the lights. Remember, you want to keep the lights an inch or two above the tips of the plants. Seedlings grow at different rates, so it can be a challenge to adjust the lights to suit all your plants. One way to tackle this is to have a number of small pieces of 1" thick wood to prop up shorter seedlings to the appropriate heights.
Thin, Thin, Thin
If you look closely, you'll see that for many plants the first two "leaves" don't look like the plant's normal leaves. These are called the "seed leaves," and they are actually the cotyledons -- the food storage structure in the seed.
Once you see the first set of "true leaves" -- not counting the seed leaves -- you need to check on the crowding situation. You want only one plant growing in each cell of a six-pack, each peat pot, or any other small container. You have two choices. You can transplant the extra seedlings to different containers, or simply snip off the extras at the soil line.
Snipping them off is the best option, because it doesn't disturb the roots of the one you are saving. It hurts, but you have to do it! Otherwise, instead of one vigorous plant you'll have 2 or 3 weak, spindly plants in each container. Think carefully before you decide to transplant the extras. Do you really need a dozen extra tomato plants? Is it worth risking damaging the roots of the six you really want?
Fertilizing your Seedlings
Once you see the second set of true leaves, you can begin to fertilize your plants. The easiest way is to use a soluble fertilizer that you mix with water. Vegetable seedlings can be fertilized with a water-soluble plant fertilizer with a formulation such as 2-4-2 or 15-30-15. If seedlings begin to look yellow and thin, it indicates that a dose of fertilizer is needed. Fertilize the seedlings for the first time a few days after they have emerged, applying the fertilizer at one-half the manufacturer's recommended strength. Later applications should be full strength. Depending on the fertilizer used, about 1 to 2 teaspoons per gallon of water applied once each two weeks should be adequate
Don't overdo it -- more definitely is NOT better! Never apply a more concentrated solution than is recommended on the label, or you can damage plant roots.
.

19
Preparing the Soil
Good Garden Soil A good garden soil is deep, loose, fertile, well drained, and slightly acid and has a lot of organic matter (decayed plant and animal material). Because most garden soils don’t meet all these requirements, good gardeners always try to improve their soil. Garden soils range from almost pure sand to the more ideal sandy loams to silt loams and clays.
While sandy soils are easier to work, they are generally low in organic matter. This means they do not hold moisture and plant foods well. Adding organic material is the first step toward improving sandy soils.
Heavier soils, such as the silt loams and especially the clays, usually hold water well but are harder to manage. In fact, many of these soils have too much water due to poor drainage. They also warm up more slowly in the spring. You can improve drainage in heavier, wetter soils by using raised beds. Adding organic matter to heavier soils also improves drainage by creating more space between soil particles. This makes the soil easier to handle. Fall tilling may also help.
To keep heavier soils in best condition, work them only when the soil is a bit dry. Working heavier soils when wet causes packing and forms clods.
How do you know when it's dried enough to till? You can't go by the calendar. Instead, take a handful of soil, and squeeze it. If water oozes out, then it's too wet. If it doesn't ooze, then poke the ball of soil gently. If the ball crumbles apart, it's dry enough. If not, then you probably still need to wait a little longer. (Of course this isn't an exact test, and results will depend on your soil type.)
Prepare the soil about 6 inches deep, making sure all sod is turned under. Do this with a garden spade, a plow, or a rototiller. If you spade by hand, shatter and slice each shovelful so the soil is crumbly. Finish by leveling and smoothing with a rake.
Make a ball, then poke it... 1
Make a ball, then poke it... ...If it crumbles, it's dry enough to till

20
Soil pH Take a soil sample every three or four years to find out the pH (acidity) of your soil. Soil acidity is measured using the pH scale, which runs from 0 to 14, with a pH of 7 being neutral. The lower the number, the more acidic; the higher the number, the more alkaline. Blueberries and rhododendrons thrive in soil with a pH in the range of 4.0 to 5.2; garden vegetables generally prefer a pH of 6.5 to 6.8. Is your soil pH too high? Probably not, although popular press urges most gardeners to question whether soil pH is 'right'. Only a soil test for pH can indicate whether soil pH is 'right' and 'right ' really depends on the plant you want to grow and the natural pH of your soil. Turf, vegetables and annual flowers are very tolerant to a wide range of soil pH and acidifying soil is generally not necessary and not recommended.
Southern Wisconsin soils tend to be naturally alkaline with a pH between 7 and 8. This alkaline or high pH condition is primarily the result of the limestone or calcium carbonate parent material these soils were formed from. Other factors contributing to high pH may be use of alkaline building materials and frequent irrigation with hard or alkaline water. Soils in Milwaukee, Waukesha, Kenosha, Racine and other eastern counties are special case because the high pH comes from marl--a very fine-divided highly reactive calcium carbonate. Changing pH of these soils can be very difficult.
Start with a soil test to determine current soil pH. For soils having a pH less than 7.5, you should be able to add a sulfur amendment and successfully lower pH. If soils have pH above 7.5, adding sulfur amendments will probably not reduce pH much because of the 'free' calcium carbonate or marl present in these soils.
Peat moss is a good source of organic carbon and can be used to help reduce soil pH, however peat moss may also not be effective for causing large pH changes. Try adding a one to two inch layer of peat moss and incorporate into the top 6 to 12 inches of soil before planting. Check pH to ensure that applications are adequate. For more information on changing your soil pH, refer to InfoSource No. 1298, “Is your soil pH too high?”
Organic Matter People talk a lot about organic matter, but what exactly does the term mean? Technically, the term organic describes substances that contain carbon. For gardeners, it’s best to think of organic matter as any material that was once living, has died, and has decomposed to one degree or another. Organic matter familiar and useful to gardeners includes horse and cow manures, straw and hay, grass clippings, vegetable waste, bark mulch, wood chips, sawdust, and garden debris.
Two major factors contribute to physical properties of your soil: size of inorganic particles (sand, silt or clay) and organic matter. You cannot alter soil particle size or type much, but you can control organic matter. Most Wisconsin soils contain about 1 to 6 percent organic matter. Sandy soils should contain 2 to 3 percent organic matter; clay type soils need 4 to 5 percent. Annual applications of organic matter are required to reach these levels and to maintain them. Yet despite its small percentage in the soil, this material is one of the more important soil components and influences the physical and chemical properties of soils and the way the soil behaves.
Amazingly, adding organic matter improves both heavy clay and light, sandy soils. In heavy soils organic matter improves drainage; in dry, sandy soils in increases the water-holding capacity.
Peat moss makes an excellent source of organic material for the small garden. Coarse types will provide the best soil conditioning. Compost not only adds organic matter, but it reuses your plant materials as well. Animal manures are excellent. They should be well rotted, applied in the fall, and plowed under. Weed seeds are the chief objection to animal manures. Peat moss, compost, or animal manure should be applied about 2 inches below the soil surface and then worked in thoroughly.
So should you add these materials whenever you want? Surprisingly, the answer is no. Always compost materials before adding them to the garden. Otherwise, if you add fresh organic matter to the soil, the decomposition process can temporarily tie up soil nutrients, making them unavailable to plants. For more information on “Organic Soil Conditioners”, refer to UWEX publication A2305.

21
Compost
Making Compost
Compost is a mixture of decayed and partially decayed vegetation. When used as a soil conditioner, compost does great things. First, it encourages soil particles to clump together. This clumping power is the primary force behind developing better soil structure or "tilth," as many gardeners call it. Clumping leads to better drainage on poorly drained clay soils and allows oxygen to penetrate into the soil. Clumping also helps slow soil compaction. If you have sandy or gravelly soils, your problem is too much drainage. Compost helps here, too, because it acts like a sponge and can hold many times its weight in water, while still encouraging good drainage.
Compost also helps with soil fertility. All compost, no matter what vegetative material it's made from, contains plant nutrients. Although the nutrient levels are low, compost provides them over a long time, unlike most commercial fertilizers. More importantly, compost holds onto nutrients, just as it holds water, until plant roots can extract them. More of these nutrients would leach down past the plant roots if organic matter like compost weren’t there to grab and store them until plant roots came by to take them up.
Starting a compost pile is easy. Most methods are based on layering certain materials when building the pile, and then turning the pile on a regular basis. Here's one way to build a compost pile:
Choose a well-drained spot. Find a place for your compost that's convenient to your kitchen or garden and has well-drained soil. Install compost container. Although not required, a wire, wood, or plastic container keeps your compost pile looking neat and prevents animals from scattering food scraps. Choose a 3- to 4-foot-wide container that comes apart easily and allows plenty of air through to its contents.
Add layer of brown materials. Carbon-rich dried grass, peat moss, straw, shredded leaves, and other brown plant materials go into the pile first. Add a 4- to 6-inch layer.
Add layer of green materials. Make a second, 2- to 4-inch thick layer of nitrogen-rich green materials, such as fresh grass clippings, vegetable kitchen scraps, or livestock manure. Add a couple of inches of garden soil, especially if the layer contains food scraps.
Moisten and repeat. Alternate layers of brown and green materials until the pile is 3 to 5 feet high (or until the container is full). Moisten each layer with water before adding the next layer, but don't saturate the pile.
Turn the pile. As the materials begin to decompose, the pile heats up, but not evenly. To ensure that all materials break down, mix the pile and keep it moist. Turn the pile after the center heats up and then cools down. This can take from one to several weeks, depending on the time of year and size and composition of the materials in the pile. Use a garden fork or shovel to mix the contents, blending the inside and outside materials. Turn it about once a month from April through November. If you start a compost pile in fall and use the method discussed above, you should have finished compost by the middle of the next summer. The compost is ready to use when it's dark and crumbly. Although some people sprinkle a handful or two of lawn or garden fertilizer on top of each layer in the pile, you don't need to do this. The fertilizer does help feed the pile with nutrients and speeds the composting process, but, if added, be very careful not to add a weed n' feed, which contains herbicides.
Compost piles only smell when you build or manage them poorly. Avoid making a compost pile made up mostly or entirely of grass clippings. Mix 50 percent or less grass clippings with leaves or wood chips, or the grass will smell. Finally, do not add meat scraps, cheese or table scraps to a compost pile. They will smell and attract dogs, flies and rodents. You can, however, add vegetable and fruit scraps from the kitchen.
If you would like more information on this topic, consult UW- Extension bulletin number A2801-GROWING VEGETABLES AT HOME.

22
Three Bin Compost Method
The three-bin method of compost production: Bin 1 -- The raw material bin. Daily refuse from the kitchen such as coffee grounds, eggshells and vegetable shavings, refuse from the vegetable or flower garden, grass clippings, shredded leaves. Turn every two to three weeks. Bin 2 -- The next stage of decomposed material, which is taken from the bottom of bin 1, goes into this bin. It is turned every three to four days, until the material is humus. It is then transferred to bin 3. Bin 3 -- The compost or humus, ready for use. This method assures that only completely composted material is returned to the soil.
Construction Notes: 4 inches x 4 inches x 8 feet posts (10 x 10cm x 2.4 m) can be set into the ground 36 inches (92 cm) deep; hardware cloth (0.25 inches or 0.64 cm) can then be tacked to 3 opening sides for maximum aeration and separation of the piles. The front side is left open to allow turning and removal. Another version can be made using concrete block (8 x 8 x 16 in) (20 x 20 x 4 cm) to define the bins. They are simply set on level ground. Also note: Keep piles away from buildings due to possible fire hazards.
Other Types of Compost Bins

23
Fertilization Maintaining a high level of organic matter in the soil and a soil pH of around 6.5 (slightly acid) are essential to good plant growth and efficient use of fertilizers.
A reliable soil test is the best way to determine the kind and amount of fertilizer or other nutrients your soil needs. Results of the soil test include recommendations for lime and fertilizer. (See “What kind of soil do I have in chapter 1 for information on how to get your soil tested).
Reading the Label
A fertilizer bag will be labeled with a combination of numbers such as 10-10-10, or 6-24-24, indicating the analysis or composition of nutrients. The first number always refers to the percent by weight of nitrogen contained in that bag. The middle number always refers to the percent of the oxide of phosphorus, and the last number refers to the percent of the oxide of potassium. For example, for every 100 pounds of 10-10-10 fertilizer you buy, you get 10 pounds of Nitrogen, 10 pounds of Phosphorus, and 10 pounds of Potassium. This ratio is commonly referred to as N-P-K.
As a general rule, you should apply 2 ½ to 3 ½ pounds (2 ½ to 3 ½ cups) per 100 square feet of a complete commercial fertilizer mixture to your garden each year. Use a mixture such as 5-20-20 or 10-10-10.
Applying Fertilizer
Fertilizer should generally be applied before or at planting time. The fertilizer can be broadcast or applied in the row. You may want to use a combination of these methods during fertilization. Fertilizer is broadcast by spreading it over the top of the soil with a cyclone or drop fertilizer spreader in and east-west and north-south movement. Till the fertilizer into the soil to a depth of 3 to 4 inches. Generally one-half to two-thirds of the recommended fertilizer is broadcast over the entire garden. The remaining fertilizer is applied in furrows 3 inches to the sides of the row and slightly below the level of the seed (Figure 2). This method is known as banding.
Starter Fertilizer
A starter fertilizer is a water-soluble fertilizer supplied when watering in a transplant. Phosphorus is the most important element needed in getting your transplants off to a good start. Therefore, select a water-soluble fertilizer that has a high phosphorus content in relation to the nitrogen and potassium, such as 15-30-15, 10-52-17 or similar analysis.
Sidedressing
To keep garden vegetables growing rapidly and continuously, extra fertilizer should be applied to the soil in the form of a sidedressing. Sidedressing materials can be applied on both sides of the vegetable row about 4 to 6 inches from the plants (Figure 3). See individual vegetable sheets for recommended amounts of sidedress fertilizer. Some recommended times for side-dressing vegetables is as follows:
Asparagus -- Early Spring before growth starts. Beans and Peas -- Just before blooming. Broccoli, Cabbage, Cauliflower -- About four weeks after transplanting. Eggplant, Peppers, Squash, Tomatoes -- At blooming and when fruit set starts. Cucumbers, Cantaloupe, Watermelons -- As vines start to run.

24
Planting the Vegetable Garden
When to Plant The second major step in successful vegetable gardening is proper planting at the proper time. Certain preparation, planting procedures, and timing should be followed to insure an abundant, healthy crop. Follow the recommendations in the vegetable planting guide MG211. For best production, plant vegetables at the proper time, i.e. cool season crops early and warm season crops after danger of frost is passed. Mark out seed and transplant rows with stakes so that they are as evenly spaced as possible. This not only looks better, but it also allows easier maintenance. While many crops can be directly seeded into the ground, some crops are best started as transplants. This results in earlier crops, longer harvest, and sometimes better quality produce.
Seeds Outdoors To prepare seed furrows, mark out each row with twine tied tightly between two end stakes. Open the furrow to the proper depth with a hoe, and sow the seeds, trying to space properly. Follow directions for seeding found on most seed packets. Do not sow seeds too deeply or they may not germinate. Place carrots, radishes, and lettuce seeds no deeper than 1/4 inch. Large seeds such as peas, beans, and cucumbers can be sown 1 to 1 ½ inches deep. Vine crops can be planted six seeds in a cluster or hill and then later thinned to four plants per hill. Cover the seeds and lightly press the soil down with your hands or the rake. Be sure to label the rows. Thin seed rows to their proper spacing after the plants are 1-2 inches tall. Thin the plants with scissors rather than pulling them so you won’t disturb the other plants. Use the thinnings for salads. Transplants Commonly transplanted vegetables include: broccoli, cabbage, cauliflower, celery, eggplant, head lettuce, onion, parsley, pepper, sweet potato, and tomato. Other crops sometimes grown from transplants include Brussels sprouts, cucumber, muskmelon, okra, pumpkin, squash, and watermelon
Up until now, your seedlings have led the good life in your climate-controlled house. The great outdoors provides all sorts of challenges to the tender, "spoiled" plant, and you need to give it some time to adapt. Sunlight is much stronger than indoor lights. Just like you can get sunburn if you are exposed to bright sunshine, especially early in the season when you aren’t acclimated, your plants can also suffer from sunburn. It can even kill them! Harsh winds and temperature extremes are other environmental conditions that can stress plants. So you need to gradually acclimate your plants to outdoor conditions, and this process is called hardening off.
All indoor plants should go through a hardening off period of one to two weeks. The first day, place plants outdoors in a sheltered spot for an hour or two. Choose a location in light shade and protected from strong winds. The next day, increase the amount of time and exposure slightly, and continue to increase every day until you are leaving the plants out in full sun and overnight. Plants exposed to sun and wind will dry out much faster than they did indoors. Seedlings in small containers may need watering several times a day. The best time for transplanting is on a cloudy--even misty--cool, calm day. The worst is a hot, sunny, windy day.
Plant at proper distances, and set all plants at the same level they were growing in the pot. Young vegetable seedlings may be planted so that their lowest leaves are just above the soil level. If peat pots are used, be sure to break down the edges and bottoms of the pots to allow root development. All other pots should be removed before planting. Lightly firm the soil around the transplants and water in, using a soluble plant food solution if possible.
Be sure to protect young transplants against heat, cold, and damaging winds during the first 2 to 4 days after transplanting. When unfavorable conditions threaten, place boxes, baskets, plastic milk jugs, or flower pots over the transplants (Figure 5). Do not leave the protectors over the plants longer than necessary, however. If it gets warm during the day, remove the protectors to provide proper ventilation for the plants. A shingle stuck in the ground at a slant on the south side of a plant can serve as a sunshade.

25
Care of the Vegetable Garden
Care after planting is the third important step in good vegetable gardening. Proper care is what makes the difference between “just” vegetables and those that have that really fresh, home garden goodness. Weed Control Weed control is a must. Nothing is more disheartening than a well-prepared garden overrun by weeds. The best time to control weeds is when they’re small. If allowed to grow, weeds compete with the vegetable plants for water, fertilizer, and sunlight while harboring insects and diseases. Weed with a sharp hoe, using a shallow shaving stroke, not a chop. Don’t cultivate too closely to plants. Prevent stem and root injury by hand pulling weeds. The use of chemical herbicides is generally not practical for the home garden. However, Dacthal and Preen are pre-emergence herbicides that you can use around most garden crops. Do not apply in areas where you intend to seed.
Mulching Mulches control weeds and offer other advantages as well. A 2-4-inch layer of organic matter will control most of the weeds. Mulching encourages growth by conserving moisture, controlling weeds, and moderating soil temperature. Black plastic mulch tends to increase soil temperature and is ideal for warm season crops such as tomatoes, eggplants, peppers, and vine crops. Black films are mainly used to suppress weeds, although they also raise the soil temperature. Early potatoes may be grown under black plastic films without hilling up. White and red films are used mainly to reflect light and warmth onto ripening fruits such as tomatoes and melons. Some films are made with a lower side black to suppress weeds, and the upper side white to reflect light. These films raise the soil temperature about 12oF.
• Plastic mulch is applied before planting the crop. • Dig a trench around the area to be planted, lay down the mulch, and secure its edges firmly
into the soil. • Make cross-shaped slits in the plastic at the required spacing, and dig a hole in the soil large
enough to take the plant’s root ball. • Remove the plant from its pot, and place it in the hole. Firm the soil around the root ball and
water. Stake if necessary. • If drip irrigation is used, install hose before applying the plastic mulch.
Organic mulches tend to keep soil cooler and are ideal for moderating hot summer temperatures. Straw, bark chips, shredded bark, sawdust, and compost are all good mulching materials. Apply these materials in late early June, after you clean up weeds and the soil has warmed. Place the material around the plants and between the rows. Use 4 inches of mulch if coarse material like straw is used, or 2 inches for fine material like grass clippings. For more information on mulches, refer to UWEX publication A3383, “Mulches for Home Gardens and Plantings”.

26
Watering Vegetable plants need plenty of water throughout the entire growing season. Apply 1 to 1 ½ inches per week in a single watering, unless rain does it for you. Light sprinklings may do more harm than good because roots tend to form near the surface of the ground if water doesn’t penetrate deeper. Shallowly rooted plants are more susceptible to drought damage. Sandy soil requires more frequent watering than heavy clay. However, always apply water slowly so it can soak in. Check the amount applied by catching it in straight-sided tin cans placed throughout the garden, or by digging down to see if the moisture has penetrated at least 6 inches. Inexpensive plastic rain gauges are also available. There are periods in the growing cycle of vegetables when water is particularly beneficial; these vary according to the individual vegetable. Germinating seeds, seedlings, and newly transplanted plants should never be allowed to dry out, so water frequently and lightly. Leafy and salad vegetables, such as spinach, chard, most cole crops, and lettuces, require frequent waterings to help them crop heavily. The most critical period is between ten days and three weeks before maturity; during this period, but only in very dry conditions, apply a single heavy watering of 5-gallons/sq yd. Outside this period, give half this amount weekly during dry weather. The critical point for fruiting crops such as tomatoes, peppers, beans, zucchini, cucumbers, and peas is when the flowers are forming and fruits or pods are developing. If conditions are dry during this time, water weekly at the rate for leafy crops (above). Do not water heavily before the critical period since this produces leafy growth at the expense of fruit. Root crops, such as carrots, radishes, and beets, need moderate watering during the growing period. In the early stages, water at a rate of 1 gallon/sq yd if the soil is dry. Increase this rate four-fold when the roots start to swell, watering every two weeks if dry conditions persist. Thinning Vegetables need room to grow. Proper spacing between plants in the row as well as between rows promotes faster growth and a larger, better quality crop. Vegetables started from plants should have been spaced properly when planted; however, those started from seed will have to be thinned. See Vegetable Planting Guide MG211 for recommended spacing between plants. Thin plants while they are small and when the soil is moist to minimize injury to the remaining plants. Grasp plants to be removed right at the soil line, and pull them out gently. If you are damaging other plants, don’t remove plants by pulling; rather, cut them off at the soil line. Leave the strong plants, and firm the soil after you’ve finished. Watering after thinning is helpful in resettling the soil around the roots of remaining plants. Insect and Disease Control The very first step in controlling diseases and insect pests is to identify the cause of the problem. Then choose an appropriate control strategy. Commercially available garden sprays or dusts applied throughout the growing season will control many vegetable insects and diseases. Spray or dust regularly as directed on the label. Be sure to cover the underside of the leaves as well as the tops. Controls may need to be reapplied after a rain. Refer to UWEX publication A2088 “Managing Insects in the home Vegetable Garden” for more information. Gardeners can use a number of approaches to prevent insects from attacking plants. Crawling insects such as cutworms can be excluded with a physical barrier such as a tin can around the bases of plants. Paper discs can prevent access to plant bases to control cabbage maggot. Flying insects can be excluded by placing a row cover such as Reemay or AG-19 tent over the plants during periods of intense pest activity. Reflective mulch (aluminum foil or white) effectively repels aphids. Colored traps such as yellow bowls filled with soapy water can attract insects away from plants and drown them. When insects are on plants, gardeners can physically remove and destroy them. This hands-on approach is most effective with large, easily detected pests such as hornworms and Colorado potato beetles. The most practical way to control certain plant diseases is to use resistant or tolerant cultivars when available. There are other steps you can take to avoid diseases in your vegetable garden.
• Clean up plant refuse in and around the garden in the fall and compost only disease-free refuse • Avoid bringing in diseased plants or using your own “saved seed” • Avoid damping-off of seedlings by using a sterile growing mixture
27
If you choose to spray potato and tomato plants with a labeled fungicide, do so once each week after the plants are approximately 12 inches tall to reduce losses from leaf spots and late blight. This treatment will also control anthracnose fruit spot on tomato. You should also try to pick off and destroy the leaves as soon as spots occur. To reduce dependence on pesticides, use the following techniques:
• Plant only disease-resistant cultivars • Plant crops in a different location from year to year • Practice good garden sanitation, such as removing plant debris from the garden and keeping the
edges and fence rows free of trash and weeds • Handpick insect pests when possible.
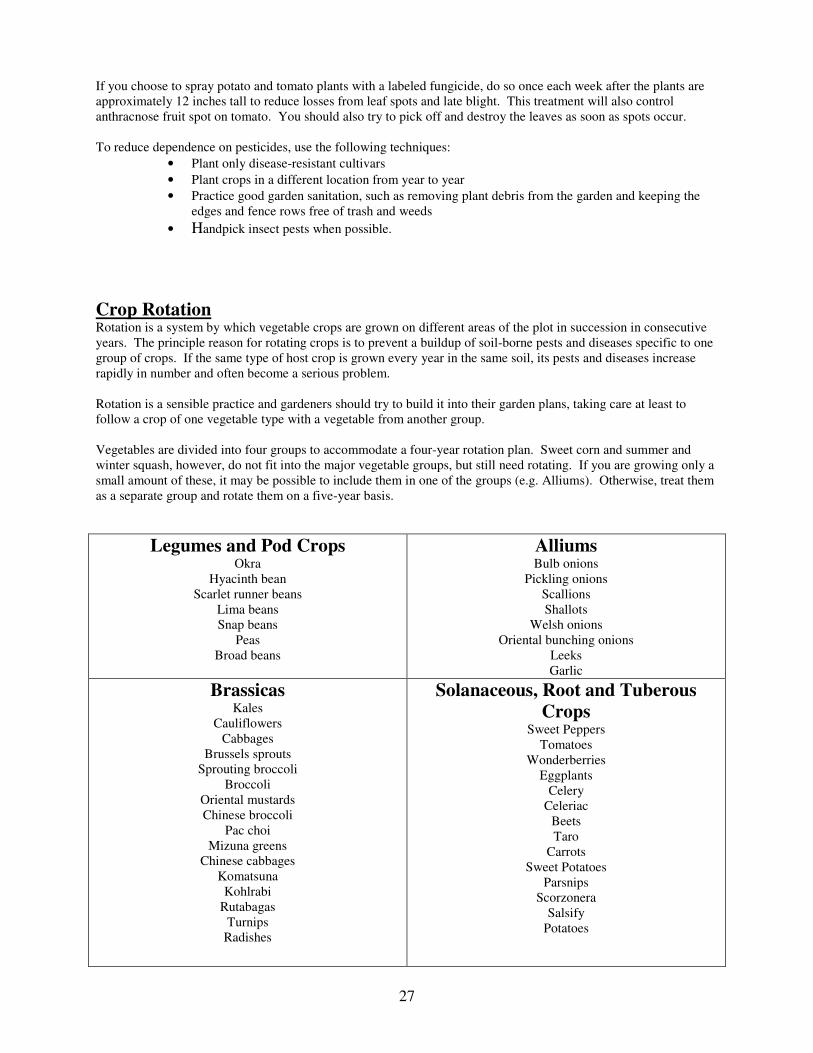
Crop Rotation Rotation is a system by which vegetable crops are grown on different areas of the plot in succession in consecutive years. The principle reason for rotating crops is to prevent a buildup of soil-borne pests and diseases specific to one group of crops. If the same type of host crop is grown every year in the same soil, its pests and diseases increase rapidly in number and often become a serious problem. Rotation is a sensible practice and gardeners should try to build it into their garden plans, taking care at least to follow a crop of one vegetable type with a vegetable from another group. Vegetables are divided into four groups to accommodate a four-year rotation plan. Sweet corn and summer and winter squash, however, do not fit into the major vegetable groups, but still need rotating. If you are growing only a small amount of these, it may be possible to include them in one of the groups (e.g. Alliums). Otherwise, treat them as a separate group and rotate them on a five-year basis.
Legumes and Pod Crops Okra
Hyacinth bean Scarlet runner beans
Lima beans Snap beans
Peas Broad beans
Alliums Bulb onions
Pickling onions Scallions Shallots
Welsh onions Oriental bunching onions
Leeks Garlic
Brassicas Kales
Cauliflowers Cabbages
Brussels sprouts Sprouting broccoli
Broccoli Oriental mustards Chinese broccoli
Pac choi Mizuna greens
Chinese cabbages Komatsuna Kohlrabi
Rutabagas Turnips
Radishes
Solanaceous, Root and Tuberous Crops
Sweet Peppers Tomatoes
Wonderberries Eggplants
Celery Celeriac
Beets Taro
Carrots Sweet Potatoes
Parsnips Scorzonera
Salsify Potatoes

28
Harvest and Storage The nutritional content, freshness, and flavor that vegetables possess depend on the stage of maturity and the time of day at which they are harvested. Over-mature vegetables will be stringy and coarse. When possible, harvest vegetables during the cool part of the morning and process them as soon as possible. If for some reason processing must be delayed, cool the vegetables in ice water or crushed ice and store them in the refrigerator to preserve flavor and quality. Here are some brief guidelines for harvesting vegetable crops:
Asparagus -- Harvest the spears when they are at least 6 to 8 inches tall by snapping or cutting them at ground level. A few spears may be harvested the second year after crowns are set out. A full harvest season will last 4 to 6 weeks during the third growing season.
Beans, Snap -- Start harvesting before seeds develop in the pod. Beans are ready to pick if they snap easily when bent in half.
Beans, Lima -- Harvest when the pods first start to bulge with the enlarged seeds. Pods must still be green, not yellowish.
Broccoli -- Harvest the dark green, compact cluster or head while the buds are shut tight, before any yellow flowers appear. Small side shoots will develop later, providing a continuous harvest.
Brussels Sprouts -- Harvest the lower sprouts (small heads) when they are about 1 to 1 1/2 inches in diameter by twisting them off. Lower leaves along the stem may be removed to hasten maturity.
Cabbage -- Harvest when the heads feel hard and solid.
Carrots -- Harvest when the roots are 3/4 to 1 inch in diameter. The largest roots generally have the darkest tops.
Cauliflower -- Exclude sunlight (blanch) when the curds are 2 to 3 inches in diameter by loosely tying together the outer leaves above the curd with a string or rubber band. Harvest the curds (heads) when they are 6 to 8 inches in diameter but still compact, white, and smooth. The head should be ready 10 to 15 days after tying.
Collards -- Harvest older leaves when they reach a length of 8 to 12 inches. New leaves will grow as long as the central growing point remains, providing a continuous harvest. Whole plants may be harvested and cooked if desired.
Corn, Sweet -- Silks begin to turn brown and dry out as the ears mature. Check a few ears for maturity by opening the top of the ear and pressing a few kernels with a thumbnail. If the liquid exuded is milky rather than clear, the ear is ready for harvest. Cooking a few ears is a good way to test for maturity.
Cucumbers -- Harvest when the fruits are deep green, before yellow color appears. The length should be 2 to 3 inches for sweet pickles, 5 to 6 for dills, and 6 to 8 for slicing. Pick 4 to 5 times per week to encourage continuous production. Mature cucumbers left on the vine will stop production of the entire plant.
Eggplant -- Harvest when the fruits are 4 to 5 inches in diameter and their color is a glossy purplish black. (A white variation is also available.) The fruit is getting too old when the color starts to dull or become bronzed. Because the stem is woody, cut -- do not pull -- the fruit from the plant. A short stem should remain on each fruit.
Kale -- Twist off the outer, older leaves when they reach a length of 8 to 10 inches and are medium green in color. Heavy, dark green leaves are over-mature and are likely to be tough and bitter. New leaves will grow, providing a continuous harvest.
Kohlrabi -- Harvest when the thickened stems or bulb (the edible part) is 2 to 3 inches in diameter by cutting off the plant just below the bulb. Stems become woody if left too long before harvest.
Lettuce -- Harvest the older, outer leaves from leaf lettuce as soon as they are 4 to 6 inches long. Harvest heading types when the heads are moderately firm and before seed stalks form.
Muskmelons(Cantaloupes) -- Harvest when the stem slips easily from the fruit with a gentle tug. Another indicator of ripeness is when the netting on skin becomes rounded and the flesh between the netting turns from a green to a tan color.
Mustard -- Harvest the leaves and leaf stems when they are 6 to 8 inches long; new leaves will provide a continuous harvest until they become strong in flavor and tough in texture from temperature extremes.

29
Okra -- Harvest young, tender pods when they are 2 to 3 inches long. Pick at least every other day during the peak-growing season. Over-mature pods become woody and are too tough to eat.
Onions -- Harvest when the tops fall over and begin to turn yellow. Dig the onions and allow them to dry out in the open sun for a few days to toughen the skin. Then remove the dried soil by brushing and onions lightly. Cut the stem, leaving 2 to 3 inches attached, and store in net-type bag in a cool, dry place.
Peas -- Harvest regular peas when the pods are well rounded; edible-podded varieties should be harvested when pods are well rounded but before seeds are more than one-half of their full size if the pods are to be eaten; harvest when seeds are fully developed but still fresh and bright green if pods are to be discarded. Pods are getting too old when they lose their brightness and turn light or yellowish green.
Peppers -- Harvest sweet peppers with a sharp knife when the fruits are firm, crisp, and full size. Green peppers will turn red if left on the plant. Allow hot peppers to attain their bright red color and full flavor while attached to the vine; then cut them and hang them to dry.
Potatoes (Irish) -- Harvest the tubers when the plants begin to dry and die down. Store the tubers in a cool, high-humidity location with good ventilation, such as the basement or crawl space to the house. Avoid exposing the tubers to light. Greening, which denotes the presence of dangerous alkaloids, will occur even with small amounts of light.
Pumpkins -- Harvest pumpkins and winter squash before frost and after the vines dry up, the fruit color darkens, and the skin surface resists puncture from your thumbnail. Avoid bruising or scratching the fruit while handling it. Leave a 3- to 4-inch portion of stem attached to the fruit and store it in a cool, dry location with good ventilation.
Radishes -- Harvest when the roots are 1/2 to 1 1/2 inches in diameter. The shoulders of radish roots often appear through the soil surface when they are mature. If left in the ground too long, they will become tough and woody.
Rutabagas -- Harvest when the roots are about 3 inches in diameter. The roots may be stored in the ground and used as needed if properly mulched.
Spinach -- Harvest by cutting all the leaves off at the base of the plant when they are 4 to 6 inches long. New leaves will grow, providing additional harvests.
Squash, Summer -- Harvest when the fruit is soft, tender, and 6 to 8 inches long (3 to 4 inches across for patty pans). The skin color often changes to a dark, glossy green or yellow, depending on variety. Pick every two or three days to encourage production.
Squash, Winter – Harvest when fruits are full size, the rind is firm and glossy, and the portion of the fruit touching the soil is cream to orange.
Sweet potatoes -- Harvest the roots when they are large enough for use before frost. Avoid bruising or scratching during handling. (Damaged sweet potatoes rot easily in storage.) Ideal storage conditions are a temperature of 55o F and a relative humidity of 85%. The basement or crawl space of a house may suffice.
Swiss Chard -- Harvest by breaking off the developed outer leaves 1 inch above the soil. New leaves will grow, providing a continuous harvest.
Tomatoes -- Harvest the fruits at the most appealing ripeness stage -- up to dead red ripe. (There are some yellow varieties of tomatoes.) Flavor is best at room temperature, but ripe fruit may be held at 45o to 50oF for 7 to 10 days.
Turnips -- Harvest the roots when they are 2 to 3 inches in diameter but before heavy frosts occur in the fall. The tops may be used as greens when the leaves are 3 to 5 inches long.
Watermelons -- Ripe watermelons produce a dull thud rather than a sharp, metallic sound when thumped. Other ripeness indicators are a deep yellow rather than white color when the melon touches the ground, brown tendrils on the stem near the fruit, and a rough, slightly rigid feel to the skin surface.

30
����
����
�
����������� ������� ������������� ���� ��� � ��� ����������� ��!"���"��#���$�%"!"&������"���'��$�%"!"&������"�"�
������������ �� �� ����
()������� ������� ������*�����"�
!�!��� ������� � �#�� �������+ ������� ��,"�#���$�%���&��-"�-�--�
��������������� ���������� ���� � ��
��
�./��0�*��1����23�4�5� 6�
Master Gardener Home Vegetable Guide – MG 210a March 1, 2001 (Revised March 1, 2003)