proudly serving thefrms fire records management system
TRANSCRIPT

proudly serving the
FRMSFire Records Management
System

History
2001 - Telecom and Emergency Services began process of upgrading the existing dispatch system.
2002 - new programs purchased– CAD (Computer Aided Dispatch)– FRMS (Fire Records Management System)– LRMS (Law Records Management System)
2002/2003 - training began on the new programs

Access & Security Each computer connects to FRMS through the Gateway and
must have the Citrix ICA client. Any computer with an internet connection can access FRMS. Telecom is responsible for the protection and integrity of the
network for the entire county. Attempts to circumvent computer security (using someone
else’s token or log-in) will leadto prosecution by WarrenCounty.

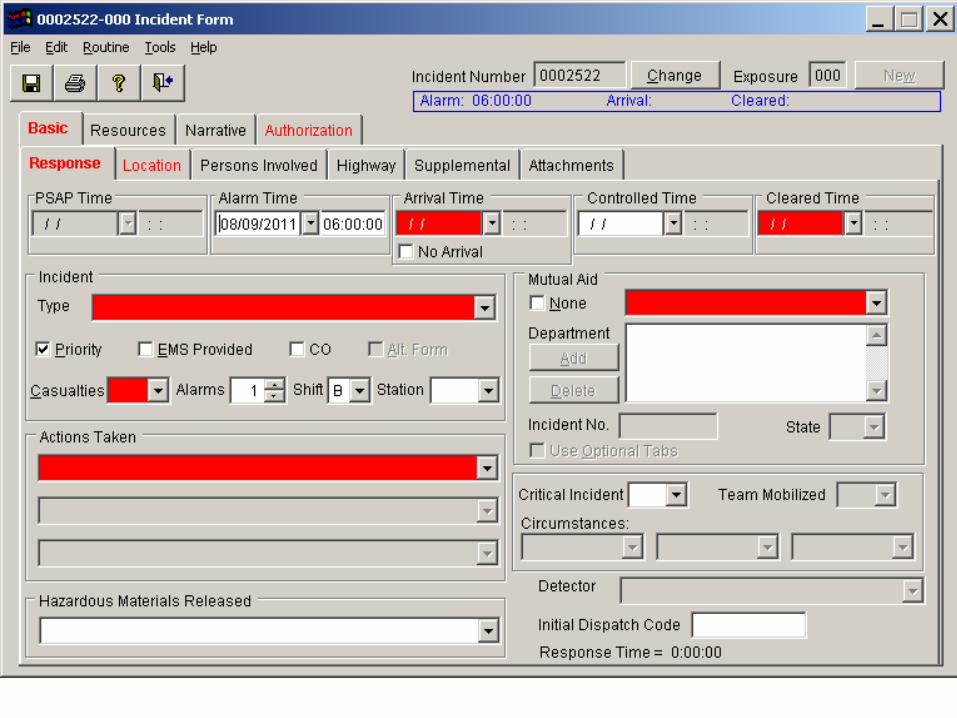
WORKING WITH FRMS
entering FIRE and EMS data

Opening the program
To gain access to the Warren County network, follow these instructions:
1. Open your internet browser & navigate to https://gateway.wcpsn.net
2. Enter your User Name
3. PASSCODE: Enter your unique 4-6 digit number followed by the 6-digit number displayed on your RSA Token.
4. Press the Log On button or hit your <Enter> key
Opening the program
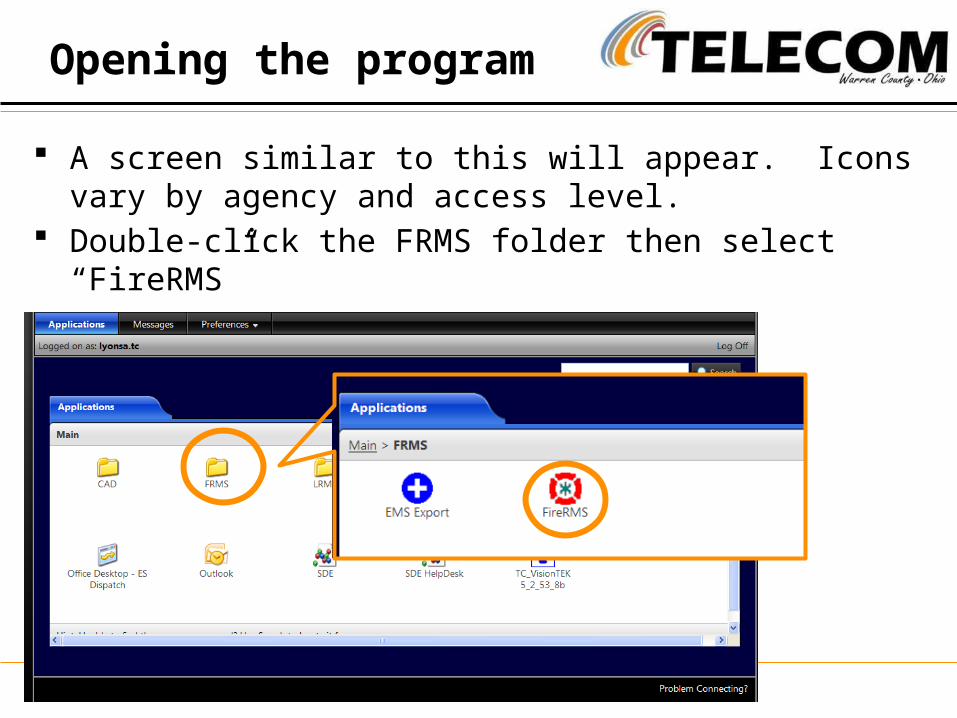
A screen similar to this will appear. Icons vary by agency and access level.
Double-click the FRMS folder then select “FireRMS”

Opening the program
The next screen to appear is the FRMS Login screen
Enter your User Name & Password (set by your agency)
Working in the Program
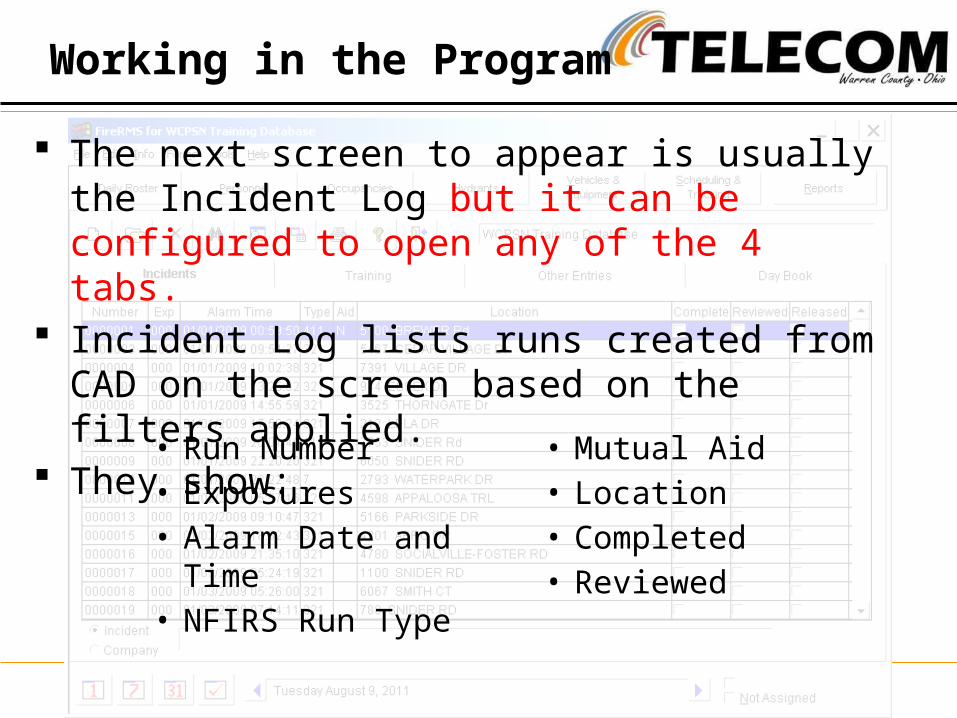
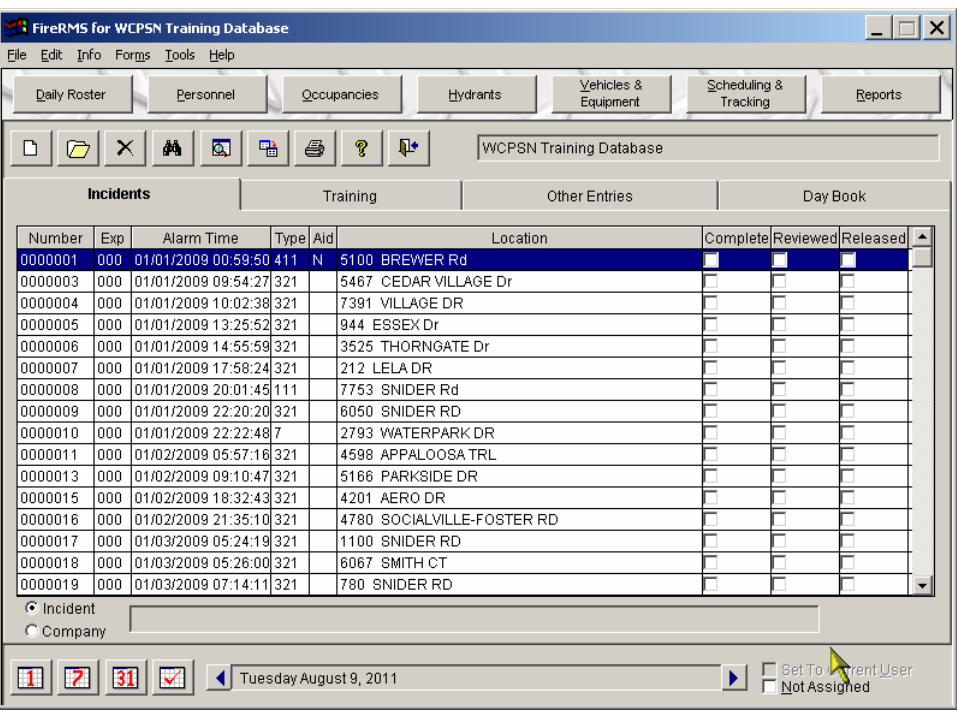
The next screen to appear is usually the Incident Log but it can be configured to open any of the 4 tabs.
Incident Log lists runs created from CAD on the screen based on the filters applied.
They show:
• Run Number• Exposures• Alarm Date and Time• NFIRS Run Type
• Mutual Aid• Location• Completed• Reviewed
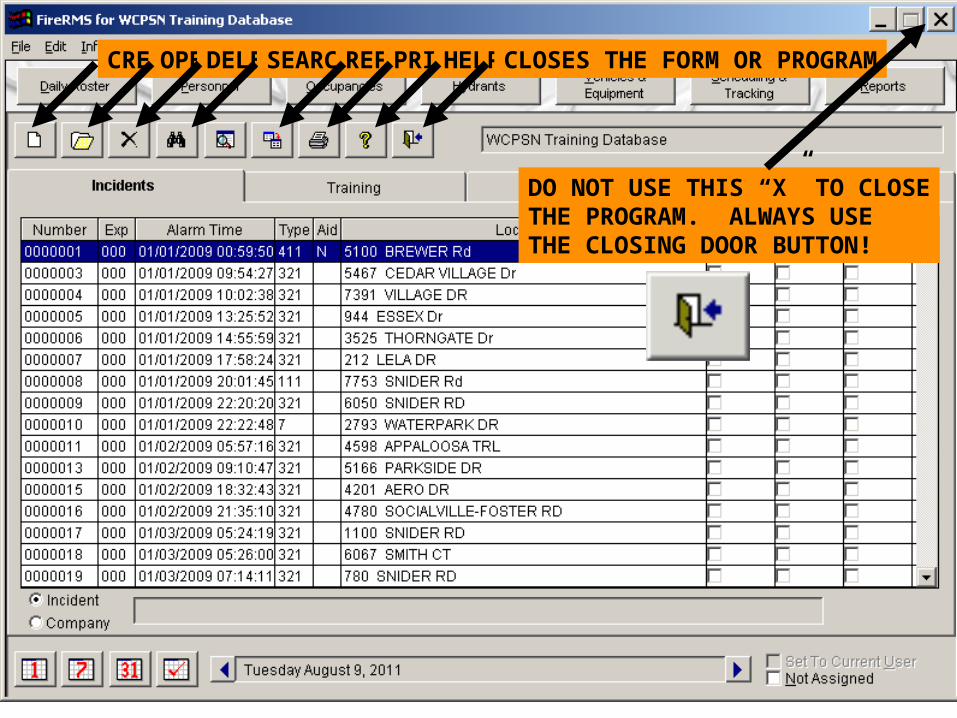
CREATES A NEW REPORTOPENS A SELECTED ENTRYDELETES A REPORTSEARCHES FOR A REPORTREFRESHES THE LISTPRINTS THE PAGEHELPCLOSES THE FORM OR PROGRAM
DO NOT USE THIS “X” TO CLOSETHE PROGRAM. ALWAYS USETHE CLOSING DOOR BUTTON!

Displays the Current DayDisplays the Previous 7 daysDisplays the Previous 31 daysAllows the selection of a Specific Day, Month or Range

WORKING IN THE PROGRAM
Let’s Complete a Report from the Incident List
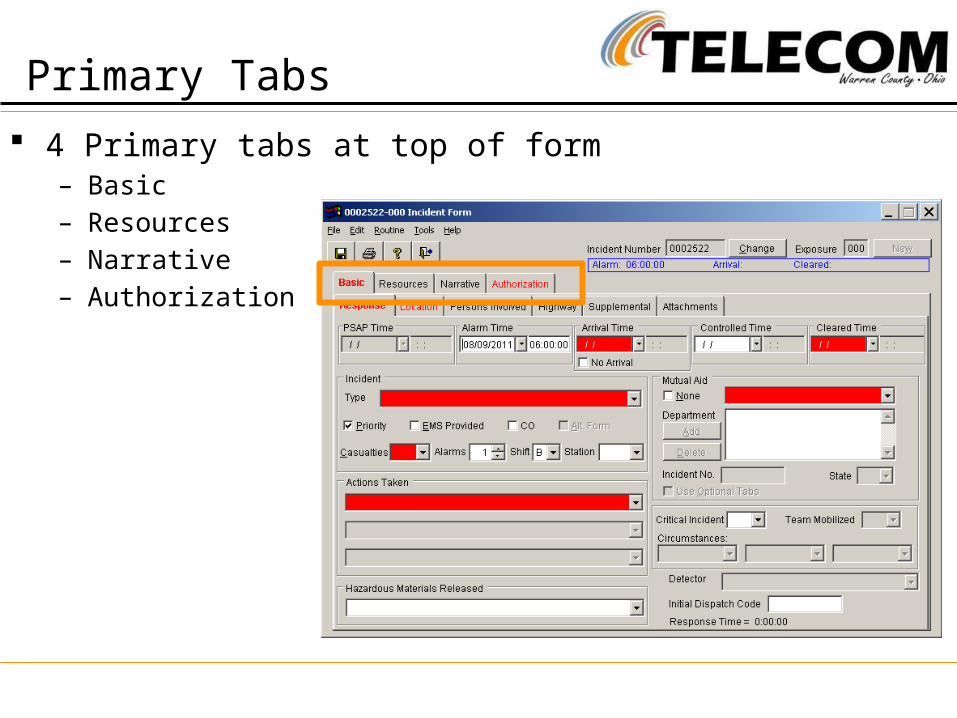
4 Primary tabs at top of form– Basic– Resources– Narrative– Authorization
Primary Tabs
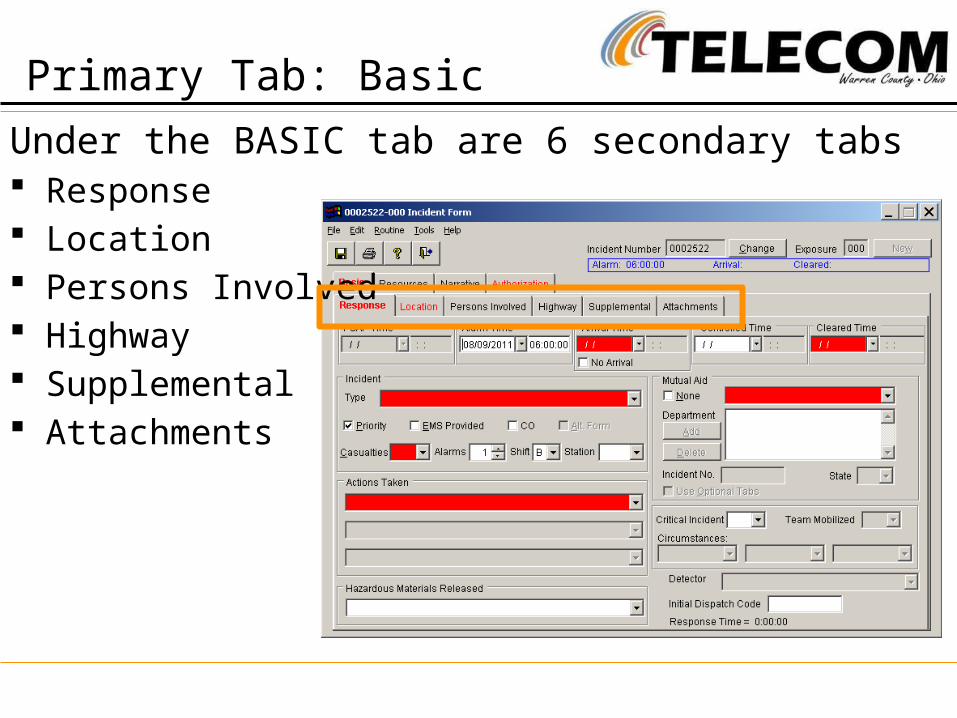
Primary Tab: Basic
Under the BASIC tab are 6 secondary tabs Response Location Persons Involved Highway Supplemental Attachments

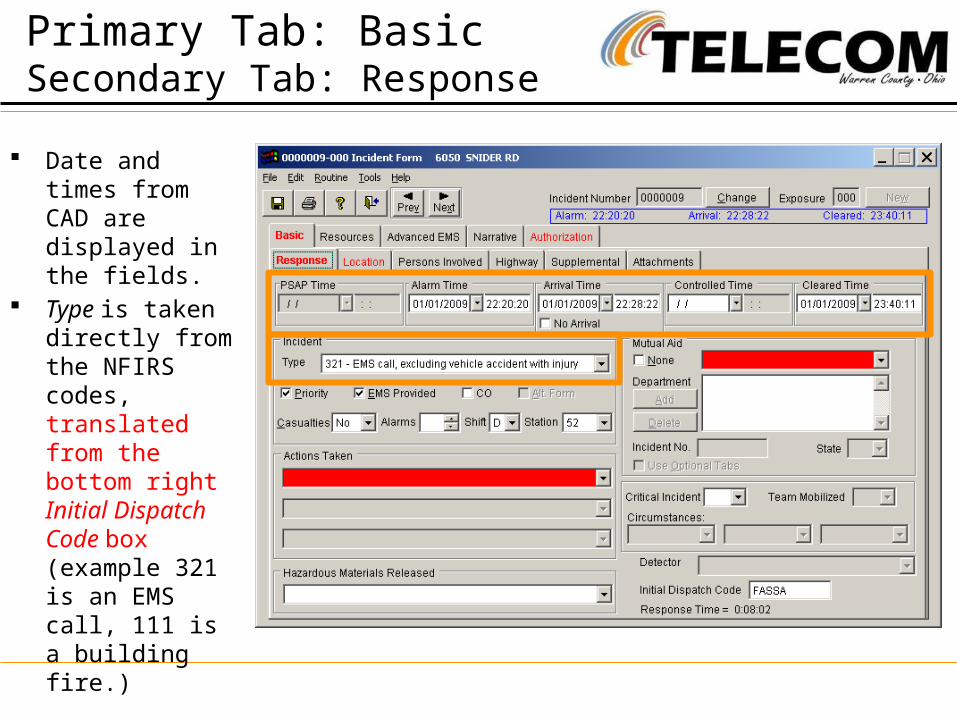
Primary Tab: BasicSecondary Tab: Response
White fields Red fields
– required by NFIRS (National Fire Incident Reporting System)
Yellow Fields– Not shown, but
agency-specific.– Can select other
color than yellow, as well as multiples.
Primary Tab: BasicSecondary Tab: Response
Date and times from CAD are displayed in the fields.
Type is taken directly from the NFIRS codes, translated from the bottom right Initial Dispatch Code box (example 321 is an EMS call, 111 is a building fire.)

Priority – checked if response was a priority - almost all responses are.
EMS Provided – if checked this will cause another Primary tab to appear called ADVANCED EMS.
Primary Tab: BasicSecondary Tab: Response
Primary Tab: BasicSecondary Tab: Response
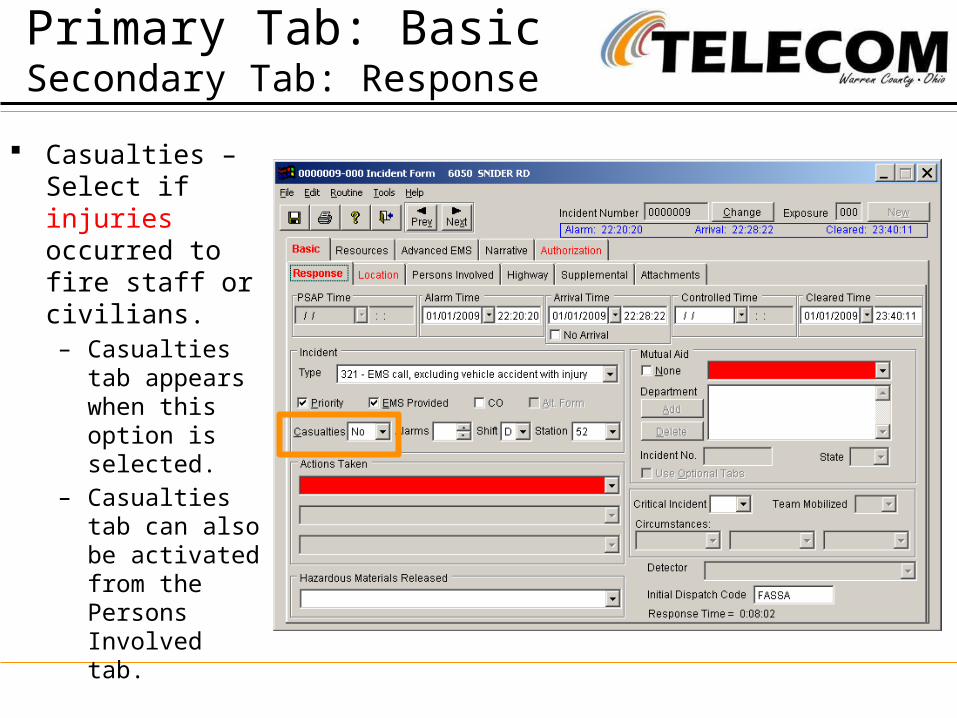
Casualties – Select if injuries occurred to fire staff or civilians.– Casualties tab
appears when this option is selected.
– Casualties tab can also be activated from the Persons Involved tab.
Primary Tab: BasicSecondary Tab: Response
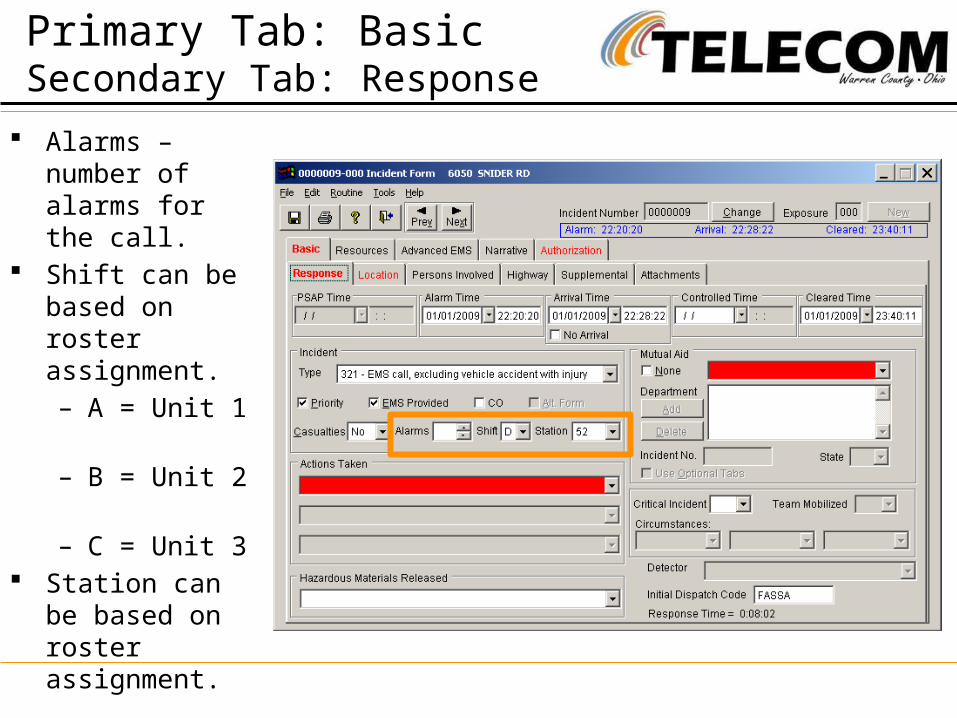
Alarms – number of alarms for the call.
Shift can be based on roster assignment.– A = Unit 1 – B = Unit 2 – C = Unit 3
Station can be based on roster assignment.
Primary Tab: BasicSecondary Tab: Response
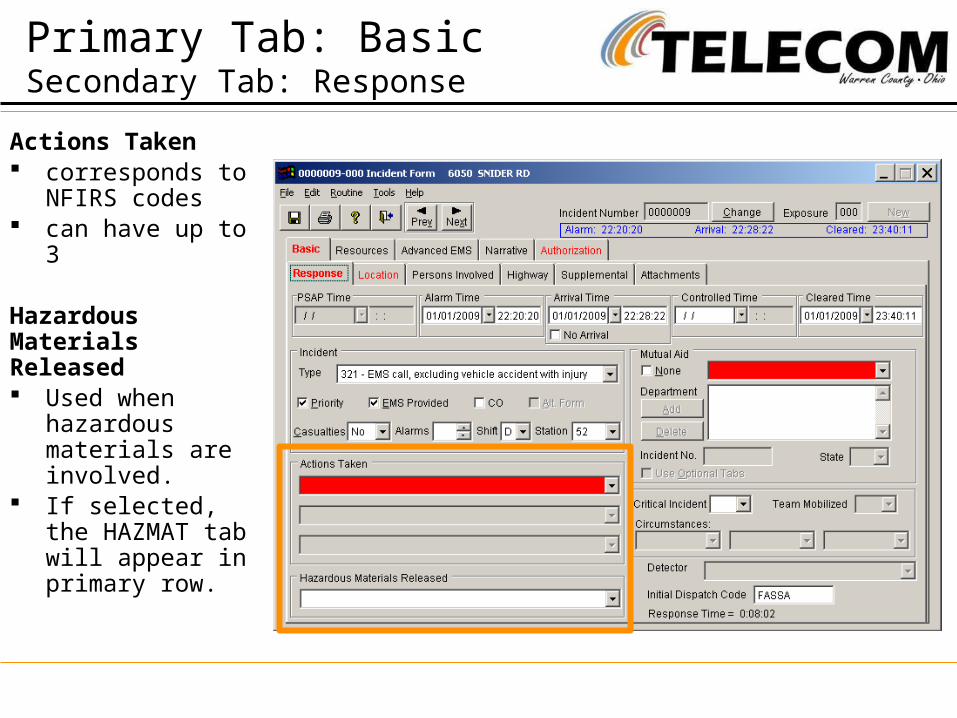
Actions Taken corresponds to
NFIRS codes can have up to 3
Hazardous Materials Released Used when
hazardous materials are involved.
If selected, the HAZMAT tab will appear in primary row.
Primary Tab: BasicSecondary Tab: Response
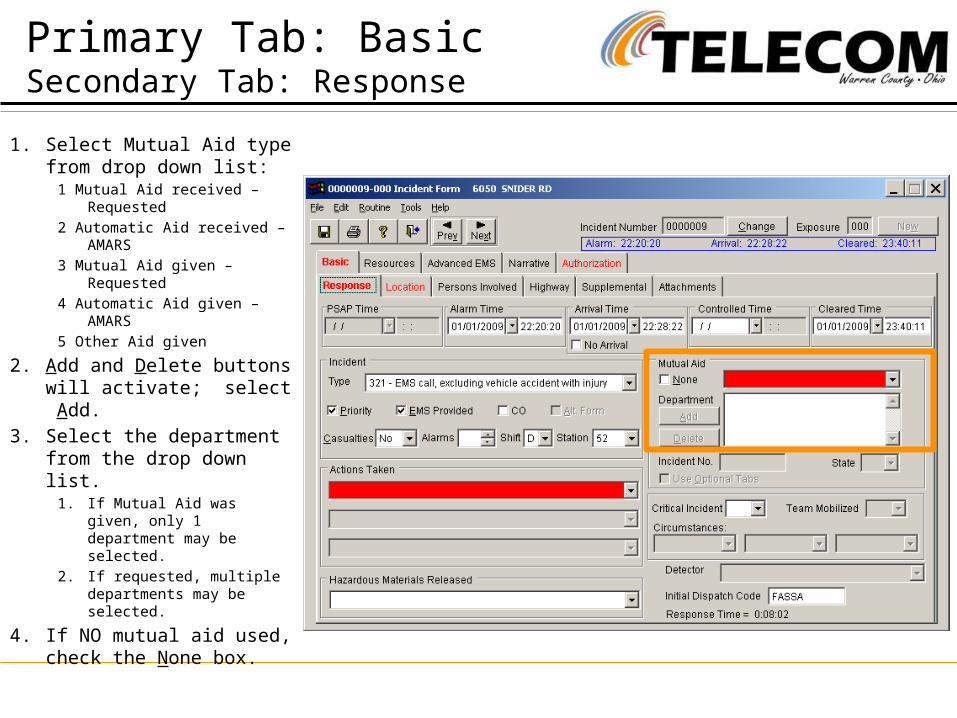
1. Select Mutual Aid type from drop down list:
1 Mutual Aid received – Requested
2 Automatic Aid received – AMARS
3 Mutual Aid given – Requested
4 Automatic Aid given – AMARS
5 Other Aid given
2. Add and Delete buttons will activate; select Add.
3. Select the department from the drop down list.
1. If Mutual Aid was given, only 1 department may be selected.
2. If requested, multiple departments may be selected.
4. If NO mutual aid used, check the None box.

Incident No. - If mutual aid department’s Incident number is known.
Detector – select whether detector functioned, did not function, etc.
Initial Dispatch Code - displays the CAD dispatch code.
Once completed, select the Location tab.
Primary Tab: BasicSecondary Tab: Response


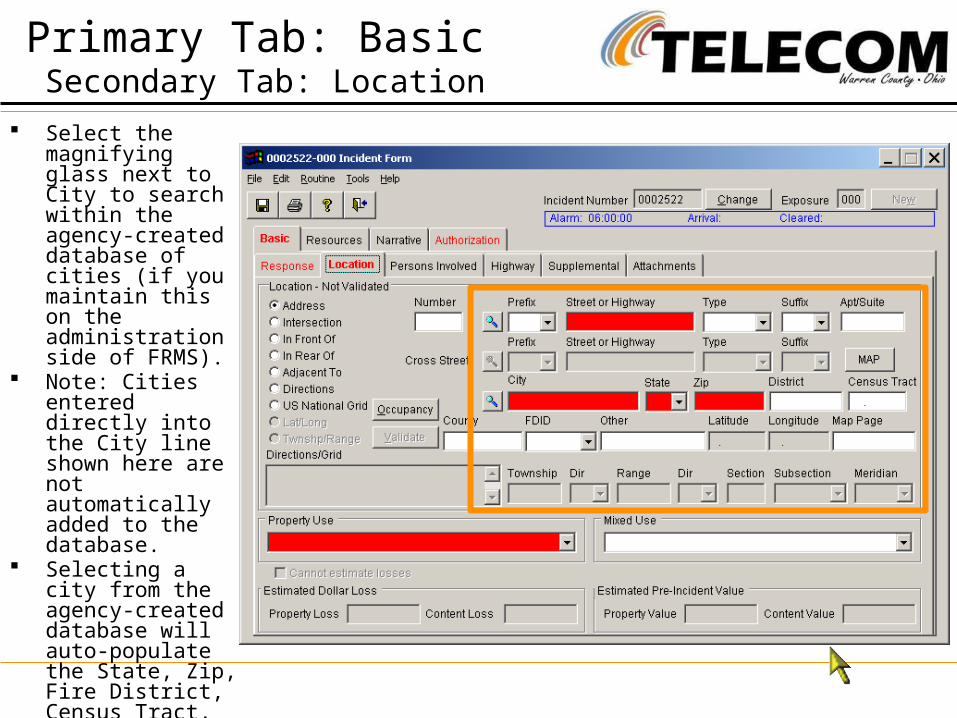
Primary Tab: BasicSecondary Tab: Location
Location – Not Validated Most address
information will auto populate from the CAD system, however you may need to add information.
Check the Directions as all ST RT or US RT information does not auto populate.

Primary Tab: BasicSecondary Tab: Location
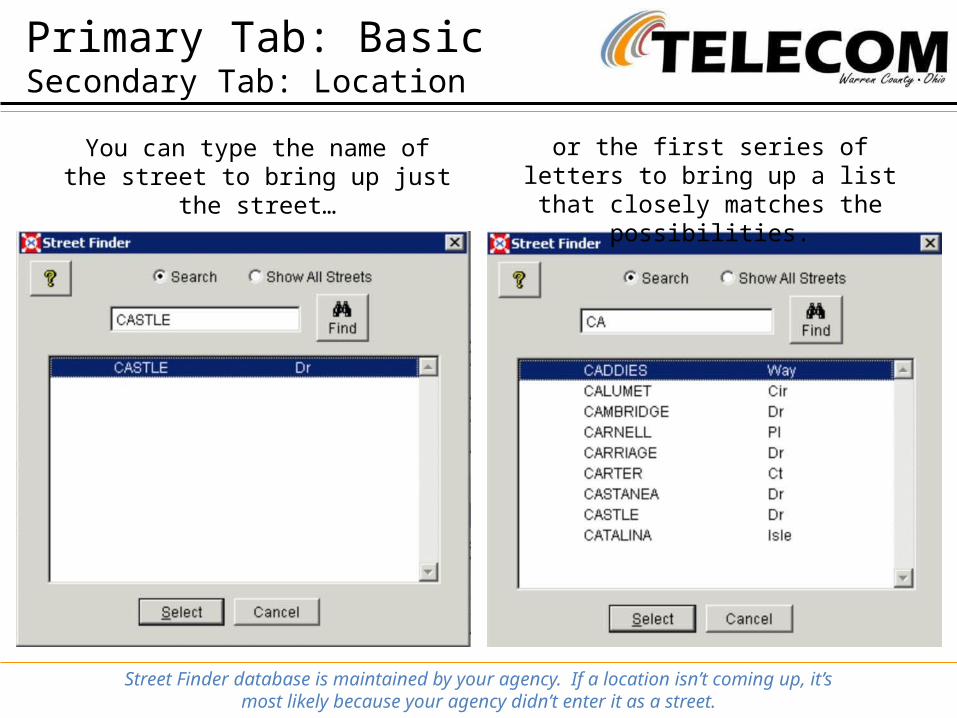
You can type the name of the street to bring up just the street…
or the first series of letters to bring up a list that closely matches the
possibilities.
Street Finder database is maintained by your agency. If a location isn’t coming up, it’smost likely because your agency didn’t enter it as a street.
Primary Tab: Basic Secondary Tab: Location
Select the magnifying glass next to City to search within the agency-created database of cities (if you maintain this on the administration side of FRMS).
Note: Cities entered directly into the City line shown here are not automatically added to the database.
Selecting a city from the agency-created database will auto-populate the State, Zip, Fire District, Census Tract, County, FDID number, and Other information associated to it.
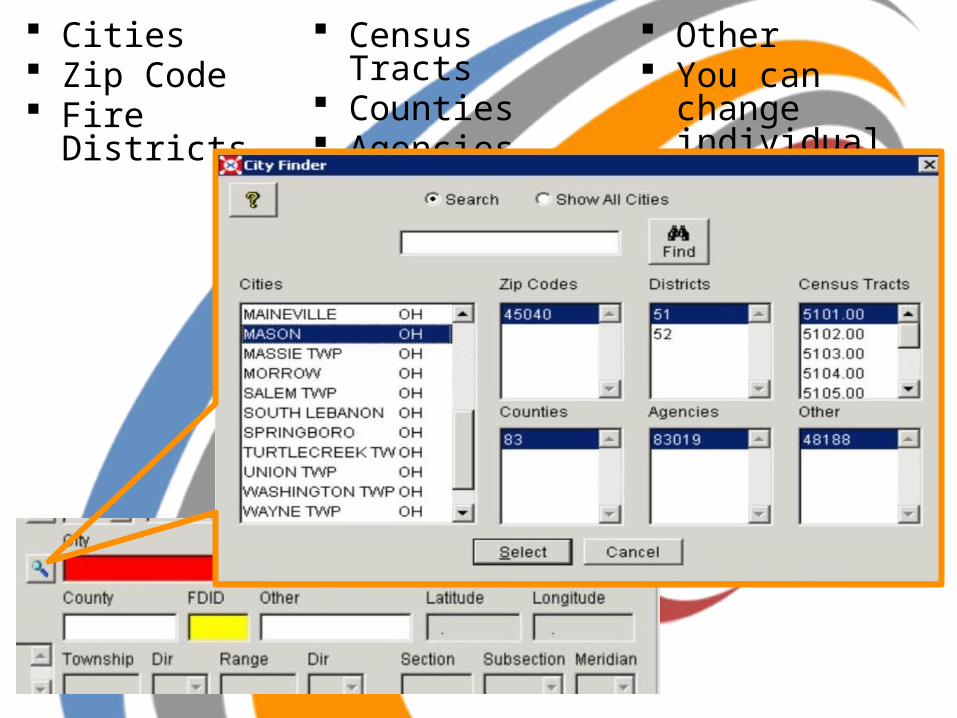
Cities Zip Code Fire Districts
Census Tracts Counties Agencies FDID
Other You can change
individual cells
Primary Tab: Basic Secondary Tab: Location
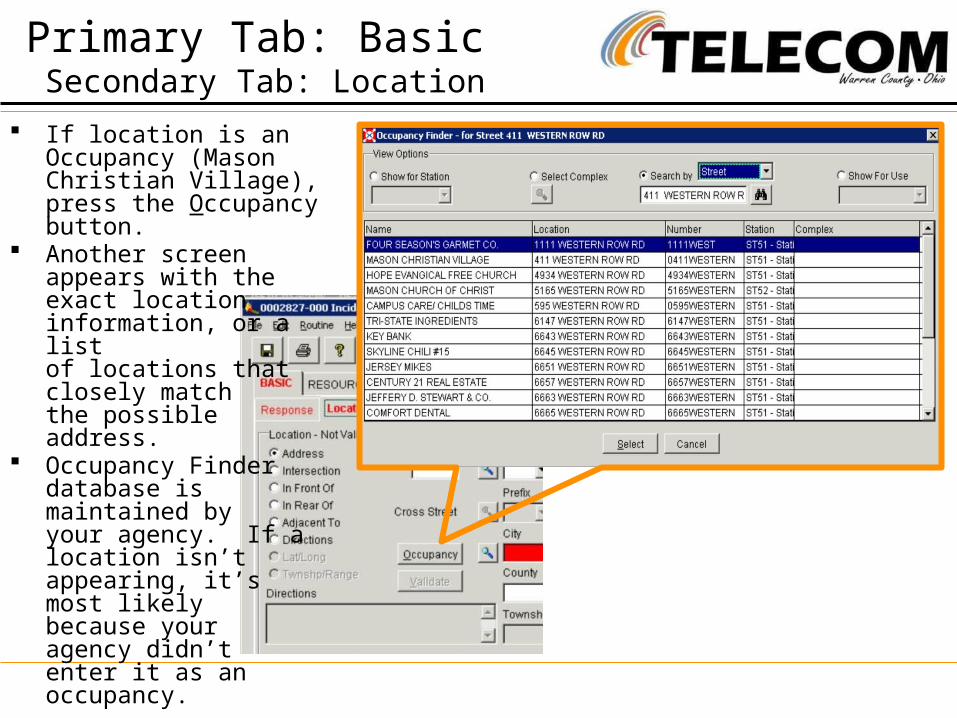
If location is an Occupancy (Mason Christian Village), press the Occupancy button.
Another screen appears with the exact location information, or a listof locations thatclosely matchthe possibleaddress.
Occupancy Finder database ismaintained byyour agency. If alocation isn’tappearing, it’smost likelybecause youragency didn’tenter it as anoccupancy.
Primary Tab: Basic Secondary Tab: Location
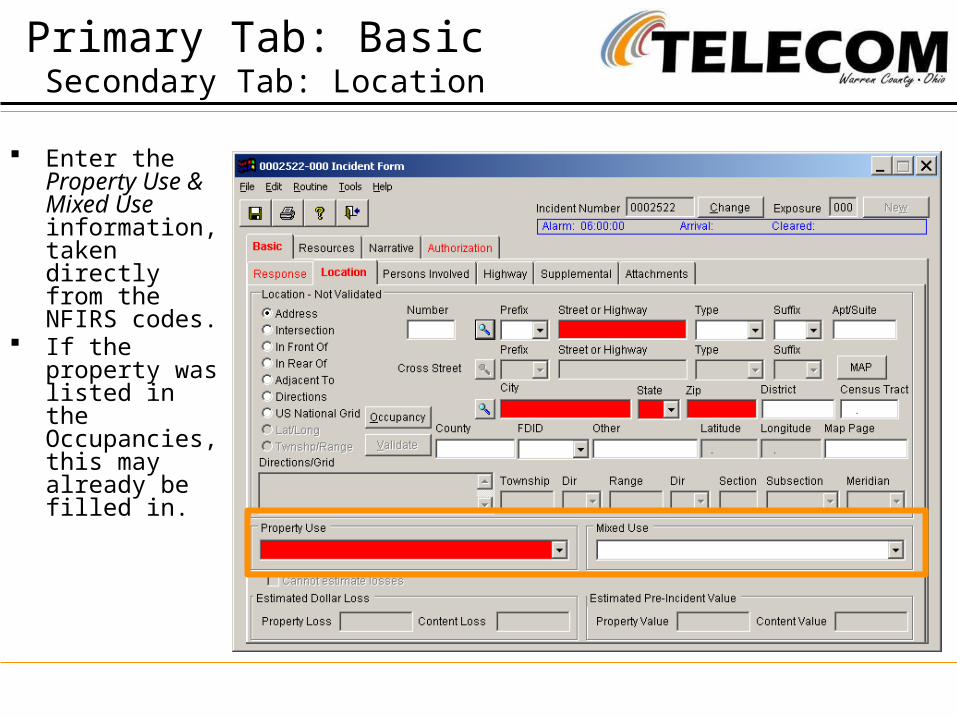
Enter the Property Use & Mixed Use information, taken directly from the NFIRS codes.
If the property was listed in the Occupancies, this may already be filled in.
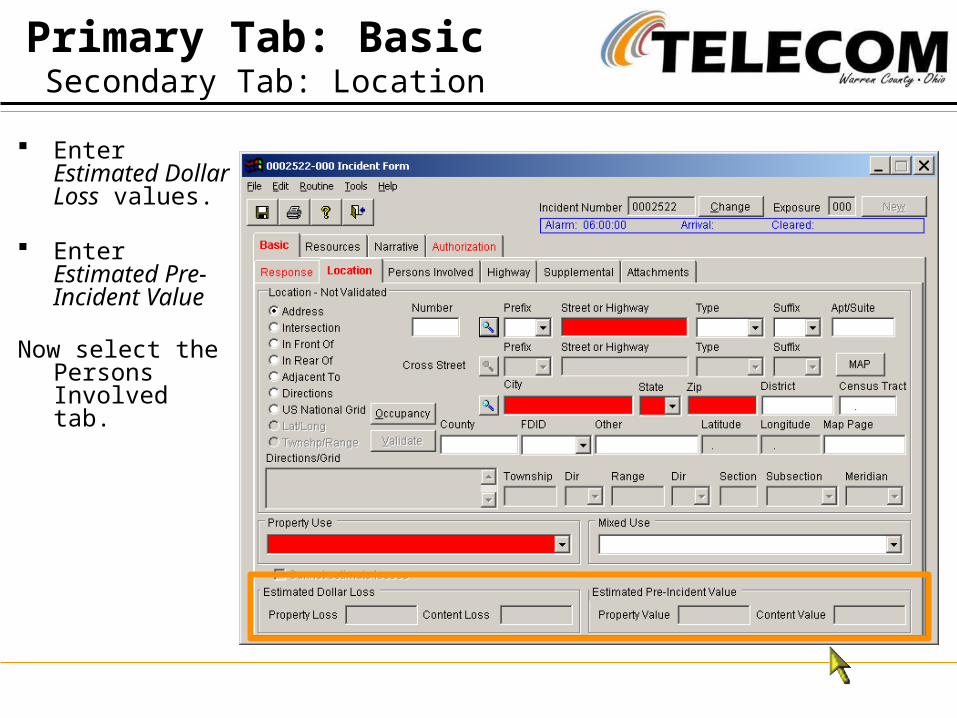
Enter Estimated Dollar Loss values.
Enter Estimated Pre-Incident Value
Now select thePersons Involved tab.
Primary Tab: Basic Secondary Tab: Location
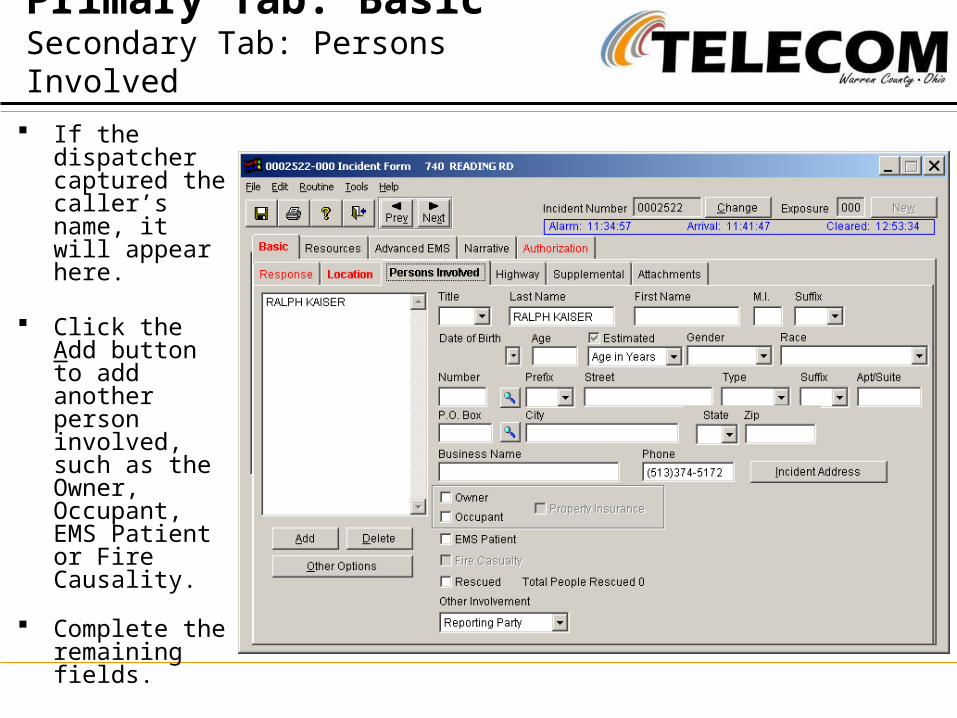
If the dispatcher captured the caller’s name, it will appear here.
Click the Add button to add another person involved, such as the Owner, Occupant, EMS Patient or Fire Causality.
Complete the remaining fields.
Primary Tab: BasicSecondary Tab: Persons Involved
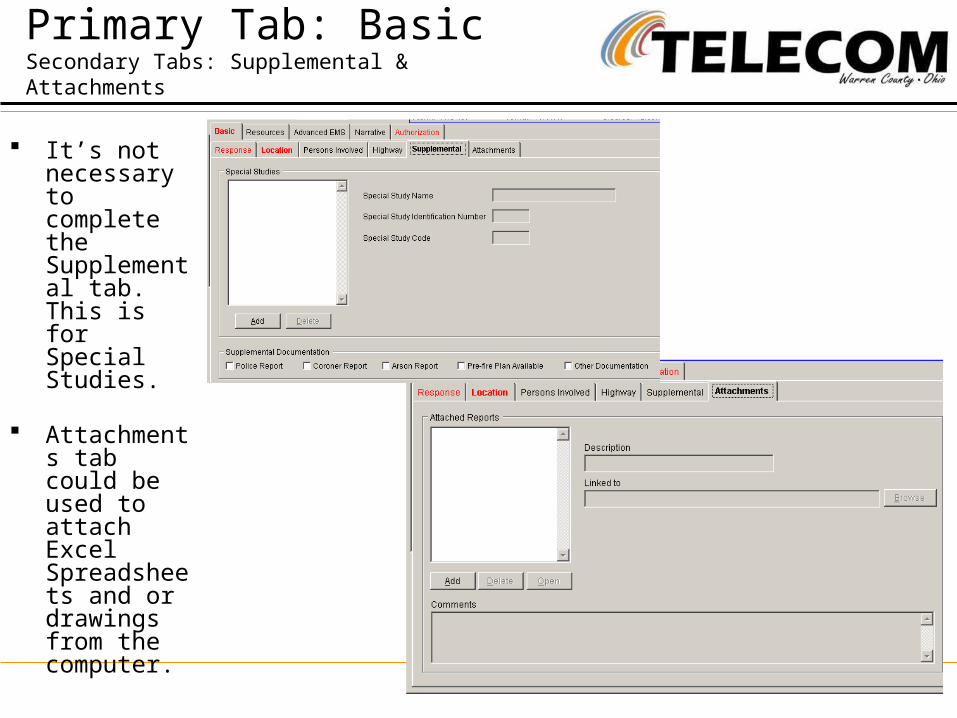
It’s not necessary to complete the Supplemental tab. This is for Special Studies.
Attachments tab could be used to attach Excel Spreadsheets and or drawings from the computer.
Primary Tab: BasicSecondary Tabs: Supplemental & Attachments

Select the Resources tab to add apparatus and personnel.
Primary Tab: BasicSecondary Tab: Persons Involved
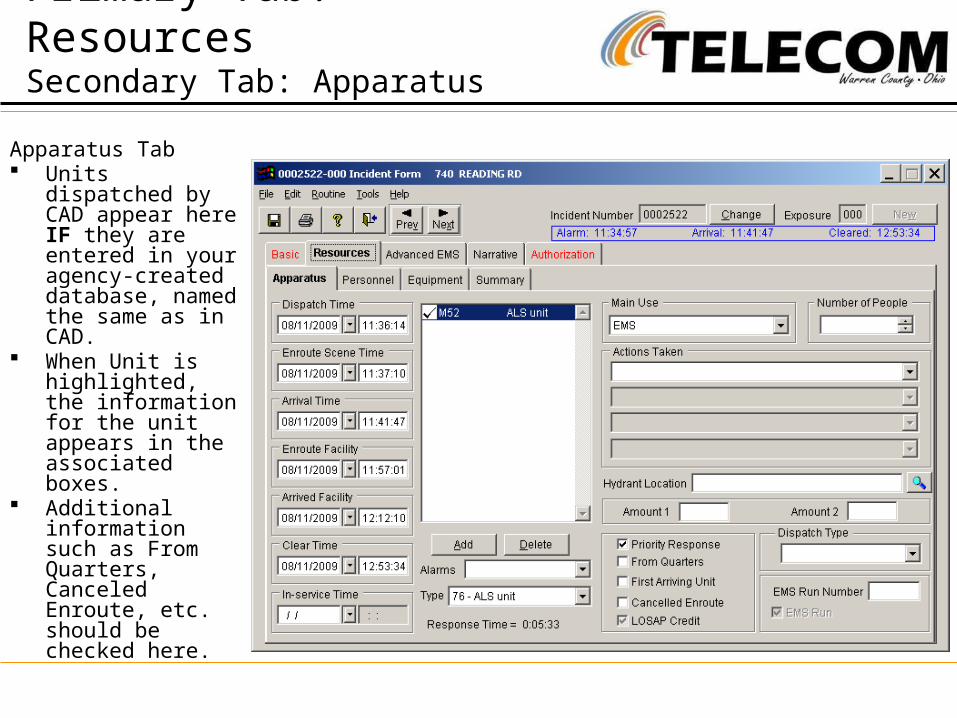
Apparatus Tab Units dispatched by
CAD appear here IF they are entered in your agency-created database, named the same as in CAD.
When Unit is highlighted, the information for the unit appears in the associated boxes.
Additional information such as From Quarters, Canceled Enroute, etc. should be checked here.
Primary Tab: ResourcesSecondary Tab: Apparatus
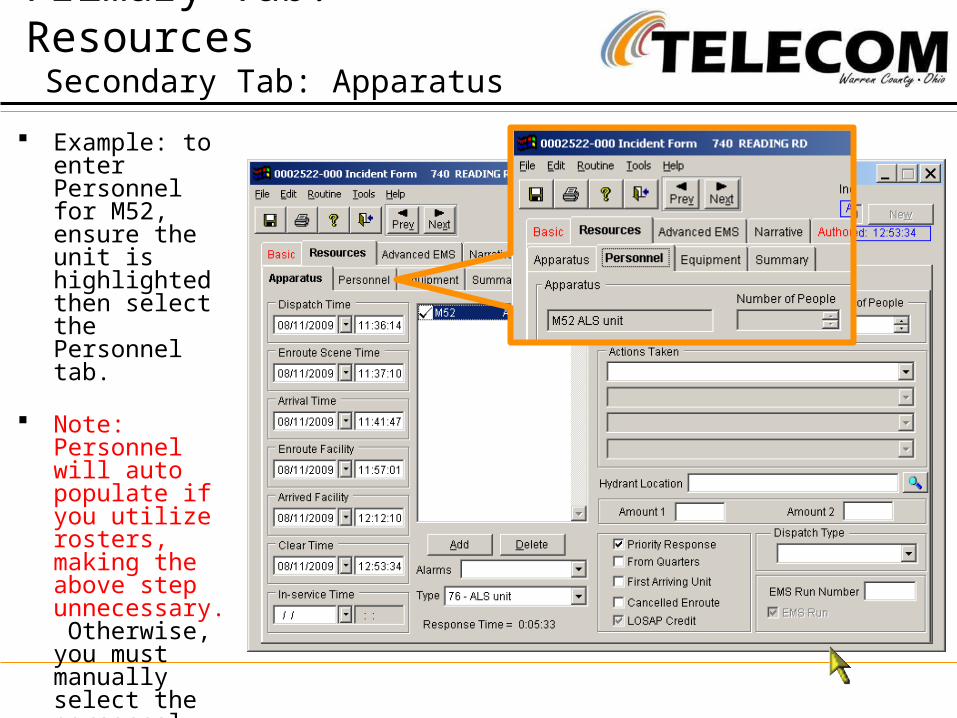
Example: to enter Personnel for M52, ensure the unit is highlighted then select the Personnel tab.
Note: Personnel will auto populate if you utilize rosters, making the above step unnecessary. Otherwise, you must manually select the personnel using the following steps.
Primary Tab: Resources Secondary Tab: Apparatus
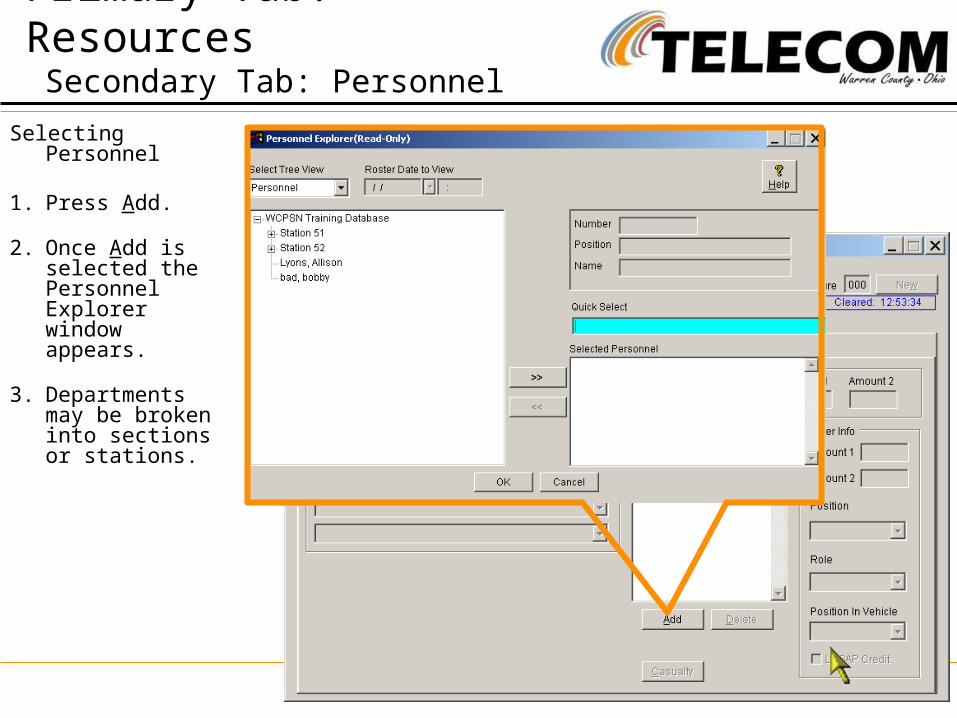
Selecting Personnel
1. Press Add.
2. Once Add is selected the Personnel Explorer window appears.
3. Departments may be broken into sections or stations.
Primary Tab: Resources Secondary Tab: Personnel
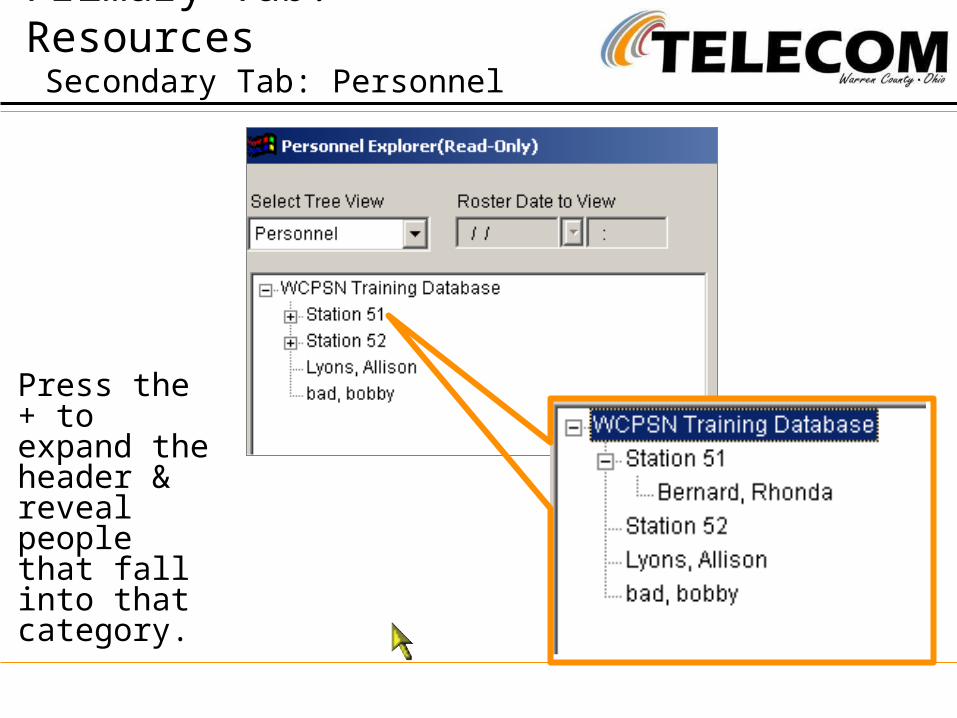
Press the + to expand the header & reveal people that fall into that category.
Primary Tab: Resources Secondary Tab: Personnel
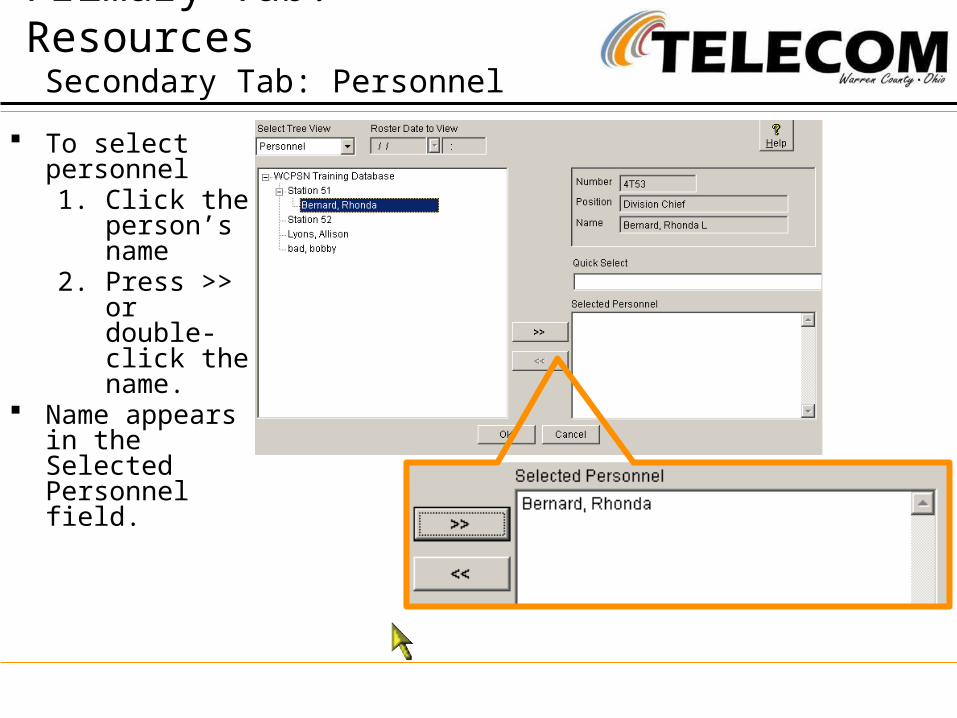
To select personnel1. Click the
person’s name
2. Press >> or double-click the name.
Name appears in the Selected Personnel field.
Primary Tab: Resources Secondary Tab: Personnel
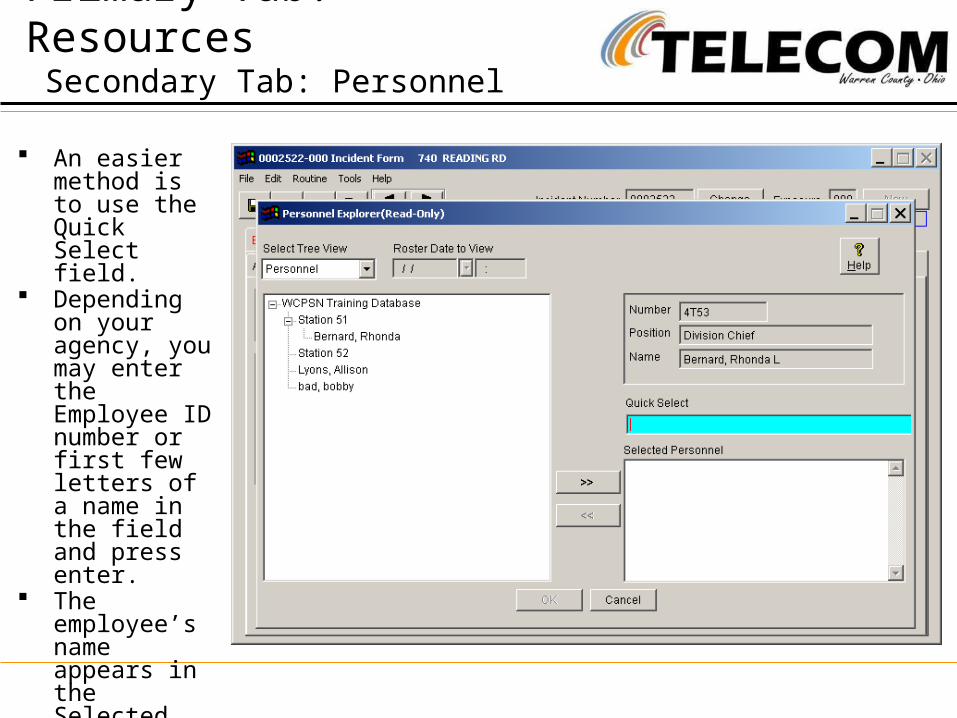
An easier method is to use the Quick Select field.
Depending on your agency, you may enter the Employee ID number or first few letters of a name in the field and press enter.
The employee’s name appears in the Selected Personnel field.
Primary Tab: Resources Secondary Tab: Personnel

Primary Tab: Resources Secondary Tab: Equipment

Summary tab is a brief overview of the Apparatus & Personnel Tabs. It does NOT auto populate.
Lists number of apparatus for department mutual aid
Lists number of personnel selected for department mutual aid
3 categories1. Suppression2. EMS3. Other
Primary Tab: Resources Secondary Tab: Summary
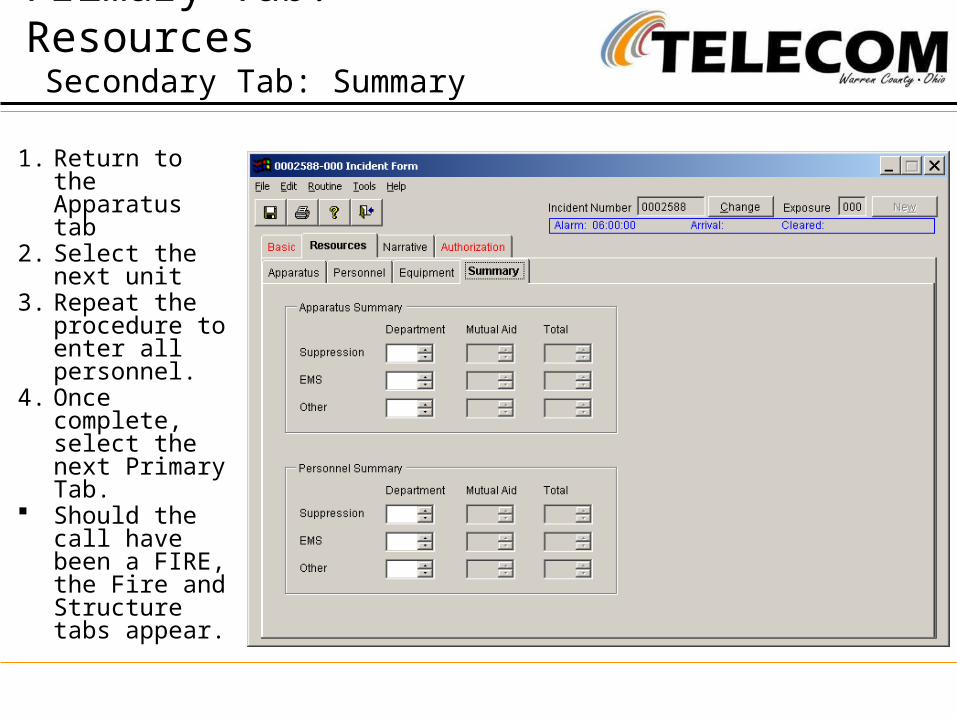
1. Return to the Apparatus tab
2. Select the next unit
3. Repeat the procedure to enter all personnel.
4. Once complete, select the next Primary Tab.
Should the call have been a FIRE, the Fire and Structure tabs appear.
Primary Tab: Resources Secondary Tab: Summary

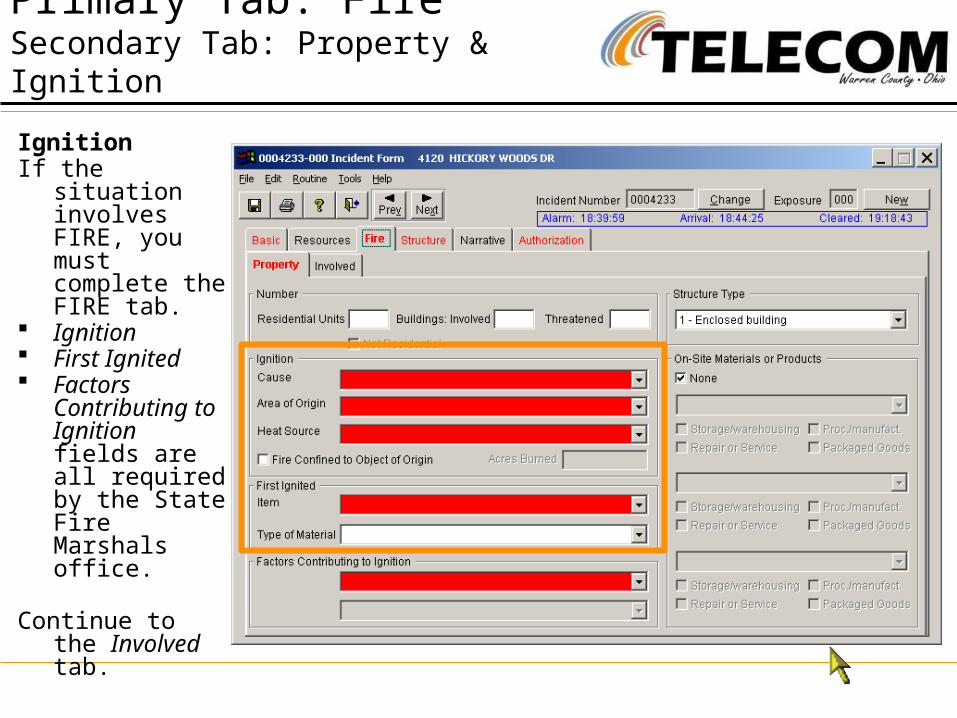
IgnitionIf the situation
involves FIRE, you must complete the FIRE tab.
Ignition First Ignited Factors
Contributing to Ignition fields are all required by the State Fire Marshals office.
Continue to the Involved tab.
Primary Tab: FireSecondary Tab: Property & Ignition
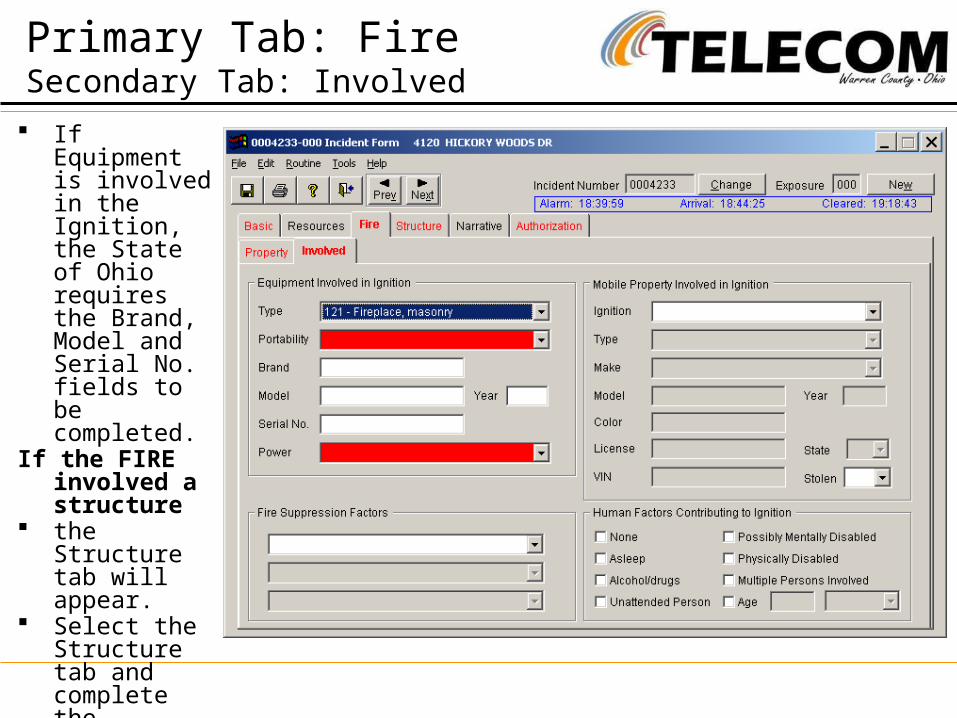
If Equipment is involved in the Ignition, the State of Ohio requires the Brand, Model and Serial No. fields to be completed.
If the FIRE involved a structure
the Structure tab will appear.
Select the Structure tab and complete the information.
Primary Tab: FireSecondary Tab: Involved
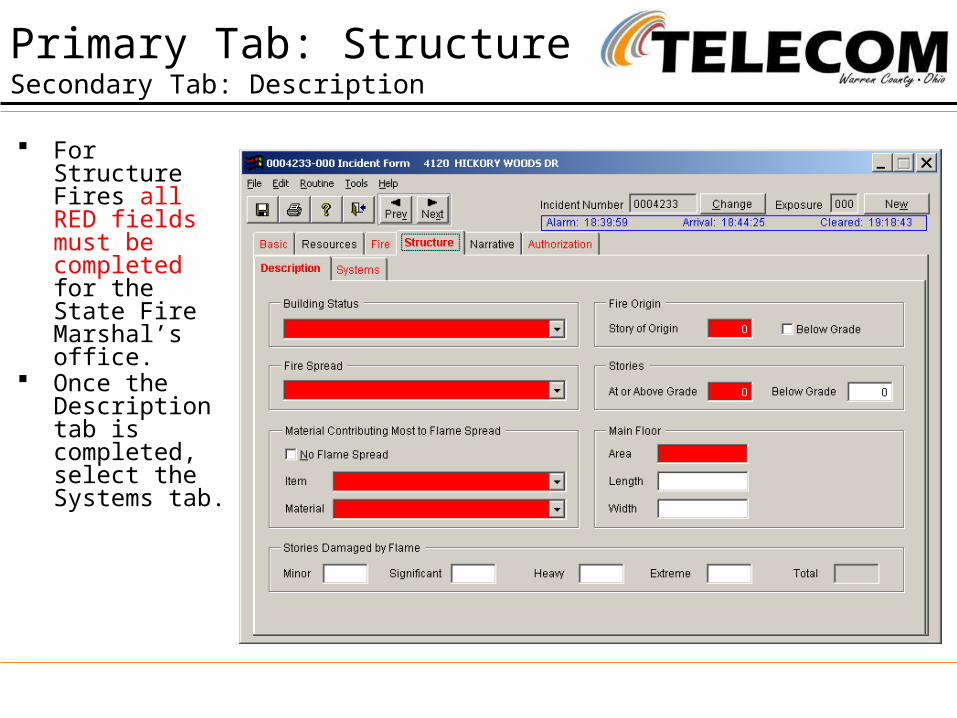
For Structure Fires all RED fields must be completed for the State Fire Marshal’s office.
Once the Description tab is completed, select the Systems tab.
Primary Tab: StructureSecondary Tab: Description
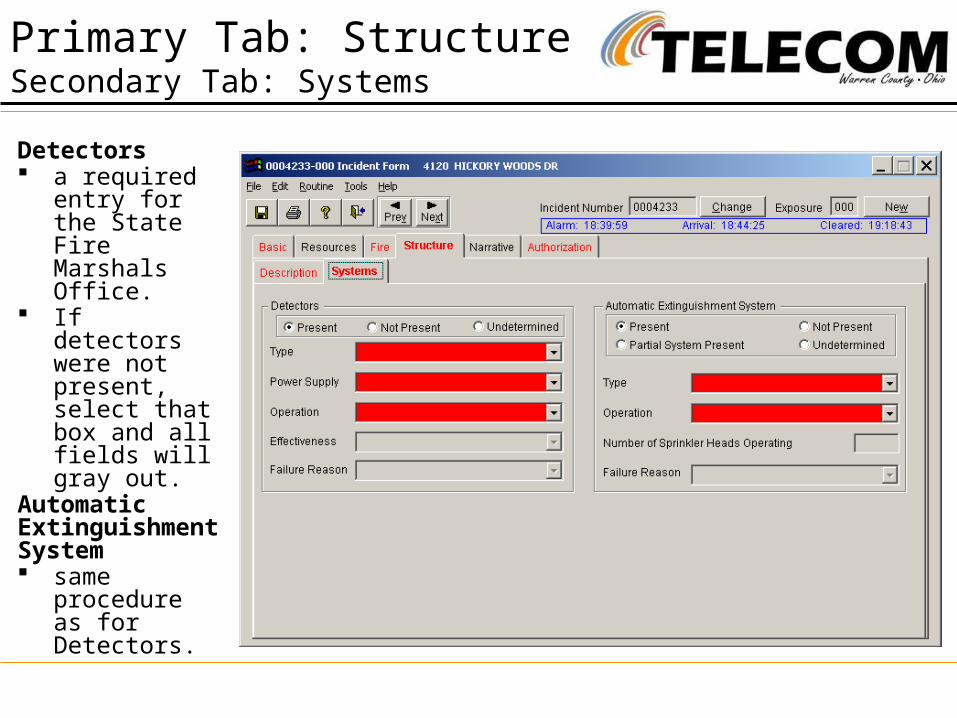
Detectors a required entry
for the State Fire Marshals Office.
If detectors were not present, select that box and all fields will gray out.
Automatic Extinguishment System same
procedure as for Detectors.
Primary Tab: StructureSecondary Tab: Systems
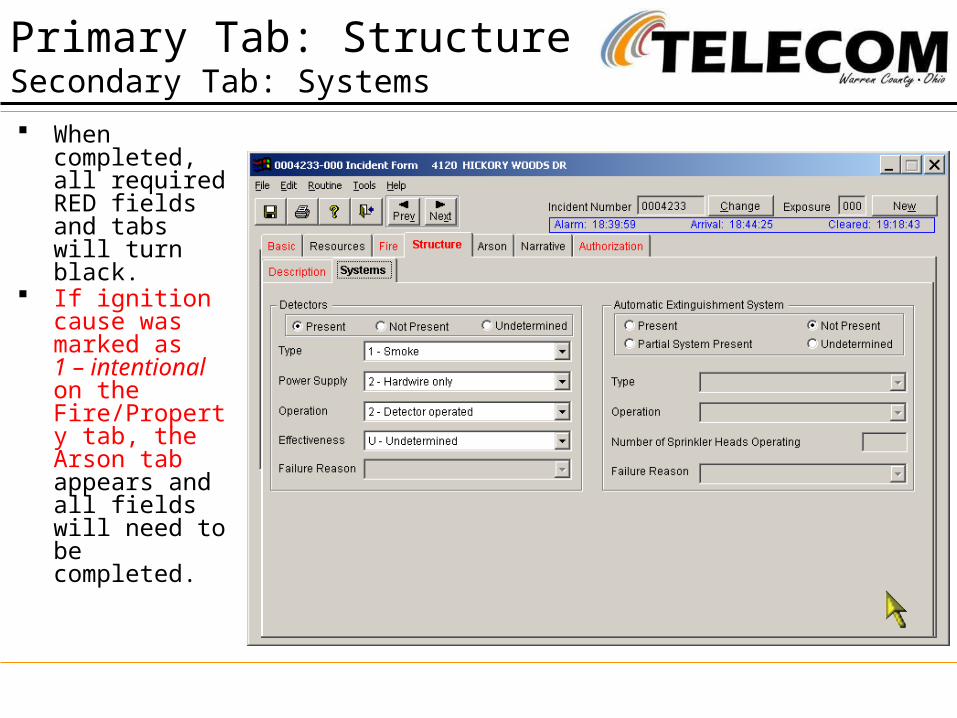
When completed, all required RED fields and tabs will turn black.
If ignition cause was marked as1 – intentional on the Fire/Property tab, the Arson tab appears and all fields will need to be completed.
Primary Tab: StructureSecondary Tab: Systems


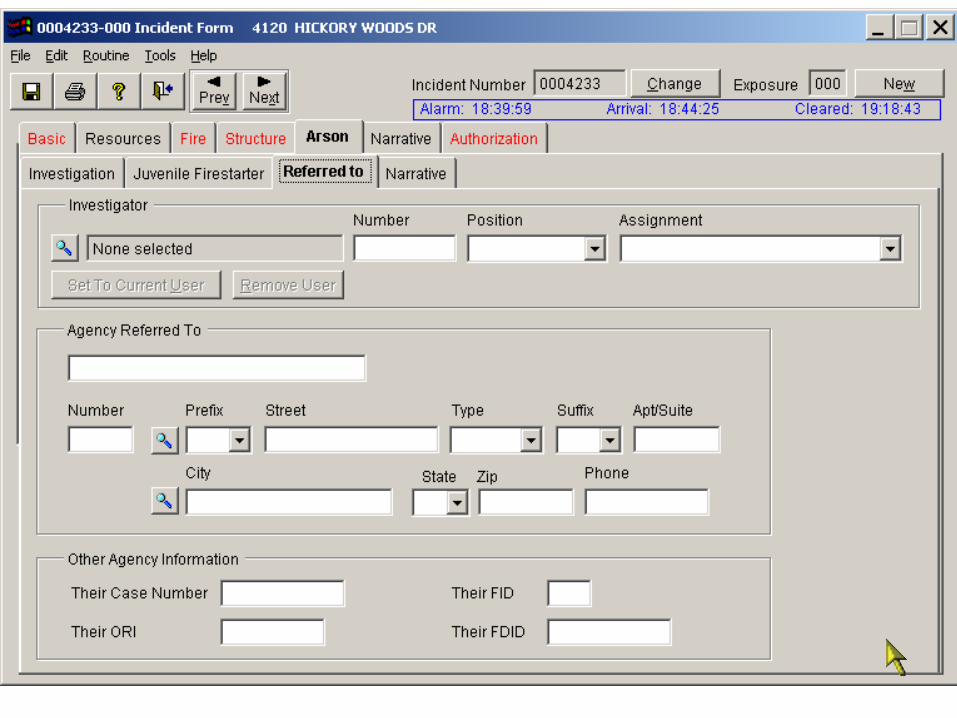


This is the Narrative page just for the arson portion of the incident.
The Narrative tab on the top row is a higher level Narrative for the entire report.
Primary Tab: ArsonSecondary Tab: Narrative

This is the Narrative Tab for the entire report.
Any comments made in CAD for the incident will automatically transfer to FRMS.
You can create multiple narratives per incident.
To Add a narrative, press the Add button.
Primary Tab: Narrative
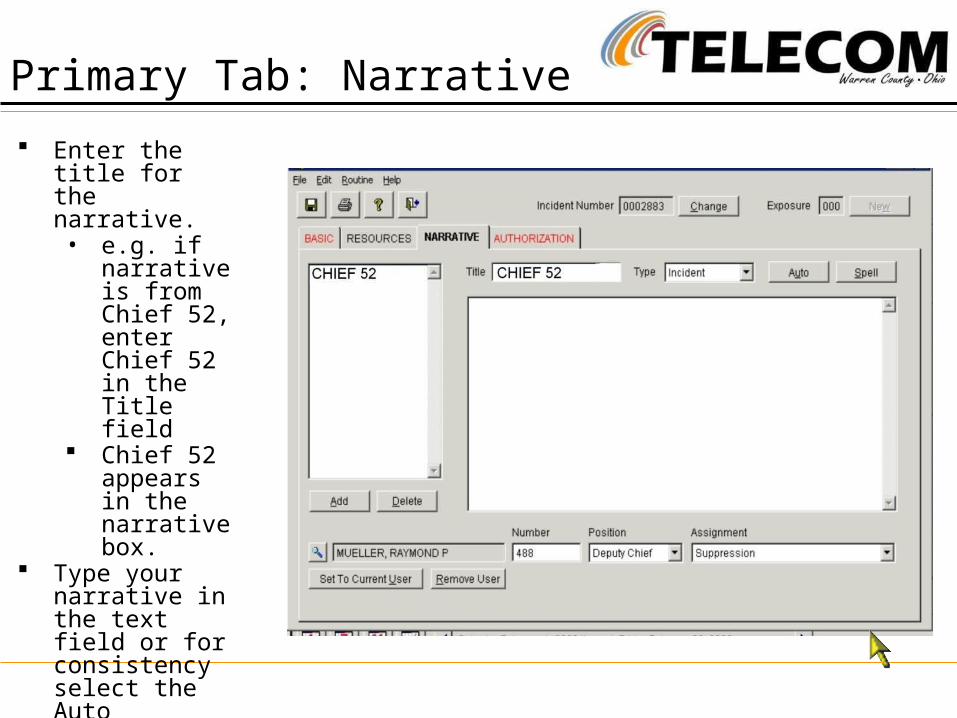
Enter the title for the narrative. • e.g. if
narrative is from Chief 52, enter Chief 52 in the Title field
Chief 52 appears in the narrative box.
Type your narrative in the text field or for consistency select the Auto narrative button.
Primary Tab: Narrative
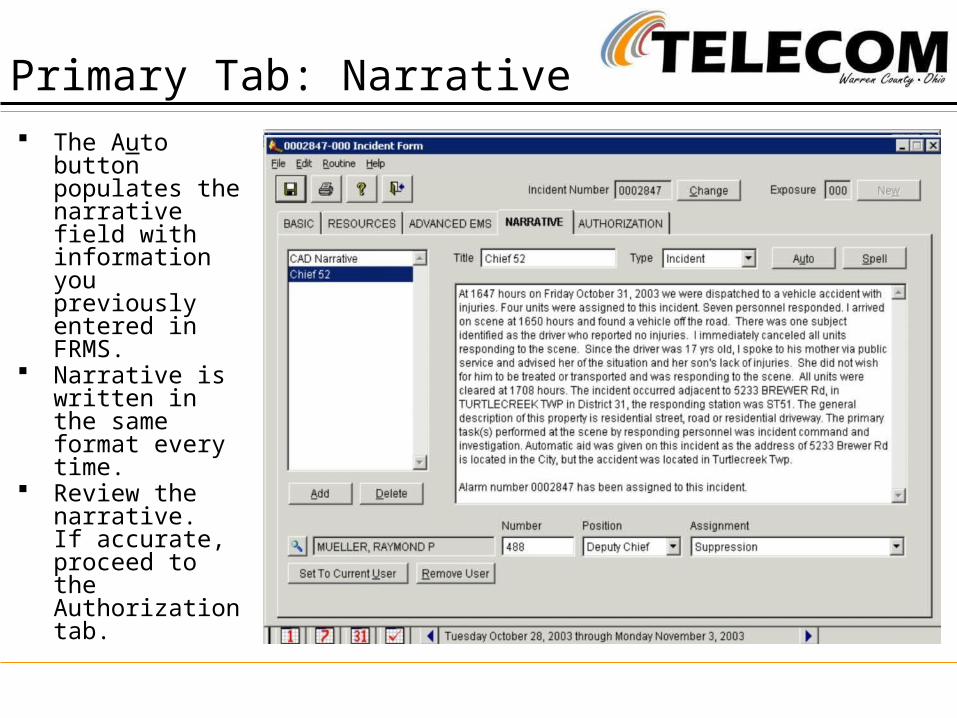
The Auto button populates the narrative field with information you previously entered in FRMS.
Narrative is written in the same format every time.
Review the narrative. If accurate, proceed to the Authorization tab.
Primary Tab: Narrative
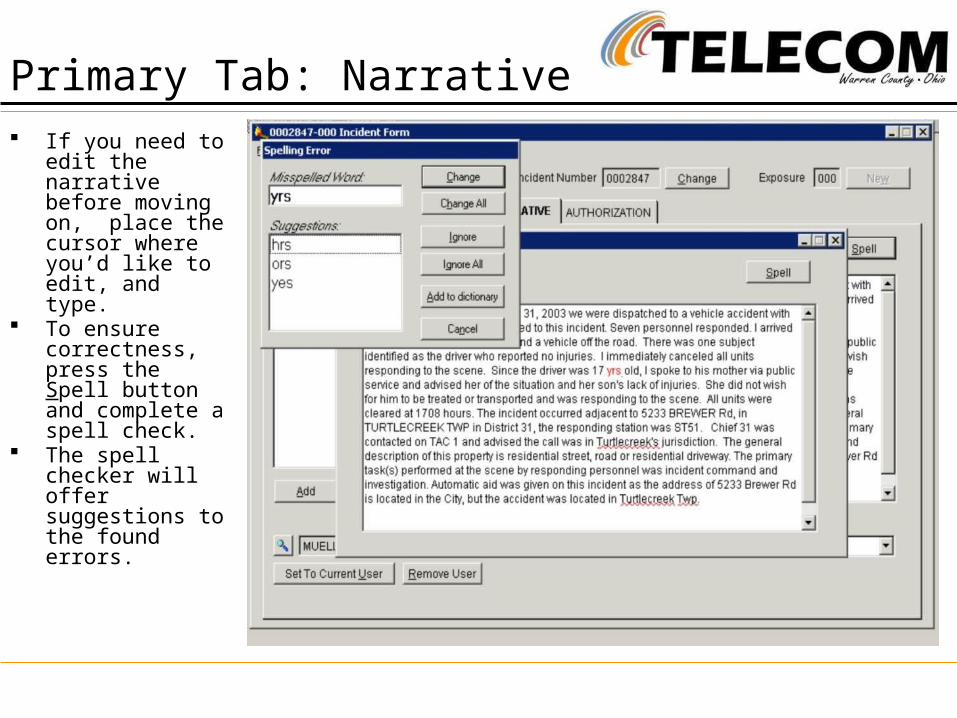
If you need to edit the narrative before moving on, place the cursor where you’d like to edit, and type.
To ensure correctness, press the Spell button and complete a spell check.
The spell checker will offer suggestions to the found errors.
Primary Tab: Narrative

Once the narrative is complete, push the SAVE button (disc icon).
If you have edited the narrative, DO NOT PUSH THE AUTO BUTTON AGAIN – it will erase the edited narrative and replace it with the original version.
X
Primary Tab: Narrative

Now that your narrative is saved, you may select the Authorization tab.
Primary Tab: Narrative
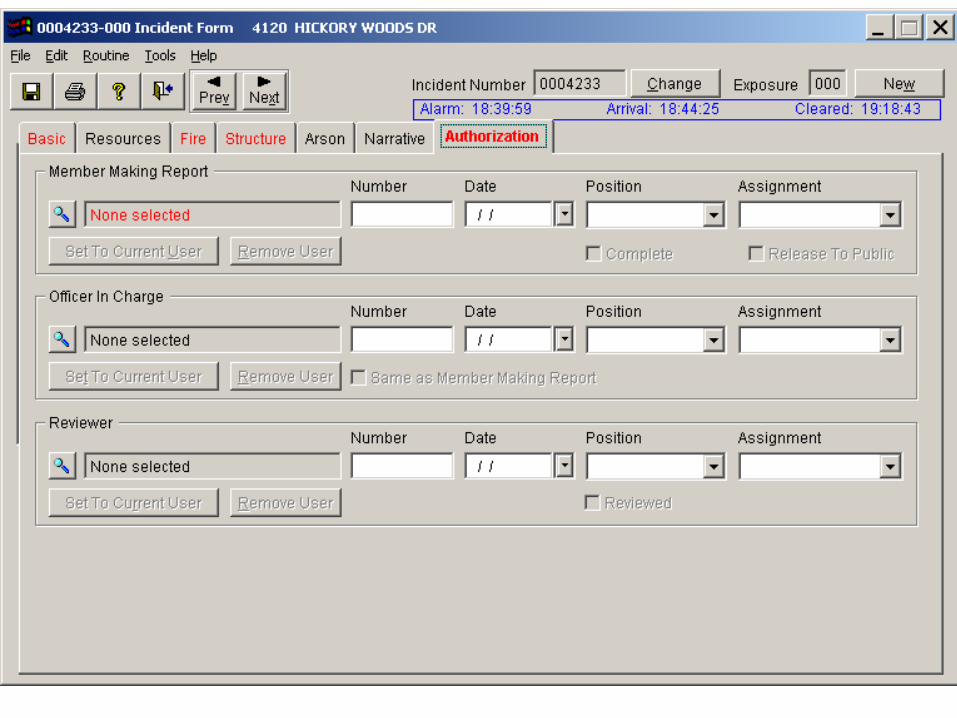
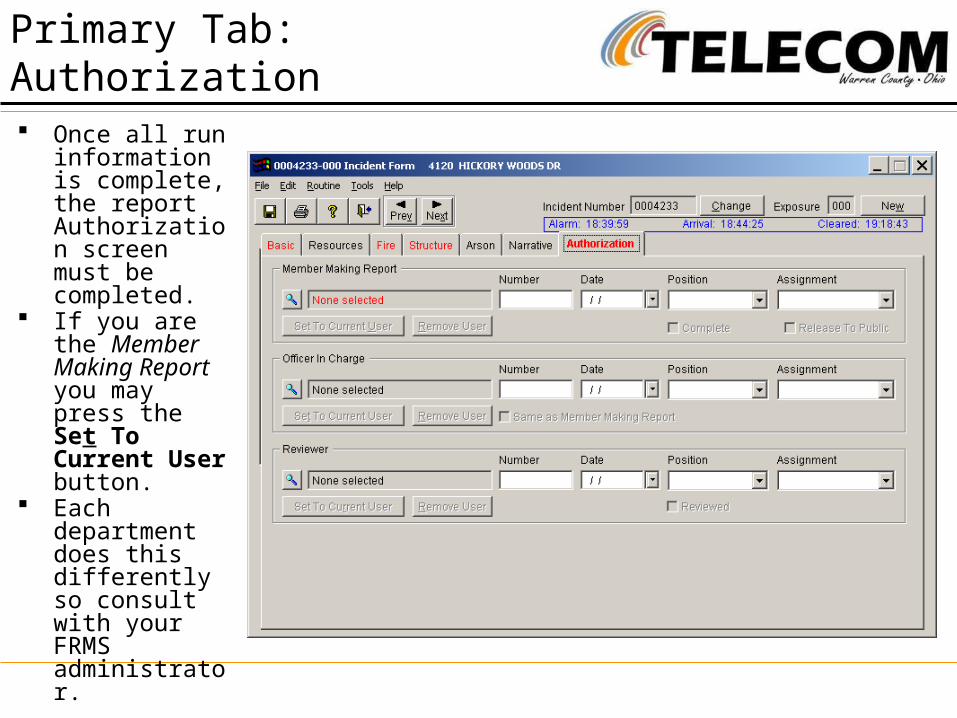
Once all run information is complete, the report Authorization screen must be completed.
If you are the Member Making Report you may press the Set To Current User button.
Each department does this differently so consult with your FRMS administrator.
Primary Tab: Authorization
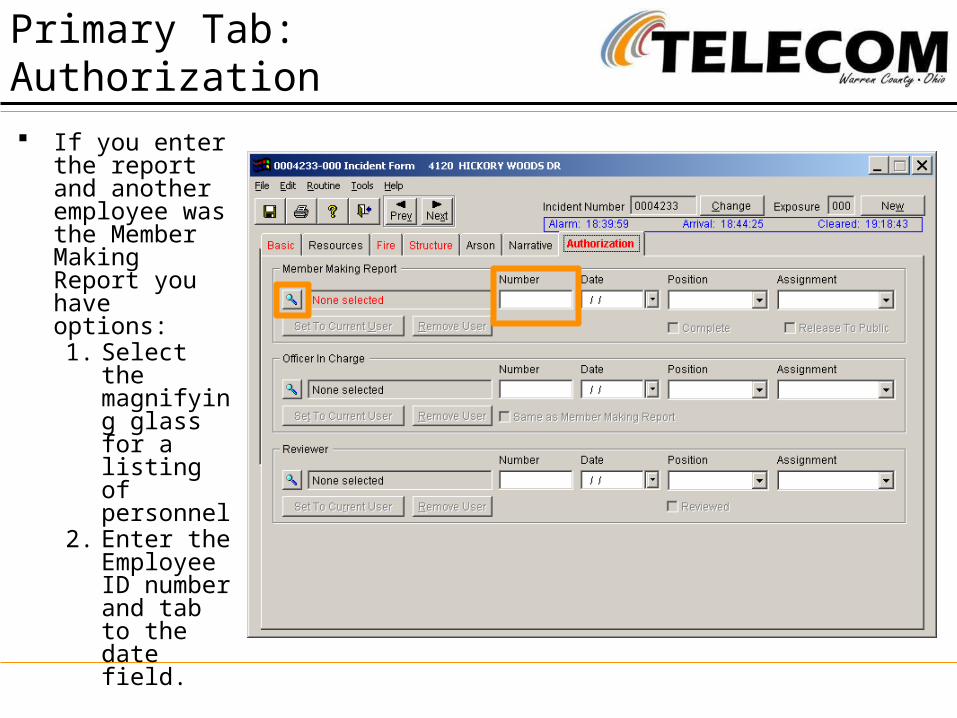
If you enter the report and another employee was the Member Making Report you have options:1. Select the
magnifying glass for a listing of personnel
2. Enter the Employee ID number and tab to the date field.
Primary Tab: Authorization
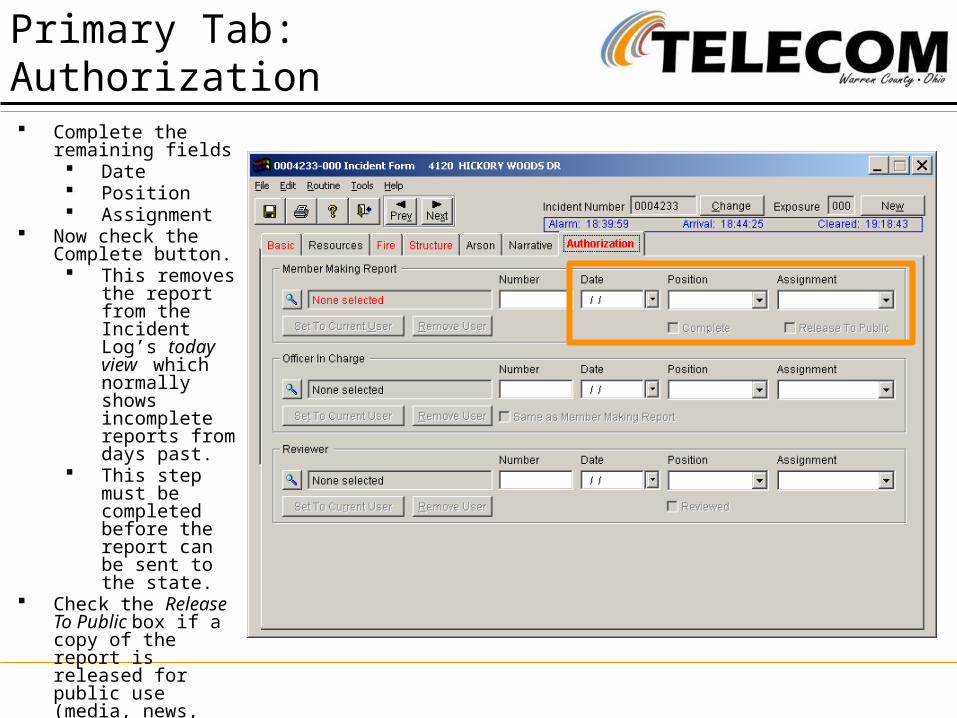
Complete the remaining fields Date Position Assignment
Now check the Complete button. This removes
the report from the Incident Log’s today view which normally shows incomplete reports from days past.
This step must be completed before the report can be sent to the state.
Check the Release To Public box if a copy of the report is released for public use (media, news, etc).
Primary Tab: Authorization

Enter Officer in Charge.
Same options and process as Member Making Report section.
Once report is complete, click the Save button (disc icon)
Primary Tab: Authorization

proudly serving the
Additional Forms
windows that appear
dependingon selected information

proudly serving the
EMS

We saw this Basic form window earlier.
EMS Scenario Type of call
is 321 – EMS call.
EMS Provided is checked.
These two selections have activated the Advanced EMS tab.
Primary Tab: BasicSecondary Tab: Response

Complete Response tab Location tab Persons Involved
tab In this tab
you will indicate the person involved is an EMS Patient
Primary Tab: BasicSecondary Tab: Persons Involved

Scene Tab Complete the
number of patients field.
If an MCI (mass casualty incident), select the drop down list and complete.
If no MCI select 99 (N/A)
Location Type -Home, School, etc.
Service Type -Scene, Standby, etc.
Area – suburban, rural, etc.
Primary Tab: Advanced EMSSecondary Tab: Scene
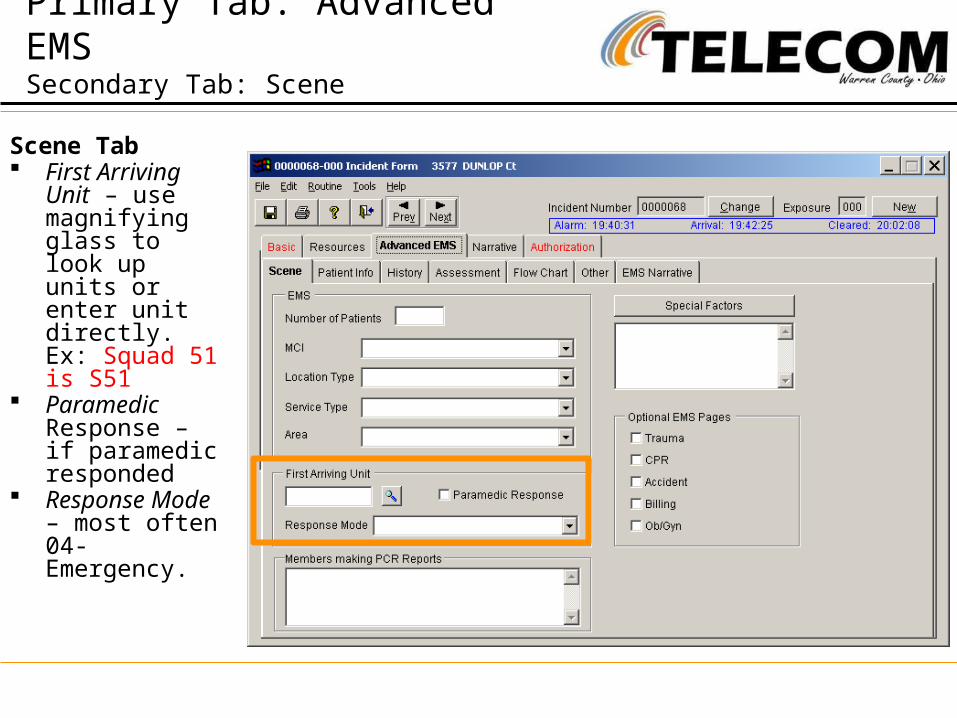
Scene Tab First Arriving Unit
– use magnifying glass to look up units or enter unit directly. Ex: Squad 51 is S51
Paramedic Response – if paramedic responded
Response Mode – most often04-Emergency.
Primary Tab: Advanced EMSSecondary Tab: Scene
Scene Tab
Primary Tab: Advanced EMSSecondary Tab: Scene
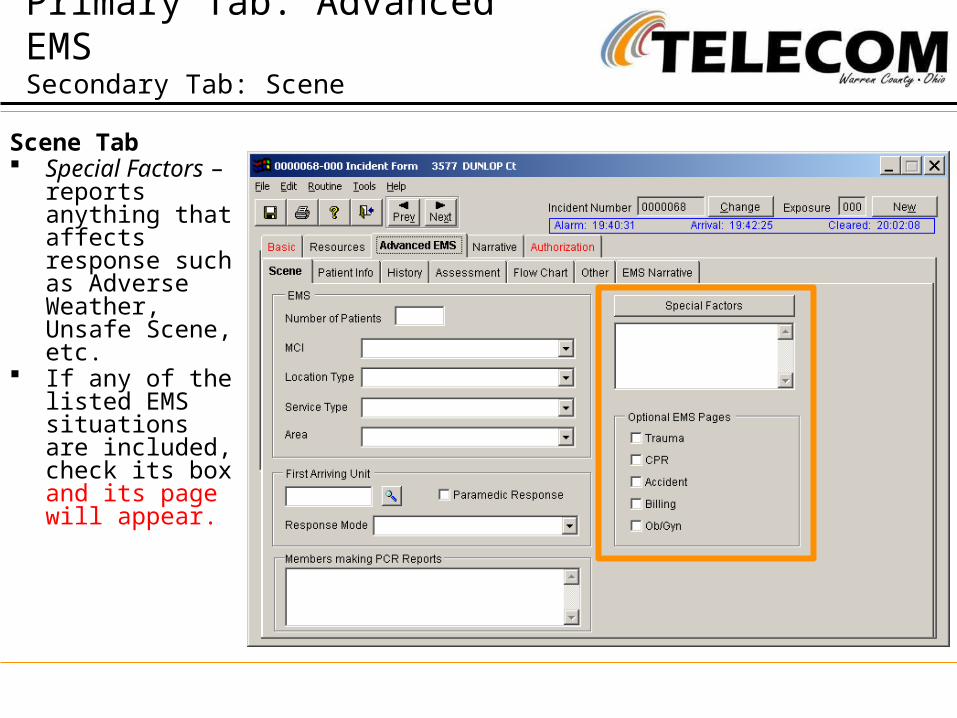
Scene Tab Special Factors –
reports anything that affects response such as Adverse Weather, Unsafe Scene, etc.
If any of the listed EMS situations are included, check its box and its page will appear.
Primary Tab: Advanced EMSSecondary Tab: Scene
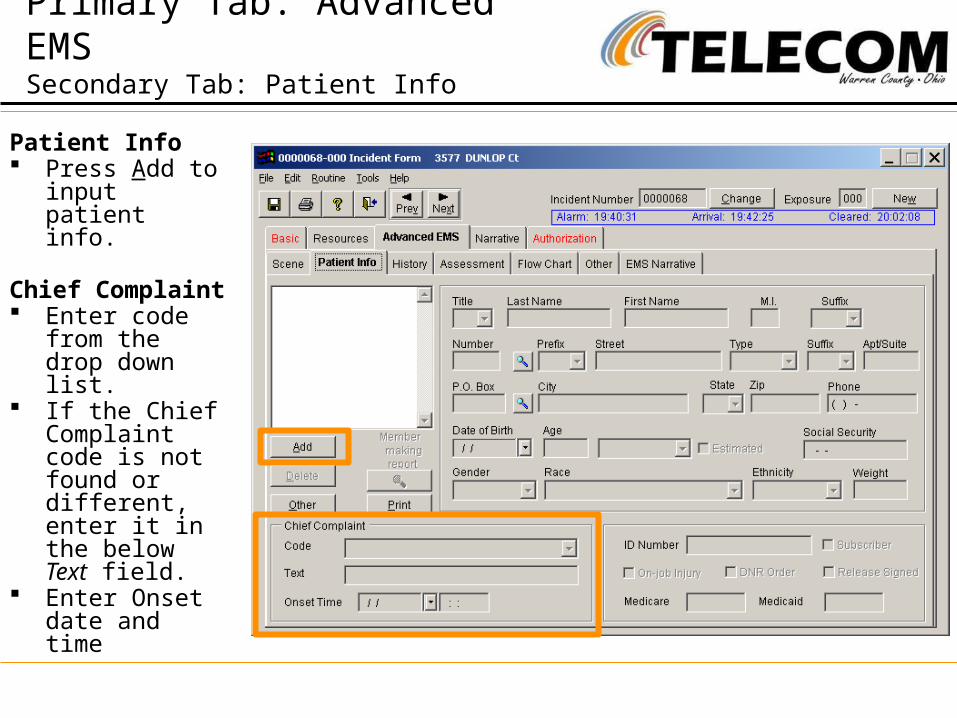
Patient Info Press Add to
input patient info.
Chief Complaint Enter code from
the drop down list.
If the Chief Complaint code is not found or different, enter it in the below Text field.
Enter Onset date and time
Primary Tab: Advanced EMSSecondary Tab: Patient Info
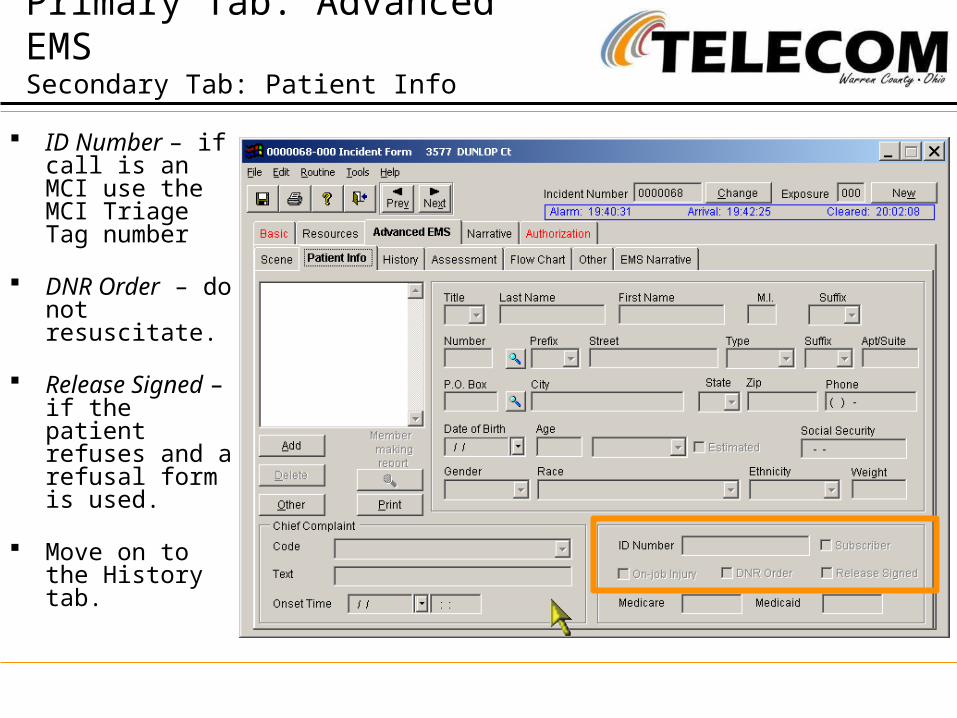
ID Number – if call is an MCI use the MCI Triage Tag number
DNR Order – do not resuscitate.
Release Signed – if the patient refuses and a refusal form is used.
Move on to the History tab.
Primary Tab: Advanced EMSSecondary Tab: Patient Info

Patient - should appear since you entered them in the Patient Info tab, but if not, select from the drop down.
Signs and Symptoms – press the button to select then it will appear in the box. you can select more than one.
Past Medical History – press the button to select then it will appear in the box. you can select more than one.
Primary Tab: Advanced EMSSecondary Tab: History

Provider Impression / Assessment - Enter your impression of the patient from the drop down list.
Cause of Illness / Injury - choose from the drop down list.
Severity 01-Non Urgent 02-Urgent 03-Life
Threatening 04-Full Arrest
Enter last name of patient’s physician
List allergies
List medications
Primary Tab: Advanced EMSSecondary Tab: History

Human Factors - Check any that have influenced the call.
Pregnancy – select from drop down list if involved.
Now go to the Assessment tab
Primary Tab: Advanced EMSSecondary Tab: History
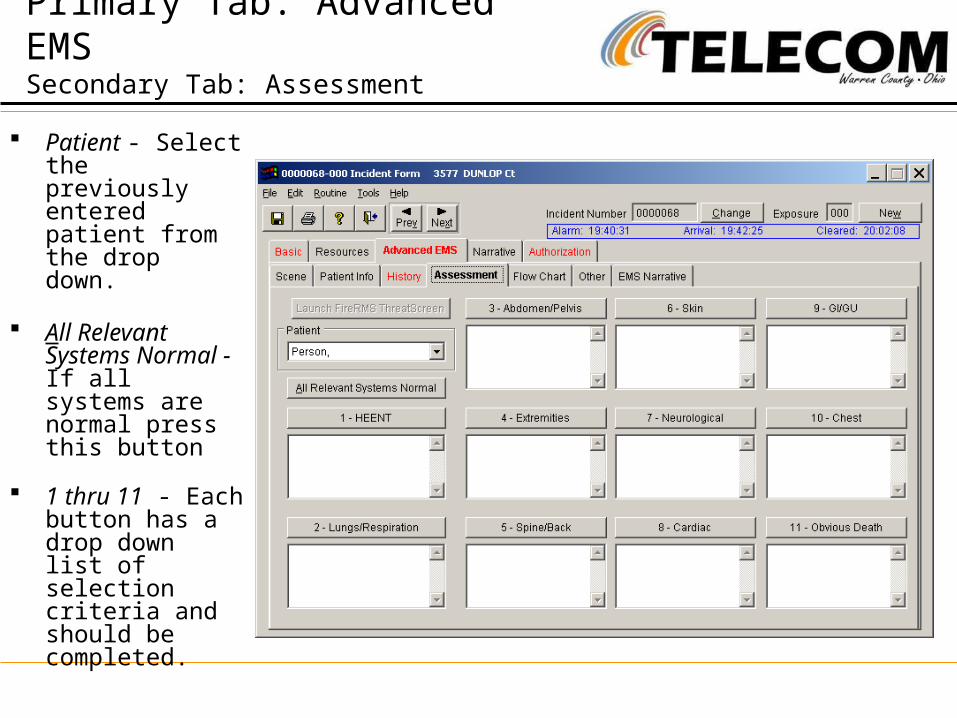
Patient - Select the previously entered patient from the drop down.
All Relevant Systems Normal - If all systems are normal press this button
1 thru 11 - Each button has a drop down list of selection criteria and should be completed.
Primary Tab: Advanced EMSSecondary Tab: Assessment
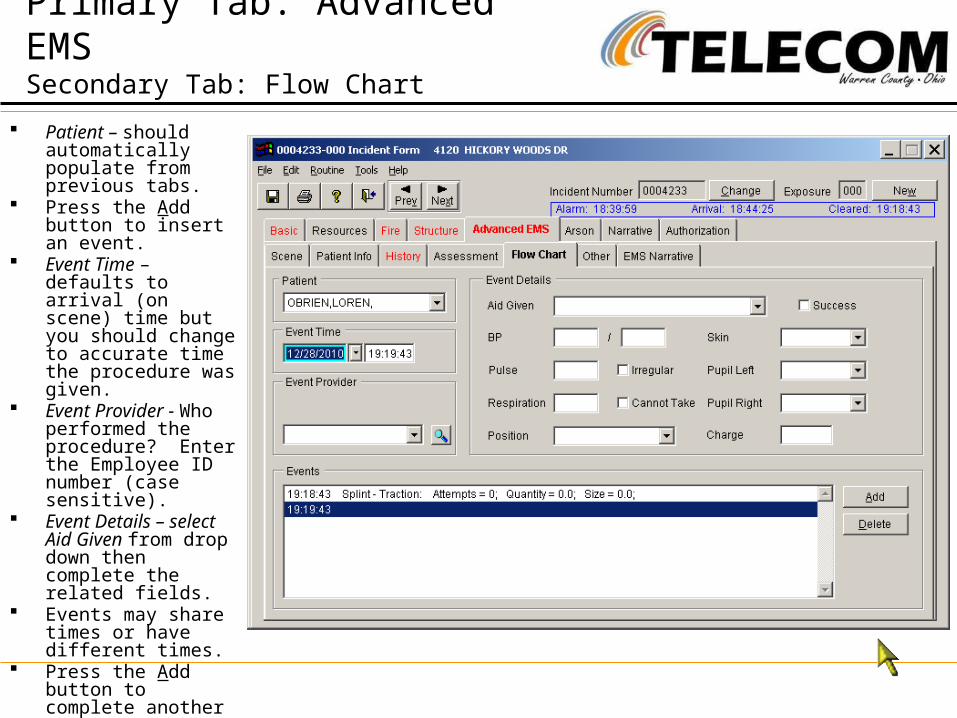
Patient – should automatically populate from previous tabs.
Press the Add button to insert an event.
Event Time – defaults to arrival (on scene) time but you should change to accurate time the procedure was given.
Event Provider - Who performed the procedure? Enter the Employee ID number (case sensitive).
Event Details – select Aid Given from drop down then complete the related fields.
Events may share times or have different times.
Press the Add button to complete another event
Primary Tab: Advanced EMSSecondary Tab: Flow Chart

When all Events are completed, continue to the Other Tab.
Primary Tab: Advanced EMSSecondary Tab: Flow Chart
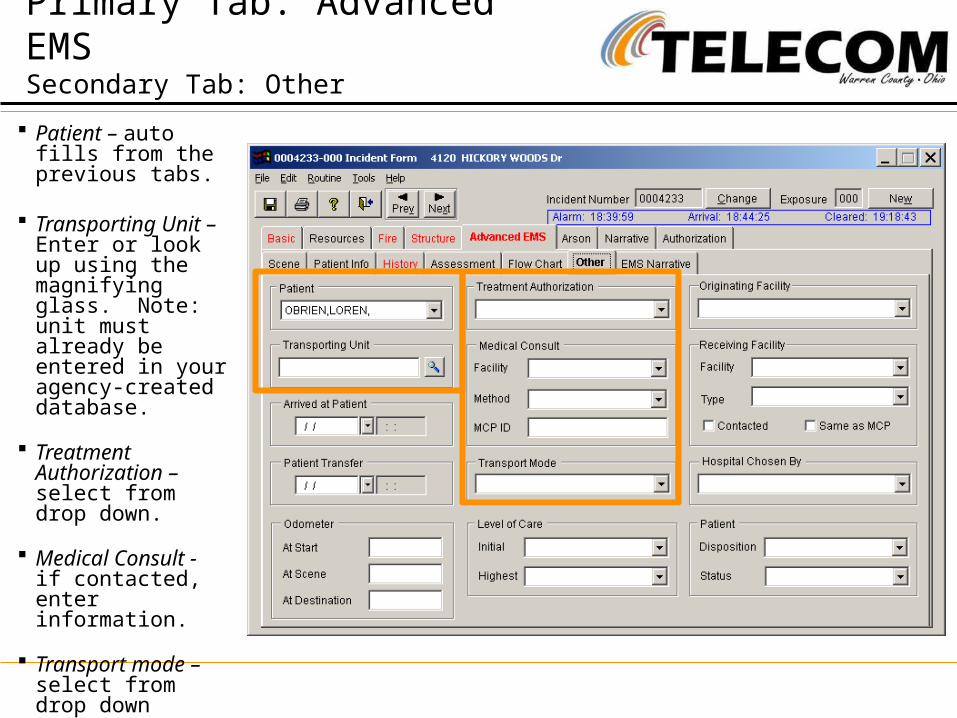
Patient – auto fills from the previous tabs.
Transporting Unit – Enter or look up using the magnifying glass. Note: unit must already be entered in your agency-created database.
Treatment Authorization – select from drop down.
Medical Consult - if contacted, enter information.
Transport mode – select from drop down
Primary Tab: Advanced EMSSecondary Tab: Other

Level of Care Initial – first type
given upon arrival Highest – highest
level given at any point in the incident.
Receiving Facility Facility to which
patient was transported
Type usually06-Hospital
Hospital Chosen By – select from drop down list.
Primary Tab: Advanced EMSSecondary Tab: Other
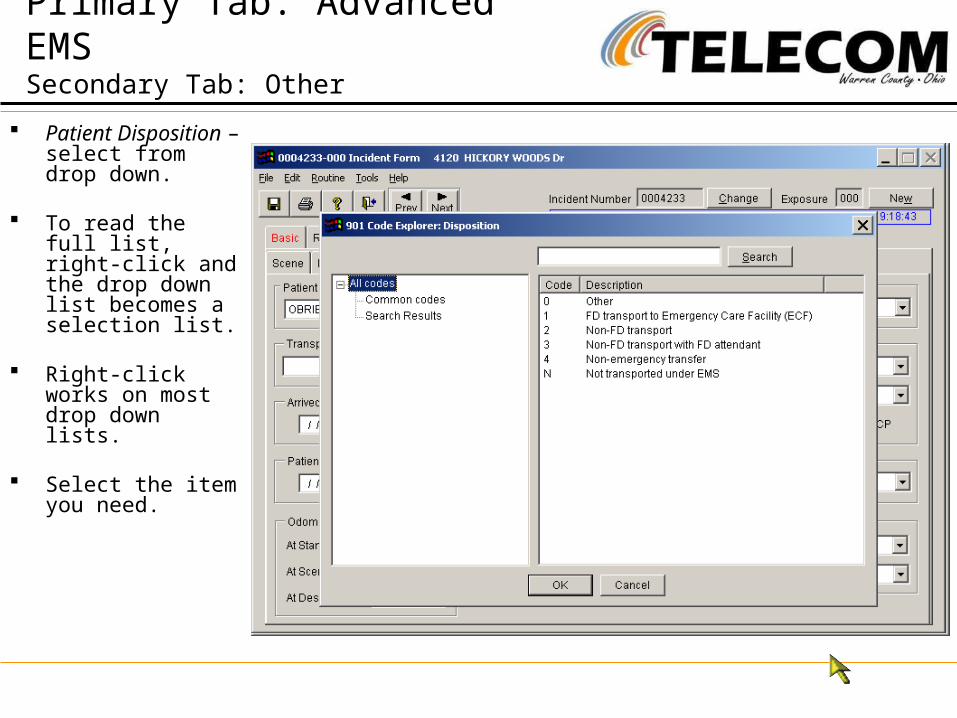
Patient Disposition – select from drop down.
To read the full list, right-click and the drop down list becomes a selection list.
Right-click works on most drop down lists.
Select the item you need.
Primary Tab: Advanced EMSSecondary Tab: Other

proudly serving the
OTHER FIRE

The appearance of additional tabs (report forms) are dependent on the information entered in the Incident Type field.
421-Chemical hazard (no spill or leak) prompted the HAZMAT tab to appear. Let’s go there.
Primary Tab: BasicSecondary Tab: Response

Red fields must be completed.
Once all completed, go to the Involved tab.
Primary Tab: HazmatSecondary Tab: Release

Complete the fields in this tab.
Continue to the Identification tab.
Primary Tab: HazmatSecondary Tab: Involved

Press Add and enter from the list.
Complete all fields in the form.
Proceed to the remainder of the report as we walked through before.
Primary Tab: HazmatSecondary Tab: Identification

proudly serving the
DAYBOOKlist details, pub ed events, assignments
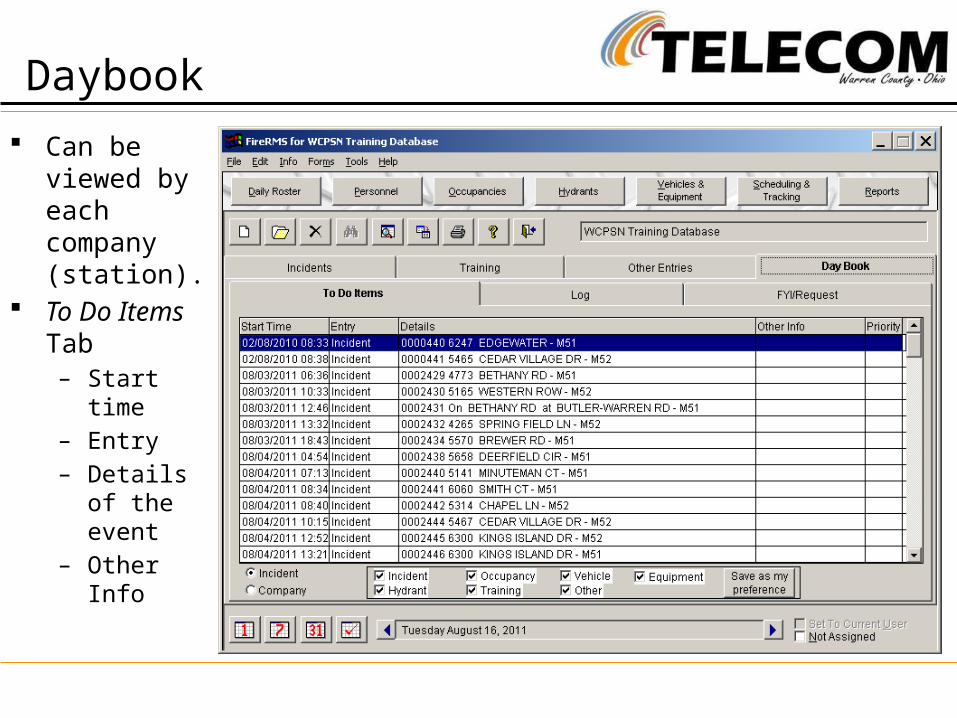
Daybook Can be
viewed by each company (station).
To Do Items Tab– Start time– Entry– Details of
the event– Other Info

Daybook
Log Tab– Start Time– End Time– Entry– Details– Other Info

Daybook
FYI/Request Tab

Daybook To Add an entry,
pres the NEW button (paper with folded corner).
You may select:– New Incident– New Training
Session– New Other
Entry. To add to the
Daybook choose Other Entry.

Select the Type of entry from the drop down list.
Daybook
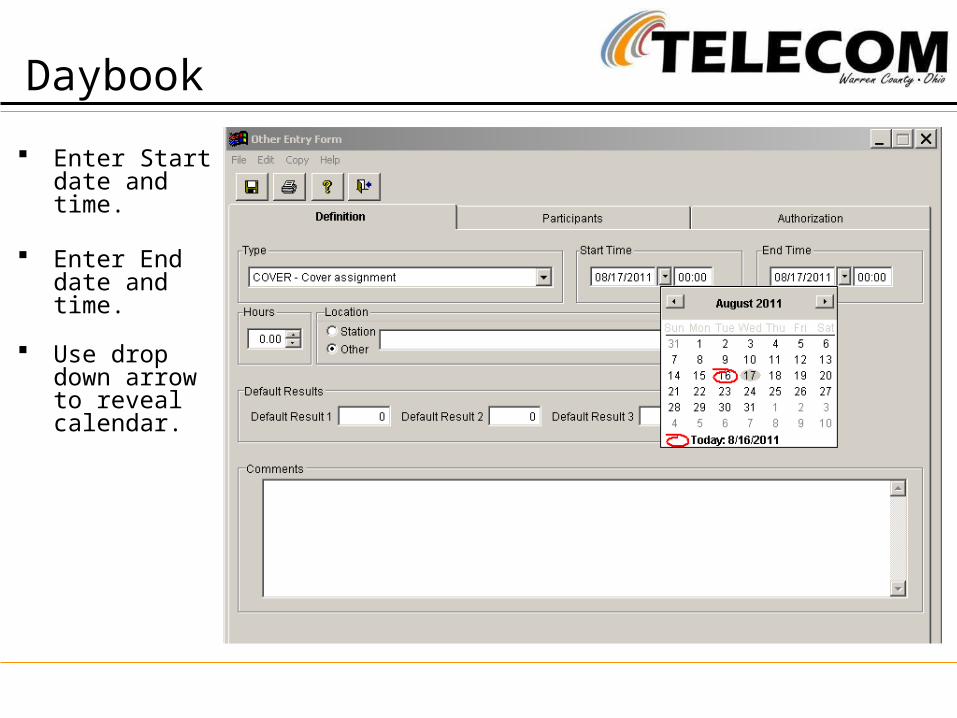
Enter Start date and time.
Enter End date and time.
Use drop down arrow to reveal calendar.
Daybook
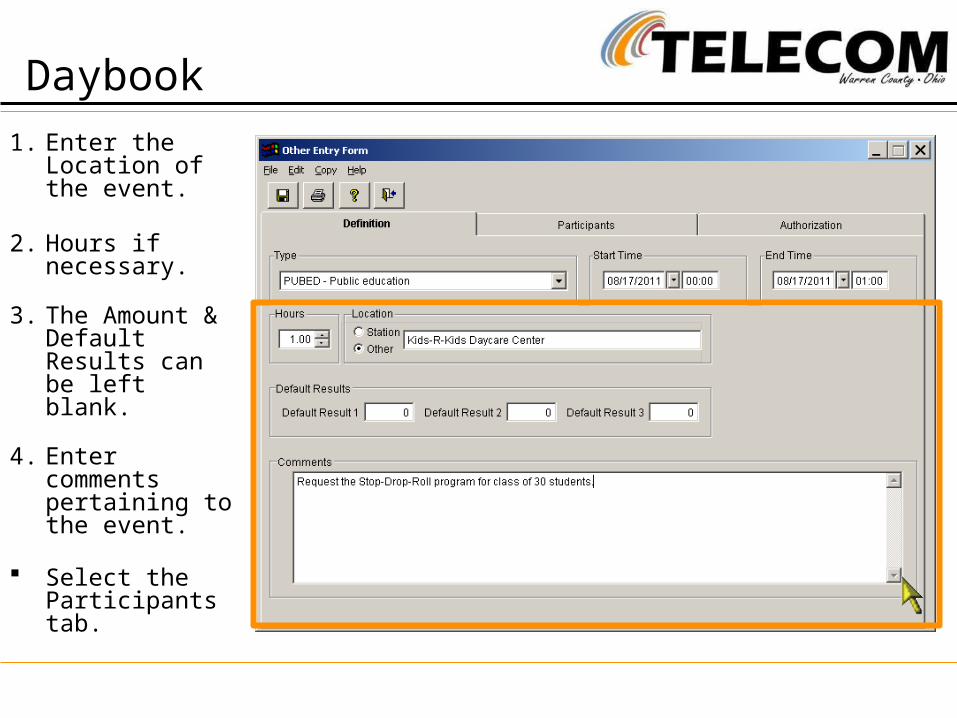
1. Enter the Location of the event.
2. Hours if necessary.
3. The Amount & Default Results can be left blank.
4. Enter comments pertaining to the event.
Select the Participants tab.
Daybook
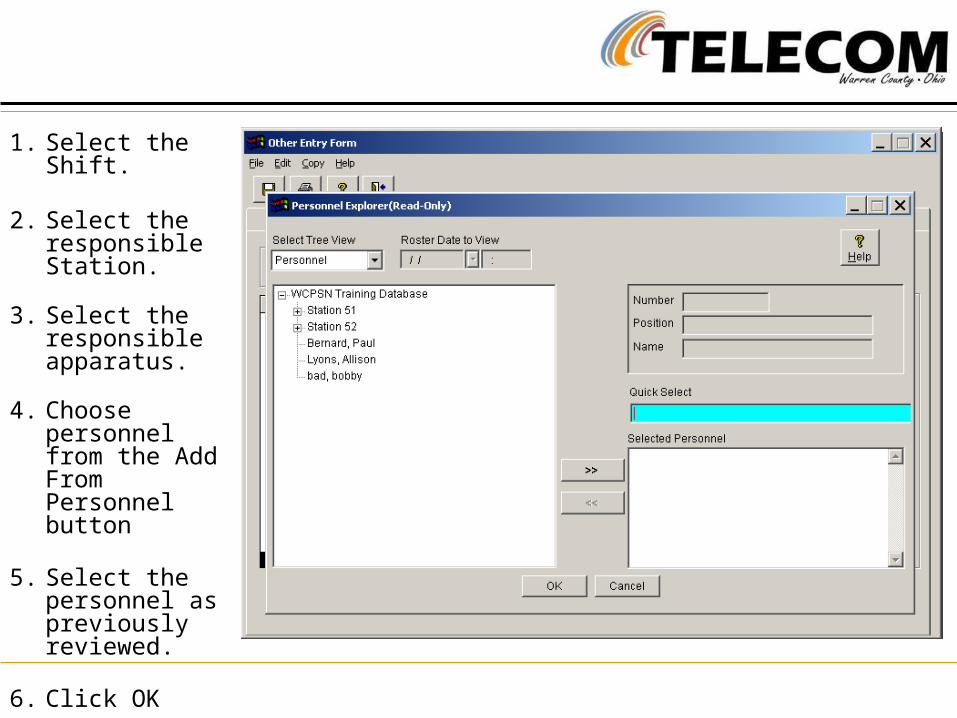
1. Select the Shift.
2. Select the responsible Station.
3. Select the responsible apparatus.
4. Choose personnel from the Add From Personnel button
5. Select the personnel as previously reviewed.
6. Click OK

Once the participants are entered, go to Authorization.
Daybook
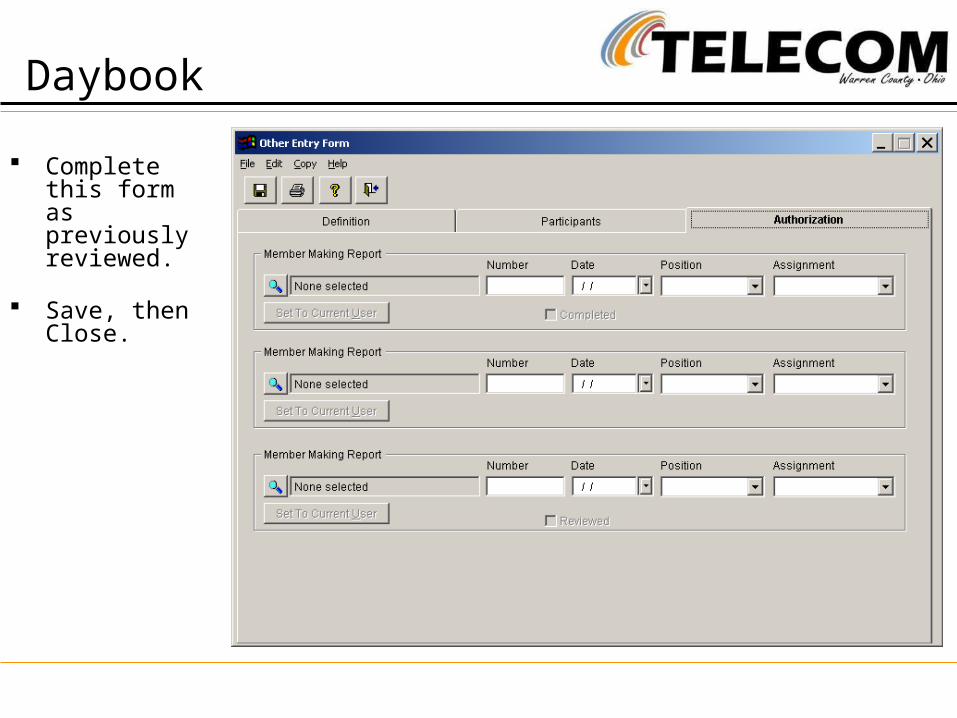
Complete this form as previously reviewed.
Save, then Close.
Daybook

proudly serving the
TRAINING
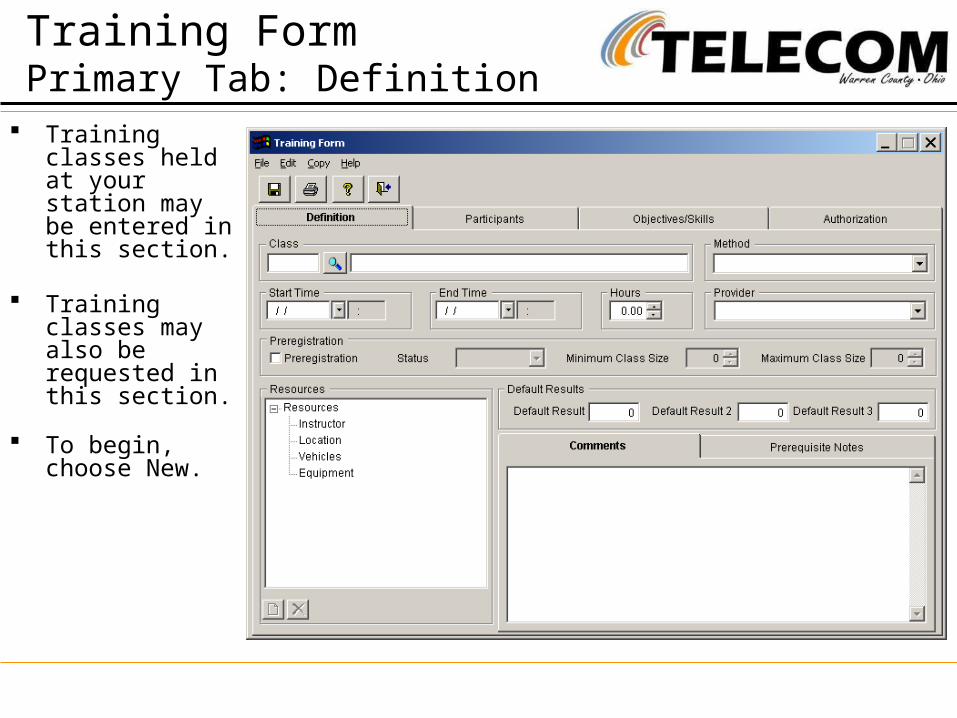
Training classes held at your station may be entered in this section.
Training classes may also be requested in this section.
To begin, choose New.
Training FormPrimary Tab: Definition

Select the class from the magnifying glass look-up list.
A pop-up Class Explorer window appears with a Training Catalog organized by Training Category.
Each Category has a + box that expands to reveal all training.
Click the + next to EMS-EMERGENCY MEDICAL
Training FormPrimary Tab: Definition
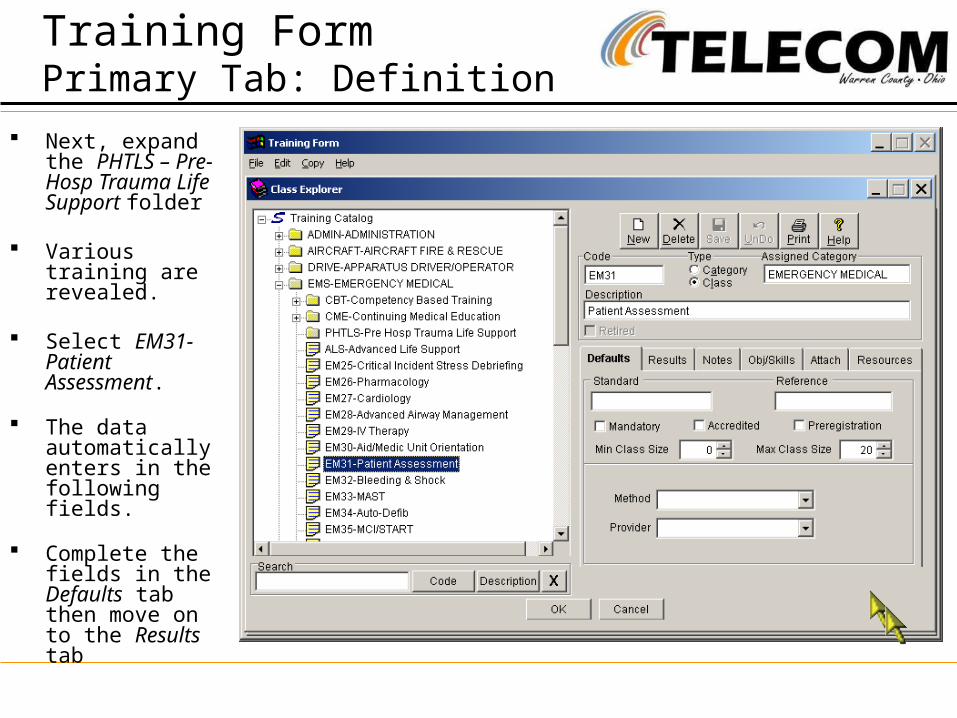
Next, expand the PHTLS – Pre-Hosp Trauma Life Support folder
Various training are revealed.
Select EM31-Patient Assessment.
The data automatically enters in the following fields.
Complete the fields in the Defaults tab then move on to the Results tab
Training FormPrimary Tab: Definition

Enter Credit Hours
Continue to the Notes tab.
Training FormPrimary Tab: Definition

Enter any class notes in the field provided.
You can date stamp the field prior to or after the entry by pressing the Date Stamp button.
If prerequisites are required select that tab, otherwise continue to Obj/Skills.
Training FormPrimary Tab: Definition

Objectives and skills can be entered here.
Press New icon Select the
topic category Fields will
automatically fill in
Click OK
Go to Attach tab if attachments are needed.
Training

All information is complete –click OK.
Training
FRMS Reporting
Crews are expected to complete their run reports upon return to the Station.
Fire crews should use the Fire Report Worksheet at the scene then complete the report on the FRMS computer.
Once completed on the computer, print a copy from FRMS and attach to the back of the Fire Report Worksheet and turn into the Battalion as normal.
FRMS Reporting
EMS crews shall continue to complete their written EMS report. The following copies shall be distributed as follows:– White – Return to your agency.
– Yellow – Return to the agency.
– Pink – Leave at Hospital (EMS Coordinator Copy)
– Gold – Leave at Hospital (Medical Record Copy)
FRMS Reporting
EMS crews are expected to enter the EMS report information on the FRMS computer upon their return to the Station.
Once completed on the computer, print a copy from FRMS and attach to the back of the EMS Report and turn into the Battalion as normal.