prosthetics vista suite installation guide · prosthetics vista suite installation guide version...
TRANSCRIPT

Prosthetics VistA Suite Installation Guide
Version 3.0 (GUI Version) January 2005
Revised May 2007 for Patch RMPR*3.0*75
Department of Veterans Affairs Health System Design and Development
Provider Systems


Revision History Description Date Author Prosthetics VistA Suite (GUI) V. 3.0 released. January 2005 RMPR*3.0*75 released May 2007 Alfred Bustamante
January 2005 Prosthetics VistA Suite (GUI) i Installation Guide


Table of Contents
Overview .....................................................................................................................................1 Preinstallation.............................................................................................................................3
Uninstalling a Previous Version of the Prosthetics Suite ................................................... 3 Installing the RPC Broker................................................................................................... 4 Downloading the Installation File....................................................................................... 5 Extracting the Installation File............................................................................................ 6
Client Installation.......................................................................................................................7 Installing the GUI Application............................................................................................ 7
Post Installation ........................................................................................................................13 Setting Up the Hosts File .................................................................................................. 13 Running the Prosthetics VistA Suite................................................................................. 16 Uninstalling the Prosthetics VistA Suite........................................................................... 17
January 2005 Prosthetics VistA Suite (GUI) iii Installation Guide


Overview
With Patch RMPR*3*75, Prosthetics offers the Create Lab Work Order (OWL) feature, which offers lab work ordering functionality in a windows-based environment. This Prosthetics VistA Suite (GUI) Installation Guide will help IRM and users to download and install the GUI portion of the patch. See the patch description for the instructions for the VistA portion of the patch. The following is a list of documentation on the VistA Document Library (VDL) for Prosthetics graphical user interface (GUI) applications::
Introduction
• Delayed Order Report (DOR) (GUI) Installation Guide • Delayed Order Report (DOR) (GUI) User Manual • NPPD Detail Display (GUI) Installation Guide • Prosthetics VistA Suite (GUI) User Manual • Prosthetics VistA Suite (GUI) Installation Guide (i.e., the manual you
are currently reading.) • View Billing Information (GUI) User Manual
Note: The Prosthetics Main Menu (GUI) User Manual is no longer a separate manual. It has been combined with the Prosthetics Application Suite User Manual (GUI). The Prosthetics Main Menu window allows you to access all GUI applications for Prosthetics.
IMPORTANT NOTE to IRM
RMPR_3_75.EXE, the full VistA suite, is typically installed on each Prosthetic user’s computer. For sites which prefer their users to connect to the VistA Suite over the network, RMPR_3_75.EXE may be installed on a server that has a user environment set up.
January 2005 Prosthetics VistA Suite (GUI) 1 Installation Guide


Preinstallation
Uninstalling a Previous Version of the Prosthetics Suite
IMPORTANT: Remove previous VistA Prosthetics Suite installations
You must first uninstall an existing VistA Prosthetics suite installation. To do this, go to the Control Panel Add or Remove Programs option and select the Prosthetics VistA suite item. Click the Add/Remove button and follow the prompts to uninstall the Prosthetics suite. This remainder of this section of the Installation Guide contains a fully-detailed workflow for uninstalling a previous Prosthetics suite. If you are installing the Prosthetics VistA Suite for the first time, or don’t require detailed uninstall instructions, you can skip to the next section—Installing the RPC Broker. If you already have the RPC Broker installed, you don’t need to reinstall it. If that’s the case, you may skip to the following section—Downloading the Installation File.
Detailed uninstall workflow
This workflow is based on the Windows XP operating system (OS). If you are using a different OS, some screens and item names may vary.
1. Click the Windows Start button. 2. Move your mouse pointer over Settings to expose Control Panel to expand
its menu, then select Add or Remove Programs. The Add or Remove Programs window displays a list of currently installed programs. Note: Depending on your preferred Windows menu style, you may not see Settings. If that is the case, simply click Control Panel.
3. Click Prosthetics Vista Suite from the list. That will display the Add/Remove button.
4. Click the Change/Remove button. A progress window displays for a few seconds while the system prepares to make changes.
5. A confirmation popup asks, “Do you want to completely remove the selected application and all of its components?” Click OK to proceed with the uninstall.
6. Another progress window displays for a few seconds, then the Maintenance Complete window displays. Click Finish.
7. Close the Add or Remove Programs window. The previous version of the Prosthetics VistA Suite is now uninstalled. Since you were already a Prosthetics VistA Suite user, you probably already have the RPC Broker installed. If that’s the case, you may skip to the following section—Downloading the Installation File. If not, continue with the next section to install the RPC Broker,
January 2005 Prosthetics VistA Suite (GUI) 3 Installation Guide

Installing the RPC Broker
RPC Broker The assumption is made that the user’s PC has the required RPC Broker Client
Workstation set up. If this is not the case, the user should first install this software. The installation is beyond the scope of this installation guide, but the RPC Broker files and installation instructions can be found on the VA’s RPC Broker web page: http://vista.med.va.gov/broker/index.asp. These files must be installed before running the GUI application.
4 Prosthetics VistA Suite (GUI) January 2005 Installation Guide

Downloading the Installation File
Anonymous directory
The file for this patch can be obtained from the ANONYMOUS.SOFTWARE directory at one of the OI Field Offices. The preferred method is to FTP the file from DOWNLOAD.VISTA.MED.VA.GOV, which will transmit the file from the first available server. Alternatively, you may elect to retrieve the file from a specific OI Field Office. The documentation can be read via the Adobe Acrobat Reader browser program. The .EXE file is binary file and must be transferred using binary file transfer tools.
Download steps To begin the install process and unzip the files, follow these steps:
1. From the ANONYMOUS.SOFTWARE Directory, download the file
RMPR_3_75.EXE. 2. Make a note of the file location.
Warning: Wrong filename
Warning: If the filename of the file you download is RMPR_3_75.EXE;1 then you must rename it to RMPR_3_75.EXE so that the filename does not have “;1” at the end of it.
To change the filename, right click the RMPR_3_75.EXE;1, file and select the Rename option. Then delete the “;1” from the filename and press [ENTER].
January 2005 Prosthetics VistA Suite (GUI) 5 Installation Guide

Extracting the Installation File
Default location of extracted files is C:\PROS\
The file RMPR_3_75.EXE is a zip file that contains the setup files needed for the automated installation. For setup purposes, the files will unzip to the following folder: C:\PROS\ As an alternative to extracting these files to every client computer, IRM staff can unzip this file to a shared folder (directory) on a network server and then run the installation “SETUP.EXE” remotely. Recommendation: Do not change the file folder, as future patches will need to overwrite these files.
Unzip steps 1. Double click the installation file RMPR_3_75.EXE. The WinZip Self-
Extractor dialog displays.
2. Click the Unzip button (as shown above). A successful message displays when the unzip process has completed.
3. Click OK to close the confirmation popup. 4. The WinZip Self-Extractor dialog box continues to display (as shown
above). Click the Close button.
6 Prosthetics VistA Suite (GUI) January 2005 Installation Guide

Client Installation
Installing the GUI Application
Automatic Wizard
Once you have extracted the files onto your C: drive, you can perform an installation using the automatic wizard that is provided. This feature combines several steps to make installation easy.
Install steps To begin the installation, follow these steps:
1. Double-click the My Computer icon on your desktop. The Windows
Explorer view displays. 2. Double click the C: drive in your Windows Explorer view. 3. Double click the PROS folder to display the setup files. 4. Double click the Setup.exe file in the C:\PROS folder. 5. The Install Shield Wizard begins and displays the download process.
6. Click the Next button on the first window of the Install Shield Wizard for
the GUI application.
January 2005 Prosthetics VistA Suite (GUI) 7 Installation Guide

7. Click the Yes button on the License Agreement if you agree to the terms of
the license. Note: If you choose No, the setup will automatically close.
8 Prosthetics VistA Suite (GUI) January 2005 Installation Guide

8. Click the Next button on the Choose Destination Location window.
Recommendation: The destination folder C:\Program Files\Vista\PROS has been established in accordance with VA policy so as not to conflict with other VA programs. It is recommended that you do NOT change this portion of the path.
January 2005 Prosthetics VistA Suite (GUI) 9 Installation Guide

9. Click OK on the confirmation box. Notice that it states that the PROS folder
was created.
10. Click the Next button on the Start Copying Files dialog box.
10 Prosthetics VistA Suite (GUI) January 2005 Installation Guide
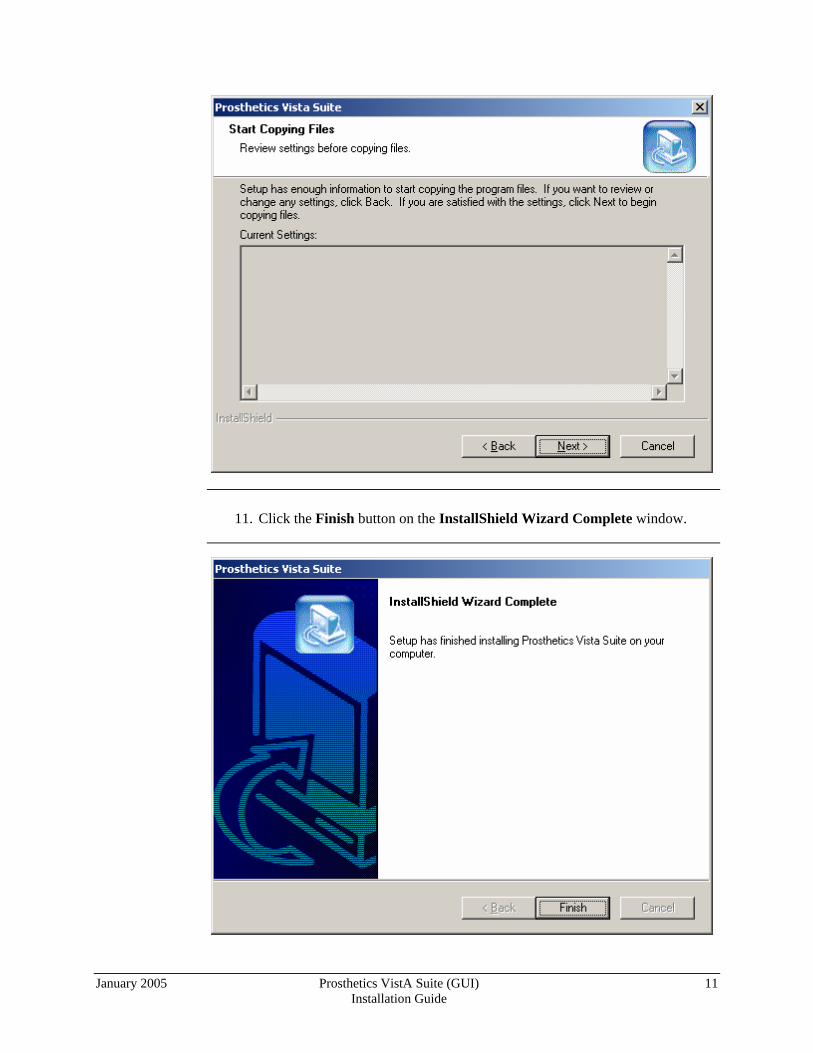
11. Click the Finish button on the InstallShield Wizard Complete window.
January 2005 Prosthetics VistA Suite (GUI) 11 Installation Guide

Setup is almost complete. The final step of the installation is to set up your Hosts
file. Proceed to the next section.
12 Prosthetics VistA Suite (GUI) January 2005 Installation Guide

Post Installation
Setting Up the Hosts File
HOSTS file A link must be established between the client and the server via the PC’s Hosts file
and the PC’s Windows Registry. The Windows 2000/XP Hosts file (no extension) is located in the following directory: C:\WINDOWS\system32\drivers\etc If the Hosts file does not exist, it must be created. (There may be a sample Hosts file named hosts.sam already in place.)
NOTE Note: If you create the file with Notepad, Notepad automatically adds a .txt
extension. To remove the extension, use Explorer to rename the file from Hosts.txt to Hosts
CAUTION If the Hosts file already exists, do not delete anything.
Sample HOSTS file viewed in Notepad
January 2005 Prosthetics VistA Suite (GUI) 13 Installation Guide

Simple Hosts file update
If the user needs to access only one GUI server and the server port is 9200, then add a line to the Hosts file as shown in the example above using the IP address provided by the server administrator. Note: There must be at least one space between the address and the name. There can be no spaces in the name itself. After you’ve updated the Hosts file and saved it, make sure the file still does not have an extension. If it does, remove it. If the server port is not 9200 and/or if the user needs to access multiple GUI servers, then you must run the ServerList utility described below.
Hosts file update using the ServerList utility
Follow these instructions for updating the Hosts file in conjunction with the ServerList utility.
1. Add the GUI server IP addresses and names to the Hosts file:
• BrokerServer1 (Use any names you like.) • BrokerServer2
Notes: There must be at least one space between the address and the name. There can be no spaces in the name itself.
After you’ve updated the Hosts file and saved it, make sure the file still does not have an extension. If it does, remove it.
2. Run the ServerList Utility (ServerList.exe), which is installed in the following folder:
C:\Program Files\Vista\PROS
The left windowpane of the ServerList utility shows those servers that have been set up as Host Servers in the HOSTS file. The right windowpane shows those servers that have been set up as Broker servers.
3. To enable a Broker server, double-click on the name in the left window to move it to the right window, and then enter the corresponding server port number.
Note: The order of the names in the right list is the order they will be displayed in the drop-down box when starting the GUI feature. If only one server is listed on the right, then you won’t see the drop-down box – it will automatically select that server as the default).
“Del” column A left-click in the “Del” column marks and un-marks server for deletion. See the
following ServerList screen for an example.
14 Prosthetics VistA Suite (GUI) January 2005 Installation Guide

ServerList
January 2005 Prosthetics VistA Suite (GUI) 15 Installation Guide

Running the Prosthetics VistA Suite
Installation Complete
The application is now installed in C:\Program Files\Vista\PROS. An icon named Prosthetics Vista Suite has been placed on your desktop. It looks like a medicine bag, as shown below.
Double-click the icon to run the application. The application can also be run in the following way: Start All Programs Prosthetics Vista Suite
16 Prosthetics VistA Suite (GUI) January 2005 Installation Guide

Uninstalling the Prosthetics VistA Suite
Uninstall procedure
To uninstall the application, do the following:
1. Click the Windows Start button. 2. Move your mouse pointer over Settings to expose Control Panel to expand
its menu, then select Add or Remove Programs. The Add or Remove Programs window displays a list of currently installed programs. Note: Depending on your preferred Windows menu style, you may not see Settings. If that is the case, simply click Control Panel.
3. Click Prosthetics Vista Suite from the list. That will display the Change/Remove button.
4. Click the Change/Remove button. A progress window displays for a few seconds while the system prepares to make changes.
5. A confirmation popup asks, “Do you want to completely remove the selected application and all of its components?” Click OK to proceed with the uninstall.
6. Another progress window displays for a few seconds, then the Maintenance Complete window displays. Click Finish.
7. Close the Add or Remove Programs window. 8. To complete the full removal, the setup files will need to be deleted from the
file location you selected (usually C:\PROS).
January 2005 Prosthetics VistA Suite (GUI) 17 Installation Guide