project tracking and rollup - smartsheet tracking and rollup...sheet includes a pre-populated sheet...
TRANSCRIPT

1
The Project Tracking and Rollup template set is the quick and easy way to get a project up and running, and report on risks and milestone to stakeholders.
Template Set Getting Started Guide
Project Tracking and Rollup
©2018 - 2019. All Rights Reserved.Smartsheet Inc. Patents and Patents Pending.smartsheet.com
Last Updated: August 31, 2019

Get the Template SetClick the link below and the template set will be added to your Sheets folder, you can find it on the left side of the screen under Sheets.
Project Tracking and Rollup Template Set
What’s Included in the SetWith the Project Tracking and Rollup template set, you can accelerate work execution and run more effective projects.
Project Plan Sheet Track all of the tasks and deadlines for your project.
Project Rollup Dashboard A dashboard that summarizes key project details.
Project Milestones ReportTrack critical project milestones.
At Risk ReportA running log of at-risk tasks.
2
Project Tracking and RollupTemplate Set Getting Started Guide
Page
REQUIREMENTS: This template set is designed for Business and Enterprise Plan users. If you’re on a Team or Individual plan, you can still use template set, however, premium features, such as dashboards, Automated Actions, Activity Log etc. will not be available. Identify your plan and user type
REQUIREMENTS: This template set has been designed to utilize the full suite of functionality available in Smartsheet. Select plans do not have access to all premium features like Dashboards, Automated Actions, and Activity Log. If you are on a limited plan you can still use the template set however not all premium functionality will be available. Click here to see a list of discontinued plans.

3
Project Tracking and RollupTemplate Set Getting Started Guide
Page
Step 1: Create a New Workspace
Open Home. From the home menu, click the Create button in the upper right hand corner. From the drop-down menu, select Workspace. Name the workspace.
Step 2: Drag the Files into Workspace
Select the template set folder under your Sheets folder. Drag and drop the folder down to the workspace you just created.
Learn more:
Workspaces Overview, Workspace Sharing, Home Tab
Learn more:
Manage Items in a Workspace (Add, Move, Remove)
Using a workspace is a best practice when building a collaborative process. Workspaces allow you to centralize your work and control sharing with different stakeholders.
Set Up

Customize
4Page
Project Tracking and RollupTemplate Set Getting Started Guide
A
B
Step 3:Modify the Project Plan Sheet
Use the Project Plan sheet to track and maintain critical data about a project. Project sheets in Smartsheet have dependencies enabled and includes columns such as Duration, Predecessors, and % Complete. The project plan will automate your project timeline from the start date forward and will provide an estimated end date based on project tasks. It’s best to enable dependencies for projects with deadlines to ensure every milestone in your project is tracked and on time, and ultimately meet your deadline.
A. In the Task Name column, name the project phases in the parent (light gray) rows.
B. Use the indented grandchild (white) rows in your hierarchy, to enter tasks in the Task Name column.
C. Starting on row 3, enter dates in the Start Date and End Date columns.
D. The other data on your ancestor and parent rows, including Start Date, End Date, % Complete, and Duration are auto calculated by the tasks below the parent row.
E. Attach documents or links to webpages to the row in the Attachment (paperclip icon) column to keep all of your project information and resources in one place.
F. Track the progress of your project by viewing the interactive Gantt timeline to see which tasks are complete (green), which are late (red), which are in progress (blue), and which are on hold (orange). Conditional formatting rules apply formatting automatically to rows or cells based on the values they contain.
Learn more:
Project Management and Gantt Charts, Hierarchy: Indent or Outdent Rows, Date Column Type, Parent Rollup Functionality, Upload an Attachment, Symbols Column Type (i.e. Status symbols, Decision symbols, etc.), Using Column Symbols, Apply Formatting Automatically with Conditional Formatting Rules
F
D
E
C

5Page
Project Tracking and RollupTemplate Set Getting Started Guide
Step 4:Adjust Durations & Predecessors
Learn more:
Contact List Column, Manage Contacts in the My Smartsheet Contacts List
“Duration” and “Predecessor” are two unique column types that exist in project sheets.
A. Set the duration of each task in the “Duration” column.
B. Set predecessors, or relationships between tasks, in the “Predecessors” column.
Step 5:Assign Tasks to Team Members
Assign tasks to individuals by adding their email addresses in the Assigned To column. A contact includes both the name and email address, which drives delivery of automated actions, alerts, reports, and more.
A. Add contacts in the Assigned To column by individually creating a new contact, or adding an existing contact from your Contact List.
Learn more:
Project Sheet Columns: Start Date, End Date, Duration, % Complete and Predecessors
A B

6Page
Project Tracking and RollupTemplate Set Getting Started Guide
Step 6:Adjust Alert
A. To edit the alert workflow, click on Automation and select Manage Workflows in the dropdown menu.
B. Then double-click on the workflow itself in order to edit the criteria.
An automatic alert workflow is a great way to let your team know they have new tasks to fulfill as soon as they are assigned. An alert has been set on the project sheets to notify anyone shared to the sheet right away when a new task has been assigned to them.
Learn more:
Save Time and Work Faster With Automated Workflows
A
B

7Page
Project Tracking and Rollup Template Set Getting Started Guide
Step 7:Recurring Reminder
A. Modify the reminder by going to Automation and selecting Manage Workflows in the dropdown menu. Then double-click on the workflow to open the editor window.
B. To customize the workflow’s schedule (trigger box), click on the dropdown that begins with Every day starting on and select Run once to trigger on a single date, or choose Custom to edit the recurrence schedule.
C. Customize the workflow conditions (condition boxes) to add criteria and then click Save.
An automated recurring reminder is a great way to save time and keep track of deadlines. The Recurring Incomplete Task alert will notify the contact listed in the Assigned To column every day when the End Date is in the next 3 days and where the current Status is On Hold, Not Started, or In Progress. Note if you set up recurring reminders for other people, be thoughtful about how often you send the alert.
Learn more:
Alerts & Reminders
A
A
B
C

8
Project Tracking and Rollup Template Set Getting Started Guide
Page
Step 8: Sheet Bonus: View or Edit Your Project Summary Data
For those with a Business or Enterprise plan, this template set utilizes the sheet summary feature. The Project Plan sheet includes a pre-populated sheet summary that provides a standard, robust way to organize and report on project information in your sheet. Here you can see a quick recap of the status of tasks and the count of those at risk. Open the sheet summary on the right panel to view or edit your project summary fields. You can use formulas and reference another summary fields.
A. Click the sheet summary icon to expand the sheet summary. You can expand and collapse the right panel to stay in the context of your sheet or maximize your sheet real estate when you don’t need to view it.
B. To add fields, click +New Field.
C. Name your field and select the field type: Text/Number, Contact list, Date, Dropdown list, Checkbox, or Symbols.
D. To edit the field properties, hover over the right side of the field and click on the vertical ellipsis (⋮) to open the field options dropdown menu.
Learn more:
Define Your Work with Sheet Summary, Maximize Your Sheet Summary Usage, Create a Portfolio View with a Summary Report
B
A

9Page
Project Tracking and RollupTemplate Set Getting Started Guide
Learn more:
Reports
Step 9:Update Status and Filters
A. Click on the Filter button and select Tasks Assigned to Me to see tasks assigned to the current user viewing the sheet. You can also select any of the other filter options to perform other tasks.
B. Select the Filter Off button in the toolbar to create, use, or modify filters.
Step 10:View the Project Milestone Report
The Project Milestones Report tracks all the critical project milestones by displaying any rows where the duration is equal to 0 (the definition of a milestone), and the Task Name is not blank. The information in this report also appears on the Project Rollup Dashboard.
After the task has been assigned, the task owner can update the status by selecting an option from a custom dropdown list in the Status column. If there are multiple owners, filters are an ideal way to help people cut through the noise. On the Project Plan sheet, we created a shared filter called Tasks Assigned to Me. Anyone viewing the sheet can select that filter and see only their assigned items.
Learn more:
Dropdown List, Filters, Shared Filter
A
B

10Page
Project Tracking and RollupTemplate Set Getting Started Guide
Step 11:Use the At Risk Report A task is automatically flagged as At Risk if the status is not Complete and the End Date is in the past. This report surfaces all at-risk tasks in one view, and also displays them on the Project Tracking and Rollup dashboard.
Learn more:
Reports
Step 12:Use the Unique Formulas
The At Risk column on the project plan leverages a formula to automatically flag Tasks that have an End Date in the past and do not have a status of Complete. The formula looks like this:
=IF(AND([End Date]3 < TODAY(), NOT(Status3 = "Complete")), 1, 0)
The logic states that if the End Date is less than today (in the past) and status is not Complete then 1 (flag the row as at risk). If these statements are not true, then 0 (do nothing), and don’t flag the row as at risk.
Learn more:
Formulas and Functions
Customize
9Page
Project Tracking and RollupTemplate Set Getting Started Guide
CB
A
Learn more:
Make Changes to an Existing Dashboard, Viewing and Sharing a Dashboard, Widget Types for Smartsheet Dashboards
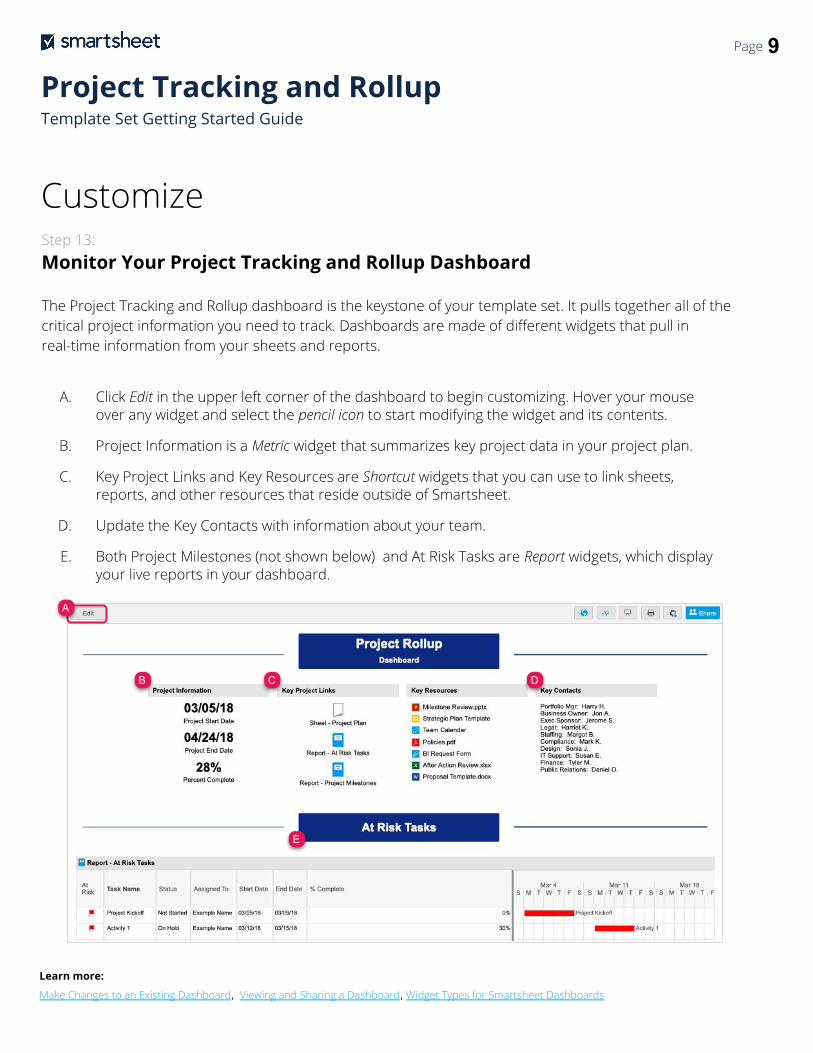
Step 13:Monitor Your Project Tracking and Rollup Dashboard
The Project Tracking and Rollup dashboard is the keystone of your template set. It pulls together all of the critical project information you need to track. Dashboards are made of different widgets that pull in real-time information from your sheets and reports.
A. Click Edit in the upper left corner of the dashboard to begin customizing. Hover your mouse over any widget and select the pencil icon to start modifying the widget and its contents.
B. Project Information is a Metric widget that summarizes key project data in your project plan.
C. Key Project Links and Key Resources are Shortcut widgets that you can use to link sheets, reports, and other resources that reside outside of Smartsheet.
D. Update the Key Contacts with information about your team.
E. Both Project Milestones (not shown below) and At Risk Tasks are Report widgets, which display your live reports in your dashboard.
D
E

12Page
Project Tracking and RollupTemplate Set Getting Started Guide
Step 14:Share Your Project Tracking and Rollup Template Set
Learn more:
Workspace Sharing
Sharing is the best way to collaborate with others involved in your projects. You can share your entire workspace with members of your department, or share individual items within the workspace. For more information on sharing and permission levels, check out this infographic.
FEEDBACK: Let us know what you think of the Project Tracking and Rollup template set! Share your feedback here.