project : maintenance and instrumentation of a renewable energy platform bimantara adi withaka tutor...
TRANSCRIPT

PROJECT : MAINTENANCE AND INSTRUMENTATION OF A RENEWABLE ENERGY PLATFORM
BIMANTARA ADI WITHAKATUTOR : MATTHIEU PUIGTGIM DEPARTMENTIUT LITTORAL COTE D’OPALE2015
TABLE OF CONTENT
• Project Description
• Renewable Energy platform
• Problems
• Objectives
• Server Preparation
• Installation of a Virtual Server using phpMySQL
• PHP File Programming
• Arduino Programming
• Serial Communication
• Data Collecting
• Data parsing
• TCP/IP Communication
• Future Development
•Conclusion

INTRODUCTION
• Every years GIM Department gives to its students a challenge to developt a simple project.
• There is an Energy platform in GIM Department which is developed continuesly by their students every year.
• Last year, some students of Licence PRIME along with some students of EILCO installed an arduino in the platform in order to acquire temperatures data which were stored in a cloud server.
Project Description
Server Preparation
Arduino Programming
Future Development
Conclusion
Introduction
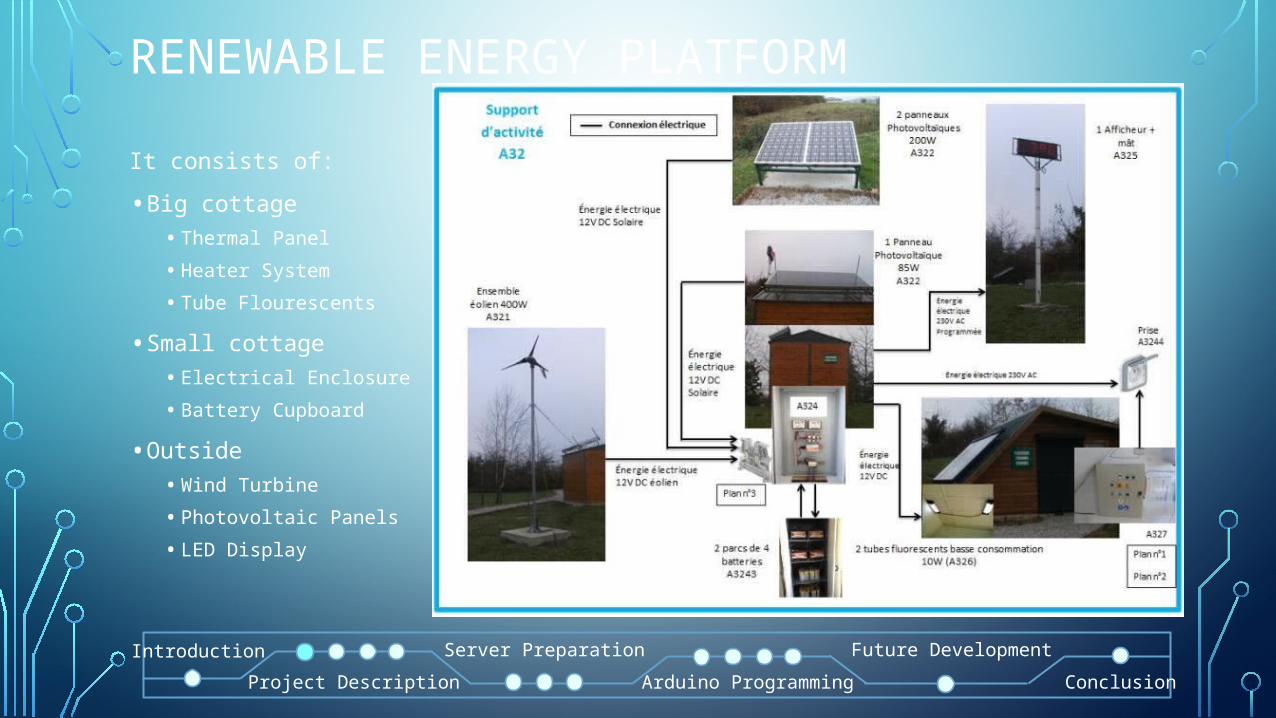
RENEWABLE ENERGY PLATFORM
It consists of:
• Big cottage
• Thermal Panel
• Heater System
• Tube Flourescents
• Small cottage
• Electrical Enclosure
• Battery Cupboard
• Outside
• Wind Turbine
• Photovoltaic Panels
• LED Display
Project Description
Server Preparation
Arduino Programming
Future Development
Conclusion
Introduction
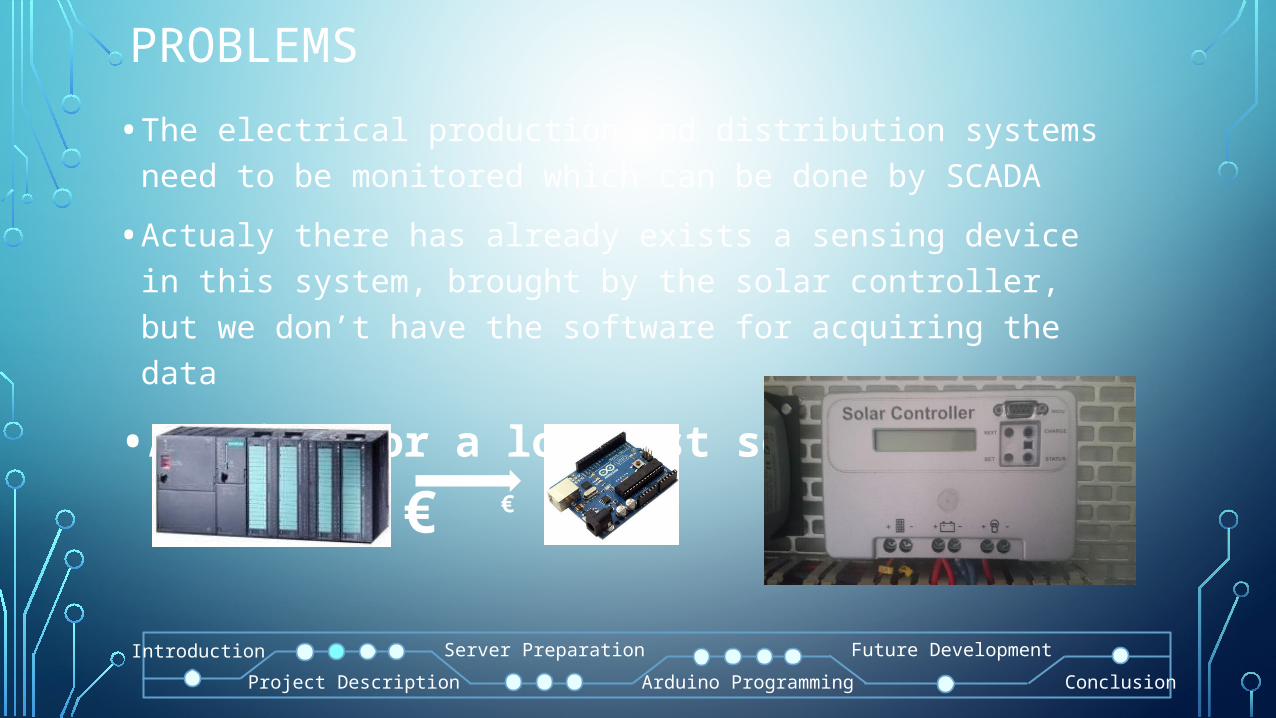
PROBLEMS
• The electrical production and distribution systems need to be monitored which can be done by SCADA
• Actualy there has already exists a sensing device in this system, brought by the solar controller, but we don’t have the software for acquiring the data
•Arduino for a low cost solution
Project Description
Server Preparation
Arduino Programming
Future Development
Conclusion
Introduction
€ €
OBJECTIVES
“Developing a SCADA system with Arduino to collect electrical production and usage data then send and store its in the server's database”
Project Description
Server Preparation
Arduino Programming
Future Development
Conclusion
Introduction

VIRTUAL SERVER + MY SQL
Because the server in IUT use a virtual machine, so we also use a virtual machine with Debian « Crunchbang » Operating Systems for our server database.
MySQL Preparation:
• Create a user
• Create a database
• Create a table
Project Description
Server Preparation
Arduino Programming
Future Development
Conclusion
Introduction

PHP FILE
• Data Form
<html><head></head><body><form action="insertform.php" method="get">Sensor1= <input type="text" name="sensor1"><br />Sensor2= <input type="text" name="sensor2"><br />Sensor3= <input type="text" name="sensor3"><br />Sensor4= <input type="text" name="sensor4"><br />Sensor5= <input type="text" name="sensor5"><br />Sensor6= <input type="text" name="sensor6"><br />Sensor7= <input type="text" name="sensor7"><br /><input type="submit" name="submit"></form>
<?phpif (isset($_GET['submit'])){$con = mysql_connect ("localhost","arduino","123456");if (!$con){die("Error: ".mysql_error());}mysql_select_db("arduinotest",$con);
$sql = "INSERT INTO $base (sensor1,sensor2,sensor3,sensor4,sensor5,sensor6,sensor7) VALUES('$_GET[sensor1]','$_GET[sensor2]','$_GET[sensor3]','$_GET[sensor4]','$_GET[sensor5]','$_GET[sensor6]','$_GET[sensor7]')";
mysql_query($sql,$con);}?></body></html>
Project Description
Server Preparation
Arduino Programming
Future Development
Conclusion
Introduction

PHP FILE
• Data Form
• To show the data
Project Description
Server Preparation
Arduino Programming
Future Development
Conclusion
Introduction
<html><head></head><body><?php
// Déclaration des variables //$host = 'localhost';$user = 'arduino';$password = 'iutgim2014';$dbase = 'arduinotest';$base = 'test2';// Fin de déclaration //
$con = mysql_connect ($host,$user,$password);if (!$con){die("Error: ".mysql_error());}
mysql_select_db($dbase,$con);
$sql = "SELECT * FROM $base";$myData = mysql_query ($sql,$con);
echo "<table border=2> <tr><th>Temps</th><th>Tension actuelle</th><th>Courant actuel</th><th>Temperature actuelle</th><th>Tension minimale</th><th>Tension maximale</th><th>Courant minimum</th><th>Courant maximum</th></tr>";
while ($record = mysql_fetch_array($myData)){echo "<tr>";echo "<td>".$record['temps']."</td>";echo "<td>".$record['sensor1']."</td>";echo "<td>".$record['sensor2']."</td>";echo "<td>".$record['sensor3']."</td>";echo "<td>".$record['sensor4']."</td>";echo "<td>".$record['sensor5']."</td>";echo "<td>".$record['sensor6']."</td>";echo "<td>".$record['sensor7']."</td>";}echo "</table>";?></body></html>

ARDUINO CONFIGURATION
• Arduino Configuration:
• Ethernet Shield + Module PoE
• RS232 Shield
• Use Software Serial library in order to make two serial communications between RS232 – Arduino – Ethernet.
Project Description
Server Preparation
Arduino Programming
Future Development
Conclusion
Introduction

SERIAL COMMUNICATION
• RS232 Protocol :
• Baudrate: 1200; Parity: no; Databits: 8; Stopbits: 1
• To retrieve the data the PC must send F<CRLF>
• Response of the SCD: In this sequence the data will be returned as ASCII signs.
• R: current voltage; current power; current temperature; minimum voltage; maximum voltage; minimum power; maximum power; CRLF
• R:12,85;13,0; 9;11,60;21,94; 8,9;15,8;
Project Description
Server Preparation
Arduino Programming
Future Development
Conclusion
Introduction
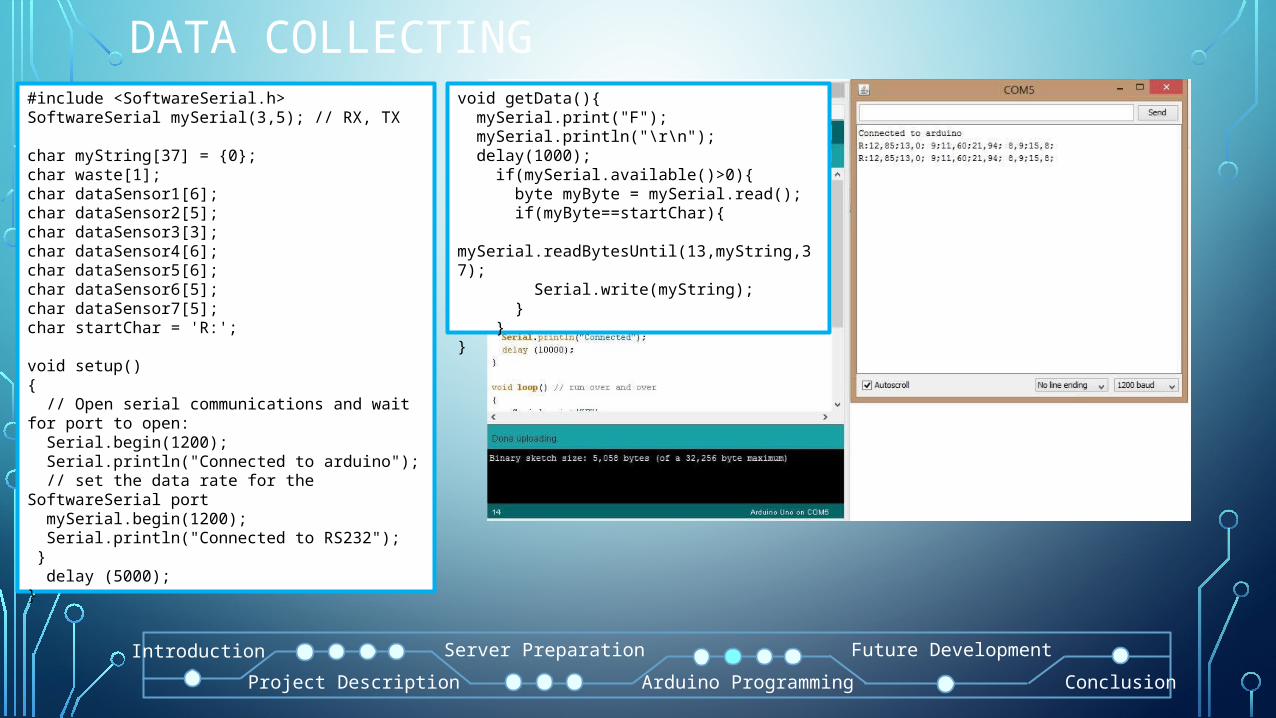
DATA COLLECTING
Project Description
Server Preparation
Arduino Programming
Future Development
Conclusion
Introduction
#include <SoftwareSerial.h>SoftwareSerial mySerial(3,5); // RX, TX
char myString[37] = {0};char waste[1];char dataSensor1[6];char dataSensor2[5];char dataSensor3[3];char dataSensor4[6];char dataSensor5[6];char dataSensor6[5];char dataSensor7[5];char startChar = 'R:';
void setup() { // Open serial communications and wait for port to open: Serial.begin(1200); Serial.println("Connected to arduino"); // set the data rate for the SoftwareSerial port mySerial.begin(1200); Serial.println("Connected to RS232"); } delay (5000);}
void getData(){ mySerial.print("F"); mySerial.println("\r\n"); delay(1000); if(mySerial.available()>0){ byte myByte = mySerial.read(); if(myByte==startChar){ mySerial.readBytesUntil(13,myString,37); Serial.write(myString); } } }

DATA PARSING
Project Description
Server Preparation
Arduino Programming
Future Development
Conclusion
Introduction
void parseData(){char *strtokIndx;strtokIndx = strtok(myString,";"); // get the first part - the stringstrcpy(dataSensor1, strtokIndx); // copy it to dataSensor1 strtokIndx = strtok(NULL, ";"); strcpy(dataSensor2, strtokIndx); strtokIndx = strtok(NULL, ";"); strcpy(dataSensor3, strtokIndx); strtokIndx = strtok(NULL, ";"); strcpy(dataSensor4, strtokIndx); strtokIndx = strtok(NULL, ";"); strcpy(dataSensor5, strtokIndx); strtokIndx = strtok(NULL, ";"); strcpy(dataSensor6, strtokIndx); strtokIndx = strtok(NULL, ";"); strcpy(dataSensor7, strtokIndx);}
void showParsedData(){ Serial.print("Sensor1: "); Serial.write(dataSensor1); Serial.println(); Serial.print("Sensor2: "); Serial.write(dataSensor2); Serial.println(); Serial.print("Sensor3: "); Serial.write(dataSensor3); Serial.println(); Serial.print("Sensor4: "); Serial.write(dataSensor4); Serial.println(); Serial.print("Sensor5: "); Serial.write(dataSensor5); Serial.println(); Serial.print("Sensor6: "); Serial.write(dataSensor6); Serial.println(); Serial.print("Sensor7: "); Serial.write(dataSensor7); Serial.println();}

TCP/IP COMMUNICATION
Project Description
Server Preparation
Arduino Programming
Future Development
Conclusion
Introduction
#include <Ethernet.h>#include <SPI.h>#include <Client.h>
byte mac[] = { 0x90, 0xA2, 0xDA, 0x0D, 0x34, 0x09 }; // RESERVED MAC ADDRESSIPAddress ip(192,168,1,249);char serverName[] = "192.168.1.250";EthernetClient client;
void setup() { if (Ethernet.begin(mac)==0){ Serial.println("Failed connect ethernet"); Ethernet.begin(mac,ip); } else { Serial.println("conected to server"); } delay (5000);}
void sendData(){ if (client.connect("192.168.1.250",80)) { client.print("GET /projet/insertform2.php?"); client.print("sensor1="); client.print(dataSensor1); client.print("&sensor2="); client.print(dataSensor2); client.print("&sensor3="); client.print(dataSensor3); client.print("&sensor4="); client.print(dataSensor4); client.print("&sensor5="); client.print(dataSensor5); client.print("&sensor6="); client.print(dataSensor6); client.print("&sensor7="); client.print(dataSensor7); client.print("&submit=Soumettre+la+requ%EAte");client.println( " HTTP/1.1"); client.println("Host: 192.168.1.250"); client.println("Content-Type: application/x-www-form-urlencoded"); client.println(); client.println( "Connection: close" );client.stop();}
else { Serial.println("--> connection failed/n"); } if (client.connected()) { client.stop();}

FUTURE DEVELOPMENT
• Resolving the problem due to data transfer failure or problem with more viable code.
• Supervising datas in the server database (In progress with EILCO Students)
• Install several relay as a control switch, which is connected with arduino to manage batteries charging and usage
• Using SCADA with weather information to perform a study of photovoltaic panels and wind turbine performance, later can be use to plan a maintenance.
Project Description
Server Preparation
Arduino Programming
Future Development
Conclusion
Introduction
CONCLUSION
• Arduino can become a low price device for monitoring and controlling an electrical installation
• Arduino has an ability to do several communication with various devices
• Serial Communication via RS232 with solar controller to acquire data.
• TCP/IP Communication via Ethernet + Module PoE to send data to the server database.
Project Description
Server Preparation
Arduino Programming
Future Development
Conclusion
Introduction

THANKS FOR YOUR ATTENTIONHAPPY PROGRAMMING!
HAPPY ARDUINO DAY