program administrator manual - acc telecom · strata cix program administrator manual 12/04 iii...
TRANSCRIPT

TOSHIBA Digital Solutions Division
December 2004
Early Adopter Document
Program Administrator Manual

Publication InformationToshiba America Information Systems, Inc., Digital Solutioins Division, reserves the right, without prior notice, to revise this information publication for any reason, including, but not limited to, utilization of new advances in the state of technical arts or to simply change the design of this document.
Further, Toshiba America Information Systems, Inc., Digital Solutions Division, also reserves the right, without prior notice, to make such changes in equipment design or components as engineering or manufacturing methods may warrant.
CIX-AM-PRGRM-VA
Version A, December 2004
© Copyright 2004Toshiba America Information Systems, Inc. Digital Solutions DivisionAll rights reserved. No part of this manual, covered by the copyrights hereon, may be reproduced in any form or by any means—graphic, electronic, or mechanical, including recording, taping, photocopying, or information retrieval systems—without express written permission of the publisher of this material.
Strata is a registered trademark of Toshiba Corporation. Stratagy is a registered trademark of Toshiba America Information Systems, Inc. Strata AirLink is a trademark of Toshiba America Information Systems, Inc.
Trademarks, registered trademarks, and service marks are the property of their respective owners.
TOSHIBA AMERICA INFORMATION SYSTEMS, INC. (“TAIS”)Digital Solutions Division License Agreement
IMPORTANT: THIS LICENSE AGREEMENT (“AGREEMENT”) IS A LEGAL AGREEMENT BETWEEN YOU (“YOU”) AND TAIS. CAREFULLY READ THIS LICENSE AGREEMENT. USE OF ANY SOFTWARE OR ANY RELATED INFORMATION (COLLECTIVELY, “SOFTWARE”) INSTALLED ON OR SHIPPED WITH A TAIS DIGITAL SOLUTIONS PRODUCT OR OTHERWISE MADE AVAILABLE TO YOU BY TAIS IN WHATEVER FORM OR MEDIA, WILL CONSTITUTE YOUR ACCEPTANCE OF THESE TERMS, UNLESS SEPARATE TERMS ARE PROVIDED BY THE SOFTWARE SUPPLIER. IF YOU DO NOT AGREE WITH THE TERMS OF THIS LICENSE AGREEMENT, DO NOT INSTALL, COPY OR USE THE SOFTWARE AND PROMPTLY RETURN IT TO THE LOCATION FROM WHICH YOU OBTAINED IT IN ACCORDANCE WITH APPLICABLE RETURN POLICIES. EXCEPT AS OTHERWISE AUTHORIZED IN WRITING BY TAIS, THIS SOFTWARE IS LICENSED FOR DISTRIBUTION ONLY TO END-USERS PURSUANT TO THIS LICENSE AGREEMENT.
1. License Grant. The Software is not sold; it is licensed upon payment of applicable charges. TAIS grants to you a personal, non-transferable and non-exclusive right to use the copy of the Software provided under this License Agreement. You agree you will not copy the Software except as necessary to use it on one TAIS system at a time at one location. Modifying, translating, renting, copying, distributing, transferring or assigning all or part of the Software, or any rights granted hereunder, to any other persons and removing any proprietary notices, labels or marks from the Software is strictly prohibited; You agree violation of such restrictions will cause irreparable harm to TAIS and provide grounds for injunctive relief, without notice, against You or any other person in possession of the Software. You and any other person whose possession of the software violates this License Agreement shall promptly surrender possession of the Software to TAIS, upon demand. Furthermore, you hereby agree not to create derivative works based on the Software. TAIS reserves the right to terminate this license and to immediately repossess the software in the event that You or any other person violates this License Agreement.
2. Intellectual Property. You acknowledge that no title to the intellectual property in the Software is transferred to you. You further acknowledge that title and full ownership rights to the Software will remain the exclusive property of TAIS and/or its suppliers, and you will not acquire any rights to the Software, except the license expressly set forth above. You will not remove or change any proprietary notices contained in or on the Software. The Software is protected under US patent, copyright, trade secret, and/or other proprietary laws, as well as international treaties. Any transfer, use, or copying of the software in violation of the License Agreement constitutes copyright infringement. You are hereby on notice that any transfer, use, or copying of the Software in violation of this License Agreement constitutes a willful infringement of copyright.
3. No Reverse Engineering. You agree that you will not attempt, and if you employ employees or engage contractors, you will use your best efforts to prevent your employees and contractors from attempting to reverse compile, reverse engineer, modify, translate or disassemble the Software in whole or in part. Any failure to comply with the above or any other terms and conditions contained herein will result in the automatic termination of this license and the reversion of the rights granted hereunder back to TAIS.
4. Limited Warranty. THE SOFTWARE IS PROVIDED “AS IS” WITHOUT WARRANTY OF ANY KIND. TO THE MAXIMUM EXTENT PERMITTED BY APPLICABLE LAW, TAIS AND ITS SUPPLIERS DISCLAIM ALL WARRANTIES WITH REGARD TO THE SOFTWARE, EITHER EXPRESS OR IMPLIED, INCLUDING, BUT NOT LIMITED TO, THE WARRANTY OF NON-INFRINGEMENT OF THIRD PARTY RIGHTS, THE WARRANTY OF YEAR 2000 COMPLIANCE, AND THE IMPLIED WARRANTIES OF MERCHANTABILITY AND FITNESS FOR A PARTICULAR PURPOSE. THE ENTIRE RISK AS TO THE QUALITY AND PERFORMANCE OF THE SOFTWARE IS WITH YOU. NEITHER TAIS NOR ITS SUPPLIERS WARRANT THAT THE FUNCTIONS CONTAINED IN THE SOFTWARE WILL MEET YOUR REQUIREMENTS OR THAT THE OPERATION OF THE SOFTWARE WILL BE UNINTERRUPTED OR ERROR-FREE. HOWEVER, TAIS WARRANTS THAT ANY MEDIA ON WHICH THE SOFTWARE IS FURNISHED IS FREE FROM DEFECTS IN MATERIAL AND WORKMANSHIP UNDER NORMAL USE FOR A PERIOD OF NINETY (90) DAYS FROM THE DATE OF DELIVERY TO YOU.
5. Limitation Of Liability. TAIS’ ENTIRE LIABILITY AND YOUR SOLE AND EXCLUSIVE REMEDY UNDER THIS LICENSE AGREEMENT SHALL BE AT TAIS’ OPTION REPLACEMENT OF THE MEDIA OR REFUND OF THE PRICE PAID. TO THE MAXIMUM EXTENT PERMITTED BY APPLICABLE LAW, IN NO EVENT SHALL TAIS OR ITS SUPPLIERS BE LIABLE TO YOU FOR ANY CONSEQUENTIAL, SPECIAL, INCIDENTAL OR INDIRECT DAMAGES FOR PERSONAL INJURY, LOSS OF BUSINESS PROFITS, BUSINESS INTERRUPTION, LOSS OF BUSINESS INFORMATION/DATA, OR ANY OTHER PECUNIARY LOSS OF ANY KIND ARISING OUT OF THE USE OR INABILITY TO USE THE SOFTWARE, EVEN IF TAIS OR ITS SUPPLIER HAS BEEN ADVISED OF THE POSSIBILITY OF SUCH DAMAGES. IN NO EVENT SHALL TAIS OR ITS SUPPLIERS BE LIABLE FOR ANY CLAIM BY A THIRD PARTY.
6. State/Jurisdiction Laws. SOME STATES/JURISDICTIONS DO NOT ALLOW THE EXCLUSION OF IMPLIED WARRANTIES OR LIMITATIONS ON HOW LONG AN IMPLIED WARRANTY MAY LAST, OR THE EXCLUSION OR LIMITATION OF INCIDENTAL OR CONSEQUENTIAL DAMAGES, SO SUCH LIMITATIONS OR EXCLUSIONS MAY NOT APPLY TO YOU. THIS LIMITED WARRANTY GIVES YOU SPECIFIC RIGHTS AND YOU MAY ALSO HAVE OTHER RIGHTS WHICH VARY FROM STATE/JURISDICTION TO STATE/JURISDICTION.
7. Export Laws. This License Agreement involves products and/or technical data that may be controlled under the United States Export Administration Regulations and may be subject to the approval of the United States Department of Commerce prior to export. Any export, directly or indirectly, in contravention of the United States Export Administration Regulations, or any other applicable law, regulation or order, is prohibited.
8. Governing Law. This License Agreement will be governed by the laws of the State of California, United States of America, excluding its conflict of law provisions.
9. United States Government Restricted Rights. The Software is provided with Restricted Rights. Use, duplication, or disclosure by the United States Government, its agencies and/or instrumentalities is subject to restrictions as set forth in subparagraph (c)(1)(ii) of The Rights in Technical Data and Computer Software Clause at DFARS 252.227-7013 (October 1988) or subparagraphs (c)(1) and (2) of the Commercial Computer Software - Restricted Rights at 48 CFR 52.227-19, as applicable.
10. Severability. If any provision of this License Agreement shall be held to be invalid, illegal or unenforceable, the validity, legality and enforceability of the remaining provisions hereof shall not in any way be affected or impaired.
11. No Waiver. No waiver of any breach of any provision of this License Agreement shall constitute a waiver of any prior, concurrent or subsequent breach of the same or any other provisions hereof, and no waiver shall be effective unless made in writing and signed by an authorized representative of the waiving party.
YOU ACKNOWLEDGE THAT YOU HAVE READ THIS LICENSE AGREEMENT AND THAT YOU UNDERSTAND ITS PROVISIONS. YOU AGREE TO BE BOUND BY ITS TERMS AND CONDITIONS. YOU FURTHER AGREE THAT THIS LICENSE AGREEMENT CONTAINS THE COMPLETE AND EXCLUSIVE AGREEMENT BETWEEN YOU AND TAIS AND SUPERSEDES ANY PROPOSAL OR PRIOR AGREEMENT, ORAL OR WRITTEN, OR ANY OTHER COMMUNICATION RELATING TO THE SUBJECT MATTER OF THIS LICENSE AGREEMENT.
Toshiba America Information Systems, Inc.Digital Solutions Division9740 Irvine BoulevardIrvine, California 92618-1697 United States of America
DSD 0602045932


Contents
Introduction
Organization........................................................................................................................................... iiiConventions............................................................................................................................................ iiiRelated Documents/Media ..................................................................................................................... iv
Chapter 1 – My Phone Manager
My Phone Manager Server PC Hardware/Software Requirements .....................................................1-1Minimum Hardware Platform .......................................................................................................1-1Minimum Software Platform.........................................................................................................1-2
System Configuration...........................................................................................................................1-2Installation............................................................................................................................................1-3User Levels...........................................................................................................................................1-3Configure My Phone Manager.............................................................................................................1-3
Step 1: Configure Users................................................................................................................1-3Step 2: Log In as Administrator ...................................................................................................1-4Step 3: Change Administrator Password ......................................................................................1-4Step 4: Equipment Setup ..............................................................................................................1-4
Run My Phone Manager ......................................................................................................................1-6My Phone Manager Main Screen.........................................................................................................1-7Program Menu......................................................................................................................................1-7
Voice Mail Settings .......................................................................................................................1-8FeatureFlex ....................................................................................................................................1-8Telephone System..........................................................................................................................1-8Super1 Options ..............................................................................................................................1-9
About....................................................................................................................................................1-9Log Out ................................................................................................................................................1-9
Chapter 2 – FeatureFlex
Set up FeatureFlex................................................................................................................................2-1Step 1: Configure Stratagy ES System.........................................................................................2-1Step 2: License Requirement........................................................................................................2-1Step 3: Program Strata CIX for Adaptability ...............................................................................2-1
Access FeatureFlex ..............................................................................................................................2-2Sorting the Screen..........................................................................................................................2-2
Add FeatureFlex Application to Phone................................................................................................2-3Delete FeatureFlex Application from Phone........................................................................................2-3Edit FeatureFlex Application ...............................................................................................................2-4Remove FeatureFlex Application ........................................................................................................2-4
Strata CTX Program Administrator Manual 12/04 i

ContentsChapter 2 – FeatureFlex
ii
Strata CTX Program Administrator Manual 12/04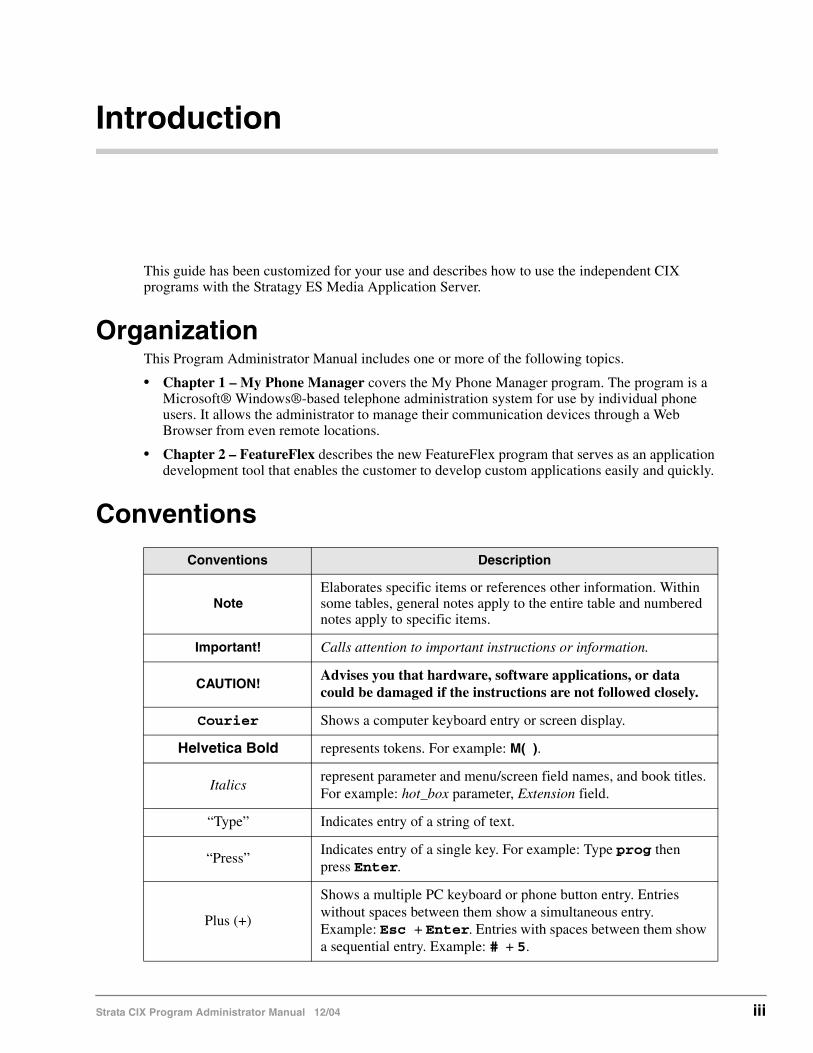
Introduction
This guide has been customized for your use and describes how to use the independent CIX programs with the Stratagy ES Media Application Server.
OrganizationThis Program Administrator Manual includes one or more of the following topics.
• Chapter 1 – My Phone Manager covers the My Phone Manager program. The program is a Microsoft® Windows®-based telephone administration system for use by individual phone users. It allows the administrator to manage their communication devices through a Web Browser from even remote locations.
• Chapter 2 – FeatureFlex describes the new FeatureFlex program that serves as an application development tool that enables the customer to develop custom applications easily and quickly.
Conventions
Conventions Description
NoteElaborates specific items or references other information. Within some tables, general notes apply to the entire table and numbered notes apply to specific items.
Important! Calls attention to important instructions or information.
CAUTION!Advises you that hardware, software applications, or data could be damaged if the instructions are not followed closely.
Courier Shows a computer keyboard entry or screen display.
Helvetica Bold represents tokens. For example: M( ).
Italicsrepresent parameter and menu/screen field names, and book titles. For example: hot_box parameter, Extension field.
“Type” Indicates entry of a string of text.
“Press”Indicates entry of a single key. For example: Type prog then press Enter.
Plus (+)
Shows a multiple PC keyboard or phone button entry. Entries without spaces between them show a simultaneous entry. Example: Esc + Enter. Entries with spaces between them show a sequential entry. Example: # + 5.
Strata CIX Program Administrator Manual 12/04 iii
iv
Related Documents/MediaNote Some documents listed here may appear in different versions on the CD-ROM, FYI, or in
print. To find the most current version, check the version/date in the Publication Information on the back of the document’s title page.
You can find additional detailed information about Stratagy in the following companion documents:
• Strata CIX/CTX General Description
• Strata CIX/CTX Installation and Maintenance Manual
• Strata CIX/CTX Programming Manual (Vol. 1)
• Strata CIX Programming Manual (Vol. 2) Stratagy ES Voice Mail Application
• Strata CIX Library CD-ROM
For authorized users, Internet site FYI (http://fyi.tsd.toshiba.com) contains all current Stratagy ES documentation and enables you to view, print, and download current publications.
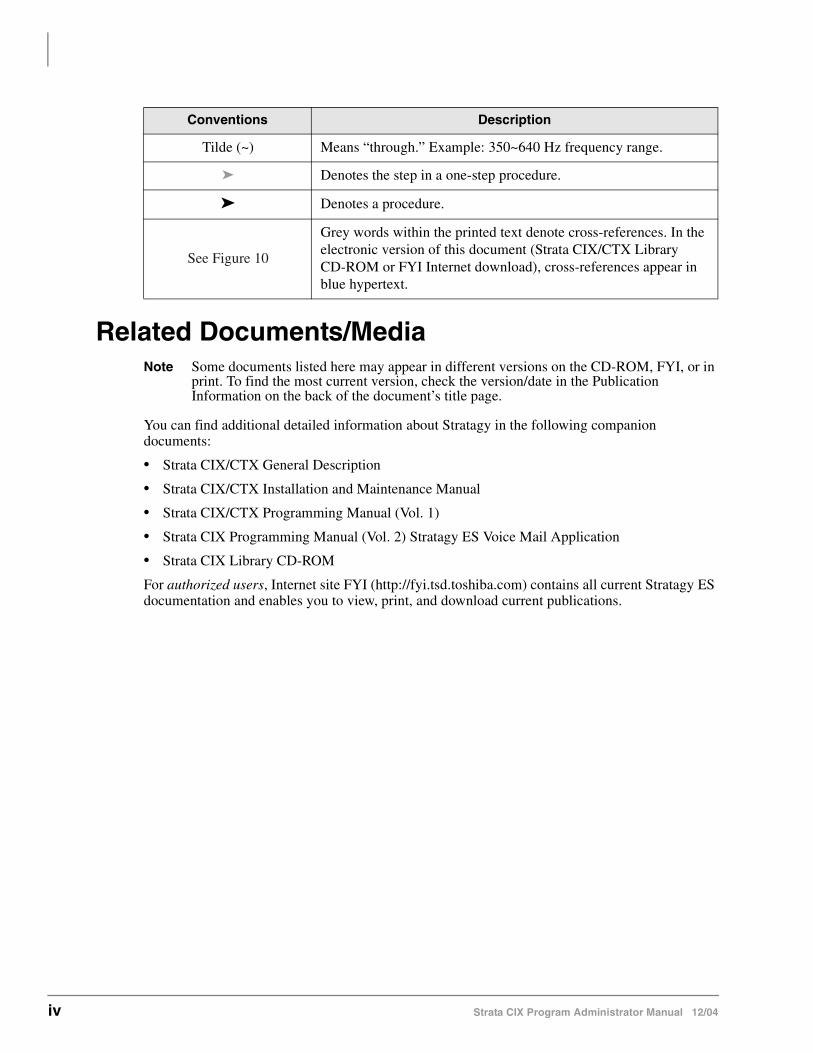
Tilde (~) Means “through.” Example: 350~640 Hz frequency range.
➤ Denotes the step in a one-step procedure.
➤ Denotes a procedure.
See Figure 10
Grey words within the printed text denote cross-references. In the electronic version of this document (Strata CIX/CTX Library CD-ROM or FYI Internet download), cross-references appear in blue hypertext.
Conventions Description
Strata CIX Program Administrator Manual 12/04

My Phone Manager 1
This chapter serves as a companion document to the My Phone Manager User Guide. It is written for the Administrator who will be installing, configuring and administering the program. All feature descriptions and how to use the features are in the user guide.
My Phone Manager is a Microsoft® Windows®-based telephone administration system for use by individual phone users. It allows the administrator to manage their communication devices through a Web Browser from even remote locations.
The Client PC must have network connection and Microsoft® Internet Explorer 5.5 or above. The user connects to My Phone Manager with the browser in the same manner as connecting to any Website.
Note At this time My Phone Manager only supports Windows IE. Other browsers are not supported.
The number of concurrent users who can use the program depends on the server platform on which the program is installed. Windows 2000 Professional and Windows XP Professional are limited to 10 connections per server—MAS or PC. The Windows 2000/2003 server can have up to 256 simultaneous users.
Note For a complete wording of the Microsoft License Agreement, see the End-User License Agreement (EULA) document in the Windows program. To view the EULA document, click Start > Run. In the pop-up box, type EULA.txt and click OK.
When the maximum number of users are logged on to the program, the next user who attempts to log on will see the message “Error Message: HTTP 403.9 – Access Forbidden: Too many users are connected.”
My Phone Manager is a service provided for the following users:
• Telephone users both in the office and/or from a remote location who can use the Web Browser and Internet connection to customize settings for his/her phone and voice mailbox, including setting Call Forward and Do Not Disturb.
• Supervisor who has access clearance to configuring features such as System Speed Dial, Advisory Message and Account Codes.
My Phone Manager Server PC Hardware/Software Requirements
Minimum Hardware Platform• Intel® Pentium 400 MHz or faster
• 512MB RAM
• 1.6GB free space on the hard disk
• SVGA card and monitor
• CD-ROM drive
Strata CIX Program Administrator Manual 12/04 1-1

My Phone ManagerSystem Configuration
1-2
• Network Interface Card (NIC) connects to URL
Minimum Software Platform• Windows® 2000 Pro/XP Pro/2003
Note XP home edition is not supported.
• Internet Explorer version 5.5 or higher
System ConfigurationThere are two basic hardware configurations for My Phone Manager (see Figure 1 below). Configuration 1 has My Phone Manager software installed on the MAS with Client PCs able to access it over the Internet. Configuration 2 has a PC server on the network that has My Phone Manager software installed on it.
Figure 1 My Phone Manager System Configurations
Client PC
VPN/Internet
Strata CIX
MAS
Client PC Client PC
(with eManager and My Phone Manager)
Client PC
VPN/Internet
Strata CIXMAS
Client PC Client PC
(with eManager)
My Phone ManagerServer
7663
Configuration 1
Configuration 2
Strata CIX Program Administrator Manual 12/04

My Phone ManagerInstallation
InstallationNote You need to uninstall any existing My Phone Manager software before starting this
procedure.
1. Insert the CD-ROM into the CD-ROM drive. The Installation screen displays.
2. Click Install My Phone Manager and the installation begins.
3. Follow the installation instructions on the screen.
4. Click Finish when the installation is complete. The system reboots.
Notes
• The installer automatically creates the Default Web Site virtual directory “MyPhoneManager.”
• The installer automatically registers all necessary components.
User LevelsThere are three levels—normal, Super1 and Super2 (not currently supported). The levels are assigned in the My Phone Manager Level field in the Station Assignments screen of eManager.
Note The Super1 user is not the System Administrator of the program. The Super1 user is someone located in the company who can be assigned to take care of day-to-day operations such as system speed dial and account codes, etc.
The Normal level allows the user to view all menu options except Account Code and DISA Code. In addition, there are two screens where additional fields are only available to the Super1 user.
The Super1 level allows the user to view all menu options including the Account Code and DISA Code. The Super1 user also has access to additional fields on the following screens enabling the editing of those screens—Advisory Message and System Speed Dial screens.
Configure My Phone Manager
Step 1: Configure Users1. From the eManager Main Menu, click Advanced Configuration > Station > Assignments. The
Assignments screens display.
2. Click Basic tab.
3. Choose the DN from the list at the right side of the screen and click Refresh. The screen that displays is Program 200 Station Data for DKTs or SLTs or Program 260 Full IP Station Assignment for IP-VM or IPTs.
Strata CIX Program Administrator Manual 12/04 1-3

My Phone ManagerConfigure My Phone Manager
1-4
4. Set the following parameters (sample screen shown at right):
• Set System Speed Dial – Set to Enable (allows the Super1 user to make changes to the system speed dial through My Phone Manager or the phone).
• My Phone Manager Level – Choose one: Normal, Super1, Super2 (not supported)
• Security Code – Set to CIX security code.
Note This security code is what the client uses to log into the CIX. If you use your telephone security code, you can only manage the CIX phone system. Users who want to manage both their phone system and voice mail must use their voice mail security code to log in.
Step 2: Log In as Administrator1. Start the Internet Explorer.
2. Type http://<PC Name>/MyPhoneManager (example: http://NETWORK/MyPhoneManager) and press <Enter>. The Login screen displays (shown right).
3. In the CIX System field, select your system from the drop-down menu.
4. In the Extension field, type in Administrator.
5. In the Security code field, type in “password.”
6. Click Sign In.
Step 3: Change Administrator Password1. The Change Administrator Password screen displays below the Equipment Setup screen.
2. Type in the new password and confirm it. Click Change.
Step 4: Equipment SetupThe Equipment Setup screen is for adding, modifying or deleting equipment. If you enter the information for both the CIX and SES as one piece of equipment, the menu you view will be a blended menu of both CIX and Stratagy options (see “Program Menu” on page 7).
If you want the option of viewing only CIX programming or only Stratagy ES programming, you need to make and save a separate entry for each piece of Equipment in this screen. For
Strata CIX Program Administrator Manual 12/04

My Phone ManagerConfigure My Phone Manager
example: For CIX only, leave the IP Address for the SES blank and for Stratagy only, leave the CIX/CTX fields blank.
The defined equipment is saved in a file and stored on the server.
Note This file is not combined with the equipment entered on the Equipment Editor screen from the eManager Profile.
1. Select a Telephone System from the Equipment drop-down menu. If the desired equipment name is not found, type in a name in the Equipment Name field and click Add.
Note To delete an Equipment name, select it from the drop-down menu and click Delete.
2. In the Equipment section, fill in the appropriate fields based on the descriptions shown in Table 1 below.
3. Click Finish.
Table 1 Equipment Editor Screen Fields
FIELD DESCRIPTION
Equipment Name Name designating the equipment. For example: CIX999.
Possible values: alphanumeric characters
CIX/CTX
IP Address Enter the IP Address of the CIX system. For example: 192.168.254.253.
Format: xxx.xxx.xxx.xxx
Community Name Enter the Community password.
Possible values: Alpha characters
Default: communityName
Confirm Community Name
Re-enter the Community password.
Strata CIX Program Administrator Manual 12/04 1-5

My Phone ManagerRun My Phone Manager
1-6
Run My Phone Manager1. Start the Internet Explorer.
2. Type http://<PC Name>/MyPhoneManager (example: http://NETWORK/MyPhoneManager) and press <Enter>. The Login screen displays (shown right).
3. In the CIX System field, select your system from the drop-down menu.
4. Type in your Extension and Security code.
5. (Optional) Check Change Security Code or Password.
Note This security code is for the individual user of the program.
6. Click Sign In.
7. If you checked Change Security Code, a dialog box displays (shown right). You are requested to enter the new password and confirm it. If the security code is to access only the phone, check the radio button For Telephone access only. Click Apply.
8. The My Phone Manager main screen displays.
SES
IP Address Enter the IP Address of the Media Server. For example: 192.168.254.252.
Format: xxx.xxx.xxx.xxx
Table 1 Equipment Editor Screen Fields (continued)
FIELD DESCRIPTION
Strata CIX Program Administrator Manual 12/04

My Phone ManagerMy Phone Manager Main Screen
My Phone Manager Main ScreenAfter you log in to My Phone Manager, the main screen displays (shown below). Verify the information on this screen. It contains the System type and Software version.
Program MenuThe Program Menu is the primary tool used to navigate through My Phone Manager. Click a selection to open the options available.
The Program menu consists of three possible configurations—only CIX options, only Stratagy ES options or a blend of both.
What you see depends upon:
• the equipment you are connected to using the Sign In screen, CIX System field
• or, the extension and security code that was used at log in.
The figure to the right shows a blended menu.
Note See My Phone Manager User Guide for a complete description of these features and how to use them.
Program Menu
SoftwareVersions
Voice Mail Options
Telephone System Options
Super1 Options
Standard Options
FeatureFlex Options
Strata CIX Program Administrator Manual 12/04 1-7

My Phone ManagerProgram Menu
1-8
Voice Mail SettingsThe user can access the Media Server to customize their mailbox settings. The features are:
• Mailbox settings
• Name and Greetings
• Message Notification
• Distribution Lists
FeatureFlexThe user can access FeatureFlex to customize the features. See Chapter 2 – FeatureFlex.
Telephone SystemThe user can access the Telephone system to personalize telephone settings, retrieve information and remotely activate/deactivate phone features. The following are the phone features:
• Telephone Setting
• Basic Settings
• Key Programming
• Speed Dial Setting
• Advanced Settings
• DKT Phone Settings
• Call Forward/DND
• DND Activating
• Call Forward Setting
• Display Dial Code (for display only)
• Advisory Message (user can only display, Super1 can display and edit).
Figure 2 Advisory Message Screen
Displays only on Super1 screen.
Strata CIX Program Administrator Manual 12/04

My Phone ManagerAbout
• System Speed Dial (user can only display, Super1 can display and edit)
Figure 3 System Speed Dial Screen
Super1 Options• DISA Code (access limited to Super1 user)
• Account Code (access limited to Super1 user)
AboutClick on About and the Main Screen displays (shown on page 7).
Log OutClick on Log Out and the Login screen displays (shown on page 6).
Displays only on Super1 screen.
Strata CIX Program Administrator Manual 12/04 1-9

My Phone ManagerLog Out
1-10
Strata CIX Program Administrator Manual 12/04
Featu
reFlex
FeatureFlex 2
FeatureFlex™ is a new application development tool that enables the customer to develop custom applications easily and quickly.
In order to use FeatureFlex applications, the feature must first be assigned to the extension. The assignment is done using the Options screen in the eManager program (see Chapter 2 in the Strata CIX/CTX Programming Manual). eManager provides the user with friendly, easy-to-learn, and easy-to-use user interfaces to install/uninstall customer-developed FeatureFlex applications. Then, using either eManager or the My Phone Manager program, the feature is configured for the individual phone.
Set up FeatureFlexStep 1: Configure Stratagy ES System
Configure the Stratagy ES system for CTX Proprietary Integration per Chapter 10 of the Strata CIX Programming Manual Volume 2.
Step 2: License Requirement1. A FeatureFlex license for CIX (LIC-CIX-FF) must be purchased.
2. Follow the procedures in MAS Licensing in Chapter 2 – eManager of the Strata CIX Voice Programming Manual Volume 2.
Step 3: Program Strata CIX for Adaptability1. Using eManager, click
Advanced Configuration > System > I/O Device. Program 803 I/O Device screen displays (shown at right).
2. Click IO Logical Device tab and set Program 803 I/O Device. This screen is used to assign SMDR and SMDI to logical device and BSIS port numbers.
First set the screen to:
• FB00 Logical Device No. – 208 CTI #8.
• Device Port No. – set device to 11.
• FB01Device Connection – LAN.
Strata CIX Program Administrator Manual 12/04 2-1

FeatureFlexAccess FeatureFlex
2-2
3. Click LAN Device tab and set Program 801 LAN Device. This screen assigns the LAN parameters for the PC applications connected to the LCTU Network Jack through a LAN or Hub.
First set screen to:
• FB00 – Set LAN Port No. to the port number set in Program 803 for 208CTI#8.
• FB01 – Protocol = TCP
• FB02 – PC Operation Type = Server
• FB03 – Data Flow = Asynchronization
• FB04 – Server Port Number = 1117
Access FeatureFlexImportant! You must be connected to the Media Application Server (MAS) in order to see the
FeatureFlex menu option.
1. From the eManager Main screen, click Advanced Configuration > FeatureFlex.
2. Click Configuration and the FeatureFlex Configuration screen displays (shown below).
The first time you access this screen it is blank. As you assign the features to the phones using the Add function (see “Add FeatureFlex Application to Phone” on page 3, the assigned features display on this screen.
From this screen, you can see the list of existing Application(s) and the Extension and User Agent to which each is assigned. By placing your cursor on the feature, a one-line description of the feature displays.
Sorting the ScreenClick on an up arrow ( ) in the field and the column is sorted in ascending order
...or click on a down arrow ( ) in the field and the column is sorted in descending order.
Strata CIX Program Administrator Manual 12/04

FeatureFlexAdd FeatureFlex Application to Phone
Add FeatureFlex Application to Phone1. From the FeatureFlex Configuration screen, click Add. The Add FeatureFlex Application
screen displays (shown below).
2. Highlight the Application, Ext., and User Agent you want to assign to a phone. Highlighting an application displays the description at the bottom of the screen.
Note If an Extension has had feature(s) assigned to it in the past, the eManager program remembers the associated User Agent and automatically highlights it when you select the extension number in this screen.
3. Click Add. Depending upon the feature you chose, additional pop-up boxes display.
Note The pop-up boxes are identical whether you are adding or editing a feature. See “Edit FeatureFlex Application” for an example of the screen.
4. Fill in the requested information and click OK. The FeatureFlex Editor screen displays with the new feature assignment displayed at the bottom of the list.
5. For any FeatureFlex feature(s) that require a key assignment, you must also set the key assignment using eManager. Click Advanced Configuration > Station > Assignments, and set key assignments.
Delete FeatureFlex Application from PhoneNote This function only deletes the feature from the extension and is not the same as the
Remove feature described later.
1. Highlight the feature on the FeatureFlex Editor screen and click Delete. A pop-up box displays requesting you confirm the deletion.
2. Click OK. The feature is deleted from the screen.
Strata CIX Program Administrator Manual 12/04 2-3
FeatureFlexEdit FeatureFlex Application
2-4
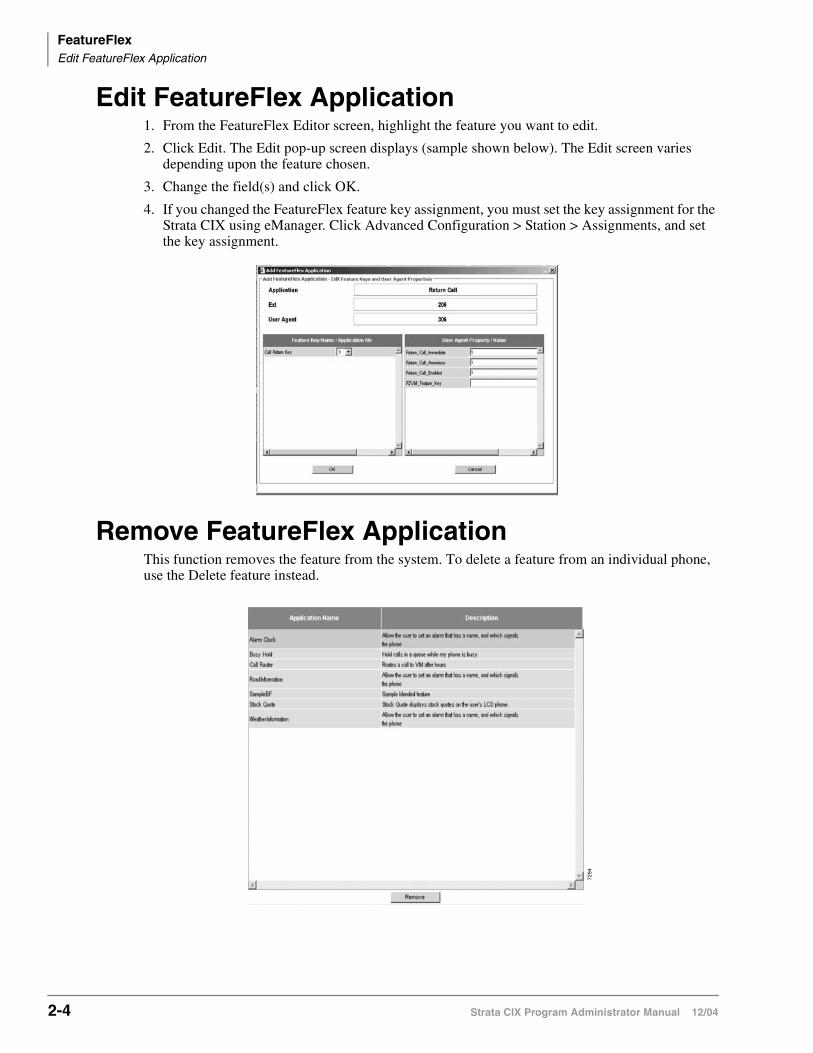
Edit FeatureFlex Application1. From the FeatureFlex Editor screen, highlight the feature you want to edit.
2. Click Edit. The Edit pop-up screen displays (sample shown below). The Edit screen varies depending upon the feature chosen.
3. Change the field(s) and click OK.
4. If you changed the FeatureFlex feature key assignment, you must set the key assignment for the Strata CIX using eManager. Click Advanced Configuration > Station > Assignments, and set the key assignment.
Remove FeatureFlex ApplicationThis function removes the feature from the system. To delete a feature from an individual phone, use the Delete feature instead.
7294
Strata CIX Program Administrator Manual 12/04

FeatureFlexRemove FeatureFlex Application
1. From the eManager Main menu, click Advanced Configuration > FeatureFlex > Removal. The Remove FeatureFlex screen displays (shown above).
2. Highlight a feature in the box and click Remove. A pop-up box asks you to confirm the removal.
3. Click OK. The feature is removed.
Important! When an Administrator removes a feature, no phones can use that feature if they already subscribed to it, and no phones can have that feature added to their configurations. Once removed, a feature can only be reinstated by restoring the files that comprise the feature.
Strata CIX Program Administrator Manual 12/04 2-5

FeatureFlexRemove FeatureFlex Application
2-6
Strata CIX Program Administrator Manual 12/04