pro8432wt troubleshooting
TRANSCRIPT

Pro8432WT Troubleshooting Ver.7.3
June 14th, 2017
Oki Data Corporation

Contents
■ Paper handling
1. Turned up at the top of media
2. Exit jam
3. Induce exit jam
4. Multi feed
5. Hopping jam
6. Skew
7. Curl
8. Irregular stack
■ PQ
9. High resistance media : Circular faded mark
10. PQ issue due to adhesion of coating
10-1. Some specific coated media : faded print
10-2. Horizontal streaks of EP drum cycle
10-3. Vertical White Line
11. EP Drum unit : horizontal streak
12. Uneven density around the top of media

13. Uneven pattern printout
14. Pickup-roller mark
15. Clack
16. Wrinkle
17. Vertical Line caused by storage under high temperature
environment
18. Faded print
19. Dirty side edge

Symptom 1 - Turned up at the top of media
(Two sheet type media) Transfer layer of two sheets type media turns up at the top of media.
Since this media is two sheets type, the issue does not affect a printed result after transfer to textiles.
Turned up at the top of media
Occurrence
Conditions
All environments.
It occurs rarely in low temperature and low humidity environment.
Causes This phenomenon occurs when the media after fusing rubs against the
conveying rib of the paper guide.
Solution Stock the media in the environment of low temperature and low humidity.
Possible Side
Effect
Nothing.

Symptom 2 - Exit JAM
If you print curled media, it occurs turned up at the top of media, and it causes exit JAM.
Exit JAM
Occurrence
Conditions
Using of transfer media left in high humidity
Causes Transfer media has been waved or curled before printing. And curled media
after fusing rubs against the conveying rib of the paper guide. As a result,
the load of feeding increases and JAM occurs.
Solution Stock the media in the environment of low temperature and low humidity.
Possible Side
Effect
Nothing.
Jamming paper
Curled paper before print

Symptom 3 - Induce exit JAM
Jam occurs when the bottom edge of the paper sticks to separation blade of fuser unit.
Induce exit JAM
Occurrence
Conditions
Not specified.
The amount of deposition of glue of transfer media or toner will be
increased each time printing with the media.
Causes Adhere glue of transfer media or toner to separation blade of fuser unit.
Herewith, when any media has been exited, the media tends to stick to the
separation blade.
Solution Clean separation blade using cotton soaked with alcohol.
Also, make a margin of 15mm from the bottom end of the page when create
and print design.
Possible Side
Effect
Nothing.
Glue or tonner adhered to separation blade
Glue or tonner adhered to jam paper

Clean tip of the separation blade using cotton soaked with alcohol.
Open the guide of fuser unit after fuser unit has been cooled down enough.
How to clean the separation blade

Symptom 4 - Multi feed
Multi feed
Occurrence
Conditions
High temperature and low humidity environment.
All environment may occur.
Causes Static Electricity.
Surface condition of the media.
Solution Set media to a tray one by one.
Possible Side
Effect
Nothing.

Symptom 5 - Hopping JAM
When one sheet of media has been set on a tray, the sheet can't be fed.
Hopping JAM
Occurrence
Conditions
Characteristic of media.
NN/HH/LL
Causes The frictional force between the cork part of Hopper assembly and media is
large.
Solution Hide the cork part of Hopper assembly by piece of paper.
Possible Side
Effect
If hide the cork part, multi feed may occur when set multiple sheet.

Hide the cork by a piece of paper.
Cork
Piece of paper (Taped)
(Size : 30x90mm)
Tape
Fit the back side to the chamfering line.
(See below figure)
Roller
Cork
Piece of paper Tape
Align to the Chamfering line

Symptom 6 - Skew
Skew
Occurrence
Conditions
High temperature and high humidity environment.
Causes The rigidity of the media is weakened by absorbing moisture and the guide
effect of the paper guide is reduced.
Solution Stock the media in the environment of low temperature and low humidity.
Possible Side
Effect
Nothing

Symptom 7 - Curl
The media after printing is curled.
Curl
Occurrence
Conditions
All environments.
Causes Characteristic of media, the material between front and back side will be
different.
Solution Even if printing is curled, there are no issue with the printing quality. Please
open and use.
Same level as Pro9420WT(C9WT)
Possible Side
Effect
Nothing
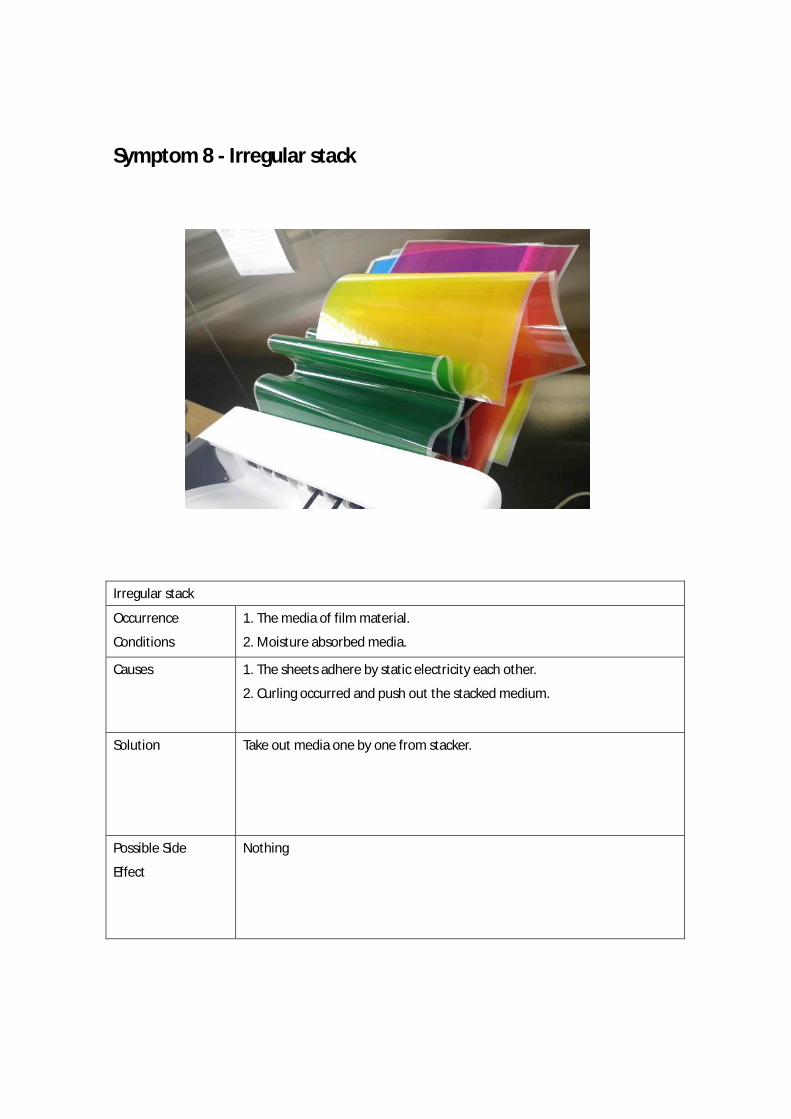
Symptom 8 - Irregular stack
Irregular stack
Occurrence
Conditions
1. The media of film material.
2. Moisture absorbed media.
Causes 1. The sheets adhere by static electricity each other.
2. Curling occurred and push out the stacked medium.
Solution Take out media one by one from stacker.
Possible Side
Effect
Nothing

Symptom 9 - High resistance media : Circular faded mark
Circular faded marks could appear on toner image when high resistance media is used. This problem occurs during toner transfer.

Circular faded mark
Occurrence
Conditions
High resistance media
Normal to low humidity environment (NN/NL/LL)
Causes Discharge at the toner transfer process to medium
Solution In case of two-sheet-type transfer medium whose adhesion layer is white
and prepared as separated sheet, circular faded mark is hardly visible on
garment thanks to the white adhesion layer that masks circular faded mark.
In case of one-sheet-type transfer medium whose adhesion layer is usually
transparent, circular faded mark is sometimes visible on garment.
If circular faded mark is still visible on garment, try followings
1. Press scroll button ▲ or ▼ to display “Functions.”
2. Select [Menus] and press [Enter].
3. Select [Print Adjust] and press [Enter].
4. Select [Paper Color Setting] and press [Enter].
5. Adjust level +1 using scroll button ▲.
6. Press [Enter] to select the level. Check mark appears next to the level
and change is now applied.
7. Check print result. Repeat procedure above until you get desirable
result.
Possible Side
Effect
Dirty side edge could appear. If circular faded mark and dirty side edge occur
at the same time, improve circular faded mark by “Paper Color setting” as +1
or +2 and cut the paper side edge to remove the dirty side edge.

Symptom 10-1 - Some specific coated media : Faded print
The print will appear faded on the page when printing low coverage contents.

Faded print
Occurrence
Conditions
This could occur under high humidity environment.
Causes Adhesion of coating material on some specific coated media surface to EP
Drum surface
Solution To avoid this symptom, open media package just before use and use this
kind of media under low humidity environment only.
If this symptom happens, clean surface of EP drum using cotton soaked with
alcohol.
In order to clean all of surface of the EP drum, the appeared surface position
of the EP drum has to be changed. To make it realized, repeat the below
processes five times.
- Open top cover.
- Detach the EP unit.
- Clean the appeared surface of the EP drum.
- After the alcohol dries, return the EP unit and close the top cover.
Possible Side
Effect
When you clean the EP drum surface, take care followings.
Light exposure.
※When the EP drum is exposed to light for a long time, Horizontal band
may appear.
Uneven cleaning.
※If some area of EP drum surface is not cleaned enough, horizontal band
may appear.

Symptom 10-2 - Horizontal streaks of EP drum cycle
White or black horizontal streaks could appear on printing area. When these appear in the cycle of the EP drum, the glue or coating of the transfer media adhered to the EP drum.
94mm
enlarged photo

Name Horizontal streaks of EP drum cycle
Occurrence
Conditions
・After printing transfer media covered with glue or coating.
・Printing low coverage contents on transfer media.
・Using of transfer media left in high humidity.
Causes This phenomenon occurs when the glue or coating of the transfer media
adhere to the EP drum.
Solution Clean surface of EP drum using cotton soaked with alcohol.
In order to clean all of surface of the EP drum, the appeared surface position
of the EP drum has to be changed. To make it realized, repeat the below
processes five times.
- Open top cover.
- Detach the EP unit.
- Clean the appeared surface of the EP drum.
- After the alcohol dries, return the EP unit and close the top cover.
Possible Side
Effect
Attention to light exposure.
※When exposed to light for a long time, Horizontal band may appear.
Attention to uneven cleaning.
※Horizontal band may appear.

Symptom 10-3 - Vertical White Line
Vertical white line could appear on printing area
enlarged photo

Name Vertical White Line
Occurrence
Conditions
・After printing transfer media covered with glue or coating.
・Printing low coverage contents on transfer media.
・Using of transfer media left in high humidity.
Causes This phenomenon occurs when the glue or coating of the transfer media
entered the EP unit.
Solution Execute “VL Cleaning” from operation panel.
1. Press scroll button ▲ or ▼ to display “Functions.”
2. Select [Menus] and press [Enter].
3. Select [Print Adjust] and press [Enter].
4. Select [VL Cleaning] and press [Enter].
5. Confirm [Execute] has been selected, and press [Enter].
Possible Side
Effect
EP unit life will be shortened by 2 page count at one time.

Symptom 11 - Horizontal White Lines
There is a possibility that streaks with a EP drum cycle appear in a halftone area of white toner.
SampleA ( Less than 120 prints per day )
Print pattern Garment after transfer

SampleB ( More than 120 prints per day )
Print pattern Garment after transfer

Name Horizontal White Lines
Occurrence
Conditions
・All environments.
・Halftone area of white toner.
・It is usually “SampleA” or better.
If you print more than 120 sheets per day, you may get worse up to
“SampleB”.
Causes This phenomenon occurs due to the material characteristics of the EP unit.
Solution If lines have appeared, please enable “Drum Cleaning” mode which can be
set from operation panel.
1. Press scroll button ▲ or ▼ to display “Functions.”
2. Select [Menus] and press [Enter].
3. Select [Print Adjust] and press [Enter].
4. Select [Drum Cleaning] and press [Enter].
5. Select [On] and press [Enter].
Please disable “Drum Cleaning” mode next morning.
Possible Side
Effect
EP unit life will be shorten when “Drum Cleaning” mode has been enabled.

Symptom 12 - Uneven density around the top of media
Uneven density and Ghost around the top of media by element parts in the EP unit.
Pro8432WT(C8WT) Pro9420WT(C9WT)
【Reference】
38mm 50mm
Cyan 100%

Name Uneven density around the top of media
Occurrence
Conditions
・All environment
・Printing high coverage contents
Causes This phenomenon occurs when there is a difference in the charging of toner
in the element part cycle.
Solution Same level as Pro9420WT(C9WT).
Possible Side
Effect
Nothing
Pro8432WT(C8WT) Pro9420WT(C9WT)
【Reference】
38mm 50mm
Ghost pattern

Symptom 13 - Uneven pattern printout
After print on this media, uneven pattern printout appears.
Uneven pattern
printout

Uneven pattern printout
Occurrence
Conditions
NN/HH
Causes Ingress of moisture from high humidity environment to media
.
Solution Stock the media at a place of low humidity.
The issue does not affect a printed result after transfer to textiles.
Possible Side
Effect
Nothing
Magenta+White 100% Magenta 100%
After transfer to textile
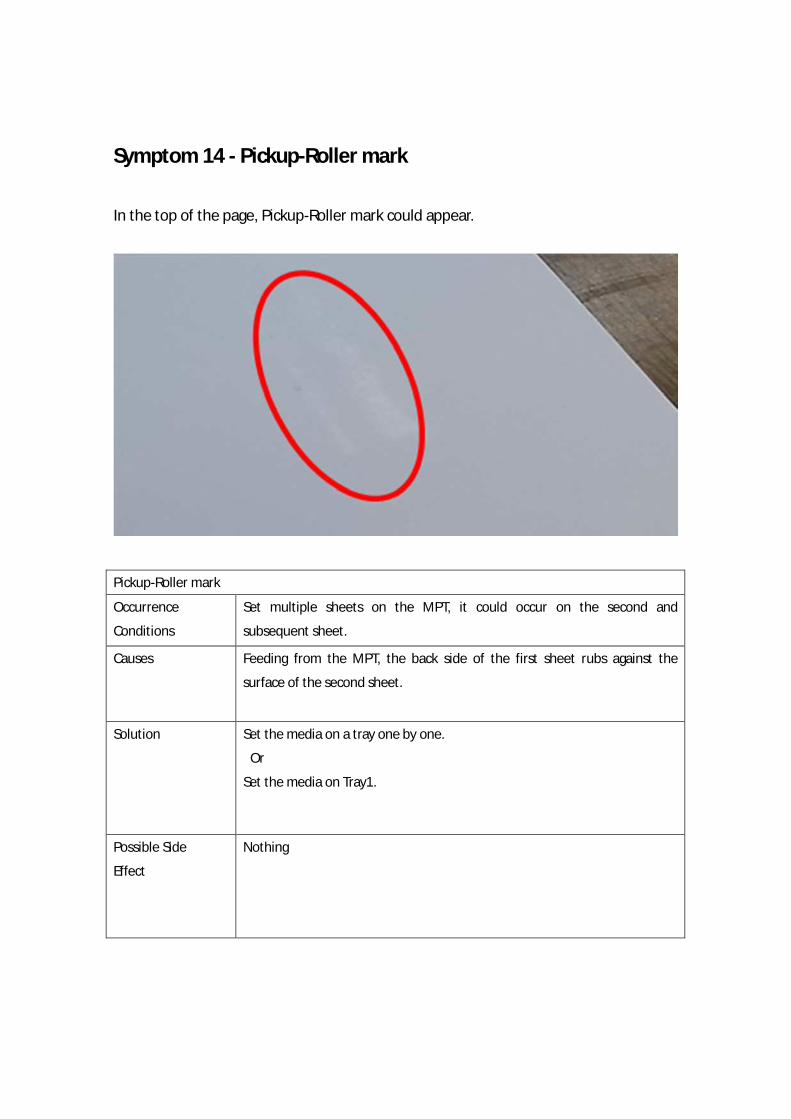
Symptom 14 - Pickup-Roller mark
In the top of the page, Pickup-Roller mark could appear.
Pickup-Roller mark
Occurrence
Conditions
Set multiple sheets on the MPT, it could occur on the second and
subsequent sheet.
Causes Feeding from the MPT, the back side of the first sheet rubs against the
surface of the second sheet.
Solution Set the media on a tray one by one.
Or
Set the media on Tray1.
Possible Side
Effect
Nothing

Symptom 15 - Clack
After print on this media, some clacks appear on the media.
Clack

Clack
Occurrence
Conditions
All Conditions
Print Duty 200% or more
Causes Characteristic of media
Solution A crack occurs to a layer of an upper toner
C7WT or C9WT also have the issue, but the issue has not been pointed out
from customers so far.
In addition, since the issue does not affect a printed result after transfer to
textiles.
Possible Side
Effect
Nothing
Not visible after transfer to textile
Paper
Clack
Textile
Clack
White Magenta

Symptom 16 - Wrinkle
After print on this media, some wrinkles appear on the media.
Wrinkle

Wrinkle
Occurrence
Conditions
HH/NN
Causes Ingress of moisture from high humidity environment to media
Solution Stock the media at a place of low temperature and low humidity.
Possible Side
Effect
Nothing

Symptom 17 - Vertical Line caused by storage under high
temperature environment.
Vertical line could appear on printing area
enlarged photo

Name Vertical Line caused by storage under high temperature environment.
Occurrence
Conditions
After EP durm is stored for 2 weeks or more under the environment that
max temperature in a day reaches about 60℃.
※Only white toner.
Causes Toner is cohered by high temperature.
Solution Execute “VL Cleaning” from operation panel.
1. Press scroll button ▲ or ▼ to display “Functions.”
2. Select [Menus] and press [Enter].
3. Select [Print Adjust] and press [Enter].
4. Select [VL Cleaning] and press [Enter].
5. Confirm [Execute] has been selected, and press [Enter].
6. Print.
Repeat the process ”1~6” about 5 times.
Possible Side
Effect
EP drum life will be shortened by 3 pages at the process ”1~6”

Symptom 18 - Faded print
Faded print could appear on toner image when high resistance medium is used. This problem occurs during toner transfer.
Faded print
Occurrence
Conditions
High resistance media
All environment
Causes Toner transfer problem from EP drum to medium.
Solution You can manually adjust using printer control panel.
1. Press scroll button ▲ or ▼ to display “Functions.”
2. Select [Menus] and press [Enter].
3. Select [Print Adjust] and press [Enter].
4. Select [Paper Color Setting] and press [Enter].
5. Adjust level +1 using scroll button ▲.
6. Press [Enter] to select the level. Check mark appears next to the level
and change is now applied.
7. Check print result. Repeat procedure above until you get desirable
result
Possible Side
Effect
Dirty side edge could appear. If faded print and dirty side edge occur at the
same time, improve faded print by increasing “Paper Color setting” and cut
the paper side edge to remove the dirty side edge.

Symptom 19 - Dirty side edge
Dirty side edge could appear when high resistance medium is used. This problem occurs during toner transfer.
Dirty side edge
Occurrence
Conditions
High resistance media
All environment
Causes Discharge at the side edge of medium during toner transfer process
Solution You can manually adjust using printer control panel.
1. Press scroll button ▲ or ▼ to display “Functions.”
2. Select [Menus] and press [Enter].
3. Select [Print Adjust] and press [Enter].
4. Select [Paper Color Setting] and press [Enter].
5. Adjust level -1 using scroll button ▼.
6. Press [Enter] to select the level. Check mark appears next to the level
and change is now applied.
7. Check print result. Repeat procedure above until you get desirable
result
Medium’s edge

Possible Side
Effect
Faded print could appear. If faded print and dirty side edge occur at the
same time, improve faded print by increasing “Paper Color setting” and cut
the paper side edge to remove the dirty side edge.